


SCO 5032 ELEKTR‹KL‹ P‹fi‹R‹C‹ KULLANMA KILAVUZU
TR
EN
FR
NL
DE
ES
RU
HR
AR
1
2
3
4
|
6 |
|
7 |
5 |
8 |
|
|
|
9 |
|
10 |
|
11 |
- 1 -

TÜRKÇE / G‹R‹fi
De¤erli Müflterimiz,
Tebrikler. Çok iyi bir tercih yapt›n›z!
Alm›fl oldu¤unuz ürün üstün tasar›ma sahip kaliteli bir üründür.
Bu cihaz› tam anlam›yla ve güvenli bir flekilde kullanabilmek için bu kullan›m k›lavuzunu lütfen dikkatli bir flekilde okuyunuz.
Sayg›lar›m›zla,
Sinbo Küçük Ev Aletleri
S‹NBO SCO 5032 ELEKTR‹KL‹ P‹fi‹R‹C‹
KULLANIM KILAVUZU
Cihazla oynamamalarını güvenceye almak için çocuklar gözetim altında tutulmalıdır.
Bu ürün (çocuklar dahil ) fiziksel hassasiyeti az, zihinsel olarak yetersiz, deneyimsiz ve yeterli bilgiye sahip olmadan yada kendilerinin güvenli¤inden sorumlu olan kifliler tarafından bu ürünü kullanmak için gerekli talimatlar verilmemifl kiflilerin kullanımına uygun de¤ildir.
Children being supervised not to play with the appliance.
This appliance is not intended for use by persons (including children) with reduced physical, sensory or mental capabilities, or lack of experience and knowledge, unless they have been given supervision or instruction concerning use of the appliances by a person responsible for their safety. Children should be supervised to ensure that they do not play with the appliance.
- 2 -

ÖNEML‹ UYARILAR
•Bakım, Onarım ve Kullanımda Uyulması Gereken Kurallar
•Cihaz› kullanmadan önce talimat› okuyunuz ve baflvuru kayna¤› olarak saklay›n›z.
*Kullan›m k›lavuzunu dikkatle okuyunuz ve sonraki kullan›mlar için uygun flekilde saklay›n›z.
*Cihaz mutlaka toprakl› prizde kullan›lmal› ve fifl prize s›k›ca yerlefltirilmelidir. Cihazla ayn› anda üniversal soket ve bir baflka elektrikli cihaz› kullanmay›n›z.
*Fifli prize s›k› s›k›ya yerlefltiriniz, gevflek kalmas› halinde parçalar›n yanmas›na neden olabilir.
*Kullanmad›¤›n›z zaman cihaz› prizden çekiniz?
*Cihaz çal›fl›rken çocuklar›n cihaza dokunmas›n› engelleyiniz.
*Cihaz› ve kablosunu uygun konumda yerlefltiriniz ve yanabilecek fleylerle temas ettirmeyiniz
*Herhangi bir sorundan veya tehlikeden kaç›nmak amac› ile lütfen iç tencerede sadece original aksesuarlar› kullan›n
*‹ç tencereyi gövde içine yerlefltirmeden ve / veya tencere boflken çal›flt›rmay›n›z.
*‹ç tencereyi do¤rudan atefle koymay›n›z, aksi takdirde tencereniz hasar görecektir.
*‹ç tencere olmaks›z›n tencerenin içine su veya yiyecek koymay›n›z
*Cihaz çal›fl›r durumda iken iç tencereyi kesinlikle ç›karmay›n›z.
*Piflirici çal›fl›rken gövde ve etraf›ndaki ›s› yüksek olaca¤›ndan, özellikle metal parçalara dokunmay›n›z, çok yak›n durmay›n›z.
*Kapa¤›n ›s› nedeniyle deformasyona u¤rama riskinden veya herhangi bir sorun yaflanmas›ndan kaç›nmak üzere buhar ç›k›fl›n› herhangi bir flekilde mutfak bezi veya herhangi bir örtü ile örtmeyiniz,
*Cihaz› s›cak veya ›slak ortamlarda çal›flt›rmay›n›z.
*‹ç tencereye zarar vermekten kaç›nmak üzere pirinci iç tencerenin içinde y›kamay›n›z
*‹ç tencere deformasyona u¤ram›flsa, kesinlikle kullanmay›n›z, teknik servise gönderiniz.
*‹ç tencerenin d›fl›, özellikle de taban› temiz olmal›d›r. ‹ç tencere ile ›s›t›c› tabla aras›nda bir fley olmad›¤›ndan emin olun. ‹ç tencere ile taban aras›nda herhangi bir fley varsa bunu mutlaka temizleyiniz.
*‹ç tencereyi, gövde içine yerlefltirdikten sonra iç tencerenin taban› ile ›s›t›c› tablan›n s›k› s›k›ya temasta olaca¤› flekilde döndürün
*Cihaz› temizlerken, elektrik ba¤lant›s› kesilmifl ve cihaz so¤umufl olmal›d›r.
*Cihaz›n gövdesini suya sokmay›n, cihaz›n içine su kaçmas›na engel olun.
*Yiyecek art›klar›n›n kötü kokmas›n› engellemek için, taflma emniyet kapa¤› ile buhar ç›k›fl›n› düzenli olarak temizleyiniz.
*Uzun sure kullan›lmad›¤› durumlarda, cihaz› prizde tutmay›n›z ve kuru havadar bir ortamda muhafaza ediniz.
*E¤er güç kablosu veya fifli hasar görmüfl ise, kesinlikle kullanmay›n›z ve yenisi ile de¤ifltiriniz.
*E¤er cihaz çal›flma s›ras›nda ar›zalan›rsa, ilk önce cihaz› dü¤mesinden kapat›n ve elektrik ba¤lant›s›n› kesin. Bu durumdaki cihaz› kullanmay›n ve derhal yetkili servise gönderin. Parçalar› orijinal olmayan parçalarla de¤ifltirmeyin ve kendi bafl›n›za onarmaya kalkmay›n.
-3 -

C‹HAZIN ÖZELL‹KLER‹
Model: SCO 5032
Voltaj: 230V~50Hz
Güç: 860W
Kapasite: 5.0L
Uygun kifli say›s›: 2-10
D‹KKAT!!
Ürünün üzerinde bulunan iflaretlemelerde veya ürünle verilen di¤er bas›l› dökümanlarda beyan edilen de¤erler, ilgili standartlara göre laboratuar ortam›nda elde edilen de¤erlerdir. Bu de¤erler, ürünün kullan›m ve ortam flartlar›na göre de¤iflebilir.
TASARIM VE TEKN‹K ÖZELL‹KLERDE ÖNCEDEN B‹LD‹R‹M YAPILMAKSIZIN DE⁄‹fi‹KL‹⁄E G‹D‹LEB‹L‹R!
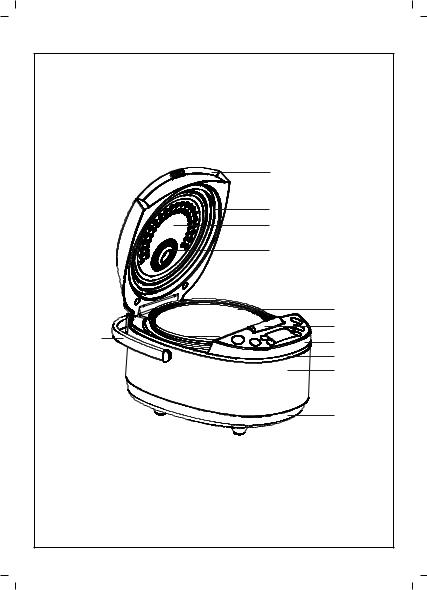
C‹HAZIN TANITIMI
1.Kapak
2.S›zd›rmaz halka
3.‹ç kapak
4.Buhar ç›k›fl› s›zd›rmazl›k halkas›
5.Sap
6.‹ç tencere
7.Kapak açma dü¤mesi
8.Kontrol panosu
9.Orta halka
10.Hazne
11.Taban
C‹HAZIN KULLANIMI
•Ba¤lantı veya Montajın Nasıl Yapılaca¤ını Gösterir fiema ile Ba¤lantı veya Montajın Kimin Tarafından Yapılaca¤ına (tüketici, yetkili servis) iliflkin bilgiler
•Lütfen cihaz› kullanmaya bafllamadan önce bu k›lavuzu dikkatli bir flekilde okuyunuz. * Kullanmadan önce, kullan›m k›lavuzunu dikkatle okuyunuz
* Cihaz›n standart voltaj› ile flebekenizin voltaj›n›n ayn› olup olmad›¤›n› kontrol edin
* ‹lk kullan›mdan önce, tüm ambalaj malzemelerini ç›kar›n, iç tencereyi, buhar ç›k›fl ucunu, taflma emniyet kapa¤›n› d›flar› al›n ve suyla temizleyin.
* ‹ç tencereyi gövde içine yerlefltirmeden önce, iç tencere ile ›s›t›c› tabla aras›nda bir fley olmad›¤›ndan emin olun. ‹ç tencere ile taban aras›nda herhangi bir fley varsa bunu mutlaka temizleyiniz. Ard›ndan iç tencereyi gövde içine yerlefltirdikten sonra iç tencerenin taban› ile ›s›t›c› tablan›n s›k› s›k›ya temasta olaca¤› flekilde döndürün.
-4 -

C‹HAZIN KULLANIMI
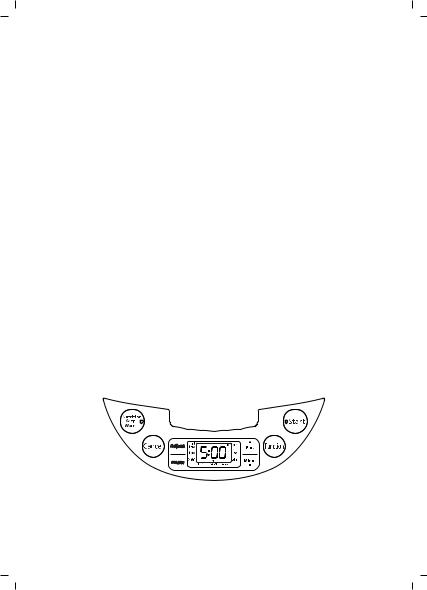
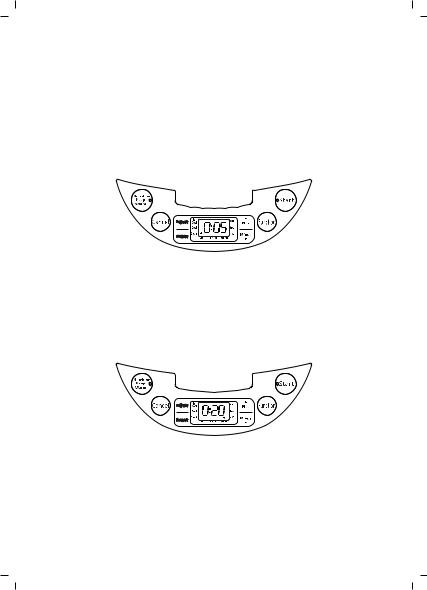
Pirinç (Piflirme-H›zl› Piflirme-Kavurma)
*Azami pirinç kapasitesi 6 bardakt›r. Pirinç ve suyun oran› 1:1.1 olmal›d›r (bu oran sadece örnektir, oran› kendi tercihleriniz do¤rultusunda ayarlayabilirsiniz). Azami kapasitenin üstüne ç›kmay›n›z.
*‘Function” (‹fllev) dü¤mesine basarak ‘Piflirme’, ‘H›zl› Piflirme’ veya ‘Kavurma!y› seçin.
*Kavurma için ön ayarl› süre 1:30 saattir; Ayar aral›¤› 1 – 2 saat aras›ndad›r. “adjustment” (ayar)a basarak zaman› ayarlayabilirsiniz. “add” (ekle)ye basarak zaman› art›rabilir, “reduce” (azalt)a basarak süreyi azaltabilirsiniz. Her bas›fl›n›z süreyi 10 dakika artt›r›r veya azalt›r.
*Ayarlamay› tamamlad›¤›n›zda, karfl›l›k gelen iflleve girifl için “Start” (bafllat)a bas›n›z, “Start” (bafllat) ›fl›¤› yanacakt›r.
*Piflirme tamamland›¤›nda, piflirici, s›cak tutma konumuna geçecek ve seçiminize karfl›l›k gelen gösterge ›fl›¤› yanacakt›r.
Piflirme Süresi Referans Tablosu ‹fllev: Süre
Piflirme: Yaklafl›k 35 dakika H›zl› Piflirme: Yaklafl›k 50 dakika
Kavurma: 1-2 Saat
Dikkat: Yukar›daki süreler sadece bilgi içindir, piflirme süresi, voltaja, pirinç veya su miktar›na ve pirincin türüne göre de¤iflecektir.
Not: 1. E¤er piflirici haz›rda bekleme konumundayken “Start” (Bafllat)a basarsan›z, piflirici do¤rudan piflirme konumuna geçecektir.
2. Pirincin birbirine yap›flmas›n› istemiyorsan›z, 30 dakikada bir s›cak tutma konumuna getirerek pirinci kar›flt›r›n›z.
- 5 -

C‹HAZIN KULLANIMI
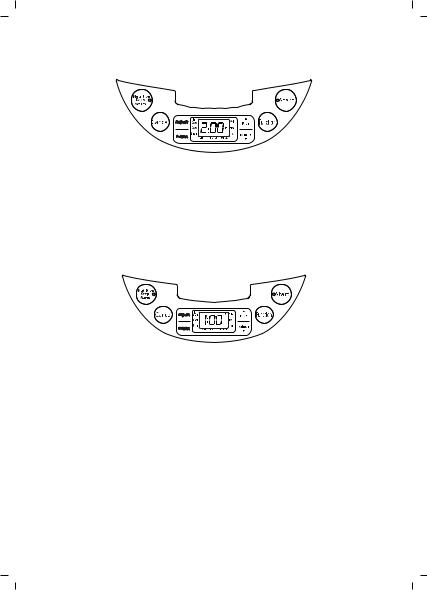
Buhar
*‘Function” (‹fllev) dü¤mesine basarak ‘Buhar’› seçin.
*Ön ayarl› süre 5 dakikad›r, ayar aral›¤› 5 – 50 dakika aras›ndad›r. “adjustment” (ayar)a basarak zaman› ayarlayabilirsiniz. “add” (ekle)ye basarak zaman› art›rabilir, “reduce” (azalt)a basarak süreyi azaltabilirsiniz. Her bas›fl›n›z süreyi 1 dakika artt›r›r veya azalt›r.
*Tüm ayarlar tamamland›¤›nda, karfl›l›k gelen iflleve girifl için “Start” (bafllat)a bas›n›z, “Start” (bafllat) ›fl›¤› yanacakt›r.
*Piflirme tamamland›¤›nda, piflirici, s›cak tutma konumuna geçecek ve seçiminize karfl›l›k gelen gösterge ›fl›¤› yanacakt›r.
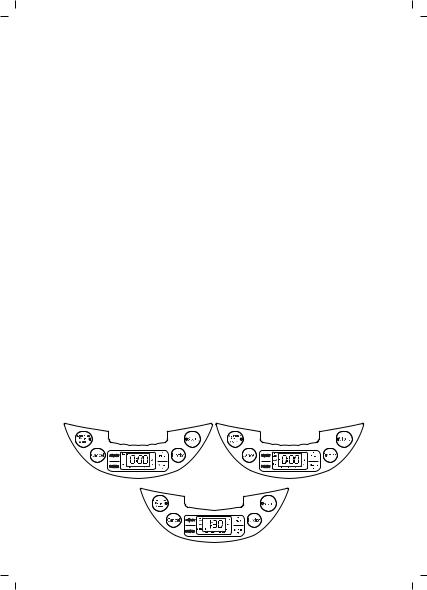
Yeniden Is›tma
*‘Function” (‹fllev) dü¤mesine basarak ‘Is›tma’y› seçin, seçiminize karfl›l›k gelen gösterge ›fl›¤› yan›p sönecektir;
*Önceden ayarl› süre 20 dakikad›r; süre ayarlanamaz.
*Tüm ayarlar tamamland›¤›nda, karfl›l›k gelen iflleve girifl için “Start” (bafllat)a bas›n›z, “Start” (bafllat) ›fl›¤› yanacakt›r.
*Piflirme tamamland›¤›nda, piflirici, s›cak tutma konumuna geçecek ve seçiminize karfl›l›k gelen gösterge ›fl›¤› yanacakt›r.
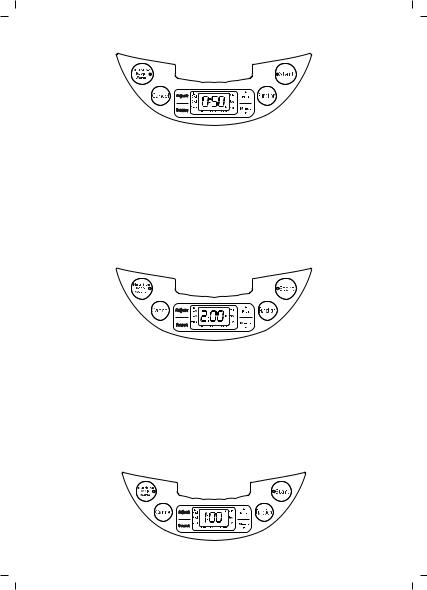
Kek
*‘Function” (‹fllev) dü¤mesine basarak ‘Kek’i seçin, seçiminize karfl›l›k gelen gösterge ›fl›¤› yan›p sönecektir;
*Önceden ayarl› süre 50 dakikad›r;
*Tüm ayarlar tamamland›¤›nda, karfl›l›k gelen iflleve girifl için “Start” (bafllat)a bas›n›z, “Start” (bafllat) ›fl›¤› yanacakt›r.
*Piflirme tamamland›¤›nda, piflirici, s›cak tutma konumuna geçecek ve seçiminize karfl›l›k gelen gösterge ›fl›¤› yanacakt›r.
-6 -

C‹HAZIN KULLANIMI
Yavafl Piflen Sulu Yemekler
*‘Function” (‹fllev) dü¤mesine basarak ‘Sulu yemekler’i seçin.
*Önceden ayarl› süre 2 saattir; ayarlama aral›¤› 2 – 8 saat aras›nda de¤iflir. “adjustment” (ayar)a basarak zaman› ayarlayabilirsiniz. “add” (ekle)ye basarak zaman› art›rabilir, “reduce” (azalt)a basarak süreyi azaltabilirsiniz. Her bas›fl›n›z süreyi 0,5 (yar›m) saat (30 dakika) artt›r›r veya azalt›r.
*Tüm ayarlar tamamland›¤›nda, karfl›l›k gelen iflleve girifl için “Start” (bafllat)a bas›n›z, “Start” (bafllat) ›fl›¤› yanacakt›r.
*Piflirme tamamland›¤›nda, piflirici, s›cak tutma konumuna geçecek ve seçiminize karfl›l›k gelen gösterge ›fl›¤› yanacakt›r.
Lapa/Çorba
*‘Function” (‹fllev) dü¤mesine basarak ‘Lapa/çorba’y› seçin.
*Önceden ayarl› süre 1 saattir; ayarlama aral›¤› 1 – 4 saat aras›nda de¤iflir. “adjustment” (ayar)a basarak zaman› ayarlayabilirsiniz. “add” (ekle)ye basarak zaman› art›rabilir, “reduce” (azalt)a basarak süreyi azaltabilirsiniz. Her bas›fl›n›z süreyi 10 dakika artt›r›r veya azalt›r.
*Tüm ayarlar tamamland›¤›nda, karfl›l›k gelen iflleve girifl için “Start” (bafllat)a bas›n›z, “Start” (bafllat) ›fl›¤› yanacakt›r.
*Piflirme tamamland›¤›nda, piflirici, s›cak tutma konumuna geçecek ve seçiminize karfl›l›k gelen gösterge ›fl›¤› yanacakt›r.
- 7 -
C‹HAZIN KULLANIMI
Ön Ayar
*Ön ayar süresi demek, Yeme¤i yemek istedi¤iniz zaman dilimi eksi flu an demektir. Diyelim ki flu an saat 13:00, e¤er yeme¤i saat 18:00 de yemek istiyorsan›z, “Ön Ayar Süresi”ni 18:00’e yani 5 saat sonras›na ayarlamal›s›n›z, böylece saat 18:00’de güzel bir akflam yeme¤ine oturabilirsiniz)
*Yiyeceklerin tad›n›n kaçmamas› için, ön ayar süresi 12 saati geçmemelidir.
*Afla¤›da ön ayar süreleri için referans tablosu verilmifltir
Örne¤in:
*‘Function” (‹fllev) dü¤mesine basarak ‘Lapa/çorba’y› seçin. Ön ayarl› süre 1 saattir. Piflirme süresini ayarlamak istiyorsan›z, (çorba için piflirme süresi ayar› için verilen referanslara bak›n›z). Ayarlamay› tamamlad›¤›n›zda “Preset” (Ön Ayar)a bas›n, seçmifl olsu¤unuz ifllev için “adjustment” (ayar)a basarak zaman› ayarlayabilirsiniz. “add” (ekle)ye basarak zaman› art›rabilir, “reduce” (azalt)a basarak süreyi azaltabilirsiniz. Her bas›fl›n›z süreyi 30 dakika artt›r›r veya azalt›r.
*Tüm ayarlar tamamland›¤›nda, karfl›l›k gelen iflleve girifl için “Start” (bafllat)a bas›n›z, “Start” (bafllat) ›fl›¤› yanacakt›r.
Ön Ayar Referans Tablosu ‹fllev: Zaman ayar› aral›¤› H›zl› Piflirme: 1.5 saat-24 saat Buhar: 1 saat-24 saat Kavurma: 1.5 saat-24 saat
Yavafl Piflen Sulu Yemek: 2.5 saat-24 saat
Lapa ve Çorba: 1.5 saat-24 saat
Not: 1. Piflirici, h›zl› piflirme konumunda iken, ön ayar yap›lmas› mümkün de¤ildir.
2. Ön ayar süresi piflirme süresinden k›sa ise, piflirici ön ayar konumuna geçmeyecek, buna karfl›l›k, derhal seçmifl oldu¤unuz ifllevi bafllatacakt›r.
- 8 -

KULLANIM HATALARINA ‹L‹fiK‹N B‹LG‹LER
Cihazınızı, beyan edilen voltaj ile çal›flt›r›n›z.Bulundu¤unuz yerin voltaj›n›n uygun olup olmad›¤›n› kontrol ediniz.
Güç kablosunun ar›zalanmas› durumunda tehlikelerin önlenmesi için kablo üretici, servis merkezi ya da benzer bir ehliyetli kifli taraf›ndan de¤ifltirilmelidir. Ar›za durumunda cihaz› kendiniz sökmeye kalk›flmay›n›z, bak›m merkezimiz ya da sat›fl sonras› hizmet merkezimiz ile ba¤lant›ya geçiniz.
Cihaz› kendiniz onarmaya kalk›flmay›n›z. Meydana gelebilecek ar›zalardan firmam›z kesinlikle sorumlu de¤ildir, ve cihaz›n›z garanti kapsam› d›fl›nda ifllem görecektir.
TAfiIMA VE NAKL‹YE ESNASINDA
•Ürünü düflürmeyiniz,
•Darbelere maruz kalmamas›n› sa¤lay›n›z,
•S›k›flmamas›n›, ezilmemesini sa¤lay›n›z,
•Ambalaj üzerindeki iflaretlemelere uyunuz.
•Orjinal ambalajıyla taflımaya özen gösteriniz.
‹NSAN SA⁄LI⁄I VE ÇEVREYE SAYGI
Bu iflaret, ürünün AB genelinde di¤er ev at›klar›yla birlikte elden ç›kar›lmamas› gerekti¤ini göstermektedir. Çevre ve insan sa¤l›¤›n›n kontrolsüz flekilde elden ç›kar›lm›fl olan at›klar nedeniyle zarar görmesini önlemek amac›yla, malzeme
kaynaklar›n›n sürdürülebilir yeniden kullan›m›n› sa¤lamak için cihaz›n geri dönüflümünü sa¤lay›n›z. Kullan›lm›fl cihazlar›n›z› lütfen iade ve toplama merkezlerine ulaflt›r›n›z ya da ürünün sat›n al›nd›¤› ma¤azayla ba¤lant›ya geçiniz. Bu yerler ürünü teslim al›p çevreye duyarl› bir flekilde geri dönüflümlerini sa¤layabilirler.
TEM‹ZL‹K VE BAKIM
• Tüketicinin Kendi Yapabilece¤i Bakım, Onarım veya Ürünün Temizli¤ine ‹liflkin Bilgiler
‹ç tencerenin, buhar bölmesinin, alüminyum kapak ve taflma emniyet kapa¤›n›n temizlenmesi
*‹ç tencereyi alüminyum kapak ve taflma emniyet kapa¤›n› temizlemek için s›cak su, deterjan ve sünger kullan›n. Afl›nd›r›c› deterjan veya metal temizlik teli kullanmay›n.
*E¤er iç tencereye yemek yap›flm›flsa, temizlemeden önce suyla ›slat›n.
*Cihaz›n gövdesini suya sokmay›n, cihaz›n içine su kaçmas›na engel olun
*‹ç tencereyi ve buhar tutucusunu bulafl›k makinesinde y›kayabilirsiniz.
‹ç tencere için dikkat edilecek hususlar:
*Bulafl›k makinesine yerlefltirdi¤inizde, bulafl›k makinesinin tutucusunun iç tencereyi çizmemesine dikkat edin.
*‹ç tencerenizi daha uzun süre kullanmak ve yap›flmaz yüzeyi çizmemek için tencerenin içerisinde herhangi bir fley kesmeyin.
*Bozulmas›n›n önüne geçek amac› ile, iç tencerenin içine sirke koymay›n
-9 -
TEM‹ZL‹K VE BAKIM
Di¤er parçalar›n temizlik ve bak›m›
*Pirinç pifliricinin yüzeyini, kapak içini, elektrik kablosunu temizlemek için nemli bir bez kullan›n, kesinlikle deterjan kullanmay›n.
*Gövdeyi temizlemek amac› ile do¤rudan su kullanmay›n.
BAKIM
• Periyodik Bakım Gerektirmesi Durumunda, Periyodik Bakımın Yapılaca¤ı Zaman Aralıkları ile Kimin Tarafından Yapılması Gerekti¤ine ‹liflkin Bilgiler
Cihaz periyodik bakım gerektirmemektedir. Düzenli olarak temizlenmesi yeterlidir.
SATIfi SONRASI H‹ZMETLER‹
Bu cihaz kullan›c› taraf›ndan de¤ifltirilebilen parçalara sahip de¤ildir. Ünitenin çal›flmamas› durumunda flu ad›mlar› izleyin.
1.Talimatlar›n do¤ru biçimde izlendi¤ini denetleyin.
2.Ana kayna¤›nda ifllevselli¤ini denetleyin.
Cihaz hâlâ çal›flm›yorsa, sat›n ald›¤›n›z yere geri götürün.
Güç kablosu hasar görmüflse, tehlikeleri önlemek için, cihaz üreticisine iade edilmelidir. Kendi kendinize tamir etmeye KALKIfiMAYIN.
fiu talimatlar› izleyin:
1.Dikkatlice, tercihen orijinal kutusuna paketleyin. Ünitenin temiz oldu¤undan emin olun.
2.Tüm yaz›flmalarda, ad›n›z›, adresinizi ve ürünün model numaras›n› belirtin.
3.‹ade etme nedeninizi belirtin.
4.Garanti kapsam›ndaysa, nereden, ne zaman al›nd›¤›n› belirtin ve sat›n alma kan›t›n› ekleyin (örn. kasa fifli).
- 10 -

SORUN G‹DERME
- 11 -

ENGLISH
SINBO SCO 5032 RICE COOKER
INSTRUCTION MANUAL
PARTS NAME
1.Lid
2.Sealing Ring
3.Inner Lid
4.Steam outlet sealing ring
5.Handle
6.Inner pot
7.Lid release button
8.Control Panel
9.Middle Ring
10.Housing
11.Base
PRODUCE STANDCARD SHEET
Model: SCO 5032
Voltage: 230V~50Hz
Rate: 860W
Capacity: 5.0L
Suitable person: 2-10
CAUTION
*Read the instruction of manual before using. and save it properly.
*Must use wall plug with earth and plug throughly the plug play should pay attention tight, don’t use universal socket and other appliance electrical in the same time.
*When plug the socket, you must make sure is tightly, or will cause the components being burned.
*Don’t put power cord plug jack when needn’t use?
*Product should be out of touch of children.
*Please put the product on a proper position with power cord, and keep away from anything which is combustible.
*Please use original accessories of inner pot in order to avoid any trouble or danger.
*Don’t start to work when you havn’t put the inner pot into body or inner pot is empty.
*Inner pot can’t be heated about the kitchen stove, or will be unshaped?
*Don’t put any food or water in body when inner pot hasn’t been put.
*When the rice cooker is working ,don’t move the inner pot ,avoiding danger.?
*When rice cooker is working ,it will produce steam and high temperature, please keep away from rice cooker.
-12 -

CAUTION
*Don’t put the dishcloth or anything cover the steam outlet, avoiding make the lid unshaped or any trouble.
*Don’t use at the place which is high temperature or wet.
*You had better not to wash rice in the inner pot directly in order to avoid the damage or unshape of inner pot.
*Don’t use the inner pot when it ‘s unshaped anymore, you should send to “repair service center” to deal with?
*Please check if anything stick on the heating plate and bottom of inner pot before using. if has, you must clean it?
*After putting the inner pot into body, please turn around in order to make sure there is close between inner pot and heating plate
*Power cord should be unplug when cleaning, and when the body is cold completely, you can clean it.
*Don’t put the product into water when cleaning?
*Please clean overflow-proof lid and steam outlet regularly in order to avoid make the rice smell peculiar?
*If you don’t use the rice cooker for a long time ,please unplug and placed it in dry ventilation.
*If you find the power line or plug is broken, please don’t use it anymore, you should be buy a new one from the specialized manufacturer or repair center.?
*If produce is out of order, please switch off the power first. And then pull out the plug from the socket, please don’t use the product, and contact our “repair service center”, don’t replace the parts which is not the origin. and don’ t repair by yourself.?
USAGE
*Before using ,please read the instruction manual carefully.
*Before plug in ,make sure the voltage is match our product’s standard?
*Before using first time, please take out all the package, and take part the inner pot ,overflow lid, steam valve, and clean them by water.
*Before put the inner pot into rice cooker, make sure there is nothing stick on the bottom of inner pot and the heating plate. you must clean it if something stick on it. and then put the inner pot into rice cooker, turn over it left and right in order to make the inner pot and heating plate are closing.
Rice (cook-Fast cook-Crust)
*The maximum capacity of rice is 6 cups, the proportion of rice and water is 1:1.1, don’t over the maximum capacity(above proportion of rice and water is just for you reference, you can adjust it according to you hobby) .
*Press “Function”, and choose cook, fast cook ,or crust.
*The default time of crust is 1:30,the range of adjustment is 1:00-2:00.press”adjustment of time ,you can adjust the time, press “add” can add the time ,press”reduce”you can reduce the time, press each time can add or reduce 10 minutes.
-13 -

USAGE
*When finish all the setting, press”start”, enter into corresponding function ”start”light will light.
*When finish setting ,cooker will enter into keeping warm, the corresponding light will light.
The reference list of cooking time Funcation: Time
Cook: About 35 minutes Fast cook: About 50 minutes Crust: 1-2 Hours
Attention: above is just for you reference, the cooking time will change according to the difference of voltage ,capacity of rice or water, material of rice.
Note: 1. If press “start” when the rice cooker is standby, will enter into cook directly. 2. in order to avoid the rice stick together, please turn over the rice after 30 minutes when enter into keeping warm.
Steam
*Press “function” and choose slow stew.
*The default time is 5 minutes, the range of adjustment is5-50 minutes, press”adjustment of time”,you can adjust the time ,press”add” can add the time ,press”reduce” can reduce the time ,press each time can add or reduce 1 minute.
*When finish all the setting, press “start”, will enter into corresponding function, start light will light.
*When finish the work, rice cooker will enter into keeping warm, the corresponding light will light.
-14 -

USAGE
Heat again
*Press “function” and choose “Heat again”.
*The default time is 20 minutes, and the time can’t adjust.
*When finish all the setting, press “start”, will enter into corresponding function, start light will light.
*When finish the work, rice cooker will enter into keeping warm, the corresponding light will light
Cake
*Press “function”and choose “Cake”.
*The default time is 50 minutes, and the time can’t adjust.
*When finish all the setting, press “start”, will enter into corresponding function, start light will light.
*When finish the work, rice cooker will enter into keeping warm, the corresponding light will light
Slow stew
*Press “function” and choose slow stew.
*The default time is 2 hours, the range of adjustment is 2-8 hours, press”adjustment of time”,you can adjust the time ,press”add” can add the time ,press”reduce” can reduce the time ,press each time can add or reduce 0.5 hour(30 minutes).
*When finish all the setting, press “start”, will enter into corresponding function, start light will light.
-15 -
USAGE
* When finish the work, rice cooker will enter into keeping warm, the corresponding light will light.
Porridge/Soup
*Press “function” and choose Porridge/soup
*The default time is 1 hour, the range of adjustment is 1-4 hours, press”adjustment of time”,you can adjust the time ,press”add” can add the time ,press”reduce” can reduce the time ,press each time can add or reduce 10 minutes).
*When finish all the setting, press “start”, will enter into corresponding function, start light will light.
*When finish the work, rice cooker will enter into keeping warm, the corresponding light will light.
Preset
*The preset time is mean the cooking time, exit’s 13:00PM now, if you want to eat at 18:00PM.you should preset time for 5 hour, and then you can enjoy you dinner at 18:00.
*The preset time should not be long in order to avoid the food untaste, suggest preset no longer than 12 hours.
*Below preset time is for you reference.
For example:
*Press “function” and choose “Porridge/Soup”, the default time is 1 hour, if you want to adjust the cooking time,( refer to the method of time set for soup to adjust the cooking time),when finish the setting ,and press the “Preset”, enter into the model of adjustment, press”add” the add the time ,press ”reduce” to reduce the time ,press each time ,will “add” or “reduce”30 minutes.
*After finish the setting and press “start” ,the corresponding light will light, rice cooker start to work.
-16 -

USAGE
The reference list for preset time
Function: The range of setting time
Fast cooker: 1.5 hour-24 hours
Steam: 1 hour-24 hours
Crust: 1.5 hour-24 hours
Slow stew: 2.5 hours-24 hours
Porridge&Soup: 1.5 hour-24 hours
Note: 1. You can’t preset when the cooker is under the function of fast cook.
2. When the preset time is less than cooking time,rice cooker will not enter into preset mode, but will enter into the function which you set immediately.
CLEANNESS AND MAINTENANCE
Cleaning inner pot, steamer , aluminum cover with protecting overflow * Don’t soak body into water, also don’t make into body.
Using hot water, detergent and sponge to clean inner pot, aluminum cover with protecting overflow. Don’t use remover and steel wire wall.
*If food sticker into inner pot, you can soak for a moment before cleaning .
*Don’t soak body into water, also don’t make into body.
*You can clean inner pot and steam holder under dish washer. Maintenance of inner pot
*Please use plastic or wood rice spoon, don’t use metal rice spoon so that protect inner pot.
*In order to protect the non-stick coating ,please don’t cut any food into the inner pot.
*Please don’t put vinegar into inner pot in order to avoid degenerate.
Cleanness and maintenance the other parts of rice cooker
* Use wet cloth to clean the housing ,inside of top lid, PCB, and the dry it, please don’t use the corrodible or abrasive material.
Don’t soak body into water, also don’t make into body
- 17 -

PROBLEM AND METHOD OF SOLVING
- 18 -

FRANÇAIS
SINBO SCO 5032 CASSEROLE À RIZ
MODE D’EMPLOI
NOMS DES PIÈCES
1.Couvercle
2.Anneau étanche
3.Couvercle intérieur
4.Anneau étanche de sortie de vapeur
5.Manche
6.Casserole intérieur
7.Bouton d’ouverture de couvercle
8.Panneau de contrôle
9.Anneau intermédiaire
10.Réservoir
11.Semelle
INFORMATIONS SUR LE PRODUIT
Modèle: SCO 5032
Voltage: 230V~50Hz
Puissance: 860W
Capacité: 5.0L
Nombre de personnes approprié: 2-10
AVERTISSEMENTS
*Lisez attentivement le mode d’emploi et conservez-le pour une consultation future.
*L’appareil doit absolument être utilisé sur une prise de terre et la fiche électrique doit être fermement installée dans la prise de courant. N’utilisez pas de douille universelle et un autre appareil électrique à la fois avec cet appareil.
*Installez rigoureusement la fiche électrique dans la prise de courant, dans le cas où elle reste relâchée, cela peut causer une brûlure des pièces.
*Débranchez l’appareil de la prise lorsque vous ne l’utilisez pas.
*Empêchez les enfants de toucher l’appareil lorsque celui-ci est en marche.
*Placez l’appareil et son cordon d’une façon convenable et ne les faites pas contacter avec des objets pouvant brûler.
*Afin d’éviter tout problème ou tout danger, veuillez s’il vous plaît utiliser uniquement les accessoires originaux dans la casserole intérieure.
*Ne faites pas fonctionner sans avoir installé la casserole intérieure dans le corps et / ou lorsque la casserole est vide.
*Ne mettez pas la casserole intérieure directement au feu, dans le cas contraire votre casserole s’endommagera.
*Ne mettez pas d’eau ou de nourriture dans la casserole en l’absence de la casserole intérieure.
-19 -
AVERTISSEMENT
*Ne retirez jamais la casserole intérieure pendant que l’appareil est en marche.
*Étant donné que le corps et la température autour sera chaude lorsque le cuiseur est en marche, veuillez ne pas toucher notamment les pièces en métal et ne restez pas trop proche.
*Afin d’éviter tout problème et tout risque de déformation du couvercle en raison de la chaleur, ne couvrez pas la sortie de vapeur avec un chiffon de cuisine ou toute autre couverture.
*Ne faites pas fonctionner l’appareil dans des milieux chauds ou mouillés.
*Afin d’éviter d’endommager la casserole intérieure ne lavez pas le riz dans la casserole intérieure.
*N’utilisez jamais la casserole intérieure si elle est déformée, envoyez-la au service technique.
*L’extérieure de la casserole intérieure, notamment la semelle doit être propre. Assurezvous qu’il ne se trouve rien entre la casserole intérieure et la plaque chauffante. Dans le cas où il se trouve quelque chose entre la casserole intérieure et la semelle nettoyez cela absolument.
*Une fois avoir installé la casserole intérieure dans le corps, faites-la tourner de façon à ce que la semelle de la casserole intérieure et la plaque chauffante soient bien en contact.
*La connexion électrique doit être coupée et l’appareil doit avoir refroidi pendant que vous nettoyez la casserole.
*N’immergez pas le corps de l’appareil dans l’eau, évitez que de l’eau s’échappe dans l’appareil.
*Afin d’éviter que les restes d’aliments ne causent une mauvaise odeur, nettoyez régulièrement le couvercle de protection contre le débordement et la sortie de vapeur.
*Ne gardez pas l’appareil branché sur la prise lorsque vous prévoyez de ne pas utiliser l’appareil pour longtemps, et conservez dans un milieu sec et aéré.
*Dans le cas où le cordon d’alimentation ou la fiche électrique est détériorée, n’utilisez jamais, remplacez-les avec les nouveaux.
*Dans le cas où l’appareil tombe en panne lors du fonctionnement, éteignez d’abord l’appareil par son bouton et coupez la connexion électrique. N’utilisez pas l’appareil dans cet état et déposez-le immédiatement chez le service agréé. Ne remplacez pas les pièces avec celles qui ne sont pas originales et n’essayez pas de réparer tout seul.
EMPLOI
*Lisez attentivement le mode d’emploi avant de ne commencer à utiliser.
*Contrôlez que le voltage standard de l’appareil soit le même que le voltage de votre réseau.
*Avant la première utilisation, retirez tous les matériels d’emballage, faites sortir dehors la casserole intérieure, l’embout de sortie de vapeur, le couvercle de protection contre le débordement et nettoyez avec de l’eau.
*Avant de n’installer la casserole intérieure dans le corps. Assurez-vous qu’il ne se trouve rien entre la casserole intérieure et la plaque chauffante. Dans le cas où il se trouve quelque chose entre la casserole intérieure et la semelle nettoyez cela absolument.
-20 -
EMPLOI
Une fois avoir installé la casserole intérieure dans le corps, faites-la tourner de façon à ce que la semelle de la casserole intérieure et la plaque chauffante soient bien en contact;
Riz Cuisson, Cuisson Rapide, Torréfaction
*La capacité maximum de riz est de 6 verres. La proportion du riz et de l’eau doit être de 1:1.1 (cette proportion n’est qu’un exemple, vous pouvez ajuster la proportion suivant vos préférences). Ne dépassez pas la capacité maximum.
*Sélectionnez « Cuisson », « Cuisson Rapide » ou « Torréfaction » en appuyant sur le bouton de ‘Function” (Fonction).
*La durée par défaut pour la torréfaction est de 1:30 heures; L’intervalle de réglage est de 1 – 2 heures. Vous pouvez régler le temps en appuyant sur “adjustment” (ajustement). Vous pouvez augmenter le temps en appuyant sur “add” (ajoute), ou diminuer le temps en appuyant sur “reduce” (réduit). Chaque pression augmentera ou diminuera la durée de 10 minutes.
*Lorsque vous aurez terminé de régler, appuyez sur “Start” (Commence) pour accéder à la fonction qui correspond, la lumière de “Start” (Commence) s’allumera.
*Lorsque la cuisson sera terminée, le cuiseur passera en position de maintien chaud et la lumière qui correspond à votre sélection s’allumera.
Tableau de Référence de Durée de Cuisson Fonction: Durée
Cuisson: Environ 35 minutes Cuisson Rapide: Environ 50 minutes
Torréfaction: 1-2 heures
Attention: Les durées ci-dessus sont uniquement pour renseignement, la durée de cuisson variera selon le voltage, la quantité du riz ou de l’eau et selon le type du riz.
Remarque: 1. Si vous appuyez sur “Start” (Commence) pendant que le cuiseur est en mode d’attente prête, il passera directement à la position de cuisson.
2. Si vous ne voulez pas que le riz ne se colle, mélangez le riz une fois toutes les 30 minutes en mettant à la position de maintien chaud.
- 21 -
EMPLOI
Vapeur
*Sélectionnez « Vapeur » en appuyant sur le bouton de ‘Function” (Fonction).
*La durée par défaut est de 5 minutes; L’intervalle de réglage est de 5 – 50 minutes. Vous pouvez régler le temps en appuyant sur “adjustment” (ajustement). Vous pouvez augmenter le temps en appuyant sur “add” (ajoute), ou diminuer la durée en appuyant sur “reduce” (réduit). Chaque pression augmentera ou diminuera la durée de 10 minutes.
*Lorsque vous aurez terminé tous les réglages, appuyez sur “Start” (Commence) pour accéder à la fonction qui correspond, la lumière de “Start” (Commence) s’allumera.
*Lorsque la cuisson sera terminée, le cuiseur passera en position de maintien chaud et la lumière qui correspond à votre sélection s’allumera.
Réchauffement
*Sélectionnez « Réchauffement » en appuyant sur le bouton de ‘Function” (Fonction), lumière qui correspond à votre sélection s’allumera;
*La durée par défaut est de 20 minutes; la durée ne peut être réglée.
*Lorsque tous les réglages seront terminés, appuyez sur “Start” (Commence) pour accéder à la fonction qui correspond, la lumière de “Start” (Commence) s’allumera.
*Lorsque la cuisson sera terminée, le cuiseur passera en position de maintien chaud et la lumière qui correspond à votre sélection s’allumera.
Cake
*Sélectionnez « Cake » en appuyant sur le bouton de ‘Function” (Fonction), lumière qui correspond à votre sélection s’allumera;
*La durée par défaut est de 50 minutes;
*Lorsque tous les réglages seront terminés, appuyez sur “Start” (Commence) pour accéder à la fonction qui correspond, la lumière de “Start” (Commence) s’allumera.
*Lorsque la cuisson sera terminée, le cuiseur passera en position de maintien chaud et la lumière qui correspond à votre sélection s’allumera.
-22 -
EMPLOI
Repas juteux qui cuisent doucement
*Sélectionnez « Repas juteux » en appuyant sur le bouton de ‘Function” (Fonction).
*La durée par défaut est de 2 heures; l’intervalle de réglage est de 2 – 8 heures. Vous pouvez régler le temps en appuyant sur “adjustment” (ajustement). Vous pouvez augmenter le temps en appuyant sur “add” (ajoute), ou diminuer la durée en appuyant sur “reduce” (réduit). Chaque pression augmentera ou diminuera la durée de 0,5 (demie) heure (30 minutes).
*Lorsque tous les réglages seront terminés, appuyez sur “Start” (Commence) pour accéder à la fonction qui correspond, la lumière de “Start” (Commence) s’allumera.
*Lorsque la cuisson sera terminée, le cuiseur passera en position de maintien chaud et la lumière qui correspond à votre sélection s’allumera.
Bouillie/Soupe
*Sélectionnez « Bouillie/Soupe » en appuyant sur le bouton de ‘Function” (Fonction).
*La durée par défaut est de 1 heure; l’intervalle de réglage est de 1 – 4 heures. Vous pouvez régler le temps en appuyant sur “adjustment” (ajustement). Vous pouvez augmenter le temps en appuyant sur “add” (ajoute), ou diminuer la durée en appuyant sur “reduce” (réduit). Chaque pression augmentera ou diminuera la durée de 10 minutes.
*Lorsque tous les réglages seront terminés, appuyez sur “Start” (Commence) pour accéder à la fonction qui correspond, la lumière de “Start” (Commence) s’allumera.
*Lorsque la cuisson sera terminée, le cuiseur passera en position de maintien chaud et la lumière qui correspond à votre sélection s’allumera.
-23 -

EMPLOI
Préréglage
*La durée de préréglage veut dire, le temps au quel vous voulez manger le repas moins le temps présent. Disons qu’il est actuellement 13h00, si vous voulez manger le repas à 18h00, Vous devez régler la durée de « Préréglage » sur 18:00 c’est-à-dire pour 5 heures après, ainsi vous pourrez vous installer pour un bon dîner à 18h00).
*Pour éviter que les aliments ne perdent leurs goûts, la durée du préréglage ne doit pas dépasser les 12 heures.
*Le tableau de référence est indiqué ci-dessous pour les durées de préréglage.
Par exemple:
*Sélectionnez « Bouillie/Soupe » en appuyant sur le bouton de ‘Function” (Fonction). La durée par défaut est de 1 heure. Si vous voulez ajuster la durée de cuisson, (veuillez voir les références indiquées pour la durée de cuisson de la soupe). Lorsque vous aurez terminé le réglage appuyez sur “Preset” (Préréglage), pour la fonction que vous avez choisie, Vous pouvez régler le temps en appuyant sur “adjustment” (ajustement). Vous pouvez augmenter le temps en appuyant sur “add” (ajoute), ou diminuer la durée en appuyant sur “reduce” (réduit). Chaque pression augmentera ou diminuera la durée de 30 minutes.
*Lorsque tous les réglages seront terminés, appuyez sur “Start” (Commence) pour accéder à la fonction qui correspond, la lumière de “Start” (Commence) s’allumera.
Tableau de Référence de Préréglage
Fonction: Intervalle de réglage de temps
Cuisson Rapide: 1.5 heure-24 heures
Vapeur: 1 heure-24 heures
Torréfaction: 1.5 heure -24 heures
Repas Juteux qui cuisent doucement: 2.5 heures -24 heures
Bouillie et Soupe: 1.5 heure - 24 heures
Remarque: 1. Il n’est pas possible de faire de préréglage lorsque le cuiseur est en position de cuisson rapide.
2. Si la durée de préréglage est plus courte que celle de la cuisson, le cuiseur ne passera en position de préréglage, en contrepartie il lancera immédiatement la fonction que vous aurez choisie.
- 24 -
 Loading...