

Page 1
KITCHEN TOOLS
Coffee Machine SKAT 1000 EDS A1
KOMPERNASS GMBH
BURGSTRASSE 21 · D-44867 BOCHUM
www.kompernass.com
ID-Nr.: SKAT 1000 EDS A1-09/11-V2
IAN: 71659
Coffee Machine
Operating instructions
R
Filtru de cafea
Instrucţiunile
Καφετιέρα
Οδηγίες χρήσης
Aparat za kavu
Upute za upotrebu
Кафемашина
Ръководство за експлоатация
Kaffeemaschine
Bedienungsanleitung
Page 2
SKAT 1000 EDS A1
1
2
3
4
5
6
7
8
9
0
w
q
Page 3

Content Page
Safety instructions 2
Technical data 3
Delivery Contents 3
Intended Application 3
Description of the appliance 3
Before the first usage 3
Programming the time 3
Making coffee 3
Timer-Function 4
Cleaning and care 4
Removing scale 5
Troubleshooting 5
Disposal 6
Warranty and Service 6
Importer 6
Read the operating instructions carefully before using the device for the first time and preserve this booklet
for later reference. Pass this manual on to whoever might acquire the device at a future date.
- 1 -
Page 4
Coffee Machine
Safety instructions
Danger of electric shock!
• Connect the appliance only to correctly installed
and earthed mains sockets.
• Remove the plug from the wall socket when you
move the appliance, fill it with water, if it malfunctions, before cleaning it and when it is not in use.
• Never submerse the appliance in liquids. Should
liquids nonetheless permeate into the appliance
housing, immediately remove the plug from the
wall socket. Arrange for it to be repaired by
qualified specialists.
• Never grasp the appliance, the power cable or
the power plug with wet hands.
• To disconnect, always pull the plug itself out of
the power socket, do not pull on the power cable.
• Do not fold or crush the power cable.
• Always check the power cable and plug before
use. To reduce potential risks in the event of
damage to the power cable, arrange for it to be
examined and repaired as soon as possible by
the manufacturer, by Customer Services or by
a similarly qualified person.
Risk of fire!
• Do not leave the appliance unattended when in
use.
• Never operate the appliance without water.
• Never place the appliance near sources of heat.
• Do not use extension cables. In the event of danger,
the plug must be quickly and easily accessible.
• Do not use an external timing switch or a separate
remote control system to operate the appliance.
Risk of personal injury!
• This appliance is not intended for use by individuals (including children) with restricted physical,
physiological or intellectual abilities or deficiences
in experience and/or knowledge unless they
are supervised by a person responsible for their
safety or receive from this person instruction in
how the appliance is to be used.
• Children should be supervised to ensure that
they do not play with the appliance.
• Lay the power cable in such a way that no one
can tread on or trip over it.
Risk of scalding!
• Never open the lid of the coffee machine during
the brewing process.
• Do not handle the hot filter bag. Remove the filter
bag first when the coffee has drained away and it
has cooled down. Use the filter holder to remove
the filter bag.
• Do not hold your hands in the rising steam.
• Never move/transport the appliance during the
brewing process.
• Remove the glass carafe first when the brewing
process is complete and the filter has fully drained
itself.
• Always close the lid before switching the coffee
machine on, there exists a risk of scalds from
steam and hot water..
Caution:
To avoid damage to the appliance!
• Fill the water tank of the appliance exclusively
with freshly drawn mains water.
• No liabilty will be accepted for damage caused
by glass breakage!
- 2 -
Page 5
Technical data
Mains voltage: 220 - 240 V ~, 50 Hz
Power consumption: 1000 W
Coffee filter bags: Size 1x 4
Before the first usage
Important:
Never fill the appliance with water beyond the maxmarking (12 cups). The appliance could overflow.
Delivery Contents
• Coffee machine
• Glass carafe
• Measuring spoon
• Operating Instructions
Before taking the appliance into use check to ensure
that all of the items listed have been supplied and
that there are no visible signs of damage.
Intended Application
The coffee machine is intended exclusively for brewing
coffee. This coffee machine is intended exclusively
for use in private households. Do not use it commercially. This appliance in intended only for indoor use.
Description of the appliance
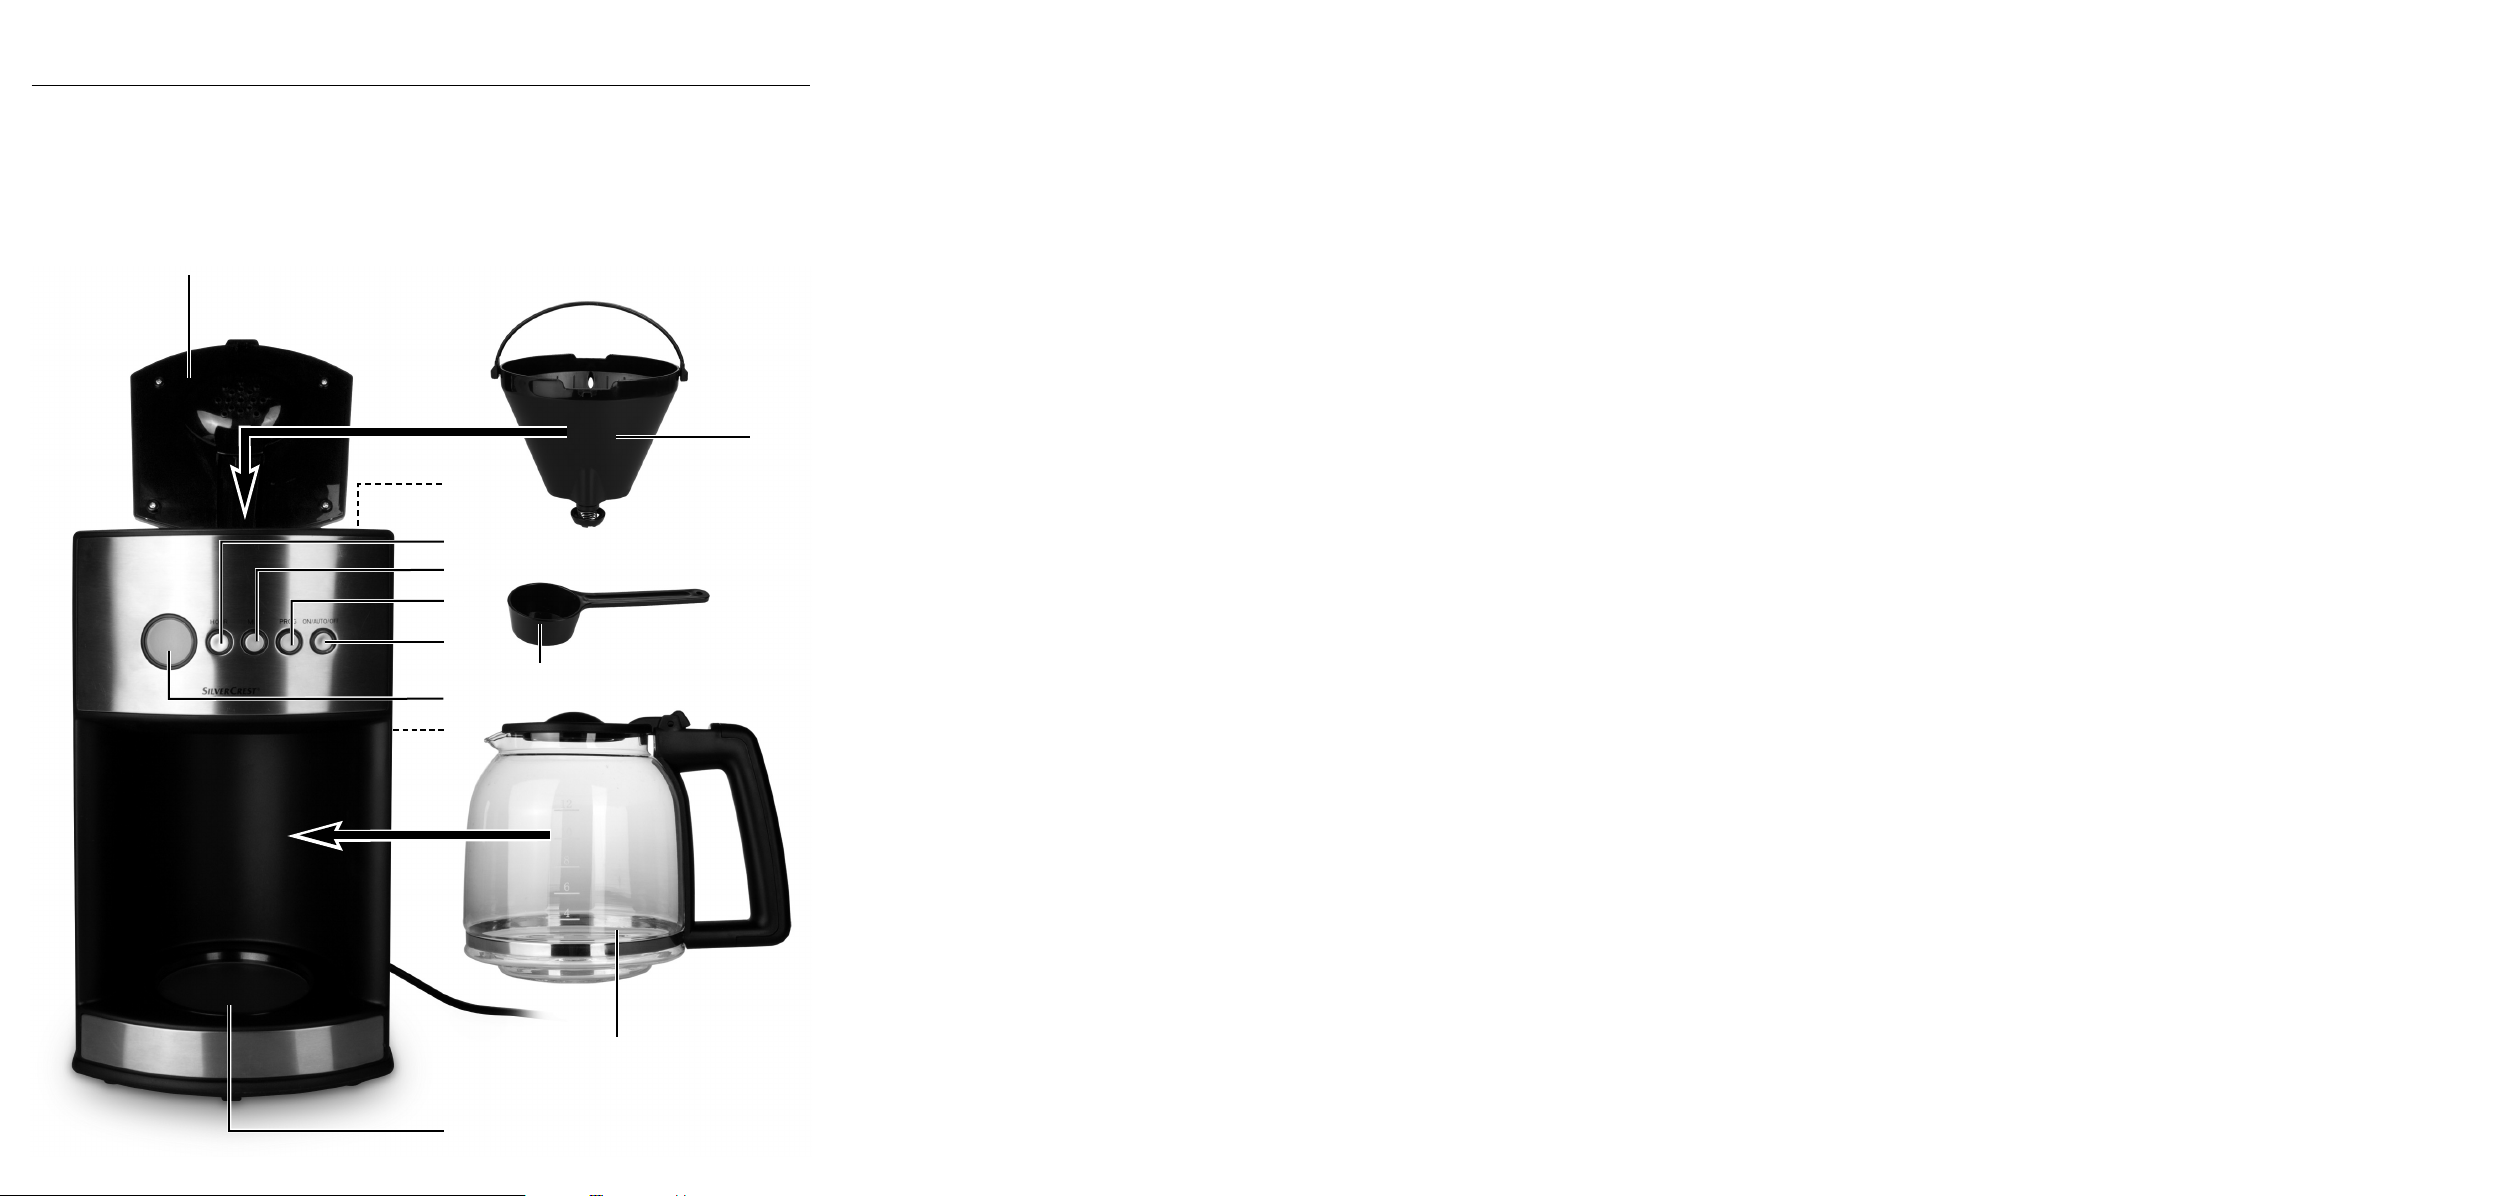
1 Lid
2 Filter holder
3 Water tank
4 HOUR button
5 MIN button
6 PROG button
7 ON/AUTO/OFF button
8 Display
9 Scale
0 Keep-warm plate
q Glass carafe
w Measuring spoon
• Before the first use, pass 12 cups of water
through the appliance. Do not insert a filter
bag and do not use any coffee powder.
• Clean the appliance (see chapter "Cleaning
and Care").
Programming the time
• Press the PROG 6 button.
CLOCK appears on the display 8.
• Repeatedly press the button HOUR 4 for hours,
resp. the button MIN 5 for minutes, until the correct
time is programmed in.
• Wait for approx. 15 seconds. The indicator
CLOCK disappears from the display 8.
The time display is now programmed.
or
• Press the button PROG 6 twice, so that only the
time is to be seen in the display 8. The time
display is now programmed.
Note:
If the coffee machine is separated from mains power
(or subject to a short power failure), the programmed
time is saved for a maximum of 15 seconds. In the
event of a longer separation from mains power, the
time must be reprogrammed.
Making coffee
Avoid brewing less than 4 cups of coffee. Otherwise,
the coffee will not have the desired temperature
and strength.
- 3 -
Page 6
• Open the lid 1 and insert a filter bag (Size 1x4)
with folded over sides into the filter holder 2.
Using the measuring spoon w place coffee
powder into the filter bag. Subject to taste, you
will require approx one level measuring spoon w
of coffee powder per cup. A level measuring
spoon w approximates to about 5,5 gr of coffee
powder.
• Fill the water tank 3 with the required amount
of water. For this, use the scale 9.
Never fill the appliance with water beyond the
max-marking (12 cups).
• Close the lid 1, ensuring that it engages.
• Place the glass carafe q in the coffee machine.
• Press the button ON/AUTO/OFF 7 to start the
brewing process. The red indicator lamp integrated
into the ON/AUTO/OFF button 7 glows.
• When the brewing process is finished you can
remove the glass carafe q and serve the coffee.
If you do not wish to serve the coffee immediately,
allow it to stand in the coffee machine. The keepwarm plate 0 will keep the coffee warm for 2
hours. After two hours the coffee machine switches
itself off automatically.
• If you wish to switch the coffee machine off
manually, press the button ON/AUTO/OFF 7
twice so that the integrated blue indicator lamp
glows constantly. After approx. 15 seconds this
extinguishes. The coffee machine is now
switched off.
Note:
Allow the coffee machine to cool down for approx. 5
minutes before commencing a further brewing process
or filling it with water.
Timer-Function
By use of the button PROG 6 you can programme
the coffee machine so that it starts the brewing process
at a pre-determined time. First, ALWAYS place coffee powder in the filter bag in the filter holder 2
and water into the water tank 3.
Place the glass carafe q in the coffee machine.
Ensure that the water tank 3 is not filled beyond
the Max. marking (12 cups).
• Press the button PROG 6 twice, so that TIMER
appears in the display 8.
• Programme in the desired start time with the button
HOUR 4 and the button MIN 5 (see chapter
"Setting the Time").
• When the desired start time has been programmed
in, press the button ON/AUTO/OFF 7 twice.
The integrated blue indicator lamp blinks and
indicates thereby that the Timer is programmed.
The coffee machine starts the brewing process
at the programmed time.
• If you wish to deactivate the Timer, press the button
ON/AUTO/OFF 7 again so that the integrated
blue indicator lamp glows constantly.
Cleaning and care
Before cleaning, always remove the plug from the
wall power socket.
Risk of electric shock!
Before you clean the coffee machine you must remove
the plug from the mains power socket.
Attention!
Never submerse the coffee machine in water or other
fluids.
Risk of Burns!
Always wait until the coffee machine has cooled
down before cleaning it.
- 4 -
Page 7

• Do not use household detergents or sharp/pointed
objects to remove soiling. These could damage
the appliance.
• Wipe the housing of the coffee machine and the
glass carafe with a soft cloth lightly moistened
with a soapy solution.
• After every brewing process remove the filter bag
from the filter holder 2.
• Remove the filter and rinse the filter holder 2
and the glass carafe q under running water.
• In cases of stubborn soiling, clean the filter
holder 2, measuring spoon w and the glass
carafe q in a mild dishwashing solution.
Rinse them off with clear water.
4. Wait until the water for approx. 2 cups has passed
through and then stop the brewing process by
pressing twice on the button ON/AUTO/OFF 7.
The integrated blue indicator lamp glows constantly and goes out after approx. 15 seconds.
5. Allow the descaling medium to stand for 15 minutes.
6. Repeat the steps 3 to 5 three times.
7. Then restart the brewing process and wait until
all of the solution has passed through.
8. Rinse the coffee machine through 3 times with
fresh water. All of the descaling medium residues
will then be removed and you can once again
use the coffee machine.
If you do not intend to use the coffee machine for
an extended period, stow the power cable in the
cable shaft at the rear of the coffee machine and
insert the power plug into the designated holes on
the cable shaft.
Removing scale
Remove scale from the coffee machine at regular
intervals.
The required descaling intervals can, subject to water
hardness, be very variable. Scale removal is already
necessary after ca. 30 brewing processes with hard
water, after ca. 60 brewing processes with soft water.
Your local water supplier will inform you about the
water hardness level in your locality.
Use only scale removal products that are suitable
for coffee makers and pay heed to the instructions
for use.
The procedure for scale removal is:
1. Place the scale removal product in the water
tank 3.
2. Insert the amount of water detailed in the usage
instructions for the descaler (max. 12 cups).
3. Press the button ON/AUTO/OFF 7 to start the
brewing process. The integrated red indicator
lamp glows.
Troubleshooting
The coffee machine is not working:
• The appliance is not switched on. Press the button
ON/AUTO/OFF 7 to switch the appliance on.
• The plug is not inserted into a power socket.
Connect the appliance with the mains.
Push the power plug into the wall socket.
The brewing process does not start at the
desired time (Timer):
• The timer is not activated. To activate the timer,
press twice on the button ON/AUTO/OFF 7.
• The time is not correctly programmed. Check the
time entered and, if necessary, re-programme it.
The coffee is too strong/too weak:
• There is too little/too much water in the water
tank 3.
Fill it with the correct amount of water.
• It is filled with too much/too little coffee powder.
Fill it with less/more coffee powder.
• The coffee powder is too finely/too coarsely
ground. Select a different grade of grinding
for your coffee powder.
- 5 -
Page 8
The brewing process takes unusually long.
The appliance switches itself off during the brewing
process.
The appliance is becoming louder when brewing.
There is excessive steam.
• The brewing system of the appliance is calcified.
Descale the appliance as described under
"Removing scale".
Disposal
If this product has been subjected to improper or
inappropriate handling, abuse, or modifications
not carried out by one of our authorised service
centres, the warranty will be considered void.
This warranty does not affect your statutory rights.
The warranty period is not extended by repairs effected under warranty. This applies also to replaced
and repaired parts. Damages or defects discovered
after purchase are to be reported directly after unpacking, at the latest two days after the purchase
date. Repairs carried out after lapse of the warranty
period are subject to charge.
Do not dispose of the appliance in your
normal domestic waste. This product is
subject to the European directive
2002/96/EC.
Dispose of the appliance through an approved
disposal centre or at your community waste facility.
Observe the currently applicable regulations.
In case of doubt, please contact your waste disposal
centre.
Dispose of the packaging materials in an
environmentally responsible manner.
Warranty and Service
With this appliance you receive a warranty of 3 years
from the date of purchase. This appliance has been
manufactured with care and thoroughly tested before
delivery.
Please retain your receipt as proof of purchase. In
the case of a warranty claim, please make contact
by telephone with our service department. Only in
this way can a post-free despatch for your goods
be assured.
The warranty covers only claims for material and
maufacturing defects, not for transport damages,
worn parts or for damage to fragile components,
e.g. buttons or batteries.. This product is for private
use only and is not intended for commercial use.
Service Great Britain
Tel.: 0871 5000 720 (£ 0.10/Min.)
E-Mail: kompernass@lidl.co.uk
IAN 71659
Importer
KOMPERNASS GMBH
BURGSTRASSE 21
D-44867 BOCHUM
www.kompernass.com
- 6 -
Page 9
Sadrˇzaj Strana
Sigurnosne napomene 8
Tehnički podaci 9
Obim isporuke 9
Namjenska uporaba uređaja 9
Opis uređaja 9
Prije prve uporabe 9
Podešavanje točnog vremena 9
Pripravljanje kave 9
Timer-funkcija 10
Čišćenje i održavanje 10
Odstranjivanje vapnenih naslaga 11
Otklanjanje grešaka 11
Zbrinjavanje 12
Jamstvo i servis 12
Uvoznik 12
Upute za rukovanje prije prve upotrebe pažljivo pročitajte i sačuvajte ih za kasnije korištenje. Ukoliko uređaj
dajete trećim osobama, priložite i ove upute.
- 7 -
Page 10
Aparat za kavu
Sigurnosne napomene
Opasnost uslijed strujnog udara!
• Uređaj priključite isključivo na propisno instaliranu
i uzemljenu mrežnu utičnicu.
• U slučajevima kada pomičete uređaj ili kada ga
punite, u slučaju smetnji, prije čišćenja ili kada ne
koristite uređaj, obavezno izvucite mrežni utikač
iz utičnice.
• Uređaj nikada ne zaronite u tekućine. Ukoliko se
ipak dogodi, da tekućina dospije u kućište uređaja,
neizostavno izvucite mrežni utikač uređaja iz mrežne utičnice.Dajte uređaj na popravak kvalificiranim
stručnjacima.
• Uređaj, mrežni kabel i mrežni utikač nikada ne
dirajte mokrim rukama.
• Mrežni kabel uvijek izvucite iz utičnice povlačenjem
za utikač, nikada ne povlačite za sam kabel.
• Ne lomite i ne gnječite mrežni kabel.
• Prije svake uporabe prekontrolirajte mrežni kabel
i utikač. Ukoliko dođe do oštećenja mrežnog kabela ovog uređaja, on mora biti zamijenjen od strane proizvođača, servisa za kupce ili druge kvalificirane osobe, kako bi bile izbjegnute opasnosti.
Opasnost od ozljede!
Ovaj uređaj nije namijenjen da bude korišten od
osoba (uključujući djecu) sa ograničenim fizičkim,
senzoričkim i duševnim osobinama ili sa pomanjkanjem
skustva i/ili znanja, osim ako ove osobe stoje pod
nadzorom druge osobe zadužene za njihovu sigurnost ili ako im je druga osoba dala naputke u vezi
načina korištenja uređaja.
Djeca trebaju biti pod nadzorom, kako bi bilo osigurano da se ne mogu igrati sa uređajem.
• Mrežni kabel postavite tako, da nitko ne može
na njega stati ili se preko njega protepsti.
Upozorenje od opeklina!
• Za vrijeme postupka kuhanja nikada ne otvorite
poklopac aparata za kavu.
• Ne dotaktnite vruću filtarsku vrećicu. Filtarsku
vrećicu izvadite tek onda, kada je tekućina procurjela i kada se filtarska vrećica ohladila. Koristite
filtarski umetak za odstranjivanje filtarske vrećice.
• Ruke ne držite u uzlazeću vodenu paru.
• Nikada ne pomičite uređaj za vrijeme postupka
kuhanja.
• Staklenu posudu izvadite tek onda, kada je postupak kuhanja okončan i filtar prazan.
• Prije uključivanja uređaja uvijek zatvorite poklopac
aparata za kavu, jer u protivnom postoji opasnost
od opeklina izlazećom parom i vrućom vodom.
Opasnost od požara!
• Uređaj za vrijeme rada nikada ne ostavite bez
nadzora.
• Uređaj nikada ne pogonite bez pitke vode.
• Uređaj nikada ne postavljajte u blizini izvora
toplote.
• Ne koristite produžni kabel. U slučaju opasnosti
mrežni utikač mora biti brzo dostupan.
• Ne koristite vanjski rasklopni sat ili odvojeni
komandni sustav za pogon uređaja.
Oprez:
Ovako ćete izbjeći oštećenja uređaja!
• U spremnik za vodu uređaja umetnite isključivo
čistu pitku vodu.
• Za štete zbog loma stakla proizvođač ne preuzima nikakvu odgovornost!
- 8 -
Page 11
Tehnički podaci
Mrežni napon: 220 - 240 V ~, 50 Hz
Nominalna snaga: 1000 W
Filtar za kavu: Veličina 1x4
Izjava o sukladnosti za ovaj proizvod dostupna je
na internet stranici www.lidl.hr.
Obim isporuke
• Aparat za kavu
• Staklena posuda
• Mjerna žlica
• Upute za rukovanje
Molimo Vas da prije puštanja uređaja u pogon prekontrolirate cjelovitost obima isporuke i da ustanovite,
postoje li eventualna oštećenja uređaja.
Namjenska uporaba uređaja
Prije prve uporabe
Napomena:
Nikada ne umetnite količinu vode, koja premašuje
oznaku Max (12 Ļalica). Može doči do prelijevanja
uređaja.
• Prije prve uporabe pustite da 12 šalica vode proteče kroz aparat za kavu. Ne umetnite filtarsku
vrećicu i pritom ne koristite kavu u prahu.
• Očistite uređaj (vidi poglavlje "Čišćenje i
održavanje").
Podešavanje točnog vremena
• Pritisnite tipku PROG 6. Na displayu 8 se
pojavljuje CLOCK.
• Pritisnite tipku HOUR 4 za sate, odnosno tipku
MIN 5 za minute toliko puta, dok željeno vrijeme
ne bude podešeno.
Aparat za kavu služi isključivo za pripravljanje kave.
Aparat za kavu predviđen je isključivo za uporabu u
privatnim domaćinstvima. Ne koristite ga u obrtne
svrhe. Uređaj je namijenjen isključivo za uporabu u
unutrašnjim prostorijama.
Opis uređaja
1 Poklopac
2 Filtarski umetak
3 Spremnik za vodu
4 Tipka HOUR
5 Tipka MIN
6 Tipka PROG
7 Tipka ON/AUTO/OFF
8 Display
9 Skala
0 Ploča za održavanje toplote
q Staklena posuda
w Mjerna žlica
• Pričekajte ca. 15 sekundi. Prikaz CLOCK na
displayu 8 nestaje. Točno vrijeme sada je
pohranjeno.
ili
• Pritisnite tipku PROG 6 dvaput, tako da samo
još točno vrijeme na displayu 8 bude vidljivo.
Točno vrijeme sada je pohranjeno.
Napomena:
Kada aparat za kavu odvojite od strujne mreže (ili u
slučaju kratkoročnog nestanka struje), podešeno točno
vrijeme ostaje pohranjeno maksimalno 15 sekundi.
U slučaju dužeg nestanka struje podešenja morate
ponovo unijeti.
Pripravljanje kave
Izbjegnite pripravljanje količine kave veće od 4 šalica.
Kava u protivnom neće imati željenu temperaturu i
jačinu.
- 9 -
Page 12
• Otvorite poklopac 1 i umetnite jednu filtarsku
vrećicu (veličine 1x4) sa preklopljenim stranicama
u filtarski umetak 2.
Sa mjernom žlicom umetnite kavu u prahu u fil-
tarsku vrećicu. Za jednu šalicu potrebno Vam je,
ovisno o osobnom ukusu, po prilici jedna ravna
mjerna žlica w kave u prahu. Pritom jedna ravna
mjerna žlica w odgovara ca. 5,5 g kave u prahu.
• Umetnite željenu količinu vode u spremnik za
vodu 3. U tu svrhu koristite skalu 9. Nikada ne
umetnite količinu vode koja premašuje oznaku
Max (12 šalica).
• Zatvorite poklopac 1 tako da ulegne.
• Umetnite staklenu posudu q u aparat za kavu.
• Pritisnite tipku ON/AUTO/OFF 7, da biste pokrenuli postupak kuhanja. U tipci ON/AUTO/
OFF 7 integrirana crvena signalizacijska lampica
svijetli.
• Nakon kraja postupka kuhanja možete staklenu
posudu q izvaditi i kavu poslužiti.
Ako kavu ne želite poslužiti odmah, ostavite ga
da stoji u aparatu za kavu. Ploča za održavanje
temperature 0 kavu će temperirati 2 sata. Nakon
dva sata aparat za kavu se automatski isključuje.
• Ako aparat za kavu želite isključiti ručno, pritisnite tipku ON/AUTO/OFF 7 2 puta, tako da
integrirana plava signalizacijska lampica trajno
svijetli. Nakon ca. 15 sekundi ona se gasi. Aparat
za kavu sada je isključen.
Napomena:
Ostavite aparat za kavu da se ohladi po prilici pet
minuta, prije nego što započnete ponovni postupak
kuhanja ili dopunite vodu.
Timer-funkcija
Sa tipkom PROG 6 možete aparat za kavu podesiti
tako, da u određenom vremenskom trenutku započne
sa postupkom kuhanja kave. Uvijek prvo napunite
kavu u prahu u filtarsku vrećicu u filtarskom umetku
2 i vodu u spremnik za vodu 3. Postavite staklenu
posudu q u aparat za kavu. Osigurajte, da spremnik
za vodu 3 ne bude napunjen preko Max-oznake
(12 šalica).
• Pritisnite tipku PROG 6 2 puta, tako da se oznaka
TIMER 8 pojavi.
• Podesite željeni vremenski trenutak sa tipkom
HOUR 4 i tipkom MIN 5 (vidi poglavlje "Podešavanje točnog vremena").
• Kada je željeno startno vrijeme podešeno, pritisnite tipku ON/AUTO/OFF 7 2 puta. Integrirana
plava signalizacijska lampica trepti i time pokazuje,
da je timer podešen.
Aparat za kavu pokreće postupak kuhanja u podešenom trenutku.
• Ako timer ponovo želite deaktivirati, pritisnite jednom tipku ON/AUTO/OFF 7, tako da integrirana
plava lampica trajno svijetli.
Čišćenje i održavanje
Prije svakog čišćenja izvucite mrežni utikač iz utičnice.
Opasnost od strujnog udara!
Prije čišćenja aparata za kavu uvijek morate izvući
mrežni utikač iz mrežne utičnice.
Pažnja!
Aparat za kavu nikada ne zaronite u vodu ili u druge
tekučine.
- 10 -
Page 13
Opasnost od ozljeda vrućom vodom!
Uvijek pričekajte da se aparat za kavu ohladi, prije
nego što ga čistite.
• Ne koristite agresivna sredstva za čišćenje domaćinstva niti oštre, odnosno šiljate predmete za uklanjanje nečistoća. Time možete oštetiti aparat za
kavu.
• Kućište aparata za kavu prebrišite sa mekanom
krpom, blago navlaženom sapunskom lužinom.
• Nakon svake uporabe izvadite filtarsku vrećicu
iz filtarskog umetka 2.
• Izvadite filtar i isperite filtarski umetak 2 i staklenu
posudu q pod mlazom tekuće pitke vode.
• Očistite filtarski umetak 2, mjernu žlicu w i staklenu posudu q od tvrdokornih onečišćenja u
vodi sa nešto sredstva za pranje posuđa. Sve
dijelove isperite bistrom vodom.
Ako aparat za kavu ne koristite duže vrijeme, kabel
smjestite u šahtu za kabel na stražnjoj strani uređaja
i mrežni utikač stavite u za to predviđene otvore na
kabelskom šahtu.
1. Ulijte sredstvo za odstranjivanje u spremnik za
vodu 3.
2. Količinu vode navedenu u uputama sredstva za
odstranjivanje vapnenih naslaga ulijte u spremnik
(maksimalno 12 šalica).
3. Pritisnite tipku ON/AUTO/OFF 7, da biste pokrenuli postupak kuhanja. Integrirana crvena
signalizacijska lampica svijetli.
4. Pričekajte, dok protekne voda u količini koja odgovara ca. 2 šalice, i nakon toga zaustavite postupak kuhanja tako što ćete 2 puta tipku
ON/AUTO/OFF 7 pritisnuti. Integrirana plava
signalizacijska lampica trajno svijetli i gasi se nakon
ca. 15 sekundi.
5. Sredstvo za odstranjivanje vapnenca pustite da
djeluje 15 minuta.
6. Ponovite korake 3. - 5. tri puta.
7. Zatim pokrenite postupak kuhanja i pričekajte,
dok voda kompletno ne protekne.
8. Pustite aparat za kavu da 3 puta kuha bistru vodu.
Nakon toga će ostaci sredstva za odstranjivanje
vapnenca biti odstranjeni i aparat za kavu možete
ponovo početi koristiti.
Odstranjivanje vapnenih
naslaga
Aparat za kavu oslobodite od vapnenih naslaga u
redovnim vremenskim razmacima.
Vremenski razmaci za odstranjivanje mogu biti vrlo
različiti, ovisno o tvrdoći vode. Kod visokog stupnja
tvrdoće vode odstranjivanje može biti potrebno već
nakon ca. 30 uporaba, a kod niskog stupnja tvrdoće
vode nakon ca. 60 uporaba. Stupanj tvrdoće Vaše
vode možete doznati kod Vašeg lokalnog snabdjevača vodom.
Koristite isključivo sredstvo za odstranjivanje vapnenih
naslaga prikladno za aparate za kavu. Pritom obratite
pažnju na pripadajuće upute za uporabu.
Odstranjivanje naslaga vapnenca vršite na slijedeći
način:
Otklanjanje grešaka
Aparat za kavu ne funkcionira:
• Uređaj nije uključen. Pritisnite prekidač
ON/AUTO/OFF 7, da biste uključili uređaj.
• Mrežni utikač nije utaknut u utičnicu. Spojite uređaj
sa strujnom mrežom. Utaknite mrežni utikač u
mrežnu utičnicu.
Postupak kuhanja ne započinje u podešenom
vremenskom trenutku (timer):
• Timer nije aktiviran. Pritisnite tipku ON/AUTO/
OFF 7 dva puta, kako biste aktivirali timer.
• Točno vrijeme nije ispravno podešeno. Kontrolirajte točno vrijeme i po potrebi ga podesite.
Kava je prejaka/preslaba:
• Premalo/previše je vode u spremniku za vodu 3.
Umetnite ispravnu količinu vode.
- 11 -
Page 14

• Umetnuta je prevelika/premala količina kave
u prahu. Umetnite više/manje kave u prahu.
• Kava u prahu je mljevena prefino/pregrubo.
Izaberite prikladnu finoću mljevenja Vaše kave
u prahu.
Postupak kuhanja traje neobično dugo.
Uređaj se isključuje za vrijeme kuhanja kave.
Uređaj postaje glasniji za vrijeme kuhanja.
Nastaje prekomjerna para.
• Sustav kuhanja u uređaju je onečišćen vapnenim
naslagama. Očistite uređaj od vapnenih naslaga na način opisan u poglavlju "Odstranjivanje
vapnenih naslaga".
Zbrinjavanje
Uređaj niukom slučaju ne bacajte u obično kućno smeće. Ovaj proizvod podliježe europskoj smjernici 2002/96/EC.
Uređaj otklonite preko ovlaštenog poduzeća za
otklanjanje otpada ili preko vašeg komunalnog poduzeća za otklanjanje otpada.
Obratite pažnju na aktualne važeće propise. U slučaju dvojbe se povežite sa Vašom ustanovom za
zbrinjavanje.
Jamstvo i servis
Na ovaj uređaj dobivate jamstvo u trajanju od 3
godine od datuma kupnje. Uređaj je pažljivo proizveden i prije isporuke brižljivo kontroliran.
Molimo sačuvajte blagajnički račun kao dokaz o
kupnji. Molimo vas, da se u slučaju garancije telefonski
povežete sa svojom servisnom ispostavom. Samo
na taj način vaša roba može biti besplatno uručena.
Jamstvo vrijedi isključivo za greške materijala ili greške
u izradi, a ne za transportne štete, potrošne dijelove
ili za oštećenja lomljivih dijelova, na primjer prekidača
ili baterija. Proizvod je namijenjen samo za privatnu,
a ne za gospodarsku uporabu.
U slučaju zlouporabe i nestručnog rukovanja, primjene sile i zahvata, koje nije izvršila naša autorizirana
servisna ispostava, jamsto prestaje važiti. Vaša zakonska prava ovim jamstvom ostaju netaknuta.
Jamstveni rok se ne produžava korištenjem prava
na jamstvo. To vrijedi i za zamijenjene i popravljene
dijelove. Eventualno već prilikom kupnje postojeće
štete i nedostaci moraju biti javljeni odmah nakon
raspakiranja, najkasnije međutim dva dana nakon
datuma kupnje. Popravke vršene nakon isteka jamstvenog roka podliježu obavezi plaćanja.
Servis Hrvatska
Tel.: 0800 777 999
E-Mail: kompernass@lidl.hr
IAN 71659
Sve materijale ambalaže zbrinite na način
neškodljiv za okoliš.
Uvoznik
Lidl Hrvatska d.o.o. k.d.,
p.p. 61
10020 Novi Zagreb
Proizvođač:
KOMPERNASS GMBH
BURGSTRASSE 21
D-44867 BOCHUM, Njemačka
www.kompernass.com
- 12 -
Page 15

CUPRINS PAGINA
Indicaţii de siguranţă 14
Date tehnice 15
Furnitura 15
Utilizarea conform destinaţiei 15
Descrierea aparatului 15
Înainte de prima utilizare 15
Setarea orei 15
Prepararea cafelei 15
Funcţia de temporizare 16
Curăţarea şi mentenanţa 16
Îndepărtarea calcarului 17
Remedierea defecţiunilor 17
Eliminarea aparatelor uzate 18
Garanţia şi service-ul 18
Importator 18
Citiţi cu atenţie instrucţiunile de utilizare înainte de prima utilizare şi păstraţi-lepentru o consultare ulterioară.
Dacă înmănaţ iaparatul unor terţi, ataşaţi şi instrucţiunile de utilizare.
- 13 -
R
Page 16

Cafetieră
Indicaţii de siguranţă
Pericol de electrocutare
• Conectaţi aparatul numai la o priză instalată
regulamentar şi pământată.
• Dacă mişcaţi aparatul, dacă-l umpleţi, în caz de
defecţiuni, înainte de curăţare sau când nu-l
utilizaţi, scoateţi ştecărul din priză.
• Nu introduceţi niciodată aparatul în lichide.
Dacă se infiltrează lichide în carcasa aparatului,
scoateţi imediat ştecărul aparatului din priză.
Aparatul trebuie apoi reparat de către un specialist.
• Nu puneţi niciodată mâinile ude pe aparat, pe
cablul de alimentare sau pe ştecăr.
• Scoateţi cablul din priză trăgând de ştecăr; nu
trageţi direct de cablu.
• Nu frângeţi şi nu striviţi cablul de alimentare.
• Înainte de fiecare utilizare, verificaţi cablul de alimentare şi ştecărul. Pentru a evita deteriorările, la
defectarea cablului de alimentare, acesta trebuie
înlocuit de către producător, serviciul clienţi autorizat de acesta sau de către o altă persoană calificată.
Pericol de incendiu!
• Nu lăsaţi aparatul să funcţioneze nesupravegheat.
• Nu utilizaţi niciodată aparatul fără apă.
• Nu aşezaţi aparatul în apropierea surselor de
căldură.
• Nu utilizaţi cabluri prelungitoare. În caz de pericol,
ştecărul trebuie să fie uşor accesibil.
• Nu utilizaţi temporizatoare externe sau sisteme
separate de comandă de la distanţă pentru operarea aparatului.
!
Pericol de rănire!
• Acest aparat nu este destinat utilizării de către
persoane (inclusiv copii) cu capacităţi fizice, senzoriale sau mentale limitate sau cu o experienţă
limitată şi/sau cunoştinţe limitate, cu excepţia
cazului în care sunt supravegheate de către o
persoană responsabilă cu siguranţa lor sau au
primit instrucţiuni de la aceasta privind modul de
utilizare a aparatului.
• Copiii trebuie supravegheaţi, pentru a împiedica
utilizarea aparatului ca jucărie.
• Pozaţi cablul de alimentare astfel încât să nu se
calce pe el sau să devină un obstacol pentru
persoane.
Avertizare contra opăririi
• Nu deschideţi niciodată capacul cafetierei în
timpul fierberii.
• Nu atingeţi filtrul fierbinte. Îndepărtaţi filtrul de
hârtie numai după scurgerea lichidului şi răcirea
acestuia. Utilizaţi dispozitivul de filtrare, pentru
îndepărtarea filtrului de hârtie.
• Nu ţineţi mâinile deasupra aburului care se
degajă.
• Nu mişcaţi aparatul în timpul fierberii.
• Luaţi vasul de sticlă numai după terminarea fierberii şi după golirea filtrului.
• Înainte de pornire, închideţi întotdeauna capacul
cafetierei, altfel există pericol de opărire din cauza
aburului şi apei fierbinţi degajate.
!
Atenţie
Astfel evitaţi daunele
• Turnaţi numai apă curată în rezervorul aparatului.
• Pentru spargerea sticlei nu se oferă garanţie!
!
R
- 14 -
Page 17

Date tehnice
Tensiune: 220 - 240 V ~, 50 Hz
Putere nominală: 1000 W
Filtru de cafea: dimensiune 1x4
Înainte de prima utilizare
Observaţie
Nu umpleţi rezervorul de apă peste marcajul Max
(12 ceşti). Din aparat ar putea curge apă.
Furnitura
• Cafetieră
• Vas de sticlă
• Lingură gradată
• Instrucţiuni de utilizare
Înainte de punerea în funcţiune, verificaţi dacă furnitura este completă şi dacă piesele prezintă deteriorări.
Utilizarea conform destinaţiei
Cafetiera este destinată exclusiv preparării cafelei.
Cafetiera este destinată utilizării exclusive în locuinţele
private. A nu se utiliza în scopuri profesionale.
Aparatul trebuie utilizat numai în spaţii interioare.
Descrierea aparatului
1 Capac
2 Element de filtrare
3 Rezervor de apă
4 Tasta HOUR
5 Tasta MIN
6 Tasta PROG
7 Tasta ON/AUTO/OFF
8 Ecran
9 Scală
0 Plită de menţinere la cald
q Cană de sticlă
w Lingură gradată
• Înainte de prima utilizare lăsaţi să treacă prin
cafetieră 12 ceşti de apă. Nu introduceţi niciun filtru
de hârtie şi nu utilizaţi cafea măcinată.
• Curăţaţi aparatul şi toate accesoriile (a se vedea
capitolul „Curăţarea şi mentenanţa“).
Setarea orei
• Apăsaţi tasta PROG 6. Pe display 8 apare
CLOCK.
• Apăsaţi tasta HOUR 4 pentru oră, resp. tasta
MIN 5 pentru minute până se setează ora dorită.
• Aşteptaţi aprox. 15 secunde. Afişajul CLOCK de
pe display 8dispare. Ora este acum setată.
sau
• Apăsaţi tasta PROG 6 de două ori, astfel încât
pe display 8 să fie afişată numai ora. Ora este
acum setată.
Indicaţie
Când cafetiera este deconectată de la curent (sau
când nu este curent), ora setată se menţine max.
15 secunde. Dacă lipsa curentului durează mai
mult, va trebui să reluaţi setarea.
Prepararea cafelei
Evitaţi să preparaţi mai puţin de 4 ceşti de cafea.
Altfel, cafeaua nu va avea temperatura şi tăria dorite.
- 15 -
R
Page 18

• Deschideţi capacul 1 şi aşezaţi un filtru de hârtie
(mărimea 1x4) cu marginile îndoite în dispozitivul
de filtrare 2.
Cu lingura gradată w turnaţi cafeaua măcinată
în filtrul de hârtie. În funcţie de preferinţe, aveţi
nevoie de o cantitate de cafea de aprox. o lingură
gradată w rasă pentru o ceaşcă. O lingură
gradată rasă w corespunde cu cca 5,5 g cafea
măcinată.
• Umpleţi rezervorul de apă 3 cu cantitatea de
apă dorită. Pentru aceasta folosiţi scala 9.
Nu umpleţi rezervorul de apă peste marcajul
Max (12 ceşti).
• Închideţi capacul 1, astfel încât să facă clic.
• Aşezaţi vasul de sticlă q în cafetieră.
• Apăsaţi tasta ON/AUTO/OFF 7 pentru a porni
procesul de preparare. Lumina roşie integrată în
tasta ON/AUTO/OFF 7se aprinde.
• Dacă procesul de fierbere s-a terminat, puteţi lua
cana de sticlă q şi servi cafeaua.
Dacă nu doriţi să serviţi imediat cafeaua, lăsaţi-o
să stea în cafetieră. Plita de menţinere la cald 0
menţine cafeaua caldă timp de 2 ore.
După 2 ore cafetiera se opreşte automat.
• Dacă doriţi să opriţi cafetiera manual, apăsaţi
tasta ON/AUTO/OFF 7 de 2 ori, astfel încât să
se aprindă permanent lumina albastră integrată.
Aceasta se stinge după cca 15 secunde. Cafetiera
este acum oprită.
Funcţia de temporizare
Cu ajutorul tastei PROG 6 puteţi seta cafetiera să
înceapă procesul de fierbere la o oră prestabilită.
Înainte, puneţi cafeaua în filtrul de hârtie 2 şi apă
în rezervor 3. Aşezaţi vasul de sticlă q în cafetieră.
Asiguraţi-vă că rezervorul 3 nu este umplut peste
macajul Max (12 ceşti).
• Apăsaţi tasta PROG 6 de 2 ori, astfel încât pe
Display 8 să apară TIMER.
• Setaţi ora de pornire cu ajutorul tastei HOUR 4
şi al tastei MIN 5 (vezi capitolul „Setarea orei“).
• După setarea orei de pornire, apăsaţi de două
ori tasta ON/AUTO/OFF 7. Lumina albastră
integrată clipeşte, indicând faptul că timer-ul este
setat. Cafetiera va porni prepararea la ora setată.
• Dacă doriţi să dezactivaţi timer-ul, apăsaţi tasta
ON/AUTO/OFF 7 o dată, astfel încât să se
aprindă permanent lumina albastră integrată.
Curăţarea şi mentenanţa
Înainte de fiecare curăţare scoateţi ştecărul din priză.
Pericol de electrocutare!
Înainte de a curăţa cafetiera, trebuie să scoateţi
întotdeauna ştecărul din priză.
Indicaţie
Lăsaţi cafetiera să se răcească cca 5 minute înainte
de a porni un nou proces de fierbere şi înainte de
a completa apă în rezervor.
R
Atenţie!
Nu introduceţi cafetiera în apă sau alte lichide!
- 16 -
Page 19

Pericol de arsuri!
Aşteptaţi întotdeauna ca aparatul să se răcească
înainte de a-l curăţa.
• Nu utilizaţi detergenţi sau obiecte ascuţite pentru
a îndepărta murdăria. Prin utilizarea acestora
cafetiera poate fi deteriorată.
• Ştergeţi carcasa cafetierei cu un prosop moale,
uşor umezit în apă cu săpun.
• După fiecare utilizare scoateţi filtrul de hârtie din
dispozitivul de filtrare 2.
• Îndepărtaţi filtrul şi clătiţi dispozitivul de filtrare 2
şi cana de sticlă q cu apă curentă de la reţea.
• Curăţaţi dispozitivul de filtrare 2, lingura gradată w şi cana de sticlăq, în cazul depunerilor
persistente, în apă cu detergent de vase. Clătiţi
toate piesele cu apă curată.
Dacă nu utilizaţi cafetiera timp îndelungat, strângeţ i
cablul în locaşul pentru cablu de pe spatele cafetierei
şi introduceţi ştecărul în găurile prevăzute pentru
aceasta.
Îndepărtarea calcarului
Înlăturaţi în mod regulat calcarul din cafetieră.
Intervalele la care este necesar acest lucru depinde
de gradul de duritate al apei şi poate fi foarte diferit.
Dacă gradul de duritate al apei este foarte mare, este
necesară îndepărtarea calcarului după cca 30 de
utilizări ale aparatului; dacă duritatea este redusă,
îndepărtarea calcarului se face după cca 60 de utilizări. Gradul de duritate al apei il aflaţi de la furnizorul
local de apă.
1. Introduceţi substanţa de îndepărtare a calcarului
în rezervorul de apă 3.
2. Turnaţi apoi cantitatea de apă indicată în instrucţiunile de utilizare ale produsului (max. 12 ceşti).
3. Apăsaţi tasta ON/AUTO/OFF 7 pentru a porni
procesul de fierbere. Se aprinde lumina roşie.
4. Aşteptaţi până când au trecut aprox. 2 ceşti de
apă şi apoi opriţi fierberea, apăsând de 2 ori tasta
ON/AUTO/OFF 7. Lumina albastră integrată
va lumina permanent şi se va stinge după cca.
15 secunde.
5. Lăsaţi substanţa detartrantă să acţioneze
15 minute.
6. Repetaţi de 3 ori paşii 3 - 5
7. Porniţi apoi procesul de fierbere până când a
trecut toată apa.
8. Lăsaţi cafetiera să efectueze 3 cicluri de fierbere
cu apă curată. Atunci sunt înlăturate toate resturile detartrantului şi puteţi folosi din nou cafetiera.
Remedierea defecţiunilor
Cafetiera nu funcţionează:
• Aparatul nu este pornit. Apăsaţi butonul
ON/AUTO/OFF 7, pentru a porni aparatul.
• Ştecărul nu a fost introdus în priză. Conectaţ i
aparatul la reţeaua de curent. Introduceţi ştecărul în
priză.
Fierberea nu începe la timpul dorit (timer):
• Timerul nu este activat. Apăsaţi de două ori tasta
ON/AUTO/OFF 7, pentru a activa timer-ul.
• Ora nu este setată corect. Verificaţi ora şi eventual
setaţi-o.
Utilizaţi numai substanţe pentru îndepărtarea calcarului pentru cafetiere şi respectaţi instrucţiunile de
utilizare ale produsului respectiv.
Pentru îndepărtarea calcarului procedaţi astfel:
- 17 -
R
Page 20

Cafeaua este prea tare/slabă:
• În rezervor 3 se află o cantitate prea mică/mare
de apă.
Umpleţi rezervorul cu cantitatea corectă de apă.
• Aţi pus prea multă/prea puţină cafea. Puneţi
mai puţină/ mai multă cafea.
• Cafeaua este măcinată prea fin/prea mare.
Alegeaţi o cafea cu un alt grad de măcinare.
Procesul de fierbere durează neobişnuit de
mult timp.
Aparatul se opreşte în timpul procesului de
fierbere.
Aparatul emite zgomote la fierbere.
Se formează o cantitate prea mare de abur.
• Sistemul de fierbere al aparatului este acoperit cu
calcar. Îndepărtaţi calcarul din aparat în modul
descris în capitolul „Îndepărtarea calcarului”.
Eliminarea aparatelor uzate
Nu aruncaţi aparatul sub nicio formă
în gunoiul menajer obişnuit. Acest produs
intră sub incidenţa directivei europene
2002/96/EC.
Eliminaţi aparatul prin intermediul unei firmei specializate şi autorizate sau prin intermediul serviciului local
de eliminare a deşeurilor.
Respectaţi reglementările actuale în vigoare.
Dacă aveţi nelămuriri, contactaţi serviciul dumneavoastră local de eliminare a deşeurilor.
Garanţia şi service-ul
Pentru acest aparat se acordă o garanţie de 3 ani
începând cu data cumpărării. Aparatul a fost produs
cu grijă şi verificat cu scrupulozitate înaintea livrării.
Păstraţi bonul de casă pentru a dovedi cumpărarea.
În cazul reparaţiilor din perioada de garanţie, contactaţi telefonic centrul dumneavoastră de service.
Numai astfel poate fi asigurată o expediere gratuită
a produsului dumneavoastră.
Garanţia acoperă numai defectele de material sau
de fabricaţie, nu şi deteriorările rezultate în urma
transportului, piesele de uzură sau deteriorările apărute la componentele fragile, de ex. comutatoare sau
acumulatoare. Aparatul este destinat numai pentru
uz privat şi nu pentru o utilizare profesională.
În cazul manevrării abuzive sau necorespunzătoare,
al uzului de forţă şi al intervenţiilor care nu au fost
realizate de către filiala noastră autorizată de service,
garanţia îşi pierde valabilitatea. Drepturile dumneavoastră legale nu sunt restrânse prin această garanţie.
Perioada de garanţie nu este prelungită după realizarea reparaţiilor din perioada de garanţie. Acest
lucru este valabil şi pentru piesele înlocuite şi reparate.
Deteriorările şi deficienţele prezente deja la cumpărare
trebuie semnalate imediat după dezambalare sau
cel târziu în două zile de la data cumpărării.
Reparaţiile necesare după expirarea perioadei de
garanţie se efectuează contra cost.
R
Service România
Tel.: 0800896637
E-Mail: kompernass@lidl.ro
IAN 71659
Eliminaţi toate materialele de ambalare
într-un mod ecologic.
R
Importator
KOMPERNASS GMBH
BURGSTRASSE 21
D-44867 BOCHUM
www.kompernass.com
- 18 -
Page 21

Cъдържание Cтраница
Указания за безопасност 20
Технически характеристики 21
Окомплектовка на доставката 21
Употреба по предназначение 21
Описание на уреда 21
Преди първата употреба 21
Настройка на часа 21
Приготвяне на кафе 21
Функция таймер 22
Почистване и поддръжка 22
Отстраняване на котлен камък 23
Отстраняване на повреди 23
Изхвърляне 24
Гаранция и сервиз 24
Вносител 24
Прочетете внимателно ръководството за експлоатация преди да използвате уреда за първи път и го
запазете за по-нататъшна употреба. Когато предавате уреда на трети лица, предайте и това ръководство.
- 19 -
Page 22

Кафемашина
Указания за безопасност
Опасност от токов удар!
• Свързвайте уреда само към инсталиран според
инструкциите и заземен контакт.
• Изключвайте щепсела от контакта, когато
премествате или пълните уреда, при повреди,
преди почистване на уреда или ако няма да
го използвате.
• Никога не потапяйте уреда в течности. Ако все
пак някога попадне течност в корпуса на уреда,
изключете веднага щепсела на уреда от
контакта. Дайте уреда за ремонт от квалифицирани специалисти.
• Никога не хващайте уреда, кабела и щепсела
с мокри ръце.
• Изключвайте кабела като дърпате винаги щепсела от контакта, а не самия кабел.
• Не огъвайте и не притискайте кабела.
• Проверявайте кабела и щепсела преди всяка
употреба. Ако кабелът на уреда се повреди,
той трябва да се смени от производителя,
неговия сервиз или от лице с подходяща
квалификация, за да се избегнат опасности.
Опасност от пожар!
• Никога не оставяйте уреда без наблюдение
по време на работа.
• Никога не използвайте уреда без вода.
• Никога не инсталирайте уреда в близост до
източници на топлина.
• Не използвайте удължител. При опасност трябва
да има бърз достъп до щепсела.
• За работа с уреда не използвайте външен
таймер или отделна система за дистанционно
управление.
Опасност от нараняване!
• Този уред не е предвиден за използване от
лица (включително и деца) с ограничени
физически, органолептични или умствени
способности или от лица, които не притежават
необходимия опит и/или знания, освен ако не
са под надзора на лица, отговорни за тяхната
безопасност или не са получили от тях указания
как трябва да се използва уредът.
• Децата трябва да се наблюдават, за да е
сигурно, че не играят с уреда.
• Полагайте кабела така, че никой да не го
настъпва или да не се спъва в него.
Предупреждение за опасност от
попарване!
• По време на процеса на запарване никога не
отваряйте капака на кафемашината.
• Не докосвайте горещата филтърна торбичка.
Изваждайте филтърната торбичка, едва след
като течността е изтекла и филтърната торбичка
се е охладила. Използвайте вложката за
филтъра, за да отстраните филтърната
торбичка.
• Не дръжте ръцете си над издигащата се водна
пара.
• Никога не премествайте уреда по време на
процеса на запарване.
• Вземайте стъклената кана, едва след като процесът на запарване е завършил и течността е
изтекла от филтъра.
• Преди включване винаги затваряйте капака
на кафемашината, в противен случай съществува опасност от попарване от излизаща пара
и гореща вода.
Внимание:
За избягване на повреди на уреда:
• Наливайте само чиста чешмяна вода в
резервоара за вода на уреда.
• За щети поради счупване на стъклото не се
поема отговорност!
- 20 -
Page 23

Технически характеристики
Мрежово напрежение: 220 - 240 V ~, 50 Hz
Номинална мощност 1000 W
Филтри за кафе: размер 1x4
Преди първата употреба
Указание
Никога не наливайте вода над маркировката
Max (12 чаши). Уредът може да прелее.
Окомплектовка на доставката
• Кафемашина
• Стъклена кана
• Дозираща лъжица
• Ръководство за обслужване
Преди пускането в експлоатация проверете комплектността на доставката и за евентуални повреди.
Употреба по предназначение
Кафемашината служи само за приготвяне на кафе.
Кафемашината е предназначена само за употреба
в домашни условия. Не я използвайте за професионални цели. Уредът е предназначен само за
употреба на закрито.
Описание на уреда
1 Капак
2 Вложка за филтъра
3 Резервоар за вода
4 Бутон HOUR
5 Бутон MIN
6 Бутон PROG
7 Бутон ON/AUTO/OFF
8 Дисплей
9 Скала
0 Плоча за поддържане в топло състояние
q Стъклена кана
w Дозираща лъжица
• Преди първата употреба пуснете да минат 12
чаши вода през кафемашината. Не поставяйте
филтърна торбичка и не сипвайте мляно кафе.
• Почистете уреда (виж глава „Почистване и
поддръжка“).
Настройка на часа
• Натиснете бутона PROG 6. На дисплея се
появява 8 CLOCK.
• Натискайте бутона HOUR 4 за часовете респ.
бутона MIN 5 за минутите дотогава, докато
се настрои желаното време.
• Изчакайте около 15 секунди. Показанието
CLOCK на дисплея 8 угасва. Часът е запаметен.
или
• Натиснете бутона PROG 6 два пъти, така че
на дисплея 8 да се вижда само часът. Часът
е запаметен.
Указание:
При изключване на кафемашината от електрическата мрежа (или при кратко спиране на тока),
настроеният час остава запаметен за макс. 15
секунди. При изключване за по-дълго време от
електрическата мрежа настройките трябва да се
извършат наново.
Приготвяне на кафе
Избягвайте да запарвате по-малко от 4 чаши
кафе. В противен случай кафето няма желаната
температура и сила.
- 21 -
Page 24

• Отворете капака 1 и поставете филтърна
торбичка (размер 1x4) с прегънати страни във
вложката за филтъра 2. С дозиращата лъжица
w сипете мляно кафе във филтърната торбичка.
За една чаша ви необходимо, според личния
вкус, около една изравнена дозираща лъжица
w мляно кафе. Една изравнена дозираща
лъжица w отговаря на около 5,5 г мляно кафе.
• Налейте желаното количество вода в резервоара за вода 3. За тази цел използвайте скалата
9. Никога не наливайте вода над маркировката Max (12 чаши).
• Затворете капака 1, така че да се фиксира.
• Поставете стъклената кана q в кафемашината.
• Натиснете бутона ON/AUTO/OFF 7, за да
започне процесът на запарване. Вградената в
бутона ON/AUTO/OFF 7 червена индика-
торна лампичка свети.
• Щом завърши процесът на запарване, можете
да вземете стъклената кана q и да сервирате
кафето. Ако не искате да сервирате кафето
веднага, оставете стъклената кана в кафемашината. Плочата за поддържане в топло състояние 0 поддържа два часа кафето топло.
След два часа кафемашината се изключва
автоматично.
• Ако искате да изключите кафемашината ръчно,
натиснете бутона ON/AUTO/OFF 7 два пъти,
така че вградената синя индикаторна лампичка
да свети постоянно. След 15 секунди тя угасва.
Кафемашината е изключена.
Указание:
Оставете кафемашината да се охлажда в продължение на около 5 минути, преди да започнете
следващо запарване или да налеете допълнително
вода.
Винаги най-напред сипвайте мляно кафе във
филтърната торбичка
във вложката на филтъра 2 и вода в резервоара
за вода 3. Поставете стъклената кана q в
кафемашината. Уверете се, че резервоарът за
вода 3 не е напълнен над маркировката
Max (12 чаши).
• Натиснете бутона PROG 6 два пъти, така че
на дисплея 8 да се появи показанието TIMER.
• Настройте желаното време за започване с
бутона HOUR 4 и бутона MIN 5 (виж глава
„Настройка на часа“).
• След като желаното време за започване е
настроено, натиснете бутона ON/AUTO/OFF
7 два пъти. Вградената синя индикаторна
лампичка мига и с това показва, че таймерът
е настроен. Кафемашината започва процеса
на запарване в настроеното време.
• Ако искате да деактивирате отново таймера,
натиснете един път бутона ON/AUTO/OFF 7,
така че вградената синя индикаторна лампичка
да свети постоянно.
Почистване и поддръжка
Преди всяко почистване изключвайте щепсела от
контакта.
Опасност от токов удар!
Преди почистване на кафемашината винаги трябва
да изключвате щепсела от контакта.
Внимание!
Никога не потапяйте кафемашината във вода или
други течности.
Функция таймер
С бутона PROG 6 можете да настроите кафемашината така, че процесът на запарване да започне
в точно определен момент.
Опасност от изгаряне!
Преди да почистите кафемашината, винаги изчаквайте да се охлади.
- 22 -
Page 25

• Не използвайте домакински почистващи препарати или остри предмети, за да отстраните
замърсявания. С тях можете да повредите
кафемашината.
• Избърсвайте корпуса на кафемашината с леко
навлажнена със сапунена вода, мека кърпа.
• След всяка употреба изваждайте филтърната
торбичка от вложката за филтъра 2.
• Изваждайте филтъра и измивайте вложката за
филтъра 2 и стъклената кана q под течаща
чешмяна вода.
• При упорити замърсявания мийте вложката за
филтъра 2, дозиращата лъжица w и стъклената кана q с мека сапунена вода. Изплаквайте всички части с чиста вода.
Ако няма да използвате кафемашината дълго
време, прибирайте кабела в кабелния канал на
задната страна на кафемашината и поставяйте
щепсела в предвидените за него отвори в кабелния
канал.
Отстраняване на котлен камък
2. Налейте количеството вода, посочено в упътването за употреба на препарата за отстраняване
на котлен камък (макс. 12 чаши).
3. Натиснете бутона ON/AUTO/OFF 7, за да
започне процесът на запарване. Вградената
червена индикаторна лампичка свети.
4. Изчакайте, докато премине водата за около
две чаши и след това спрете процеса на
запарване, като натиснете два пъти бутона
ON/AUTO/OFF 7. Вградената червена
индикаторна лампичка свети постоянно и угасва
след около 15 секунди.
5. Оставете препарата за отстраняване на котлен
камък да действа 15 минути.
6. Повторете стъпките 3 - 5 три пъти.
7. След това започнете процеса на запарване и
изчакайте, докато премине цялото количество
вода.
8. Оставете кафемашината да запари три пъти
чиста вода. Тогава всички остатъци от
препарата за отстраняване на котлен камък са
отстранени и вие можете да използвате
кафемашината отново.
Редовно отстранявайте котления камък от
кафемашината.
Интервалите за почистване на котления камък
могат да бъдат различни в зависимост от степента
на твърдост на водата. При висока степен на
твърдост на водата почистването на котлен камък
се налага още след около 30 използвания, а при
ниска степен на твърдост на водата - след около
60 използвания. Осведомете се за степента на
твърдост на вода от местното водоснабдително
дружество.
Използвайте само подходящ за кафемашини
препарат за отстраняване на котлен камък и
спазвайте упътването за употреба.
За отстраняването на котлен камък постъпете така:
1. Сипете препарата за отстраняване на котлен
камък в резервоара за вода 3.
Отстраняване на повреди
Кафемашината не функционира:
• Уредът не е включен. Натиснете превключвателя
ON/AUTO/OFF 7, за да включите уреда.
• Щепселът не е включен в контакт. Включете
уреда в електрическата мрежа. Поставете
щепсела в контакт.
Процесът на запарване не започва в желаното
време (таймер):
• Таймерът не е активиран. Натиснете бутона
ON/AUTO/OFF 7 два пъти, за да активирате
таймера.
• Часът не е настроен правилно. Проверете часа
и ако е необходимо, го настройте.
- 23 -
Page 26

Кафето е много силно/много слабо:
• Има твърде малко/твърде много вода в резервоара за вода 3. Налейте правилното количество
вода.
• Сипано е твърде много/твърде малко мляно
кафе. Сипете по-малко/повече мляно кафе.
• Кафето е смляно твърде ситно/твърде едро.
Изберете друга степен на мелене за вашето
мляно кафе.
Процесът на запарване продължава необичайно
дълго.
Уредът се изключва по време на запарването.
Уредът шуми силно при запарването.
Получава се прекомерно количество пара.
• Запарващата система на уреда е покрита с
котлен камък. Почистете котления камък от
уреда, както е описано в “Отстраняване на
котлен камък”.
Изхвърляне
В никакъв случай не изхвърляйте уреда
с обикновените битови отпадъци. Този
уред подлежи на европейската
Директива 2002/96/EC.
Изхвърляйте уреда чрез лицензирана фирма за
изхвърляне на отпадъци или общинската служба
за изхвърляне на отпадъци.
Спазвайте актуално валидните разпоредби. В
случай на съмнение се свържете със службата за
изхвърляне на отпадъци.
Гаранция и сервиз
За този уред вие получавате гаранция от 3 години
от датата на закупуване. Уредът е произведен
старателно и е проверен добросъвестно преди
доставката.
Запазете касовата бележка като доказателство
за покупката. В гаранционен случай се свържете
по телефона с вашия сервиз. Само по този начин
може да се осигури безплатното изпращане на
вашата стока.
Даването на гаранция важи само за материални
или фабрични дефекти, но не и за транспортни
щети, износващи се части или при повреда на
лесно чупливи части, напр. превключватели или
акумулаторни батерии. Продуктът е предназначен
единствено за домашна, а не за професионална
употреба.При непозволена и неправилна
употреба, при прилагане на сила или
интервенции, които не са извършени от нашия
оторизиран сервизен филиал, гаранцията отпада.
Законните ви права не се ограничават от тази
гаранция. Гаранционният срок не се удължава от
гаранцията. Това важи и за сменени и
ремонтирани части. За евентуалните, налични
още при закупуването повреди и недостатъци
трябва да се съобщи веднага след
разопаковането, но най-късно два дена след
датата на закупуване. След като изтече гаранционният срок, ремонтите трябва да се заплащат.
Сервизно обслужване България
Тел.:00800 111 4920
Е-мейл: kompernass@lidl.bg
IAN 71659
Предавайте опаковъчните материали за
екологично изхвърляне.
Вносител
KOMPERNASS GMBH
BURGSTRASSE 21
44867 BOCHUM, GERMANY
www.kompernass.com
- 24 -
Page 27

Περιεχόμενα Σελίδα
Υποδείξεις ασφαλείας 26
Τεχνικές πληροφορίες 27
Σύνολο αποστολής 27
Σκοπός χρήσης 27
Περιγραφή συσκευής 27
Πριν από την πρώτη χρήση 27
Ρύθμιση της ώρας 27
Προετοιμασία καφέ 28
Λειτουργία χρονοδιακόπτη 28
Καθαρισμός και συντήρηση 28
Απομάκρυνση αλάτων 29
Διόρθωση σφαλμάτων 29
Απόρριψη 30
Εγγύηση και σέρβις πελατών 30
Εισαγωγέας 31
Διαβάστε το εγχειρίδιο χειρισμού πριν από την πρώτη χρήση προσεκτικά και φυλάξτε το για μια μελλοντική
χρήση. Παραδώστε το εγχειρίδιο σε όποιον παραδοθεί στη συνέχεια η συσκευή.
- 25 -
Page 28

Καφετιέρα
Υποδείξεις ασφαλείας
Κίνδυνος λόγω ηλεκτροπληξίας
• Συνδέετε τη συσκευή μόνο σε μια σύμφωνα με τις
προδιαγραφές εγκατεστημένη και γειωμένη πρίζα.
• Βγάζετε το φις από την πρίζα όταν κινείτε τη
συσκευή, τη γεμίζετε, σε περίπτωση βλαβών,
πριν καθαρίσετε τη συσκευή ή όταν δεν την
χρησιμοποιείτε!
• Ποτέ μη βυθίζετε τη συσκευή σε υγρά. Εάν ωστόσο
φτάσει κάποια φορά υγρό στο περίβλημα συσκευής,
τραβήξτε αμέσως το βύσμα της συσκευής από
την πρίζα δικτύου. Επιτρέψτε την επισκευή από
εξειδικευμένο ειδικό προσωπικό.
• Ποτέ μην πιάνετε τη συσκευή, το καλώδιο
τροφοδοσίας και το φις με βρεγμένα χέρια.
• Να πιάνετε πάντα το φις κατά την εξαγωγή
από την πρίζα, μην τραβάτε ποτέ το καλώδιο.
• Μην διπλώνετε ή μαγγώνετε το καλώδιο
τροφοδοσίας.
• Ελέγχετε πριν από κάθε χρήση το καλώδιο
τροφοδοσίας και το φις. Όταν το καλώδιο
δικτύου αυτής της συσκευής έχει βλάβη,
πρέπει να αντικατασταθεί από τον κατασκευαστή, το τμήμα εξυπηρέτησης πελατών ή ένα
αντιστοίχως εξειδικευμένο άτομο, ώστε να
αποφεύγετε κινδύνους.
Κίνδυνος πυρκαγιάς!
• Ποτέ μην αφήνετε τη συσκευή κατά τη λειτουργία
χωρίς επιτήρηση.
• Μη λειτουργείτε ποτέ τη συσκευή χωρίς νερό βρύσης.
• Ποτέ μην τοποθετείτε τη συσκευή κοντά σε πηγές
θερμότητας.
• Μην χρησιμοποιείτε καλώδια επέκτασης. Σε περίπτωση
κινδύνου πρέπει το φις να είναι γρήγορα προσβάσιμο.
• Μη χρησιμοποιείτε εξωτερικό χρονοδιακόπτη ή
ξεχωριστό τηλεχειριστήριο για να λειτουργήσετε
τη συσκευή.
Κίνδυνος τραυματισμού!
• Αυτή η συσκευή δεν προορίζεται για χρήση από
άτομα (συμπεριλαμβανομένων παιδιών) με περιορισμένες φυσικές, αισθητηριακές ή πνευματικές
δυνατότητες ή με έλλειψη εμπειρίας και/ ή με
έλλειψη γνώσεων, εκτός εάν επιτηρούνται μέσω
ενός υπεύθυνου ατόμου για την ασφάλειά τους
ή εάν έχουν λάβει υποδείξεις για το πώς
χρησιμοποιείται η συσκευή.
• Τα παιδιά πρέπει να επιτηρούνται ώστε να
εξασφαλίζεται ότι δεν παίζουν με τη συσκευή.
• Να τοποθετείτε το καλώδιο έτσι ώστε να μην
μπορεί να το πατήσει κανείς ή να σκοντάψει
σε αυτό.
Προειδοποίηση για εγκαύματα!
• Ποτέ μην ανοίγετε κατά τη διάρκεια της
διαδικασίας βρασίματος το καπάκι της
καφετιέρας.
• Μην αγγίζετε το καυτό φίλτρο καφέ. Αφαιρέστε το
φίλτρο καφέ αφού πρώτα στραγγίξει όλος ο καφές
και έχει κρυώσει το φίλτρο. Χρησιμοποιείτε το ένθεμα
φίλτρου για να απομακρύνετε το φίλτρο καφέ.
• Ποτέ μην βάζετε τα χέρια σας στον ατμό που
ανεβαίνει.
• Ποτέ μην κινείτε τη συσκευή κατά τη διαδικασία
παρασκευής του καφέ.
• Αφαιρέστε την γυάλινη κανάτα μόνο όταν έχει
τελειώσει η διαδικασία παρασκευής καφέ και
το φίλτρο έχει αδειάσει.
• Πριν από την ενεργοποίηση κλείνετε πάντα το
καπάκι της καφετιέρας, αλλιώς υπάρχει κίνδυνος
εγκαύματος από εξερχόμενους ατμούς και καυτό
νερό.
Προσοχή:
Έτσι αποφεύγετε την πρόκληση ζημιών
στη συσκευή!
• Γεμίζετε το δοχείο νερού της συσκευής μόνο με
καθαρό νερό βρύσης.
• Δεν αναλαμβάνουμε καμία ευθύνη για ζημίες
από τη θραύση του γυαλιού!
- 26 -
Page 29

Τεχνικές πληροφορίες
Τάση ρεύματος: 220 - 240 V ~, 50 Hz
Ονομαστική απόδοση: 1000 W
Φίλτρο καφέ: Μέγεθος 1x4
Σύνολο αποστολής
• Καφετιέρα
• Γυάλινη κανάτα
• Δοσομετρικό κουτάλι
• Οδηγίες χρήσης
Παρακαλούμε ελέγχετε πριν από τη θέση σε λειτουργία
το σύνολο αποστολής για την πληρότητα και για
ενδεχόμενες βλάβες.
Σκοπός χρήσης
Η καφετιέρα εξυπηρετεί αποκλειστικά για την
προετοιμασία καφέ. Η καφετιέρα προορίζεται
αποκλειστικά για τη χρήση σε ιδιωτικά νοικοκυριά.
Μην τη χρησιμοποιείτε για επαγγελματικό σκοπό.
Η συσκευή προορίζεται μόνο για χρήση σε
εσωτερικό χώρο.
Περιγραφή συσκευής
1 Καπάκι
2 Εξάρτημα φίλτρου
3 Δοχείο νερού
4 Πλήκτρο HOUR
5 Πλήκτρο MIN
6 Πλήκτρο PROG
7 Πλήκτρο ON/AUTO/OFF
8 Οθόνη
9 Διαβάθμιση
0 Πλάκα διατήρησης ζεστού
q Γυάλινη κανάτα
w Δοσομετρικό κουτάλι
Πριν από την πρώτη χρήση
Υπόδειξη:
Ποτέ μην προσθέτετε νερό πάνω από τη σήμανση
Max (12 κούπες). Υπάρχει κίνδυνος το νερό να
υπερχειλίσει από τη συσκευή.
• Πριν από την πρώτη χρήση αφήστε να τρέξουν
12 φλιτζάνια νερό μέσα από την καφετιέρα.
Μην τοποθετείτε τότε φίλτρο και μην βάζετε καφέ.
• Καθαρίστε τη συσκευή (βλ. κεφάλαιο "Καθαρισμός
και συντήρηση").
Ρύθμιση της ώρας
• Πιέστε το πλήκτρο PROG 6.
Στην οθόνη 8 προβάλλεται το CLOCK.
• Πιέστε το πλήκτρο HOUR 4 για τις ώρες ή το
πλήκτρο MIN 5 για τα λεπτά τόσες φορές έως
ότου ρυθμιστεί η επιθυμητή ώρα.
• Περιμένετε περ. 15 δευτερόλεπτα. Η ένδειξη
CLOCK στην οθόνη 8 σβήνει. Η ώρα έχει
τώρα αποθηκευτεί.
ή
• Πιέστε το πλήκτρο PROG 6 δύο φορές έτσι ώστε
να μπορεί να φαίνεται μόνο η ώρα στην οθόνη 8.
Η ώρα έχει τώρα αποθηκευτεί.
Υπόδειξη:
Όταν αποσυνδεθεί η καφετιέρα από το δίκτυο
ρεύματος (ή σε μία μικρή διακοπή ρεύματος),
παραμένει αποθηκευμένη η ρυθμισμένη ώρα για το
μέγιστο 15 δευτερόλεπτα. Σε μία μεγαλύτερη χρονική
περίοδο αποσύνδεσης από το δίκτυο ρεύματος πρέπει
να πραγματοποιείτε εκ νέου τις ρυθμίσεις.
- 27 -
Page 30

Προετοιμασία καφέ
Αποφεύγετε να κάνετε λιγότερα από 4 φλιτζάνια
καφέ. Διαφορετικά ο καφές δεν θα έχει την
επιθυμητή θερμοκρασία και γεύση.
• Ανοίξτε το καπάκι 1 και τοποθετήστε ένα
χάρτινο φίλτρο (Μέγεθος 1x4) με λυγισμένες
πλευρές στο εξάρτημα φίλτρου 2.
Γεμίστε με το κουτάλι δοσομέτρησης w σκόνη
καφέ μέσα στο χάρτινο φίλτρο. Ανά φλιτζάνι
χρειάζεστε ανάλογα με την προσωπική σας
γεύση, περ. ένα κοφτό κουτάλι δοσομέτρησης w
σκόνη καφέ. Ένα κοφτό κουτάλι δοσομέτρησης
w αντιστοιχεί περ. σε 5,5 γρ. σκόνη καφέ.
• Γεμίστε με την επιθυμούμενη ποσότητα νερού
μέσα στο δοχείο νερού 3. Χρησιμοποιήστε για
αυτό τη διαβάθμιση 9.
Ποτέ μην προσθέτετε νερό πάνω από τη σήμανση
Max (12 φλιτζάνια).
• Κλείστε το καπάκι 1, ώστε να κουμπώσει.
• Τοποθετήστε τη γυάλινη κανάτα q στην
καφετιέρα.
• Πιέστε το πλήκτρο ON/AUTO/OFF 7, ώστε να
εκκινηθεί το βράσιμο του καφέ. Η ενσωματωμένη
στο πλήκτρο ON/AUTO/OFF 7 κόκκινη λυχνία
ένδειξης ανάβει.
• Όταν η διαδικασία βρασίματος έχει
ολοκληρωθεί, μπορείτε να απομακρύνετε τη
γυάλινη κανάτα q και να σερβίρετε τον καφέ.
Εάν δεν θέλετε να σερβίρετε τον καφέ αμέσως,
αφήστε τον στην καφετιέρα. Η πλάκα διατήρησης
ζεστού 0 διατηρεί τον καφέ ζεστό για 2 ώρες.
Μετά από δύο ώρες, η καφετιέρα
απενεργοποιείται αυτόματα.
• Εάν θέλετε να απενεργοποιήσετε την καφετιέρα
χειροκίνητα, πιέστε το πλήκτρο ON/AUTO/OFF 7
2 φορές ώστε να ανάβει συνεχώς η ενσωματωμένη
μπλε λυχνία ένδειξης. Μετά από περ. 15
δευτερόλεπτά, σβήνει. Η καφετιέρα είναι τώρα
απενεργοποιημένη.
Υπόδειξη:
Αφήστε την καφετιέρα να κρυώσει περίπου για 5 λεπτά,
πριν ξεκινήσετε να φτιάχνετε καινούργιο καφέ ή πριν
συμπληρώσετε νερό.
Λειτουργία χρονοδιακόπτη
Με το κουμπί PROG 6 μπορείτε να προγραμματίσετε
την καφετιέρα έτσι ώστε να ξεκινάει να φτιάχνει καφέ
μια καθορισμένη χρονική στιγμή. Γεμίζετε πάντα
πρώτα με σκόνη καφέ στο χάρτινο φίλτρο στο ένθεμα
φίλτρου 2 και με νερό στο δοχείο νερού 3.
Τοποθετήστε τη γυάλινη κανάτα q στην καφετιέρα.
Εξασφαλίζετε ότι το δοχείο νερού 3 δεν έχει γεμίσει
πάνω από τη μέγιστη ένδειξη (Max.) (12 φλιτζάνια).
• Πιέστε το πλήκτρο PROG 6 2 φορές έτσι ώστε
να εμφανίζεται το TIMER στην οθόνη 8.
• Ρυθμίστε την επιθυμητή ώρα έναρξης με το
κουμπί HOUR 4 και με το πλήκτρο MIN 5
(βλέπε Κεφάλαιο “Ρύθμιση της ώρας“).
• Όταν έχει ρυθμιστεί η επιθυμητή ώρα έναρξης,
πιέστε το πλήκτρο ON/AUTO/OFF 7 2 φορές.
Η ενσωματωμένη μπλε λυχνία ένδειξης αναβοσβήνει
και δείχνει έτσι ότι έχει ρυθμιστεί ο χρονοδιακόπτης.
Η καφετιέρα εκκινεί τη διαδικασία βρασίματος
στη ρυθμισμένη ώρα.
• Εάν θέλετε να απενεργοποιήσετε πάλι το
χρονοδιακόπτη, πιέστε μια φορά το πλήκτρο
ON/AUTO/OFF 7, ώστε να ανάβει συνεχώς
η ενσωματωμένη μπλε λυχνία ένδειξης.
Καθαρισμός και συντήρηση
Πριν από κάθε καθαρισμό τραβάτε το φις από την
πρίζα.
Κίνδυνος ηλεκτροπληξίας!
Πριν από τον καθαρισμό της καφετιέρας, πρέπει
πάντα να τραβάτε το βύσμα από την πρίζα.
- 28 -
Page 31

Προσοχή!
Μη βυθίζετε την καφετιέρα ποτέ σε νερό ή σε άλλα υγρά.
Κίνδυνος εγκαύματος!
Πριν από τον καθαρισμό περιμένετε πάντα έως ότου
κρυώσει η καφετιέρα.
• Μην χρησιμοποιείτε οικιακά καθαριστικά ή αιχμηρά
ή μυτερά αντικείμενα, για να απομακρύνετε
ακαθαρσίες. Έτσι μπορεί να πάθει βλάβη η
καφετιέρα.
• Σκουπίζετε το κάλυμμα της μηχανής καφέ με ένα
ελαφρά βρεγμένο μαλακό πανί σε διάλυμα νερού
με σαπούνι.
• Μετά από κάθε χρήση απομακρύνετε το φίλτρο
καφέ από το ένθεμα φίλτρου 2.
• Απομακρύνετε το φίλτρο και καθαρίζετε το ένθεμα
φίλτρου 2 και τη γυάλινη κανάτα q σε ρέον
νερό βρύσης.
• Καθαρίζετε το ένθεμα φίλτρου 2, το κουτάλι
δοσομέτρησης w και τη γυάλινη κανάτα q σε
σκληρές ακαθαρσίες σε ήπιο νερό πλύσης.
Ξεπλένετε όλα τα εξαρτήματα με καθαρό νερό.
Εάν δεν χρησιμοποιήσετε την καφετιέρα για μεγάλο
χρονικό διάστημα, φυλάξτε το καλώδιο στην αντίστοιχη
υποδοχή στην πίσω πλευρά της καφετιέρας και
εισάγετε το βύσμα στις για αυτό προβλεπόμενες
οπές στην υποδοχή καλωδίου.
Χρησιμοποιήστε αποκλειστικά ειδικό μέσο αφαίρεσης
αλάτων για καφετιέρες και προσέξτε το αντίστοιχο
εγχειρίδιο χειρισμού.
Η διαδικασία που πρέπει να ακολουθήσετε είναι
η εξής:
1. Προσθέστε το προϊόν απομάκρυνσης αλάτων
στο δοχείο νερού 3.
2. Γεμίστε με την δοθείσα στις οδηγίες χρήσεως του
προϊόντος απομάκρυνσης αλάτων, ποσότητα
νερού (μέγ. 12 φλιτζάνια).
3. Πιέστε το πλήκτρο ON/AUTO/OFF 7, για να
εκκινήσετε τη διαδικασία βρασίματος.Η
ενσωματωμένη κόκκινη ενδεικτική λυχνία ανάβει.
4. Περιμένετε έως ότου το νερό για 2 φλιτζάνια
περάσει και σταματήστε στη συνέχεια τη
διαδικασία βρασίματος, πιέζοντας 2 φορές το
πλήκτρο ON/AUTO/OFF 7. Η ενσωματωμένη
μπλε λυχνία ένδειξης ανάβει συνεχώς και σβήνει
μετά από περ. 15 δευτερόλεπτα.
5. Αφήστε το προϊόν απομάκρυνσης αλάτων να
επιδράσει για 15 λεπτά.
6. Επαναλάβετε τα βήματα 3. - 5. τρεις φορές.
7. Εκκινήστε στη συνέχεια τη διαδικασία
βρασίματος και περιμένετε έως ότου περάσει
εντελώς το νερό.
8. Επιτρέψτε η καφετιέρα να διεξάγει 3 φορές
βράσιμο με καθαρό νερό. Στη συνέχεια έχουν
απομακρυνθεί όλα τα υπολείμματα προϊόντος
απομάκρυνσης αλάτων και μπορείτε να
χρησιμοποιήσετε πάλι την καφετιέρα.
Απομάκρυνση αλάτων
Απομακρύνετε τα άλατα από την καφετιέρα ανά
τακτά χρονικά διαστήματα.
Τα απαραίτητα διαστήματα απομάκρυνσης αλάτων
μπορεί να διαφέρουν ανάλογα με τη σκληρότητα
του νερού. Σε υψηλό βαθμό σκληρότητας είναι
απαραίτητη η αφαίρεση αλάτων ήδη μετά από
περίπου 30 χρήσεις, σε χαμηλό βαθμό σκληρότητας,
μετά από 60 χρήσεις.
Μπορείτε να μάθετε το βαθμό σκληρότητας στον
τοπικό παροχέα νερού.
Διόρθωση σφαλμάτων
Η καφετιέρα δε λειτουργεί:
• Η συσκευή δεν είναι ενεργοποιημένη.
Πιέστε το διακόπτη ON/AUTO/OFF 7, ώστε
να ενεργοποιήσετε την καφετιέρα.
• Το βύσμα δεν είναι σε μια πρίζα. Συνδέστε τη
συσκευή στο ηλεκτρικό ρεύμα. Βάλτε το φις στην
πρίζα.
Η καφετιέρα δεν ξεκινάει να φτιάχνει καφέ την
προγραμματισμένη ώρα (χρονοδιακόπτης):
- 29 -
Page 32

• Ο χρονοδιακόπτης δεν έχει ενεργοποιηθεί. Πιέστε
το πλήκτρο ON/AUTO/OFF 7 δύο φορές ώστε
να ενεργοποιήσετε το χρονοδιακόπτη.
• Η ώρα δεν είναι σωστά ρυθμισμένη. Ελέγξτε την
ώρα και εάν χρειάζεται διορθώστε την.
Ο καφές είναι πολύ δυνατός/πολύ ελαφρύς:
• Υπάρχει πολύ λίγο/πολύ νερό στο δοχείο νερού 3.
Προσθέστε τη σωστή ποσότητα νερού.
• Υπάρχει πολλή/πολύ λίγη σκόνη καφέ στο
φίλτρο. Αφαιρέστε/προσθέστε καφέ, ανάλογα.
• Η σκόνη καφέ είναι πολύ/λίγο αλεσμένη. Επιλέξτε
καφέ διαφορετικού βαθμού άλεσης.
Η διαδικασία παρασκευής καφέ διαρκεί
ασυνήθιστα πολύ.
Η συσκευή απενεργοποιείται κατά τη διαδικασία
παρασκευής καφέ.
Η συσκευή κάνει πολύ θόρυβο κατά τη διαδικασία
παρασκευής καφέ.
Δημιουργείται πολύς ατμός.
• Το εσωτερικό σύστημα της συσκευής έχει πιάσει
άλατα. Αφαιρέστε τα άλατα από τη συσκευή,
όπως περιγράφεται στην ενότητα "Απομάκρυνση
αλάτων".
Απόρριψη
Σε καμία περίπτωση μην πετάξετε τη
συσκευή στα οικιακά απορρίμματα.
Αυτό το προϊόν υπόκειται στην
Ευρωπαϊκή Οδηγία 2002/96/EC.
Απομακρύνετε τη συσκευή μέσω μιας εγκεκριμένης
επιχείρησης απομάκρυνσης ή μέσω της κοινοτικής
επιχείρησης απομάκρυνσης.
Να τηρείτε τους ισχύοντες κανονισμούς.
Σε περίπτωση αμφιβολιών ελάτε σε επαφή με την
επιχείρηση απόρριψης.
Εγγύηση και σέρβις πελατών
Έχετε για αυτή τη συσκευή 3 χρόνια εγγύηση από
την ημερομηνία αγοράς. Η συσκευή κατασκευάστηκε
και ελέγχθηκε προσεκτικά πριν από την αποστολή.
Παρακαλούμε φυλάξτε την απόδειξη ταμείου ως
απόδειξη για την αγορά. Σε περίπτωση εγγύησης
ελάτε σε επικοινωνία με το τμήμα του σέρβις
τηλεφωνικά. Μόνο έτσι μπορεί να εξασφαλιστεί μια
δωρεάν αποστολή του εμπορεύματός σας.
Η απόδοση εγγύησης ισχύει μόνο για σφάλματα
υλικού ή κατασκευής, όχι όμως για ζημιές από τη
μεταφορά, για εξαρτήματα φθοράς ή για βλάβες σε
εύθραυστα εξαρτήματα, π.χ. διακόπτες ή
συσσωρευτές. Το προϊόν προορίζεται μόνο για την
ιδιωτική και όχι για την επαγγελματική χρήση.
Σε περίπτωση κακής μεταχείρισης και ακατάλληλης
χρήσης, σε χρήση βίας και σε παρεμβάσεις οι
οποίες δεν διεξήχθησαν από το εξουσιοδοτημένο
μας τμήμα σέρβις, η εγγύηση παύει να ισχύει. Τα νομικά σας δικαιώματα δεν περιορίζονται μέσω αυτής
της εγγύησης.
Ο χρόνος εγγύησης δεν επιμηκύνεται μέσω της
εγγύησης. Αυτό ισχύει επίσης και για εξαρτήματα
που έχουν αντικατασταθεί και επισκευαστεί.
Ενδεχόμενες ήδη από την αγορά υπάρχουσες
φθορές και ελλείψεις πρέπει να ανακοινωθούν
αμέσως μετά την αποσυσκευασία, το αργότερο όμως
δύο ημέρες μετά την ημερομηνία αγοράς. Τυχόν
επισκευές μετά τη λήξη του χρόνου εγγύησης,
χρεώνονται.
Σέρβις Ελλάδα
Tel.: 801 5000 019 (0,03 EUR/Min.)
E-Mail: kompernass@lidl.gr
IAN 71659
Απομακρύνετε όλα τα υλικά συσκευασιών
φιλικά προς το περιβάλλον.
- 30 -
Page 33

Εισαγωγέας
KOMPERNASS GMBH
BURGSTRASSE 21
D-44867 BOCHUM
www.kompernass.com
- 31 -
Page 34

- 32 -
Page 35

Inhaltsverzeichnis Seite
Sicherheitshinweise 34
Technische Daten 35
Lieferumfang 35
Bestimmungsgemäßer Gebrauch 35
Gerätebeschreibung 35
Vor dem ersten Gebrauch 35
Einstellung der Uhrzeit 35
Kaffeezubereitung 35
Timer-Funktion 36
Reinigung und Wartung 36
Entkalkung 37
Fehlerbehebung 37
Entsorgen 38
Garantie und Service 38
Importeur 39
Lesen Sie die Bedienungsanleitung vor der ersten Verwendung aufmerksam durch und heben Sie diese für
den späteren Gebrauch auf. Händigen Sie bei Weitergabe des Gerätes an Dritte auch die Anleitung aus.
- 33 -
Page 36

Kaffeemaschine
Sicherheitshinweise
Gefahr durch Stromschlag!
• Schließen Sie das Gerät nur an eine vorschriftsmäßig installierte und geerdete Netzsteckdose an.
• Ziehen Sie, wenn Sie das Gerät bewegen, befüllen, bei Störungen, bevor Sie das Gerät reinigen
oder wenn Sie es nicht gebrauchen, den
Netzstecker aus der Netzsteckdose.
• Tauchen Sie das Gerät nie in Flüssigkeiten. Falls
doch einmal Flüssigkeit in das Gerätegehäuse
gelangt, ziehen Sie sofort den Netzstecker des
Geräts aus der Netzsteckdose. Lassen Sie es
von qualifiziertem Fachpersonal reparieren.
• Fassen Sie das Gerät, Netzkabel und -stecker
nie mit nassen Händen an.
• Ziehen Sie das Netzkabel stets am Stecker aus
der Steckdose, ziehen Sie nicht am Kabel selbst.
• Knicken oder quetschen Sie das Netzkabel nicht.
• Überprüfen Sie vor jedem Gebrauch Netzkabel
und -stecker. Wenn das Netzkabel dieses
Gerätes beschädigt wird, muss es durch den
Hersteller, seinen Kundendienst oder eine ähnlich qualifizierte Person ersetzt werden, um
Gefährdungen zu vermeiden.
Brandgefahr!
• Lassen Sie das Gerät während des Betriebs
niemals unbeaufsichtigt.
• Betreiben Sie das Gerät niemals ohne
Leitungswasser.
• Stellen Sie das Gerät niemals in der Nähe von
Wärmequellen auf.
• Benutzen Sie kein Verlängerungskabel. Bei Gefahr muss der Netzstecker schnell erreichbar sein.
• Benutzen Sie keine externe Zeitschaltuhr oder ein
separates Fernwirksystem um das Gerät zu
betreiben.
Verletzungsgefahr!
• Dieses Gerät ist nicht dafür bestimmt, durch
Personen (einschließlich Kinder) mit eingeschränkten physischen, sensorischen oder
geistigen Fähigkeiten oder mangels Erfahrung
und/oder mangels Wissen benutzt zu werden,
es sei denn, sie werden durch eine für ihre
Sicherheit zuständige Person beaufsichtigt oder
erhielten von ihr Anweisungen, wie das Gerät
zu benutzen ist.
• Kinder sollten beaufsichtigt werden, um sicherzustellen, dass sie nicht mit dem Gerät spielen.
• Verlegen Sie das Netzkabel so, dass niemand
darauf treten oder darüber stolpern kann.
Warnung vor Verbrühungen!
• Öffnen Sie niemals während des Brühvorgangs
den Deckel der Kaffeemaschine.
• Berühren Sie nicht die heiße Filtertüte. Entnehmen
Sie die Filtertüte erst, wenn die Flüssigkeit abgelaufen und die Filtertüte abgekühlt ist. Benutzen
Sie den Filtereinsatz, um die Filtertüte zu
entfernen.
• Halten Sie Ihre Hände nicht in den aufsteigenden Wasserdampf.
• Bewegen Sie niemals das Gerät während des
Brühvorgangs.
• Entnehmen Sie die Glaskanne erst, wenn der
Brühvorgang abgeschlossen ist und der Filter
leer gelaufen ist.
• Schließen Sie vor dem Einschalten immer den
Deckel der Kaffeemaschine, es besteht sonst Verbrühungsgefahr durch austretenden Dampf und
heißes Wasser.
Vorsicht:
So vermeiden Sie Geräteschäden!
• Füllen Sie ausschließlich sauberes Leitungswasser in den Wassertank des Geräts.
• Für Schäden durch Glasbruch wird keine
Haftung übernommen!
- 34 -
Page 37

Technische Daten
Netzspannung: 220 - 240 V ~, 50 Hz
Nennleistung: 1000 W
Kaffeefilter: Größe 1x4
Vor dem ersten Gebrauch
Hinweis:
Füllen Sie nie mehr Wasser, als bis zur Max-Markierung (12 Tassen) ein. Das Gerät kann überlaufen.
Lieferumfang
• Kaffeemaschine
• Glaskanne
• Messlöffel
• Bedienungsanleitung
Bitte überprüfen Sie vor der Inbetriebnahme den
Lieferumfang auf Vollständigkeit und eventuelle
Beschädigungen.
Bestimmungsgemäßer
Gebrauch
Die Kaffeemaschine dient ausschließlich dem Zubereiten von Kaffee. Die Kaffeemaschine ist ausschließlich für die Benutzung in privaten Haushalten
bestimmt. Benutzen Sie sie nicht gewerblich.
Das Gerät ist nur für den Innengebrauch bestimmt.
Gerätebeschreibung
1 Deckel
2 Filtereinsatz
3 Wassertank
4 Taste HOUR
5 Taste MIN
6 Taste PROG
7 Taste ON/AUTO/OFF
8 Display
9 Skala
0 Warmhalteplatte
q Glaskanne
w Messlöffel
• Lassen Sie vor dem ersten Gebrauch 12 Tassen
Wasser durch die Kaffeemaschine laufen. Legen
Sie keine Filtertüte ein und benutzen Sie dabei
kein Kaffeepulver.
• Reinigen Sie das Gerät (siehe Kapitel „Reinigung und Wartung“).
Einstellung der Uhrzeit
• Drücken Sie die Taste PROG 6. Im Display 8
erscheint CLOCK.
• Drücken Sie die Taste HOUR 4 für die Stunden
bzw. die Taste MIN 5 für die Minuten so oft,
bis die gewünschte Uhrzeit eingestellt ist.
• Warten Sie ca. 15 Sekunden. Die Anzeige
CLOCK im Display 8 erlischt. Die Uhrzeit ist
nun gespeichert.
oder
• Drücken Sie die Taste PROG 6 zweimal, so
dass nur noch die Uhrzeit im Display 8 zu se-
hen ist. Die Uhrzeit ist nun gespeichert.
Hinweis:
Wenn die Kaffeemaschine vom Stromnetz getrennt
wird (oder bei einem kurzen Stromausfall), bleibt die
eingestellte Uhrzeit für max. 15 Sekunden gespeichert.
Bei einer längeren Trennung vom Stromnetz müssen
Sie die Einstellungen neu vornehmen.
Kaffeezubereitung
Vermeiden Sie es, weniger als 4 Tassen Kaffee zu
brühen. Ansonsten hat der Kaffee nicht die gewünschte Temperatur und Stärke.
- 35 -
Page 38

• Öffnen Sie den Deckel 1 und legen Sie eine Filtertüte (Größe 1x4) mit umgeknickten Seiten in
den Filtereinsatz 2.
Füllen Sie mit dem Messlöffel w Kaffeepulver in
die Filtertüte ein. Pro Tasse benötigen Sie, je
nach persönlichem Geschmack, ca. einen gestrichenen Messlöffel w Kaffeepulver. Dabei entspricht ein gestrichener Messlöffel w ca. 5,5 g
Kaffeepulver.
• Füllen Sie die gewünschte Wassermenge in den
Wassertank 3 ein. Nutzen Sie dafür die Skala
9. Füllen Sie nie mehr Wasser, als bis zur MaxMarkierung (12 Tassen) ein.
• Schließen Sie den Deckel 1, so dass er
einrastet.
• Stellen Sie die Glaskanne q in die Kaffeema-
schine.
• Drücken Sie die Taste ON/AUTO/OFF 7, um
den Brühvorgang zu starten. Die in der Taste
ON/AUTO/OFF 7 integrierte rote Anzeigelampe leuchtet.
• Wenn der Brühvorgang beendet ist, können Sie
die Glaskanne q entnehmen und den Kaffee
servieren.
Wenn Sie den Kaffee nicht sofort servieren wollen, lassen Sie ihn in der Kaffemaschine stehen.
Die Warmhalteplatte 0 hält den Kaffee für 2
Stunden warm. Nach zwei Stunden schaltet sich
die Kaffeemaschine automatisch aus.
• Wenn Sie die Kaffeemaschine manuell ausschalten möchten, drücken Sie die Taste
ON/AUTO/OFF 7 2 mal, so dass die integrier-
te blaue Anzeigelampe dauerhaft leuchtet.
Nach ca. 15 Sekunden erlischt diese. Die Kaffeemaschine ist nun ausgeschaltet.
Hinweis:
Lassen Sie die Kaffeemaschine etwa 5 Minuten lang
auskühlen, bevor Sie einen weiteren Brühvorgang
beginnen oder Wasser nachfüllen.
Timer-Funktion
Mit der Taste PROG 6 können Sie die Kaffeemaschine so einstellen, dass sie zu einem festgelegten
Zeitpunkt mit dem Brühvorgang beginnt. Füllen Sie
immer zuerst Kaffeepulver in die Filtertüte im Filtereinsatz 2 und Wasser in den Wassertank 3. Stellen Sie die Glaskanne q in die Kaffeemaschine.
Stellen Sie sicher, dass der Wassertank 3 nicht
über die Max-Markierung hinaus (12 Tassen) gefüllt ist.
• Drücken Sie die Taste PROG 6 2 mal, so dass
TIMER im Display 8 erscheint.
• Stellen Sie die gewünschte Startzeit mit der Taste
HOUR 4 und der Taste MIN 5 ein (siehe Kapi-
tel „Einstellung der Uhrzeit“).
• Wenn die gewünschte Startzeit eingestellt ist,
drücken Sie die Taste ON/AUTO/OFF 7 2
mal. Die integrierte blaue Anzeigelampe blinkt
und zeigt damit an, dass der Timer eingestellt ist.
Die Kaffeemaschine startet den Brühvorgang zur
eingestellten Zeit.
• Wenn Sie den Timer wieder deaktivieren möchten, drücken Sie einmal die Taste
ON/AUTO/OFF 7, so dass die integrierte
blaue Anzeigenlampe dauerhaft leuchtet.
Reinigung und Wartung
Ziehen Sie vor jeder Reinigung den Netzstecker aus
der Netzsteckdose.
Gefahr eines elektrischen Schlags!
Bevor Sie die Kaffeemaschine reinigen, müssen Sie
immer den Netzstecker aus der Netzsteckdose
ziehen.
Achtung!
Tauchen Sie die Kaffeemaschine nie in Wasser oder
andere Flüssigkeiten.
- 36 -
Page 39

Verbrennungsgefahr!
Warten Sie immer, bis die Kaffeemaschine abgekühlt ist, bevor Sie sie reinigen.
• Benutzen Sie keine Haushaltsreiniger oder scharfe bzw. spitze Gegenstände, um Verschmutzungen zu entfernen. Dadurch könnten Sie die Kaffeemaschine beschädigen.
• Wischen Sie das Gehäuse der Kaffeemaschine
mit einem, leicht mit milder Seifenlauge befeuchteten, weichen Tuch ab.
• Nehmen Sie nach jeder Benutzung die Filtertüte
aus dem Filtereinsatz 2.
• Entfernen Sie den Filter und spülen Sie Filtereinsatz 2 und die Glaskanne q unter fließendem
Leitungswasser aus.
• Reinigen Sie Filtereinsatz 2, Messlöffel w und
die Glaskanne q bei hartnäckigeren Verschmutzungen in mildem Spülwasser. Spülen Sie alle
Teile mit klarem Wasser ab.
Wenn Sie die Kaffeemaschine für längere Zeit nicht
benutzen, verstauen Sie das Kabel im Kabelschacht
auf der Rückseite der Kaffeemaschine und stecken
Sie den Netzstecker in die dafür vorgesehenen Löcher am Kabelschacht.
1. Geben Sie das Entkalkungsmittel in den Wassertank 3.
2. Füllen Sie die in der Bedienungsanleitung des
Entkalkers angegebene Menge Wasser ein
(max. 12 Tassen).
3. Drücken Sie die Taste ON/AUTO/OFF 7, um
den Brühvorgang zu starten. Die integrierte rote
Anzeigelampe leuchtet.
4. Warten Sie, bis das Wasser für ca. 2 Tassen
durchgelaufen ist und stoppen Sie dann den
Brühvorgang, indem Sie 2 mal die Taste
ON/AUTO/OFF 7 drücken. Die integrierte
blaue Anzeigelampe leuchtet dauerhaft und erlischt nach ca. 15 Sekunden.
5. Lassen Sie das Entkalkungsmittel 15 Minuten einwirken.
6. Wiederholen Sie die Schritte 3. - 5. drei mal.
7. Starten Sie dann den Brühvorgang und warten
Sie, bis das Wasser komplett durchgelaufen ist.
8. Lassen Sie 3 mal die Kaffeemaschine mit klarem
Wasser brühen. Dann sind alle Entkalkungsmittelreste entfernt und Sie können die Kaffeemaschine wieder benutzen.
Fehlerbehebung
Entkalkung
Entkalken Sie die Kaffeemaschine in regelmäßigen
Abständen.
Die nötigen Entkalkungs-Abstände können je nach
Härtegrad Ihres Wassers sehr unterschiedlich sein.
Bei hohem Härtegrad ist eine Entkalkung bereits
nach ca. 30 Benutzungen notwendig, bei niedrigem
Härtegrad nach ca. 60 Benutzungen. Den Härtegrad Ihres Wassers erfahren Sie beim örtlichen
Wasserversorger.
Verwenden Sie ausschließlich für Kaffeemaschinen
geeignetes Entkalkungsmittel und beachten Sie die
dazugehörige Gebrauchsanleitung.
So gehen Sie zum Entkalken vor:
Die Kaffeemaschine funktioniert nicht:
• Das Gerät ist nicht eingeschaltet. Drücken Sie
den Schalter ON/AUTO/OFF 7, um das Gerät
einzuschalten.
• Der Netzstecker steckt nicht in einer Netzsteckdose.
Verbinden Sie das Gerät mit dem Stromnetz.
Stecken Sie den Netzstecker in eine
Netzsteckdose.
Der Brühvorgang startet nicht zur gewünschten
Zeit (Timer):
• Der Timer ist nicht aktiviert. Drücken Sie die Taste
ON/AUTO/OFF 7 zwei mal, um den Timer zu
aktivieren.
• Die Uhrzeit ist nicht richtig eingestellt. Kontrollieren Sie die Uhrzeit und stellen Sie sie
gegebenenfalls ein.
- 37 -
Page 40

Der Kaffee ist zu stark/zu schwach:
• Es ist zu wenig/zu viel Wasser im Wassertank
3. Füllen Sie die korrekte Wassermenge ein.
• Es ist zu viel/zu wenig Kaffeepulver eingefüllt.
Füllen Sie weniger/mehr Kaffeepulver ein.
• Das Kaffeepulver ist zu fein/zu grob gemahlen.
Wählen Sie einen anderen Mahlgrad für Ihr
Kaffeepulver.
Der Brühvorgang dauert ungewöhnlich lange.
Das Gerät schaltet sich während des Brühens
aus.
Das Gerät wird beim Brühen lauter.
Es entsteht übermäßiger Dampf.
• Das Brühsystem des Gerätes ist verkalkt. Entkalken Sie das Gerät wie unter “Entkalkung”
beschrieben.
Entsorgen
Werfen Sie das Gerät keinesfalls in den
normalen Hausmüll. Dieses Produkt
unterliegt der europäischen Richtlinie
2002/96/EC.
Entsorgen Sie das Gerät über einen zugelassenen
Entsorgungsbetrieb oder über Ihre kommunale
Entsorgungseinrichtung.
Beachten Sie die aktuell geltenden Vorschriften.
Setzen Sie sich im Zweifelsfall mit Ihrer Entsorgungseinrichtung in Verbindung.
Garantie und Service
Sie erhalten auf dieses Gerät 3 Jahre Garantie ab
Kaufdatum. Das Gerät wurde sorgfältig produziert
und vor Anlieferung gewissenhaft geprüft.
Bitte bewahren Sie den Kassenbon als Nachweis
für den Kauf auf. Bitte setzen Sie sich im Garantiefall mit Ihrer Servicestelle telefonisch in Verbindung.
Nur so kann eine kostenlose Einsendung Ihrer Ware
gewährleistet werden.
Die Garantieleistung gilt nur für Material- oder
Fabrikationsfehler, nicht aber für Transportschäden,
Verschleißteile oder für Beschädigungen an zerbrechlichen Teilen, z. B. Schalter oder Akkus. Das
Produkt ist lediglich für den privaten und nicht für
den gewerblichen Gebrauch bestimmt.
Bei missbräuchlicher und unsachgemäßer Behandlung, Gewaltanwendung und bei Eingriffen, die
nicht von unserer autorisierten Service-Niederlassung vorgenommen wurden, erlischt die Garantie.
Ihre gesetzlichen Rechte werden durch diese
Garantie nicht eingeschränkt.
Die Garantiezeit wird durch die Gewährleistung
nicht verlängert. Dies gilt auch für ersetzte und reparierte Teile. Eventuell schon beim Kauf vorhandene
Schäden und Mängel müssen sofort nach dem
Auspacken gemeldet werden, spätestens aber zwei
Tage nach Kaufdatum. Nach Ablauf der Garantiezeit anfallende Reparaturen sind kostenpflichtig.
Führen Sie alle Verpackungsmaterialien
einer umweltgerechten Entsorgung zu.
- 38 -
Page 41

Service Deutschland
Tel.: 01805 772 033 (0,14 EUR/Min. aus dem dt.
Festnetz, Mobilfunk max. 0,42 EUR/Min.)
E-Mail: kompernass@lidl.de
IAN 71659
Importeur
KOMPERNASS GMBH
BURGSTRASSE 21
44867 BOCHUM, GERMANY
Service Österreich
Tel.: 0820 201 222 (0,15 EUR/Min.)
E-Mail: kompernass@lidl.at
IAN 71659
Service Schweiz
Tel.: 0842 665566 (0,08 CHF/Min.,
Mobilfunk max. 0,40 CHF/Min.)
E-Mail: kompernass@lidl.ch
IAN 71659
www.kompernass.com
- 39 -
 Loading...