

IAN 274344
ELECTRIC KNIFE SHARPENER SEMS 12 A1
ELECTRIC KNIFE SHARPENER
Operating instructions
ELEKTRISCHER MESSERSCHÄRFER
Bedienungsanleitung
ELEKTRISK KNIVSLIBER
Betjeningsvejledning

GB / IE Operating instructions Page 1
DK Betjeningsvejledning Side 15
DE / AT / CH Bedienungsanleitung Seite 29
Before reading, unfold the page containing the illustrations and familiarise yourself with all functions of
the device.
Før du læser, vend siden med billeder frem og bliv bekendt med alle apparatets funktioner.
Klappen Sie vor dem Lesen die Seite mit den Abbildungen aus und machen Sie sich anschließend mit allen
Funktionen des Gerätes vertraut.
B
A

GB│IE
│
1 ■
SEMS 12 A1
Contents
Introduction ...................................................2
Copyright ............................................................... 2
Limitation of liability ....................................................... 2
Intended use ............................................................ 2
Package contents ..............................................3
Disposal of packaging materials ............................................. 3
Description of the appliance .....................................3
Technical data .................................................4
Safety guidelines ..............................................5
Preparation ...................................................7
Sharpen knives . . . . . . . . . . . . . . . . . . . . . . . . . . . . . . . . . . . . . . . . . . . . . . . . 7
Double-sided smooth grind ................................................. 8
Single-sided smooth grind ................................................. 10
Cleaning .....................................................12
Storage .....................................................13
Disposal .....................................................13
Warranty and service ..........................................14
Importer .....................................................14

■ 2 │ GB
│
IE
SEMS 12 A1
Introduction
Congratulations on the purchase of your new appliance!
You have decided in favour of a modern, high-quality product. These operating
instructions are part of this product. They contain important information on safety,
usage and disposal. Before using the product, familiarise yourself with all handling
and safety guidelines. This appliance may only be used as described and for the
purposes indicated. Please also pass these operating instructions on to any future
owner(s).
Copyright
This documentation is protected by copyright.
Any reproduction, or any reprint even in the form of excerpts, as well as the ren-
dition of figures even in modified form, is only permitted with the manufacturer’s
written consent.
Limitation of liability
All the technical information, data and instructions regarding installation, connection
and operation contained in these operating instructions corresponds to the latest
information available to us at the time of printing and takes our previous experience
and know-how into account.
No claims can be derived from the details, illustrations and descriptions in these
instructions.
The manufacturer assumes no responsibility for damage caused by failure to
observe these instructions, improper use, incompetent repairs, unauthorised
modifications or for the use of non-approved replacement parts.
Intended use
This appliance is exclusively intended for the sharpening of knives (made of
metal or ceramics) that are used in private households.
This appliance is intended solely for use in private households. Not for commercial use!
GB│IE
│
3 ■
SEMS 12 A1
Package contents
The appliance is supplied with the following components as standard:
▯ Electric Knife Sharpener
▯ Mains adapter
▯ Operating instructions
1) Remove all parts of the appliance and the operating instructions from the box.
2) Remove all packaging materials from the appliance.
NOTE
► Check the package for completeness and for signs of visible damage.
► If the delivery is not complete or has been damaged due to defective
packaging or transportation, contact the Service Hotline (see section
Warranty and Service).
Disposal of packaging materials
The packaging protects the appliance from damage during carriage.
The packaging materials have been selected for their environmental friendliness
and ease of disposal, and are therefore recyclable.
Returning the packaging to the material cycle conserves raw materials and
reduces the amount of waste which is generated. Dispose of packaging materials
that are no longer needed in accordance with applicable local regulations.
NOTE
► If possible, keep the original packaging of the appliance during the warranty
period so that the appliance can be packed properly for return shipment in
the event of a warranty claim.
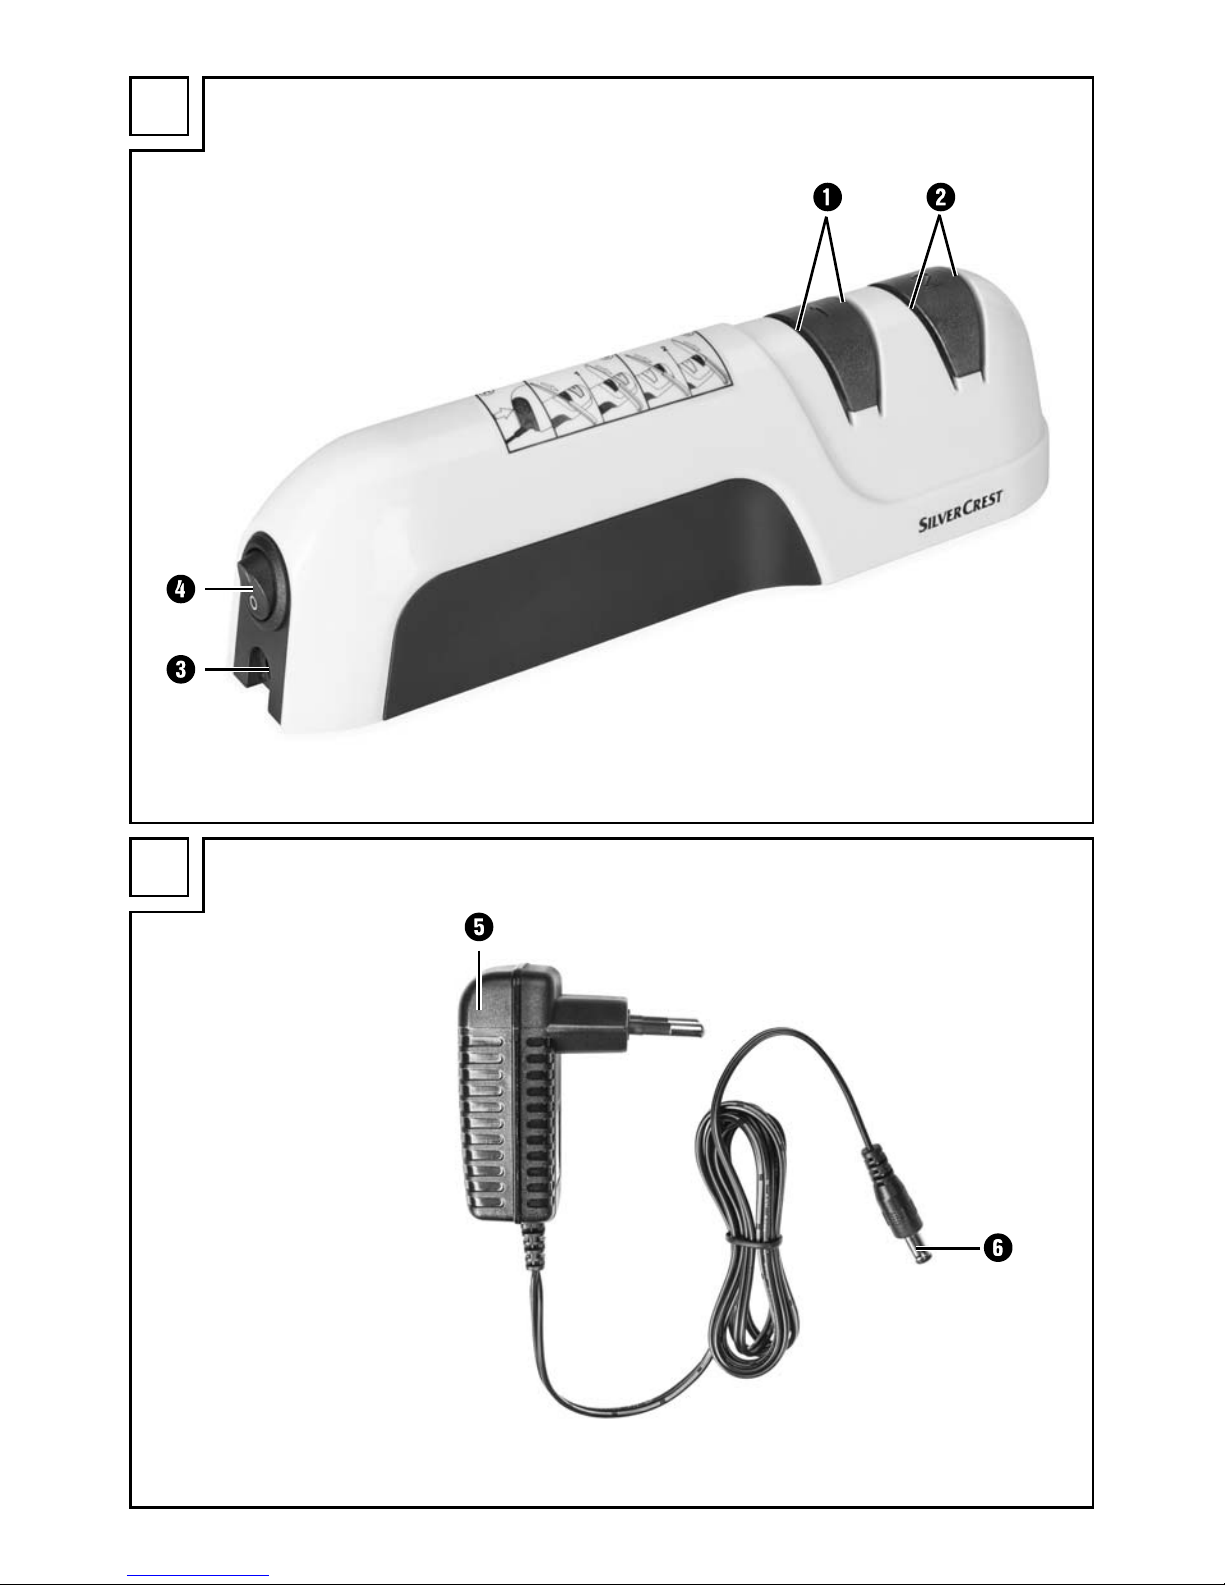
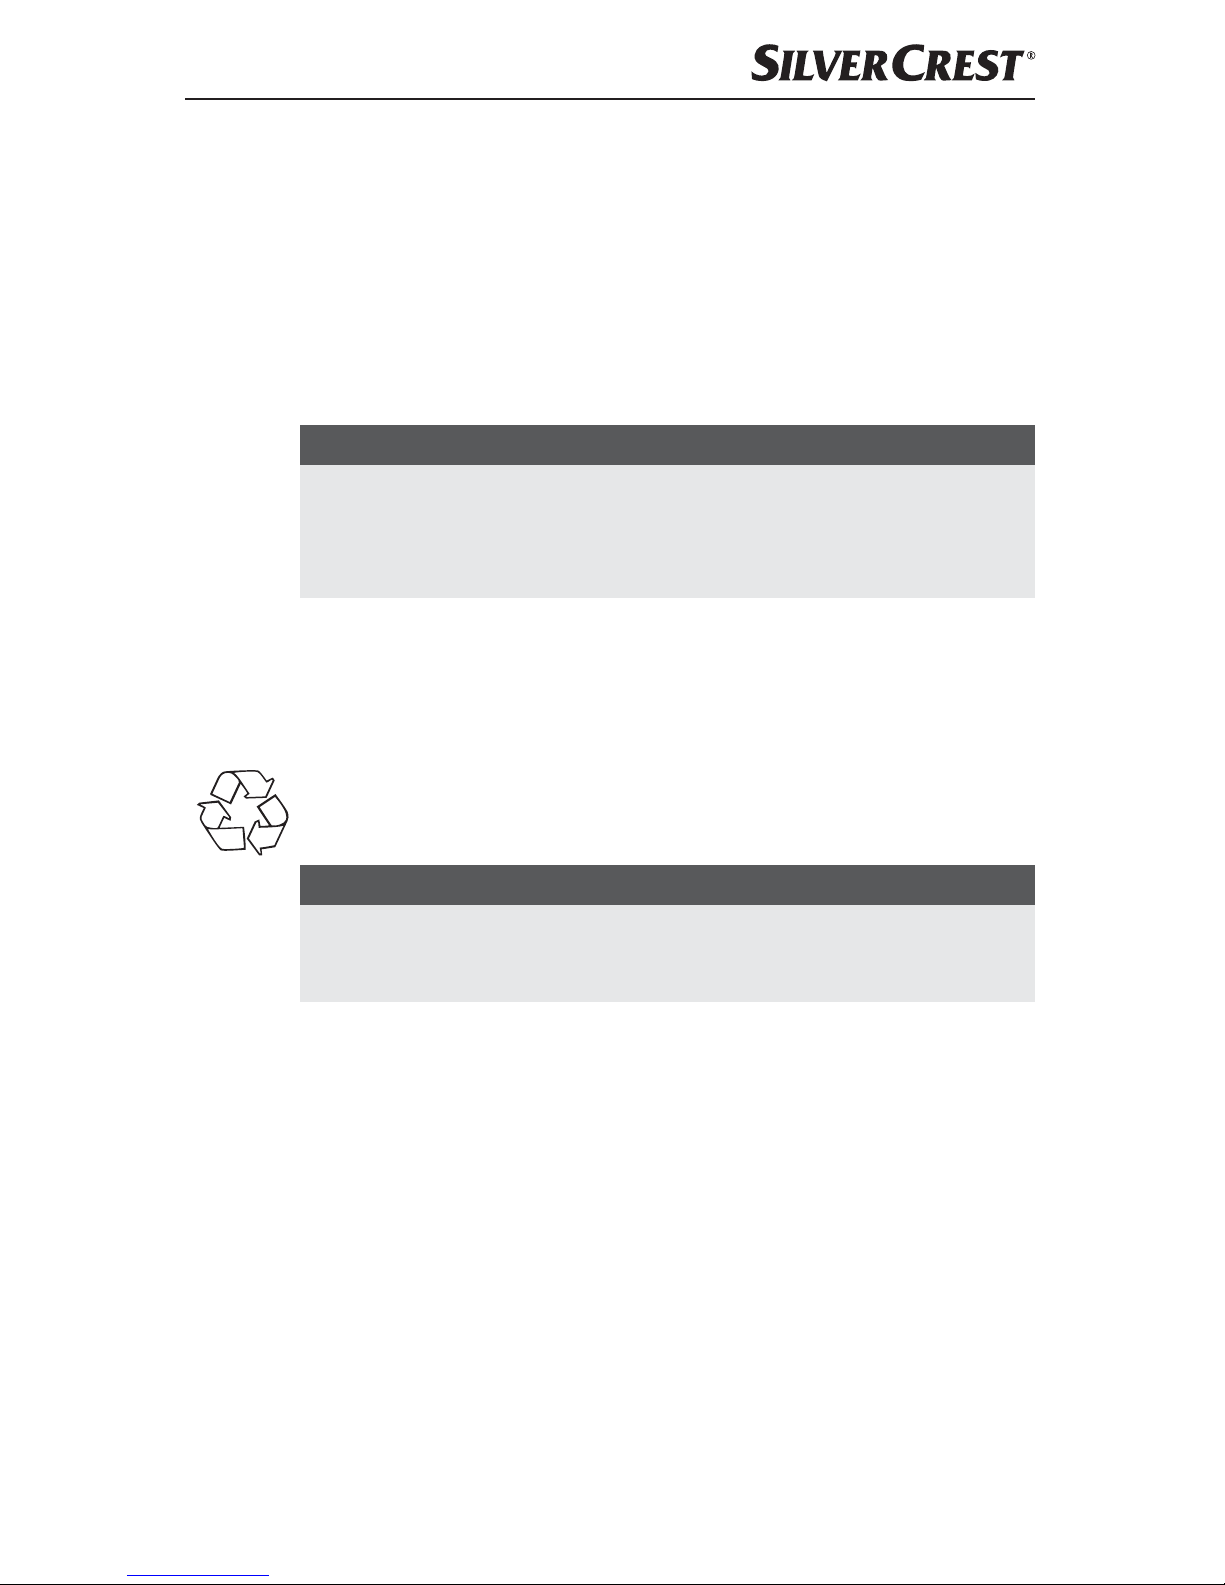
Description of the appliance
Figure A:
Grinding openings for rough sharpening (sharpening base 1)
Grinding openings for fine sharpening (sharpening base 2)
Socket for mains adapter
On/Off switch
Figure B:
Mains adapter
Power plug
■ 4 │ GB
│
IE
SEMS 12 A1
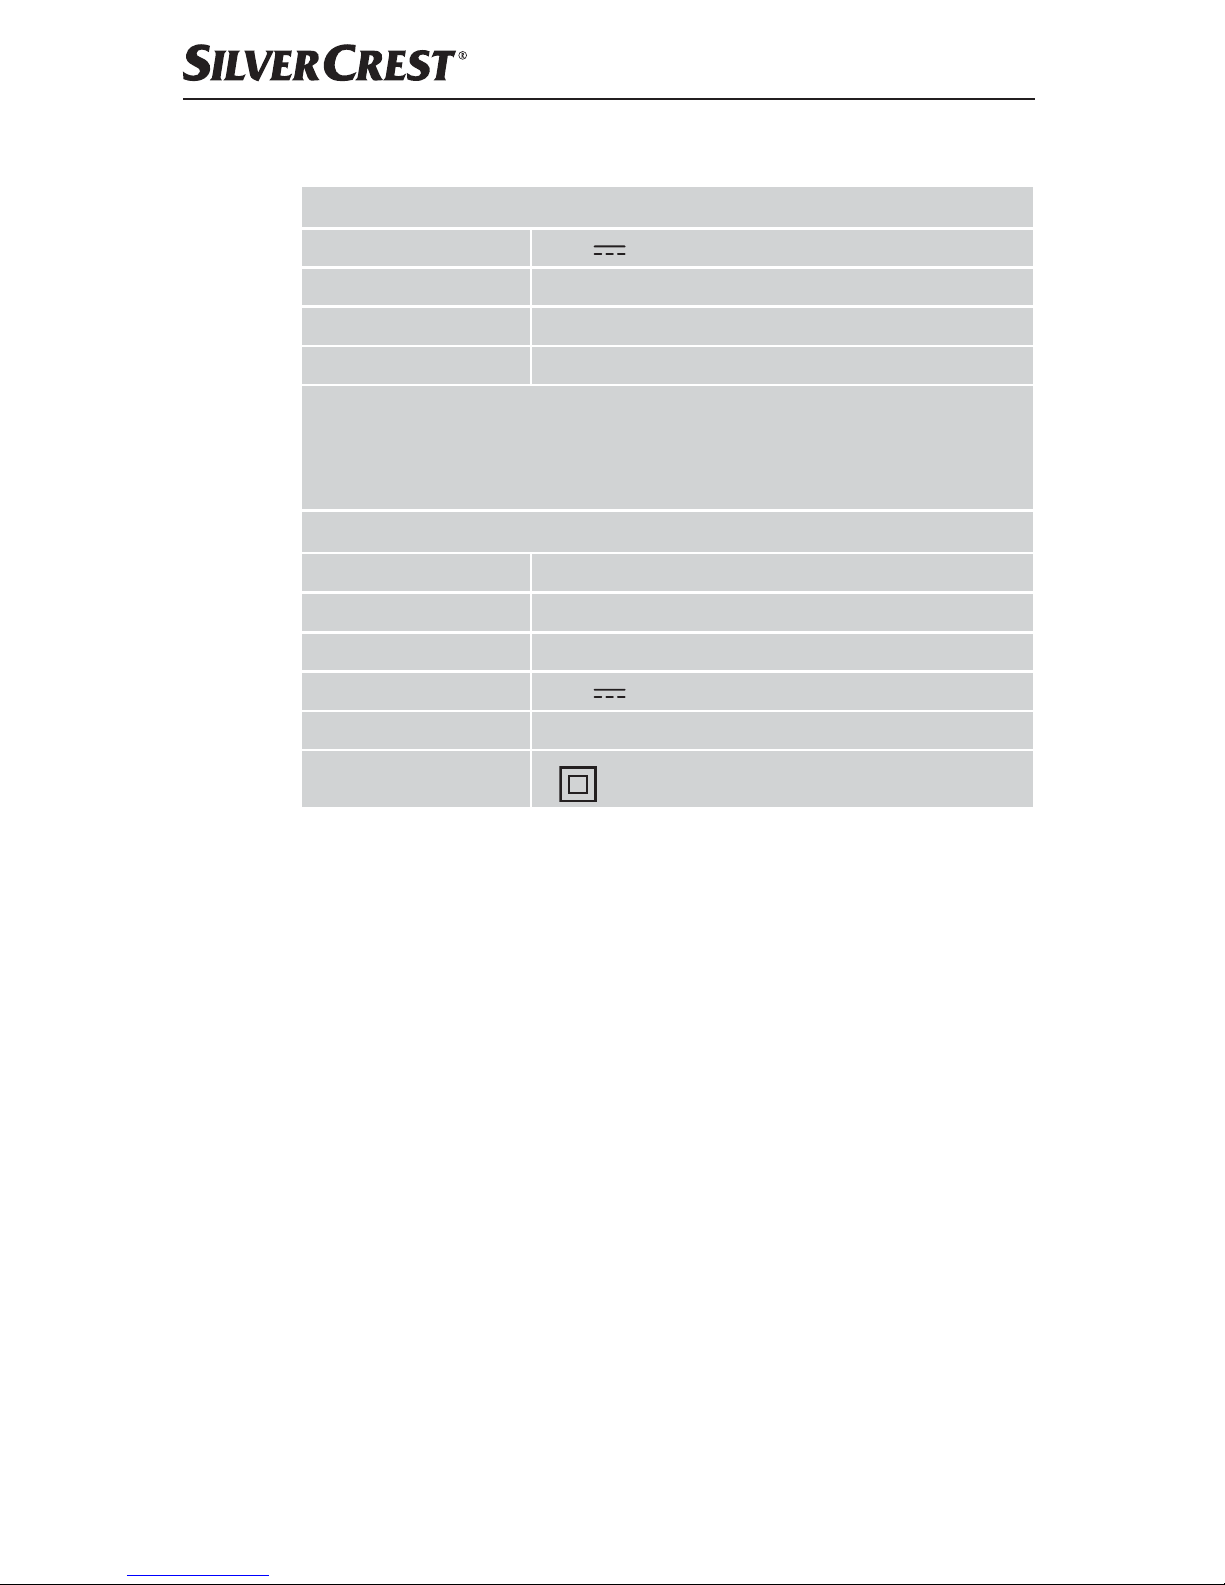
Technical data
Appliance
Input voltage 12 V
Power consumption 12 W, (1.0 A)
Sharpening speed 3200 rotations/minute
CO time 2 minutes
The CO time (continuous operation time) is the amount of time an appliance can
be operated without the motor overheating and becoming damaged. When
the specified CO time has been reached, the appliance must be switched off
until the motor has cooled down to room temperature (approx. 20 minutes).
Mains adapter (LY012SPS-120108VH)
Manufacturer Iyangel
Input voltage 100 - 240 V ∼, 50 - 60 Hz
Current consumption 0.4 A
Output voltage 12 V
Output current 1.08 A
Protection class
II
GB│IE
│
5 ■
SEMS 12 A1
Safety guidelines
RISK OF ELECTRIC SHOCK
► Protect the product from moisture. Only use it in dry rooms;
do not use outdoors or in moist environments.
► Ensure that the power cable cannot be damaged during
use, in particular not from sharp blades.
► To prevent accidents, have defective plugs and/or power
cables replaced immediately by an authorised specialist
technician or our Customer Service department.
► Never open any housing parts.
NEVER submerse the appliance in water or other liquids!
Otherwise there is a risk of an electric shock.
► After use or during absences, always remove the plug from
the mains power socket. Mains voltage is on the product for
as long as the mains plug is in the socket.
► Ensure that the plug can be reached at all times in order to
be able to pull it out of the socket in case of danger.
► The appliance may only be used with the original power
supply.
Use the mains adapter / the appliance only indoors.

■ 6 │ GB
│
IE
SEMS 12 A1
WARNING! RISK OF INJURY!
► Check to ensure that the appliance is in a serviceable con-
dition before use. If there are visible damages, you may
not continue the use of the appliance. In that case, contact
customer service first to check the appliance for safety.
► Ensure that no hair, loose clothing or body parts come into
contact with the rotating grinding stone.
► Wear protective gloves to avoid injury from sharp blades.
► This appliance should not be used by children.
► The appliance should always be disconnected from the
mains when unattended and before assembly, disassembly
or cleaning.
► The appliance and its connecting cable must be kept away
from children.
► Children must not use the appliance as a plaything.
► This appliance may be used by persons with limited physi-
cal, sensory or mental capabilities or lack of experience
and knowledge, provided that they are under supervision
or have been told how to use the appliance safely and are
aware of the potential risks.
► Use the appliance only if the covers are fitted properly on
the grinding stones.
CAUTION – PROPERTY DAMAGE!
► Do not use this appliance for wet sharpening.
► Do not use this appliance for sharpening knives with serrated
edges or toothed blades. Sharpening would grind out the
serrated edges or the teeth and make the knife unusable.
GB│IE
│
7 ■
SEMS 12 A1
Preparation
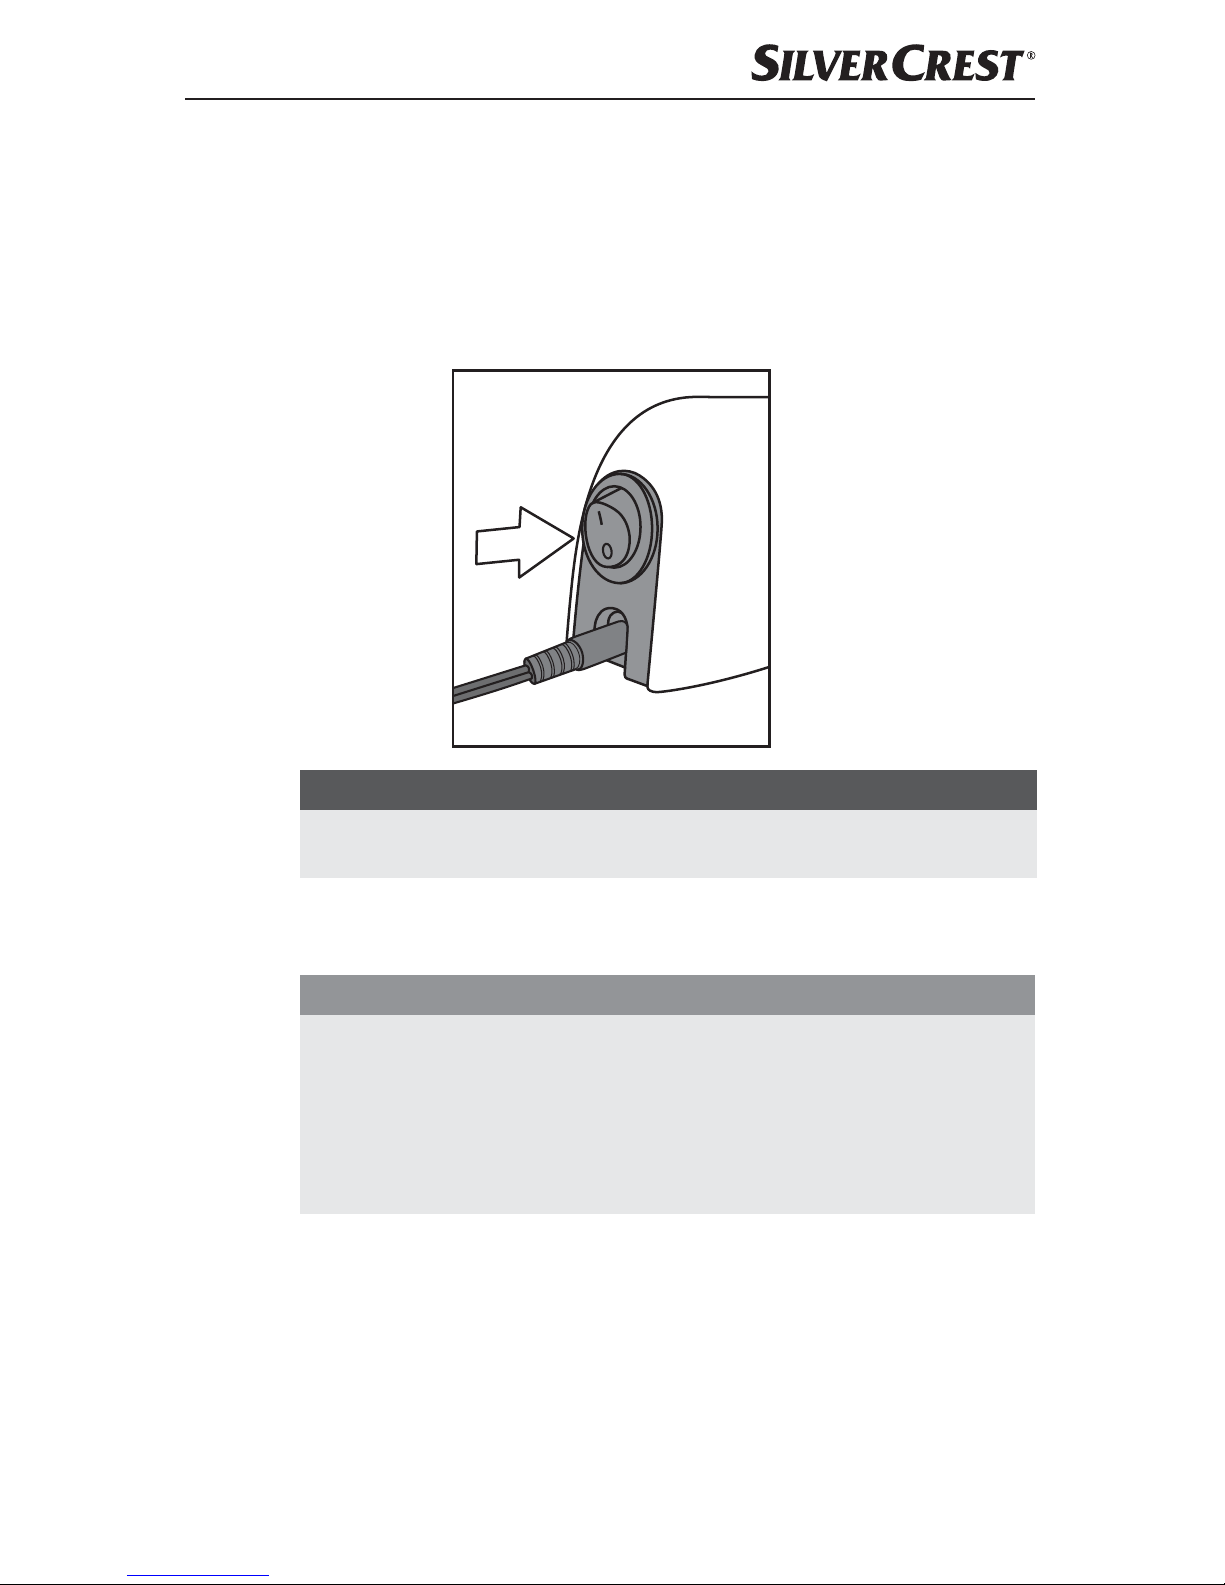
1) Connect the plug of the mains adapter with the socket on the
appliance.
2) Place the appliance on a suitable and level surface.
3) Connect the mains adapter into a power socket.
4) Switch on the appliance using the On/Off switch .
NOTE
► The knives you would like to sharpen must be free from dirt and food
residues!
Sharpen knives
CAUTION – PROPERTY DAMAGE!
► Never exceed the maximum operating time of 2 minutes. Let the appliance
cool down for about 20 minutes after 2 minutes of operation, before using
it again.
► Do not exert any firm pressure with the blade on the grinding stone – this
damages the blade and does not accelerate the sharpening process.
► To sharpen knives with ceramic blades, use only sharpening base 2 .
■ 8 │ GB
│
IE
SEMS 12 A1
Double-sided smooth grind
For a double-sided grind, the blade of the knife is sharpened from both sides
toward the cutting edge. Smooth grind is characterised by the knife’s smooth
blade, meaning no waves or notches are ground in it.
NOTES ON THE HANDLING OF THE APPLIANCE
► Prevent that the blade cuts into the plastic housing of the appliance when it
is pulled through.
Accidental cuts into the housing, however, do not compromise the functioning
of the appliance.
► To sharpen knives with ceramic blades, use only sharpening base 2 .
For this purpose, follow the instructions starting from step 3).
► Use the two slits of sharpening base 1 only for very dull knives. For this
purpose, follow the instructions starting from step 1).
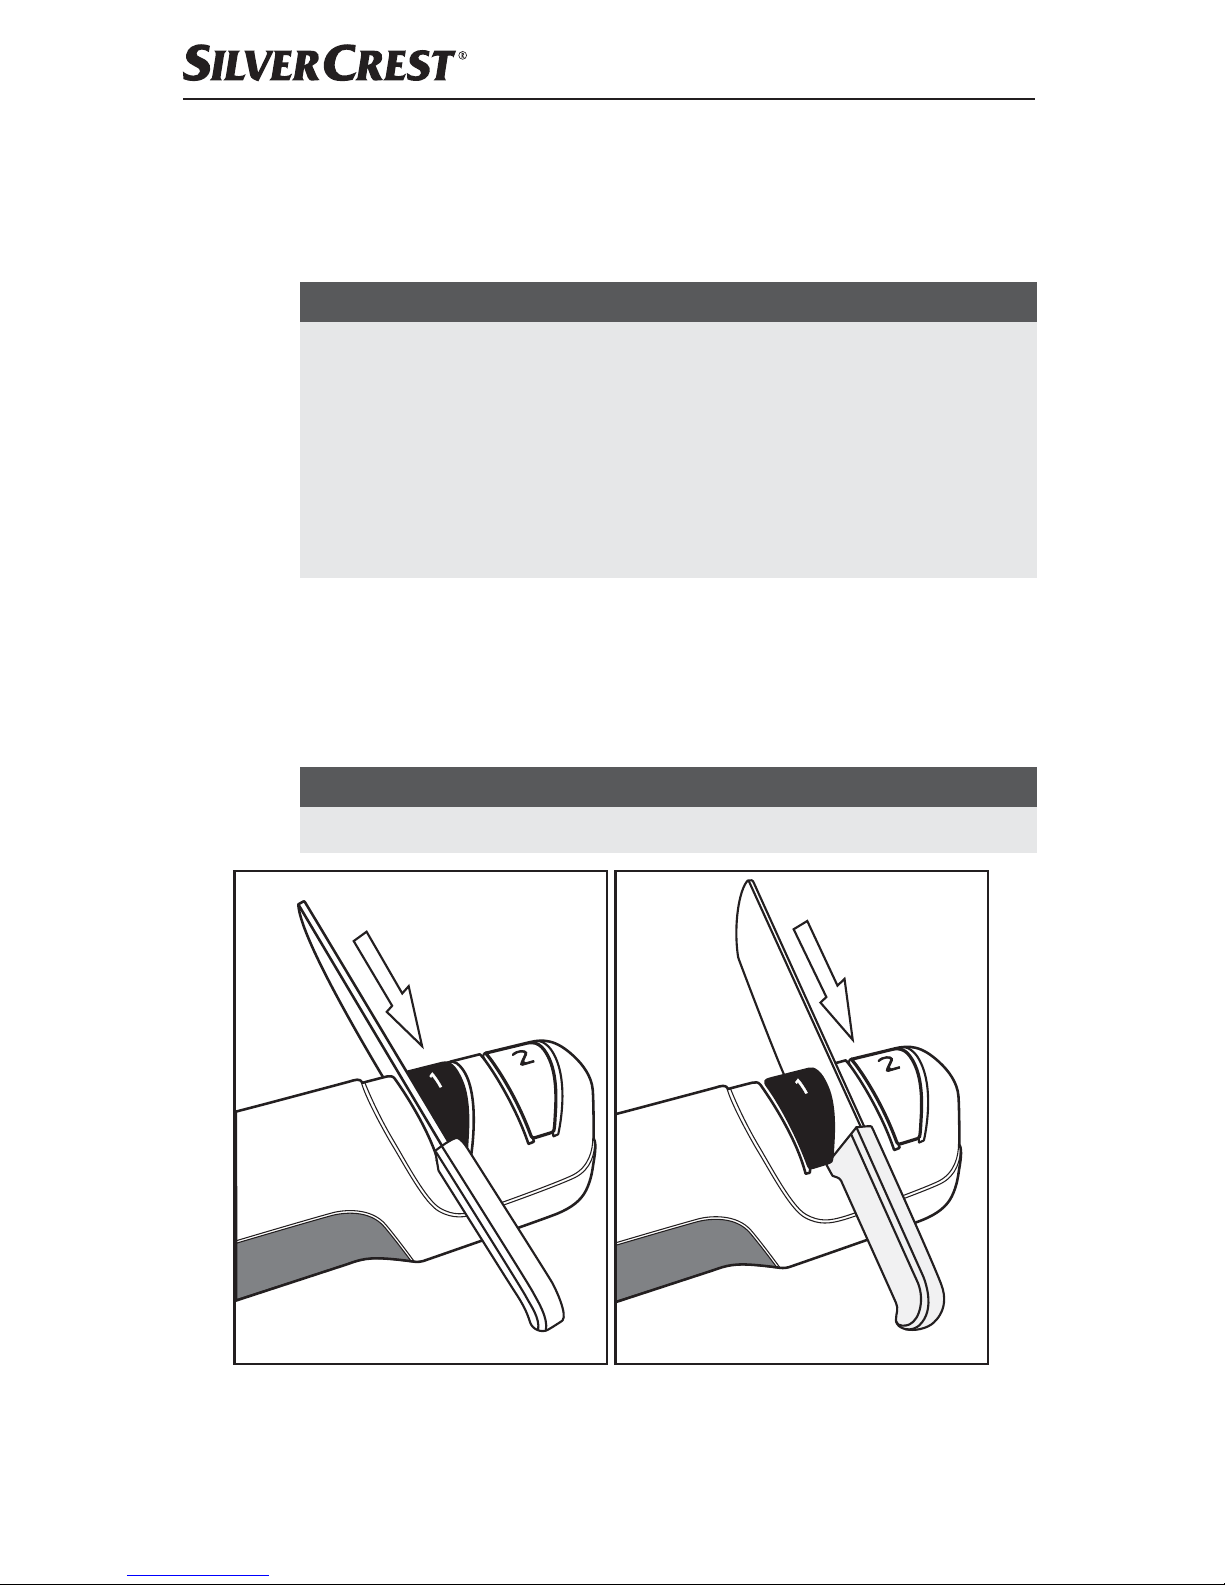
1) Always hold the appliance with your left hand.
2) Hold the knife at the handle and pull the blade in a steady movement once
through the left and once through the right slit of sharpening base 1 .
Exert slight pressure when sharpening in the direction of the sharpening
stone to ensure even contact with the knife.
NOTE
► Very dull knives might have to be pulled through more than once.
GB│IE
│
9 ■
SEMS 12 A1
NOTE
► Use both slits of sharpening bases / equally frequently to achieve
even sharpening.
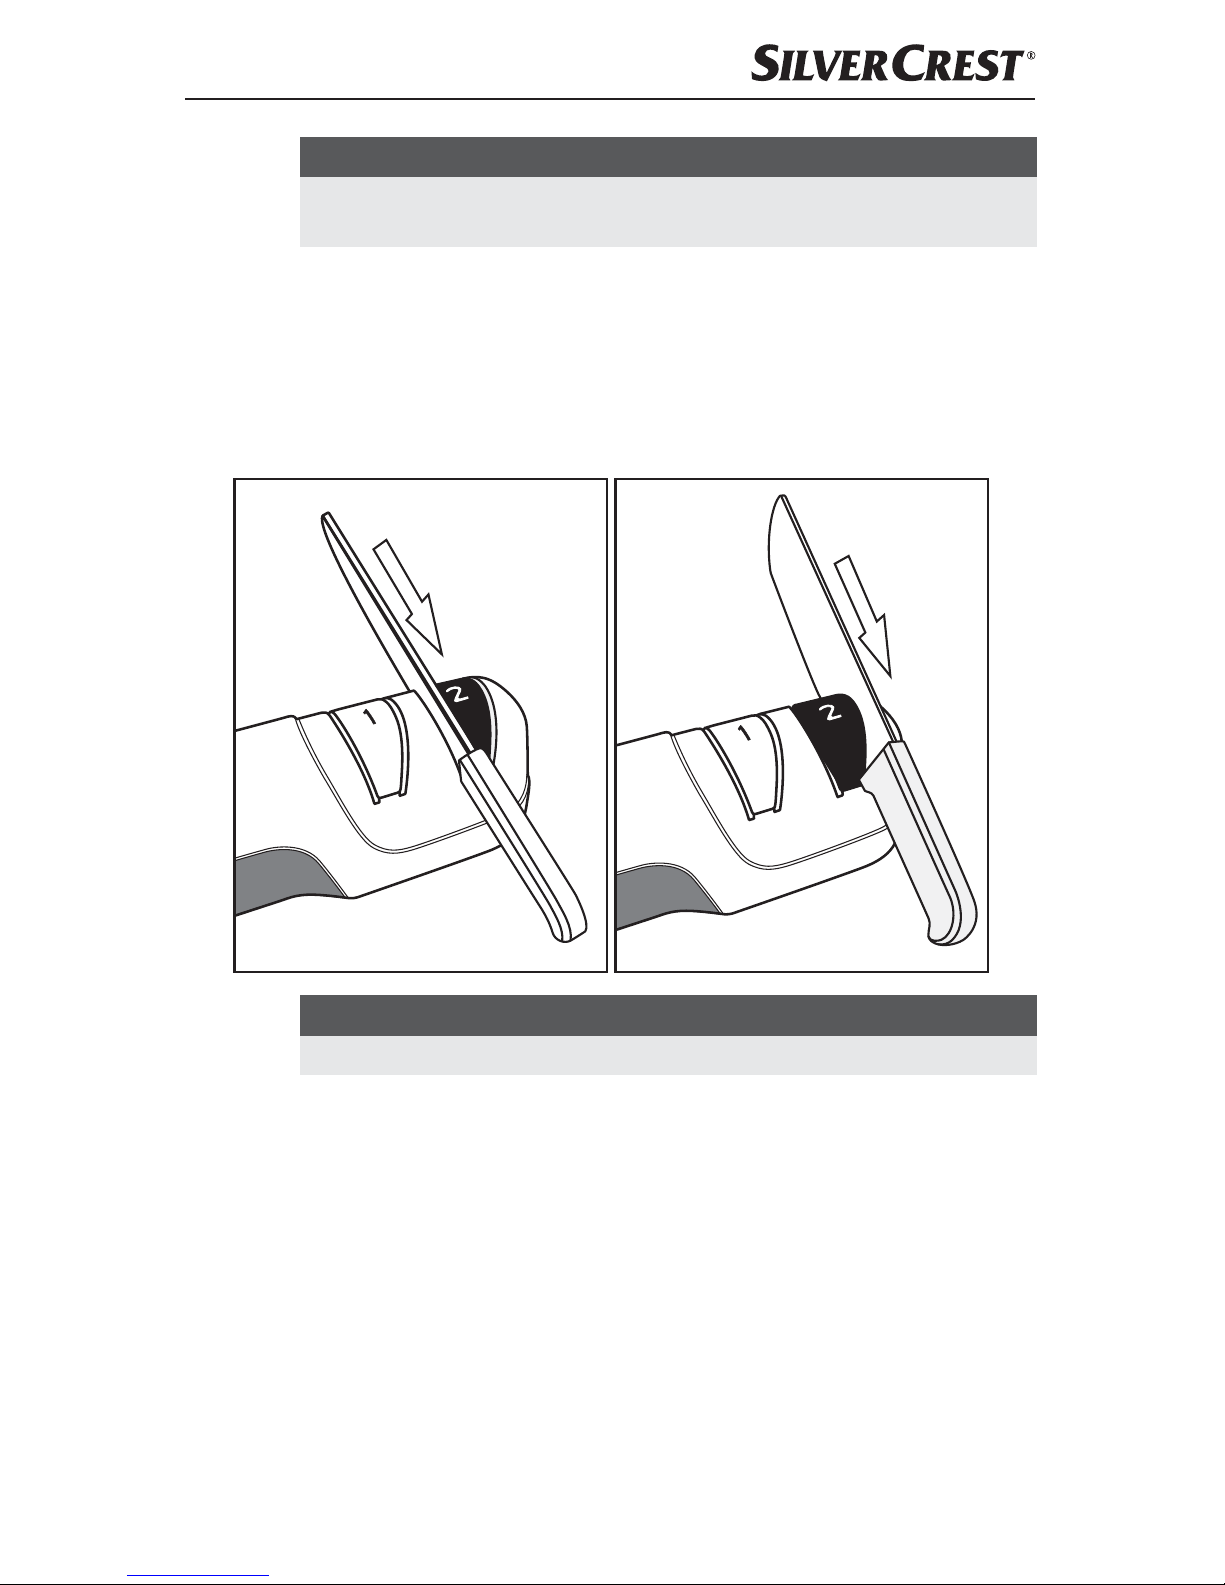
3) Hold the knife at the handle and now pull the blade in a steady movement
through the left and through the right slit of sharpening base 2 in alternation.
If necessary, pull the blade multiple times through both slits of sharpening
base 2 .
Normally, it is sufficient to pull the blade 2 times slowly (approx. 4 - 6 seconds)
and 2 times quickly (approx. 1 - 2 seconds) through both slits of sharpening
base 2 :
NOTE
► Very dull knives might have to be pulled through more than once.
4) If you believe that the blade has reached the desired sharpness, test it on
a piece of cutting matter.
Be sure to clean the blade again before you might possibly re-sharpen it.
5) To re-sharpen the blade, pull it once more through the slits of sharpening
base 2 in alternation, until the desired sharpness is reached.
6) If you are satisfied with the result, turn the appliance off on the On/Off
switch .
7) Clean the blade thoroughly before you use the knife again, in order to
remove potential grinding residues such as metal dust or chips.

■ 10 │ GB
│
IE
SEMS 12 A1
Single-sided smooth grind
For a single-sided grind, one side of the blade runs perfectly straight toward the
cutting edge and the other side is angled up to the cutting edge of the knife. The
angled side is the sharpened side. The single-sided grind can either be smooth
or have small teeth as found on table knives. However, you should only sharpen
blades using a smooth grind with this appliance.
NOTICES ON HANDLING THE APPLIANCE
► Prevent the blade from cutting into the plastic housing of the appliance
when it is pulled through.
Accidental cuts into the housing do not compromise the function of the
appliance.
► Use the sharpening base 1 only for very dull knives. For this purpose,
follow the instructions starting from step 1).
► If knives have a one-sided grind, sharpen only the side of the blade with
the grind. Use either only the right or only the left slit in sharpening base 1
/2 – depending on which side the knife's blade is ground
.
►
To sharpen knives with ceramic blades, use only sharpening base 2 .
1) Always hold the appliance with your left hand.
2) Hold the knife by the handle and pull the blade in a steady movement
once through the left-hand or once through the right-hand slit in sharpening
base1 .
Depending on which side of the blade is ground, exert slight pressure when
sharpening in the direction of the sharpening stone to ensure even contact
with the knife.
NOTE
► Very dull knives might have to be pulled through more than once.

GB│IE
│
11 ■
SEMS 12 A1
or
3) Hold the knife at the handle and pull the blade in a steady movement
through the left-hand or through the right-hand slit in sharpening base 2 .
Depending on which side of the blade is ground, pull the blade multiple
times through the slit in sharpening base 2 if necessary.
Normally, it is sufficient to pull the blade twice slowly (approx. 4 - 6 seconds)
and twice quickly (approx. 1 - 2 seconds) through both slits of sharpening
base 2 :
or

■ 12 │ GB
│
IE
SEMS 12 A1
NOTE
► Very dull knives might have to be pulled through more than once.
4) If you believe that the blade has reached the desired sharpness, test it on a
piece of cutting matter.
Be sure to clean the blade again before you re-sharpen it if necessary.
5) To re-sharpen the blade, pull it once more through the slit of sharpening base
2 , until the desired sharpness is reached.
6) Once you are satisfied with the result, turn the appliance off using the On/
Off switch .
7) Before using the knife, clean the blade thoroughly in order to remove potential grinding residues such as metal dust or chips.
Cleaning
RISK OF ELECTRIC SHOCK
► First, pull out the mains adapter from the socket and pull out plug
from socket , before you clean the appliance.
NEVER submerse the appliance in water or other liquids!
Otherwise there is a risk of an electric shock.
CAUTION – PROPERTY DAMAGE!
► Do not use aggressive or abrasive cleaning agents. These can damage the
surfaces of the appliance.
■ Clean the housing using only a dry or lightly moistened cloth. For stubborn
soiling use a mild detergent on the cloth.
■ Wipe off the mains adapter with a damp cloth. Ensure that the appliance
and the mains adapter are completely dry before using the appliance
again.
 Loading...