

Page 1
KITCHEN TOOLS
4
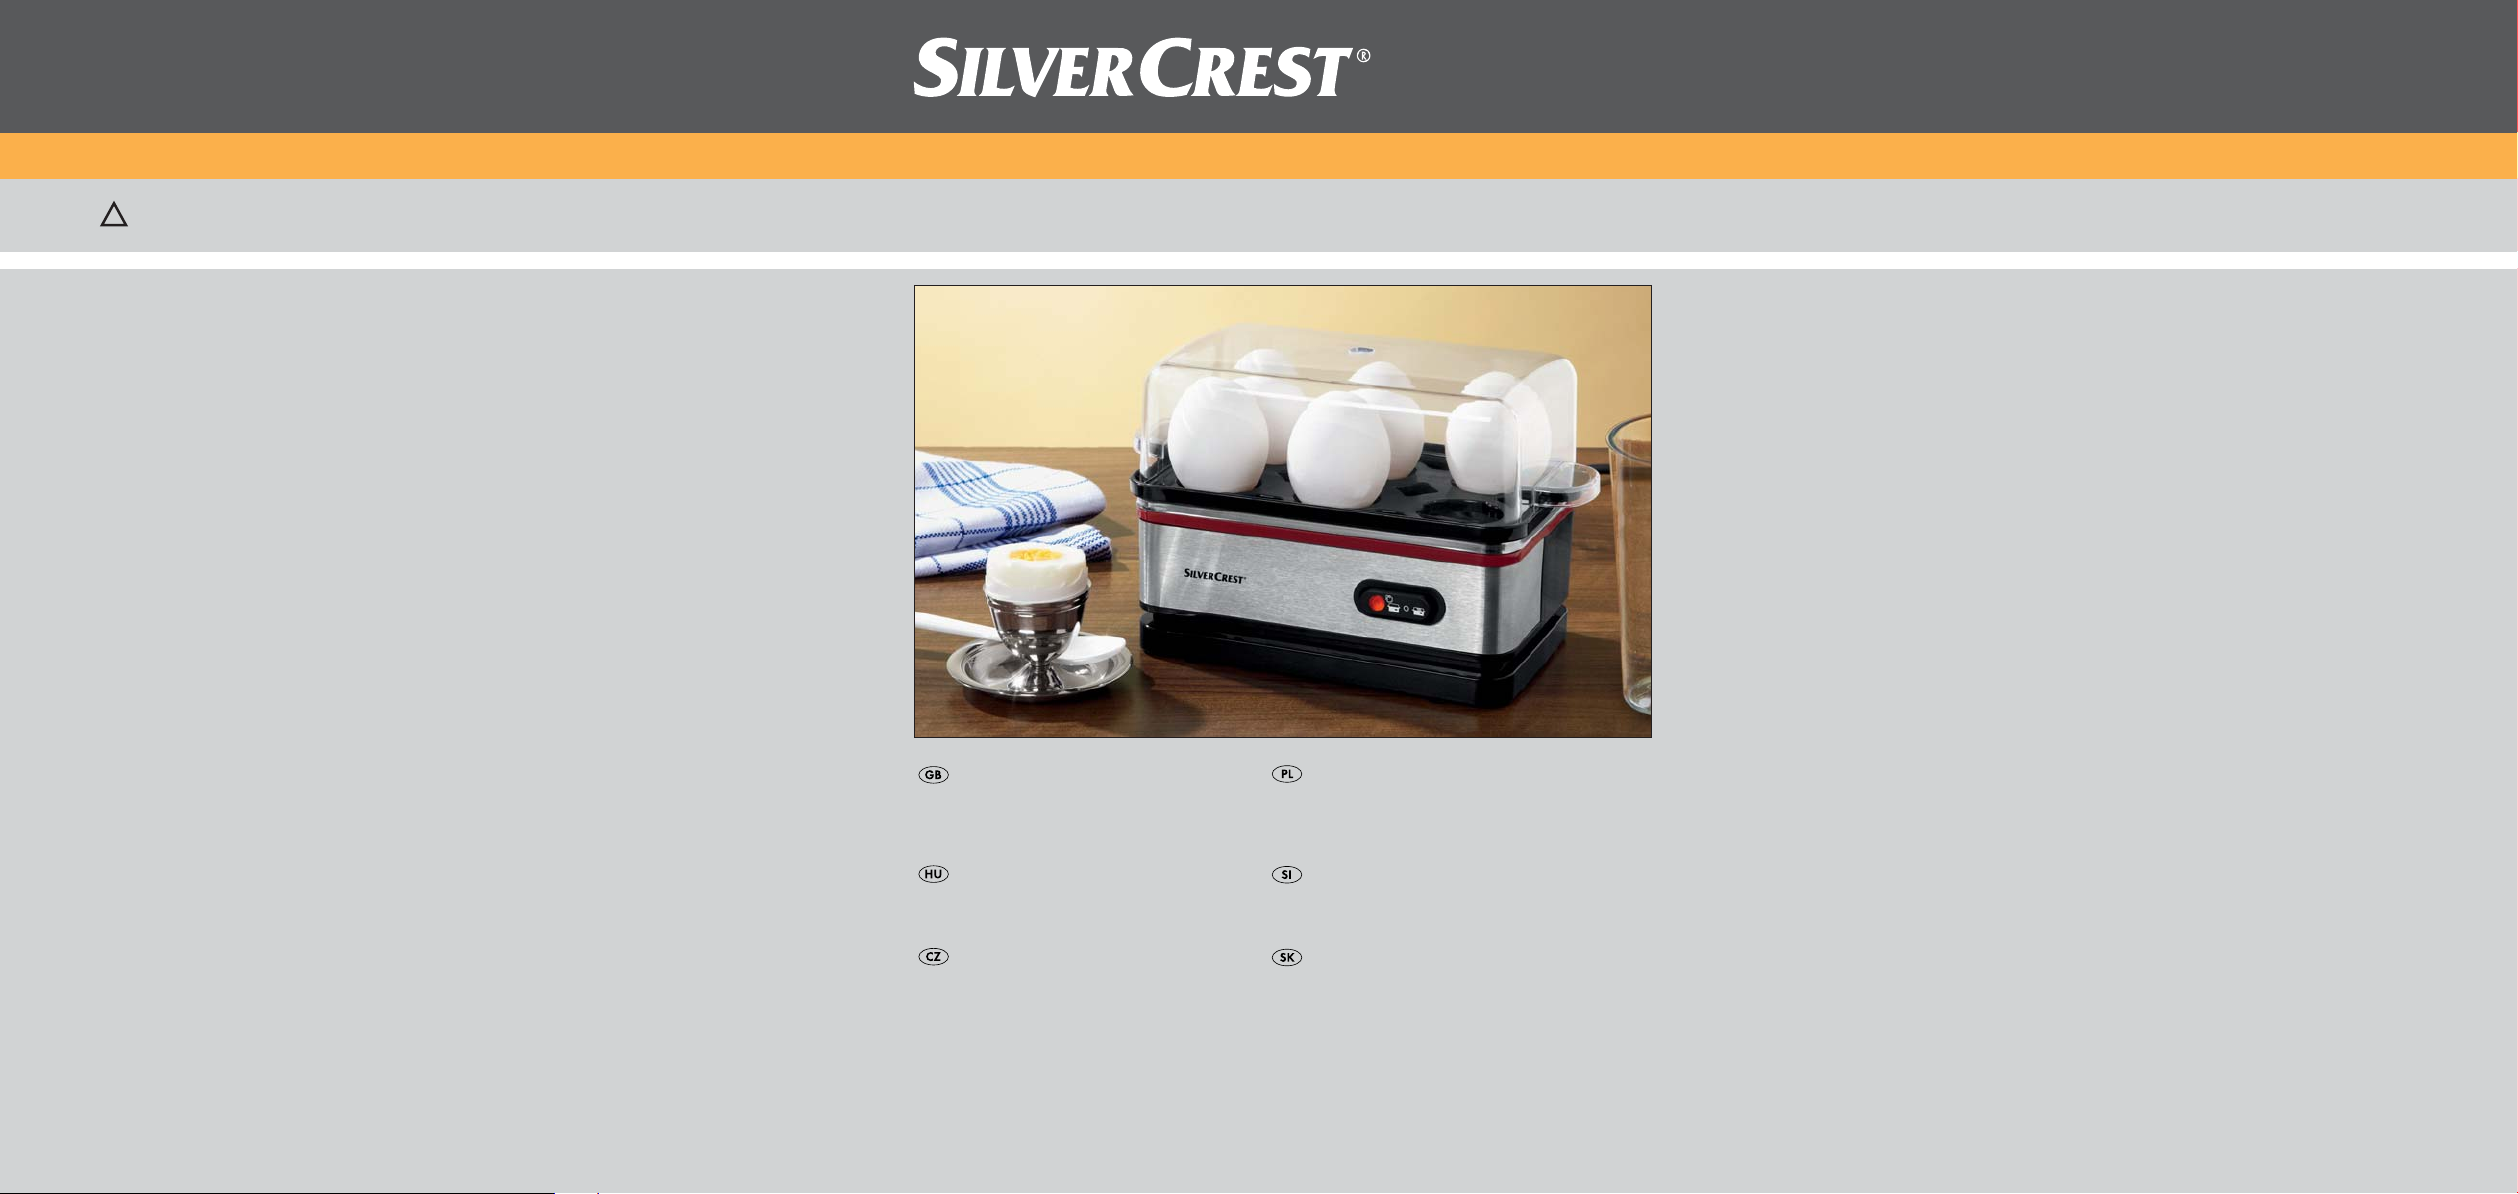
Egg Cooker SEKD 400 A1
Egg Cooker
Operating instructions
Urządzenie do gotowania
jajek
Instrukcja obsługi
KOMPERNASS GMBH
BURGSTRASSE 21 · D-44867 BOCHUM
www.kompernass.com
ID-Nr.: SEKD400A1-06/10-V2
Tojásfőző
Használati utasítás
Vařič vajec
Návod k obsluze
Kuhalnik za jajca
Navodila za uporabo
Varič vajec
Návod na obsluhu
Page 2
SEKD 400 A1
1
2
3
7
4
5
6
Page 3

Egg Cooker 2
Read the operating instructions carefully before using the appliance for the first time
and preserve this booklet for later reference. Pass the manual on to whomsoever might
acquire the appliance at a later date.
Urządzenie do gotowania jajek 6
Niniejszą instrukcję należy zachować, aby móc także później z niej skorzystać, w
przypadku przekazywania urządzenia osobom trzecim należy przekazać także instrukcję!
Tojásfőző 10
Őrizze meg ezt a leírást arra az esetre, ha később kérdése merülne fel. A készülék
harmadik személynek történő továbbadásakor adja tovább a leírást is!
Kuhalnik za jajca 14
Ta navodila shranite za poznejša vprašanja – ob predaji naprave tretji osebi jih
priložite zraven!
Vařič vajec 18
Uschovejte tento návod pro případné pozdější dotazy a předejte jej v případě
přenechání přístroje třetím osobám zároveň s ním!
Varič vajec 22
Uschovajte si tento návod na použitie v budúcnosti – a pri odovzdávaní prístroja tretej
osobe odovzdajte aj návod!
- 1 -
Page 4
Egg Cooker
4. Safety instructions
1. Intended use
This appliance is intended exclusively for cooking
and keeping warm chicken eggs in private
households.
It is not intended for use with other foods or other
materials. It is also not intended for commercial or
industrial use.
2. Technical data
Voltage: 220-240 V ~50 Hz
Power consumption: 400 W
Capacity: Max. 6 eggs
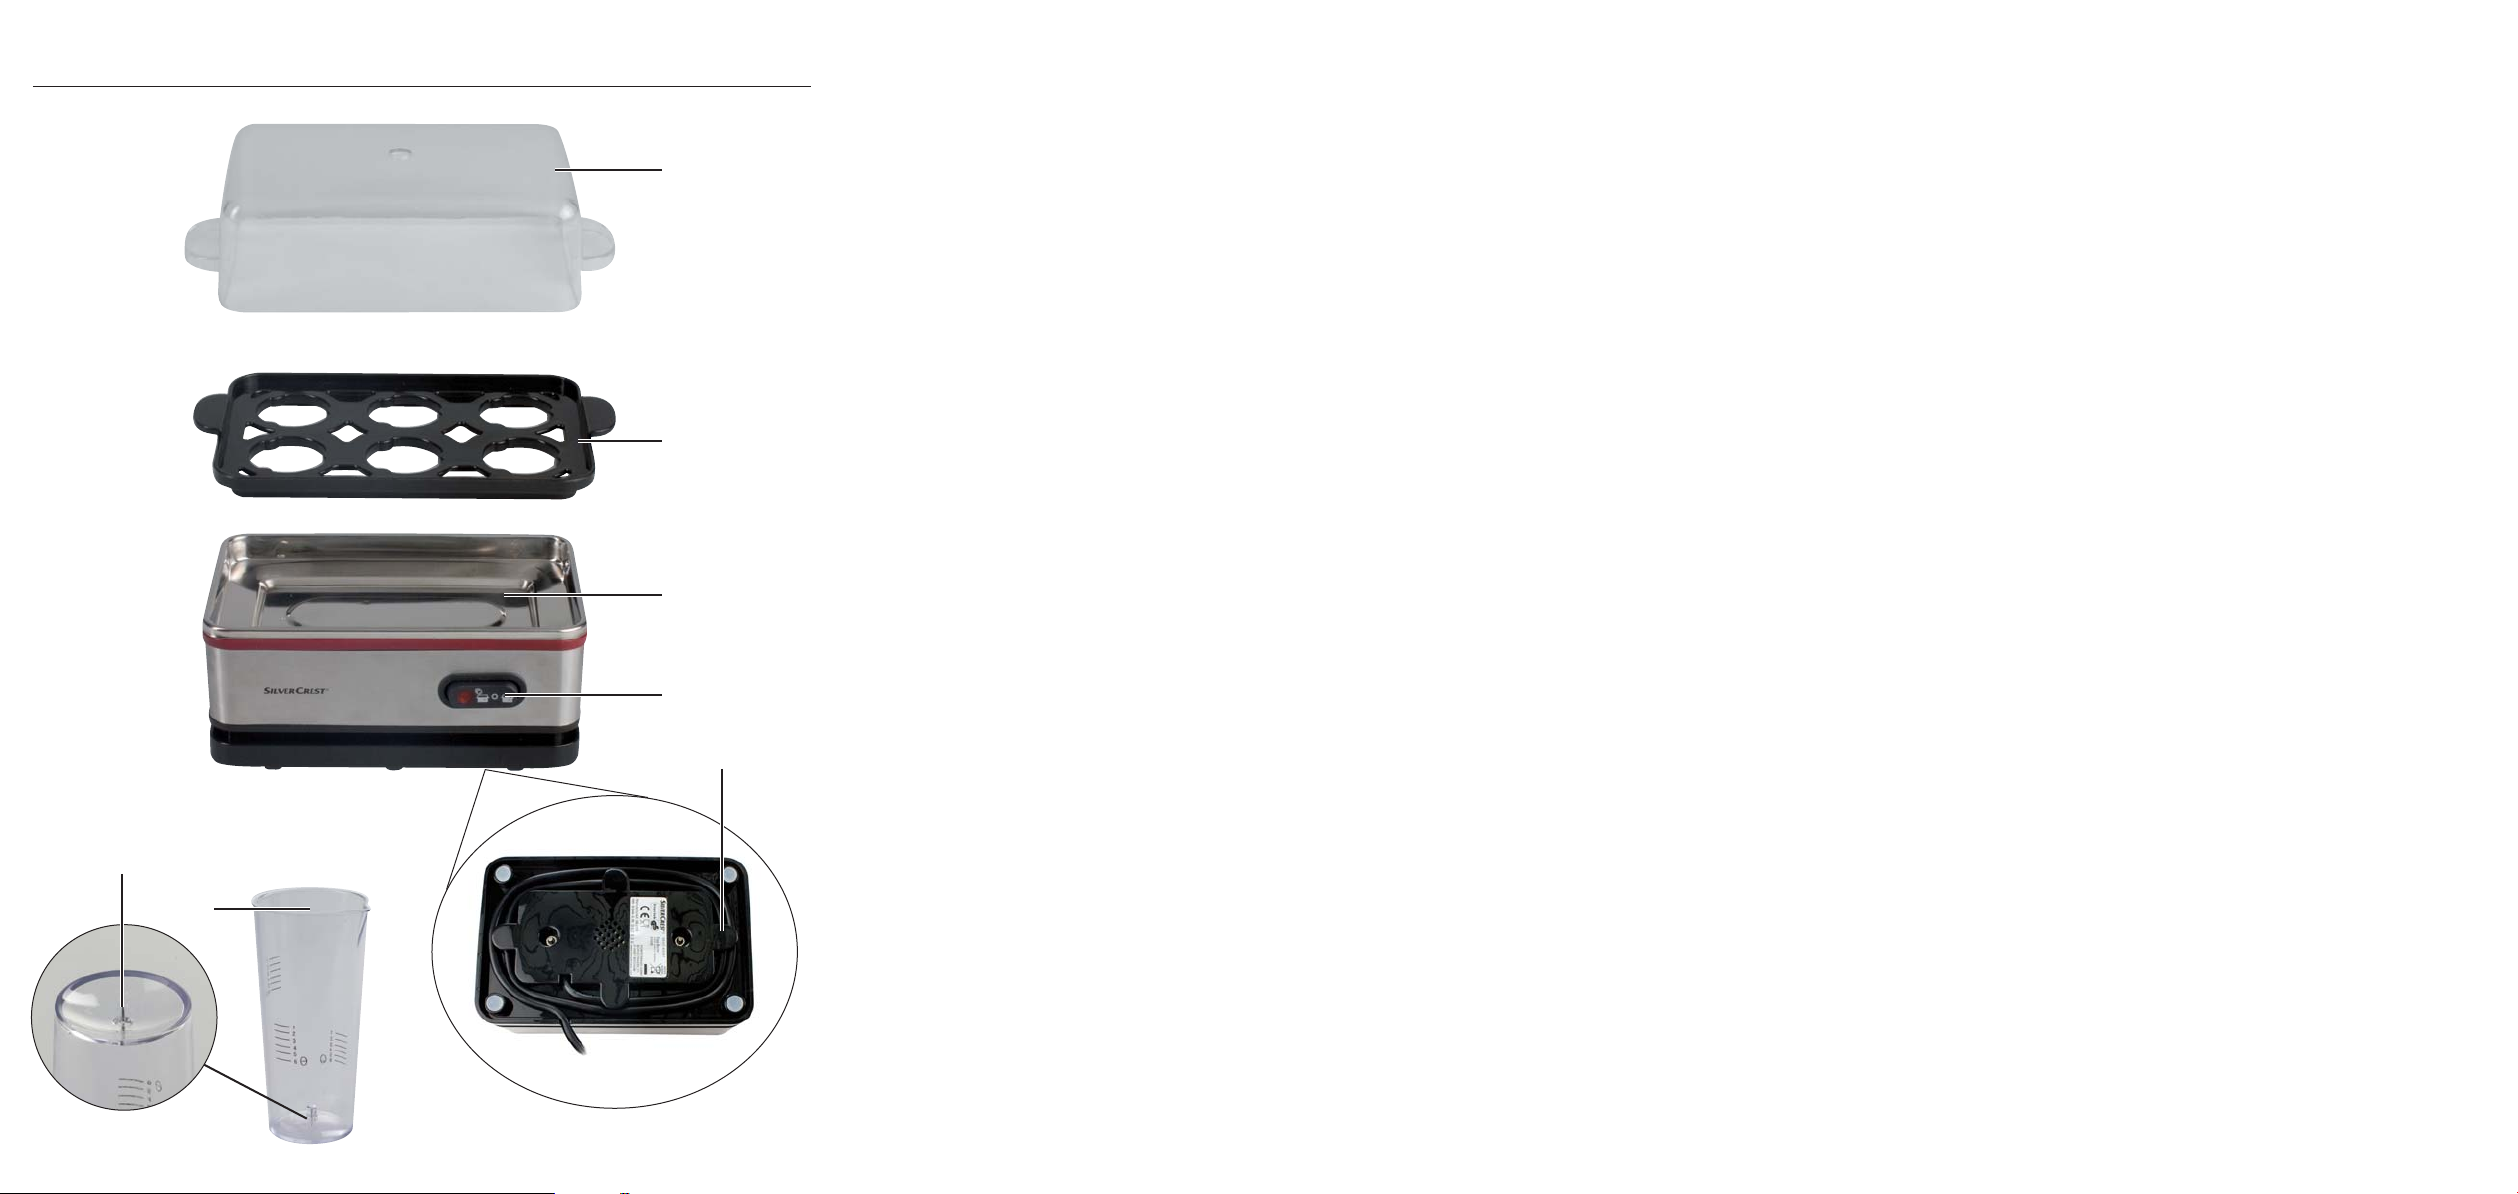
3. Appliance description
Lid
q
Egg holder
w
Cooking bowl
e
Operating switch
r
(position “ “: cook)
(position "O": off)
(position " ": keep warm)
Rolled-up cable
t
Measuring cup
y
Egg pick (integrated in the measuring cup)
u
DANGER! Electric shock!
Risk of fire!
• Only connect the egg cooker to a properly
installed and grounded socket with a main
voltage of 220 - 240 V ~ 50 Hz.
• Always pull the power plug from the socket
when you move or fill the device, in event of problems, before cleaning the appliance and while
the cooker is not in use! Never pull on the power
cord, only on the power plug. Never touch the
appliance plug with wet or moist hands.
Never submerge the appliance in liquid, never
subject it to moisture and never use it outdoors.
• If the appliance does fall into liquid, immediately
pull the power plug from the socket. Then refrain
from operating the appliance until it has been
inspected by an approved service company.
• Do not use the egg cooker if it is located on a
wet surface or if your hands or the appliance
are wet.
• Position the power cord so that it does not come
into contact with hot or sharp-edged objects.
• Do not kink or crush the power cord and do not
wind it around the appliance.
• Arrange for defective power plugs and/or cables to be replaced as soon as possible by a
qualified technician or by our Customer Service
Department to avoid the risk of injury.
• Do not use an external time switch or a separate
remote control system to operate the appliance.
- 2 -
Page 5

Danger of injuries!
• Never leave the appliance unattended during
operation.
• Do not allow individuals (including children) to
use the appliance whose physical, sensorial or
mental abilities or lack of experience and knowledge hinder their safe usage of it if they have
not previously been supervised or instructed in its
correct usage.
• Tell children about the appliance and its potential dangers so that they do not play with it.
• Be careful with the egg pick
the measuring cup.
• The casing surfaces become very hot during
operation. Therefore, only grip the lid
egg holder
removing them.
CAUTION! Hot steam escapes from the
steam hole and upon opening the lid
Danger of scalding!
by the grips provided when
w
on the bottom of
u
q
and the
!
q
5. Starting up
Before starting up the appliance, make certain
that ...
- egg cooker, plug and power cable are in good
working order and...
- all packaging materials have been removed
from the egg cooker.
➪ First clean the appliance as described under 8.
6. Cooking eggs
➪ Pick a hole in the top or bottom side of the egg
with the egg pick
➪ Place the eggs on the egg holder
picked side up.
➪ Fill the measuring cup
amount of water. The amount of water depends
on the number of eggs and the desired degree
of hardness.
u
.
y
with the
w
with the required
➪ Always open the lid qby lifting up with the grip
and removing it to the side. Avoid letting the
escaping steam contact your hand and arm.
➪ Remove the egg holder
has completely escaped.
Attention! Property damage!
• Never place the appliance near heat sources.
• Never open the housing. If the housing is opened, the safety of the device is no longer assured
and the warranty becomes void.
• Only use the accessories included and never use
the appliance without the egg holder
place.
• Let the appliance and the accessory parts cool
down completely before cleaning and storing
them.
only once the steam
w
w
in
Explanation of the symbols on the measuring cup:
hard
medium
soft
Tip:
Depending on the size of the egg, to obtain the desired hardness you may need to vary the volume of
water used from that detailed by the scale markings
on the measuring cup
a little more water (about one mark on the measuring scale). The cooking time will be extended. The
egg will be harder. If the egg is too hard, use a little
less water the next time (about one mark on the measuring scale). The cooking time will be shortened.
The egg will be softer.
➪ Now pour the water into the cooking bowl
➪ Place the egg holder
and place the lid qon top.
- 3 -
. If the egg is too soft, use
y
in the cooking bowl
w
e
.
e
Page 6
➪ Press the operating switch rto the left (position
“ “) to turn the appliance on for cooking.
As soon as the eggs are cooked, a signal sounds.
Push the operating switch back to the position
“O” to turn the appliance off.
➪ After cooking, peel the eggs under cold, flowing
water.
7. Keeping eggs warm
Use the keep-warm function only for hard boiled
eggs.
After boiling, rinse the eggs under cold flowing
water.
➪ Push the operating switch to the right to activate
the keeping warm function (position " ")
after cooking the eggs.
➪ Push the operating switch back to the position
"O" to turn the appliance off.
Note:
Never use cleaning agents or solvents. This can cause damage to the appliance.
Cleaning the appliance:
➪ Pull the power plug out from the power socket.
➪ Let the appliance cool off.
➪ Then clean the cooking bowl
cord with a slightly damp cloth.
➪ Remove calcified residue with a solution of
vinegar and water.
➪ Afterward, operate the appliance only with
clear water to remove the vinegar smell.
➪ Always dry the appliance well before using it
again.
Cleaning the accessories:
➪ Wash the lid
measuring cup
water.
• The egg holder w, lid qand measuring cup
can be cleaned in a dishwasher.
, the egg holder wand the
q
with soap under flowing
y
and the power
e
y
9. Storage
8. Cleaning and care
Life-threatening danger of electrical
shock:
• Never open the egg cooker housing. There are
no operating elements inside.
Never immerse the egg cooker components
into water or other liquids!
Caution:
When cleaning the measuring cup, be careful of the
egg pick
. Danger of injury!
u
Let the egg cooker cool off completely before
storing it.
➪ Wind the power cord around the cord winder
on the bottom of the appliance.
t
➪ Store the appliance in a dry place.
- 4 -
Page 7
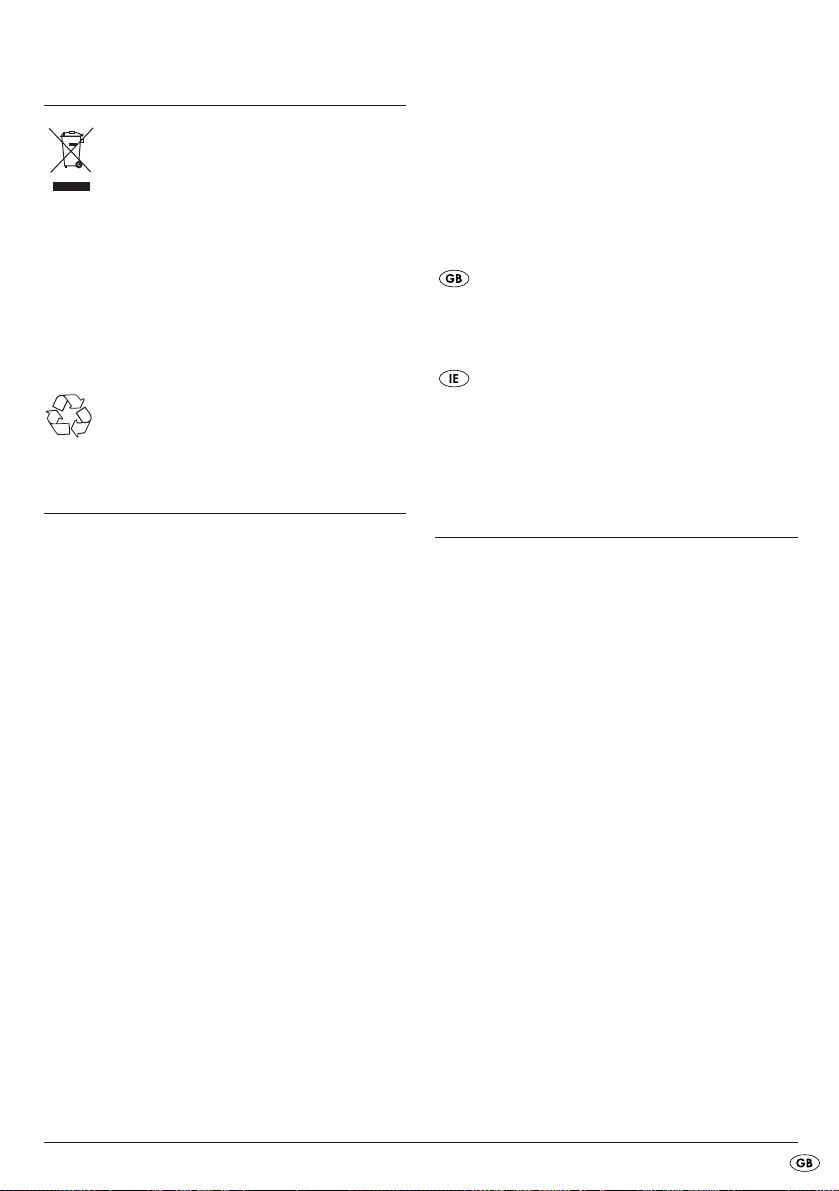
10. Disposal
Do not dispose of the appliance in your
normal domestic waste. This product is
subject to the European guideline
2002/96/EC.
Dispose of the appliance through an approved disposal centre or at your community waste facility.
Observe the currently applicable regulations.
In case of doubt, please contact your waste disposal
centre.
Dispose of all packaging materials in an
environmentally friendly manner.
11. Warranty & Service
The warranty for this appliance is for 3 years from
the date of purchase. The appliance has been manufactured with care and meticulously examined before delivery. Please retain your receipt as proof of
purchase. In the event of a warranty claim, please
make contact by telephone with our Service Department. Only in this way can a post-free despatch for
your goods be assured.
The warranty covers only claims for material and
maufacturing defects, but not for transport damage,
for wearing parts or for damage to fragile components, e.g. buttons or batteries. This product is for
private use only and is not intended for commercial
use. The warranty is void in the case of abusive and
improper handling, use of force and internal tampering not carried out by our authorized service
branch. Your statutory rights are not restricted in
any way by this warranty.
The warranty period will not be extended by repairs
made under warranty. This applies also to replaced
and repaired parts. Any damage and defects extant
on purchase must be reported immediately after unpacking the appliance, at the latest, two days after
the purchase date. Repairs made after the expiration of the warranty period are subject to payment.
DES UK LTD
Tel.: 0871 5000 700
e-mail: support.uk@kompernass.com
Kompernass Service Ireland
Tel: 1850 930 412 (0,082 EUR/Min.)
Standard call rates apply. Mobile operators may vary.
e-mail: support.ie@kompernass.com
(£ 0.10 / minute)
12. Importer
KOMPERNASS GMBH
BURGSTRASSE 21
D-44867 BOCHUM
www.kompernass.com
- 5 -
Page 8
Urządzenie do
gotowania jajek
1. Cel zastosowania
To urządzenie jest przeznaczone wyłącznie do
gotowania i podtrzymywania wysokiej temperatury
jaj kurzych i nadaje się wyłącznie do użytku
domowego.
Nie nadaje się ono do przyrządzania innych
artykułów spożywczych. Urządzenia nie należy
stosować do celów komercyjnych i przemysłowych.
4. Wskazówki bezpieczeństwa
NIEBEZPIECZEŃSTWO!
porażenia prądem!
Niebezpieczeństwo pożaru!
• Przyłączyć urządzenie do prawidłowo zainstalowanego i uziemionego gniazdka o napięciu
znamionowym 220 - 240 V ~50 Hz.
• Przy zmianie miejsca ustawienia, napełnianiu, w
wypadku usterki, przed rozpoczęciem czyszczenia, w czasie przerwy w użytkowaniu zawsze
wyjmować wtyczkę z gniazdka zasilania! Nigdy
nie ciągnąć za przewód sieciowy, jedynie za
wtyczkę. Nie dotykać wtyczki mokrymi rękoma.
2. Dane techniczne
Napięcie: 220-240 V ~ 50 Hz
Pobór mocy: 400 W
Pojemność: maks. 6 jajek
3. Opis urządzenia
Pokrywa
q
Koszyczek na jajka
w
Pojemnik do gotowania
e
Włącznik
r
(położenie “ “: gotowanie)
(położenie “O“: wył.)
(położenie “ “: podtrzymywanie
wysokiej temperatury)
Zwinięcie kabla
t
Miarka
y
Igła (jest w miarce)
u
W żadnym przypadku nie wolno zanurzać urządzenia w cieczy, narażać go na kontakt z
wilgocią i używać go na zewnątrz.
• Jeśli jednak zdarzy się, że do urządzenie dostanie się woda, natychmiast wyjąć wtyczkę z gniazdka. Po tym zdarzeniu nie włączać urządzenia w normalny sposób, lecz zwrócić się do
serwisu w celu stwierdzenia ewentualnych
usterek.
• Nie korzystać z urządzenia, jeśli znajduje się
ono na wilgotnym podłożu lub w wypadku
mokrych rąk lub obudowy urządzenia.
• Kabel sieciowy ułożyć w taki sposób, aby nie
stykał się on w żadnym stopniu z ostro zakończonymi częściami.
• Kabla sieciowego nie wolno zginać, zgniatać
ani owijać wokół urządzenia .
• Aby uniknąć zagrożenia, uszkodzone kable sieciowe lub wtyczki niezwłocznie wymień w autoryzowanym punkcie serwisowym.
• W użytkowaniu urządzenia nie wykorzystuj zewnętrznych czasomierzy ani żadnego oddzielnego systemu sterowania.
- 6 -
Page 9

Niebezpieczeństwo zranienia!
• Nie pozostawiać pracującego urządzenia bez
odpowiedniego nadzoru.
• Nie zezwalaj na użytkowanie tostera przez osoby (w tym dzieci) upośledzone umysłowo lub fizycznie lub nie posiadające odpowiedniej wiedzy i doświadczenia w bezpiecznym
użytkowaniu urządzeń, bądź jeśli nie zostały
one uprzednio odpowiednio poinstrowane lub
przeszkolone.
• Poinformuj dzieci o zagrożeniach związanych z
użytkowaniem urządzenia i nie pozwól dzieciom bawić się urządzeniem.
• Obchodzić się ostrożnie z igłą
• W czasie pracy obudowa jest bardzo gorąca. Z
tego względu w celu zdjęcia pokrywy
zyczka
do tego celu uchwyt.
chwytać wyłącznie za przewidziany
w
UWAGA! Z otworu wylotowego pary oraz
przy otwieraniu pokrywy
gorące powietrze! Niebezpieczeństwo
poparzenia!
na dnie miarki.
u
wydobywa się
q
q
i kos-
5. Uruchamianie
Przed uruchomieniem urządzenia należy
przekonać się, czy ...
- urządzenie, wtyczka i kabel zasilający są w
odpowiednim stanie i, czy ...
- z urządzenia usunięte zostały wszystkie
materiały opakowania.
➪ Najpierw wyczyścić urządzenie zgodnie z
opisem podanym w punkcie 8.
6. Gotowanie jajek
➪ Za pomocą igły uwykonać nakłucie od góry
bądź od dołu jajek.
➪ Umieścić jajka stroną nakłucia w ko- szyczku
➪ Nalać do miarki
Ilość wody zależy od ilości gotowanych jajek i
wybranego stopnia twardości.
Objaśnienia do symboli na miarce:
odpowiednią ilość wody.
y
w
.
➪ Otworzyć pokrywę
uchwytu i zdjęcie w bok. Unikać kontaktu rąk z
wydobywającą się gorącą parą.
➪ Koszyczek
całkowitym wyparowaniu pary.
zdejmować dopiero po
w
poprzez uniesienie
q
Uwaga! Niebezpieczeństwo
uszkodzenia!
• Nie ustawiać urządzenia w pobliżu źródeł ciepła.
• Nigdy nie otwierać obudowy. W takim wypadku nie można zapewnić należytego bezpieczeństwa i następuje wygaśnięcie gwarancji.
• Stosować wyłącznie akcesoria dołączone do
zestawu i nie uruchamiać urządzenia bez założonego koszyczka
• Przed wyczyszczeniem i schowaniem urządzenia należy odczekać do całkowitego ostygnięcia wszystkich części.
w
.
na twardo
średni:
na miękko
Wskazówka:
W zależności od wielkości jajek może się zdarzyć,
że niezależnie od podziałki na miarce
będzie dolać więcej lub mniej wody, by uzyskać
żądaną twardość jajek.
Gdy jajko będzie zbyt miękkie, dolej nieco wody
(jedną kreskę więcej na podziałce). Wydłuży się
przez to czas gotowania. Jajko będzie twardsze.
Gdy jajko będzie zbyt twarde, przy następnym gotowaniu nalej mniej wody (jedną kreskę mniej na
podziałce). Czas gotowania będzie krótszy. Jajko
będzie bardziej miękkie.
➪ Wodę nalewać tylko do pojemnika
➪ Założyć koszyczek
nia
i zakryć pokrywą q.
e
- 7 -
na pojemnik do gotowa-
w
y
e
trzeba
.
Page 10

➪ Nacisnąć włącznik rw lewo (położenie
“ “) aby włączyć urządzenie.
8. Czyszczenie i konserwacja
Jeśli jajka osiągną właściwy stopień ugotowania,
rozlega się sygnał.
Nacisnąć włącznik ponownie do położenia “O”
aby wyłączyć urządzenie.
➪ Po ugotowaniu umieścić jajka w zimnej wodzie
w celu ostudzenia.
7. Utrzymywanie wysokiej
temperatury jajek
Funkcji utrzymywania ciepłoty używaj tylko do
jajek gotowanych na twardo.
Jajka po ugotowaniu ostudź pod zimną, bieżącą
wodą.
➪ Naciśnij przełącznik w prawo, aby po ugotowa-
niu jajek włączyć funkcję podtrzymywania
wysokiej temperatury (położenie “ “).
➪ Nacisnąć włącznik ponownie do położenia “O”
aby wyłączyć urządzenie.
Zagrożenie życia poprzez poraże-
nie prądem elektrycznym:
• Nigdy nie otwierać obudowy urządzenia. We
wnętrzu nie ma żadnych elementów sterujących.
Nigdy nie zanurzać elementów urządzenia w
wodzie ani w innych cieczach!
Uwaga:
Przy czyszczeniu zwracać uwagę na igłę u.
Niebezpieczeństwo skaleczenia!
Wskazówka:
Nie używać żadnych środków do czyszczenia ani
rozpuszczalników. Mogą one spowodować uszkodzenie urządzenia.
Czyszczenie:
➪ Wyciągnąć najpierw wtyczkę sieciową z gni-
azdka sieciowego.
➪ Pozwolić na ostygnięcie urządzenia.
➪ Następnie wymyć pojemnik do gotowania
kabel sieciowy lekko zwilżonym ręcznikiem.
➪ Usunąć osad z kamienia stosując roztwór nie-
wielkiej ilości octu z wodą.
➪ W celu pozbycia się zapachu octu włączyć
urządzenie z czystą wodą.
➪ Za każdym razem przed użyciem urządzenie
należy dokładnie wysuszyć.
e
i
Czyszczenie akcesoriów:
➪ Pokrywę
wodą i płynem do mycia naczyń.
• Uchwyt do jajek w, pokrywka qi miarka
nadają się również do mycia w zmywarce do
naczyń.
- 8 -
, koszyczek wi miarkę ymyć
q
y
Page 11

9. Przechowywanie
Przed schowaniem urządzenia należy odczekać,
aż całkowicie wystygnie.
➪ Kabel sieciowy zwijać tpod dnem
urządzenia.
➪ Urządzenie przechowuj w suchym miejscu.
10. Utylizacja
Urządzenia nie należy wyrzucać wraz
z normalnymi odpadami domowymi.
Niniejszy produkt podlega działaniom,
przewidziamyn w przepisach dyrektywy europejskiej 2002/96/EC.
Urządzenie należy usuwać w akredytowanych zakładach utylizacji odpadów lub komunalnych zakładach utylizacji odpadów.
Należy przestrzegać aktualnie obowiązujących
przepisów. W razie pytań i wątpliwości odnośnie
zasad utylizacji należy skontaktować się z najbliższym zakładem utylizacji odpadów.
Materiał opakowaniowy należy przekazywać do utylizacji zgodnie z przepisami o
ochronie środowiska.
Urządzenie objęte jest dwuletnią gwarancją, licząc
od daty zakupu. Urządzenie zostało starannie wyprodukowane i poddane skrupulatnej kontroli przed
wysyłką. Paragon należy zachować jako dowód
dokonania zakupu. W przypadku roszczeń gwarancyjnych należy skontaktować się telefonicznie z
serwisem. Tylko w ten sposób można zagwarantować bezpłatną wysyłkę zakupionego produktu.
Gwarancja obejmuje wyłącznie wady materiałowe
i fabryczne, natomiast nie obejmuje szkód powstałych podczas transportu, części ulegających zużyciu ani uszkodzeń części łatwo łamliwych, np. wyłączników, akumulatorów. Produkt przeznaczony
jest wyłącznie do użytku domowego, a nie do zastosowań profesjonalnych.
Gwarancja traci ważność w przypadku niewłaściwego używania urządzenia, używania niezgodnego z przeznaczeniem, użycia siły lub ingerencji w
urządzenie dokonywanej poza naszymi autoryzowanymi punktami serwisowymi. Niniejsza gwarancja nie ogranicza ustawowych praw nabywcy urządzenia.
Okres gwarancji nie ulega wydłużeniu o czas trwania usługi gwarancyjnej. Dotyczy to również wymienionych i naprawionych części. Szkody i wady zauważone już w chwili zakupu należy zgłosić od razu
po rozpakowaniu, nie później niż po upływie
dwóch dni od daty zakupu. Po upływie okresu
gwarancyjnego wszystkie naprawy będą wykonywane płatnie.
11. Gwarancja i serwis
Urządzenie objęte jest dwuletnią gwarancją, licząc
od daty zakupu. Urządzenie zostało starannie wyprodukowane i poddane skrupulatnej kontroli przed
wysyłką. Paragon należy zachować jako dowód
dokonania zakupu. W przypadku roszczeń gwarancyjnych należy skontaktować się telefonicznie z
serwisem. Tylko w ten sposób można zagwarantować bezpłatną wysyłkę zakupionego produktu.
Kompernass Service Polska
Tel.: 022 / 3972212
e-mail: support.pl@kompernass.com
12. Importer
KOMPERNASS GMBH
BURGSTRASSE 21
D-44867 BOCHUM
www.kompernass.com
- 9 -
Page 12

Tojásfőző
4. Biztonsági utasítások
1. Rendeltetés
Ez a készülék kizárólag tyúktojás magánháztartásban történő főzésére és melegítésére alkalmas.
Nem alkalmas más élelmiszerekkel vagy anyagokkal való használatra. Úgyszintén nem alkalmas
kereskedelmi vagy ipari használatra.
2. Műszaki adatok
Feszültség: 220-240 V ~ 50 Hz
Teljesítményfelvétel: 400 W
Kapacitás: max. 6 tojás
3. Készülék leírása
Fedél
q
Tojástartó
w
Főzőtálca
e
Kapcsoló
r
( “ “ pozíció: Főzés)
( “O“ pozíció: Kikapcsolás)
( “ “ pozíció: Melegítés)
Kábeltartó
t
Mérőpohár
y
Tojáskiszúró (a mérőpohárba beszerelve)
u
VESZÉLY! Áramütés!
Tűzveszély!
• A tojásfőzőt csak előírásszerűen beszerelt és
földelt, 220 - 240 V ~50 Hz hálózati
feszültségű dugaszoló aljzatba szabad
csatlakoztatni.
• Mindig húzza ki a csatlakozót a dugaszoló aljzatból, ha mozgatja, meg- tölti a készüléket,
üzemzavar esetén, tisztítás előtt, vagy ha nem
használja a készüléket! Soha ne a kábelnél fogva, hanem a csatlakozónál fogva húzza ki a készüléket. Ne érjen hozzá a készülék csatlakozójához nedves vagy vizes kézzel.
Semmi esetre se merítse a készüléket folyadékba, ne tegye ki folyadékkal való érintkezésnek
és ne használja a szabadban.
• Ha a készülék folyadékba esne, húzza ki azonnal a hálózati csatlakozót a dugaszoló aljzatból. Ezután ne használja a készüléket, hanem
először ellenőriztesse minősített szakemberrel.
• Ne használja a tojásfőzőt vizes padlón állva
vagy ha a kezei vagy a készülék vizesek.
• Úgy helyezze el a hálózati kábelt, hogy az ne
kerülhessen érintkezésbe forró vagy éles
tárgyakkal.
• Ne törje meg és ne szorítsa be a hálózati kábelt,
és ne tekerje a készülék köré.
• A veszély elkerülése érdekében a sérült hálózati
kábelt vagy csatlakozót azonnal cseréltesse ki
engedéllyel rendelkező szakemberrel vagy az
ügyfélszolgálattal.
• Ne használjon külső időkapcsolót vagy külön távirányító rendszert a készülék üzemeltetésére!
- 10 -
Page 13

Sérülésveszély!
• Üzem közben ne hagyja a készüléket felügyelet
nélkül.
• Ne engedje, hogy a készüléket olyan személyek
(ideértve a gyermekeket is) használják, akik testi,
érzékszervi vagy lelki képességeik vagy tapasztalatuk és ismeretük hiánya megakadályoznának
abban, hogy biztonságosan használják a készüléket, ha felügyelet nélkül vannak, vagy ha
előtte nem világítosották fel őket a készülék
használatáról.
• Világosítsa fel a gyermekeket a készülékről és
annak veszélyeiről, hogy ne játsszanak vele
• Vigyázzon a mérőpohár alján található
tojáskiszúróval
• A készülék házának a felülete üzemelés közben
nagyon felforrósodik. Ezért csakis a fedelet
és a tojástartót wfogja meg az erre kijelölt
fülnél, ha ezeket a részeket le akarja venni.
Vigyázat: A gőznyíláson át, és a fedél
kinyitásakor forró gőz áramlik ki!
Leforrázhatja magát!
➪ A fedél qkinyitásához emelje meg a fogantyút
és mozdítsa el oldalra.Ügyeljen rá, hogy a keze
és a karja ne kerüljön érintkezésbe a kiáramló
gőzzel.
➪ Csak akkor vegye ki a tojástartót
teljesen elszállt.
u
.
q
q
, ha a gőz
w
Figyelem! Anyagi kár!
• A készüléket soha ne állítsa hőforrás közelébe.
• Soha ne nyissa fel a készülék házát. Ebben az
esetben nem tudjuk biztosítani biztonságát és a
garancia is érvényét veszti.
• Csak a csomagban található alkatré- szeket
használja és a készüléket soha ne használja a
tojástartó
• Hagyja a készüléket és az alkatrészeket teljesen
lehűlni, mielőtt tisztítaná és eltenné őket.
w
nélkül.
5. Üzembehelyezés
Mielőtt üzembe helyezné a készüléket, győződjön
meg arról, hogy ...
- a készülék, a hálózati dugó és a hálózati kábel
kifogástalan állapotban van és...
- minden csomagolóanyag el van távolítva a
készülékről.
➪ Első alkalommal a 8. pontban leírtak alapján
tisztítsa meg a készüléket.
6. Tojásfőzés
➪ Szúrjon a tojáskiszúróval uegy lyukat a tojás
tetejébe vagy aljába.
➪ Helyezze a tojást a kiszúrt oldalával felfele a
tojástartóba
➪ Töltse a szükséges mennyiségű vizet a mérőpo-
hárba
y
és kívánt keménységüktől függ.
A mérőpoháron található jelzések magyarázata:
kemény
közepes:
lágy
Tudnivaló:
A tojás méretétől függően előfordulhat, hogy a mérőpoháron
vesebb vizet kell betöltenie, hogy a tojás megfelelő
keménységűre főjön. Ha túl lágy a tojás, kicsivel
több vizet töltsön bele (kb. egy csíkkal többet a skálán). A főzési idő meghosszabbodik. A tojás keményebb lesz.
Ha túl kemény lett a tojás, a legközelebbi főzéskor
kicsivel kevesebb vizet töltsön bele (kb. a skálán
egy csíkkal kevesebb). A főzési idő lerövidül. A tojás lágyabb lesz.
➪ Ezután töltse a vizet a főzőtálcába
➪ Tegye a tojástartót
helyezze rá a fedelet
.
w
. A víz mennyisége a tojások számától
lévő skálától eltérően több vagy ke-
y
.
e
a főzőtálcába eés
w
.
q
- 11 -
Page 14

➪ A készülék bekapcsolásához nyomja el a kapc-
soló gombot
balra (a “ “ pozícióba).
r
8. Tisztítás és ápolás
Hangjelzés hallható, ha a tojások készen vannak.
A készülék kikapcsolásához nyomja vissza a
kapcsoló gombot a “O” pozícióba.
➪ Tartsa a tojásokat a főzés után folyó hideg
víz alá.
7. A tojások melegen tartása
A melegentartó funkciót csak keményre főtt tojá-
soknál használja.
A tojásokat főzés után hideg folyó víz alatt öblít-
se le.
➪ A tojások megfőzése után a melegentartó funkci-
ót úgy tudja aktiválni, ha elnyomja a kapcsolót
jobbra (a “ “-es pozícióba).
➪ A készülék kikapcsolásához nyomja vissza a
kapcsoló gombot a “O” pozícióba.
Elektromos áramütés veszély:
• Ne nyissa ki a készülék házát. A ké-szülékházon
belül semmiféle kezelőelem nem található.
Soha ne merítse a készüléket vízbe vagy egy-
éb folyadékba!
Vigyázat:
A mérőpohár mosogatásakor ügyeljen a tojáskiszúróra!
. Balesetveszély!
u
Tanács:
Ne használjon tisztító- vagy oldószert. Ezek kárt
okozhatnak a készülékben.
A készülék tisztítása:
➪ Először húzza ki a csatlakozót a dugaszoló
aljzatból.
➪ Először hagyja a készüléket lehűlni.
➪ Ezután törölje meg a főzőtálcát
kábelt egy enyhén nedves mosogatókendővel.
➪ Távolítsa el a vízkőlerakódást egy kis
ecetesvízzel.
➪ Ezután csak tiszta vízzel helyezze üzembe a kés-
züléket annak érdekében, hogy az ecetszag
elszálljon.
➪ Mindenképpen jól szárítsa meg a készüléket a
következő használat előtt.
és a hálózati
e
A hozzátartozó részek tisztítása:
➪ Mosogassa el a fedőt
mérőpoharat
• A tojástartó
gatógépben is tisztítható.
- 12 -
mosogatószerrel, folyó víz alatt.
y
, fedél qés mérőpohár ymoso-
w
, a tojástartót wés a
q
Page 15

9. Tárolás
11. Garancia és szerviz
Hagyja teljesen lehűlni a készüléket, mielőtt
visszatenné a helyére.
➪ Tekerje a hálózati kábelt a készülék alján
található kábeltartóra
➪ A készüléket száraz helyen tárolja.
t
.
10. Ártalmatlanítás
Semmi esetre se dobja a készüléket a
háztartási hulladékba. Jelen termékre
a 2002/96/EC számú európai utasítás
rendelkezési vonatkoznak.
A készüléket engedélyeztetett hulladékgyűjtő
helyen vagy a helyi hulladékeltávolító üzemnél
tudja kidobni.
Vegye figyelembe az érvényben lévő idevonatkozó
előírásokat. Ha kérdése merülne fel, vegye fel a
kapcsolatot a hulladékfeldolgozó vállalattal.
A csomagolóanyagot juttassa környezetvédő ártalmatlanítóhelyre.
A készülékre 3 év garanciát adunk a vásárlás dátumától számítva. A készüléket gondosan gyártottuk,
és szállítás előtt lelkiismeretesen ellenőriztük. Kérjük,
a vásárlás igazolására őrizze meg a pénztári blokkot.
Kérjük, garanciaigény esetén vegye fel a kapcsolatot telefonon az Ön közelében lévő szervizzel.
Csak ebben az esetben garantálhatjuk, hogy ingyen tudja beküldeni az árut.
A garancia csak anyag- és gyártási hibára vonatkozik, nem pedig szállítási kárra, kopásra vagy törékeny részek (pl. kapcsoló vagy elem) sérülésére. A termék kizárólag magánhasználatra, nem üzleti
használatra készült.
A garancia érvényét veszti visszaélésszerű vagy
szakavatatlan kezelés, erőszak alkalmazása vagy
olyan beavatkozások esetén, amelyeket nem engedélyeztetett szervizelő üzleteink hajtottak végre. Az
ön törvényes jogait ez a garancia nem korlátozza.
A garanciaidő nem hosszabbodik a jótállással. Ez
a kicserélt vagy javított alkatrészekre is érvényes.
Az esetlegesen már a megvételkor meglévő károkat
és hiányosságokat azonnal kicsomagolás után, legkésőbb két nappal a vétel dátumától számítva jelezni kell. A garanciális idő lejárta után esedékes javítások térítéskötelesek.
Kompernass Service Hungary
Tel.: 06 40 104680
e-mail: support.hu@kompernass.com
12. Gyártja
KOMPERNASS GMBH
BURGSTRASSE 21
D-44867 BOCHUM
www.kompernass.com
- 13 -
Page 16

Kuhalnik za jajca
4. Varnostni napotki
1. Namen uporabe
Ta aparat je predviden izključno za kuhanje in
oh-ranjanje toplote kokošjih jajc v privatnih
gospodinjstvih.
Aparat ni predviden za uporabo z drugimi živili ali
drugimi materiali. Ravno tako ni predviden za
upo-rabo v obrtnih ali industrijskih področjih.
2. Tehnični podatki
Napetost: 220-240 V ~ 50 Hz
Moč: 400 W
Kapaciteta: maks. 6 jajc
3. Opis aparata
Pokrov
q
Držalo jajc
w
Grelna posoda
e
Obratovalno stikalo
r
(položaj “ “: kuhanje)
(položaj “O“: izklop)
(položaj “ “: ohranjanje toplote)
Navitje kabla
t
Merilna posoda
y
Konica za jajca (sestavni del merilne posode)
u
NEVARNOST! Električni udar!
Nevarnost požara!
• Kuhalnik za jajca priključite samo na pravilno instalirano in ozemljeno omrežno vtičnico z omrežno napetostjo 220 V - 240 V / 50 Hz.
• Kadar aparat premikate, polnite, pri motnjah,
preden aparat začnete čistiti ali kadar ga ne
potrebujete, omrežni vtič zmeraj potegnite iz
vtičnice! Nikoli ne vlecite za omrežni kabel, zmeraj vlecite za omrežni vtič. Vtiča aparata se ne
dotikajte z mokrimi ali vlažnimi rokami.
Aparata nikakor ne smete potopiti v tekočine,
ga izpostavljati vlagi ali ga uporabljati na
prostem.
• Če bi vam aparat kljub vsemu padel v tekočino,
omrežni vtič takoj potegnite iz vtičnice. Po tem
aparata ne uporabljajte več, temveč ga dajte
preveriti pooblaščeni servisni poslovalnici.
• Kuhalnika za jajca ne uporabljajte, če se nahajate na vlažnih tleh, imate vlažne roke ali je
aparat moker.
• Omrežni kabel položite tako, da se ne dotika
vročih ali ostrih predmetov.
• Omrežnega kabla ne prepogibajte ali stiskajte
in ga ne ovijajte okoli aparata.
• Poškodovane omrežne vtiče ali omrežne kable
dajte takoj zamenjati pooblaščenemu strokovnemu osebju ali servisni službi, da se izognete nevarnostim.
• Za upravljanje naprave ne uporabljajte zunanje
stikalne ure ali ločenega daljinskega upravljalnega sistema.
- 14 -
Page 17

Nevarnost poškodbe!
• Aparata med obratovanjem ne puščajte brez
nadzora.
• Ta aparat ni namenjen temu, da ga uporabljajo
osebe (vključno z otroci) z omejenimi fizičnimi,
zaznavnimi ali duševnimi sposobnostmi ali s pomanjkljivimi izkušnjami in/ali znanjem, razen
pod nadzorom osebe, ki je zanje odgovorna ali
jim je dala navodila v zvezi z uporabo aparata.
• Otroke je treba nadzorovati, da preprečite igro
z aparatom.
• S konico za jajca
ravnajte previdno.
• Površine ohišja se med delovanjem zelo segrejejo. Zato pokrov
na zato predvidenem ročaju, da ju lahko
odstranite.
Pozor! Iz luknje za paro in pri odpiranju
pokrova
Nevarnost opeklin
na dnu merilne posode
u
in držalo jajc wprijemajte
q
iz aparata izstopa vroča para!
q
5. Zagon
Preden aparat prvič uporabite, se prepričajte o tem,
da...
- so aparat, omrežni vtič in omrežni kabel v
brezhibnem stanju in...
- so vsi embalažni materiali odstranjeni z aparata.
➪ Aparat najprej očistite, kot je opisano pod 8.
6. Kuhanje jajc
➪ S konico za jajca unaredite luknjo na spodnji
ali zgornji strani jajc.
➪ Jajca z zabodeno stranjo navzgor vstavite
v držalo jajc
➪ Merilno posodo
no vode. Količina vode je odvisna od števila jajc
in želene stopnje njihove trdote.
Razlaga simbolov na merilni posodi:
.
w
napolnite s potrebno količi-
y
➪ Odprite pokrov q, tako da primete za ročaj, ga
dvignete in pomaknete na stran. Izogibajte se
stiku dlani in rok z izstopajočo paro.
➪ Držalo jajc
v celoti razkadila.
vzemite ven šele, ko se je para
w
Pozor! Materialna škoda!
• Aparata nikoli ne postavljajte v bližino virov
toplote.
• Ohišja nikoli ne odpirajte. V tem primeru varnost
ni več zagotovljena in jamstvo preneha veljati.
• Uporabljajte le dele pribora, ki so priloženi kuhalniku, in aparata nikoli ne uporabljajte brez
vstavljenega držala jajc
• Aparat in deli pribora naj se v celoti ohladijo,
preden jih očistite in shranite.
w
.
trdo
srednje
mehko
Napotek:
Odvisno od velikosti jajc se lahko zgodi, da morate
ne glede na skalo na merilni posodi
ali več vode, da dosežete želeno stopnjo trdote
jajc.
Če je jajce premehko, dolijte malce več vode (za
okrog eno črto na skali več). Čas kuhanja se podaljša. Jajce postane bolj trdo.
Če je jajce postalo pretrdo, pri naslednjem postopku kuhanja dodajte malce manj vode (za okrog eno
črto na skali manj). Čas kuhanja se skrajša. Jajce
postane bolj mehko.
➪ Sedaj v grelno posodo
➪ Držalo jajc
skupaj pokrijte s pokrovom
➪ Obratovalno stikalo
(položaj “ “), da aparat vklopite.
- 15 -
dajte v grelno posodo ein vse
w
nalijte vodo.
e
q
pomaknite na levo
r
.
doliti manj
y
Page 18

Kakor hitro so jajca kuhana, zadoni signal.
Obratovalno stikalo pomaknite nazaj v položaj
“O”, da aparat izklopite.
➪ Po koncu kuhanja jajca splahnite s hladno,
tekočo vodo.
7. Ohranjanje toplote jajc
8. Čiščenje in nega
Smrtna nevarnost zaradi električ-
nega udara:
• Ohišja aparata nikoli ne odpirajte. V njem se
ne nahajajo nobeni upravljalni elementi.
Delov aparata nikoli ne potopite v vodo ali
druge tekočine!
Funkcijo ohranjanja toplote uporabljajte le za
trdo skuhana jajca.
Po koncu kuhanja jajca splahnite s hladno, teko-
čo vodo.
➪ Obratovalno stikalo pomaknite na desno, da po
kuhanju jajc aktivirate funkcijo ohranjanja
toplote (položaj “ “).
➪ Obratovalno stikalo pomaknite nazaj v položaj
“O”, da aparat izklopite.
Previdno
Pri čiščenju merilne posode pazite na konico za jajca
. Nevarnost poškodbe!
u
Napotek
Ne uporabljajte čistil ali topil. Ta bi privedla do škode na aparatu.
Čiščenje aparata:
➪ Najprej omrežni vtič potegnite iz vtičnice.
➪ Aparat pustite, da se ohladi.
➪ Potem grelno posodo
te z rahlo navlaženo krpo za pomivanje.
➪ Ostanke vodnega kamna odstranite z raztopino
vode in malce kisa.
➪ Potem aparat zaženite samo s čisto vodo, da
odstranite vonj po kisu.
➪ Aparat v vsakem primeru dobro posušite, preden
ga ponovno uporabite.
Čiščenje pribora:
➪ Pokrov
splahnite s čistilom pod toplo vodo.
• Držalo jajc
lahko očistite tudi v pomivalnem stroju.
, držalo jajc win merilno posodo
q
, pokrov qin merilno posodo
w
in omrežni kabel očisti-
e
y
y
- 16 -
Page 19

9. Shranjevanje
11. Garancija in servis
Pustite, da se aparat najprej popolnoma ohladi,
preden ga shranite.
➪ Omrežni kabel navijte okrog navitja kabla
na dnu aparata.
➪ Aparat hranite na suhem.
t
10. Odstranitev
Naprave v nobenem primeru ne
odvrzite v običajne hišne smeti. Ta
proizvod je podvržen evropski
Direktivi 2002/96/EC.
Napravo oddajte pri podjetju, registriranem za
predelavo odpadkov, ali pri svojem komunalnem
podjetju za predelavo odpadkov.
Upoštevajte trenutno veljavne predpise. V primeru
dvoma se obrnite na svoje podjetje za predelavo
odpadkov.
Embalažo oddajte za okolju primerno
odstranitev.
Ta naprava ima 3 leta garancije od datuma nakupa. Naprava je bila skrbno izdelana in pred dobavo natančno preverjena. Prosimo, da blagajniški račun shranite kot dokazilo o nakupu. V primeru
uveljavljanja garancije se po telefonu obrnite na
svojo servisno službo.
Samo tako je zagotovljeno brezplačno pošiljanje
vašega izdelka.
Garancija velja le za napake pri materialu ali izdelavi, ne pa tudi za poškodbe pri transportu, potrošne dele ali za poškodbe lomljivih delov, npr. stikal
ali akumulatorjev.
Izdelek je namenjen izključno za zasebno in ne za
poslovno uporabo.
V primeru zlorabe ali nepravilnega ravnanja, pri
uporabi sile ter pri posegih, ki jih ni izvedla naša
pooblaščena servisna poslovalnica, garancija preneha veljati. Vaših zakonskih pravic ta garancija ne
omejuje.
Jamstvo ne podaljša garancijske dobe. To velja tudi
za zamenjane in popravljene dele. Morebitne poškodbe in pomanjkljivosti, ki obstajajo že pri nakupu,
je treba javiti takoj po razpakiranju, najpozneje pa
dva dni po datumu nakupa.Popravila po preteku
garancijske dobe je treba plačati.
Birotehnika
Phone:+386 (0) 2 522 16 66
Fax: +386 (0) 2 531 17 40
e-mail: support.si@kompernass.com
12. Proizvajalec
KOMPERNASS GMBH
BURGSTRASSE 21
D-44867 BOCHUM
www.kompernass.com
- 17 -
Page 20

Vařič vajec
4. Bezpečnostní pokyny
1. Účel použití
Tento přístroj je určen výhradně pro vaření slepičích
vajec a jejich udržování v teple v soukromých
domácnostech.
Přístroj není určen k použití pro jiné potraviny či jiné
materiály. Také není určen pro použití v živnostenských a průmyslových oblastech.
2. Technické údaje
Napětí: 220-240 V ~ 50 Hz
Příkon: 400 W
Obsah: max. 6 vajec
3. Popis přístroje
Kryt
q
Držák vajec
w
Varná miska
e
Vypínač
r
(Poloha “ “: vaření)
(Poloha “O“: vypnuto)
(Poloha “ “: udržování v teple)
Navíjení kabelu
t
Odměrný pohárek
y
Hrot na propíchnutí vejce
u
(integrované v odměrce)
POZOR NEBEZPEČÍ! Zásah
elektrickým proudem!
Nebezpečí požáru!
• Vařič vajec připojujte pouze do řádně instalované a uzemněné zástrčky o napětí
220 - 240 V ~50 Hz.
• Pokud spotřebič přemisťujete či plníte nebo v případě poruchy, před čištěním a tehdy, když přístroj není v provozu, vytahujte vždy zástrčku ze
zásuvky! Nikdy netahejte za kabel, nýbrž vždy
jen za zástrčku. Nedotýkejte se zástrčky mokrýma nebo vlhkýma rukama.
Spotřebič nesmíte v žádném případě nořit do
kapalin, vystavovat vlhkosti ani používat venku.
• Pokud spotřebič přesto spadne do kapaliny, okamžitě vytáhněte zástrčku ze zásuvky. Poté již
spotřebič neuvádějte do provozu a nechte ho
zkontrolovat autorizovaným servisním střediskem.
• Vařič vajec nepoužívejte, stojíte-li na vlhké podlaze nebo jsou-li vaše ruce či přístroj mokré.
• Síťový kabel umístěte tak, aby nepřišel do styku s
horkými nebo ostrými předměty.
• Neohýbejte a nestlačujte síťový kabel a neomotávejte ho kolem přístroje.
• Poškozené síťové zástrčky a síťové kabely nechte
ihned vyměnit odborným personálem nebo zákaznickým servisem. Vyhnete se tak nebezpečí.
• Pro provoz přístroje nepoužívejte externího časovače nebo samostatný systém k dálkovému ovládání.
- 18 -
Page 21

Nebezpečí zranění!
• Spotřebič nenechávejte během provozu bez
dozoru.
• Nikdy nenechte přístroj obsluhovat osoby (včetně dětí), jejichž fyzické, senzorické nebo mentální schopnosti či nedostatek zkušeností a znalostí
jim znemožňují bezpečné používání přístroje,
pokud předtím nebyly instruovány nebo nad sebou nemají dohled.
• Vysvětlete dětem funkci přístroje a rizika práce s
ním, aby si s přístrojem nehrály
• S hrotem na propíchnutí vejce
ho pohárku zacházejte opatrně.
• Povrch krytu je při provozu přístroje velmi horký.
Dotýkejte se proto krytu
výhradně na k tomu určené úchytce, chcete-li je
vyjmout.
POZOR! Z otvoru na odvádění páry a při
otevření víka uniká horká pára!
Nebezpečí opaření!
q
na dně měrné-
u
a držáku vajec
w
5. Uvedení do provozu
Dříve než uvedete zařízení do provozu, ujistěte se,
že ...
- přístroj, zástrčka a síťový kabel jsou v
bezvadném stavu a...
- všechny obaly byly z přístroje odstraněny.
➪ Přístroj nejprve vyčistěte, jak je popsáno v
bodě 8.
6. Vaření vajec
➪ Hrotem upropíchněte do horní nebo dolní části
vejce otvor.
➪ Vejce vložte propíchnutou stranou nahoru do
držáku vajec
➪ Naplňte měrný pohárek
vím vody. Množství vody závisí na počtu vajec a
požadované tvrdosti.
w
.
potřebným množst-
y
➪ Kryt
➪ Držák vajec
otvírejte tak, že jej zvednete za úchytku
q
a odložíte stranou. Zabraňte kontaktu rukou a
paží s unikající párou.
vyjměte až poté, co pára zcela
w
zmizí.
Pozor! Věcné škody!
• Spotřebič nikdy neumisťujte do blízkosti zdroje
tepla.
• Plášť nikdy neotevírejte! V tomto případě není
zaručena bezpečnost a zanikne nárok na
záruku.
• Používejte pouze příslušenství obsažené v dodávce a přístroj nikdy nezapínejte bez vloženého držáku vajec
• Před čištěním a uložením přístroje a příslušenství
je nechejte zcela vy- chladnout.
w
.
Objasnění symbolů na měrném pohárku:
Natvrdo
Střední
Naměkko
Upozornění:
Dle velikosti vajíček může dojít k tomu, že odchylujíc
se od stupnice na odměrce
nebo více vody pro dosažení požadované tvrdosti
vajíček.
Pokud je vajíčko příliš měkké, dolijte trochu vody
(přibližně o jednu cejchovací čárku na stupnici navíc). Tím se tak doba vaření prodlouží. Vejce se uvaří více natvrdo. Pokud se vejce uvařilo příliš natvrdo,
nalijte při dalším vaření do vařiče na vajíčka méně
vody (přibližně o jednu cejchovací čárku na stupnici
méně). Doba vaření se tak zkrátí. Vejce se nyní uvaří víc naměkko.
- 19 -
musíte nalít méně
y
Page 22

➪ Vodu nalijte do varné misky e.
➪ Držák vajec
nasaďte kryt
➪ Otočte vypínač
stroj se zapne.
Jakmile jsou vejce uvařená, zazní signál.
vložte do varné misky ea
w
.
q
doleva (poloha “ “) pří-
r
8. Čištění a údržba
Nebezpečí ohrožení života elek-
trickým proudem:
• Nikdy neotvírejte kryt přístroje. Uvnitř nejsou
umístěny obslužné prvky.
Vypínač otočte zpět do polohy “O”, přístroj se
vypne.
➪ Po uvaření vejce zchlaďte pod tekoucí studenou
vodou.
7. Udržování vajec v teple
Teplo udržovací funkci používejte pouze pro va-
jíčka, uvařená natvrdo.
Zchlaďte uvařená vejce pod tekoucí studenou
vodou.
➪ Pro aktivování funkce udržení teploty (pozice
“ “) po uvaření vajec stiskněte provozní
páčku směrem doprava.
➪ Vypínač otočte zpět do polohy “O”, přístroj se
vypne.
Nikdy nenamáčejte díly přístroje do vody ani
jiných kapalin!
Pozor:
Při čištění měrného pohárku dávejte pozor na hrot
na propichování vajec!
u
Upozornění:
Nepoužívejte žádné čisticí prostředky ani rozpouštědla. Ty mohou způsobit škody na přístroji.
Čištění přístroje:
➪ Nejprve vytáhněte zástrčku ze zásuvky.
➪ Nechte přístroj nejprve vychladnout.
➪ Pak otřete varnou misku
kabel slabě navlhčeným hadrem.
➪ Zbytky vodního kamene odstraňte roztokem z
malého množství octa a vody.
➪ Poté přístroj zapněte pouze s čistou vodou,
abyste odstranili zápach octa.
➪ Přístroj v každém případě dobře osušte předtím,
než jej budete znovu používat.
Čištění příslušenství:
➪ Kryt
, držák vajec wa měrný pohárek
q
omyjte pod tekoucí vodou.
e
a síťový
y
• Vajíčkový izolátor
take vhodné pro mytí v myčce.
- 20 -
, víko qa odměrka yjsou
w
Page 23

9. Úschova
11. Záruka & servis
Před odstavením zařízení jej nejprve ponechte
zcela vychladnout.
➪ Síťový kabel naviňte do navíjení kabelu tna
dně přístroje.
• Přístroj uchovávejte na suchém místě.
10. Likvidace
V žádném případě nevyhazujte přístroj
do běžného domovního odpadu. Tento
výrobek musí plnit ustanovení evropské směrnice 2002/96/EC.
Zlikvidujte přístroj prostřednictvím firmy na likvidaci
s příslušným povolením nebo zařízení na likvidaci
komunálního odpadu.
Dodržujte aktuální platné předpisy. V případě
pochybností kontaktujte příslušnou firmu, která
se zabývá likvidací odpadu.
Veškeré obalové materiály nechte zlikvidovat v souladu s ekologickými předpisy.
Na tento přístroj platí tříletá záruka od data zakoupení. Přístroj byl vyroben s nejvyšší pečlivostí a před
odesláním prošel výstupní kontrolou. Uschovejte si,
prosím, pokladní
lístek jako doklad o nákupu. V případě uplatňování
záruky kontaktujte telefonicky
Vaší servisní službu. Pouze tak může být zajištěno
bezplatné zaslání Vašeho zboží.
Záruka se vztahuje pouze na chyby materiálu nebo
výrobní závady, ale ne na škody,vzniklé při přepravě, ne na součásti, podléhající rychlému opotřebení
nebo na poškození křehkých dílů, jako jsou např.
spínače nebo akumulátory. Výrobek je určen pouze
pro privátní použití, ne průmyslové.
Při nesprávném a neodborném využívání, při použití
násilí a při zásazích, které nebyly provedeny našimi
autorizovanými servisními provozovnami, záruční
nároky zanikají.
Vaše práva vyplývající ze zákona touto zárukou
nejsou omezena.
Záruční doba se zárukou neprodlouží. Toto platí
také pro náhradní díly a opravené součásti. Případné škody a vady, existující už při koupi, se musí hlásit ihned po vybalení, nejpozději však
do dvou dnů od data nákupu. Po uplynutí záruční
doby se provedené opravy musí zaplatit.
Ing. Martin Šimák, zprostředkovatel
servisu výrobků Kompernass
Hotline: 800 400 235
Fax: 271 722 939
e-mail: support.cz@kompernass.com
12. Dovozce
KOMPERNASS GMBH
BURGSTRASSE 21
D-44867 BOCHUM
www.kompernass.com
- 21 -
Page 24

Varič vajec
4. Bezpečnostné pokyny
1. Účel použitia
Tento prístroj je určený výlučne na varenie a udržiavanie kuracích vajec v teple v domácnostiach.
Nie je určený na použitie s inými potravinami alebo
materiálmi. Taktiež nie je určený na používanie v
obchodných alebo priemyselných prevádzkach.
2. Technické údaje
Napätie: 220-240 V ~ 50 Hz
Príkon: 400 W
Kapacita: max. 6 vajec
3. Opis prístroja
Vrchnák
q
Držiak vajec
w
Varná nádoba
e
Vypínač
r
(poloha “ “: varenie)
(poloha „O“: vypnuté)
(poloha “ “: udržiavanie tepla)
Navíjanie kábla
t
Odmerka
y
Bodec (integrované v odmerke)
u
Nebezpečenstvo! Hrozí zásah elek
trickým prúdom!
Nebezpečenstvo požiaru!
• Pripojte varič vajec len k predpisovo nainštalovanej a uzemnenej zásuvke so sieťovým napätím
220 - 240 V ~50 Hz.
• Vždy vytiahnite zástrčku zo zásuvky, keď prístroj
premiestňujete alebo napĺňate, pri poruchách,
pred čistením prístroja alebo keď ho dlhšie nepoužívate! Nikdy neťahajte za sieťovú šnúru, ale
vždy za zástrčku. Nedotýkajte sa prístrojovej
zástrčky mokrými alebo vlhkými rukami.
Prístroj nesmiete ponárať do kvapalín, vystavovať vlhkosti a používať vonku.
• Ak prístroj predsa len spadne do kvapaliny,
ihneď vytiahnite zástrčku zo zásuvky. Potom
prístroj nepoužívajte, ale najprv ho nechajte v
autorizovanej opravovni preskúšať.
• Nepoužívajte varič vajec, keď stojíte na vlhkej
podlahe alebo máte ruky alebo prístroj mokré.
• Položte sieťovú šnúru tak, aby sa nedotýkala
horúcich alebo ostrých predmetov.
• Neohýbajte a nestláčajte sieťovú šnúru, ani ju
neovíjajte okolo prístroja.
• Aby ste sa vyhli možným ohrozeniam, nechajte
poškodené sieťové zástrčky alebo sieťové šnúry
ihneď vymeniť autorizovanému odborníkovi alebo v zákazníckom servise.
• Na ovládanie prístroja nepoužívajte žiadne externé spínacie hodiny ani samostatný systém diaľkového ovládania.
- 22 -
Page 25

Nebezpečenstvo úrazu!
• Nenechávajte prístroj počas prevádzky bez
dozoru.
• Nedovoľte, aby prístroj obsluhovať také osoby
(vrátane detí), ktorých fyzické, senzorické alebo
mentálne schopnosti, prípadne nedostatok skúseností a znalostí neumožňujú bezpečné používanie prístroja, ak ste ich predtým nepoučili alebo
na ne nedohliadli.
• Vysvetlite deťom všetko o prístroji a nebezpečenstvách jeho používania, aby sa s ním nehrali.
• Opatrne zaobchádzajte s bodcom
odmerky.
• Povrch variča je v prevádzke veľmi horúci. Dotýkajte sa preto len na to určených rukovätí na kryte
a držiaku vajec w, ak ich chcete
q
vybrať.
POZOR! Z otvoru pre paru a pri otvorení krytu
vychádza horúca para!
q
Nebezpečenstvo oparenia
➪ Otvorte kryt qtak, že ho za rukoväť nadvihnete
a dáte nabok. Vyhnite sa dotyku ruky s vychádzajúcou parou.
➪ Držiak vajec
úplne zmizne.
vyberte až potom, keď para
w
u
na dne
Pozor! Vecné škody!
• Neumiestňujte kávovar nikdy v blízkosti zdrojov
tepla.
• Nikdy neotvárajte skrinku prístroja. V takom
prípade nie je zaručená bezpečnosť a záruka
končí.
• Používajte len dodané príslušentsvo a nepoužívajte prístroj nikdy bez vloženého držiaka vajec
.
w
• Pred čistením a poskladaním nechajte prístroj a
príslušenstvo úplne vychladnúť.
5. Uvedenie do prevádzky
Skôr než uvediete zariadenie do prevádzky, uistite
sa, že ...
- prístroj, zástrčka a napájací kábel sú v
bezchybnom stave a ...
- všetky obaly boli zo zariadenia odstránené.
➪ Najprv prístroj očistite tak, ako je opísané v
bode 8.
6. Varenie vajec
➪ Urobte bodcom udieru v hornej alebo dolnej
časti vajec.
➪ Uložte vajcia napichnutou stranou nahor do drž-
iaka
.
w
➪ Naplňte odmerku
vody. Množstvo vody závisí od počtu vajec a
požadovaného stupňa tvrdosti.
Vysvetlenie symbolov na odmerke:
tvrdé
stredné
mäkké
Upozornenie:
Podľa veľkosti vajec sa môže stať, že budete musieť
dať viac alebo menej vody, než ukazuje stupnica
na odmerke
peň tvrdosti vajec.
Ak sú vajcia príliš mäkké, pridajte trochu viac vody
(asi o jedno vajce viac na stupnici). Doba varenia
sa predĺži. Vajcia budú tvrdšie.
Ak sú vajcia príliš tvrdé, dajte pri ďalšom varení trochu menej vody (asi o jedno vajce menej na stupnici). Doba varenia sa skráti. Vajcia budú mäkšie.
➪ Teraz naplňte vodou nádobu
➪ Vložte držiak vajec
nádoby
, aby ste dosiahli požadovaný stu-
y
a zakryte krytom q.
e
potrebným množstvom
y
.
e
do varnej
w
- 23 -
Page 26

➪ Stlačte vypínač rdoľava (poloha “ “), čím
prístroj zapnete.
8. Čistenie a údržba
Len čo sú vajcia uvarené, ozve sa signál.
Stlačte vypínač späť do polohy „O“, aby ste
prístroj vypli.
➪ Po varení oblejte vajcia studenou tečúcou
vodou.
7. Udržiavanie vajec v teple
Funkciu udržiavania v teple používajte len pri
natvrdo uvarených vajciach.
Po uvarení vajcia ochlaďte pod tečúcou stude-
nou vodou.
➪ Abyste po uvareni vajec aktivovali funkciu udrža-
nia teploty (pozícia “ “) potisnite prevádzkovú páčku smerom vpravo.
➪ Stlačte vypínač späť do polohy „O“, aby ste
prístroj vypli.
Nebezpečenstvo úrazu elektrickým
prúdom:
• Nikdy neotvárajte skrinku prístroja. Vo vnútri nie
sú žiadne obslužné prvky.
Nikdy neponárajte časti zariadenia
do vody alebo do iných kvapalín!
Pozor:
Pri čistení odmerky si dajte pozor na bodec u. Nebezpečenstvo poranenia!
Upozornenie:
Nepoužívajte žiadne čistiace prostriedky ani rozpúšťadlá. Môžu viesť k poškodeniu prístroja.
Čistenie prístroja:
➪ Najprv vytiahnite zástrčku zo sieťovej zásuvky.
➪ Nechajte prístroj vychladnúť.
➪ Potom jemne navlhčenou handričkou očistite var-
nú nádobu
➪ Odstráňte usadeniny (vodný kameň) roztokom z
trochy octu a vody.
➪ Potom zapnite prístroj naplnený len čistou
vodou, aby ste odstránili zápach octu.
➪ V každom prípade prístroj dobre vysušte pred-
tým než ho začnete opäť používať.
a sieťovú šnúru.
e
Čistenie príslušenstva:
➪ Čistiacim prostriedkom umyte kryt
vajec
• Držiak vajec
né aj na umývanie v umývačke riadu.
- 24 -
a odmerku ypod tečúcou vodou.
w
, kryt qa odmerka ysú vhod-
w
, držiak
q
Page 27

9. Uskladnenie
11. Záruka a servis
Pred odstavením zariadenia ho najprv nechajte
úplne vychladnúť.
➪ Naviňte sieťovú šnúru okolo príchytiek tpod
dnom prístroja.
➪ Skladujte prístroj na suchom mieste.
10. Likvidácia
Prístroj v žiadnom prípade nevyhadzujte do normálneho domového odpadu.
Tento výrobok podlieha európskej
smernici 2002/96/EC.
Zlikvidujte prístroj v príslušnom zariadení (firme)
na likvidáciu odpadu.
Dodržte aktuálne platné predpisy. V prípade
pochybností sa obráťte na zariadenia na likvidáciu
odpadu.
Všetok baliaci materiál zlikvidujte
ekologickým spôsobom.
Na tento prístroj máte trojročnú záruku od dátumu
nákupu. Prístroj bol starostlivo vyrobený a pred expedíciou dôkladne vyskúšaný. Uschovajte si, prosím, účtenku ako dôkaz o nákupe. V prípade uplatňovania záruky sa spojte s opravovňou telefonicky.
Len tak sa dá zabezpečiť bezplatné zaslanie tovaru.
Záruka platí len na chyby materiálu a výroby, nie
na poškodenia spôsobené prepravou, opotrebením
ani na poškodenia krehkých častí, ako sú spínače
alebo akumulátory.
Výrobok je určený výlučne na súkromné používanie
a nie na komerčné účely.
Záruka prestáva platiť pri zaobchádzaní nezodpovedajúcom účelu, pri neprimeranom zaobchádzaní,
pri používaní násilia a pri zásahoch, ktoré neurobil
nami autorizovaný servis. Práva vyplývajúce zo zákona nie sú touto zárukou obmedzené.
Záručná doba sa nepredlžuje o dobu trvania záručných opráv. To platí aj na vymenené alebo opravené diely. Prípadné poškodenia a nedostatky zistené
už pri nákupe musíte ohlásiť ihneď po vybalení, najneskoršie však do dvoch dní od dátumu zakúpenia.
V prípade opráv spadajúcich do obdobia po uplynutí záručnej doby ste povinní uhradiť vzniknuté
náklady.
Kompernass Service Slowakia
Tel. 0850 00 10 16 (
e-mail: support.sk@kompernass.com
0,075 EUR/Min.)
12. Dovozca
KOMPERNASS GMBH
BURGSTRASSE 21
D-44867 BOCHUM
www.kompernass.com
- 25 -
Page 28

- 26 -
 Loading...