

Page 1
6WDLQOHVV6WHHO6WHDP2YHQ6'%2$
6WDLQOHVV6WHHO6WHDP2YHQ
2SHUDWLQJLQVWUXFWLRQV
53'DPSIEDFNRIHQB&RYHUB/%LQGG
Page 2

RP57458 Dampfgarer LB6 Seite 1 Montag, 27. August 1956 9:07 21
Be sure to note the fold-out page ........
SDBO 1850 A1_10_V1.7_GB
Page 3
RP57458 Dampfgarer LB6 Seite 1 Montag, 27. August 1956 9:07 21
1
3
2
6
4
5
11 10 9
12 16
13
14
15
7
8
17
18
19
20
21
22
23
24
Page 4

RP57458 Dampfgarer LB6 Seite 2 Montag, 27. August 1956 9:07 21
Page 5
1
2
3
4
5
6
7
8
9
10
11
12
13
14
15
16
17
18
19
20
21
22
23
24
RP57458 Dampfgarer LB6 Seite 3 Montag, 27. August 1956 9:07 21
Contents
1. Names of parts (see fold-out page). . . . . . . . . . . . . . . . . . . . . . . . . . . . . . . . . . . . . . . . . 3
2. Description . . . . . . . . . . . . . . . . . . . . . . . . . . . . . . . . . . . . . . . . . . . . . . . . . . . . . . . . . . 4
3. Safety Information. . . . . . . . . . . . . . . . . . . . . . . . . . . . . . . . . . . . . . . . . . . . . . . . . . . . . 4
4. Unpacking and setting up . . . . . . . . . . . . . . . . . . . . . . . . . . . . . . . . . . . . . . . . . . . . . . . . 7
5. Operating . . . . . . . . . . . . . . . . . . . . . . . . . . . . . . . . . . . . . . . . . . . . . . . . . . . . . . . . . . . 8
6. Recommended settings. . . . . . . . . . . . . . . . . . . . . . . . . . . . . . . . . . . . . . . . . . . . . . . . . 13
7. Table of Automatic Programmes . . . . . . . . . . . . . . . . . . . . . . . . . . . . . . . . . . . . . . . . . . 17
8. Recipes for the automatic programmes . . . . . . . . . . . . . . . . . . . . . . . . . . . . . . . . . . . . . 18
9. Cleaning . . . . . . . . . . . . . . . . . . . . . . . . . . . . . . . . . . . . . . . . . . . . . . . . . . . . . . . . . . . 23
10. Troubleshooting . . . . . . . . . . . . . . . . . . . . . . . . . . . . . . . . . . . . . . . . . . . . . . . . . . . . . . 24
11. Disposal . . . . . . . . . . . . . . . . . . . . . . . . . . . . . . . . . . . . . . . . . . . . . . . . . . . . . . . . . . . 24
12. Technical data . . . . . . . . . . . . . . . . . . . . . . . . . . . . . . . . . . . . . . . . . . . . . . . . . . . . . . . 25
13. Warranty . . . . . . . . . . . . . . . . . . . . . . . . . . . . . . . . . . . . . . . . . . . . . . . . . . . . . . . . . . 25
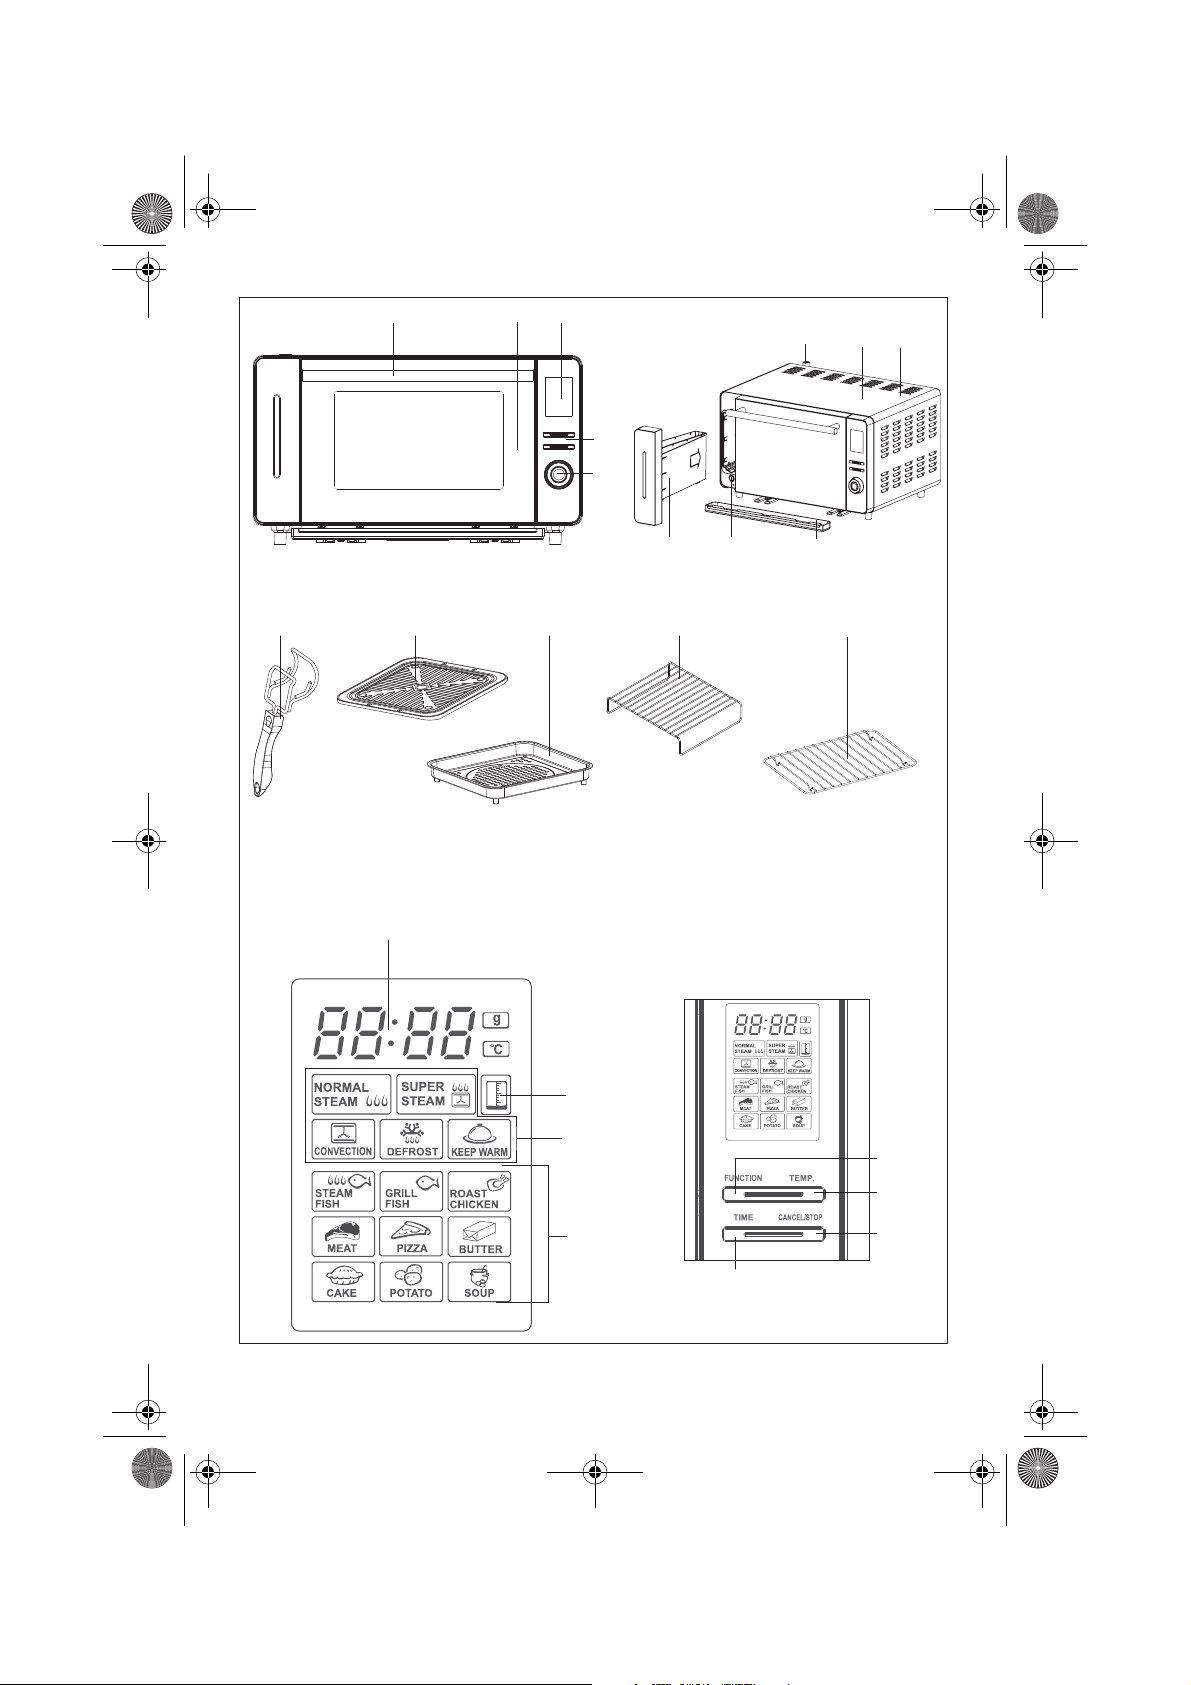
Door handle
Door
Display window
Menu keys
Control knob
Steam vent
Casing
Warning “Hot surfaces”
Drip tray
Water valve
Water tank
Tray removal handle
1. Names of parts
(see fold-out page)
Baking tray
Steam tray
Oven rack
Grill rack
Display for time, temperature or weight
Display “Water tank empty”
Function displays
Automatic programme displays
“FUNCTION” button
“TEMP” temperature button
“CANCEL/STOP” button
“TIME” button
SDBO 1850 A1
3
Page 6
RP57458 Dampfgarer LB6 Seite 4 Montag, 27. August 1956 9:07 21
2. Description
2.1 Intended purpose
This SilverCrest SDBO 1850 A1 steam oven
works using a combination of hot air and
steam. It can be used to stew, steam, blanch,
roast or bake fresh food.
The supply of steam keeps warmed-up food
looking fresh, as if it had just been cooked
from scratch!
The oven is also suitable for the defrosting of
frozen, low-protein foods or for the
preparation of food from the freezer.
This appliance should only be used in dry
rooms. It must not be used out in the open or in
humid rooms.
This appliance is intended for private use
and is not suitable for commercial purposes.
3. Safety Information
3.1 Terms used
The following signalling terms are found in
these Operating Instructions:
Warning!
High risk. Disregarding the
warning may cause injury to life
and limb.
Caution!
Medium risk. Disregarding the warning may
cause damage to property.
Note:
Low risk. Circumstances that should be taken
into account when dealing with this
appliance.
2.2 Scope of supply
• 1 steam oven
• 1 grill rack
• 1 oven rack
• 1 baking tray
• 1 steam tray
• 1 tray removal handle
• 1 set of spacers
• 1 copy of the Operating Instructions
2.3 Symbols on the appliance
The adjacent symbol 8 warns
against touching hot surfaces.
3.2 General information
• Before using the appliance, be sure to
read these Operating Instructions
carefully. They are a component part of
the appliance and must be available at
all times.
• Use the appliance only for the purpose
described (see “2.1 Intended purpose”
on page 4).
• Check whether the mains voltage (see
type plate on the appliance) agrees with
your mains voltage.
• This device is not intended to be used by
individuals (including children) with
limited physical, sensory or mental
capabilities or with a lack of experience
and/or lack of knowledge, unless
supervised by a person responsible for
4
Page 7
RP57458 Dampfgarer LB6 Seite 5 Montag, 27. August 1956 9:07 21
their safety or they have received
instructions from such a person as to
how to use the device. Children should
always be supervised to ensure that they
do not play with the device.
• If there should be any malfunctions, the
appliance may only be repaired by our
Service Centre.
• The appliance must only be set up on a
firm, level, dry and non-flammable
surface.
• Check that the power socket is easily
accessible so that you can pull out the
mains plug quickly if necessary.
3.3 Protection against electric shock
Warning! The following safety
information is intended to protect
you against electric shock.
• Only plug the appliance into a correctly
installed, earthed wall socket.
• Do not use the appliance if it has fallen
on the floor, received a hard blow or
fallen into water. In this case, please
contact our Service Centre. You will find
the service address in “13. Warranty”
on page 25.
• The appliance must not under any
circumstances be used if it is damaged.
Have the device repaired in such cases
by a qualified specialist. You will find the
service address in “13. Warranty” on
page 25.
• If the mains cable for this appliance is
damaged, it must be replaced by the
manufacturer or a person with similar
qualifications in order to avoid a
hazard.
• Water or other liquids must never be
allowed to enter the casing 7 . For this
reason:
– never use it outdoors
– never place containers filled with
liquid, such as drinking glasses, vases
etc. on the appliance
– never use in a very damp environment
such as a bathroom.
If liquid should enter the casing 7 ,
unplug the mains plug immediately and
have the appliance repaired by a
qualified technician. Further information
can be found in “13. Warranty” on
page 25.
• Never touch the appliance, the mains
cord or the mains plug with moist hands.
• Always pull the mains cord out by the
plug. Never pull it by the cord itself.
• Ensure that the mains cable is not
kinked, twisted or crushed.
• Ensure that the mains cable is not
damaged on sharp edges.
• Keep the mains cord away from hot
surfaces (such as stove eyes).
• If you are not using the appliance for a
prolonged period of time, remove the
plug from the wall socket. Only then is
the appliance completely free of current.
• You should avoid using extension cords.
This is only allowed under very
particular conditions:
– The extension cord has to be suited for
the appliance's amperage.
– The extension cord must not be
installed "loose": it must not be
possible to trip over it or within the
reach of children.
– The extension cord must not by any
means be damaged.
– No other devices other than this
appliance must be connected to the
mains socket, as otherwise
overloading of the power supply
network could occur (multiple sockets
are not allowed!).
SDBO 1850 A1
5
Page 8
RP57458 Dampfgarer LB6 Seite 6 Montag, 27. August 1956 9:07 21
• The appliance must not be operated with
an external time switch or separate
remote control system, such as a wireless
remote control socket.
• Clean the appliance regularly in order to
avoid any build-up of grease which
could catch fire.
3.4 Protection against the danger of
fire
Warning! As the appliance works
at high temperatures, please
observe the following safety
information to prevent fire.
• While the appliance is operating, there
must be no flammable objects (e.g.
curtains, paper) in the immediate vicinity
of the appliance.
• Never use the appliance to dry textiles
or other items on, over or in front of the
appliance.
• To avoid overheating, the appliance must
never be covered.
• When setting up the appliance, maintain
a minimum distance of 5 cm from other
appliances and the wall.
• Never operate the appliance in rooms
where there is a risk of explosion or in
the vicinity of flammable gases or
liquids.
• The appliance must never be placed
immediately beneath a wall socket, as
the heat it generates could damage the
electrical installation.
• Never leave the appliance running when
it is unattended. The presence of odour
is almost always an indication of
damage. If you notice any such odour,
unplug the mains plug immediately and
have the appliance inspected. You will
find the service address in
“13. Warranty” on page 25.
3.5 Protection against injury
Warning! To avoid injury, please
observe the following information.
• Ensure that it is not possible for anyone
to trip over or to get caught up in or step
on the mainscable.
• The surface of the oven can become very
hot during operation. It is thus advisable
to use oven gloves or some sort of
protection to avoid any risk of burning
when operating the appliance.
• To remove the hot tray or rack without
risk of burns, please use the tray removal
handle 12 .
• Once hot, if you wish to transport the
appliance, switch it off, pull out the
mains plug, and wait until the appliance
has cooled down. Otherwise you could
burn yourself on the hot surface.
• Hot steam can escape from the steam
vent 6 . Be careful not to scald yourself.
• If the door 2 is opened during operation
of the appliance or immediately
afterwards, a rush of hot steam may
escape. Be careful not to scald yourself.
• Do not use any sealed air-tight
containers with this appliance. The
resulting pressure may lead them to
explode.
3.6 For the safety of your child
Warning! Children often cannot
assess dangers correctly and are
injured as a result. Please therefore
observe the following:
• This product may only be used under
adult supervision to ensure that children
do not play with the appliance.
• Always take care to ensure the
appliance is kept out of the reach of
children at all times.
6
Page 9
RP57458 Dampfgarer LB6 Seite 7 Montag, 27. August 1956 9:07 21
• Ensure that the packing film does not
become a deadly trap for a child.
Packing film is not a toy.
3.7 Protection against material
damage
Caution! To avoid any material damage,
please observe the following requirements.
• Ensure that the hot steam can escape
from the steam vent 6 freely and that
there are no objects or furniture in the
way that are at risk of being damaged.
4. Unpacking and setting up
Note: As the appliance and heating
elements are supplied with a thin film of
grease, there might be a small amount of
smoke and odour the first time the appliance
is used. This is not harmful and will stop
after a short while. Please ensure in the
meantime that there is sufficient ventilation.
1. Unpack the appliance from the
packaging.
2. Remove the transport packaging.
3. Remove the accessories and packaging
material from inside the appliance.
4. Check that the appliance shows no signs
of damage.
• When you are not using the appliance,
do not store any other items in the
appliance other than those accessories
which have been delivered with it.
• Only use the accessories provided or
any accessories which are
recommended in these Operating
Instructions. Using accessories from
another manufacturer or accessories
which have not been recommended may
result in damage to the appliance.
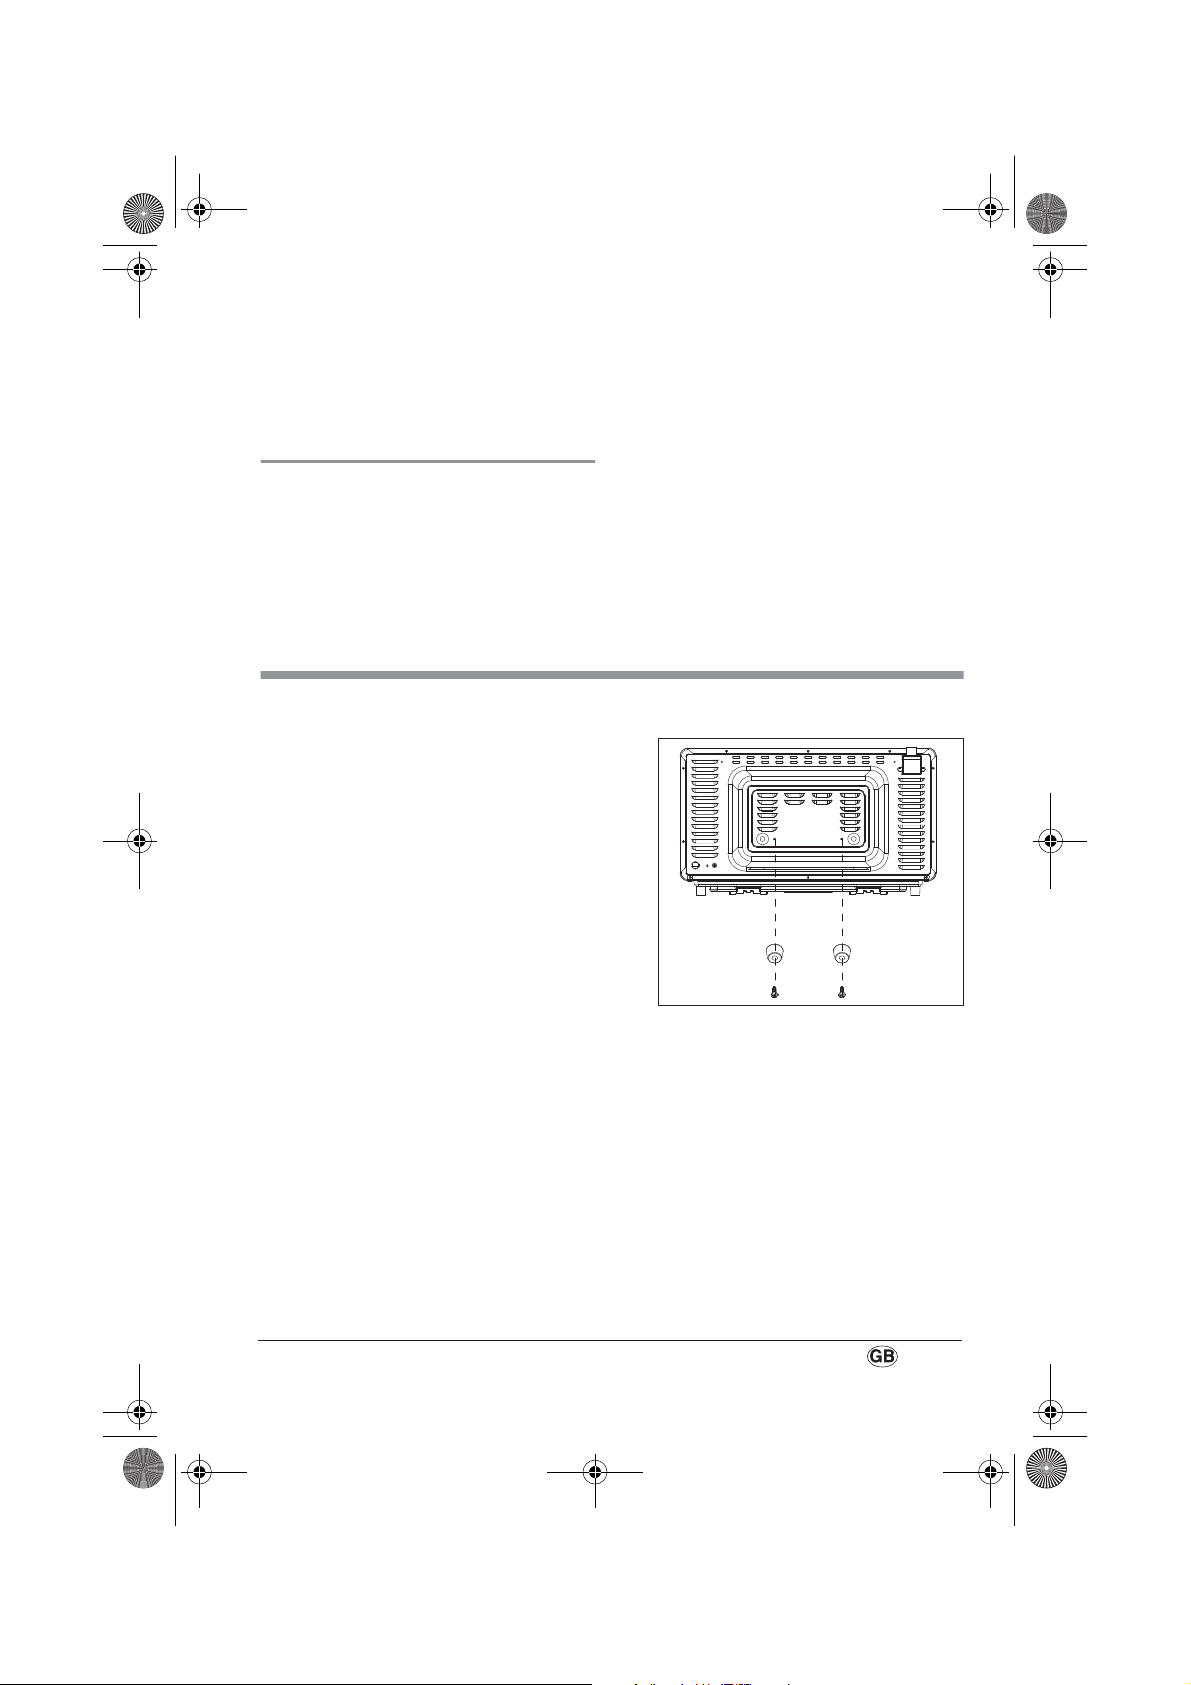
5. Screw the spacers provided to the rear
of the appliance.
6. Clean the appliance and the accessories
(see “9. Cleaning” on page 23).
7. Select a place to put the appliance,
– somewhere which complies with the
safety instructions (see “3. Safety
Information” on page 4);
– a place that is sturdy, level and fire-
proof, and is approx. 5 cm away from
other objects;
– where the steam can freely escape
from the steam vent 6 ;
– where the door 2 can be fully opened.
SDBO 1850 A1
7
Page 10

RP57458 Dampfgarer LB6 Seite 8 Montag, 27. August 1956 9:07 21
11
8. Pull the water tank 11 forwards and out.
9. Fill the water tank 11 with clean
drinking water.
Note: The water level in the water tank
should always lie between the
“MIN” and “MAX” marks on the side.
Push the water tank 11 back into the
appliance.
10.Insert the mains plug into a suitable
mains socket, one that complies with the
technical data.
11.Press the “FUNCTION” key 21 :
In the display 3 , the available functions
will appear.
12.Turn the control knob 5 until the 19
“SUPERSTEAM” display flashes.
13. Press the control knob 5 .
14. Wait until the 30 minutes shown on the
timer are up.
15. Unplug the mains plug and allow the
appliance to cool down.
16.Clean the appliance again. Observe
here the information in the section
entitled “9. Cleaning” on page 23.
5. Operating
Note: When using the steaming function of
the oven, steam will constantly escape
through the steam vent 6 . Make sure that
this steam can escape freely.
5.1 Preparing the appliance
1. Insert the mains plug into a wall socket
that complies with the technical data (see
“12. Technical data” on page 25).
The display 17 shows 0:00.
8
2. Pull the water tank 11 forwards and out
of the appliance 7 .
3. Fill the water tank 11 with clean
drinking water.
Notes:
– The water level must be above the
“MIN” mark on the side of the tank.
– Do not overfill the water tank 11 . Do
not exceed the maximum filling level
(“MAX” on side). This corresponds to
1.2 l water, which is enough for
Page 11

RP57458 Dampfgarer LB6 Seite 9 Montag, 27. August 1956 9:07 21
approximately 70 minutes of
operation.
– Even when you are not using the
steam function, the tank must be filled
with water.
Insufficient water: As
soon as the water runs out
and the water tank 11 is
almost empty, the “Water
tank empty” display 18 will
flash and the appliance will
interrupt the cooking process.
In this case, refill the water
tank with water.
5.2 Setting the time
The clock can be set when the
appliance is in stand-by mode.
In stand-by mode, the display
field 3 will only show the time
set.
1. Press and hold the 24 “TIME” button for
several seconds.
The first digit on the display 17 will
flash.
2. Turn the control knob 5 until the display
17 shows the right time in hours.
3. Confirm this by pressing 24 “TIME”.
The last two digits on the display 17 will
then flash.
4. Turn the control knob 5 until the display
17 shows the right time in minutes.
5. Confirm this by pressing 24 “TIME”.
The time has now been set.
5.3 Selecting accessories
Select the accessory suitable for the food
which is to be cooked (see
“6. Recommended settings” on page 13).
Baking tray 13:
Baking tray 13 Oven rack 15
• If you are using the baking tray 13 for
baking, do not place it on the base of
the appliance. Place the baking tray 13
on the oven rack 15 so that the food is
heated from both above and below.
• In order to avoid excessive staining of
the appliance, always use the baking
tray 13 as a drip tray if it is not being
used for cooking.
Steam tray 14:
Baking tray 13 Steam tray 14
• If you are using the steam tray 14,
always place it on the baking tray 13.
SDBO 1850 A1
9
Page 12

RP57458 Dampfgarer LB6 Seite 10 Montag, 27. August 1956 9:07 21
Oven rack 15:
Baking tray 13 Oven rack 15
Baking tray 13
Steam tray 14
• Food can be placed on the oven rack
15 in an oven-proof dish. The oven rack
15 fits into both the baking tray 13 and
the steam tray 14.
• If you are not using the oven rack 15,
you can use it as a stand on which to
place the hot baking tray 13 or steam
tray 14 after removing them from the
appliance.
Oven rack 15
Grill rack 16:
Baking tray 13 Grill rack 16
• It is possible to slide the grill rack 16
into position in the oven. You can then
use the baking tray 13 as a drip tray.
5.4 Selecting functions
Note: In “6. Recommended settings” on
page 13, you will find setting
recommendations for the various foods.
1. Press the “FUNCTION” button 21:
10
In the display 3, the available functions
will appear.
2. Turn the control knob 5 until the
required function flashes:
Page 13

RP57458 Dampfgarer LB6 Seite 11 Montag, 27. August 1956 9:07 21
Normal Steam: The
“Normal Steam” setting is used
for steaming chicken, dumplings,
vegetables, pre-cooked rice and noodles:
• The basic setting for “Normal Steam” is
100 °C cooking temperature and
30 min cooking time.
• The cooking temperature for “Normal
Steam” can be set between 100 °C to
140 °C.
Super Steam: The “Super
Steam“ setting is used for the
steaming of fish, prawns,
shrimp, mussels, pork goulash, vegetables,
sweet corn, etc.:
• The basic setting for “Super Steam“ is
250 °C cooking temperature and
30 min cooking time.
• The cooking temperature for “Super
Steam“ can be set between 200 °C to
250 °C.
Convection: The steam oven
uses hot air for this function.
You can thus use the oven to
cook pizzas, chicken, potatoes, eggs,
steaks, fish, etc.:
• The basic setting for convection is
250 °C cooking temperature and
30 min cooking time.
• The cooking temperature for convection
can be set between 100 °C to 250 °C.
Defrost: This function gently
defrosts low-protein frozen food
such as bread, bread rolls,
vegetables and fruit.
Notes:
– Fish and meat should be slowly
defrosted in the refrigerator
beforehand as defrosting at high
temperatures can lead to the
coagulation of protein.
– Fruit will quickly go soft and mushy if
it is defrosted too quickly. If you are
defrosting whole fruit, it should be
allowed to thaw out slowly in the
refrigerator. With this programme, it is
possible to defrost fruit which is to be
further processed, e.g. for
marmalades, smoothies or purees.
• The basic setting for defrosting is 120 °C
cooking temperature and 30 min
cooking time.
• The temperature for defrosting can be
set between 70 °C to 150 °C.
Keep Warm: This function
can be used to warm up food or
keep ready-made meals warm.
• The basic setting for keeping food warm
is 70 °C cooking temperature and
30 min cooking time.
3. In order to set the cooking time, press the
24 “TIME” button.
4. Turn the control knob 5 until the display
17 shows the required cooking time.
The cooking time has now been set. The
appliance switches off automatically
once the cooking time has expired.
Note: If steps 3. and 4. are skipped,
the cooking time will be set to
30 minutes.
5. In order to set the cooking temperature,
press the 22 “TEMP” button.
6. Turn the control knob 5 until the display
17 shows the required temperature.
Note: If steps 5. and 6. are skipped,
the cooking temperature will be set to the
basic setting.
SDBO 1850 A1 11
Page 14

RP57458 Dampfgarer LB6 Seite 12 Montag, 27. August 1956 9:07 21
7. In order to activate the function selected,
press the control knob 5.
5.5 Emptying the drip tray 9
Some of the steam used condenses and
collects in the drip tray 9.
To prevent the drip tray 9 from overflowing,
it should be emptied after every use:
1. Pull the drip tray 9 forwards and out.
Note: The drip tray 9 is located under
the door 2. The drip tray 9 can be
removed simply by gripping it at the
sides.
2. Empty the drip tray 9.
3. Push the drip tray 9 back into position in
the oven.
5.6 Discontinuing a function and
switching off
Note: If the cooking programme is
interrupted or the door 2 is opened, the
cooking time may take slightly longer.
1. The running function will be interrupted
if:
– the “CANCEL/STOP” button 23 is
pressed;
– the door 2 is opened;
– the water tank 11 is pulled out;
– the water tank 11 is empty and the
“Water tank empty” display 18 is
flashing.
The symbol for the selected function and
the remaining cooking time will flash.
2. In order to continue with the function
selected, press the control knob 5.
3. In order to bring the cooking function to
a complete stop, do not press the control
knob 5 but press “CANCEL/STOP” 23
a second time.
5.7 Selecting an automatic
programme
Note: In “7. Table of Automatic
Programmes” on page 17, you will find
suggestions for using the automatic
programme settings.
The steam oven has 9 automatic programme
settings which can be selected for the
preparation of various meals.
1. Choose from one of the available
automatic programmes by pressing
“FUNCTION” 21.
20
In the display 3, the available functions
and automatic programmes will appear.
2. Press the control knob 5 until the display
20 for the required automatic
programme flashes.
3. Press the control knob 5.
In the display 17, the weight, size or
quantity will appear.
4. Turn the control knob 5 in order to
change the weight, size or quantity.
5. In order to activate the function selected,
press the control knob 5.
12
Page 15

RP57458 Dampfgarer LB6 Seite 13 Montag, 27. August 1956 9:07 21
5.8 Removing food
Always use the tray removal handle 12
when removing the trays or racks from the
oven to avoid any burn injuries.
5.9 Child safety
The appliance has a child lock. When this is
activated, all functions are blocked and
cannot be operated should a small child
press any of the buttons.
1. In order to activate the child lock, hold
down the “CANCEL/STOP” button 23
for several seconds.
6. Recommended settings
The values given for the cooking time and
temperature are standard values. These may
vary depending on the type of food to be
cooked. It also depends on whether, for
example, you prefer vegetables with a bit of
a bite or slightly softer.
The blocked symbol will
appear in the display17.
2. In order to deactivate the child lock, hold
down the “CANCEL/STOP” button 23
again for several seconds.
The time will once again appear in the
display 17.
5.10 Illuminating the display field 3
The display 3 will fade out during operation
after a few minutes. As soon as any of the
buttons are activated, it will automatically
light up again.
Note: If the cooking programme is
interrupted or the door 2 is opened, the
cooking time may take slightly longer. If the
food is not fully cooked when the cooking
time expires, select the same programme
again but this time set the cooking time to
just a few minutes.
6.1 Vegetables
For 4 people, you will need approx. 750 1000 g of raw produce or 650 - 800 g of
frozen goods.
Food Function Time in minutes Temperature Specifics
Cauliflower Normal Steam 20 - 30 100 °C in florets
Beans Normal Steam 35 - 40 100 °C
Broccoli Normal Steam 35 - 45 100 °C in florets. It is a good idea to
Fennel Normal Steam 25 - 30 100 °C halved
SDBO 1850 A1 13
Use the steam tray 14 when preparing
vegetables.
remove the stalks as these
always remain harder than
the florets.
Page 16

RP57458 Dampfgarer LB6 Seite 14 Montag, 27. August 1956 9:07 21
Food Function Time in minutes Temperature Specifics
Carrots Normal Steam 20 - 30 100 °C in slices
Kohlrabi Normal Steam 15 - 25 100 °C in strips
Pepper Normal Steam 10 - 15 100 °C in strips
Brussels sprouts Normal Steam 25 - 30 100 °C
Boiled potatoes Normal Steam 30 - 45 100 °C diced (approx. 3 cm), lightly
salted. The cooking time
given applies for approx.
300 g. For larger amounts,
cook for a longer period.
Asparagus Normal Steam 20 - 35 100 °C
Spinach Normal Steam 7 - 10 100 °C only fresh spinach
Celery stalks Normal Steam 25 - 30 100 °C
Courgette Normal Steam 10 - 15 100 °C in slices
Mange tout Normal Steam 10 - 15 100 °C
6.2 Processed foodstuffs
For 4 people, you will need 250 g of
processed food plus 500 ml of liquid. Water
or milk can be used here. Round-grain rice
will take longer to cook than long-grain rice.
Food Function Time in minutes Temperature Specifics
Rice + liquid Normal Steam 25 - 30 100 °C Use an oven-proof dish
Semolina + liquid Normal Steam 10 - 20 100 °C Use an oven-proof dish
Add some salt or sugar here after cooking.
For semolina, you will need 1 l milk and
250 g semolina - Stir with an egg whisk
after cooking and leave to swell.
6.3 Dumplings
For 4 people, you will need a yeast dough
made with 500 g flour for yeast dumplings.
For bread dumplings, you will need bread
dough from 6 - 8 old bread rolls.
Food Function Time in minutes Temperature Specifics
Yeast dumplings
(Dampfnudeln)
Yeast dumplings
(Hefeklöße)
Bread dumplings Normal Steam 20 - 25 100 °C Use the steam tray 14
Potato dumplings Normal Steam 15 - 20 100 °C Use the steam tray 14
Normal Steam 15 - 20 100 °C Use the steam tray 14
Normal Steam 15 - 20 100 °C Use the steam tray 14
For potato dumplings, you will need a
potato dough made from 1000 g potatoes.
14
Page 17

RP57458 Dampfgarer LB6 Seite 15 Montag, 27. August 1956 9:07 21
6.4 Bread or bread rolls
Make the dough from a maximum 500 g
flour. Larger portions will need to be cooked
in several stages.
Food Function Time in minutes Temperature Specifics
White bread Super Steam 45 - 50 200 °C Place on grill rack 16
Brown bread Super Steam 50 - 60 230 °C Place on grill rack 16
Bread rolls Super Steam 20 - 25 230 °C Place on grill rack 16
6.5 Meat, steamed
The time given applies to 600 g of meat for 4 people.
Food Function Time in minutes Temperature Specifics
Chicken leg Normal Steam 35 - 40 100 °C Use the steam tray 14
Turkey schnitzel Normal Steam 20 - 25 100 °C Use the steam tray 14
Kasseler (pork) Normal Steam 40 - 60 100 °C Use the steam tray 14
6.6 Meat, roasted
The time given applies in each case to 1 kg meat.
Food Function Time in minutes Temperature Specifics
Roast pork Convection 60 - 80 160 °C Use the baking tray 13
Roast veal Convection 50 - 70 160 °C Use the baking tray 13
Kasseler (pork) Convection 40 - 60 160 °C Use the baking tray 13
Filet of pork Convection 40 - 50 180 °C Use the baking tray 13
Chicken Convection 55 - 65 180 °C Place on grill rack 16
Fish Convection 40 - 50 180 °C Use the baking tray 13
6.7 Fish, steamed
Food Function Time in minutes Temperature Specifics
Trout 3 x 250 g Normal Steam 15 - 20 100 °C Use the steam tray 14
Gilthead sea bream,
approx. 800 g
Pollock, approx.
800 g
SDBO 1850 A1 15
Normal Steam 30 - 35 100 °C Use the steam tray 14
Normal Steam 30 - 35 100 °C Use the steam tray 14
Page 18

RP57458 Dampfgarer LB6 Seite 16 Montag, 27. August 1956 9:07 21
6.8 Compote
Cut up 500 -1000 g fruit into small pieces
and place in an oven-proof dish with a bit of
liquid on the grill rack 16.
Food Function Time in minutes Temperature Specifics
Apple compote Normal Steam 15 - 20 100 °C
Pear compote Normal Steam 25 - 30 100 °C
Peach compote Normal Steam 10 - 15 100 °C
Plum compote Normal Steam 15 - 20 100 °C
6.9 Blanching
Raw vegetables should be blanched before freezing.
Food Function Time in minutes Temperature Specifics
Vegetables e.g.
carrots, peas,
beans
Normal Steam 5 100 °C Use the steam tray 14
6.10 Casserole
Food Function Time in minutes Temperature Specifics
Casserole Convection 30 - 60 160 °C Place in oven-proof dish on
oven rack
16
Page 19

RP57458 Dampfgarer LB6 Seite 17 Montag, 27. August 1956 9:07 21
7. Table of Automatic Programmes
Note: This table describes the preparation
of individual products. It is possible,
however, to prepare entire menus using the
Automatic programme Portion Recommendation
Steamed fish 400 g Use fresh or defrosted fish filets and lay flat on steam
600 g
Grilled fish 400 g Use fresh or defrosted fish filets and lay flat on greased
600 g
Roast chicken 700 g Use fresh or defrosted chicken breast filets and lay flat
1000 g Place chicken breast filet, chicken wing or chicken leg,
1400 g Place the defrosted chicken on the greased baking tray
Meat 150 g Only use fresh or defrosted minute steaks, seasoned and
250 g
500 g
Pizza S (thin) Thin Italian pizza. Turn the pizza 180° after half the
L (thick) Thick American pizza. Turn the pizza 180° after half the
Butter
(Melting butter)
Cake
(cakes and
biscuits)
Potatoes 600 g Peel and cut up the potatoes, placing them on a greased
Soup 250 g Place 250 g vegetables and chicken breast and 500 ml
50 g Slice up room-temperature butter into smaller pieces and
150 g
250 g
200 g Yeast dough and cake batter - for flat pastries. The
400 g
600 g
900 g
1200 g
500 g Place 500 g vegetables and chicken breast and 800 ml
tray 14.
baking tray 13.
on greased baking tray 13.
fresh or defrosted, beside each other on a greased
baking tray 13.
13.
placed on a greased tray.
cooking time has passed to ensure the pizza is evenly
cooked.
cooking time has passed to ensure the pizza is evenly
cooked.
place in an oven-proof dish. Leave it to stand when the
programme comes to an end to benefit from the
remaining heat.
amount given is for ready-made pastry. As there is more
heat generated at the back of the oven, it may be a good
idea to use a tray for the second half of the cooking time
to ensure the cakes/biscuits are evenly baked.
baking tray 13.
water in an oven-proof dish.
water in an oven-proof dish.
automatic programmes (see “8. Recipes for
the automatic programmes” on page 18).
SDBO 1850 A1 17
Page 20

RP57458 Dampfgarer LB6 Seite 18 Montag, 27. August 1956 9:07 21
8. Recipes for the automatic programmes
Note:The values given for the cooking time
and temperature are standard values. These
may vary depending on the type of food to
be cooked. It also depends on whether, for
example, you prefer vegetables with a bit of
a bite or slightly softer.
8.1 STEAMED FISH - Filet of pollock
on a bed of mixed vegetables
with herb rice
Ingredients for 2 people:
• 500 g frozen vegetables, e.g. mixed
vegetables
• 500 g filet of pollock, fresh or defrosted
• 1 carton of herb crème fraîche
• Salt, pepper, lemon
• 150 g Basmati rice with 300 ml water
and salt
• 20 g melted butter
• 1 tablespoon of chopped herbs
Preparation:
1. Evenly distribute vegetables on baking
tray 13.
2. Place the filet of fish on top of the
vegetables after sprinkling it with lemon
juice and seasoning with salt and
pepper.
3. Place the oven rack 15 on top of the
baking tray 13 and place them both on
the bottom of the steam oven.
4. Add the rice, together with water and
salt, to an oven-proof dish.
5. Place the dish with the rice on the oven
rack 15.
6. Close the door 2.
7. Select the STEAMED FISH automatic
programme with 600 g (see
“5.7 Selecting an automatic
programme” on page 12).
8. Place 20 g butter in an oven-proof dish
and put it in the oven for the last 4
minutes of cooking for melting.
9. When the cooking time has expired,
remove the rice and fold in the melted
butter and herbs.
10.Spoon the rice mixture onto the plates
for serving and spread the herb crème
fraîche onto the fish filet.
8.2 GRILLED FISH - Filet of plaice
with spinach
Ingredients for 2 people:
• 4 plaice filets, fresh or defrosted
• 400 g leafy spinach, frozen
• 1 tablespoon of crème fraîche
• 400 g sliced potatoes - pre-cooked for
30 minutes with the Normal Steam
function
• salt, pepper, lemon,
• some oil
• grated Parmesan cheese
Preparation:
1. 4 plaice filets sprinkled with lemon juice,
seasoned with salt and pepper.
2. Place on the baking tray 13 which has
been sprinkled with oil.
3. Place the oven rack 15 on top of the
baking tray 13 and place them both on
the bottom of the steam oven.
4. Season the pre-cooked potatoes with salt
and place in an oven-proof dish,
together with knobs of butter, on the grill
rack 16.
18
Page 21

RP57458 Dampfgarer LB6 Seite 19 Montag, 27. August 1956 9:07 21
5. Add 400 g frozen spinach leaves to an
oven-proof dish and place on the grill
rack 16 also.
6. Select the GRILLED FISH automatic
programme with 600 g (see
“5.7 Selecting an automatic
programme” on page 12).
7. Season the spinach leaves with salt after
cooking and add some crème fraîche to
taste, place on a serving plate together
with the potatoes and fish and sprinkle
with the grated Parmesan (for the
spinach).
• Variation: Instead of spinach, you can
also fry small pieces of smoked ham,
sprinkle over the plaice filets and then
serve with salad.
Variation: Salmon steaks
• Instead of the plaice, you can also use
2 salmon steaks.
• Serve with salad.
8.3 ROAST CHICKEN - Chicken breast
with vegetables and potatoes
Ingredients for 2 people:
• 2 medium-sized chicken breasts
• 400 g hard-boiled potatoes
• 6 thin slices of courgette
• 3 large, fresh mushrooms
• 2 tomatoes cut into slices
• 1 red pepper
• 100 g Emmentaler cheese, grated
• Salt, pepper, seasoning
Preparation:
1. Peel the potatoes and slice thinly.
2. Place the potato slices on half the baking
tray 13.
3. Cut the courgette, mushrooms, pepper
and tomatoes into thin slices and place
on the other half of the baking tray 13.
4. Add salt and pepper to the potatoes and
other ingredients and season to taste.
5. Season the chicken breasts and place
them on top of the other ingredients.
6. Select the ROAST CHICKEN automatic
programme with 1400 g (see
“5.7 Selecting an automatic
programme” on page 12).
7. Sprinkle the Emmentaler cheese over the
chicken breasts and the potatoes
10 minutes before the cooking time
expires.
Variation: Instead of Emmentaler, you can
also use Mozzarella cut into small pieces.
8.4 MEAT - Meatballs with potato-
vegetable mix
Ingredients for 2 people:
For the potato-vegetable mix:
• 400 g of pre-cooked potatoes
• 4 shallots
• 1 yellow and 1 red pepper
• 6 small tomatoes
• Just under 2 tablespoons of olive oil
• Salt, Pepper
• 2 tablespoons of finely chopped basil
(optional)
For the meatballs:
• 250 g minced meat
• 1 onion, finely chopped
• 1 raw egg
• 1 old bread roll, soaked and cut up
small
• Salt, pepper, mustard (according to
taste)
SDBO 1850 A1 19
Page 22

RP57458 Dampfgarer LB6 Seite 20 Montag, 27. August 1956 9:07 21
Preparation:
1. Peel the potatoes and slice thinly.
2. Spread the potato slices on the baking
tray 13 for pre-cooking.
3. Place the oven rack 15 in the oven and
place the baking tray 13 on top of this.
4. Pre-cook for 30 minutes using the
Normal Steam function at 100 °C (see
“5.4 Selecting functions” on page 10).
In the meantime:
5. Peel and halve the shallots; halve, pit
and cut the peppers into large pieces.
6. Halve or quarter the tomatoes.
7. Mix the meatball ingredients together
and form 6 meatballs.
As soon as the potatoes are ready:
8. Remove the baking tray 13 and then the
oven rack 15 from the oven using the
tray removal handle 12.
9. Spread the spring onions, diced peppers
and tomatoes over the potato slices.
10.Sprinkle with a little oil.
11.Place the oven rack 15 on the baking
tray 13.
12.Place the oven rack 15 and the baking
tray 13 back in the oven.
13.Place the meatballs on the steam tray 14
and place this tray on the oven rack 15.
14.Select the MEAT automatic programme
with 500 g (see “5.7 Selecting an
automatic programme” on page 12).
8.5 PIZZA
Ingredients for 2 people:
For the pizza base:
• 250 g plain flour
• 1 packet of raising agent
• Approx. 150 ml lukewarm water
• 1 tablespoon of oil
• 1 teaspoon of salt
For the topping:
• Peeled tinned tomatoes
• 150 g Mozzarella or another grated
cheese
• Ham or salami as preferred
• Salt, pepper, oregano (according to
taste)
Preparation:
1. Make the pizza base using the
ingredients.
2. Let the pizza base sit.
3. When ready, roll out pizza base on
baking tray 13.
4. Add toppings.
5. Place the oven rack 15 in the oven and
place the baking tray 13 on top of this.
6. Select the PIZZA automatic programme
with “L” (see “5.7 Selecting an automatic
programme” on page 12).
Variation:
You can also use a ready-made frozen
pizza
20
Notes:
– Cook thin, Italian pizzas at level “S”;
– Cook thick, American pizzas at level
“L”;
Page 23

RP57458 Dampfgarer LB6 Seite 21 Montag, 27. August 1956 9:07 21
– Turn the pizza 180° after half the
cooking time has passed to ensure the
pizza is evenly cooked.
– Cook the frozen pizza according to
the instructions given on the package
using the “CONVECTION” function
(see “5.4 Selecting functions” on
page 10). Should the manufacturer
specify that the oven must be preheated, add an extra 5 minutes to the
cooking time. Then place the pizza in
the oven after 5 minutes.
8.6 CAKES - Berry Cake
Ingredients for 1 cake:
• 250 g white flour
• 1/2 sachet baking powder
• 60 g crushed almonds
• 140 g sugar
• 125 g soft butter
• 200 g natural yoghurt
• 1 egg
• 250 g berries (blackcurrants,
blueberries, gooseberries - fresh or
frozen)
Preparation:
1. Add all ingredients, apart from the
berries, to a mixing bowl and stir
together quickly.
2. Mix in the berries.
3. Evenly distribute mixture on baking tray
13.
4. Place the oven rack 15 in the oven and
place the baking tray 13 on top of this.
5. Select the CAKE automatic programme
with 600 g (see “5.7 Selecting an
automatic programme” on page 12).
Variation:
Make a dough using 250 g flour, garnish
with plums and a sprinkling of crumbs.
8.7 POTATOES - Potatoes with Alpine
cheese
Ingredients for 2-3 people:
• 1 kg hard-boiled potatoes
• 200 ml cream
• 100 g grated Alpine cheese
• Salt, pepper
Preparation:
1. Peel the potatoes and slice thinly.
2. Evenly distribute the potato slices on the
baking tray 13.
3. Season with salt and pepper.
4. Place the oven rack 15 in the oven and
place the baking tray 13 on top of this.
5. Select the POTATOES automatic
programme with “6” (see “5.7 Selecting
an automatic programme” on page 12).
6. Add the cream and grated cheese to the
potatoes 30 minutes before the cooking
time expires.
7. Allow to cook for the remaining time.
8. Serve with salad.
SDBO 1850 A1 21
Page 24

RP57458 Dampfgarer LB6 Seite 22 Montag, 27. August 1956 9:07 21
8.8 POTATOES - Béchamel potatoes
Ingredients for 2-3 people:
• 1 kg hard-boiled potatoes
• 40 g butter
• 200 ml cream
• Salt, pepper, some lemon juice
• 1 handful of parsley
Preparation:
1. Peel the potatoes and slice thinly.
2. Evenly distribute the potato slices on the
baking tray 13.
3. Season with salt, pepper and sprinkle
with lemon juice.
4. Pour on cream.
5. Spread small knobs of butter over
potatoes.
6. Place the oven rack 15 in the oven and
place the baking tray 13 on top of this.
7. Select the POTATOES automatic
programme with “6” (see “5.7 Selecting
an automatic programme” on page 12).
8. Sprinkle with chopped parsley when
cooked.
8.9 SOUP - Chicken soup with rice
noodles
Ingredients for 2-3 people:
• 600 ml water
• 200 g chicken filet cut into pieces
• 250 g vegetables (carrots, beans, leek,
alternatively frozen soup vegetables)
• 50 g rice noodles
• Salt, spices, herbs
• Sherry to taste
Preparation:
1. Add the vegetables, water and salt to an
oven-proof glass dish.
2. Place the oven rack 15 in the oven.
3. Place the glass dish containing the
ingredients on the oven rack 15.
4. Select the SOUP automatic programme
with 500 g (see “5.7 Selecting an
automatic programme” on page 12).
5. After cooking, season with herbs and
spices (Sambal Olek) and sherry.
6. Add the soaked and chopped rice
noodles.
22
Page 25

RP57458 Dampfgarer LB6 Seite 23 Montag, 27. August 1956 9:07 21
9. Cleaning
To ensure your appliance gives you lasting
service, you should clean it regularly.
Warning! To avoid the danger of
an electric shock or burning:
– remove the mains plug before
each clean;
– allow the appliance to cool
down;
– never immerse the appliance in
water;
– never allow water or cleaning
agent to run into the appliance.
Caution! Never use abrasive, corrosive or
caustic cleaning materials. These could
damage the appliance.
9.1 Cleaning the appliance
1. Clean the inside and outside of the
appliance with a damp cloth.
Note: You could also use a mild
washing-up liquid if necessary.
2. Wipe off with fresh water.
3. Do not use the machine again until it is
fully dry.
9.2 Cleaning the accessories
1. Clean the accessories by hand using
warm water.
2. If heavily soiled, leave parts to soak in
warm water for 20 – 30 minutes. You
could add a few drops of mild washingup liquid.
3. Carefully dry all parts after cleaning.
Note: The grill rack 16, the oven rack 15
and the tray removal handle 12 can all be
cleaned in the dishwasher. The baking tray
13 and the steam tray 14 are not suitable
for use in the dishwasher due to their special
coating.
9.3 Cleaning the water tank 11 and
the drip tray 9
1. Pull the water tank 11 forwards and out
of the appliance 7.
2. Empty the water tank 11.
3. Press the water valve 10. All the
condensed water which has been
collected runs into the drip tray 9.
4. Pull the drip tray 9 forwards and out.
Note: The drip tray 9 is located under
the door 2. The drip tray 9 can be
removed simply by gripping it at the
sides.
5. Empty the drip tray 9.
6. Clean the water tank 11 and the drip
tray 9 by hand using warm water.
7. Dry off the water tank 11 and the drip
tray 9.
8. Push the water tank 11 back into the
appliance.
9. Push the drip tray 9 back into position in
the oven.
SDBO 1850 A1 23
Page 26

RP57458 Dampfgarer LB6 Seite 24 Montag, 27. August 1956 9:07 21
10. Troubleshooting
Fault Cause Remedy
Appliance cannot be
switched on
Appliance switches
off automatically
There is a puddle of
water forming underneath the appliance
Child safety is activated Release child safety (see “5.9 Child
Faulty fuse or wall socket Select another wall socket.
Faulty appliance Have repairs carried out at a specialist
Cooking time has expired If necessary, start the cooking process
The door 2 was opened Close door, press control knob 5.
Water tank 11 was pulled
out
Water tank 11 is empty and
the 18 “Water tank empty”
display is flashing
Drip tray 9 is full and is
overflowing
safety” on page 13).
workshop or dispose of the appliance.
Further information can be found in
“13. Warranty” on page 25.
again.
Push water tank back in, press control
knob 5.
Refill water, press control knob 5.
Empty drip tray 9 (see “5.5 Emptying
the drip tray 9” on page 12).
11. Disposal
11.1 Appliance
The symbol with the crossedout rubbish bin on wheels
means that within the European
Union, the product must be
disposed of to a sorted rubbish
collection. This applies to the
product and all accessories which are
marked with this symbol. Marked products
must not be disposed of via the regular
domestic waste but must be handed in to a
recycling centre for electrical or electronic
devices. Recycling helps to reduce the use of
raw materials and to relieve the
24
environment. You can obtain information
about disposal and the location of your
nearest recycling centre from your local
waste management service, for example, or
Yellow Pages.
11.2 Packaging
If you would like to dispose of the
packaging, please observe the
corresponding environmental regulations in
your country. Dispose of the packaging in
Germany via the collection of the dual
system ("Grüner Punkt").
Page 27

RP57458 Dampfgarer LB6 Seite 25 Montag, 27. August 1956 9:07 21
12. Technical data
Power supply: 220 - 240 V~/50-60 Hz
Power consumption: 1,850 Watt
Protection class: I
13. Warranty
The warranty for your appliance is valid for
3 years from the date of purchase. The
warranty does not cover damage resulting
from improper connection, the use of
another manufacturer’s parts, normal wear
and tear, the use of force, improper use, or
attempts to carry out repairs yourself. The
appliance has been manufactured in
accordance with strict quality guidelines and
checked before leaving the factory.
Nonetheless, should operational faults
occur, please contact the Service Centre
first.
Please do not send in any appliance before
contacting our Service Centre.
To enable us to process your request quickly,
please have ready your proof of purchase
and the product number (for this appliance:
SDBO 1850 A1).
Please contact our service hotline for
guarantee claims and technical matters:
00800/4212 4212
(Monday to Friday between
8 a.m. and 4 p.m.)
E-mail: hoyer-gb@teknihall.com
SDBO 1850 A1 25
Page 28

RP57458 Dampfgarer LB6 Seite 26 Montag, 27. August 1956 9:07 21
Page 29

RP57458 Dampfgarer LB6 Seite 27 Montag, 27. August 1956 9:07 21
Page 30

+R\HU+DQGHO*PE+
.¾KQHK¸IH
6'%2$B Ɇ,$1B
53'DPSIEDFNRIHQB&RYHUB/%LQGG
'+DPEXUJ
 Loading...