


LC-60LE830X
Sharp LC-60LE830X, Aquos LC-46LE835X, LC-40LE830X, LC-52LE830X, LC-46LE830X Operation Manual
...
MODEL
LC-60LE835X
LC-52LE835X
LC-46LE835X
LC-40LE835X
LCD COLOUR TELEVISION
OPERATION MANUAL


OPERATION MANUAL
ENGLISH
Dear SHARP customer
Thank you for your purchase of the SHARP LCD colour TV product. To ensure safety and many years of trouble-free
operation of your product, please read Important safety precautions carefully before using this product.
Contents
ENGLISH
Introduction .................................................................3
Precautions For Daily Use .......................................3
Important safety precautions ...................................3
Supplied accessories ..............................................5
Optional accessories ..............................................5
Preparation .................................................................6
Protection against overturning ................................6
Attaching the stand unit – 52/46/40LE835X ............ 7
Attaching the stand unit – 60LE835X ......................8
Connecting the TV ..................................................9
Angle adjustment ...............................................9
Using the remote control unit ................................10
Inserting the batteries .......................................10
Angle of the remote control unit ........................10
Cautions regarding the remote control unit .......10
Part names and functions ........................................11
TV (front view) .......................................................11
TV (rear view) ........................................................11
Remote control unit ..............................................12
Quick guide ...............................................................13
What is the HOME? .............................................. 13
Basic operation ................................................ 13
Initial auto installation ............................................ 15
Checking signal strength and channel strength .....15
Watching TV ..............................................................16
Daily operation ......................................................16
Turning on/off the power –
using the TV front panel ................................. 16
Turning on/off the power –
using the remote control unit .......................... 16
Switching between digital and analogue
broadcasts .....................................................17
Programme guide (CH list) ................................17
Programme information (DTV) ..........................17
Selecting an external video source ...................17
Switching the digital audio format ..................... 18
Switching the analogue audio format ................ 18
Teletext ................................................................. 19
EPG ...................................................................... 21
Useful settings for using EPG ........................... 21
Selecting a programme using EPG ................... 22
Timer setup using EPG ....................................24
Cancelling the timer setup ................................24
Connecting external devices ................................... 25
Video connections ................................................ 26
HDMI connection .............................................26
Component connection .................................... 27
VIDEO connection ............................................27
Audio connections ................................................28
Speaker/amplifier connection ........................... 28
AQUOS LINK .............................................................29
Controlling HDMI devices using AQUOS LINK.......29
AQUOS LINK connection ...................................... 30
Operating an AQUOS LINK device ........................ 30
Basic adjustment ...................................................... 32
Picture settings .....................................................32
Audio settings ....................................................... 34
Power save settings .............................................. 35
Channel settings ...................................................36
Digital setting ...................................................36
Analogue setting ..............................................37
Sort .................................................................. 37
Erase programme ............................................37
Useful viewing functions ..........................................38
TV Start-up time setting ........................................38
Individual setting – Password ................................38
Individual setting – Time ........................................ 39
Individual setting – Language ................................39
Optional features settings .....................................40
Selecting the picture size manually ...................40
Selecting the WSS picture size automatically .... 40
Setting audio input ........................................... 41
Skipping specified inputs .................................. 41
Selecting the HDMI picture size automatically ... 42
Adjusting image position ..................................43
Additional features ................................................ 44
Network function ......................................................45
Connecting to the network ....................................45
Specifications (Wireless LAN USB adapter) ...........47
Optional accessories (Wireless LAN USB
adapter) .............................................................. 47
Using the skype ....................................................48
Using AQUOS.NET ...............................................48
Clear browser setting ............................................ 49
About links ............................................................ 49
Other useful features ...............................................51
Using a USB device ..............................................51
Connecting a USB device ................................51
Selecting USB usage .......................................51
Time shift ..............................................................52
USB media/Home network ................................... 55
Photo mode .....................................................56
3D mode ..........................................................56
Music mode ..................................................... 57
Video mode......................................................58
USB device compatibility ......................................59
Home network server compatibility ....................... 59
Connecting a PC ....................................................... 60
Connecting a PC ..................................................60
Displaying a PC image on the screen .................... 60
Selecting the picture size .................................. 60
Adjusting the PC image automatically ............... 61
Adjusting the PC image manually ..................... 61
PC control of the TV .............................................62
Command list ................................................... 63
1

Enjoying 3D image viewing......................................64
Display format for 3D and 2D images ................... 64
Viewing 3D images ............................................... 65
Receiving a 3D image signal that can be
detected automatically ...................................65
Switching 3D to 2D mode ................................ 65
Receiving a 3D image signal that cannot be
detected automatically ...................................65
Watching 2D images in 3D ...............................66
Switching to the previous mode ....................... 66
3D Menu ..........................................................66
Configuring the TV settings to enhance 3D image
viewing ............................................................... 66
3D picture adjustments .................................... 66
3D setup .......................................................... 67
Troubleshooting – 3D Images ................................ 68
Appendix ...................................................................69
Troubleshooting .................................................... 69
Troubleshooting – Digital broadcasting ..................69
Reset .................................................................... 70
Updating your TV via DVB-T ................................. 70
Getting information ...............................................71
Updating your TV via USB/Network ...................... 71
Information on the software licence for this
product ..............................................................72
Software licence ............................................... 72
Specifications .......................................................73
Removing the stand .............................................. 74
Mounting the TV on a wall .....................................75
Dimensional drawings ...........................................76
CLEARING THE PASSWORD ............................... 78
NOTE
• The illustrations used throughout this operation manual are
based on LC-46LE835X.
This product qualifies for ENERGY STAR when “HOME”
is selected for “TV Location”.
Setting “TV Location” to “HOME” allows the TV to
achieve an energy-saving status for household use.
2

Introduction
Precautions For Daily Use
Observe the following items
Maintenance of the cabinet
• When cleaning the cabinet, use a soft cloth (made of cotton, floss, etc.) to clean gently.
• Do not use a dry or damp rag mixed with chemicals, as this could cause the ingredients of the cabinet body to deteriorate or
crack.
• Be careful not to use an abrasive cloth for cleaning or clean with excessive force, as this could scratch the surface of the
cabinet.
• If the cabinet is greatly soiled, clean with a soft cloth (made of cotton, floss, etc.) soaked with a small amount of diluted neutral
detergent and wrung out, and then clean with a soft dry cloth.
• Solvents such as benzene or thinner could cause the cabinet to deteriorate, or make its coating come off. Therefore do not use
such solvents to clean the cabinet.
• Because plasticizer is included in the plastics, deterioration or the coating peeling off could occur when the cabinet comes into
contact with some substances. Therefore keep it away from volatile substances such as insecticide. In addition, do not let it
come into contact with objects made of rubber, resin, etc. for a long time.
Maintenance of the LCD panel
• Before cleaning the LCD panel, be sure to turn off the TV set and unplug the power cord from the outlet.
• When cleaning the LCD panel, use a dry and soft cloth (made of cotton, floss, etc.) to clean the surface of the LCD panel gently.
For protecting the LCD panel, do not clean with a dirty cloth, detergent, or a dry or damp rag mixed with chemicals, as this
could cause peeling of the panel surface.
• Be careful not to clean with an abrasive cloth or with excessive force, as this could cause the panel surface to be scratched.
• If the LCD panel is greatly soiled, clean it gently with a soft cloth (made of cotton, floss, etc.) soaked with a small amount of
water (Do not clean with excessive force, so as to avoid the scratch of the panel surface).
• If dust sticks on the surface of the LCD panel, clean the panel with a commercially available cleaning brush (anti-static brush).
Important safety precautions
Caring for the cabinet
• Use a soft cloth (cotton, flannel, etc.) and gently wipe the
surface of the cabinet.
• Using a chemical cloth (wet/dry sheet type cloth, etc.) may
deform the components of the main unit cabinet or cause
cracking.
• Wiping with a hard cloth or using strong force may scratch
the surface of the cabinet.
• If the cabinet is very dirty, wipe with a soft cloth (cotton,
flannel, etc.) soaked in neutral detergent diluted with water
and thoroughly wrung out, and then wipe with a soft dry
cloth.
• The cabinet is primarily made of plastic. Avoid using
benzene, thinner, and other solvents, as these may deform
the cabinet and cause the paint to peel off.
• Do not apply insecticides or other volatile liquids.
• Also, do not allow the cabinet to remain in contact
with rubber or vinyl products for a long period of time.
Plasticizers inside the plastic may cause the cabinet to
deform and cause the paint to peel off.
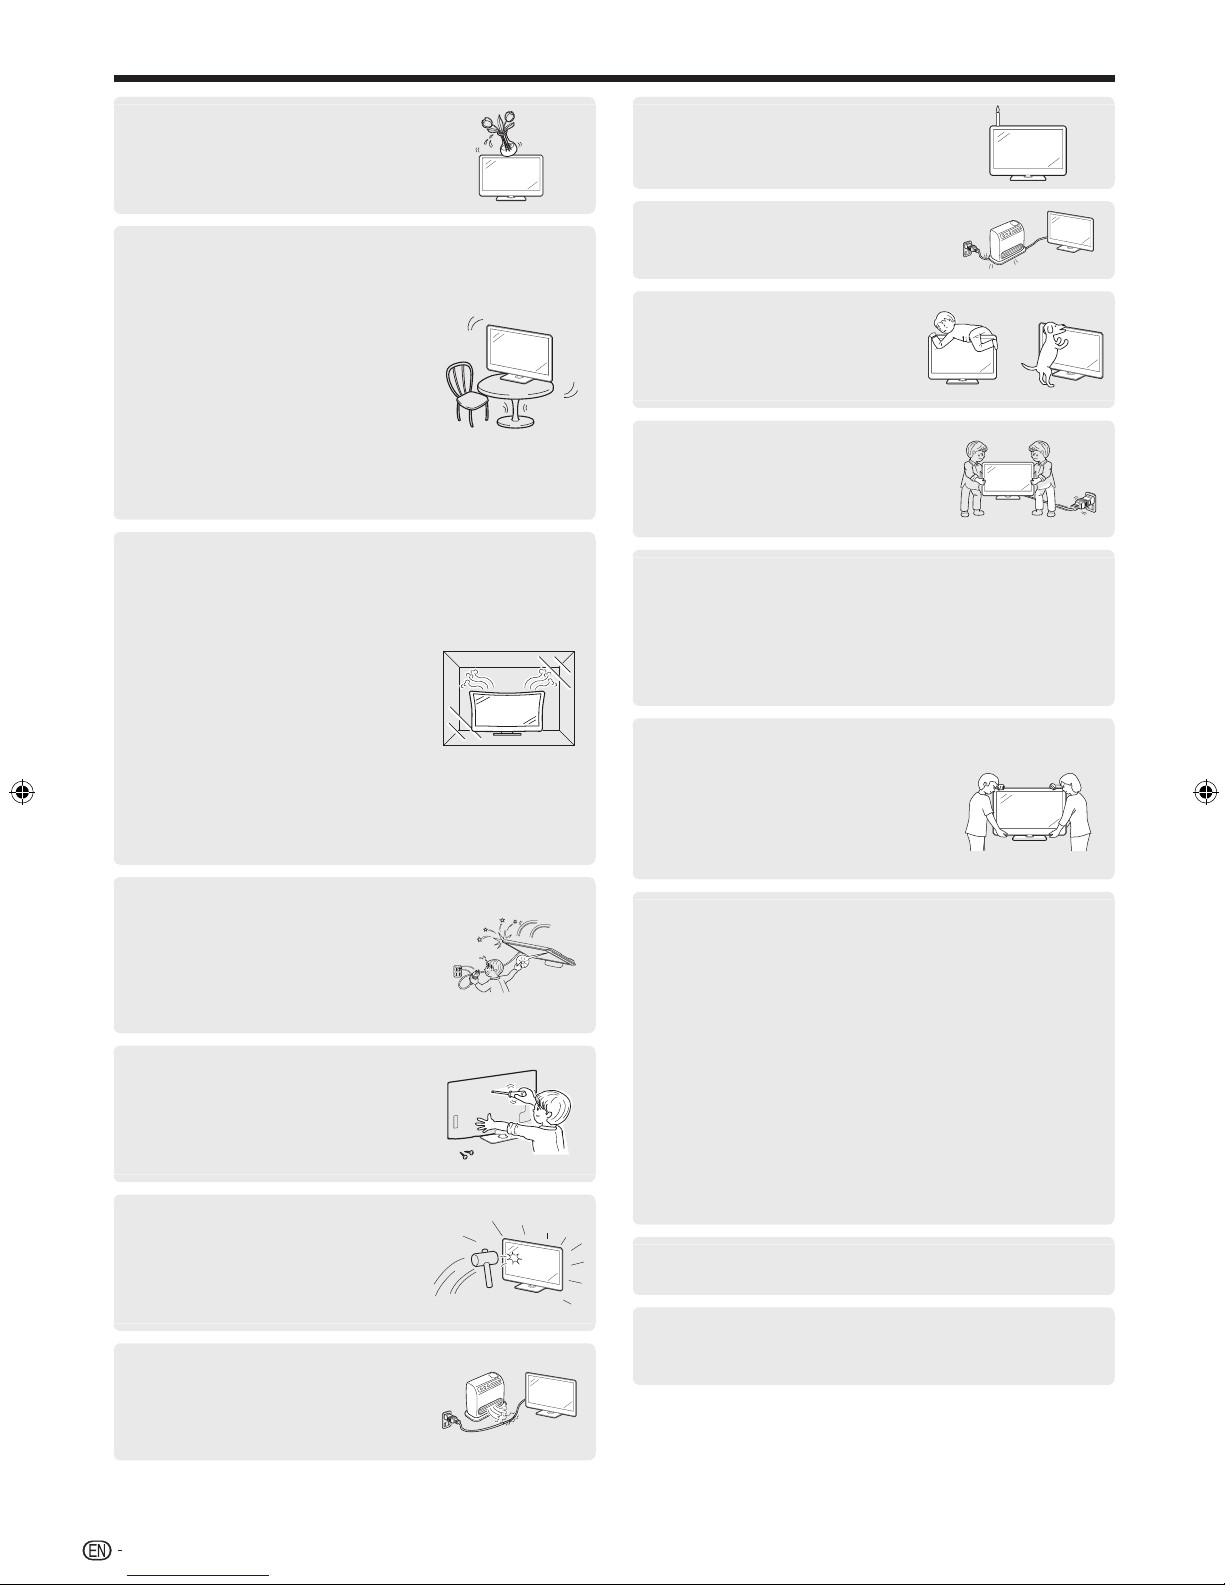
• When relocating the product
placed on a cart, it must be moved
with utmost care. Sudden stops,
excessive force and uneven floor
surface can cause the product to fall
from the cart.
Caring for the front panel
• Turn off the main power and unplug
the AC cord from the wall outlet
before handling.
• Gently wipe the surface of the front
panel with a soft cloth (cotton,
flannel, etc.).
• To protect the front panel, do not
use a dirty cloth, liquid cleaners, or
a chemical cloth (wet/dry sheet type
cloth, etc.). This may damage the
surface of the front panel.
• Wiping with a hard cloth or using
strong force may scratch the surface
of the front panel.
• Use a soft damp cloth to gently wipe
the front panel when it is really dirty
(It may scratch the surface of the
front panel when wiped strongly).
• If the front panel is dusty, use
an anti-static brush, which is
commercially available, to clean it.
• Water and moisture — Do not use
the product near water, such as
bathtub, washbasin, kitchen sink,
laundry tub, swimming pool and in a
wet basement.
3
Introduction
• Do not place vases or any other
water-filled containers on this
product.
The water may spill onto the product
causing fire or electric shock.
• Stand — Do not place the product
on an unstable cart, stand, tripod
or table. Doing so can cause the
product to fall, resulting in serious
personal injuries as well as damage
to the product. Use only a cart,
stand, tripod, bracket or table
recommended by the manufacturer
or sold with the product. When
mounting the product on a wall, be
sure to follow the manufacturer’s
instructions. Use only the mounting
hardware recommended by the
manufacturer.
• Ventilation — The vents and other
openings in the cabinet are designed
for ventilation. Do not cover or block
these vents and openings since
insufficient ventilation can cause
overheating and/or shorten the life
of the product. Do not place the
product on a bed, sofa, rug or other
similar surface, since they can block
ventilation openings. This product is
not designed for built-in installation;
do not place the product in an
enclosed place such as a bookcase
or rack, unless proper ventilation
is provided or the manufacturer’s
instructions are followed.
• To prevent fire, never place any type
of candle or naked flames on the top
or near the TV set.
• To prevent fire or shock hazard, do
not place the AC power cord under
the TV set or other heavy items.
• Do not place heavy objects
on this product or stand on it.
Doing so could cause injury if the
product overturns. Take special
care near children and pets.
• Unplug the power cord before you
move the TV set. If not unplugged
beforehand, the power cord may
become damaged and cause
electric shock.
The LCD panel is a very high technology product with
2,073,600 pixels, giving you fine picture details.
Due to the very large number of pixels, occasionally a few
non-active pixels may appear on the screen as a fixed point
of blue, green, red or yellow.
This is within product specifications and does not constitute
a fault.
Precautions when transporting the TV
• When transporting the TV, never
carry it by holding or otherwise
putting pressure onto the display.
Be sure to always carry the TV by
two people holding it with two hands
— one hand on each side of the TV.
• In case the product is dropped and
the cabinet is damaged, be sure to
turn off the power of the product,
and unplug the power cord. If you
continue to use the product, it may
cause fire or electric shock. Contact
your dealer.
• Do not open the rear cover of the
cabinet to reconstruct the circuits.
There exists high voltage within the
cabinet and it may cause electric
shock and injury. If maintenance is
required, contact your dealer.
• The LCD panel used in this product
is made of glass. Therefore, it can
break when the product is struck
forcefully or with a sharp object. If
the LCD panel is broken, be careful
not to be injured by broken glass.
• Heat sources — Keep the product
away from heat sources such as
radiators, heaters, stoves and other
heat-generating products (including
amplifiers).
If a television is not positioned in a sufficiently stable location,
it can be potentially hazardous due to falling.
Many injuries, particularly to children, can be avoided by
taking simple precautions such as:
• Using cabinets or stands recommended by the
manufacturer of the television.
• Only using furniture that can safely support the television.
• Ensuring the television is not overhanging the edge of the
supporting furniture.
• Not placing the television on tall furniture (for example,
cupboards or bookcases) without anchoring both the
furniture and the television to a suitable support.
• Not standing the televisions on cloth or other materials
placed between the television and supporting furniture.
• Educating children about the dangers of climbing on
furniture to reach the television or its controls.
• Do not display a still picture for a long time, as this could
cause an afterimage to remain.
• Install the product on the place where the AC cord can
be unplugged easily from the AC outlet, or from the AC
INPUT terminal on the rear of the product.
NOTE
• The above are pictures for reference only; the actual item
might be different.
4

Introduction
Supplied accessories
Remote control unit ( x 1) “AAA” size battery ( x 2) AV cable ( x 1)
Pages 10 and 12 Page 10 Page 27
Stand unit
LC-60LE835X
Page 8
LC-52/46LE835X
Page 7
LC-40LE835X
Page 7
Cable tie ( x 1) 3D glasses accessories Operation manual
Page 9
Optional accessories
The listed optional accessories are available for this LCD colour TV. Please purchase them at your nearest shop.
• Additional optional accessories may be available in the near future. When purchasing, please read the newest catalogue for
compatibility and check the availability.
No. Part name Part number
Wall mount bracket (60 inch models)
1
Wall mount bracket (52/46 inch
AN-52AG4
models)
Wall mount bracket (40 inch models) AN-37AG2
2
Attachment (40 inch models) AN-37P30
3 3D glasses
*1
Refer to page 47 for details on sales areas.
AN-3DG10-S
AN-3DG20-B
No. Part name Part number
KI-OUA004WJN1*
4 Wireless LAN USB adapter
KI-OUA004WJN2*
KI-OUA004WJN3*
KI-OUA004WJN4*
1
1
1
1
5
Preparation
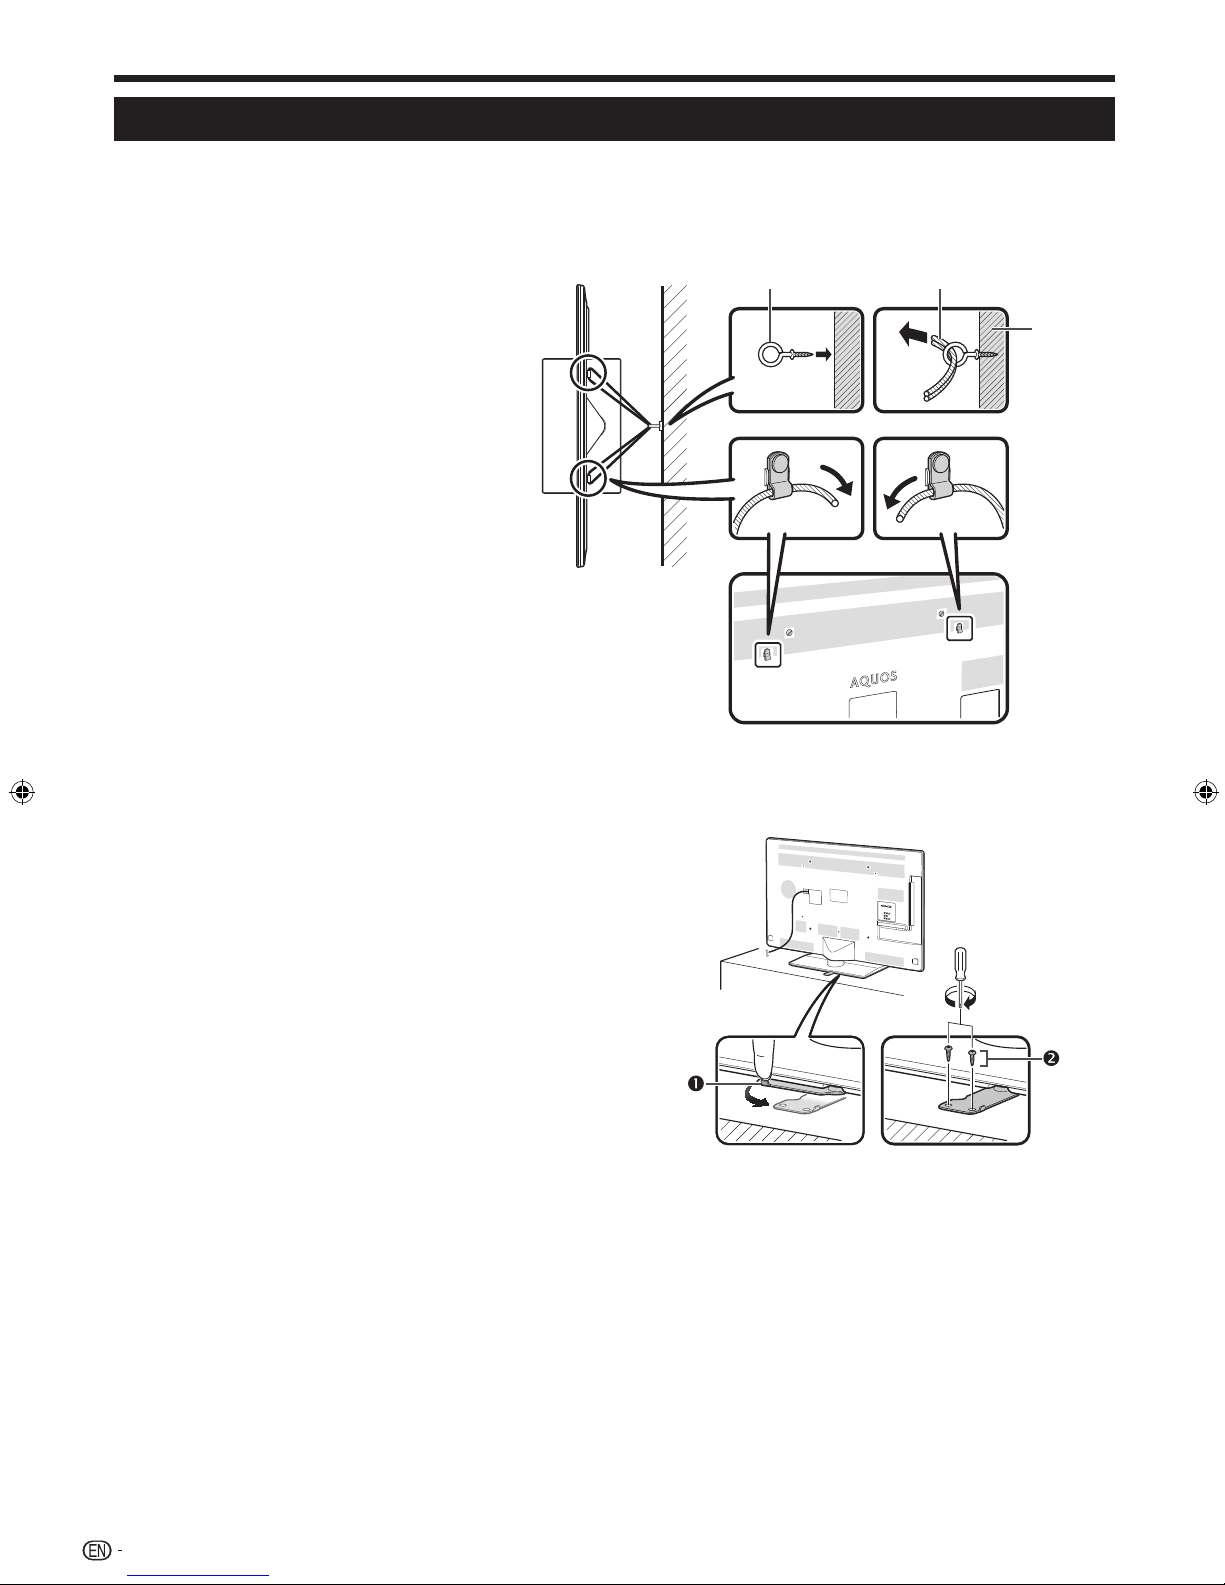
Protection against overturning
There is a danger of the product overturning in the case of a disaster or sudden collision. Carry out the following tipresistant measurement for your safety.
Anchoring the TV to the wall or a pillar
1 Affix the TV to the wall or a pillar using
extra strong ties and cup hooks.
View from the top
n o
Wall
Fixing the TV to the table
1 Place the TV on the table.
2 Pull the attached restraining bracket out so that it
is at a 90 degrees angle.
3 Insert commercially available screws in the holes
of the restraining bracket and tighten the screws
to secure the TV to the table.
• Use commercially available screws to firmly secure the
TV.
CAUTION
• As this product is heavy, use a table that is wide
enough to support the product and capable of
withstanding the product’s weight. The table should be
set where it will not be overturned.
• Be sure to use at least two people when moving the TV.
Cup hook (commercially available)
Tie (commercially available)
Restraining bracket (attached)
Screws (commercially available)
6

Preparation
Attaching the stand unit –
52/46/40LE835X
• Before performing work, spread cushioning over the surface
on which you will be laying the TV. This will prevent it from
being damaged.
CAUTION
• Attach the stand in the correct direction.
• Be sure to follow the instructions. Incorrect installation
of the stand may result in the TV falling over.
1 Confirm that there are screws with the stand unit.
For 52/46 inch models
(four long screws, four middle screws and one
short screw)
For 40 inch models
(three long screws, three middle screws and one
short screw)
2 Attach the supporting post for the stand unit onto
the base using the long screws with a screwdriver
as shown.
Long screws
4 Insert and tighten middle screws into the holes on
the rear of the TV.
Middle
screws
Middle
screws
40 inch models 52/46 inch models
5 Attaching the stand cover.
1
Insert the stand cover.
2
Insert and tighten a short screw into the hole of the
stand cover.
Short
screw
Supporting
post
40 inch models 52/46 inch models
Long screws
3 Insert the stand into the openings on the bottom
of the TV (hold the stand so it will not drop from
the edge of the base area).
Soft cushion
40 inch models 52/46 inch models
NOTE
• To detach the stand unit, perform the steps in reverse order.
• A screwdriver is not supplied with this product.
7

Preparation
Attaching the stand unit – 60LE835X
• Before performing work, spread cushioning over the surface
on which you will be laying the TV. This will prevent it from
being damaged.
CAUTION
• Attach the stand in the correct direction.
• Be sure to follow the instructions. Incorrect installation
of the stand may result in the TV falling over.
1 Confirm that there are screws with the stand unit.
For 60 inch models
(four long screws, four middle screws and two
short screws)
2 Attach the supporting post for the stand unit onto
the base using the long screws with a screwdriver
as shown.
Long screws
2
Supporting
post
1
5 Attaching the stand cover.
1
Insert the stand cover.
2
Insert and tighten two short screws into the holes of
the stand cover.
Short screws
NOTE
• To detach the stand unit, perform the steps in reverse order.
• A screwdriver is not supplied with this product.
3 Insert the stand into the openings on the bottom
of the TV (hold the stand so it will not drop from
the edge of the base area).
Soft cushion
4 Insert and tighten middle screws into the holes on
the rear of the TV.
Middle
screws
8

Preparation
Connecting the TV
Notes on installing the TV
• Avoid direct sunlight and place the TV in a well-ventilated
location.
• Place the TV in a level location.
• Do not turn on the power of the TV before connecting the AC
cord.
1 Connect the antenna cable.
p
o
n
Standard DIN45325 connector (IEC169-2)
Antenna cable (75-ohm coaxial type: commercially
available)
Room antenna terminal (75-ohm type)
2 Connect external devices.
See pages 25 to 28 for connecting external equipment, such
as a VCR and DVD player.
3 Plug the AC cord in to the AC outlet (product
shape varies in some countries).
TV (rear view)
4 Bundle the cables.
1
Insert the clip into the hole on the TV.
2
Bundle the cables.
Cable tie
CAUTION
TO PREVENT RISK OF ELECTRIC SHOCK, DO
NOT TOUCH UN-INSULATED PARTS OF ANY
CABLES WITH THE AC CORD CONNECTED.
Angle adjustment
The TV can be rotated up to 20 degrees to the right or
left.
20°
20°
2
1
1
Detach the cable tie on the
rear of the TV. Press cable tie
clip (1) and pull out cable tie
(2) completely to release.
• Place the TV close to the AC outlet, and keep the power
plug within reach.
• Disconnect the AC cord from the AC outlet if the TV will
not be used for a long period of time.
Front
CAUTION
• Adjust the screen with both hands. Place one hand on the TV
and rotate the screen while holding the bottom of the stand
with your other hand.
9

Preparation
Using the remote control unit
Inserting the batteries
Before using the TV for the first time, insert two supplied “AAA” size batteries. When the batteries become depleted
and the remote control unit fails to operate, replace the batteries with new “AAA” size batteries.
1 Open the battery cover. 2 Insert the two supplied “AAA”
size batteries.
• Place batteries with their terminals
corresponding to the (e) and (f)
indications in the battery compartment.
CAUTION
Improper use of batteries can result in chemical leakage or explosion. Be sure to follow the instructions below.
• Do not mix batteries of different types. Different types of batteries have different characteristics.
• Do not mix old and new batteries. Mixing old and new batteries can shorten the life of new batteries or cause chemical leakage in
old batteries.
• Remove batteries as soon as they have worn out. Chemicals that leak from batteries can cause a rash. If you find any chemical
leakage, wipe thoroughly with a cloth.
• The batteries supplied with this product may have a shorter life expectancy due to storage conditions.
• If you will not be using the remote control unit for an extended period of time, remove the batteries from it.
• Batteries shall not be exposed to excessive heat such as sunshine, fire or the like.
3 Close the battery cover.
Angle of the remote control unit
Use the remote control unit by pointing it towards the remote control sensor. Objects between the remote control unit
and sensor may prevent proper operation.
30°
30°
* When mounting the TV on the wall
30°
5 m
30°
Remote control sensor
Cautions regarding the remote control unit
• Do not expose the remote control unit to shock. In addition, do not soak the remote
control unit to liquids, and do not place in an area with high humidity.
• Do not install or place the remote control unit under direct sunlight. The heat may cause
deformation of the unit.
• The remote control unit may not work properly if the remote control sensor of the TV is
under direct sunlight or strong lighting. In such cases, change the angle of the lighting or
the TV, or operate the remote control unit closer to the remote control sensor.
10

Part names and functions
TV (front view)
Illumination LED*
OPC sensor*
1
3D infrared emitter*
3
2
Remote control sensor
*1
3D mode: Blue illumination
2D mode: White illumination
*2
This panel emits infrared signal towards the 3D glasses you wear when viewing 3D images. Do not place anything between the 3D infrared emitter on
the TV and the infrared receiver on the 3D glasses. Refer to page 68 for details.
*3
OPC: Optional Picture Control (Page 32)
TV (rear view)
RS-232C terminal
PC terminal
INPUT 2 (VIDEO/AUDIO (L/R))
terminal
INPUT 3 (COMPONENT/
AUDIO (L/R)) terminal
OUTPUT (Headphones/
AUDIO (L/R)) terminal*
USB 1 port*
2
HDMI 1 (HDMI/ARC)
terminal (INPUT 4)
1
USB 3
(WIRELESS LAN)
port
USB 2 (HDD) port
ETHERNET (10/100) terminal Antenna terminal
*1
Refer to page 42 for details.
*2
Skype will be available only for the USB1 port. Visit the following website for details:
skype: http://www.skype.com or Sharp: http://www.aquos-world.com
*3
The HDMI 2 and PC terminals can both use the same audio input terminal (AUDIO IN (HDMI 2/PC)). However, the proper item must be selected in the
“Audio select” menu (refer to page 41 for details).
WARNING
• Excessive sound pressure from earphones and headphones can cause hearing loss.
• Do not set the volume at a high level. Hearing experts advise against extended listening at high volume levels.
HDMI 2 (HDMI) terminal
(INPUT 5)
HDMI 3 (HDMI) terminal
(INPUT 6)
HDMI 4 (HDMI) terminal
(INPUT 7)
INPUT 1 (AV IN) terminal
AUDIO IN (HDMI 2/PC)
3
jack
*
DIGITAL AUDIO OUTPUT terminal
11

Part names and functions
Remote control unit
117
MENU
2
3
4
5
6
7
8
9
10
11
12
13
14
15
1 POWER (Standby/On)
To switch the power on and off (Page 16).
2 ATV (Analogue TV)
Press to access analogue TV mode (Page 17).
DTV (Digital TV)
Press to access digital TV mode (Page 17).
3 AQUOS LINK buttons
If external equipment such as a AQUOS BD player
is connected via HDMI cables and is AQUOS LINK
compatible, you can use these AQUOS LINK buttons. See
pages 29 and 31 for details.
4 CONTROL
Press to display the panel to operate some functions on the
screen.
5 TIME SHIFT (READY/a/F/b)
Press to temporarily record a programme you are watching
if you want to interrupt a programme to answer a phone
call, for example (Pages 52 to 54).
6 0–9
Set the channel (Page 16).
7 A (Flashback)
Press to return to the previously selected channel or
external input.
8 MPX
Select a sound multiplex mode (Page 18).
12
16
18
19
20
21
22
23
24
25
26
27
9 WIDE
Change a wide image mode (Pages 40, 59 and 60).
10 e (Mute)
Mute the sound.
11 VOL+/
12 HOME
13 3D
14 a/b/c/d (Cursor)
15 EXIT
16 MENU
17 FREEZE
18 RADIO
19 INPUT (INPUT SOURCE)
20 ECO
21 AV MODE
22 m (Teletext)
23 CHr/s
24 EPG
25 RETURN
26 Buttons for useful operations
27 R/G/Y/B (Colour) buttons
–
Set the volume.
Display the “HOME” screen for enjoy Internet connection
and Home network function and to perform settings for the
TV (Page 13 ).
Select between 3D and 2D image viewing (Pages 64–68).
Select a desired item on the setting screen.
ENTER
Execute a command.
Turn off the On-Screen Display (Page 13).
Displays the menu screen (Page 13).
Freeze a motion picture on the screen.
INFO
DTV only: Display the programme information (Page 17).
DTV only: Switch between radio and data mode.
When only data broadcasting (no radio broadcasting) is
transmitted by DVB, the radio broadcasting will be skipped.
DISPLAY
Display the channel or input information.
Reveal/hide the guide display for USB media mode (Pages
56–58).
Select an input source (Pages 17, 26, 41, 42 and 60).
Select “Energy save” setting (Page 35).
Select audio/video settings (Page 32).
Select the teletext mode (All TV image, all text image and
TV/text image) (Page 19).
TV input mode: Select the channel (Page 16).
AQUOS.NET: Select the page (Page 49).
DTV only: To display EPG (Electronic Programme Guide)
screen (Pages 21 to 24).
Menu mode: Return to the previous menu screen (Page 13).
[ (Subtitle)
Switch subtitle languages on/off (Page 19).
k (Reveal hidden teletext)
Teletext mode: Display hidden characters (Page 19).
1 (Subpage)
Display the teletext subpage directly (Page 19).
3 (Hold)
Teletext mode: Stop updating teletext pages automatically.
Press 3
The coloured buttons are correspondingly used to select
the coloured items on the screen (e.g., AQUOS LINK, USB
media, Home network, teletext).
again to release the hold mode (Page 19).

Quick guide
MENU
MENU
MENU
What is the HOME?
You can easily launch to enjoy Internet connection and Home network function and to perform settings for the TV from
this “HOME” screen.
Basic operation
Display the HOME screen
Press HOME and the “HOME” screen
displays.
Exit the HOME screen
The operation will exit the “HOME” screen
if you press B before it is completed.
Select an item
Selecting in the HOME.
Press a/b/c/d to select the desired service or menu, and then press A.
1 Skype
You can enjoy video call on your AQUOS (Page 48).
2 YouTube
TM
You can enjoy YouTube on your AQUOS.
3 AQUOS.NET
By connecting the TV to the Internet (Pages 48, 49).
4 Home network (Page 55)
5 USB media (Page 55)
6 TV Menu
Call up the OSD (On-screen Display) to perform settings
for the TV. The OSD (On-screen Display) for the settings
is called “TV Menu”. The “TV Menu” enables various
settings and adjustments.
You can call up “TV Menu” screen by press
NOTE:
MENU.
7 Input change
8 IP Control (Page 62)
9 Network setup (Pages 45, 46)
10 CH list (Page 17)
13
2
Yo u
T ube
TM
4
5
6
7
USB media
TV Menu
:Select
* When displays, you are not connected to USB
devices.
is displayed, check your USB device’s
If
connection.
* When
network.
is displayed, check your TV’s network settings
If
and connection.
Home network
Input change
:End
:Enter
displays, you cannot connect to TV’s
IP Control
CH list
HOME
Network setup
USB
LAN
8
9
10
Regarding the instruction on the manual
On this manual, the following expression is often used in order to simplify instructions.
• Go to “HOME” > “TV Menu” > “Setup” > ...
This indicates how to navigate through the HOME screen using a/b/c/d and A buttons.
13

Quick guide
Using software keyboard
Use the software keyboard when you need to input text.
Char.Set
Caps
Done
Cancel
Cursor Left Caps Char.Set Cursor Right
1 Char. Set
Changes character set into the
alphabet, numbers, symbols, etc.
2 Caps
Changes characters to capital/lower
case.
3 Done
Confirm the entry.
4 Cancel
Abort input and close the software
keyboard.
5 R/G/Y/B (Colour) buttons
Selects the coloured items on the
screen.
6 Input cursor
Press c/d to move the cursor when
highlighted.
7 Input field
The text you enter is displayed as you
type it in.
8 Character
Input characters by using these
buttons.
9
Put a line break.
NOTE
• Depend on application, there might has a different software keyboard with above indication.
10 Clear
11 Delete
Clear
Delete
Erases the character string.
• When the cursor is somewhere in a
line: the character string to the right
of the cursor will be erased.
• When the cursor is at the right
end of a line: the entire line will be
erased.
If the cursor is at the right end of a
line, this erases text one character at
a time.
• You can also delete text by
pressing C on the remote
control unit.
14

Quick guide
Initial auto installation
When the TV is powered on for the first time after
purchase, the initial auto installation wizard appears.
Follow the menus and make the necessary settings one
after another.
Confirm the following before turning on the
power
E
Is the antenna cable connected?
E
Is the AC cord plugged in?
1 Press POWERa on the TV.
• The initial auto installation wizard appears.
2 Setting the OSD language.
Press a/b to select the desired language, and then press
A.
3 Selecting the location of the TV.
Press c/d to select where you will use this TV, and then
press A.
HOME:
• Settings are optimised for normal home viewing and
energy efficiency.
• “STANDARD” will be the default value for the “AV mode”
setting.
STORE:
• Settings are designed for maximum impact in retail store
displays.
• “DYNAMIC (Fixed)” will be the default value for the “AV
mode” setting. If the “AV mode” is changed, the TV will
automatically switch back to “DYNAMIC (Fixed)” when
there is no operation using the TV or remote control unit
for 30 minutes.
• The confirmation screen pops up only when selecting
“STORE”. Press c/d to select “Yes” or “No”.
* This product qualifies for ENERGY STAR in “HOME” mode
default setting.
* ENERGY STAR qualification is based on “STANDARD” in the “AV
mode” menu.
NOTE
• STORE: A demonstration image will be displayed after initial
auto installation is completed. If you have chosen “STORE”
by mistake, go to “Setup” > “View setting” > “Reset” > select
“HOME” again.
4 Setting the country.
Press a/b to select your country or area, and then press
A.
• This setting screen only appears during the initial auto
installation.
5 Press c/d to select “Digital search” or “Analogue
search”, and then press A.
6 The TV searches for, sorts and stores all the
receivable TV stations according to their settings
and the connected antenna.
• To abort the initial auto installation in progress, press
C.
NOTE
• If you turn off the power on the TV while performing a channel
search in Step 5, the initial auto installation wizard may not
appear. The auto installation function allows you to execute
the installation again from “Setup” > “View setting” (Page 36).
• The initial auto installation wizard will abort if you leave the TV
unattended for 30 minutes before searching for channels in
Step 6.
Checking signal strength and
channel strength
If you install a DTV antenna for the first time or relocate it,
you should adjust the alignment of the antenna to receive
a good reception while checking the antenna setup
screen.
1 Go to “HOME” > “TV Menu” > “Setup” > “View
setting” > “Channel settings” > “Antenna setupDIGITAL”.
E
Checking signal strength
2 Press a/b to select “Signal strength”, and then
press A.
Supply voltage
Signal strength
Channel strength
E
Checking channel strength
CH No.
Signal strength
Current Max.
Quality
Current Max.
97 97
99 99
3 Press a/b to select “Channel strength”, and then
press A.
• You can input a specified frequency band using the 0–9
numeric buttons.
Supply voltage
Signal strength
Channel strength
Frequency
CH No.
Signal strength
Current Max.
Quality
Current Max.
97 97
99 99
MHz
4 Position and align the antenna so that the
maximum possible values for “Signal strength”
and “Quality” are obtained.
NOTE
• The values of “Signal strength” and “Quality” indicate when to
check the appropriate alignment of the antenna.
Supplying power to the antenna
You can supply power to the antenna in order to receive
digitally/terrestrially broadcast stations after connecting
the antenna cable to the antenna terminal on the rear of
the TV.
1 Go to “HOME” > “TV Menu” > “Setup” > “View
setting” >“Channel settings” > “Antenna setupDIGITAL” >“Supply voltage”.
2 Press c/d to select “On”, and then press
A.
15
Watching TV
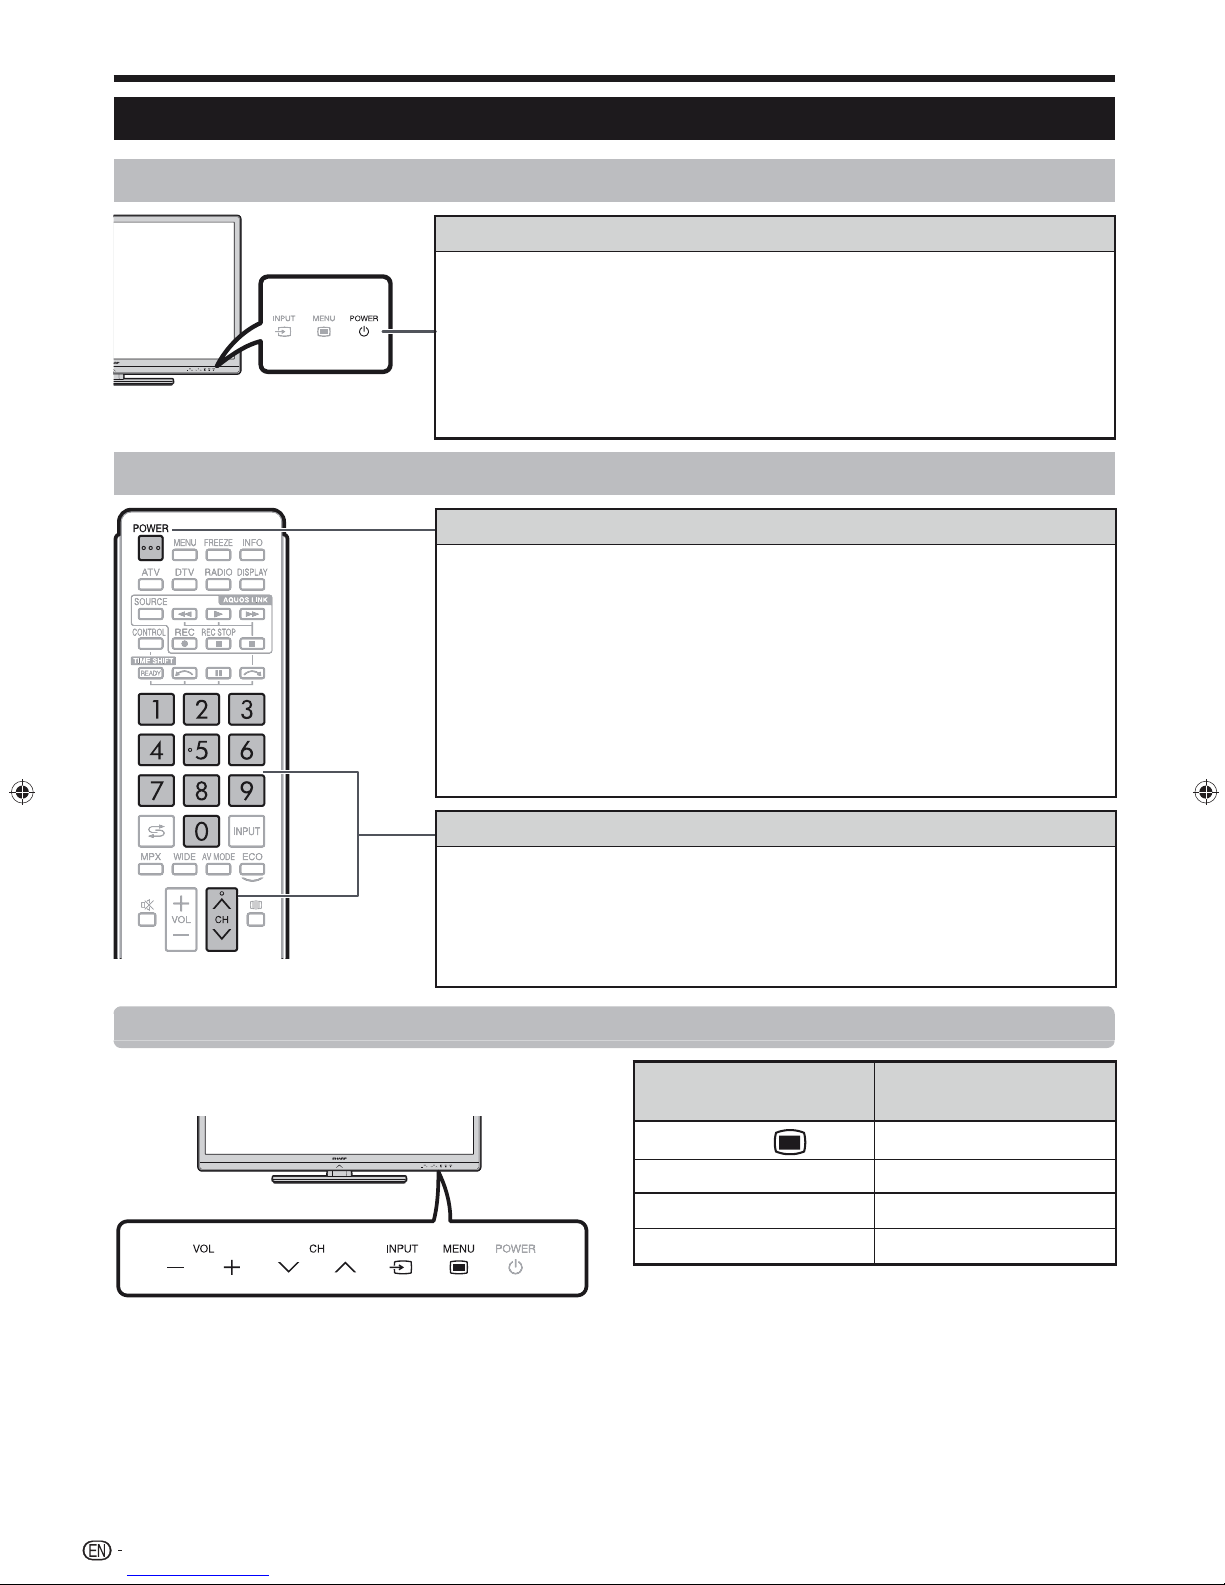
Daily operation
Turning on/off the power – using the TV front panel
Turning on/off the power
1 Turn on the power.
Press POWER a on the TV (after a few seconds, an image appears
with sound).
• Wait more than five seconds until you press POWER a on the TV after inserting the
power plug.
2 Turn off the power.
Switch it off by pressing POWER a on the TV.
Turning on/off the power – using the remote control unit
Standby mode
1 To standby mode.
If the TV is turn on, you can switch it to standby by pressing POWER
on the remote control unit.
2 Switch on from standby.
From standby, press POWER on the remote control unit.
NOTE
• If you are not going to use this TV for a long period of time, be sure to remove the AC
cord from the AC outlet.
• A small amount of electric power is still consumed even when the TV is in standby
mode.
Changing channels
1 Turn on the power.
2 Select a programme using 0–9 numeric buttons or CHr/s on the
remote control unit.
NOTE
• You can also select a programme using CHr/s on the TV front panel.
Operation without a remote control unit
You can operate the menu settings using the TV control
panel.
TV control panel
buttons
MENU
INPUT b
CH r/CH s
Remote control
buttons
MENU
ENTER
a/b
VOL k/VOL ld/c
16
MENU
MENU
Watching TV
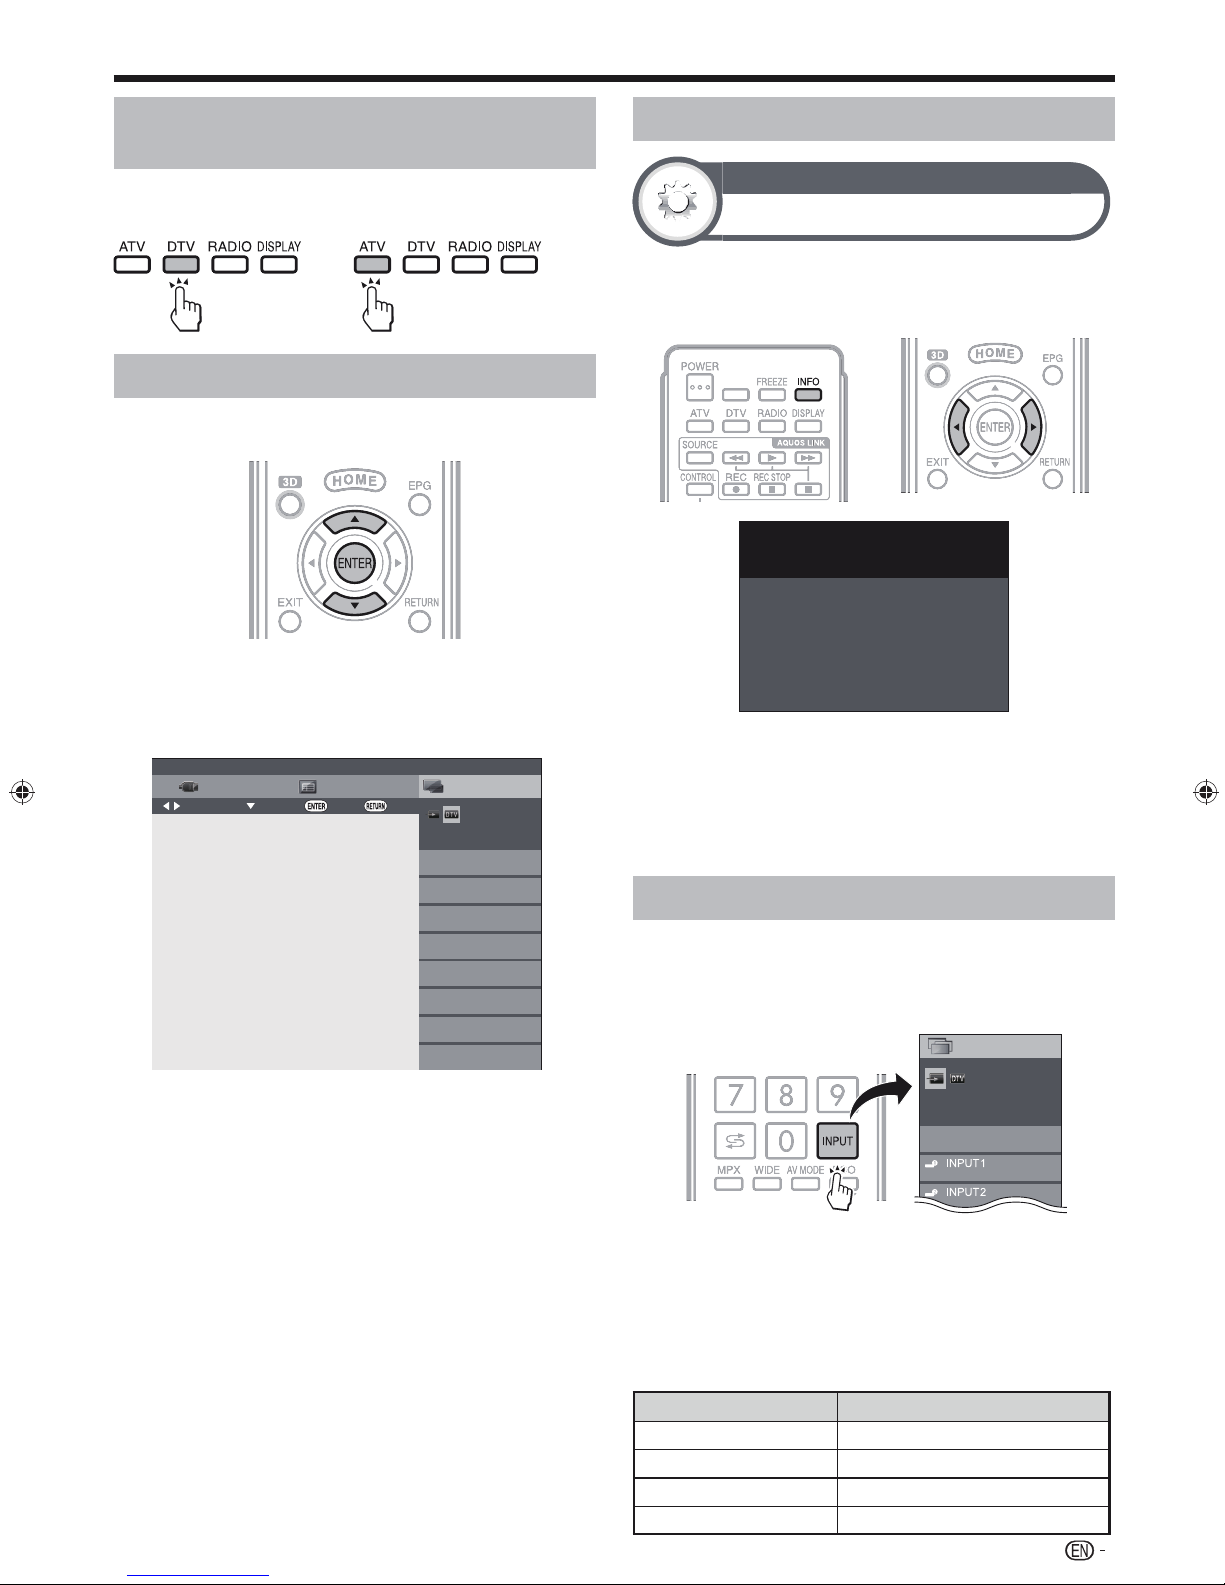
Switching between digital and
analogue broadcasts
Watching digital
broadcasts
Watching analogue
broadcasts
Programme guide (CH list)
You can check the current schedule of DTV events and
view detailed information about current events.
1 Press A to display the programme guide list.
2 Press a/b to display your desired programme,
and then press A.
• When you press A, the TV jumps to the channel.
Link
operation
:Exit:Enter:Select:Select menu
001
002
003
004
005
006
007
008
Menu
CH listEPG
DTV
TV1
SD Moving
TV2
HD ColorBar
TV3
H264 SD-Color Pat…
TV4
H264 HD-Monosco
SD Color Pattern
HD Moving
SD Colour Bar
MPEG SD Moving
Programme information (DTV)
Option
Programme info.
While watching DTV you can check the extended
programme information on the screen using INFO on the
remote control.
001 DTV TV1
SD Moving
20:00 - 21:00
HProgramme info.
HInput Info.
Video : 576i
Audio : STEREO
Age : No limit
Optic. REC : OK
• If there is more information, pressing c/d allows you to go
to the next page or return to the previous page.
• You can cancel this info by pressing INFO again.
E
Using Info on the menu screen
Go to “HOME” > “TV Menu” > “Setup” > “Option”
>“Option for view” > “Programme info.”.
Selecting an external video source
Once the connection is made, press INPUT to display
the “INPUT” screen, and then press INPUT or a/b
to switch over to the appropriate external source with
A.
CH list
INPUT
TV
Switchable
NOTE
• You can also select an external video source from “CH list” >
“INPUT”.
• Only inputs which are not set for “Input skip” (Page 41) and
properly connected inputs can be selected.
• You can select an external video source for an HDMI
connections as shown below.
Connected terminal Selectable item
HDMI 1 INPUT 4
HDMI 2 INPUT 5
HDMI 3 INPUT 6
HDMI 4 INPUT 7
17

Watching TV
Switching the digital audio format
If multi sound modes are received, each time you press
MPX the mode switches as follows.
Audio (ENG)
L/R LRLR
Audio (ENG)
CH A CH B CH AB
Audio (ENG) MONO
STEREO
CH A
Press c/d to select L or R sound when the STEREO or
DUAL MONO screen is displayed.
Audio (ENG)
L/R LRLR
STEREO
NOTE
• The sound mode screen disappears in six seconds.
• Selectable items vary depending on the received broadcasts.
• When the “Audio description setting” menu is set to “On”, the
audio description sound is selected depending on the main
audio.
Switching the analogue audio
format
You can switch between multiple audio modes
when watching a multiple audio or stereo broadcast
programme.
When receiving a bilingual signal
Each time you press MPX, the mode switches among
NICAM CH A, NICAM CH B, NICAM CH AB and MONO.
Bilingual mode
ATV
CH A
ATV
MONO
ATV
CH B
ATV
CH AB
When receiving a monaural signal
Each time you press MPX, the mode switches between
NICAM MONO and MONO.
Monaural mode
ATV
MONO
ATV
MONO
In the TV mode of A2 TV broadcasts
When receiving a stereo signal
Each time you press MPX, the mode switches between
STEREO and MONO.
Stereo mode
ATV
STEREO
ATV
MONO
In the NICAM TV broadcasts
When receiving a stereo signal
Each time you press MPX, the mode switches between
NICAM STEREO and MONO.
Stereo mode
ATV
STEREO
18
ATV
MONO
When receiving a bilingual signal
Each time you press MPX, the mode switches among
CH A, CH B and CH AB.
Bilingual mode
ATV
CH A
ATV
CH AB
ATV
CH B
When receiving a monaural signal
When you press MPX, “MONO” displays.
Monaural mode
ATV
MONO
NOTE
• “BBC1”, “01” and “PAL” are tentative network name, channel
and colour system.

Watching TV
Teletext
What is teletext?
Teletext broadcasts pages of information and
entertainment to specially equipped TV. Your TV receives
teletext signals broadcast by a TV network, and decodes
them into graphical format for viewing. News, weather
and sports information, stock exchange prices and
programme previews are among the many services
available.
Turning teletext on/off
1 Select a TV channel or external source providing a
teletext programme.
2 Press m to display the teletext.
3 Press m again to display the teletext on the right
screen and the normal image on the left screen.
• Many stations use the TOP operating system, while some use
FLOF (e.g., CNN). Your TV supports both these systems. The
pages are divided into topic groups and topics. After switching
on the teletext, up to 2,000 pages are stored for fast access.
• If you select a programme with no teletext signal, “No Teletext
available” displays.
• The same message displays during other modes if no teletext
signal is available.
TELETEXT
TELETEXT
View setting
Text language
If Teletext information does not display correctly, perform
the procedure below.
Select from among six kinds of language tables: West
Europe, East Europe, Greek/Turkish, Cyrillic, Arabic and
Farsi.
Each table is compatible with the Teletext languages
listed below.
1 Go to “HOME” > “TV Menu” > “Setup” > “View
setting” > “Individual setting” >“Text language”.
Text language
Teletext language settings
West Europe
East Europe
Greek/Turkish
Cyrillic
Arabic
Farsi
BackSelect
• Each time you press m, the screen switches as shown above.
NOTE
• Teletext will not work in 3D mode.
Buttons for teletext operations
Buttons Description
CHr/s
Colour (R/G/Y/B)
Numeric buttons
0–9
k (Reveal
hidden teletext)
3 (Freeze/Hold)
[ (Subtitle for
teletext)
1 (Subpage)
A
Increase or decrease the page number.
Select a group or block of pages displayed
in the coloured brackets at the bottom of the
screen by pressing the corresponding colour
(R/G/Y/B) on the remote control unit.
Directly select any page from 100 to 899 by
using the 0–9 numeric buttons.
Reveal or hide hidden information such as an
answer to a quiz.
Stop updating teletext pages automatically or
release the hold mode.
Display the subtitle or exit the subtitle screen.
Subtitles will not be displayed when the service
does not contain subtitle information.
Reveal or hide subpages.
Selects directly the desired subpage (0-9).
• Move to the previous subpage (R).
• Move to the following subpage (G).
• These two buttons are shown on the screen
by the symbols “e” and “f”.
Display the top menu.
• The top menu will not be displayed when the
service does not support top menus.
• West Europe — English, French, Scandinavian, Turkish,
German, Spanish, Italian
• East Europe — Polish, French, Scandinavian, Czech,
German, Slovenian/Croatian, Italian, Rumanian
• Greek/Turkish — English, French, Scandinavian, Turkish,
German, Spanish, Italian, Greek
• Cyrillic — English, Russian, Estonian, Czech, German,
Slovenian/Croatian, Ukrainian, Lettish
• Arabic — English, French, Scandinavian, Turkish,
German, Hebrew, Italian, Arabic
• Farsi — English, French, Scandinavian, Turkish, German,
Hebrew, Italian, Farsi
NOTE
• Teletext can be displayed only when it is sent by a network.
Not used to convert between languages.
19
Watching TV
View setting
Initial teletext page
If you set the language of the initial page (this page is
displayed for the first time after pressing m) for teletext
in DTV mode, it will start from the selected language
page.
1 Go to “HOME” > “TV Menu” > “Setup” > “View
setting” >“Individual setting” > “Initial teletext
page”.
2 Press a/b/c/d to select the desired language,
and then press A.
NOTE
• This function is available for teletext in DTV mode. This is not
available for teletext in ATV or external input mode.
• If the initial teletext page of the selected language in this
function is not included in a received broadcast, the default
initial page will be displayed.
View setting
MHEG-5 (EPG)
This function is set to enable MHEG-5 in DTV mode.
Go to “HOME” > “TV Menu” > “Setup” > “View
setting” >“Individual setting” > “MHEG-5 (EPG)” .
Item
Enable
Disable
MHEG-5 is displayed during DTV mode.
MHEG-5 is not displayed during DTV mode.
NOTE
• This function is only displayed for models for the New Zealand
market. This function is not displayed for models for the other
market than “New Zealand”.
• When the country setting is set to “New Zealand” in the initial
auto installation, this function is available. When the country
setting is set to countries other than “New Zealand”, then this
item is greyed out and cannot be selected.
• The MHEG-5 is not displayed when there is no MHEG-5
information on broadcast in setting this function to “Enable”.
• When this function is set to “Enable”, subtitles may not be
displayed. If this occurs, set to “Disable” and then display of
subtitles will be possible.
20
Watching TV
EPG
EPG is a programme list that is displayed on the screen.
With the EPG, you can check the schedule of DTV/
RADIO/DATA, view detailed information about them, tune
to an event currently on-air.
Useful settings for using EPG
Basic setting
View setting
EPG
If you want to use the EPG for digital stations, select
“Yes”. The EPG data must be automatically captured
while the TV is in standby mode. After setting to “Yes”,
it may take some time to turn off the power using the
remote control unit or the TV due to the data capture
process.
Go to “HOME” > “TV Menu” > “Setup” > “View
setting” > “Individual setting” > “Standby search”
> “EPG”.
E
Selecting EPG to “Yes” will result in higher power
consumption*.
E
Selecting EPG to “No” will save power consumption.
NOTE
* Approximately 22W for 15–30 minutes (depending on number
of channels tuned) after power off from remote control.
• EPG data will not update if the TV is turned off from the
power switch at the TV front panel.
• “EPG” cannot be selected when the country setting is set to
“New Zealand”.
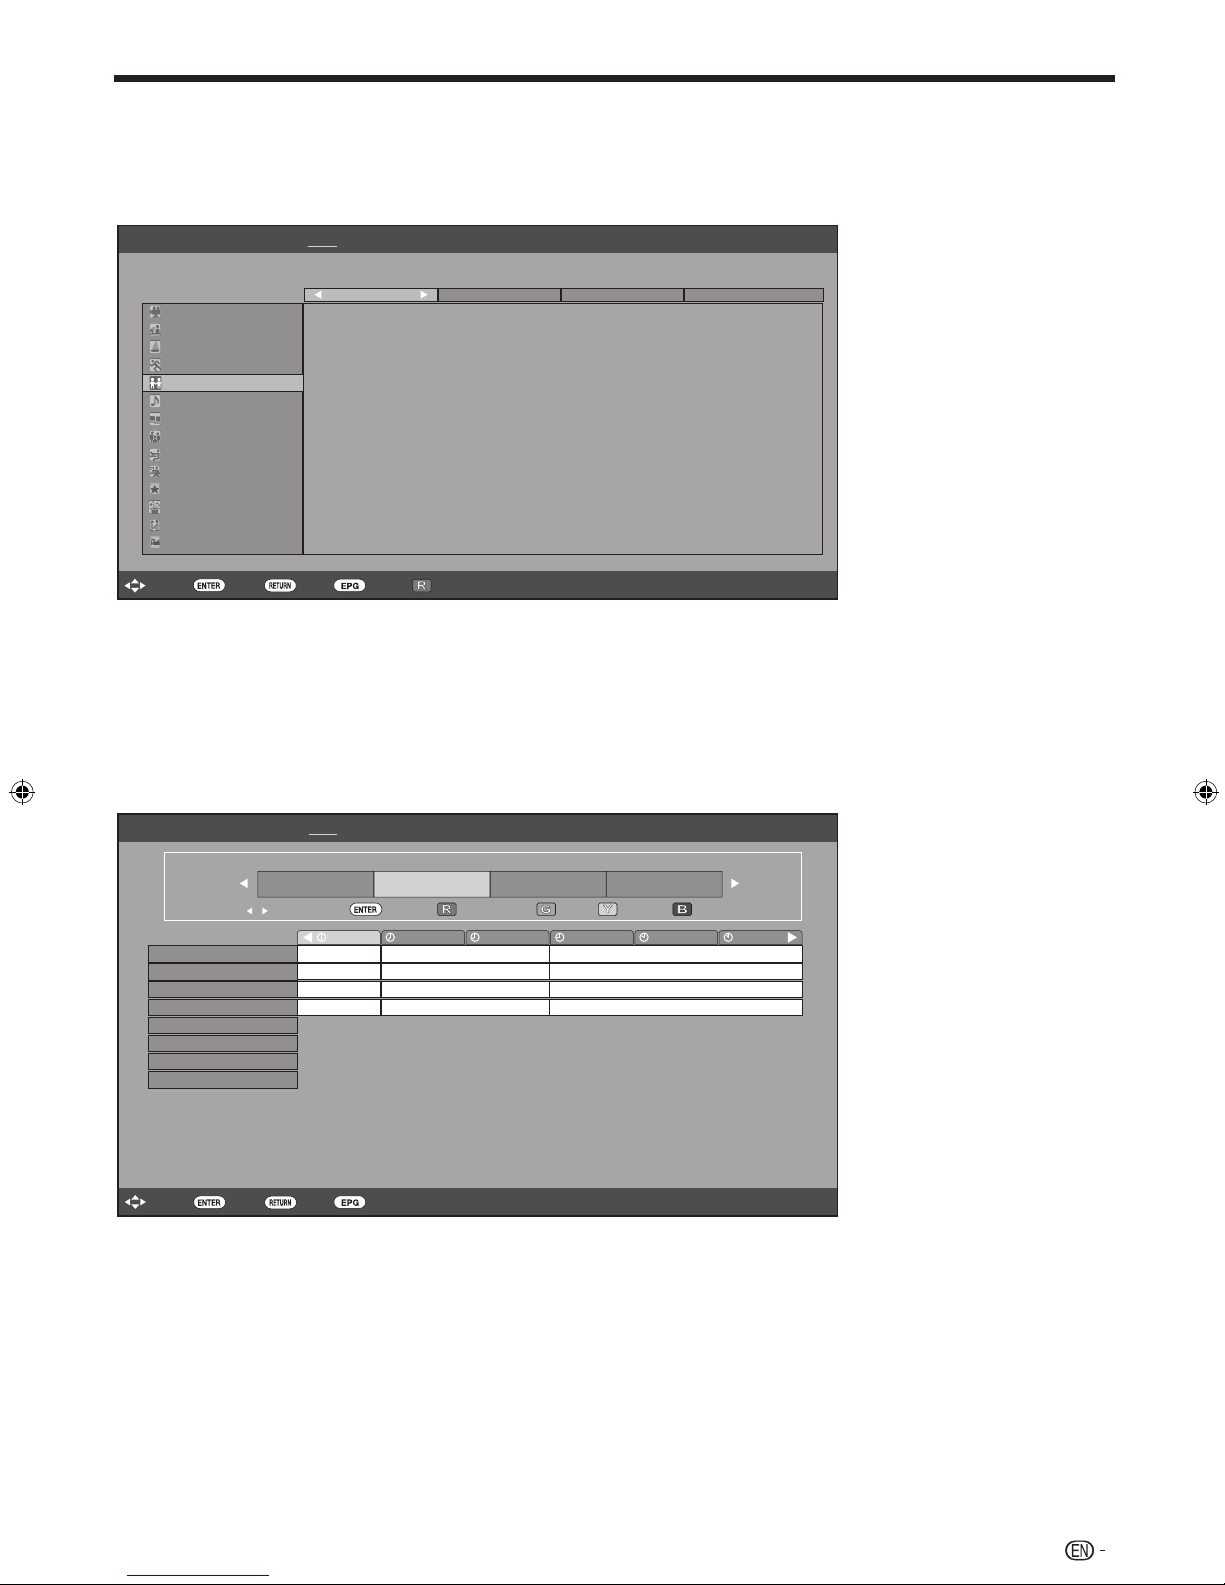
EPG display settings
Option
Display range setup
Option
Genre icon setup
You can grey out or place a mark on desired genres and
smoothly search for programmes you frequently watch.
1 Go to “HOME” > “TV Menu” > “Setup” > “Option”
> “EPG setup” > “Genre icon setup”.
2 Press a/b to select the desired genre, and then
press A.
E
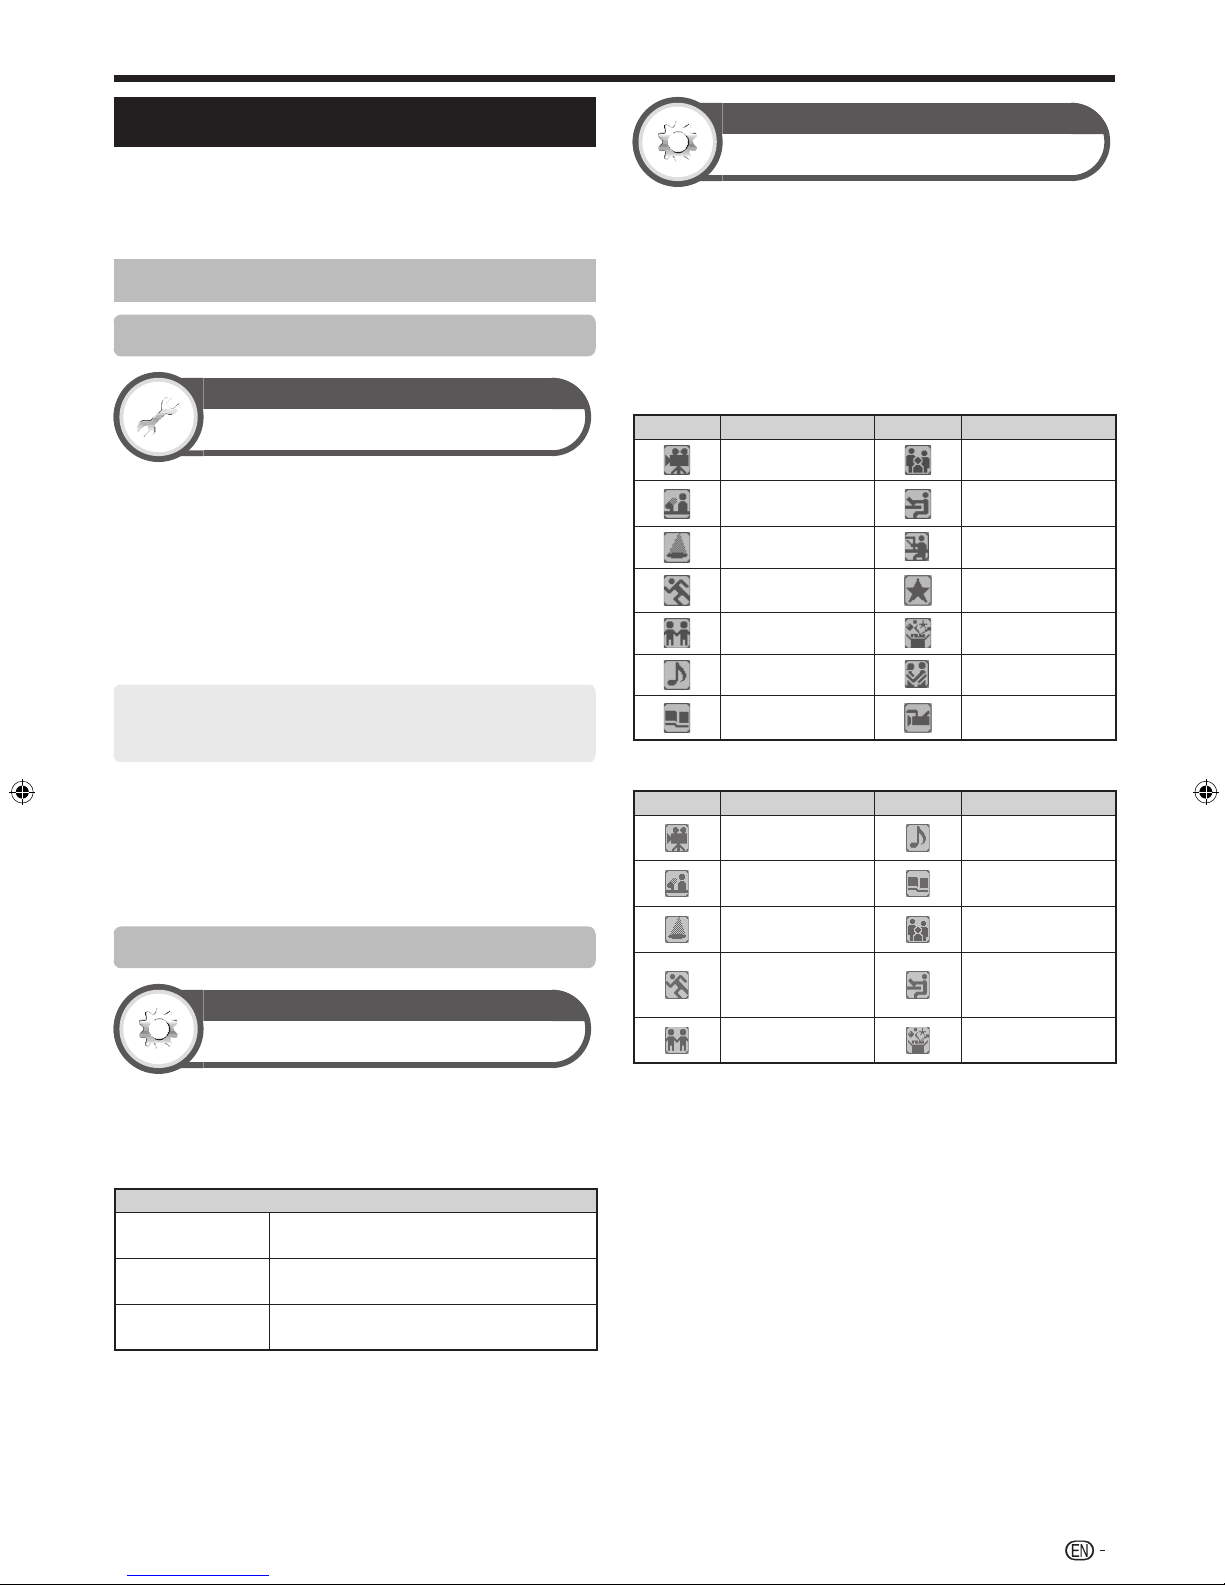
Genre icon list
Genre icon list for Australia
Icon Genre Icon Genre
Movie Current affairs
News
Entertainment Infotainment
Sport Special
Children’s Comedy
Music Drama
Arts/Culture Documentary
Genre icon list except Australia
Icon Genre Icon Genre
Movie/Drama
News/Current
affairs
Show/Game show
Sports
Children’s/Youth
programmes
Education/
Information
Music/Ballet/
Dance
Arts/Culture
(without music)
Social/Political
issues/Economics
Education/
Science/Factual
topics
Leisure hobbies
The “Display range setup” allows you to select three
types of time spans for display on the screen.
Go to “HOME” > “TV Menu” > “Setup” > “Option”
> “EPG setup” > “Display range setup”.
Item
Mode 1
(Wide angle)
Mode 2
(Zoom)
Mode 3
(Vertical angle)
Displays six hours of programme
information.
Displays three hours of programme
information.
Changes to the EPG display format with a
vertical time span.
NOTE
• “Display range setup” cannot be selected when the country
setting is set to “New Zealand”.
3 Press a/b to select a level to pick out or search
for programmes you want to watch (“Standard”,
“Light”, “Remark”).
21

Watching TV
Selecting a programme using EPG
Basic operation
EPG
E
Display the EPG screen
EPG [DTV-TV]
Press EPG.
E
Display the EPG screen
1 Press c/d to select the time span you want to
search.
• Continue to press d to display programmes in the next
time span.
2 Press a/b to select the desired programme.
• If a or b are displayed on the left of the services,
continue to press a/b to display next or previous
screen.
E
Close the EPG screen
Press EPG again.
[Fri] 1/4 20:00Today [Sat]2 [Sun]3 [Mon]4 [Tue]5 [Wed]6 [Thu]7 [Fri]8
001
TV1 SD Moving
20:00 - 21:00
TV1
TV2
TV3
TV4
SD Color Pattern
HD Moving
SD Color Bar
MPEG SD Moving 008
: Select : Enter : Back : Exit Programme info. Search by genre Search by date Timer list
20 21 22 23 0 1
001
SD Moving
HD ColorBar
002
003
H264 SD-Color P...
004
H264 HD-Monosco
005
006
007
SD Moving SD Moving
HD ColorBar
H264 SD-Color Pattern
H264 HD-Monosco
HD ColorBar
H264 SD-Color Pattern
H264 HD-Monosco
NOTE
• You can also display the EPG screen from “HOME” >
“TV Menu” > “EPG” > “EPG”.
• The time displayed on the EPG is information sent by the TV
station.
• When the country setting is set to “New Zealand”, the EPG
screen and operation differ due to the use of MHEG-5 EPG.
The EPG screen and operation vary depending on the
broadcasts.
• When the country setting is set to “New Zealand”, the
EPG function is not available when MHEG-5 EPG is not
broadcasted.
• MHEG-5 EPG may not be displayed properly in the 3D mode.
If so, cancel the 3D mode and then MHEG-5 EPG will be
available.
• The MHEG-5 EPG function is not available for models for the
market other than New Zealand.
Selecting a programme
3 Check programme information
1 Press a/b/c/d to select the programme you
want to check.
2 Press R.
Programme information
EPG [DTV-TV]
001
57 SD Moving
20:00 – 21:00
TV1
TV2
TV3
TV4
4%$PMPS1BUUFSO
)%.PWJOH
4%$PMPS#BS
.1&(4%.PWJOH 008
: Select : Enter : Back : Exit
Programme Info.
Back to EPG
20 21 22 23 0 1
001
4%.PWJOH
)%$PMPS#BS
002
003
)4%$PMPS1
004
))%.POPTDP
005
006
007
4%.PWJOH 4%.PWJOH
)%$PMPS#BS
)4%$PMPS1BUUFSO
))%.POPTDP
Next
)%$PMPS#BS
)4%$PMPS1BUUFSO
))%.POPTDP
3 Press A to tune to the selected programme.
NOTE
• When the country setting is set to “New Zealand”, this
function is not available due to the use of MHEG-5 EPG.
[Fri] 1/4 20:00Today [Sat]2 [Sun]3 [Mon]4 [Tue]5 [Wed]6 [Thu]7 [Fri]8
22
Watching TV
4 Search a programme in a category
1 Press G.
2 Press a/b to select the desired genre, and then press A.
3 Press a/b to select a programme you want to watch, and then press A.
EPG [DTV-TV] [Fri] 1/4 20:00
Search by genre
Movie
News
Entertainment
Sports
Children’s
Music
Arts/Culture
Current affairs
Education/Information
Infotainment
Special
Comedy
Drama
Documentary
: Select : Enter : Back : Exit
Today [Sat]2 [Sun]3 [Mon]4 [Tue]5 [Wed]6 [Thu]7 [Fri]8
[Today] 1 12-0
[Sat] 2 0-12 [Sat] 2 12-0 [Sun] 3 0-12
Found no programme by the genre.
Select other time by c d
Back to EPG
NOTE
• The genre information depends on the broadcasts.
• You can also display the EPG screen from “HOME” > “TV Menu” > “EPG” > “Search by genre”.
• When the country setting is set to “New Zealand”, this function is not available due to the use of MHEG-5 EPG.
5 Search for a programme by date/time
1 Press Y.
2 Press c/d to select the desired time span and then press A.
EPG [DTV-TV]
Search by time
TV1
TV2
TV3
TV4
4%$PMPS1BUUFSO
)%.PWJOH
4%$PMPS#BS
.1&(4%.PWJOH 008
Today
0 – 6 6 – 12 12 – 18 18 – 0
: Select time
001
4%.PWJOH
)%$PMPS#BS
002
003
)4%$PMPS1
004
))%.POPTDP
005
006
007
: Enter
6 7 8 9 10 11
4%.PWJOH 4%.PWJOH
)%$PMPS#BS
)4%$PMPS1BUUFSO
))%.POPTDP
Back to EPG
Enter Prev.
)%$PMPS#BS
)4%$PMPS1BUUFSO
))%.POPTDP
Next
[Fri] 1/4 20:00Today [Sat]2 [Sun]3 [Mon]4 [Tue]5 [Wed]6 [Thu]7 [Fri]8
Next Prev.
: Select : Enter : Back : Exit
3 Press a/b to select the desired programme, and then press A.
NOTE
• When you select a programme outside of the current time span, the timer setting screen displays (Page 24).
• You can also display the EPG screen from “HOME” > “TV Menu” > “EPG” > “Search by date”.
• When the country setting is set to “New Zealand”, this function is not available due to the use of MHEG-5 EPG.
6 Display the timer list for TV programmes
Press B.
• Refer to page 24 for the timer setup.
23

Watching TV
Timer setup using EPG
You can switch to a programme at a set time.
1 Press EPG.
2 Press a/b/c/d to select the programme you
want to set, and then press A.
Programme info.
Back to EPG
Watch No
Next
3 Press c/d to select “Watch”, and then press
A.
• If you select “No”, the TV returns to the EPG screen.
4 Press c/d to select “Yes”, and then press
A.
• The selected TV programme is marked with an icon.
5 Press A to select “Back”.
Cancelling the timer setup
1
Press EPG.
2 Press a/b/c/d to select the programme with
timer setup, and then press A.
3 Press c/d to select “Cancel”, and then press
A.
4 Press c/d to select “Yes”, and then press
A.
E
Cancelling using B button on the remote
control unit
1 Press EPG.
2 Press B to display the timer setup list.
3 Press a/b to select the programme you want to
cancel timer setup, and then press A.
4 Press c/d to select “Cancel”, and then press
A.
5 Press c/d to select “Yes”, and then press
A.
24
 Loading...