


, 420(2010 model) Owner's Manual")
420 Elliptical
003–3238–110109C

Para obtener este manual en Español Latino Americano vaya a:
http://www.schwinnfitness.com.
Table of Contents
Important Safety Instructions |
3 |
Maintenance |
16 |
Safety Warning Labels and Serial Number |
4 |
Level the Machine |
17 |
Features |
6 |
Moving the Machine |
17 |
Specifications |
7 |
Troubleshooting |
18 |
Operations |
8 |
Contacts |
21 |
Console |
8 |
Manuel du Propriétaire |
23 |
Contact Heart Rate Sensors |
14 |
|
|
Patent Information This product may be covered by US and Foreign Patents and Patents Pending.
©2009 Nautilus, Inc., All rights reserved
™and ® indicate a trademark or registered trademark. Nautilus, Inc. (www.nautilus.com) trademarks include NAUTILUS®, BOWFLEX®, STAIRMASTER®, SCHWINN® and UNIVERSAL® and respective logos.
Other trademarks are the property of their respective owners.
2

Important Safety Instructions
This icon means a potentially hazardous situation which, if not avoided, could result in death or serious injury.
Before using this equipment, obey the following warnings:
Read and understand the complete Owner’s Manual. Keep Owner’s Manual for future reference.
Read and understand all warnings on this machine. If at any time the Warning stickers become loose, unreadable or dislodged, contact Nautilus® Customer Service for replacement stickers.
•Children must not be let on or near to this machine. Moving parts and other features of the machine can be dangerous to children.
•Consult a physician before you start an exercise program. Stop exercising if you feel pain or tightness in your chest, become short of breath, or feel faint. Contact your doctor before you use the machine again. Use the values calculated or measured by the machine’s computer for reference purposes only.
•Before each use, examine this machine for loose parts or signs of wear. Contact Nautilus® Customer Service for repair information.
•Maximum user weight limit: 300 lbs. (136 kg). Do not use if you are over this weight.
•This machine is for home use only.
•Do not wear loose clothing or jewelry. This machine contains moving parts.
•Set up and operate this machine on a solid, level, horizontal surface.
•Make the Pedals stable before you step on them. Use caution when you step off the machine.
•Disconnect all power before servicing this machine.
•Do not operate this machine outdoors or in moist or wet locations.
•Keep at least 24" (0.6 m) on each side of the machine clear. This is the recommended safe distance for access and passage around and emergency dismounts from the machine. Keep third parties out of this space when machine is in use.
•Do not over exert yourself during exercise. Operate the machine in the manner described in this manual.
•Correctly adjust and safely engage all Positional Adjustment Devices. Make sure that the Adjustment Devices do not hit the user.
•Keep the Foot Pedals clean and dry.
3
Safety Warning Labels and Serial Number
Type Description
AWARNING
•Keep children away.
•Prior to use, read and understand the Owners Manual.
•Injury or death is possible if Caution is not used while using this machine.
•The maximum user weight for this machine is 300 lbs (136 kg).
•Replace any “Caution”, “Warning” or “Danger” label that is illegible, damaged, or removed.
•This machine is for home use only.
4

AVERTISSEMENT
•Gardez les enfants et les animaux de compagnie éloignés de cette machine en tout temps.
•Lisez et familiarisez-vous avec le Manuel du propriétaire et avec tous les avertissements avant d’utiliser cette machine.
•Soyez prudent lorsque vous utilisez cet équipement pour ne pas vous infliger de graves blessures.
•Cette machine supporte un poids maximal de 300 lbs (136 kg).
•Remplacez toute étiquette d’avertissement endommagée, illisible ou manquante.
•Cette machine est à usage domestique uniquement.
B Serial Number |
Record serial number on Contacts page at end of this manual. |
|
|
5
Features
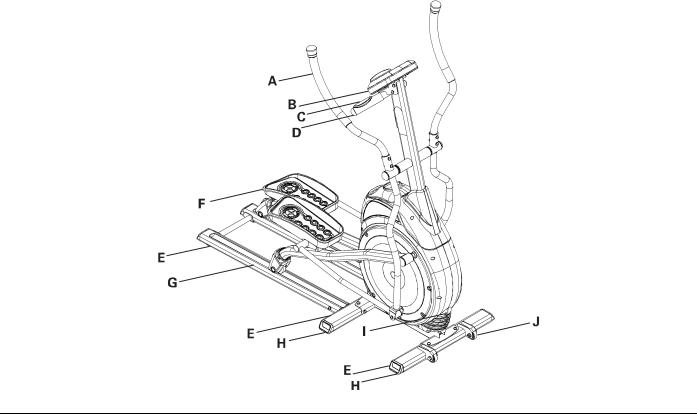
A |
Swing Handlebar Arms |
F |
Foot Pedals |
|
|
|
|
B |
Console |
G |
Rails |
|
|
|
|
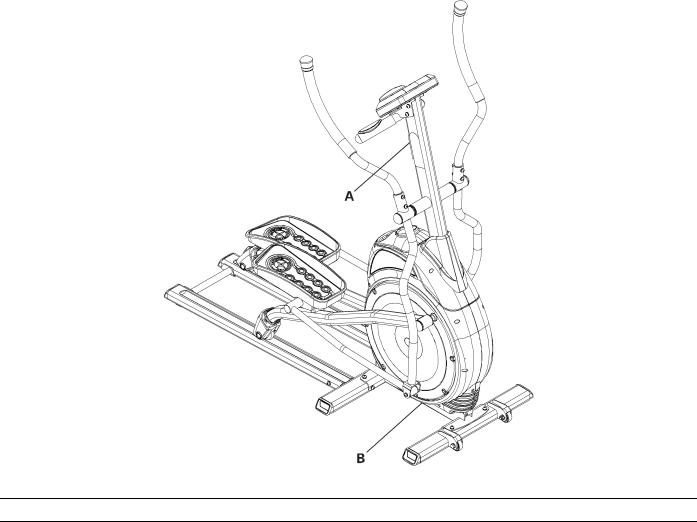
C Contact Heart Rate (CHR) sensors |
H |
Stabilizer Bars |
|
|
|
|
|
D |
Static Handlebars |
I |
AC Adaptor Plug |
|
|
|
|
E |
Levelers |
J |
Transport Wheels |
|
|
|
|
6

Specifications
Power
Requirements
Operational Voltage |
6VDC |
Operating Current |
500 mA |
Regulatory Approvals |
AC Power Adapter: UL listed, CSA certified (or equivalent), Rated 120V60Hz Input, 6VDC, 500mA |
|
Output. Class 2 or LPS. |
7

Operations
Before You Start
Consult a physician before you start an exercise program. Stop exercising if you feel pain or tightness in your chest, become short of breath, or feel faint. Contact your doctor before you use the machine again. Use the values calculated or measured by the machine’s computer for reference purposes only.
What to Wear
Wear rubber-soled athletic shoes. You will need the appropriate clothes for exercise that allow you to move freely.
How Often Should You Exercise
Consult a physician before you start an exercise program. Stop exercising if you feel pain or tightness in your chest, become short of breath, or feel faint. Contact your doctor before you use the machine again. Use the values calculated or measured by the machine’s computer for reference purposes only.
•3 times a week for 30 minutes each day.
•Schedule workouts in advance. Try to work out even when you do not want to.
Step Onto Your Machine
1.Steady yourself with the Handlebars or the hand grips under the Console.
2.The Pedals may not be at the same resting level. Step onto the lower Pedal with your first step.
3.Place your other foot on the opposite Pedal. Be sure to get comfortable with the Pedals before beginning a workout.
Workout Stride
The Elliptical lets you do a forward or backward workout stride. You can even change the direction during a workout. To change your stride, slow the Pedals until they stop and change direction.
Console
The Console provides important information about your workout and lets you control the resistance levels while you exercise. The Console has a grid display with touch control buttons to navigate you through the exercise programs.
Power-Up Mode
The Console will enter POWER-UP mode if it is plugged into a power source, any button is pushed, or if it receives an indication from the RPM sensor as a result of pedaling the machine.
8
Features
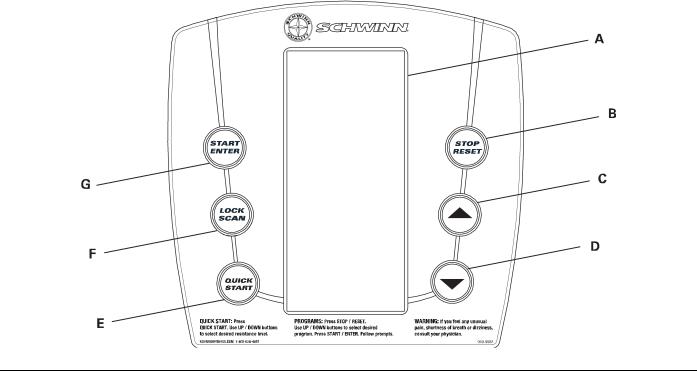
A |
LCD Display |
— Console screen |
|
|
|
B |
STOP/RESET button |
— Pauses an active workout, , and if pushed again, will end the workout |
|
|
|
C |
Increase button (▲) |
— Increases a value (age, time, distance, calories, or workout resistance level) |
|
|
|
D |
Decrease button (▼) |
— Decreases a value (age, time, distance, calories, or workout resistance level) |
E |
QUICK START button |
— Begins a Quick Start workout |
|
|
|
F |
LOCK/SCAN button |
— Cycles through your workout variables for 6 seconds each. Push STOP/RESET for |
|
|
manual control of the scan function. Push STOP/RESET again to exit the scan mode. |
|
|
|
G |
START/ENTER button |
— Starts a Program workout, confirms information , or will resume a paused workout |
|
|
|
9
LCD Display
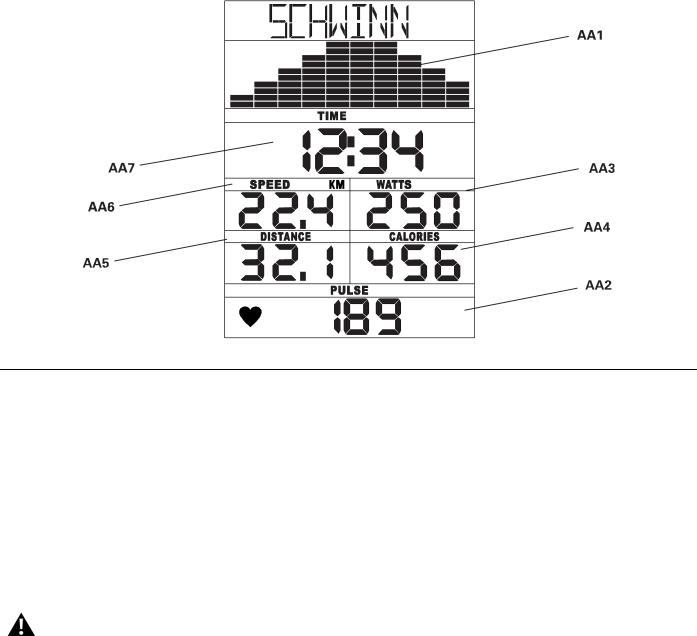
AA1 |
Program Display |
AA5 |
Distance |
|
|
|
|
AA2 |
Pulse |
AA6 |
Speed |
|
|
|
|
AA3 |
Watts |
AA7 |
Time |
|
|
|
|
AA4 |
Calories |
|
|
|
|
|
|
Program Display
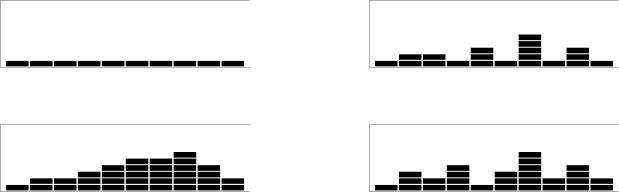
The Program Display shows the name of the program selection and the dot-matrix area shows the course profile for the program. Each column in the profile shows one interval (1/40 of the total program time). The higher the column, the higher the resistance level and/or speed for that interval. The flashing column shows your current interval.
Pulse
The Pulse display field shows the heart rate in beats per minute (BPM) from the heart rate monitor (HRM).
Consult a physician before you start an exercise program. Stop exercising if you feel pain or tightness in your chest, become short of breath, or feel faint. Contact your doctor before you use the machine again. Use the values calculated or measured by the machine’s computer for reference purposes only.
Watts
The WATTS display field shows the power that you are producing at the current resistance level (1 horsepower = 746 watts).
Calories
The CALORIES display field shows the estimated calories that you have burned during the exercise. If no calorie goal is set up for the current workout program, the display value starts at zero and counts forward until the end of the workout. If the workout has a calorie goal, the display starts at the preset value and counts down to zero.
Distance
The DISTANCE display field shows the distance count (miles or km) in the workout. If no distance goal is set up for the current workout program, the display value starts at zero and counts forward until the end of the workout. If the workout has a distance goal, the display starts at the preset value and counts down to zero.
10
Speed
The Speed display field shows the estimated speed in kilometers per hour (KM) or miles per hour (MPH).
Time
The Time display field shows the time count in the workout. If no preset time is set up for the current workout program, the display value starts at zero and counts forward until the end of the workout. Maximum time is 99:59.
If the workout has a preset time, the display starts at the preset value and counts down to zero. The display shows the total time count for the workout, then the time count for the current interval.
Quick Start / Manual Program
The Quick Start / Manual program lets you start a workout without entering any information.
1.Step on the machine.
2.Push the QUICK START button to start the QUICK START / MANUAL program.
3.Push the Increase or Decrease buttons to change the resistance level. The default Quick Start resistance level is 3. The time will count up from 00:00.
4.Push STOP when done with your workout.
Select a User (Guest or Custom)
To perform a workout program, you must select a User. Select GUEST USER to start a simple workout and push START/ENTER. To create a Custom User, use the Increase/Decrease buttons and select ADD USER. This feature lets you input your personal information, automatically records your workout results, and lets you create a custom workout.
Note: Different machine models can have a different number of Custom User programs available.
Custom User
1.Select ADD USER and push START/ENTER.
2.Enter your information (weight, target weight, height, and age) with the Increase/Decrease buttons. Push the START/ENTER button to set it and go to the next screen.
3.Enter the time for your custom workout (default is 30 minutes). Push START/ENTER.
4.The Program Display will have a default resistance level of 1 for all columns. Adjust the resistance level of the active column (flashing) with the Increase/Decrease buttons. Push START/ENTER to record the resistance level. The completed columns move off the screen to the left, and the next column is active. Continue until all 40 columns are set.
5.Your Custom Program is available for a workout.
From the Power Up screen, you can also EDIT, DELETE or VIEW the Custom User. Use the Increase/Decrease buttons to move through the options. Push START/ENTER to select them.
Note: Push the STOP/RESET button to go back to the previous character or screen.
Profile Programs
These programs automate different resistances and workout levels.
Course 1 |
Course 2 |
11
Circuit 1 |
Circuit 2 |
Pursuit 1 |
Pursuit 2 |
Starting a Profile Program:
1.Step on the machine.
2.Use the Increase or Decrease buttons to select a user (guest or custom) and push START/ENTER.
3.Use the Increase or Decrease buttons to select one of the above programs. Push START/ENTER.
4.Use the Increase and Decrease buttons to answer questions. Push START/ENTER to record your answers.
5.Push the START/ENTER button to start the profile workout.
Fitness Test
The Fitness Test measures the improvements of your physical fitness level. The test compares your power output (in Watts) to your heart rate. As you become more fit you will produce more power (Watts) at a given heart rate.
When the test starts, the power (Watts) slowly increases. This means you will work harder, and as a result, your heart rate increases. The Watts continue to increase automatically until your heart rate reaches the “Test Zone.” This zone is individually computed to be near 75 percent of your maximum heart rate. When you reach the Test Zone your machine holds the Watts steady for 3 minutes. This lets you reach a stable condition (where your heart rate becomes steady). At the end of the 3 minutes, the Console measures your heart rate and the power output (Watts). These numbers, along with information about your age and weight, are computed to produce a “Fitness Score”.
Note: Fitness Test scores should only be compared to your previous scores and not other users.
Over time, you will output more Watts of power at a certain Heart Rate. Compare your Fitness Scores to see your improvement.
Cool Down / Recovery
When you complete a timed workout, you can begin a cool down / recovery session. As you continue to use the machine, the Console will count the duration of your recovery session.
Press STOP to end the recovery session and go to your workout results.
Results
When you complete or cancel a workout, the Console will show your current workout value totals and averages. After showing your results for approximately two minutes, the Console will enter Sleep Mode.
Note: To display your results longer than the standard time, push the INCREASE or DECREASE buttons.
Pausing or Stopping
1.Push the STOP/RESET button to pause your workout. WORKOUT PAUSED mode shows on the Display.
2.Push START/ENTER to continue your workout, or push the STOP/RESET button to stop the workout.
Changing Resistance Levels
Push the Increase or Decrease buttons to change the resistance level at any time in a workout program.
12
Auto Shut-Off (Sleep Mode)
If the Console does not receive any input in approximately 5 minutes, it will automatically shut off. The LCD display is off while in Sleep Mode.
Note: The Console does not have an On/Off switch.
Console Setup Mode
The Console Setup Mode lets you set the units of measure to either English or Metric, adjust the contrast of the display, and stop or start the motivational messages. Motivational messages show on the screen to increase your enthusiasm and to give positive feedback while you are working out.
1.Hold down the LOCK/SCAN button and Increase button together for 3 seconds while in the POWER-UP MODE to go into the CONSOLE SETUP MODE.
2.Push the Increase/Decrease buttons to change between ELLIPTICAL and BIKE.
3.Push START/ENTER to set.
4.Push the Increase/Decrease buttons to change between ENGLISH and METRIC units.
5.Push START/ENTER to set.
6.Push Increase/Decrease to adjust the screen contrast (BACKLIGHTS; “5” = maximum intensity, “1” = minimum).
7.Push START/ENTER to set.
8.The Console shows TOTAL HOURS.
9.Push START/ENTER.
10.Push Increase/Decrease to turn motivational messages off or on.
11.Push START/ENTER to set.
12.Push Increase/Decrease to set which software version to use (“SW30 V1.0” = x20 machine, “SW40 V1.0” = x40 machine, or “NLS 514” = 514 machine).
13.Push START/ENTER to set.
Note: Push STOP/RESET for previous screen.
13
Contact Heart Rate Sensors
Contact Heart Rate (CHR) sensors send your heart rate signals to the Console. The CHR sensors are the stainless steel parts of the Handlebars. To use, put your hands comfortably around the sensors. Be sure that your hands touch both the top and the bottom of the sensors. Hold firm, but not too tight or loose. Both hands must make contact with the sensors for the Console to detect a pulse. After the Console detects four stable pulse signals, your initial pulse rate will be shown.
Once the Console has your initial heart rate, do not move or shift your hands for 10 to 15 seconds. The Console will now validate the heart rate. Many factors influence the ability of the sensors to detect your heart rate signal:
•Movement of the upper body muscles (including arms) produces an electrical signal (muscle artifact) that can interfere with pulse detection. Slight hand movement while in contact with the sensors can also produce interference.
•Calluses and hand lotion may act as an insulating layer to reduce the signal strength.
•Some Electrocardiogram (EKG) signals generated by individuals are not strong enough to be detected by the sensors.
CHR detection may be limited to walking or slow jogging due to the extreme muscle artifacts and hand motion generated by a comfortable running style. If your heart rate signal ever seems erratic after validation, wipe off your hands and the sensors and try again.
Heart Rate Calculations
Your maximum heart rate usually decreases from 220 Beats Per Minute (BPM) in childhood to approximately 160 BPM by age 60. This fall in heart rate is usually linear, decreasing by approximately one BPM for each year. There is no indication that training influences the decrease in maximum heart rate. Individuals of the same age could have different maximum heart rates. It is more accurate to find this value by getting a stress test than by using an age related formula.
Your at rest heart rate is influenced by endurance training. The typical adult has an at rest heart rate of approximately 72 BPM, where as highly trained runners may have readings of 40 BPM or lower.
The Heart Rate table is an estimate of what Heart Rate Zone (HRZ) is effective to burn fat and better your cardiovascular system. Physical conditions vary, therefore your individual HRZ could be several beats higher or lower than what is shown.
The most efficient procedure to burn fat during exercise is to start at a slow pace and gradually increase your intensity until your heart rate reaches between 60 – 85% of your maximum heart rate. Continue at that pace, keeping your heart rate in that target zone for over 20 minutes. The longer you maintain your target heart rate, the more fat your body will burn.
The graph is a brief guideline, describing the generally suggested target heart rates based on age. As noted above, your optimal target rate may be higher or lower. Consult your physician for your individual target heart rate zone.
Note: As with all exercises and fitness regimens, always use your best judgment when you increase your exercise time or intensity.
14
 Loading...