


 Loading...
Video
Cassette Recorder
SV-675
SV-670
SV-470
SV-275
SV-270
Instruction Manual
www.samsungvcr.com

About this manual
Thank you for purchasing a Samsung Video Cassette Recorder (VCR).
Your Owner’s Instructions contain much valuable information on setting up and using your VCR. Please take the time to read them as they will help you take full advantage of your VCR’s features.
The instructions in this manual are for models, SV-675, SV-670, SV-470, SV-275 and SV-270. Before you start reading this manual please check your model number. It is displayed on the rear of the VCR.
-(SV-675): Exceptions only for a certain model, for example SV-675.
-Gray shaded areas marked with a star indicate instructions that are only relevant to one model.
Features Chart
Feature |
SV-675 |
SV-670 |
SV-470 |
SV-275 |
SV-270 |
|
|
|
|
|
|
IPC (Intelligent Picture Control) |
● |
● |
● |
● |
● |
|
|
|
|
|
|
Changing recording speed (SP/LP) |
● |
● |
● |
● |
● |
G-CODE recording |
● |
|
|
● |
|
|
|
|
|
|
|
Connecting an RCA Audio/Video cable |
● |
|
|
● |
|
|
|
|
|
|
|
Hi-Fi and A2 STEREO |
● |
● |
|
|
|
|
|
|
|
|
|
NICAM Stereo (Newzealand Only) |
● |
● |
|
|
|
Dual VCR/TV remote Control |
● |
● |
● |
● |
|
|
|
|
|
|
|
ENG-2

Contents |
|
Foreword |
|
Safety Instructions . . . . . . . . . . . . . . . . . . . . . |
4 |
VCR Overviews |
|
Front View of the VCR . . . . . . . . . . . . . . . . . |
5 |
Rear View of the VCR . . . . . . . . . . . . . . . . . . |
6 |
Infrared Remote Control . . . . . . . . . . . . . . . . |
7 |
Display Indicator . . . . . . . . . . . . . . . . . . . . . . |
8 |
Accessories . . . . . . . . . . . . . . . . . . . . . . . . . |
8 |
Inserting Batteries in the Remote Control . . . . |
8 |
Connecting Your Video Cassette Recorder
Connecting Your VCR to the TV using
the Coaxial Cable . . . . . . . . . . . . . . . . . . . . . 8 Connecting Your VCR to the TV using
the RCA Cable . . . . . . . . . . . . . . . . . . . . . . . 9 Connecting Other Equipment to Your VCR . . 9 Plug & Auto Set Up . . . . . . . . . . . . . . . . . . . . 10 Tuning Your Television for the VCR . . . . . . . . 10
Setting Up Your Video Cassette Recorder
Setting the Date and Time . . . . . . . . . . . . . . . 11
Displaying/Hiding On-Screen Information . . . . 11
Choosing Your Language . . . . . . . . . . . . . . . 12
Setting the VCR Output Channel . . . . . . . . . . 12
Presetting the Stations Automatically . . . . . . . 13
Presetting the Stations Manually . . . . . . . . . . 14
Clearing a Preset Station . . . . . . . . . . . . . . . . 15
Changing the Preset Station Table . . . . . . . . . 15
Recording Television Broadcasts
Selecting the Cassette Type . . . . . . . . . . . . . 16 Selecting the Recording Speed . . . . . . . . . . . 16 NICAM (Newzealand SV-675/SV-670 Only) . . 16 Recording a Programme Immediately . . . . . . 17 Recording a Programme with Automatic Stop . . . 17 Using the G-CODE Feature
(SV-675/SV-275 Only) . . . . . . . . . . . . . . . . . . 18
Modifying G-CODE Programming
(SV-675/SV-275 Only) . . . . . . . . . . . . . . . . . . 19
Using the Timer Programming Feature . . . . . 20
Checking a Preset Recording . . . . . . . . . . . . 21
Cancelling a Preset Recording . . . . . . . . . . . 21
Playing Back
Playing a Cassette . . . . . . . . . . . . . . . . . . . . 21
Adjusting Picture Alignment Automatically
(SV-270 Only) . . . . . . . . . . . . . . . . . . . . . . . . 21
Adjusting Picture Alignment Manually . . . . . . 21
Intelligent Picture Control . . . . . . . . . . . . . . . 22
Intelligent Picture Control
(SV-270 Only) . . . . . . . . . . . . . . . . . . . . . . . . 22
Selecting the Colour Mode . . . . . . . . . . . . . . 23
Selecting the Audio Output Mode
(SV-675/SV-670 Only) . . . . . . . . . . . . . . . . . . . 23
Selecting the Audio Mute Mode
(SV-470/SV-275/SV-270 Only) . . . . . . . . . . . . 23
Playing a Cassette in Slow Motion
(SV-675/SV-670/SV-470 Only) . . . . . . . . . . . . 24
Searching for a Sequence
Playing a Sequence Frame by Frame . . . . . . 24 Picture Search, Fast Forward/Rewind . . . . . . 24 Searching for a Specific Sequence . . . . . . . . 25 Auto Repeat Play . . . . . . . . . . . . . . . . . . . . . 26 Interval Repeat Play . . . . . . . . . . . . . . . . . . . 26
Easy operation
Using the Tape Counter . . . . . . . . . . . . . . . . . 26
Advanced Recording Features |
|
Connecting an RCA Audio/Video Input Cable |
|
(SV-675/SV-275 Only) . . . . . . . . . . . . . . . . . . |
27 |
Using the Assemble Edit Function . . . . . . . . . . |
28 |
Recording from Another VCR or Camcorder . . . |
28 |
Easy operation
Using the TV Buttons on the Remote Control (SV-675/V-670/SV-470/SV-275 Only) . . . . . . . 29 Auto Power off . . . . . . . . . . . . . . . . . . . . . . . 29 Technical Specifications . . . . . . . . . . . . . . . . 30
Solving Problems
Problems and Solutions . . . . . . . . . . . . . . . . . 31
TV Frequency Table . . . . . . . . . . . . . . . . . . . 32
ENG-3
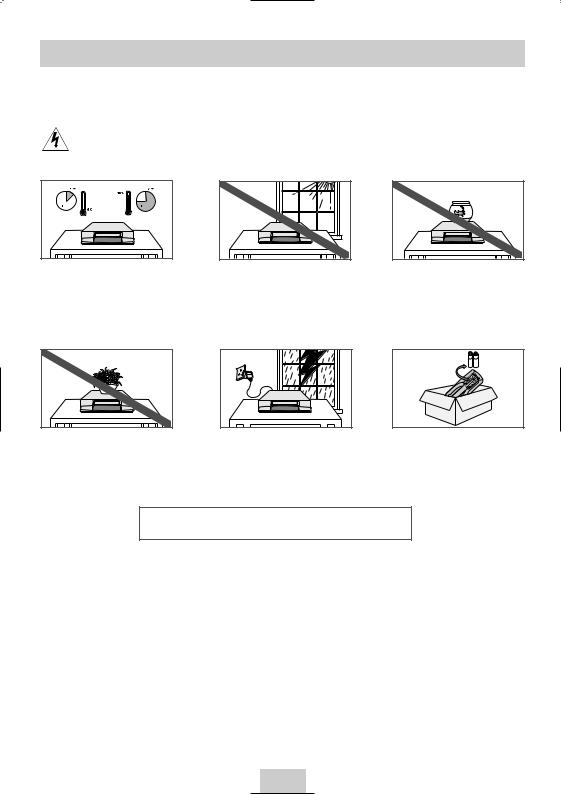
Safety Instructions
The following illustrations represent precautions.
The lightning bolt is a warning sign alerting you to dangerous voltage inside the product.
DO NOT OPEN THE DVD-VCR. Refer to service personnel.
Do NOT expose the DVD-VCR to extreme temperature conditions (below 5°C and above 40°C) or to extreme humidity conditions (less than 10% and more than 75%).
Do NOT expose the DVD-VCR to direct sunlight.
Do NOT place any objects on the DVD-VCR or remote control.
During a storm and/or lightning, unplug the DVD-VCR from the mains socket and aerial.
THIS DEVICE IS NOT FOR USE IN INDUSTRIAL
ENVIRONMENTS
ENG-4

Front View of the VCR
(SV-670) |
(SV-675) |
STANDBY/ON |
EJECT |
VIDEO CASSETTE |
STOP |
REW |
PLAY |
BUTTON |
BUTTON |
COMPARTMENT |
BUTTON |
BUTTON |
BUTTON |
STANDBY/ON |
STANDBY/ON |
EJECT |
|
EJECT |
|
|
|
|
|
REW |
PLAY |
|
|
F.F |
VIDEO |
L AUDIO R |
|
|
|
|
PROG |
REC |
STOP |
P/S |
|
LINE IN 2 |
|
|
|
|
|
|
|
|
|
|
|
|
|
|
|
|
|
|
|
|
|
|
|
|
|
|
|
|
|
|
|
|
|
|
|
|
|
|
|
|
|
|
|
|
|
|
|
|
|
|
|
|
|
|
|
|
|
|
|
|
|
|
|
|
|
|
|
|
|
|
|
|
|
|
|
|
|
|
|
|
|
|
|
|
|
|
|
|
|
|
|
|
|
|
|
|
|
|
|
|
|
|
|
|
|
|
|
|
|
|
|
|
|
|
|
|
|
|
|
|
|
|
|
|
|
|
|
|
|
|
|
|
|
|
|
|
|
|
|
|
|
|
|
|
|
|
|
|
|
|
|
|
|
|
|
|
|
|
|
|
|
LINE IN 2 AUDIO |
|
PROGRAMME |
|
RECORD |
|
PAUSE/STILL |
|
F.F |
|
||||||||||||
|
|
|
|
|
|
LINE IN 2 |
|
|
|
|
|||||||||||||||||||
|
|
|
|
|
|
VIDEO INPUT |
|
L, R INPUT |
|
SELECTION BUTTONS |
|
BUTTON |
|
BUTTON |
|
BUTTON |
|
||||||||||||
|
|
|
|
|
|
SOCKET |
|
SOCKETS |
|
|
|
|
|
|
|
|
|
|
|
|
|
|
|
|
|
|
|
||
|
|
|
|
|
|
|
|
|
|
|
|
|
|
|
|
|
|
|
|
|
|
|
|||||||
|
|
|
|
|
|
|
|
|
|
|
|
|
|
|
|
|
|
|
|
|
|
|
|||||||
|
|
|
|
|
|
|
|
|
|
|
|
|
|
|
|
|
|
|
|
|
|
|
|||||||
|
|
|
|
|
|
|
|
|
|
|
|
|
|
|
|
|
|
|
|
|
|
|
|
|
|
|
|
|
|
|
|
|
|
|
|
|
|
|
|
|
|
|
|
|
|
|
|
|
|
|
|
|
|
|
|
|
|
|
|
|
|
|
|
|
|
|
|
|
|
|
|
|
|
|
|
|
|
|
|
|
|
|
|
|
|
|
|
|
|
(SV-470)
STANDBY/ON |
EJECT |
VIDEO CASSETTE |
STOP |
REW |
PLAY |
BUTTON |
BUTTON |
COMPARTMENT |
BUTTON |
BUTTON |
BUTTON |
STANDBY/ON |
EJECT |
|
|
|
REW |
PLAY |
F.F |
PROG |
REC |
STOP |
P/S |
PROGRAMME |
RECORD |
PAUSE/STILL |
F.F |
SELECTION BUTTONS BUTTON |
BUTTON |
BUTTON |
|
(SV-270) |
(SV-275) |
STANDBY/ON |
EJECT |
VIDEO CASSETTE |
STOP |
REW |
PLAY |
BUTTON |
BUTTON |
COMPARTMENT |
BUTTON |
BUTTON |
BUTTON |
LINE IN 2 |
LINE IN 2 AUDIO |
PROGRAMME |
RECORD |
PAUSE/STILL |
F.F |
VIDEO INPUT |
INPUT SOCKETS |
SELECTION BUTTONS BUTTON |
BUTTON |
BUTTON |
|
SOCKET |
|
|
|
|
|
ENG-5
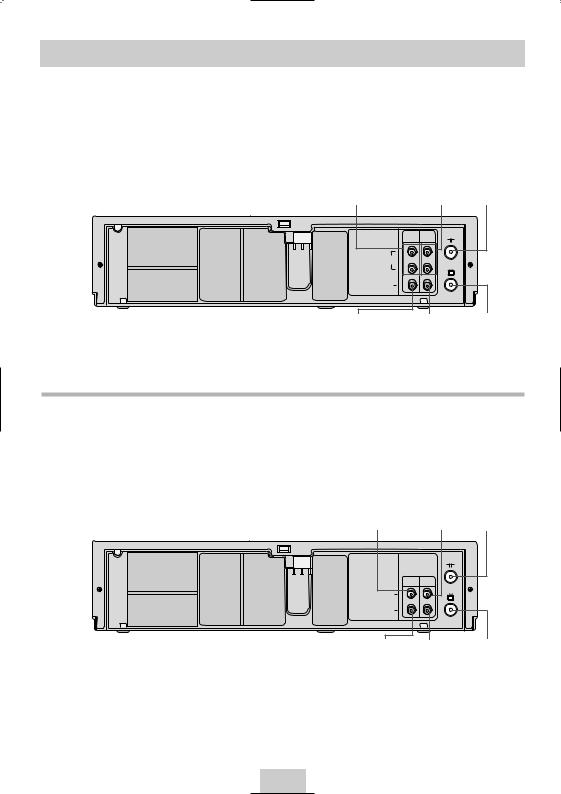
Rear View of the VCR
(SV-675/SV-670)
AUDIO L, R OUTPUT |
AUDIO L, R INPUT AERIAL IN |
|
SOCKETS |
SOCKETS CONNECTOR |
|
|
LINE |
LINE |
|
OUT |
IN 1 |
|
R |
|
|
AUDIO |
|
|
L |
|
|
|
TV |
|
VIDEO |
|
VIDEO INPUT |
VIDEO OUTPUT OUT TO TV |
|
SOCKET |
|
SOCKET CONNECTOR |
(SV-470/SV-275/SV-270)
AUDIO OUTPUT |
AUDIO INPUT |
AERIAL IN |
|
SOCKET |
|
SOCKET CONNECTOR |
|
|
LINE |
LINE |
|
|
OUT |
IN 1 |
|
AUDIO |
|
|
|
|
|
TV |
|
VIDEO |
|
|
|
VIDEO OUTPUT |
VIDEO INPUT |
OUT TO TV |
|
SOCKET |
SOCKET |
CONNECTOR |
|
ENG-6
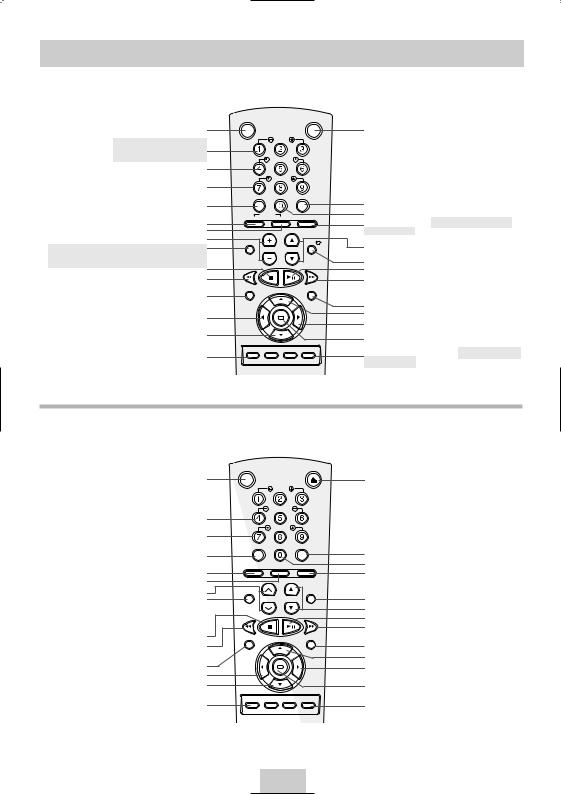
Infrared Remote Control
(SV-675/SV-670/SV-470/SV-275)
|
VCR STANDBY/ON |
|
|
TV STANDBY/ON |
VCR STANDBY/ON BUTTON |
|
|
|
|
|
|
SLOW |
|
|
SLOW BUTTON |
|
|
|
|
(SV-675/SV-670/SV-470) |
|
SHUTTLE |
|
|
SHUTTLE BUTTON |
|
|
|
|
|
|
V-LOCK |
|
|
V-LOCK BUTTON |
|
|
|
|
|
CLR/RST |
F.ADV |
INDEX |
|
CLEAR AND RESET BUTTON |
-/-- |
|
|
|
|
SELECT |
VCR |
INPUT |
|
TV BUTTON |
TV |
|
||
|
|
|
|
|
VCR BUTTON |
|
|
|
REPEAT |
VOLUME BUTTONS |
AUDIO |
|
|
DISP./ |
AUDIO MODE SELECTION BUTTON |
VOL |
PROG/TRK |
||
(SV-675/SV-670) |
|
|
|
|
AUDIO MUTE BUTTON (SV-470/SV-275) |
|
|
|
|
STOP BUTTON |
|
|
|
|
REWIND/REVERSE PICTURE |
|
|
|
|
SEARCH BUTTON |
REC |
|
|
MENU |
RECORD BUTTON |
|
|
|
|
MENU SELECTION BUTTON |
|
|
OK |
|
|
|
|
|
|
MENU SELECTION DOWN BUTTON |
|
|
|
|
|
SPEED |
DUB |
TV/VCR |
TIMER |
RECORDING SPEED SELECTION BUTTON
TV STANDBY/ON BUTTON
INDEX BUTTON
FRAME ADVANCE BUTTON
TUNER, LINE IN 1, LINE IN 2 (SV-675/
SV-275 ONLY) SELECTION / REPEAT SELECTION BUTTON
PROGRAMME SELECTION /
TRACKING BUTTONS DISPLAY BUTTON
PLAY/PAUSE/STILL BUTTON FAST-FORWARD/FORWARD SEARCH BUTTON
MENU BUTTON
MENU SELECTION UP BUTTON MENU SELECTION BUTTON
OK BUTTON
TIMER BUTTON / G-CODE (SV-675/
SV-275 ONLY) BUTTON
(SV-270)
|
STANDBY/ON |
|
|
EJECT |
STANDBY/ON BUTTON |
|
|
|
|
|
|
|
SLOW |
|
|
|
SHUTTLE |
|
|
SHUTTLE BUTTON |
|
|
|
|
|
|
V-LOCK |
|
|
V-LOCK BUTTON |
|
|
|
|
|
CLR/RST |
F.ADV |
INDEX |
|
CLEAR AND RESET BUTTON |
|
|
|
|
AUTO TRACKING BUTTON |
A.TRK |
|
IPC |
INPUT |
|
|
|
|
|
IPC BUTTON |
|
|
|
REPEAT |
TRACKING BUTTONS |
AUDIO |
|
|
DISPLAY |
|
|
|
|
|
AUDIO MUTE BUTTON |
TRK |
PROG |
||
|
|
|
|
|
STOP BUTTON |
REC |
|
|
MENU |
|
|
|
||
REWIND/REVERSE PICTURE |
|
|
|
|
SEARCH BUTTON |
|
|
|
|
RECORD BUTTON |
|
|
OK |
|
MENU SELECTION BUTTON |
|
|
|
|
MENU SELECTION DOWN BUTTON |
|
|
|
|
RECORDING SPEED SELECTION |
SPEED |
DUB |
TV/VCR |
TIMER |
|
|
|
|
|
BUTTON
EJECT BUTTON
INDEX BUTTON
FRAME ADVANCE BUTTON TUNER, LINE IN 1SELECTION / REPEAT SELECTION BUTTON
DISPLAY BUTTON
PROGRAMME SELECTION BUTTON PLAY/PAUSE/STILL BUTTON
FAST-FORWARD/FORWARD SEARCH BUTTON
MENU BUTTON
MENU SELECTION UP BUTTON MENU SELECTION BUTTON
OK BUTTON
TIMER BUTTON
ENG-7

Display Indicator
1 |
2 |
3 |
4 |
VIDEO STEREO
|
|
|
|
5 |
6 |
|
1 |
Cassette loaded |
5 |
|
|
|
|
STEREO indicator |
|
|
||||
|
indicator |
|
(SV-675/SV-670/ |
|
|
|
2 |
PLAY indicator |
|
Only) |
|
|
|
3 |
Multi-function display |
6 |
Rec indicator |
|
|
|
4 |
Timer indicator |
|
|
|
|
|
Accessories
You have just purchased a SAMSUNG Video Cassette Recorder (VCR). Together with your you will find the following accessories in the
REMOTE CONTROL
OWNER’S INSTRUCTIONS
COAXIAL CABLE
Inserting Batteries in the Remote
Control
You must insert or replace the batteries in the remote control when you:
Purchase the video cassette recorder
Find that the remote control is no longer working correctly
1Push the tab in the direction of the arrow to release the battery compartment cover on the rear of the remote control.
2Insert two AA, R6 or equivalent batteries, taking care to respect the polarities:
+ on the battery with + on the remote control
– on the battery with – on the remote control
3Replace the cover by aligning it with the base of the remote control and pushing it back into place.
Do not mix different battery types (manganese and alkaline for example).
Connecting Your VCR to the TV using the Coaxial Cable
To receive television programmes a signal must be received from one of the following sources:
An outdoor aerial |
An indoor aerial |
A cable television network A satellite receiver
Make sure that both the television and the VCR are switched off before connecting the cables.
1Remove the aerial or network input cable from the television.
2Connect this cable to the 75Ω coaxial socket marked 
 on the rear of your VCR.
LINE |
LINE |
OUT |
IN 1 |
R 
DIO
L
2
EO
3Plug the coaxial cable supplied into the  socket on your VCR.
LINE |
LINE |
|
TV |
OUT |
IN 1 |
|
|
|
|
|
|
R |
|
|
|
AUDIO |
|
|
|
L |
|
|
|
|
|
TV |
|
VIDEO |
|
|
|
|
|
3 |
4 |
|
|
|
4Plug the other end of the coaxial cable into the connector previously used for the aerial on the television.
5To obtain better quality pictures and sound on your television, you can also connect your VCR to the television via the RCA cable (see section below) if your television is equipped with this type of connection.
ENG-8
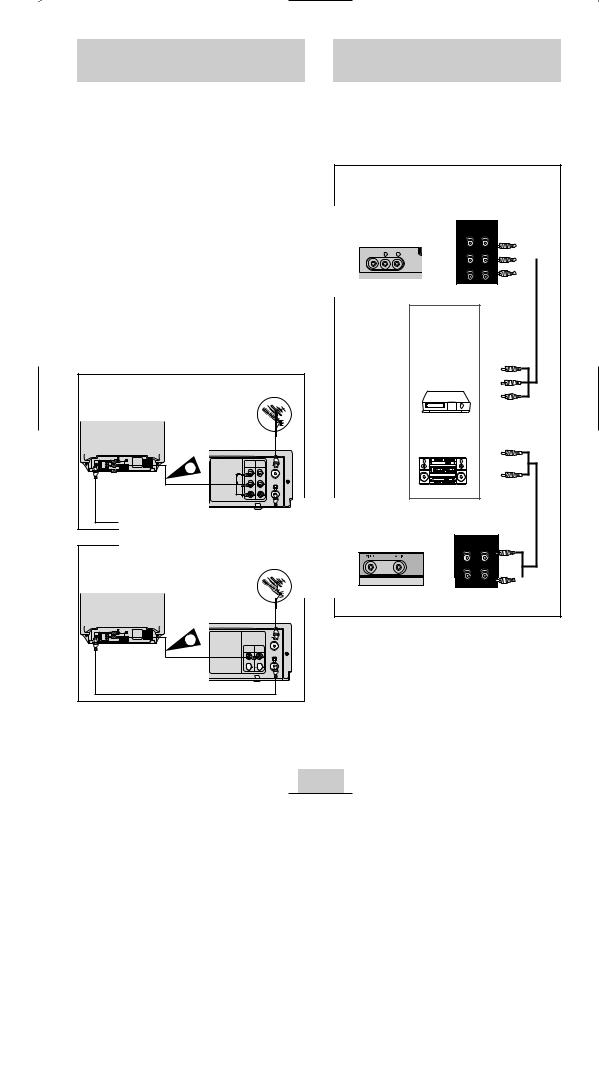
Connecting Your VCR to the TV using the RCA Cable
You can connect your VCR to the television using the RCA cable if the appropriate input is available on the television. You thus:
Obtain better quality sound and pictures
Simplify the setting up procedure of your VCRRegardless of the type of connection
chosen, you must always connect the coaxial cable supplied. Otherwise, no picture will be visible on the screen when the VCR is switched off.
Make sure that both the television and the VCR are switched off before connecting the cables.
1 Connect the coaxial cable as indicated in the above section.
2 Connect one end of the RCA Audio/Video cable to the Video output and Audio output socket on the rear of the VCR.
3 Plug the other end into the appropriate connector on the television.
SV-675/SV-670 |
|
Aerial |
|
|
|
TV |
|
|
2 |
LINE |
LINE |
OUT |
IN 1 |
|
R |
|
|
|
|
|
|
AUDIO |
|
|
L |
|
|
|
TV |
|
VIDEO |
|
RF |
|
|
coaxial cable |
|
|
SV-470/SV-275/SV-270 |
|
Aerial |
|
|
|
TV |
|
|
2 |
|
|
LINE |
LINE |
OUT |
IN 1 |
AUDIO
TV
VIDEO 


RF
coaxial cable
Connecting Other Equipment to Your VCR
You can connect other audio and/or video equipment to your VCR in different ways. The following illustrations give a few examples of the connection possibilities.
The RCA input/output connectors on the front of the VCR are used for equipment, such as camcorders, VCRs or sound systems.
SV-675 |
LINE |
LINE |
OUT |
IN 1 |
|
|
R |
|
VIDEO |
L AUDIO R |
|
|
L |
|
|
LINE IN 2 |
|
FRONT OF THE VCR REAR OF THE VCR
Camcorder
VCR
Sound system
SV-275 |
|
LINE |
LINE |
OUT |
IN 1 |
LINE IN 2 |
|
FRONT OF THE VCR REAR OF THE VCR
ENG-9

Plug & Auto Set Up |
Tuning Your Television for the VCR |
Your VCR will automatically set itself up when it is plugged into the mains for the first time. TV stations will be stored in memory. The process takes a few minutes. Your VCR will then be ready for use.
1Connect the coaxial cable as indicated on page 8~9. (Connecting Your VCR to the TV Using the Coaxial Cable)
|
TV |
LINE |
LINE |
OUT |
IN 1 |
R |
|
AUDIO |
|
L |
|
VIDEO |
|
2Plug the VCR into the mains.
Result: The LANGUAGE SET menu is displayed.
3Select the required language by pressing the or buttons.
4Press OK to store the language selected. Result: A message appears.
5Press OK to start the auto scanning.
The number of stations automatically stored by the VCR depends on the number of stations that it has found.
6On completion, press MENU twice to exit the menu.
Auto preset can be performed by pressing ■
(STOP) on the VCR continuously for 5 seconds or more with no tape inserted.
You must tune your television for the VCR only if you are not using a RCA cable
To view pictures from your VCR when a RCA cable is used, the television must be set to the audio/video mode (AV).
1Switch on the television.
2Switch on the VCR by pressing STANDBY/ON on the front of the VCR or VCR STANDBY/ON on the remote control.
3Select a programme position on the television to be reserved for use with your VCR.
4Insert the video cassette in the VCR. Check that the VCR starts reading the cassette; if not, pressII button.
5Start a scan on your television or set the television to UHF channel 38.
6Fine tune the television until the pictures and sound are obtained clearly.
7If you cannot find the pictures and sound, or there is interference from nearby channels, it may be necessary to change the setting of the VCR output channel (see Setting the VCR Output Channel on page 12 and Problems and Solutions on page 31).
8When the picture and sound are perfectly clear, store this channel at the desired programme position on the television.
Result: That programme is now reserved for use with your VCR.
ENG-10
Setting the Date and Time
used to:
recording
recorder
more than 1
more than 30
1
2
PROG OPTIONS INSTALL
CLOCK
CLOCK BONUS LANG
CLOCK SET
OK END:MENU
3 |
|
|
|
|
|
|
|
|
|
|
option. |
|
|
|
|
|
|
|
|
|
|
|
displayed. |
4 |
|
|
|
|
|
|
|
minutes, day, |
|||
|
|
|
|
|
|
|
. |
||||
|
|
|
|
|
|
|
|
|
|||
|
|
|
|
|
|
|
|
|
|
|
|
|
CLOCK |
|
|
|
|
|
|
|
|||
|
|
|
|
|
|
|
|
|
|
|
|
|
|
|
|
|
12:00 |
1/JAN/2004 |
|||||
|
|
|
|
|
|
|
THU |
||||
|
|
|
|
|
|
AUTO CLOCK : ON |
|||||
|
|
|
|
|
|
|
|||||
|
|
|
END: |
|
|
||||||
|
|
MENU |
|||||||||
5 |
Press the |
or buttons to increase or |
|||||||||
|
decrease the value. |
||||||||||
|
|
Result: The day of the week is displayed |
|||||||||
|
automatically. |
|
|
|
|
|
|||||
|
|
|
|
|
You can hold the or buttons down to scroll |
||||||
|
|
|
|
|
more quickly through the values. |
||||||
6 On completion, press MENU twice to exit the menu.
Displaying/Hiding On-Screen
Information
both on the VCR
information on Index, (SV-675/SV-275
.
.
is displayed.
or , buttons to
|
|
|
|
|
|
|
|
|
|
|
|
|
|
|
|
|
|
|
|
|
option. |
|
|
|
|
|
|
|
|
|
|
|
|
|
|
|
|
|
|
|
|
|
|
|
|
|
|
|
|
|
|
|
|
|
|
|
|
|
|
|
|
|
|
|
|
|
|
|
|
|
|
|
|
|
|
|
|
|
|
|
|
|
|
|
|
|
|
|
|
|
|
|
|
|
|
|
|
|
|
|
|
|
|
|
|
|
|
|
|
|
|
|
|
|
|
|
|
|
|
|
|
|
|
|
|
|
|
|
|
|
|
|
|
|
|
|
|
|
|
|
|
|
|
|
|
|
|
|
|
|
|
|
|
|
|
|
|
|
|
|
|
|
|
|
|
|
|
|
|
|
|
|
|
|
displayed. |
|
|
|
|
|
|
|
|
|
|
|
|
|
|
|
|
|
|
|
|
|
buttons, until the |
|
|
|
|
|
|
|
|
|
|
|
|
|
|
|
|
|
|||||
|
|
|
|
|
|
|
|
|
|
|
|
|
|
|
|
|
|
||||
OPTIONS |
|
|
|
|
|
|
|
|
|
|
|
|
|
|
|||||||
|
|
|
|
|
|
|
|
|
|
|
|
|
|
|
|
|
|||||
|
|
OSD |
|
|
|
|
|
|
|
|
|
:ON |
|
|
|
||||||
|
|
TAPE SELECT |
:E180 |
|
|
|
|||||||||||||||
|
|
COLOUR SYSTEM |
:AUTO |
|
|
|
|||||||||||||||
|
|
IPC |
|
|
|
|
|
|
|
|
|
:ON |
|
|
|
||||||
|
|
|
|
|
|
|
|
|
|
||||||||||||
|
|
|
|
|
|
END: |
|
|
|||||||||||||
|
|
|
|
|
MENU |
||||||||||||||||
|
|
|
5 |
|
|
|
|
|
|
|
|
|
|
|
|
|
|
|
|
|
|
To... |
|
|
Press or , until... |
||||||||||||||||||
|
|
|
|
|
|
|
|
|
|
|
|||||||||||
|
|
|
|
|
|
Display on-screen information |
|
|
ON is displayed. |
||||||||||||
|
|
|
|
|
|
|
|
|
|
|
|||||||||||
|
|
|
|
|
|
Hide on-screen information |
|
|
OFF is displayed. |
||||||||||||
|
|
|
|
|
|
|
|
|
|
|
|
|
|
|
|
|
|
|
|
|
|
6On completion, press MENU twice to exit the menu.
ENG-11
Loading...