


00872A SV-2000M/xev-GB1 9/8/56 12:10 PM Page a
MULTI SYSTEM VIDEO
CASSETTE RECORDER
SV-2000M
Owner’s Instructions
00872A SV-2000M/xev-GB1 9/8/56 12:10 PM Page 1
Quick Look-Up Guide
GB
To record a Program now |
|
To record a Program and |
To record a Program when |
|
|
|
let it stop automatically |
you’re away |
|
|
|
|
|
|
|
|
|
|
|
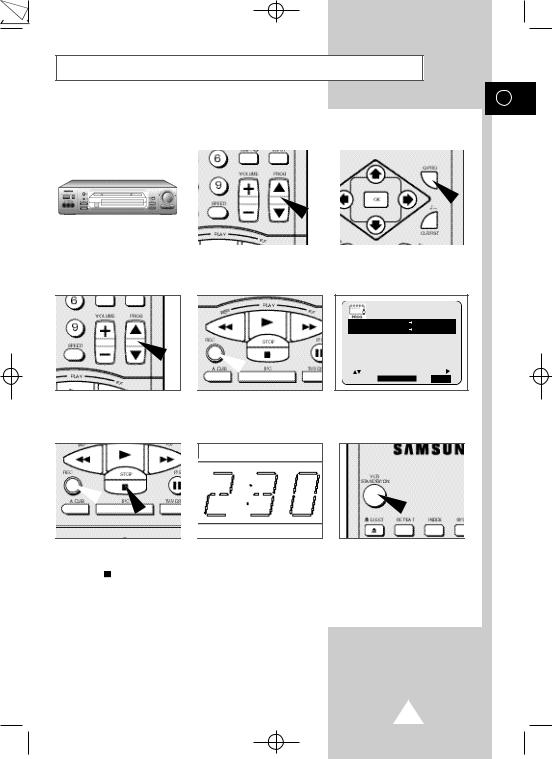
Insert the cassette.
Select the program by pressing the PROGbuttons ( or
or  ) on the remote control.
Insert the cassette.
Select the program by pressing the PROGbuttons ( or
or  ) on the remote control.
Press REC for at least one second to start recording.
Insert the cassette.
Press the Q-PRO button on the remote control.
|
1/JAN SAT |
2:38 |
||
PR DAY |
START |
|
STOP |
|
-- ---- --:-- |
- - : - -- - |
|||
-- ---- --:-- |
→ - - : - -- - |
|||
-- ---- --:-- |
→ --:-- -- |
|||
-- ---- --:-- |
→ --:-- -- |
|||
-- ---- --:-- |
→ - - : - -- - |
|||
-- ---- --:-- |
→ - - : - -- - |
|||
|
|
|
|
SET: |
DELETE:CLR/RST |
|
MENU |
||
Enter the Timer program data. Then press the MENU button.
Press REC for at least one second to start recording.
When you have finished recording, press STOP ( ).
).
Press REC several times until the required recording time is displayed.
Result: Recording stops automatically at the end of the required time.
Press VCR STANDBY/ON to turn off the VCR and to activate the timer.
1
00872A SV-2000M/xev-GB1 |
9/8/56 12:10 PM Page 2 |
|
Contents |
|
|
GB |
|
|
FOREWORD |
|
|
■ |
Safety Instructions......................................................................................... |
4 |
■ |
Getting Started.............................................................................................. |
5 |
VCR OVERVIEWS |
|
|
■ |
Front View of the VCR................................................................................... |
6 |
■ |
Rear View of the VCR................................................................................... |
6 |
■ |
Display Indicators.......................................................................................... |
7 |
■ |
Infrared Remote Control................................................................................ |
7 |
CONNECTING YOUR VIDEO CASSETTE RECORDER |
|
|
■ |
Worldwide TV Color System.......................................................................... |
8 |
■ |
Multi-System VCR......................................................................................... |
9 |
■ |
Deciding How to Connect Your VCR............................................................. |
10 |
■ |
Connecting Your VCR to the TV.................................................................... |
11 |
SETTING UP YOUR VIDEO CASSETTE RECORDER |
|
|
■ |
Inserting the Batteries in the Remote Control................................................ |
12 |
■ |
Initial Setup.................................................................................................... |
12 |
■ |
User Set Setting............................................................................................ |
13 |
■ |
Setting the Date and Time............................................................................. |
14 |
■ |
To turn On-Screen Information on/off............................................................ |
14 |
■ |
Setting the VCR RF out System.................................................................... |
15 |
■ |
Setting the RF OUT CHANNEL..................................................................... |
16 |
■ |
Presetting the Stations Automatically............................................................ |
17 |
■ |
Presetting the Stations Manually................................................................... |
18 |
■ |
Clearing a Preset Station............................................................................... |
19 |
■ |
Changing the Preset Station Table................................................................ |
20 |
RECORDING TELEVISION BROADCASTS |
|
|
■ |
Selecting the Cassette Type.......................................................................... |
21 |
■ |
Selecting the Recording Speed..................................................................... |
21 |
■ |
Protecting a Recorded Cassette.................................................................... |
21 |
■ |
Recording a Program.................................................................................... |
22 |
■ |
Stopping a Recording Temporarily................................................................ |
23 |
■ |
Recording a Program with Automatic Stop.................................................... |
23 |
■ |
Using the Timer Programming Feature......................................................... |
24 |
■ |
Checking a Preset Recording........................................................................ |
25 |
■ |
Cancelling a Preset Recording...................................................................... |
25 |
■ |
Receiving Stereo Broadcasts........................................................................ |
26 |
■ |
NICAM........................................................................................................... |
26 |
PLAYING BACK |
|
|
■ |
Playing a Cassette......................................................................................... |
27 |
■ |
Adjusting Picture Alignment Manually........................................................... |
27 |
■ |
Intelligent Picture Control.............................................................................. |
28 |
■ |
Selecting the COLOR SYSTEM Mode.......................................................... |
29 |
■ |
Adjusting Picture Sharpness......................................................................... |
30 |
■ |
Selecting the Audio Output Mode.................................................................. |
30 |
Contents (cont.)
GB
REWINDINGAND FAST-FORWARDING |
|
|
■ Rewinding and Fast-forwarding a Cassette................................................... |
31 |
|
■ Playing a Cassette in Slow Motion................................................................ |
31 |
|
■ Playing a Sequence Frame by Frame........................................................... |
32 |
|
■ Playing a Sequence at Variable Speeds....................................................... |
32 |
|
SEARCHINGFORA SEQUENCE |
|
|
■ Searching for a Specific Sequence............................................................... |
33 |
|
■ |
Auto Repeat Play........................................................................................... |
34 |
■ |
Interval Repeat Play...................................................................................... |
34 |
■ Using the Tape Counter................................................................................ |
35 |
|
ADVANCED RECORDING FEATURES |
|
|
■ Using the Assemble Edit Function................................................................. |
36 |
|
■ Connecting Other Equipment to Your VCR................................................... |
37 |
|
■ Recording from Another VCR or Camcorder................................................. |
38 |
|
■ |
Hi-Fi Audio System........................................................................................ |
39 |
■ Audio Dubbing a Pre-recorded Cassette....................................................... |
40 |
|
OTHER FUNCTIONS AND USEFUL RECOMMENDATIONS |
|
|
■ Using the TV Buttons on the Remote Control .............................................. |
41 |
|
■ |
Auto Power Off.............................................................................................. |
42 |
■ |
Locking Your VCR......................................................................................... |
42 |
■ |
Technical Specifications................................................................................ |
43 |
SOLVING PROBLEMS |
|
|
■ |
Problems and Solutions................................................................................. |
44 |
GLOSSARY |
|
|
■ |
Glossary of Terms......................................................................................... |
45 |
WORLD BROADCAST SYSTEMS ................................................................................. |
46 |
|
INTERNATIONAL SERVICE NETWORK ......................................................................... |
47 |
|
Symbols
1 |
1 |
|
|
|
|
||
Press/push |
Hold down |
Important |
Note |
1 = Step number |
|
|
|
2 |
3 |
||
|
|
|
|
|
|
|
|
|
|
|
|
00872A SV-2000M/xev-GB1 9/8/56 12:10 PM Page 4
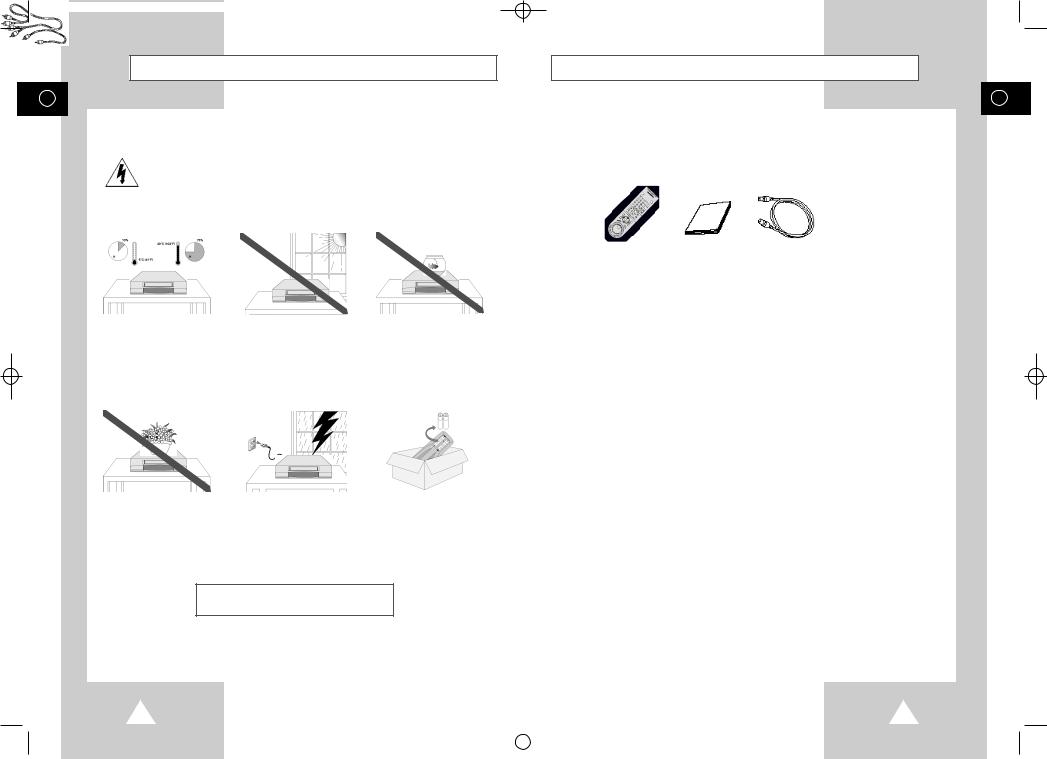
Safety Instructions
GB
The following illustrations represent the precautions to be taken when using this video cassette recorder.
The lightning flash with the arrowhead in the triangle is a warning sign alerting you to dangerous voltage inside the product.
DO NOT OPEN THE VCR.
|
|
|
|
|
|
|
|
|
|
|
|
Do NOT expose the VCR to |
|
Do NOT expose the VCR to |
|
Do NOT expose the VCR to |
|
extreme temperature conditions |
|
direct sunlight. |
|
any liquids. |
|
(below 5°C(41°F) and above |
|
|
|
|
|
40°C(104°F) or to extreme |
|
|
|
|
|
|
|
|
|
||
humidity conditions (less than |
|
|
|
|
|
10% and more than 75%). |
|
|
|
|
|
|
|
|
|
|
|
|
|
|
|
|
|
|
|
|
|
|
|
Do NOT place any objects on |
|
During a storm and/or lightning, |
If the remote control is not |
the VCR or remote control. |
|
unplug the VCR from the AC |
used for a long period of time, |
|
|
outlet and antenna. |
remove the batteries and store |
|
|
|
it in a cool, dry place. |
|
|
|
THIS UNIT IS NOT FOR USE IN INDUSTRIAL
ENVIRONMENTS.
Getting Started
GB
Thank you for purchasing a SAMSUNG Video Cassette Recorder (VCR).
Together with your VCR, you will find the following accessories in the box.
REMOTE CONTROL |
OWNER’S |
COAXIAL CABLE |
A/V RCA CABLES |
|
& BATTERIES “AAA” |
||||
INSTRUCTIONS |
(EUROPE...) |
|
||
|
|
|||
|
& POWER ADAPTOR |
|
|
|
|
|
|
|
Your Owner’s Instructions contain much valuable information on setting up and using your VCR. Please take the time to read them as they will help you take full advantage of the VCR’s features.
The manual is organized as follows:
A series of step-by-step procedures for each function available forms the main body of the manual.
You can consult the glossary on page 45, to obtain an explanation of the main technical terms used throughout this manual.
On pages 6 and 7, you will find illustrations of the VCR (front and rear), the display and the remote control unit to help you find the buttons and understand the symbols displayed.
Preparing Your Video Cassette Recorder
Before being able to play and record video cassettes, you must prepare and connect your VCR.
Insert batteries in the remote control.
Connect your VCR to the television.
Set the date and time used to display information on the television screen.
Preset the stations.
All these operations are essential so you must follow the step-by-step instructions carefully.
4 |
5 |
||
|
|
|
|
|
|
|
|
|
|
|
|

00872A SV-2000M/xev-GB1 9/8/56 12:10 PM Page 6
Front View of the VCR
GB
STANDBY/ON |
RECORD |
REC.SPEED |
VIDEO CASSETTE |
|
||
BUTTON |
BUTTON |
COMPARTMENT |
|
|||
BUTTON |
SHUTTLE RING |
|||||
|
|
|
||||
|
EJECT |
|
|
|
|
|
|
BUTTON |
|
|
|
|
|
|
|
|
|
|
JOG RING |
|
|
|
|
|
|
|
|
|
|
PROGRAM |
INPUT SELECTION |
PLAY |
STOP |
|||
|
|
BUTTONS |
BUTTON |
BUTTON |
||||
|
|
|
|
BUTTON |
|
|
|
|
RCA VIDEO |
RCA AUDIO |
PICTURE CONTROL |
|
|
|
PAUSE/STILL |
||
|
|
|
BUTTON |
|||||
INPUT JACK |
L,R INPUT |
BUTTONS |
COLOR SYSTEM |
AUDIO SELECTION |
||||
|
|
|||||||
|
JACKS |
|
SELECTION BUTTON |
BUTTON |
|
|
|
|
Rear View of the VCR
RCA AUDIO L, R |
ANTENNA IN |
OUTPUT JACKS |
RF CONNECTOR |
|
|
LINE1 (AUDIO/VIDEO) IN/OUT |
OUT TO TV |
SCART (EURO-21) SOCKET |
RF CONNECTOR |
Display Indicators
GB
2 |
9 |
10 |
4 |
6 |
3 |
1 |
5 |
7 |
8 |
1 |
|
|
|
|
Timer indicator |
6 |
Hi-Fi Indicator |
|
|
2 |
Recording speed indicator |
7 |
Stereo system Indicator |
|
3 |
Cassette in/out indicator |
8 |
Audio Level meter |
|
4 |
Color system indicator |
9 |
VCR/TV mode Indicator |
|
5 |
Multi-function display |
10 |
IPC on/off mode Indicator |
|
|
|
|
|
|
Infrared Remote Control
VCR STANDBY/ON BUTTON INTERVAL REPEAT BUTTON
EJECT BUTTON
INDEX BUTTON
NUMERIC BUTTONS
100 BUTTON
PLAY BUTTON
REWIND/REVERSE PICTURE SEARCH BUTTON
RECORD BUTTON
AUDIO-DUBBING BUTTON
INTELLIGENT PICTURE
CONTROL BUTTON
MENU BUTTON
OK BUTTON
MENU SELECTION SHIFT BUTTONS AUTO TRACKING BUTTON
TV STANDBY/ON BUTTON
COLOR SYSTEM SELECTION BUTTON
AUDIO OUTPUT SELECTION BUTTON
VCR BUTTON
TV BUTTON
DISPLAY BUTTON
TUNER, LINE 1, LINE 2 SELECTION BUTTON
PROGRAM UP/DOWN BUTTONS
VOLUME UP/DOWN BUTTONS
REC.SPEED BUTTON
FAST-FORWARD/FORWARD PICTURE SEARCH BUTTON STOP BUTTON
PAUSE/STILL BUTTON
TV/VCR SELECTION BUTTON
QUICK PROGRAMBUTTON
MENU SELECTION UP/DOWN BUTTONS
CLEAR/RESET BUTTON
TRACKING BUTTONS |
SLOW BUTTONS |
 JOG/SHUTTLE RING
6 |
7 |
||
|
|
|
|
|
|
|
|
|
|
|
|

00872A SV-2000M/xev-GB1 9/8/56 12:10 PM Page 8
Worldwide TV Color System
GB
Many countries have different TV signal formats, with no exchangeability between them. This makes it impossible to play back or record tapes with different signal formats.
Comparison of TV color systems
|
|
|
NTSC |
NTSC4.43 |
PAL-M |
PAL |
|
PAL-N |
SECAM MESECAM |
|
Number of |
|
|
525 |
|
|
|
|
625 |
|
scanning lines |
|
|
|
|
|
|||
|
|
|
|
|
|
|
|
||
|
Field |
|
|
60Hz |
|
|
|
50Hz |
|
|
frequency |
|
|
|
|
|
|
|
|
|
Line frequency |
|
15.734kHz |
|
|
|
15.625kHz |
||
|
Color signal |
Sub carrier suppression quadrature modulation |
|
FM modulation |
|||||
|
modulation |
|
|
||||||
|
system |
|
|
|
|
|
|
|
|
|
Color signal |
3.579545 |
4.433619 |
3.575611 |
4.433619 |
3.582056 |
DB 4.25MHz |
||
|
frequency |
|
MHz |
MHz |
MHz |
MHz |
|
MHz |
DR 4.40625MHz |
|
Burst signal |
Fixed phase |
|
Inverted by 1 H |
|
|
DR.DB alternation |
||
|
|
|
|
|
|
||||
|
Classification of TV color systems by country |
|
|
|
|||||
|
NTSC |
: Korea, U.S., Canada, Japan, Taiwan, and Philippines |
|||||||
|
|
PAL |
: United Kingdom, Germany, Western Europe, China, and Singapore |
||||||
|
|
SECAM |
: France, Eastern Europe, and CIS |
|
|
|
|||
|
|
PAL-M |
: Brazil |
|
|
|
|
|
|
PAL-N : Argentina (The tape is the same as that of PAL)
NTSC4.43 : Pseudo NTSC signal which is made to use NTSC tape in the Middle East
(The tape is the same as that of NTSC3.58)
MESECAM : The name of a tape which uses the SECAM signal recording method. The output signal during playback is SECAM signal.
Worldwide Broadcasting system is B/G, I, D/K, M, N, L.
*SV-2000M accepts all worldwide Broadcasting systems except SECAM-L (France region).
Multi-System VCR
GB
The SV-2000M (Multi-System VCR) in that it will play back tapes recorded in any TV Broadcasting System except PAL-M, PAL-N.
SV-2000M (Multi-System VCR)
With a Multi-System VCR:
The TV must correspond to the system of the tape being played, otherwise, a Multi-System TV is also required;
Tape duplication with system conversion (eg NTSC to PAL) is not possible.
8 |
9 |
||
|
|
|
|
|
|
|
|
|
|
|
|
00872A SV-2000M/xev-GB1 9/8/56 12:10 PM Page 10
Deciding How to Connect Your VCR
GB
You must take into account various factors when deciding how to connect your various audio and/or video systems.
Types of connectors available on your systems.
Systems connected permanently to the VCR (satellite receiver for example) or from time to time (camcorder for example).
Your VCR is equipped with the following connectors.
Connector |
Location |
Type |
Direction |
Recommended Use |
Audio output |
Rear |
Audio RCA |
Out |
Television |
|
|
|
|
Other VCR |
|
|
|
|
Audio System |
LINE 1 IN |
Rear |
SCART |
In/Out |
Television |
|
|
|
|
Satellite receiver |
|
|
|
|
Other VCR |
LINE 2 IN |
Front |
Audio/Video RCA |
In |
Audio system |
|
|
|
|
Camcorder |
|
|
|
|
Other VCR |
OUT TO TV |
Rear |
75 Ω |
Out |
Television |
|
|
coaxial |
|
|
IN FROM ANT. Rear |
75 Ω |
In |
Antenna |
|
|
|
coaxial |
|
Cable television network |
Whenever you connect an audio or video system to your VCR, ensure that all units are switched off.
Refer to the documentation supplied with your equipment for detailed connection instructions and associated safety precautions.
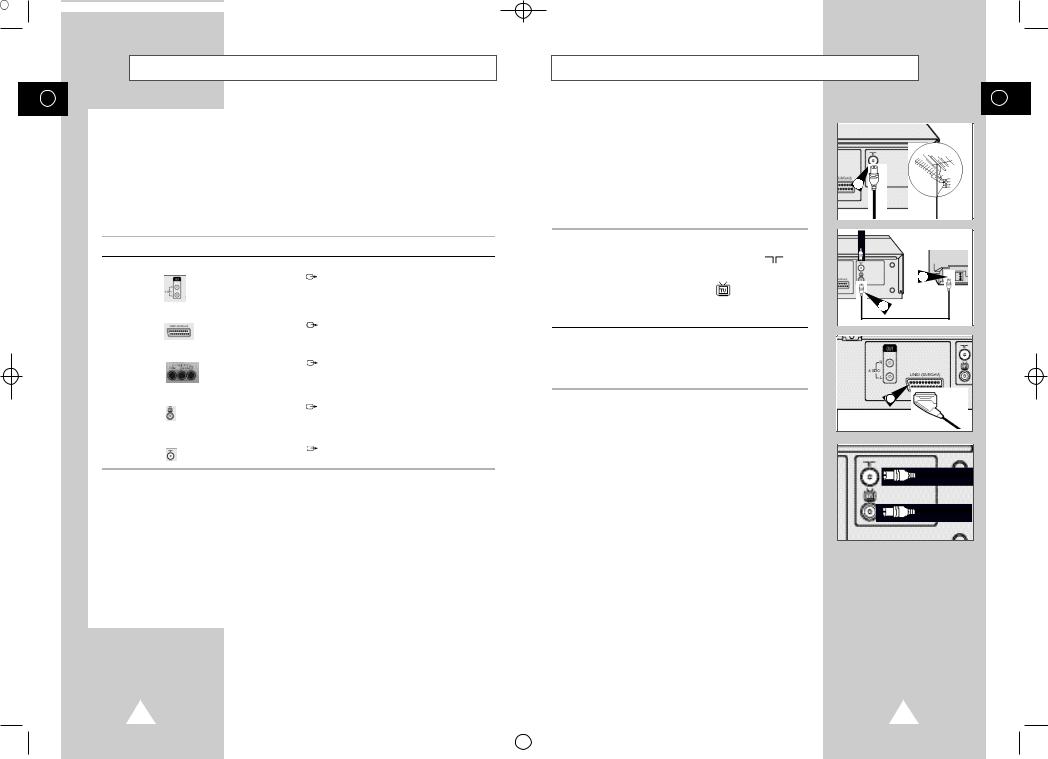
Connecting Your VCR to the TV
GB
To receive television programs from an over-the-air or cable television network, a signal must be received from one of the following sources.
An outdoor antenna.
An indoor antenna.
|
A cable television system. |
2 |
|
||
Make sure that both the television and the VCR are |
|
|
|
switched off before connecting the cables. |
|
1 Remove the 75Ω coaxial cable from the television.
2 Connect this cable to the 75Ω coaxial socket marked on the rear of your VCR.
3 |
Plug the coaxial cable supplied into the |
socket on your VCR. |
4Plug the other end of the coaxial cable into the connector previously used for the antenna on the television.
5Connect one end of the SCART cable to the LINE1(EURO AV) socket on the rear of the VCR.
6Plug the other end of the SCART cable into the appropriate connector on the television.
Regardless of the type of connection chosen, you must always connect the coaxial cable supplied. Otherwise, no picture will be visible on the screen when the VCR is switched off.
TV
4
3
5
10 |
11 |
||
|
|
|
|
|
|
|
|
|
|
|
|
00872A SV-2000M/xev-GB1 9/8/56 12:10 PM Page 12
Inserting the Batteries in the Remote Control
GB
1
You must insert or replace the batteries in the remote control when you:
purchase the video cassette recorder ; or
find that the remote control is no longer working correctly.
1Push the tab in the direction of the arrow to release the battery compartment cover on the rear of the remote control.
2Insert two AAA or equivalent batteries (supplied), taking care to respect the polarities.
+ on the battery with + on the remote control.
– on the battery with – on the remote control.
3Replace the cover by aligning it with the base of the remote control and pushing it back into place.
Initial Setup
* *COUNTRY SET * * |
EUROPE |
AMERICA |
ASIA/OCEANIA |
MIDDLE EAST/AFRICA |
* *EUROPE * * |
U.K |
GERMANY |
ITALY |
SPAIN |
SWEDEN |
BELGIUM |
AUSTRIA |
RUSSIA |
NETHERLANDS
OTHERS M/G/I/K:M
MEMORY: O K
AUTO SET-UP WILL BE
STARTED.
CHECK ANTENNA AND
TV CABLE CONNECTION.
PROCEED: O K
END: MENU
The VCR automatically displays the initial setup MENU when the VCR is plugged into the AC outlet for the first time.
1 Plug the VCR into the AC outlet.
Result: The LANGUAGE SETis displayed.
2Press the  ,
,  and OK button to select your favorite language. Result: The COUNTRY SETis displayed.
3Press the  ,
,  ,
,  button to select your country region. Result: The country list is displayed.
4Press the  ,
,  ,
,  and OK button to select your country.
If your country does not appear in the country list, then select OTHERS.
5Press the OK button to store TV stations in the memory automatically.
Connecting your VCR to the TV using the SCART cable.
6It will automatically tune itself in and store TV stations in the memory.
The process will finish after a few minutes. Your VCR will then be ready for use.
AUTO SET UP |
PLEASE WAIT |
1% |
END: MENU |
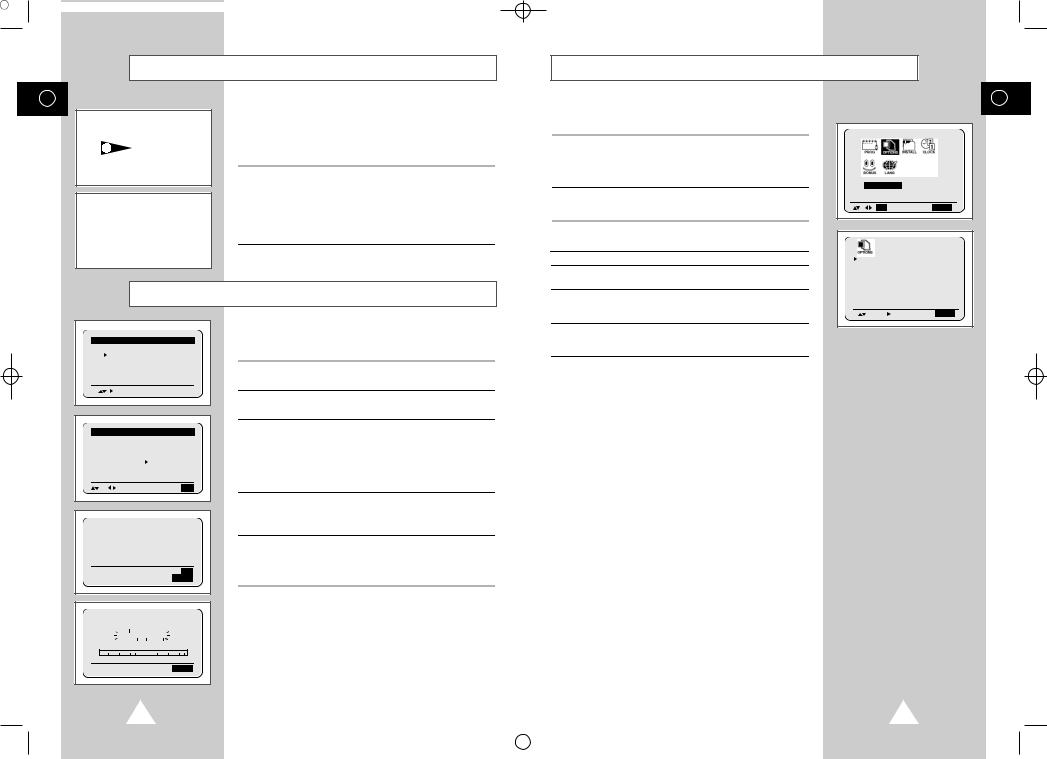
USER SET Setting
The user set is initially set at the factory. If you want to make any changes to the USER SET, please follow the instructions below.
1Press the MENU button on the remote control. Result: The MAIN menu is displayed.
2Press the  or
or  button to select USER SET. Result: The USER SETis displayed.
3Press the OK button to select this options.
4Check below to change the item.
ITEM |
USAGE |
COMMENT |
OSD |
OSD display on/off |
Initial setting is on. |
TAPE |
tape length selection |
Select the recording tape type for |
SELECT |
|
remaining time. |
COLOR |
COLOR SYSTEM |
To select NT3.58 → NT4.43 → |
SYSTEM |
or B/W selection |
NTPB or AUTO → PAL → SECAM |
|
|
→ MESECAM → B/W. |
IPC |
Intelegent |
Initial mode is IPC ON. |
|
Picture |
|
|
Control |
|
NICAM |
NICAM on/off |
Initial mode is NICAM ON |
GB
USER SET |
|
O K |
END: MENU |
OSD |
:ON |
TAPE SELECT |
:E180/ |
|
T120 |
COLOR SYSTEM |
:AUTO |
IPC |
:ON |
NICAM |
:ON |
|
END:MENU |
12 |
13 |
||
|
|
|
|
|
|
|
|
|
|
|
|
 Loading...