


RS23JGRS
Table of contents
 Loading...
SIDE BY SIDE
REFRIGERATOR
OWNER’S MANUAL AND INSTALLATION
ENGLISH
CONTENTS
SAFETY WARNING....................................................................................2
OPERATING INSTRUCTIONS
SETTING UP THE REFRIGERATOR ........................................................4
MAJOR FEATURES.....................................................................................4
CONTROL PANEL .......................................................................................5
DIGITAL PANEL ..........................................................................................7
TEMPERATURE CONTROL ......................................................................8
ICE AND COLD WATER DISPENSER .......................................................8
USING THE WATER DISPENSER(optional).......................................................9
SHELVES AND BINS ...................................................................................11
FOOD STORAGE GUIDE ........................................................................12
CoolSelect ZoneTMDrawer GUIDE.............................................................14
REMOVING FREEZER ACCESSORIES..................................................16
REMOVING REFRIGERATOR ACCESSORIES.....................................16
BEVERAGE STATIONTM(optional) ............................................................16
CLEANING ACCESSORIES......................................................................17
CHANGING THE INTERIOR LIGHT.........................................................18
WATER FILTER..........................................................................................19
DOORS.......................................................................................................19
INSTALLATION INSTRUCTIONS
INSTALLATION OF THE REFRIGERATOR ............................................20
REMOVING THE FRONT LEG COVER .........................................21
REMOVING THE REFRIGERATOR DOORS ......................................... 22
REATTACHING THE REFRIGERATOR DOORS....................................24
ADJUSTING THE CLEARANCE BETWEEN THE DOORS....................27
CHECKING THE WATER DISPENSER LINE ..........................................29
INSTALLAING THE WATER DISPENSER LINE......................................30
TROUBLESHOOTING...............................................................................35
DA99-00494B REV(0.7
)
SAFETY WARNINGS
• Before operating the appliance, please read this manual thoroughly and retain it for
your reference.
• Because these following operating instructions cover various models, the characteris
WARNING
CAUTION/WARNING SYMBOLS USED OTHER SYMBOLS USED
tics of your refrigerator may differ slightly from those described in this manual
• The appliance is not intended for use by children or infirm persons without adult supervision.
• Children should be supervised to ensure that they do not play with the appliance.
• R600a or R134a is used as a refrigerant. Check the compressor label on the rear of the appli
ance and the rating label inside the fridge to see which refrigerant is used for your refrigerator.
• The refrigerator only use ice makers which made by samsung Electronics for the refrigerator.
• The incorporated ice-makers are to be installed only by the manufacture or its service agent.
Represents something you must NOT
Indicates that a danger of death
or serious injury exists.
WARNING
Indicates that a risk of
personal injury or material
CAUTION
damage exists.
WARNINGS
Do not plug several appliances into the same multiple power board.
• This could cause overheating and the risk of fire.
Make sure that the power plug is not squashed or
dam-aged by the back of the refrigerator .
• A damaged power plug may overheat and cause fire.
Do not bend the power cord excessively or placeheavey articles on it .
• This constitutes a fire hazard. If the power cord is
damaged, have it replaced immediately by the
manufacturer or its service agent.
Do not directly spray water inside or outside the
refrigerator.
• There is a risk of fire or electric shock.
Do not spray inflamable gas near the refrigerator.
• There is a risk of explosion or fire.
Do not insert the power plug with wet hands.
• You may receive an electric shock.
Do not put a container filled with water on the
refrigerator.
• If spilled, there is a risk of fire or electric shock.
Do not install the refrigerator in a damp place or a
place where it may come in contact with water.
• Deteriorated insulation of electrical parts may cause an
electric shock or fire.
Do not store volatile or flammable substances in the
refrigerator.
• The storage of benzene, thinner, alcohol, ether, LP gas
and other such products may cause explosions.
Represents something you must NOT
disassemble.
Represents something you must NOT touch.
Represents something you must follow.
Indicates that you must disconnect the
power plug from the socket.
Represents a ground is needed to prevent
electric shock.
It is recommended that this symbol be
handled by service man.
Do not disassemble or repair the refrigerator by yourself.
• You run the risk of causing a fire, malfunctions and/or
personal injury.
Pull the power plug out of the socket before changing
the interior light of the refrigerator.
• Otherwise, there is a risk of electric shock.
If you wish to dispose of the refrigerator / freezer
throw it away after first removing the doors and seals.
• Do so in a way, that is not possible for a child to remain
trapped inside.
The refrigerator must be grounded.
• You must ground the refrigerator to prevent any power
leak ages or electric shocks caused by current leakage
from the refrigerator.
Never use gas pipes, telephone lines or other potential lightening rods as ground.
• Improper use of the ground plug can result in electric
shock.
WARNING
• Keep ventilation openings in the appliance enclosure
or mounting structure clear of obstruction.
• Do not use mechanical devices or any other means to
accelerate the defrosting process, other than those
recommended by the manufacturer.
• Do not damage the refrigerant circuit.
• Do not use electrical appliances inside the refrigera-
tor/freezer, unless they are of a type recommended
by the manufacturer.
2
CAUTIONS
Do not overfill the refrigerator with food.
• When you open the door, an item may fall out and
cause personal injury or material damage.
Do not put bottles or glass containers in the freezer.
• When the contents freeze, the glass may break and
cause personal injury.
If the wall socket is loose, do not insert the power
plug.
• There is a risk of electric shock or fire.
Do not disconnect the power cord by pulling on it.
• Damage to the cord may cause a short-circuit, fire
and/or electric shock.
• If the power cord is damaged, it must be replaced by
the manufacturer, a certified service agent or qualified
service personnel.
Do not store articles on the top of the appliance .
• When you open or close the door, the articles may fall
and cause personal injury and/or material damage.
Do not store pharmaceuticals products, scientific
materials or temperature-sensitive products in the
refrigerator.
• Products that require strict temperature controls must
not be stored in the refrigerator.
Do not let children hang on the door. If not, a serious injury may occur.
If you smell pharmaceutical or smoke, pull out the
power plug immediately and contact your SAMSUNG Electronics service center.
Do not touch the inside walls of the freezer or
products stored in the freezer with wet hands.
• This may cause frostbite.
Do not insert your hands into the bottom area
under the appliance.
• Any sharp edges may cause personal injury.
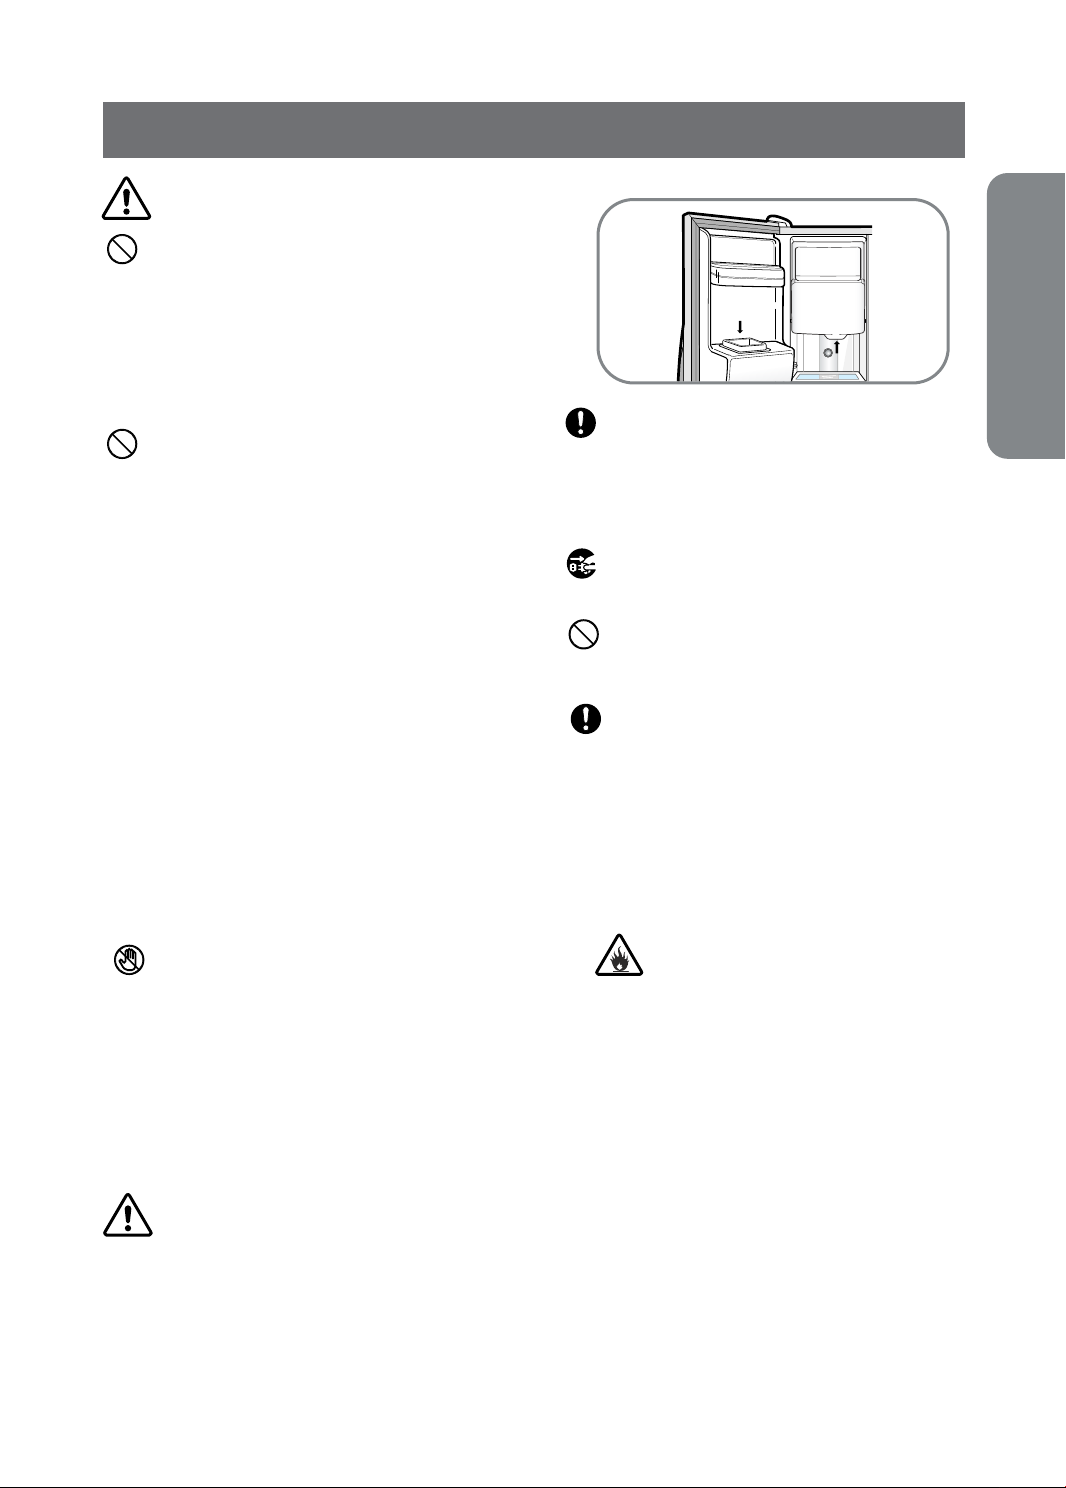
Never put fingers or other objects into the dispenser
hole and ice chute. It may cause personal injury or
material damage
Either R600a or R134a are the refrigerants used.
Check the compressor label on the rear of the appliance
and the rating label inside the fridge to
see which refrigerant is used for your refrigerator.
CAUTIONS
The refrigerant used in the refrigerator/freezer and the
gases in the insulation material require special disposal procedures. Ensure that none of the pipes on the
back of the appliance are damaged prior to disposal.
Do not use a wet or damp cloth when cleaning
the plug. Remove any foreign matter or dust
from the power plug pins.
• Otherwise there is a risk of fire.
• If the refrigerator is disconnected from the power
supply, you should wait for at least five minutes
before plugging it back.
If the refrigerator is not to be used for a long
period of time, pull out the power plug.
• Deterioration in the insulation may cause fire.
The appliance is not intended for use by young
children or infirm persons without supervision.
Young children should be supervised to
ensure
that they do not play with the appliance.
Do not place the equipment directly under the
sunlight.
The appliance must be positioned so that the
plug is accessible after installation
If the power cord is damaged it must be
replaced
by manufacturer, a certified service agent or
qualified service personnel.
This appliance contains a small amount of
isobutane refrigerant (R600a), a natural gas
with high environmental compatibility that is,
ing and installing the appliance, care should be taken
to ensure that no parts of the refrigerating circuit are
damaged.
Refrigerant squirting out of the pipes could ignite or
cause an eye injury. If a leak is detected, avoid any
naked flames or potential sources of ignition and air
the room in which the appliance is standing for several minutes.
• In order to avoid the creation of a flammable gas-air mix-
• Never start up an appliance showing any signs of dam-
however, also combustible. When transport-
ture if a leak in the refrigerating circuit occurs, the size of
the room in which the appliance may be sited depends on
the amount of refrigerant used.
The room must be 1m
refrigerant inside the appliance. The amount of refrigerant
in your particular appliance is shown on the identification
plate inside the appliance.
age. If in doubt, consult your dealer.
3
in size for every 8 g of R600a
SAFETY W ARNING
3
SETTING UP THE REFRIGERAT OR
Once you have performed the following steps, your refrigerator should be fully operational. If not, check the power
supply and electricity source. If you have any questions, contact your SAMSUNG service center.
Place the refigerator in an appropriate location
with reasonable clearance between the wall
and the refigerator.
(refer to installation instructions in this mannal)
When the refrigerator is plugged in,
the interior light should come on when
you open the doors.
MAJOR FEATURES
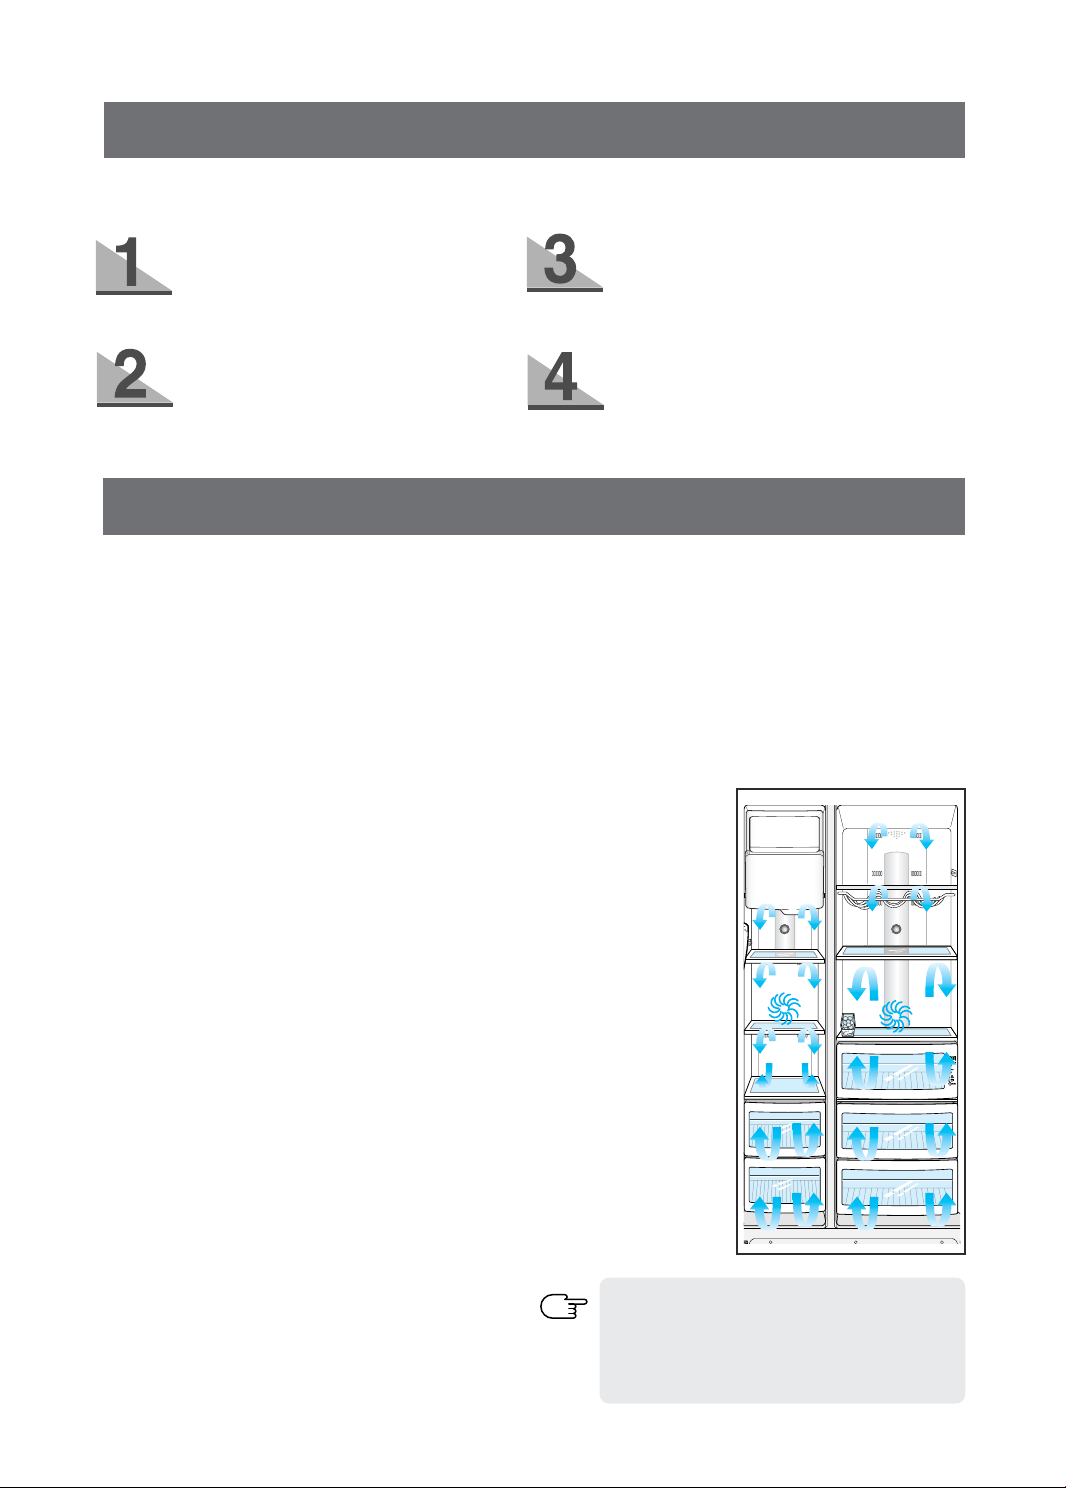
Twin Cooling System
• The refrigerator and the freezer have two evapora
tors. Given this independent system, the freezer
and the refrigerator are cooled individually as
required and are, therefore, more efficient. Food
odor from the refrigerator does not affect food in
the freezer due to separate of air flow circulation.
Multi-Flow System
• Cool air circulates through multiple vents on every
shelf level. This provides even distribution of
cooling inside cabinets to keep your food fresh
longer.
Door Alarm
• A beeper reminds you if the door is left open.
High humidity for fresher food
• You can keep food, fruit and vegetables fresh for
longer because your refrigerator supplies highly
humidified cold air. This can be up to four or five
times more effective than a normal refrigerator.
Set the temperature control to the coldest
temperature and wait for an hour. The
freezer should get slightly chilled and the
motor should run smoothly.
Once the refrigerator temperature is sufficiently
low, you can store food in the
refrigerator. After starting the refrigerator, it
takes a few hours to reach the appropriate
temperature.
Beverage Station (optional)
• You do not have to open the main door to access
frequently used food in the extra
refrigerating compartment. This saves time
and money.
Deodorizer (optional)
• Reusable deodorizer keeps the refrigerator air
fresh and odor free.
CoolSelect
TM
Zone
Drawer
(optional)
• User can select
Quick Cool, Thaw
and Select buttons
for quickly chill, thaw
and cools items.
Select Soft Freeze,
Cool or Chill to
control the tempera
ture of drawer.
Energy-saving fridge/freezer
• Power consumption is kept to a minimum by distributing cool air separately to the refrigerator and
freezer.
Faster cooling times
• The power freeze function allow you to freeze food
more quickly.
Abundant supply of ice and cold water
• The ice and water dispenser provides ice and cold
water at any time.
NOTE
4
This operation instruction covers various
models.
The characteristics of your appliance may
differ slightly from those described in this
manual.
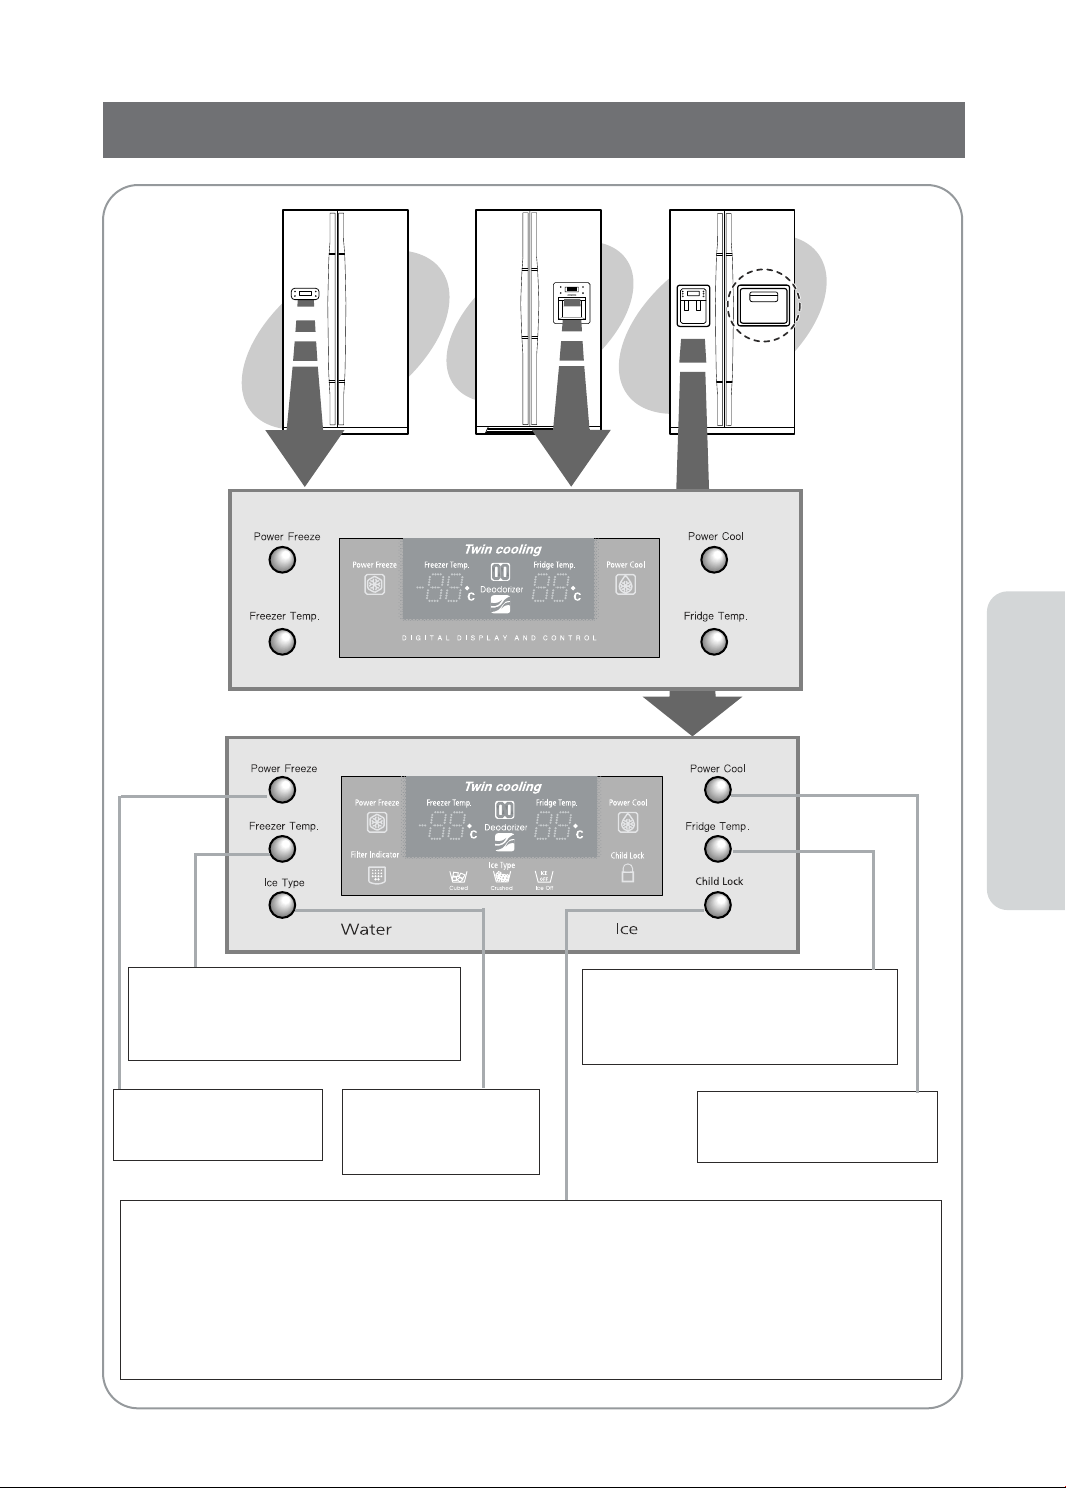
CONTROL PANEL
Basic Model
Dispenser Model
FREEZER TEMP. BUTTON
To set the freezer temperature, press the button repeatedly to change the set temperature
in sequence between -14°C and -25°C
POWER FREEZE BUTTON
Speeds up the freezing
process inthe freeze.
CHILD LOCK BUTTON
When the child lock button is pressed for 3 seconds, the child lock indicator is on with an audible tone. when it is
locked, all keys can not be modified except the Ice type button. This function will prevent accidental setting that may
be caused by children or pets. To unlock the setting functions, press this button for 3 seconds again.
Also, this button has another function. When this button is pressed for 3 seconds (lock indication lamp turn on), the
heater for sweat control is off at a same time. If sweat is appeared around the cover dispenser or beverage station
with this function, press this button for 3 seconds again. then, the light will turn off and the sweat control function will
be performed. and all keys will be unlocked at a same time.
ICE TYPE BUTTON
Use this button to choose
Cubed or Crushed Ice or
Ice off.
FRIDGE TEMP. BUTTON
To set the fridge temperature, press the button repeatedly to change the set temperature in sequence between 7°C and 1°C.
POWER COOL BUTTON
Speeds up the cooling process in
the refrigerator
OPERATING INSTRUCTIONS
5
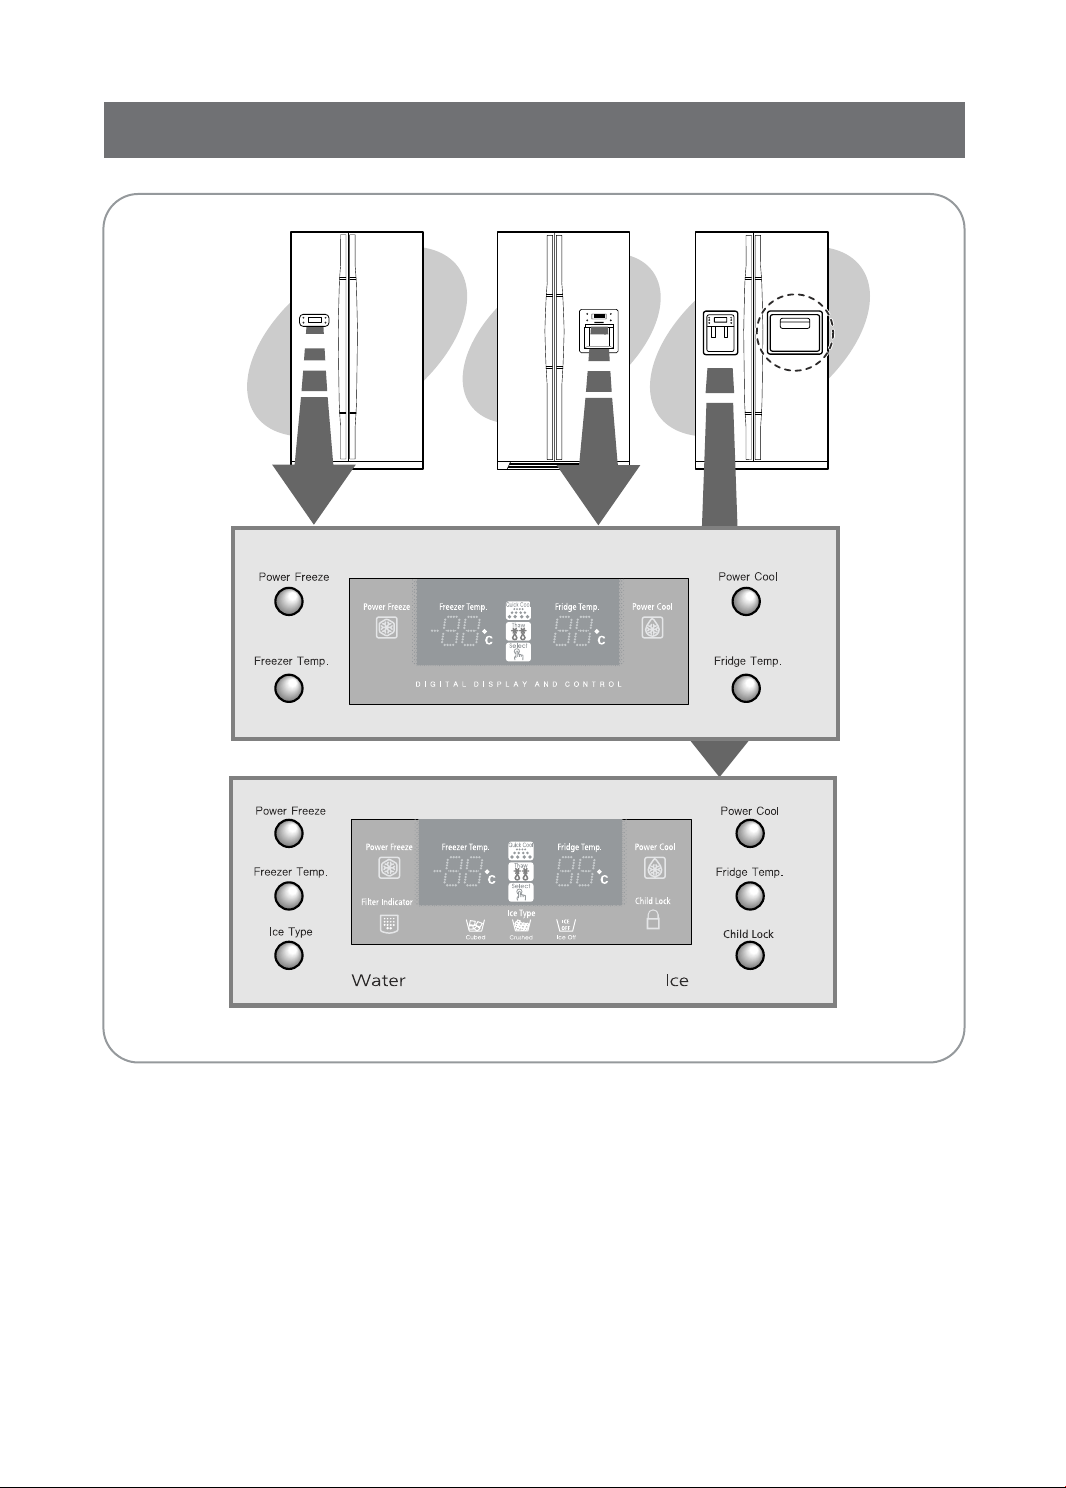
CONTROL PANEL
Cool Select zone
Cool Select zone
Basic Model (With CoolSelect Zone)
Dispenser Model (With CoolSelect Zone)
6
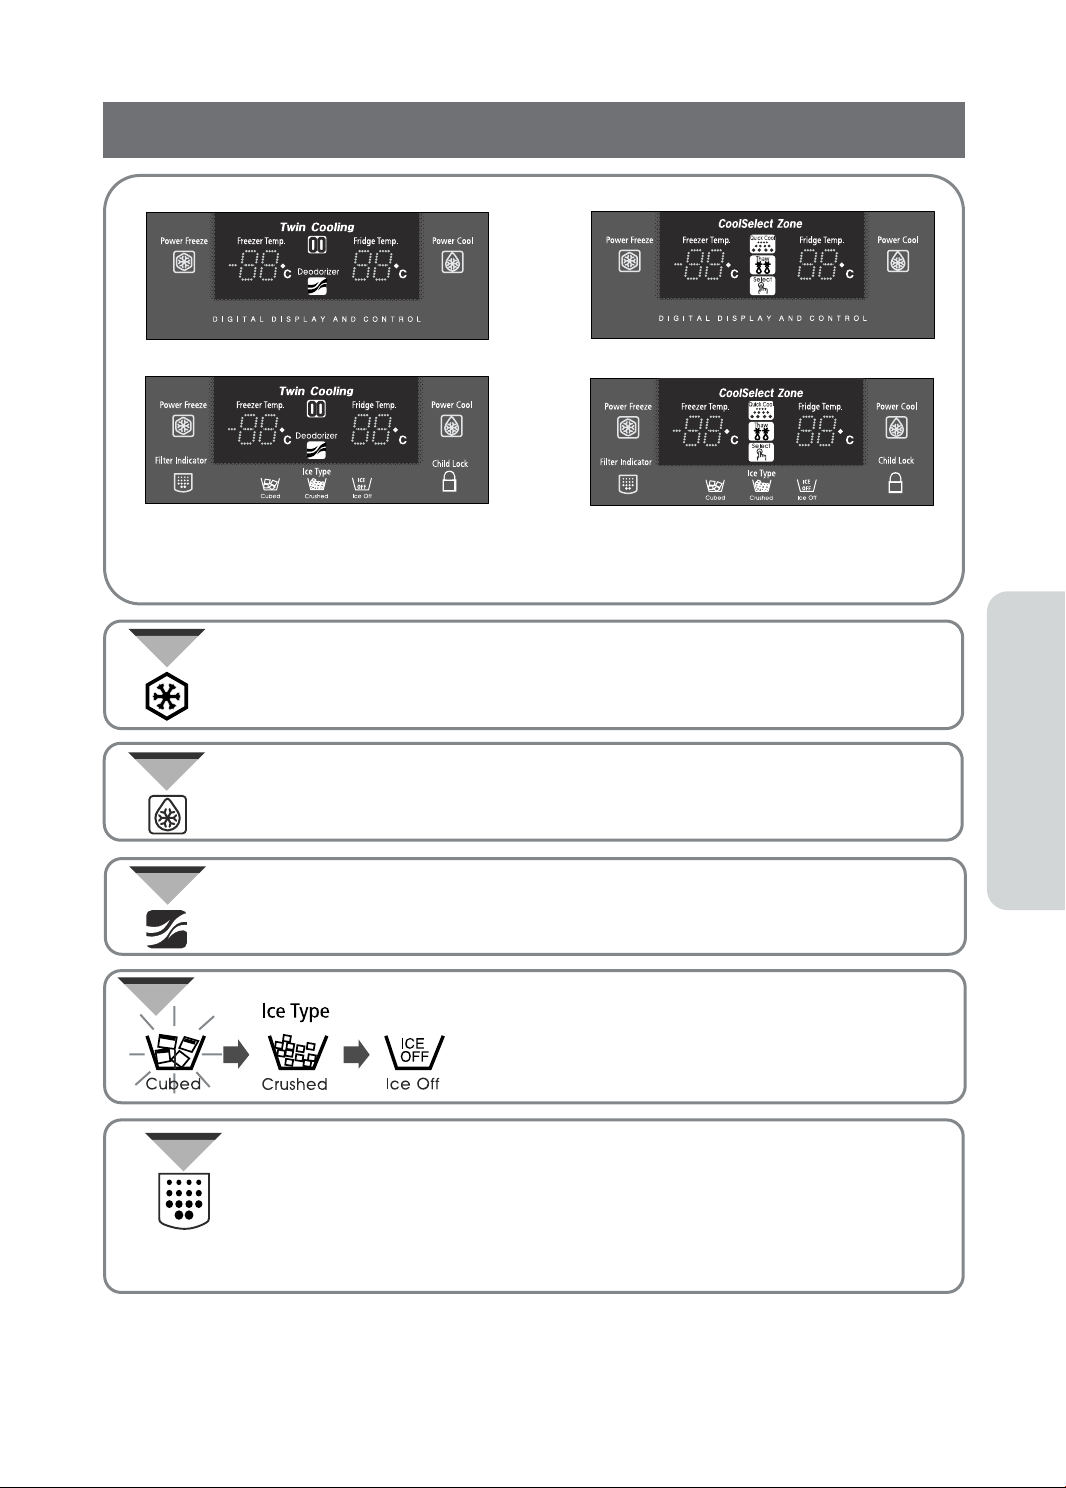
DIGITAL PANEL
Freezer Temp. indicates the current freezer temperature.
Fridge Temp. indicates the current refrigerator temperature.
Quick Cool, Thaw, and Select show the status of the CoolSelect Zone
TM
Drawer
Power Freeze
Power Cool
Deodorizer
• This light is on when you press the Power Freeze button.
Press this button to quickly return the freezer to the set temperature.
• If you need much ice, you can get ice faster.
• Press the button again to cancel the Power Freezer mode.
• This light is on when you press the Power Cool button.
Press the button to quickly return the refrigerator to the set temperature.
• Press the button again to cancel the Power Cool mode.
• This light indicates the recyclable deodorizer is in operation.
• Recycle the honeycomb cartridge once or twice a year (see “Cleaning the
Accessories” section)
Cubed Ice, Crushed Ice and Ice Off
Filter Indicator
• When the green light changes to orange, it is time to replace the water filter.
If indicator is red, quick replacement is strongly recommended.
• When the water filer is replaced, reset the indicator by pressing the Ice
Type button and the Child Lock buttons simultaneously for 3 seconds.
• To turn this indicator off, press the Ice Type and Child Lock buttons simulta
neously for 5 seconds.
OPERATING INSTRUCTIONS
• Press the Ice Type button in seqence to choose
Cubed Ice, Crushed Ice or Ice Off to stop making ice.
• Bright icon indicates the ice state currently operated.
7
TEMPERATURE CONTROL
Freezer
• The freezer temperature can be set between -14°C and
-25°C.
• Press the Freezer Temp. button repeatedly until the
desired set temperature is shown in the temperature
display.
• The temperature display changes in sequence between
-14°C and -25°C. When the display reaches 14°C, it
returns to -25°C.
• After five seconds, the display reverts to the actual
freezer temperature. The unit will then work to adjust to
the new desired temperature.
• When ice cream is stored above -15°C in freezer, it may melt.
• The temperature of the freezer or the refrigerator rises from frequent openings, when sweeping
and from warm food. This may cause the digital display to blink . The digital display will stop
WARNING
blinking when the freezer and refrigerator return to the normal temperature.
Refrigerator
• The refrigerator temperature can be set between 7°C
and 1°C.
• Press the Fridge Temp. button repeatedly until the
desired temperature is shown in the temperature
display.
• The temperature display changes in sequence and
reverts in the same way as the freezer.
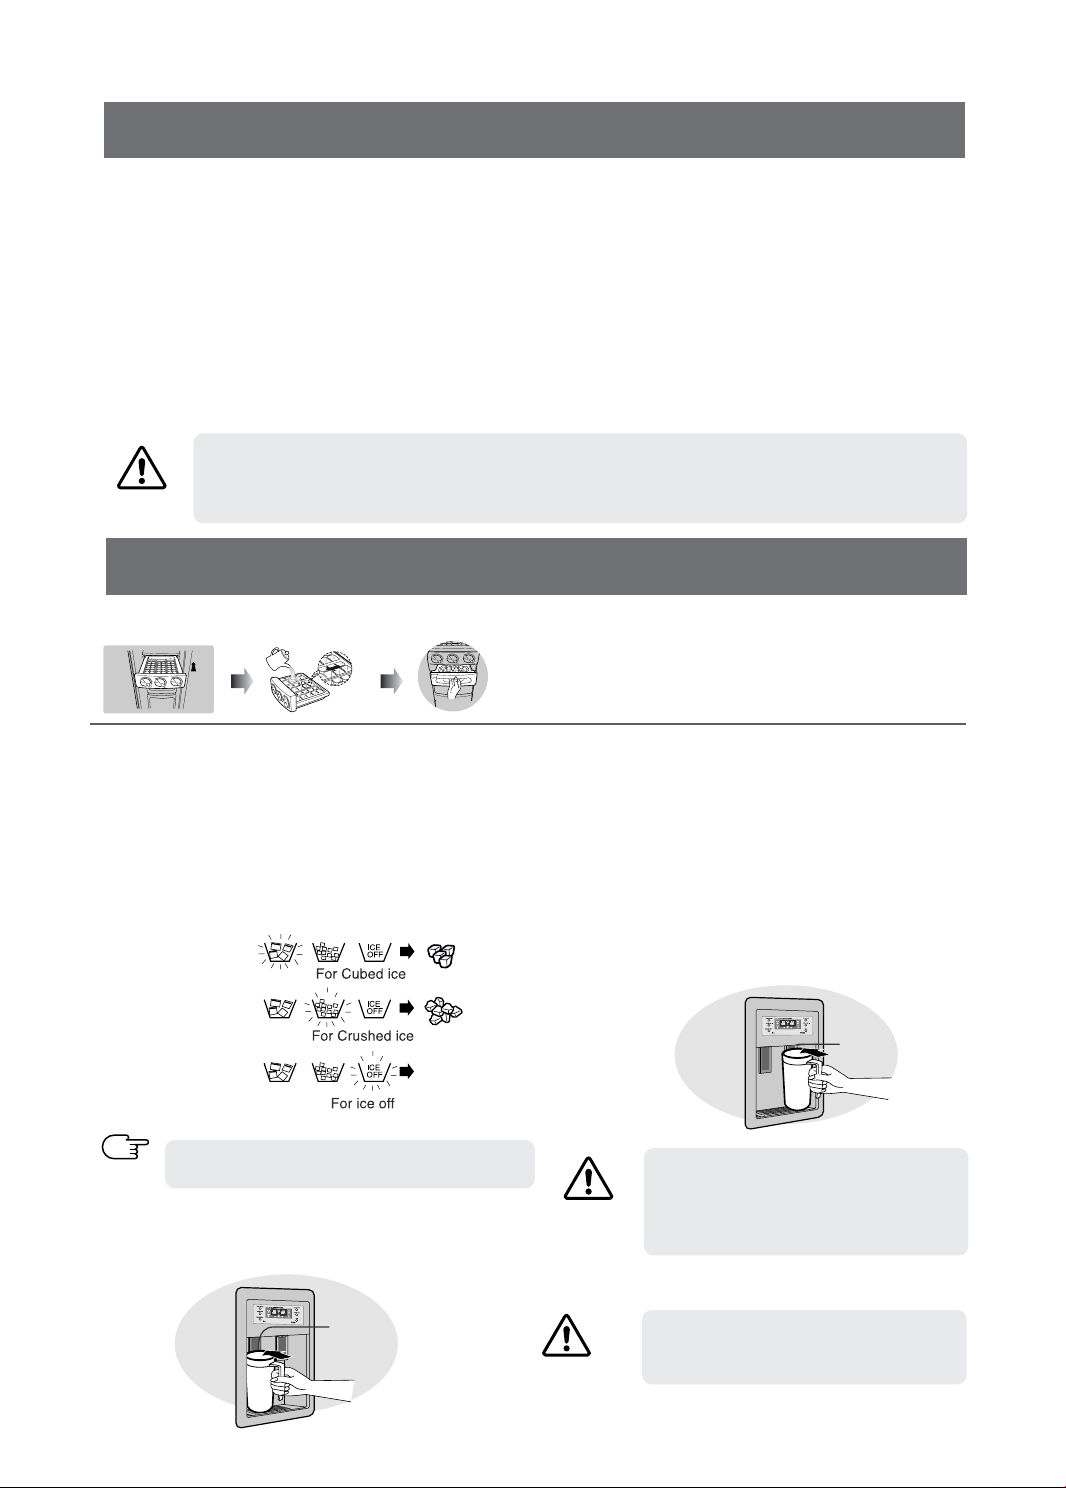
ICE and COLD W ATER DISPENSER
Ice Maker (Basic Model)
• Pull out the ice tray.
• Add water until it reaches the water level indicator.
• Put the ice tray back in place.
Ice Dispenser
The ice maker produces 10 cubes at once and about 120
cubes a day automatically. This quantity may be influenced by
factors such as the freezer temperature, the Power Freeze
function and the number of door openings. When your refrigerator is plugged in, the Cubed Ice mode is automatically selected .
Press the Ice Type button to select the type of ice:
Water Dispenser
The capacity of the water tank is approximately 1.2 l.
Cold Water
• Push the water dispenser lever with a cup.
• If you have just installed the refrigerator, throw away the
first six glassfuls of water to flush out impurities in the
water supply system.
• Cubed Ice
• Crushed Ice
• No Ice
NOTE
If the Ice remains in the Ice bucket, the
cubed ice is obtained.
No Ice
Push the ice dispenser lever with a cup.
• Place a cup to line of the dispenser lever
to prevent the ice from jumping out.
Push
CAUTION
WARNING
8
Push
If you have a long vacation or business
trip and won’ t use the water or ice dispensers, close the water valve.
Otherwise, water may occur leakage.
Never put fingers or any other objects
in the dispenser opening.
It may cause injury.
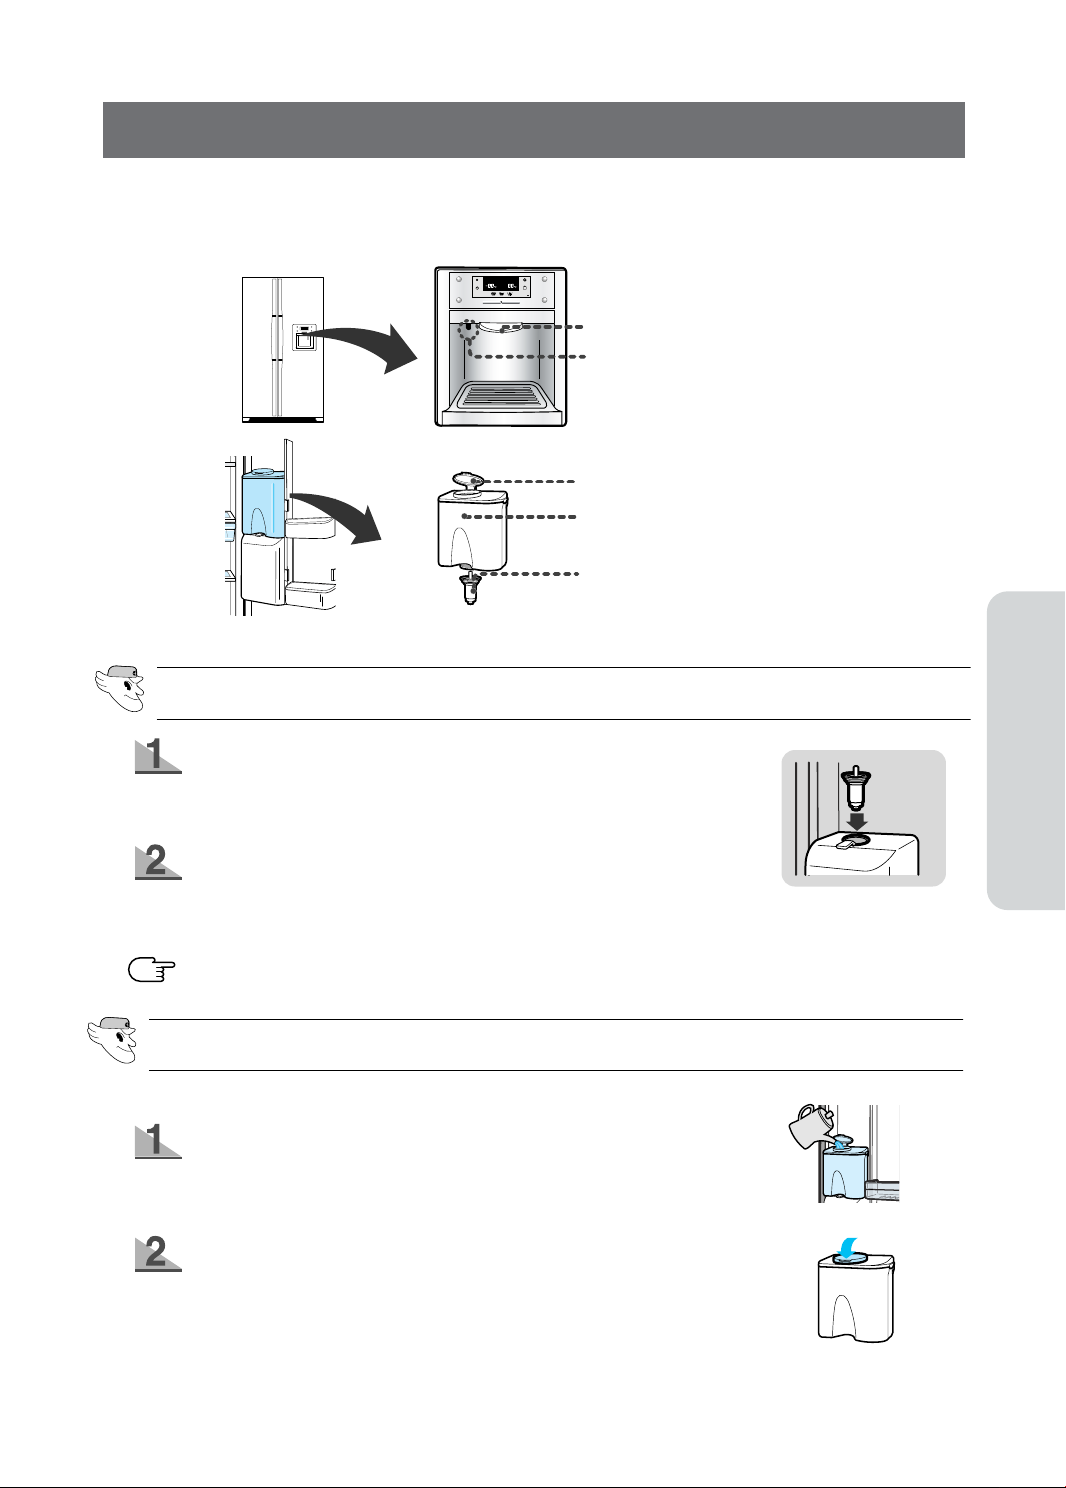
USING THE WATER DISPENSER (OPTION)
With the water dispenser, you can obtain chilled water easily without opening the refrigerator door. In addition, you can save electricity by reducing the number of times the door is opened by more than 30%.
Overview
Push lever
Locking device
Water tank cap
Water tank
Water supply device
WHEN THE W A TER DISPENSER IS NOT USED. THE FOLLOWING W AYS RECOMMDED
Fix the water supply device tightly into the fixing hole.
• The door will not be closed automatically when the water supply
device is pulled out for a long time because of cold leaking.
Set the locking device to the “LOCK”.
•
When pressing the “PUSH” button with the water supply device only fixed at
the fixing hole, and the locking device is set on “OPEN”, the water supply
device can be removed from the fixing hole and cold leaks.
NOTE
When exposing to child, set the locking device to the “LOCK”.
FILLING THE W ATER TANK
Open the water tank by removing the round cap and fill it up
with drinking water.
• Fill the tank up to the full level (just over 4.2 litres).
Replace the round cap by pushing down on it until it clicks
into place.
OPERATING INSTRUCTIONS
9
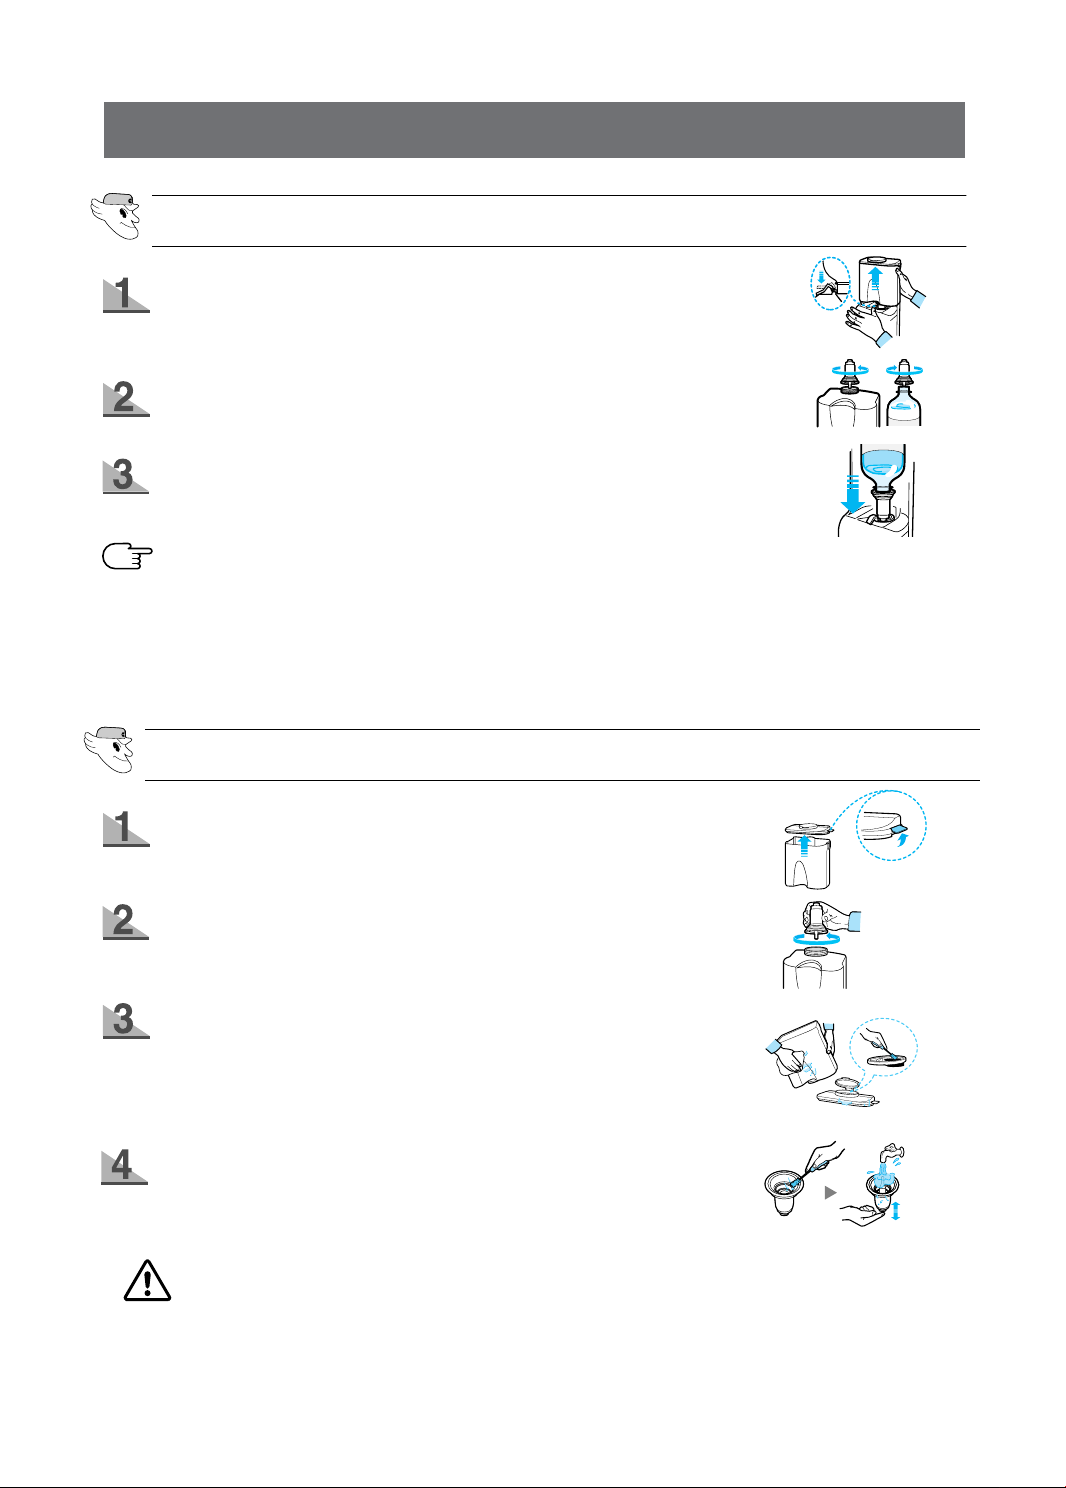
INSTALLING A REGULAR BOTTLE
Press the fixing lever, lift the exclusive water tank upwards, then
remove it.
Remove the water supply device from the exclusive water tank,
then set the inner groove of the water supply device in a regular
spring water bottle and fix it in position by turning it.
Turn the water supply device over, then fix it in position in the
fixing hole.
• Gurgling sounds may be heard when air enters the water tank from regular mineral water or beverage
NOTE
bottles.
• Some regular mineral water or beverage bottles may not fit the water supply device, depending on their
size.
• If water does not come out satisfactorily when you press the “push” button, press it again.
• Do not use carbonated drinks, such as cola, cider or sodas. When you press the button, the beverage
may spurt out due to the pressure of carbonic gas accumulated in the upper part of beverage bottle.
• Use bottled mineral water or boiled tap water that does not contain any particles.
Water T ank / Supply Device
Pull upward and disassemble the hooks on both sides of
the large-sized cap.
Loosen the water supply device by turning it in the direction of the arrow and removing it.
Wipe the large-sized cap and the exclusive water tank with
warm water and detergent.
• Hold the cap and pull it upwards to remove it. Clean the cap
and waste filtering bottle attached to the cap with a soft
brush.
After cleaning the water supply device with a soft brush,
press the water supply device operation lever, then wash
it in running water.
• Clean the water tank frequently if it used to dispense tea or other such beverages. Only use filtered tea. For better hygiene, beverages with a high sugar content (juice, soft drinks) are not
WARNING
recommended.
• Deposits can be cleaned by wiping the tank with a cloth dampened in vinegar or salt water.
• Check that the rubber seal on the water supply device has not slipped off or is not damaged
by a sharp-edged object. Otherwise, it may leak.
10
SHELVES AND BINS
FREEZER
Door Bin
Light
Shelf
Twist ice maker
Ice tray
Drawer
Ice maker
Ice chute
Front leg cover
Basic model Model with ice and water dispenser
REFRIGERATOR
Dairy compartment
Lights
Wine Self(Optional)
Water tank
Door Bin
Beverage Station
Foldable Shelf(optional)
Deodorizer (optional)
Egg Container
CoolSelect ZoneTMDrawer
(optional)
Vegetable & Fruit Drawer
OPERATING INSTRUCTIONS
Door Bins
11
Loading...