


Magicinfo Express 2
Table of contents
 Loading...
MagicInfo Express 2 allows you to create content with ease using various layouts. Using MagicInfo Express 2, create
and manage schedules to play content on Samsung display devices at a specific time.
User Guide
MagicInfo Express 2
MagicInfo Express 2
2
MagicInfo Express 2
Contents
Before getting started
3 About MagicInfo Express 2
Installation requirements
4 How to install/uninstall the program
Install
Uninstall
Configuring initial settings
6 Registering your store
9 Selecting a display model
Creating content
11 MagicInfo Express 2 overview
12 Creating content using Quick Start mode
Select a layout type
Select elements
Editing the layout
Saving content
Create a schedule
Send out content
40 Creating content using Custom Design mode
Creating a layout
Saving content
Create a schedule
Send out content
69 Creating an ad clip
Select a theme
Selecting multimedia elements
Edit the ad frame
Save settings
76 Managing content and schedules
Using additional features
77 Configuring detailed MagicInfo Express 2 settings
Changing the display model
Setting the timer
Updating the display device software
Changing store settings
Managing fonts
Setting the destination folder
Viewing the software details
81 Viewing the tutorial
Open Source Announcement
82 Windows
GNU LESSER GENERAL PUBLIC LICENSE
Apache License, Version 2.0
94 Mac
GNU LESSER GENERAL PUBLIC LICENSE
Apache License, Version 2.0

3
03
Before getting started
About MagicInfo Express 2
MagicInfo Express 2 allows you to create content with ease using various layouts. Using MagicInfo Express 2, create and manage
schedules to play content on Samsung display devices at a specific time.
Installation requirements
■ CPU: Intel® i3 or later
■ HDD: At least 1 GB of free space
■ RAM: 4 GB or greater
■ Operating system: Windows 7 SP1 and later, or Mac OS X 10.8 (Mountain Lion) and later
■ Resolution: 1280x960 and higher is recommended
< Note
Make sure to run the program install file as an administrator.
MagicInfo Express 2

4
Before getting started
How to install/uninstall the program
Install
1
Run the program installation file. Select a language and click OK.
2
Read the instructions and click Next.
3
When the license agreement page appears, click I Agree.
4
Set the installation folder and click Install.
5
Before getting started
5
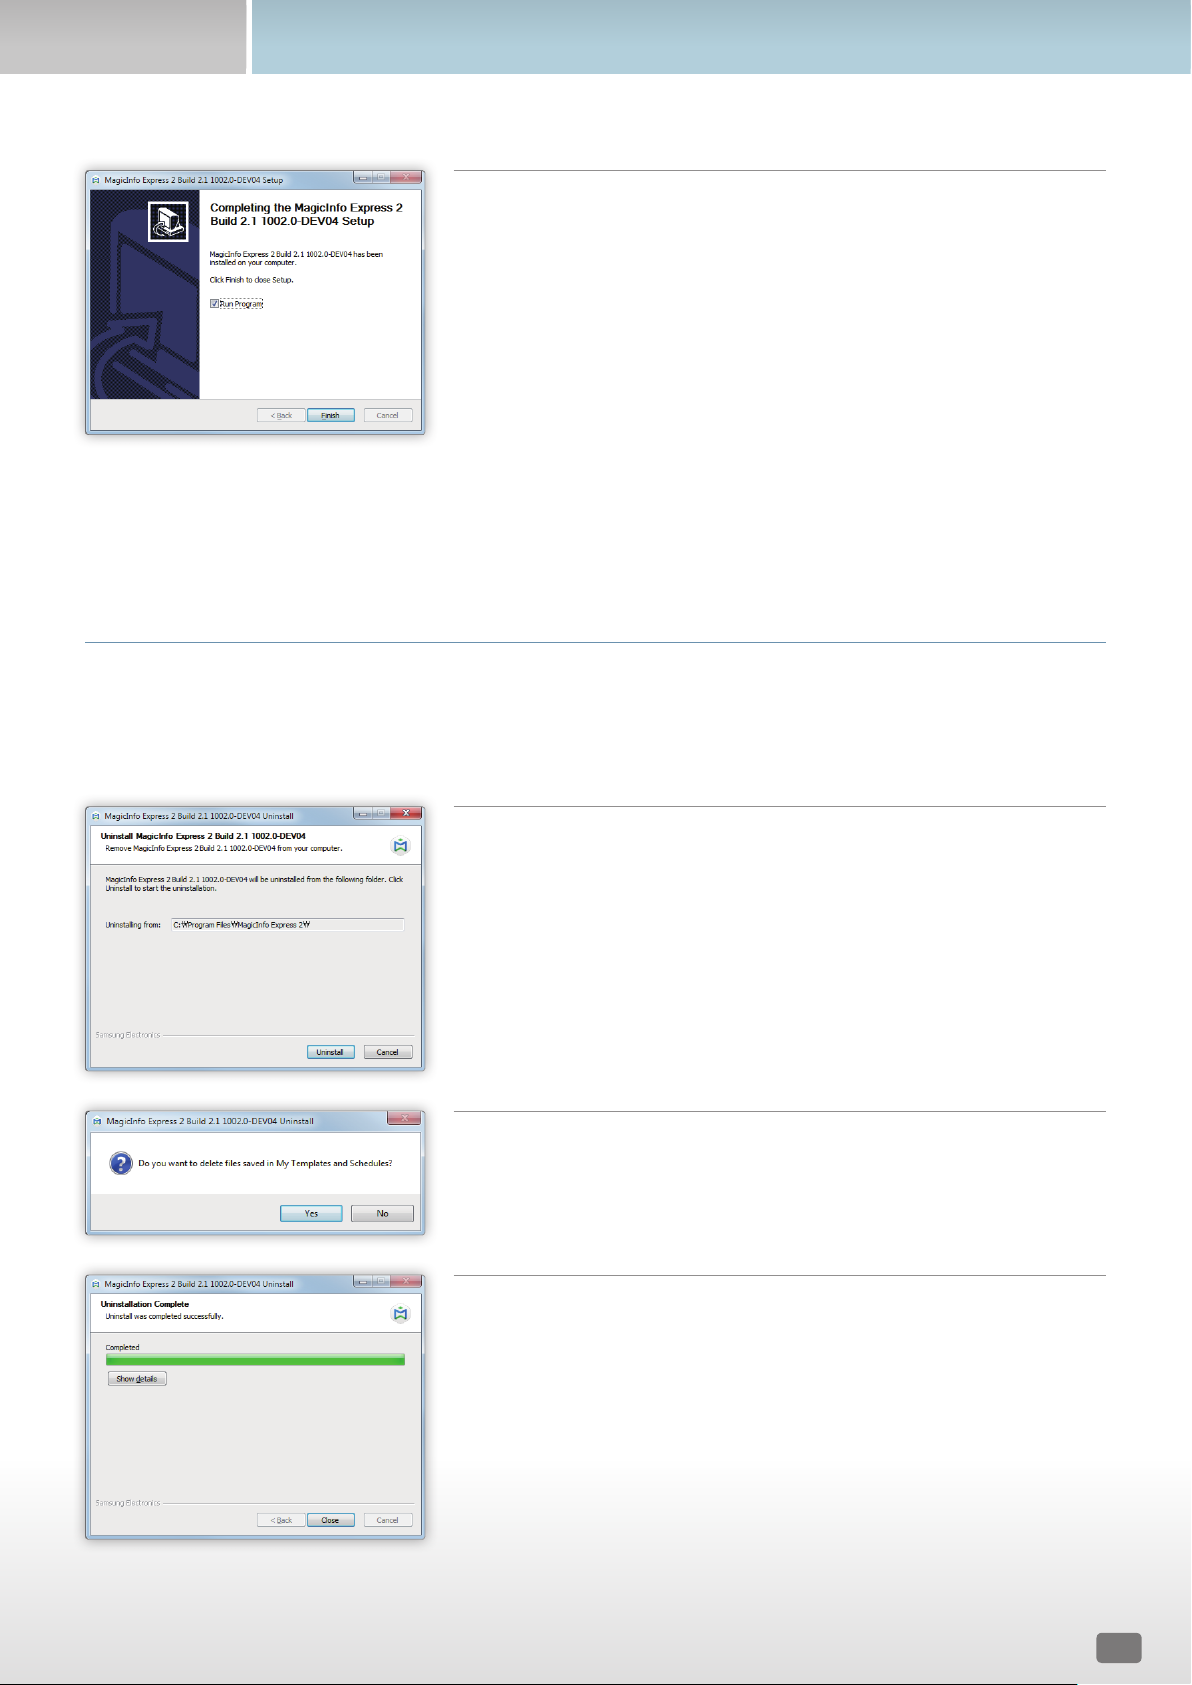
After the program install is complete, click Finish.
– To immediately run the installed program, select the Run Program
checkbox.
– The program can also be run by double-clicking the program icon on the
desktop.
Uninstall
If you encounter a problem when using the program, uninstall the program following the instructions below:
< Note
The program cannot be uninstalled properly if it is in use. Make sure to close the program before uninstalling it.
1
Use the control panel or the list of start-up programs to open the uninstall
page, and then click Uninstall.
2
Select whether you want to delete content and schedules that were
previously created.
3
After the program uninstall is complete, click Close.

6
04
Configuring initial settings
To use the MagicInfo Express 2, first register your store and select a display model. The registered store name is automatically
entered in the template. The registered business hours is set as the default business hours when you create a content schedule.
Registering your store
< Note
• The store registration page appears only when the program is launched for the first time.
• You can edit or add stores using the Settings menu. For further details, refer to the following: ► Changing store settings
1
Enter the store name and click either Next or .
< Note
You cannot proceed to the next step if you do not enter a store name.
MagicInfo Express 2

7
Configuring initial settings
2
Set the business hours and days, then click either Next or .
< Note
You cannot proceed to the next step if you do not select any days.
1
2
3
4
5
1
Go back to the step where you set the store name.
2
Set the days the business will be open. Select the checkboxes of the desired days of the week.
3
Select a day you want to set the business hours. Click / to select a day of the week. You can assign
different business hours to each day if necessary.
4
Set the opening and closing times for the selected day. Click the time input field and select a time from the list.
Alternatively, manually enter a time in minutes.
5
Select the checkbox if you want to keep the store open for 24 hours on the selected day.
8
Configuring initial settings
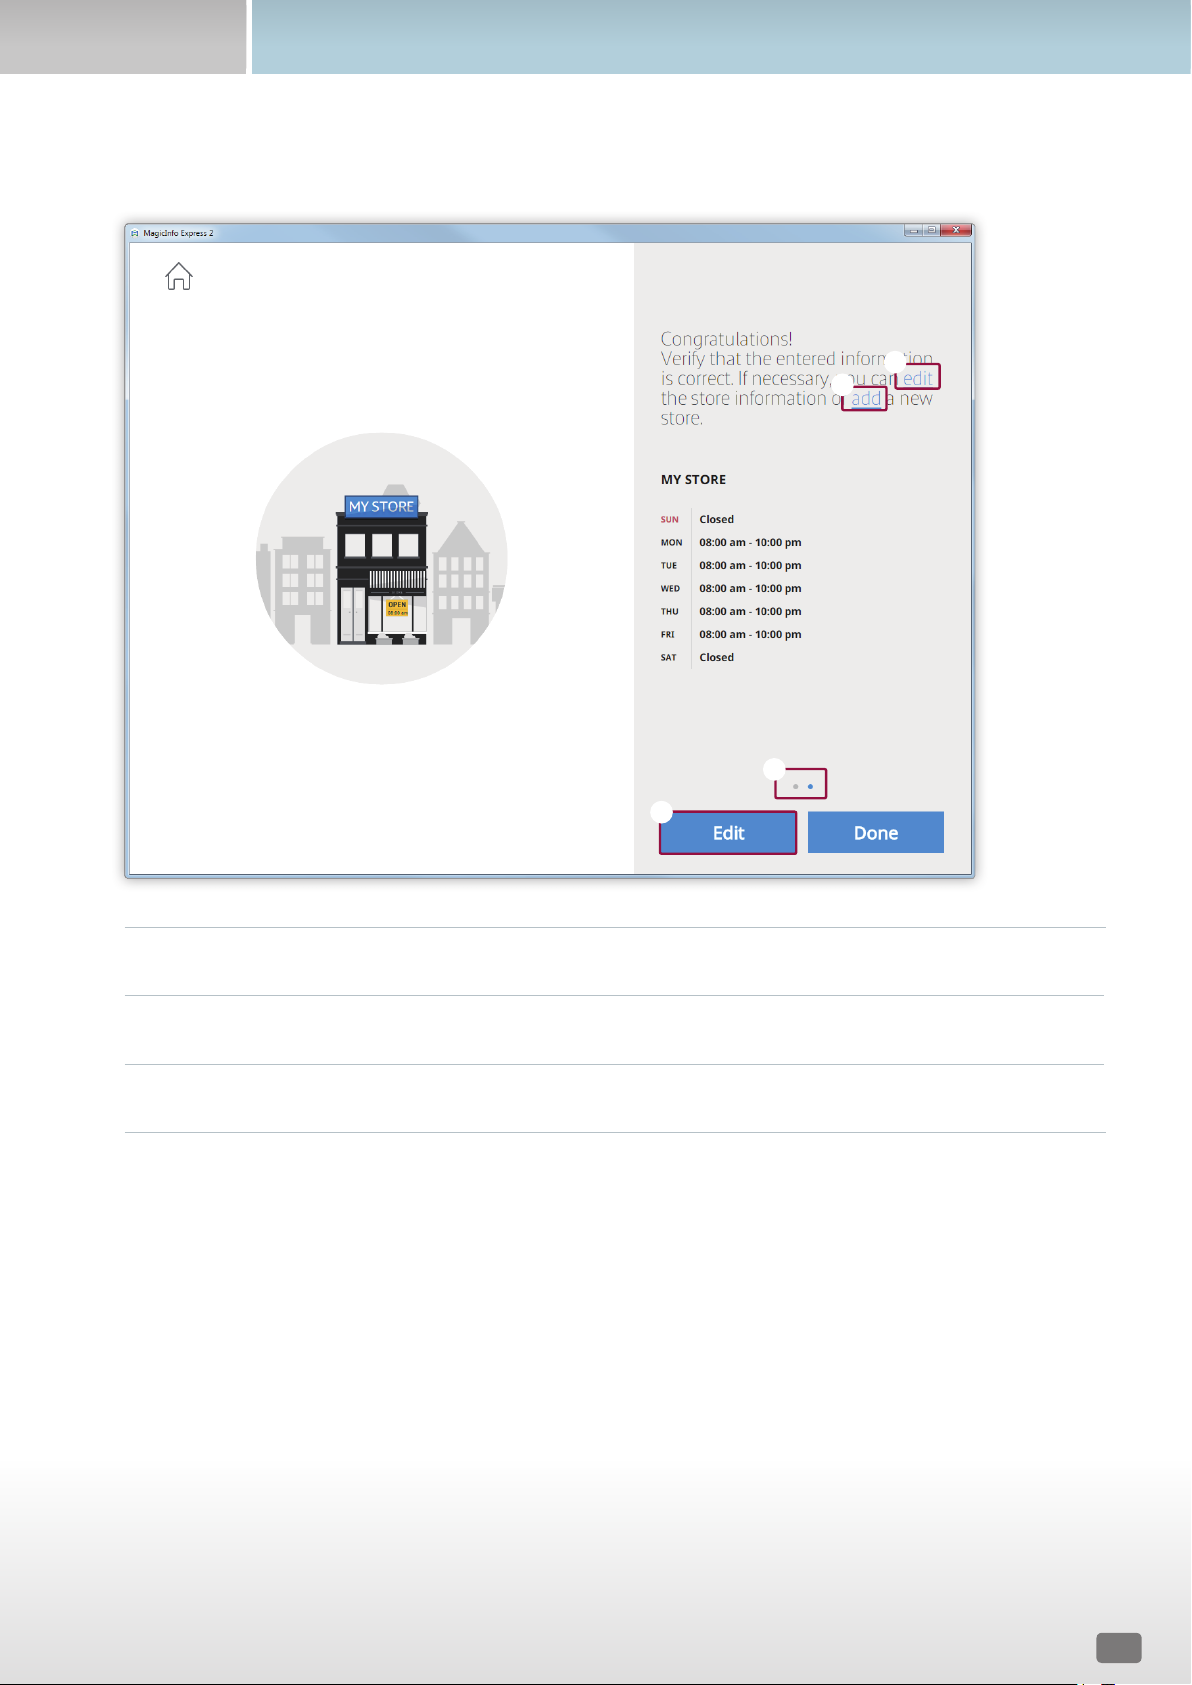
3
Confirm the registered store information and click Done.
1
3
1
2
1
Edit registered store information.
2
Register a new store.
3
View information about another store if more than one store is registered.
9
Configuring initial settings
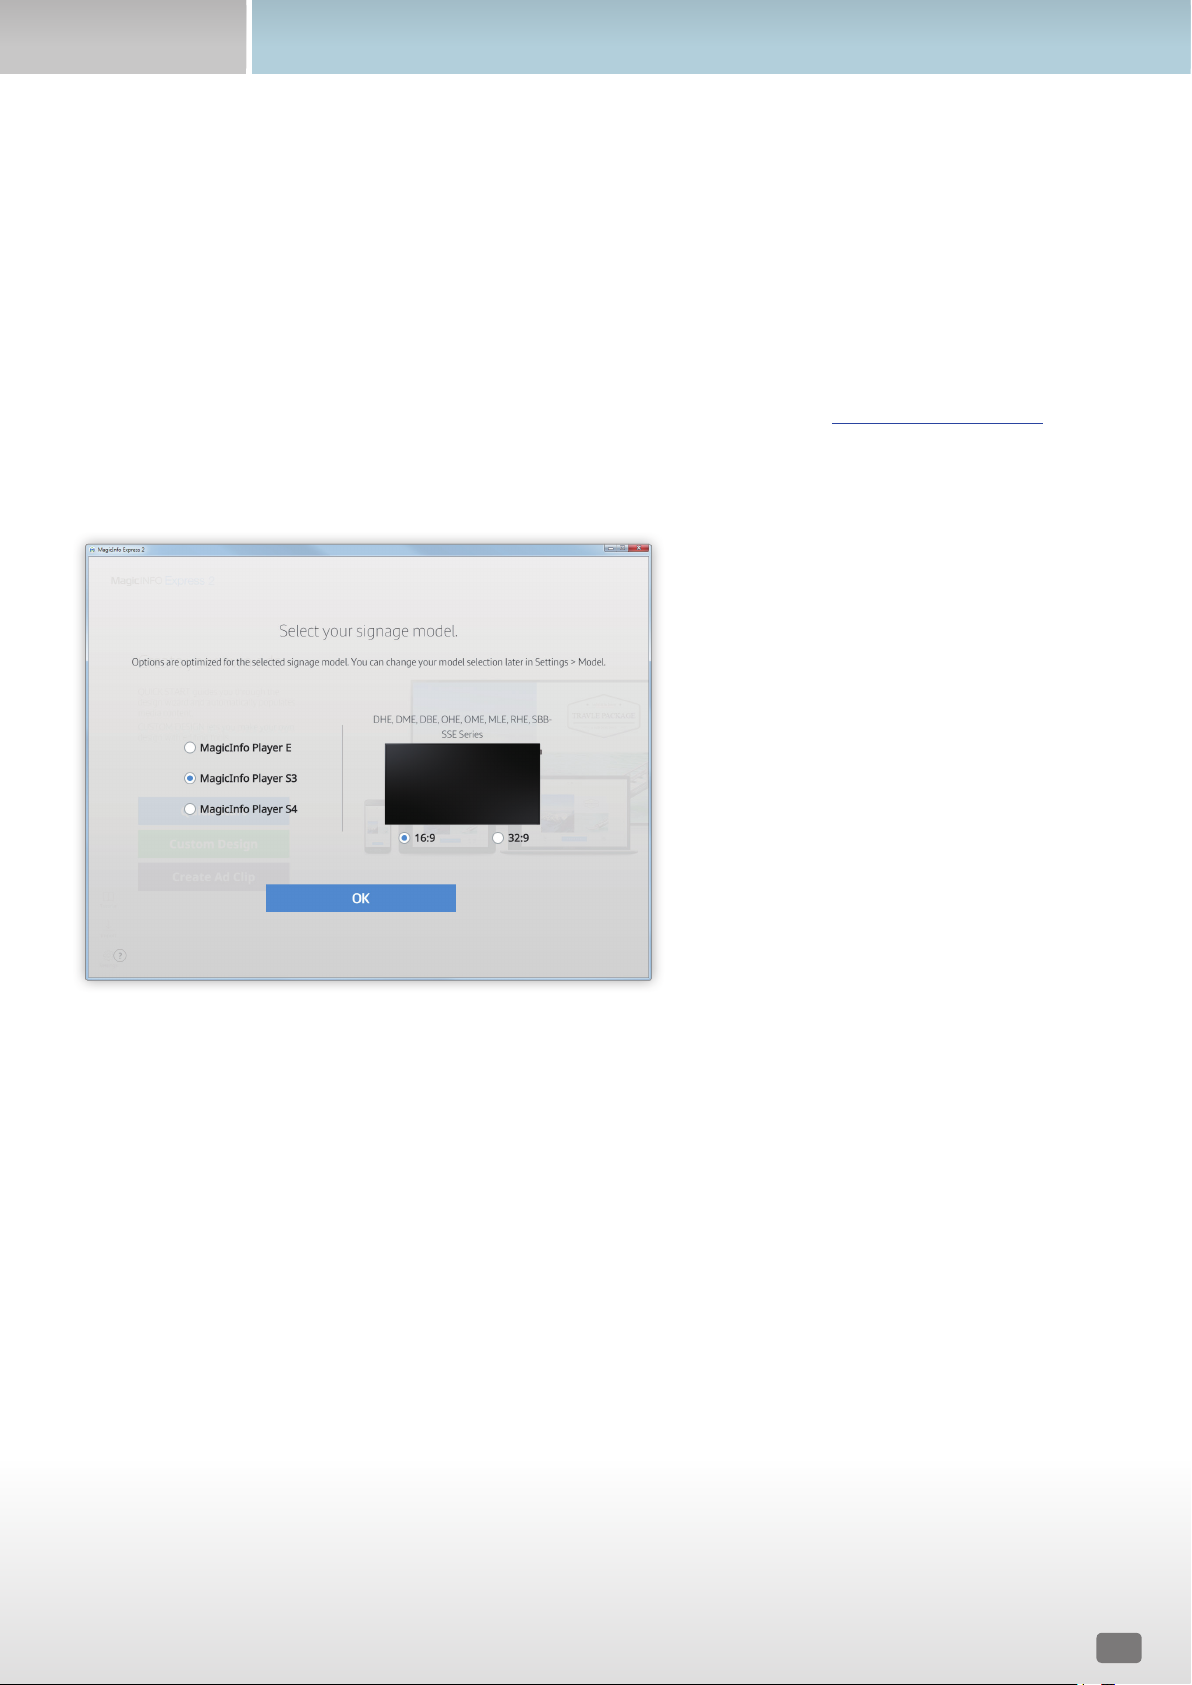
Selecting a display model
Select a Samsung display model you want to send content and schedules to. The screen display and functions available when
creating content vary, depending on the selected model.
< Note
• The select display model page appears only when the program is launched for the first time.
• You can change the display model using the Settings menu. For further details, refer to the following: ► Changing the display model
Select the display model and click OK.
▪ It is possible to select an aspect ratio if the MagicInfo Player S3 model is selected.

10
05
Creating content
You can create content according to the following steps.
< Note
• Quick Start: This mode automatically configures the layout according to the selected element. Even beginners can easily create content using
this mode.
• Custom Design: This mode allows professional and advanced users to create content using custom layouts.
• Create Ad Clip: Easily create an ad clip by selecting a theme.
Quick Start
Create Ad Clip
Custom Design
Select a layout
type
Select a theme
Creating a layout
Select elements
Select elements
Create a schedule
Editing the layout
Edit the ad frame
Send out content
Create a schedule
Save settings
Send out content
MagicInfo Express 2
11
Creating content
MagicInfo Express 2 overview
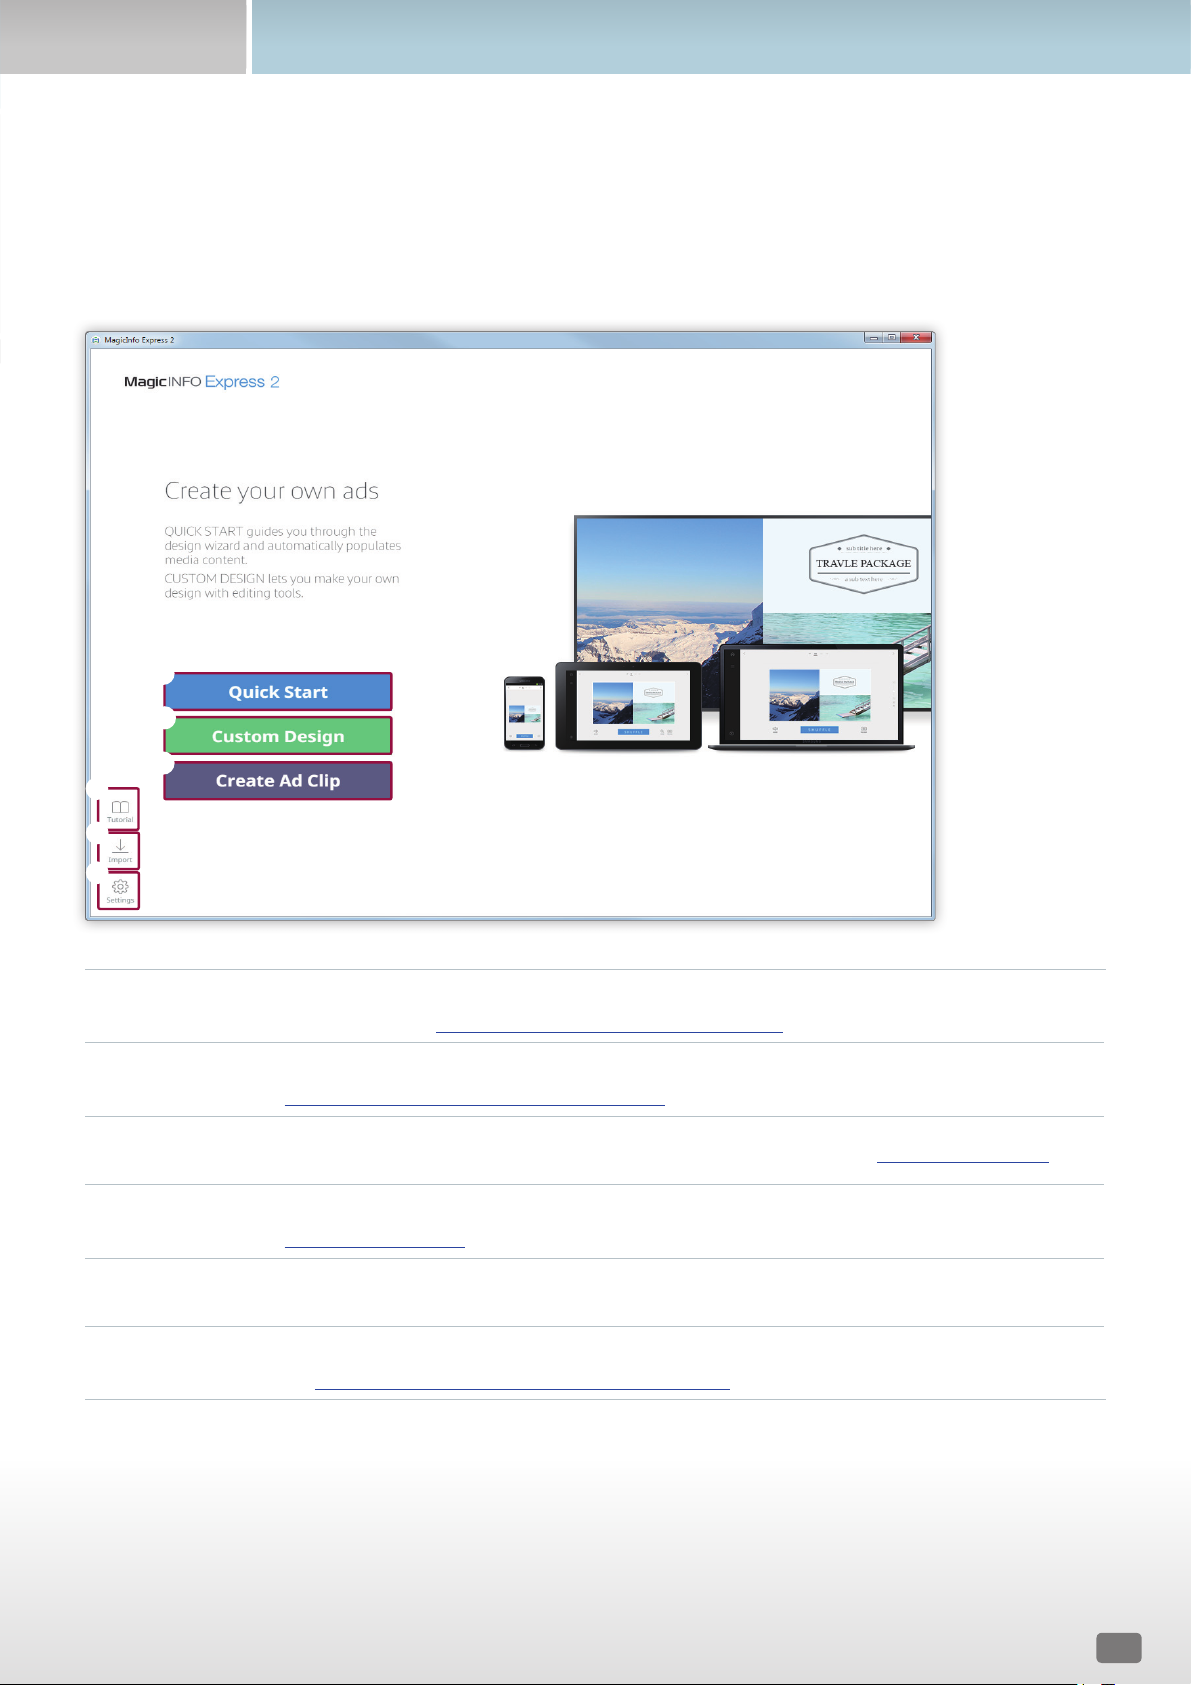
Registering a store displays the home screen shown below. Select either the Quick Start or Custom Design mode, and then create
and manage content and schedules.
1
Create content using the Quick Start mode. Even beginners can easily organize content using this mode. For further
details, refer to the following: ► Creating content using Quick Start mode
2
Organize and create content to suit your preferences using the Custom Design mode. For further details, refer to the
following: ► Creating content using Custom Design mode
3
Easily create an ad clip by selecting a theme. For further details, refer to the following: ► Creating an ad clip
4
Use the video tutorial to learn how to use the MagicInfo Express 2. For further details, refer to the
following: ► Viewing the tutorial
5
Import content or schedule files saved on a USB device to view them on the home screen.
6
Configure the detailed MagicInfo Express 2 settings such as the timer and store details. For further details, refer to
the following: ► Configuring detailed MagicInfo Express 2 settings
1
2
3
4
5
6

12
Creating content
Creating content using Quick Start mode
Quick Start mode allows any user, including beginners, to easily organize content.
< Note
This user guide assumes that you are using MagicInfo Player S3.
Click Quick Start on the home screen.
13
Creating content
Select a layout type
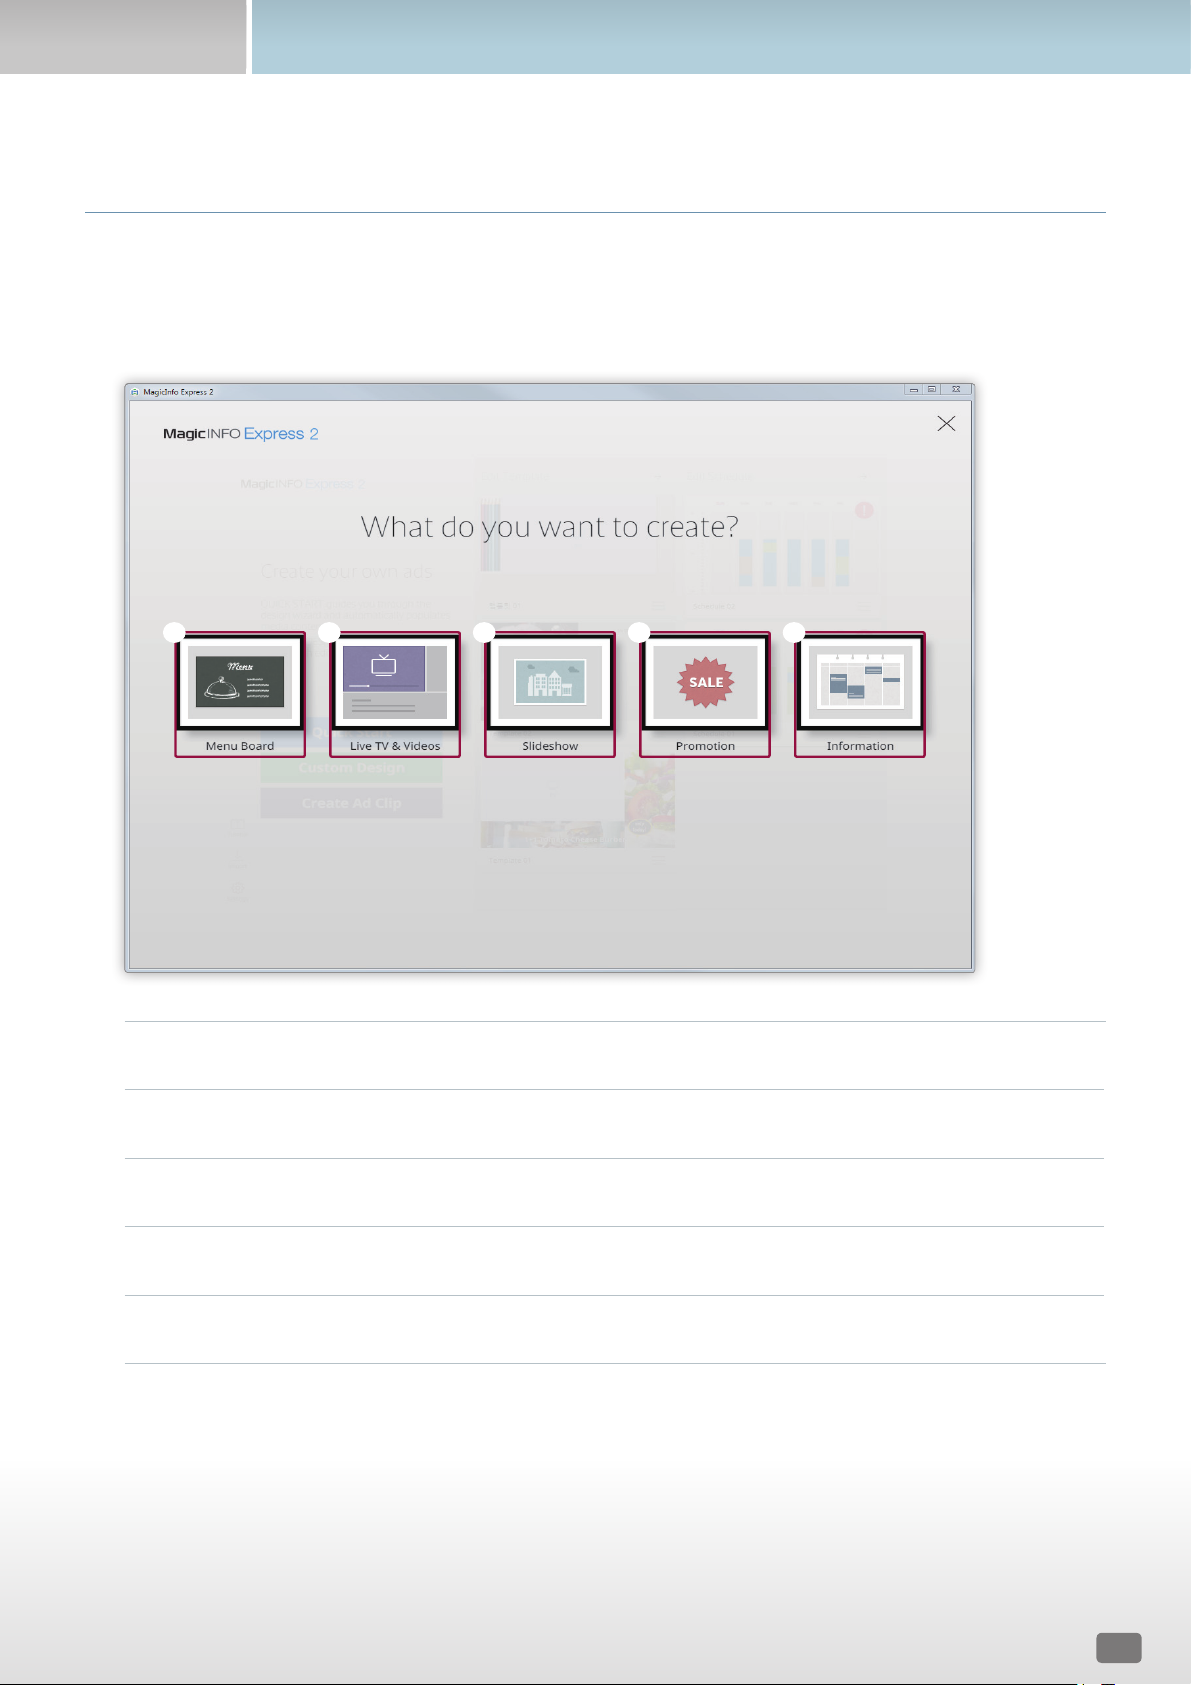
Organize content by selecting the desired layout type.
Select a layout type.
▪ A layout of the selected type will be automatically configured.
1
Create a menu of food and prices for a restaurant.
2
Create a video for in-store advertising.
3
Create a fullscreen slideshow for in-store advertising.
4
Create promotional content consisting of images.
5
Create content that can be used to deliver information.
1 2 3 4 5
14
Creating content
Select elements
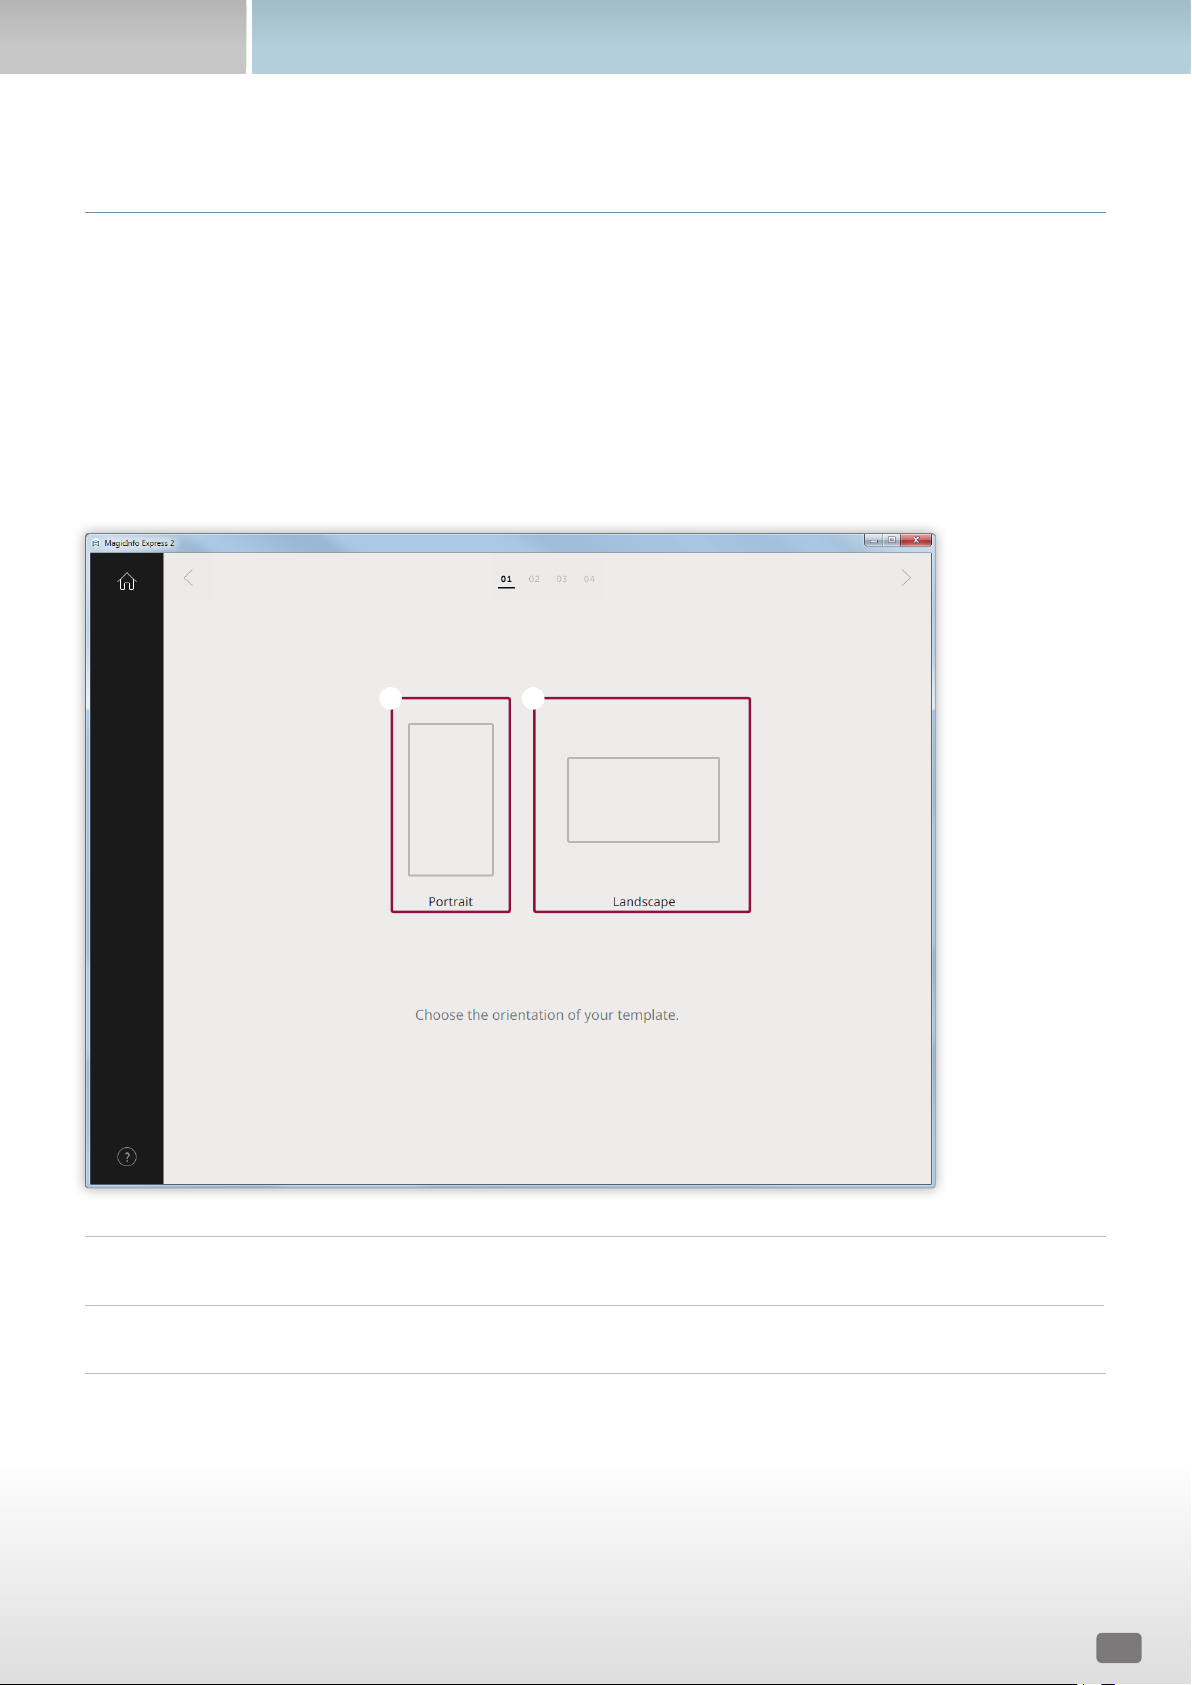
You must select a layout orientation before selecting an input source and multimedia elements.
Selecting a layout orientation
Select a layout orientation.
< Note
The screen to select a layout orientation appears only one time.
1
Select this portrait layout if your display device is installed in portrait orientation.
2
Select this landscape layout if your display device is installed in landscape orientation.
1 2
15
Creating content
Selecting multimedia elements
Select image or video files to apply to the content.
< Note
• You can use image and video elements to organize content only when the layout type is set to Live TV & Videos. Only image elements can be
used if one of the other four layout types is selected.
• The minimum and maximum numbers of required multimedia elements for each layout vary depending on the selected layout type and
orientation. The number of selectable elements for each layout type is shown below:
• MagicInfo Player E
- Menu Board: Images (0-9 elements)
- Live TV & Videos: Images (0 to 9 images, landscape layout only) and videos or input sources (0 to 1 video, landscape layout only). Portrait
layout is not available if the display model is set to MagicInfo Player E
- Slideshow: Images (2-20 elements)
- Promotion: Images (1-9 elements)
- Information: Images (0-5 elements)
• MagicInfo Player S3/S4
- Menu Board: Images (0-9 elements)
- Live TV & Videos: Images (0-9 elements for landscape layout), images (0-2 elements for portrait layout), videos or input sources (0-1 elements)
- Slideshow: Images (2-100 elements)
- Promotion: Images (1-9 elements)
- Information: Images (0-5 elements)
• For image files, you can only select a file of 20 MB or smaller.
• For video files, resolution (measured in pixels) that can be selected depends on the selected layout and orientation.
- MagicInfo Player E: 1920 x 1080 or smaller (Only files with a width of 1920 or smaller and height of 1080 or smaller are supported. Files with a
greater height than width are not compatible.)
- MagicInfo Player S3: 1920 x 1080 or smaller (Files with a width or height longer than 1920 are not compatible.)
- MagicInfo Player S4: 4096 x 2160 or smaller (Only files with a width of 4096 or smaller and height of 2160 or smaller are supported. )
16
Creating content
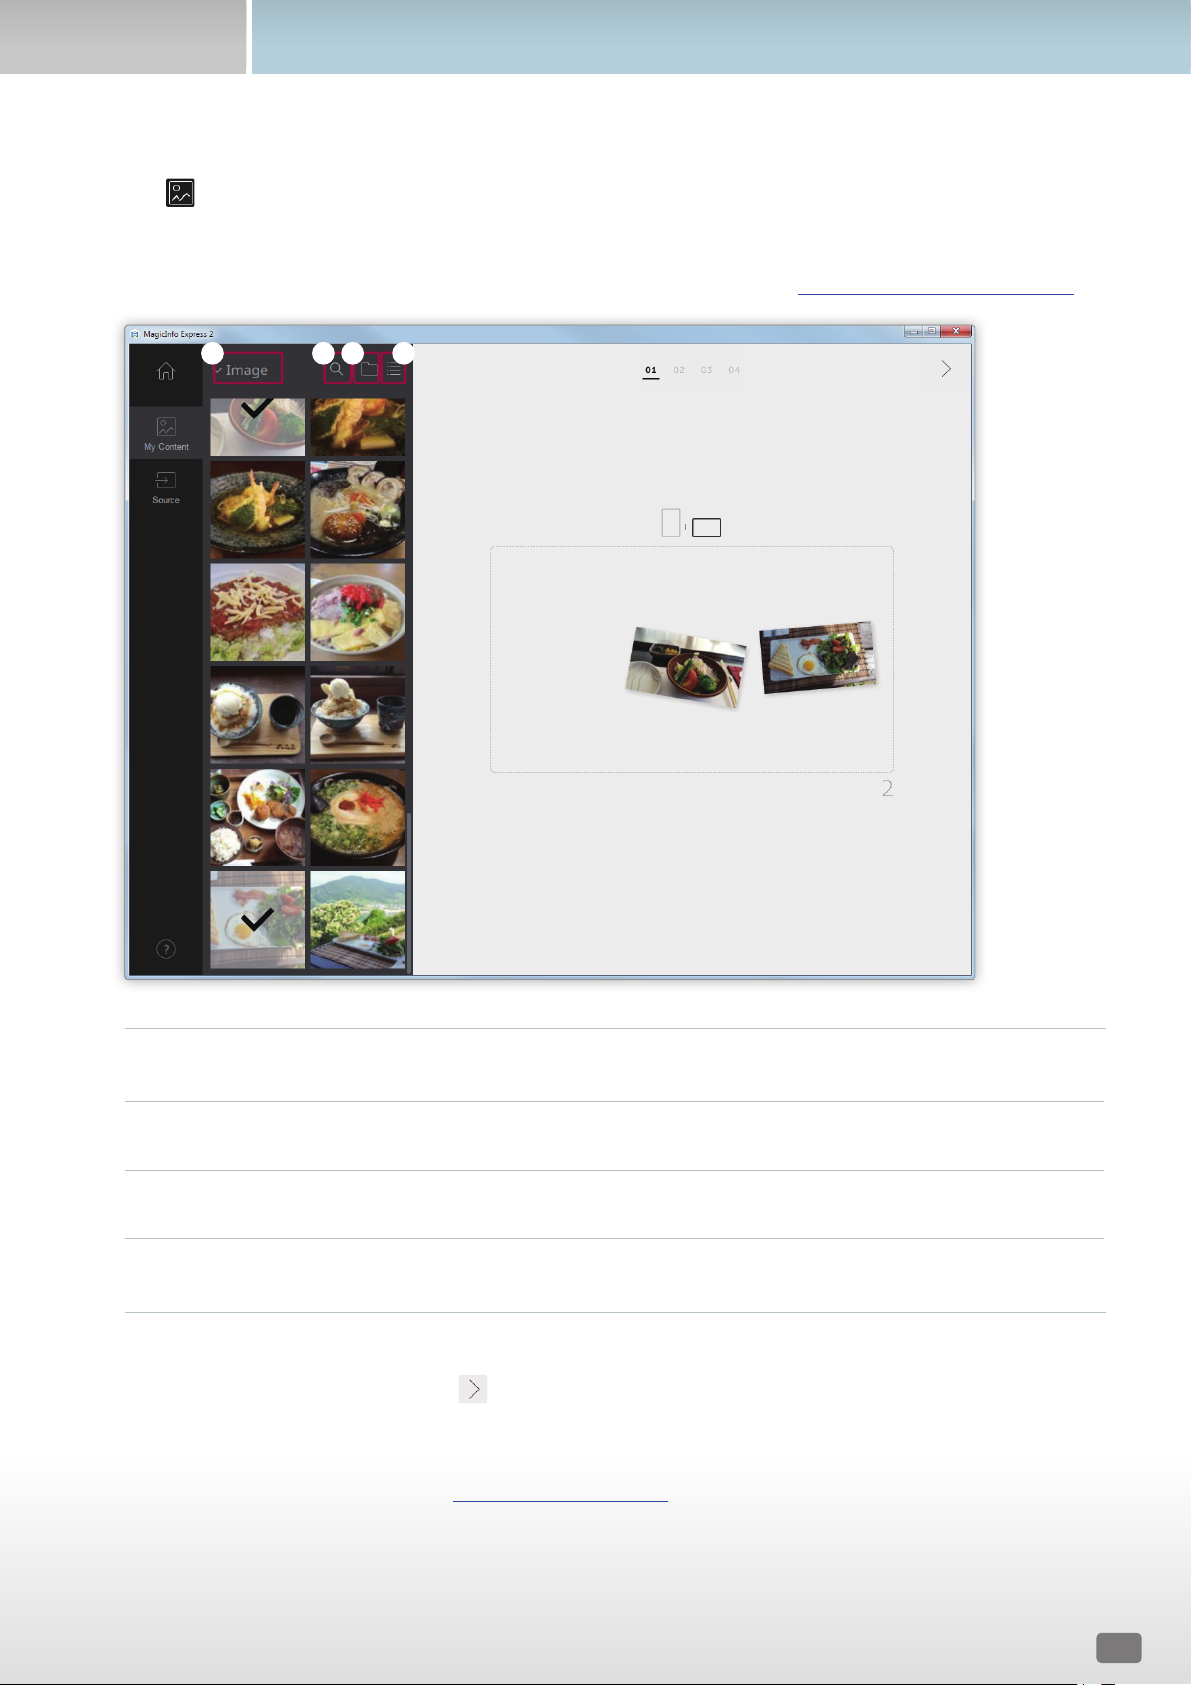
1
Click from the element tab.
2
From the list of multimedia elements, select the checkboxes of elements to apply to the content.
– For details on how to import a list of multimedia elements, refer to the following: ► Importing multimedia elements
1
Select a multimedia element type to sort the list. This option is available if the layout type is set to Live TV &
Videos. Select a multimedia element type from the dropdown list.
2
Search for a multimedia element by the name.
3
Set the folder to import a multimedia element.
4
Change the view mode for the list of multimedia elements. The multimedia elements will be rearranged by file
name or as thumbnails according to the selected view mode.
3
After selecting multimedia elements, click .
– You will be redirected to the next step where you can add the elements.
– If the layout type is set to Live TV & Videos, make sure to set the input source before proceeding to the next step. For
further details, refer to the following: ► Setting the input source
1 2 3 4

17
Creating content
Importing multimedia elements
1
Click > .
2
Click Add.
3
Select a folder from which to import multimedia elements.
4
Click OK.
– To add a folder, click Add.
Setting the input source
If the layout type is set to Live TV & Videos, you can organize content by adding an input source connected to the display device.
< Note
• You can select a country from which to select an input source if the display model is set to MagicInfo Player E. Available input sources vary
depending on the selected country.
• If you proceed to the next step without selecting an input source, the input source is automatically set to TV which is the default input source.
1
Click from the element tab.
2
Select the checkbox of the input source to apply to the content.
< Note
You can select only one input source.
3
After selecting an input source, click .
– You will be redirected to the next step where you can add the elements.
18
Creating content
Editing the layout
Organize content by inserting a variety of elements based on the layout type.
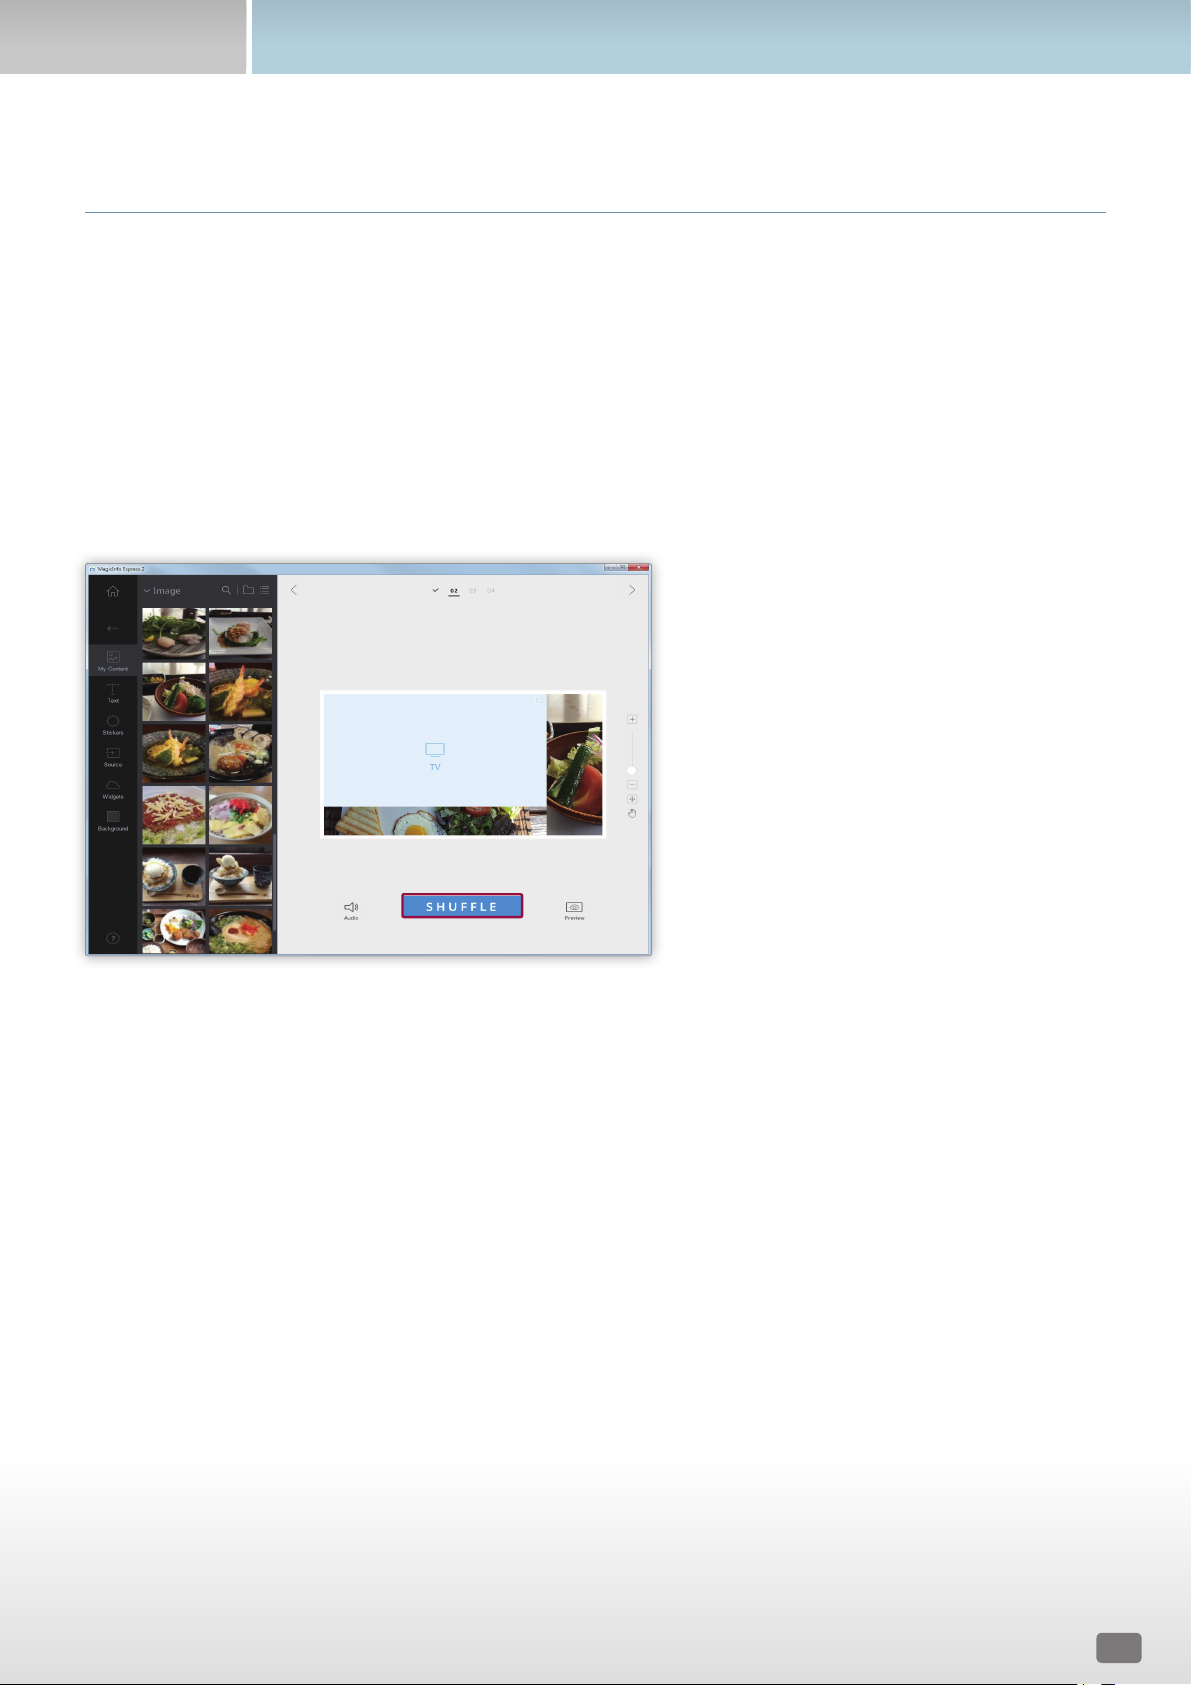
Configuring settings to split the screen
Various split screen modes are available, depending on the selected layout type and orientation and the number of added
elements.
Click SHUFFLE at the bottom of the screen.
▪ A different split screen mode appears each time the button is clicked.
Adding elements
Configure the layout using various types of elements.
Edit the layout using the elements and functions below:
< Note
It is not possible to overlap elements one another regardless of the element type if the display model is set to MagicInfo Player E.
19
Creating content
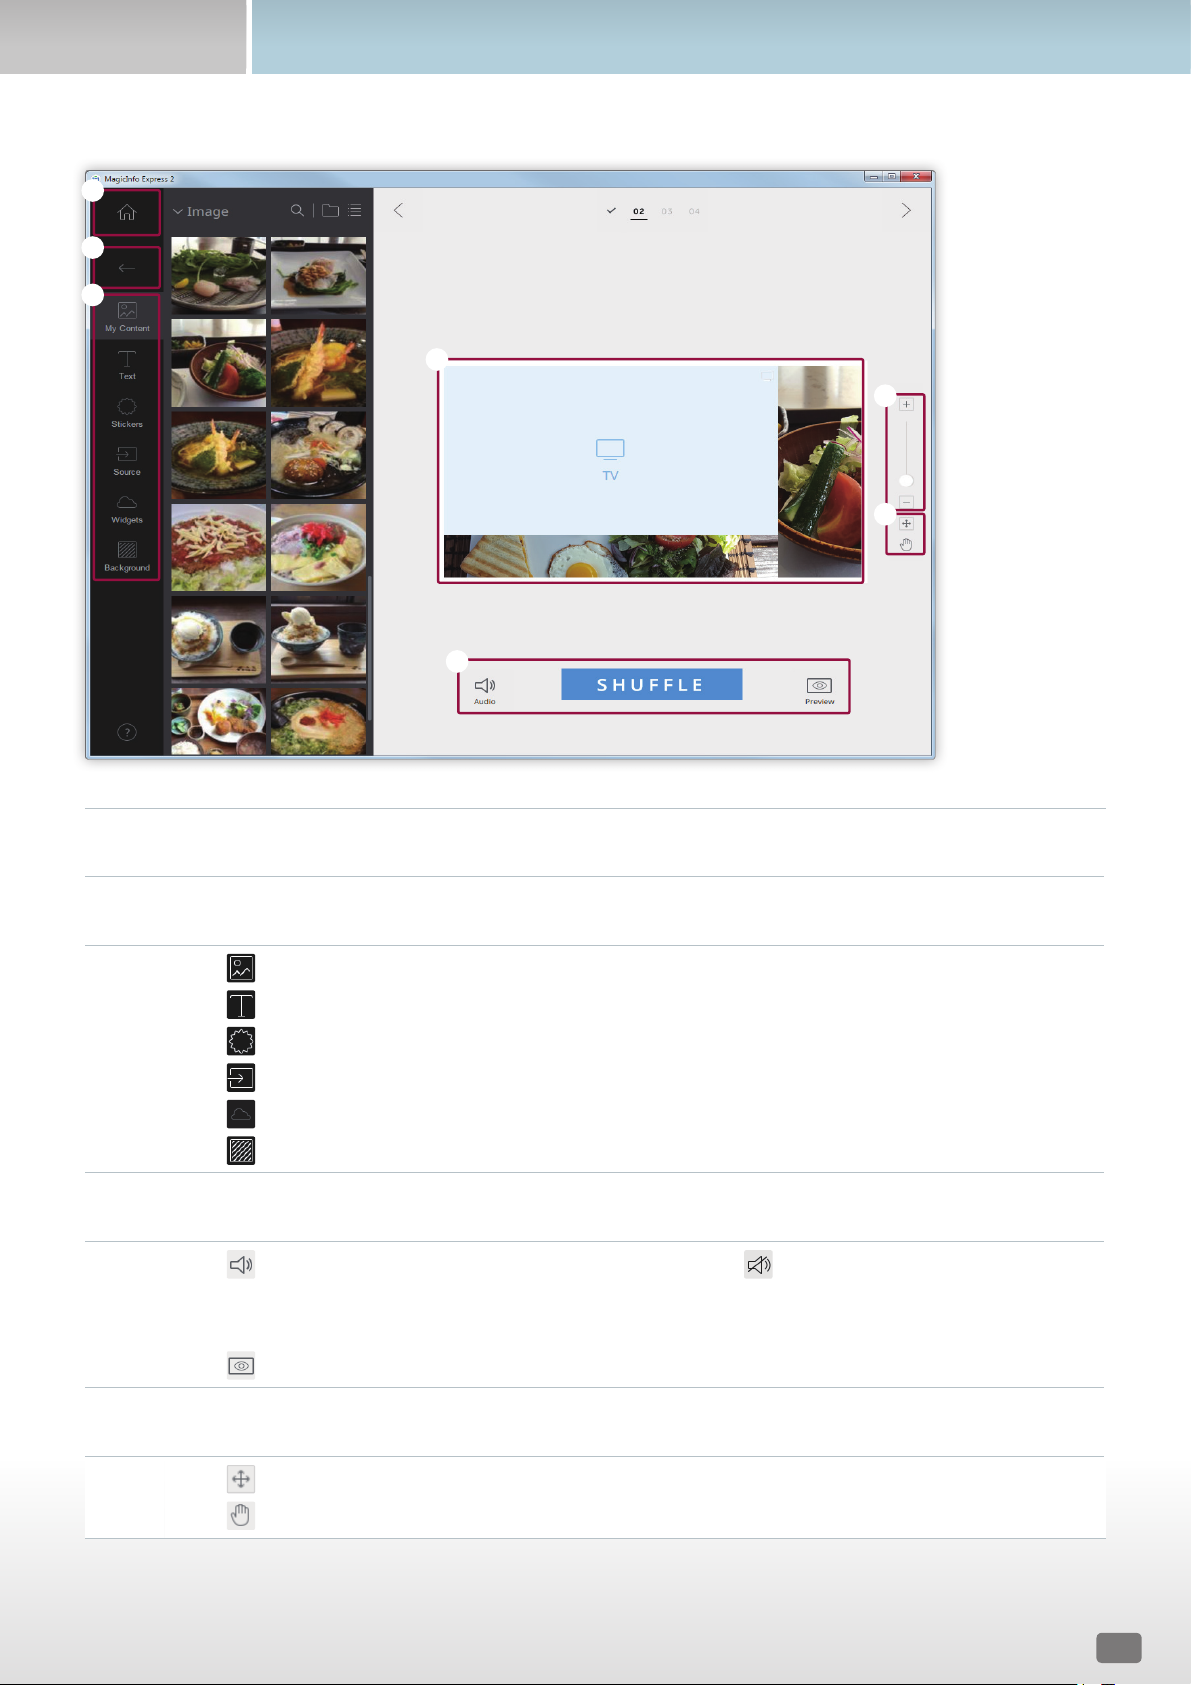
1
Go back to the home screen.
2
Close the element tab.
3
▪ : Replace content or add images as a slideshow.
▪
: Add text.
▪
: Add stickers. This function is not available if the display model is set to MagicInfo Player E.
▪
: Add an input source.
▪
: Add a widget. This function is not available if the display model is set to MagicInfo Player E.
▪
: Configure the background settings.
4
View the layout and edit added elements.
5
▪ : Configure the sound settings. To mute the sound, enable the icon.
▪ SHUFFLE: Change the split screen settings in the layout. The number of available split screen modes varies,
depending on the selected layout type and orientation and the number of elements.
▪
: View the preview screen.
6
Zoom in or out on the layout. Use the slide bar to customize the zoom level.
7
▪ : Adjust the size and position of the layout section according to the program window size.
▪
: Move the layout section.
1
2
3
6
7
5
4
20
Creating content
Editing elements
Edit elements added in the layout.
< Note
For details on how to edit elements, refer to the description of each element.
Setting the size and position of an element
Select an element, then set the size and position of the element as follows:
▪ To move the element, click inside the element and drag to another position. Move an element precisely, using the reference
line that appears when moving it.
▪ To resize the layout that contains a specific element, click
around the element and drag vertically or horizontally.
Deleting an element
Select the element to delete, and then click or press the Delete key on the keyboard.
▪ Deleted elements cannot be restored.

21
Creating content
Organizing multimedia elements
Replace images or videos. You can also add images for a slideshow.
Replacing multimedia elements
1
Click from the element tab.
2
From the list of multimedia elements, click and drag a replacement element over the multimedia element you want to
replace in the edit section.
3
When you are prompted to confirm that you want to replace the element, click Replace.
– The multimedia element will be replaced.
22
Creating content
Adding multimedia element slides
Set image or video elements as a slideshow.
1
Click from the element tab.
2
From the list of multimedia elements, click and drag an element over the default element in the edit section.
3
When you are prompted to confirm that you want to add the element, click Add.
– The element will be added to a slideshow.
< Note
There will be no confirmation prompt when additional elements are added to the slideshow.
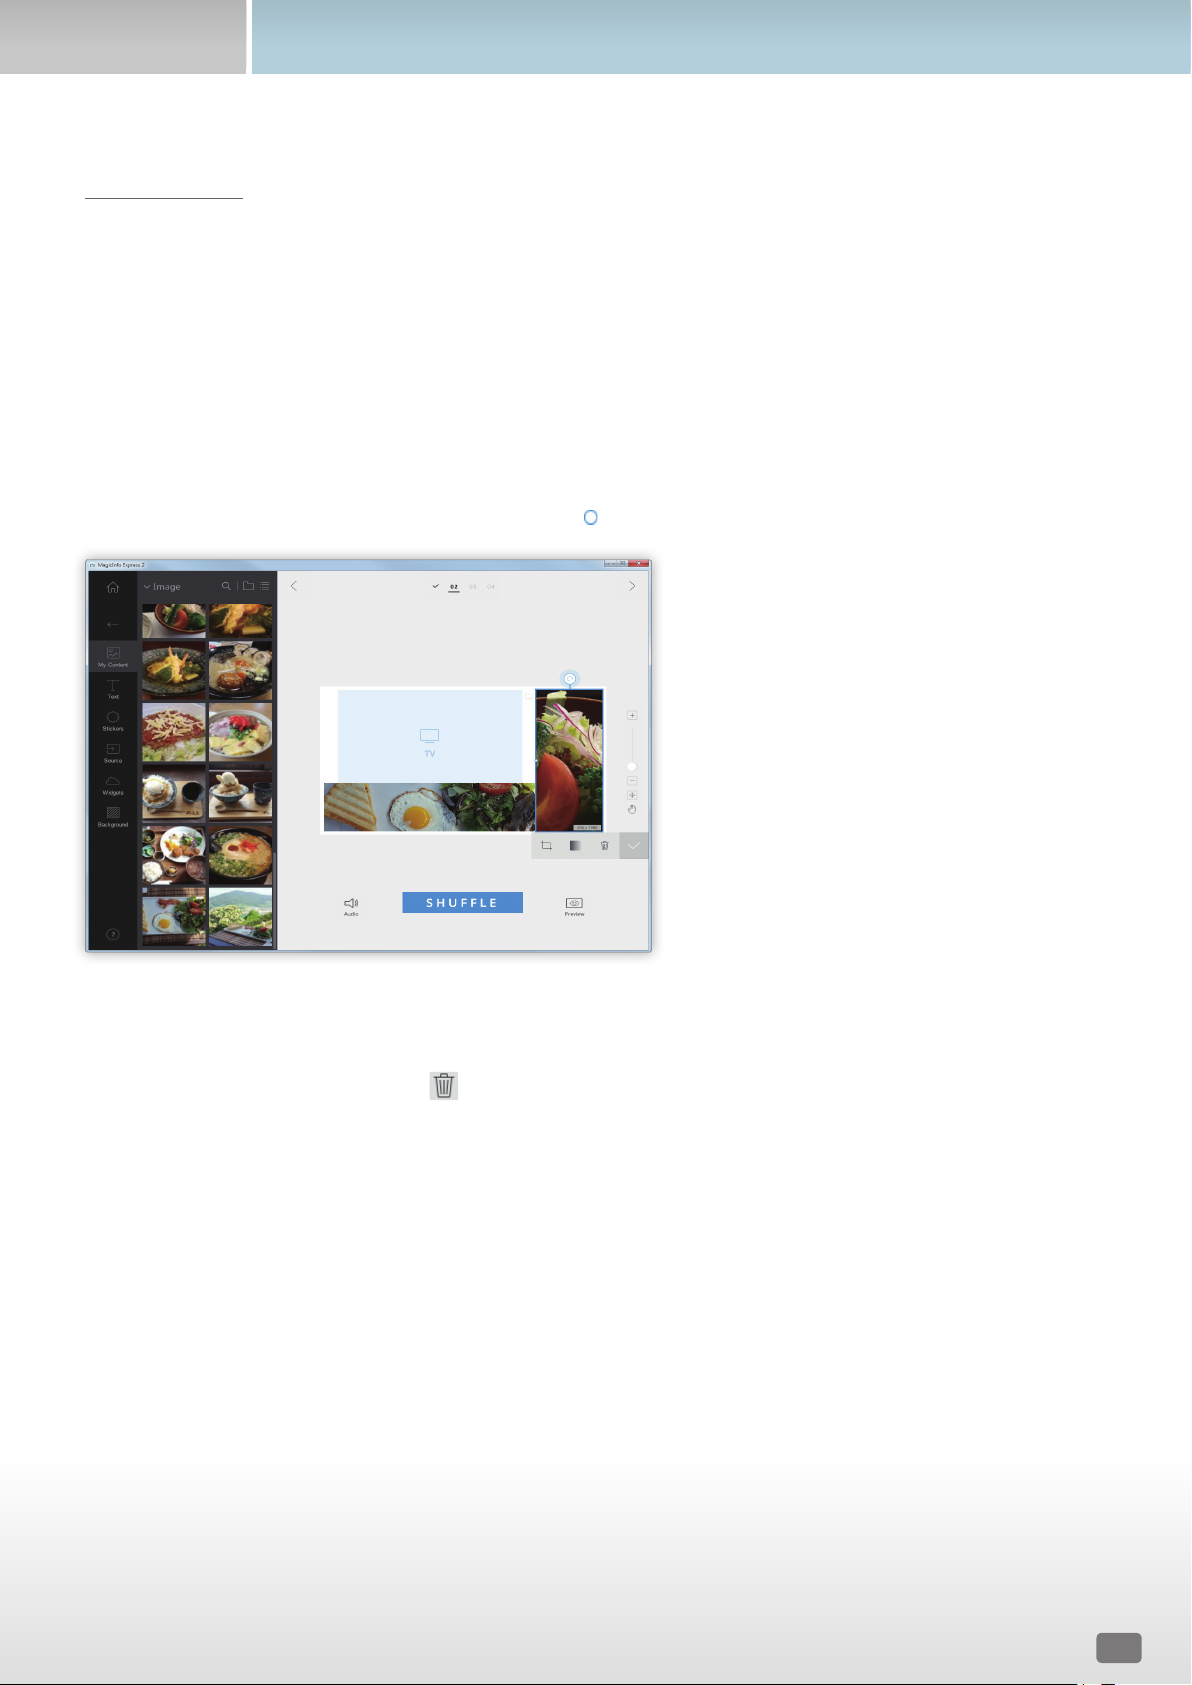
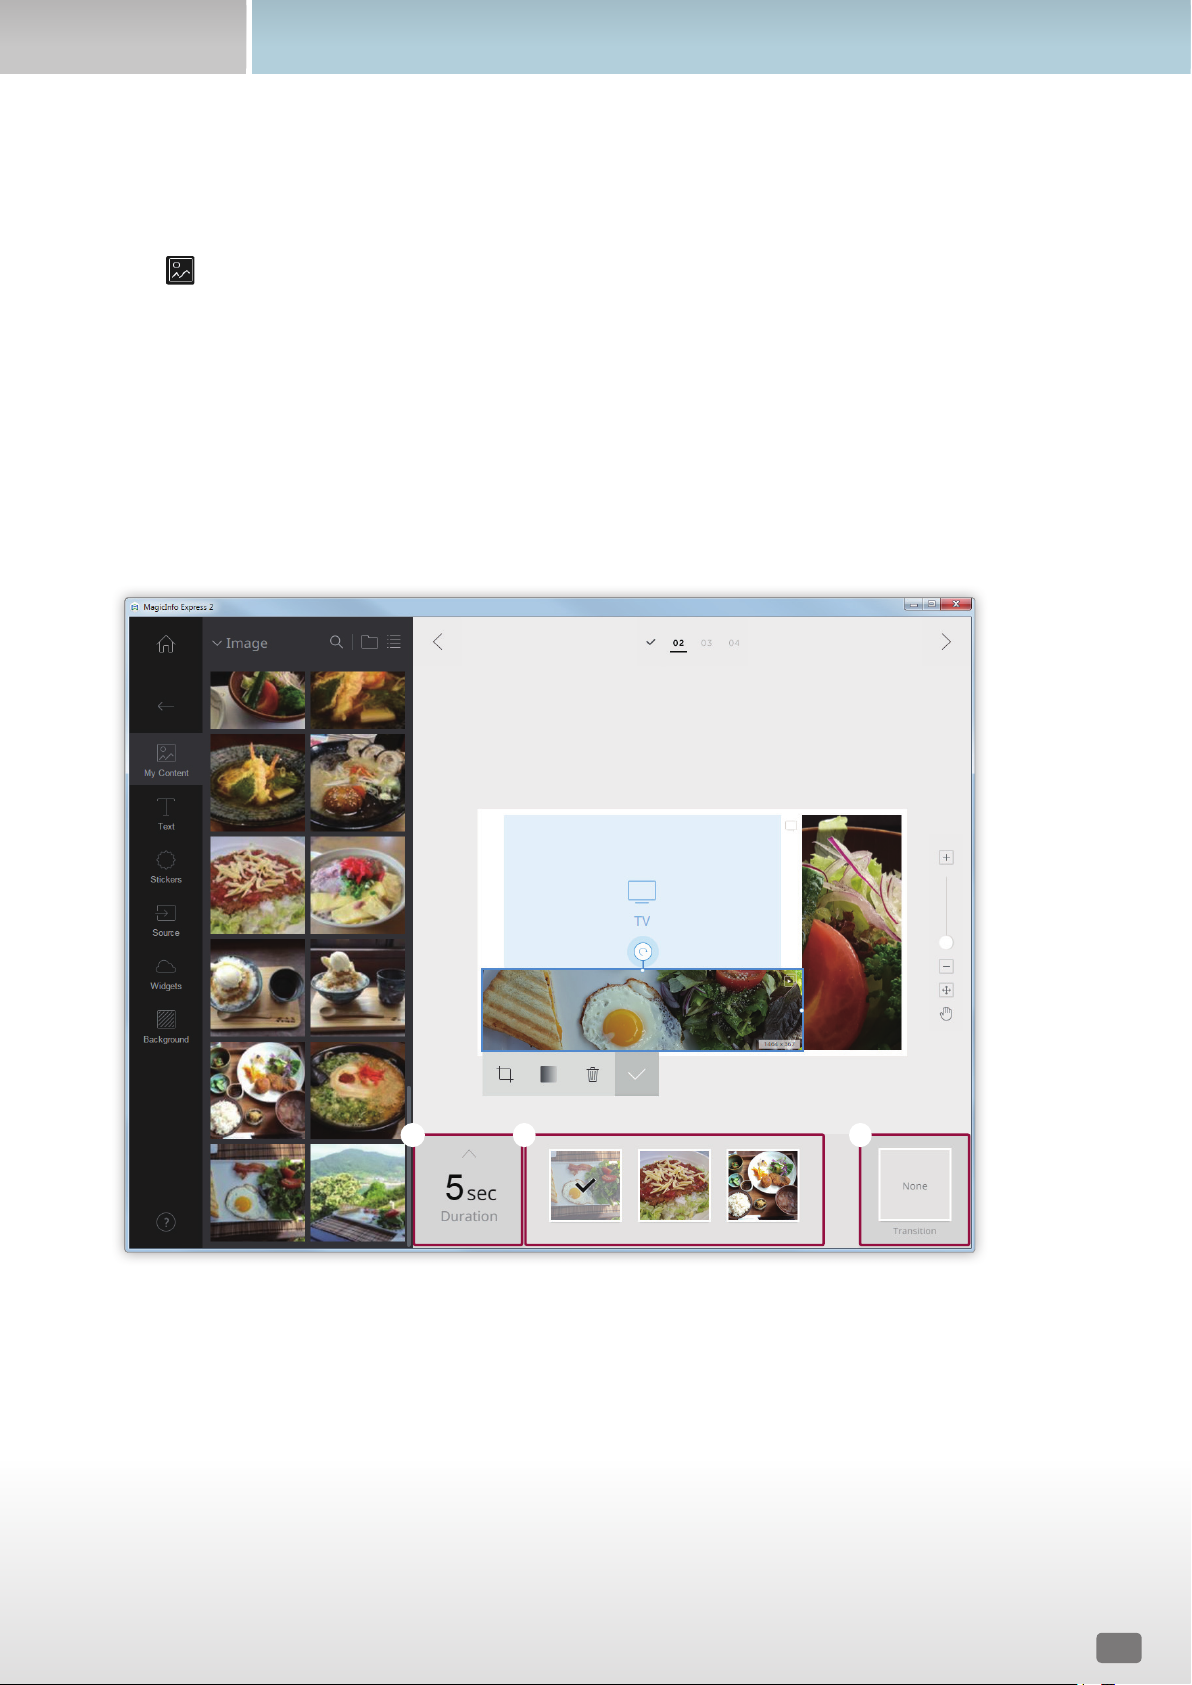
4
Click a slide from the edit section, then apply effects to the slide.
1 32
23
Creating content
1
Set the duration to display an element. The duration can be set in the range between 5 and 60 seconds.
2
View the list of slide elements.
▪ To set an element as the representative element in the edit section, select the element. A tick mark should
appear.
▪ To change the playback sequence of an element, click and drag the element to another position.
▪ To delete an element, place the mouse cursor on the element and click
.
3
Insert a slide transition effect. Select a transition effect.
< Note
This function is not available if the display model is set to MagicInfo Player E.
Editing multimedia elements
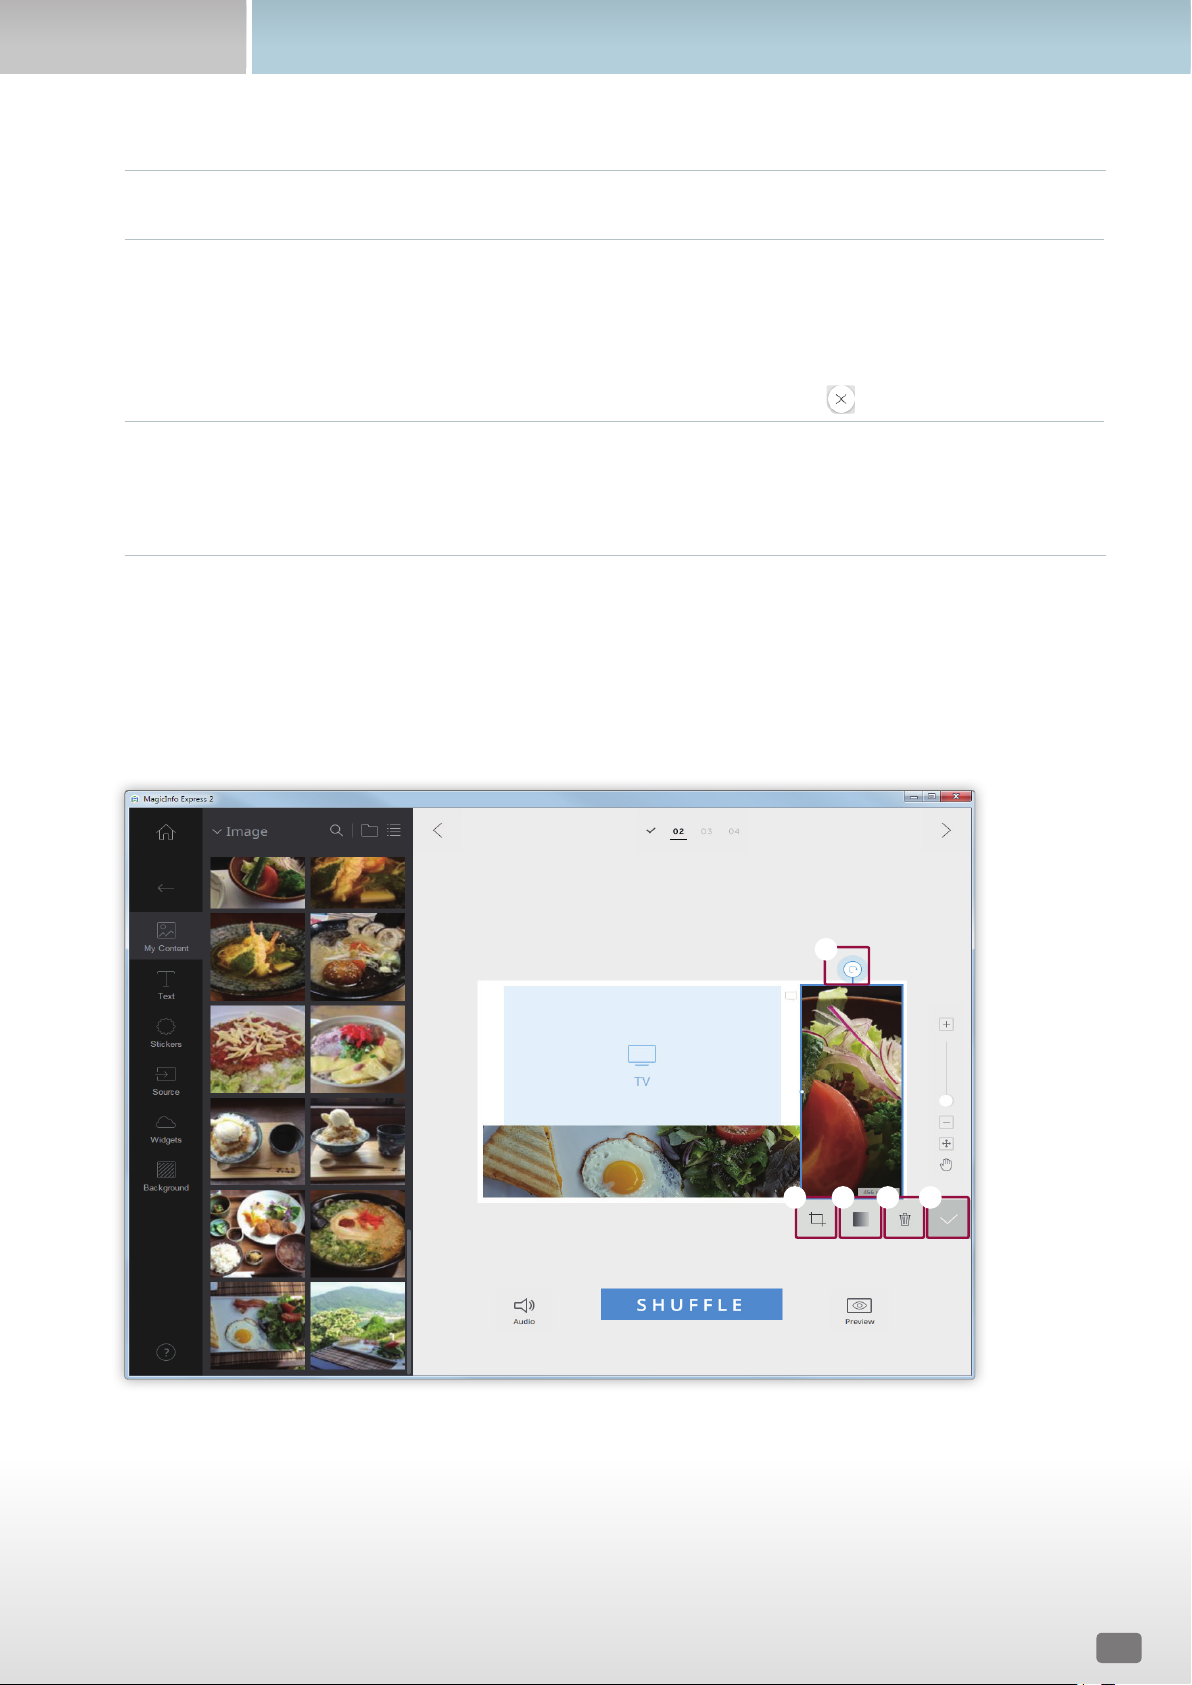
1
Click a multimedia element from the edit section.
2
Edit the multimedia element using the functions below:
2
1
3 4 5

24
Creating content
1
Rotate the image element. Click and drag the icon in a desired direction. The image element can be rotated by
90 degrees at a time. (90º/180º/270º/360º)
2
Zoom in or out only on the content while keeping the layout size locked. Use the slide bar to customize the
zoom level. To undo the zoom level, click .
3
Adjust the image opacity.
4
Delete a multimedia element.
5
Close the edit bar.
Organizing text
Add a text box or edit default text.
< Note
• It is not possible to add a text element over an input source or a video element.
• It is not possible to add a text element over another element regardless of the element type if the display model is set to MagicInfo Player E.
Adding text
1
Click from the element tab.
2
Click and drag a text box of your choice to the edit section.
3
Adjust the position of the text box in the edit section, then enter text.
25
Creating content
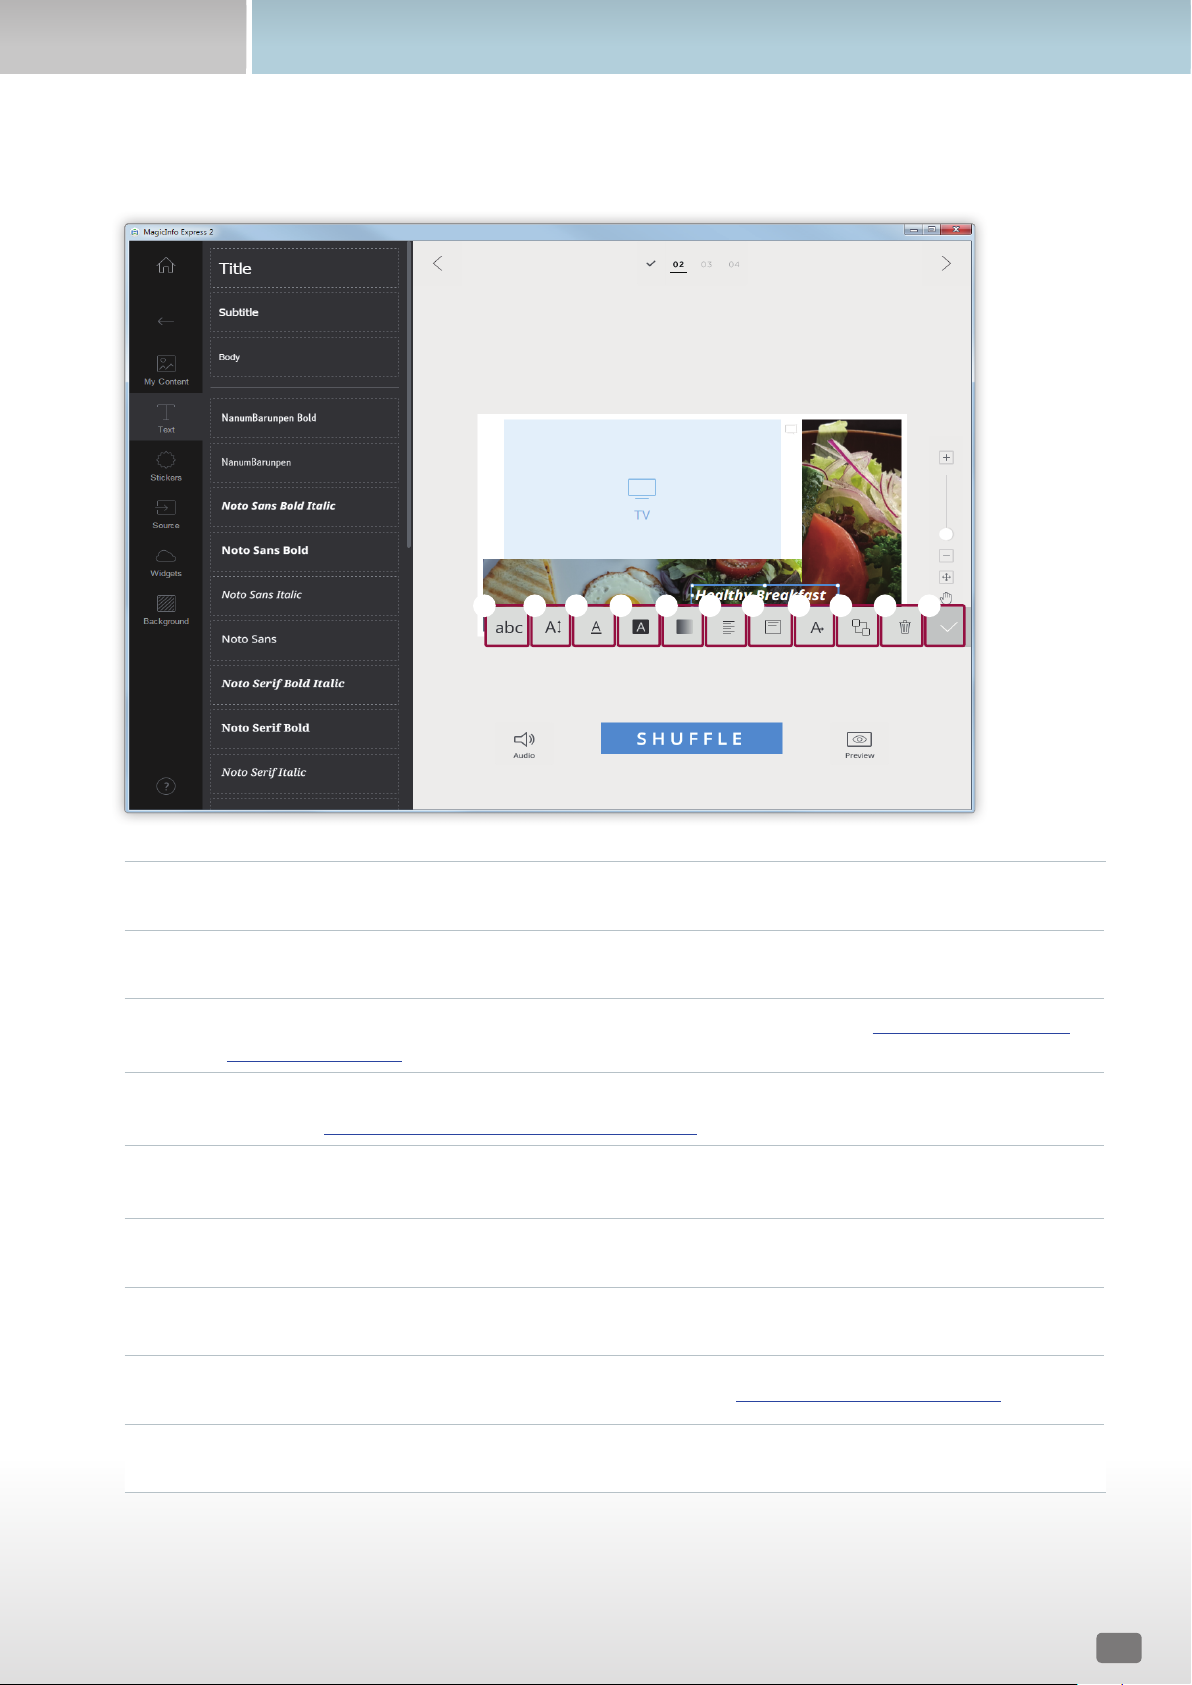
4
Use the edit text bar to edit the text.
1
Select a text font.
2
Specify the text size. Text size can be set in the range between 20 and 200 points.
3
Select a text color. For details on how to set the text color, refer to the following: ► Setting the text color/
text background color
4
Select a text background color. For details on how to set the text background color, refer to the
following: ► Setting the text color/text background color
5
Adjust the opacity of the text background color. It is possible to adjust the opacity only when a text
background color is specified. The closer the value is to 0%, the less opaque the background color.
6
Select a horizontal text alignment mode.
7
Select a vertical text alignment mode.
8
Display scrolling text. For further details, refer to the following: ► Configuring text scroll settings
9
Set the order of text boxes if more than one text box is used.
1 2
3
4 5 6 7 8
9 0 !

26
Creating content
0
Delete a text box.
!
Close the edit bar.
Changing text
1
Click the default text and enter new text.
2
Use the edit text bar to edit the text.
Setting the text color/text background color
1
On the edit text bar, click or .
2
Use the color bar to customize the color.
1
View the created list of colors. Click a color.
2
View the color currently being created.
3
Create a new color.
4
Set the text background color transparent.
< Note
The text color cannot be set transparent.
5
Select a default color.
6
Select a color. Use the slide bar to select a color.
7
Adjust the brightness of the selected color.
3
1 2
4 5
6
7

27
Creating content
Configuring text scroll settings
1
On the edit text bar, click .
2
Configure specific text scroll settings.
–
: Enable or disable the text scroll feature.
–
: Set the text scrolling direction.
–
: Set the text scrolling speed.
Adding stickers
Add stickers of various designs to the layout.
< Note
• This function is not available if the display model is set to MagicInfo Player E.
• It is not possible to add sticker elements over input source or video elements.
1
Click from the element tab.
2
From the list of stickers, click and drag a sticker to the edit section.
– The sticker will be added to the layout.
– You can add a text box over the sticker. You can also stack several stickers.
28
Creating content
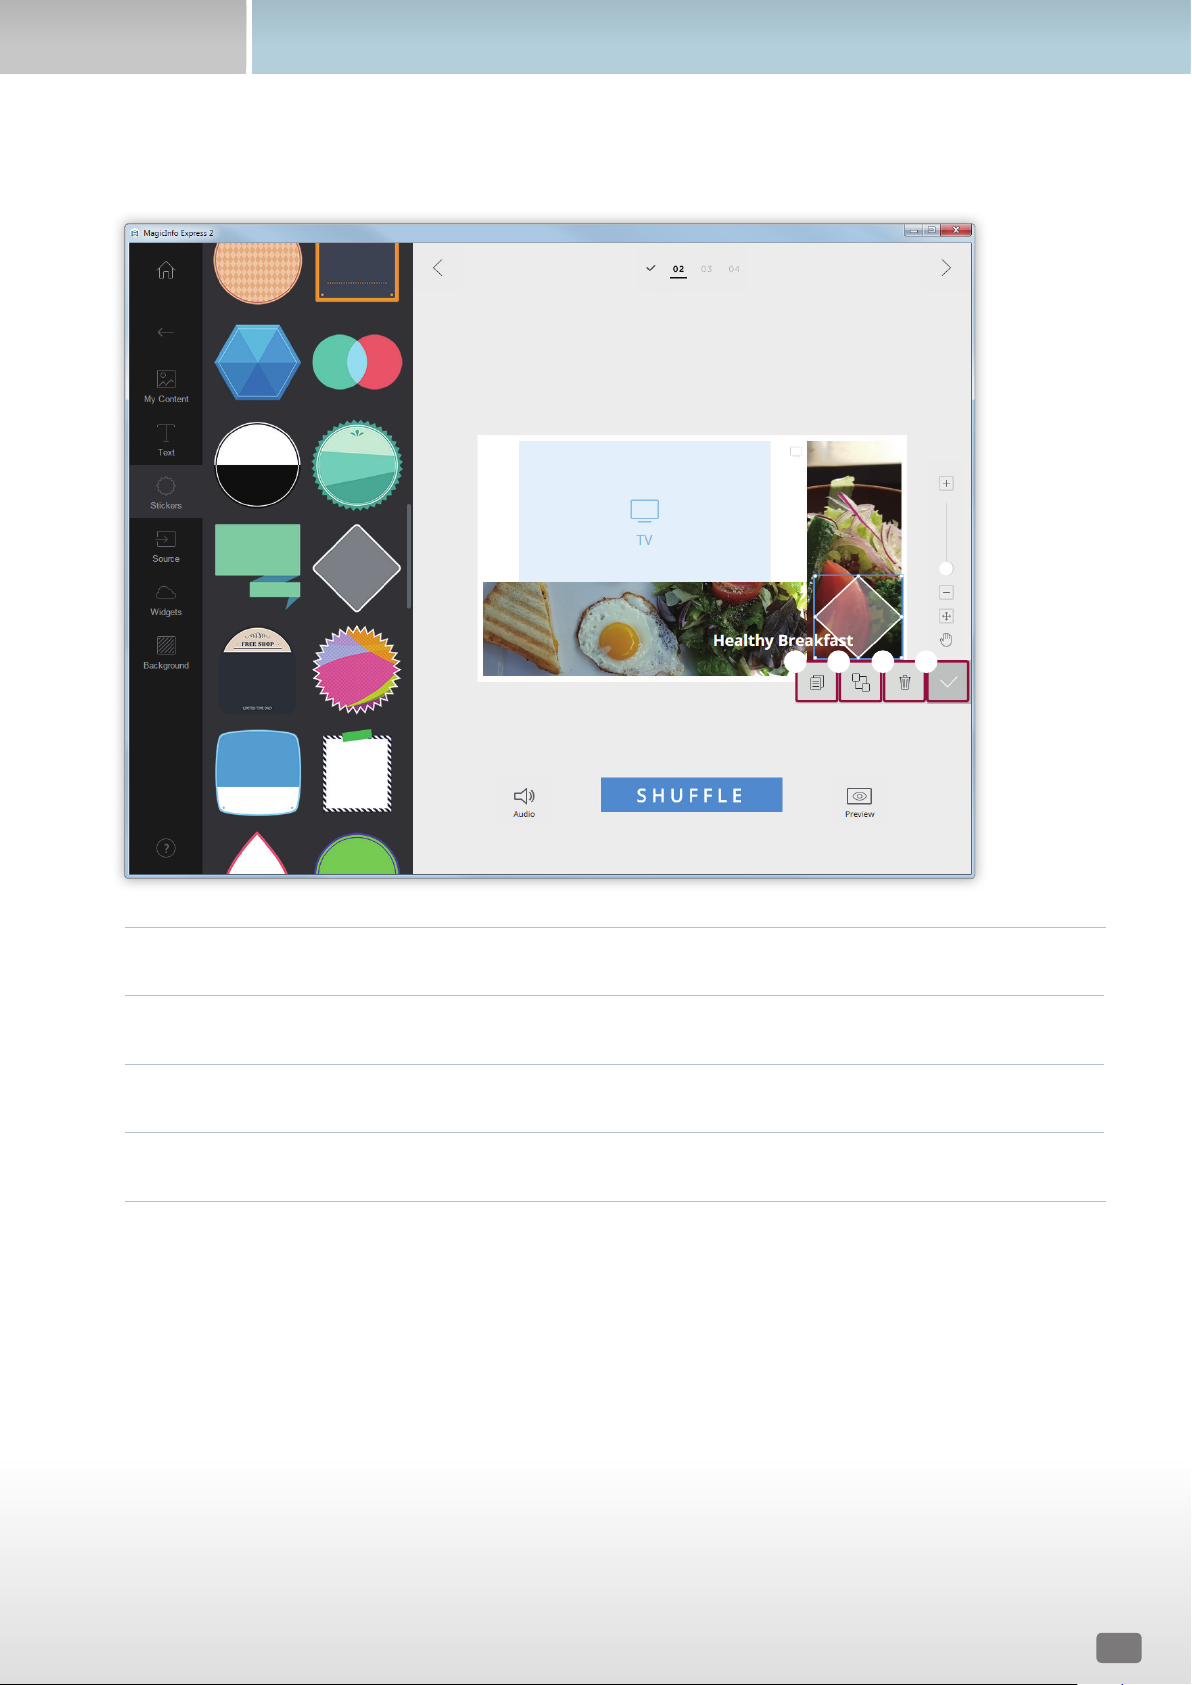
3
Click the sticker and use the edit bar to edit the sticker.
1
Copy the sticker.
2
Set the order to arrange stickers if more than one sticker is used.
3
Delete the sticker.
4
Close the edit bar.
1 2 3 4

29
Creating content
Adding an input source
Organize content by adding an input source connected to the display device to the layout.
< Note
• You can select a country from which to select an input source if the display model is set to MagicInfo Player E. Available input sources vary
depending on the selected country.
• It is not possible to use a text, sticker or image element in a section where an input source has been added.
1
Click from the element tab.
2
From the list of input sources, click and drag an input source to the edit section.
– The input source will be added to the layout.

30
Creating content
Adding widgets
Add widgets that show time or weather information. Configure widget properties.
< Note
• This function is not available if the display model is set to MagicInfo Player E.
• It is not possible to add widget elements over input source or video elements.
1
Click from the element tab.
2
From the list of widgets, click and drag a widget to the edit section.
3
Click the widget that has been added, and then use the edit bar to configure properties.
– Available setting items vary depending on the widget. For details, refer to the method to configure properties for each
widget. ► Configuring clock widget settings, Configuring RSS widget settings, Configuring weather widget settings,
Configuring web widget settings
Loading...