


DA-E670
Wireless Audio with Dock
user manual
imagine the possibilities
Thank you for purchasing this Samsung product.
To receive more complete service, please register your product at
www.samsung.com/register

features
AllShare Play
Play music saved on your devices (such as your PC, Smart phone, or NAS) through the Wireless Audio with Dock via a network connection.
AirPlay
Play music saved on your Apple devices on the Wireless Audio with Dock.
Dual Docking Audio Speaker System
Using the system's dual docking station, dock, charge, and then play either Samsung Galaxy devices or Apple devices through the system's built-in speakers.
USB Host support
Connect and play music files from external USB storage devices such as MP3 players, USB flash memory, etc. using the Wireless Audio with Dock's USB HOST function.
Bluetooth Function
Connect a Bluetooth device to the Wireless Audio with Dock and enjoy music from the device with high quality stereo sound, all without wires!
aptX®
aptX enables high quality Bluetooth stereo audio, delivering wired audio quality wirelessly.
License
AirPlay, AirPlay logo, iPhone, iPod, iPod classic, iPod nano, iPod shuffle, and iPod touch are trademarks of Apple Inc., registered in the U.S. and other countries. iPad is a trademark of Apple lnc.
2
safety information
Safety Warnings
|
|
|
|
|
|
|
CAUTION |
|
|
|
|
RISK OF ELECTRIC SHOCK |
|
|
|
|
DO NOT OPEN |
|
|
|
|
|
|
|
|
|
|
|
|
The lighting flash and arrowhead within the |
CAUTION: TO REDUCE THE RISK OF |
The explanation point within the triangle |
||
triangle indicates that there is dangerous |
ELECTRIC SHOCK, DO NOT REMOVE THE |
indicates that there are important instructions |
||
voltage Inside the product. |
COVER (OR BACK). NO USER SERVICEABLE |
accompanying the product. |
||
|
PARTS INSIDE. REFER SERVICING TO |
|
||
|
QUALIFIED SERVICE PERSONNEL. |
|
||
|
|
|
|
|
WARNING
• To reduce the risk of fire or electric shock, do not expose this appliance to rain or moisture. CAUTION
•Do not expose this apparatus to dripping or splashing. Do not put objects filled with liquids, such as vases on the apparatus.
•To turn this apparatus off completely, you must pull the power plug out of the wall socket. Consequently, the power plug must be easily and readily accessible at all times.
This product satisfies FCC regulations when shielded cables and connectors are used to connect the unit to other equipment. To prevent electromagnetic interference with electric appliances, such as radios and televisions, use shielded cables and connectors for connections.
FCC NOTE (for U.S.A):
This equipment has been tested and found to comply with the limits for a Class B digital device, pursuant to Part 15 of the FCC Rules. These limits are designed to provide reasonable protection against harmful interference in a residential installation.
This equipment generates, uses and can radiate radio frequency energy and, if not installed and used in accordance with the instructions, may cause harmful interference to radio communications. However, there is no guarantee that interference will not occur in a particular installation.
If this equipment does cause harmful interference to radio or television reception, which can be determined by turning the equipment off and on, the user is encouraged to try to correct the interference by one or more of the following measures:
•Reorient or relocate the receiving antenna.
•Increase the separation between the equipment and receiver.
•Connect the equipment to an outlet that is on a different circuit than the radio or TV.
•Consult the dealer or an experienced radio/TV technician for help.
Caution : FCC regulations state that any unauthorized changes or modifications to this equipment may void the user's authority to operate it.
Important Safety Instructions
Read these operating instructions carefully before using the unit. Follow all the safety instructions listed below. Keep these operating instructions handy for future reference.
1)Read these instructions.
2)Keep these Instructions.
3)Heed all warnings.
4)Follow all instructions.
5)Do not use this apparatus near water.
6)Clean only with dry cloth.
7)Do not block any ventilation openings. Install in accordance with the manufacturer's instructions.
8)Do not install near any heat sources such as
radiators, heat registers, stoves, or other apparatus (including amplifiers) that produce heat.
9)Do not defeat the safety purpose of the polarized or grounding-type plug. A polarized plug has two blades with one wider than the other. A grounding type plug has two blades and a third grounding prong. The wide blade or the third prong are provided for your safety. If the provided plug does not fit into your outlet, consult an electrician for replacement of the obsolete outlet.
10)Protect the power cord from being walked on or pinched particularly at plugs, convenience receptacles, and the point where they exit from the apparatus.
11)Only use attachment/accessories
specified by the manufacturer.
12) Use only with the cart, stand, tripod, bracket, or table specified by the manufacturer, or sold with the apparatus. When a cart is used, use caution when moving the cart/apparatus combination to avoid injury from tip-over.
13)Unplug this apparatus during lightning storms or when unused for long periods of time.
14)Refer all servicing to qualified service personnel. Servicing is required when the apparatus has been damaged in any way, such as power-supply cord or plug is damaged, liquid has been spilled or objects have fallen into the apparatus, the apparatus has been exposed to rain or moisture, does not operate normally, or has been dropped.
CALIFORNIA USA ONLY
This perchlorate warning applies only to primary CR ( Manganese Dioxide ) Lithium coin cells in the product sold or distributed ONLY in California USA
" Perchlorate Material - special handling may apply, See www.dtsc.ca.gov/hazardouswaste/perchlorate. "
EnG
3

PrecaUtions
2.7 inch
3.9 inch
3.9 inch |
3.9 inch |
Ensure that the AC power supply in your house complies with the power requirements listed on the identification sticker located on the back of your product. Install your product horizontally, on a suitable base (furniture), with enough space around it for ventilation (3~4 inches). Make sure the ventilation slots are not covered. Do not place the unit on amplifiers or other equipment which may become hot. This unit is designed for continuous use. To fully turn off the unit, disconnect the AC plug from the wall outlet. Unplug the unit if you intend to leave it unused for a long period of time.
During thunderstorms, disconnect the AC plug from the
wall outlet. Voltage peaks due to lightning could damage the unit.
Protect the product from moisture (i.e. vases) , and excess heat (e.g.fireplaces) or equipment creating strong magnetic or electric fields Disconnect the power cable from the AC supply if the unit malfunctions. Your product is not intended for industrial use. This product is for personal use only.
Condensation may occur if your product has been stored in cold temperatures. If transporting the unit during the winter, wait approximately 2 hours until the unit has reached room temperature before using.
Do not expose the unit to direct sunlight or other heat sources. This could cause the unit to overheat and malfunction.
that are harmful to
the environment.
Do not dispose of batteries in the general household trash.
4

contents
features |
2 |
Features |
2 |
2 |
License |
safety information |
3 |
Safety warnings |
3 |
4 |
Precautions |
getting started |
6 |
Before reading the user’s manual |
6 |
6 |
What’s included |
descriptions |
7 |
Top/Front/Rear Panel |
7 |
|
|
remote control |
9 |
Tour of the remote control |
9 |
|
|
power on and volume
control
10
connections
11
playing
23
functions
28
troubleshooting
31
10Turning the Power on/off
10Adjusting the volume
11Installing the Toroidal ferrite on the Power cable
12Using the Spacer Cover
13Connecting a device to the Dual Dock
14Connecting an audio device using AUX IN
15Connecting to your Network
21 Connecting to Bluetooth devices
23 Using the TV mode (SoundShare)
23Using the docking mode with Samsung Galaxy and Apple Devices
25Using the Bluetooth mode
26Using the USB mode
27Using AirPlay and AllShare Play mode
28Basic functions
29Advanced functions
30Software upgrade (only USB mode)
31Troubleshooting
appendix |
32 Specifications |
32 |
5 |
|
EnG
getting started
Before Reading the User’s Manual
Note the following terms before reading the user manual.
Icons used in this manual
Icon |
Term |
Definition |
|
|
|
|
Caution |
Indicates a situation where a function does not operate or settings may be |
|
canceled. |
|
|
|
Note Indicates tips or instructions on the page that help a function operate.
Safety Instructions and Troubleshooting
1)Familiarize yourself with the Safety Instructions before using this product. (See page 3)
2)If a problem occurs, check Troubleshooting. (See page 31)
Copyright
©2012 Samsung Electronics Co.,Ltd.
All rights reserved; no part or whole of this user’s manual may be reproduced or copied without the prior written permission of Samsung Electronics Co.,Ltd.
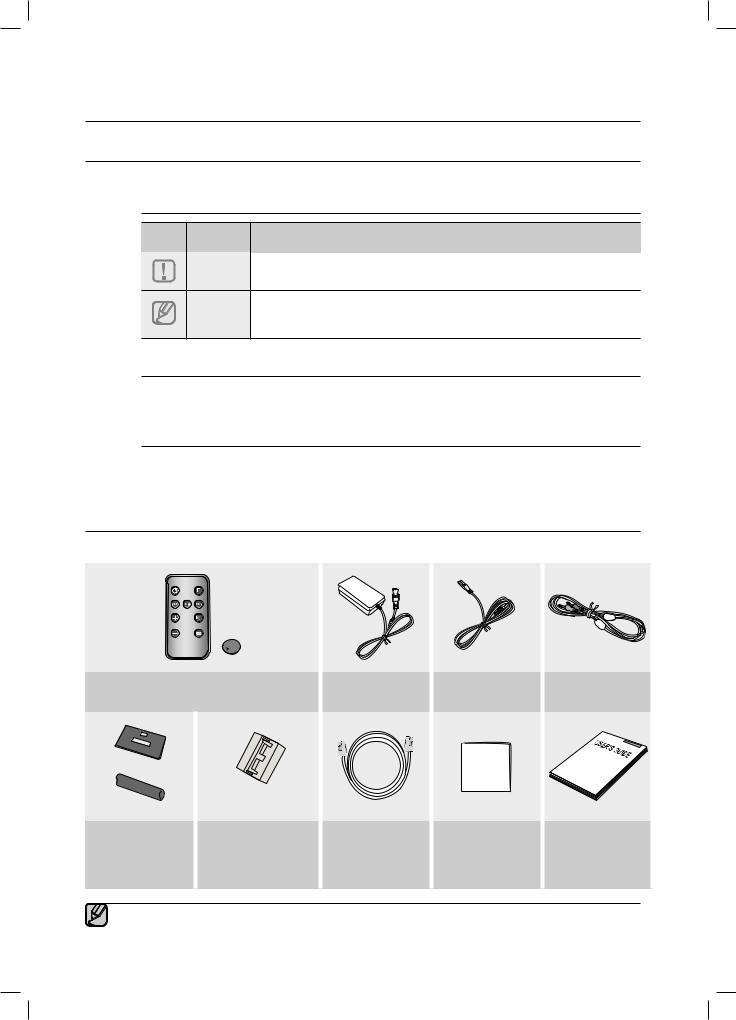
WHAT’s inclUDED
Check for the supplied accessories shown below.
|
FUNCTION |
|
MUTE |
VOL |
BASS |
|
Remote Control / Lithium Battery (3V) |
DC Adapter |
Power Cable |
Audio Cable |
(AH59-02482A/4301-000108) |
(BN44-00461A) |
(3903-000598) |
(BN39-01286A) |
|
(Large) |
|
|
|
|
(For Power Cable 1EA) |
|
|
|
Spacer Cover/ |
|
|
|
|
Protection Cover |
Ferrite Core |
LAN Cable |
Cloth |
User Manual |
(AH63-02996A/ |
(3301-000144) |
(GL39-00050A) |
(BN63-02368B) |
(AH68-02481M) |
AH63-03008A) |
|
|
|
|
▪▪ The appearance of the accessories may differ slightly from the illustrations above.
6
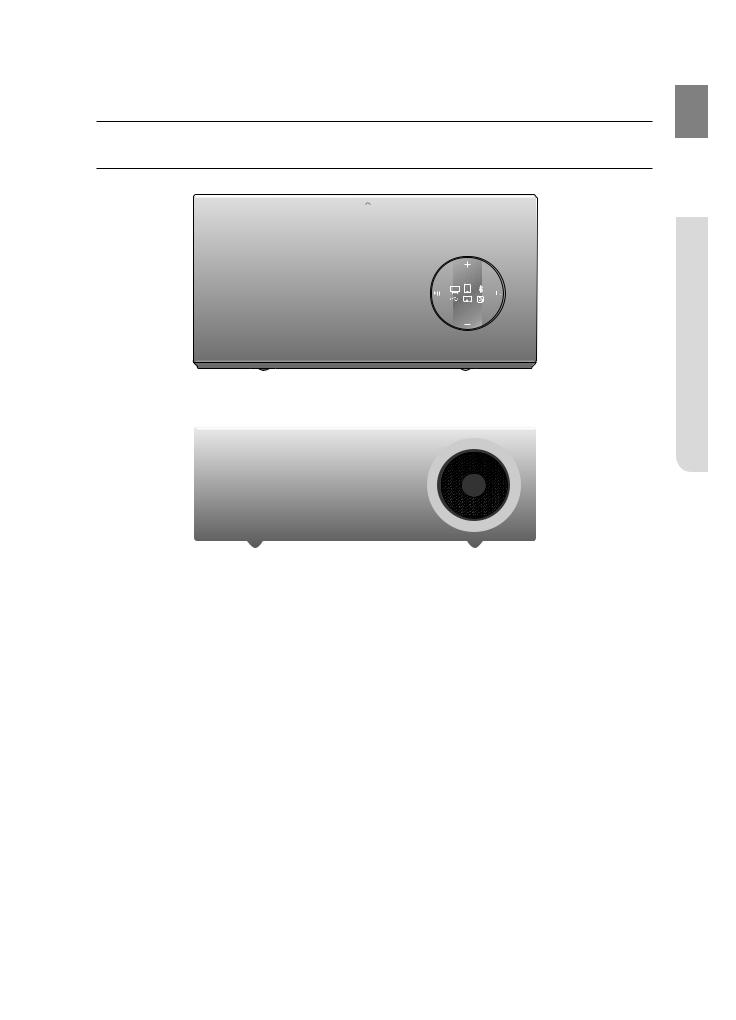
descriptions
TOP/Front/Rear Panel
<TOP>
DOCK |
1 |
|
2 |
3 |
4
<FRONT>
5
<REAR> |
PUSH |
LAN
DC 14V 4A WPS/ |
AUX IN ONLY FOR |
6
|
|
LAN |
|
|
DC 14V 4A WPS/ |
AUX IN |
ONLY FOR |
7 |
RESET |
|
SERVICE |
|
|
|
|
|
USB |
500mA |
|
8
11
9 |
10 |
EnG
 escriptions● D
7
|
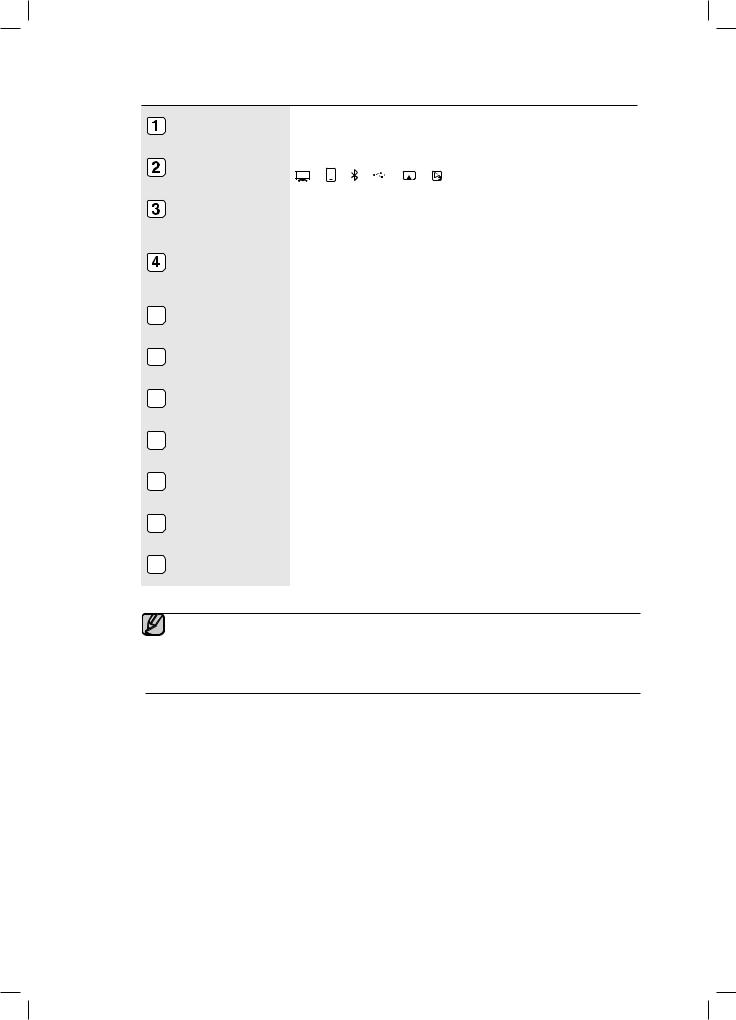
PLAY/PAUSE |
Play or pause a music file. |
|
|
BUTTON |
||
|
|
||
|
|
|
|
|
FUNCTION |
Switches the mode as follows : |
|
|
BUTTON |
; ; ; ; ; ; AUX (LED Off) |
|
|
|
|
|
|
VOLUME +/- |
Controls the volume level. |
|
|
BUTTON |
||
|
|
||
|
|
|
|
|
|
When you change the mode with the Function button, the icon of the |
|
|
FUNCTION |
selected mode is displayed in white on the Function Display. |
|
|
DISPLAY |
The LED blinks when you turn the power on and stops blinking when |
|
|
|
the unit is on and ready to play. |
|
5 |
DUAL DOCK |
Provides a 5 pin dock for Samsung Galaxy devices and a 30 pin dock |
|
for Apple devices. |
|||
|
|
||
|
|
|
|
6 |
LAN TERMINAL |
Lets you connect to a network using a LAN cable. |
|
|
|
|
|
7 |
DC 14V |
Connect the unit's DC adapter to this jack. |
|
|
|
|
|
8 |
WPS/RESET |
Used in procedures for connecting the unit to wireless networks. |
|
BUTTON |
|||
|
|||
|
|
|
|
9 |
USB PORT |
Connect an external USB storage device such as an MP3 player here |
|
to play files located on the device. |
|||
|
|
||
|
|
|
|
10 |
AUX IN |
Connect to the Analog output of an external device. |
|
|
|
|
|
11 |
ONLY FOR |
This jack is for service only. |
|
|
SERVICE |
|
|
|
|
|
▪▪ When you turn on this unit, there will be a 4 to 5 second delay before it produces sound. ▪▪ To update the product’s software via USB port, it is required to use a USB memory device.
 ▪▪ This unit can connect to mobile devices with high audio output levels. When you connect this unit to external devices with high output levels, it may lower the audio output to protect the amp and speakers.
▪▪ When disconnecting the power cable from the wall outlet, hold the plug. Do not pull the cable.
8

remote control
Tour of the Remote Control
POWER BUTTON |
FUNCTION |
Turns the unit on and off.
CONTROL BUTTON
Search for the next or previous music file.
MUTE
VOL
BASS
VOLUME

Adjusts the volume level of the unit.
FUNCTION BUTTON
Selects the Function mode.
PLAY/PAUSE BUTTON
Play or pause a music file.
MUTE BUTTON
Mutes the sound from this unit. Press again to restore the sound to the previous volume level.
BASS BUTTON
Optimize the sound based on your tastes.
●recontrolotem EnG
Installing battery in the Remote Control
1.Open the cover of the remote control by putting your fingernail into the gap between the cover and body of the remote control. Then, lift the cover and separate it completely.
2.Install a 3V Lithium battery. Insert the battery into the battery
compartment with the + side facing up.
3.Fit the remote control's cover to the remote control. Next, lower the cover so that it is flush with the body of the remote, and then press the cover into the body by pushing the edges down with your hand.
▪▪ Be careful not to catch your fingernail in the gap when you lift the cover. You can damage your fingernail.
Operation Range of the Remote Control
You can use the remote control up to 23 feet (7 meters) in a straight line from the unit. You can also operate the remote at a horizontal angle of up to 30° from the remote control sensor.
9

power on and volume control
tUrning the PoWer on/off
DOCK
or
FUNCTION
FUNCTION
MUTE
VOL
BASS
MUTE
1. To turn on this unit, press any button on the unit's top panel when the unit is in Standby mode. or,
Press POweR on the remote control.
2. To turn off this unit, press the +# button on the unit's top panel for more than 3 seconds. or,
Press POweR on the remote control again.
adJUsting the VoLUMe
Use +,- buttons to adjust the volume. The function LEDs light from left to right when you turn the volume up and from right to left when you turn the volume down. The LEDs do not light if you try to increase the volume when it has already been set to maximum or try to decrease the volume when it has already been set to minimum.
DOCK
FUNCTION
or
MUTE
MUTE
VOL
BASS
VOL
BASS
Press the +/– button on the right side of the top panel. or,
Press vOL +/– on the remote control.
▪ The volume level increases or decreases when you press VOL +/–.
▪You can also use the volume controls of devices connected using the Dual Dock or Bluetooth to control the volume. However, your ability to control the volume using the volume controls of devices connected using Bluetooth may be limited.
10
connections
instaLLing the toroidaL ferrite on the PoWer caBLe
Lift up to release the lock and open the core.
Close the lock back. |
Wind Power cable around the core three times. |
|
(Start winding at 2-4 inches away from the plugs) |
ENG
 CONNECTIONS●
11
 Loading...