

Page 1

20-422.fm Page 1 Friday, January 7, 2000 12:54 PM
200CH VHF/Air/UHF Home Scanner
with Scanner Control Protocol and WX Alert
Cat. No. 20-422
OWNER’S MANUAL
Please read before using this equipment.
Page 2

20-422.fm Page 2 Friday, January 7, 2000 12:54 PM
FEATURES
Your RadioShack 200Ch VHF/Air/UHF
Home Scanner lets y ou in on all the action! This scanner gives you direct access to over 23,000 frequencies,
including those used by police and fire
departments, ambulance and transportation services, government agencies,
and amateur radio services. You can select up to 200 channels to scan and you
can change selections at any time.
The scanner ’s frequency bands let you
search specific, preset ranges of frequencies quickly and easily.
Your scanner has all the se special features:
Weather Alert
— warns you of serious
weather conditions by sounding an
alarm if the weather service transmits a
weather alert tone.
Weather Band Key
— scans seven preprogrammed weather cha nnels to keep
you informed about current weather
conditions.
Scanner Control Protocol
— lets you
download channel in formation (frequency, lockout, priority, delay) from your PC
to the scanner.
Ten 20-Channel Storage Banks
— let
you store 20 channels in each of ten
banks to group channels so calls are
easier to identify.
Ten Monitor Memories
— let you temporarily save ten frequencies located
during a frequency search, so you can
decide if you wa nt to st ore them permanently.
Priority Channels
— let you set the
scanner to check u p to ten chann els ev ery 2 seconds so you do not miss important calls.
Band Search
— lets you quickly and
easily search preset frequency ranges,
so you can find new and un liste d bro adcasts.
Direct Search
— lets you searc h for a
transmission starting from a specified
frequency.
Search Skip
— lets you select up to 20
frequencies for t he scanner to skip during a search, so you can search more
efficiently.
Two-Second Channel Scan/Search
— lets you set the sca nner so it
Delay
delays scann ing or sear ching for 2 seconds before moving to another channel /
frequency, so you can hear more replies.
Lock-Out
— keeps channels y ou selec t
from being scanned, so you can skip
over busy ch a nne ls su ch a s t h os e wi t h a
continuous transmission.
©
1999 Tandy Corporation.
RadioShack is a registered trademark used by Tandy Corporation.
All Rights Reserved.
2
Page 3

20-422.fm Page 3 Friday, January 7, 2000 12:54 PM
Key Confirmation Tones
— the scanner sounds a tone whe n you per form an
operation correctl y and sounds an error
tone if you make an error.
Memory Backup
— keeps channel fre quencies stored in memory for an extended time even i f your scanner loses
power.
External Speaker Jack
— lets you connect an external speaker, or an earphone or headphones for private
listening.
External Ante nna Term inal
— lets you
connect an external antenna (not supplied) for improved reception.
Your scanner can receive all of these
frequencies:
• 29–54 MHz (10-Meter Amateur
Radio, VHF Lo, 6-Meter Amateur)
• 108–136.975 MHz (Aircraft)
• 137–174 MHz (Government, 2Meter Amateur Radio, VHF Hi)
• 406–512 MHz (UHF Lo, 70-Centimeter Amateur Radio, Gov ernment,
UHF “T” Band)
This table shows the preset frequency
steps your scanner uses for each frequency range.
Frequency
Range (MHz) Step (kHz)
29–54 5
108–136.975 12.5
137–144 5
144–148 5
148–174 5
406–450 12.5
450–470 12.5
470–512 12.5
The frequency steps are preset.
Note:
You cannot change them.
Your scanner can also receive these
preprogrammed weather channel frequencies:
• 162.400 MHz
• 162.425 MHz
• 162.450 MHz
• 162.475 MHz
• 162.500 MHz
• 162.525 MHz
• 162.550 MHz
3
Page 4

20-422.fm Page 4 Friday, January 7, 2000 12:54 PM
FCC NOTICE
Your scanner might cause TV or radio
interference even when it is operating
properly. To determine whether your
scanner is causing the interference, tur n
off your scanner. If the interference goes
away, your scanner is causing i t. Try to
eliminate the interference by:
• moving your scann er away from the
receiver
• connecting your scanner to an outlet
that is on a different electrical circu it
from the receiver
• contacting your local RadioShack
store for help
If you cannot eliminate the interference,
the FCC requires that you stop using
your scanner.
This device compl ies with P art 15 of the
FCC Rules
following conditions: (1) This device
must not cause harmful interference and
(2) this device mus t accept any inte rference received, including interference
that may cause undesired operation.
. Operation is subjec t to the
SCANNING LEGALLY
most every transmission your scanner
can receive. However, there are some
transmissions you should never intentionally listen to. These include:
• telephone conversations (cellular,
cordless, or other p rivate means of
telephone signal transmission)
• pager transmissions
• any scrambled or encrypted transmissions
According to the Electronic Communications Privacy A ct (ECPA), you are subject to fines and possible imprisonmen t
for intentionall y listenin g to, using, o r divulging the contents of su ch a transmission unless you have the consent of a
party to the communication (unless su ch
activity is otherwise illegal).
This scanner has been des igned to prevent reception of illegal transmissions.
This is done to c omply with th e legal r equirement that scanners be manufactured so as to not be easily modifiable to
pick up those transmissions. Do not
open your scanne r’s case to make any
modifications that could allow it to pick
up transmissions that it is not legal to listen to. Doing so could subje ct you to legal penalties.
Your scanner covers frequencies used
by many different groups including police and fire departments, ambulance
services, government agencies, private
companies, amateur radio services, military operations, pager services, and
wireline (telephone and telegraph) service providers. It is legal to listen to al-
4
We encourage responsible, legal scanner use.
Page 5

20-422.fm Page 5 Friday, January 7, 2000 12:54 PM
CONTENTS
Preparation .......................... ............................................. ....................................... 6
Removing the Display Protector ......................................................................... 6
Connecting an Antenna ...................................................................................... 6
Connecting Power .............................................................................................. 7
Connecting an External Speaker ........................................................................ 8
Connecting an Earphone or Headphones .......................................................... 8
Understanding Your Scanner ................................... ...... ....... ...... ....... ...... ...... ....... 9
A Look at the Front Panel ................................................................................... 9
A Look at the Display ....................................................................................... 10
Understanding Banks and Bands ....................................................................... 12
Channel-Storage Banks . ...... ....... ...... ....... ...... ....... ...... ..................................... 12
Monitor Memories ........................ ...... ....... ...... ............................................. ..... 12
Frequency Bands ............................................................................................. 12
Operation ............................. ............................................. ..................................... 14
Turning On the Scanner/Setting Volume and Squelch ..................................... 14
Resetting the Scanner ...................................................................................... 14
Manually Storing Frequencies into Channels ................................................... 14
Searching For and Temporarily Storing Active Frequencies ............................ 15
Listening to Monitor Memories ......................................................................... 16
Moving a Frequency From a Monitor Memory to a Channel ............................ 17
Deleting a Frequency From a Channel ............................................................ 17
Scanning Channels .......................................................................................... 17
Manually Selecting a Channel .......................................................................... 18
Special Features ........... ...... ...... ....... ...... .............................................. ...... ........... 19
Delay ................................................................................................................ 19
Skipping Frequencies/Channels ....................................................................... 19
Priority .............................................................................................................. 20
Listening to the Weather Band ......................................................................... 21
Turning the Key Tone On or Off ........................................................................ 21
A General Guide to Scanning .............................................................................. 22
Guide to Frequencies ....................................................................................... 22
Guide to the Action Bands ................................................................................ 23
Band Allocation ................................................................................................ 24
Frequency Conversion ..................................................................................... 27
Troubleshooting ...................................................................... ................... ........... 28
Care and Maintenance .......................................................................................... 29
Specifications ....................................................................................................... 30
5
Page 6
20-422.fm Page 6 Friday, January 7, 2000 12:54 PM
PREPARATION
This scanner is desi gned for use in the
home as a base station. You can place it
on any flat surfac e su ch as a desk , sh elf ,
or table.
REMOVING THE DISPLAY
PROTECTOR
Your scanner ’s display is prote cted during shipment by a piec e of film. Peel o ff
this film before you use the scanner.
CONNECTING AN
ANTENNA
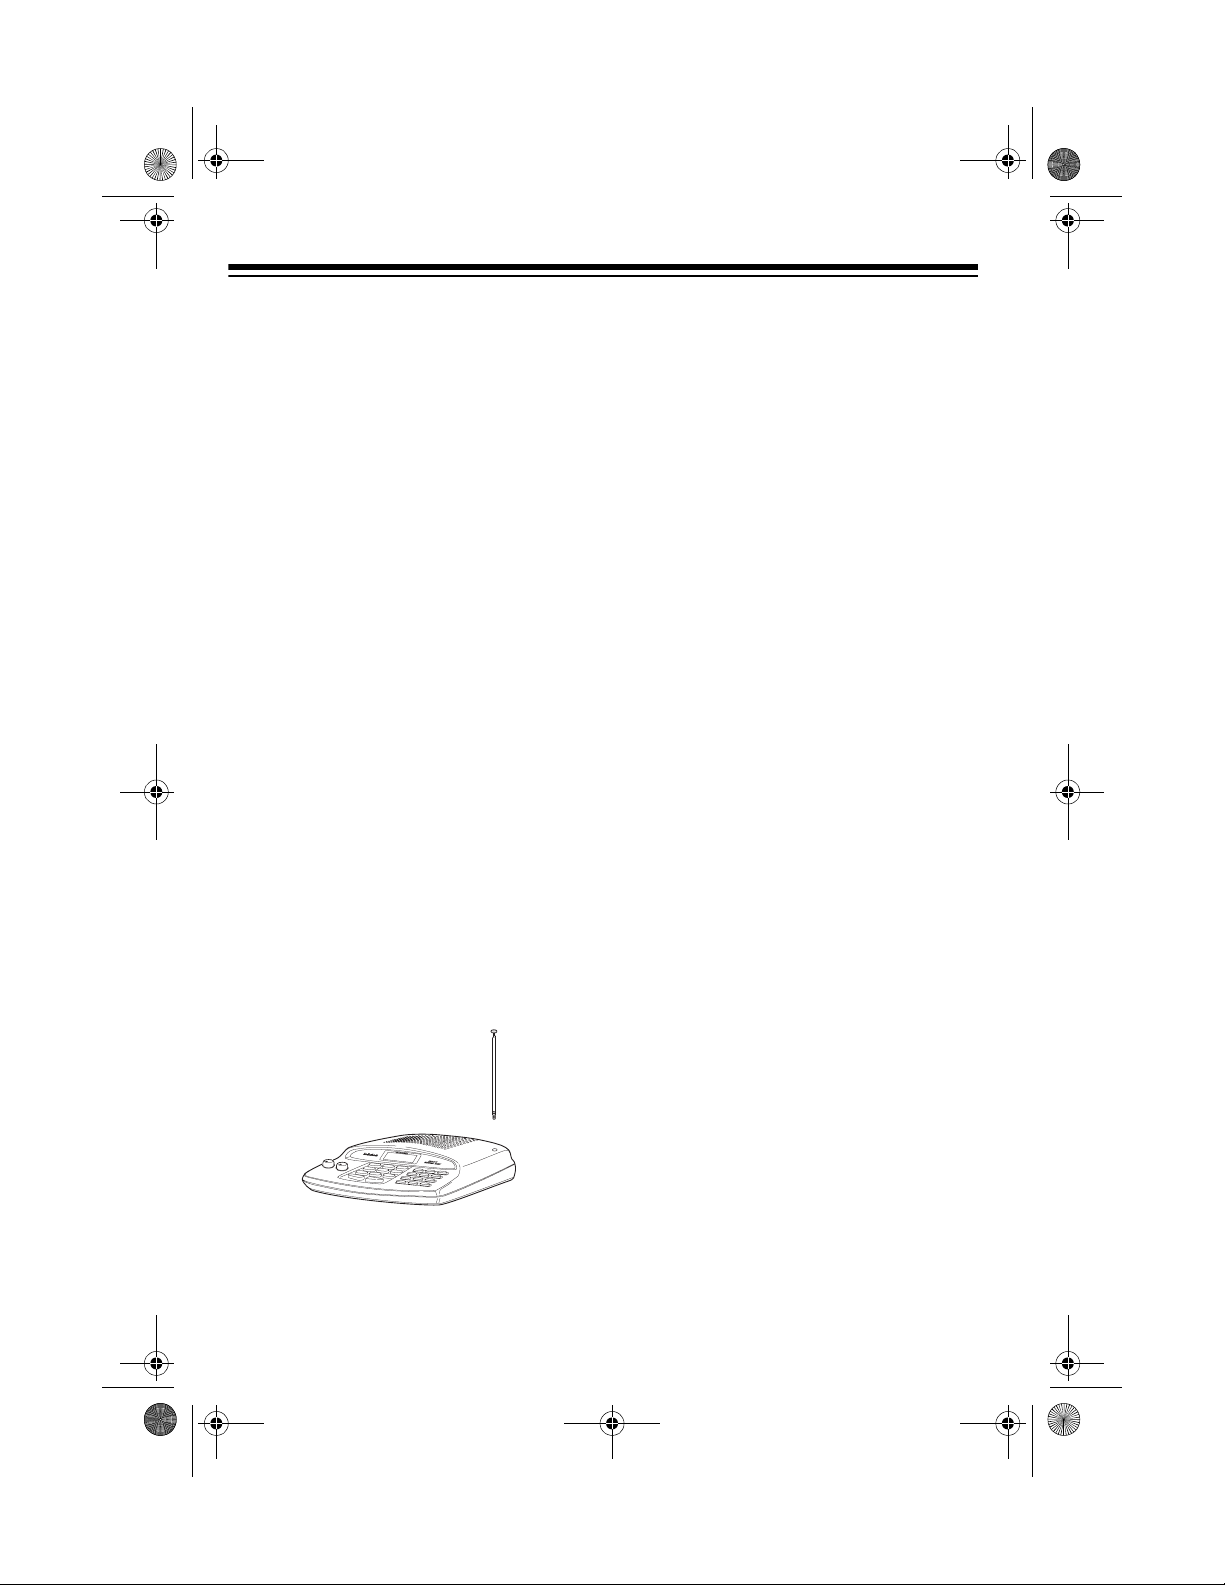
Connecting the Supplied
Antenna
You must install an antenna before you
can operate the scanner.
The supplied telescopi ng antenna helps
your scanner receive strong local signals. To install the antenna, thread it
clockwise into t he hole on t he scann er ’s
top.
ception of the tran sm is si on s y ou w ant t o
hear, adjust the antenna’s length.
Frequency
(MHz)
29–54 Extend fully
108–174 Collapse one segment
406–512 Collapse both segments
Antenna Length
Connecting an Outdoor
Antenna
Instead of the supplied antenna, you can
connect an outdoor base-st ation antenna (not supplied) t o your scanner. Your
local RadioShack st ore sells a va riety of
antennas. Choose the one that best
meets your needs.
When deciding on a base-s tation ant enna and its location, consider these
points:
• The antenna should be as high as
possible on the house.
• The antenna and its cable should be
as far as possible from sources of
electrical noise such as appliances
or other radios.
The scanner’s sensitivity depends on
the antenna’s length and various environmental conditions. For the best re-
6
• The antenna should be vertical for
the best performance.
To connect a base-station antenn a, first
remove the supplied antenna from the
scanner. Always use 50-ohm coaxial cable, such as RG-58 or RG-8, to connec t
the base-station antenna. For lengths
over 50 feet, use RG-8 low-loss dielectric coaxial cable. If the antenna cable’s
connector does not fit in the
you might also need an ante nna plug
ANT
jack,
Page 7
!
20-422.fm Page 7 Friday, January 7, 2000 12:54 PM
adapter. Your local RadioShack store
carries a wide varie ty of coax ia l antenna
cable and connectors.
Once you choose an antenna, follow the
mounting instructions supplied with the
antenna. Then route the antenna’s cable
to the scanner and co nnect the cable to
ANT
the
Cautions:
jack on the back of the scanner.
• Do not run the cable over sharp
edges or moving parts that might
damage it.
• Do not run the cable n ext to power
cables or other antenna cables.
• Follow all cautions and warnings
included with your antenna.
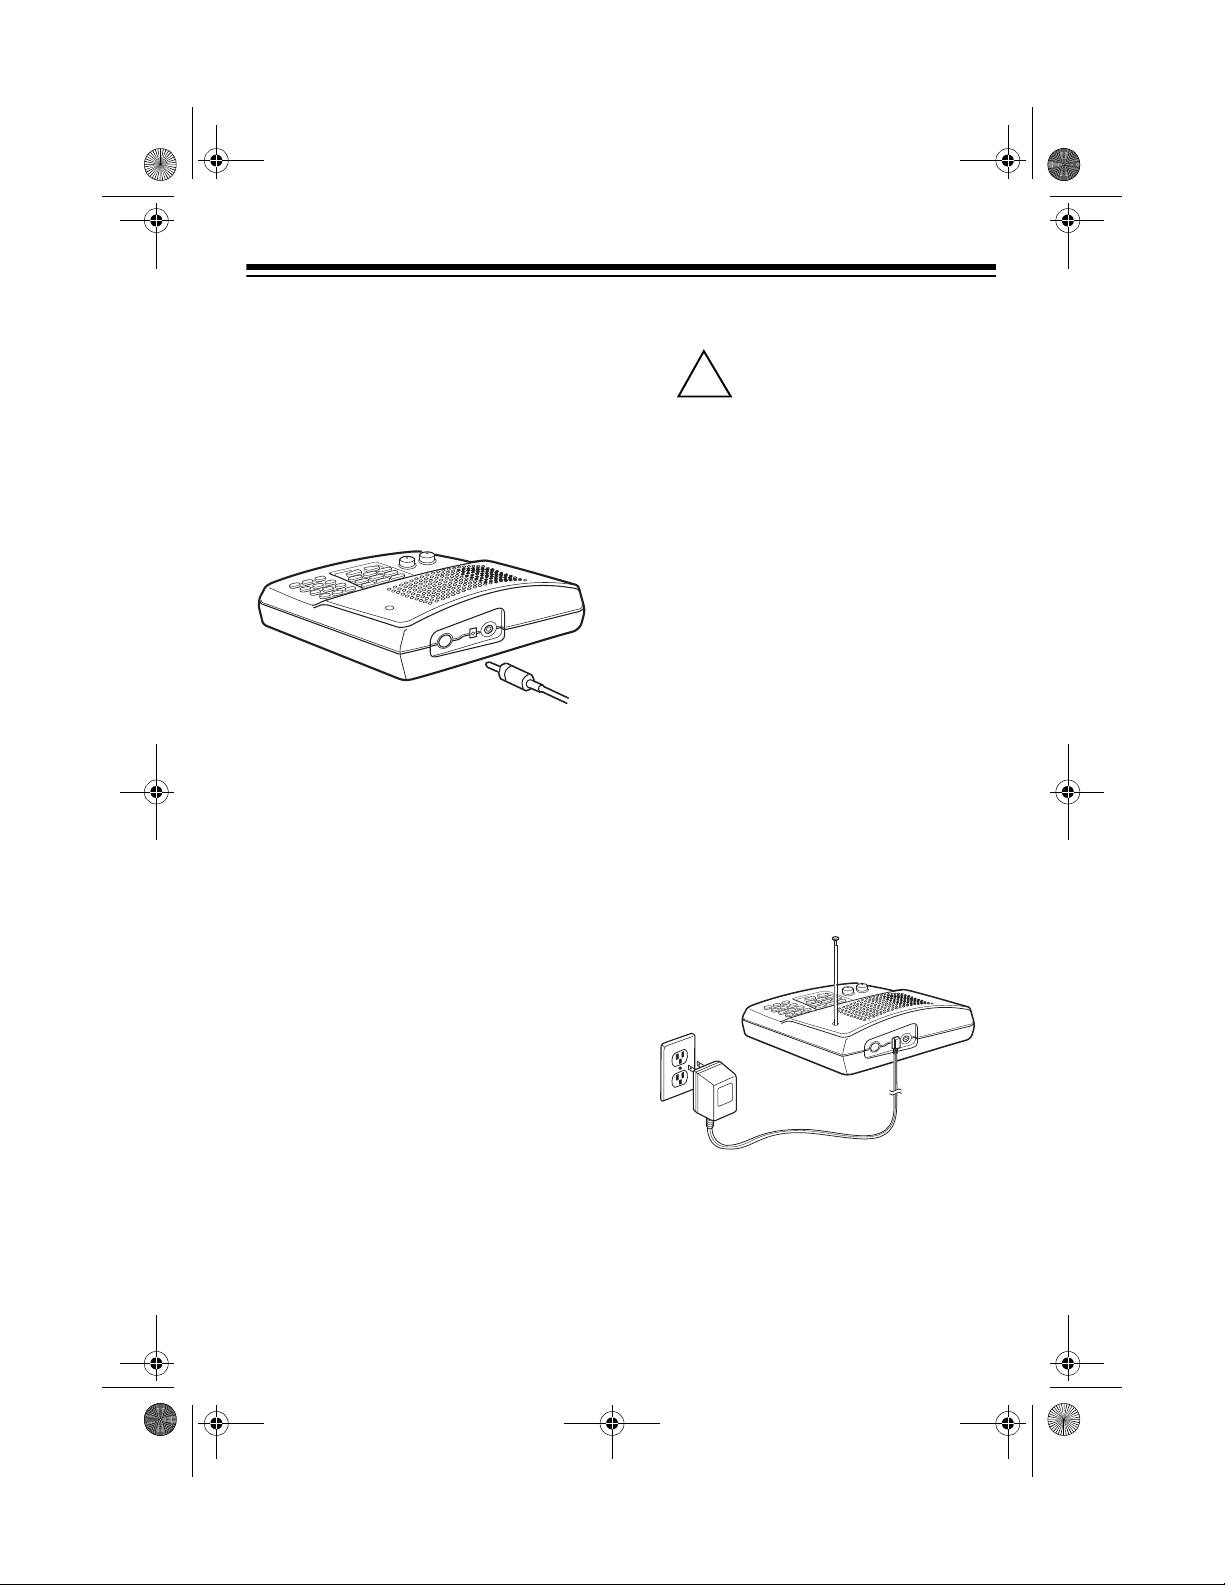
Cautions:
You must use a Class 2
power source that s upplies
10V AC and delivers 300
mA. Its plug must fit the scanner’s
AC 10V
meets these specifications. Using
an adapter that does not meet these
specifications could damage the
scanner or the adapter.
• A replacement adapter is available
by special order through your local
RadioShack store.
• Always connect the AC adapter to
the scanner befor e you co nne ct it t o
AC power. When you finish, disconnect the adapter from AC powe r before you disconnect it from the
scanner.
Insert the AC adapt er’s barrel plug into
AC 10V
the
ner, then plug the AC adapter into a
standard AC outlet.
jack. The supplied adapter
jack on the back of the scan-
CONNECTING POWER
Use the supplied 10V, 300-mA AC
adapter to power the scanner.
Warning:
polarized plug with an extension cord receptacle unless the blades can be fully
inserted to prevent blade exposure.
Do not use the AC adapt er’s
7
Page 8
20-422.fm Page 8 Friday, January 7, 2000 12:54 PM
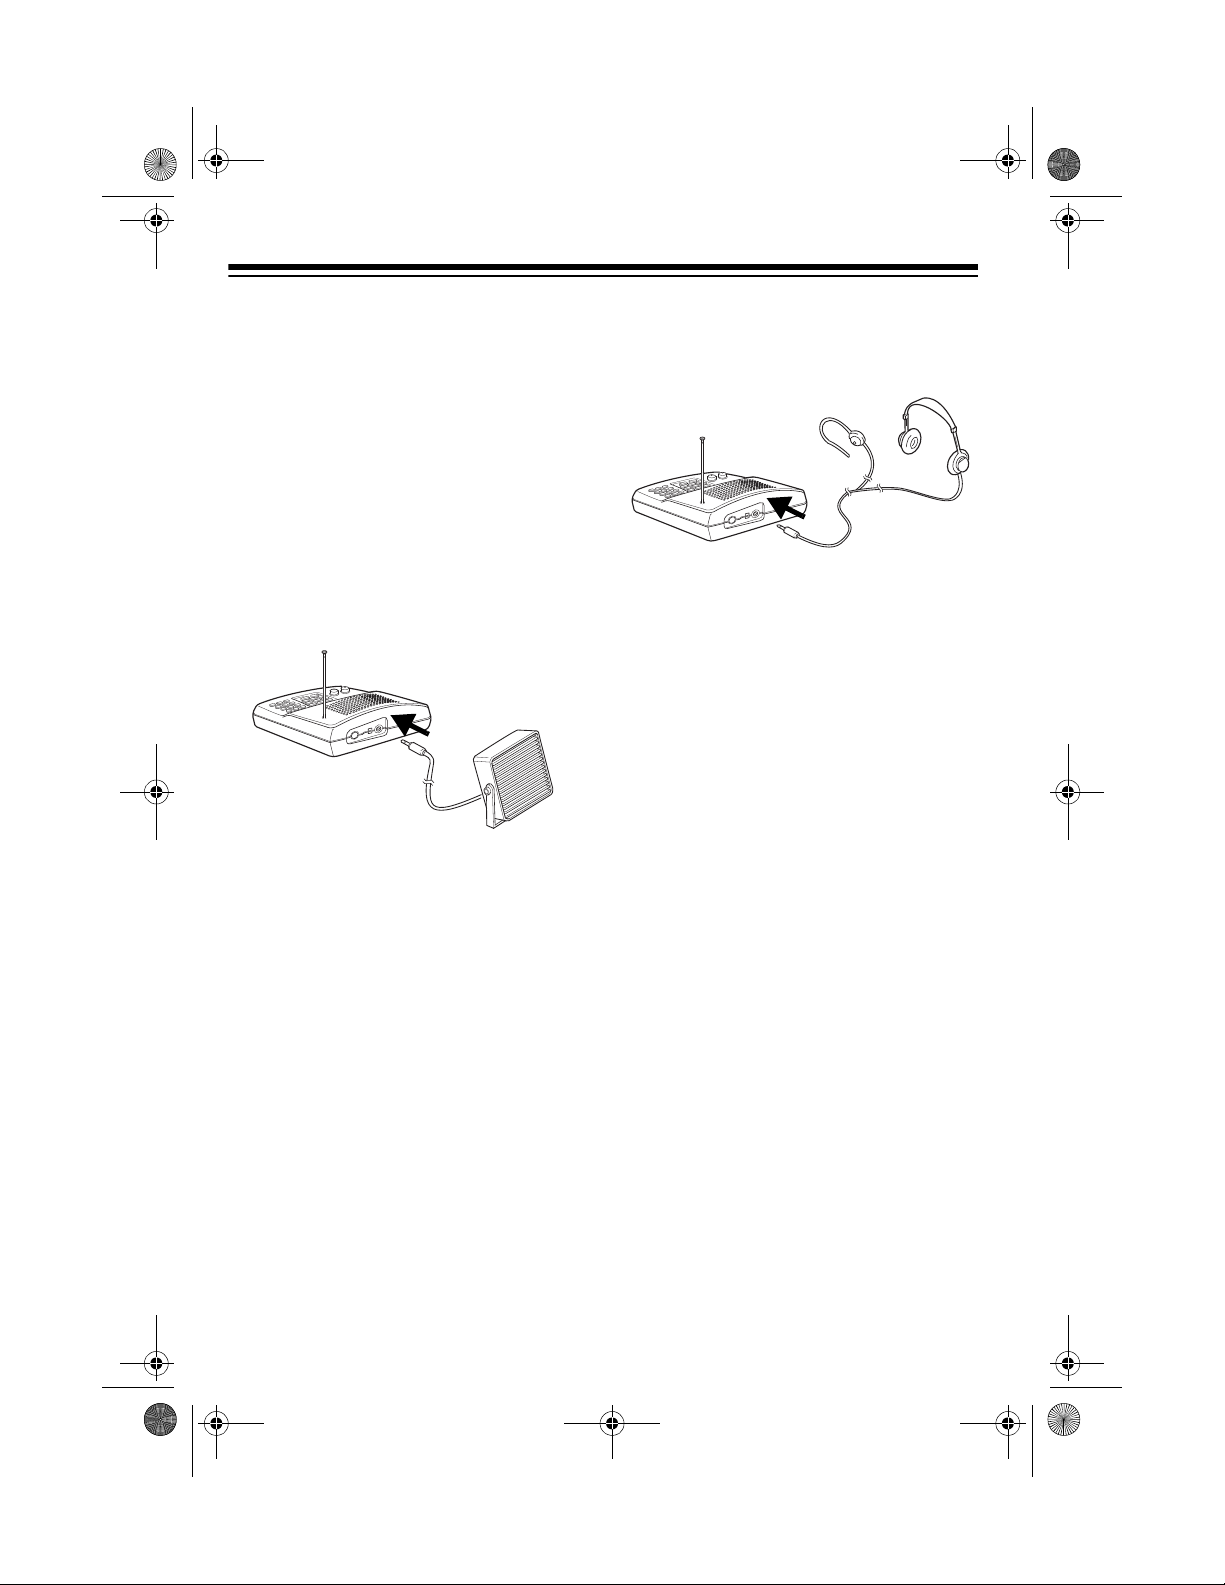
CONNECTING AN
EXTERNAL SPEAKER
You can connect an optional external
speaker with a
the scanner. Use an 8-ohm external
speaker that can handle at least 2.5
watts of power. Your local RadioShack
store sells scanner accessories, including external speakers.
Insert the speaker’s plug into the
SP.
jack on the back of the scanner.
Plugging in an external speaker
Note:
disconnects the scanner’s internal
speaker.
1
/
8
-inch (3.5-mm) plug to
EXT.
Insert the earphone’s or headphones’
plug into the
EXT. SP.
jack on the back of
the scanner.
Plugging in an earphone or he ad-
Note:
phones disconnec ts the scan ner ’s internal speaker.
Listening Safely
To protect your hearing, follow these
guidelines when you use an earphone/
headphones.
• Set the volume to the low est setting
before you begin liste ning. A fter yo u
begin listening, adjus t the volume to
a comfortable level.
CONNECTING AN
EARPHONE OR
HEADPHONES
You can connect an optional earphone
or pair of monaural headp hon es wit h a
inch (3.5-mm) pl ug to the scanner. Your
local RadioShack store se lls a com plete
line of earphones and headphones.
8
1
/
• Do not listen at e xtremely high volume levels. Extended high-volume
listening can lead to permanent
hearing loss.
• Once you set the volume, do not
increase it. Over time, your ears
8
-
adapt to the volum e level, so a volume level that does not cause discomfort might still damage your
hearing.
Page 9
20-422.fm Page 9 Friday, January 7, 2000 12:54 PM
UNDERSTANDING YOUR SCANNER
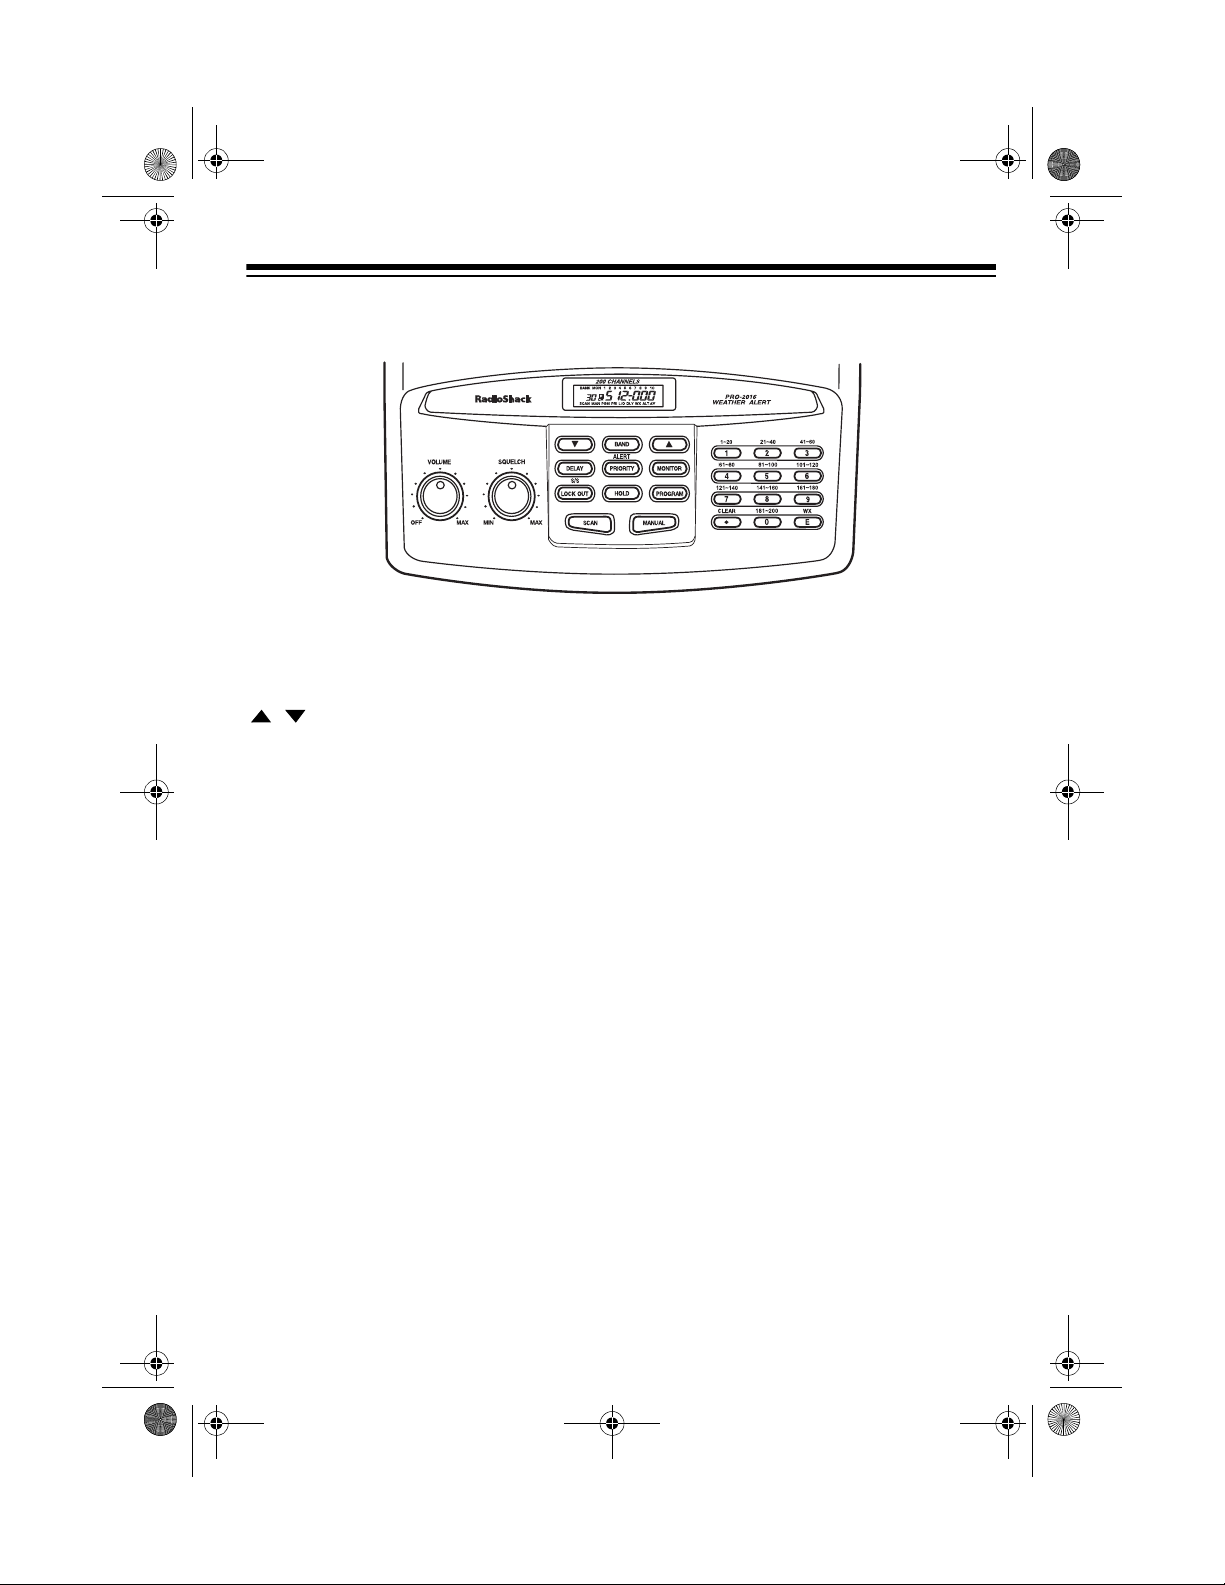
A LOOK AT THE FRONT PANEL
VOLUME
SQUELCH
Turns the scanner on or off and adjusts the volume.
Adjusts the scanner’s squelch.
/ Sets the search direction.
BAND
DELAY
Searches a band you select.
Programs a 2-seco nd delay for the selec ted channel ; sets a
delay for all active frequencies during a search.
ALERT/PRIORITY
Sets the scanner to the weather alert mode; turns priority on
or off for a particular channel.
MONITOR
Stores frequencies into, and accesses, the ten monitor
memories.
S/S-LOCKOUT
Skips a specified frequency during a band or direct search
(search/skip/lockout) or locks out selected channels during scanning.
HOLD
PROGRAM
SCAN
Pauses the scanner during a search.
Programs frequencies into channels.
Scans through the channels.
MANUAL
Stops scannin g to let you list en to a monitor me mory or directly enter a channel number.
9
Page 10
20-422.fm Page 10 Friday, January 7, 2000 12:54 PM
1–9, 0
CLEAR/.
WX/E
Each key has a single-digit label, and the 1–
also have a range of nu mbers. Us e the
enter the numbers for a channel or a frequency. Use the
range of number s abo ve the key (
lect or deselect the channels in a channel-storage bank.
Clears an incorrect ent ry, or enters the decimal point when
you enter a frequency.
Scans the seven prepr ogrammed weather ch annels; stores
frequencies into channels.
digits on the keys to
61–80
, for example) to se-
and
9
0
keys
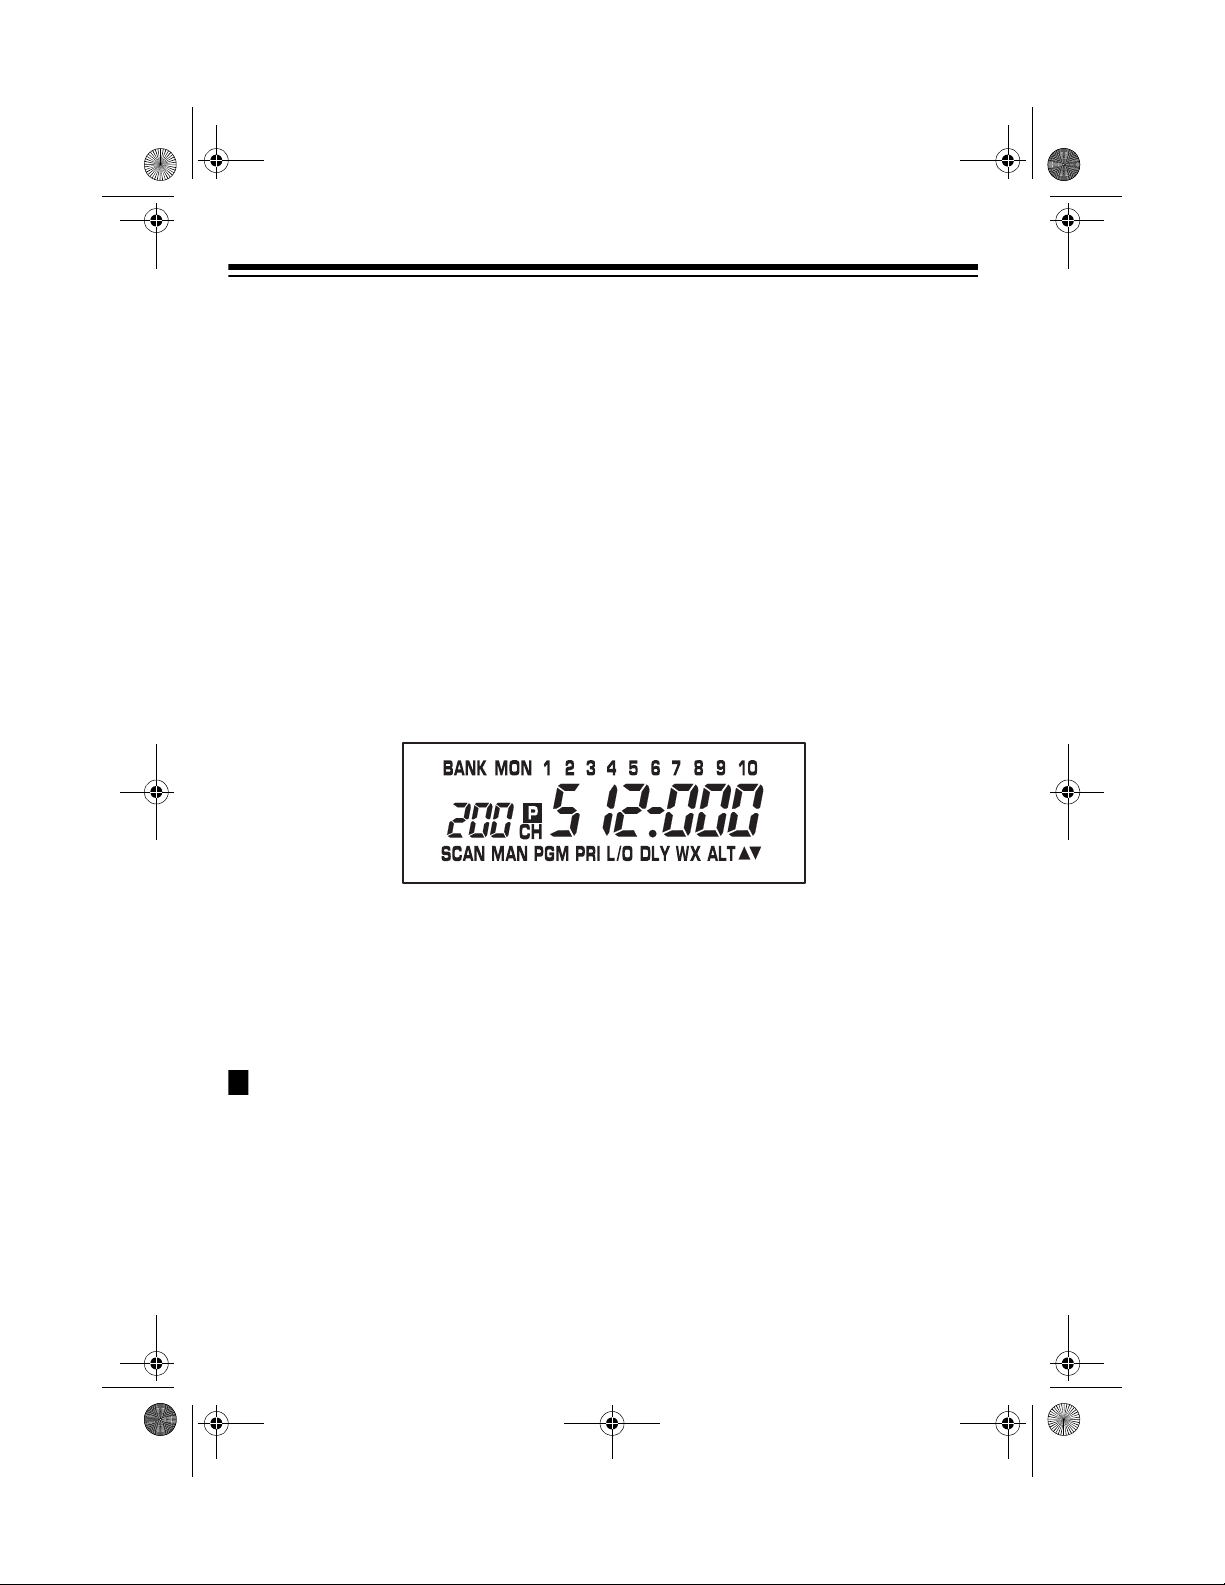
A LOOK AT THE DISPLAY
The display has indi cators that show the scanner ’s current operating mo de. A good
look at the display will help you understand your scanner.
Appears with a number (1–10) to its right to show which
BANK
channel-storage banks are turned on for scanning.
MON
Appears when you tune to a priority channel.
P
CH
Appears with a number (1–10) to its right to show which
monitor memory you are listening to.
Appears with a number (1–200) to its left to show which
channel the scanner is tuned to.
SCAN Appears when you scan channels.
MAN Appears when you manually select a channel.
PGM Appears when you program the scanner.
10
Page 11

20-422.fm Page 11 Friday, January 7, 2000 12:54 PM
PRI Appears when the priority feature is turned on.
L/O (lockout) Appears when you lock out channels or skip a frequency, or
when you manual ly se lect a ch a nnel o r f req ue nc y tha t i s lo cked
out or skipped
.
DLY Appears when the scanner is scanning or searching when you
have programmed a 2-second delay
.
WX (weather) Appears when the scanner is tuned to the weather band.
ALT Appears during weather alert mode and flashes when the scan-
ner receives a weather alert.
/ Indicates the search direction during a search.
b Appears instead of a channel number during a band search.
d Appears instead of a channel number during a direct search.
H Appears during a band search hold.
h Appears during a direct search hold.
11
Page 12

20-422.fm Page 12 Friday, January 7, 2000 12:54 PM
UNDERSTANDING BANKS AND BANDS
You can store freq uencies into either a
programmable memo ry loc ati on c all ed a
channel, or a temporary memory location called a monitor me mory. You can
store a frequency in each of the scanner’s channels (up to 200 ) and up to 10
monitor memories.
Your scanner also has eight frequency
bands, each covering a specific range of
frequencies you can search.
CHANNEL-STORAGE
BANKS
To make it easier to ident ify and select
the frequencies you want to listen to, the
scanner’s channels are divided into 10
channel-storage banks (1–9 and 0) of 20
channels each. You can use each
channel-storage ba nk to group frequencies, such as those used by the police
department, fire departmen t, ambul ance
services, and amateur radio operators
(see “Guide to the Action Bands” on
Page 23).
MONITOR MEMORIES
Monitor memories are temporary storage areas where you can store up to ten
frequencies during a search while you
decide whether to save them int o channels. You can man ual ly select and listen
to frequencies stored in monitor memories.
FREQUENCY BANDS
Your scanner has eight frequency
bands, each covering a specific range of
frequencies. You can search these
bands for specifi c bro adcasts by repe atedly pressing
displays the band you want.
For example, you can search through all
frequencies between 29.000 and 54.000
MHz for specific broadcasts by repeatedly pressing
pears. The scanner then automatically
searches the frequencies in that band.
BAND
until the scanner
BAND
until
29-54
ap-
For example, there might be three or
four police departments in your area,
each using several different frequencies.
Additionally, there might be other law
enforcement agenc ies suc h as stat e po lice, county sheriffs, or SWAT teams
that use their own frequencies. You
could program all law enforcement frequencies starting with Channel 1 (the
first channel in Bank 1), then program
the fire department, paramedic, and other public safety freq uen ci es s tarting with
Channel 21 (the first channel in Bank 2).
12
Page 13

20-422.fm Page 13 Friday, January 7, 2000 12:54 PM
This table shows the frequency band ranges displayed by the scanner and the typical
usage, frequency coverage, and step for each.
Displayed
Frequency
Band Range
29-54
108-137
137-144
144-148
148-174
406-450
450-470
470-512
Typical Usage
10-Meter Amateur Radio, VHF
Lo, 6-Meter Amateur Radio
Aircraft 108.000 to 136.975 12.5
Government 137.000 to 144.000 5.0
2-Meter Amateur Radio 144.000 to 148.000 5.0
VHF Hi 148.000 to 174.000 5.0
Government, 70-Centimeter
Amateur Radio
UHF Lo 450.000 to 470.000 12.5
UHF “T” Band 470.000 to 512.000 12.5
Frequency Covera ge
(MHz)
29.000 to 54.000 5.0
406.000 to 450.000 12.5
Step
(kHz)
Notes:
• Your scanner searches at the preset frequency step rate (5 or 12.5 kHz) for each
band. You cannot change the frequency step rate.
• The scanner displays the nearest 1 kHz step. For example, if you tune to
406.1125, the scanner displays 406.112.
• While searchin g through a band, you mig ht hear a frequency you want to store.
You can store any frequency into a monitor memory.
• You cannot change or delete any of the frequencies in the frequency bands.
13
Page 14

20-422.fm Page 14 Friday, January 7, 2000 12:54 PM
OPERATION
TU RNING ON THE
SCANNER/SETTING
VOLUME AND SQUELCH
1. Turn
2. Turn
3. Turn
Notes:
• If the scanner picks up unwanted,
• If you want to listen to a weak or dis-
• If the scanner will not scan, turn
VOLUME
counterclockwise.
VOLUME
hear a hissing sound.
SQUELCH
leave it set to a point just after the
hissing sound stops.
partial, or very weak tr ansmissions,
turn
decrease the scanner’s sensitivity to
these signals.
tant station, turn
clockwise.
SQUELCH
SQUELCH
further clockwise.
SQUELCH
and
clockwise until you
clockwise, then
clockwise to
SQUELCH
fully
counter-
RESETTING THE
SCANNER
You might need to res et the scanner in
any of the following conditions:
• before you use it for the first time (to
clear anything that might already
have been stored in m emory previously)
• if the scanner’s display locks up
• if the scanner does not work properly after you connect power
• if the scanner is dropped or subjected to an electrical shock
Caution:
information you have programmed into
the scanner. Use this procedure only
when you are sure your scanne r is not
working properly.
Follow these steps to reset the scanner.
1. Turn off the scanner.
2. While you hold down
This procedure clears all the
2
and 9, turn
on the scanner. When
appears, release 2 and 9.
CLEAr
MANUALLY STORING
FREQUENCIES INTO
CHANNELS
If you know of a frequency you want to
store, you can manually store it into a
channel.
Good references for active frequencies
are RadioShack’s
Guide Including Fire and Emergency
Services
tory
We update these directories every year,
so be sure to get a current copy. See
also “Guide to the Action Bands” on
Page 23 in this manual.
Note:
frequencies in your area, follow the
steps in “Searc hing Fo r and Temporarily
Storing Active Freq uencies” o n Page 15
to search for transmissions.
,
Aeronautical Frequency Direc-
, and
Maritime Frequency Directory
If you do not have a reference to
Police Call Radio
.
14
Page 15

20-422.fm Page 15 Friday, January 7, 2000 12:54 PM
Follow these steps to manually store a
frequency into a channel.
1. If the scanner is scanning, press
MANUAL
2. Using the number keys, enter the
channel number wher e you want to
store a frequency.
3. Press
bank number, the selected chann el
number and
channel number is empty), and
000.000
grammed frequency) appear.
4. Using the number keys, enter the
frequency you want to store into that
channel, including the decimal point.
Note:
rounds the entered fr equency up to
the closest valid frequency. For
example, if you try to enter a frequency of 151.473, your scanner
accepts it as 151.475.
5. Press
channel was locked out, the loc kout
is removed.
Note:
quency in Step 4, the scanner displays
repeat Steps 4 and 5.
6. To program the next channel in
sequence, repeat Steps 3–5. T o program another channel (not in
sequence), repeat Steps 2–5.
.
PROGRAM
(or the previously pro-
Your scanner automatically
E
to store the frequency. If the
If you entered an invalid fre-
Error
BANK
.
L/O
(if the selected
. Press
CLEAR
and the
, then
SEARCHING FOR AND
TEMPORARILY STORING
ACTIVE FREQUENCIES
You can search for transmissions us ing
either a band or direct search, then temporarily store the frequencies for those
transmission s int o monit o r memor ie s.
Notes:
• If you manually tune to a search skip
frequency, the display shows
(see “Skipping Frequencies/Channels” on Page 19).
• You can use the scanner’s delay
feature while using band or direct
search. See “Delay” on Page 19.
Band Search
Using band search, you can select a frequency band and search for transmissions within only that band.
1. Repeatedly press
see the frequency ba nd you want t o
search.
The scanner displays ▲ or ▼, the
range for each frequency band,
appears, and the number of the current monitor memory blinks on the
display. Then the scanner starts to
search the frequenc ies in the band.
When the scan ner finds a t ransmission, it stops and displays the frequency until the transmiss ion stops,
then the scanner starts searching
again.
BAND
L/O
until you
b
15
Page 16

20-422.fm Page 16 Friday, January 7, 2000 12:54 PM
2. To manually search the band, pres s
HOLD
after the scanner starts automatically searching the frequencies. The scanner disp lays
▲ or ▼, and a frequency with in the
band you selected.
3. Repeatedl y pr ess ▲ to step from the
lower to the upper range, or ▼ to
step from the upper to the lower
range.
Hold down ▲ or ▼ for about 1 s econd or press
matic search.
4. When the scanner finds an active
frequency, you can do any of the following:
• save the frequency into the cur-
rent monitor memory by pressi ng
MONITOR
• continue searching by pressing ▲
or ▼.
• stop searching and listen to the
frequency by pressing
(hold) appears.
You can change th e dir ection of a
Note:
manual search by pressing ▲ or ▼
once.
HOLD
.
to return to auto-
H
(hold),
HOLD
.
the search. Press • to en ter the dec imal point.
3. Press ▲ or ▼ to search up or down
from the selected frequency.
(direct) and ▲ or ▼ appear, and the
next available monitor memory
number flashes.
If you entered an invalid fre-
Note:
quency in Step 2, the scanner dis-
Error
plays
repeat Steps 2 and 3.
4. When the scanner finds an active
frequency, you can do any of the following:
• save the frequency into the cur-
rent monitor mem ory by pressing
MONITOR
• continue searchi ng or change the
search direction by pressing ▲ or
▼.
• stop searching and listen to the
frequency by pressing
H
(hold) appears.
To manually step through frequencies
one at a time after you stop a search, repeatedly press ▲ or ▼. To continue
searching, either press
down ▲ or ▼ for about 1 second.
. Press
.
CLEAR
HOLD
, then
HOLD
.
or hold
d
h
Direct Search
Using direct search, you c an ente r a f requency, then search for transmissions
above or below that freque ncy within all
of the frequency bands.
1. Press
2. Use the number keys to enter the
16
MANUAL
frequency where you want to start
.
LISTENING TO MONITOR
MEMORIES
After you store frequencies into the
scanner’s monitor memories, you can
listen to them by pressing
MONITOR
sired monitor memory.
, then the number for the de-
MANUAL
,
Page 17

20-422.fm Page 17 Friday, January 7, 2000 12:54 PM
You can also select a monitor memory
by repeatedly pressing
the desired monitor memory appears.
To listen to the monitor memories,
Note:
the priority channel feature must be
turned off (see “Priority” on Page 20).
MONITOR
until
MOVING A FREQUENCY
FROM A MONITOR
MEMORY TO A CHANNEL
1. If the scanner is scanning, press
MANUAL
2. Use the number keys to enter the
channel number wher e you want to
store the monitor frequency, then
press
3. Press
ber flashes and the frequency
stored in the monitor memory and
the monitor memory’s number
appear.
4. Use the number keys to enter the
monitor memory number that has
the frequency you want t o store into
the channel. The frequency appears.
5. Press
quency in the selected channel.
.
PROGRAM
MONITOR
E
. The scanner stores the fre -
PGM
.
appears.
. The channel num-
DELETING A FREQUENCY
FROM A CHANNEL
1. If the scanner is scanning, press
MANUAL
2. Use the number keys to enter the
channel number containing the frequency you want to delete.
3. Press
4. Press
deleted.
To replace a frequency stored in a monitor memory, store a new frequency in
that monitor memory.
.
PROGRAM
0
then E. The frequency is
.
SCANNING CHANNELS
You cannot scan channels until
Note:
you have stored frequencies in them.
To scan channels s tored i n the cha nnel-
storage banks, press
ner scans through all channels in the active banks.
To select one or more channel-storage
banks while scanning, select each bank
you want to scan by pressing its number
key so the bank’s number appears on
the display.
SCAN
. The scan-
The channels for each bank are
Note:
listed above the scanner’s number keys.
To turn off channe l- s tor age banks , pre ss
the number key for each of the bank(s)
so the bank’s number disappears. The
scanner does not scan any of the stored
channels within b anks you have turned
off.
17
Page 18

20-422.fm Page 18 Friday, January 7, 2000 12:54 PM
Notes:
• You can manually sele ct any channel in a bank, even if the bank is
turned off.
• You cannot turn off all ten banks.
• The scanner skips channels that
have been locked out (see “Skipping
Frequencies/Channels” on Page 19.
MANUALLY SELECTING A
CHANNEL
You can continuousl y monitor a specific
channel without sc anning. This is us eful
if you hear an eme rgency broadcast on
a channel and want to hear all the details (even though there might be periods of silence) or if you want to monitor
only a specific channel or a locked-out
channel.
Follow these steps to manually s elect a
channel.
1. Press
2. Use the number keys to enter the
Notes:
• If your scanner is scanning and
• If you repeatedly press
18
MANUAL
desired channel numbe r, then press
MANUAL
stops at the desired ch annel, simpl y
press
the channel.
the scanner steps through the channels.
MANUAL
.
again.
to manually select
MANUAL
,
Page 19

20-422.fm Page 19 Friday, January 7, 2000 12:54 PM
SPECIAL FEATURES
DELAY
Many agencies use a two-way radio system that might have a pause of sever al
seconds between a query and a reply.
To avoid missing a reply, you can program a 2-second delay into any of your
scanner’s channels or frequencies.
Then, when the scanner stops on the
channel,
continues to monitor the channel for 2
seconds after the transmission stops before it resumes scanning or searching.
You can program a 2-second delay in either of the following ways:
• If the scanner is sca nni ng and s top s
• If the desired channel is not
If the scanner is searching, press
during the search.
display and the scanner automatically
adds a 2-second delay to every transmission it stops on.
To turn off delay on an y channel, select
that channel then press
appears. To turn off delay for all frequencies during a search, simply press
DELAY
DLY
appears and the scanne r
on an active channel , quickly press
DELAY
before it starts to scan again.
selected, manua lly select the channel then press
.
DELAY.
DLY
appears on the
DELAY
DLY
.
DELAY
dis-
SKIPPING FREQUENCIES/
CHANNELS
You can scan channels faster by skipping ones that have a continuous tran smission, such as a weather channel.
You can lock out up to al l 200 channels
while scanning, or skip up to 20 frequencies during a band or direct search.
To skip a channel/freque ncy while s canning or searching, press
when the scanner stops on it.
Notes:
• If you skip more t han 20 search frequencies, each new frequency
replaces an earlier one, starting
from the first stored frequency.
• You can manually select skipped
frequencies after y ou pr e ss
stop a search. The s ca nner di sp la ys
L/O
when you select a skipped frequency. See “Manually Selecting a
Channel” on Page 18).
Removing Skip from
Frequencies
To remove the skip from a frequency
while searchin g, press
search, press ▲ or ▼ to select the
skipped frequency, then repeatedly
until
L/O
disappears.
S/S
press
S/S-LOCKOUT
HOLD
HOLD
to stop the
to
To remove the skip from all frequencies
at once while searching, hold down
LOCKOUT
until the scanner beeps twice.
S/S-
19
Page 20

20-422.fm Page 20 Friday, January 7, 2000 12:54 PM
If you turned the key tone off (see
Note:
“Turning the Key Tone On or Off” on
Page 21), the scanner does not beep
when you hold down
S/S-LOCKOUT
.
Removing Lockout from
Channels
Follow these steps t o remove the lockout from a channel while scanning.
1. Press
2. Use the number keys to enter the
3. Press
4. Repeatedly press
To remove th e lockou t from all channels
while scanning, use the number keys to
select the banks con taining the skipped
channels, press
down
twice.
MANUAL
to stop scanning.
channel number you want to delete
the lockout from.
MANUAL
L/O
disappears.
LOCKOUT
.
LOCKOUT
MANUAL
, then hold
until
until the scanner b eeps
scans, it checks t he priority channels in
each selected bank for activity every 2
seconds.
Notes:
• Y ou can skip priority channels. If you
skip all priority channels, the scanner displays
P CH LOC OUt
when
you turn on the priority feature. See
“Skipping Frequencies/Channels”
on Page 19.
• The priority feature must be turned
off to listen to monitor memories.
The scanner automatically designates
the first channel in each bank as that
bank’s priority channel. Follow these
steps to program a different channel as
the priority channel.
1. Press
PROGRAM
.
2. Use the number keys to enter the
channel number you want to program as the priority channel, then
PRIORITY
press
. P appears to the
right of the channel number.
If you turned off the key tone ( see
Note:
“Turning the Key Tone On or Off” on
Page 21), the scanner does not beep
when you hold down
LOCKOUT
.
PRIORITY
The priority feature lets you scan
through programmed chan nels and still
not miss important or interesting calls on
specific channels. You can program one
stored channel in each bank as a priority
channel (up to 10 total ). As the scanner
20
3. Repeat Steps 1 and 2 for each
channel you want to program as a
priority channel.
To review the priority channel numbers
for all banks, press
peatedly press
To turn on priority, press
ing scanning or when
PRI
appears, and the scanner checks
PROGRAM
PRIORITY
.
PRIORITY
MAN
appears.
then re-
dur-
the priority channel in each selected
bank every 2 seconds. It stays on the
channel if there is activity, and
P
ap-
pears.
Page 21

20-422.fm Page 21 Friday, January 7, 2000 12:54 PM
To turn off the priority feature, press
ORITY
Note:
bank in which a priority channel has
been programmed, the scanner stops
on the lowest-number e d p rior it y channel
first while scanning.
PRI
.
disappears.
If you are scanning more than one
PRI-
LISTENING TO THE
WEATHER BAND
The National Oceanic and Atm ospheric
Administration (NOAA ) uses 7 frequencies to broadc ast lo ca l fore casts an d regional weather information. We have
preprogrammed your scanner with these
frequencies.
For a list of all 7 national wea ther
Note:
frequencies, see “Na tional Weather Fre quencies” on Page 22.
2. Press
When a severe weath er emergenc y signal is broadcas t, the scanner sounds a
loud alarm (regardless of the volume
control setting), and
flashes. The alarm continues until the
emergency signal stops transmitting.
To manually turn off the siren and exit
the weather alert mode, press
ALERT
broadcast turns off.
ALT
.
appears and the
H
appears and
ALERT
ALT
.
Testing Alert Tone
To hear the alert tone, make sure the
scanner is not set to sound an alert tone,
WX
press
tone sounds and the frequency and
TESt
Press
, then hold down
alternately appear.
ALERT
to exit the alert tone mode.
ALERT
. The
To scan the preprogrammed weather
channels, press
the scanner searches the weather channels and stops on an active broadcast. If
a broadcast is weak, press
continue search ing through the weathe r
channels. Press ▲ or ▼ to switch the
search direction.
WX
. WX appears, and
WX
again to
Weathe r Alert
Your scanner’s weather alert feature can
warn you when your lo cal weather station broadcasts a se vere weather emergency signal. (See “Testing Alert Tone”).
1. Press
WX
to find the clearest local
weather broadcasting station.
TURNING THE KEY TONE
ON OR OFF
The scanner is preset to sound a tone
each time you press any of its keys.
Follow these step s to turn the scann er’s
key tone on or off.
1. If the scanner is turned on, turn
VOLUME
clicks to turn it off.
2. Hold do wn
turn on the scanner.
key tone is off) or
key tone is on) appe ars for about 3
seconds.
counterclockwise until it
S/S-LOCKOUT
while you
no bEEP
On bEEP
(if the
(if the
21
Page 22

20-422.fm Page 22 Friday, January 7, 2000 12:54 PM
A GENERAL GUIDE TO SCANNING
Your scanner’s rece ption is mainly “line-of-sight.” Yo u usually cannot hear stations
that are beyond the horizon.
GUIDE TO FREQUENCIES
Ham Radio Frequencies
Ham radio operators often br oadcast emergency information when other means of
communication break down.
The following chart shows the voice frequencies that you can monitor:
Wavelength (Meters) Voice (MHz)
10-Meter
6-Meter
2-Meter
70-Centimeter
29.000–29.700 MHz
50.000–54.000 MHz
144.000–148.000 MHz
420.000–450.000 MHz
National Weather Frequencies
162.400 162.475 162.525
162.425 162.500 162.550
162.450
Birdie Frequencies
Every scanner has birdie frequencies. Birdies are signals created by the scanner’s internal circuits. Th ese stray freq uencies might i nterfere with broa dcasts on the same
or similar frequencies. If yo u program one of these frequencies, you hear only noise
on that frequency. If the interference is not severe, you might be able to turn
SQUELCH
This scanner’s known birdie frequencies (in MHz) are 171.250 and 460.0125.
To find the birdies in your scanner, begin by disconnecting the antenna and moving it
away from the scan ner. Make sure that no other nearby radio or TV sets ar e turned
on near the scanner. Use the search function and search every frequency range from
its lowest frequency to the highest. Occas ionally, the search ing will stop as if it ha d
found a signal, ofte n without a ny s ound. Tha t is a birdie . Ma ke a lis t of al l the birdies
in your scanner for future reference.
clockwise to cut out the birdie.
22
Page 23

20-422.fm Page 23 Friday, January 7, 2000 12:54 PM
GUIDE TO THE ACTION BANDS
Typical Band Usage
VHF Band (29.00-300.00 MHz)
Low Range
6-Meter Amateur
U.S. Go vernment
2-Meter Amateur
High Range
UHF Band (300 MHz-3.0 GHz)
U.S. Go vernment
70-cm Amateur
Low Range
FM-TV Audio Broadcast, Wide Band
Primary Usage
137.00–144.00 MHz
144.00–148.00 MHz
148.00–174.00 MHz
406.00–420.00 MHz
420.00–450.00 MHz
450.00–470.00 MHz
470.00–512.00 MHz
29.00–50.00 MHz
50.00–54.00 MHz
As a general rule, mo st of th e radio ac tivi ty is co ncentr ated o n the fol lowing frequ encies:
VHF Band
Activities Frequencies
Government, Police, and Fire 153.785–155.980 MHz
Emergency Services 158.730–159.460 MHz
Railroad 160.000–161.900 MHz
UHF Band
Activities Frequencies
Land-Mobile “Paired”
Frequencies
Base Stations 451.025–454.950 MHz
Mobile Units 456.025–459.950 MHz
Repeater Units 460.025–464.975 MHz
Control Stations 465.025–469.975 MHz
Remote control sta tions and mobile u nits operate at 5 MHz higher than their
Note:
450.000–470.000 MHz
associated base stations and relay repeater units.
23
Page 24

20-422.fm Page 24 Friday, January 7, 2000 12:54 PM
BAND ALLOCATION
Use the following listing of the typical services within your scanner’s frequency coverage to assist you to decide which freque ncy ranges to scan. These freque ncies are
subject to chang e, a nd might vary from area to area. F or a more complete listing , r efer to the “Police Call Radio Guide including Fire and Emergency Services,” available
at your local RadioShack store.
Abbreviations Services
BIFC . . . . . . . . . . . . . . . . . . . . . . . . . . . . . . . . . . . Boise (ID) Interagency Fire Cache
BUS . . . . . . . . . . . . . . . . . . . . . . . . . . . . . . . . . . . . . . . . . . . . . . . . . . . . . . . Business
CAP . . . . . . . . . . . . . . . . . . . . . . . . . . . . . . . . . . . . . . . . . . . . . . . . . . . Civil Air Patrol
CB . . . . . . . . . . . . . . . . . . . . . . . . . . . . . . . . . . . . . . . . . . . . . . . . . . . . Citizens Band
CCA . . . . . . . . . . . . . . . . . . . . . . . . . . . . . . . . . . . . . . . . . . . . . . . . . Common Carrier
CSB . . . . . . . . . . . . . . . . . . . . . . . . . . . . . . . . . . . . . . . . . . . . Conventional Systems
CTSB . . . . . . . . . . . . . . . . . . . . . . . . . . . . . . . . . . . . Conventional/Trunked Systems
FIRE . . . . . . . . . . . . . . . . . . . . . . . . . . . . . . . . . . . . . . . . . . . . . . . . . Fire Department
HAM . . . . . . . . . . . . . . . . . . . . . . . . . . . . . . . . . . . . . . . . . . . . . Amateur (Ham) Radio
GOVT . . . . . . . . . . . . . . . . . . . . . . . . . . . . . . . . . . . . . . . . . . . . . Federal Government
GMR . . . . . . . . . . . . . . . . . . . . . . . . . . . . . . . . . . . . . . . . . . . . . General Mobile Radio
GTR . . . . . . . . . . . . . . . . . . . . . . . . . . . . . . . . . . . . . . . . . . . . . . . . . General Trunked
IND . . . . . . . . . . . . . . . . . . . . . . . . . . . . . . . . . . . . . . . . . . . . . . . . Industrial Services
. . . . . . . . . . . . . . . . . . . . . (Manufacturing, Construction, Farming, Forest Products)
MAR . . . . . . . . . . . . . . . . . . . . . . . . . . . . . . . . . . . . . . . . . . . . Military Amateur Radio
MARI . . . . . . . . . . . . . . . . . . . . . . . . . . . . . . . . . . . . . . . . . . . Maritime Limited Coast
. . . . . . . . . . . . . . . . . . . . . . . . . . . . . . . . . . . . . . . . (Coast Guard, Marine Telephone,
. . . . . . . . . . . . . . . . . . . . . . . . . . . . . . . . . . . . . . . Shipboard Radio, Private Stations)
MARS . . . . . . . . . . . . . . . . . . . . . . . . . . . . . . . . . . . . . Military Affiliate Radio System
MED . . . . . . . . . . . . . . . . . . . . . . . . . . . . . . . . . . . . . . . Emergency/Medical Services
MIL . . . . . . . . . . . . . . . . . . . . . . . . . . . . . . . . . . . . . . . . . . . . . . . . . . . . . U.S. Military
MOV . . . . . . . . . . . . . . . . . . . . . . . . . . . . . . . . . . . . . . . Motion Picture/Video Industry
NEW . . . . . . . . . . . . . . . . . . . . . . . . . . . . . . . . . . . . . . . . . . . . . . New Mobile Narrow
NEWS . . . . . . . . . . . . . . . . . . . . . . . . . . . . . . . Relay Press (Newspaper Reporters)
OIL . . . . . . . . . . . . . . . . . . . . . . . . . . . . . . . . . . . . . . . . . . . . . Oil/Petroleum Industry
POL . . . . . . . . . . . . . . . . . . . . . . . . . . . . . . . . . . . . . . . . . . . . . . . Police Department
PUB . . . . . . . . . . . . . . . . . . . . . . . . . . . . . . . . . . . . . . . . . . . . . . . . . . Public Services
. . . . . . . . . . . . . . . . . . (Public Safety, Local Government, Forestry Conservation)
PSB . . . . . . . . . . . . . . . . . . . . . . . . . . . . . . . . . . . . . . . . . . . . . . . . . . . . Public Safety
PTR . . . . . . . . . . . . . . . . . . . . . . . . . . . . . . . . . . . . . . . . . . . . . . . . . . Private Trunked
ROAD . . . . . . . . . . . . . . . . . . . . . . . . . . . . . . . . . . . . . Road & Highway Maintenance
RTV . . . . . . . . . . . . . . . . . . . . . . . . . . . . . . . . . Radio/TV Remote Broadcast Pickup
TAXI . . . . . . . . . . . . . . . . . . . . . . . . . . . . . . . . . . . . . . . . . . . . . . . . . . . . Taxi Services
TELB . . . . . . . . . . . . . . . . . . . . . . . . . . . . . . . . . . . . . . . . . . . . . . . Mobile Telephone
. . . . . . . . . . . . . . . . . . . . . . . (Aircraft, Radio Common Carrier, Landline Companies)
TELC . . . . . . . . . . . . . . . . . . . . . . . . . . . . . . . . . . . . . . . . . . . . . . . Cordless Phones
TELM . . . . . . . . . . . . . . . . . . . . . . . . . . . . . . . . . . . . . . . . . . Telephone Maintenance
TOW . . . . . . . . . . . . . . . . . . . . . . . . . . . . . . . . . . . . . . . . . . . . . . . . . . . . . Tow Trucks
TRAN . . . . . . . . . . . . . . . . . . . . . . . . . . . . . . . . . . . . . . . . . . Transportation Services
24
Trucks, Tow Trucks, Buses, Railroad, Other)
Page 25

20-422.fm Page 25 Friday, January 7, 2000 12:54 PM
TSB . . . . . . . . . . . . . . . . . . . . . . . . . . . . . . . . . . . . . . . . . . . . . . . . . Trunked Systems
TVn . . . . . . . . . . . . . . . . . . . . . . . . . . . . . . . . . . . . . . . . . . . . FM-TV Audio Broadcast
USXX . . . . . . . . . . . . . . . . . . . . . . . . . . . . . . . . . . . . . . . . . . . Government Classified
UTIL . . . . . . . . . . . . . . . . . . . . . . . . . . . . . . . . . . . . . . . . . . . Power & Water Utilities
WTHR . . . . . . . . . . . . . . . . . . . . . . . . . . . . . . . . . . . . . . . . . . . . . . . . . . . . . . Weather
VERY HIGH FREQUENCY (VHF)
VHF Low Band—(29–50 MHz—in 5 kHz steps)
29.000–29.700 . . . . . . . . . . . . . . . . . . . . . . . . . . . . . . . . . . . . . . . . . . . . . . . . . . HAM
29.900–30.550 . . . . . . . . . . . . . . . . . . . . . . . . . . . . . . . . . . . . . . . . . . . . . GOVT, MIL
30.580–31.980 . . . . . . . . . . . . . . . . . . . . . . . . . . . . . . . . . . . . . . . . . . . . . . IND, PUB
32.000–32.990 . . . . . . . . . . . . . . . . . . . . . . . . . . . . . . . . . . . . . . . . . . . . . GOVT, MIL
33.020–33.980 . . . . . . . . . . . . . . . . . . . . . . . . . . . . . . . . . . . . . . . . . BUS, IND, PUB
34.010–34.990 . . . . . . . . . . . . . . . . . . . . . . . . . . . . . . . . . . . . . . . . . . . . . GOVT, MIL
35.020–35.980 . . . . . . . . . . . . . . . . . . . . . . . . . . . . . . . . . . . . BUS, PUB, IND, TELM
36.000–36.230 . . . . . . . . . . . . . . . . . . . . . . . . . . . . . . . . . . . . . . . . . . . . . GOVT, MIL
36.250 . . . . . . . . . . . . . . . . . . . . . . . . . . . . . . . . . . . . . . . . . . . . . . . . Oil Spill Cleanup
36.270–36.990 . . . . . . . . . . . . . . . . . . . . . . . . . . . . . . . . . . . . . . . . . . . . . GOVT, MIL
37.020–37.980 . . . . . . . . . . . . . . . . . . . . . . . . . . . . . . . . . . . . . . . . . . . . . . PUB, IND
38.000–39.000 . . . . . . . . . . . . . . . . . . . . . . . . . . . . . . . . . . . . . . . . . . . . . GOVT, MIL
39.020–39.980 . . . . . . . . . . . . . . . . . . . . . . . . . . . . . . . . . . . . . . . . . . . . . . . . . . PUB
40.000–42.000 . . . . . . . . . . . . . . . . . . . . . . . . . . . . . . . . . . . . . . . GOVT, MIL, MARI
42.020–42.940 . . . . . . . . . . . . . . . . . . . . . . . . . . . . . . . . . . . . . . . . . . . . . . . . . . POL
42.960–43.180 . . . . . . . . . . . . . . . . . . . . . . . . . . . . . . . . . . . . . . . . . . . . . . . . . . . IND
43.220–43.680 . . . . . . . . . . . . . . . . . . . . . . . . . . . . . . . . . . . . . . . . TELM, IND, PUB
43.700–44.600 . . . . . . . . . . . . . . . . . . . . . . . . . . . . . . . . . . . . . . . . . . . . . . . . . TRAN
44.620–46.580 . . . . . . . . . . . . . . . . . . . . . . . . . . . . . . . . . . . . . . . . . . . . . . POL, PUB
46.600–46.990 . . . . . . . . . . . . . . . . . . . . . . . . . . . . . . . . . . . . . . . . . . . GOVT, TELC
47.020–47.400 . . . . . . . . . . . . . . . . . . . . . . . . . . . . . . . . . . . . . . . . . . . . . . . . . . PUB
47.420 . . . . . . . . . . . . . . . . . . . . . . . . . . . . . . . . . . . . . . . . . . . . American Red Cross
47.440–49.580 . . . . . . . . . . . . . . . . . . . . . . . . . . . . . . . . . . . . . . . . . . . . . . IND, PUB
49.610–49.990 . . . . . . . . . . . . . . . . . . . . . . . . . . . . . . . . . . . . . . . . . . . . . MIL, TELC
6-Meter Amateur Band—(50–54 MHz)
50.00–54.00. . . . . . . . . . . . . . . . . . . . . . . . . . . . . . . . . . . . . . . . . . . . . . . . . . . . . HAM
U.S. Government Band (137–144 MHz)
137.000–144.000 . . . . . . . . . . . . . . . . . . . . . . . . . . . . . . . . . . . . . . . . . . . GOVT, MIL
2-Meter Amateur Band (144–148 MHz)
144.000–148.000 . . . . . . . . . . . . . . . . . . . . . . . . . . . . . . . . . . . . . . . . . . . . . . . . HAM
VHF High Band (148–174 MHz)
148.050–150.345 . . . . . . . . . . . . . . . . . . . . . . . . . . . . . . . . . . . . . . . CAP, MAR, MIL
150.775–150.790 . . . . . . . . . . . . . . . . . . . . . . . . . . . . . . . . . . . . . . . . . . . . . . . . MED
150.815–150.980 . . . . . . . . . . . . . . . . . . . . . . . . . . . . . . . . . TOW, Oil Spill Cleanup
150.995–151.475 . . . . . . . . . . . . . . . . . . . . . . . . . . . . . . . . . . . . . . . . . . ROAD, POL
151.490–151.955 . . . . . . . . . . . . . . . . . . . . . . . . . . . . . . . . . . . . . . . . . . . . IND, BUS
151.985 . . . . . . . . . . . . . . . . . . . . . . . . . . . . . . . . . . . . . . . . . . . . . . . . . . . . . . . TELM
152.0075 . . . . . . . . . . . . . . . . . . . . . . . . . . . . . . . . . . . . . . . . . . . . . . . . . . . . . . . MED
25
Page 26

20-422.fm Page 26 Friday, January 7, 2000 12:54 PM
152.030–152.240 . . . . . . . . . . . . . . . . . . . . . . . . . . . . . . . . . . . . . . . . . . . . . . . . TELB
152.270–152.480 . . . . . . . . . . . . . . . . . . . . . . . . . . . . . . . . . . . . . . . . IND, TAXI, BUS
152.510–152.840 . . . . . . . . . . . . . . . . . . . . . . . . . . . . . . . . . . . . . . . . . . . . . . . . TELB
152.870–153.020 . . . . . . . . . . . . . . . . . . . . . . . . . . . . . . . . . . . . . . . . . . . . IND, MOV
153.035–153.725 . . . . . . . . . . . . . . . . . . . . . . . . . . . . . . . . . . . . . . . . IND, OIL, UTIL
153.740–154.445 . . . . . . . . . . . . . . . . . . . . . . . . . . . . . . . . . . . . . . . . . . . PUB, FIRE
154.490–154.570 . . . . . . . . . . . . . . . . . . . . . . . . . . . . . . . . . . . . . . . . . . . . IND, BUS
154.585 . . . . . . . . . . . . . . . . . . . . . . . . . . . . . . . . . . . . . . . . . . . . . . Oil Spill Cleanup
154.600–154.625 . . . . . . . . . . . . . . . . . . . . . . . . . . . . . . . . . . . . . . . . . . . . . . . . BUS
154.655–156.240 . . . . . . . . . . . . . . . . . . . . . . . . . . . . . . . . . MED, ROAD, POL, PUB
156.255–157.425 . . . . . . . . . . . . . . . . . . . . . . . . . . . . . . . . . . . . . . . . . . . . OIL, MARI
157.450 . . . . . . . . . . . . . . . . . . . . . . . . . . . . . . . . . . . . . . . . . . . . . . . . . . . . . . . MED
157.470–157.515 . . . . . . . . . . . . . . . . . . . . . . . . . . . . . . . . . . . . . . . . . . . . . . . . TOW
157.530–157.725 . . . . . . . . . . . . . . . . . . . . . . . . . . . . . . . . . . . . . . . . . . . . IND, TAXI
157.740 . . . . . . . . . . . . . . . . . . . . . . . . . . . . . . . . . . . . . . . . . . . . . . . . . . . . . . . BUS
157.770–158.100 . . . . . . . . . . . . . . . . . . . . . . . . . . . . . . . . . . . . . . . . . . . . . . . . TELB
158.130–158.460 . . . . . . . . . . . . . . . . . . . . . . . . . . . . . . BUS, IND, OIL, TELM, UTIL
158.490–158.700 . . . . . . . . . . . . . . . . . . . . . . . . . . . . . . . . . . . . . . . . . . . . . . . . TELB
158.730–159.465 . . . . . . . . . . . . . . . . . . . . . . . . . . . . . . . . . . . . . . POL, PUB, ROAD
159.480 . . . . . . . . . . . . . . . . . . . . . . . . . . . . . . . . . . . . . . . . . . . . . . . . . . . . . . . . .OIL
159.495–161.565 . . . . . . . . . . . . . . . . . . . . . . . . . . . . . . . . . . . . . . . . . . . . . . . TRAN
161.580–162.000 . . . . . . . . . . . . . . . . . . . . . . . . . . . . . . . . . . . . . . . OIL, MARI, RTV
162.0125–162.35 . . . . . . . . . . . . . . . . . . . . . . . . . . . . . . . . . . . . . GOVT, MIL, USXX
162.400–162.550 . . . . . . . . . . . . . . . . . . . . . . . . . . . . . . . . . . . . . . . . . . . . . . . WTHR
162.5625–162.6375 . . . . . . . . . . . . . . . . . . . . . . . . . . . . . . . . . . . GOVT, MIL, USXX
162.6625 . . . . . . . . . . . . . . . . . . . . . . . . . . . . . . . . . . . . . . . . . . . . . . . . . . . . . . MED
162.6875–163.225 . . . . . . . . . . . . . . . . . . . . . . . . . . . . . . . . . . . . GOVT, MIL, USXX
163.250 . . . . . . . . . . . . . . . . . . . . . . . . . . . . . . . . . . . . . . . . . . . . . . . . . . . . . . . MED
163.275–166.225 . . . . . . . . . . . . . . . . . . . . . . . . . . . . . . . . . . . . . GOVT, MIL, USXX
166.250 . . . . . . . . . . . . . . . . . . . . . . . . . . . . . . . . . . . . . . . . . . . . . GOVT, RTV, FIRE
166.275–169.400 . . . . . . . . . . . . . . . . . . . . . . . . . . . . . . . . . . . . . . . . . . GOVT, BIFC
169.445–169.505 . . . . . . . . . . . . . . . . . . . . . . . . . . . . . . . . . . Wireless Mikes, GOVT
169.55–169.9875 . . . . . . . . . . . . . . . . . . . . . . . . . . . . . . . . . . . . . GOVT, MIL, USXX
170.000–170.150 . . . . . . . . . . . . . . . . . . . . . . . . . . . . . . . . . BIFC, GOVT, RTV, FIRE
170.175–170.225 . . . . . . . . . . . . . . . . . . . . . . . . . . . . . . . . . . . . . . . . . . . . . . . GOVT
170.245–170.305 . . . . . . . . . . . . . . . . . . . . . . . . . . . . . . . . . . . . . . . . Wireless Mikes
170.350–170.400 . . . . . . . . . . . . . . . . . . . . . . . . . . . . . . . . . . . . . . . . . . . GOVT, MIL
170.425–170.450 . . . . . . . . . . . . . . . . . . . . . . . . . . . . . . . . . . . . . . . . . . . . . . . . BIFC
170.475 . . . . . . . . . . . . . . . . . . . . . . . . . . . . . . . . . . . . . . . . . . . . . . . . . . . . . . . PUB
170.4875–173.175 . . . . . . . . . . . . . . . . . . . . . . . . . . . . GOVT, PUB, Wireless Mikes
173.225–173.5375 . . . . . . . . . . . . . . . . . . . . . . . . . . . . . . . . MOV, NEWS, UTIL, MIL
173.5625–173.5875 . . . . . . . . . . . . . . . . . . . . . . . . . . . . . . MIL Medical/Crash Crews
173.60–173.9875 . . . . . . . . . . . . . . . . . . . . . . . . . . . . . . . . . . . . . . . . . . . . . . . GOVT
ULTRA HIGH FREQUENCY (UHF)
U. S. Government Band (406–420 MHz)
406.125–419.975 . . . . . . . . . . . . . . . . . . . . . . . . . . . . . . . . . . . . . . . . . GOVT, USXX
26
Page 27

20-422.fm Page 27 Friday, January 7, 2000 12:54 PM
70-cm Amateur Band (420–450 MHz)
420.000–450.000 . . . . . . . . . . . . . . . . . . . . . . . . . . . . . . . . . . . . . . . . . . . . . . . . HAM
Low Band (450–470 MHz)
450.050–450.925 . . . . . . . . . . . . . . . . . . . . . . . . . . . . . . . . . . . . . . . . . . . . . . . . RTV
451.025–452.025 . . . . . . . . . . . . . . . . . . . . . . . . . . . . . . . . . . IND, OIL, TELM, UTIL
452.0375–453.00 . . . . . . . . . . . . . . . . . . . . . . . . . . . IND, TAXI, TRAN TOW, NEWS
453.0125–454.000 . . . . . . . . . . . . . . . . . . . . . . . . . . . . . . . . . . . . . . . . . . . PUB, OIL
454.025–454.975 . . . . . . . . . . . . . . . . . . . . . . . . . . . . . . . . . . . . . . . . . . . . . . . TELB
455.050–455.925 . . . . . . . . . . . . . . . . . . . . . . . . . . . . . . . . . . . . . . . . . . . . . . . . RTV
457.525–457.600 . . . . . . . . . . . . . . . . . . . . . . . . . . . . . . . . . . . . . . . . . . . . . . . . BUS
458.025–458.175 . . . . . . . . . . . . . . . . . . . . . . . . . . . . . . . . . . . . . . . . . . . . . . . . MED
460.0125–460.6375 . . . . . . . . . . . . . . . . . . . . . . . . . . . . . . . . . . . . FIRE, POL, PUB
460.650–462.175 . . . . . . . . . . . . . . . . . . . . . . . . . . . . . . . . . . . . . . . . . . . . . . . . BUS
462.1875–462.450 . . . . . . . . . . . . . . . . . . . . . . . . . . . . . . . . . . . . . . . . . . . BUS, IND
462.4625–462.525 . . . . . . . . . . . . . . . . . . . . . . . . . . . . . . . . . IND, OIL, TELM, UTIL
462.550–462.925 . . . . . . . . . . . . . . . . . . . . . . . . . . . . . . . . . . . . . . . . . . . GMR, BUS
462.9375–463.1875. . . . . . . . . . . . . . . . . . . . . . . . . . . . . . . . . . . . . . . . . . . . . . . MED
463.200–467.925. . . . . . . . . . . . . . . . . . . . . . . . . . . . . . . . . . . . . . . . . . . . . . . . . .BUS
FM-TV Audio Broadcast, UHF Wide Band (470–512 MHz)
(Channels 14 through 69 in 6 MHz steps)
475.750 . . . . . . . . . . . . . . . . . . . . . . . . . . . . . . . . . . . . . . . . . . . . . . . . . . . Channel 14
481.750 . . . . . . . . . . . . . . . . . . . . . . . . . . . . . . . . . . . . . . . . . . . . . . . . . . . Channel 15
487.750 . . . . . . . . . . . . . . . . . . . . . . . . . . . . . . . . . . . . . . . . . . . . . . . . . . . Channel 16
493.750 . . . . . . . . . . . . . . . . . . . . . . . . . . . . . . . . . . . . . . . . . . . . . . . . . . . Channel 17
499.750 . . . . . . . . . . . . . . . . . . . . . . . . . . . . . . . . . . . . . . . . . . . . . . . . . . . Channel 18
505.750 . . . . . . . . . . . . . . . . . . . . . . . . . . . . . . . . . . . . . . . . . . . . . . . . . . . Channel 19
511.750 . . . . . . . . . . . . . . . . . . . . . . . . . . . . . . . . . . . . . . . . . . . . . . . . . . . Channel 20
Some cities use the 470–512 MHz band for land/mobile service.
Note:
FREQUENCY CONVERSION
The tuning location of a s tation can be expressed in frequency (kHz or MHz) or in
wavelength (meters). The following information can help you make the necessary
conversions.
1 MHz (million) = 1,000 kHz (thousand)
To convert MHz to kHz, multiply the number of megahertz by 1,000:
9.62 (MHz) × 1000 = 9620 kHz
To convert from kHz to MHz, divide the number of kilohertz by 1,000:
2780 (kHz) ÷ 1000 = 2.780 MHz
To convert MHz to meters, divide 300 by the number of megahertz:
300 ÷ 7.1 MHz = 42.25 meters
27
Page 28

20-422.fm Page 28 Friday, January 7, 2000 12:54 PM
TROUBLESHOOTING
If your scanner is not working as it should, these suggestions mi ght help you eliminate the problem. If the scanner still does not operate pr operly, take it to your local
RadioShack store for assistance.
SYMPTOM SUGGESTION
Scanner is on, but will not scan. Be sure
ly. See “Turning On the Scanner/Setting Volume and Squelch” on Page 14.
Make sure channels are stored in the
channel-storage banks and the scanner is set to scan. See
Channels” on Page 17.
Scanner receives stations poorly or not
at all.
• The scanner’s keys do not work.
• The display shows random segments.
Scanner does not work at all. Check that the power supply is work-
Check the antenna (indoor or outdoor).
Signals may be blocked from being re-
ceived by the scanner due to metal
frames or material in the building.
Change the scanner’s location and try
again.
Be sure
ly. See “Turning On the Scanner/Setting Volume and Squelch” on Page 14.
The scanner might be locked. Reset
the scanner. See “Resetting the Scanner” on Page 14.
ing.
SQUELCH
SQUELCH
is adjusted proper-
“Scanning
is adjusted proper-
Scanner locks on frequencies that have
an unclear transmission.
28
The scanner might be locked. Reset
the scanner.
ner” on Page 14.
Be sure
ly. See “Turning On the Scanner/Setting Volume and Squelch” on Page 14.
Be sure birdie frequencies are not programmed, or listen to birdie frequencies manually. See “Birdie
Frequencies” on Page 22.
See “Resetting the Scan-
SQUELCH
is adjusted proper-
Page 29

20-422.fm Page 29 Friday, January 7, 2000 12:54 PM
CARE AND MAINTENANCE
Your
RadioShack 200Ch VHF/Air/UHF Home Scanner
sign and craftsmansh ip. The foll owing sugge stions wil l help you ca re for your scan ner so you can enjoy it for years.
Keep the scanner dry. If it gets wet, wipe it dry immediately. Liquids
might contain minerals that can corrode the electronic circuits.
Use and store the scanner only in normal temperature environments.
Temperature extremes can shorten the life of electronic devices, and
distort or melt plastic parts.
Keep the scanner away from dust and dirt, whi ch can caus e premature
wear of parts.
Handle the scanner gently and careful ly. Droppi ng it can dam age circu it
boards and cases and can cause the scanner to work improperly.
Wipe the scanner with a damp cloth occasionally to keep it looking new.
Do not use harsh ch emicals, cleani ng solvents, or strong detergents to
clean the scanner.
Modifying or ta mpering with the scanner’s in ternal components can cause a malfunction and might invalidate its warran ty and voi d your FCC authorization to operate it. If your scanner is not performing as it should, take it to your local RadioShack
store for assistance.
is an example of superior de-
29
Page 30

20-422.fm Page 30 Friday, January 7, 2000 12:54 PM
SPECIFICATIONS
Frequency Coverage:
VHF Lo ......................................................................... 29.7
Amateur Radio ............................................................. 29
420
Aircraft ................................ ......................... .... 108
–
136.975 MHz (in 12.5 kHz steps)
Government ................................................................ 137
406
VHF Hi ........................................................................ 148
UHF .................................... ................... ................. 450
UHF “T” .................................................................. 470
–
50 MHz (in 5 kHz steps)
–
29.7 MHz (in 5 kHz steps)
–
50
54 MHz (in 5 kHz steps)
–
144
148 MHz (in 5 kHz steps)
–
450 MHz (in 12.5 kHz steps)
–
144 MHz (in 5 kHz steps)
–
420 MHz (in 12.5 kHz steps)
–
174 MHz (in 5 kHz steps)
–
470 MHz (in 12.5 kHz steps)
–
512 MHz (in 12.5 kHz steps)
Channels of Operation .......................... Any 200 channels in any band combinations
(20 channels × 10 banks) and 10 monitor channels
Sensitivity (20 dB S/N with 3 kHz deviation for FM, 60% modulation for AM):
29–54 MHz ................................................................................................ 0.5 µV
108–136.975 MHz ..................................................................................... 1.8 µV
137–174 MHz ............................................................................................ 0.6 µV
406–512 MHz ............................................................................................ 0.6 µV
Selectivity (@162.4 MHz (WX)):
–6 dB .................... ....... ...... ...... ....... ...... ....... ...... ....... ...... ......................... ±10 kHz
–50 dB ..................................................................................................... ±16 kHz
Search Speed ...................................................................................... 20 Steps/Sec.
Scan Speed ................................................................................... 20 Channels/Sec.
Priority Sampling ........................................................................................ 2 Seconds
Delay Time ................................................................................................. 2 Seconds
IF Frequencies ....................................................................... 21.4 MHz and 450 kHz
30
Page 31

20-422.fm Page 31 Friday, January 7, 2000 12:54 PM
Antenna Impedance ...................................................................................... 50 Ohms
Audio Power .................................................................................. 840 mW Maximum
1
Built-In Speaker ......................................... 2
/
Inch (57 mm), 8-Ohm, Dynamic Type
4
AC Adapter ............................................................................................... 10 Volts AC
Dimensions (HWD) .............................. 2
3
/
× 93/
8
11
/
Inches (60 × 238 × 170 mm)
6
8
16
×
Weight (without AC Adapter) ............................................................ 1 lb 2 oz (510 g)
Specifications are typical; individual units might vary. Specifications are subject to
change and improvement without notice.
31
Page 32

20-422.fm Page 32 Friday, January 7, 2000 12:54 PM
Limited One-Year Warranty
This product is warrante d by RadioSha ck against manufac turing defect s in material and wor kmanship under normal use for one (1) year from the date of purchase from RadioShack company-owned
stores and authorized RadioShack franchisees and dealers. EXCEPT AS PROVIDED HEREIN, RadioShack MAKES NO EXPRESS WARRANTIES AND ANY IMPLIED WARRANTIES, INCLUDING
THOSE OF MERCHANTABILITY AND FITNESS FOR A PARTICULAR PURPOSE, ARE LIMITED
IN DURATION TO THE DURATION OF THE WRITTEN LIMITED WARRANTIES CONTAINED
HEREIN. EXCEPT AS PROVIDED HEREIN, RadioShack SHALL HAVE NO LIABILITY OR RESPONSIBILITY TO CUSTOMER OR ANY OTHER PERSON OR ENTITY WI TH RESPECT TO ANY
LIABILITY, LOSS OR DAMAGE CAUSED DIRECTLY OR INDIRECTLY BY USE OR PERFORMANCE OF THE PRODUCT OR ARISING OUT OF ANY BREACH OF THIS WARRANTY, INCLUDING, BUT NOT LIMITED TO, ANY DAMAGES RESULTING FROM INCONVENIENCE, LOSS
OF TIME, DATA , PROPERTY, REVENUE, OR PROFIT OR ANY INDIRECT, SPECIAL, INCIDENTAL, OR CONSEQUENTIAL DAMAGES, EVEN IF RadioShack HAS BEEN ADVISED OF THE
POSSIBILITY OF SUCH DAMAGES.
Some states do not allow limitations on how long an implied warranty lasts or the exclusion or limitation of incidental or consequential damages, so the above limitations or exclusions may not apply to
you.
In the event of a pr oduct defect durin g the warranty pe riod, take the pro duct and the RadioShack
sales receipt as proof of purchase date to any RadioShack store. RadioShack will, at its option, unless otherwise provid ed by law: (a) correct the defect by product repair wi tho ut c har ge for parts and
labor; (b) replace the product wi th one of the same or similar design; or (c) refund the purch ase
price. All replace d parts a nd prod ucts, and p roducts o n which a refund is made, become th e property of RadioShack. New or recond itioned parts a nd products may be used in the performance of
warranty service. Re paired or replace d parts and pro ducts are warran ted for the rem ainder of the
original warranty period. You will be charged for repair or replacement of the product made after the
expiration of the warranty period.
This warranty does not cover: (a) damage or failure caused by or attributable to acts of God, abuse,
accident, misuse, i mproper or abnormal usag e, fa ilu re to fo ll ow i nstructi o ns, imp rop er installation or
maintenance, altera tion, lightning or othe r incidence of excess voltage or current; (b ) any repairs
other than those provided by a RadioShack Authorized Service Facility; ( c) consumables such as
fuses or batteries; (d) cosmetic dam age; (e) tra nsportation , shipping or insurance costs; or (f) costs
of product removal, installation, set-up service adjustment or reinstallation.
This warranty give s you specific l egal rights, an d you may al so have other r ights which var y from
state to state.
RadioShack Customer Relations, 200 Taylor Street, 6th Floor, Fort Worth, TX 76102
We Service Wh at We Sell
12/99
RadioShack
A Division of Tandy Corporation
Fort Worth, Texas 76102
UBZZ01309ZZ
12A99 Printed in the Philippines
 Loading...