


 5-IN-ONE REMOTE
TABLE OF CONTENTS
Introduction . . . . . . . . . . . . . . . . . . . . . . . . . . . . . . . . . . . . . . . . . . . . . . . . . . . . . . . . . . . . . . . . . . . . . . . . . . 3
Installing Batteries. . . . . . . . . . . . . . . . . . . . . . . . . . . . . . . . . . . . . . . . . . . . . . . . . . . . . . . . . . . . . . . . . . . . 4
A Quick Look At The Controls. . . . . . . . . . . . . . . . . . . . . . . . . . . . . . . . . . . . . . . . . . . . . . . . . . . . . . . . . . . . 5
Key Functions . . . . . . . . . . . . . . . . . . . . . . . . . . . . . . . . . . . . . . . . . . . . . . . . . . . . . . . . . . . . . . . . . . . . . . . 6
Using The Backlight . . . . . . . . . . . . . . . . . . . . . . . . . . . . . . . . . . . . . . . . . . . . . . . . . . . . . . . . . . . . . . . . . . 8
Device Table . . . . . . . . . . . . . . . . . . . . . . . . . . . . . . . . . . . . . . . . . . . . . . . . . . . . . . . . . . . . . . . . . . . . . . . . 9
Key Table . . . . . . . . . . . . . . . . . . . . . . . . . . . . . . . . . . . . . . . . . . . . . . . . . . . . . . . . . . . . . . . . . . . . . . . . . 10
Programming A Device. . . . . . . . . . . . . . . . . . . . . . . . . . . . . . . . . . . . . . . . . . . . . . . . . . . . . . . . . . . . . . . . 14
Programming A TV/VCR Combo. . . . . . . . . . . . . . . . . . . . . . . . . . . . . . . . . . . . . . . . . . . . . . . . . . . . . . . . . 15
Searching For Your Code . . . . . . . . . . . . . . . . . . . . . . . . . . . . . . . . . . . . . . . . . . . . . . . . . . . . . . . . . . . . . . 16
Checking The Codes . . . . . . . . . . . . . . . . . . . . . . . . . . . . . . . . . . . . . . . . . . . . . . . . . . . . . . . . . . . . . . . . . . 16
Reassigning Device Keys . . . . . . . . . . . . . . . . . . . . . . . . . . . . . . . . . . . . . . . . . . . . . . . . . . . . . . . . . . . . . . 17
Programming Favorite Channel Scan. . . . . . . . . . . . . . . . . . . . . . . . . . . . . . . . . . . . . . . . . . . . . . . . . . . . 17
Using Channel Scan. . . . . . . . . . . . . . . . . . . . . . . . . . . . . . . . . . . . . . . . . . . . . . . . . . . . . . . . . . . . . . . . . . 18
Changing Volume Lock. . . . . . . . . . . . . . . . . . . . . . . . . . . . . . . . . . . . . . . . . . . . . . . . . . . . . . . . . . . . . . . . 18 Locking Volume Control to One Mode (Global Volume Lock) . . . . . . . . . . . . . . . . . . . . . . . . . . . . . . . . . . . . 18 Unlocking Volume Control for a Single Device (Individual Volume Unlock). . . . . . . . . . . . . . . . . . . . . . . . . 18 Unlocking All Volume Control (Restoring Global Unlock) . . . . . . . . . . . . . . . . . . . . . . . . . . . . . . . . . . . . . . 19
Troubleshooting . . . . . . . . . . . . . . . . . . . . . . . . . . . . . . . . . . . . . . . . . . . . . . . . . . . . . . . . . . . . . . . . . . . . . 20
Care . . . . . . . . . . . . . . . . . . . . . . . . . . . . . . . . . . . . . . . . . . . . . . . . . . . . . . . . . . . . . . . . . . . . . . . . . . . . . . . 21
Specifications . . . . . . . . . . . . . . . . . . . . . . . . . . . . . . . . . . . . . . . . . . . . . . . . . . . . . . . . . . . . . . . . . . . . . . . 21
Instruction To The User. . . . . . . . . . . . . . . . . . . . . . . . . . . . . . . . . . . . . . . . . . . . . . . . . . . . . . . . . . . . . . . . 22
Limited Warranty. . . . . . . . . . . . . . . . . . . . . . . . . . . . . . . . . . . . . . . . . . . . . . . . . . . . . . . . . . . . . . . . . . . . . 23
Guía Del Usuario . . . . . . . . . . . . . . . . . . . . . . . . . . . . . . . . . . . . . . . . . . . . . . . . . . . . . . . . . . . . . . . . . . . . 24
Manufacturer’s Codes (Códigos De Fabricantes) . . . . . . . . . . . . . . . . . . . . . . . . . . . . . . . . . . . . . . . . . . 46 Setup Codes For Audio Amplifiers (Códigos De Configuración Para Amplificadores De Audio) . . . . . . . . . . 46 Setup Codes For Audio Receivers (Códigos De Configuración Para Receptores De Audio) . . . . . . . . . . . . . 46 Setup Codes For Cable Converters (Códigos De Configuración Para Convertidores De Cable) . . . . . . . . . . 47 Setup Codes For CD Players (Códigos De Configuración Para Reproductores De CDs) . . . . . . . . . . . . . . . . 47 Setup Codes For DVD Players (Códigos De Configuración Para Reproductores DVD) . . . . . . . . . . . . . . . . . 48 Setup Codes For Home Automation (Códigos De Configuración Para La Automatización Del Hogar) . . . . . 49 Setup Codes For Home-Theater-In-A-Box Devices (Códigos De Configuración Para
Dispositivos Home-Theater-In-A-Box) . . . . . . . . . . . . . . . . . . . . . . . . . . . . . . . . . . . . . . . . . . . . . . . . . . . . 49 Setup Codes For Satellite Receivers (Códigos De Configuración Para Receptores De Satélite) . . . . . . . . . . 49 Setup Codes For TVs (Códigos De Configuración Para Televisores) . . . . . . . . . . . . . . . . . . . . . . . . . . . . . . 49 Setup Codes For TV/VCR Combos (Códigos Para Programar Combinaciones Televisor/ Videograbadora) . . 51 Setup Codes For VCRs (Códigos De Configuración Para Videograbadoras) . . . . . . . . . . . . . . . . . . . . . . . . 52
2 Table Of Contents

USER’S GUIDE
INTRODUCTION
The RadioShack 5-in-One Remote is our newest universal remote control. It is designed to operate up to five home entertainment devices, including TV, video, and audio components. Moreover, this remote control contains sophisticated technology that will allow you to consolidate the clutter of all of your original remote controls into one easy-to-use product. It’s packed with advanced features such as:
•Code Search and Verification – help you quickly set up the remote control to operate your devices
•Channel Scan and Favorite Channel Scan – let you “channel surf ” all available and favorite channels
•Volume Lock – to assign volume controls to individual devices or to one global device
•Mode Reassignment – lets you add control of another TV, VCR, or DVD player or other auxiliary device
•Dedicated Menu/Guide Keys – for instant access to cable and satellite program guides and menus
•Searchable Code Library – contains world’s largest and most efficient group of infrared remote control codes for virtually every current brand and make
•Partial Backlighting – to aid operation in low ambient light
After installing four (4) new AAA alkaline batteries (not included, see next page), you can immediately use the RadioShack 5-in-One remote to control an RCA TV, VCR, and cable converter, and a Pioneer DVD player and audio receiver.
To control other brands, please perform the instructions in Programming A Device on page 14 and Programming A TV/VCR Combo on page 15.
Introduction 3


 5-IN-ONE REMOTE
INSTALLING BATTERIES
Your RadioShack 5-in-One remote requires four AAA batteries (not supplied) for power. For the best performance and longest life, we recommend using RadioShack alkaline batteries.
CAUTIONS:
•Use only fresh batteries of the required size and recommended type.
•Do not mix old and new batteries, different types of batteries (e.g., standard, alkaline, or rechargeable), or rechargeable batteries of different capacities.
•If you do not plan to use the remote for an extended period, remove the batteries. Batteries can leak chemicals that can destroy electronic parts.
WARNING: Dispose of old batteries promptly and properly. Do not burn or bury them.
TO INSTALL BATTERIES:
|
|
|
|
|
|
|
|
|
|
|
|
|
|
|
|
|
|
|
|
|
|
|
|
|
|
|
|
|
|
|
|
|
|
|
|
|
|
|
|
|
|
|
|
|
|
|
|
|
|
|
|
|
|
|
|
|
|
|
|
|
|
|
|
|
|
|
|
|
|
|
|
|
|
|
|
|
|
|
|
|
|
|
|
|
|
|
|
|
|
|
|
|
|
|
|
|
|
|
|
|
|
|
|
|
|
|
|
|
|
|
|
|
|
|
|
|
|
|
|
|
|
|
|
|
|
|
|
|
|
|
|
|
|
|
|
|
|
|
|
|
|
|
|
|
|
|
|
|
|
|
|
|
|
|
|
|
|
|
|
|
|
|
|
|
|
|
|
|
|
|
|
|
|
|
|
|
|
|
|
|
|
|
|
|
|
|
|
|
|
|
|
|
|
|
|
|
|
|
|
|
|
|
|
|
|
|
|
|
|
|
|
|
|
|
|
|
|
|
|
|
|
|
|
|
|
|
|
|
|
|
|
|
|
|
|
|
|
|
|
|
|
|
|
|
|
|
|
|
||||||
|
|
|
|
|
|
|
||||||||
|
|
|
|
|
|
|
||||||||
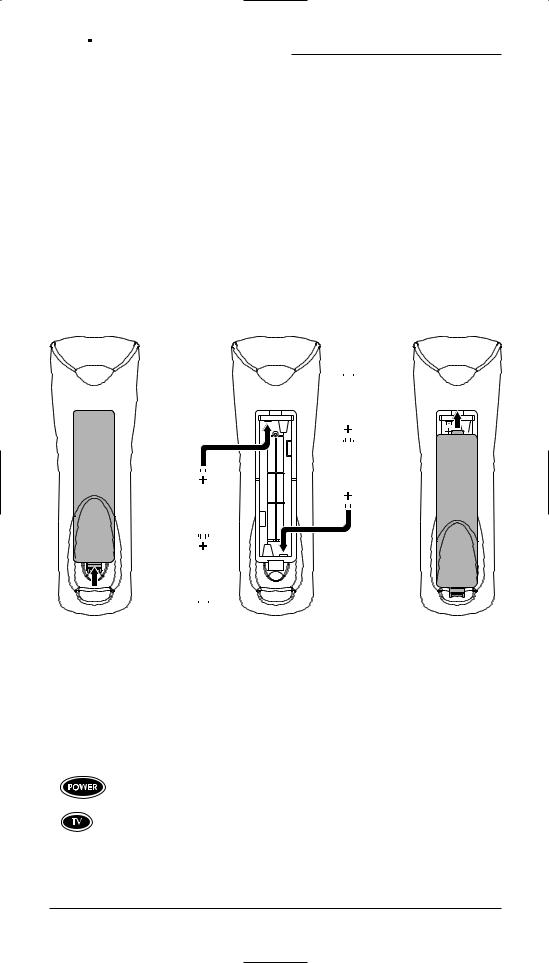
1. |
Press the tab on the battery compartment cover (located on the back of the |
|||||||||||||
|
remote) and lift off the cover. |
|
|
|
|
|
|
|
|
|
|
|||
2. |
Place the AAA batteries in the compartment as indicated by the polarity |
|||||||||||||
|
symbols (+ and –) marked inside. |
|
|
|
|
|
|
|
|
|
|
|||
3. |
Align the cover key with the compartment opening and replace the cover. |
|||||||||||||
4. |
Test the RadioShack 5-in-One remote by first pressing POWER and then any |
|||||||||||||
|
device key (e.g., TV). If batteries are inserted correctly, the red LED will blink |
|||||||||||||
|
once after each key press. |
|
|
|
|
|
|
|
|
|
|
|||
NOTE: When the RadioShack 5-in-One remote stops operating properly, replace the batteries within 10 minutes (to protect the programming information).
4 Installing Batteries
USER’S GUIDE
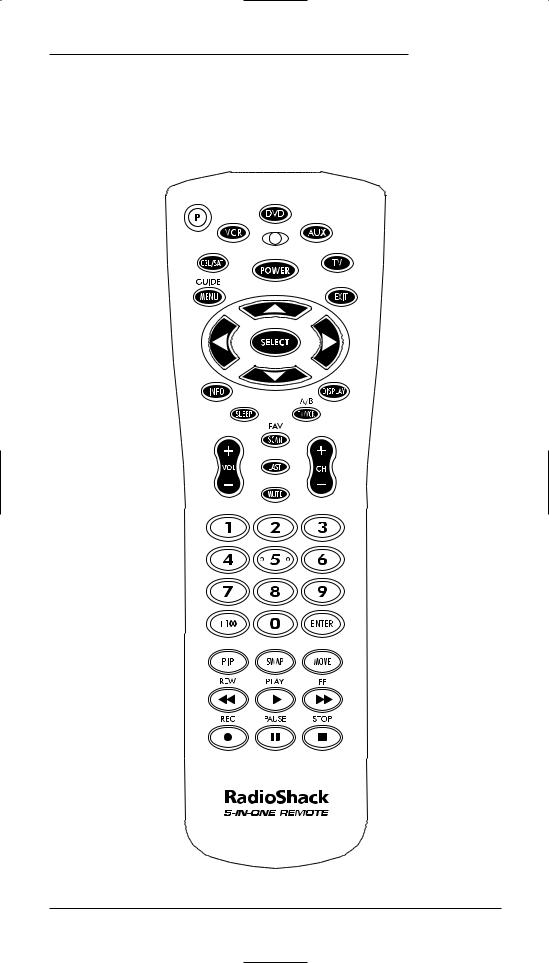
A QUICK LOOK AT THE CONTROLS
Use the illustration below to locate controls on the RadioShack 5-in-One remote and then study the Key Functions (on the next three pages) to learn how they function.
NOTE: Also refer to the “Key Table” (starting on page 10) to learn key functions for specific devices.
continued on next page...
A Quick Look At The Controls |
5 |


 5-IN-ONE REMOTE
A QUICK LOOK AT THE CONTROLS (continued)
KEY FUNCTIONS
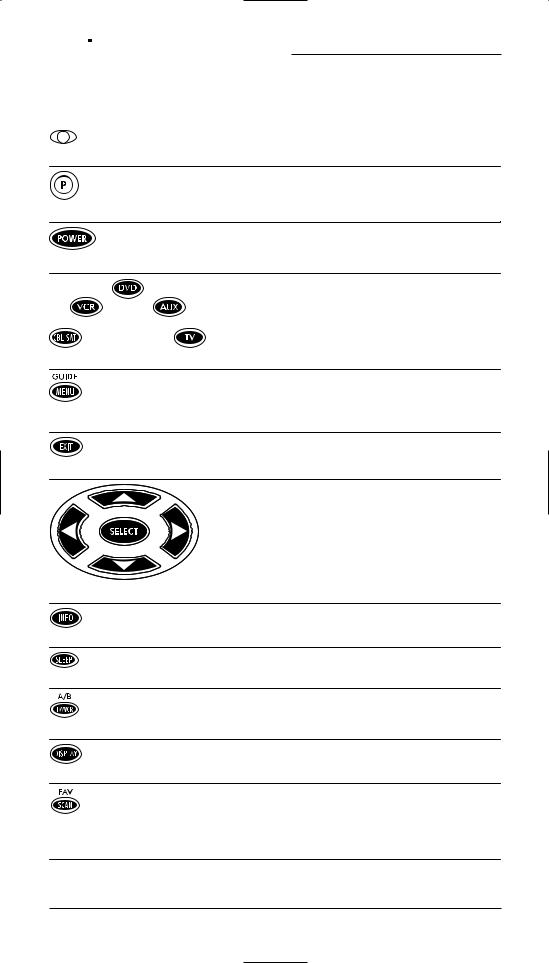
The red LED (Light Emitting Diode) blinks to show that the remote control is sending signals.
Use P for all programming sequences.
Press POWER once to turn on or off the selected device.
Press CBL/SAT, VCR, DVD, AUX, or TV once to select a device to control.
Press MENU (GUIDE) once to display the menu, guide, or program for the selected device.
Press EXIT once to exit the selected device’s menu, guide, or program.
Use the cursor keys (▲,▼, ▲ , or ▲) to move the cursor in the program guide and menu screens. Use SELECT to choose options from your selected device’s menu or guide.
Use INFO to display the current channel and program information.
Use SLEEP to activate your device’s sleep timer (if one is available for the device).
Use TV/VCR (A/B) to switch the TV’s input to view TV or
VCR programs, or act as your cable box’s A/B switch.
Press DISPLAY once to turn on or off the selected device’s information display.
In the CBL/SAT, VCR, DVD, and TV modes, use SCAN (FAV) to scan favorite channels and/or all channels. See
Programming Favorite Channel Scan on page 17 and Using Channel Scan on page 18.
6 A Quick Look At The Controls
USER’S GUIDE
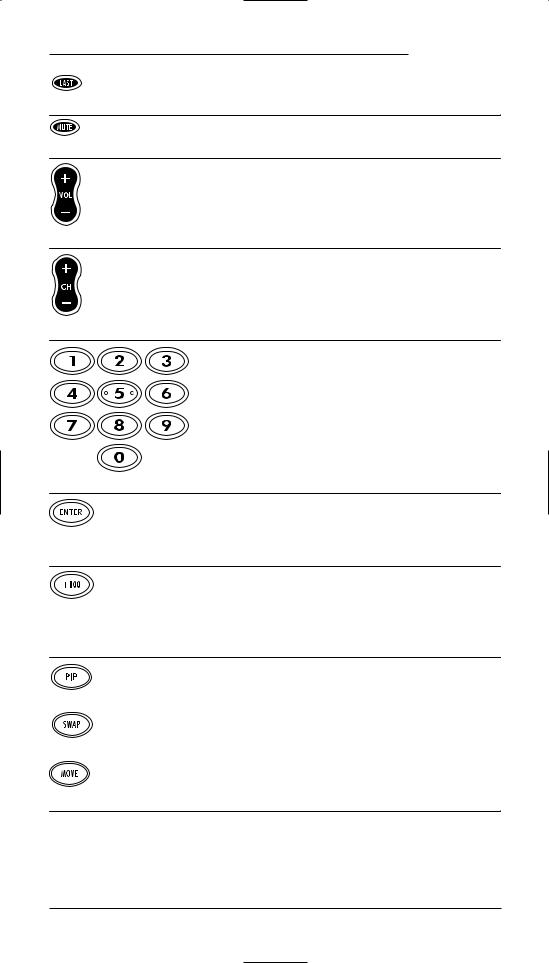
Press LAST once to recall the last-viewed channel or to page back one screen on the main menu.
Press MUTE once to turn the audio off or on.
Use VOL+ (or VOL-) to raise (or lower) the audio volume.
Use CH+ (or CH-) to select the next higher (or lower) channel.
Use the keypad (1 ~ 9 and 0) to directly enter channels (e.g., 009 or 031).
Press ENTER once after entering the channel numbers on some TVs.
In the CBL/SAT and DVD modes, also use ENTER as SELECT.
Use +100 to enter channels over 100 (e.g., press +100, then 3, and then 1 = 131).
For a CD player in the AUX mode, use +100 to add 10 to the digit entry (e.g., press +100 then 7 = 17).
In the VCR or TV mode, use PIP to switch the Picture-In- Picture feature on or off (if available on your TV).
Use SWAP to switch images and sound (if available) between the main and window pictures.
Use MOVE to move the window picture (if available) to different positions in the main picture.
continued on next page...
A Quick Look At The Controls |
7 |


 5-IN-ONE REMOTE
A QUICK LOOK AT THE CONTROLS
KEY FUNCTIONS (CONTINUED)
In the VCR or TV mode, use the transport keys,  (REW),
  (PLAY),
  (FF),
(FF),  (PAUSE), and
  (STOP), to control your VCR. To record a VCR program, press
  (REC) twice.
In the DVD mode, use the transport keys to control your
DVD player.
In the AUX mode, use the transport keys to control a
CD player.
In the CBL/SAT mode, use the transport keys for VOD (Video On Demand) if available on your cable or satellite service.
USING THE BACKLIGHT
The RadioShack 5-in-One remote includes a unique lighted keypad backlight control. It operates in the following ways:
•When you press a key during normal usage, the backlight will turn on for 5 seconds. Thereafter, each time you press a key, the 5-second timer will reset and count down again. If no key is pressed during this time, the backlight will turn off.
•During programming, the backlight will turn on for 10 seconds. Thereafter, each time you press a key, the 10-second timer will reset and count down again. If no key is pressed during this time, the back light will turn off.
•When you press SCAN (FAV), the backlight will turn off after 3 seconds.
8 A Quick Look At The Controls
USER’S GUIDE
DEVICE TABLE
After programming, the RadioShack 5-in-One remote’s device keys will be able to control the following device types. Please refer to this table when performing the instructions in
Programming A Device on page 14.
DEVICE KEY |
CONTROLS THIS DEVICE TYPE |
|
TV |
|
VCR, TV/VCR Combo, or PVR (Personal Video Recorder) |
|
Cable Converter or Satellite Receiver |
|
DVD Player |
|
Audio Amplifier,Audio Receiver, CD Player, Home Automation, or |
|
Home Theater-In-A-Box (HTIB) |
A Quick Look At The Controls |
9 |


 5-IN-ONE REMOTE
A QUICK LOOK AT THE CONTROLS (continued)
KEY TABLE
|
|
KEY FUNCTIONS FOR SELECTED DEVICE1 |
|
||
KEY |
AUDIO |
AUDIO |
CABLE |
CD |
DVD |
|
AMP./RCVR./ |
RCVR./DVD |
CONVERTER |
PLAYER |
PLAYER |
|
HTIB2 |
COMBO |
|
|
|
|
Menu/ |
Menu |
Guide3 |
Menu/ |
Menu |
|
Program |
(DVD) |
|
Program |
|
|
Clear |
Return |
Exit |
Clear |
Exit |
|
Up/ |
Up |
Up |
Up/ |
Up |
|
Rear Up |
|
|
Disc Up |
|
|
Down/ |
Down |
Down |
Down/ |
Down |
|
Rear Down |
|
|
Disc Down |
|
|
Left/ |
Left |
Left |
Left/ |
Left |
|
Balance Left |
|
|
Track Down |
|
|
Right/ |
Right |
Right |
Right/ |
Right |
|
Balance Right |
|
|
Track Up |
|
|
Select/ |
Enter |
Select |
Select/ |
Select/ |
|
Surr. Sound |
(DVD) |
|
Disc Select |
Enter |
|
Mode On/Off |
|
|
|
|
|
Front |
– |
Info. |
Info. |
Display |
|
Channels |
|
|
|
|
|
– |
– |
Favorite/ |
– |
Favorite/ |
|
|
|
Ch. Scan |
|
Ch. Scan |
|
Input |
Disc |
A/B/ |
– |
TV/ |
|
|
Skip |
Bypass |
|
DVD |
|
Rear |
GUI |
Display |
– |
Display |
|
Channels |
|
|
|
|
|
Band |
Repeat |
Last |
Random |
– |
|
FM/AM |
Play On/Off |
Channel |
Play On/Off |
|
|
Preset |
Preset |
Channel |
Preset |
Skip |
|
Up |
Up |
Up |
Up |
Forward |
|
Preset |
Preset |
Channel |
Preset |
Skip |
|
Down |
Down |
Down |
Down |
Reverse |
|
Source 1/ |
FM |
Digit 1 |
Track 1/ |
Digit 1 |
|
Digit 1 |
Mode |
|
Digit 1 |
|
continued on page 12...
10 A Quick Look At The Controls

|
|
|
|
USER’S GUIDE |
KEY TABLE |
|
|
|
|
|
|
KEY FUNCTIONS FOR SELECTED DEVICE1 |
||
KEY |
SATELLITE |
TV |
TV/VCR |
VCR/ |
|
RECEIVER |
|
COMBO |
PVR |
|
Guide3 |
Menu |
Guide |
Menu |
|
|
|
|
(or Guide)3 |
|
Exit |
Exit |
Exit |
Exit |
|
Up |
Up |
Up |
Up |
|
Down |
Down |
Down |
Down |
|
Left |
– |
Left |
Left |
|
Right |
– |
Right |
Right |
|
Select |
Select |
Select |
Select |
|
Info. |
Info. |
Info. |
Info. |
|
Favorite/ |
– |
Favorite/ |
Favorite/ |
|
Ch. Scan |
|
Ch.Scan |
Ch. Scan |
|
TV/ |
TV/ |
TV/ |
TV/ |
|
Satellite |
Video |
VCR |
VCR |
|
Display |
Display |
Display |
Display |
|
Last |
Last |
Last |
Last |
|
Channel |
Channel |
Channel |
Channel |
|
Channel |
Channel |
Channel |
Channel |
|
Up |
Up |
Up |
Up |
|
Channel |
Channel |
Channel |
Channel |
|
Down |
Down |
Down |
Down |
|
Digit 1 |
Digit 1 |
Digit 1 |
Digit 1 |
continued on page 13...
A Quick Look At The Controls 11


 5-IN-ONE REMOTE
A QUICK LOOK AT THE CONTROLS (continued)
KEY TABLE (CONTINUED FROM PAGE 10)
|
|
|
KEY FUNCTIONS FOR SELECTED DEVICE1 |
|
|||
KEY |
AUDIO |
AUDIO |
CABLE |
CD |
|
DVD |
|
|
|
AMP./RCVR./ |
RCVR./DVD |
CONVERTER |
PLAYER |
|
PLAYER |
|
|
HTIB2 |
COMBO |
|
|
|
|
|
|
Source 2/ |
Tuner |
Digit 2 |
Track 2/ |
|
Digit 2 |
|
|
Digit 2 |
|
|
Digit 2 |
|
|
|
|
|
|
|
|
|
|
|
|
Source 3/ |
Band |
Digit 3 |
Track 3/ |
|
Digit 3 |
|
|
Digit 3 |
FM/AM |
|
Digit 3 |
|
|
|
|
|
|
|
|
|
|
|
|
Source 4/ |
DVD |
Digit 4 |
Track 4/ |
|
Digit 4 |
|
|
Digit 4 |
|
|
Digit 4 |
|
|
|
|
|
|
|
|
|
|
|
|
Source 5/ |
Tape |
Digit 5 |
Track 5/ |
|
Digit 5 |
|
|
Digit 5 |
|
|
Digit 5 |
|
|
|
|
|
|
|
|
|
|
|
|
Source 6/ |
VCR |
Digit 6 |
Track 6/ |
|
Digit 6 |
|
|
Digit 6 |
|
|
Digit 6 |
|
|
|
|
|
|
|
|
|
|
|
|
Source 7/ |
Aux. |
Digit 7 |
Track 7/ |
|
Digit 7 |
|
|
Digit 7 |
|
|
Digit 7 |
|
|
|
|
|
|
|
|
|
|
|
|
Source 8/ |
TV |
Digit 8 |
Track 8/ |
|
Digit 8 |
|
|
Digit 8 |
|
|
Digit 8 |
|
|
|
|
|
|
|
|
|
|
|
|
Source 9/ |
Satellite |
Digit 9 |
Track 9/ |
|
Digit 9 |
|
|
Digit 9 |
|
|
Digit 9 |
|
|
|
|
|
|
|
|
|
|
|
|
Source 10/ |
Tuning |
Digit 0 |
Track 10/ |
|
Digit 0 |
|
|
Digit 0/ |
Mode |
|
Digit 0 |
|
|
|
|
Power On |
|
|
|
|
|
|
|
|
|
|
|
|
|
|
|
Enter/ |
Enter |
Enter/ |
+10 |
|
Enter/ |
|
|
Select |
(Rcvr.) |
Select |
|
|
Select |
|
|
|
|
|
|
|
|
|
|
– |
– |
PIP On/ |
– |
|
– |
|
|
|
|||||
|
|
|
|
Instant |
|
|
|
|
|
|
|
Replay |
|
|
|
|
|
|
|
|
|
|
|
|
|
– |
– |
PIP Swap/ |
– |
|
– |
|
|
|
|
Return |
|
|
|
|
|
|
|
To Live |
|
|
|
|
|
|
|
|
|
|
|
|
|
– |
– |
PIP Move/ |
– |
|
– |
|
|
|
|
Quick Skip/ |
|
|
|
|
|
|
|
PIP Off |
|
|
|
|
|
|
|
|
|
|
|
NOTES:
1.Functions are active only if available on your original remote control(s).
2.Home-Theater-In-A-Box (HTIB) device.
3.Guide is available for cable converters or satellite receivers in CBL/SAT mode or PVRs in the VCR mode.
12 A Quick Look At The Controls
|
|
|
|
|
|
|
USER’S GUIDE |
KEY TABLE (CONTINUED FROM PAGE 12) |
|
|
|
||||
|
|
|
|
|
|
|
|
|
|
|
KEY FUNCTIONS FOR SELECTED DEVICE1 |
||||
KEY |
SATELLITE |
|
TV |
TV/VCR |
|
VCR/ |
|
|
|
RECEIVER |
|
|
COMBO |
|
PVR |
|
|
|
|
|
|
|
|
|
|
Digit 2 |
|
Digit 2 |
Digit 2 |
|
Digit 2 |
|
|
|
|
|
|
|
|
|
|
Digit 3 |
|
Digit 3 |
Digit 3 |
|
Digit 3 |
|
|
|
|
|
|
|
|
|
|
Digit 4 |
|
Digit 4 |
Digit 4 |
|
Digit 4 |
|
|
|
|
|
|
|
|
|
|
Digit 5 |
|
Digit 5 |
Digit 5 |
|
Digit 5 |
|
|
|
|
|
|
|
|
|
|
Digit 6 |
|
Digit 6 |
Digit 6 |
|
Digit 6 |
|
|
|
|
|
|
|
|
|
|
Digit 7 |
|
Digit 7 |
Digit 7 |
|
Digit 7 |
|
|
|
|
|
|
|
|
|
|
Digit 8 |
|
Digit 8 |
Digit 8 |
|
Digit 8 |
|
|
|
|
|
|
|
|
|
|
Digit 9 |
|
Digit 9 |
Digit 9 |
|
Digit 9 |
|
|
|
|
|
|
|
|
|
|
Digit 0 |
|
Digit 0 |
Digit 0 |
|
Digit 0 |
|
|
|
|
|
|
|
|
|
|
Enter/ |
|
Enter |
Enter |
|
Enter |
|
|
Select |
|
|
|
|
|
|
|
|
|
|
|
|
|
|
|
PIP On/ |
|
PIP On |
PIP On/ |
|
PIP On/ |
|
|
|
|
||||
|
|
Instant |
|
|
Instant |
|
Instant |
|
|
Replay |
|
|
Replay |
|
Replay |
|
|
|
|
|
|
|
|
|
|
PIP Swap/ |
|
PIP Swap |
PIP Swap/ |
|
PIP Swap/ |
|
|
Return |
|
|
Return |
|
Return |
|
|
To Live |
|
|
To Live |
|
To Live |
|
|
|
|
|
|
|
|
|
|
PIP Move/ |
|
PIP Move/ |
PIP Move/ |
|
PIP Move/ |
|
|
Quick Skip/ |
|
PIP Off |
Quick Skip/ |
|
Quick Skip/ |
|
|
PIP Off |
|
|
PIP Off |
|
PIP Off |
|
|
|
|
|
|
|
|
A Quick Look At The Controls 13


 5-IN-ONE REMOTE
PROGRAMMING A DEVICE
The RadioShack 5-in-One remote comes preprogrammed to operate an RCA TV, VCR, and cable converter, and a Pioneer DVD player and audio receiver. To control devices other than the default brands, follow these steps; otherwise, skip this section.
Before proceeding, find the codes for the devices you want to program in Manufacturer’s Codes starting on page 46 and write them down or highlight them.
NOTE: To control a TV/VCR combo, see “Programming A TV/VCR Combo” on the next page.
1. |
Turn on the device (e.g.,VCR or DVD player) and, if necessary, load media |
|
(e.g., cassette or disc). |
2. |
On the RadioShack 5-in-One remote, press a device key (i.e., CBL/SAT, VCR, |
|
DVD, AUX, or TV). |
|
NOTE: Use the “Device Table” on page 9 to locate the appropriate key for the device you |
|
want to program |
3. |
Press and hold P until the red LED blinks twice, then release P. |
4. |
Enter the first four-digit code for your device. If the code is correct, the LED |
|
blinks twice. |
|
NOTE: If the LED does not blink twice, repeat steps 2 through 4 and try entering the |
|
code again. |
5. |
To verify the code works, aim the RadioShack 5-in-One remote at the device |
|
and press POWER (or PLAY, if the device does not have a POWER key). The |
|
device should turn off. If it does not respond, repeat steps 2 through 5, trying |
|
each code for your brand until you find one that works. If you cannot find a |
|
code that works, see Searching For Your Code on page 16. |
6. |
Repeat steps 1 through 5 for each device you want to control. For future |
|
reference, write down each working device code in the boxes below: |
CBL/SAT Code:
Device Type:________________________________
VCR Code:
DVD Code:
TV Code:
AUX Code:
Device Type:________________________________
14 Programming A Device
USER’S GUIDE
PROGRAMMING A TV/VCR COMBO
Before proceeding, find the codes for the device you want to program in Setup Codes for TV/VCR Combos on page 51 and write them down or highlight them.
1. |
Turn on the TV/VCR Combo and insert a videocassette. |
2. |
On the RadioShack 5-in-One remote, press VCR. |
3. |
Press and hold P until the red LED blinks twice, then release P. |
4. |
Enter the first four-digit code for your device. If the code is correct, the LED |
|
blinks twice. |
|
NOTE: If the LED does not blink twice, repeat steps 2 through 4 and try entering the |
|
code again. |
5. |
To verify the code works, aim the RadioShack 5-in-One remote at the device |
|
and press POWER (or PLAY, if the device does not have a POWER key). The |
|
device should turn off. If it does not respond, repeat steps 2 through 5, trying |
|
each code for your brand until you find one that works. If you cannot find a |
|
code that works, see Searching For Your Code on page 16. |
|
NOTE: If you locate a setup code that works, but requires a separate TV code, you must |
|
program the TV code into the remote separately to control the volume. For VCR/TV |
|
combos that use separate TV codes, TV volume is controlled by pressing VCR first, then |
|
TV. After that, use VOL+ (or VOL-) to raise (or lower) the TV volume. See “Changing |
|
Volume Lock” on page 18 for other volume control options. |
6. |
For future reference, write down the working TV/VCR combo code in the |
boxes below:
TV/VCR Code:
TV Code (if used):
Programming A TV/VCR Combo 15


 5-IN-ONE REMOTE
SEARCHING FOR YOUR CODE
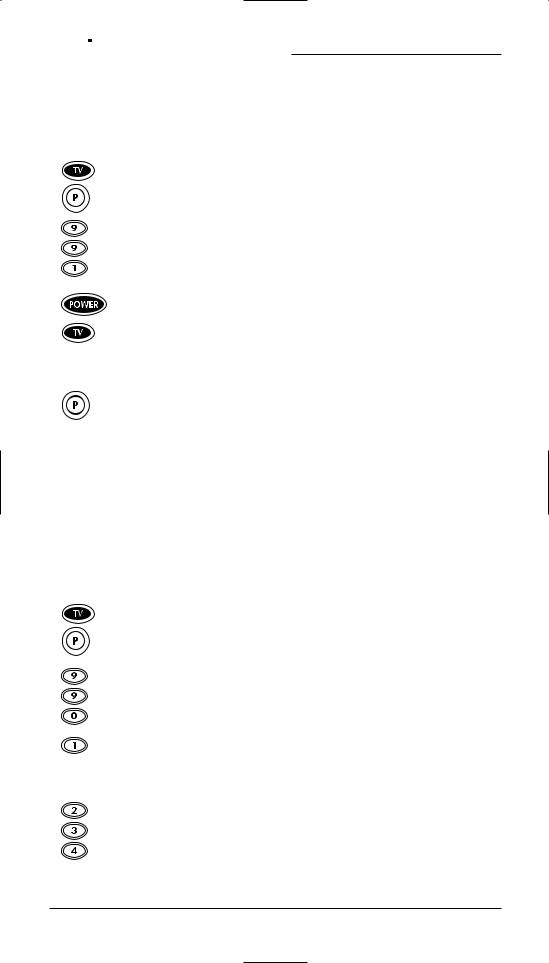
If your device does not respond to the RadioShack 5-in-One remote after trying all codes listed for your brand, or if your brand is not listed at all, try searching for your code. For example, to search for a code for your TV:
1. |
Press TV on the remote. |
2. |
Press and hold P until the red LED blinks twice, then release P. |
3. |
Press 9 9 1. The LED blinks twice. |
4. |
Aim the remote at the TV and slowly alternate between pressing POWER |
|
and TV. |
|
The RadioShack 5-in-One remote sends IR codes from its library to the |
|
selected device, starting with the most popular code first. Stop when the TV |
|
turns off. |
5. |
Press and hold P until the LED blinks twice to lock the code, then release P. |
6. |
To search for other device codes, repeat steps 1 through 5, substituting the |
|
appropriate key for the device you are searching for. |
CHECKING THE CODES
If you have set up the RadioShack 5-in-One remote using the procedure in Searching For Your Code, you may need to find out which four-digit code is operating your equipment. For example, to find out which code is operating your TV:
1. |
Press TV on the remote. |
2. |
Press and hold P until the red LED blinks twice, then release P. |
3. |
Press 9 9 0. The LED blinks twice. |
4. |
Press 1 to view the code for the first digit. Wait three seconds, count the LED |
|
blinks (e.g., three blinks = 3), and write down the number. |
|
NOTE: If a code digit is 0, the LED does not blink. |
5. |
Repeat step 4 for the three remaining digits, using 2 for the second digit, |
|
3 for the third digit, and 4 for the fourth digit. |
6. |
To check for other device codes, repeat steps 1 through 5, substituting the |
|
appropriate key for each device you are checking. |
16 Searching For Your Code/Checking The Codes
USER’S GUIDE
REASSIGNING DEVICE KEYS
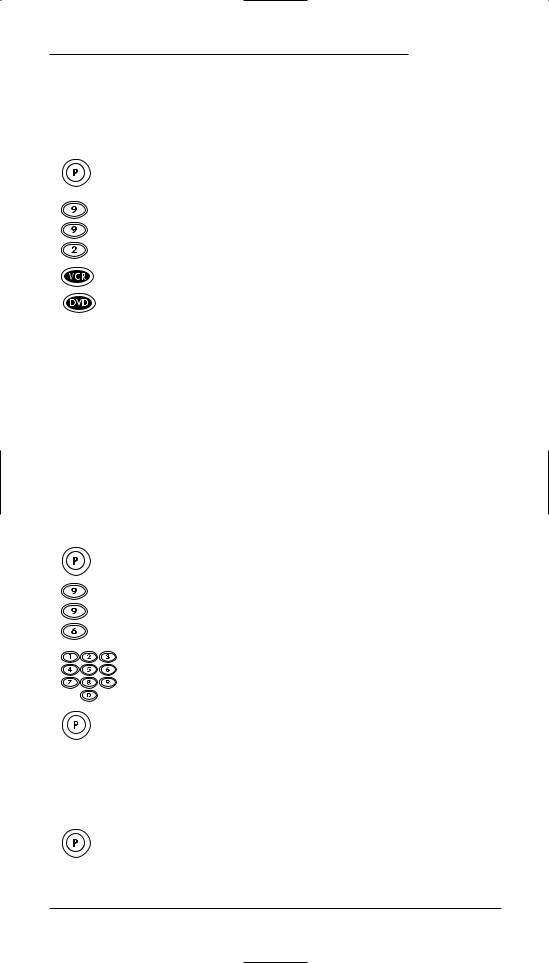
The RadioShack 5-in-One remote can be set to control a second DVD, VCR, TV, or cable/satellite receiver. For example, if you want to control a TV, a cable converter, and two VCRs, follow these steps to reassign the unused DVD key to operate the second VCR.
1. |
Press and hold P until the red LED blinks twice on the remote, then release P. |
2. |
Press 9 9 2. The LED blinks twice. |
3. |
Press VCR then DVD. The DVD key is now ready to be programmed as your |
|
second VCR. Follow the instructions in Programming A Device on page 14. |
To reassign other device keys to the DVD key, repeat steps 1 through 3 above, substituting CBL/SAT, AUX, or TV for VCR in step 3. To reassign another unused device key, substitute the desired key for the DVD key in step 3.
PROGRAMMING FAVORITE CHANNEL SCAN
The RadioShack 5-in-One remote allows you to store a list of up to 10 favorite channels, in any order, that will be immediately scanned when you press SCAN (FAV).
NOTE: Only channels of one mode can be stored and any previously-stored channels will be cleared.
1. |
Press the desired device key on the remote. |
2. |
Press and hold P until the red LED blinks twice, then release P. |
3. |
Press 9 9 6. The LED blinks twice. |
4. |
Use the keypad to enter a favorite channel number (e.g., 031), then press P. |
|
NOTE: Up to four digits can be entered for a favorite channel number (e.g., 0031). |
|
If you do enter four digits, do not press P. The program automatically advances to the |
|
next open memory slot and waits for your next entry |
5. |
Repeat step 4 for each favorite channel to be stored, up to a total of |
|
10 channels. |
|
NOTE: If you try entering more than 10 channels, the RadioShack 5-in-One remote |
|
automatically exits programming. |
6. |
Press and hold P for about three seconds to exit programming. |
Reassigning Device Keys/Programming Favorite Channel Scan 17
 Loading...