

Page 1

AVIC-S1
Hardware and Bluetooth Manual
Page 2

R00
Trademarks
The Bluetooth word mark and logo are owned by the Bluetooth SIG, Inc. All
other brand and product names are trademarks or registered trademarks of their
respective companies.
Note
The information in this document is subject to change without notice.
Page 3

Table of Contents
Notice ....................................................................................................iii
1 Getting Started ...............................................................................1
1.1 Understanding Hardware Features ................................................... 1
Front Components............................................................................. 1
Back Components ............................................................................. 2
Right-Side Components .................................................................... 3
Top Components ............................................................................... 3
Bottom Components.......................................................................... 4
1.2 Connecting to AC Power and Charging the Battery.......................... 5
1.3 Performing the Initial Startup ............................................................. 6
1.4 Turning Your Device On and Off ....................................................... 7
1.5 Destination Menu............................................................................... 7
1.6 Navigating on the Screen .................................................................. 8
1.7 Using a SD Card................................................................................ 8
2 Bluetooth HF Phone.......................................................................9
2.1 About Bluetooth HF Phone................................................................ 9
2.2 Connecting a Bluetooth Mobile Phone .............................................. 9
2.3 Starting Bluetooth Mobile Phone..................................................... 10
2.4 Placing a Call................................................................................... 11
Keypad............................................................................................. 11
Contacts........................................................................................... 12
Call History ...................................................................................... 13
Redial............................................................................................... 14
2.5 Operations During a Call ................................................................. 14
2.6 Receiving a Call............................................................................... 15
2.7 Connecting to a Paired Phone......................................................... 16
2.8 Initiating Pair Mode.......................................................................... 16
2.9 Closing Bluetooth HF Phone ........................................................... 17
2.10 Ending the Bluetooth Connection .................................................... 17
i
Page 4

3 Troubleshooting and Maintenance.............................................18
3.1 Resetting Your System.................................................................... 18
3.2 Troubleshooting............................................................................... 19
Power Problems .............................................................................. 19
Screen Problems ............................................................................. 19
Connection Problems ...................................................................... 20
GPS Problems ................................................................................. 20
3.3 Maintaining Your Device.................................................................. 21
ii
Page 5

Notice
z Before using this product, read “Important Information for the User” (a
separate manual) which contains warnings, cautions, and other important
information that you have to follow.
z This manual provides hardware and Bluetooth® information. For
information on the GPS navigation software, see the “Operation Manual.”
iii
Page 6

Page 7
1 Getting Started
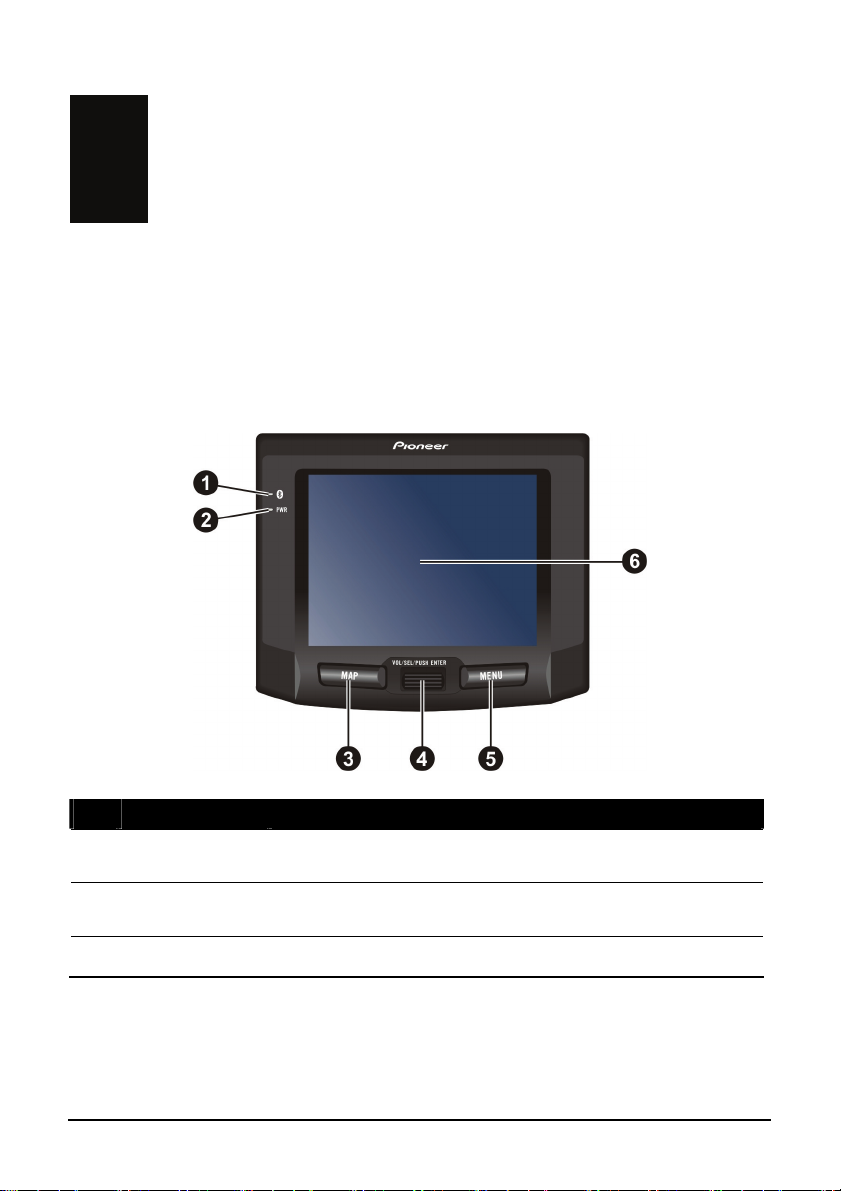
1.1 Understanding Hardware Features
Front Components
Ref Component Description
Bluetooth
n
Indicator Bluetooth is always on when your device is turned on.
Power
o
Indicator
Map Button Opens the Map screen.
p
Flashes in blue to indicate that Bluetooth is on. The
Glows bright amber to indicate that the battery is charging,
and turns green when th
e battery is fully charged.
1
Page 8

Scroll Wheel
q
Menu Button
r
Touch Screen
s
Back Components
In a list or in Phone Menu:
Scrolls through the list or Bluetooth menu buttons by
rotating the wheel.
Selects the highlighted item by pressing in the wheel.
In the Map screen:
Adjusts the volume by rotating the wheel.
Opens the Address Book by pressing in the wheel.
Opens the Destination Menu by pressing briefly.
Opens the Phone Menu by pressing for 2 seconds.
Displays the output of your device. Touch the screen with
your fingertip to select menu commands or enter
information.
Ref Component Description
ON/OFF Switch The main power/battery cutoff switch.
n
Speaker
o
External GPS
p
Antenna
For voice prompts, system operation tone, and hands free
dial voice.
This connector (under rubber dust cover) allows use of an
external GPS antenna (not available through Pioneer),
which may be positioned on top of the car for better signal
reception in areas with poor reception. Contact Pioneer
Support for recommendations on available third party
products.
2
Page 9

Right-Side Components
Ref Component Description
SD Slot
n
Reset Button Restarts your device (soft reset).
o
Accepts an SD (Secure Digital) card for future map and
software upgrades.
Top Components
Ref Component Description
Power Button
n
Turns the device on and off by pressing for at least 2
seconds.
3
Page 10

Bottom Components
Ref Component Description
Mini-USB
n
Connector
Car Kit
o
Connector
Microphone For Bluetooth hands-free calling.
p
Connects to the AC adapter or USB cable.
Connects to the optional TMC Kit (ND-TMC1) for
receiving TMC (Traffic Message Channel) information
NOTE: ND-TMC1 is available for European models only.
Follow the instructions supplied with ND-TMC1 for
operation.
4
Page 11

1.2 Connecting to AC Power and Charging the Battery
You are recommended to fully charge your device before using it for the very
first time.
1. Connect the AC adapter cable to the mini-USB connector on your device.
2. Connect one end of the power cable to the AC adapter and the other end to a
wall outlet.
The power indicator glows amber when charging is in progress. Do not
disconnect your device from AC power until the battery is fully charged. The
power indicator will turn green. This will take a couple of hours.
CAUTION: For optimal performance of the lithium battery, take note of the following:
z Do not charge the battery where the temperature is high (e.g. in direct sunlight).
z There is no need to fully discharge the battery before charging. You can charge the
battery before it is discharged.
z If you will not use the product for a long period of time, be sure to fully charge the
battery at least once every two weeks. Over discharge of the battery can affect the
charging performance.
5
Page 12

1.3 Performing the Initial Startup
1. Slide the ON/OFF switch to the ON position.
2. Your device turns on and prompts you to select the language. Select the
desired language and tap
the rest of the initial startup settings.
OK. Your device restarts and guides you through
3. When the warning screen appears, read the entire warning and tap
agree.
4. The Destination Menu appears.
6
OK if you
Page 13

1.4 Turning Your Device On and Off
Press and hold the power button for at least 2 seconds to turn on and off your
device.
When you press the power button to turn off the unit, your device actually enters
into a suspend state and the system stops operating. Once you turn on the system
again, it resumes from the same guidance or menu screen you left off at.
1.5 Destination Menu
The Destination Menu is your starting place for various tasks. Tap a button to
start a task or open another menu. (For information on the GPS navigation
software, see the “Operation Manual.” For information on the
the next chapter.)
Phone Menu, see
You can access the Destination Menu at any time by pressing the MENU
button on your device.
7
Page 14

1.6 Navigating on the Screen
To navigate and select objects on the screen, simply use your finger and touch
the screen. The following are possible via touch screen:
z Tap
Touch the screen once with your finger to
open items or select options.
z Drag
Hold your finger on the screen and drag
up/down/left/right or across the screen.
z Tap and hold
Tap and hold your finger until an action is
complete, or a result or menu is shown.
1.7 Using a SD Card
NOTE: Make sure that no foreign objects enter the slot.
Your device has a SD slot where you can insert an Secure Digital storage card
for future software and application upgrades sold by Pioneer. To use a SD card,
insert it into the slot, with the connector pointing to the slot and its label facing
the front of the device.
To remove a card, first make sure that no application is accessing the card, and
then slightly push the top edge of the card to release it and then pull it out of the
slot.
8
Page 15

2 Bluetooth HF Phone
2.1 About Bluetooth HF Phone
Your device can serve as a hands-free (HF) device for a Bluetooth mobile
phone. After establishing the Bluetooth connection, you can tap your device to
place and receive phone calls instead of picking up the mobile phone, and can
use the built-in speakers and microphone for your conversation.
2.2 Connecting a Bluetooth Mobile Phone
To connect with a Bluetooth mobile phone for the first time:
1. Initiate the Bluetooth searching process on your mobile phone. You should
see “Pioneer AVIC-S1” in the device list after searching is completed.
2. C-S1” to create the connection. Use the 0000 default
Select “Pioneer AVI
passkey to connect.
3. Your AVIC-S1 can now serve as a hands-free device for your mobile
phone.
9
Page 16

2.3 Starting Bluetooth Mobile Phone
1. Press and hold the MENU button on your device for at least 2 seconds.
- or Tap
Settings on the Destination Menu. Tap twice and then tap
Phone Menu.
2. The Bluetooth HF Phone main screen appears. The status bar at the bottom
shows the name of the mobile phone connected.
10
Page 17

2.4 Placing a Call
After pairing with your mobile phone, you can place a call using any of the four
buttons (
Redial) on the Bluetooth HF Phone main screen.
Keypad, Contact, Call History, and
Keypad
By tapping the Keypad button on the Bluetooth HF Phone main screen,
you can enter the telephone number with the onscreen keypad. After entering
the telephone number, tap
NOTE:
z To delete the last digit entered, tap the Backspace button.
z The other two buttons allow you to switch to Contacts and Call
History screens.
to place the call.
Back
Backspace
Contacts
Call History
Call
11
Page 18

Contacts
You can transfer contact data of your Bluetooth devices via OPP (Object Push
Profile). As long as you have sent such information to your device, the
information is available in Bluetooth HP Phone.
To call a contact, tap the
Contact button on the Bluetooth HF Phone
main screen.
Back
Index
Call the selected
number.
Tap the desired contact and the phone number list appears. Tap the phone
number to call and tap
to call the selected phone number.
12
Page 19

Call History
NOTE: Bluetooth HF Phone cannot access the call history stored in a connected mobile
phone.
Tap the Call History button on the Bluetooth HF Phone main screen to
display the recent incoming, outgoing, or missed calls together with information
such as date, time, and duration of each call.
Incoming
Delete
Tap the respective button (
Missed) to view the last 20 calls of the selected type.
Outgoing
Delete All
Incoming, Outgoing, or
With an item selected, you can tap the
the
button to delete the item.
Missed
To clear all items in the current list, tap the
Call
button to dial the number or
button.
13
Page 20

Redial
Tap the Redial button on the Bluetooth HF Phone main screen to dial
the last number you called or received.
Mute
Cancel
2.5 Operations During a Call
During a call, four functions are available:
Switch to
z If you need to input other numbers, such as an extension number, tap
mobile phone.
Mute
End
to open the keypad and tap the digits. The keypad will close when you tap
the button again or when there has been no input for 5 seconds.
14
Page 21

A
A
z Tap the Mute button to mute your sound so that the other party cannot
hear you. To end the mute mode, tap the same button again.
z Tap the Ignore button to end the call.
z Tap the Transfer button to switch the call to your mobile phone. To
switch back to your device, tap the same button again.
2.6 Receiving a Call
When you have a call after pairing with a mobile phone, the device rings and
displays the Incoming Call screen.
While in the map screen While in the Bluetooth HF Phone screen
Mute
ccept
Reject Reject
ccept
Mute
To accept the call, tap the
To reject the call, tap the
To mute the ring tone before receiving or rejecting, tap the
Answer button.
Ignore button.
Mute button.
15
Page 22

2.7 Connecting to a Paired Phone
Once you have established a Bluetooth connection with a mobile phone, it will
be stored in your device. You can initiate the connection from your device.
1. Start Bluetooth HF Phone as described in section 2.2
2. Tap the
Your device will search the last paired mobile phones for an available
connection.
NOTE:
z Make sure that the mobile phone is in “discoverable” mode.
z Up to 8 sets of paired mobile phones can be stored. A 9th paired mobile phone will
replace the oldest one.
Connect button on the Bluetooth HF Phone main screen.
2.8 Initiating Pair Mode
By tapping the Pair Mode button on the Bluetooth HF Phone main
screen, you can manually set your device to Pair Mode. Within the duration of
60 seconds, you can initiate the pairing process on your mobile phone to
discover your device as a hands-free device.
16
Page 23

2.9 Closing Bluetooth HF Phone
To hide the Bluetooth HF Phone screen, tap the button on the
Bluetooth HF Phone main screen. Bluetooth HF Phone is still running in the
background.
2.10 Ending the Bluetooth Connection
When you turn off your device, the connection is ended. You can also end the
connection from your mobile phone.
17
Page 24

Troubleshooting and
3 Troubleshooting and Maintenance
This chapter gives solutions to common problems you may encounter. It also
pro
vides guidelines on how to take care of your device.
NOTE: If you encounter a problem you cannot solve, contact an authorized service center for
assistance.
Maintenance
3.1 Resetting Your System
Occasionally, you may need to reset your device. For example,
you should reset your system when it stops responding; or
appears to be “frozen” or “locked up.”
Use the stylus pen to press the reset button on
called a “soft reset.”
If your device still does not respond after a soft reset, you can use
the following steps to perform a “hard reset.”
your device. This is
1. Disconnect all cables, including the AC adapter,
2. Slide the ON/OFF switch to the OFF position.
3. Wait for 1 minute and then slide the switch back to the ON position.
18
from your device.
Page 25

4. Your device turns on.
3.2 Troubleshooting
Power Problems
Power does not turn on when using battery power
z The remaining battery power may be too low to run your device. Connect
the AC adapter to your device and then to AC power. Then, turn on your
device.
Screen Problems
Screen is off
If the screen does not respond even after you press the power button, try the
following in order until the problem is solved:
z Connect the AC adapter to your device and to external AC power.
z Reset your system.
19
Page 26

Screen responds slowly
z Make sure that your device is not running out of battery power. If the
problem still exists, reset your system.
Screen freezes
z Reset your system.
Screen is hard to read
z Make sure that the backlight of the display is on and if necessary adjust the
brightness. On the Destination Menu, tap
Settings Æ Hardware Æ Brightness.
Connection Problems
Cable Connection Problems
z Make sure that your device and your computer are both turned on before
trying to establish a connection.
z Make sure that the cable is securely plugged into the USB port on your
computer and on the device. Connect the USB cable directly to your
computer—do not run the cable through a USB hub.
z Reset your device before connecting the cable. Always disconnect your
device before you restart your computer.
GPS Problems
When there are no valid signals available, consider the following:
z Make sure that the device is facing a clear view of the sky.
z Note that the GPS reception can be affected by:
9 Bad weather
9 Dense overhead obstacles (e.g. trees and tall buildings)
9 Other wireless device in the car
9 Reflective car window tint and heated screens.
20
Page 27

3.3 Maintaining Your Device
Taking good care of your device will ensure trouble-free operation and reduce
the risk of damage to your device.
z Keep your device away from excessive moisture and extreme temperatures.
z Avoid exposing your device to direct sunlight or strong ultraviolet light for
extended periods of time.
z Do not place anything on top of your device or drop objects on your device.
z Do not drop your device or subject it to severe shock.
z Do not subject your device to sudden and severe temperature changes. This
could cause moisture and condensation build up inside the unit, which could
damage your device. In the event of moisture or condensation, allow the
device to dry out completely before use.
z Do not place heavy objects on top of this device. Use the provided Carrying
Case when transporting the unit outside of the vehicle.
z The screen surface can easily be scratched. Avoid touching it with sharp
objects. Non-adhesive generic screen protectors designed specifically for
use on portable devices with LCD panels may be used to help protect the
screen from minor scratches.
z Never clean your device with it powered on. Use a soft, lint-free cloth
moistened with water to wipe the screen and the exterior of your device.
z Do not use paper towels to clean the screen.
z Never attempt to disassemble, repair or make any modifications to your
device. Disassembly, modification or any attempt at repair could cause
damage to your device and even bodily injury or property damage and will
void any warranty.
z Do not store or carry flammable liquids, gases or explosive materials in the
same compartment as your device, its parts or accessories.
21
 Loading...