

Page 1
This guide is intended to guide you through the basic functions of
this navigation system. For details, please refer to the Operation
Manual provided with the product.
Basic hardware buttons
1 h button
2 VOL (+/–) button
Press to adjust the AV
(Audio and Video) source
volume.
3 MAP button
Press to display the Map
screen.
4 HOME button
Press to display the Top
menu screen.
5 MODE button
Press to switch between the
Application screen and the
AV operation screen.
6 TRK button
7 button
Press to remove the
detachable faceplate from
this product.
English
Quick Start Guide
NAVIGATION AV SYSTEM
AVIC-F960DAB/AVIC-F960BT/AVIC-F860BT
< KMZZ14B >
< CRD4775-A > EU
© 2014 PIONEER CORPORATION.
All rights reserved.
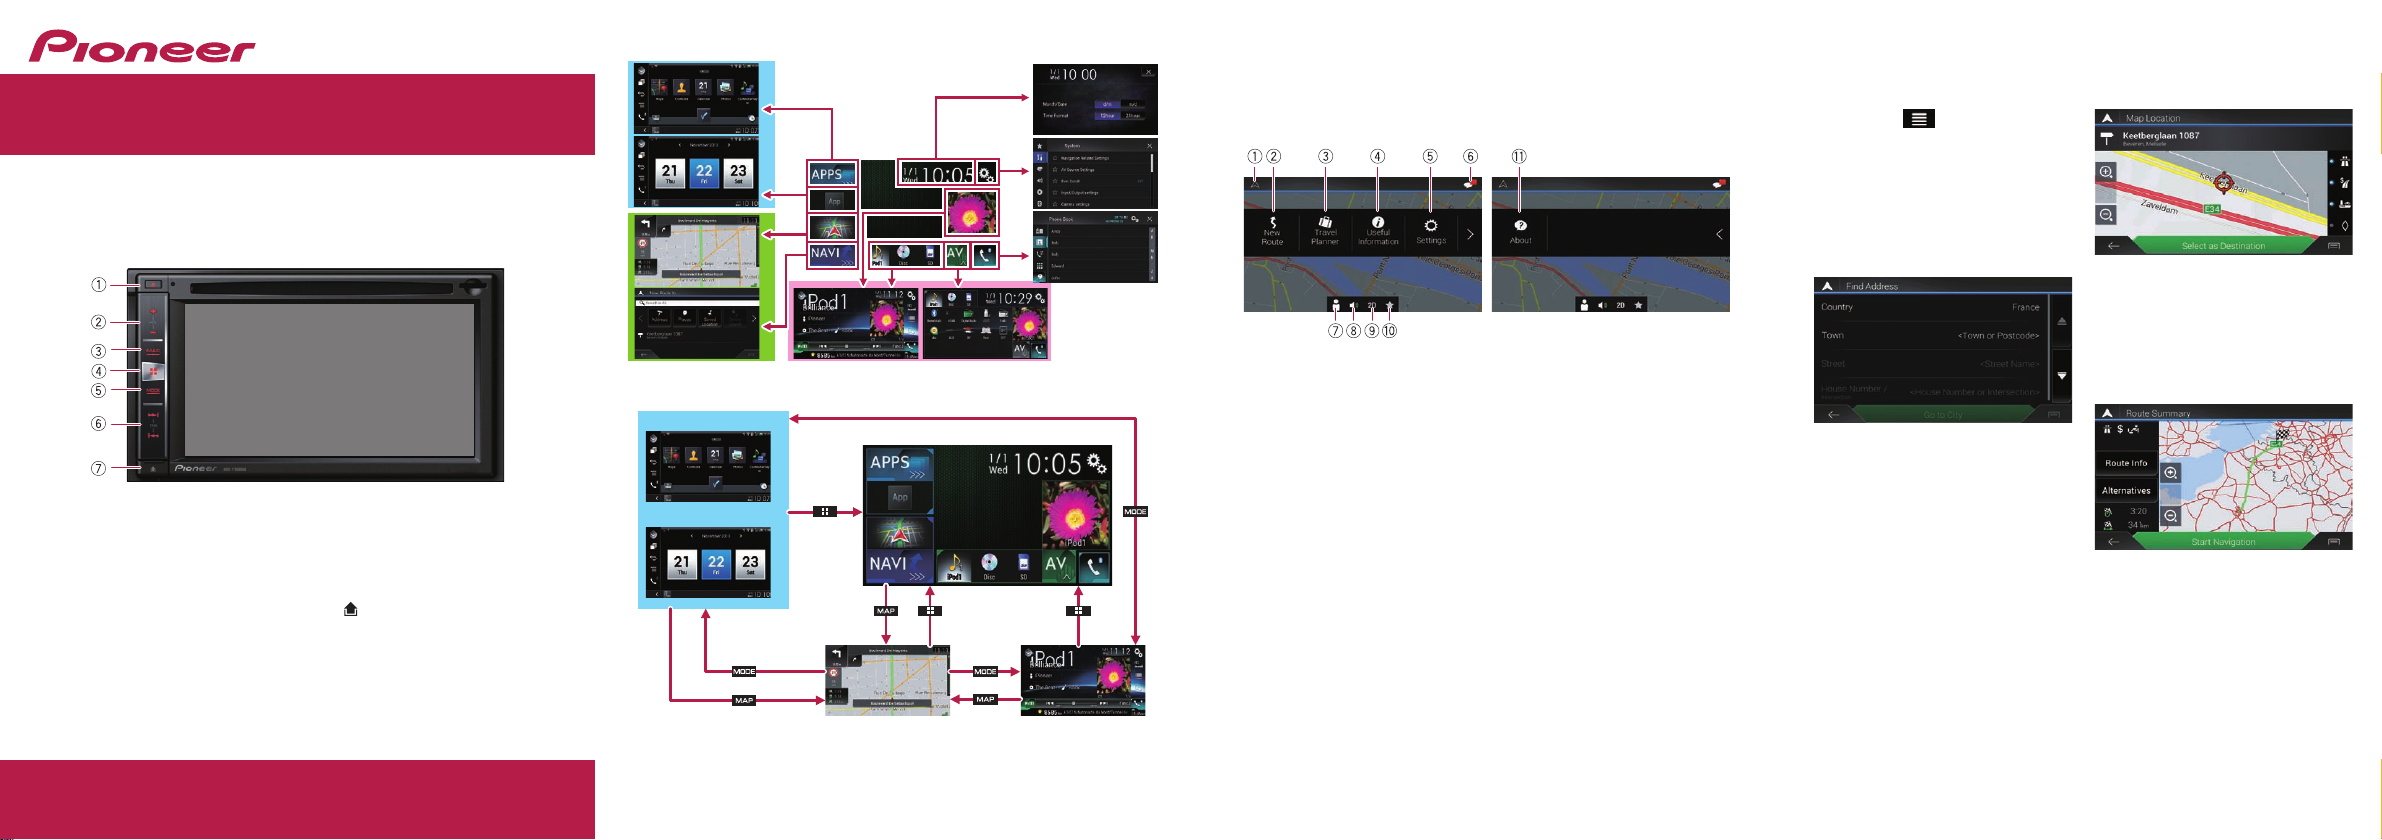
Switching screens using the touch panel keys
Switching screens using the hardware buttons
How to use the navigation menu screens
You can use various functions such as the route guidance and
related settings.
You can see some of menu options when you are navigating
without a planned route.
1 Returns to the Map screen.
2 Searches for your
destination by entering an
address, its coordinate, or
selecting a place of interest,
etc.
3 Builds your route using the
list of destinations.
4 Displays useful information
to support your driving.
5 Configures the programme
settings.
6 Sees notifications that
contain important
information for the users.
7
Displays the “Driver Profiles”
screen where you can create
new profiles or edit the
existing profiles.
8 Mutes the sound of the
navigation system (the voice
guidance, or beep sounds,
for example).
9 Switches among 2D, 3D, or
2D North up view modes.
a Displays the location where
you saved as a favourite.
b Displays the information
of your navigation system
(the version information, or
licences, for example).
Searching for a location by address
1 Press the MAP button.
The Map screen appears.
2 Touch to display the
navigation menu on the
Map screen.
3 Touch [New Route].
4 Touch [Address].
The “Find Address” screen
appears.
5 Touch [Country], and
select the country.
6 Touch [Town], and select
the city/town.
7 Touch [Street], and select
the street.
8 Touch [House Number /
Intersection], and select
the house number or the
crossing street.
After you touch the
selected address to finish
the address search, the
searched location appears
on the Map screen.
9 Touch [Select as
Destination].
After a short summary of
the route parameters, a
map appears showing the
entire route. The route is
automatically calculated.
10 Touch [Start Navigation].
Your navigation system
starts the route guidance.
Page 2
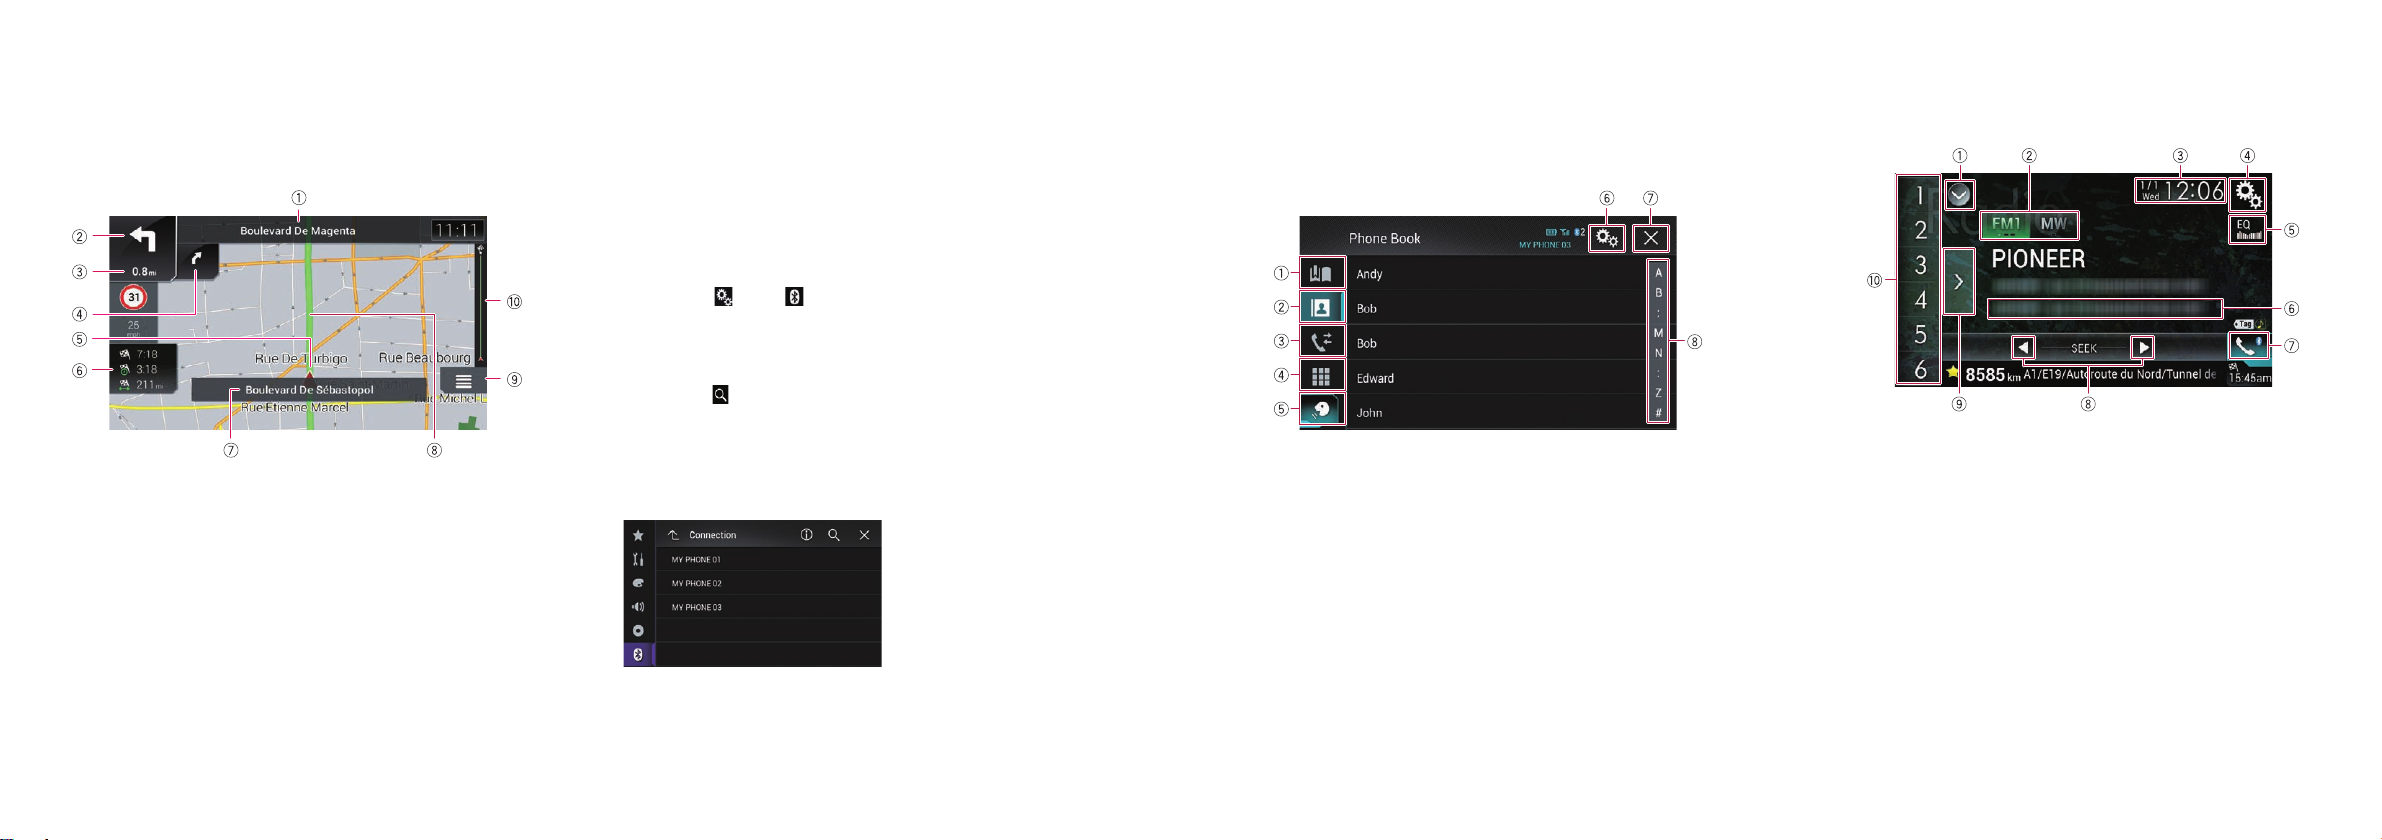
How to use the map
Most of the information provided by your navigation system can
be seen on the map. You need to become familiar with how the
information appears on the map.
Information with an asterisk (*) appears only when the route is set.
The AV information is displayed in the bottom of the Map screen.
1 Shows the number and
name of the street to be
used (or next guidance
point).*
2 Shows the next guidance
point (manoeuvre).*
3 Shows the distance to
the next guidance point
(manoeuvre).*
4 Shows the second
manoeuvre arrow.*
5 Indicates the current
location of your vehicle.
6 Displays the following
information.*
! The estimated time of the
arrival at the destination
! The remaining time of the
trip
! The remaining distance to
the destination
7 Shows the name of the
street (or city) that your
vehicle is travelling on (or
in).
8 Indicates the current route.*
9 Displays the Navigation
menu screen.
a Indicates the progress to the
final destination.*
Pairing your Bluetooth® devices
You can use various additional functions (hands-free phoning and
Bluetooth audio) by connecting your Bluetooth devices to this
navigation system. To use the functions, pair the devices with the
navigation system in advance.
1 Activate the Bluetooth
wireless technology on
your devices.
2 Press the HOME button
to display the Top menu
screen.
3 Touch then .
The “Bluetooth” screen
appears.
4 Touch [Connection].
5 Touch .
The system searches for
Bluetooth devices waiting
for a connection and
displays them in the list if a
device is found.
6 Touch the Bluetooth
device name you want to
register.
While connecting,
“Pairing… Please wait.” is
displayed. If the connection
is established, “Paired.” is
displayed.
Using hands-free phoning
If your mobile phone features Bluetooth technology, this navigation
system can be connected to your mobile phone wirelessly. Using
this hands-free function, you can operate the navigation system to
make or receive phone calls. You can also transfer the phone book
data stored in your mobile phone to the navigation system.
1 Displays the preset dial
screen.
2 Switches to the phone book
list.
3 Switches to the missed,
received and dialled call
lists.
4 Switches the mode to enter
the phone number directly.
5 Switches to the voice
recognition function (for
iPhone).
6 Displays the Setting menu
screen.
7 Closes the screen.
8 Displays the alphabet
search screen.
Using the radio
You can listen to the radio using this product.
Once you have stored broadcast channels, you can easily recall
preset channels from memory with a single touch of a key.
1 Displays the source list.
2 Selects a band.
3 Displays the Time and date
setting screen.
4 Displays the Setting menu
screen.
5 Recalls equaliser curves.
6 Stores song information to
an iPod.
7 Displays the Phone menu
screen.
8 Performs manual tuning or
seek tuning.
9 Displays the preset
channels.
a Recalls the preset channel
stored to a key from memory
with a single touch of the
key.
Stores the current broadcast
frequency to a key for later
recall by continuing to touch
the key.
Page 3

Ce guide est destiné à vous guider à travers les fonctions de base
de ce système de navigation. Pour en savoir plus, reportez-vous au
Manuel de fonctionnement fourni avec le produit.
Boutons physiques de base
1 Bouton h
2 Bouton VOL (+/–)
Appuyez sur ce bouton
pour régler le volume de la
source AV (Audio et Vidéo).
3 Bouton MAP
Appuyez sur ce bouton pour
afficher l’écran de Carte.
4 Bouton HOME
Appuyez sur ce bouton pour
afficher l’écran du Menu
principal.
5 Bouton MODE
Appuyez sur ce bouton pour
basculer entre l’écran de
l’application et l’écran de
Fonction AV.
6 Bouton TRK
7 Bouton
Appuyez sur ce bouton pour
retirer la façade amovible de
ce produit.
Français
Guide de démarrage rapide
SYSTEME DE NAVIGATION AV
AVIC-F960DAB/AVIC-F960BT/AVIC-F860BT
< KMZZ14B >
< CRD4775-A > EU
© 2014 PIONEER CORPORATION.
Tous droits de reproduction et de traduction réservés.
Changement d’écran à l’aide des touches de l’écran tactile
Changement d’écran à l’aide des touches physiques
Comment utiliser les écrans du menu de navigation
Vous pouvez utiliser plusieurs fonctions, telles que le guidage
d’itinéraire et les réglages connexes.
Vous pouvez voir certaines options de menu lorsque vous vous
déplacez sans itinéraire prévu.
1 Retourne à l’écran de Carte.
2 Recherche votre destination
en saisissant une adresse,
ses coordonnées ou en
sélectionnant un centre
d’intérêt, etc.
3 Crée votre itinéraire à l’aide
de la liste des destinations.
4 Affiche des informations
utiles pour assister votre
conduite.
5 Configure les réglages du
programme.
6 Affiche les notifications
contenant des informations
importantes pour les
utilisateurs.
7 Affiche l’écran “Profils de
conducteur” dans lequel
vous pouvez créer de
nouveaux profils ou modifier
des profils existants.
8 Coupe le son du système de
navigation (par exemple, le
guidage vocal ou les bips
sonores).
9 Bascule entre les modes
de visualisation 2D, 3D ou
Orientation Nord 2D.
a Affiche l’emplacement que
vous avez enregistré en tant
que favori.
b Affiche les informations
relatives à votre système de
navigation (par exemple, les
informations sur la version
ou les licences).
Recherche d’un emplacement à partir d’une adresse
1 Appuyer sur le bouton
MAP.
L’écran de Carte apparaît.
2 Touchez pour afficher
le menu de navigation sur
l’écran de Carte.
3
Touchez [Nouvel itinéraire].
4 Touchez [Adresse].
L’écran “Chercher
l’adresse” apparaît.
5 Touchez [Pays] et
sélectionnez le pays.
6 Touchez [Ville] et
sélectionnez la ville.
7 Touchez [Rue] et
sélectionnez la rue.
8 Touchez [Numéro
/ Intersection] et
sélectionnez le numéro
de maison ou la rue
d’intersection.
Après avoir touché l’adresse
sélectionnée pour terminer
la recherche par adresse,
l’emplacement recherché
apparaît sur l’écran de
Carte.
9 Touchez [Sélectionner
comme destination].
Après une brève synthèse
des paramètres de
l’itinéraire, une carte
affichant l’itinéraire entier
apparaît. L’itinéraire est
automatiquement calculé.
10 Touchez [Lancer
navigation].
Votre système de navigation
démarre le guidage de
l’itinéraire.
Page 4

Comment utiliser la carte
La plupart des informations fournies par votre système de
navigation sont visibles sur la carte. Il est nécessaire que vous vous
familiarisiez avec l’affichage des informations sur la carte.
Les informations suivies d’un astérisque (*) apparaissent
uniquement lorsque l’itinéraire est défini.
Les informations AV s’affichent en bas de l’écran de Carte.
1 Affiche le numéro et le nom
de la rue à emprunter (ou
point de guidage suivant).*
2 Affiche le point de guidage
suivant (manœuvre).*
3 Affiche la distance au
point de guidage suivant
(manœuvre).*
4 Affiche la flèche de la
seconde manœuvre.*
5 Indique la position actuelle
de votre véhicule.
6 Affiche les informations
suivantes.*
! L’heure estimée d’arrivée à
destination
! Le temps de trajet restant
! La distance restante jusqu’à
destination
7 Affiche le nom de la rue (ou
de la ville) dans laquelle se
trouve le véhicule.
8 Indique l’itinéraire actuel.*
9 Affiche l’écran de Menu de
navigation.
a Indique la progression
jusqu’à la destination
finale.*
Appariement de vos périphériques Bluetooth
®
Vous pouvez utiliser plusieurs fonctions supplémentaires
(téléphone main libre et audio Bluetooth) en connectant vos
périphériques Bluetooth à ce système de navigation. Pour utiliser
les fonctions, appariez les périphériques avec le système de
navigation au préalable.
1 Activez la technologie
sans fil Bluetooth sur vos
périphériques.
2 Appuyez sur le bouton
HOME pour afficher
l’écran de Menu principal.
3 Touchez puis .
L’écran “Bluetooth”
apparaît.
4 Touchez [Connexion].
5 Touchez .
Le système recherche des
périphériques Bluetooth
en attente de connexion et
affiche dans une liste les
périphériques trouvés.
6 Touchez le nom du
périphérique Bluetooth
que vous souhaitez
enregistrer.
“Couplage… Veuillez
patienter.” s’affiche
pendant la connexion. Si
la connexion est établie,
“Jumelé” s’affiche.
Utilisation de la téléphonie mains libres
Si votre téléphone portable intègre la technologie Bluetooth, ce
système de navigation peut être relié sans fil à votre téléphone
portable. À l’aide de la fonction mains libres, vous pouvez utiliser le
système de navigation pour effectuer ou recevoir des appels. Vous
pouvez également transférer l’annuaire de votre téléphone portable
dans le système de navigation.
1 Affiche l’écran de
numérotation prédéfinie.
2 Bascule vers la liste de
l’annuaire.
3 Bascule vers les listes des
appels en absence, reçus et
effectués.
4 Change de mode pour entrer
directement le numéro de
téléphone.
5 Bascule vers la fonction de
reconnaissance vocale (pour
iPhone).
6 Affiche l’écran de
Paramètre.
7 Ferme l’écran.
8 Affiche l’écran de recherche
alphabétique.
Utilisation de la radio
Vous pouvez écouter la radio au moyen du produit.
Une fois les canaux de radiodiffusion mémorisés, vous pouvez
facilement rappeler les canaux préréglés depuis la mémoire, en
touchant une seule touche.
1 Affiche la liste de sources.
2 Sélectionne une bande.
3 Affiche l’écran de Réglage
de l’heure et de la date.
4 Affiche l’écran de
Paramètre.
5 Rappelle des courbes
d’égalisation.
6 Mémorise les informations
de la chanson sur un iPod.
7 Affiche l’écran de Menu
téléphone.
8 Effectue la syntonisation
manuelle ou la syntonisation
automatique.
9 Affiche les canaux préréglés.
a Rappelle de la mémoire le
canal préréglé associé à une
touche si vous touchez une
fois la touche.
Enregistre la fréquence de
radiodiffusion en cours sur
une touche pour un rappel
ultérieur si vous continuez
de toucher la touche.
 Loading...