

Page 1

Operation Manual
NAVIGATION AV SYSTEM
AVIC-F40BT
AVIC-F940BT
AVIC-F840BT
Be sure to read Important Information for the User
first!
Important Information for the User includes the
important information that you must understand before
using this navigation system.
English
Page 2
Contents
Thank you for buying this Pioneer product.
Please read through these instructions so you will know how to operate your model
properly. After you have finished reading the instructions, keep this document in a
safe place for future reference.
Important
The screens shown in the examples may differ
from actual screens.
Actual screens may be changed without notice
for performance and function improvements.
Introduction
Manual overview 9
– How to use this manual 9
– Conventions used in this manual 9
– Terms used in this manual 9
Notice regarding video viewing 10
Notice regarding DVD-Video viewing 10
Notice regarding MP3 file usage 10
iPod compatibility 10
Map coverage 11
Protecting the LCD panel and screen 11
Notes on internal memory 11
– Before removing the vehicle
battery 11
– Data subject to erasure 11
Basic operation
Checking part names and functions 12
Protecting your product from theft 14
– Removing the detachable
faceplate 14
– Attaching the detachable faceplate 14
Adjusting the LCD panel angle 15
Inserting and ejecting a disc 15
– Inserting a disc (for AVIC-F40BT) 15
– Ejecting a disc (for AVIC-F40BT) 16
– Inserting a disc (for AVIC-F940BT and
AVIC-F840BT) 16
– Ejecting a disc (for AVIC-F940BT and
AVIC-F840BT) 16
Inserting and ejecting an SD memory
card 16
– Inserting an SD memory card (for AVIC-
F40BT) 17
– Ejecting an SD memory card (for AVIC-
F40BT) 17
– Inserting an SD memory card (for AVIC-
F940BT and AVIC-F840BT) 18
– Ejecting an SD memory card (for AVIC-
F940BT and AVIC-F840BT) 18
Plugging and unplugging a USB storage
device 19
– Plugging in a USB storage device 20
– Unplugging a USB storage device 20
Connecting and disconnecting an iPod 20
– Connecting your iPod 20
– Disconnecting your iPod 20
Startup and termination 21
On first-time startup 21
Regular startup 21
– A message about the map
database 22
Demonstration images 22
How to use the navigation menu screens
Screen switching overview 24
What you can do on each menu 25
Shortcut Menu 25
– Selecting the shortcut 25
– Removing a shortcut 26
Operating list screens (e.g. POI list) 26
Operating the on-screen keyboard 26
How to use the map
How to read the map screen 27
– Enlarged map of the intersection 28
– Display during motorway driving 29
Types of the road stored in the map
database 29
Operating the map screen 29
– Changing the scale of the map 29
– Switching the map orientation 30
– Scrolling the map to the position you
want to see 30
2
Engb
Page 3

Contents
– Viewing information about a specified
location 30
– Using shortcut menus on the map 31
Switching the view mode 32
Eco-friendly driving functions
Checking the eco-friendly driving status 33
Displaying Eco Drive Level guidance 34
Sudden start alert 34
Searching for and selecting a location
The basic flow of creating your route 35
Searching for a location by address 36
– Searching for a street name first 36
– Searching for a city name first 37
– Finding your destination by specifying
the postcode 38
– Searching by selected city history 39
Setting up a route to your home 39
Searching for Points of Interest (POI) 40
– Searching for POIs by preset
categories 40
– Searching for a POI directly from the
name of the facilities 40
– Searching for a nearby POI 41
– Searching for POIs around the
destination 41
– Searching for POIs around the city 41
Selecting destination from “Favourites” 42
Searching for POIs by using the data on the
SD memory card 42
Selecting a location you searched for
recently 43
Searching for a location by coordinates 43
After the location is decided
Setting a route to your destination 44
– Displaying multiple routes 44
Checking and modifying the current
route
Displaying the route overview 45
Modifying the route calculation
conditions 45
– Items that users can operate 45
Checking the current itinerary 46
Editing waypoints 47
– Adding a waypoint 47
– Deleting a waypoint 47
– Sorting waypoints 48
Cancelling the route guidance 48
Registering and editing locations
Storing favourite locations 49
– Registering a location by
“Favourites” 49
– Registering a location by scroll
mode 49
Editing registered locations 49
– Editing the favourite location in the
list 49
– Editing your home 50
– Sorting the favourite locations in the
list 50
– Deleting a favourite location from the
list 51
Exporting and importing favourite
locations 51
– Exporting favourite locations 51
– Importing favourite locations 51
Deleting the destination history from the
list 52
Using traffic information
Checking all traffic information 53
Checking traffic information on the
route 54
How to read traffic information on the
map 54
Setting an alternative route to avoid traffic
jams 55
– Checking for traffic jams
automatically 55
Engb
3
Page 4

Contents
– Checking traffic information
manually 55
Selecting traffic information to display 56
Selecting preferred RDS-TMC service
provider manually 56
Registering and connecting a Bluetooth
device
Preparing communication devices 57
Registering your Bluetooth devices 57
– Searching for nearby Bluetooth
devices 57
– Pairing from your Bluetooth
devices 58
– Searching for a specified Bluetooth
device 59
– Deleting a registered device 60
Connecting a registered Bluetooth device
manually 60
– Setting for priority connecting 61
Using hands-free phoning
Displaying the phone menu 62
Making a phone call 62
– Direct dialling 62
– Making a call home easily 63
– Calling a number in the phone
book 63
– Dialling from the history 64
– Dialling a favourite location 64
– Dialling a facility’s phone number 64
– Dialling from the map 65
Receiving a phone call 65
– Answering an incoming call 65
Transferring the phone book 66
– Changing the order of names in the
phone book 67
– Deleting registered contacts 67
Changing the phone settings 67
– Editing the device name 67
– Editing the password 68
– Stopping Bluetooth wave
transmission 68
– Echo cancelling and noise
reduction 68
– Answering a call automatically 68
– Setting the automatic rejection
function 69
– Clearing memory 69
– Updating the Bluetooth wireless
technology software 70
Notes for hands-free phoning 70
Basic operations of the AV source
Displaying the AV operation screen 72
– Selecting a source 72
Operating list screens (e.g. iPod list
screen) 72
– Switching between the AV operation
screen and the list screen 72
– Selecting an item 73
– Returning to the previous display 73
Using the radio (FM)
Starting procedure 74
Reading the screen 74
Using the touch panel keys 75
– Storing and recalling broadcast
frequencies 76
– Using radio text 76
Operating by hardware buttons 77
Using advanced functions 77
– Storing the strongest broadcast
frequencies 77
– Tuning in strong signals 77
– Limiting stations to regional
programming 78
– Searching for an RDS station by PTY
information 78
– Receiving traffic announcements 78
– Tuning into alternative frequencies 79
– Using news programme
interruption 79
4
Engb
Page 5
Contents
– Interruption icon status 79
– PTY list 81
Using the radio (AM)
Starting procedure 82
Reading the screen 82
Using the touch panel keys 83
– Storing and recalling broadcast
frequencies 83
Operating by hardware buttons 84
Using advanced functions 84
– Storing the strongest broadcast
frequencies 84
– Tuning in strong signals 84
Playing audio CDs
Starting procedure 86
Reading the screen 86
Using the touch panel keys 87
Operating by hardware buttons 88
Using advanced functions 88
Playing music files on ROM
Starting procedure 89
Reading the screen 89
Using the touch panel keys 91
Operating by hardware buttons 92
Using advanced functions 92
Playing a DVD-Video
Starting procedure 94
Reading the screen 94
Using the touch panel keys 95
– Resuming playback (Bookmark) 96
– Searching for a specific scene and
starting playback from a specified
time 97
– Direct number search 97
– Operating the DVD menu 97
– Using DVD menu by touch panel
keys 97
– Frame-by-frame playback 98
– Slow motion playback 98
Operating by hardware buttons 98
Using advanced functions 98
Playing a DivX video
Starting procedure 100
Reading the screen 100
Using the touch panel keys 101
– Frame-by-frame playback 102
– Slow motion playback 102
– Starting playback from a specified
time 103
Operating by hardware buttons 103
Using advanced functions 103
DVD-Video or DivX setup
Displaying DVD/DivX® Setup menu 104
Setting the top-priority languages 104
Setting the angle icon display 104
Setting the aspect ratio 105
Setting the parental lock 105
– Setting the code number and
level 105
Setting the auto play 106
Setting the subtitle file for DivX 106
Language code chart for DVDs 107
Playing music files (from USB or SD)
Starting procedure 108
Reading the screen 108
Using the touch panel keys (Music) 110
Operating by hardware buttons 111
Using advanced functions 111
Playing video files (from USB or SD)
Starting procedure 112
Reading the screen 112
Using the touch panel keys (Video) 113
– Searching for a specific scene and
starting playback from a specified
time 114
Operating by hardware buttons 114
Using advanced functions 114
Engb
5
Page 6

Contents
Using an iPod (iPod)
Starting procedure 115
Reading the screen 115
Using the touch panel keys 117
Operating by hardware buttons 119
Starting the video playback 119
Narrowing down a song or video with the
list 119
Operating an application for iPhone from the
navigation system 120
– Starting procedure 121
– Using the touch panel keys 121
– Using the keyboard 122
– When using an application not
compatible with Advanced App
Mode 122
Operating the functions from your iPod 123
– Starting procedure 123
– Using the touch panel keys 123
Playing MusicSphere 124
– Starting procedure 124
– Reading the screen 124
– Using the touch panel keys 124
Using advanced functions 124
Using Aha Radio
Starting procedure 126
– For Android device users 126
– For iPhone users 127
Reading the screen 128
Using the touch panel keys 129
Functions coupled with Aha Radio and the
navigation system 130
– Displaying POIs obtained with Aha
Radio 130
Using the Bluetooth audio player
Starting procedure 131
Reading the screen 131
Using the touch panel keys 133
Operating by hardware buttons 133
Using advanced functions 134
6
Engb
Using AV input
Reading the screen 135
Using AV1 135
Using AV2 135
Using the touch panel keys 135
Customising preferences
Displaying the screen for navigation
settings 136
Checking the connections of leads 136
Checking sensor learning status and driving
status 137
– Clearing status 137
Using the fuel consumption function 138
– Inputting the fuel consumption
information for calculating the fuel
cost 138
– Calculating the fuel consumption 138
– Exporting the data of fuel cost
information 139
Recording your travel history 140
Using the demonstration guidance 140
Registering your home 141
Correcting the current location 141
Changing the eco-function setting 141
– Clearing the fuel consumption
information 142
Displaying the screen for map settings 142
Setting the auto-zoom display 143
Setting the detailed city map 143
Setting the barrier graphic for city map 143
Setting the speed limit display 144
Displaying the traffic notification icon 144
Displaying the Bluetooth connection
icon 144
Setting the current street name display 144
Setting the display of icons of favourite
locations 145
Displaying the 3D landmarks 145
Displaying manoeuvres 146
Displaying the fuel consumption
information 146
Page 7

Contents
Displaying POI on the map 146
– Displaying preinstalled POIs on the
map 146
– Displaying the customised POIs 147
Changing the view mode 148
Setting the map colour change between day
and night 148
Changing the road colour 148
Changing the setting of navigation
interruption screen 148
Selecting the “Quick Access” menu 149
Displaying the screen for system
settings 149
– Customising the regional settings 150
– Setting the Volume for Guidance and
Phone 152
– Changing the preinstalled splash
screen 153
– Changing to the splash screen stored
in the SD memory card 153
– Setting for rear view camera 154
– Adjusting the response positions of the
touch panel (touch panel
calibration) 155
– Setting the illumination colour 155
– Checking the version information 156
– Reversing the climate control status
display 156
Selecting the video for rear display 156
Adjusting the picture 157
Displaying the screen for AV system
settings 158
– Setting video input 1 (AV1) 158
– Setting video input 2 (AV2) 159
– Changing the wide screen mode 159
– Setting the rear output 160
– Switching the preout setting 160
– Switching the muting/attenuation
timing 160
– Switching the muting/attenuation
level 161
– Switching Auto PI seek 161
– Setting the FM tuning step 161
– Displaying your DivX VOD registration
code 162
– Displaying your DivX VOD
deregistration code 162
– Selecting the smartphone connection
method 162
Displaying the screen for AV sound
settings 162
– Using balance adjustment 163
– Using the equaliser 163
– Adjusting the equaliser curve
automatically (Auto EQ) 165
– Using sonic centre control 168
– Adjusting loudness 168
– Using subwoofer output 168
– Using the high pass filter 168
– Adjusting source levels 169
– Enhancing bass (Bass Booster) 169
Replicating the settings 169
Setting the safe mode 170
Turning off the screen 170
Displaying the operation status of
vehicle equipment
Displaying obstacle detection
information 171
Displaying the operating status of the climate
control panel 171
Operating your navigation system with
voice
To ensure safe driving 173
Basics of the voice operation 173
– Flow of the voice operation 173
– Starting the voice operation 173
– How to use the voice operation 174
Available basic voice commands 175
– Basic commands 175
– Voice operation for AV source 175
Engb
7
Page 8

Contents
– Voice commands related to hands-free
phoning 176
Tips for the voice operation 176
Other functions
Setting the anti-theft function 177
– Setting the password 177
– Entering the password 177
– Deleting the password 177
– Forgotten password 177
Returning the navigation system to the
default or factory settings 178
– Restoring the default setting 178
– Returning the navigation system to the
initial state 178
– Setting items to be deleted 179
Appendix
Troubleshooting 181
Messages for navigation functions 186
Messages for audio functions 188
Positioning technology 190
– Positioning by GPS 190
– Positioning by dead reckoning 190
– How do GPS and dead reckoning work
together? 190
Handling large errors 191
– When positioning by GPS is
impossible 191
– Conditions likely to cause noticeable
positioning errors 192
Route setting information 194
– Route search specifications 194
Handling and care of discs 194
– Built-in drive and care 195
– Ambient conditions for playing a
disc 195
Playable discs 195
– DVD-Video and CD 195
– AVCHD recorded discs 196
– Playing DualDisc 196
– Dolby Digital 196
Detailed information for playable media 196
– Compatibility 196
– Media compatibility chart 199
Bluetooth 203
SD and SDHC logo 203
WMA/WMV 204
DivX 204
AAC 204
Android™ 204
Detailed information regarding connected
iPod devices 204
– iPod and iPhone 204
– iTunes 205
Using app-based connected content 205
– Aha Radio 205
Using the LCD screen correctly 206
– Handling the LCD screen 206
– Liquid crystal display (LCD)
screen 206
– Maintaining the LCD screen 206
– LED (light-emitting diode)
backlight 206
Display information 207
– Destination Menu 207
– Phone Menu 207
– Settings Menu 208
– Navi Settings menu 208
– System Settings menu 209
– Map Settings menu 209
– Bluetooth Settings menu 210
– AV System Settings menu 210
– AV Sound Settings menu 211
Glossary 212
Specifications 215
8
Engb
Page 9

Introduction
Chapter
01
Manual overview
Before using this product, be sure to read Important Information for the User (a separate
manual) which contains warnings, cautions,
and other important information that you
should note.
The screen examples shown in this manual
are the ones for AVIC-F40BT. If you use a different model, the screens that appear may differ
from the examples in the manual.
How to use this manual
Finding the operation procedure for
what you want to do
When you have decided what you want to do,
you can find the page you need from the Con-
tents.
Finding the operation procedure from
a menu name
If you want to check the meaning of an item
displayed on the screen, you will find the necessary page from the Display information at
the end of the manual.
Glossary
Use the glossary to find the meanings of
terms.
Conventions used in this manua l
Before moving on, take a few minutes to read
the following information about the conventions used in this manual. Familiarity with
these conventions will help you greatly as you
learn how to use your new equipment.
! Buttons on your navigation system are de-
scribed in ALL CAPITAL, BOLD lettering:
e.g.)
HOME button, MODE button.
! Menu items, screen titles, and functional
components are described in bold with
double quotation marks “”:
e.g.)
“Destination Menu” screen or “ AV
Source” screen
! Touch panel keys that are available on the
screen are described in bold in brackets [ ]:
e.g.)
[Destination], [Settings].
! Extra information, alternatives and other
notes are presented in the following format:
e.g.)
p If the home location has not been stored
yet, set the location first.
! Functions of other keys on the same screen
are indicated with # at the beginning of the
description:
e.g.)
# If you touch [OK], the entry is deleted.
! References are indicated like this:
e.g.)
= For details of the operations, refer to
Screen switching overview on page 24.
Terms used in this manual
“Front display” and “Rear display”
In this manual, the screen that is attached to
the body of this navigation unit will be referred
to as the “Front display”. Any additional screen
that is commercially available and can be connected to this navigation unit will be referred
to as the “Rear display”.
“Video image”
“Video image” in this manual indicates moving images of DVD -Video, DivX
equipment that is connected to this system
with an RCA cable, such as general-purpose
AV equipment.
®
, iPod, and any
Introduction
Engb
9
Page 10

Chapter
01
Introduction
“External storage device (USB, SD)”
The SD memory card, SDHC memory card,
microSD card, microSDHC card and USB
memory device are collectively referred to as
the “external storage device (USB, SD)”. If it indicates the USB memory only, it is referred to
as the “USB storage device”.
“SD memory card”
The SD memory card, SDHC memory card,
microSD card and microSDHC card are collectively referred to as the “ SD memory
card”.
Notice regarding video
viewing
Remember that use of this system for commercial or public viewing purposes may constitute an infringement on the author’s rights
as protected by the Copyright Law.
Notice regarding DVDVideo viewing
This item incorporates copy protection technology that is protected by U.S. patents and
other intellectual property rights of Rovi
Corporation. Reverse engineering and disassembly are prohibited.
Notice regarding MP3 file
usage
Supply of this navigation system conveys only
a licence for private, non-commercial use and
does not convey a licence nor imply any right
to use this product in any commercial (i.e. revenue-generating), real time broadcasting (terrestrial, satellite, cable and/or any other
media), broadcasting/streaming via internet,
intranets and/or other networks or in other
electronic content distribution systems, such
as pay-audio or audio-on-demand applications. An independent licence for such use is
required. For details, please visit
http://www.mp3licensing.com.
iPod compatibility
This product supports only the following iPod
models and iPod software versions. Others
may not work correctly.
! iPod touch (4th generation): iOS 5.0
! iPod touch (3rd generation): iOS 5.0
! iPod touch (2nd generation): iOS 4.2.1
! iPod touch (1st generation): iOS 3.1.3
! iPod classic 120GB: Ver. 2.0.1
! iPod classic 160GB (2009): Ver. 2.0.4
! iPod classic 80GB: Ver. 1.1.2
! iPod classic 160GB (2007): Ver. 1.1.2
! iPod nano (6th generation): Ver. 1.1
! iPod nano (5th generation): Ver. 1.0.2
! iPod nano (4th generation): Ver. 1.0.4
! iPod nano (3rd generation): Ver. 1.1.3
! iPhone 4S: iOS 5.0
! iPhone 4: iOS 5.0
! iPhone 3GS: iOS 5.0
! iPhone 3G: iOS 4.2.1
! iPhone: iOS 3.1.3
p In this manual, iPod and iPhone will be re-
ferred to as iPod.
p When you use this navigation system with
a Pioneer USB interface cable for iPod (CDIU51V) (sold separately), you can control an
iPod compatible with this navigation system.
p Operation methods may vary depending on
the iPod model s and the software version
of iPod.
p Depending on the software version of the
iPod, it may not be compatible with this
equipment.
For details about iPod compatibility with
this navigation system, refer to the information on our website.
10
Engb
Page 11

Introduction
Chapter
01
Map coverage
For details about the map coverage of this navigation system, refer to the information on
our website.
Protecting the LCD panel
and screen
p Do not allow direct sunlight to fall on the
LCD screen when this product is not being
used. Extended exposure to direct sunlight
can result in LCD screen malfunction due
to the resulting high temperatures.
p When using a mobile phone, keep the aer-
ial of the mobile phone away from the LCD
screen to prevent disruption of the video in
the form of spots, coloured stripes, etc.
p To protect the LCD screen from damage, be
sure to touch the touch panel keys with
your finger only and gently touch the
screen.
Notes on internal memory
Before removing the vehicle
battery
If the battery is disconnected or discharged,
the memory will be erased and must be reprogrammed.
p Some data remains. Be sure to read Setting
items to be deleted first.
= For details, refer to Setting items to be
deleted on page 179.
Introduction
Data subject to erasure
The information is erased by disconnecting
the yellow lead from the battery (or removing
the battery itself).
p Some data remains. Be sure to read Setting
items to be deleted first.
= For details, refer to Setting items to be
deleted on page 179.
Engb
11
Page 12

Chapter
02
Basic operation
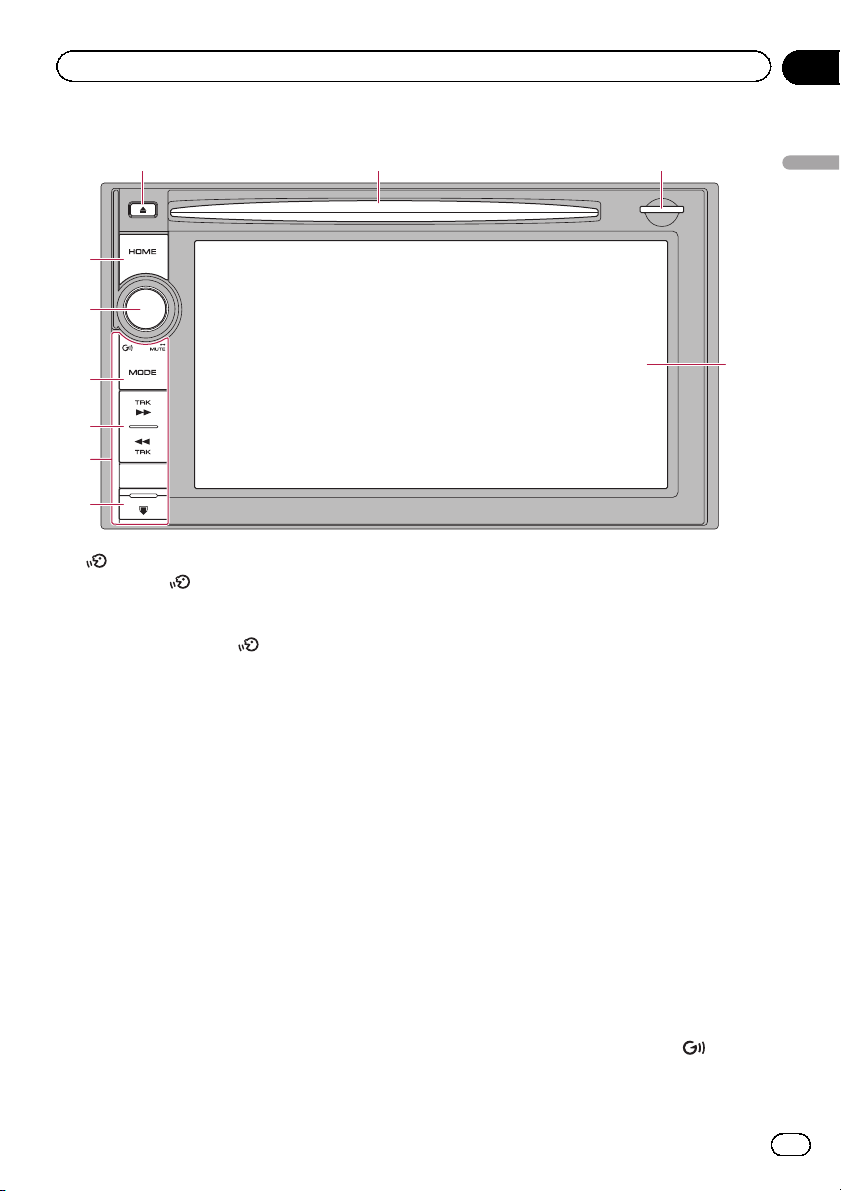
Checking part names and functions
This chapter gives information about the names of the parts and the main features using the buttons.
AVIC-F40BT (with the LCD panel closed)
7654321
AVIC-F40BT (with the LCD panel open)
12
8
9
Engb
Page 13
Basic operation
AVIC-F940BT, AVIC-F840BT
6 8
3
a
Chapter
02
9
Basic operation
4
5
b
c
1 button
! Press the
button to activate voice op-
erations.
= For details, refer to Chapter 29.
! Press and hold the
button to switch
the AV source to mute.
To cancel the muting, press and hold it
again.
2 VOL (+/–) button
Press to adjust the AV (Audio and Video)
source volume.
3 HOME button
! Press the HOME button to display the
“Top Menu” screen.
! Press to switch between the Classic
Menu and the Shortcut Menu while the
“Top Menu” is displayed.
= For details, refer to What you can do
on each menu on page 25.
! Press and hold to turn off the screen dis-
play.
4 MODE button
! Press to switch between the map screen
and the AV operation screen.
! Press to display the map screen while
the navigation function screen is displayed.
! Press and hold to display the “Picture
Adjustment” screen.
= For details, refer to Adjusting the pic-
ture on page 157.
5 TRK button
Press to perform manual seek tuning, fast
forward, reverse and track search controls.
6 h button
7 LCD screen
8 Disc-loading slot
Insert a disc to play.
= For details, refer to Inserting and ejecting
a disc on page 15.
9 SD card slot
= For details, refer to Inserting and ejecting
an SD memory card on page 16.
a Multi-control (Volume knob/
/MUTE)
! Rotate to adjust the AV (Audio and
Video) source volume.
7
Engb
13
Page 14
Chapter
02
Basic operation
! Press the centre of Multi-control to hear
the route guidance.
! Press and hold the centre of Multi-con-
trol to mute the AV (Audio and Video)
source. To cancel the muting, press and
hold it again.
b Detachable faceplate
c
button
Press to remove the detachable faceplate
from the navigation system.
= For details, refer to Removing the detach-
able faceplate on this page.
Protecting your product
from theft
p This function is available for AVIC-F940BT
and AVIC-F840BT.
The detachable faceplate can be detached
from the navigation system to discourage
theft, as described below.
CAUTION
! Do not expose the detachable faceplate to ex-
cessive shock or disassemble it.
! Never grip the buttons tightly or use force
when removing or attaching.
! Keep the detachable faceplate out of reach of
small children to prevent them from putting it
in their mouths.
! After removing the detachable faceplate, keep
it in a safe place so it is not scratched or da-
maged.
! Keep the detachable faceplate out of direct
sunlight and high temperatures.
! When removing or attaching the detachable
faceplate, do so after turning the ignition
switch off (ACC OFF).
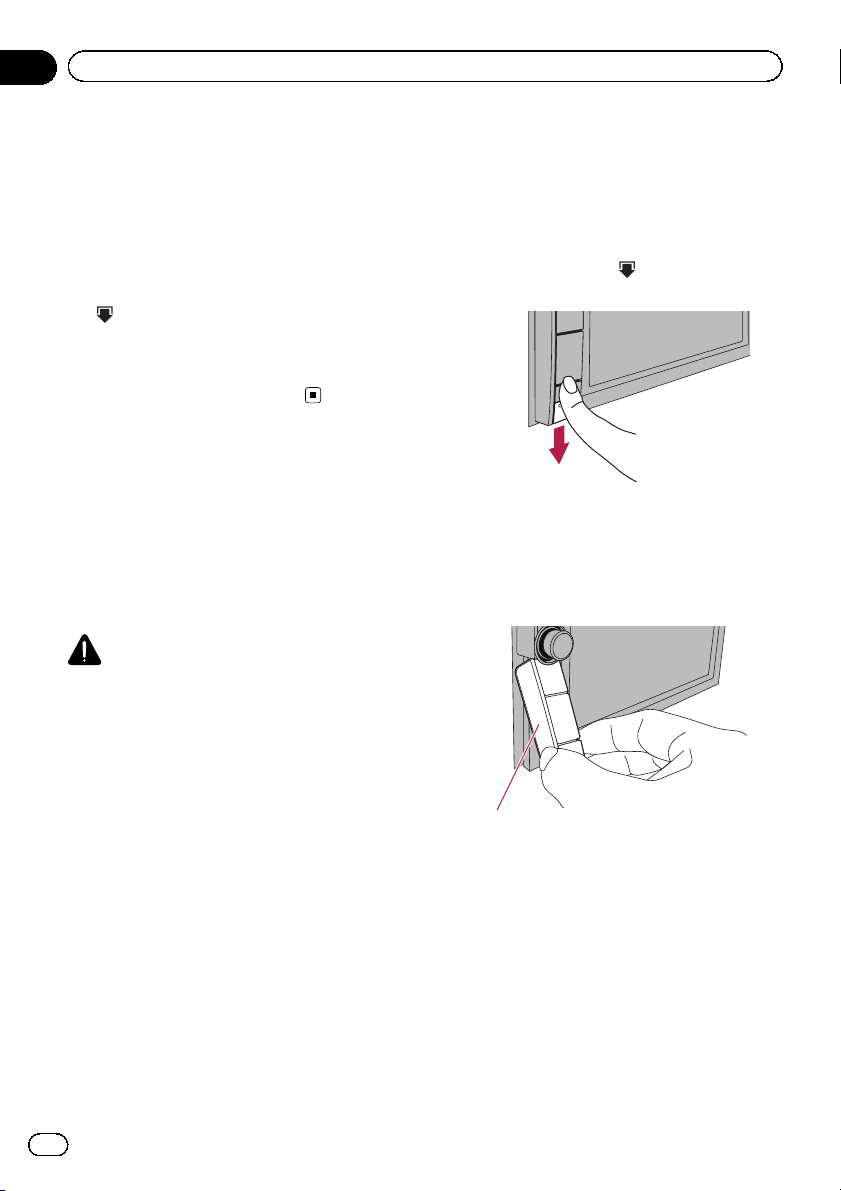
Removing the detachable
faceplate
p The navigation system cannot be operated
while the detachable faceplate is removed
from the navigation system.
1 Press and hold the
it down.
When you release your finger, the bottom of
the detachable faceplate separates slightly
from the navigation system.
2 Gently grip the bottom of the detachable faceplate and slowly pull it outward.
Detachable faceplate
button, and slide
Attaching the detachable faceplate
1 Slide the detachable faceplate all the
way into the navigation system.
Make sure the detachable faceplate is securely connected to the mounting hooks of
the navigation system.
14
Engb
Page 15
Basic operation
Chapter
02
2 Push the lower part of the detachable
faceplate until you hear a click.
If you fail to successfully attach the detachable faceplate to the navigation system, try
again but be careful not to force it as the
panel could be damaged.
Adjusting the LCD panel angle
p This function is available for AVIC-F40BT
only.
WARNING
Keep hands and fingers clear of the unit when
opening, closing, or adjusting the LCD panel. Be
especially cautious of children’s hands and fingers.
CAUTION
Do not open or close the LCD panel by force. This
may cause malfunction.
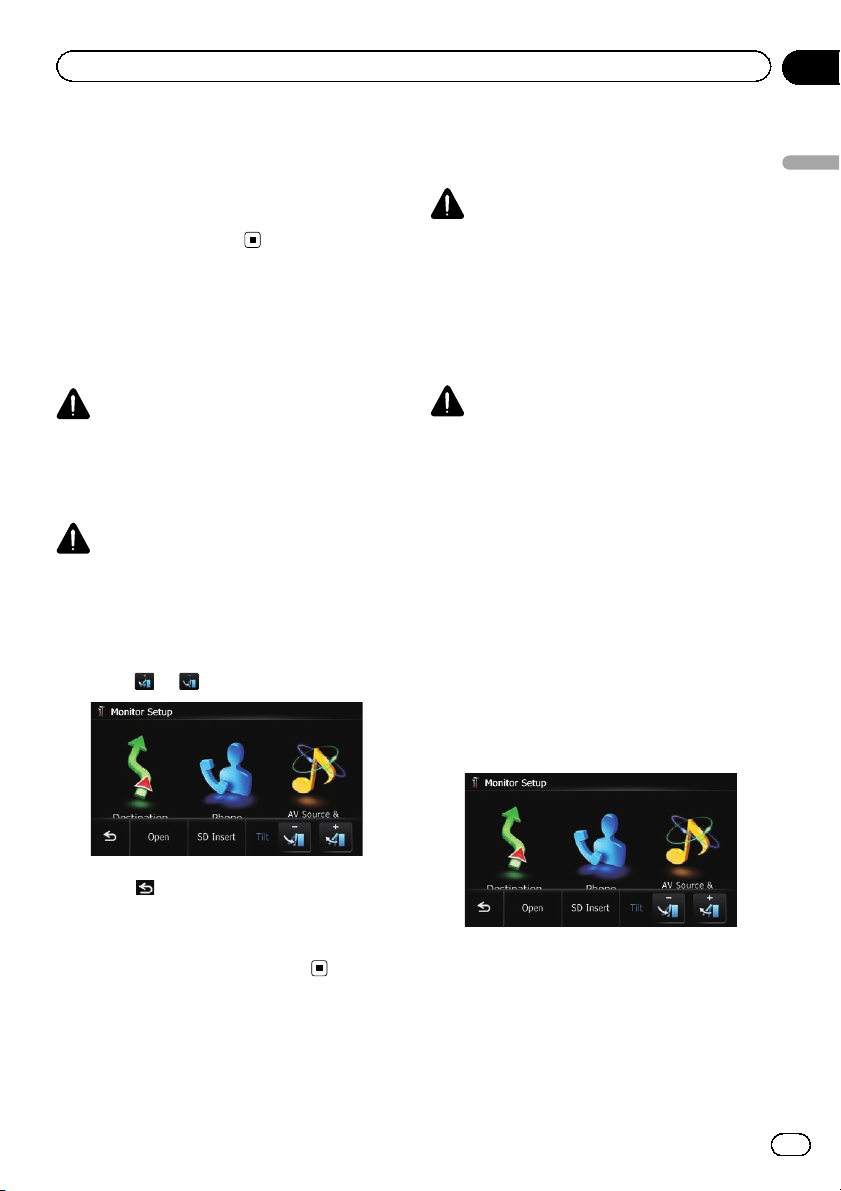
1 Press the h button.
The “Monitor Setup” screen appears.
2 Touch
or to adjust the angle.
Inserting and ejecting a disc
Inserting a disc (for AVIC-F40BT)
WARNING
! Keep hands and fingers clear of the unit when
opening, closing, or adjusting the LCD panel.
Be especially cautious of children’s hands
and fingers.
! Do not use with the LCD panel left open. If
LCD panel is left open, it may result in injury
in the event of an accident.
CAUTION
! Do not open or close the LCD panel by force.
This may cause malfunction.
! Do not operate this navigation system until
the LCD panel completely opens or closes. If
this navigation system is operated while the
LCD panel is opening or closing, the LCD
panel may stop at that angle for safety.
! Do not place a glass or a can on the open
LCD panel. Doing so may break this navigation system.
! Do not insert anything other than a disc into
the disc-loading slot.
1 Press the h button.
The “Monitor Setup” screen appears.
Basic operation
3 Touch .
p The adjusted angle of the LCD panel will be
memorised and the LCD panel will automatically return to that angle the next time the
LCD panel is opened or closed.
2 Touch [Open].
The LCD panel opens, and the disc-loading
slot appears.
Engb
15
Page 16
Chapter
02
Basic operation
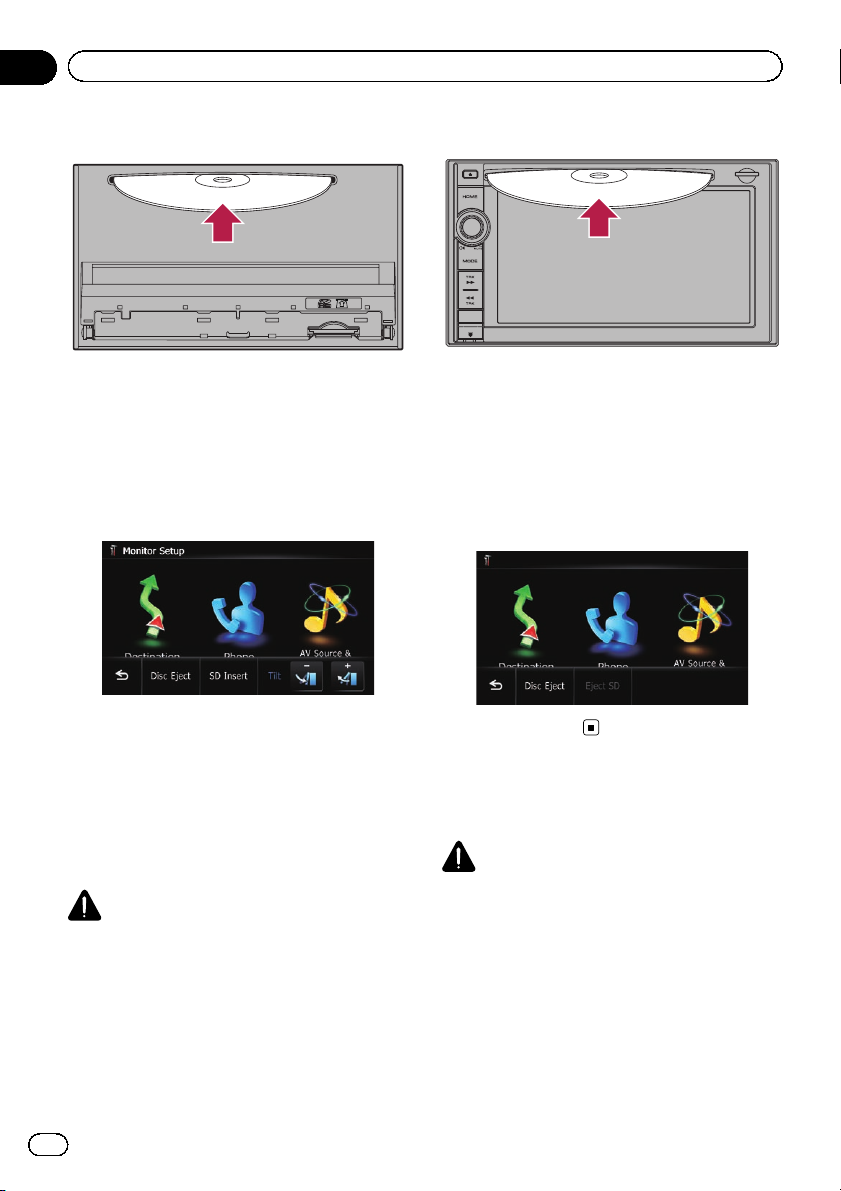
3 Insert a disc into the disc-loading slot.
The disc is loaded, and the LCD panel closes.
Ejecting a disc (for AVIC-F40BT)
1 Press the h button.
The “Monitor Setup” screen appears.
2 Touch [Disc Eject].
% Insert a disc into the disc-loading slot.
Ejecting a disc (for AVIC-F940BT
and AVIC-F840BT)
1 Press the h button.
The touch panel keys for ejecting the media
appear.
2 Touch [Disc Eject].
The LCD panel opens, and the disc is ejected.
3 Remove the disc, and press the h button.
The LCD panel closes.
Inserting a disc (for AVICF940BT and AVIC-F840BT)
CAUTION
Do not insert anything other than a disc into the
disc-loading slot.
16
Engb
The disc is ejected.
Inserting and ejecting an
SD memory card
CAUTION
! Ejecting an SD memory card during data
transfer can damage the SD memory card. Be
sure to eject the SD memory card by the procedure described in this manual.
! If data loss or corruption occurs on the sto-
rage device for any reason, it is usually not
possible to recover the data. Pioneer accepts
no liability for damages, costs or expenses
arising from data loss or corruption.
! Do not insert anything other than SD memory
cards.
Page 17
Basic operation
p This system is not compatible with Multi
Media Card (MMC).
p Compatibility with all SD memory cards is
not guaranteed.
p This unit may not achieve optimum perfor-
mance with some SD memory cards.
Inserting an SD memory card
(for AVIC-F40BT)
CAUTION
! Do not press the h button when an SD mem-
ory card is not fully inserted. Doing so may damage the card.
! Do not press the h button before an SD mem-
ory card has been completely removed. Doing
so may damage the card.
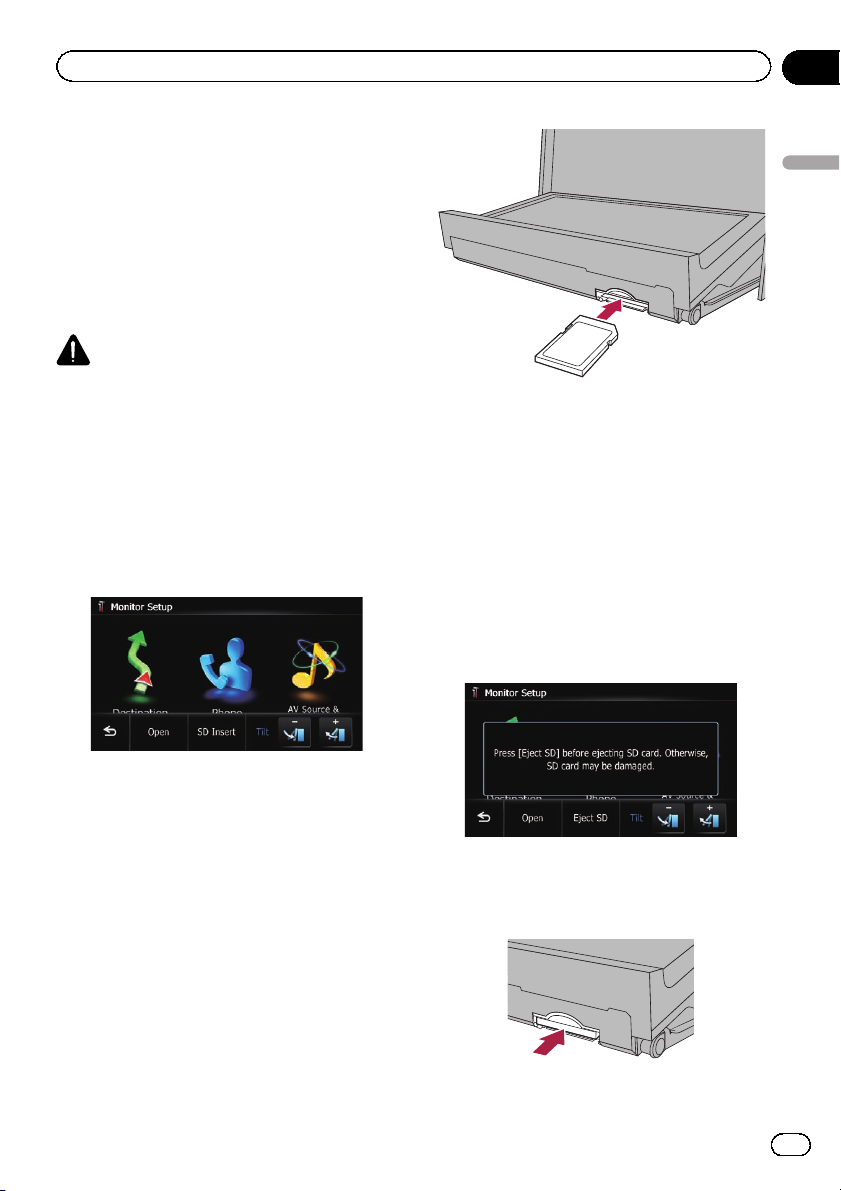
1 Press the h button.
The “Monitor Setup” screen appears.
2 Touch [SD Insert].
Chapter
02
Basic operation
4 Press the h button.
The LCD panel closes.
p If data related to map data, such as custo-
mised POI data, is stored on the SD memory card, the navigation system restarts.
Ejecting an SD memory card
(for AVIC-F40BT)
1 Press the h button.
The “Monitor Setup” screen appears.
The LCD panel opens, and the SD card slot appears.
3 Insert an SD memory card into the SD
card slot.
Insert it with the label surface facing to the upside and press the card until it clicks and completely locks.
2 Touch [Eject SD].
The LCD panel opens.
3 Press the middle of the SD memory
card gently until it clicks.
Engb
17
Page 18
Chapter
02
Basic operation
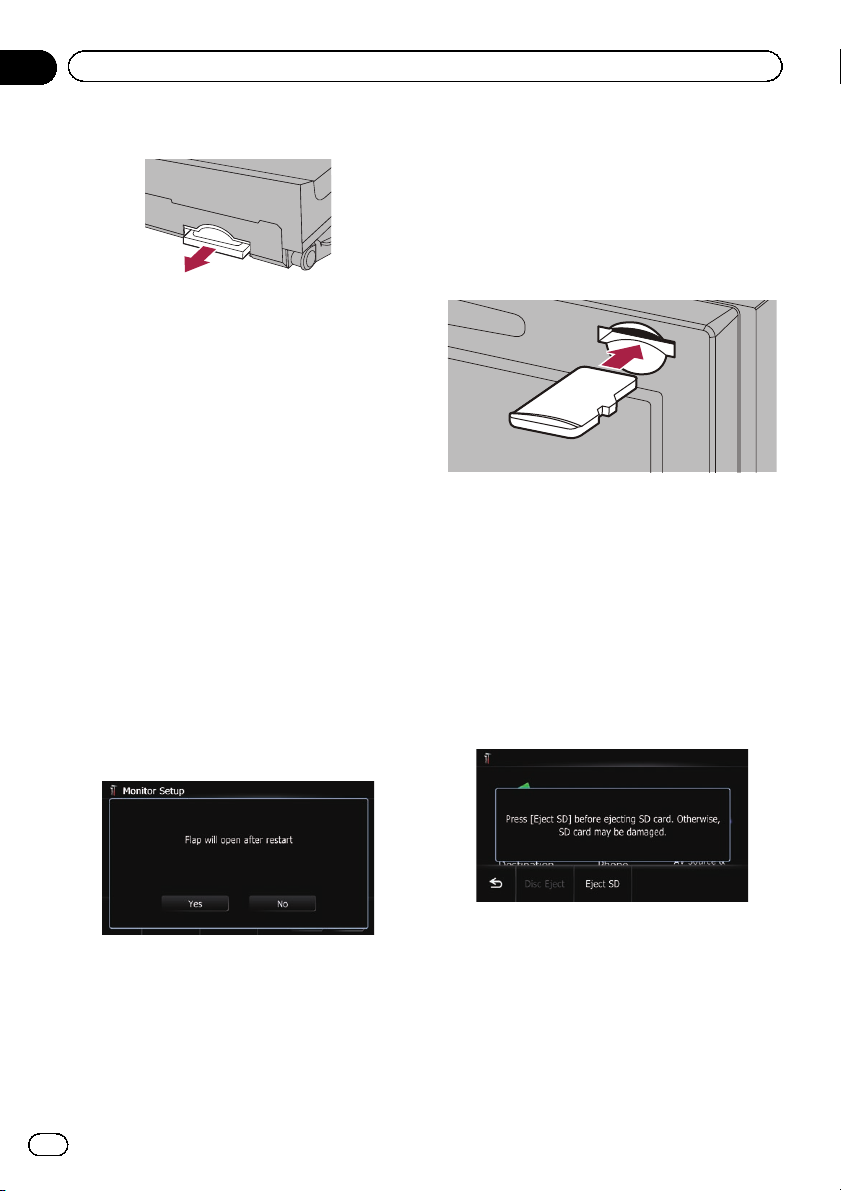
4 Pull the SD memory card out straight.
5 Press the h button.
The LCD panel closes.
p When you eject the SD memory card by
touching [Eject SD], the model information
that you are using will be automatically
stored into the SD memory card.
The utility programme NavGate FEEDS will
use this information to recognise the model
that you use.
When the data related to map data is
stored
p This description is for AVIC-F40BT.
If data related to map data, such as customised POI data, is stored on the SD memory
card, operating procedures are slightly different.
1 Press the h button and then touch
[Eject SD].
2 Touch [Yes].
Inserting an SD memory card (for
AVIC-F940BT and AVIC-F840BT)
% Insert an SD memory card into the SD
card slot.
Insert the SD memory card with the terminal
contacts facing down, and press the card until
it clicks and locks completely.
p If data related to map data, such as custo-
mised POI data, is stored on the SD memory card, the navigation system restarts.
Ejecting an SD memory card (for
AVIC-F940BT and AVIC-F840BT)
1 Press the h button.
The touch panel keys for ejecting the media
appear.
2 Touch [Eject SD].
The navigation system restarts, and then the
LCD panel opens.
3 Eject the SD memory card.
4 Press the h button.
The LCD panel closes.
18
Engb
A message prompting you to remove the SD
memory card appears.
Page 19

Basic operation
3 Press the middle of the SD memory
card gently until it clicks.
4 Pull the SD memory card out straight.
The navigation system restarts, and a message
prompting you to remove the SD memory card
appears.
3 Eject the SD memory card while the
message is displayed.
Eject the SD memory card before touching
[OK].
4 Touch [OK].
The navigation system restarts.
Plugging and unplugging a
USB storage device
Chapter
02
Basic operation
When the data related to map data is
stored
p This description is for AVIC-F940BT and
AVIC-F840BT.
If data related to map data, such as customised POI data, is stored on the SD memory
card, operating procedures are slightly different.
1 Press the h button and then touch
[Eject SD].
2 Touch [Yes].
CAUTION
! To prevent data loss and damage to the sto-
rage device, never remove it from this navigation system while data is being transferred.
! Pioneer cannot guarantee compatibility with
all USB mass storage devices and assumes
no responsibility for any loss of data on media
players, smart phones, or other devices while
using this product.
p This navigation system may not achieve op-
timum performance with some USB storage devices.
p Connection via a USB hub is not possible.
Engb
19
Page 20
Chapter
02
Basic operation
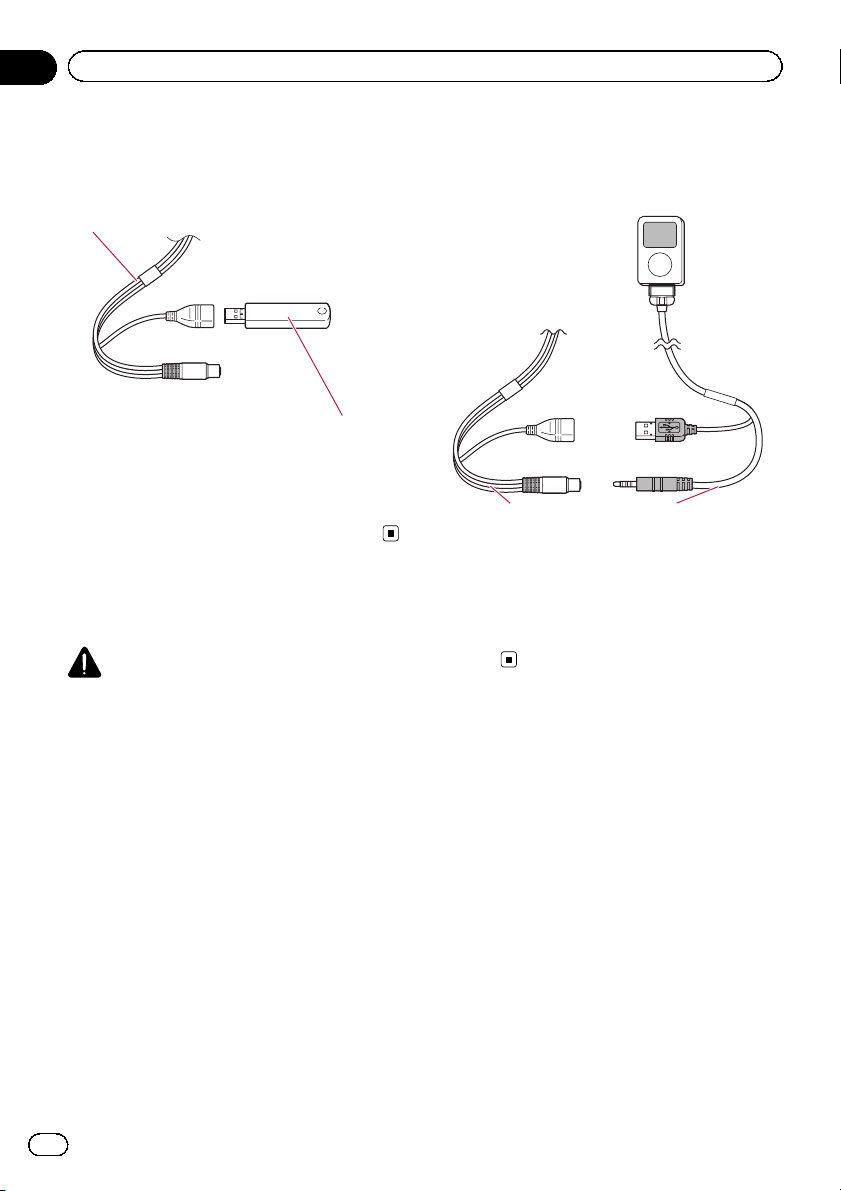
Plugging in a USB storage device
% Plug a USB storage device into the USB
and mini-jack connector.
USB and mini-jack connector
USB storage device
Unplugging a USB storage devic e
% Pull out the USB storage device after
checking that no data is being accessed.
Connecting and
disconnecting an iPod
CAUTION
! To prevent data loss and damage to the sto-
rage device, never remove it from this navigation system while data is being transferred.
! Pioneer cannot guarantee compatibility with
all USB mass storage devices and assumes
no responsibility for any loss of data on media
players, smart phones, or other devices while
using this product.
1 Check that no USB storage device is
connected.
2 Connect your iPod.
USB and mini-jack connector
USB interface cable for
iPod
Disconnecting your iPod
% Pull out the USB interface cable for iPod
after checking that no data is being accessed.
Connecting your iPod
Using the USB interface cable for iPod enables you to connect your iPod to the navigation system.
p A USB interface cable for iPod (CD-IU51V)
(sold separately) is required for connection.
p For details about iPod compatibility with
this navigation system, refer to the information on our website.
p Connection via a USB hub is not possible.
20
Engb
Page 21
Basic operation
Chapter
02
Startup and termination
1 Start the engine to boot up the system.
After a short pause, the splash screen comes
on for a few seconds.
p To protect the LCD screen from damage, be
sure to touch the touch panel keys with
your finger only and gently touch the
screen.
2 Turn off the vehicle engine to terminate the system.
The navigation system is also turned off.
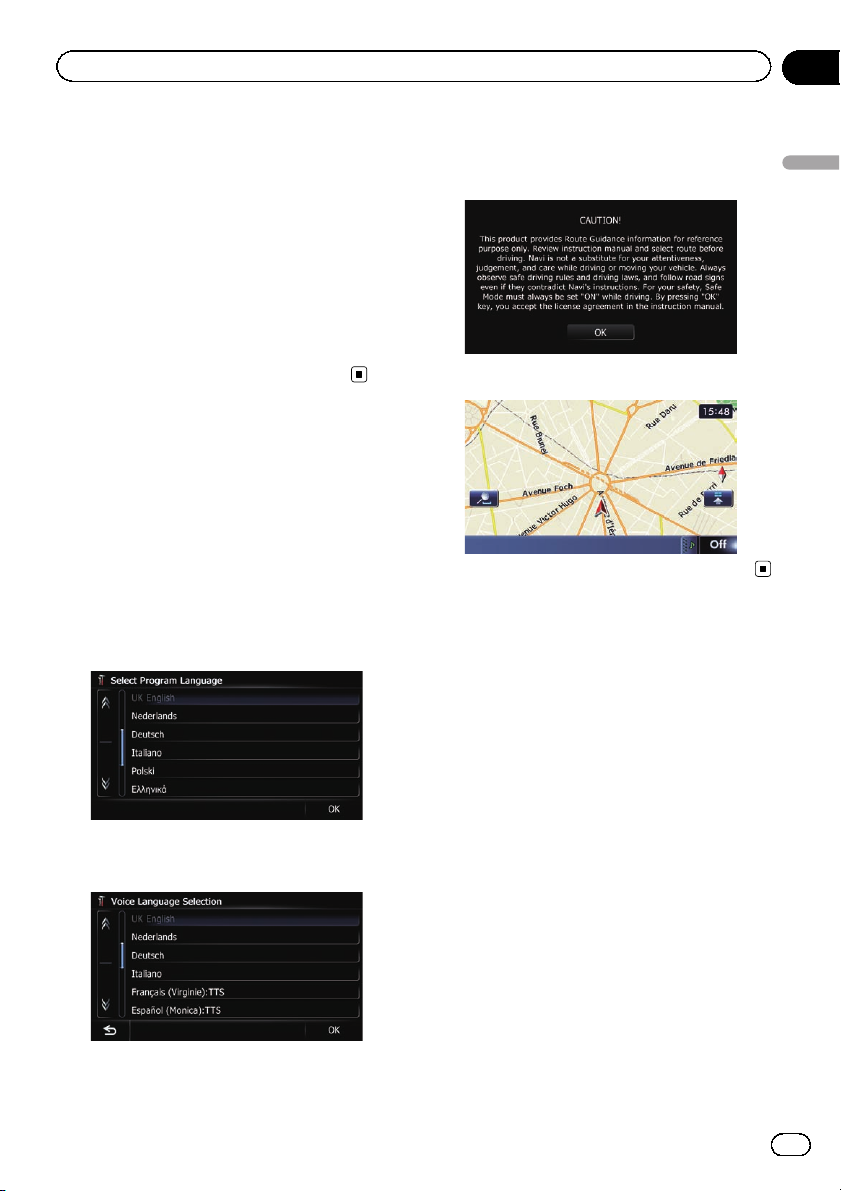
On first-time startup
When you use the navigation system for the
first time, select the language that you want to
use.
1 Start the engine to boot up the system.
After a short pause, the splash screen comes
on for a few seconds.
2 Touch the language that you want to
use on the screen.
3 Touch the language that you want to
use for the voice guidance.
4 Read the disclaimer carefully, checking
its details, and then touch [OK] if you
agree to the conditions.
The map screen appears.
Regular startup
% Start the engine to boot up the system.
After a short pause, the splash screen comes
on for a few seconds.
p The screen shown will differ depending on
the previous conditions.
p When there is no route, the disclaimer ap-
pears after the navigation system reboots.
Read the disclaimer carefully, checking its
details, and then touch [OK] if you agree to
the conditions.
p If the anti-theft function is activated, you
must enter your password.
Read the disclaimer carefully, checking its
details, and then touch [OK] if you agree to
the conditions.
Basic operation
The navigation system will now restart.
Engb
21
Page 22

Chapter
02
Basic operation
A message about the map
database
After you start using this navigation system, a
message related to map data may be displayed.
p This message is displayed the first time you
turn on the navigation system each month.
p Touch the message to close it or it will dis-
appear automatically after eight seconds.
Demonstration images
If you do not operate this navigation system
for two minutes, demonstration images are
displayed.
p The demonstration images will not be dis-
played if you drive after mounting this navigation system.
22
Engb
Page 23

Basic operation
Chapter
02
Basic operation
Engb
23
Page 24
Chapter
03
How to use the navigation menu screens
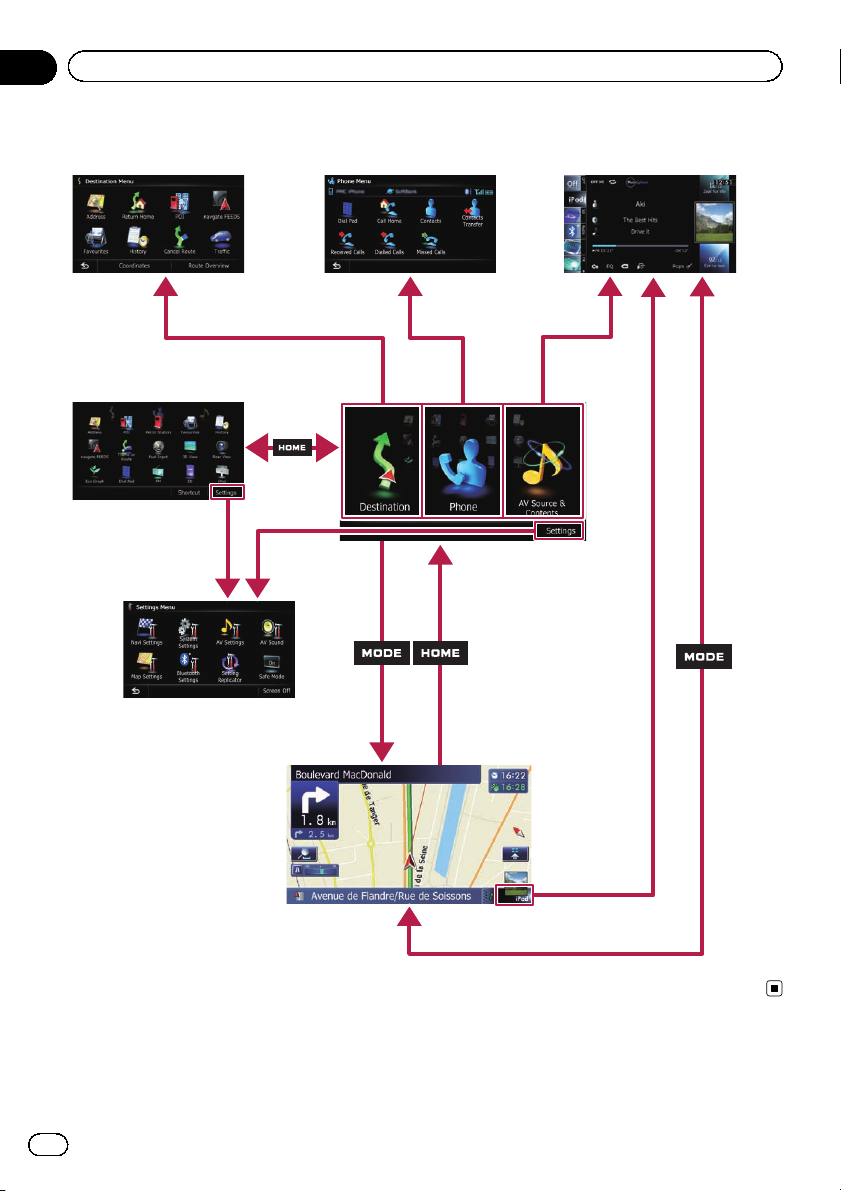
Screen switching overview
2
1
5
34
1
6
24
Engb
Page 25
How to use the navigation menu screens
Chapter
03
What you can do on each
menu
1 Top Menu
Press the HOME button to display the “Top
Menu” screen.
This is the starting menu to access the desired
screens and operate the various functions.
There are two types of the “Top Menu” screen.
Classic Menu
Shortcut Menu
p In this manual, Classic Menu will be re-
ferred to as “Top Menu”.
2 Destination Menu
You can search for your destination on this
menu. You can also check or cancel your set
route from this menu.
3 Phone Menu
You can access the screen that is related to
hands-free phoning.
4 AV operation screen
This is the screen that normally appears when
you play the AV source.
5 Settings Menu
You can access the screen to customise set-
tings.
6 Map screen
You can use this screen to check the current
vehicle position information and route to the
destination.
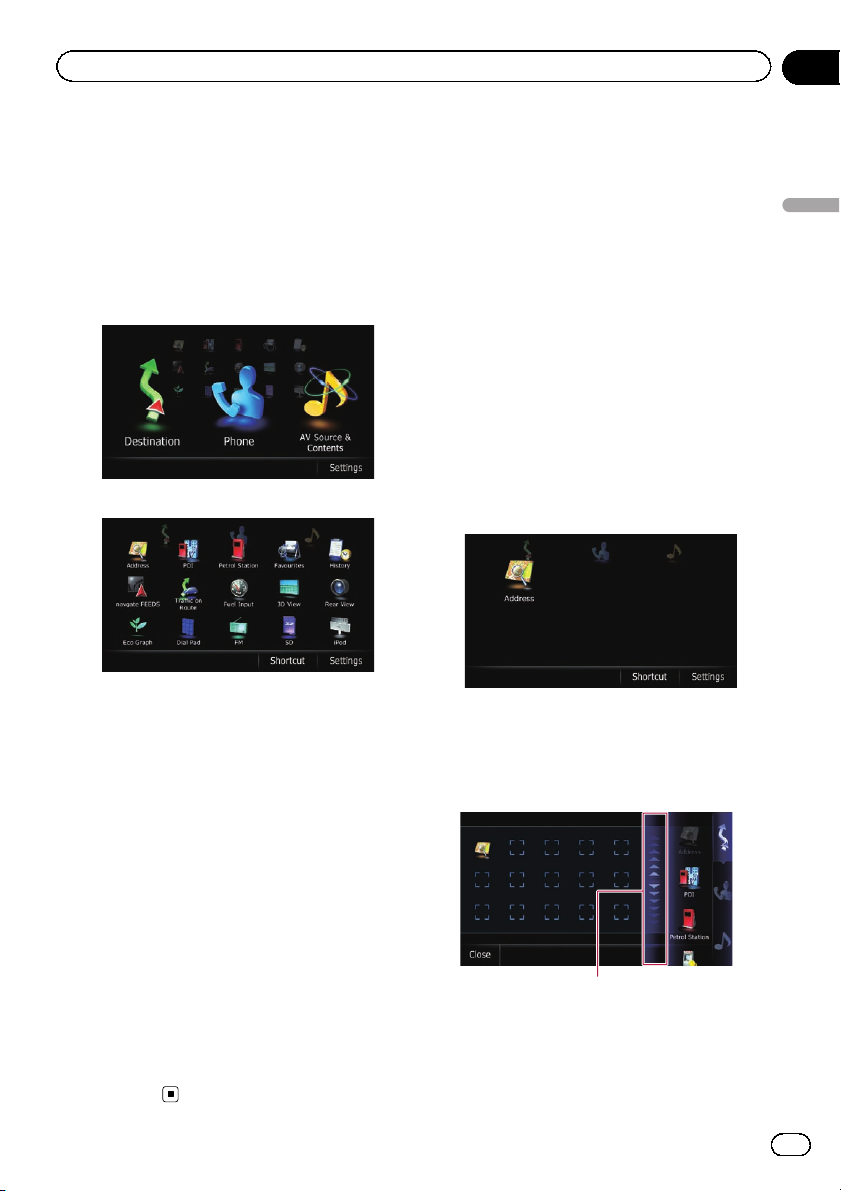
Shortcut Menu
Registering your favourite menu items in
shortcuts allows you to quickly jump to the registered menu screen by a simple touch on
the Shortcut Menu screen.
Selecting the shortcut
p Up to 15 menu items can be registered in
shortcuts.
1 Press the HOME button repeatedly to
display the Shortcut Menu screen.
p When you use the navigation system for the
first time or no items are set on shortcut, a
message will appear. Touch [Yes ] to proceed to next step.
2 Touch [Shortcut].
The Shortcut selection screen appears.
3 Touch the tab on the right edge or scroll
the bar to display the icon that you want
to set to shortcut.
Scroll bar
4 Touch and hold the icon that you want
to add to shortcut.
How to use the navigation menu screens
Engb
25
Page 26
Chapter
03
How to use the navigation menu screens
5 Move the icon to the left side of the
screen, and then release it.
The selected item is added to shortcut.
Removing a shortcut
1 Touch and hold the icon of the shortcut
you want to remove.
2 Move the icon to the right side of the
screen, and then release it.
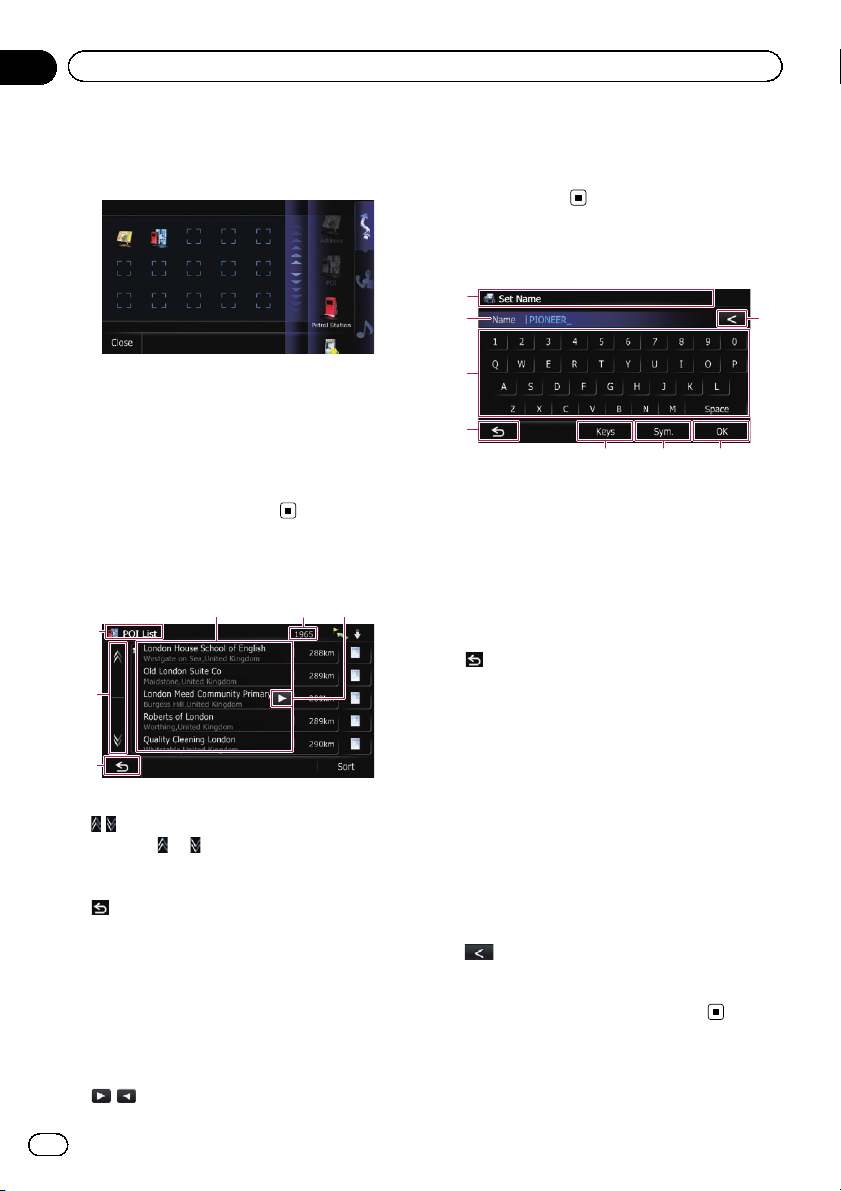
Operating list screens (e.g.
POI list)
54
6
1
2
3
1 Screen title
2
Touching or on the scroll bar scrolls
through the list and allows you to view the remaining items.
3
The previous screen returns.
4 Listed items
Touching an item on the list allows you to narrow down the options and proceed to the next
operation.
5 Number of possible choices
p If there are 10 000 or more possible
choices, “****” is displayed.
6
If all of the characters cannot be displayed
within the displayed area, touching the key to
the right of the item allows you to see remaining characters.
Operating the on-screen
keyboard
1
2
3
4
5 76
1 Screen title
The screen title appears.
2 Text box
Displays the characters that are entered. If
there is no text in the box, an informative
guide with text appears.
3 Keyboard
Touch the keys to enter the characters.
4
The previous screen returns.
5 Keys
Switches the on-screen keyboard layout.
6 Sym., Others, 0-9
You can enter other characters of alphabet.
You can also enter text with marks such as [&]
or [+] or numbers.
Touch to toggle the selection.
p Even if you use any of “A”, “Ä”, “Å”, “Æ”,
the displayed result is the same.
7 OK
Confirms the entry and allows you to proceed
to the next step.
8
Deletes the input text one letter at a time, beginning at the end of the text. Continuing to
touch the key deletes all of the text.
8
26
Engb
Page 27
How to use the map
Most of the information provided by your navigation system can be seen on the map. You need to become familiar with how information appears on the map.
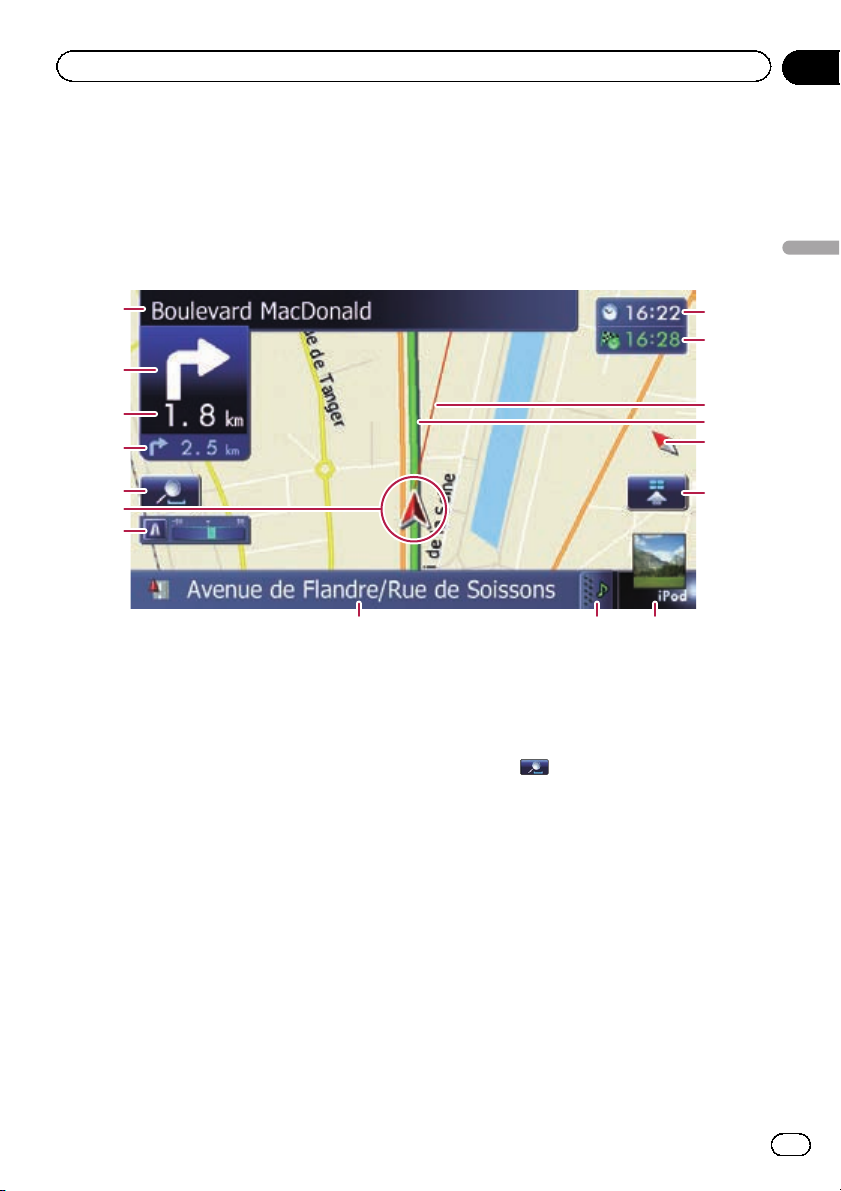
How to read the map screen
This example shows an example of a 2D map screen.
Chapter
04
How to use the map
1
2
3
4
5
6
7
8
p Information with an asterisk (*) appears
only when the route is set.
p Depending on the conditions and settings,
some items may not be displayed.
1 Name of the street to be used (or next gui-
dance point)*
2 Next direction of travel*
As you get closer to the guidance point, the
colour of the item changes to green.
p Touching this item enables you to hear
the next guidance again.
p You can select between display and
non-display.
= For details, refer to Displaying man-
oeuvres on page 146.
3 Distance to the guidance point*
Shows the distance to the next guidance
point.
p Touching this item enables you to hear
the next guidance again.
4 Second manoeuvre arrow*
9 a
Shows the turning direction after next guidance point and the distance to there.
= For details, refer to Displaying man-
oeuvres on page 146.
5 Map control
Touching
changing the map scale and the map orientation.
6 Current position
Indicates the current location of your vehicle.
The apex of the triangular mark indicates your
orientation and the display moves automatically as you drive.
displays touch panel keys for
p The apex of the triangular mark is the
proper current position of the vehicle.
7 Eco-Meter
Displays a graph comparing the past average
fuel mileage and the average fuel mileage
since the navigation system was last started.
= For details, refer to Displaying the fuel
consumption information on page 146.
g
f
e
d
c
b
Engb
27
Page 28
Chapter
04
How to use the map
8 Street name (or city name) that your vehi-
cle is travelling along
= For details, refer to Setting the current
street name display on page 144.
9 Extension tab for the AV information bar
Touching this tab opens the AV information
bar and enables you to briefly view the current
status on the AV source. Touching it again retracts the bar.
a Shortcut to the AV operation screen
The AV source currently selected is shown.
Touching the indicator displays the AV operation screen of the current source directly.
p Depending on the source currently cho-
sen, an image is displayed.
b Quick Access icon
Displays the “Quick Access” menu.
= For details, refer to Using shortcut
menus on the map on page 31.
c Map orientation indicator
! When “North up” is selected, is dis-
played.
! When “Heading up” is selected,
is
displayed.
p The red arrow indicates north.
= For details, refer to Switching the map or-
ientation on page 30.
d Current route*
The route currently set is highlighted in colour
on the map. If a waypoint is set on the route,
the route after the next waypoint is highlighted in another colour.
e Direction line*
The direction towards your destination (next
waypoint, or the position of a cursor) is indicated with a straight line.
f Multi-Info window
Each touch of Multi-Info window changes the
display information as follows.
! Distance to the destination (or dis-
tance to waypoint)*
! Estimated time of arrival at your des-
tination or waypoint*
The estimated time of arrival is an ideal
value calculated based on the value set
for “Average Speed” and the actual
driving speed. The estimated time of ar-
rival is only a reference value, and does
not guarantee arrival at that time.
! Travel time to your destination or
waypoint*
g Current time
Meaning of guidance flags
Destination
The checkered flag indicates your
destination.
Waypoint
The blue flags indicate your waypoints.
Guidance point
The next guidance point (nex t turning point, etc.) is shown by a yellow flag.
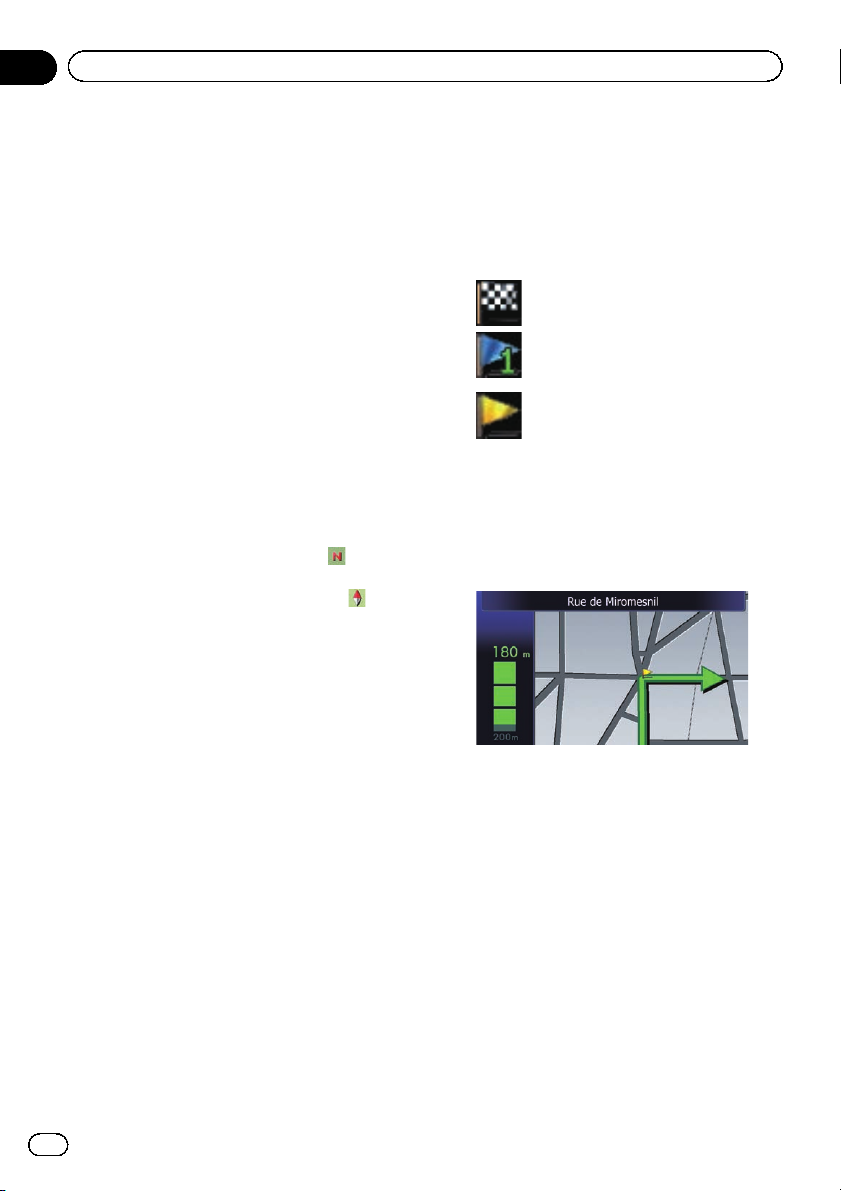
Enlarged map of the intersection
When “Close Up View” in the “Map Settings”
screen is “On”, an enlarged map of the intersection appears.
= For details, refer to Setting the auto-z oom
display on page 143.
28
Engb
Page 29
How to use the map
Chapter
04
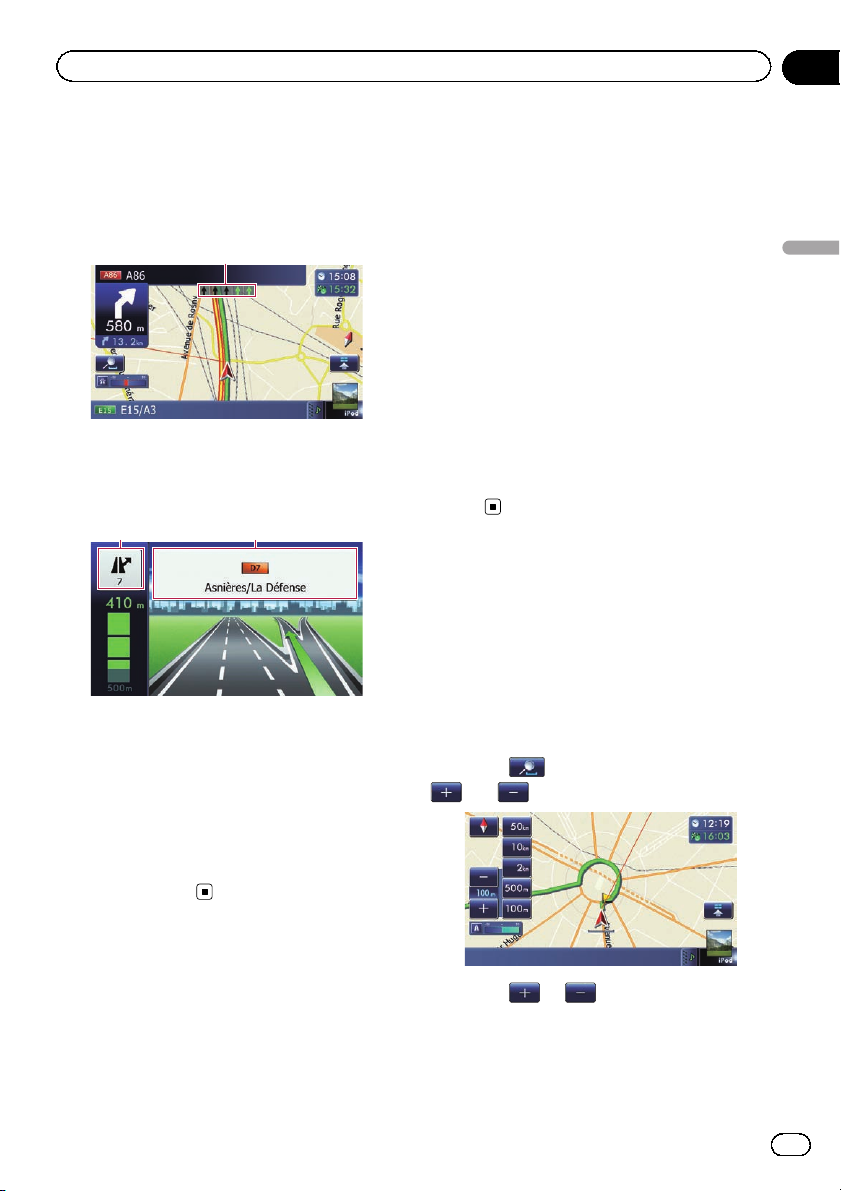
Display during motorway driving
In certain locations of the motorway, lane information is available. The map indicates the
recommended lane to be in to easily manoeuvre the next guidance.
1
While driving on the motorway, motorway exit
numbers and motorway signs may be displayed in the vicinity of interchanges and
exits.
2 3
1 Lane information
2 Motorway exit information
Displays the motorway exit.
3 Motorway signs
These show the road number and give directional information.
p If the data for these items is not contained
in the built-in memory, the information is
not available even if there are the signs on
the actual road.
route guidance, including turn-by-turn voice
directions and arrow icons.
Roads without turn-by-turn
instructions
Routable roads (the route displayed and highlighted in violet) have only basic data and can
only be used to plot a navigable route. Pioneer
Navigation will only display a navigable route
on the map (only the arrival guidance for the
destination or a waypoint is available). Please
review and obey all local traffic rules along the
highlighted route for your safety.
No turn-by-turn directions will be displayed on
these roads.
Non routable roads (pink colour road)
Map display is possible, but it cannot be used
for route calculation. Please review and obey
all local traffic rules along this route. (For your
safety.)
Operating the map screen
Changing the scale of the map
You can change the map scale between 25
metres and 2 000 kilometres (25 yards and
1 000 miles).
1 Display the map screen.
= For details of the operations, refer to Screen
switching overview on page 24.
2 Touch on the map screen.
and with the map scale appear.
How to use the map
Types of the road stored in
the map database
Roads included in the route guidance
Turn by turn routable roads contain full attribute data and can be used for full route guidance. Pioneer navigation will display full
3 Touch or to change the map
scale.
p If you do not operate the function for a few
seconds, the touch panel keys for map display control disappear.
Engb
29
Page 30
Chapter
04
How to use the map
# If you touch the direct scale key, the map is
changed to the selected scale directly.
Switching the map orientation
You can switch how the map shows your vehicle’s direction between “Heading up” and
“North up”.
! Heading up:
The map display always shows the vehicle’s
direction as proceeding toward the top of
the screen.
! North up:
The map display always has north at the
top of the screen.
p The map orientation is fixed at “North up”
when the map scale is 50 kilometres (25
miles) or more.
p The map orientation is fixed at “Heading
up” when the 3D map screen is displayed.
1 Display the map screen.
= For details of the operations, refer to Screen
switching overview on page 24.
2 Touch on the map screen.
or appears.
3 Touch or to switch the vehicle’s
direction.
Each time you touch the key changes the setting.
p If you do not operate the function for a few
seconds, the touch panel keys for map display control disappear.
2 Touch and drag the map in the desired
direction to scroll.
1
2
1 Cursor
2 Distance from the current position
Positioning the cursor to the desired location
results displaying in a brief informational overview about the location at the bottom of
screen, with the street name and other information for this location. (The information
shown varies depending on the position.)
p The scrolling increment depends on your
dragging length.
# If you touch
rent position.
p Pressing MODE button returns the map to
the current position.
, the map returns to the cur-
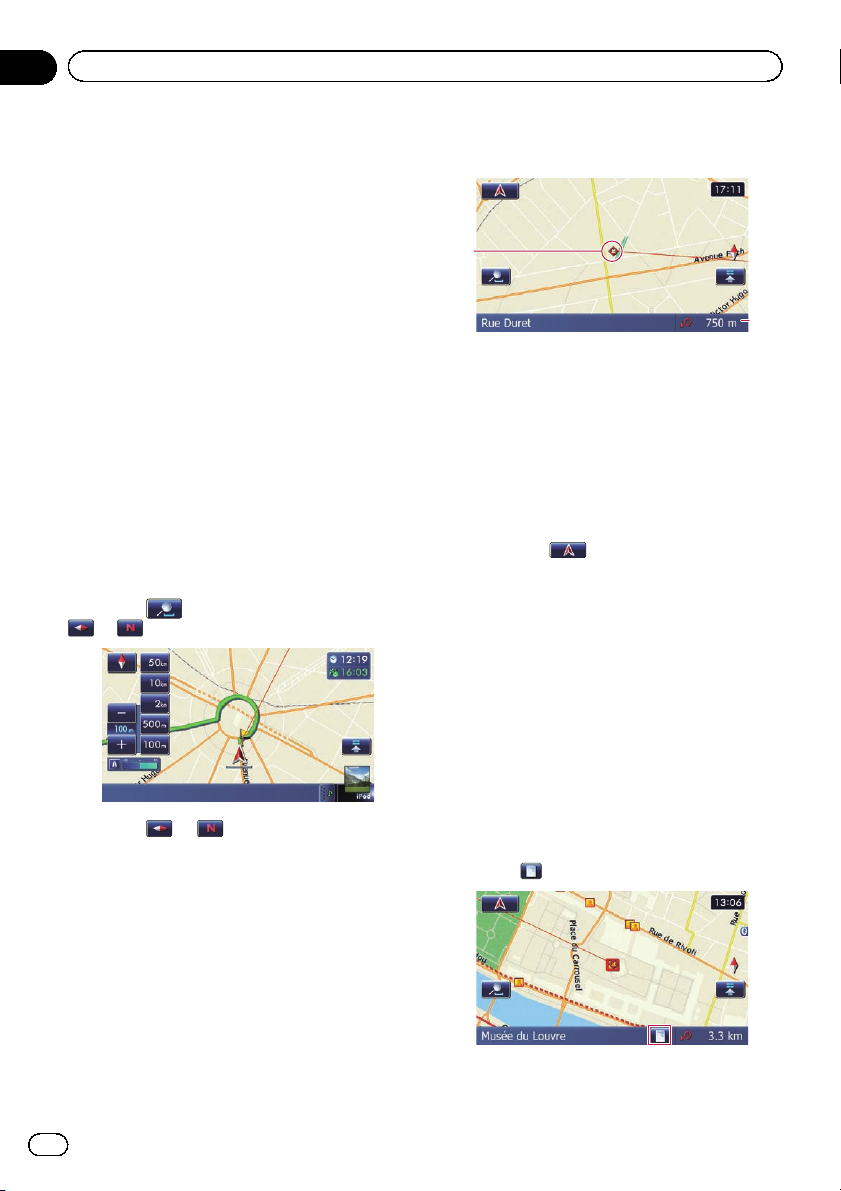
Viewing information about a
specified location
An icon appears at registered places (home location, specific places, Favourites entries)
and places where there is a POI icon or traffic
information icon. Place the scroll cursor over
the icon to view detailed information.
1 Scroll the map and move the scroll cursor to the icon you want to view.
2 Touch
.
Scrolling the map to the
position you want to see
1 Display the map screen.
= For details of the operations, refer to Screen
switching overview on page 24.
30
Engb
The “Information List” screen appears.
Page 31

How to use the map
Chapter
04
3 Touch the item that you want to check
the detailed information.
Information for a specified location appears.
The information shown varies according to the
location. (There may be no information for that
location.)
= For details, refer to Setting the display of
icons of favourite locations on page 145.
= For details, refer to Displaying POI on the
map on page 146.
= For details, refer to How to read traffic infor-
mation on the map on page 54.
p Touching [Call] enables you to call the posi-
tion if a telephone number is available.
(Pairing with mobile phone featuring
Bluetooth wireless technology is required.)
= For details, refer to Dialling from the map
on page 65.
Using shortcut menus on the map
“Quick Access” menu allows you to perform
various tasks, such as route calculation for the
location indicated by the cursor or registering
a location in “Favourites”, faster than using
the navigation menu.
You can customise “Quick Access” displayed
on screen. The “Quick Access” described here
are prepared as the default setting.
= For details, refer to Selecting the “Quick Ac-
cess” menu on page 149.
p Items marked with an asterisk (*) cannot
be removed from the “Quick Access”
menu.
% When the map is displayed, touch
Quick Access menu
: Route Options*
Displayed when the map is not scrolled. This
item can be selected only during route guidance.
You can modify the condi tions for route calculation and recalculate the current route.
= For details, refer to Modifying the route cal-
culation conditions on page 45.
: Destination*
Displayed when the map is scrolled. Set the
route to the place specified with the cursor.
: Registration
Register information on the location indicated
by the cursor to “Favourites”.
= For details, refer to Registering a location by
scroll mode on page 49.
: Vicinity Search
Find POIs (Points Of Interest) in the vicinity of
the cursor.
= For details, refer to Searching for a nearby
POI on page 41.
: Overlay POI
Displays icons for surrounding facilities (POI)
on the map.
= For details, refer to Displaying POI on the
map on page 146.
: Volume
Displays the “Volume Settings” screen.
= For details, refer to Setting the Volume for
Guidance and Phone on page 152.
: Contacts
Displays the “Contacts List” screen.
= For details, refer to Calling a number in the
phone book on page 63.
Close
Hides the “Quick Access” menu.
.
How to use the map
Engb
31
Page 32

Chapter
04
How to use the map
Switching the view mode
Various types of screen displays can be selected for navigation guidance.
1 Display the “Map Settings” screen.
= For details, refer to Displaying the screen for
map settings on page 142.
2 Touch [View Mode].
The “View Mode” screen appears.
3 Touch the type that you want to set.
You can select the following types:
! 2D View (default):
Displays a normal map (2D map).
! 3D View:
Displays a map with an aerial view (3D
map).
The following information is displayed.
— Name of the next route to be taken by
the vehicle
— Arrow indicating the direction of the ve-
hicle
— Distance to the guidance points
p This mode is available when the route is
set.
! Rear View:
Displays the rear view image on the left
side of the screen and the map on the right
side of the screen.
p This mode is available when the rear
view camera setting is set to “On”.
= For details, refer to Setting for rear view
camera on page 154.
! Eco Graph:
Displays a graph for eco-driving on the left
side of the screen and the map on the right
side of the screen.
! Street View:
32
Engb
Information on the next four guidance
points closest to the current location appear in order from top to bottom on the left
side of the screen.
= For details, refer to Checking the eco-
friendly driving status on the next
page.
Page 33

Eco-friendly driving functions
Chapter
05
This navigation system is equipped with ecofriendly driving functions that can be used to
estimate whether you are driving in an environmentally friendly way.
This chapter describes these functions.
! The fuel mileage calculated is based on a
theoretical value determined from vehicle
speed and position information from the
navigation system. The fuel mileage displayed is only a reference value, and does
not guarantee the mileage displayed can be
obtained.
! The eco-friendly driving functions are an es-
timate of the real time fuel consumption to
average fuel consumption ratio and is not
an actual value.
! The eco-friendly driving functions and cal-
culations take into consideration the location of the GPS position and speed of the
vehicle in determining a value.
Checking the eco-friendly
driving status
This function estimates approximate fuel mileage based on your driving, compares that with
your average fuel mileage in the past, and displays the results in a graph.
The graph appears when the map display is
set to “Eco Graph”.
1 Display the “Map Settings” screen.
= For details, refer to Displaying the screen for
map settings on page 142.
2 Touch [View Mode].
The “View Mode” screen appears.
3 Touch [Eco Graph].
The “Eco Graph” screen appears.
1
2
3
1 Eco Score
The result of the comparison of your past
average fuel mileage and current average
fuel mileage appears as a value from
0.0 Pts (points) to 10.0 Pts. The higher the
value, the better the fuel mileage when
compared to past route guidance.
The green gauge indicates the current
score, and the grey gauge indicates the
best score to date.
The “Eco Score” is updated every 5 minutes.
p This is not displayed when “Eco Score”
is set to “Off” or when no route is set.
2 Best Score
Displays the best score to date.
p This is not displayed when “Eco Score”
is set to “Off” or when no route is set.
3 Average fuel mileage comparison graph
Displays a comparison of the average fuel
mileage up to the point the navigation system was last stopped (past average fuel
mileage) and the current average fuel mileage. The display is updated every 3 seconds. The more the value moves in the
direction of +, the better the fuel mileage.
There are three different graph bars.
! Total
A comparison of the past average fuel
mileage and the average fuel mileage of
the current drive.
!
: Ordinary Road
A comparison of the past average fuel
mileage and the average fuel mileage
for 90 seconds in the past, while the vehicle is driving on an ordinary road.
!
: Motorway
A comparison of the past average fuel
mileage and the average fuel mileage
for 90 seconds in the past, while the vehicle is driving on a motorway.
4
Eco-friendly driving functions
Engb
33
Page 34

Chapter
05
Eco-friendly driving functions
4 Animal icons
The number of displayed animal icons increases or decreases according to the value
of “Eco Score”.
p This is not displayed when “Eco Score”
is set to “Off” or when no route is set.
p Even if you use the “Eco Graph” function
immediately after you start using the navigation system for the first time,
displayed and the function may not be available.
= For details, refer to Troubleshooting on page
181.
p The display settings can be changed.
= For details, refer to Changing the eco-func-
tion setting on page 141.
may be
Displaying Eco Drive Level
guidance
This navigation system is equipped with the
“Eco Drive Level” function that estimates how
well you have driven in an environmentally
friendly way.
The points of “Eco Drive Level” change according to “Eco Score” when the vehicle
reaches the destination. When a certain number of points is reached, the level increases
and a message appears.
Tree icon
Sudden start alert
If the speed of the vehicle exceeds 41 km/h
(25.5 mph) within 5 seconds from the time it is
started, a message appears and a warning
sound beeps.
= For details of the operation, refer to Chan-
ging the eco-function setting on page
141.
As the level increases, a tree icon changes
from a young tree to a big tree.
p This is not displayed when “Eco Drive
Level” is set to “Off”.
= For details of the operation, refer to Chan-
ging the eco-function setting on page
141.
34
Engb
Page 35

Searching for and selecting a location
Chapter
06
CAUTION
For safety reasons, these route-setting functions
are not available while your vehicle is in motion.
To enable these functions, you must stop in a
safe place and put on the handbrake before setting your route.
p Some information regarding traffic regula-
tions depends on the time when the route
calculation is performed. Thus, the information may not correspond with a certain
traffic regulation when your vehicle actually
passes through the location in question.
Also, the information on the traffic regulations provided will be for a passenger vehicle, and not for a truck or other delivery
vehicles. Always follow the actual traffic
regulations when driving.
The basic flow of creating
your route
1 Park your vehicle in a safe place and apply
the handbrake.
j
2 Display the “Destination Menu” screen.
= For details of the operations, refer to
Screen switching overview on page 24.
Searching for and selecting a location
j
3 Select the method of searching for your
destination.
j
4 Enter the information about your destina-
tion to calculate route.
j
5 Confirm the location on the map.
= For details, refer to Setting a route to
your destination on page 44.
j
6 The navigation system calculates the route
to your destination, and then shows the
route on the map.
j
7 Check and decide the route.
= For details, refer to Setting a route to
your destination on page 44.
8 Your navigation system sets the route to
j
your destination, and the map of your surroundings appears.
j
9 Release the handbrake, drive in accordance
with navigation guidance.
Engb
35
Page 36

Chapter
06
Searching for and selecting a location
Searching for a location by
address
The most frequently used function is “Ad-
dress”, in which the address is specified and
the destination is searched.
You can select the method of searching for a
location by address.
! Searching for a street name first
! Searching for a city name first
! Finding the location by specifying the post-
code
Searching for a street name first
p Depending on the search results, some
steps may be skipped.
p When you enter characters, the system will
automatically search the database for all
possible options. Only the characters you
enter are active.
p If the search candidates number reaches
20 or less, the screen automatically
changes to the search result screen.
1 Display the “Destination Menu” screen.
= For details of the operations, refer to Screen
switching overview on page 24.
3 Touch the key next to “Zone” to display
the country list.
4 Touch one of the items on the list to set
the country as search area.
The screen returns to the previous screen.
5 Touch [Street].
2 Touch [Address].
36
Engb
# If you touch [History], the “City History List”
screen appears, enabling you to search by previously selected city history.
= For details, refer to Searching by selected
city history on page 39.
Page 37

Searching for and selecting a location
Chapter
06
6 Enter the street name and then touch
[OK].
The “Street Selection” screen appears.
7 Touch the street you want.
8 Enter the city name and then touch
[OK].
The “Select City” screen appears.
9 Touch the desired city name.
# If you touch , the geographic centre of the
city appears on the map screen.
11 Touch the desired house number range.
The searched location appears on the map
screen.
= For the subsequent operations, refer to Set-
ting a route to your destination on page 44.
Searching for a city name first
p Depending on the search results, some
steps may be skipped.
p When you enter characters, the system will
automatically search the database for all
possible options. Only the characters you
enter are active.
p If the search candidates number reaches
20 or less, the screen automatically
changes to the search result screen.
1 Display the “Destination Menu” screen.
= For details of the operations, refer to Screen
switching overview on page 24.
2 Touch [Address].
The “Address Search” screen appears.
3 Touch [City].
4 Enter the city name and then touch
[OK].
Searching for and selecting a location
10 Enter the house number and then
touch [OK].
The “House Number Selection” screen appears.
# If you touch [OK] without entering the house
number, a representative location on the street in
the selected city appears.
The “Select City” screen appears.
5 Touch the desired city name.
# If you touch , the geographic centre of the
city appears on the map screen.
Engb
37
Page 38

Chapter
06
Searching for and selecting a location
6 Enter the street name and then touch
[OK].
The “Street Selection” screen appears.
7 Touch the street you want.
8 Enter the house number and then
touch [OK].
The “House Number Selection” screen appears.
# If you touch [OK] without entering the house
number, a representative location on the street in
the selected city appears.
9 Touch the desired house number range.
The searched location appears on the map
screen.
= For the subsequent operations, refer to Set-
ting a route to your destination on page 44.
Finding your destination by
specifying the postcode
If you know the postcode of your destination,
you can use it to find your destination.
p Depending on the search results, some
steps may be skipped.
1 Display the “Destination Menu” screen.
= For details of the operations, refer to Screen
switching overview on page 24.
2 Touch [Address].
The “Address Search” screen appears.
3 Touch the key next to “Zone” to display
the country list.
4 Touch one of the items on the list to set
the country as search area.
The screen returns to the previous screen.
5 Touch [Postcode].
The “Enter Postcode” screen appears.
6 Input the postcode.
A list of cities with the specified postcode is
shown (except for the following cases).
British postcode:
The searched location appears on the map
screen.
Netherlands postcode:
If you input a partial postcode (4 digits) or a
complete postcode (6 digits), and touch [OK],
a list of cities is shown.
7 Touch the city or area where your destination is located.
# If you touch , the geographic centre of the
city appears on the map screen.
8 Enter the street name and then touch
[OK].
The “Street Selection” screen appears.
p If there is no house number, the searched
location appears on the map screen.
38
Engb
Page 39

Searching for and selecting a location
Chapter
06
9 Touch the street you want.
The “Enter House Number” screen appears.
p If the selected street has only one matching
location, the searched location appears on
the map screen.
10 Enter the house number and then
touch [OK].
The “House Number Selection” screen appears.
# If you touch [OK] without entering the house
number, a representative location on the street in
the selected city appears.
11 Touch the desired house number range.
The searched location appears on the map
screen.
= For the subsequent operations, refer to Set-
ting a route to your destination on page 44.
Searching by selected city history
You can search the cities from the history that
you have searched by entering the name with
the keyboard and selected by “Address”, “POI”
or “Favourites”.
p The history can store up to 50 cities.
p The cities are listed in order of the most re-
cent search.
1 Display the “Destination Menu” screen.
= For details of the operations, refer to Screen
switching overview on page 24.
2 Touch [Address].
The “Address Search” screen appears.
3 Touch [History].
The “City History List” screen appears.
4 Touch the desired city name.
The “Street Name” screen appears.
# If you touch , the geographic centre of the
city appears on the map screen.
6 Touch the street you want.
The “Enter House Number” screen appears.
p If the selected street has only one matching
location, the searched location appears on
the map screen.
7 Enter the house number and then
touch [OK].
The “House Number Selection” screen appears.
# If you touch [OK] without entering the house
number, a representative location on the street in
the selected city appears.
8 Touch the desired house number range.
The searched location appears on the map
screen.
= For the subsequent operations, refer to Set-
ting a route to your destination on page
44.
Setting up a route to your
home
If your home location is stored, the route to
your home can be calculated by touching a
single key.
1 Display the “Destination Menu” screen.
= For details of the operations, refer to Screen
switching overview on page 24.
2 Touch [Return Home].
p If you have not registered your home loca-
tion, a message appears. Touch [Register]
to start registration.
= For details, refer to Registering your
home on page 141.
Searching for and selecting a location
5 Enter the street name and then touch
[OK].
The “Street Selection” screen appears.
Engb
39
Page 40

Chapter
06
Searching for and selecting a location
Searching for Points of
Interest (POI)
Information about various facilities (Points Of
Interest – POI), such as petrol stations, car
parks or restaurants, is available. You can
search for a POI by selecting the category (or
entering the POI Name).
Searching for POIs by preset
categories
You can search for POIs with a single touch
from the preset category.
1 Display the “Destination Menu” screen.
= For details of the operations, refer to Screen
switching overview on page 24.
2 Touch [POI].
3 Touch the desired category.
Preset categories
1 Display the “Destination Menu” screen.
= For details of the operations, refer to Screen
switching overview on page 24.
2 Touch [POI].
The “POI Search” screen appears.
3 Touch [Spell Name].
4 Enter the POI name and then touch
[OK].
The “POI List” screen appears.
# If you change the country to search, touch the
country key and display the “Zone Selection”
screen to change the setting.
Country key
p Once the country has been selected, you
only have to change countries when your
destination is outside of the country you selected.
The “POI List” screen appears.
4 Touch the POI you want.
The searched location appears on the map
screen.
= For the subsequent operations, refer to Set-
ting a route to your destination on page 44.
Searching for a POI directly
from the name of the facilities
p If the search candidates number reaches
20 or less, the screen automatically
changes to the search result screen.
40
Engb
5 Touch the POI you want.
The searched location appears on the map
screen.
# If you touch [Sort], the order of POI can be
sorted.
p Current order is indicated on the upper
right of the screen.
:
!
Sorts the items in the list in order by distance from the vehicle position.
:
!
Sorts the items in the list in order by degree
of consistency with the entered text.
:
!
Sorts the items in the list alphabetically.
= For the subsequent operations, refer to Set-
ting a route to your destination on page 44.
Page 41

Searching for and selecting a location
Chapter
06
Searching for a nearby POI
You can search for POIs in your surroundings.
p Up to 300 POIs within a 160 kilometres (100
miles) radius of the vehicle position are
listed in order by distance.
1 Display the “Destination Menu” screen.
= For details of the operations, refer to Screen
switching overview on page 24.
2 Touch [POI].
The “POI Search” screen appears.
3 Touch [Near Me].
POIs are divided into several categories.
4 Touch the category you want.
The “POI List” screen appears.
p If there are more detailed categories within
the selected category, repeat this step as
many times as necessary.
5 Touch the POI you want.
The searched location appears on the map
screen.
= For the subsequent operations, refer to Set-
ting a route to your destination on page 44.
Searching for POIs around the
destination
p This function is available when the route is
set.
5 Touch the POI you want.
The searched location appears on the map
screen.
= For the subsequent operations, refer to Set-
ting a route to your destination on page 44.
Searching for POIs around the city
You can search for POIs around a specified
city.
p If the search candidates number reaches
20 or less, the screen automatically
changes to the search result screen.
1 Display the “Destination Menu” screen.
= For details of the operations, refer to Screen
switching overview on page 24.
2 Touch [POI].
The “POI Search” screen appears.
3 Touch [Around City].
4 Enter the city name and then touch
[OK].
The “Select City” screen appears.
# If you change the country to search, touch the
country key and display the “Zone Selection”
screen to change the setting.
Country key
Searching for and selecting a location
1 Display the “Destination Menu” screen.
= For details of the operations, refer to Screen
switching overview on page 24.
2 Touch [POI].
The “POI Search” screen appears.
3 Touch [Near Destination].
POIs are divided into several categories.
4 Touch the category you want.
The “POI List” screen appears.
p If there are more detailed categories within
the selected category, repeat this step as
many times as necessary.
p Once the country has been selected, you
only have to change countries when your
destination is outside of the country you selected.
# If you touch [History], the “City History List”
screen appears, enabling you to search by previously selected city history.
= For details, refer to Searching by selected
city history on page 39.
Engb
41
Page 42

Chapter
06
Searching for and selecting a location
5 Touch the desired city name.
POIs are divided into several categories.
# If you touch , the geographic centre of the
city appears on the map screen.
6 Touch the category you want.
The “POI List” screen appears.
p If there are more detailed categories within
the selected category, repeat this step as
many times as necessary.
7 Touch the POI you want.
The searched location appears on the map
screen.
= For the subsequent operations, refer to Set-
ting a route to your destination on page 44.
How to read the “POI List” screen
The following information is displayed on the
“POI List” screen.
123
1 Facility name
2 Facility address
3 Distance from the position that the search
starts
p If you touch , detailed information of the
facility appears.
= For details, refer to Storing favourite loca-
tions on page 49.
1 Display the “Destination Menu” screen.
= For details of the operations, refer to Screen
switching overview on page 24.
2 Touch [Favourites].
3 Touch the entry you want.
The searched location appears on the map
screen.
= For the subsequent operations, refer to Set-
ting a route to your destination on page
44.
Searching for POIs by using
the data on the SD memory
card
Creating a customised POI is possible by
using the utility programme NavGate FEEDS
which is available separately, on your PC.
(NavGate FEEDS will be available on our website.) Storing the customised POI properly and
inserting the SD memory card enables the system to use the data for searches.
Selecting destination from
“Favourites”
Storing locations you visit frequently saves
time and effort.
Selecting an item from the list provides an
easy way to specify the position.
p This function is not available if no locations
have been registered in “Favourites”.
42
Engb
1 Store the item into the SD memory card
by using the NavGate FEEDS.
2 Insert an SD memory card into the SD
card slot.
= For details of the operation, refer to Insert-
ing and ejecting an SD memory card on
page 16.
Page 43

Searching for and selecting a location
Chapter
06
3 Display the “Destination Menu” screen.
= For details of the operations, refer to Screen
switching overview on page 24.
4 Touch [navgate FEEDS].
The “Select POI” screen appears.
5 Touch the item you want.
6 Touch the POI you want.
The searched location appears on the map
screen.
= For the subsequent operations, refer to Set-
ting a route to your destination on the next
page.
Selecting a location you
searched for recently
The places that you have set as destination or
waypoint in the past are automatically stored
in “History”.
p If no location is stored in Destination His-
tory, you cannot select [History]. (If you
perform a route calculation, you can select
[History].)
p “History” can store up to 100 locations. If
the entries reach the maximum, the new
entry overwrites the oldest one.
1 Display the “Destination Menu” screen.
= For details of the operations, refer to Screen
switching overview on page 24.
2 Touch [History].
3 Touch the entry you want.
= For the subsequent operations, refer to Set-
ting a route to your destination on the next
page.
Searching for a location by
coordinates
Entering a latitude and longitude pinpoints
the location.
1 Display the “Destination Menu” screen.
= For details of the operations, refer to Screen
switching overview on page 24.
2 Touch [Coordinates].
3 Touch [East] or [West], and then enter
the longitude.
To enter W 50°1’2.5” for example, touch
[West], [0], [5], [0], [0], [1], [0], [2], and [5].
4 Touch [North] or [South], and then
enter the latitude.
To enter N 5°1’2.5” for example, touch [North],
[0], [5], [0], [1], [0], [2], and [5].
5 Touch [OK].
The searched location appears on the map
screen.
= For the subsequent operations, refer to Set-
ting a route to your destination on the next
page.
Searching for and selecting a location
The searched location appears on the map
screen.
Engb
43
Page 44

Chapter
07
After the location is decided
Setting a route to your
destination
1 Search for a location.
= For details, refer to Chapter 6.
After searching for the destination, the Location confirmation screen appears.
2 Touch [OK].
Location confirmation screen
The destination is set, and then route calculation starts.
When the route calculation is completed,
Route confirmation screen appears.
# If you press the MODE button during route
calculation, the calculation is cancelled and the
map screen appears.
# If you touch [Scroll], the map display is chan-
ged to the scroll mode. In the scroll mode, you
can display the location more precisely to register
it, or make settings.
# If you touch [Waypoint], the location is added
to the “Waypoints List” screen.
p If a destination is not set, [Waypoint] is not
available.
3 Touch [OK].
Route confirmation screen
1 23 4
Sets the displayed route as your route, and
starts the route guidance.
1 Travel time to your destination
2 Distance to the destination
3 Estimated fuel cost to your destination
= For details, refer to Inputting the fuel
consumption information for calculating
the fuel cost on page 138.
4 Route calculation condition
# If you touch
whether to cancel the calculated route appears.
If you touch [Yes], the calculated route is cancelled and the map screen appears.
1
2
3
4
1 Multiple Route
= For details, refer to Displaying multiple
routes on this page.
2 Options
= For details, refer to Modifying the route
calculation conditions on the next page.
3 Profile
= For details, refer to Checking the current
itinerary on page 46.
4 Waypoints
= For details, refer to Editing waypoints on
page 47.
, the message confirming
Displaying multiple routes
You can select a desired route from multiple
route options. Calculated routes are shown in
different colours.
p If you set waypoints, you cannot display
multiple routes.
1 Touch [Multiple Route] on the Route
confirmation screen.
Multiple route options appear.
2 Touch
Another route is displayed.
3 Touch [OK].
Route confirmation screen appears.
to .
44
Engb
Page 45

Checking and modifying the current route
Chapter
08
Displaying the route overview
p “Route Overview” is active only when the
route is set.
1 Press the HOME button to display the
“Top Menu” screen.
2 Touch [Destination].
The “Destination Menu” screen appears.
3 Touch [Route Overview].
1
2
3
1 Options
= For details, refer to Modifying the route
calculation conditions on this page.
2 Profile
= For details, refer to Checking the current
itinerary on the next page.
3 Waypoints
= For details, refer to Editing waypoints on
page 47.
4 Touch [OK].
Modifying the route
calculation conditions
You can modify the condi tions for route calculation and recalculate the current route.
1 Display the “Route Overview” screen.
= For details, refer to Displaying the route
overview on this page.
2 Touch [Options].
3 Touch the desired items to change the
route calculation conditions and then
touch [OK].
Checking and modifying the current route
The route is recalculated, and the Route confirmation screen appears.
Items that users can operate
Settings marked with an asterisk (*) show that
these are default or factory settings.
Route Condition
This setting controls how the route should be
calculated by taking into account the time, distance or main road.
Determines which condition takes priority for
route calculation.
Fast*:
Calculates a route with the shortest travel time
to your destination as a priority.
Short:
Calculates a route with the shortest distance
to your destination as a priority.
Main Road:
Calculates a route that passes major arterial
roads as a priority.
Engb
45
Page 46

Chapter
08
Checking and modifying the current route
Avoid Toll Road
This setting controls whether toll roads (including toll areas) should be taken into account.
Off*:
Calculates a route that may include toll roads
(including toll areas).
On:
Calculates a route that avoids toll roads (including toll areas).
p The system may calculate a route that in-
cludes toll roads even if “On” is selected.
Avoid Ferry
This setting controls whether ferry crossings
should be taken into account.
Off*:
Calculates a route that may include ferries.
On:
Calculates a route that avoids ferries.
p The system may calculate a route that in-
cludes ferries even if “On” is selected.
Avoid Motorway
This setting controls whether motorways may
be included in the route calculation.
Off*:
Calculates a route that may include motorways.
On:
Calculates a route that avoids motorways.
p The system may calculate a route that in-
cludes motorways even if “On” is selected.
Time restrictions
This setting controls whether streets or
bridges that have traffic restrictions during a
certain time should be taken into account.
p If you want to set your route to avoid raised
draw bridges, select “On”.
On*:
Calculates a route while avoiding streets or
bridges with traffic restrictions during a certain time.
Off:
Calculates a route while ignoring traffic restrictions.
p The system may calculate a route that in-
cludes streets or bridges that are subject to
traffic restrictions during a certain time
even if “On” is selected.
CAUTION
If the time difference is not set correctly, the navigation system cannot consider traffic regulations
correctly. Set the time difference correctly.
= For details, refer to Setting the time difference
on page 151.
Learning Route
The system learns the travel history of your vehicle for each road.
This setting controls whether or not the travel
history should be taken into account.
On*:
Calculates a route with the travel history taken
into account.
Off:
Calculates a route without the travel history
taken into account.
Clear:
Clears the current travel history.
Checking the current itinerary
You can check the route details.
1 Display the “Route Overview” screen.
= For details, refer to Displaying the route
overview on the previous page.
2 Touch [Profile].
The “Route Profile” screen appears.
46
Engb
Page 47

Checking and modifying the current route
Chapter
08
Editing waypoints
You can edit waypoints (locations you want to
visit on the way to your destination) and recalculate the route so that it passes through
these locations.
Adding a waypoint
Up to 5 waypoints can be set, and waypoints
and final destination can be sorted automatically or manually.
1 Display the “Route Overview” screen.
= For details, refer to Displaying the route
overview on page 45.
2 Touch [Waypoints].
The “Waypoints List” screen appears.
3 Touch [Add].
The “Select Search Method” screen appears.
4 Search for a location.
= For details, refer to Chapter 6.
5 Touch [OK].
6 Touch [OK] on the “Waypoints List”
screen.
Checking and modifying the current route
The route is recalculated, and the Route confirmation screen appears.
p If you set waypoints, you cannot display
multiple routes.
Deleting a waypoint
You can delete waypoints from the route and
then recalculate the route. (You can delete
successive waypoints.)
1 Display the “Route Overview” screen.
= For details, refer to Displaying the route
overview on page 45.
2 Touch [Waypoints].
The “Waypoints List” screen appears.
3 Touch [Delete] next to the waypoint
that you want to delete.
The touched waypoint will be deleted from the
list.
4 Touch [OK] on the “Waypoints List”
screen.
The route is recalculated, and the Route confirmation screen appears.
5 Touch [OK].
The map of the current position appears.
Engb
47
Page 48

Chapter
08
Checking and modifying the current route
Sorting waypoints
You can sort waypoints and recalculate the
route.
p You cannot sort waypoints that you have al-
ready passed.
1 Display the “Route Overview” screen.
= For details, refer to Displaying the route
overview on page 45.
2 Touch [Waypoints].
The “Waypoints List” screen appears.
3 Touch [Sort].
The “Sort Waypoints” screen appears.
4 Touch the waypoint or destination.
Put them in the desired order.
# If you touch [Automatic], the destination and
waypoints are sorted in the order of a nearest
waypoint from the current location in the direct
aerial path.
# If you touch [Clear], waypoint sort is can-
celled.
5 Touch [OK].
The “Waypoints List” screen appears.
6 Touch [OK] on the “Waypoints List”
screen.
The route is recalculated, and the Route confirmation screen appears.
7 Touch [OK].
The map of the current position appears.
1 Display the “Destination Menu” screen.
= For details of the operations, refer to Screen
switching overview on page 24.
2 Touch [Cancel Route].
A message confirming the cancellation of the
current route appears.
3 Touch [Yes].
The current route is deleted, and a map of
your surroundings reappears.
# If you touch [Skip], the next waypoint is
skipped and a new route is calculated. All other
waypoints remain.
When the route calculation is completed, Route
confirmation screen appears.
p [Skip] is available only when a waypoint is
set.
# If you touch [No], the previous screen returns
without deleting the route.
Cancelling the route guidance
If you no longer need to travel to your destination, follow the steps below to cancel the route
guidance.
48
Engb
Page 49

Registering and editing locations
Chapter
09
Storing favourite locations
Storing your favourite locations as “Favour-
ites” provides you with the opportunity to save
the time and effort of re-entering this information. Stored items can be made available on
“Favourites” later.
Registering a location by
“Favourites”
“Favourites” can store up to 400 locations.
Home location is counted as one of the items
in “Favourites”.
1 Display the “Destination Menu” screen.
= For details of the operations, refer to Screen
switching overview on page 24.
2 Touch [Favourites].
The “Favourites” screen appears.
3 Touch [Add].
The “Select Search Method” screen appears.
4 Search for a location.
= For details about the search methods, refer
to Chapter 6.
5 When the map of the location you
want to register is displayed, touch [OK].
The location is registered, and then the “Edit
Favourite” screen appears.
= For details, refer to Editing the favourite loca-
tion in the list on this page.
6 Touch [OK].
The registration is complete.
Registering a location by scroll
mode
p This function is available when “Registra-
tion” is set in the “Quick Access” menu.
= For details, refer to Selecting the “Quick
Access” menu on page 149.
1 Touch and drag the screen to scroll the
map to the position that you want to register.
2 Touch to display the “Quick Access”
menu.
3 Touch
The location is registered, and then the “Edit
Favourite” screen appears.
= For details, refer to Editing the favourite loca-
tion in the list on this page.
4 Touch [OK].
The registration is complete.
.
Editing registered locations
Editing the favourite location
in the list
1 Display the “Destination Menu” screen.
= For details of the operations, refer to Screen
switching overview on page 24.
2 Touch [Favourites].
The “Favourites” screen appears.
3 Touch
want to edit.
The “Edit Favourite” screen appears.
4 Touch the item that you want to
change the setting.
1
2
3
next to the location that you
Registering and editing locations
4
Engb
49
Page 50

Chapter
09
Registering and editing locations
1 Name
You can enter the desired name.
p Up to 17 characters can be input for the
name.
2 Phone#
You can edit the registered phone number.
To dial the number, touch [Call].
The maximum digits you can enter for the
phone number is 15.
3 Icon
You can change the symbol displayed on
the map and “Favourites”.
4 Modify Location
You can change the registered location by
scrolling the map.
5 Touch [OK].
The registration is complete.
Editing your home
When you have already registered your home,
you can edit the information of your home.
1 Display the “Destination Menu” screen.
= For details of the operations, refer to Screen
switching overview on page 24.
2 Touch [Favourites].
p Home location is displayed on the top of
the list.
3 Touch next to the home location.
The “Edit Favourite” screen appears.
4 Touch the item that you want to
change the setting.
1
2
1 Phone#
To dial the number, touch [Call].
2 Modify Location
You can change the registered location by
scrolling the map.
p For home information, [Name] and [Icon]
are not editable.
5 Touch [OK].
The registration is complete.
Sorting the favourite locations
in the list
1 Display the “Destination Menu” screen.
= For details of the operations, refer to Screen
switching overview on page 24.
2 Touch [Favourites].
The “Favourites” screen appears.
3 Touch [Sort].
Each time you touch [Sort] changes the sort
order.
p Current order is indicated on the upper
right of the screen.
!
:
Sorts the items in the list in order of the recently used items.
!
:
Sorts the items in the list alphabetically.
!
:
Sorts the items in the list in order by distance from the vehicle position.
50
Engb
Page 51

Registering and editing locations
Chapter
09
Deleting a favourite location
from the list
1 Display the “Destination Menu” screen.
= For details of the operations, refer to Screen
switching overview on page 24.
2 Touch [Favourites].
The “Favourites” screen appears.
3 Touch [Delete].
4 Select the location you want to delete.
A tick mark appears next to the selected location.
# If you touch [All], you can select all entries. If
you want to deselect all entries, touch [None].
5 Touch [Delete].
Exporting and importing
favourite locations
Exporting favourite locations
You can export the “Favourites” data to an SD
memory card for editing by using the utility
programme NavGate FEEDS which is available
separately, on your PC.
p If there is previous data in the SD memory
card, the data is overwritten with new data.
1 Insert an SD memory card into the SD
card slot.
= For details of the operation, refer to Insert-
ing and ejecting an SD memory card on
page 16.
2 Display the “Destination Menu” screen.
= For details of the operations, refer to Screen
switching overview on page 24.
3 Touch [Favourites].
The “Favourites” screen appears.
4 Touch
Data export starts.
After the data is exported, the completion message appears.
.
Registering and editing locations
A message will appear asking you to confirm
the deletion.
6 Touch [Yes].
The data you selected is deleted.
# If you touch [No], the deletion is cancelled.
5 Touch [OK].
The “Favourites” screen appears.
Importing favourite locations
You can import the locations that you have edited on the utility programme NavGate FEEDS
to “Favourites”.
p When a location that is already registered
in “Favourites” is imported, the location is
overwritten.
1 Store the item into the SD memory card
by using the NavGate FEEDS.
Engb
51
Page 52

Chapter
09
Registering and editing locations
2 Insert an SD memory card into the SD
card slot.
= For details of the operation, refer to Insert-
ing and ejecting an SD memory card on
page 16.
3 Display the “Destination Menu” screen.
= For details of the operations, refer to Screen
switching overview on page 24.
4 Touch [Favourites].
The “Favourites” screen appears.
5 Touch
The message confirming whether to replace
the stored items appears.
6 Touch [Yes].
Data import starts.
After importing the data is finished, the “Fa-
vourites” screen appears.
.
Deleting the destination
history from the list
Items in “History” can be deleted. All entries
in “History” can be deleted at once.
1 Display the “Destination Menu” screen.
= For details of the operations, refer to Screen
switching overview on page 24.
2 Touch [History].
The “Destination History List” screen appears.
3 Touch [Delete].
The “Delete from History” screen appears.
4 Select the location you want to delete.
A tick mark appears next to the selected location.
# If you touch [All], you can select all entries. If
you want to deselect all entries, touch [None].
5 Touch [Delete].
A message will appear asking you to confirm
the deletion.
6 Touch [Yes].
The data you selected is deleted.
# If you touch [No], the deletion is cancelled.
52
Engb
Page 53

Using traffic information
Chapter
10
You can check real-time traffic information
transmitted by the Traffic Message Channel
(TMC) of the FM Radio Data System (RDS) on
the screen. Such traffic information is updated
periodically. When the navigation system receives updated traffic information, the navigation system will overlay the traffic information
on your map and also display detailed text information when available. When you are travelling along a route and there is traffic
information on your current route, the system
will detect it and ask you if you would like to
be rerouted, or suggest another route automatically.
p The system acquires the traffic information
up to 150 km in radius from the vehicle position. (If there is a lot of traffic information
around your vehicle, the radius will be
shorter than 150 km.)
p The navigation system provides the follow-
ing functions by using the information
from RDS-TMC service:
! Displaying a list of traffic information
! Displaying traffic information on a map
! Suggesting a route to avoid traffic jams
by using traffic information
p The term “traffic jam” in this section indi-
cates the following types of traffic information: slow, queuing and stationary traffic
and closed/blocked roads. This information
is always taken into consideration when
checking your route, and the information
related with these events cannot be turned
off. If you select other traffic information in
“Traffic Settings”, the information can be
displayed in a list or on a map.
= For details, refer to Selecting traffic infor-
mation to display on page 56.
Checking all traffic
information
Traffic information is displayed on a screen in
the form of a list. This allows you to check how
many traffic incidents have occurred, their location and their distance from your current position.
1 Display the “Destination Menu” screen.
= For details of the operations, refer to Screen
switching overview on page 24.
2 Touch [Traffic].
The “Traffic Menu” screen appears.
3 Touch [Traffic List].
The “Traffic List” screen appears.
The list with received traffic information is
shown.
4 Select an incident you want to view in
detail.
The details of the selected incident are displayed.
p Touching an incident you want to see allows
you to view the detailed information of the
incident. If the information cannot be displayed on one screen, touch
the remaining information.
p Touching
tion on a map. (Traffic information without
positional information cannot be checked
on a map.)
# If you touch [Sort], the traffic information can
be sorted.
Each time you touch the key changes the setting.
!
You can sort the traffic information by distance from your current position.
When you touch [Traffic List], the list dis-
played will be sorted according to the linear
distance from the vehicle position to the
traffic information.
When you touch [Traffic on Route], the list
displayed will be sorted according to the
distance from the vehicle position to the
traffic information.
!
You can sort the traffic information in alphabetical order.
allows you to check the loca-
:
:
or to view
Using traffic information
Engb
53
Page 54

Chapter
10
Using traffic information
! :
You can sort the traffic information according to the incident.
The list will be sorted in the order of closed/
blocked roads, traffic jam, accidents, road
works and others.
Current order is indicated on the upper right of
the screen.
# If you touch [Refresh] while new traffic infor-
mation is received, current information is changed and old information is removed. The traffic
information list is updated to reflect the new situation.
5 Touch .
The previous screen returns.
Checking traffic
information on the route
All traffic information on the current route is
displayed on screen in a list.
1 Display the “Destination Menu” screen.
= For details of the operations, refer to Screen
switching overview on page 24.
2 Touch [Traffic].
The “Traffic Menu” screen appears.
3 Touch [Traffic on Route].
The “Traffic on Route” screen appears.
The method for checking the content displayed on the screen is the same as “Traffic
List” screen.
= For details, refer to Checking all traffic infor-
mation on the previous page.
Traffic event ico n
! with yellow line:
Slow and queuing traffic
with red line:
!
Stationary traffic
!
with black line:
Closed/blocked roads
!
etc.:
Accidents, constructions, etc.
p For meanings of other icons, check them
the “Traffic Type Settings” screen.
For details of the operations, refer to Selecting
traffic information to display on page 56.
How to read traffic
information on the map
The traffic event information displayed on the
map is as follows.
p A line is displayed only when the map scale
is 5 km (2.5 miles) or lower.
p Icons appear only when the scale on the
map is 20 km (10 miles) or lower. If the
scale is changed, the icons are resized according to the selected scale.
54
Engb
Page 55

Using traffic information
Chapter
10
Setting an alternative
route to avoid traffic jams
The navigation system checks at regular intervals whether or not there is the traffic information on your route. If the navigation system
detects any traffic jams on your current route,
the system tries to find a better route in the
background.
p The following types of traffic incidents on
the route will be checked: slow, queuing
and stationary traffic, and closed/blocked
roads except for closed motorway exits/entrances.
Checking for traffic jams
automatically
If there is information about traffic jams on
your current route and if an alternative route
can be found, the navigation system will recommend a new alternative route automatically. In such a case, the following screen will
appear.
p When no selection is made, the screen re-
turns to the previous screen.
Checking traffic information
manually
Touching the notification icon on the map
screen allows you to check traffic information
on your route while the icon is displayed. The
notification icon is only displayed on the navigation map screen if there is any traffic information on your route.
p The notification icon is not available if your
vehicle deviates from the route.
1 Set [Show Traffic Incident] to “View”.
= For details, refer to Displaying the traffic no-
tification icon on page 144.
2 Display the map screen.
The icon appears when the system acquires
traffic information on the current route.
= For details of the operations, refer to Screen
switching overview on page 24.
3 Touch the notification icon while the
icon is displayed.
Notification icon
Using traffic information
12
1 Difference in distance and travel time between
the existing route and new route.
2 Distance from the current position of your ve-
hicle to the point of entry into the new route.
p There is no action if the system cannot find
any traffic jam information on your route or
the system cannot find an alternative.
1 Touch [New].
The recommended route is displayed on the
screen.
# If you touch [Current] while the recom-
mended route is displayed, the screen switches
to the current route display.
2 Touch [OK].
The displayed route is set.
Traffic information on the current route is displayed on the map screen.
4 Touch [Diversion] to search for an alternative route.
Engb
55
Page 56

Chapter
10
Using traffic information
After touching [Diversion], the route is recalculated taking all traffic jams on your current
route into account.
p [Diversion] will be available only when the
system can find traffic jams.
p Notification icon shows the nearest traffic
information on the route. However, if you
touch [Diversion], the route is recalculated
by taking into account not only this infor-
mation, but also all traffic jam information
on the route.
= For details, refer to Checking for traffic jams
automatically on the previous page.
# If you touch [List], the “Traffic on Route”
screen appears.
# If you touch
the map screen returns.
, the message disappears and
Selecting traffic
information to display
There are different types of traffic information
that can be received via the RDS-TMC service,
and you can select which types will be incorporated and displayed on your navigation system.
1 Display the “Destination Menu” screen.
= For details of the operations, refer to Screen
switching overview on page 24.
2 Touch [Traffic].
The “Traffic Menu” screen appears.
3 Touch [Traffic Settings].
The “Traffic Settings” screen appears.
4 Touch [Displayed Traffic Info].
The “Traffic Type Settings” screen appears.
5 Touch the traffic information item to
display.
A tick mark appears next to the selected traffic
information.
# If you touch [All], you can select all entries. If
you want to deselect all entries, touch [None].
6 Touch [OK].
The selected traffic information icon is added
to the screen.
7 Touch [OK].
Selecting preferred RDS-TMC
service provider manually
A default preferred TMC service provider for
each country has been set. The navigation system tunes to the radio station with good reception among the preferred RDS-TMC service
providers. If you want to set another preferred
RDS-TMC service provider, you can manually
select one from available RDS-TMC service
providers.
1 Display the “Destination Menu” screen.
= For details of the operations, refer to Screen
switching overview on page 24.
2 Touch [Traffic].
The “Traffic Menu” screen appears.
3 Touch [TMC Provider Selection].
4 Touch the desired service provider on
the list.
After touching a service provider, the system
starts tuning to the selected RDS-TMC service
provider. When the tuning is successful, the
system returns to the map display.
56
Engb
Page 57

Registering and connecting a Bluetooth de vice
Chapter
11
If your devices feature Bluetooth®technology,
this navigation system can be connected to
your devices wirelessly. This section describes
how to set up a Bluetooth connection.
For details about the connectivity with the devices featuring Bluetooth wireless technology,
refer to the information on our website.
Preparing communication
devices
This navigation system has a built-in function
to use devices featuring Bluetooth wireless
technology.
= For details, refer to Notes for hands-free
phoning on page 70.
You can register and use devices that feature
the following profiles with this navigation system.
! HFP (Hands Free Profile)
! A2DP (Advanced Audio Distribution Pro-
file)
p If the registered device features both HFP
and A2DP, the hands-free connection is
made and then the Bluetooth audio connection is made.
If the registered device features either profile, the corresponding connection is made.
p When the navigation system is turned off,
the Bluetooth connection is also disconnected. When the system restarts, the system automatically attempts to reconnect
the previously-connected device. Even
when the connection is severed for some
reason, the system automatically reconnects the specified device (except when the
connection is severed due to device operation).
! Searching for nearby Bluetooth devices
! Pairing from your Bluetooth devices
! Searching for a specified Bluetooth device
p If you try to register more than 5 devices,
the system will ask you to select one of the
registered devices to delete.
= For details, refer to Deleting a registered
device on page 60.
Searching for nearby Bluetooth
devices
The system searches for available Bluetooth
devices near the navigation system, displays
them in a list, and registers them for connection.
1 Activate the Bluetooth wireless technology on your devices.
For some Bluetooth devices, no specific-action
is necessary to activate Bluetooth wireless
technology. For details, refer to the instruction
manual of your devices.
2 Display the “Settings Menu” screen.
= For details of the operations, refer to Screen
switching overview on page 24.
3 Touch [Bluetooth Settings].
The “Bluetooth Settings” screen appears.
4 Touch [Registration].
The “Nearby Device List” screen appears.
The system searches for Bluetooth devices
waiting for the connection and displays them
in the list if a device is found.
p Up to 30 devices will be listed in the order
that the devices are found.
5 Wait until your Bluetooth device appears in the list.
Registering and connecting a Bluetooth device
Registering your Bluetooth
devices
You need to register your devices featuring
Bluetooth wireless technology when you connect it for the first time. A total of 5 devices
can be registered. Three registration methods
are available:
Engb
57
Page 58

Chapter
11
Registering and connecting a Bluetooth de vice
p If you cannot find the Bluetooth device that
you want to connect, check that the device
is waiting for the Bluetooth wireless tech-
nology connection.
6 Touch the Bluetooth device name you
want to register.
Pairing from your Bluetooth
devices
You can register the Bluetooth device by setting the navigation system to standby mode
and requesting connection from the Bluetooth
device.
1 Activate the Bluetooth wireless technology on your devices.
For some Bluetooth devices, no specific-action
is necessary to activate Bluetooth wireless
technology. For details, refer to the instruction
manual of your devices.
2 Display the “Settings Menu” screen.
= For details of the operations, refer to Screen
switching overview on page 24.
3 Touch [Bluetooth Settings].
The “Bluetooth Settings” screen appears.
4 Touch [Registration].
The “Nearby Device List” screen appears.
5 Touch [Register from mobile phone].
The navigation system waits for a Bluetooth
wireless technology connection.
# If you touch [Search Again], the system starts
searching for Bluetooth devices waiting for connection, and displays them in the list format
when any devices are detected.
7 Enter the password (the default password is “1111”) using the Bluetooth device.
Enter the password while the message “Please
follow the instructions on your mobile
phone.” appears.
The device is registered in the navigation system.
After the device is successfully registered, the
Bluetooth connection is established from the
navigation system.
58
Engb
6 Register the navigation system on your
Bluetooth device.
If your device asks you to enter a password,
enter the password of the navigation system.
When the device is successfully registered,
the connection settings are made from the device.
p If registration fails, repeat the procedure
from the beginning.
Page 59

Registering and connecting a Bluetooth de vice
Chapter
11
Searching for a specified
Bluetooth device
If you cannot connect your Bluetooth device
using the nearby device search and if your
Bluetooth device is found in the list, try the following method.
1 Activate the Bluetooth wireless technology on your devices.
For some Bluetooth devices, no specific-action
is necessary to activate Bluetooth wireless
technology. For details, refer to the instruction
manual of your devices.
2 Display the “Settings Menu” screen.
= For details of the operations, refer to Screen
switching overview on page 24.
3 Touch [Bluetooth Settings].
The “Bluetooth Settings” screen appears.
4 Touch [Registration].
The “Nearby Device List” screen appears.
5 Touch [Select specific devices].
The “Select specific devices” screen appears.
6 Touch the Bluetooth device name to be
connected.
7 Wait until your Bluetooth device appears in the list.
p If you cannot find the Bluetooth device that
you want to connect, check that the device
is waiting for the Bluetooth wireless technology connection.
8 Touch the Bluetooth device name you
want to register.
Registering and connecting a Bluetooth device
The system searches for Bluetooth devices
waiting for the connection and displays them
in the list if a device is found.
p If you cannot find the desired device name
on the list, touch [Other phones] to search
the devices available nearby.
Engb
59
Page 60

Chapter
11
Registering and connecting a Bluetooth de vice
# If you touch [Search Again], the system starts
searching for Bluetooth devices waiting for connection, and displays them in the list format
when any devices are detected.
9 Enter the password (the default password is “1111”) using the Bluetooth device.
Enter the password while the message “Please
follow the instructions on your mobile
phone.” appears.
The device is registered in the navigation system.
After the device is successfully registered, the
Bluetooth connection is established from the
navigation system.
Deleting a registered device
When you have already registered 5 Bluetooth
devices and you want to add another one, you
must first delete one of the registered devices.
p If a registered phone is deleted, all the
phone book entries and call history lists
that correspond to the phone will be also
cleared.
1 Display the “Settings Menu” screen.
= For details of the operations, refer to Screen
switching overview on page 24.
2 Touch [Bluetooth Settings].
The “Bluetooth Settings” screen appears.
3 Touch [Registration].
A message prompting you to delete a registered device appears.
4 Touch [OK].
The “Delete from Connection List” screen
appears.
5 Touch the Bluetooth device name that
you want to delete.
The device is deleted.
Connecting a registered
Bluetooth device manually
The navigation system automatically connects
the Bluetooth device selected as the target of
connection. However, connect the Bluetooth
device manually in the following cases:
! Two or more Bluetooth devices are regis-
tered, and you want to manually select the
device to be used.
! You want to reconnect a disconnected
Bluetooth device.
! Connection cannot be established automa-
tically for some reason.
If you start connection manually, carry out the
following procedure. You can also connect the
Bluetooth device by having the navigation system detect it automatically.
1 Activate the Bluetooth wireless technology on your devices.
For some Bluetooth devices, no specific-action
is necessary to activate Bluetooth wireless
technology. For details, refer to the instruction
manual of your devices.
2 Display the “Settings Menu” screen.
= For details of the operations, refer to Screen
switching overview on page 24.
3 Touch [Bluetooth Settings].
The “Bluetooth Settings” screen appears.
4 Touch [Connection].
The “Connection List” screen appears.
60
Engb
Page 61

Registering and connecting a Bluetooth de vice
Chapter
11
5 Touch the name of the device that you
want to connect.
The “Select Profile” screen appears.
6 Touch the profile that you want to con-
nect.
You can select the following profiles:
! Handsfree and Audio:
Connects the device as the hands-free
phone and the Bluetooth audio player.
! Audio:
Connects the device as Bluetooth audio
player.
! Handsfree:
Connects the device as the hands-free
phone.
Connection starts.
When a connection is successfully established, a connection complete message appears and the map screen returns by touching
[OK].
p To cancel the connection to your device,
touch [Cancel].
p If connection fails, check whether your de-
vice is waiting for a connection and then
retry.
!
:
Appears when the device is registered so
that it will be preferentially paired with both
the hands-free and Bluetooth audio connection.
!
:
Appears when the device is registered so
that it will be preferentially paired with the
Bluetooth audio connection.
!
:
Appears when the device is registered so
that it can be preferentially paired with the
hands-free connection.
Registering and connecting a Bluetooth device
Setting for priority connecting
The selected device is set for priority connecting.
And one of the following icons is indicated
next to the device name.
Engb
61
Page 62

Chapter
12
Using hands-free phoning
CAUTION
For your safety, avoid talking on the phone as
much as possible while driving.
If your mobile phone features Bluetooth technology, this navigation system can be connected to your mobile phone wirelessly. Using
this hands-free function, you can operate the
navigation system to make or receive phone
calls. You can also transfer the phone book
data stored in your mobile phone to the navigation system. This section describes how to
set up a Bluetooth connection and how to operate a mobile phone featuring Bluetooth
technology on the navigation system.
For details about the connectivity with the devices featuring Bluetooth wireless technology,
refer to the information on our website.
Displaying the phone menu
Use the “Phone Menu” if you connect the mobile phone to the navigation system for utilisation.
= For details, refer to Chapter 11.
1 Press the HOME button to display the
“Top Menu” screen.
2 Touch [Phone].
The “Phone Menu” screen appears.
21 3 45
Making a phone call
You can make a phone call in many different
ways.
Direct dialling
1 Display the “Phone Menu” screen.
= For details, refer to Displaying the phone
menu on this page.
2 Touch [Dial Pad].
The “Dial Input” screen appears.
3 Touch the number keys to enter the
phone number.
The phone number that was input is displayed.
When the input is complete, [OK] becomes
active.
# If you touch , the entered number is deleted
one digit at a time from the end of the number.
Press and hold to delete all digits.
# If you touch
4 Touch [OK] to make a call.
p To cancel the call after the system starts
dialling, touch
5 Touch to end the call.
, the previous screen returns.
.
1 Name of connected mobile phone
2 Network name of the mobile phone com-
pany
3 Strength of the Bluetooth connection be-
tween the navigation system and the device
4 Reception status of the mobile phone
5 Battery status of the mobile phone
62
Engb
Page 63

Using hands-free phoning
Chapter
12
Making a call home easily
You can call home without taking the time to
enter the phone number if the phone number
has been registered.
1 Display the “Phone Menu” screen.
= For details, refer to Displaying the phone
menu on the previous page.
2 Touch [Call Home].
Dialling home starts.
p If you have not registered your home num-
ber, a message appears. Touch [Register]
to start registration.
= For details, refer to Registering your
home on page 141.
Calling a number in the phone
book
You can select and call a contact from the
phone book entries transferred to the navigation system.
p Before using this function, you need to
transfer the phone book entries stored in
your mobile phone to the navigation system.
= For details, refer to Transferring the phone
book on page 66.
Searching for a contact to call on the
alphabet tabs
1 Display the “Phone Menu” screen.
= For details, refer to Displaying the phone
menu on the previous page.
2 Touch [Contacts].
The “Contacts List” screen appears.
3 Touch alphabet tabs.
The screen jumps to the top of the page displaying the entries that start with the selected
letter or number.
p Touching [#ABCDE] displays all entries that
start with symbols or numbers.
p Touching [Others] displays the page includ-
ing entries that are not assigned to any of
the other tabs.
4 Touch the desired name on the list.
The “Contacts Type Selection” screen ap-
pears.
5 Touch the desired entry on the list to
make a call.
6 Touch
to end the call.
Calling a number by searching by name
1 Display the “Phone Menu” screen.
= For details, refer to Displaying the phone
menu on the previous page.
2 Touch [Contacts].
The “Contacts List” screen appears.
3 Touch [Search].
The “Contacts Name Search” screen appears.
You can search by the names registered in the
“Contacts List” screen.
Using hands-free phoning
Engb
63
Page 64

Chapter
12
Using hands-free phoning
4 Enter the desired name and then touch
[OK].
The “Contacts Name Search Results” screen
appears.
5 Touch the desired name on the list.
The “Contacts Type Selection” screen ap-
pears.
6 Touch the desired entry on the list to
make a call.
7 Touch
to end the call.
Dialling from the history
The most recent calls made (dialled), received
and missed are stored in the call history list.
You can browse the call history list and call
numbers from it.
p Each call history saves 30 calls per regis-
tered mobile phone. If the number of calls
exceeds 30, the oldest entry will be deleted.
1 Display the “Phone Menu” screen.
= For details, refer to Displaying the phone
menu on page 62.
2 Touch [Received Calls], [Dialled Calls] or
[Missed Calls].
The selected call history list appears.
3 Touch an entry on the list.
Dialling starts.
p To cancel the call after the system starts
dialling, touch
# If you touch [Detail], the “Detailed Informa-
tion” screen appears.
You can check the details of the party before making a phone call.
4 Touch to end the call.
.
Dialling a favourite location
You can make a call to an entry stored in the
“Favourites” list.
1 Display the “Destination Menu” screen.
= For details of the operations, refer to Screen
switching overview on page 24.
2 Touch [Favourites].
The “Favourites” screen appears.
3 Touch
want to make a call.
The “Edit Favourite” screen appears.
4 Touch [Call] to make a call.
p To cancel the call after the system starts
dialling, touch
5 Touch to end the call.
next to the location that you
.
Dialling a facility’s phone number
You can make a call to facilities with phone
number data.
p You cannot make a call to locations or POIs
that have no phone number data.
1 Display the “Destination Menu” screen.
= For details of the operations, refer to Screen
switching overview on page 24.
64
Engb
Page 65

Using hands-free phoning
Chapter
12
2 Touch [POI].
The “POI Search” screen appears.
3 Search for the POI.
The “POI List” screen appears.
= For details of the operation, refer to Search-
ing for Points of Interest (POI) on page 40.
4 Touch next to the POI that you want
to call.
The “POI Information” screen appears.
5 Touch [Call] to make a call.
p To cancel the call after the system starts
dialling, touch
6 Touch to end the call.
.
Dialling from the map
You can make a call by selecting the icon of a
registered location or a POI icon from the map
screen.
p You cannot make a call to locations or POIs
that have no phone number data.
1 Scroll the map, and place the cursor on
an icon on the map.
2 Touch
The “Information List” screen appears.
3 Touch the POI you want.
The “POI Information” screen appears.
4 Touch [Call] to make a call.
p To cancel the call after the system starts
dialling, touch
5 Touch to end the call.
.
.
Receiving a phone call
You can perform hands-free answering by
using the navigation system.
Answering an incoming call
The system informs you that it is receiving a
call by displaying a message and producing a
ring sound.
p You can set the system to automatically an-
swer incoming calls. If not set to automatically answer incoming calls, you will have
to answer the calls manually.
= For details, refer to Answering a call
automatically on page 68.
p If the voice on the other end of the call is
too quiet to hear, you can adjust the volume
of the received voice.
= For details, refer to Setting the Volume
for Guidance and Phone on page 152.
p The registered name appears if the phone
number of the received call is already registered in “Contacts”.
p Depending on the caller ID service, the
phone number of the received call may not
be displayed. “Unknown” appears instead.
1 To answer an incoming call, touch
The operation menu during a call appears.
# If you touch [Vol –]or[Vol +], you can adjust
the ring tone volume.
# If you touch
jected.
The rejected call is recorded in the missed call
history list.
= For details, refer to Dialling from the history
on the previous page.
, an incoming call is re-
Using hands-free phoning
.
Engb
65
Page 66

Chapter
12
Using hands-free phoning
2 Touch to end the call.
The call ends.
p You may hear a noise when you hang up
the phone.
# If you touch [Vol –]or[Vol +], you can adjust
the volume when talking.
# If you touch [Close Menu], the operation
menu during call is minimised.
To display the menu again, touch
.
p A maximum of 1 000 entries can be trans-
ferred per mobile phone. If the entries exceed 1 000, the extra entries will not be
transferred. If more than one number is registered for one person, such as work place
and home, each number may be counted
separately.
p Each entry can hold up to 5 phone num-
bers.
p Depending on the mobile phone that is
connected to this navigation system via
Bluetooth technology, this navigation system may not be able to display the phone
book correctly. (Some characters may be
garbled.)
p If the phone book in the mobile phone con-
tains image data, the phone book may not
be correctly transferred.
p The transferred data cannot be edited on
the navigation system.
1 Connect the mobile phone that has the
phone book to transfer.
= For details, refer to Connecting a registered
Bluetooth device manually on page 60.
2 Touch [Contacts Transfer] on the
“Phone Menu” screen.
Transferring the phone book
You can transfer the phone book entries from
your mobile phone to the phone book of the
navigation system.
p Depending on the mobile phone, phone
book may be called Contacts, Business
Card or something else.
p With some mobile phones, it may not be
possible to transfer the entire phone book
at once. In this case, transfer addresses
one at a time from your phone book using
your mobile phone.
p If you connect the mobile phone featuring
auto-synchronisation function, phone book
transfer or synchronisation will be automatically performed.
66
Engb
3 Check that the following screen is displayed, and operate your mobile phone to
transfer the phone book entries.
When data transfer is finished, a message asking whether you want to transfer more data
appears.
Touch [Yes] to continue the transfer.
Page 67

Using hands-free phoning
Chapter
12
4 Touch [No].
The transferred data is imported to the navigation system.
When the data is successfully imported, an
import complete message is displayed and the
“Contacts List” screen appears.
p It may take time depending on how many
entries will be transferred.
Changing the order of names in
the phone book
1 Display the “Settings Menu” screen.
= For details of the operations, refer to Screen
switching overview on page 24.
2 Touch [Bluetooth Settings].
The “Bluetooth Settings” screen appears.
3 Touch [Sort Order].
Each touch of [Sort Order] changes the settings as follows:
! First (default):
Switches the contacts entries to first/last
name display and sort the entries by order
of first name.
! Last:
Switches the contacts entries to last/first
name display and sort the entries by order
of last name.
p Depending on the type of mobile phone, the
settings may not be available.
2 Touch [Contacts].
The “Contacts List” screen appears.
3 Touch [Delete].
The “Delete from Contacts” screen appears.
4 Touch the entry you want to delete.
A tick mark appears next to the entry.
# If you touch [All], you can select all entries. If
you want to deselect all entries, touch [None].
5 Touch [Delete].
The message confirming whether to delete the
entry appears.
6 Touch [Yes].
The entry is deleted.
# If you touch [No], the deletion is cancelled.
Changing the phone settings
Editing the device name
You can change the device name to be displayed on your mobile phone. (Default is
“PIONEER NAVI”.)
1 Display the “Settings Menu” screen.
= For details of the operations, refer to Screen
switching overview on page 24.
2 Touch [Bluetooth Settings].
The “Bluetooth Settings” screen appears.
3 Touch [Device Name].
The keyboard to enter the name appears.
4 Touch
and enter the new name by using the keyboard.
to delete the current name,
Using hands-free phoning
Deleting registered contacts
1 Display the “Phone Menu” screen.
= For details, refer to Displaying the phone
menu on page 62.
Engb
67
Page 68

Chapter
12
Using hands-free phoning
p Up to 16 characters can be entered for a de-
vice name.
5 Touch [OK].
The name is changed.
Editing the password
You can change the password to be used for
authentication on your mobile phone. (Default
is “1111”.)
p Four to eight characters can be entered for
a password.
1 Display the “Settings Menu” screen.
= For details of the operations, refer to Screen
switching overview on page 24.
2 Touch [Bluetooth Settings].
The “Bluetooth Settings” screen appears.
3 Touch [Password].
The “Set Password” screen appears.
4 Touch
word, and enter the new password by
using the keyboard.
5 Touch [OK].
The password is changed.
to delete the current pass-
Stopping Bluetooth wave
transmission
You can stop transmission of electric waves by
turning off the Bluetooth function. If you do
not use the Bluetooth wireless technology, we
recommend selecting “Off”.
1 Display the “Settings Menu” screen.
= For details of the operations, refer to Screen
switching overview on page 24.
2 Touch [Bluetooth Settings].
The “Bluetooth Settings” screen appears.
3 Touch [Bluetooth On/Off].
Each touch of [Bluetooth On/Off] changes
the settings as follows:
! On (default):
Turns on Bluetooth function.
! Off:
Turns off Bluetooth function.
Echo cancelling and noise
reduction
When you are operating hands-free phoning
in the vehicle, you may hear an undesirable
echo. This function reduces the echo and
noise while you are using hands-free phoning,
and maintains a certain sound quality.
1 Display the “Settings Menu” screen.
= For details of the operations, refer to Screen
switching overview on page 24.
2 Touch [Bluetooth Settings].
The “Bluetooth Settings” screen appears.
3 Touch [Echo Cancel].
Each touch of [Echo Cancel] changes the settings as follows:
! On (default):
Activates echo cancelling and noise reduction.
! Off:
Deactivates echo cancelling and noise reduction.
Answering a call automatically
The navigation system automatically answers
incoming calls to the mobile phone, so you
can answer a call while driving without taking
your hands off the steering wheel.
1 Display the “Settings Menu” screen.
= For details of the operations, refer to Screen
switching overview on page 24.
2 Touch [Bluetooth Settings].
The “Bluetooth Settings” screen appears.
3 Touch [Auto Answer Preference].
The “Auto Answer Preference” screen appears.
68
Engb
Page 69

Using hands-free phoning
Chapter
12
4 Touch the desired option.
On this screen, you can select the following
items:
! Off (default):
No automatic response. Respond manually.
! Immediately:
Answers immediately.
! After 3 seconds:
Answers after three seconds.
! After 6 seconds:
Answers after six seconds.
! After 10 seconds:
Answers after ten seconds.
Setting the automatic rejection
function
If this function is on, the navigation system
automatically rejects all incoming calls.
p If “Refuse All Calls” is set to “On”, rejected
incoming calls will not be stored in the
missed call list.
Clearing memory
You can clear the memory of each item that
corresponds to the connected mobile phone:
phone book, dialled/received/missed call history list and preset dials.
1 Display the “Settings Menu” screen.
= For details of the operations, refer to Screen
switching overview on page 24.
2 Touch [Bluetooth Settings].
The “Bluetooth Settings” screen appears.
3 Touch [Clear Memory].
The “Clear Memory” screen appears.
4 Touch the desired option.
Using hands-free phoning
1 Display the “Settings Menu” screen.
= For details of the operations, refer to Screen
switching overview on page 24.
2 Touch [Bluetooth Settings].
The “Bluetooth Settings” screen appears.
3 Touch [Refuse All Calls].
Each touch of [Refuse All Calls] changes the
settings as follows:
! Off (default):
Accepts all incoming calls.
! On:
Rejects all incoming calls.
p If both “Refuse All Calls” and “Auto An-
swer Preference” are activated, “Refuse
All Calls” takes priority and all incoming
calls are automatically rejected.
On this screen, you can select the following
items:
! Contacts:
Clears the registered phone book.
! Received Calls List:
Clears the received call history list.
! Dialled Calls List:
Clears the dialled call history list.
! Missed Calls List:
Clears the missed call history list.
# If you touch [Clear All], all the data is cleared
that correspond to the connected mobile phone.
5 Touch [Yes].
Data on the selected item is cleared from this
navigation system’s memory.
# If you do not want to clear the memory that
you have selected, touch [No].
Engb
69
Page 70

Chapter
12
Using hands-free phoning
Updating the Bluetooth
wireless technology software
Update files will be available for download in
the future. You will be able to download the latest update from an appropriate website to
your PC.
p Before you download the files and install
the update, read through the instructions
on the website. Follow the instructions on
the website for steps until [Firmware up-
date] becomes active.
1 Store the updated files into the SD
memory card.
2 Insert an SD memory card into the SD
card slot.
= For details of the operation, refer to Insert-
ing and ejecting an SD memory card on
page 16.
3 Display the “Settings Menu” screen.
= For details of the operations, refer to Screen
switching overview on page 24.
4 Touch [Bluetooth Settings].
The “Bluetooth Settings” screen appears.
5 Touch [Firmware update].
The current version is displayed.
8 Wait until the upgrade process is complete.
A message will appear after the update is
complete.
9 Touch [OK].
The message disappears, and the map screen
returns.
10 Eject the SD memory card.
Notes for hands-free phoning
General notes
! Connection to all mobile phones featuring
Bluetooth wireless technology is not guaranteed.
! The line-of-sight distance between this na-
vigation system and your mobile phone
must be 10 metres or less when sending
and receiving voice and data via Bluetooth
technology. However, the actual transmission distance may be shorter than the estimated distance, depending on the usage
environment.
! With some mobile phones, the ring sound
may not be output from the speakers.
! If private mode is selected on the mobile
phone, hands-free phoning may be disabled.
6 Touch [Firmware update].
The message confirming whether or not to
start the update will appear.
7 Touch [Yes].
Update starts.
70
Engb
Registration and connection
! Mobile phone operations vary depending
on the type of mobile phone. Refer to the
instruction manual that came with your
mobile phone for detailed instructions.
! With mobile phones, phone book transfer
may not work even though your phone is
paired with the navigation system. In that
case, disconnect your phone, perform pairing again from your phone to the navigation system, and then perform the phone
book transfer.
Making and receiving calls
! You may hear a noise in the following situa-
tions:
Page 71

Using hands-free phoning
Chapter
12
— When you answer the phone by using
the button on the phone.
— When the person on the other end of
line hangs up the phone.
! If the person on the other end of the phone
call cannot hear the conversation due to an
echo, decrease the volume level for handsfree phoning. This may reduce the echo.
! With some mobile phones, even if you
press the accept button on the mobile
phone when a call comes in, hands-free
phoning may not be performed.
! The registered name appears if the phone
number of the received call is already registered in the phone book. When one phone
number is registered under different
names, the name that comes first in the
phone book is displayed.
! If the phone number of the received call is
not registered in the phone book, the
phone number of the received call appears.
The received call history and the
dialled number history
! Calls made or editing performed only on
your mobile phone will not be reflected to
the dialled number history or phone book
in the navigation system.
! You cannot make a call to the entry of an
unknown user (no phone number) in the received call history.
! If calls are made by operating your mobile
phone, no history data will be recorded in
the navigation system.
garbled, or first and last names may be reversed.)
! If the phone book in the mobile phone con-
tains image data, the phone book may not
be transferred correctly. (Image data cannot be transferred from the mobile phone.)
! Depending on the mobile phone, phone
book transfer may not be available.
Using hands-free phoning
Phone book transfers
! If there are more than 1 000 phone book en-
tries on your mobile phone, all entries may
not be downloaded completely.
! With some mobile phones, it may not be
possible to transfer all items in the phone
book at one time. In this case, transfer
items one by one from your mobile phone.
! Depending on the mobile phone, this navi-
gation system may not display the phone
book correctly. (Some characters may be
Engb
71
Page 72

Chapter
13
Basic operations of the AV source
This chapter describes the basic operations of
the AV source.
You can play or use the following sources with
your Pioneer navigation system.
! TUNER (FM, MW/LW)
! CD
! ROM (in MP3, AAC, WMA)
! DVD-Video
! DivX
! USB
! SD
The following sources can be played back or
used by connecting an auxiliary device.
! iPod
! Smartphone application (Aha Radio)
! Bluetooth audio
! AV input 1 (AV1)
! AV input 2 (AV2)
p With the AVIC-F840BT, AV input 2 connec-
tion is not available. And AVIC-F840BT
shows “AV Input” as “AV1 Input”.
Displaying the AV
operation screen
% Press the MODE button when the map
screen is displayed.
p The AV operation screen can also be dis-
played by touching [AV Source & Con-
tents] on the “Top Menu”.
1 Touch, then drag any source icons up or
down to display additional source icons.
The AV source icons will scroll, and previously
hidden icons will appear.
2 Tap the icon of the source you want to
select.
The operation screen of the selected source
appears.
p The currently selected source icon is high-
lighted.
Operating list screens (e.g.
iPod list screen)
This describes the operations when a list
screen is displayed.
p For information on how to display the list
screen, refer to the descriptions within the
desired source portion of this manual.
Switching between the AV
operation screen and the list
screen
The following example describes how to
switch between the AV operation screen and
the artist list screen of iPod.
1 Touch the appropriate key to display
the list that you want.
Selecting a source
Source icons
72
Engb
Page 73

Basic operations of the AV source
Chapter
13
2 Touch the key on the right edge of the
screen.
The AV operation screen returns.
Selecting an item
1 Scroll the list by dragging items up or
down to display the item you want to select.
p Flicking a list item enables you to quickly
scroll through the list.
To stop scrolling, gently touch the list.
Basic operations of the AV source
2 Tap the item.
p The item currently selected is highlighted.
Returning to the previous display
% Touch to return to the previous
screen.
Engb
73
Page 74

Chapter
14
Using the radio (FM)
You can listen to the radio by using the navigation system. This section describes operations
for radio (FM).
The functions related to RDS (Radio Data System) are available only in areas with FM stations broadcasting RDS signals. Even if the
navigation system is receiving an RDS station,
not all the functions related with RDS will be
available.
Starting procedure
1 Display the AV operation screen.
= For details of the operations, refer to Dis-
playing the AV operation screen on page 72.
2 Tap [FM] on the left edge of the screen
to display the “FM” screen.
3 Use the touch panel keys on the screen
to control the radio.
= For details, refer to Using the touch panel
keys on the next page.
Reading the screen
12 65
7843
9
4 Frequency indicator
5 STEREO indicator
Shows that the frequency selected is being
broadcast in stereo.
6 TEXT indicator
Shows when radio text is received.
7 NEWS indicator
Shows the status of news programmes.
8 TRFC indicator
Shows the status of traffic announcements.
9 Current time
a Programme service name or frequency in-
dicator
Shows the frequency of the preset item. If the
programme service name can be obtained,
the programme service name is shown instead of the frequency.
b Preset number indicator
Shows what preset item has been selected.
c PTY indicator
Shows the programme type of the current station (when available).
d Radio text display area
Displays the radio text currently received.
e Source icon
Shows which source has been selected.
e
d
c
1 Band indicator
Shows which band the radio is tuned to: FM1
to FM3.
2 Programme service name indicator
Shows the programme service name (station
name) of the current station.
3 Signal level indicator
74
Engb
a
b
Page 75

Using the radio (FM)
Using the touch panel keys
8
7
6
1 Performs manual tuning
To tune manually, touch [o]or[p] briefly.
The frequencies move up or down one step at
a time.
Performs seek tuning
To perform seek tuning, touch and hold [o]
or [p] for about one second and then release. The tuner will scan frequencies until a
broadcast strong enough for good reception
is found.
p You can cancel seek tuning by touching
either [o]or[p] briefly.
p If you keep holding [o]or[p], you
can skip broadcasting frequencies.
Seek tuning will start at the time you release the keys.
2 Selects a preset channel
The keys can be used to switch preset channels.
Scroll by dragging the keys up or down to display the preset channel you want to select,
and tap the channel.
p The lower keys and the upper keys ap-
pear only when the preset channel is selected.
1
345
3 Searches for an RDS station by PTY infor-
mation
= For details, refer to Searching for an RDS
station by PTY information on page 78.
4 Recalls equaliser curves
= For details, refer to Using the equaliser
on page 163.
5 Displays the “Function” menu
= For details, refer to Using advanced func-
tions on page 77.
6 Displays radio text screen
7 Switches between the AV operation
screen and the preset list display
You can switch the screen display according
to your preference.
= For details of the operation, refer to
Switching between the AV operation
screen and the list screen on page 72.
8 Selects an FM band
Tapping the key repeatedly switches between
the following FM bands: FM1, FM2,orFM3.
p This function is convenient for preparing
different preset lists for each band.
Chapter
14
Using the radio (FM)
2
Engb
75
Page 76

Chapter
14
Using the radio (FM)
Storing and recalling broadcast
frequencies
With a tap of any of the preset tuning keys
(“P1” to “P6”), you can easily store up to six
broadcast frequencies for later recall (also
with the tap of a key).
1 Select a frequency that you want to
store in memory.
2 Display the preset channel list.
= For details, refer to Switches between the
AV operation screen and the preset list
display on the previous page.
3 Keep touching a preset tuning key [P1]
to [P6].
Preset list display
Preset tuning keys
The selected radio station has been stored in
memory.
The next time you tap the same preset tuning
key “P1” to “P6”, the radio station frequencies
are recalled from memory.
p Up to 18 FM stations, six for each of the
three FM bands can be stored in memory.
= For details of the list operations, refer to Op-
erating list screens (e.g. iPod list screen) on
page 72.
Using radio text
This tuner can display radio text data transmitted by RDS stations, such as station information, the title of the currently broadcast
song and the name of the artist.
p The tuner automatically memorises the
three latest radio text broadcasts received,
replacing text from the least recent reception with new text when it is received.
p When no radio text is received, “No Text” is
displayed.
Viewing the three latest radio text
You can display the currently received radio
text and the three most recent radio text transmissions.
1 Display the radio text screen.
= For details, refer to Displays radio text
screen on the previous page.
2 Press the TRK button.
Pressing the button switches the text contents
from the current radio text to the most recent
three radio text transmissions.
p If there is no radio text data in memory, the
display will not change.
Storing and recalling radio text
You can store data from up to six radio text
transmissions in the touch panel keys “1” to
“6”.
1 Display the radio text you want to
store in memory.
= For details, refer to Viewing the three latest
radio text on this page.
2 Touch and hold any of the keys [1] to
[6] to store the displayed radio text.
The selected radio text is stored in memory.
The next time you press the same keys in the
radio text display, the stored text is recalled
from memory.
76
Engb
Page 77

Using the radio (FM)
Chapter
14
p If the radio text data is already stored under
all keys, the new text will overwrite the existing one.
Operating by hardware
buttons
Pressing the TRK button
You can move preset channels up or down.
Pressing and holding the TRK button
You can perform seek tuning.
Using advanced functions
% Touch on the “FM” screen.
The “Function” menu appears.
1 2 3 4
567
1 Stores the strongest broadcast frequen-
cies
2 Tunes in strong signals
3 Limits stations to regional program-
ming
4 Searches for an RDS station by PTY in-
formation
5 Receives traffic announcements
6 Tunes into alternative frequencies
7 Uses news programme interruption
= For details of each function, refer to sec-
tions below with the relative titles.
Storing the strongest broadcast
frequencies
BSM (best stations memory) lets you automatically store the six strongest broadcast frequencies under the preset tuning keys “P1” to
“P6” and, once stored there, you can tune into
them with the touch of a key.
p Storing broadcast frequencies with BSM
may replace broadcast frequencies you
have already saved.
1 Touch
The “Function” menu appears.
2 Touch [BSM].
3 Touch [Start] to begin a search.
“BSM” begins to flash. While “BSM” is flashing, the six strongest broadcast frequencies
will be stored under the preset tuning keys
“P1” to “P6” in order of their signal strength.
When this is complete, “BSM” stops flashing.
# If you touch [Stop], the storage process is
cancelled.
on the “FM” screen.
Tuning in strong signals
Local seek tuning allows you to tune in only
those radio stations with sufficiently strong
signals for good reception.
1 Touch
The “Function” menu appears.
2 Touch [Local].
3 Touch [On] to turn local seek tuning on.
# If you touch [Off], local seek tuning is turned
off.
4 Touch [cPrev] or [Nextd] to set the sensitivity.
There are four levels of sensitivity for FM.
Level: 1 — 2 — 3 — 4
p The level “4” setting allows reception of only
on the “FM” screen.
the strongest stations, while lower settings
let you receive weaker stations.
Using the radio (FM)
Engb
77
Page 78

Chapter
14
Using the radio (FM)
Limiting stations to regional
programming
When AF is used to automatically retune frequencies, the regional function limits the selection to stations broadcasting regional
programmes.
1 Touch
The “Function” menu appears.
2 Touch [Regional].
Each touch of [Regional] turns it on or off.
p Regional programming and regional net-
p The preset number may disappear on the
p The regional function can be turned on or
on the “FM” screen.
works are organised differently depending
on the country (i.e., they may change according to the time, country or broadcast
area).
display if the tuner tunes in a regional station that differs from the originally set station.
off independently for each FM band.
Searching for an RDS station by
PTY information
You can search for general types of broadcasting programmes.
= For details, refer to PTY list on page 81.
1 Touch
The “Function” menu appears.
2 Touch [PTY].
3 Touch [cPrev] or [Nextd] to select a
programme type.
There are four programme types:
NEWS&INF — Popular — Classics — Others
4 Touch [Start] to begin a search.
The tuner searches for a station broadcasting
that programme type.
# If you touch [Stop], the search is cancelled.
p The programmes of some stations may dif-
on the “FM” screen.
fer from that indicated by the transmitted
PTY.
p If no station is broadcasting the type of pro-
gramme you searched for, “Not Found” is
displayed for about two seconds and then
the tuner returns to the original station.
Receiving traffic announcements
TA (traffic announcement standby) lets you receive traffic announcements automatically, no
matter what source you are listening to. TA
can be activated for both a TP station (a station that broadcasts traffic information) or another enhanced network’s TP station (a station
carrying information that cross-references TP
stations).
1 Tune in a TP station or another enhanced network’s TP station.
2 Touch [TA] on the “Function” menu to
turn traffic announcement standby on.
p To turn traffic announcements standby off,
touch [TA] again.
3 Use the VOL (+/–) button or Multi-control to adjust the TA volume when a traffic
announcement begins.
The newly set volume is stored in memory and
recalled for subsequent traffic announcements.
4 Touch [Cancel] while a traffic announcement is being received to cancel the announcement.
The tuner returns to the original source but remains in standby mode until [TA] is touched
again.
You can also cancel the announcement by
changing the source or band.
p The system switches back to the original
source following traffic announcement reception.
p Only TP stations and other enhanced net-
works’ TP stations are tuned in during seek
tuning or BSM when the TA function is on.
78
Engb
Page 79

Using the radio (FM)
Chapter
14
Tuning into alternative frequencies
If you are listening to a broadcast and the reception becomes weak or there are other problems, the navigation system will
automatically search for a different station in
the same network that is broadcasting a stronger signal.
1 Touch
The “Function” menu appears.
2 Touch [AF].
Each touch of [AF] turns it on or off.
p Only RDS stations are tuned in during seek
tuning or BSM when AF is on.
p When you recall a preset station, the tuner
may update the preset station with a new
frequency from the station’s AF list. No preset number appears on the display if the
RDS data for the station received differs
from that for the originally stored station.
p Sound may be temporarily interrupted by
another programme during an AF frequency search.
p AF can be turned on or off independently
for each FM band.
PI Seek operation
If the unit fails to find a suitable alternative frequency, or if you are listening to a broadcast
and the reception becomes weak, the navigation system will automatically search for a different station with the same programming.
During the search, “PI Seek” is displayed and
the output is muted. Muting is discontinued
after completion of the PI Seek, whether or not
a different station is found.
Activating the Auto PI seek for
preset stations
When preset stations cannot be recalled, as
when travelling long distances, the unit can
be set to perform PI Seek during preset recall.
p The default setting for Auto PI Seek is off.
= For details, refer to Switching Auto PI seek
on page 161.
on the “FM” screen.
Using news programme
interruption
When a news programme is broadcast from a
PTY code news station, the navigation system
can switch from any station to the news broadcast station. When the news programme
ends, reception of the previous programme resumes.
1 Touch
on the “FM” screen.
The “Function” menu appears.
2 Touch [News].
Each touch of [News] turns it on or off.
A news programme can be cancelled by
touching [Cancel].
You can also cancel the news programme by
changing the source or band.
Interruption icon status
When the information interruption setting is
enabled, the interruption icon is displayed.
The interruption icon display may change depending on the programme reception status.
= For details of the operation, refer to Receiv-
ing traffic announcements on the previous
page.
= For details of the operations, refer to Using
news programme interruption on this page.
p The interruption icon is displayed on all AV
source operation screens.
TRFC indicator
Indicator Meaning
Information interruption is activated, but you will not receive data
since there is none.
Information interruption is activated, and currently receiving data.
(No display)
Information interruption is deactivated.
Using the radio (FM)
Engb
79
Page 80

Chapter
14
Using the radio (FM)
NEWS indicator
Indicator Meaning
(No display)
Information interruption is activated, but you will not receive data
since there is none.
Information interruption is activated, and currently receiving data.
Information interruption is deactivated.
80
Engb
Page 81

Using the radio (FM)
PTY list
Chapter
14
General Specific Type of programme
NEWS&INF News News
Affairs Current affairs
Info General information and advice
Sport Sports
Weather Weather reports/meteorological information
Finance Stock market reports, commerce, trading, etc.
Popular Pop Mus Popular music
Rock Mus Contemporary modern music
Easy Mus Easy listening music
Oth Mus Non categorised music
Jazz Jazz
Country Country music
Nat Mus National music
Oldies Oldies music, golden oldies
Folk Mus Folk music
Classics L. Class Light classical music
Classic Serious classical music
Others Educate Educational programmes
Drama All radio plays and serials
Culture National or regional culture
Science Nature, science and technology
Varied Light entertainment
Children Children’s
Social Social affairs
Religion Religion affairs or services
Phone In Phone In
Touring Travel programmes, not for announcements about traffic problems
Leisure Hobbies and recreational activities
Document Documentaries
Using the radio (FM)
Engb
81
Page 82

Chapter
15
Using the radio (AM)
You can listen to the radio using this navigation system. This section describes operations
for radio (MW/LW).
Starting procedure
1 Display the AV operation screen.
= For details of the operations, refer to Dis-
playing the AV operation screen on page 72.
2 Tap [AM] on the left edge of the screen
to display the “AM” screen.
3 Use the touch panel keys on the screen
to control the radio.
= For details, refer to Using the touch panel
keys on the next page.
Reading the screen
32
1
1 Source icon
Shows which source has been selected.
2 Signal level indicator
3 Frequency indicator
Shows the current frequency.
4 Current time
5 Preset number indicator
Shows what preset item has been selected.
82
Engb
4
3
5
Page 83

34
Using the radio (AM)
Using the touch panel keys
5
Chapter
15
1
Using the radio (AM)
2
1 Performs manual tuning
To tune manually, touch [o]or[p] briefly.
The frequencies move up or down one step at
a time.
Performs seek tuning
To perform seek tuning, touch and hold [o]
or [p] for about one second and then release. The tuner will scan frequencies until a
broadcast strong enough for good reception
is found.
p You can cancel seek tuning by touching
either [o]or[p] briefly.
p If you keep holding [o]or[p], you
can skip broadcasting frequencies.
Seek tuning will start at the time you release the keys.
2 Selects a preset channel
The keys can be used to switch preset channels.
Scroll by dragging the keys up or down to display the preset channel you want to select,
and tap the channel.
p The lower keys and the upper keys ap-
pear only when the preset channel is selected.
3 Recalls equaliser curves
= For details, refer to Using the equaliser
on page 163.
4 Displays the “Function” menu
= For details, refer to Using advanced func-
tions on the next page.
5 Switches between the AV operation
screen and the preset list display
You can switch the screen display according
to your preference.
= For details of the operation, refer to
Switching between the AV operation
screen and the list screen on page 72.
Storing and recalling broadcast
frequencies
With a tap of any of the preset tuning keys
(“P1” to “P6”), you can easily store up to six
broadcast frequencies for later recall (also
with the tap of a key).
1 Select a frequency that you want to
store in memory.
Engb
83
Page 84

Chapter
15
Using the radio (AM)
2 Display the preset channel list.
= For details, refer to Switches between the
AV operation screen and the preset list
display on the previous page.
3 Keep touching a preset tuning key [P1]
to [P6].
Preset list display
Preset tuning keys
The selected radio station has been stored in
memory.
The next time you tap the same preset tuning
key “P1” to “P6”, the radio station frequencies
are recalled from memory.
= For details of the list operations, refer to Op-
erating list screens (e.g. iPod list screen) on
page 72.
Operating by hardware
buttons
Pressing the TRK button
You can move preset channels up or down.
Pressing and holding the TRK button
You can perform seek tuning.
Using advanced functions
% Touch on the “AM” screen.
The “Function” menu appears.
1 2
1 Stores the strongest broadcast frequen-
cies
2 Tunes in strong signals
= For details of each function, refer to sec-
tions below with the relative titles.
Storing the strongest broadcast
frequencies
BSM (best stations memory) lets you automatically store the six strongest broadcast frequencies under the preset tuning keys “P1” to
“P6” and, once stored there, you can tune into
them with the touch of a key.
p Storing broadcast frequencies with BSM
may replace broadcast frequencies you
have already saved.
1 Touch
The “Function” menu appears.
2 Touch [BSM].
3 Touch [Start] to begin a search.
“BSM” begins to flash. While “BSM” is flashing, the six strongest broadcast frequencies
will be stored under the preset tuning keys
“P1” to “P6” in order of their signal strength.
When this is complete, “BSM” stops flashing.
# If you touch [Stop], the storage process is
cancelled.
on the “AM” screen.
Tuning in strong signals
Local seek tuning allows you to tune in only
those radio stations with sufficiently strong
signals for good reception.
84
Engb
Page 85

Using the radio (AM)
1 Touch on the “AM” screen.
The “Function” menu appears.
2 Touch [Local].
3 Touch [On] to turn local seek tuning on.
# If you touch [Off], local seek tuning is turned
off.
4 Touch [cPrev] or [Nextd] to set the sensitivity.
There are two levels of sensitivity for MW/LW.
Level: 1 — 2
p The level “2” setting allows reception of only
the strongest stations, while lower settings
let you receive weaker stations.
Chapter
15
Using the radio (AM)
Engb
85
Page 86

Chapter
16
Playing audio CDs
You can play a normal music CD using the
built-in drive of the navigation system. This
section describes how.
Starting procedure
1 Display the AV operation screen.
= For details of the operations, refer to Dis-
playing the AV operation screen on page 72.
2 Insert the disc you want to play into
disc-loading slot.
Playback starts from the first track of the CD.
= For details, refer to Inserting and ejecting a
disc on page 15.
p If the disc is already set, tap [Disc] on the
left edge of the screen.
= For details, refer to Selecting a source on
page 72.
3 Use the touch panel keys on the screen
to control the disc.
= For details, refer to Using the touch panel
keys on the next page.
Reading the screen
2
3
4
1
5
1 Source icon
Shows which source has been selected.
2 Playback condition indicator
Indicates the current playback condition.
Scanning tracks of a CD
Indicator Meaning
Cancels the scan play.
Plays the beginning of each
track in the current repeat play
range for about 10 seconds.
Playing tracks in random order
Indicator Meaning
Does not play tracks in random
order.
Plays all tracks in the current
disc in random order.
Setting a repeat play range
Indicator Meaning
Repeats the current disc.
Repeats just the current track.
3 Current track information
! : Artist name
Shows the artist name of the track currently playing (when available).
!
: Album title
Shows the title of the album of the current track (when available).
!
: Track title
Shows the title of the track currently
playing (when available).
! Play time
Shows the elapsed playing time within
the current track.
p “-------” is displayed if there is no corre-
sponding information.
4 Current time
5 Track information
! Track number indicator
Shows the track number and the total
number of tracks in the current repeat
range.
! Track title indicator
86
Engb
Page 87

Playing audio CDs
Using the touch panel keys
123
Chapter
16
9
8
7
56
1 Scans tracks of a CD
Scan play is performed by touching only one
key.
= For details of the operation, refer to
Scans tracks of a CD on the next page.
2 Plays tracks in random order
All of the tracks in the disc can be played at
random by touching only one key.
= For details of the operation, refer to
Plays tracks in random order on the
next page.
3 Sets a repeat play range
The repeat play range can be changed by
touching only one key.
= For details, refer to Changes the repeat
range on the next page.
4 Selects a track to play
Scrolling the keys up or down displays tracks,
and tapping a track starts playback.
Tapping the lower key during random playback skips to the next track. Tapping the
upper key jumps to the start of the current
track.
5 Recalls equaliser curves
= For details, refer to Using the equaliser
on page 163.
Playing audio CDs
4
6 Displays the “Function” menu
= For details, refer to Using advanced func-
tions on the next page.
7 Playback and Pause
Touching [f] switches between playback
and pause.
8 Selects a track from the list
Touching the key displays the list which lets
you see the list of track titles on a disc. You
can play a track on the list by tapping it.
p “-------” is displayed if there is no corre-
sponding information.
= For details, refer to Operating list screens
(e.g. iPod list screen) on page 72.
9 Switches the media file type played
= For details, refer to Switches the
media file type played on page 92.
Engb
87
Page 88

Chapter
16
Playing audio CDs
Operating by hardware
buttons
Pressing the TRK button
You can skip tracks forward or backward.
Pressing and holding the TRK button
You can perform fast reverse or fast forward.
Using advanced functions
% Touch on the “CD” screen.
The “Function” menu appears.
1 2 3 4
1 Changes the repeat range
Each touch of [Repeat] changes the setting
as follows:
! Disc: Repeats the current disc.
! Track: Repeats just the current track.
p If you perform track search or fast for-
ward or reverse, track repeat playback is
automatically cancelled.
2 Plays tracks in random order
Each touch of [Random] turns it on or off.
p If you turn the random play on when the
repeat play range is set to “Track”, the
repeat play range changes to “Disc”
automatically.
3 Scans tracks of a CD
Each touch of [Scan] turns it on or off. Scan
play lets you hear the first 10 seconds of
each track on the CD. When you find the
track you want, touch [Scan] to turn scan
play off.
p After scanning is finished, normal play-
back of the tracks will begin again.
p If you turn the scan play on when the re-
peat play range is set to “Track”, the re-
peat play range changes to “Disc”
automatically.
4 Uses “Sound Retriever” function
“Sound Retriever” function automatically
enhances compressed audio and restores
rich sound.
Each touch of [Sound Retriever] changes
the setting as follows:
! MODE 1: Activates “Sound Retriever”
function.
! MODE 2: Activates “Sound Retriever”
function.
! Off: Deactivates “Sound Retriever”
function.
p “MODE 2” has a stronger effect than
“MODE 1” and is more effective when
playing back highly compressed audio
data.
88
Engb
Page 89

Playing music files on ROM
Chapter
17
You can play a disc that contains compressed
audio files using the built-in drive of the navigation system. This section describes these
operations.
p In the following description, the MP3,
WMA, AAC files are collectively referred to
as “Compressed audio file”.
Starting procedure
1 Display the AV operation screen.
= For details of the operations, refer to Dis-
playing the AV operation screen on page 72.
2 Insert the disc you want to play into
disc-loading slot.
Playback starts from the first file of the ROM.
= For details, refer to Inserting and ejecting a
disc on page 15.
p If the disc is already set, tap [Disc] on the
left edge of the screen.
= For details, refer to Selecting a source on
page 72.
3 Use the touch panel keys on the screen
to control the disc.
= For details concerning operations, refer to
Using the touch panel keys on page 91.
Reading the screen
2
3
4
1
5
1 Source icon
Shows which source has been selected.
2 Playback condition indicator
Indicates the current playback condition.
Scanning folders and files
Indicator Meaning
Cancels the scan play.
Plays the first audio files of each
folder for about 10 seconds
when the repeat range is set to
“Disc”.
Plays the beginning of each
audio file in the current folder
for about 10 seconds when the
repeat range is set to “Folder”.
Playing files in random order
Indicator Meaning
Does not play files in random
order.
Plays all audio files in the current repeat play range in random order.
Setting a repeat play range
Indicator Meaning
Repeats all compressed audio
files.
Repeats just the current file.
Repeats the current folder.
3 Current file information
! : Folder name
Shows the folder name currently playing.
!
: Artist name
Shows the artist name currently playing
(when available).
!
: Album title
Shows the title of the album of the current file (when available).
!
: Track title
Shows the title of the track currently
playing (when available).
p If the title of a track is not available,
the file name appears.
! Play time
Shows the elapsed playing time within
the current file.
Playing music files on ROM
Engb
89
Page 90

Chapter
17
Playing music files on ROM
p “-------” is displayed if there is no corre-
4 Current time
5 File information
! File number indicator
! File name indicator
! File type indicator
sponding information.
Shows the type of audio files.
90
Engb
Page 91

Playing music files on ROM
Using the touch panel keys
123
9
8
7
56
Chapter
17
Playing music files on ROM
4
1 Scans folders and files
Scan play is performed by touching only one
key.
= For details of the operation, refer to
Scans folders and files on the next
page.
2 Plays files in random order
The files in the current repeat play range can
be played at random by touching only one key.
p If the disc contains a mixture of various
media file types, all tracks or files within
the current part (“CD” or “ROM”) are
played randomly.
= For details, refer to Plays files in ran-
dom order on the next page.
3 Sets a repeat play range
The repeat play range can be changed by
touching only one key.
= For details, refer to Changes the repeat
range on the next page.
4 Selects a file to play
Scrolling the keys up or down displays files,
and tapping a file starts playback.
Tapping the lower key during random playback skips to the next file. Tapping the upper
key jumps to the start of the current file.
5 Recalls equaliser curves
= For details, refer to Using the equaliser
on page 163.
6 Displays the “Function” menu
= For details, refer to Using advanced func-
tions on the next page.
7 Playback and Pause
Touching [f] switches between playback
and pause.
8 Selects a file from the list
Touching the key displays the list which lets
you see the list of track titles or folder names
on a disc.
p If the title of a track is not available, the
file name appears.
Tapping a folder on the list shows its content.
You can play a file on the list by tapping it.
Engb
91
Page 92

Chapter
17
Playing music files on ROM
= For details, refer to Operating list screens
(e.g. iPod list screen) on page 72.
Touching displays the content of the upper
folder (parent folder). If the uppermost folder
is listed,
9 Switches the media file type played
When playing a disc containing a mixture of
various media file types, you can switch between media file types to play.
Tap the key repeatedly to switch between the
following media file types:
CD (audio data (CD-DA)) — ROM (compressed audio file) — DivX (DivX video
files)
cannot be used.
Operating by hardware
buttons
Pressing the TRK button
You can skip files forward or backward.
Pressing and holding the TRK button
You can perform fast reverse or fast forward.
Using advanced functions
% Touch on the “ROM” screen.
The “Function” menu appears.
1 2 3 4
1 Changes the repeat range
Each touch of [Repeat] changes the setting
as follows:
! Disc: Repeats all compressed audio
files.
! Track: Repeats just the current file.
! Folder: Repeats the current folder.
p If you select another folder during repeat
play, the repeat play range changes to
“Disc”.
p If you perform fast reverse or fast for-
ward during “Track”, the repeat play
range changes to “Folder”.
p When “Folder” is selected, it is not pos-
sible to playback a subfolder of that
folder.
p When playing discs with compressed
audio files and audio data (CD-DA), repeat play is performed within the currently playing data session even if “Disc”
is selected.
2 Plays files in random order
Each touch of [Random] turns it on or off.
When the random play is turned on, the
files in the current repeat play range are
randomly played.
p If you turn the random play on when the
repeat play range is set to “Track”, the
repeat play range changes to “Folder”
automatically.
3 Scans folders and files
Scan play lets you hear the first 10 seconds
of each file. Scan play is performed in the
current repeat play range.
Each touch of [Scan] turns it on or off.
When you find the file you want, touch
[Scan] to turn the scan play off.
p After completion of file or folder scan-
ning, normal playback of the files will
begin again.
p If you turn the scan play on when the re-
peat play range is set to “Track”, the repeat play range changes to “Folder”
automatically.
p If you turn the scan play on while the re-
peat play range is set to “Disc”, scan
play is performed for only the first file of
each folder.
4 Uses “Sound Retriever” function
“Sound Retriever” function automatically
enhances compressed audio and restores
rich sound.
92
Engb
Page 93

Playing music files on ROM
Each touch of [Sound Retriever] changes
the setting as follows:
! MODE 1: Activates “Sound Retriever”
function.
! MODE 2: Activates “Sound Retriever”
function.
! Off: Deactivates “Sound Retriever”
function.
p “MODE 2” has a stronger effect than
“MODE 1” and is more effective when
playing back highly compressed audio
data.
Chapter
17
Playing music files on ROM
Engb
93
Page 94

Chapter
18
Playing a DVD-Video
You can play a DVD-Video using the built-in
drive of the navigation system. This section describes operations for playing a DVD-Video.
Starting procedure
1 Display the AV operation screen.
= For details of the operations, refer to Dis-
playing the AV operation screen on page 72.
2 Insert the disc you want to play into
disc-loading slot.
The source changes and then playback will
start.
= For details, refer to Inserting and ejecting a
disc on page 15.
p If the disc is already set, tap [Disc] on the
left edge of the screen.
= For details, refer to Selecting a source on
page 72.
3 Use the touch panel keys on the screen
to control the disc.
= For details, refer to Using the touch panel
keys on the next page.
Reading the screen
1 5 6 72 3 4
8
4 Audio channel indicator
Shows the current audio channel type, such
as “Mch” (Multi-channel).
5 Subtitle number indicator
Shows the subtitle number currently selected.
6 Subtitle language indicator
Shows the subtitle language currently selected.
7 Viewing angle indicator
Shows what viewing angle has been selected.
8 Current time
9 Digital sound format indicator
Shows which digital sound format (surround
sound format) has been selected.
a Play time indicator
Shows the elapsed playing time within the
current title.
b Source icon
Shows which source has been selected.
b
1 Title number indicator
Shows the title number currently playing.
2 Audio track indicator
Shows the audio track number and audio language currently selected.
3 Chapter number indicator
Shows the chapter number currently playing.
94
Engb
9
a
Page 95

Playing a DVD-Video
Using the touch panel keys
Playback screen (page 1)
Chapter
18
b
Playing a DVD-Video
a
9
8
Playback screen (page 2) Playback screen (page 3)
g
f
e
dc
p With some discs, the icon 9 may be dis-
played, meaning that the operation is invalid.
1 Displays the “Function” menu
= For details, refer to Using advanced func-
tions on page 98.
2 Recalls equaliser curves
= For details, refer to Using the equaliser
on page 163.
3 Switches the display
Touching [Disp] changes the indication on the
information plate as follows:
Disc information display — Repeat range and
L/R select display
4 Switches to the next page of touch panel
keys
5 Displays the DVD menu keypad
= For details, refer to Using DVD menu by
touch panel keys on page 97.
6 Playback and Pause
Touching [f] switches between playback
and pause.
7 Hides the touch panel keys and informa-
tion of the current video
Touching [Hide] shows only the current video.
p If you want to display the touch panel
keys and information of the current
video again, touch anywhere on the LCD
screen.
654321
7
jih
Engb
95
Page 96

Chapter
18
Playing a DVD-Video
8 Skips forward or backward
Touching [p] skips to the start of the next
chapter. Touching [o] once skips to the
start of the current chapter. Touching it twice
quickly will skip to the previous chapter.
9 Stops playback
When [g] is touched once to stop playback,
playback can be resumed from the stopped
position. When [g] is touched two times to
stop playback, playback returns to the beginning.
a Displays the DVD menu
You can display the menu by touching [Menu]
or [Top Menu] while a disc is playing. Touching either of these keys again lets you start
playback from the location selected from the
menu. For details, refer to the instructions provided with the disc.
b Resumes playback (Bookmark)
= For details, refer to Resuming playback
(Bookmark) on this page.
c Frame-by-frame playback (or slow-motion
playback)
= For details, refer to Frame-by-frame play-
back on page 98.
= For details, refer to Slow motion playback
on page 98.
d Fast reverse or forward
Touch and hold [m]or[n] to perform fast
reverse or forward.
If you keep touching [m]or[n] for five
seconds, fast reverse/fast forward continues
even if you release either of these keys. To resume playback at a desired point, touch
[f] or opposite key of [m]or[n] which
you touched.
e Skips the title forward or backward
Touching [d] skips to the start of the next title.
Touching [c] skips to the start of the previous
title.
f Performs an operation (such as resuming)
that is stored on the disc
When using a DVD that has a point recorded
that indicates where to return to, the DVD returns to the specified point and begins playback from that point.
g Searches for a desired scene and starts
playback from a specified time
= For details, refer to Searching for a speci-
fic scene and starting playback from a
specified time on the next page.
h Changes the audio track (Multi-audio)
Each touch of [Audio] switches between
audio tracks recorded in the disc.
p DTS audio format cannot be output, so
select an audio track other than DTS
audio format.
p Display indications such as MPEG-A
and Mch describe the audio track recorded on the DVD. This indication may
not be the same as the actual sound
currently output from the navigation system.
i Changes the subtitle (Multi-subtitle)
Each touch of [S.Title] switches between the
subtitle languages recorded on the disc.
j Changes the viewing angle (Multi-angle)
Each touch of [Angle] switches between viewing angles.
p During playback of a scene shot from
multiple angles, the angle icon
is
displayed. Turn the angle icon display
on or off using the “ DVD/DivX® Setup”
menu.
= For details, refer to Setting the angle icon
display on page 104.
Resuming playback (Bookmark)
The Bookmark function lets you resume playback from a selected scene the next time the
disc is loaded.
% Touch [BookM.].
96
Engb
Page 97

Playing a DVD-Video
Chapter
18
You can bookmark one point for each of up to
five discs. If you try to memorise another point
for the same disc, the older bookmark will be
overwritten by the newer one.
p To clear the bookmark on a disc, touch and
hold [BookM.].
Searching for a specific scene
and starting playback from a
specified time
You can search for the scene you want by specifying a title or a chapter, and the time.
p Chapter search and time search are not
available when disc playback has been
stopped.
1 Touch [Search] and then touch [Title]
(title), [Chapter] (chapter), [Time] (time).
2 Touch the keys to input the target number or time and then touch [Enter].
Direct number search
You can use this function when you need to
enter a numerical command during DVD playback.
1 Touch [Search].
2 Touch [10Key].
3 Touch [0] to [9] to input the desired
number.
4 While the input number is displayed,
touch [Enter].
Operating the DVD menu
You can operate the DVD menu by touching
the menu item on the screen directly.
p This function can be used when the
key is displayed on the lower right corner of
the LCD screen.
p This function may not work properly with
some DVD disc content. In that case, use
touch panel keys to operate the DVD menu.
p If you touch the screen while
played, the touch panel keys will not be displayed.
is dis-
Playing a DVD-Video
For titles, chapters
! To select 3, touch [3] and [Enter] in order.
! To select 10, touch [1] and [0] and [Enter]in
order.
For time (time search)
! To select 5 minutes 3 seconds, touch [5],
[min], [3], [sec] and [Enter] in order.
! To select 71 minutes 00 seconds, touch [7],
[1], [min] and [Enter] in order.
! To select 100 minutes 05 seconds, touch
[1], [0], [0], [5], [sec] and [Enter] in order.
p To cancel an input number, touch [Clear].
To cancel the input numbers, touch and
hold [Clear].
1 Touch the screen to display the touch
panel keys.
2 Touch [Top Menu] or [Menu] to display
touch panel keys to operate the DVD
menu.
3 Touch the desired menu item.
# If you touch , the touch panel keys for
selecting the menu item are displayed.
Using DVD menu by touch
panel keys
If items on the DVD menu appear, the touch
panel keys may overlay them. If so, select an
item using those touch panel keys.
Engb
97
Page 98

Chapter
18
Playing a DVD-Video
1 Touch [a], [b], [c]or[d] to select the
desired menu item.
p If the touch panel keys for DVD menu selec-
tion disappear, touching anywhere on the
screen, then touch
keys are displayed again.
2 Touch [Enter].
Playback starts from the selected menu item.
The way to display the menu differs depending
on the disc.
# If you touch [Position], the display position of
touch panel keys is changed each time you touch
it.
# If you touch [Hide], the touch panel keys dis-
appear and the
select a menu item by touching it.
. The touch panel
icon is displayed. You can
Frame-by-frame playback
This lets you move ahead one frame at a time
during pause.
2 Touch [q]or[r] to adjust playback
speed during slow motion playback.
Each time you touch [q]or[r] it changes
the speed in four steps in the following order:
1/16 f 1/8 f 1/4 f 1/2
p There is no sound during slow motion play-
back.
p With some discs, images may be unclear
during slow motion playback.
p Reversed slow motion playback is not possi-
ble.
Operating by hardware
buttons
Pressing the TRK button
You can skip chapters forward or backward.
Pressing and holding the TRK button
You can perform fast reverse or fast forward.
Using advanced functions
% Touch on the “DVD-V” screen.
The “Function” menu appears.
1 2 3
% Touch [r] during pause.
Each time you touch [r], you move ahead
one frame.
p To return to normal playback, touch [f].
p With some discs, images may be unclear
during frame-by-frame playback.
Slow motion playback
This lets you slow down playback speed.
1 Touch and hold [r] until
played during playback.
The icon
motion playback begins.
p To return to normal playback, touch [f].
98
Engb
is displayed, and forward slow
is dis-
1 Changes the repeat range
Each touch of [Repeat] changes the setting
as follows:
! Disc: Plays throughout the current disc.
! Chapter: Repeats just the current chap-
ter.
! Title: Repeats just the current title.
Page 99

Playing a DVD-Video
p If you perform chapter (title) search, fast
forward, fast reverse or slow motion
playback, the repeat play range changes
to “Disc”.
p This function is not available when disc
playback has been stopped.
2 Selects audio output
When playing DVDs recorded with LPCM
audio, you can switch the audio output.
Touch [L/R Select] repeatedly until the desired audio output appears on the display.
Each touch of [L/R Select] changes the settings as follows:
! L+R: Left and right
! L: Left
! R: Right
! Mix: Mixing left and right
p This function is not available when disc
playback has been stopped.
3 DVD setup adjustments
= For details, refer to Displaying DVD/
DivX® Setup menu on page 104.
Chapter
18
Playing a DVD-Video
Engb
99
Page 100

Chapter
19
Playing a DivX video
You can play a DivX disc using the built-in
drive of the navigation system. This section describes those operations.
Starting procedure
1 Display the AV operation screen.
= For details of the operations, refer to Dis-
playing the AV operation screen on page 72.
2 Insert the disc you want to play into
disc-loading slot.
The source changes and then playback will
start.
= For details, refer to Inserting and ejecting a
disc on page 15.
p If the disc is already set, tap [Disc] on the
left edge of the screen.
= For details, refer to Selecting a source on
page 72.
3 Use the touch panel keys on the screen
to control the disc.
= For details, refer to Using the touch panel
keys on the next page.
Reading the screen
1562 3 4 7
4 Audio channel indicator
Shows the current audio channel type, such
as “Mch” (Multi-channel).
5 Subtitle number indicator
Shows the subtitle number currently selected.
6 Repeat range indicator
Shows which repeat range has been selected.
= For details, refer to Changes the repeat
range on page 103.
7 Current time
8 Digital sound format indicator
Shows the digital sound format (surround
sound format) currently selected.
9 Play time indicator
Shows the elapsed playing time within the
current file.
a Source icon
Shows which source has been selected.
a
1 Folder number indicator
Shows the folder number currently playing.
2 Audio track indicator
Shows the audio track number currently selected.
3 File number indicator
Shows the file number currently playing.
100
Engb
8
9
 Loading...