


 Loading...
Quick start guide / understanding the menu system
Press the Left soft key (LSK)  to enter the main menu in idle mode. Use the Navigation keys
 to go up or down in the menu list or to navigate within the lists. Press the LSK
  to select the menu or an option and confirm a setting.
A short press of one of the soft keys confirms the text function described above these keys.
Press the Up navigation key  to access the Redial list in idle mode and press the Down navigation key
  to access the Call log.
Answer / end a call
Make a
Read Call log
Redial a number
Call from phonebook
Add a name
to the phonebook
Adjust the earpiece volume during a call
Adjust the handset loudspeaker volume
Mute and unmute the microphone
Set the date and time
Set the handset ring tone
Activate/deactivate the answer machine
(only DECT 627)
/
Press  , scroll
  to select Call log or SMS and browse
Quick start guide |
1 |

DECT 623/DECT 627 Handset
Colour Display
Headline : shows icons current menu operation Soft key line : shows contextual menus.
Left Soft key
-In idle mode, short press to access the main menu.
-Short press to select contextual menu.
Pick-up & Recall key
-Press to take the line and answer a call.
-To insert R for operator services when on line.
Keypad lock & insert 
-Short press to insert 
-Long press to lock/unlock the keypad in idle mode.
Loudspeaker*
- Short press to take the line and to activate the handset loudspeaker during a call.
Navigation keys
 Scroll to move through the menus & options
 Scroll up to access the Redial
list from idle mode
 Scroll down to access the Call log/SMS messages from idle mode
|
Hang-up key |
|
- A short press to hang-up the line |
|
or to exit (return to idle mode). |
|
- A long press to power off the |
|
handset. |
|
Case mode & insert # |
|
- Short press to insert #. |
|
- Press to change case mode when |
|
editing. |
|
- Long press to insert a pause (P) |
|
when dialling. |
|
Intercom / Call transfer |
|
- Short press to initiate an internal |
Microphone |
call. |
-Short press during internal call to transfer the call or switch between internal call and external call.
-Short press to answer an internal call.
*Warning : Handsfree activation could suddenly increase the volume in the earpiece to a very high level. Make sure the handset is not too close to your ear.
2

Icons on the handset display
The display gives information about the operation of your telephone.A total of 8 icons can be shown in the headline of the display :
When being used for the first time, it is sometimes necessary to wait until the battery is sufficiently charged before the icons appear on the display.
The handset is registered and in range of the base. When blinking, this symbol indicates that the handset is not registered to the base or out of range.
The ringtone is deactivated.
The alarm clock is activated.
An external call is in progress. When blinking, this symbol indicates that there is an incoming external call in progress or that the line is already busy.
An internal call is in progress. When blinking, this symbol indicates that there is an incoming internal call.
The keypad is locked.
The handset loudspeaker is activated.
New message(s) (SMS, call log entry or voice mail).
scroll from empty to full status. battery shows the status :
Icons on the base display
 .
.
only DECT 627
The display of the base DECT 627 gives information about the answer machine and the settings.
Time (HH : MM ) 


 Date (DD / MM)
Number of messages
The remote access code is activated.
New unread message(s) on answer machine.
Old message(s) on answer machine, already read.
The answer machine is ON.
Indicates the type of outgoing message.
Indicates the number of rings before the answer machine will start playing the outgoing message.
Call screening ON/OFF
display |
3 |

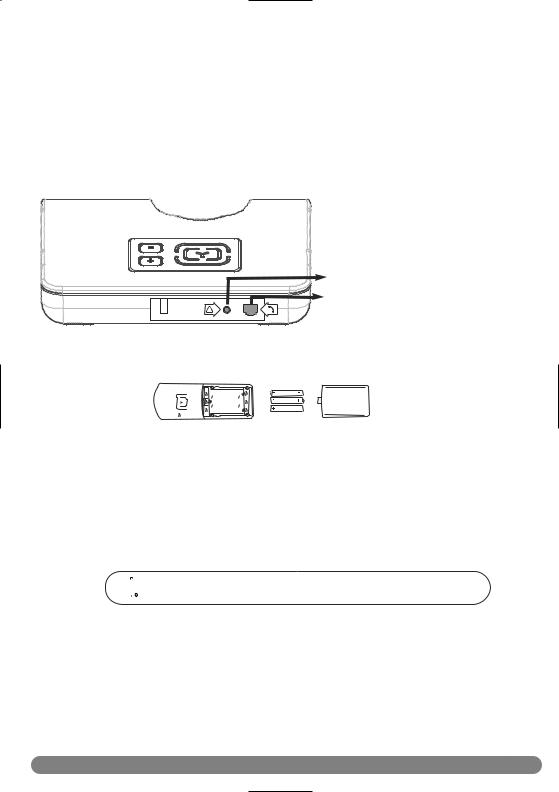
DECT 623 base station
key
enables you to locate a missing handset if the and has charged batteries. Press the key until
to ring. Once retrieved, press |
key on the |
paging. |
|
DECT 627 base station
/ |
Volume keys |
Loudspeaker |
Record Memo & |
|
To adjust the base volume level |
Outgoing messages |
|||
|
||||
|
|
|
Short press to record a |
|
Backlight will be ON when |
|
memo. |
||
|
Long press to record outgoing |
|||
there are new answer machine |
|
|||
|
message 1 or 2 (see page 49). |
|||
messages or answer machine |
|
|||
memory is full. |
|
|
||
Icons see page 3 |
|
|
||
Paging key |
|
Skip forward / Next |
||
Press to locate all handsets. |
|
message |
||
|
|
|
Short press to go to the next |
|
ON/OFF key |
|
message while listening. |
||
Press to switch the answer |
|
|
||
machine ON or OFF |
|
|
||
Skip back / Replay |
Play / Stop key |
Delete key |
||
key |
|
Short press to delete the |
||
If pressed within 1 second of |
Short press to play message. |
current message during |
||
message playback : Skip to pre- |
Short press to stop playback |
playback. |
||
vious message. |
|
while listening to a message. |
Long press in idle mode to |
|
If pressed after 1 second of |
||||
Long press to enter answer |
delete all messages (after all |
|||
message playback : Replay |
||||
current message. |
machine setting mode. |
messages have been read). |
||
4

Table of contents |
|
|
|
Quick start guide |
1 |
DECT 623 / DECT 627 |
2 |
Icons on the handset display |
3 |
Icons on the base DECT 627 |
3 |
DECT 623 / DECT 627 base |
4 |
Table of contents |
5-6 |
Menu structure |
7-9 |
Contextual soft key labels |
9 |
Conformity, environment |
10 |
Declaration of conformity |
|
Using GAP standard compliance |
11 |
Installing the DECT 623/627 |
|
Unpacking your DECT 623/627 |
12 |
Installing the base station |
13 |
Installing and replacing the batteries |
13 |
Battery life and range |
13 |
Configuration mode |
14 |
Handset power Off/On and |
14 |
Introduction |
|
Idle mode |
15 |
Understanding the menu system |
15 |
Basic principles |
16 |
In-call features |
17 |
Editing systems |
18 |
SMS |
|
Write and send new SMS |
19 |
View SMS |
20 |
Inbox |
21 |
Outbox |
22 |
Draft folder |
24 |
SMS settings |
25 |
Clock & Alarm |
26 |
To set the date and time |
26 |
To set the alarm clock |
26-27 |
Phonebook |
|
Group ring tone |
28 |
New entry |
28 |
View |
29 |
|
|
Table of contents |
5 |

Call log
View |
32 |
Store a number in the phonebook |
32 |
Delete all |
33 |
Redial list
View |
34 |
Store a number in the phonebook |
34 |
Delete all |
35 |
Intercom
Internal call |
36 |
Call transfer |
36 |
Conference call |
37 |
Personalize
Wallpaper |
38 |
Contrast |
38 |
Handset tones |
38 |
Handset name |
40 |
Auto answer |
40 |
Language |
40 |
Advance settings
Dial mode |
41 |
Flash time |
41 |
Voice language (only DECT 627) |
42 |
Security |
42 |
Registration |
43 |
Unregistration |
43 |
Reset |
43 |
Network service (Operator services) |
44 |
Answer machine DECT 627 |
|
Keys |
45 |
Display |
46 |
Saved messages |
46 |
Delete answer machine messages |
47 |
Answer machine settings |
47 |
Outgoing messages |
49 |
Record and listen to a memo |
50 |
Remote control |
51 |
Default settings |
51 |
FAQ |
52-53 |
Troubleshooting |
54-55 |
Index |
56 |
6
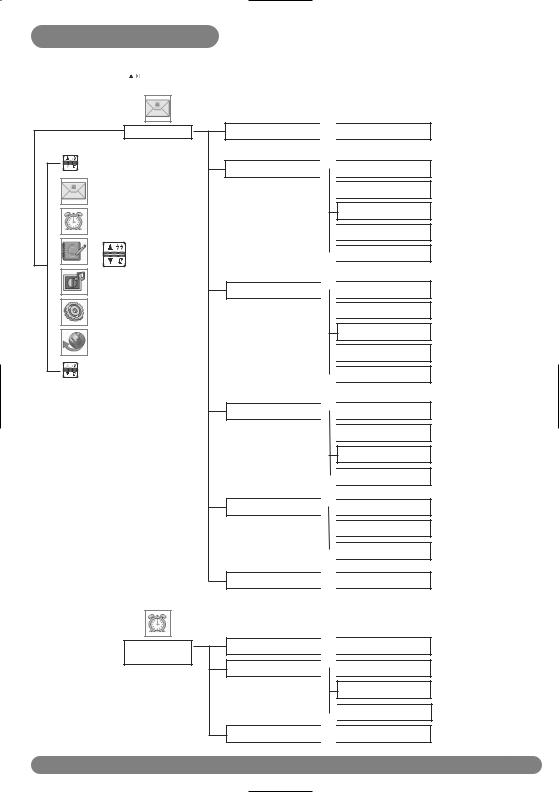
Menu structure
From idle mode, to enter the menu, press the Left soft key (LSK)  MENU. Use the Navigation keys
  to go up or down in the menu list.
|
Write a SMS |
|
Inbox |
Menu |
Outbox |
Draft
SMS Settings
Default Center
Clock & |
Date & Time |
Alarm |
Alarm |
|
Alarm Tone

 SMS
SMS

 Reply
Reply
 Edit
Edit
Save Number
 Delete
 Delete all


 Edit
Edit
 Resend
Save as Draft
 Delete
 Delete all

 Edit
Edit
 Send
Send
Delete
 Delete all

 SMS Center 1
 SMS Center 2
 SMS Center 3

 Select SMS center

 Enter Date & Time

 Off
Off
On Once
 On Daily

 Alarm tone 1/2/3
Menu structure |
7 |

Phonebook
Personalize
Adv.Settings
New Entry |
Enter name |
Enter number |
Select Group |
List Entry |
List of names |
|
|
Edit Entry |
List of names |
|
|
Delete Entry |
List of names |
|
|
Delete All |
|
|
|
|
|
Wallpaper |
|
|
Wallpaper 1/2/3/4 |
|
|
|
|
|
|
|
|
|
|
|
|
Contrast |
|
|
Level 1/2/3 |
|
|
|
|
|
|
|
|
|
|
|
|
|
|
|
|
|
|
|
|
Handset Tones |
|
|
HS RingVolume |
|
Level 1/2/3/Off |
|
|
|
|
|
|
|
|
|
|
|
|
|
|
|
|
|
|
|
|
|
HS Ringtone |
|
Melody names |
|
|
|
|
|
|
|
|
|
|
|
|
|
|
|
|
|
|
|
|
|
Group Melody |
|
Select melody for |
|
|
|
|
|
|
|
group A / B /C |
|
|
|
|
|
|
|
|
|
|
|
|
|
|
|
|
|
|
|
|
|
KeyTone |
|
On / Off |
|
|
|
|
||||
|
|
|
|
|
|
|
|
|
|
|
|
|
|
|
|
|
|
|
|
|
SMSTone |
|
On / Off |
|
|
|
|
|
|
|
|
|
|
|
|
|
|
|
|
|
|
Handset name |
|
|
Enter HS name |
|
|
|
|
|
|
|
|
|
|
|
|
|
|
|
|
|
|
|
|
Auto Answer |
|
|
On / Off |
|
|
|
|
|
|
|
|
||
|
|
|
|
|
|
|
|
|
|
|
|
|
|
|
|
|
|
Language |
|
|
List of languages |
|
|
|
|
|
|
|
|
||
|
|
|
|
|
|
|
|
Dial Mode |
Tone / Pulse |
|
|
Flash Time |
Short/Medium/Long |
|
|
Voice Lang. |
Language list |
|
|
Security |
Change PIN |
Enter PIN |
Enter new PIN |
|
Call Barring |
Enter PIN |
Nr. 1/2/3/4 |
Registration |
Enter PIN |
|
|
Unregistration |
Handset list |
|
|
Reset |
Yes / No |
|
|
8

|
|
|
|
|
|
|
|
|
|
|
|
|
|
|
|
|
|
|
|
Net. Service |
|
|
|
Call Forward |
|
|
|
||
|
|
|
|
|
|
||||
|
|
|
|
|
|
|
|
|
|
|
|
|
|
|
|
Call Fwd Busy |
|
|
Activate / Deactivate / |
network depen- |
|
|
|
|
|
Setting |
|||
|
|
|
|
|
|
||||
dent features |
|
|
|
|
|
|
|
||
|
|
|
|
|
|
|
|||
|
|
|
|
|
|
Call Fwd UnAns |
|
|
|
|
|
|
|
|
|
|
|
|
|
|
|
|
|
|
|
|
|
|
|
|
|
|
|
|
|
|
|
|
|
|
|
|
|
|
|
|
|
|
|
|
|
|
|
|
|
Voice Mail |
|
|
|
|
|
|
|
|
|
|
|
|
|
|
|
|
|
|
|
|
|
|
|
|
|
|
|
|
|
Call Back |
|
|
Activate / Deactivate |
|
|
|
|
|
|
|
|
||
|
|
|
|
|
|
|
|
|
|
|
|
|
|
|
|
|
|
|
|
|
|
|
|
|
|
|
|
|
|
|
|
|
|
|
|
|
|
|
|
Contextual soft key labels
Depending on context the following soft key labels |
|
|
may appear above the Left and Right soft keys : |
MENU PHBK |
|
Soft key label |
Function |
|
MENU |
Initiate a menu function. |
|
SELECT |
Choose the current selection. |
|
OK |
Confirm the current settings / entry or function. |
|
BACK |
Go back to the previous screen. |
|
PHBK |
Access Phonebook list. |
|
MUTE |
Mute the handset microphone. |
|
UNMUTE |
Unmute the handset microphone. |
|
SILENT |
Stop the incoming ring tone. |
|
CLEAR |
Clear the current character and shift the cursor |
|
SAVE |
to the left. |
|
Save in phonebook. |
|
|
STOP |
Switch off the alarm. |
|
VIEW |
View the details of an entry. |
|
ALL |
To call all handsets via intercom. |
|
CONF |
Start a conference call. |
|
Menu structure |
9 |
Conformity,environment and safety
power fails.An alternative has to be
in compliance with the essential This product can only be
mentioned on the packaging.
monophased power, excluding IT the communication can be lost.
in the standard EN 60-950.The unit from the electrical outlet.
always easily accessible.
Network Voltages), as defined in
open the handset or the base charging contacts or the battery to
type other than the one supplied :
earpiece to a very high level. Make sure
disposal of your packaging materials, their recycling.
Equipment; 2002/96/EC) is to recovery and recycling techniques to
and components,
bin.
and electronic
accessories) in the designated
product back to the retailer.
10

Declaration of conformity
with ANNEX IV of the R&TTE-Directive requirements :
of the user)
to electromagnetic compatibility)
& ETSI EN 301 489-1 V1.4.1 (08/2002)
requirements regarding Council Directive

 0168
0168
GAP handsets and base stations comply with make.Your DECT 623/627 handset and
minimum guaranteed functions are : dial.The advanced features may not be 623/627 with your base station (except
with a GAP standard base station of a
in the manufacturer’s instructions, then
DECT 623/627 base station, place the base follow the procedure in the manufacturer’s
Philips has marked the battery and packaging with standard symbols designed to promote the recycling and appropriate disposal of your eventual waste.
 A financial contribution has been paid to the associated national recovery & recycling system.
 The labelled packaging material is recyclable.
DECTTM is a Trade Mark of ETSI registered for the benefit of the implementers of the DECT technology.
Declaration of conformity |
11 |

Installing the DECT 623/627
One DECT 623 handset
A guarantee
A line cord*
Unpacking your DECT 627
The DECT 627 package contains:
One DECT 627 base station |
One DECT 627 handset |
||
NiMh AAA |
A user guide |
|
|
550 mAh |
A guarantee |
||
and an SMS |
|||
rechargeable |
|||
leaflet |
|
||
batteries |
|
||
|
|
||
|
A power supply |
A line cord* |
|
|
unit |
|
|
*Warning : You may find in the box the line adaptor delivered separately from the line cable. In this case, please connect the line adaptor to the line cable before connecting it to the line socket.
find one or more additional handsets, batteries.
12
Installing the base station
Place your product close enough to the telephone and mains power sockets so that the cables will reach.To properly install the base station, plug the line cord and the power cable into the base station. Plug the cord and the cable into the wall. If you have a broadband DSL Internet connection, please make sure you have one DSL filter plugged directly on each line socket used in the house and check the modem and the phone are plugged in the correct filter slot (one specific for each).
Warning ! The electrical network is classified as hazardous according to criteria in the standard EN 60-950.The only way to power down this product is to unplug the power supply from the electrical outlet. Ensure the electrical outlet is located close to the apparatus and is always easily accessible.
Please take care that the power supply and telephone line are connected to the correct sockets as
incorrect placement could damage your equipment.
Warning !Always use the line cable provided with the product otherwise you may not have a dialling tone.
|
Connect the power supply |
|
Connect the telephone line cord |
! |
delivered with the product |
Installing and replacing the batteries in the handset
To insert the batteries, open the battery cover, place the batteries as indicated and then replace the battery cover.When the handset is placed on the base station, the 3 battery bars scroll (if charge is needed).Allow 12 - 15 hours for the batteries to fully charge. On first use it may be necessary to wait for a few minutes before seeing symbols on the display.
Never use any battery type other than the one supplied : risk of explosion.
Warning: the base station must always be plugged into the mains when charging or when in use. Always use rechargeable batteries.
The warranty does not apply to the batteries and any other components which have a limited lifetime or are exposed to wear.
 Batteries should not be disposed of with general household waste.
Battery life
Optimal battery life is reached after 3 cycles of complete charging & discharging.When reaching the range limit and the conversation becomes crackly, move closer to the base.To reach optimal range, place the base station away from electrical appliances.
Battery life in |
Battery life in standby |
Indoor range |
Outdoor range |
talk time |
mode |
|
|
|
|
|
|
up to 14 hours |
up to 140 hours |
up to 50 metres |
up to 300 metres |
|
|
|
|
Installing the DECT 623/627 |
13 |

Configuration mode
Country dependent feature
Before using your DECT 623/627, you need to configure it according to the country of use. Install the batteries.After a few minutes of charging, the configuration screen appears.
Browse  through the different countries.
Press  SELECT to choose the country that suits you.
Browse  through the list of operators.
Press  SELECT to choose your operator.
Your phone is ready to be used.
If you need to re-configurate your DECT 623/627, see page 40.
Note: If  BACK is pressed, the handset will show the country selection screen again.
Handset power OFF and ON
To power the handset OFF or ON long press the  key.
key.
Keypad lock/unlock
Long press the  key to lock/unlock the keypad in idle mode.
Introduction
mode, the DECT 623/627 display shows various information:
-The date & time, the name of the handset and the instructions to access the menu.
-New calls, new SMS  or network voicemailbox message, if any.
-and the alarm clock  , if activated.
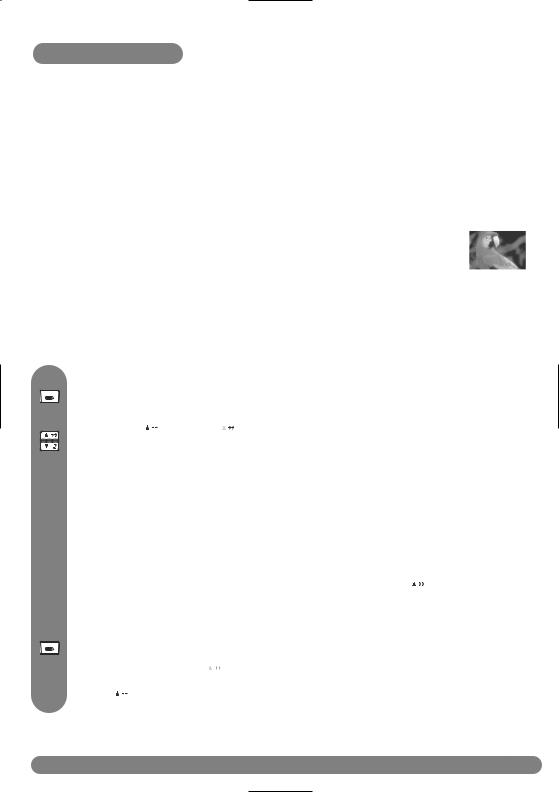
You can define a wallpaper image for the idle mode (see page 38). By default one of the preinstalled pictures is used as wallpaper.
the menu system
To access the main menus from the idle mode, press the Left Soft Key  MENU.
MENU.
Scroll up  or down
  to reach the desired menu and press the Left Soft Key
  to SELECT.To return to the idle mode
press the Right Soft Key to select  BACK.
BACK.
The sub menus are listed one under the other, so when reaching the bottom of the list, the first item is then shown again.
Up to five sub menus are displayed on the screen.When there are more than 5 sub menus in the list, an arrow ▼ is displayed between the soft key labels.
To reach one particular sub-menu, use the navigation keys  and press the Left Soft Key
  to SELECT.
Note : in idle mode the Phonebook names list is also directly accessible via the Right Soft Key  PHBK, the Call log via the Down navigation key
  and the Redial list via the Up navigation key
  .
.
Introduction |
15 |
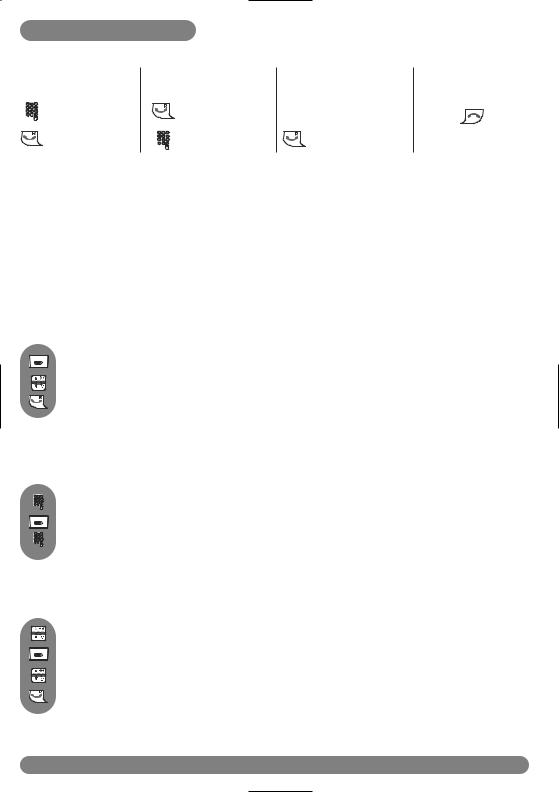
Basic principles
To make, to answer and to end a call
Predialling |
Direct dialling |
Answer a call* |
End a call |
Dial the number |
Press the key |
When ringing |
|
Make the call |
Dial the number |
Take the line |
|
*You can also press the  key to answer an incoming external call in handsfree mode. If you have activated the Auto Answer Mode (see page 40) simply lift up the handset from the base or charger to answer a call.
Warning ! Upon incoming calls, the handset ringer volume can increase in the earpiece. Make sure the handset is not too close to your ear when ringing.
Call duration counter
After you have taken the line (dial a number or answer a call), the call duration counter appears on the handset display.
To call from the phonebook
Press the RSK to directly access PHBK.
Choose a name in the list.
Make the call.
a name from predial
Dial the number.
Press SAVE to enter the options.
Enter the name and press  OK.
OK.
Redial from call log
Press the Down key to directly access the Call log.
Press SELECT.
Choose an entry.
Make the call.
16

In-call features
During an external call, some other options are available.
To mute the handset microphone
Press to select MUTE (the caller can no longer hear you).
Press again to resume the conversation (UNMUTE).
(available only if you have at least two handsets)
an external call, you can use the intercom key to call another handset and, for transfer the call to this handset.
Press to put the external call on hold, the caller can no longer hear you. Enter the number of the handset you want to transfer the call to.
Press to end the call on the first handset when the second handset has taken the line.
Other options are available such as Switch and Conference call (see page 36-37).
To access the phonebook, the call log or the redial list
Press the RSK  to enter the Phonebook or press the Down navigation key

 to enter the Call log or press Up navigation key
  to enter the Redial list.
To switch the handset loudspeaker ON/OFF
Press  to activate or deactivate the handset loudspeaker.
Warning : Handsfree activation could suddenly increase the volume in the earpiece to a very high level. Make sure the handset is not too close to your ear.
To increase/decrease the volume of the earpiece and loudspeaker during a call
Scroll up to increase or down to decrease the volume when on line.
The last setting is stored for the next calls.
Caller Line Identification and Call waiting
If you subscribe to the Call waiting service, a beep in the earpiece informs you of a second incoming call.The name or number of the second caller may be displayed if you also
subscribe to Caller Line Identification Service.To answer that second call, use  +
+ 
(according to your network, the code may be different). Please contact your network provider for more details.
In-call features |
17 |
Loading...