


DFU
TS3258
TS3658
Return your Warranty Registration card today to ensure you receive all the benefits you’re entitled to.
Once your PHILIPS MAGNAVOX purchase is registered, you’re eligible to receive all the privileges of owning a PHILIPS MAGNAVOX product. So complete and return the Warranty Registration Card enclosed with your purchase at once. And take advantage of these important benefits.
Warranty
Verification
Registering your product within 10 days confirms your right to maximum protection under the terms and conditions of your PHILIPS MAGNAVOX warranty.
Owner Confirmation
Your completed Warranty Registration Card serves as verification of ownership in the event of product theft or loss.
Congratulations on your purchase, and welcome to the “family!”
Model Registration
Returning your Warranty Registration Card right away guarantees you’ll receive all the information and special offers which you qualify for as the owner of your model.
|
|
|
|
|
T |
|
|
|
|
|
|
|
|
A |
I |
O |
|
|
|
|
|
|
R |
|
|
|
N |
|
|
|
|
|
T |
|
|
|
|
|
|
|
|
I |
S |
|
|
|
N |
|
|
|
G |
|
|
|
|
|
E |
||
E |
|
|
|
|
|
|
E |
||
|
AHurry! |
D |
|||||||
R |
|
||||||||
|
|
|
|
|
|
|
|
E |
|
S |
|
|
|
|
|
W |
D |
||
|
|
|
|
|
|
||||
Y |
|
|
|
|
|
|
|||
|
|
|
|
|
|
|
|||
|
|
|
D |
|
|
|
I |
|
|
|
|
|
|
|
|
T |
|
|
|
|
|
|
0 |
|
|
|
|
|
|
|
|
|
1 |
N |
H |
|
|
||
|
|
|
|
|
|
||||
|
|
|
|
|
|
I |
|
|
|
Dear PHILIPS MAGNAVOX product owner:
Thank you for your confidence in PHILIPS MAGNAVOX. You’ve selected one of the best-built, bestbacked products available today. And we’ll do everything in our power to keep you happy with your purchase for many years to come.
As a member of the PHILIPS MAGNAVOX “family,” you’re entitled to protection by one of the most comprehensive warranties and outstanding service networks in the industry.
What’s more, your purchase guarantees you’ll receive all the information and special offers for which you qualify, plus easy access to accessories from our convenient home shopping network.
And most importantly you can count on our uncompromising commitment to your total satisfaction. All of this is our way of saying welcome–and thanks for investing in a PHILIPS MAGNAVOX product. Sincerely,
Robert Minkhorst
President and Chief Executive Officer
P.S. Remember, to get the most from your PHILIPS MAGNAVOX product, you must return your Warranty Registration Card within 10 days. So please mail it to us right now!
Know these safetysymbols
CAUTION
RISK OF ELECTRIC SHOCK
DO NOT OPEN
CAUTION: TO REDUCE THE RISK OF ELECTRIC SHOCK, DO NOT
REMOVE COVER (OR BACK). NO USER-SERVICEABLE PARTS
INSIDE. REFER SERVICING TO QUALIFIED SERVICE PERSONNEL.
tThis “bolt of lightning” indicates uninsulated material within your unit may cause an electrical shock. For the safety of everyone in your household, please do not remove product covering.
sThe “exclamation point” calls attention to features for which you should read the enclosed literature closely to prevent operating and maintenance problems.
WARNING: TO PREVENT FIRE OR SHOCK HAZARD, DO NOT EXPOSE THIS EQUIPMENT TO RAIN OR MOISTURE.
CAUTION: To prevent electric shock, match wide blade of plug to wide slot, and fully insert.
ATTENTION: Pour éviter les chocs électriques, introduire la lame la plus large de la fiche dans la borne correspondante de la prise et pousser jusqu’au fond.


 Visit our World Wide Web Site at http://www.philipsmagnavox.com

SAFETY INSTRUCTIONS - Read before operating equipment
This product was designed and manufactured to meet strict quality and safety standards. There are, however, some installation and operation precautions which you should be particularly aware of.
1.Read Instructions - All the safety and operating instructions should be read before the appliance is operated.
2.Retain Instructions - The safety and operating instructions should be retained for future reference.
3.Heed Warnings - All warnings on the appliance and in the operating instructions should be adhered to.
4.Follow Instructions - All operating and use instructions should be followed.
5.Water and Moisture - The appliance should not be used near water - for example, near a bathtub, washbowl, kitchen sink, laundry tub, in a wet basement or near a swimming pool, etc.
6.Carts and Stands - The appliance should be used only with a cart or stand that is recommended by the manufacturer.
6A. An appliance and cart combination should be moved with care. Quick stops, excessive force, and uneven sur-  faces may cause the appliance and cart combination to
overturn.
7.Wall or Ceiling Mounting - The appliance should be mounted to a wall or ceiling only as recommended by the manufacturer.
8.Ventilation - The appliance should be situated so that its location or position does not interfere with its proper ventilation. For example, the appliance should not be situated on a bed, sofa, rug, or similar surface that may block the ventilation openings; or, placed in a builtin installation, such as a bookcase or cabinet that may impede the flow of air through the ventilation openings.
9.Heat - The appliance should be situated away from heat sources such as radiators, heat registers, stoves, or other appliances (including amplifiers) that produce heat.
10.Power Sources - The appliance should be connected to a power supply only of the type described in the operating instructions or as marked on the appliance.
11.Power-Cord Protection - Power supply cords should be routed so that they are not likely to be walked on or pinched by items placed upon or against them, paying particular attention to cords and plugs, convenience receptacles, and the point where they exit from the appliance.
12.Cleaning - The appliance should be cleaned only as recommended by the manufacturer.
13.Power Lines - An outdoor antenna should be located away from power lines.
14.Outdoor Antenna Grounding - If an outside antenna is connected to the receiver, be sure the antenna system is grounded so as to provide some protection against voltage surges and built up static charges.
Section 810 of the National Electric Code, ANSI/NFPA No. 70-1984, provides information with respect to proper grounding of the mats and supporting structure grounding of the lead-in wire to an antenna discharge unit, size of grounding connectors, location of antennadischarge unit, connection to grounding electrodes and requirements for the grounding electrode. See Fig. below.
15.Non-use Periods - The power cord of the appliance should be unplugged from the outlet when left unused for a long period of time.
16.Object and Liquid Entry - Care should be taken so that objects do not fall and liquids are not spilled into the enclosure through openings.
17.Damage Requiring Service - The appliance should be serviced by qualified service personnel when:
A.The power supply cord or the plug has been damaged; or
B.Objects have fallen, or liquid has been spilled into the appliance; or
C.The appliance has been exposed to rain; or
D.The appliance does not appear to operate normally or exhibits a marked change in performance; or
E.The appliance has been dropped, or the enclosure damaged.
18.Servicing - The user should not attempt to service the appliance beyond that described in the operating instructions. All other servicing should be referred to qualified service personnel.
Note to the CATV system installer: This reminder is provided to call the CATV system installer's attention to Article 820-40 of the NEC that provides guidelines for proper grounding and, in particular, specifies that the cable ground shall be connected to the grounding system of the building, as close to the point of cable entry as practical.
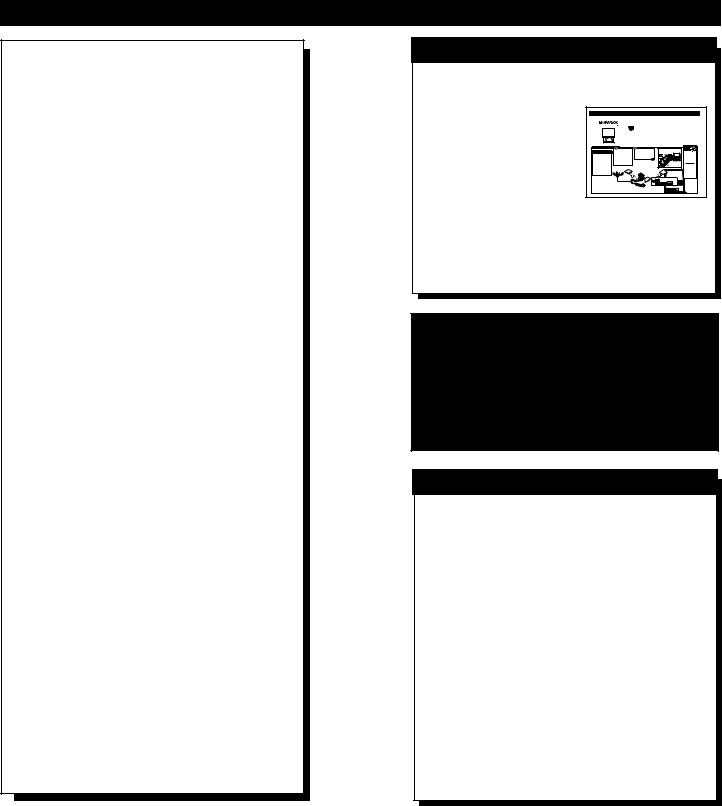
EXAMPLE OF ANTENNA GROUNDING AS PER NATIONAL ELECTRICAL CODE (NEC)
Example of Antenna Grounding
as per NEC - National Electric Code
GROUND CLAMP |
ANTENNA LEAD IN WIRE |
|
ANTENNA DISCHARGE UNIT (NEC SECTION 810-20)
|
GROUNDING CONDUCTORS (NEC SECTION 810-21) |
|
GROUND CLAMPS |
ELECTRIC SERVICE EQUIPMENT |
POWER SERVICE GROUNDING ELECTRODE SYSTEM (NEC ART 250, PART H) |
|
MAC3964

TABLE OF CONTENTS
Introduction |
|
Welcome/Registration of Your TV ............................ |
2 |
Safety/Precautions ..................................................... |
3 |
Table of Contents ....................................................... |
4 |
Features ...................................................................... |
5 |
On-Screen MENU |
|
Picture |
|
Adjusting the TV Picture ................................... |
6 |
Features |
|
Setting the TV’s On-screen Clock ...................... |
7 |
Activating the TV’s On Timer Control............... |
8 |
Selecting the TV’s On Timer Channel .............. |
9 |
Setting the TV’s On Timer Startup Time.......... |
10 |
Turning on the On Timer Display..................... |
11 |
Setting the Access Code within SmartLock ..... |
12 |
Using SmartLock to Block Channels ............... |
13 |
Using the Noise Reduction (NR) Control ........ |
14 |
Using the Contrast + Control............................ |
14 |
Setting the TV for Closed Caption ................... |
15 |
Using the Sleep Timer Control ......................... |
16 |
Sound |
|
Adjusting the Treble, Bass, and Balance Sound |
|
Controls............................................................. |
17 |
Setting the TV for Stereo and SAP Programs .. |
18 |
Using the Incredible Stereo Control ................. |
19 |
Using the Volume Bar Control ......................... |
19 |
Using the Audio Out Jacks (with TV Speaker |
|
On/Off Control) ................................................ |
20 |
Using the TV's Audio/Video Input Jacks ....21-22 |
|
Remote Control Operation |
|
Using the Smart Picture Control .................. |
23 |
Using the Smart Sound Control (AVL)......... |
24 |
Using the Surf and Alternate Channel Buttons ....... |
25 |
Setting the Remote to Operate |
|
Accessory Devices .......................................... |
26-27 |
Setting the TV Remote to Operate Accessory Devices |
|
(Search Method) ..................................................... |
28 |
Remote Control Direct Entry Code List ............ |
29-30 |
Using the Remote’s VCR Buttons .......................... |
31 |
General Information |
|
Tips if Something Isn’t Working ................ |
32 |
Glossary of TV Terms.............................................. |
33 |
Index ........................................................................ |
33 |
Factory Service Locations .................................. |
34-35 |
Warranty................................................................... |
36 |
QUICK USE/INSTALLATION GUIDE
Getting Started |
|
Warning/Precautions................................... |
1 |
Hooking Up Your TV ................................. |
1 |
How to Use the “INSTALL” Controls .................. |
2-3 |
Using the Language Control...................................... |
2 |
Setting the TV to Auto Program Channels ................ |
2 |
Setting the TV for a Cable or Antenna Signal........... |
2 |
Using the Adding and Deleting Channels ................. |
3 |
Setting the Channel Name Control............................ |
3 |
How to use the Smart Clock control ......................... |
3 |
Basic TV and Remote Control Operation ................. |
4 |
Copyright © 1997 Philips Consumer Electronics Company. All rights reserved.
Infrared Remote Control works your TV set, VCR, and a variety of wireless remote control Cable Converters (Satellite Receivers, DVD, etc.).
Standard broadcast (VHF/UHF) or Cable TV (CATV) channel capability.
Stereo Ready TV with built-in audio amplifier and twin speaker system for receiving TV programs broadcast in stereo sound.
Closed Captioning allows the viewer to read TV program dialogue or voice conversations as on-screen text.
Automatic Programming of Channels for quick and easy selection of favorite stations available in your area.
On-Screen Features (in either English, French, or Spanish) show helpful messages for setting of TV controls.
Audio/Video Jackpanel for direct connections with VCRs (or other video accessories) providing quality TV picture and sound playback.
On Timer automatically turns the TV ON at a preset time, and channel.
Sleep-Timer automatically turns the TV OFF at preset times.
SmartLock feature allows you to block the viewing of certain channel or external audio/video connections were you might not want your children viewing inappropriate material.
Smart Picture allows you to set the picture color, tint, contrast, etc. for various types of programming such as Sports, Movies, Multi Media (Gaming), or Weak Signals with the push of one button.
Smart Sound controls the sudden volume changes that occur when changing programs or when a commercial break comes on. It eliminates the peaks and valleys in the TV’s sound with one pleasant listening level.
FEATURES
SET-UP AND QUICK USE GUIDE
Use the simple Set-Up Guide (supplied with your TV information packet) for details on:
•Cable/Antenna Hook-ups
•Auto-Programming of Channels
•Channel Editing
SET-UP AND QUICK USE GUIDE
|
|
|
|
|
|
TABLE OF CONTENTS |
|||
|
Smart.Very smart. |
|
|
|
|
|
|||
|
|
Getting Started |
|
• For details on product registration, warranty, |
|||||
|
|
|
|
|
|
..................................Warning/Precautions |
1 |
|
and service refer to the other literature included |
|
|
Projection |
|
|
|
Hooking Up Your TV |
1 |
|
with your TV information packet. |
|
|
Television and |
|
|
|
|
Please retain all these materials and keep them |
||
|
|
Remote Control |
|
|
How to Use the First Time Set-Up Control .............. |
2 |
|
handy for future reference. |
|
|
|
|
|
|
.................Basic TV and Remote Control Operation |
3 |
|
WARNING: TO PREVENT FIRE OR SHOCK |
|
|
|
|
|
|
How to Use the On-Screen Menu Controls............... |
4 |
|
HAZARD DO NOT EXPOSE THIS UNIT TO |
|
|
|
|
|
|
|
|
|
|
RAIN OR EXCESSIVE MOISTURE. |
|
|
|
|
|
|
|
|
|
|
ANTENNA |
|
1 |
|
S |
|
|
|
|
|
H |
|
O |
/I |
|
(75 ohm) on the |
adapter (or antenna) onto the |
Remember, |
combination (outdoor |
|
you're ready to con- |
ANTENNA plug on the rear of |
be sure to set the |
|
|
the TV. |
the TV. If the round end of the |
TV for the type sig- |
||
Aor indoor) antenna |
If |
has flat twin- |
antenna wire is threaded, screw |
nal you've connect- |
|
receives normal broadcast |
|
(300 ohm), you first |
it down tight. |
ed (see "SETUP" |
|
channels |
2-13 (VHF) and |
|
the antenna wires |
STOP |
on page 2 of this |
14-69 (UHF). Your con- |
|
on a 300 to 75 |
|
Guide.) |
|
nection to such an antenna |
|
. |
|
To order any |
|
is easy since there is only |
|
|
|
optional accessory |
|
one antenna plug (75Ω - |
|
|
|
contact your dealer |
|
ohm) on the back of your |
|
1 |
2 |
or call the toll-free |
|
TV - and that’s where the |
|
accessory ordering |
|||
antenna goes. |
|
number (1-800-292- |
|||
|
|
|
|
|
6066): |
•Automatic Clock Setting (Smart Clock)
•Basic TV and Remote Control Operation
•On-Screen Menu Use
NOTE: This owner's manual is used with several different television models. Not all features (and drawings) discussed in this manual will necessarily match those found with your television system. This is normal and does not require you contacting your dealer or requesting service.
END-OF-LIFE DISPOSAL
Your new television and its packing contain materials that can be recycled and reused. Specialized companies can recycle your product to increase the amount of reusable materials and minimize the amounts which need to be properly disposed.
Your product also uses batteries which should not be thrown away when depleted, but should be handed in and disposed of as small chemical waste.
Please find out about the local regulations on how to dispose of your old television, batteries, and packing materials whenever you replace existing equipment.
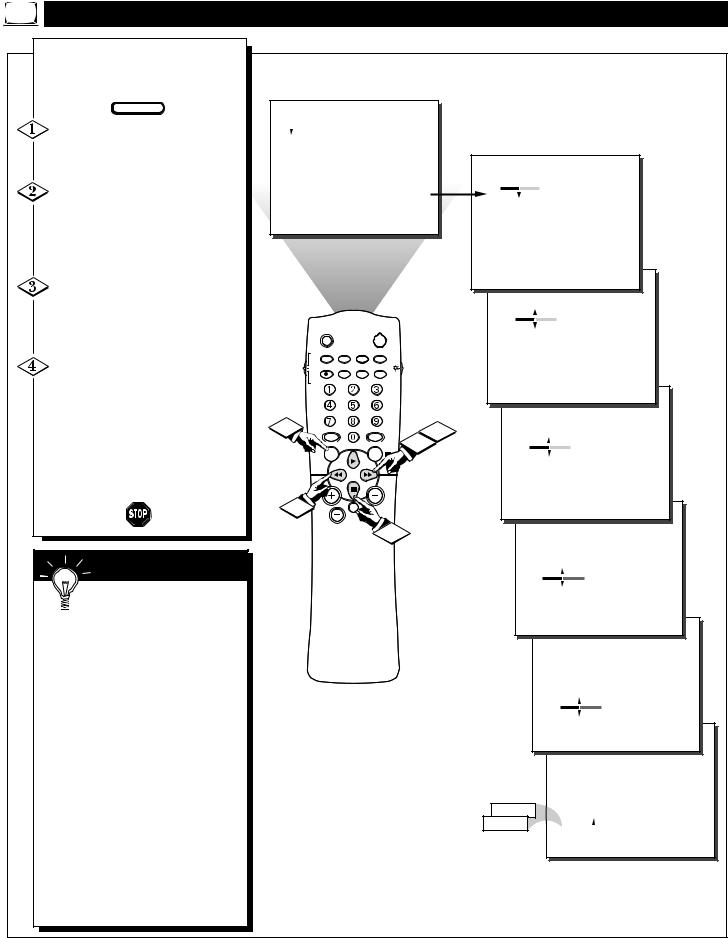
HOW TO ADJUST THE TV PICTURE |
|
|
|
|||||||
o adjust your TV picture con- |
|
|
|
|
|
|
|
|
|
|
trols, select a channel and follow |
|
|
|
|
|
|
|
|
|
|
steps shown below: |
|
|
|
|
|
|
|
|
|
|
BEGIN |
.PICTURE |
|
|
|
|
|
|
|
|
|
the MENU button on the |
|
BRIGHTNESS |
|
|
|
|
|
|||
to show the on-screen menu. |
.SOUND |
|
COLOR |
|
|
|
|
|
||
will be highlighted. |
.FEATURES |
PICTURE |
|
|
|
|
|
|||
.INSTALL |
|
SHARPNESS |
|
|
|
|
|
|||
|
|
PICTURE |
|
|
|
|
||||
the CURSOR RIGHT |
|
|
|
TINT |
. |
28 |
BRIGHTNESS |
|||
|
|
|
COLOR TEMP |
|||||||
button and the menu will shift |
|
|
|
. |
|
COLOR |
|
|||
|
|
|
|
|
. |
|
PICTURE |
|
||
right to display an adjustment |
|
|
|
|
|
|
|
|||
|
|
|
|
|
. |
|
SHARPNESS |
|||
in front of the BRIGHTNESS |
|
|
|
|
|
|
||||
|
|
|
|
|
. |
|
TINT |
|
|
|
. |
|
|
|
|
|
. |
|
COLOR TEMP |
||
RIGHT ©© buttons to adjust |
|
|
|
|
|
|
. |
BRIGHTNESS |
||
BRIGHTNESS level of the pic- |
|
|
|
|
|
|
28 COLOR |
|
||
. |
|
SLEEP |
|
|
POWER |
|
. |
PICTURE |
||
|
|
|
|
|
|
. |
|
|
|
|
|
TV |
AV |
STATUS/EXIT CC |
TV/VCR-CLOCK |
|
SHARPNESS |
||||
BRIGHT- |
VCR |
VCR |
INCREDIBLE MULTI |
A/CH |
|
. |
TINT |
|
||
|
ACC |
RECORD STEREO |
MEDIA |
|
|
. |
COLOR TEMP |
|||
CURSOR |
|
|
|
UP |
|
|
|
|
|
|
|
|
|
|
|
|
|
|
|
|
|
■ button to select another |
|
|
|
|
|
PICTURE |
|
|
||
|
|
|
|
|
|
|
|
|||
adjustment; COLOR, PIC- |
1 |
|
|
|
|
3 |
. |
|
BRIGHTNESS |
|
SHARPNESS, TINT, or |
SMART |
|
SMART |
. |
|
COLOR |
||||
TEMP. Use the CURSOR |
|
|
|
. |
|
|
|
|||
|
MENU |
|
|
|
28 |
PICTURE |
||||
|
|
SOUND |
|
|
|
. |
|
|
|
|
ßß or CURSOR RIGHT |
|
|
|
|
|
|
|
SHARPNESS |
||
buttons to adjust the selected |
|
|
|
|
|
|
. |
|
TINT |
|
. |
3 |
|
|
|
|
|
. |
|
COLOR TEMP |
|
|
|
|
|
|
|
|
|
|
||
|
|
|
|
4 |
|
PICTURE |
|
|
||
|
|
|
|
|
|
|
. |
|
BRIGHTNESS |
|
|
|
|
|
|
|
|
|
. |
|
COLOR |
SMART HELP |
|
|
|
|
|
|
|
. |
|
PICTURE |
|
|
|
|
|
|
|
|
. |
28 |
SHARPNESS |
Remember, when the bar |
|
|
|
|
|
|
|
. |
|
TINT |
scale is centered, the control set- |
|
|
|
|
|
|
|
. |
|
COLOR TEMP |
tings are at normal mid-range levels. |
|
|
|
|
|
|
|
|
|
|
BRIGHTNESS Press the ©© or ßß |
|
|
|
|
|
|
PICTURE |
|
||
|
|
|
|
|
|
|
. |
|
BRIGHTNESS |
|
buttons until darkest parts of the picture |
|
|
|
|
|
|
|
|
||
are as bright as you prefer. |
|
|
|
|
|
|
|
. |
|
COLOR |
|
|
|
|
|
|
|
. |
|
PICTURE |
|
|
|
|
|
|
|
|
|
|
||
COLOR Press the ©© or ßß buttons |
|
|
|
|
|
|
|
. |
|
SHARPNESS |
to add or eliminate color. |
|
|
|
|
|
|
|
. |
|
0 TINT |
PICTURE Press the ©© or ßß but- |
|
|
|
|
|
|
|
. |
. |
COLOR TEMP |
tons until lightest parts of the picture show |
|
|
|
|
|
|
|
|
|
|
good detail. |
|
|
|
|
|
|
|
|
BRIGHTNESS |
|
SHARPNESS Press the ©© or ßß |
|
|
|
|
|
|
|
|
. |
COLOR |
buttons to improve detail in the picture. |
|
|
|
|
|
|
|
|
. |
PICTURE |
TINT Press the ©© or ßß buttons to |
|
|
|
|
|
|
|
|
. |
SHARPNESS |
|
|
|
|
|
NORMAL |
|
|
. |
TINT |
|
obtain natural skin tones. |
|
|
|
|
|
|
|
|||
|
|
|
|
|
COOL |
|
WARM |
. |
28 COLOR TEMP |
|
COLOR TEMP Press the ©© or ßß |
|
|
|
|
|
|
|
|||
|
|
|
|
|
|
|
|
|
|
|
buttons to select NORMAL, COOL, or |
|
|
|
|
|
|
|
|
|
|
WARM picture preferences. (NORMAL |
|
|
|
|
|
|
|
|
|
|
will keep the whites, white; COOL will |
|
|
|
|
|
|
|
|
|
|
make the whites, bluish; and WARM will |
|
|
|
|
|
|
|
|
|
|
make the whites, reddish.) |
|
|
|
|
|
|
|
|
|
|

SETTING THE TV’S CLOCK
Your television comes with an on-screen clock. During normal
operation the clock appears on the screen when the STATUS/EXIT button is pressed or if the Timer DISPLAY control is turned ON.
BEGIN
will be highlighted.
menu.
to the left to display the controls.
disleft and highlight the TIME
.
the
indicator area.
buttons
UP © or CURSOR
■ buttons to set AM or PM.)
 SMART HELP
 Remember, be sure to
 press “0” first and then the number for single digit
.
Clock can also be set automatusing the Smart Clock feafound on page 2 of the Quick
Guide.
television’s clock settings may when it is unplugged (or AC to the set is interrupted.)
.PICTURE |
|
|
|
.SOUND |
TIMER |
|
|
.FEATURES |
SmartLock |
.FEATURES |
|
.INSTALL |
NR |
|
|
|
CONTRAST + |
...TIMER |
|
|
CLOSED CAP |
TIME |
|
|
|
.SmartLock |
ACTIVATE |
|
|
.NR |
CHANNEL |
|
|
.CONTRAST + |
START TIME |
|
|
.CLOSED CAP |
DISPLAY |
|
|
|
|
|
|
|
.FEATURES |
|
|
|
|
|
|
|
|
..TIMER |
|
|
SLEEP |
|
POWER |
|
|
|
...ACTIVATETIME |
--:-- AM |
TV |
AV |
STATUS/EXIT CC |
TV/VCR-CLOCK |
|
|
|
.CHANNEL |
|
VCR |
VCR |
INCREDIBLE MULTI |
A/CH |
6 |
|
|
.START TIME |
|
ACC |
RECORD STEREO |
|
|
|
.DISPLAY |
|
||
1 |
|
|
|
|
|
5 |
.FEATURES |
|
SMART |
SMART |
3 |
4 |
..TIMER |
.12:30 PM |
|||
|
SOUND |
|
|
..TIME |
||||
|
MENU |
|
|
|
|
.ACTIVATE |
|
|
|
|
|
|
|
|
|
|
|
|
|
|
|
|
|
|
.CHANNEL |
|
|
|
|
|
|
|
|
.START TIME |
|
|
VOL |
|
|
|
|
|
.DISPLAY |
|
MUTE
2
|
SLEEP |
|
|
POWER |
|
|
|
|
|
TV |
AV |
STATUS/EXIT |
CC |
TV/VCR |
VCR |
VCR |
INCREDIBLE |
MULTI |
A/CH |
|
|
|
UP |
|
ACC |
RECORD |
STEREO |
MEDIA |
|
The TIME (Clock) feature can be accessed directly by pressing the CLOCK button on the remote, then simply follow steps 5 and 6 to complete the task.
.
..FEATURES
..TIMER
1 . TIME 12:30 PM
.ACTIVATE
.CHANNEL
.STARTDISPLAYTIME
SMART

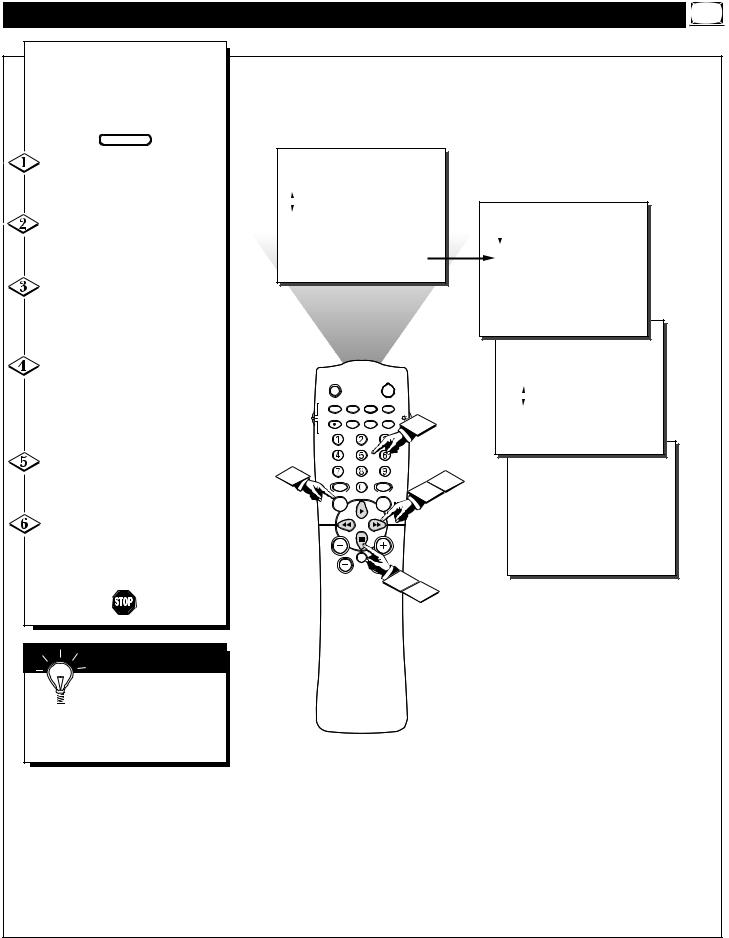
ACTIVATING THE TV’S ON TIMER CONTROL
ust like an alarm clock you can |
|
|
|
|
Jset the TV to turn itself on at the |
|
|
|
|
same time everyday. |
|
|
|
|
BEGIN |
|
|
|
|
button on the |
|
|
|
|
on-screen menu. |
.PICTURE |
|
|
|
will be highlighted. |
|
|
|
|
CURSOR DOWN ■ |
.SOUND |
TIMER |
|
|
.FEATURES |
SmartLock |
|
|
|
select the FEA- |
|
|
||
.INSTALL |
NR |
.. |
|
|
menu. |
|
|||
.FEATURES |
|
|||
|
|
CONTRAST + |
.TIMER |
|
CURSOR RIGHT |
|
CLOSED CAP |
TIME |
|
|
|
|||
|
|
.SmartLock |
ACTIVATE |
|
|
|
|
||
the menu will |
|
|
.NR |
CHANNEL |
to the left to display the |
|
|
.CONTRAST + |
START TIME |
controls. |
|
|
.CLOSED CAP |
DISPLAY |
CURSOR RIGHT |
|
|
|
|
|
|
|
.FEATURES |
|
again to shift the dis- |
|
|
|
|
|
|
|
..TIMER |
|
left, then CURSOR DOWN |
|
SLEEP |
|
|
POWER |
|
|
..TIME |
|
highlight the ACTIVATE |
|
|
|
|
|
|
.ACTIVATE |
|
|
|
|
|
|
|
|
|
|
||
control. |
TV |
AV |
STATUS/EXIT CC |
TV/VCR-CLOCK |
|
|
.CHANNEL |
|
|
|
VCR |
VCR |
INCREDIBLE |
UP |
A/CH |
|
|
.START TIME |
|
|
|
|
|
MULTI |
|
|
|
.DISPLAY |
|
CURSOR RIGHT |
ACC |
RECORD STEREO |
MEDIA |
|
|
|
|
||
|
|
|
|
|
|
|
.FEATURES |
|
|
again to highlight the |
|
|
|
|
|
|
|
|
|
timer option. Then, |
1 |
|
|
|
|
|
5 |
|
|
|
SMART |
|
SMART |
4 |
..TIMER |
|
|||
the CURSOR UP © or CUR- |
|
SOUND |
|
3 |
|
..TIME |
.ON |
||
DOWN ■ buttons to turn the |
|
MENU |
|
|
|
|
.ACTIVATE |
||
ON or OFF. |
|
|
|
|
|
|
|
||
|
|
|
|
|
|
|
.CHANNEL |
|
|
|
|
|
|
|
|
|
|
.START TIME |
|
|
|
VOL |
|
|
|
|
|
.DISPLAY |
|
|
|
|
|
|
2 |
|
|
.FEATURES |
|
SMART HELP |
|
|
|
|
|
|
|
..TIME |
|
|
|
|
|
|
|
|
..TIMER |
.OFF |
|
Remember, be sure to |
|
|
|
|
|
|
|
.ACTIVATE |
|
set the time you want the |
|
|
|
|
|
|
|
.CHANNEL |
|
to turn on using the |
|
|
|
|
|
|
|
.START TIME |
|
TIME control as described |
|
|
|
|
|
|
|
.DISPLAY |
|
10. |
|
|
|
|
|
|
|
|
|
SELECTING THE TV’S ON TIMER CHANNEL
Used along with the on timer feature, you can select a spe-
cific channel that the television will tune to when the Timer ACTIVATE control is turned ON.
BEGIN |
.PICTURE |
|
|
|
|
|
|
|
|
|
.SOUND |
TIMER |
|
|
will be highlighted. |
.FEATURES |
SmartLock |
.. |
|
|
.INSTALL |
|
|
|
|
NR |
.FEATURES |
|
|
|
|
CONTRAST + |
.TIMER |
|
|
|
CLOSED CAP |
TIME |
|
menu. |
|
|
.SmartLock |
ACTIVATE |
|
|
|
.NR |
CHANNEL |
|
|
|
.CONTRAST + |
START TIME |
|
|
|
.CLOSED CAP |
DISPLAY |
left to display the TIMER |
|
|
|
|
|
|
.FEATURES |
|
. |
|
|
|
|
|
|
|
|
|
|
|
|
|
|
|
..TIMER |
|
RIGHT |
|
|
|
|
|
|
..TIME |
|
the dis- |
|
|
|
POWER |
|
|
.ACTIVATE |
|
|
|
SLEEP |
|
|
|
.CHANNEL |
|
|
|
|
|
|
|
|
|
||
left, then CURSOR DOWN |
TV |
AV |
STATUS/EXIT CC |
TV/VCR-CLOCK |
|
|
|
|
highlight the CHANNEL con- |
VCR |
VCR |
INCREDIBLE MULTI |
A/CH |
6 |
|
.START TIME |
|
. |
ACC |
RECORD STEREO |
|
|
.DISPLAY |
|
||
|
|
|
|
|
|
.FEATURES |
|
|
RIGHT |
1 |
|
|
|
|
|
|
|
the |
SMART |
SMART |
|
4 |
..TIMER |
|
||
|
|
SOUND |
|
3 |
..TIME |
|
||
indicator area. |
|
MENU |
|
|
.ACTIVATE |
.22 |
||
buttons |
|
|
|
|
|
|
.CHANNEL |
|
|
|
|
|
|
|
.START TIME |
|
|
|
|
|
|
|
|
|
|
|
channel. |
|
|
|
|
|
|
.DISPLAY |
|
use the CHANNEL (+) or (–) |
|
VOL |
|
|
|
|
FEATURES |
|
to select the desired channel.) |
|
|
|
2 |
|
|
TIMER |
|
|
|
|
|
5 |
|
|
|
|
SMART HELP |
|
|
|
|
|
|
|
|
Remember, be sure to |
|
|
|
|
|
|
|
|
turn the Timer ACTIVATE |
|
|
|
|
|
|
|
|
ON after selecting the |
|
|
|
|
|
|
|
|
start up channel. (Refer to |
|
|
|
|
|
|
|
|
8 for further details.) |
|
|
|
|
|
|
|
|

SETTING THE TV’S ON TIMER START TIME
Used along with the on timer feature, you can select a spe-
cific time the television will turn on when the Timer ACTIVATE control is turned ON.
BEGIN |
.PICTURE |
|
|
|
|
|
|
|
|
|
|
|
Press the MENU button on the |
|
|
|
|
|
|
|
|
|
|
||
to show the on-screen menu. |
|
|
|
|
|
|
|
|
|
|
||
|
.SOUND |
|
|
|
TIMER |
|
|
|
|
|
|
|
will be highlighted. |
.FEATURES |
|
|
SmartLock |
|
|
|
.FEATURES |
|
|
||
Press the CURSOR DOWN ■ |
.INSTALL |
|
|
NR |
|
|
|
|
|
|
||
twice to select the FEA- |
|
|
|
|
CONTRAST + |
|
|
|
.. |
|
|
|
|
|
|
|
CLOSED CAP |
|
|
|
|
|
|||
|
|
|
|
|
|
|
|
.TIMER |
TIME |
|
||
menu. |
|
|
|
|
|
|
|
|
|
.SmartLock |
ACTIVATE |
|
|
|
|
|
|
|
|
|
|
|
.NR |
CHANNEL |
|
Press the CURSOR RIGHT |
|
|
|
|
|
|
|
|
|
.CONTRAST + |
START TIME |
|
button and the menu will shift |
|
|
|
|
|
|
|
|
|
.CLOSED CAP |
DISPLAY |
|
left to display the TIMER |
|
|
|
|
|
|
|
|
|
.FEATURES |
|
|
. |
|
|
|
|
|
|
|
|
|
|
|
|
|
|
|
|
|
|
|
|
|
|
..TIMER |
|
|
CURSOR RIGHT |
|
|
|
|
|
|
|
|
|
..TIME |
|
|
to shift the dis- |
|
|
|
|
|
POWER |
|
|
|
.ACTIVATE |
|
|
|
|
SLEEP |
|
|
|
|
|
|
.CHANNEL |
|
|
|
|
|
|
|
|
|
|
|
|
|
|
||
left, then CURSOR DOWN |
TV |
AV |
STATUS/EXIT CC |
TV/VCR-CLOCK |
|
|
|
|
|
|||
highlight the START TIME |
VCR |
VCR |
INCREDIBLE MULTI |
A/CH |
6 |
|
|
.START TIME |
|
|||
. |
ACC |
RECORD |
STEREO |
|
|
|
|
.DISPLAY |
|
|
||
CURSOR RIGHT |
1 |
|
|
|
|
|
|
|
5 |
.FEATURES |
|
|
to highlight the |
SMART |
|
|
SMART |
|
|
TIMER |
|
|
|||
|
|
|
4 |
|
.. |
|
|
|||||
|
|
SOUND |
|
|
|
3 |
|
..TIME |
|
|
||
indicator area. |
|
MENU |
|
|
|
|
|
.ACTIVATE |
|
|||
NUMBERED buttons |
|
|
|
|
|
|
|
|
|
.CHANNEL |
.12:00PM |
|
|
|
|
|
|
|
|
|
|
.START TIME |
|||
start up time. |
|
|
|
|
|
|
|
|
|
|||
|
|
|
|
|
|
|
|
|
.DISPLAY |
|
||
the CURSOR UP © or CUR- |
|
VOL |
|
|
|
|
|
|
|
|
||
|
|
|
|
|
|
|
|
FEATURES |
|
|||
DOWN ■ buttons to set AM or |
|
|
|
|
|
2 |
|
|
|
TIMER |
|
|
.) |
|
|
|
|
|
|
|
|
|
|
|
|
|
|
|
|
|
|
|
|
|
|
|
|
|
 SMART HELP
 Remember, be sure to
 turn the Timer ACTIVATE ON after setting the desired
up time. (Refer to page 8 for details.)
SETTING THE TV’S ON TIMER DISPLAY
nce the television clock has |
|
|
|
|
Obeen set, you can use your |
|
|
|
|
television as a clock. The Timer |
|
|
|
|
DISPLAY control allows you to per- |
|
|
|
|
manently display the time in the |
|
|
|
|
upper right corner of the screen. |
.PICTURE |
|
|
|
BEGIN |
|
|
|
|
button on the |
|
|
|
|
on-screen menu. |
.SOUND |
TIMER |
|
|
.FEATURES |
SmartLock |
.FEATURES |
|
|
will be highlighted. |
|
|||
.INSTALL |
NR |
|
||
|
|
|||
CURSOR DOWN ■ |
|
CONTRAST + |
.. |
|
|
CLOSED CAP |
|
||
select the FEA- |
|
.TIMER |
TIME |
|
|
|
.SmartLock |
ACTIVATE |
|
|
|
|
||
menu. |
|
|
.NR |
CHANNEL |
|
|
|
.CONTRAST + |
START TIME |
CURSOR RIGHT |
|
|
.CLOSED CAP |
DISPLAY |
the menu will shift |
|
|
|
|
|
|
|
..TIMER |
|
. |
|
|
|
|
|
|
|
|
|
left to display the TIMER |
|
|
|
|
|
|
|
.FEATURES |
|
CURSOR RIGHT |
|
|
|
|
|
|
|
..TIME |
|
|
|
|
POWER |
|
|
|
.ACTIVATE |
|
|
|
|
SLEEP |
|
|
|
|
.CHANNEL |
|
|
|
|
|
|
|
|
|
|
||
again to shift the dis- |
TV |
AV |
STATUS/EXIT CC |
TV/VCR-CLOCK |
|
|
|
|
|
left, then CURSOR DOWN ■ |
VCR |
VCR |
INCREDIBLE MULTI |
A/CH |
|
|
|
.START TIME |
|
the DISPLAY control. |
ACC |
RECORD STEREO MEDIA |
|
|
|
|
.DISPLAY |
|
|
|
|
|
UP |
|
|
|
|
|
|
CURSOR RIGHT |
1 |
|
|
|
|
|
5 |
.FEATURES |
|
again to highlight the |
SMART |
SMART |
|
4 |
..TIMER |
|
|||
control options. Then, |
|
SOUND |
|
3 |
|
..TIME |
|
||
|
MENU |
|
|
|
.ACTIVATE |
|
|||
the CURSOR UP © or CUR- |
|
|
|
|
|
|
|||
|
|
|
|
|
|
|
|
.CHANNEL |
|
DOWN ■ buttons to turn the |
|
|
|
|
|
|
|
.FESTARTTURESTIME |
.ON |
|
|
|
|
|
|
|
|
.. |
|
ON or OFF. |
|
|
|
|
|
|
|
..DISPLAYTIMER |
|
|
|
|
|
|
|
|
|
. |
|
|
|
VOL |
|
|
|
|
|
FEATURESTIME |
|
|
|
|
|
2 |
|
|
|
TIMERACTIVATE |
|
|
|
|
|
|
|
|
.CHANNEL |
|
|
|
|
|
|
|
|
|
|
.START TIME |
.OFF |
SMART HELP |
|
|
|
|
|
|
|
.DISPLAY |
|
|
|
|
|
|
|
|
FEATURES |
|
|
|
|
|
|
|
|
|
|
|
|
TIMER
Remember, be sure you
 have set the television’s with the correct current time. to page 7 to set the Clock
or page 2 of the Quick Guide to set the Clock
using the Smart feature.)
 Loading...