Oster 6800-6839 User Manual 2

513665_core_blender_IB_REV.qxd 6/19/09 10:53 AM Page 36
For product questions contact: Sunbeam Consumer Service USA : 1.800.334.0759 Canada : 1.800.667.8623 www.oster.com
©2009 Sunbeam Products, Inc. doing business as Jarden Consumer Solutions. All rights reserved. Distributed by Sunbeam Products, Inc. doing business as Jarden Consumer Solutions, Boca Raton, Florida 33431.
Pour les questions de produit: Sunbeam Consumer Service États-Unis : 1.800.334.0759 Canada : 1.800.667.8623 www.oster.com
©2009 Sunbeam Products, Inc. faisant affaires sous le nom de Jarden Consumer Solutions. Tous droits reservés. Distribué Sunbeam Products, Inc. faisant affaires sous le nom de Jarden Consumer Solutions, Boca Raton, Florida 33431.
Para preguntas sobre los productos llame: Sunbeam Consumer Service EE.UU. : 1.800.334.0759 Canadá : 1.800.667.8623
www.oster.com
©2009 Sunbeam Products, Inc. operando bajo el nombre de Jarden Consumer Solutions. Todos los derechos reservados. Distribuido por Sunbeam Products, Inc. operando bajo el nombre de Jarden Consumer Solutions, Boca Raton, Florida 33431.
|
|
IC |
|
|
|
|
V |
I |
|
|
|
||
O |
|
|
||||
R |
|
|
|
|
||
|
|
|
|
|
||
E |
|
|
|
“UNA RESPUESTA PARA |
||
|
|
|
|
O |
||
S |
|
|
|
|
||
|
|
|
|
|
CADA PREGUNTA” |
|
|
|
|
|
C |
|
|
T |
ÉC |
I |
¿TIENE UD. ALGUNA PREGUNTA |
|||
|
|
|||||
|
|
|
N |
|
O COMENTARIO? |
|
|
|
|
|
|
|
|
LLÁMENOS SIN COSTO AL: 01-800-506-17-00
DEL D.F. AL: 53-66-08-00
DE LUNES A VIERNES DE LAS 8:30 HRS. A LAS 17:00 HRS.
PARA MÉXICO SÓLAMENTE – FOR MEXICO ONLY
LICUADORA OSTER®
Modelos 6800-013, 6802-013, 6804-013, 6806-013, 6807-013, 6808-013, 6809-013, 6812-013, 6813-013, 6814-013, 6817-013, 6825-013, 6834-013, 6839-013, 6850-013, 6854-013, 6873-013, 6881-013, 6882-013, 6889-013
IMPORTADOR: Sunbeam Méxicana, S.A. de C.V. Avenida Juárez, No. 40-201
Ex-Hacienda de Santa Mónica Tlalnepantla, Estado de México, C.P. 54050 R.F.C. SME-570928-G90, Tel.: 53-66-08-00
PAÍS DE ORIGEN: México
PAÍS DE PROCEDENCIA: México, E.U.A.
Lea el Instructivo Ante de Usar el Aparato
NOM 004 |
Características Eléctricas |
|
60 Hz |
120 V~ 450 W |
|
MR |
Contenido: 1 Pieza |
|
SUNBEAM MEXICANA, S.A. DE C.V.
Avenida Juárez No. 40-201
Ex–Hacienda de Santa Mónica
Tlalnepantla, Estado de México, C.P. 54050
Tel. 5366-0800, Fax 5366-0810
Printed in U.S.A. |
Imprimé aux États-Unis |
Impreso en EE.UU. |


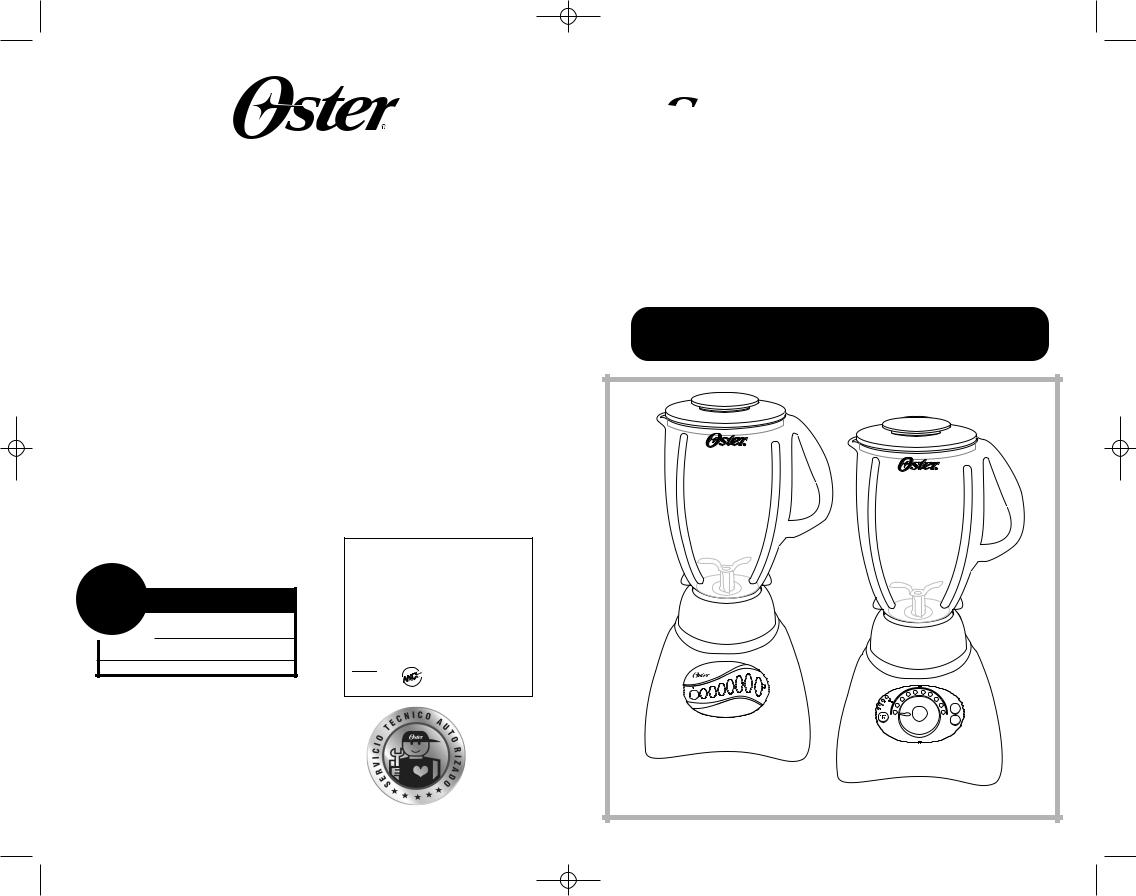
 BLENDER
LICUADORA
User Manual M
Manual de Instrucciones ÉLANGEUR Manuel d’Instructions
MODELS/MODELOS 6800-6839, 6850-6889, MODÈLES BLSTCP, BLSTCC
Pulse
Visit us at www.oster.com |
P.N. 110500-005 |

513665_core_blender_IB_REV.qxd 6/19/09 10:53 AM Page 2
IMPORTANT SAFEGUARDS
When using electrical appliances, basic safety precautions should be followed, including the following:
READ ALL INSTRUCTIONS BEFORE USE
•Unplug cord from outlet when not in use or before cleaning.
•To protect against risk of electrical shock, do not immerse the cord, plug or motor base in water or any other liquids.
•Do not let cord hang over edge of table or counter or touch hot surfaces.
•Never leave appliance unattended when in use.
•Close supervision is necessary when used near children.
•Avoid contact with moving parts. Keep hands and utensils out of jar while blending to prevent personal injury or damage to the blender. A rubber spatula may be used only when the blender is not running.
•The blade is sharp. Handle with care.
•Always put the lid on the jar before operating the blender.
•When blending hot liquids beware of steam. Remove the jar lid food chute from the lid to allow steam to escape.
•Do not blend boiling liquids in the blender.
•Do not operate any appliance with a damaged cord or plug or after the appliance malfunctions or is dropped or damaged in any manner. Return the appliance
to the nearest Authorized Sunbeam Appliance Service center for examination, repair or electrical or mechanical adjustment.
•Do not use outdoors or for commercial purposes; this appliance is for household use only.
•Use this appliance for its intended use as described in this manual.
Do not use attachments that are not recommended by the manufacturer; they may cause injury.
•Always operate on a flat surface.
•Unplug the blender when it is not in use, before taking off or putting on parts and before cleaning.
•The use of attachments not made by OSTER®, including canning or ordinary jar and processing assembly parts, is not recommended by Sunbeam Products, Inc., and may cause injury to persons.
THIS PRODUCT IS FOR HOUSEHOLD USE ONLY
The maximum rating marked on the product is based on the attachment that draws the greatest load. Other attachments may draw less power.
POWER CORD INSTRUCTIONS
Please follow the instructions below to ensure the safe use of the power cord.
•This appliance is equipped with a polarized plug. This type of plug has one blade that is wider than the other. This plug will fit in a polarized outlet only one way. This is a safety feature intended to help reduce the risk of electrical shock. If you are unable to insert the plug into the outlet, contact a qualified electrician to replace the obsolete outlet. Do not attempt to defeat the safety purpose of the polarized plug by modifying the plug in any way.
•You may use an extension cord, if necessary, but be certain to follow these guidelines:
–The marked electrical rating of the extension cord must be at least 120/127 volt, 60 Hz, 10A.
–The extension must be arranged so that it will not drape over the countertop or tabletop, will not be within the reach of children, and will not be tripped over.
•Do not pull, twist, or otherwise abuse the power cord.
SAVE THESE INSTRUCTIONS
English 2 |
English 3 |

513665_core_blender_IB_REV.qxd 6/19/09 10:53 AM Page 4
WELCOME
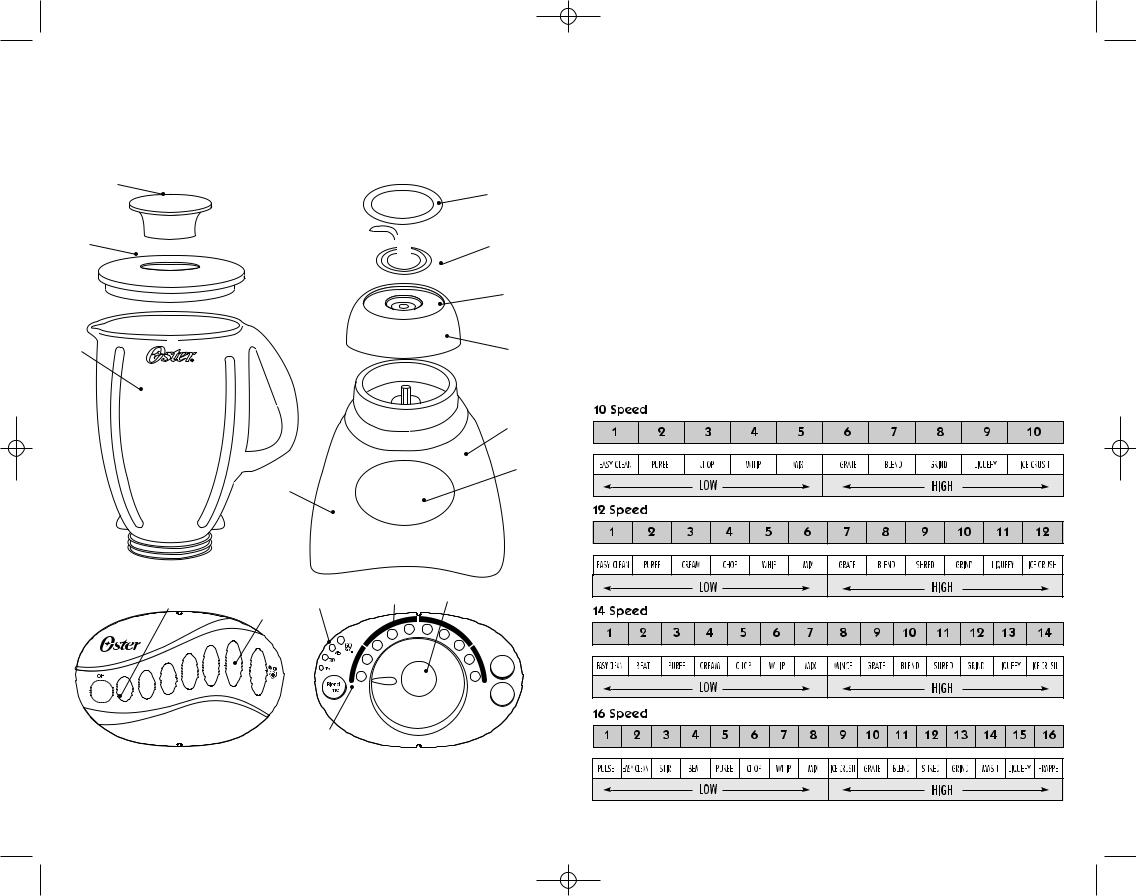
Congratulations on your purchase of an OSTER® Blender! To learn more about OSTER® products, please visit us at www.oster.com.
LEARNING ABOUT YOUR BLENDER
A
D
B  E
E
F
C |
G** |
H
I
J
K* |
N |
M L* |
|
L* |
|
Pulse
K*
PUSH BUTTON CONTROL PANEL |
DIAL CONTROL PANEL |
*Location varies by model **Select models only
FEATURES OF YOUR BLENDER
A.Feeder Cap for adding ingredients while blending
B.Leak Proof Lid
C.Jar – Your Oster Blender includes one of the following:
•5-6 Cup Dishwasher Safe/Scratch Resistant Glass Jar
•6-Cup Break-Resistant Plastic Jar
•8-Cup Dishwasher Safe Glass Party Pitcher
•5-Cup Double Walled-Insulated Thermal Jar – keeps frozen drinks, smoothies and milkshakes cold for hours
D.Sealing Ring for tight seal
E.Ice Crush Blade pulverizes ice for smooth frozen drinks.
F.Threaded Bottom Disc
G.Collar for stability from countertop to refrigerator to table
(select models only)
H.Powerful Motor with ALL-METAL DRIVE for extra durability
I.Control Panel
J.Convenient Cord Storage
K.Easy-Clean Feature – quickly cleans jars in between batches
L.Pulse for precise blending control
M.Food and drink selections for perfect results – controls allow you
to keep your blender set at your favorite food/drink selection
N.Auto Blend™ Timer (select models only)
English 4 |
English 5 |

513665_core_blender_IB_REV.qxd 6/19/09 10:53 AM Page 6
USING YOUR BLENDER
Clean blender according to the instructions in the “Cleaning and Storing Your Blender” section.
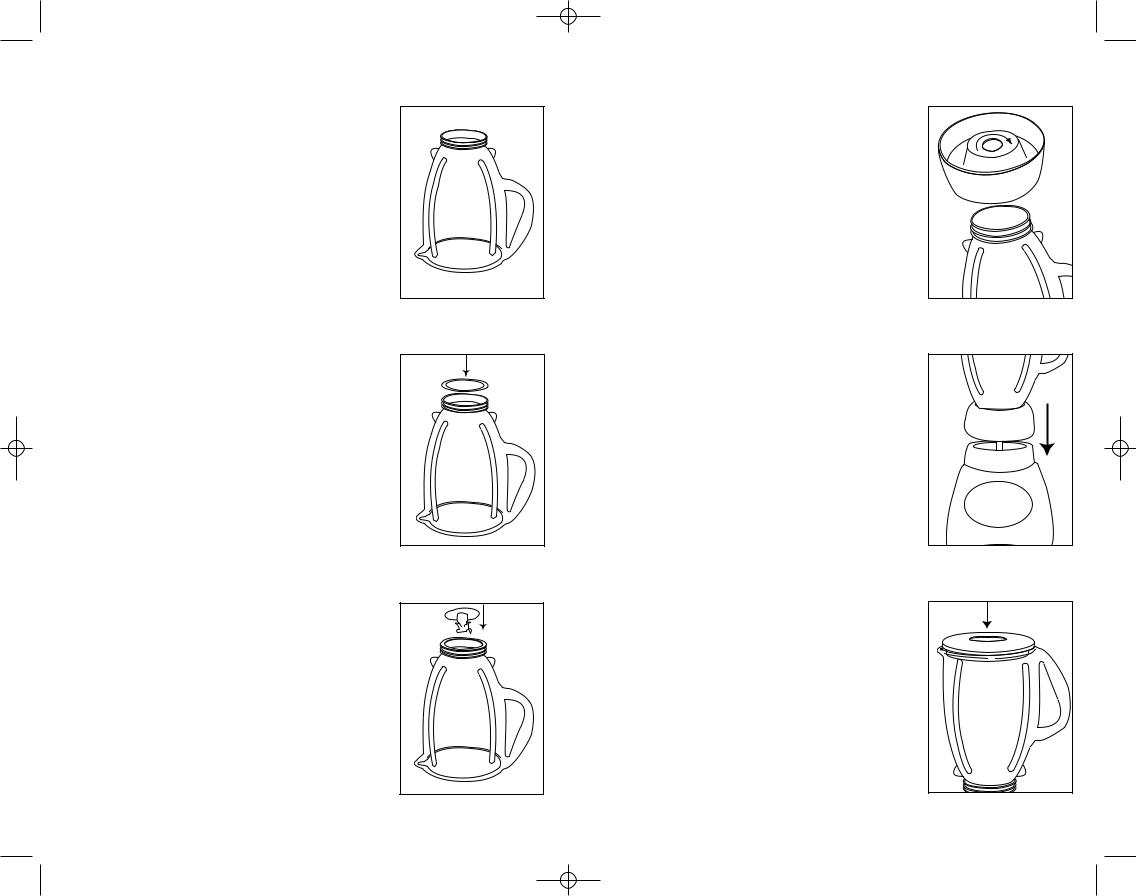
Jar Assembly:
–Turn jar upside down so the small opening is at the top. (Figure 1)
–Place sealing ring over jar opening. (Figure 2)
–Place blade into jar. (Figure 3)
–Snap threaded bottom disc and collar together. Place collar over blade and jar. (Note: If there are slots on top of collar, line them up with notches on jar.) Place the collar on jar and turn the threaded bottom disc clockwise to tighten.
(Figure 4)
–Place jar assembly onto base. (Figure 5)
–Place ingredients into jar.
–Place lid with feeder cap on jar.
–Plug the power cord into a 120 Volt AC electrical outlet.
PUSH BUTTON MODELS
Slide switch to HIGH or LOW (If your model does not have a slide switch, push HIGH or LOW button.)
Push desired speed and blend ingredients to desired consistency.
Push OFF to stop the blender and turn blender off.
To use PULSE, select HIGH or LOW. Push PULSE and hold down for desired length of time.Release PULSE and allow blade to stop. Repeat cycle as desired.
DIAL MODELS WITHOUT TIMER
Turn dial to desired food/drink selection.
Press ON and blend ingredients to desired consistency.
Press OFF to stop the motor and turn blender off. Note: Food/drink selection can be changed during blending by turning the dial to the desired selection.
To use PULSE, turn dial to desired food/drink selection. Press PULSE and hold down for desired length of time. Release and allow blade to stop. Repeat cycle as desired.
FIGURE 1
FIGURE 2
FIGURE 3
DIAL MODELS WITH TIMER
PRESS POWER TO TURN THE BLENDER ON.
The blender is set to the food/drink selection identified by a blinking indicator light. Turn dial to change the food/drink selection.
Press START and blend ingredients to desired consistency.
Press STOP to stop the motor. (Pressing POWER stops the motor and turns the blender off.)
Note: Food/drink selection can be changed during blending by turning the dial to the desired selection. Note: This blender is programmed to turn the power off automatically if not used for a period
of several minutes.
To use PULSE, turn dial to desired food/drink selection. Press PULSE and hold down for desired length of time. Release and allow blade to stop. Repeat cycle as desired.
To use Auto Blend™ Timer, press BLEND TIME until desired length of blending time (15, 30, 45, 60 seconds) is illuminated.
Turn dial to desired food/drink selection.
Press START. Blender will automatically stop when selected time has elapsed.
To stop blender before elapsed time, press STOP.
To use blender without timer, press BLEND TIME until no lights are illuminated.
BLENDING TIPS
•Put liquids in the jar first, unless a recipe says otherwise.
•Crushing ice: Crush 6 ice cubes or approximately 2 cups of ice at a time.
•This blender has been designed to gently process foods when operating at low speeds. If blades do not rotate during operation, simply choose a higher speed.
•Do not remove the lid while in use. Remove feeder cap to add smaller ingredients. (Figure 7)
•Cut all firm fruits and vegetables, cooked meats, fish and seafood into pieces no larger than 1/2 inch
(1.8 cm) to 1 inch (2.5 cm). Cut all kinds of cheeses into pieces no larger than 1/2 inch (1.8 cm).
•This blender will not mash potatoes, whip egg whites or substitute dairy toppings, mix stiff dough or grind raw meat.
FIGURE 4
FIGURE 5
FIGURE 6
English 6 |
English 7 |

513665_core_blender_IB_REV.qxd 6/19/09 10:53 AM Page 8
PROCESSING FOODS IN BLENDER
FOOD |
PROCESSED |
UNPROCESSED |
SPECIAL |
QUANTITY |
QUANTITY |
INSTRUCTIONS |
|
|
|
|
|
Breadcrumbs |
1/2-cup (125 ml) |
1 slice, torn in 8 pieces |
Pulse 1 – 4 times |
|
|
|
|
Celery |
3/4-cup (200 ml) |
1-cup (250 ml) |
Pulse 2 – 3 times |
|
|
of 1-inch (2.5 cm) pieces |
|
|
|
|
|
Cheese, Cheddar |
1-cup (250 ml) |
1-cup (250 ml) |
Pulse 2 times |
|
|
of 1-inch (2.5 cm) pieces |
|
|
|
|
|
Cheese, Swiss |
1-cup (250 ml) |
1-cup (250 ml) |
Pulse 5 times |
|
|
of 1-inch (2.5 cm) pieces |
|
|
|
|
|
Cheese, |
1-cup (250 ml) |
1-cup (250 ml) |
Chop continuously |
Hard or Semi-Hard |
|
of 1-inch (2.5 cm) pieces |
|
|
|
|
|
Coffee Beans |
1-cup (250 ml) |
1-cup (250 ml) |
Grind 45 seconds |
|
|
|
for percolators and |
|
|
|
60 seconds for drip |
|
|
|
|
Cookies, Wafer |
1/2-cup (125 ml) |
10 wafers |
Pulse 3 times |
|
|
|
|
Crackers, Graham |
1/2-cup (125 ml) |
8 crackers |
Pulse 3 times |
|
|
|
|
Peppers |
2/3-cup (150 ml) |
1-cup (250 ml) |
Pulse 1 time |
|
|
|
|
Meat, Boneless, Cooked |
1-cup (250 ml) |
1-cup (250 ml) |
Chop continuously |
|
|
of 1-inch (2.5 cm) pieces |
|
|
|
|
|
Nuts, almonds, peanuts, |
1-cup (250 ml) |
1-cup (250 ml) |
Pulse 2 – 4 times |
pecans, walnuts |
|
|
|
|
|
|
|
STORING YOUR BLENDER
After cleaning, reassemble blade to jar with sealing ring and collar.
Store blender with cover ajar to prevent container odor.
RECIPES
For fun and creative recipes for your new Oster® blender please visit www.oster.com. Here you will find everything from the perfect Breakfast Smoothie to creamy Soups, Sauces and a host of Oster® signature Frozen Drinks. For the perfect recipe for any occasion – turn on your creativity with Oster®!
GINGER PEACH SMOOTHIE
|
|
|
FROZEN |
|
|
|
MAKES |
YOGURT |
ICE CUBES |
SLICED |
FROZEN BANANA |
WHITE GRAPE |
GROUND |
CUPS |
(OUNCES) |
MEDIUM |
PEACHES |
(2INCH CHUNKS) |
JUICE (CUPS) |
GINGER (TSP) |
2 |
8 |
2 |
5 |
2 |
3/8 |
1/8 |
|
|
|
|
|
|
|
3 |
12 |
3 |
8 |
3 |
1/2 |
1/5 |
|
|
|
|
|
|
|
4 |
16 |
4 |
10 |
4 |
5/8 |
1/4 |
|
|
|
|
|
|
|
5 |
20 |
5 |
13 |
5 |
7/8 |
1/3 |
|
|
|
|
|
|
|
6 |
24 |
6 |
15 |
6 |
1 |
3/8 |
|
|
|
|
|
|
|
7 |
28 |
7 |
18 |
7 |
1 1/8 |
1/2 |
|
|
|
|
|
|
|
8 |
32 |
8 |
20 |
8 |
1 3/8 |
1/2 |
|
|
|
|
|
|
|
CLEANING AND STORING YOUR BLENDER
IMPORTANT: UNPLUG BEFORE CLEANING BASE and DO NOT IMMERSE THE BLENDER BASE IN WATER OR ANY OTHER LIQUIDS. Use a damp, soft sponge with mild detergent to clean the outside of the blender base. All parts except
for the blender base are dishwasher safe. Collar and threaded bottom disc are top rack dishwasher safe ONLY. Collar and threaded bottom disc can be separated for cleaning. Hold collar with both hands and press down on top of disc with thumbs. Place sealing ring in bottom basket of dishwasher. You can also wash the parts in warm, soapy water. Rinse well and dry.
EASY CLEAN
Pour 3 cups of warm water in the blender jar. Add 1 – 2 drops of liquid dishwashing detergent. Select Easy Clean. Blend detergent for 10 –15 seconds. Empty jar of soapy water into sink. Rinse jar thoroughly with clean water.
Note: Easy Clean is not a substitute for regular cleaning described above. It is especially important to disassemble and thoroughly clean your blender when processing milk, dairy products, meats, seafood and eggs.
STRAWBERRY SMOOTHIE
|
|
|
FROZEN |
|
|
|
MAKES |
YOGURT |
ICE CUBES |
STRAWBERRIES |
FROZEN BANANA |
WHITE GRAPE |
GROUND |
CUPS |
(OUNCES) |
MEDIUM |
(1INCH DIA.MAX) |
(2INCH CHUNKS) |
JUICE (CUPS) |
GINGER (TSP) |
2 |
7 |
2 |
2 |
2 |
3 |
1/8 |
|
|
|
|
|
|
|
3 |
11 |
3 |
3 |
3 |
4 1/2 |
1/5 |
|
|
|
|
|
|
|
4 |
14 |
4 |
4 |
4 |
6 |
1/4 |
|
|
|
|
|
|
|
5 |
18 |
5 |
5 |
5 |
7 1/2 |
1/3 |
|
|
|
|
|
|
|
6 |
21 |
6 |
6 |
6 |
9 |
3/8 |
7 |
28 |
7 |
7 |
7 |
10 1/2 |
1/2 |
|
|
|
|
|
|
|
8 |
32 |
8 |
8 |
8 |
12 |
1/2 |
|
|
|
|
|
|
|
English 8 |
English 9 |
 Loading...