


For product questions contact:
Jarden Consumer Service
USA: 1.800.334.0759
Canada: 1-800-667-8623
www.oster.com
©2014 Sunbeam Products, Inc. doing business as Jarden Consumer Solutions.
All rights reserved. Distributed by Sunbeam Products, Inc.
doing business as Jarden Consumer Solutions, Boca Raton, Florida 33431.
SPR-082114-572P
Para preguntas sobre los productos llame:
Jarden Consumer Service
EE.UU.: 1.800.334.0759
Canadá: 1-800-667-8623
www.oster.com
©2014 Sunbeam Products, Inc. operando bajo el nombre de
Jarden Consumer Solutions. Todos los derechos reservados.
Distribuido por Sunbeam Products, Inc. operando bajo el nombre de
Jarden Consumer Solutions, Boca Raton, Florida 33431.
Pour les questions de produit:
Jarden Consumer Service
États-Unis : 1.800.334.0759
Canada : 1-800-667-8623
www.oster.com
© 2014 Sunbeam Products, Inc. faisant affaires sous le nom de
Jarden Consumer Solutions. Tous droits reservés. Distribué Sunbeam Products, Inc.
faisant affaires sous le nom de Jarden Consumer Solutions,
Boca Raton, Florida 33431.
Printed in USA Impreso en EEUU Imprimé aux USA

User Manual Bl ender
Manual de Instrucciones Licuadora
Manuel d’Instructions Mélangeur
MODELS/MODELOS
MODÈLES
OSTER
®
BLSTDG SERIES
Visit us at www.oster.com
P.N. 135518-007-000

IMPORTANT SAFEGUARDS
When using electrical appliances, basic safety precautions should be followed,
including the following:
READ ALL INSTRUCTIONS BEFORE USE
• Unplug cord from outlet when not in use or before cleaning.
• To protect against risk of electrical shock, do not immerse the cord, plug or motor base in
water or any other liquids.
• Do not let cord hang over edge of table or counter or touch hot surfaces.
• Never leave appliance unattended when in use.
• Close supervision is necessary when used near children.
• Flashing Power Light indicates ready to operate. Avoid ANY contact with blades or moveable
parts. Keep hands and utensils out of jar while blending to prevent personal injury or damage
to the blender. A rubber spatula may be used only when the blender is not running.
• The blade is sharp. Handle with care.
• Always put the lid on the jar before operating the blender.
• Do not blend boiling liquids in the blender.
• When blending hot liquids, remove the flip-top spout cover from the lid. The steam from hot
liquids may push lid off jar during blending. To prevent possible burns, do not fill jar beyond
the 2 cup level. With the protection of oven mitt or towel, place one hand on top of lid. Keep
exposed skin away from lid. Start blending at lowest speed.
• Do not operate any appliance with a damaged cord or plug, or after the appliance
malfunctions or is dropped or damaged in any manner. Return the appliance to the nearest
Authorized Sunbeam Appliance Service center for examination, repair or electrical or
mechanical adjustment.
• Do not use outdoors or for commercial purposes; this appliance is for household use only.
• Use this appliance for its intended use as described in this manual. Do not use attachments
that are not recommended by the manufacturer; they may cause injury.
• Always operate on a flat surface.
• Unplug the blender when it is not in use, before taking off or putting on parts and
before cleaning.
• The use of attachments not made by OSTER® products, including canning or ordinary jar
and processing assembly parts, is not recommended by Sunbeam Products, Inc., and may
cause injury to persons.
This ProducT is for household use only
The maximum rating marked on the product is based on the attachment that draws the
greatest load. Other attachments may draw less power.
Power Cord InstruCtIons
Please follow the instructions below to ensure the safe use of the power cord.
• This appliance is equipped with a polarized plug. This type of plug has one blade that
is wider than the other. This plug will fit in a polarized outlet only one way. This is
a safety feature intended to help reduce the risk of electrical shock. If you are unable
to insert the plug into the outlet, contact a qualified electrician to replace the obsolete
outlet. Do not attempt to defeat the safety purpose of the polarized plug by modifying
the plug in any way.
• You may use an extension cord, if necessary, but be certain to follow these guidelines:
– The marked electrical rating of the extension cord must be at least 120/127 volt,
60 Hz, 10A.
– The extension must be arranged so that it will not drape over the countertop or
tabletop, will not be within the reach of children and will not be tripped over.
• Do not pull, twist or otherwise abuse the power cord.
SAVE THESE INSTRUCTIONS
2
welCome
Congratulations on your purchase of an OSTER® Blender!
To learn more about OSTER
®
products, please visit us at www.oster.com.
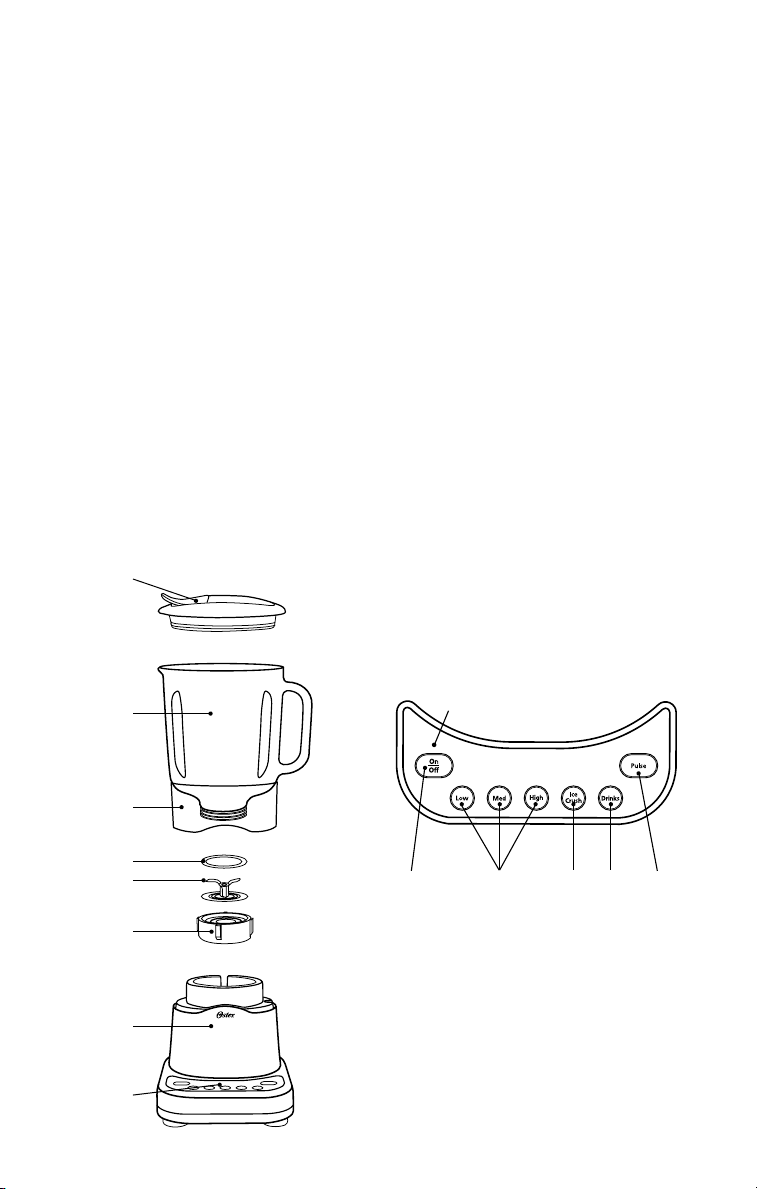
Features oF Your Blender
A. Pour through blender lid with
flip-top spout cover
B. Jar – Your Oster
®
Blender includes
one of the following:
• 7-Cup Dishwasher-Safe Glass Jar
• 8-Cup Break-Resistant Plastic Jar
C. Jar Skirt (attached to jar)
D. Sealing Ring for tight seal
E. Ice Crush Blade pulverizes ice
for smooth frozen drinks
F. Threaded Jar Nut
G. Powerful Motor with
d
rive System for lasting durability
All MeTAl
H. Electronic Control Panel
A
I. Pre-Programmed “Ice Crush”
setting - pulses on high for
30 seconds with auto shut-off
J. “ Pulse” for precise
blending control
K. “High”, “Medium” and “Low”
Speed Selections
L. Pre-Programmed “Frozen Drinks”
setting - runs on high for
45 seconds with auto shut-off
M. ON/OFF will cease operation
N. ON/OFF button flashes red
when ready to operate
B
C
D
E
F
G
H
N
M
I L JK
3
usIng Your Blender
Clean blender according to the instructions in the “Cleaning and Storing
Your Blender” section.
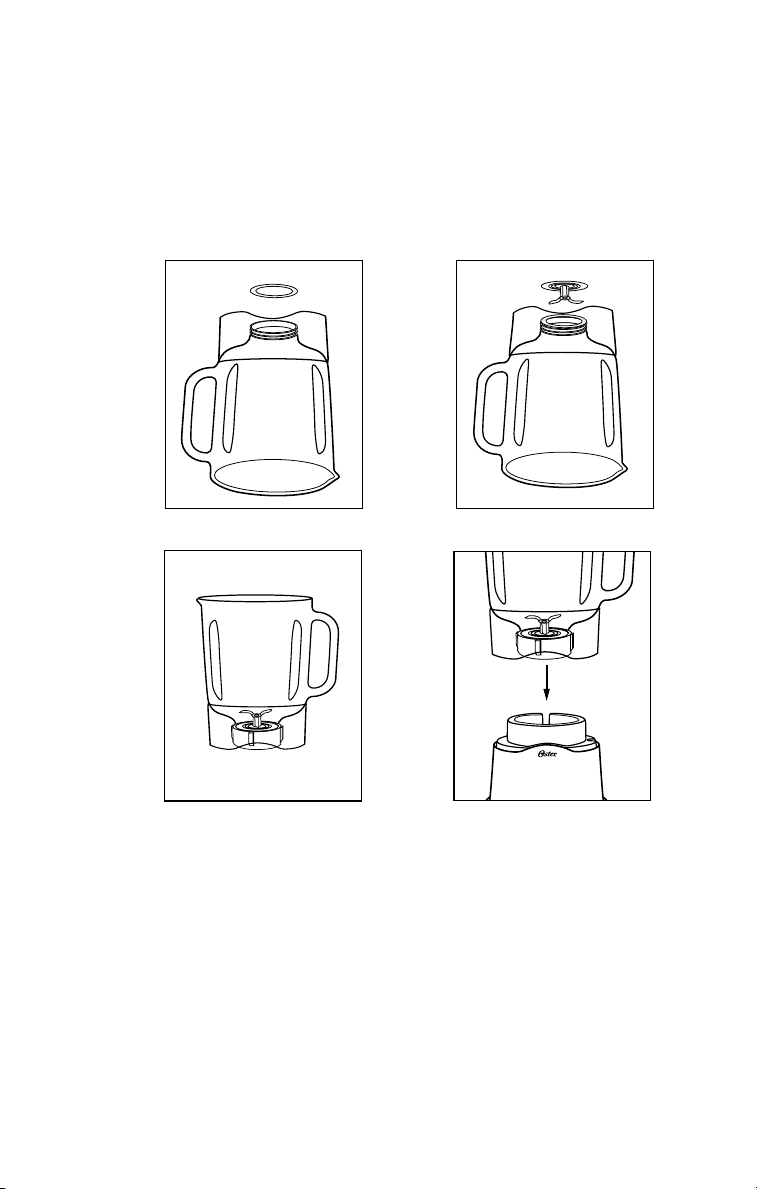
Jar assembly:
1. Turn jar upside down so the small opening is at the top. (Figure 1)
2. Place sealing ring over jar opening. (Figure 1)
3. Place blade into jar. (Figure 2)
Figure 1 Figure 2
F
igure
Figure 3
4
4. Place threaded jar nut over blade and jar. Place the threaded jar nut on
jar and turn it clockwise to tighten. (Figure 3)
5. Place jar assembly onto base. (Figure 4)
6. Place ingredients into jar according to your recipe. For best results always
add liquids first when blending.
7. Place pour through lid on jar.
8. Plug the power cord into a 120 Volt AC electrical outlet.
9. Touch the “POWER” button to turn the product on. The LED Indicator
will flash red (and continue to flash) indicating it is ready to operate. You
are now ready to blend. Avoid contact with blades and moveable parts.
4

Jar Features
Your new blender features a uniquely shaped oval jar that is designed to fit
in most refrigerator doors for convenient storage of drinks. This new jar
design creates a figure eight vortex ensuring that all ingredients are blended
efficiently for outstanding drink results.
Your new blender is equipped with a pitcher-style, flip-top lid so you don’t
have to remove the lid for pouring.
sPeed modes: low, medIum, HIgH
• To blend in High Speed, press the “HIGH” button. This is good for
Blending, Shredding, Grinding, Liquefying, and Ice crushing. Perfect for
Smoothies, Frozen Drinks, and Soups.
• To Blend in Medium Speed, press the “MED” button. This is good for
Whipping, Mincing, Pureeing, and grating. Perfect for Milkshakes, Baby
Food, Sauces, Dips, and Spreads.
• To Blend in Low Speed, press the “LOW” button. This is good for
Stirring, beating, Creaming, Chopping, and Mixing. Perfect for Food
Chopping.
• To Stop blending, press the “ON/OFF” button. The motor will come to
a stop. (Pressing the “ON/OFF” button stops the motor and turns off the
blender.)
• You can move between speeds at any time while blending by pressing any
of the other speed buttons. The new speed will start without interruption.
• Pressing the “PULSE” Button will give a momentary pulse at high speed.
The motor will then stop.
NOTE: Pressing the “ICE CRUSH or DRINKS” or the Speed button at
which it is blending will also stop the motor.
Pre-Programmed settIngs
Your new blender features 2 Pre-Programmed Settings:
“Ice Crush” and “Drinks”.
• The “ICE CRUSH” setting is ideal for crushing larger quantities of ice.
The “ICE CRUSH” mode pulses between high and off for 30 seconds and
will automatically shut off at the end of the cycle.
• The “DRINKS” setting is designed for perfectly blended frozen drinks.
The “DRINKS” setting runs on high speed for 45 seconds and will
automatically shut off at the end of the cycle.
• To stop blending in either of these settings, press the “ON/OFF” button.
The motor will come to a stop. (pressing the “ON/OFF” button stops the
motor and turns the blender off.)
• Pressing the “PULSE” button will give a momentary pulse at high speed.
The motor will then stop.
5
to use tHe Pulse settIng
The “PULSE” button momentarily activates the blender at HIGH speed.
You may also continuously touch the “PULSE” button to pulse as desired.
• To Pulse, press the “PULSE” button to activate a momentary high speed.
The blender will run at high speed as long as you press the button. The
motor will stop when you stop pressing the button.
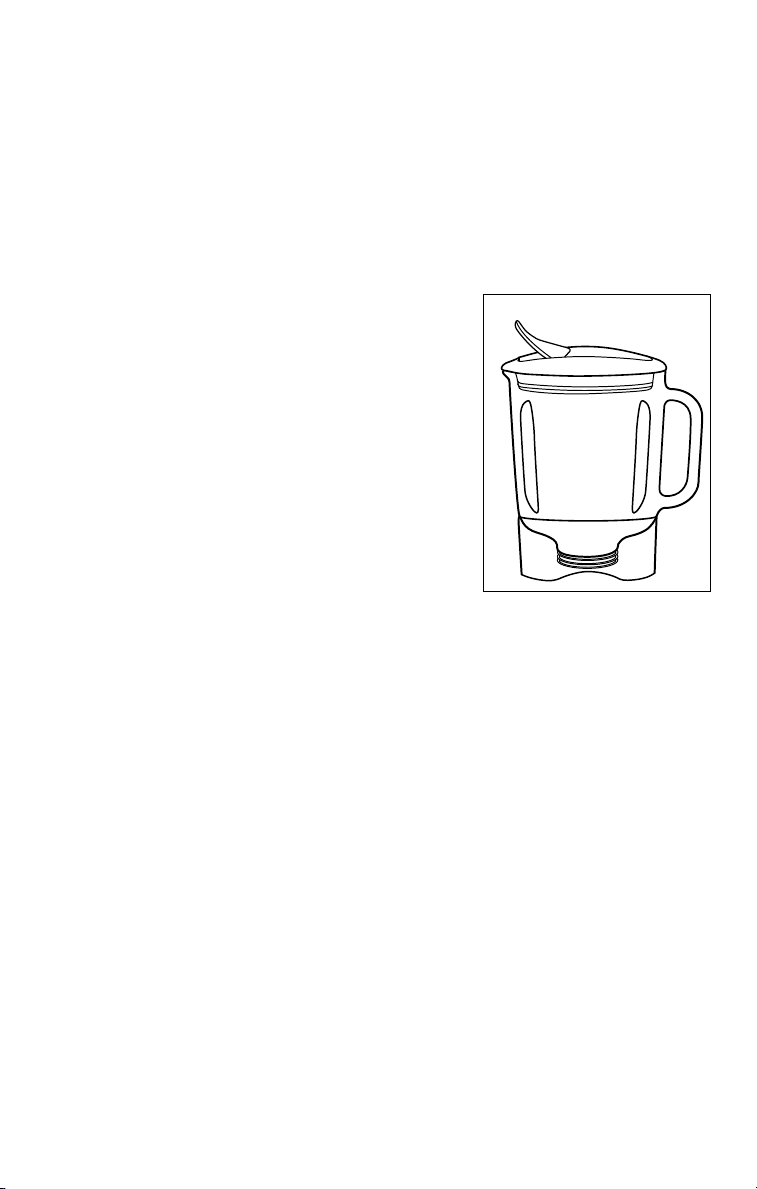
BlendIng tIPs
• Working with Hot Foods or Liquids:
(!!) WARNING: When you work with HOT
FOODS, flip the jar lid open to vent steam.
Partially cover the opening keeping hands and
other exposed skin away from the lid opening
to prevent possible burns. (Figure 6)
(!!) WARNING: When you work with HOT
LIQUIDS, flip the jar lid open and start at a
low speed, and gradually increase to a faster
speed. Do not add liquid over the 2 cup (.5L)
level. Always keep hands and exposed skin
away from steam. Start blending at lowest
speed. (Figure 6)
• Put liquids in the jar first, unless a recipe
says otherwise.
• Crushing ice: Crush approximately 3 cups of ice at a time with 2 cups of
liquid for optimal results.
• Do not remove the lid while in use. Flip the jar lid open to add smaller
ingredients. (Figure 6)
• This blender has been designed to gently process foods when operating
at low speeds. If blades do not rotate during operation, simply choose a
higher speed.
• This blender will not mash potatoes, whip egg whites or substitute dairy
toppings, mix stiff dough or grind raw meat.
Figure 6
CleanIng and storIng Your Blender
IMPORTANT: Unplug Before Cleaning Base And Do Not Immerse
The Blender Base In Water Or Any Other Liquids.
Use a damp, soft sponge with mild detergent to clean the outside of the
blender base and control panel. All parts except for the blender base are
dishwasher safe. Place sealing ring in bottom basket of dishwasher. You can
also wash the parts in warm, soapy water. Rinse well and dry.
6

storIng Your Blender
After cleaning, reassemble blade to jar with sealing ring and threaded jar
bottom. Store blender with cover ajar to prevent container odor.
reCIPes
For fun and creative recipes for your new Oster® blender please visit
www.oster.com. Here you will find everything from the perfect Breakfast
Smoothie to creamy Soups, Sauces and a host of Oster® signature Frozen
Drinks. For the perfect recipe for any occasion — turn on your creativity
with Oster®!
gInger PeaCH smootHIe
Makes
Cups
2
3
4
5
6
7
8
Makes
Cups
2
3
4
5
6
7
8
Yogurt
(ounCes)
8
12
16
20
24
28
32
Yogurt
(ounCes)
7
11
14
18
21
25
28
Frozen
ICe Cubes
MedIuM
2
3
4
5
6
7
8
slICed
peaChes
5
8
10
13
15
18
20
Frozen banana
(2 InCh Chunks)
strawBerrY smootHIe
Frozen
ICe Cubes
MedIuM
2
3
4
5
6
7
8
straWberrIes
(1 InCh dIa. Max)
2
3
4
5
6
7
8
Frozen banana
(2 InCh Chunks)
WhIte
grape JuICe
(ounCes)
2
3
4
5
6
7
8
2
3
4
5
6
7
8
3
4 1/2
6
7 1/2
9
10 1/2
12
WhIte
grape JuICe
(ounCes)
3
4 1/2
6
7 1/2
9
10 1/2
12
ground
gInger (tsp)
1/8
1/5
1/4
1/3
3/8
1/2
1/2
ground
gInger (tsp)
1/8
1/5
1/4
1/3
3/8
1/2
1/2
7

reCIPes
VanIlla mIlksHake
Makes
Cups
2
3
4
5
6
7
8
Makes
Cups
2
3
4
5
6
7
8
ICe CreaM
Cups
2
3
4
5
6
7
8
ounCes
margarIta
tequIla
ounCes
5 1/2
6 1/2
7 1/2
MargarIta MIx
ounCes
2
3
4
5
MIlk
6
9
12
15
18
21
24
6
9
12
15
18
21
24
VanIlla
tsp
1/8
1/4
1/4
3/8
3/8
1/2
1/2
ICe
Cups
1 1/2
2 1/2
3
4
5
5 1/2
6 1/2
8

3 Year Satisfaction Guarantee
Sunbeam Products, Inc. doing business as Jarden Consumer Solutions or if in Canada, Sunbeam Corporation
(Canada) Limited doing business as Jarden Consumer Solutions (collectively “JCS”) warrants that for a
period of three (3) years from the date of purchase, this product will be free from defects in material and
workmanship. JCS, at the Consumer’s sole option, will repair, or replace this product or any component of
the product found to be defective during the guarantee period. This guarantee is valid for the original retail
purchaser from the date of initial retail purchase and is not transferable. Keep the original sales receipt. Proof
of purchase is required to obtain satisfaction guarantee performance. JCS dealers, service centers, or retail
stores selling JCS products do not have the right to alter, modify or any way change the terms and conditions
of this guarantee.
All Metal Drive Ten (10) Year Limited Warranty
JCS also warrants that for a period of ten (10) years from the date of purchase, the All Metal Drive base unit
metal coupling will be free from defects in material and workmanship. JCS, at its option, will repair or replace
the metal drive stud component of the All Metal Drive coupling if found to be defective during the warranty
period. Replacement will be made with a new or remanufactured product or component. If the product is
no longer available, replacement may be made with a similar product of equal or greater value. This is your
exclusive warranty. Do NOT attempt to repair or adjust any electrical or mechanical functions on this product.
Doing so will void this warranty.
This warranty does not cover damage resulting from any of the following: negligent use or misuse of the
product, use on improper voltage or current, use contrary to the operating instructions, disassembly, repair or
alteration by anyone other than JCS or an authorized JCS service center. Further, the warranty does not cover:
Acts of God, such as fire, flood, hurricanes and tornadoes.
This warranty is valid for the original retail purchaser from the date of initial retail purchase and is not
transferable. Keep the original sales receipt. Proof of purchase is required to obtain warranty performance.
JCS dealers, service centers, or retail stores selling JCS products do not have the right to alter, modify or
any way change the terms and conditions of this limited warranty.
What are the limits on JCS’ Liability?
JCS shall not be liable for any incidental or consequential damages caused by the breach of any express,
implied or statutory warranty or condition. Except to the extent prohibited by applicable law, any implied
warranty or condition of merchantability or fitness for a particular purpose is limited in duration to the
duration of the above limited warranty. JCS disclaims all other warranties, conditions or representations,
express, implied, statutory or otherwise. JCS shall not be liable for any damages of any kind resulting from the
purchase, use or misuse of, or inability to use the product including incidental, special, consequential or similar
damages or loss of profits, or for any breach of contract, fundamental or otherwise, or for any claim brought
against purchaser by any other party. Some provinces, states or jurisdictions do not allow the exclusion or
limitation of incidental or consequential damages or limitations on how long an implied warranty lasts, so the
above limitations or exclusion may not apply to you. This limited warranty gives you specific legal rights, and
you may also have other rights that vary from province to province, state to state or jurisdiction to jurisdiction
How to Obtain Satisfaction Guarantee and/or Limited Warranty Service
In the U.S.A.
If you have any question regarding this guarantee or limited warranty or would like to obtain guarantee or limited
warranty service, please call 1-800-334-0759 and a convenient service center address will be provided to you.
In Canada
If you have any question regarding this guarantee or limited warranty or would like to obtain guarantee or limited
warranty service, please call 1-800-667-8623 and a convenient service center address will be provided to you.
In the U.S.A., this guarantee and limited warranty is offered by Sunbeam Products, Inc. doing business as
Jarden Consumer Solutions located in Boca Raton, Florida 33431. In Canada, this guarantee and limited
warranty is offered by Sunbeam Corporation (Canada) Limited, located at 20 B Hereford Street, Brampton,
Ontario L6Y 0M1. If you have any other problem or claim in connection with this product, please write to the
Consumer Service Department.
PLEASE DO NOT RETURN THIS PRODUCT TO ANY OF
THESE ADDRESSES OR TO THE PLACE OF PURCHASE.
For inquiries regarding recycling and proper disposal of this product,
please contact your local waste management facility.
9

PRECAUCIONES IMPORTANTES
Cuando use algún aparato eléctrico siempre deben seguirse precauciones básicas
de-seguridad incluyendo las siguientes:
LEA TODAS LAS INSTRUCCIONES ANTES DE USAR
• Desenchufe el cable del tomacorriente cuando no lo use o antes de efectuar
la limpieza.
• Para protegerse contra el riesgo de descargas eléctricas no sumerja el cable,
enchufe o base del motor en agua ni en ningún otro líquido.
• No deje que el cable cuelgue sobre el borde de la mesa o superficie de trabajo ni
que toque superficies calientes.
• Jamás deje el electrodoméstico desatendido mientras lo esté usando.
• Es necesaria una estricta supervisión cuando el electrodoméstico se use cerca
de niños.
• Potencia de luz parpadeante indica listo para funcionar. Evitar cualquier tipo
de contacto con hojas o partes móviles. Mantenga las manos y los utensilios
fuera del vaso durante el mezclado para evitar heridas corporales o daño al
electrodoméstico. Puede usar una espátula de goma sólo cuando la licuadora no
esté funcionando.
• La cuchilla es filosa. Manipule con cuidado.
• Siempre coloque la tapa sobre el vaso antes de operar la licuadora.
• No licue líquidos hirviendo en la licuardora.
• Cuando mezcle líquidos calientes, retire la tapa del pico abatible de la tapa.
El vapor de los líquidos calientes puede expulsar la tapa de la jarra durante el
licuado. Para prevenir posibles quemaduras, no llene la jarra por encima del nivel
de 2 tazas. Con la protección de un guante para hornos o repasador, coloque una
mano sobre la tapa. Mantenga la piel sin protección lejos de la tapa. Comience el
licuado en la velocidad más baja.
• No opere ningún electrodoméstico que tenga un cable o enchufe dañado, después
de mal funcionamiento de la unidad o si se cae o daña de cualquier otra manera.
Retorne el artefacto al Centro de Servicios Sunbeam Autorizado más cercano
para examinarlo, repararlo o ajustarlo eléctrica o mecánicamente.
• No lo use en exteriores o para propósitos comerciales; este electrodoméstico es
para uso doméstico solamente.
• Use este electrodoméstico para el uso para el cual fue diseñado, según se describe
en este manual. No use accesorios no recomendados por el fabricante; podrían
causar heridas corporales.
• Siempre opere el electrodoméstico en una superficie plana.
• Desenchufe la licuadora cuando no la use, antes de quitar o poner partes y antes
de efectuar la limpieza.
• Sunbeam Products, Inc., no recomienda el uso de accesorios no fabricados
por productos OSTER
ensamblado para-procesamiento de alimentos, pueden causar heridas corporales.
®
, incluidos recipientes o el vaso común y partes de
10

esTe ProducTo es sólo PArA uso doMésTico
El rango máximo de potencia marcado en la unidad está basado según el
aditamento que necesita más potencia. Otros aditamentos recomendados
podrían necesitar menos potencia.
InstruCCIones soBre el CaBle de tensIón
Siga las instrucciones que se enumeran a continuación para el uso seguro
del cable de tensión.
• Este electrodoméstico posee un enchufe de dos espigas. Este es un dispositivo
de seguridad diseñado para reducir el riesgo de una descarga eléctrica. Si no
puede introducir el enchufe en el tomacorriente, comuníquese con un electricista
calificado para que cambie el tomacorriente obsoleto. No intente anular la función
de seguridad del enchufe de dos espigas, efectuando modificaciones al enchufe.
• Puede usar un cable de extensión, si fuera necesario, pero siga estas indicaciones:
– La clasificación de potencia del cable de extensión debe ser al menos de
120/127 voltios, 60 Hz, 10 A.
– La extensión debe colocarse de manera que no cuelgue sobre la mesa o
mostrador y fuera del alcance de los niños para evitar tropezarse con el cable.
• No tire, retuerza ni maltrate el cable.
GUARDE ESTAS INSTRUCCIONES
11

BIenVenIdos
¡Felicitaciones por su compra de una Licuadora. Para aprender más sobre
productos OSTER
®
, por favor visítenos en www.oster.com!
CaraCterístICas de su lICuadora
A. Tapa vertedora con tapa de pico abatible
B. El Vaso – La Licuadora Oster
uno de los siguientes elementos:
• Vaso de vidrio resistente, seguro
para-lavado en lavaplatos con
capacidad para 7 tazas
• Vaso de plastico resistente a roturas
con capacidad para 8 tazas
C. Aro para estabilidad en la mesa
y el refrigerador (attached to jar)
D. Aro de Sellado Hermético
E. La cuchilla para picar hielo pulveriza
el hielo para las bebidas congeladas
F. Disco de Fondo Roscado
G. Potente motor con All Metal Drive
para una mayor durabilidad
H. Panel de Control Electrónico
A
B
®
incluye
I. Característica preprogramada
para Picar hielo (“Ice Crush”) –
se activa en velocidad alta durante
30 segundos con apagado automático
J. Función de pulsar para un control
de mezclado preciso
K. Selección de velocidades “High” (alta),
“Medium” (media) y “Low” (baja)
L. Característica preprogramada para
Bebidas congeladas (“Frozen Drinks”)
– funciona en velocidad alta durante
45 segundos con apagado automático
M. El interruptor ON/OFF detiene la
operación
N. La luz roja del botón ON/OFF
comienza a parpadear cuando la
licuadora está lista para operar
N
C
D
E
M
F
G
H
I L JK
12

Cómo usar su lICuadora
Limpie la licuadora de acuerdo a las instrucciones indicadas en la sección
“Cómo Limpiar y Guardar la Licuadora”.
Ensamblado del vaso:
1. Ponga el vaso al revés, de manera tal que la pequeña abertura se
encuentre hacia arriba. (Figura 1)
2. Coloque el aro de sellado sobre la abertura del vaso. (Figura 1)
3. Coloque la cuchilla dentro del vaso. (Figura 2)
Figura 1 Figura 2
F
igura
Figura 3
4
4. Junte hasta trabar el disco de fondo roscado con el aro. Coloque el aro
sobre la cuchilla y el vaso. Coloque el aro sobre el vaso y gire el disco con
fondo roscado en sentido horario para apretar. (Figura 3)
5. Coloque el vaso ensamblado sobre la base. (Figura 4)
6. Coloque ingredientes en el vaso.
7. Coloque la tapa vertedora en la jarra.
8. Enchufe el cable de alimentación en un tomacorriente eléctrico de
AC de 120 Voltios.
9. Presione el botón “ON/OFF” (encendido) para encender el producto.
El indicador LED parpadea con una luz roja (y continúa parpadeando)
para indicar que la licuadora está lista para operar. Ahora está listo para
licuar. Evitar contacto con hojas o partes móviles.
13

CaraCterístICas de la Jarra
Su nueva licuadora cuenta con una jarra ovalada de forma única diseñada
para adaptarse a la mayoría de las puertas de las heladeras para el práctico
guardado de bebidas. Este novedoso y único diseño de jarra de ocho vértices
asegura que todos los ingredientes se mezclen de manera efectiva para
obtener resultados increíbles.
Su nueva licuadora está equipada con una tapa abatible para que no tenga
que retirar la tapa para servir el contenido de la jarra.
modos de VeloCIdad: “low” (BaJa),
“medIum” (medIa), “HIgH” (alta)
• Para licuar en la velocidad alta, presione el botón “HIGH” (alta). Esta
velocidad es recomendada para licuar, triturar, moler, disolver y triturar
hielo. Ideal para batidos, bebidas congeladas y sopas
• Para licuar en la velocidad media, presione el botón “MED” (media).
Esta velocidad es recomendada para batir, refinar, hacer puré y rallar.
Ideal para malteadas, comida para bebés, salsas, dips y cremas para
untar.
• Para licuar en la velocidad baja, presione el botón “LOW” (baja). Esta
velocidad es recomendada para revolver, agitar, hacer cremas, picar y
mezclar. Ideal para picar alimentos
• Para detener el licuado, presione el botón ON/OFF. El motor se detendrá
(al presionar el botón ON/OFF, se detiene el motor y la licuadora se para).
• Puede alternar las velocidades en cualquier momento durante el licuado
con los botones de velocidad. La nueva velocidad comenzará sin
interrupción y el nuevo icono de velocidad parpadeará indicando que se
encuentra a esa velocidad.
• El botón PULSE genera un pulso momentáneo en alta velocidad. Luego el
motor se detendrá.
NOTA: Si se presiona ICE CRUSH o DRINKS o el botón de velocidad a
la cual se está licuando, el motor se detendrá.
FunCIones PreProgramadas
Su nueva licuadora cuenta con 2 Funciones Preprogramadas:
“Ice Crush” (picar hielo) y “Drinks” (bebidas).
• La función “ICE CRUSH” (picar hielo) es ideal para picar grandes
cantidades de hielo. El modo ICE CRUSH activa la licuadora a velocidad
alta y la detiene automáticamente en 30 segundos.
• El modo DRINKS está diseñado para obtener bebidas congeladas
perfectamente licuadas. El modo DRINKS opera a alta velocidad
durante 45 segundos y se detiene automáticamente al final del ciclo.
• Para detener el licuado en cualquiera de estos modos, presione el botón
ON/OFF. El motor se detendrá (al presionar el botón ON/OFF, se detiene
el motor y la licuadora se para).
• El botón PULSE genera un pulso momentáneo en alta velocidad. Luego el
motor se detendrá.
14

Para usar la FunCIón de Pulsos
El botón “PULSE” (pulso) activa la licuadora momentáneamente a velocidad
ALTA. También puede presionar continuamente el botón “PULSE” (pulso)
para un funcionamiento más prolongado en este modo según lo desee.
• Para “PULSAR”, presione el botón “PULSE” (pulso) para activar la
velocidad alta momentáneamente. La licuadora funcionará a velocidad
alta durante el tiempo que mantenga el botón presionado. El motor se
detendrá cuando deje de presionar el botón.
ConseJos Para el lICuado
• Uso De La Licuadora Con Alimentos
O Líquidos Calientes:
(!!) ADVERTENCIA: Cuando emplee
ALIMENTOS CALIENTES, abra la tapa de
la jarra para liberar el vapor. Incline la tapa
para alejarla de usted y cubrir parcialmente la
apertura. Mantenga las manos y otras partes del
cuerpo expuestas lejos de la apertura de la tapa
para evitar posibles quemaduras. (Figura 6)
(!!) ADVERTENCIA: Cuando emplee
LÍQUIDOS CALIENTES, abra la tapa de la
jarra, comience a baja velocidad y aumente la
velocidad de manera gradual. No agregue líquidos
por encima del nivel de 2 tazas (.5 litro). Siempre mantenga las manos
lejos del vapor. Comience el licuado en la velocidad más baja. (Figura 6)
• Coloque primero los líquidos en el vaso, a menos que la receta indique
lo contrario.
• Para picar hielo: Picado de hielo: Pique aproximadamente 3 tazas de hielo
por vez con 2 tazas de líquido para obtener resultados óptimos.
• No retire la tapa con el electrodoméstico en funcionamiento. Abra la
tapa de la jarra para agregar ingredientes pequeños. (Figura 6)
• Esta licuadora fue diseñada para mezclar suavemente los alimentos
cuando funciona a bajas velocidades. Si las hojas no giran durante el
funcionamiento, simplemente seleccione una velocidad más alta.
• Esta licuadora no hace puré de papas, no bate claras de huevo ni sustituye
lácteos para untar, mezcla masas duras ni pica carne cruda.
Figura 6
Cómo lImPIar Y guardar su lICuadora
IMPORTANTE: Desenchufe antes de limpiar la base y no sumerja la
licuadora en agua ni en ningún otro líquido.
Utilice una esponja suave humedecida con un detergente suave para limpiar
el exterior de la base y el panel de control de la licuadora. Todas las piezas
excepto la base de la licuadora pueden lavarse en lavavajillas. Coloque el
anillo de sellado en el canasto inferior del lavavajillas. También puede lavar
las piezas con agua tibia y jabón. Enjuague bien y seque.
15

Cómo guardar su lICuadora
Después de limpiar la hoja, vuelva a colocarla en la jarra con el anillo
sellador y la parte inferior roscada.
reCetas
Para preparar recetas creativas y divertidas con su nueva licuadora Oster®,
visite nuestro sitio www.oster.com. Allí encontrará todas las recetas, desde
un batido de frutas perfecto para el desayuno a sopas cremosas, salsas y
una gran cantidad de bebidas congeladas Oster®. ¡Para crear la receta
perfecta para cualquier ocasión, encienda su creatividad con Oster®!
BatIdo de durazno Y JengIBre
tazas
2
3
4
5
6
7
8
tazas
2
3
4
5
6
7
8
Yogur
(onzas)
8
12
16
20
24
28
32
Yogur
(onzas)
7
11
14
18
21
25
28
CubItos de
hIelo
(MedIanos)
2
3
4
5
6
7
8
CubItos de
hIelo
(MedIanos)
2
3
4
5
6
7
8
duraznos
Congelados
en rodaJas
5
8
10
13
15
18
20
bananas
Congeladas
(trozos de 2 pulg)
2
3
4
5
6
7
8
BatIdo de FrutIllas
FrutIllas
Congeladas
(dIáM. de 1 pulg. Máx)
2
3
4
5
6
7
8
bananas
Congeladas
(trozos de 2 pulg)
2
3
4
5
6
7
8
Jugo de uVa
blanCa
(onzas)
3
4 1/2
6
7 1/2
9
10 1/2
12
Jugo de uVa
blanCa
(onzas)
3
4 1/2
6
7 1/2
9
10 1/2
12
JengIbre
MolIdo
(CuCharadIta)
1/8
1/5
1/4
1/3
3/8
1/2
1/2
JengIbre
MolIdo
(CuCharadIta)
1/8
1/5
1/4
1/3
3/8
1/2
1/2
16

reCetas
malteada de VaInIlla
tazas
2
3
4
5
6
7
8
tazas
tazas
de
helado
2
3
4
5
6
7
8
leChe
(onzas)
6
9
12
15
18
21
24
VaInIlla
(CuCharadIta)
1/8
1/4
1/4
3/8
3/8
1/2
1/2
margarIta
MezCla de
tequIla
(onzas)
2
3
4
5
6
7
8
2
3
4
5
5 1/2
6 1/2
7 1/2
MargarIta
(onzas)
6
9
12
15
18
21
24
tazas de
hIelo
1 1/2
2 1/2
3
4
5
5 1/2
6 1/2
17

Garantía de Satisfacción de 3 Años
Sunbeam Products, Inc. haciendo negocios como Jarden Consumer Solutions, o en Canadá, Sunbeam Corporation
(Canada) Limited haciendo negocios como Jarden Consumer Solutions (colectivamente “JCS”) garantiza por
un período de tres (3) años desde la fecha de compra, que este producto estará libre de defectos de material y
manufactura. JCS, a la discreción del consumidor, reparará, o reemplazará este producto o cualquiera de sus
componentes que se encuentren defectuosos durante el período de la garantía. Esta garantía es válida para el
comprador original desde la fecha de compra inicial, y no es transferible. Guarde el recibo original de venta. La
prueba de compra es requerida para obtener la garantía de satisfacción. Los establecimientos autorizados de JCS,
Centro de servicios o tiendas de venta al por menor que vendan los productos de JCS no tienen el derecho de
alterar, modificar o cambiar de cualquier manera los términos y condiciones de esta garantía.
Garantía Limitada de Diez (10) Años de la Tracción de Metal
JCS también garantiza que por un período de diez (10) años desde la fecha de compra, la tracción de metal de la
base de la unidad y el acoplamiento de metal estarán libres de defecto en cuanto su material y manufactura. JCS,
a su propia discreción, reparará o reemplazará el componente corchete de la tracción de metal que se encuentra
en el acoplamiento de tracción de metal, si se encuentra que está defectuoso, durante el período de la garantía.
El reemplazo será con un producto o componente nuevo o re-manufacturado. Si el producto ya no se encuentra
disponible, el reemplazo se hará con un producto similar de igual o mayor valor. Esta es su garantía exclusiva.
No intente reparar, ajustar cualquier función eléctrica o mecánica en este producto. De hacerlo se anulará esta
garantía.
Esta garantía no cubre el daño que resulte de cualquiera de los siguientes: uso negligente o mal uso del producto,
uso en el voltaje o corriente no adecuados, uso contrario a lo que se indica en las instrucciones de operación,
desmontaje, reparación o alteración por cualquier otro que no sea un establecimiento autorizado de JCS o un
centro de servicio de JCS. Más aún, la garantía no cubre: fenómenos naturales tales como fuego, inundaciones,
huracanes o tornados.
Esta garantía es válida para el comprador original desde la fecha de la compra inicial y no es transferible. Guarde
el recibo original. La prueba de la compra se requiere para obtener la garantía.
Los establecimientos autorizados de JCS, centros de servicio, o tiendas de venta al por menor de productos JCS no
tienen el derecho de alterar, modificar o cambiar de ninguna manera los términos y condiciones de esta garantía
limitada.
¿Cuáles son los Límites de Responsabilidad de JCS?
JCS no será responsable por cualquier daño adicional o resultante causado por el rompimiento de cualquier
garantía o condición estatutarias expresa o implícita. Con excepción de lo que fuese prohibido por la ley, cualquier
garantía o condición de comercio implícita o diseñada para un propósito particular es limitada de acuerdo a
la duración de la garantía limitada aquí arriba. JCS niega cualquier otra garantía, condición o representación,
expresa implícita estatutaria o cualquiera que fuese. JCS no se encontrará responsable por ningún daño de ninguna
manera que resulte de la compra, uso o mal uso, o inhabilidad de usar el producto incluyendo daños adicionales,
especiales, resultantes o daños similares, o pérdida de utilidades, o por cualquier rompimiento de contrato,
fundamental o de otra forma, o por ningún reclamo en contra del comprador por un tercero. Algunas provincias,
estados o jurisdicciones no permiten la exclusión o limitación de daños adicionales o resultantes o limitaciones
en cuanto al tiempo de duración de la garantía limitada, de modo que las limitaciones aquí arriba o exclusiones,
puede que no sean aplicables a usted. Esta garantía limitada le da derechos específicos legales, y también puede
tener otros derechos los cuales varían de provincia a provincia, estado a estado, o jurisdicción a jurisdicción
Cómo Obtener Servicio de Satisfacción Garantizada y/o Garantía Limitada
En los Estados Unidos.
Si tiene cualquier pregunta acerca de esta garantía o garantía limitada o si desease obtener garantía limitada o servicio
de garantía, Por favor llame al 1-800-334-0759 y se le proporcionará la dirección de un centro de servicio.
En Canadá
Si tiene cualquier pregunta acerca de esta garantía o garantía limitada o quisiera obtener garantía o servicio
limitado, por favor llame al 1-800-667-8623 y se le proporcionará la dirección de un centro de servicio.
En los Estados Unidos, esta garantía y garantía limitada es ofrecida por by Sunbeam Products, Inc también
haciendo negocio como Jarden Consumer Solutions ubicada en Boca Raton, Florida 33431. En Canadá, esta
garantía y garantía limitada es ofrecida por Sunbeam Corporation (Canada) Limited, ubicada en20 B Hereford
Street, Brampton, Ontario L6Y 0M1. Si tiene cualquier otro problema o reclamo en conexión con este producto,
por favor escribanos al departamento de servicio al consumidor.
POR FAVOR NO DEVUELVA ESTE PRODUCTO A NINGUNA DE ESTAS
DIRECCIONES O AL LUGAR DE COMPRA.
Para preguntas acerca del reciclaje y el desecho apropiado de este producto,
por favor contacte a su oficina local de la administración de desperdicios.
18

CONSIGNES DE SÉCURITÉ
IMPORTANTES
Il conviendra de prendre toutes les précautions générales de sécurité qui
s’imposent lors de l’utilisation d’un appareil électrique, y compris:
LIRE TOUTES LE MODE D’EMPLOI AVANT UTILISATION
• Débrancher le cordon de la prise lorsque l’appareil se trouve hors service ou
avant de le nettoyer.
• Pour éviter tout risque d’électrocution, ne pas immerger le cordon, la prise ou
le socle du moteur dans de l’eau ou tout autre liquide.
• Ne pas laisser le cordon pendre sur le rebord d’une table ou d’un comptoir ni
contacter une surface chaude.
• Ne jamais laisser un appareil en service sans surveillance.
• Une surveillance étroite s’impose lors de l’utilisation de l’appareil à portée des
enfants.
• Lorsque le voyant d’alimentation clignote cela signifie que l’appareil est prêt
à être utilisé. Éviter TOUT contact avec les lames ou pièces mobiles. Garder
les mains et les ustensiles en dehors du récipient pour éviter tout risque de
blessure ou d’endommager le mélangeur. Il conviendra d’utiliser une spatule
en caoutchouc uniquement lorsque l’appareil est arrêté.
• La lame est tranchante. La manipuler avec précaution.
• Toujours recouvrir le récipient de son couvercle avant d’activer le mélangeur
• Ne pas mélanger de liquides bouillants dans le mélangeur.
• Lorsqu’un liquide chaud est mélangé, retirer le bec verseur du couvercle. La
vapeur du liquide chaud risque de soulever le couvercle du récipient. Pour
éviter tout risque de brulure remplir le récipient sans dépasser le niveau de
deux tasses. Avec la protection d’un gant de cuisine ou d’un torchon, poser
une main sur le couvercle. Ne pas toucher le couvercle avec la peau nue. Faire
démarrer le mélangeur à la vitesse la plus faible.
• Ne pas faire fonctionner un appareil avec un cordon ou une prise abimés, ni
après un mauvais fonctionnement, une chute ou autre dégât de l’appareil.
Renvoyer l’appareil au centre de service agréé Sunbeam le plus proche pour
faire examiner, réparer ou régler le fonctionnement électrique ou mécanique
de l’appareil.
• Ne pas utiliser à l’extérieur ni à des fins commerciales. Cet appareil est réservé
à l’usage domestique.
• Il conviendra de se servir de cet appareil uniquement selon son utilisation
prévue décrite dans ce manuel. Ne pas utiliser de pièces détachées qui ne sont
pas agréées par le fabricant, celles-ci risqueraient d’entraîner des blessures.
• Toujours se servir du mélangeur sur une surface plane.
• Débrancher le mélangeur une fois hors service, avant de retirer ou d’introduire
des pièces détachées, et avant de le nettoyer.
• Sunbeam Products Inc., déconseille l’utilisation de pièces détachées qui n’ont pas
été fabriquées par produits OSTER
d’usage ordinaire, car celles-ci risqueraient d’entraîner des blessures.
®
, y compris les récipients pour conserves ou
19

ceT APPAreil A éTé conçu Pour un usAge
doMesTique seuleMenT
La puissance nominale maximale indiquée sur le produit est basée sur l’utilisation
de l’accessoire qui nécessite le plus de courant électrique. Les autres accessoires
peuvent utiliser moins de courant électrique.
PréCautIons ConCernant le Cordon
d’alImentatIon éleCtrIque
Veuillez observer les instructions suivantes afin de manipuler le cordon électrique
en toute sécurité.
• Cet appareil est doté d’une fiche à trois broches. La troisième broche est prévue
pour réduire les risques d’électrocution. S’il vous est impossible d’introduire la
fiche dans la prise murale, communiquez avec un électricien qualifié pour faire
remplacer la prise par une nouvelle. Ne tentez pas de forcer ce dispositif de
sécurité en modifiant la fiche à trois broches de quelque manière que ce soit.
• Vous pouvez au besoin utiliser une rallonge électrique, mais assurez-vous
d’observer les consignes suivantes :
– La puissance électrique nominale indiquée sur l’étiquette de la rallonge doit
correspondre à au moins 120/127 volts, 60 Hz, 10A.
– La rallonge doit être installée de façon à ce qu’elle ne pende pas d’une table ou
d’un plan de travail, à ce qu’elle reste hors de portée des enfants et à ce qu’elle
ne soit pas dans le passage.
• Ne tirez pas sur le cordon, ne le tordez pas et ne l’utilisez pas à mauvais escient.
CONSERVEZ CES
INSTRUCTIONS
20

BIenVenue
Félicitations pour votre achat d’un mélangeur Oster® ! Pour en savoir plus sur les
produits Oster
®
, veuillez visiter notre site web à www.oster.com.
CHaraCtérIstIques de Votre mélangeur
A. Verser à travers le couvercle équipé
d’un bec verseur.
B. Récipients - Votre mélangeur Oster
inclut un des récipients suivants:
• Récipient en verre à 7 tasses résistant
à l’épreuve du lave vaisselle
• Récipient en plastique incassable
à 8 tasses
C. Socle du récipient (rattaché)
D. Rondelle d’étanchéité pour assurer
l’imperméabilité
E. Lame pour broyer la glace
permettant d’obtenir des boissons
glacées veloutées
F. Anneau de serrage fileté
A
B
®
G. Moteur puissant équipé de la
technologie en acier All Metal Drive
de grande pérennité
H. Panneau de commande numérique
I. Réglage « Ice Crush » (Glace broyée)
préprogrammé à impulsions rapides
pendant 30 secondes avec arrêt
automatique
J. Commande à impulsion « Pulse »
pour contrôler les mélanges avec
précision
K. Sélection des vitesses « High »
[haute], « Medium » [moyenne] »
et «Low » [faible]
L. Réglage « Drinks » [Boissons]
préprogrammé à exécution rapide
pendant 45 secondes avec arrêt
automatique
M. Touche de marche/arrêt ON/OFF
pour éteindre l’appareil
N. La touche de marche/arrêt ON/OFF
clignote en rouge pour signaler que
l’appareil est prêt à être utilisé
C
D
E
F
G
H
N
M
I L JK
21

utIlIsatIon du mélangeur
Nettoyer le mélangeur selon les instructions qui figurent à la section intitulée «
Nettoyage et rangement du mélangeur ».
Assemblage du mélangeur:
1. Renverser le récipient la petite ouverture vers le haut (Figure 1).
2. Poser la rondelle d’étanchéité sur l’ouverture du récipient (Figure 1).
3. Introduire l’ensemble lame dans le récipient (Figure 2).
Figure 1 Figure 2
F
igure
Figure 3
4. Poser l’anneau de serrage fileté par dessus la lame et l’ouverture du récipient,
et le resserrer en le faisant tourner dans le sens des aiguilles d’une montre
(Figure 3).
5. Introduire le récipient assemblé dans le socle du moteur (Figure 4).
6. Déposer les ingrédients de votre recette dans le récipient. Pour obtenir des
résultats optimums toujours ajouter les liquides en premier dans le mélangeur.
7. Recouvrir le récipient avec son couvercle à bec verseur.
8. Brancher le cordon d’alimentation dans une prise de courant de 120 volts c.a..
9. Appuyer sur la touche d’alimentation « POWER » pour allumer le mélangeur.
Le voyant DEL clignotera rouge (sans s’arrêter) pour signaler que l’appareil est
prêt à être utilisé. Éviter tout contact avec les lames et les pièces mobiles.
4
22

traIts du réCIPIent
Votre nouveau mélangeur présente un récipient unique de forme ovale conçu
pour introduction à l’intérieur de la plupart des portes de réfrigérateur et
conservation pratique des boissons. Ce nouveau récipient favorise l’effet de
tourbillon permettant le mélange efficace du contenu pour obtenir des boissons
d’une qualité exceptionnelle.
Votre nouveau mélangeur est équipé d’un couvercle de pichet à bec verseur
permettant de verser les boissons sans jamais retirer le couvercle.
séleCtIon des VItesses : Forte, moYenne, FaIBle
• Pour mélanger à la vitesse Très rapide, appuyez sur le bouton « HIGH ».
Cette vitesse est excellente pour malaxer, broyer, moudre, liquéfier et piler de
la glace. Idéale pour les frappés aux fruits, les boissons glacées et les soupes.
• Pour mélanger à la vitesse Moyenne, appuyez sur le bouton « MED ». Cette
vitesse est excellente pour fouetter, hacher, réduire en purée et râper. Idéale
pour les frappés au lait, la purée pour bébés, les sauces, les trempettes et les
tartinades.
• Pour mélanger à la vitesse Basse, appuyez sur le bouton « LOW ». Cette vitesse
est excellente pour brasser, battre, mettre en crème, couper et mélanger. Idéale
pour couper des aliments.
• Pour arrêter le mélangeur, appuyer sur la touche marche/arrêt « ON/OFF ».
Le moteur s’arrêtera. (Lorsque vous appuyez sur la touche marche/arrêt
« ON/OFF », le moteur s’arrête, et le mélangeur s’éteint.)
• Vous pouvez changer de vitesse à n’importe quel moment pendant le mélange.
Il suffit d’appuyer sur un quelconque autre bouton indicateur de vitesse. La
nouvelle vitesse s’enclenchera sans discontinu.
• La touche d’impulsion « PULSE » fournit une impulsion passagère à haute
vitesse suivie de l’arrêt du moteur.
REMARQUE: Le moteur s’arrêtera aussi lorsque que vous appuyez sur les
touches « ICE CRUSH » (broyeur de glace) ou « DRINKS » (boissons) ou le
bouton indicateur de vitesse courante du mélange.
Pre-Programmed settIngs
Votre nouveau mélangeur présente deux réglages préprogrammés:
« ICE CRUSH » (broyeur de glace) ou « DRINKS » (boissons)
• Le réglage « ICE CRUSH » (glace broyée) est idéal pour le broyage de
grandes quantités de glace. Le réglage « ICE CRUSH » (broyeur de glace)
lance des impulsions pendant 30 secondes à haute vitesse avant de s’éteindre
automatiquement en fin de cycle.
• Le réglage « DRINKS » [boissons] est conçu pour le mélange parfait de
boissons glacées. Le réglage « DRINKS » [boissons] s’exécute pendant 45
secondes avant de s’éteindre automatiquement en fin de cycle.
• Pour arrêter le mélange selon l’un ou l’autre de ces réglages, il suffit d’appuyer
sur la touche marche/arrêt « ON/OFF ». Le moteur s’arrêtera. (Lorsque vous
appuyez sur la touche marche/arrêt « ON/OFF », le moteur s’arrête, et le
mélangeur s’éteint.)
• La touche d’impulsion « PULSE » fournit une impulsion passagère à haute
vitesse suivie de l’arrêt du moteur.
23

utIlIsatIon du réglage d’ImPulsIon « Pulse »
La touche d’impulsion « PULSE » entraîne momentanément la haute vitesse du
mélangeur. Vous pouvez aussi enfoncer la touche d’impulsion « PULSE » pour
lancer des impulsions selon le besoin.
• Pour lancer une impulsion, appuyer sur la touche d’impulsion « PULSE » qui
activera une impulsion passagère à haute vitesse. Le mélangeur fonctionnera à
haute vitesse tant que la touche d’impulsion « PULSE » demeure enfoncée. Le
moteur s’arrêtera dès la touché d’impulsion « PULSE » relâchée.
ConseIls Pour mélanger
• Nourriture ou liquides chauds:
(!!!) AVERTISSEMENT: Pour le mélange de la
nourriture CHAUDE, ouvrir le bec verseur pour laisser
la vapeur se dégager. Couvrir partiellement l’ouverture
en gardant les mains et la peau nue hors portée de
l’ouverture afin d’éviter tout risque possible de brulures
(Figure 6).
(!!!) AVERTISSEMENT: Pour le mélange de liquides
CHAUDS, ouvrir le bec verseur, démarrer à faible
vitesse et augmenter lentement la vitesse par la suite.
Ne pas ajouter de liquide qui dépasse le niveau de deux
tasses (.5 L). Toujours garder les mains et la peau nue
hors portée de la vapeur. Faire démarrer le mélangeur
à la vitesse la plus faible (Figure 6).
• Verser d’abord les liquides dans le récipient, à moins que la recette indique
autrement.
• Broyage de la glace : Broyer environ 3 tasses de glace à la fois avec deux tasses
de liquide pour obtenir des résultats optimums.
• Ne pas retirer le couvercle lorsque le mélangeur marche. Ouvrir le bec verseur
pour introduire les plus petits ingrédients (Figure 6).
• Ce mélangeur à été conçu pour mélanger doucement les aliments à faible
vitesse. Lorsque les lames ne pivotent pas, choisir tout simplement une vitesse
plus élevée.
• Le mélangeur ne réduit pas les pommes de terre en purée, ne bat pas en neige
les blancs d’œuf ni les substituts de produits laitiers, ne malaxe pas les pates
dures et ne hache pas la viande.
Figure 6
nettoYage et rangement du mélangeur
IMPORTANT: Débrancher le mélangeur avant de nettoyer le socle du moteur et
ne pas l’immerger dans de l’eau ou un autre liquide quelconque.
Se servir d’une éponge non abrasive avec un détergent doux pour nettoyer
l’extérieur du socle du mélangeur et le panneau de commandes. Toutes les pièces
détachées sauf le socle du mélangeur sont résistantes à l’épreuve du lave vaisselle.
Les pièces détachées se nettoient aussi dans de l’eau chaude savonneuse. Rincer à
fond et sécher.
24

rangement du mélangeur
Après nettoyage, réassembler le récipient, la lame avec la rondelle d’étanchéité,
et l’anneau de serrage fileté. Ranger le mélangeur avec son couvercle entreouvert pour éviter la formation d’odeur à l’intérieur du récipient.
reCettes
Pour vous procurer des recettes amusantes et imaginatives pour votre nouveau
mélangeur Oster
que vous cherchez, de la parfaite boisson fouettée (Smoothie), aux soupes
onctueuses, en passant par les sauces, et toute une série de boissons glacées
®
. Pour une recette parfaitement adaptée à chaque occasion, brancher
Oster
votre imagination avec Oster
®
, veuillez visiter www.oster.com. Vous y découvrirez tout ce
®
!
BoIsson Fouettée (smootHIe) aux PeCHes
tasses
par
reCette
2
3
4
5
6
7
8
Yaourt
. (g)
oz
8 (225 g)
12 (340 g)
16 (450 g)
20 (565 g)
24 (680 g)
28 (790 g)
32 (900 g)
glaçons
(MoYens)
2
3
4
5
6
7
8
tranChes
de pêChes
surgelées
5
8
10
13
15
18
20
banane surgelée
(MorCeaux de
2 po. – 50 MM)
2
3
4
5
6
7
8
4 ½ (133 ml)
7 ½ (222 ml)
10 ½ (310 ml)
BoIsson Fouettée (smootHIe) aux FraIses
tasses
par
reCette
2
3
4
5
6
7
8
Yaourt
. (g)
oz
7 (200 g)
11 (310 g)
14 (400 g)
18 (510 g)
21 (595 g)
25 (700 g)
28 (790 g)
glaçons
(MoYens)
2
3
4
5
6
7
8
FraIses
surgelées (Max.
1
po – 25 MM)
2
3
4
5
6
7
8
banane surgelée
(MorCeaux de
2 po. – 50 MM)
2
3
4
5
6
7
8
10 ½ (311 ml)
Jus de raIsIn
blanC
. (Ml)
oz
3 (88 ml)
6 (177 ml)
9 (266 ml)
12 (355 ml)
Jus de raIsIn
blanC
. (Ml)
oz
3 (89 ml)
4 ½ (133 ml)
6 (177 ml)
7 ½ (222 ml)
9 (266 ml)
12 (355 ml)
gIngeMbre
Moulu
(C. à thé)
1/8
1/5
1/4
1/3
3/8
1/2
1/2
gIngeMbre
Moulu
(C. à thé)
1/8
1/5
1/4
1/3
3/8
1/2
1/2
25

reCettes
laIt FraPPé À la VanIlle
par
tasses
par
tasses
reCette
2
3
4
5
6
7
8
reCette
2
3
4
5
6
7
8
CrèMe glaCée
(tasses)
2
3
4
5
6
7
8
margarIta
tequIla
oz
. (Ml)
2 (60 ml)
3 (89 ml)
4 (118 ml)
5 (150 ml)
5 ½ (163 ml)
6 ½ (192 ml)
7 ½ (222 ml)
laIt
oz
. (Ml)
6 (177 ml)
9 (266 ml)
12 (355 ml)
15 (445 ml)
18 (530 ml)
21 (621 ml)
24 (710 ml)
Mélange
MargarIta (oz.)
6 (170 g)
9 (255 g)
12 (340 g)
15 (425 g)
18 (510 g)
21 (595 g)
24 (680 g)
VanIlle
(C. à thé)
1/8
1/4
1/4
3/8
3/8
1/2
1/2
glaCe
(tasses)
1 1/2
2 1/2
3
4
5
5 1/2
6 1/2
26

Garantie de satisfaction de 3 ans
Sunbeam Products, Inc. faisant affaire sous le nom de Jarden Consumer Solutions, ou au Canada, Sunbeam
Corporation (Canada) Limited, faisant affaire sous le nom de Jarden Consumer Solutions (collectivement « JCS »)
garantit que pendant une période de trois (3) ans à compter de la date d’achat ce produit sera exempt de vices de
matériaux et de fabrication. À la seule discrétion du consommateur, JCS réparera ou remplacera cet article ou toute
pièce de celui-ci dont la défectuosité a été constatée au cours de la période de garantie. Cette garantie n’est valable
que pour l’acheteur au détail initial, à compter de la date d’achat au détail initial et elle n’est pas transférable.
Veuillez conserver votre preuve d’achat originale, elle est exigée pour tout service que couvre la garantie. Les
concessionnaires JCS, les centres de services ou les détaillants qui vendent des produits JCS n’ont pas le droit
d’altérer, de modifier ou de changer d’une manière quelconque les modalités de la présente garantie.
Garantie limitée de dix (10) ans de l’entraînement tout métal
JCS garantit, en outre, que pendant une période de dix (10) ans à compter de la date d’achat, le raccord
d’accouplement de l’entraînement tout métal sera exempt de vices de matériaux et de fabrication. JCS se réserve
le droit de choisir entre réparer ou remplacer l’ergot de l’arbre d’entraînement en métal de l’accouplement de
commande tout métal, si sa défectuosité est constatée au cours de la période de garantie. Le remplacement se fera
au moyen d’un produit neuf ou réusiné ou bien d’une pièce neuve ou réusinée. Si l’article n’est plus disponible,
il sera remplacé par un article semblable, de valeur égale ou supérieure. La présente constitue votre garantie
exclusive. N’essayez PAS de réparer ou d’ajuster toute fonction électrique ou mécanique du produit, sous peine
d’annulation de la garantie. Cette garantie ne couvre pas l’endommagement attribuable à la négligence ou à
l’utilisation abusive de l’article, au branchement sur un courant ou une tension autre que ceux spécifiés, au nonrespect du mode d’emploi, au démontage, à la réparation ou à la modification par quiconque autre que JCS ou
un Centre de services agréé JCS. De plus, la garantie ne couvre pas les cas de force majeure, comme les incendies,
les inondations, les ouragans et les tornades. Cette garantie n’est valable que pour l’acheteur au détail initial, à
compter de la date d’achat au détail initial et elle n’est pas transférable. Veuillez conserver votre preuve d’achat
originale, elle est exigée pour tout service que couvre la garantie. Les concessionnaires JCS, les centres de services
ou les détaillants qui vendent des produits JCS n’ont pas le droit d’altérer, de modifier ou de changer d’une manière
quelconque les modalités de cette garantie limitée.
Quelles sont les limites de responsabilité de JCS ?
JCS décline toute responsabilité en cas de dommages accessoires ou indirects résultant du non-respect de toute
garantie ou condition explicite ou implicite. Sauf dans la mesure interdite par la législation pertinente, toute
garantie ou condition implicite de qualité commerciale ou d’application à un usage particulier est limitée à la durée
de la garantie limitée ci-dessus. JCS rejette toutes autres garanties, conditions ou représentations expresses, tacites,
légales, ou autres. JCS ne sera pas responsable des dégâts, quels qu’ils soient, résultant de l’achat, de l’utilisation
abusive ou non du produit ou de l’inaptitude à l’utiliser, y compris les dégâts directs, spéciaux, indirects ou
identiques, ni des pertes de revenus, ni de toute rupture de contrat, fondamentale ou autre, ni de toute plainte
déposée contre l’acheteur par un tiers. Certaines provinces ou juridictions et certains États interdisent d’exclure ou
de limiter les dommages accessoires ou indirects, ou ne permettent pas la limitation de la durée d’application de la
garantie implicite, de sorte que vous pouvez ne pas être assujetti aux limites ou exclusions énoncées ci-dessus. Cette
garantie limitée vous confère des droits juridiques précis et vous pouvez avoir d’autres droits, ces droits variant
d’une province, d’une juridiction ou d’un État à l’autre.
Obtention du service prévu par la garantie de satisfaction et/ou la garantie limitée
Aux États-Unis
Pour toute question concernant cette garantie ou garantie limitée, ou bien pour obtenir un service prévu par la
garantie ou la garantie limitée, appelez au 1 800 334-0759 et l’adresse d’un centre de services commodément situé
vous sera fournie.
Au Canada
Pour toute question concernant cette garantie ou garantie limitée, ou bien pour obtenir un service prévu par la
garantie ou la garantie limitée, appelez au 1 800 667-8623 et l’adresse d’un centre de services commodément situé
vous sera fournie. Aux États-Unis, la garantie ou la garantie limitée est offerte par Sunbeam Products, Inc. faisant
affaire sous le nom de Jarden Consumer Solutions, situé à Boca Raton, en Floride 33431. Au Canada, la garantie
ou la garantie limitée est offerte par Sunbeam Corporation (Canada) Limited, du 20B Hereford Street à Brampton
(Ontario) L6Y 0M1. Pour toute autre question ou réclamation concernant ce produit, veuillez écrire à notre
service à la clientèle.
NE RETOURNEZ CE PRODUIT NI À L’UNE DE
CES ADRESSES NI AU LIEU D’ACHAT.
Pour toute demande de renseignements en ce qui concerne le recyclage et l’élimination
appropriée de ce produit, veuillez communiquer avec l’installation de gestion des
déchets locale.
27
 Loading...