

For product questions contact:
Sunbeam Consumer Service
USA: 1.800.334.0759
Canada: 1.800.667.8623
www.oster.com
©2010 Sunbeam Products, Inc. doing business as
Jarden Consumer Solutions. All rights reserved.
Distributed by Sunbeam Products, Inc. doing business as
Jarden Consumer Solutions, Boca Raton, Florida 33431.
Para preguntas sobre los productos llame:
Sunbeam Consumer Service
EE.UU.: 1.800.334.0759
Canadá: 1.800.667.8623
www.oster.com
©2010 Sunbeam Products, Inc. operando bajo el nombre de
Jarden Consumer Solutions. Todos los derechos reservados.
Distribuido por Sunbeam Products, Inc. operando bajo el
nombre de Jarden Consumer Solutions, Boca Raton, Florida 33431.
2LB. BREADMAKER WITH EXPRESS BAKE
PANIFICADORA DE 2LB. CON HORNEADO RÁPIDO
User Guide & Recipes/ Guía del Usuario & Recetas
CKSTBR9050
Safety
Seguridad
How to use
Cómo usar
Cleaning
Cuidado y Limpieza
SPR-071510
Printed in China
P.N. 141008 REV. A
Impreso en China
FAQs
Preguntas frecuentes
Recipes
Rectas
Warranty
Garantía
www.oster.com

www.oster.com
2
www.oster.com
3
IMPORTANT SAFEGUARDS
When using electrical appliances, basic safety precautions should always be
followed
including the following:
1. Read all instructions, product labels and warnings before using the
breadmaker.
2. Do not touch hot surfaces. Always use oven mitts when handling hot
materials, and allow metal parts to cool before cleaning. Allow the bread
maker to cool thoroughly before putting in or taking off parts.
3. When unit is not in use and before cleaning, unplug the breadmaker from
wall outlet.
4. To protect against risk of electrical shock, do not immerse appliance, cord
or plugs in water or other liquids.
5. Close supervision is always necessary when this or any appliance is used by
or near children.
6. Do not place anything to rest on the power cord. Do not plug in cord where
people may walk or trip on it.
7. Do not operate this or any appliance with a frayed or damaged cord, or plug,
or after the appliance malfunctions or is dropped or has been damaged
in any manner. Take appliance to the nearest authorized service facility for
examination, repair, or electrical or mechanical adjustment.
8. Do not let the cord hang over the edge of a table or counter or touch hot
surfaces. Do not place on an unsteady or cloth-covered surface.
9. Avoid contact with moving parts.
10. Do not use attachments not recommended by the manufacturer; they may
cause fi re, electric shock or injury.
11. Do not use outdoors or for commercial purposes.
12. Do not place the appliance near a hot gas or electric burner, or in a heated
oven.
13. Do not use appliances for other than intended purpose.
14. To unplug, turn power off , grip plug and pull from wall outlet. Never pull
on the cord.
THIS UNIT IS INTENDED FOR
HOUSEHOLD USE ONLY
This appliances is for HOUSEHOLD USE ONLY. No user-serviceable parts inside. Do
not attempt to service this product. Do not immerse base in water or other liquid.
This appliance has a polarized alternating current plug (one blade is wider than
the other). To reduce the risk of electric shock, as a safety feature, this plug will fi t
in a polarized outlet only one way. If the plug does not insert fully in the outlet,
reverse the plug. If it still fails to fi t, contact a qualifi ed electrician.
DO NOT ATTEMPT TO DEFEAT THIS SAFETY FEATURE.
EXTENSION CORD USE
A short power supply cord is provided to reduce the hazards resulting from
entanglement or tripping over a longer cord. AN EXTENSION CORD MAY BE USED
WITH CARE; HOWEVER, THE MARKED ELECTRICAL RATING SHOULD BE AT LEAST AS
GREAT AS THE ELECTRICAL RATING OF THE APPLIANCE. The extension cord should
not be allowed to drape over the counter or tabletop where it can be pulled on by
children or tripped over.
Electrical Power
If electric circuit is overloaded with other appliances, your breadmaker may not
operate properly. The bread maker should be operated on a separate electrical
circuit from other operating appliances.
SAVE THESE INSTRUCTIONS
Thank you for purchasing the Oster® Breadmaker. Before you use
this product for the fi rst time, please take a few moments to read these
instructions and keep it for reference. Pay particular attention to the Safety
Instructions provided. Please review the product service and warranty
statements. To learn more about Oster® products, please visit us at www.
oster.com or call us at 1-800-334-0759.
www.oster.com
4
www.oster.com
5
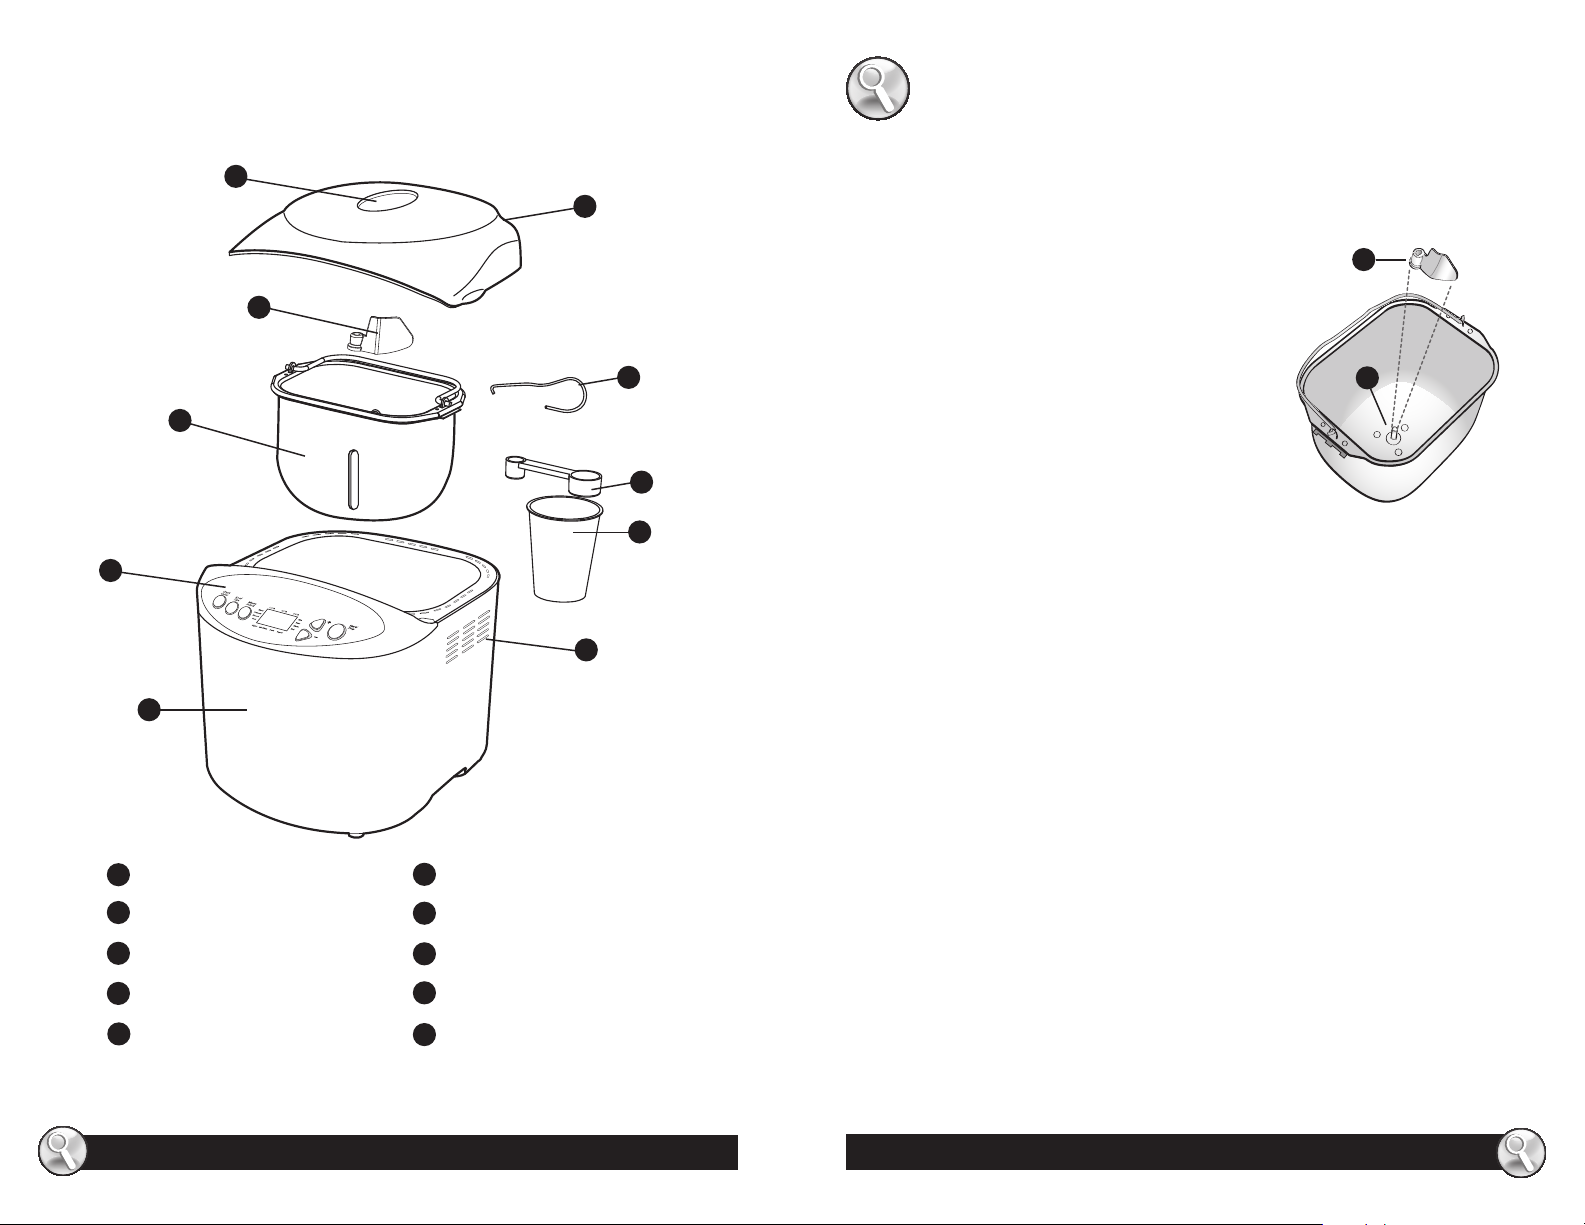
LEARNING ABOUT YOUR
EXPRESS BAKE BREADMAKER
a
i
h
HOW TO:
Preparing your breadmaker
1 Place the breadmaker on a counter where the plug will reach an outlet. DO NOT
c
j
d
yet plug the machine into the wall outlet. You will be shown later when to do this.
2 Make sure you can open the breadmaker top without
hitting the top of kitchen cabinets.
3 Open the lid and remove the baking pan. To do this,
simply grasp the handle of the pan and pull straight
up. Use a gentle, non-abrasive soap and wash, rinse,
and dry the pan thoroughly.
4 Attach the kneading blade (a) to the baking pan (b),
as shown. You will fi nd the kneading blade packed
inside the included measuring cup.
5 Set the pan aside. Do not yet place the pan into the
breadmaker.
a
b
g
f
a
Glass viewing window
b
Vent
c
Top lid assembly
d
Measuring Scoop
e
Measuring Cup
b
Breadmaker
f
g
Control Panel/LCD Display
h
Removable Bread Pan
i
Kneading Blade
j
Kneading blade removal tool
e
You’re ready to start!

www.oster.com
6
www.oster.com
7
Baking Bread
The simplest way to learn how to bake bread is to follow a basic recipe. The following recipe
is easy and the bread is delicious.
Before you begin, make sure you have the following measuring equipment:
- Liquid measuring cup
- Dry measuring cups
- Measuring spoons
You will need the following ingredients:
- Water
- Butter/Margarine
- Salt
- Bread fl our (be sure to buy bread fl our,
preferably for bread makers)
- Dry milk
- Sugar
- Active, fast rising yeast
Measuring ingredients
The most important secret of making bread is exact measurements, that’s the key to
successfully baking bread.
With wet ingredients, use ONLY measuring cups with the cups/ounces marked clearly on the
side. After fi lling the measuring cup, place it on a fl at surface and view it at eye level to make
sure the amount of liquid is exact. Then, double check.
With dry ingredients, always “level off ” the measurement with the back of a knife or a
spatula to make sure the measurement is exact. Another helpful tip is to never use the
cup to scoop the ingredients (for example, fl our). By scooping, you could add up to one
tablespoon of extra ingredients. Fill the measuring cup with a spoon before leveling off .
Order of adding ingredients
The SECOND most important secret of making bread is putting the ingredients into the
breadmaker in the EXACT order given in the recipe.
This means:
- FIRST, liquid ingredients
- SECOND, dry ingredients
- LAST, yeast
Also, make sure ALL ingredients are at room temperature, (between 77°–85° F) unless
otherwise noted in the recipe.
Note: Temperatures too cool or too hot can aff ect the way the bread rises and bakes.
It’s a good idea to start with all new, fresh ingredients (especially fresh fl our and yeast).
Now, let’s try a simple (but really good) recipe.
Traditional White Bread 2 lb. loaf
Ingredients:
1 & 3/8 cups water
2 tablespoons softened butter or margarine
4 cups bread fl our
2 tablespoons sugar
2 tablespoons dry milk
1 & 3/4 teaspoons salt
2 & 1/4 teaspoons active dry yeast
Instructions:
1 Carefully measure 1 and 3/8 cups water. Remember, use water that is room
temperature. DO NOT use very hot or very cold water. It’s a good idea to view the
measuring cup at eye level to make sure you have measured exactly 1 and 3/8 cups.
2 Pour the water into the bread pan.
3 Carefully measure 2 tablespoons of butter or margarine that is at room temperature.
Add this to the bread pan. This takes care of all of the liquid ingredients for the recipe.
Next comes the dry ingredients.
4 Measure 4 cups of bread fl our. Make sure not to “overpack” the fl our into the cup.
To avoid over packing, a good trick is to fi ll the measuring cup to overfl owing, then
tap the side of the cup with a knife or spatula to remove air pockets. Level off the
measuring cup with the knife or spatula. Pour the fl our into the bread pan.
5 Measure 2 tablespoons of sugar. Again, make sure to level off the tablespoons for
an exact measurement. Add the sugar into the bread pan.
6 Measure 2 tablespoons of dry milk. Level off the tablespoons of dry milk like all of the
rest of the dry ingredients. Add the dry milk to the bread pan.
7 Measure 1 & 3/4 teaspoons of salt. It is especially important to measure the salt
precisely because too much salt, even a little, can aff ect the rising of the dough.
Add the salt to the bread pan.
8 Before adding the yeast, use your fi nger to form a well (hole) in the fl our where you
will pour the yeast. Yeast must NEVER come into contact with a liquid when you are
adding ingredients. Measure (again, leveling off ) 2 & 1/4 teaspoons of yeast and
carefully pour it into the well you made in the fl our.
9 Carefully snap the baking pan into the breadmaker.
10 Close the lid of the bread machine and plug the power cord into the wall outlet. The
following things will happen. The machine will “beep,” and the lights of the display will
turn on. The time setting will say “3:25” hours.
11 Repeatedly press the “Crust Color” button to select the kind of crust you want. For this
recipe we recommend “Medium”. Depending on the crust color you select, the arrow
will be pointing to either light, medium or dark.
12 Press the “Start/Stop” button and your machine will start making bread. You will hear
the breadmaker begin to mix the ingredients.

www.oster.com
8
www.oster.com
9
Note: It is important that you DO NOT press the “Start/Stop” button while the breadmaker
is making bread. If you do, the machine will turn off and you will need to start over again,
from scratch.
Note: It is important that you should not raise the lid for this recipe. (For other recipes you
try later, you will need to raise the lid to add nuts, fruits, or other ingredients.)
Caution: The breadmaker is very hot DO NOT handle the machine while it’s operating.
DO NOT lift the lid while the breadmaker is baking
bread.
Bread Machine Stages (for 2 lb. loaves)
It’s fun to watch your bread being made through the viewing window. For the basic cycle,
you can expect the following things to happen as the timer counts down to zero.
To begin: The ingredients are kneaded for the fi rst time (5 minutes)
At 3:20, the dough rests for 5 minutes
At 3:15, the dough is kneaded for the second time (20 minutes)
At 2:55, the dough begins to rise (39 minutes)
At 2:16, the dough is “punched down” (10 seconds)
At 2:16, the dough continues to rise (25 minutes and 50 seconds)
At 1:50, the dough is shaped (15 seconds)
At 1:50, the dough comes to the last period of rise (48 minutes and 45 seconds)
At 0:60, the dough begins to bake (60 minutes)
At 0:00, the bread is fi nished.
After the bread is baked
Caution: Do not put your face near the lid when you open the breadmaker, hot steam may
escape that could burn you.
Important: The breadmaker has an automatic “keep warm” setting that will keep your
bread warm for up to one hour, we recommend however to remove the bread from the
breadmaker right away to preserve its freshness.
1 Use pot holders or oven mitts to carefully lift the pan by its handle from the breadmaker.
2 Turn the pan upside down onto a cooling rack and gently shake it until the bread comes
out. If it sticks, take a rubber spatula (metal can damage the pan’s surface) and carefully
go around the sides of the loaf until the bread comes out.
3 If the kneading blade comes out with the bread, use the included kneading blade
removal tool to remove it from the loaf, Remember, it will be hot!
Allow the bread to cool for 15 minutes before slicing and enjoying it.
Important: If you wish to make another loaf of bread right away, please allow the
breadmaker to cool down for 10 to 15 minutes with the cover open and the pan removed.
Overview of Breadmaker Functions
Bread function:
Please refer to the relative recipe and follow the below process
1 Insert the kneading blade into the bread pan.
2 Place ingredients in the bread pan in the following order: liquid ingredients fi rst, dry
ingredients (except yeast) second and yeast last. Note: Yeast must NEVER come into
contact with a liquid when you are adding ingredients.
3 Insert bread pan into breadmaker then gently close the lid.
4 Plug in the breadmaker, the LCD will display “MENU 1 TIMER 3:25”.
5 Press the Menu Select button to choose the type of bread desired (BASIC, FRENCH,
WHOLE WHEAT, SWEET, QUICK, EXPRESS BAKE (1.5lbs.), EXPRESS BAKE (2.0lbs.), GLUTEN
FREE, DOUGH, PASTA DOUGH, JAM, BAKE, CAKE). Note: Display will indicate the Menu
number corresponding to the bread type selected from 1 to 13.
6 Press the Crust Color Button to select the color crust desired (Light, Medium, Dark or
Rapid). Note: Display will indicate the crust color with an arrow pointing to the
corresponding crust color selected (select programs have fi xed settings).
Note: Rapid setting is available on Basic, French or Whole Wheat programs and reduces
the total time by about an hour for quicker results.
7 Press Loaf Size button to select loaf size (1.0lb, 1.5lb or 2.0lb). Note: Display will indicate
the loaf size with an arrow pointing to the corresponding loaf size selected (select
programs have fi xed settings).
8 If delay time is needed, press the up or down delay time arrows to adjust the delay
timer accordingly, the delay timer can be set for up to 15 hours. Note: The delay time
is calculated as the working time plus the delayed time (example for basic bread 2.0 lbs:
delay time set to 15:00 hours = a delay time of 11 hrs. & 35 min. plus the working time
of 3 hrs. & 25 min. for basic bread 2.0 lbs).
9 Press the “Start/Stop” button to start the breadmaker.
10 If you need to stop the breadmaker, press the “Start/Stop” button for about 1 second,
the breadmaker will stop, however you will need to redo the process.
11 Once the program is complete and the display shows “0:00”, it will beep 15 times as a
warning then it will switch to keep warm mode. In keep warm mode, the “0:00” will fl ash.
Note: Keep warm mode will last for up to 1 hour, after 1 hour it will beep 15 times and go
back to the initial status.
12 When the machine beeps, indicating the program is fi nished, pull the bread pan
straight up and out of the machine with oven mitts. Turn the bread pan upside down
and gently shake until bread falls out. Take out the kneading blade from the bottom of
bread using the included kneading blade removal tool and you are ready to eat.
Dough function:
The dough function program is similar to the bread function, except that there is no baking
mode operation. When the program is fi nished, it will beep 5 times as a warning. When the
machine beeps, indicating the program is fi nished, remove the dough from the bread pan.
Baking function:
This function can be used to bake bread or other dough. Please refer to the relative recipe
and follow the below process.

www.oster.com
10
www.oster.com
11
1 Insert the bread pan into the breadmaker.
2 Place all small pieces of food in a cluster inside the bread pan, then close the lid.
3 Press the Menu Select button to select the Baking function.
4 Press the ”Start/Stop” button to start the baking program.
5 Once the program is complete and the display shows “0:00”, it will beep 5 times
as a warning then it will switch back to the initial status.
6 At any time during the baking process, you can stop the program by pressing the
“Start/Stop” button.
Note: For more even baking, it is recommended to slice food into smaller sizes and
distribute them evenly in the bread pan.
Breadmaker Settings (for 2 lb. loaves)
Your breadmaker can bake almost any kind of bread. Recipes are included to clearly show
you which setting you should use. This model has 13 settings total – 10 bread settings
(BASIC, FRENCH, WHOLE WHEAT, SWEET, GLUTEN FREE, DOUGH, PASTA DOUGH, JAM, BAKE,
CAKE) and 3 fast bake settings (QUICK, EXPRESS BAKE (1.5lbs.), EXPRESS BAKE (2.0lbs.).
1 Basic 2 lbs. (Time: 3 hours, 25 minutes)
2 French 2 lbs. (Time: 3 hours, 35 minutes)
3 Whole Wheat 2 lbs. (Time: 3 hours, 48 minutes)
4 Sweet 2 lbs. (Time: 3 hours, 27 minutes)
5 Quick 2 lbs. (Time: 1 hour, 20 minutes)
6 Express Bake 1.0 lb (Time: 58 minutes)
7 Express Bake 1.5 lb (Time: 58 minutes)
8 Gluten Free (Time: 2 hours, 10 minutes)
9 Dough (Time: 1 hour, 30 minutes)
10 Pasta Dough (Time: 14 minutes)
11 Jam (Time: 1 hour, 5 minutes)
12 Bake (Time: 1 hour)
13 Cake (Time: 1 hour, 30 minutes)
Note: Times are approximate based on loaf size.
Basic - This setting is probably used more than any other because it gives you the best results
with just about any recipe.
French - Use this setting for making French breads. French bread takes longer to knead,
rise, and bake, providing a heartier crust.
Whole Wheat - The whole wheat setting off ers a longer rise time for breads that contain
more than 50% whole wheat fl our.
Sweet - The sweet setting is for baking breads with high amounts of sugar, fats, and
proteins, all of which tend to increase browning.
Quick - Use this setting for baking bread quickly - time is slightly longer than Express Bake
but the texture will be fi ner.
Express Bake(1.5LB) - Use this setting for baking smaller loaves of bread in under one hour.
Express Bake (2.0LB) - Use this setting for baking larger loaves of bread in under one hour.
Gluten Free - Use this setting for baking gluten free breads. It is necessary to make sure
that all ingredients being used are marked as gluten free. Note that wheat-free does not
always mean Gluten-free, you must read all labels carefully.
Dough - This setting lets you prepare dough for rolls, specialty breads, pizza, etc. which you
shape by hand, allow to rise, then bake in a conventional oven.
Pasta Dough - This setting lets you prepare dough for pastas to make noodles, ravioli or
other fresh pastas.
Jam - This setting is for baking jams and marmalades
Bake - This setting is for baking dough.
EXPRESS BAKE Breadmaker Setting:
Making Bread In Under 1 Hour
Your OSTER® breadmaker can bake great bread in under 1 hour.
This is called the “EXPRESS BAKE Breadmaker” setting. EXPRESS BAKE Breadmaker setting
loaves are a little diff erent from loaves baked on non-EXPRESS BAKE Breadmaker settings.
Make sure to try the diff erent settings to see which of them you prefer.
There are a few things you should know about the EXPRESS BAKE Breadmaker settings that
are diff erent than the other settings.
• EXPRESS BAKE Breadmaker setting breads tend to have a darker, thicker crust than other
kinds of bread. Sometimes there will be a crack in the top of the crust. This is because
baking is done at higher temperatures. They also tend to be shorter, denser loaves.
• You CANNOT use the Delay Timer for the EXPRESS BAKE Breadmaker settings. This would
cool the liquid ingredients and aff ect the way that the bread rises.
• You CANNOT use the “Crust Color” buttons for EXPRESS BAKE Breadmaker setting breads.
• DO NOT open the cover while making EXPRESS BAKE Breadmaker setting breads.
• If the loaf is hard to remove from the pan let it sit for about 5 minutes to cool. Gently
shake the bread out of the pan and wait for 15 minutes before slicing.
• If you wish to bake another Loaf of bread, you must let the bread maker cool for
20 minutes with the cover open.
• YOU CAN use standard bread mixes for EXPRESS BAKE Breadmaker setting breads, but the
results may not be as good as the results when using the recipes within this book
EXPRESS BAKE Breadmaker Setting Tips and Hints
Yeast
Always use a fast rising yeast. DO NOT use active dry yeast for EXPRESS BAKE Breadmaker
settings because the loaves will be much shorter when baked.
Liquids
Always use hot water in the range of 115°–125° F. You must use a cooking thermometer to
gauge the temperature; hotter water can kill the yeast while cooler water may not activate it.
Salt
As a rule, you should use LESS salt for EXPRESS BAKE Breadmaker setting breads. Less salt
provides you with a higher loaf. Make sure to follow your Oster® Breadmaker recipe
suggestions for best results.
Other Ingredients
Make sure all other ingredients (like fl our, sugar, dry milk, butter, etc.) are at room
temperature. Always use bread fl our for the EXPRESS BAKE Breadmaker settings.

www.oster.com
12
www.oster.com
13
Things You May Need to Buy
• You should only use “Bread Machine” fl our for the EXPRESS BAKE Breadmaker setting recipes.
• You may need a cooking thermometer to measure the temperature of the water
you use in these recipes. You should only use hot water (between 115° and 125° F)
for EXPRESS BAKE Breadmaker setting recipes.
Although baking EXPRESS BAKE Breadmaker setting breads is a little diff erent, the results
and convenience are well worth it.
The following recipe is a great one to try for your fi rst EXPRESS BAKE Breadmaker setting loaf.
Traditional White Bread 1–1/2 lb. loaf
Ingredients:
1 cup + 2 tablespoons
9 ounces total) of hot water (115° – 125°)
2 tablespoons oil
(room temperature)
Instructions:
1 Carefully measure 1 cup and 2 tablespoons (9 ounces total) of hot water. Remember,
it’s a good idea to view the measuring cup at eye level to make sure you have measured
exactly 1 cup and 2 tablespoons (9 ounces total).
2 Use a cooking thermometer to make sure the temperature of the water is between
115° – 125° F. When water is at the proper temperature, pour into the bread pan.
3 Carefully measure and add 2 tablespoons oil that is at room temperature.
4 Carefully measure and add the salt and sugar to the bread pan.
5 Measure and add exactly 3 cups of bread fl our to the bread pan. Remember to make sure
not to “overpack” the fl our into the cup. To avoid over packing, a good trick is to fi ll the
measuring cup to overfl owing, then tap the side of the cup with a knife or spatula to
remove air pockets. Level off the measuring cup with the knife or spatula.
6 Before adding the yeast, use your fi nger to form a well (hole) in the fl our where you will
pour the yeast. Yeast must NEVER come into contact with a liquid when you are adding
ingredients. Measure (again, leveling off ) 5 teaspoons of a fast-rising yeast and carefully
pour it into the well you made in the fl our.
7 Carefully snap the baking pan into the breadmaker.
8 Close the lid of the bread machine and plug the power cord into the wall outlet. The
following things will happen. The machine will “beep,” and the lights of the display will
turn on. The time setting will say “3:25” hours.
9 Repeatedly press the “Menu Select” button to select the EXPRESS BAKE Breadmaker
(1.5LB) setting.
10 Press the “Start/Stop” button and your machine will start making bread. You will hear
the breadmaker begin to mix the ingredients.
Note: It is important that you DO NOT press the “Start/Stop” button while the breadmaker
is making bread. If you do, the machine will turn off and you will need to start over again,
from scratch.
2 tablespoons sugar
1 teaspoon salt
3 cups Bread Machine fl our
5 teaspoons fast-rising yeast
Note: DO NOT raise the lid when using the EXPRESS BAKE Breadmaker setting.
Doing so can aff ect the rising of the dough.
Caution: The breadmaker is very hot DO NOT handle the machine while it’s operating.
After the EXPRESS BAKE Breadmaker setting bread is baked
Caution: Do not put your face near the lid when you open the breadmaker, Hot steam may
escape that could burn you.
Important: The breadmaker has an automatic “keep warm” setting that will keep your
bread warm for up to one hour, We recommend however to remove the bread from the
breadmaker right away to preserve its freshness.
1 Use pot holders or oven mitts to carefully lift the pan by its handle from the breadmaker.
2 Turn the pan upside down onto a cooling rack and gently shake it until the bread comes
out. If it sticks, take a rubber spatula (metal can damage the pan’s surface) and carefully
go around the sides of the loaf until the bread comes out.
3 If the kneading blade comes out with the bread, use the included kneading blade
removal tool to remove it from the loaf, Remember, it will be hot!
Allow the bread to cool for 15 minutes before slicing and enjoying it.
Important: If you wish to make another loaf of bread right away, please allow the
breadmaker to cool down for 10 to 15 minutes with the cover open and the pan removed.
Using the Delay Timer
You can delay the time your bread maker starts to have fresh bread
ready when you get up in the morning or when you come from work.
We recommend that before you use the Delay Timer, you try out a few
recipes. Use recipes that have produced good results for you in the
past.
Important: You CANNOT use the Delay Timer for EXPRESS BAKE Breadmaker settings.
Before using the Delay Timer:
1 Add all of the ingredients of the recipe.
2 Select the correct setting for the kind of bread you are making (French, Sweet, etc.).
3 Select the crust color.
Caution: Do not use recipes with ingredients that can spoil like eggs or milk.
To Use the Delay Timer:
1 Figure out how many hours and minutes there are between now and when you want
fi nal, baked bread. For example, if it is 8:00 AM and you want bread ready for dinner at
6:00 PM, that is 10 hours.
2 Use the delay timer up button to advance the time in 10 minute increments. In our
example, you will do this until the timer reads “10:00.” If necessary, use the delay timer
down button to decrease the time. (To advance the time quickly, simply press and hold
down the delay timer up/down buttons.)
Important: If you make a mistake or wish to start over, press and hold down the “Start/
Stop” button until you hear a beep, then press the “Start/Stop” button one more time. The
display will show the original setting and cycle time. The delay timer is canceled and you
can start again.

www.oster.com
14
www.oster.com
15
3 When the delay timer is set where you want it, make sure to press the “Start/Stop”
button. The colon “:” will fl ash and your bread will be ready when you planned.
Important: When using the delay timer during times of hot weather, you may wish to
reduce the liquid in your recipe by 1 or 2 tablespoons. This is to prevent the dough from
rising too much. You may also reduce the salt by 1/8 or 1/4 teaspoons and try cutting the
amount of sugar you use by 1/4 teaspoon at a time.
Tips and Hints
Experienced cooks consider bread making to be as much of an art as a science. Keep in
mind that some recipes may require a little experimentation before they are exactly the
way you want them. Just don’t give up. Still, there are special hints to ensuring quality
bread almost every time.
Use Exact Measurements
We’ve already mentioned how important it is to use exact measurements when baking
bread, but it should be said again. Level off all dry ingredients and make sure that all liquid
ingredients are measured in a glass cup with the markings clearly labeled on the side.
Use Fresh Ingredients
You should always use fresh ingredients. The reasons are:
• Flour - If you have stored your fl our for a long time, it may have become wet from
absorbing moisture, or dry, depending on the area of the country in which you live.
We recommend using fresh bread fl our.
• Yeast - Fresh yeast is probably the most important ingredient in baking bread. If the yeast
is not fresh, your bread may not rise. It is better to buy new yeast than to take a chance on
yeast that has been stored for a long time.
You can test the freshness of your yeast. Simply fi ll a cup with warm water, then add and stir
in 2 teaspoons of sugar. Sprinkle a few teaspoons of yeast on the surface of the water and
wait. After 15 minutes, the yeast should foam and there should be distinct odor. If neither
reaction happens, the yeast is old and should be thrown away.
Add Ingredients in the Correct Order
Read all recipes from top to bottom, and remember:
- FIRST, liquid ingredients
- SECOND, dry ingredients
- LAST, yeast
For Baking at High Altitudes
If you live above 3000 feet, you probably already know how to adjust other recipes like
cakes and muffi ns.
Higher altitudes tend to:
• Make dough rise faster
• Make fl our drier
To compensate for high altitude baking, we recommend the following:
If the dough is too dry
• Increase the amount of water to the recipe, sometimes as much as 2–4 tablespoons per cup.
If the bread rises too high
• Reduce the amount of yeast. For each teaspoon of yeast, try reducing the yeast by
1/8 to 1/4 teaspoon.
• Reduce the amount of sugar. For each tablespoon of sugar, reduce the amount by
1 to 2 teaspoons.
Measurement Equivalency Chart
The following chart will help you convert measurements used in the recipes.
For example: 1/2 tablespoon = 1–1/2 teaspoons
Fluid Ounce(s) Cup(s) Tablespoon(s) Teaspoon(s)
8 = 1 = 16 = 48
7 = 7/8 = 14 = 42
6 = 3/4 = 12 = 36
5 = 5/8 = 10 = 30
4 = 1/2 = 8 = 24
3 = 3/8 = 6 = 18
2 = 1/4 = 4 = 12
1 = 1/8 = 2 = 6
= = 1 = 3
1/2 = 1 1/2

www.oster.com
16
www.oster.com
17
CARE & CLEANING
FAQs
Taking Care of Your Bread Machine
Caution: Do not put the breadmaker in water or in a dishwasher, Do not use benzene,
scrubbing brushes, or chemical cleaners as these will damage the machine. Do not immerse
in liquids. Press Stop Button and remove cord plug from wall outlet. Allow to cool.
Use only a mild, non-abrasive cleaner to clean the breadmaker.
General cleaning
1 Remove all bread crumbs by wiping them away with a slightly damp cloth.
2 DO NOT bend the heating element which is located on the inside of the breadmaker.
Cleaning the baking pan and kneading blade
1 Wipe the baking pan and kneading blade with a damp cloth and dry completely.
2 DO NOT wash the pan or parts in the dishwasher. This will damage the fi nish of the pan
and the other parts.
Caring for your bread maker
1 Keep your breadmaker clean at all times.
Caution: Do not use metal utensils with the breadmaker. This will damage the non-stick
pan and other parts.
2 Don’t worry if the color of the bread pan changes over time. The color change is a result
of steam and other moisture and does not aff ect the machine’s performance.
3 If you have trouble removing the kneading blade, place warm water in the bread pan
for 10–15 minutes and this will loosen the blade.
Storing your breadmaker
1 Make sure the machine is clean and dry before storing.
2 Store the breadmaker with the lid closed.
3 Do not place heavy objects on the lid.
4 Remove the kneading blade and place inside the bread pan.
Troubleshooting
If you experience diffi culties when operating the breadmaker, review the troubleshooting
information in this section to fi nd a solution. If you are unable to fi nd a solution, please call
our Consumer Relations Department at 1(800)334–0759.
If you have a power outage
This unit has a memory function if the power goes out while you are using your breadmaker.
1 If the power goes out while working and is out for less than 6 min., when the power
comes back on the unit will resume the program from where it left off .
2 If the power goes out while working and is out for more than 6 min., when the power
comes back on the unit will not resume the program.
When the power is out for more than 6 min., when it comes back on, you should do
the following:
1 Hold down the “Start/Stop” button for at least 3 seconds. If the display does not return to
the time setting before the outage, unplug the bread maker and then plug it back in.
2 If the machine still does not start, hold down the “Start/Stop” button a second time for
3 seconds. Continue to unplug and re-plug the machine and hold down the “Start/Stop”
button until the display returns to the cycle time before the power outage.
Understanding Display Information
What do I do if my display does not light up?
Confi rm your breadmaker is plugged in.
What do I do if my display shows 0:00 and the colon “:” is ashing?
There is no problem. This just means the baking cycle is over and the breadmaker is keeping
your bread warm. Press the “Start/Stop” button to turn off the keep warm feature.
What do I do if my display shows “E00” or “E01” and continuously beeps?
This happens when the internal temperature of the chamber is too high (>136°F)
or too low (< –4°F).
1 Let the unit sit and come back to room temperature then check if it can operate again.
2 If it still does not operate, call the service center for repair.
What do I do if my display shows “EEE” and continuously beeps?
Temperature sensor circuit is broken. Call the service center for repair.
What do I do if my display shows “HHH” and continuously beeps?
Temperature sensor circuit is bypassed. Call the service center for repair.
Troubleshooting Breadmaker Problems
What do I do if I see smoke or smell a burning odor from the back of the machine?
Ingredients have spilled out of the bread pan and into the machine itself. Stop the
breadmaker and allow it to cool off . Clean the breadmaker before using it again.
Please see the “Care & Cleaning” section of the manual.
What do I do if the dough does not mix?
Make sure the baking pan and kneading blade are properly installed in the machine.

www.oster.com
18
www.oster.com
19
Troubleshooting Baking Problems
What do I do if the sides of the bread collapse and the bottom of the bread is damp?
There are several possible solutions. The bread may have been left in the bread pan too
long after baking. Remove the bread from the pan sooner and allow it to cool. Try using
more fl our (a teaspoon at a time), or less yeast (1/4 teaspoon at a time), or less water
or liquid (a teaspoon at a time). This could also be the result of forgetting to add salt
to the recipe.
What do I do if the bread has a heavy, thick texture?
Try using less fl our (a teaspoon at a time), or more yeast (1/4 teaspoon at a time). This
could also be the result of using old fl our or the wrong type of fl our for the recipe.
What do I do if the bread is not baked completely in the center?
Try using more fl our (a teaspoon more at a time), or less water or liquid (a teaspoon
less at a time). Do not lift the lid too often during baking.
What do I do if the bread has a coarse or holey texture?
This is usually the result of forgetting to add salt to the recipe.
What do I do if the bread rose too much?
Try using less yeast (1/4 teaspoon less at a time). This could also be the result of
forgetting to add salt to the recipe or forgetting to put the kneading blade into
the baking pan.
What do I do if the bread did not rise enough?
There are several possible solutions. Try using less fl our (a teaspoon less at a time), more
yeast (1/4 teaspoon more at a time), or less water (a teaspoon less at a time). This could
also be the result of:
• forgetting to add salt to the recipe,
• using old fl our or the wrong kind of fl our for the recipe,
• using old yeast,
• or not using hot water (except for the EXPRESS BAKE Breadmaker cycles).
What do I do if the bread has a oured top?
This is usually a result of using too much fl our or not enough water. Try using less fl our
(a teaspoon or less at a time), or try using more yeast (1/4 teaspoon less at a time).
What do I do if the bread is too brown?
This is usually the result of adding too much sugar to the recipe. Try using less sugar
(1 tablespoon at a time). You can also try selecting a lighter crust color selection.
What do I do if the bread is not brown enough?
This is usually the result of repeatedly lifting the lid of the bread machine or leaving
the lid open while the bread is baking. Be sure the lid is shut while the breadmaker is
in operation.
RECIPES
Basic Setting Recipes (Menu 1)
Basic bread machine stages (for 1.5 lb. loaves)
For the basic cycle, you can expect the following things to happen as the timer counts down to zero.
To begin: The ingredients are kneaded for the fi rst time (5 minutes)
At 3:13, the dough rests for 5 minutes
At 3:08, the dough is kneaded for the second time (20 minutes)
At 2:48, the dough begins to rise (39 minutes)
At 2:09, the dough is “punched down” (10 seconds)
At 2:09, the dough continues to rise (25 minutes and 50 seconds)
At 1:43, the dough is shaped (15 seconds)
At 1:43, the dough comes to the last period of rise (48 minutes and 45 seconds)
At 0:53, the dough begins to bake (53 minutes)
At 0:00, the bread is fi nished.
Note: Rapid Setting will reduce total time by about an hour.
Traditional White Bread
1.5 pound loaf
1 cup water
2 tablespoons butter or margarine
1 and 1/2 teaspoons salt
3 cups bread fl our
2 tablespoons dry milk
1 tablespoon sugar
2 teaspoons active dry yeast
1 Measure and add liquid ingredients to the bread pan.
2 Measure and add dry ingredients (except yeast) to the bread pan.
3 Use your fi nger to form a well (hole) in the fl our where you will pour the yeast. Yeast must NEVER
come into contact with a liquid when you are adding ingredients. Measure the yeast and carefully
pour it into the well.
4 Snap the baking pan into the breadmaker and close the lid.
5 Press the “Menu Select” button to choose the Basic setting.
6 Press the “Loaf Size” button to choose 1 lb., 1.5 lb., or 2 lb.
7 Press the “Crust Color” button to choose light, medium, dark or rapid crust.
8 Press the “Start/Stop” button.
2 pound loaf
1 and 3/8 cups water
2 tablespoons butter or margarine
1 and 3/4 teaspoons salt
4 cups bread fl our
2 tablespoons dry milk
2 tablespoons sugar
2 and 1/4 teaspoons active dry yeast
Basic

www.oster.com
20
www.oster.com
21
Country White Bread (no Delay Timer) - 2 lb. loaf
1 cup warm milk (110°–115°F)
1 and 1/2 tablespoons butter or margarine
1 large egg
1 and 1/2 teaspoons salt
1 Measure and add liquid ingredients to the bread pan.
2 Measure and add dry ingredients (except yeast) to the bread pan.
3 Use your fi nger to form a well (hole) in the fl our where you will pour the yeast. Yeast must NEVER
come into contact with a liquid when you are adding ingredients. Measure the yeast and carefully
pour it into the well.
4 Snap the baking pan into the breadmaker and close the lid.
5 Press the “Menu Select” button to choose the Basic setting.
6 Press the “Loaf Size” button to choose 1 lb., 1.5 lb., or 2 lb.
7 Press the “Crust Color” button to choose light, medium, dark or rapid crust.
8 Press the “Start/Stop” button.
4 cups bread fl our
1 and 1/2 tablespoons sugar
2 teaspoons active dry yeast
Potato Bread - 2 lb. loaf
1 and 3/8 cups water
2 tablespoons butter or margarine
1 and 1/4 teaspoons salt
4 cups bread fl our
1 Measure and add liquid ingredients to the bread pan.
2 Measure and add dry ingredients (except yeast) to the bread pan.
3 Use your fi nger to form a well (hole) in the fl our where you wilt pour the yeast. Yeast must NEVER
come into contact with a liquid when you are adding ingredients. Measure the yeast and carefully
pour it into the well
4 Snap the baking pan into the breadmaker and close the lid.
5 Press the “Menu Select” button to choose the Basic setting.
6 Press the “Loaf Size” button to choose 1 lb., 1.5 lb., or 2 lb.
7 Press the “Crust Color” button to choose light, medium, dark or rapid crust.
8 Press the “Start/Stop” button.
2 tablespoons sugar
1/4 cup instant potato fl akes
2 tablespoons dry milk
1 and 3/4 teaspoons active dry yeast
Oatmeal Bread - 2 lb. loaf
1 and 1/4 cups water
3 tablespoons honey
2 tablespoons butter or margarine
3/4 cup quick-cook oats
1 and 3/4 teaspoons salt
1 Measure and add liquid ingredients to the bread pan.
2 Measure and add dry ingredients (except yeast) to the bread pan.
3 Use your fi nger to form a well (hole) in the fl our where you will pour the yeast. Yeast must NEVER
come into contact with a Liquid when you are adding ingredients. Measure the yeast and carefully
pour it into the well.
4 Snap the baking pan into the breadmaker and close the lid.
5 Press the “Menu Select” button to choose the Basic setting.
6 Press the “Loaf Size” button to choose 1 lb., 1.5 lb., or 2 lb.
7 Press the “Crust Color” button to choose light, medium, dark or rapid crust.
8 Press the “Start/Stop” button.
3 and 3/4 cups bread fl our
2 tablespoons oat bran
2 tablespoons dry milk
2 teaspoons active dry yeast
Basic
Basic
Basic
Raisin Bread (no Delay Timer)
1.5 pound loaf
7/8 cups water
1 and 1/2 tablespoons butter or margarine
1 teaspoon salt
3 cups bread fl our
2 tablespoons sugar
1 and 1/2 tablespoons dry milk
1 teaspoon cinnamon
1 and 3/4 teaspoons active dry yeast
3/4 cups raisins (see note below)
1 Measure and add liquid ingredients to the bread pan.
2 Measure and add dry ingredients (except yeast) to the bread pan.
3 Use your fi nger to form a well (hole) in the fl our where you will pour the yeast. Yeast must NEVER
come into contact with a Liquid when you are adding ingredients. Measure the yeast and carefully
pour it into the well.
4 Snap the baking pan into the breadmaker and close the lid.
5 Press the “Menu Select” button to choose the Basic setting.
6 Press the “Loaf Size” button to choose 1 lb., 1.5 lb., or 2 lb.
7 Press the “Crust Color” button to choose light, medium, dark or rapid crust.
8 Press the “Start/Stop” button.
Note: When adding fruit ingredients like raisins, the bread machine will make a beeping signal during
the kneading cycle. When the bread machine beeps during the kneading cycle. Raise the lid and
sprinkle the raisins in, a few at a time, until they are kneaded with the dough.
2 pound loaf
1 and 1/4 cups water
2 tablespoons butter or margarine
1 and 1/2 teaspoons salt
4 cups bread pour
3 tablespoons sugar
2 tablespoons dry milk
1 and 1/2 teaspoons cinnamon
2 and 1/4 teaspoons active dry yeast
1 cup raisins (see note below)
Light Rye Bread - 1.5 lb. loaf
1 and 3/8 cups water
1 and 1/2 tablespoons butter or margarine
1 and 1/2 teaspoons salt
3 cups bread fl our
1 Measure and add liquid ingredients to the bread pan.
2 Measure and add dry ingredients (except yeast) to the bread pan.
3 Use your fi nger to form a well (hole) In the fl our where you will pour the yeast. Yeast must NEVER
come into contact with a liquid when you are adding ingredients. Measure the yeast and carefully
pour it into the well.
4 Snap the baking pan into the breadmaker and close the lid
5 Press the “Menu Select” button to choose the Basic setting.
6 Press the “Loaf Size” button to choose 1 lb., 1.5 lb., or 2 lb.
7 Press the “Crust Color” button to choose light, medium, dark or rapid crust.
8 Press the “Start/Stop” button.
1 cup rye fl our
2 tablespoons packed brown sugar
2 teaspoons active dry yeast
Basic
Basic

www.oster.com
22
www.oster.com
23
French Setting Recipes (Menu 2)
French Bread Machine Stages (for 1.5 lb. loaves)
For the French cycle you can expect the following things to happen as the timer counts down to zero.
To begin: The ingredients are kneaded for the fi rst time (5 minutes)
At 3:30, the dough rests for 5 minutes
At 3:25, the dough is kneaded for the second time (20 minutes)
At 3:05, the dough begins to rise (39 minutes)
At 2:26, the dough is “punched down” (10 seconds)
At 2:26, the dough continues to rise (30 minutes and 50 seconds)
At 1:55, the dough is shaped (10 seconds)
At 1:55, the dough comes to the last period of rise (59 minutes and 50 seconds)
At 0:55, the dough begins to bake (55 minutes)
At 0:00, the bread is fi nished.
Note: Rapid Setting will reduce total time by about an hour.
French Countryside Bread - 2 lb. loaf
1 and 3/8 cups water
1 and 1/2 tablespoons vegetable or olive oil
1 and 1/2 teaspoons salt
1 Measure and add liquid ingredients to the bread pan.
2 Measure and add dry ingredients (except yeast) to the bread pan.
3 Use your fi nger to form a well (hole) in the fl our where you will pour the yeast. Yeast must NEVER
come into contact with a liquid when you are adding ingredients. Measure the yeast and carefully
pour it into the well.
4 Snap the baking pan into the bread maker and close the lid.
5 Press the “Menu Select” button to choose the French setting.
6 Press the “Loaf Size” button to choose 1 lb., 1.5 lb., or 2 lb.
7 Press the “Crust Color” button to choose light, medium, dark or rapid crust.
8 Press the “Start/Stop” button.
4 cups bread fl our
1 tablespoon sugar
2 teaspoons active dry yeast
Italian Herb Bread - 2 lb. loaf
1 and 1/4 cups water
1 and 1/2 tablespoons vegetable or olive oil
1 teaspoon salt
3 and 1/2 cups bread fl our
2 teaspoons sugar
1 tablespoon dried parsley
1 Measure and add liquid ingredients to the bread pan.
2 Measure and add dry ingredients (except yeast) to the bread pan.
3 Use your fi nger to form a well (hole) in the fl our where you will pour the yeast. Yeast must NEVER
come into contact with a liquid when you are adding ingredients. Measure the yeast and carefully
pour it into the well.
4 Snap the baking pan into the breadmaker and close the lid.
5 Press the “Menu Select” button to choose the French setting.
6 Press the “Loaf Size” button to choose 1 lb., 1.5 lb., or 2 lb.
7 Press the “Crust Color” button to choose light, medium, dark or rapid crust.
8 Press the “Start/Stop” button.
1/4 cup grated parmesan cheese
2 teaspoons dried onion fl akes
1/2 teaspoon dried basil
1/2 teaspoon garlic powder
2 teaspoons active dry yeast
French
French
Whole Wheat
Setting Recipes (Menu 3)
Whole Wheat Bread Machine Stages (for 1.5 lb. loaves)
For the Whole Wheat bread cycle you can expect the following things to happen as the timer counts
down to zero.
To begin: The ingredients are kneaded for the fi rst time (5 minutes)
At 3:15, the dough rests for 5 minutes
At 3:10, the dough is kneaded for the second time (15 minutes)
At 2:55, the dough begins to rise (49 minutes)
At 2:05, the dough is “punched down” (10 seconds)
At 2:05, the dough continues to rise (25 minutes and 50 seconds)
At 1:40, the dough is shaped (10 seconds)
At 1:40, the dough comes to the last period of rise (49 minutes and 50 seconds)
At 0:50, the dough begins to bake (50 minutes)
At 0:00, the bread is fi nished.
Note: Rapid Setting will reduce total time by about an hour.
100% Whole Wheat Bread - 2 lb. loaf
1 and 5/8 cups water
1/3 cup packed brown sugar
2 teaspoons salt
4 and 2/3 cups whole wheat fl our
3 teaspoons active dry yeast
1 Measure and add liquid ingredients to the bread pan.
2 Measure and add dry ingredients (except yeast) to the bread pan.
3 Use your fi nger to form a well (hole) in the fl our where you will pour the yeast. Yeast must NEVER
come into contact with a liquid when you are adding ingredients. Measure the yeast and carefully
pour it into the well.
4 Snap the baking pan into the breadmaker and close the lid.
5 Press the “Menu Select” button to choose the Whole Wheat setting
6 Press the “Loaf Size” button to choose 1 lb., 1.5 lb., or 2 lb.
7 Press the “Crust Color” button to choose light, medium, dark or rapid crust.
8 Press the “Start/Stop” button.
Wheat

www.oster.com
24
www.oster.com
25
Honey Grain Bread
1.5 pound loaf
1 cup water
2 tablespoons butter or margarine
1 and 1/2 tablespoons honey
1 teaspoon salt
2 and 1/4 cups bread fl our
1 cup whole wheat fl our
1/2 cup quick cook oats
2 teaspoons active dry yeast
1 Measure and add liquid ingredients to the bread pan.
2 pound loaf
1 and 3/8 cups water
2 and 1/2 tablespoons butter or margarine
2 tablespoons honey
1 and 3/4 teaspoons salt
2 and 1/2 cups bread fl our
1 and 1/4 cups whole wheat fl our
2/3 cup quick cook oats
2 and 1/4 teaspoons active dry yeast
Wheat
2 Measure and add dry ingredients (except yeast) to the bread pan.
3 Use your fi nger to form a well (hole) in the fl our where you will pour the yeast. Yeast must NEVER
come into contact with a liquid when you are adding ingredients. Measure the yeast and carefully
pour it into the well.
4 Snap the baking pan into the breadmaker and close the lid.
5 Press the “Menu Select” button to choose the Whole Wheat setting
6 Press the “Loaf Size” button to choose 1 lb., 1.5 lb., or 2 lb.
7 Press the “Crust Color” button to choose light, medium, dark or rapid crust.
8 Press the “Start/Stop” button.
Honey Wheat Bread - 1.5 lb. loaf
1 and 1/8 cups water
2 tablespoons butter or margarine
4 tablespoons honey
1 teaspoon salt
1 Measure and add liquid ingredients to the bread pan.
2 Measure and add dry ingredients (except yeast) to the bread pan.
3 Use your fi nger to form a well (hole) in the fl our where you will pour the yeast. Yeast must NEVER
come into contact with a liquid when you are adding ingredients. Measure the yeast and carefully
pour it into the well.
4 Snap the baking pan into the breadmaker and close the lid.
5 Press the “Menu Select” button to choose the Whole Wheat setting
6 Press the “Loaf Size” button to choose 1 lb., 1.5 lb., or 2 lb.
7 Press the “Crust Color” button to choose light, medium, dark or rapid crust.
8 Press the “Start/Stop” button.
3 and 1/2 cups bread fl our
1 cup wheat fl ake cereal
2 tablespoons wheat bran cereal
2 teaspoons active dry yeast
Wheat
Summer Wheat Bread - 1.5 lb. loaf
1 and 3/8 cups water
1 and 1/2 tablespoons vegetable oil
2 tablespoons molasses
1 and 1/2 teaspoons salt
1 Measure and add liquid ingredients to the bread pan.
2 Measure and add dry ingredients (except yeast) to the bread pan.
3 Use your fi nger to form a well (hole) in the fl our where you will pour the yeast. Yeast must NEVER
come into contact with a liquid when you are adding ingredients. Measure the yeast and carefully
pour it into the well.
4 Snap the baking pan into the breadmaker and close the lid.
5 Press the “Menu Select” button to choose the Whole Wheat setting
6 Press the “Loaf Size” button to choose 1 lb., 1.5 lb., or 2 lb.
7 Press the “Crust Color” button to choose light, medium, dark or rapid crust.
8 Press the “Start/Stop” button.
2 cups bread fl our
2 cups whole wheat fl our
2 teaspoons active dry yeast
Buttermilk Bread - 1.5 lb. loaf
1 and 1/4 cups water
1 and 1/2 tablespoon butter or margarine
1 teaspoon white vinegar
2 tablespoons packed brown sugar
2 cups bread fl our
1 cup whole wheat fl our
1 Measure and add liquid ingredients to the bread pan.
2 Measure and add dry ingredients (except yeast) to the bread pan.
3 Use your fi nger to form a well (hole) in the fl our where you will pour the yeast. Yeast must NEVER
come into contact with a liquid when you are adding ingredients. Measure the yeast and carefully
pour it into the well.
4 Snap the baking pan into the breadmaker and close the lid.
5 Press the “Menu Select” button to choose the Whole Wheat setting
6 Press the “Loaf Size” button to choose 1 lb., 1.5 lb., or 2 lb.
7 Press the “Crust Color” button to choose light, medium, dark or rapid crust.
8 Press the “Start/Stop” button.
1 cup rye fl our
2 tablespoons powdered buttermilk
1 tablespoon vital gluten
1 and 1/2 teaspoons caraway seeds
2 teaspoons active dry yeast
Wheat
Wheat

www.oster.com
26
www.oster.com
27
Sweet Setting Recipes (Menu 4)
Sweet Bread Machine Stages (for 1.5 lb. loaves)
For the Sweet bread cycle you can expect the following things to happen as the timer counts down
to zero.
To begin: The ingredients are kneaded for the fi rst time (5 minutes)
At 3:17, the dough rests for 5 minutes
At 3:12, the dough is kneaded for the second time (20 minutes)
At 2:52, the dough begins to rise (39 minutes)
At 2:13, the dough is “punched down” (10 seconds)
At 2:13, the dough continues to rise (25 minutes and 50 seconds)
At 1:47, the dough is shaped (5 seconds)
At 1:47, the dough comes to the last period of rise (51 minutes and 55 seconds)
At 0:55, the dough begins to bake (55 minutes)
At 0:00, the bread is fi nished.
Note: With the Sweet Bread Program, crust color can’t be changed.
Springtime favorite Bread (no Delay Timer) - 1.5 lb. loaf
1 cup water
1/4 cup butter or margarine
1 large egg
1 and 1/2 teaspoon vanilla extract
1 and 1/4 teaspoons almond extract
1 teaspoon salt
1 Measure and add liquid ingredients to the bread pan.
2 Measure and add dry ingredients (except yeast) to the bread pan.
3 Use your fi nger to form a well (hole) in the fl our where you will pour the yeast. Yeast must NEVER
come into contact with a liquid when you are adding ingredients. Measure the yeast and carefully
pour it into the well.
4 Snap the baking pan into the breadmaker and close the lid.
5 Press the “Menu Select” button to choose the Sweet setting.
6 Press the “Loaf Size” button to choose 1 lb., 1.5 lb., or 2 lb.
7 Press the “Start/Stop” button.
Note: When adding fruit ingredients like raisins, the bread machine will make a beeping signal during
the kneading cycle. Raise the lid and sprinkle the raisins in, a few at a time, until they are kneaded with
the dough.
3 and 3/4 cups bread fl our
1/2 cup sugar
3 tablespoons dry milk
2 teaspoons active dry yeast
3/4 cup raisins
1 and 1/2 teaspoons of shredded orange peel
Sweet
Cottage Cheese and Chive Bread (no Delay Timer) -1.5 lb. loaf
3/8 cups water
1 cup of cottage cheese
1 egg
2 tablespoons butter or margarine
1 and 1/2 teaspoons salt
1 Measure and add liquid ingredients to the bread pan.
2 Measure and add dry ingredients (except yeast) to the bread pan.
3 Use your fi nger to form a well (hole) in the fl our where you will pour the yeast. Yeast must NEVER
come into contact with a liquid when you are adding ingredients. Measure the yeast and carefully
pour it into the well.
4 Snap the baking pan into the breadmaker and close the lid.
5 Press the “Menu Select” button to choose the Sweet setting.
6 Press the “Loaf Size” button to choose 1 lb., 1.5 lb., or 2 lb.
3 and 3/4 cups bread fl our
3 tablespoons dried chives
2 and 1/2 tablespoons sugar
2 and 1/4 teaspoons active dry yeast
Sweet
7 Press the “Start/Stop” button.
Special Winter Bread (no Delay Timer) - 1.5 lb. loaf
7/8 cups water
2 tablespoons butter or margarine
1 large egg
1/4 cup molasses
1 Measure and add liquid ingredients to the bread pan.
2 Measure and add dry ingredients (except yeast) to the bread pan.
3 Use your fi nger to form a well (hole) in the fl our where you will pour the yeast. Yeast must NEVER
come into contact with a liquid when you are adding ingredients. Measure the yeast and carefully
pour it into the well.
4 Snap the baking pan into the breadmaker and close the lid.
5 Press the “Menu Select” button to choose the Sweet setting.
6 Press the “Loaf Size” button to choose 1 lb., 1.5 lb., or 2 lb.
1/4 cup corn meal
2 and 3/4 cups bread fl our
2/3 cup whole wheat fl our
2 and 1/4 teaspoons active dry yeast
Sweet
7 Press the “Start/Stop” button.
Apple Walnut Bread - 1.5 lb. loaf
3/4 cup unsweetened apple sauce
3/8 cups apple juice
3 tablespoons butter or margarine
1 large egg
1 teaspoon salt
4 cups bread fl our
1 Measure and add liquid ingredients to the bread pan.
2 Measure and add dry ingredients (except yeast) to the bread pan.
3 Use your fi nger to form a well (hole) in the fl our where you will pour the yeast. Yeast must NEVER
come into contact with a liquid when you are adding ingredients. Measure the yeast and carefully
pour it into the well.
4 Snap the baking pan into the breadmaker and close the lid.
5 Press the “Menu Select” button to choose the Sweet setting.
6 Press the “Loaf Size” button to choose 1 lb., 1.5 lb., or 2 lb.
7 Press the “Start/Stop” button.
Note: When adding fruit ingredients like raisins, the bread machine will make a beeping signal during
the kneading cycle. Raise the lid and sprinkle the raisins in, a few at a time, until they are kneaded with
the dough.
1/4 cup packed brown sugar
1 and 1/4 teaspoons cinnamon
1/2 teaspoon baking soda
2 teaspoons active dry yeast
1/2 cup chopped walnuts
Sweet

www.oster.com
28
www.oster.com
29
EXPRESS BAKE Setting
Setting Recipes (Menus 6 and 7)
EXPRESS BAKE Bread Machine Stages
For the EXPRESS BAKE Breadmaker cycle you can expect the
following things to happen as the timer counts
down to zero.
To begin: The ingredients are kneaded (15 minutes)
At 0:43, the dough begins to rise (8 minutes)
At 0:35, the dough begin to bake (35 minutes)
At 0:00, the bread is fi nished.
Important: You CANNOT use the delay timer for EXPRESS BAKE Breadmaker setting breads.
You CANNOT change the crust color.
White Bread
1 pound loaf
1 cup and 2 tablespoons hot water (115°–125°F)
2 tablespoons oil
2 tablespoons sugar
1 teaspoon salt
3 cups bread fl our
5 teaspoons fast rising yeast
Important: Carefully measure the hot water and make sure it is between 115°–125°F by using
a cooking thermometer.
1 Measure and add liquid ingredients to the bread pan.
2 Measure and add dry ingredients (except yeast) to the bread pan.
3 Use your fi nger to form a well (hole) in the fl our where you will pour the yeast. Yeast must NEVER
come into contact with a liquid when you are adding ingredients. Measure the yeast and carefully
pour it into the well.
4 Snap the baking pan into the breadmaker and close the lid.
5 Press the “Menu Select” button to choose the Express Bake setting
a. Express Bake (1 LB) for 1 pound loaves
b. Express Bake (1.5 LB) for 1.5 pound loaves
6 Press the “Start/Stop” button.
1.5 pound loaf
1 and 1/2 cups hot water (115°–125°F)
3 tablespoons oil
3 tablespoons sugar
1 and 1/2 teaspoons salt
4 cups bread fl our
2 tablespoons fast rising yeast
EXPRESS BAKE
Cheese & Rye Bread
1 pound loaf
1 cup and 2 tablespoons hot water (115°–125°F)
1 tablespoon oil
1 tablespoon sugar
1 teaspoon salt
2 and 1/2 cups bread fl our
1/2 cup rye fl our
1 tablespoon grated Parmesan cheese
1 cup shredded cheddar cheese
5 teaspoons fast rising yeast
Important: Carefully measure the hot water and make sure it is between 115°–125°F by using
a cooking thermometer.
1 Measure and add liquid ingredients to the bread pan.
1.5 pound loaf
1 and 1/2 cups hot water (115°–125°F)
4 teaspoons oil
2 tablespoons sugar
1 and 1/2 teaspoons salt
3 and 1/4 cups bread fl our
2/3 cup rye fl our
2 tablespoons grated Parmesan cheese
1 and 1/4 cups shredded cheddar cheese
2 tablespoons fast rising yeast
EXPRESS BAKE
2 Measure and add dry ingredients (except yeast) to the bread pan.
3 Use your fi nger to form a well (hole) in the fl our where you will pour the yeast. Yeast must NEVER
come into contact with a liquid when you are adding ingredients. Measure the yeast and carefully
pour it into the well.
4 Snap the baking pan into the breadmaker and close the lid.
5 Press the “Menu Select” button to choose the Express Bake setting
a. Express Bake (1 LB) for 1 pound loaves
b. Express Bake (1.5 LB) for 1.5 pound loaves
6 Press the “Start/Stop” button.
Onion Soup Bread
1 pound loaf
1 cup and 2 tablespoons
hot water (115°–125°F)
2 tablespoons oil
2 tablespoons sugar
3 cups bread fl our
2 tablespoons dry onion soup mix
4 and 1/2 teaspoons fast rising yeast
Important: Carefully measure the hot water and make sure it is between 115°–125°F by using
a cooking thermometer.
1 Measure and add liquid ingredients to the bread pan.
1.5 pound loaf
1 and 1/2 cups + 1 tablespoon
hot water (115°–125°F)
3 tablespoons oil
3 tablespoons sugar
4 cups bread fl our
3 tablespoons dry onion soup mix
2 tablespoons fast rising yeast
EXPRESS BAKE
2 Measure and add dry ingredients (except yeast) to the bread pan.
3 Use your fi nger to form a well (hole) in the fl our where you will pour the yeast. Yeast must NEVER
come into contact with a liquid when you are adding ingredients. Measure the yeast and carefully
pour it into the well.
4 Snap the baking pan into the breadmaker and close the lid.
5 Press the “Menu Select” button to choose the Express Bake setting
a. Express Bake (1 LB) for 1 pound loaves
b. Express Bake (1.5 LB) for 1.5 pound loaves
6 Press the “Start/Stop” button.

www.oster.com
30
www.oster.com
31
Gluten Free Setting Recipe (Menu 8)
Gluten Free bread machine stages
For the Gluten Free cycle, you can expect the following things to happen as the timer counts down to zero.
To begin: The ingredients are kneaded for the fi rst time (5 minutes)
At 2:05, the dough is kneaded for the second time (10 minutes)
At 1:55, the dough rises (60 minutes)
At 0:55, the dough begins to bake (60 minutes)
At 0:00, the bread is fi nished.
Traditional Gluten Free Bread
IMPORTANT: Carefully check labels to make sure all ingredients are Gluten Free
1 and 1/4 cup water
3 tablespoons oil
1 teaspoon vinegar
3 eggs
1/2 cup tapioca
1 and 1/2 teaspoons salt
2 cups Gluten Free fl our
1 Measure and add liquid ingredients to the bread pan.
2 Measure and add dry ingredients (except yeast) to the bread pan.
3 Use your fi nger to form a well (hole) in the fl our where you will pour the yeast. Yeast must NEVER
come into contact with a liquid when you are adding ingredients. Measure the yeast and carefully
pour it into the well.
4 Snap the baking pan into the breadmaker and close the lid.
5 Press the “Menu Select” button to choose the Gluten Free setting.
6 Press the “Start/Stop” button.
1 cup rice fl our
2/3 cup potato powder
1/3 cup soybean powder
1/2 cup milk powder
3 tablespoon sugar
1 tablespoon Xanthan
2 teaspoons active dry yeast
Gluten Free
Dough/Pasta Setting Recipes (Menus 9 and 10)
Dough/Pasta Bread Machine Stages
For the Dough/Pasta cycle you can expect the following things to happen as the timer counts down
to zero.
Dough/Pasta:
To begin: The ingredients are kneaded for the fi rst time (5 minutes)
At 1:25, the dough rests for 5 minutes
At 1:20, the dough is kneaded for the second time (20 minutes)
At 1:00, the dough begins to rise (60 minutes)
At 0:00, the dough is fi nished.
Bagel Dough:
To begin: The ingredients are kneaded for the fi rst time (20 minutes)
At 1:40, the dough is kneaded for the second time (10 minutes)
At 1:30, the dough begins to rise (90 minutes)
At 0:00, the dough is fi nished.
Dough recipe ingredients (2 lbs.):
2 teaspoons oil
2 teaspoons salt
2 teaspoons dry milk
1 teaspoon sugar
Bagel dough recipe ingredients:
1 and 3/4 cups water
1 and 1/2 teaspoon honey
1 and 1/2 teaspoon salt
4 and 1/2 cups fl our
1 and 3/4 cups water
1 teaspoon active dry yeast
3 cups fl our
1 and 1/2 teaspoon active dry yeast

www.oster.com
32
www.oster.com
33
Dough Instructions
1 Put ingredients in bread pan and put the bread pan into the breadmaker.
2 Press the “Menu Select” button to choose either the dough or bagel dough setting
(if making bagel dough).
3 Press the “Start/Stop” button. The display will begin counting down the time on the Dough setting.
When dough is ready, the unit will signal and the display will read “0:00.”
4 Press “Start/Stop” button and hold it down until you hear a beep and the display clears.
5 To remove the bread pan, grasp the handle fi rmly and lift the pan out.
Note: The pan does not get hot when using the dough setting.
Preparing Dough for Baking
1 Lightly sprinkle all-purpose fl our onto a pastry mat or board. Using a rubber spatula or wooden
spoon, remove dough from the bread pan and place on lightly fl oured surface. Knead by hand
2 or 3 times to release the air. If the dough is easy to handle without fl our, shape on a lightly oiled,
clean countertop.
2 Shape dough into your favorite rolls, coff ee cake, etc. (suggestions follow). Place on greased baking
pan. Cover dough with a clean cloth and let rise until almost doubled in size (about 1 hour).
3 Bake as directed in the recipe. Remove from pan and cool on a wire rack or serve warm.
Variations for Shaping Dough
Easy Dinner Rolls
Divide dough into 12 equal pieces, shape into balls and place in greased muffi n cups. Cover, let rise and
bake as directed. Makes 12.
Swirls
Lightly grease baking sheet. Divide dough into 10 equal pieces. On a lightly fl oured surface, using your
hand, roll each piece into a pencil like strand about 10 inches long. Beginning at one end of the strand,
continue wrapping each piece around the center to form a swirl.
Place rolls 2 to 3 inches apart on prepared baking sheet. Cover,
let rise and bake as directed. Makes 10.
Butterhorns
Lightly grease baking sheet and set aside. On a lightly fl oured surface,
roll dough into a 12-inch circle. Brush dough with melted butter. Cut into 12 wedges.
To shape rolls, begin at wide end of wedge and roll towards the point. Place rolls
point side down, 2 to 3 inches apart, on prepared baking sheet. Cover, let rise and
bake as directed. Makes 12.
Rising
To Reduce Rising Time of Dough
Preheat conventional oven to 200°F for 5 minutes, then turn off oven. Shape dough, place on baking
pan as directed and cover with a clean kitchen towel. Place dough in oven until doubled in size. This will
reduce rising time by about one half.
Recipes using whole grain or unrefi ned fl ours contain less gluten and may not rise as much as those
using white bread fl our. As a result, these heavier breads may fall slightly in the center. This is normal and
will not aff ect the taste of the bread. Wheat gluten can also be added to improve the shape and volume
of bread made with low gluten fl ours.
Storing
Keeping Your Bread Fresh
There are no preservatives in your homemade bread, so store cooled loaf in a lightly sealed plastic bag.
If desired, enclose a stalk of celery in the bag to keep bread fresh longer. Do not store in the refrigerator
as this causes bread to dry out faster.
Bread Pretzel
All ingredients at room temperature (70–80°F)
2 cups bread fl our
1 and1/2 teaspoon active dry yeast
1/4 teaspoon salt
1/2 teaspoon sugar
1 Measure all ingredients into bread pan, except egg and coarse salt.
7/8 cup water
1 to 2 tablespoons coarse (Kosher) salt
1 egg, slightly beaten
2 Press and hold down the “Start/Stop” button to clear the display.
3 Press the “Menu Select” button to choose the dough setting.
4 Press the “Start/Stop” button. The display will begin counting down the time on the Dough setting.
When dough is ready, the unit will signal and the display will read “0:00.”
5 Press “Start/Stop” button and hold it down until you hear a beep and the display clears.
6 To remove the bread pan, grasp the handle fi rmly and lift the pan out.
7 Preheat oven to 450°F.
8 Divide dough into 12 pieces. Roll each into 8-inch rope. Form into pretzel shape or leave in stick
shape. Place on a greased cookie sheet, brush each with beaten egg. Sprinkle with coarse salt.
9 Bake in preheated oven for 12 to 15 minutes.
Butter Rolls (no Delay Timer)
All ingredients at room temperature (70–80°F), except milk
2 tablespoons sugar
1 teaspoon salt
2 and 3/4 cups bread fl our
2 teaspoon active dry yeast
1 Measure all ingredients into bread pan.
2 Press and hold down the “Start/Stop” button to clear the display.
3 Press the “Menu Select” button to choose the dough setting.
4 Press the “Start/Stop” button. The display will begin counting down the time on the Dough setting.
When dough is ready, the unit will signal and the display will read “0:00.”
5 Press “Start/Stop” button and hold it down until you hear a beep and the display clears.
6 To remove the bread pan, grasp the handle fi rmly and lift the pan out.
7 Shape as desired (see “Variations for Shaping Dough,” pg. 32).
8 Bake at 350°F for 25 to 30 minutes. Makes 12 rolls.
1/4 cup water
1 egg
3/4 to 7/8 cup milk
1/4 cup butter
Dough
Dough

www.oster.com
34
www.oster.com
35
Coff ee Cake (no Delay Timer)
All ingredients at room temperature (70–80°F), except milk
1/4 cup sugar
1 teaspoon salt
2 and 1/4 cups bread fl our
2 teaspoons active dry yeast
1 Measure all ingredients into bread pan.
1 egg yolk
3/4 to 7/8 cup milk
1 tablespoon butter or margarine
Dough
2 Press and hold down the “Start/Stop” button to clear the display.
3 Press the “Menu Select” button to choose the dough setting.
4 Press the “Start/Stop” button. The display will begin counting down the time on the Dough setting.
When dough is ready, the unit will signal and the display will read “0:00.”
5 Press “Start/Stop” button and hold it down until you hear a beep and the display clears.
6 To remove the bread pan, grasp the handle fi rmly and lift the pan out.
7 Pat dough into greased 9-inch round, or 5 x 7-inch oblong cake pan.
8 Add topping. Makes 1 coff ee cake. (See “Topping” recipe, right.)
Topping
2 tablespoons butter, melted
1 teaspoon ground cinnamon
Powdered Sugar Glaze, optional (see recipe below)
1/2 cup sugar
1/2 cup chopped pecans
Dough
1 Drizzle butter over dough.
2 In a small bowl, mix sugar, cinnamon and nuts; sprinkle onto butter. Cover; let rise in warm place
about 30 minutes.
3 Bake in preheated oven (375°F) 20 to 25 minutes, until golden brown.
4 Cool 10 minutes in pan on rack.
5 Drizzle with powdered sugar glaze if desired. Makes enough to cover one coff ee cake
Pizza Crust
All ingredients at room temperature (70–80°F)
1.5 pound
1/2 teaspoon salt
3 cups all-purpose fl our
1–1/2 teaspoon active dry yeast
1 cup water
2 tablespoons olive oil or vegetable oil
1 Measure all ingredients into bread pan.
2 pound
3/4 teaspoon salt
4 cups all-purpose fl our
2 teaspoon active dry yeast
1–3/8 cup water
3 tablespoons olive oil or vegetable oil
Dough
2 Press and hold down the “Start/Stop” button to clear the display.
3 Press the “Menu Select” button to choose the dough setting.
4 Press the “Start/Stop” button. The display will begin counting down the time on the Dough setting.
When dough is ready, the unit will signal and the display will read “0:00.”
5 Press “Start/Stop” button and hold it down until you hear a beep and the display clears.
6 To remove the bread pan, grasp the handle fi rmly and lift the pan out.
7 Pat dough into 12 x 15-inch jelly roll pan or greased 12-inch round (1–1/2 pound recipe) or 14-inch
round pizza pan (2 pound recipe).
8 Preheat oven to 400°F.
9 Spread pizza sauce over dough. Sprinkle toppings over sauce.
10 Bake 15 to 20 minutes or until crust is golden brown.
Pizza Toppings (optional)
1 cup (8 oz) prepared pizza sauce
1/2 lb. bulk pork sausage, browned and drained
1/3 cup chopped onions
1 pkg. (3–4 oz) sliced pepperoni
1 can (4 oz) mushroom stems and pieces, drained
1 cup chopped green peppers
Powdered Sugar Glaze
(for Coff ee Cakes and Sweet Rolls)
1 cup sifted powdered sugar
1 or 2 tablespoons water or milk
1 In a small bowl, combine all ingredients and blend until smooth.
2 Spread or drizzle glaze on slightly warm coff ee cake or sweet rolls. Makes enough to cover
1 coff ee cake.
1 teaspoon butter or margarine, softened
1/2 teaspoon vanilla
Dough
Pasta Recipes
Dough
Basic Pasta (no Delay Timer)
All ingredients should be at room temperature (70–80°F)
2 cups all-purpose fl our
1 cup semolina fl our
1 teaspoon salt
1 Measure all ingredients into bread pan.
2 Press and hold down the “Start/Stop” button to clear the display.
3 Press the “Menu Select” button to choose the dough setting.
4 Press the “Start/Stop” button and allow it to mix 8 to 10 minutes. Then press the “Start/Stop” button
again to cancel.
5 Remove dough and roll out on lightly fl oured surface. Roll to 1/8-inch thickness. Dust with fl our
if dough is sticky.
6 Cut into 1/8-inch strips for narrow noodles or 1/4-inch for medium noodles. Cook noodles in a large
pot of boiling, salted water for 10 to 15 minutes. Drain in colander.
1 tablespoon olive oil or vegetable oil
7/8 cup water

www.oster.com
36
www.oster.com
37
Jam Setting Recipes (Menu 11)
(Jams and Marmalades)
Jam Bread Machine Stages
For the Jam cycle you can expect the following things to happen as the timer counts down to zero.
To begin: The ingredients are kneaded for the fi rst time (15 minutes)
At 0:50, the dough begins to bake (50 minutes)
At 0:00, the Jam is fi nished.
Glazes
After rolls rise, just before baking, gently apply desired glaze with a pastry brush.
Bake as directed in the recipe.
• For a shiny golden crust, use Egg Glaze or Egg Yolk Glaze.
• For a shiny chewy crust, use Egg White Glaze (crust will be lighter in color).
Egg Glaze
Mix 1 slightly beaten egg with 1 Tbsp. water or milk.
Strawberry Jam (no Delay Timer)
1 cup sugar
1 tablespoon powdered low-sugar fruit pectin
1 Measure all ingredients into bread pan.
1–1/2 cups fresh strawberries, sliced
2 teaspoons lemon juice
Jam
2 Press and hold down the “Start/Stop” button to clear the display.
3 Press the “Menu Select” button to choose the jam setting.
4 Press the “Start/Stop” button. The display will begin counting down the time on the Jam setting.
When jam is ready, the unit will signal and the display will read “0:00.”
5 Using hot pads, remove bread pan. Pour jam into containers; cover. Refrigerate to set.
Makes about 3 cups.
Orange Marmalade (no Delay Timer)
1–1/4 cups sugar
2 tablespoons powdered low-sugar fruit pectin
1 With a vegetable peeler, shave off the bright layer of peel from one orange and the lemon; chop fi nely.
3 large oranges
1 lemon
Jam
2 Remove and discard remaining white peel from orange and lemon.
3 Peel remaining oranges, and discard peels. Slice fruit into 1/2-inch pieces.
4 Combine chopped peels, fruit, sugar and pectin in bread pan.
5 Press and hold down the “Start/Stop” button to clear the display.
6 Press the “Menu Select” button to choose the jam setting.
7 Press the “Start/Stop” button. The display will begin counting down the time on the Jam setting.
When jam is ready, the unit will signal and the display will read “0:00.”
8 Using hot pads, remove bread pan. Pour jam into containers; cover. Refrigerate to set.
Makes about 3 cups.
Frozen Berry Jam (no Delay Timer)
1–3/4 cups sugar
1 package (10 to 12 oz) frozen berries
(strawberries and raspberries are ideal)
1 Measure all ingredients into bread pan.
1 pouch (3 oz) liquid fruit pectin
1 tablespoon lemon juice
Jam
2 Press and hold down the “Start/Stop” button to clear the display.
3 Press the “Menu Select” button to choose the jam setting.
4 Press the “Start/Stop” button. The display will begin counting down the time on the Jam setting.
When jam is ready, the unit will signal and the display will read “0:00.”
5 Using hot pads, remove bread pan. Pour jam into containers; cover. Refrigerate to set.
Makes about 3 cups.
Egg Yolk Glaze
Mix 1 slightly beaten egg yolk with 1 Tbsp. water or milk.
Egg White Glaze
Mix 1 slightly beaten egg white with 1 Tbsp. water.
Note: To keep unused egg yolk fresh for several days, cover with cold water and store
in refrigerator in a covered container.
Garlic Butter
Mix: 1/4 cup margarine or butter, softened
1/8 tsp. garlic powder
Herb-Cheese Butter
Mix: 1/4 cup margarine or butter, softened
1 Tbsp. grated Parmesan cheese
1 tsp. chopped fresh parsley
1/4 tsp. dried oregano leaves
Dash of garlic salt
Italian Herb Butter
Mix: 1/4 cup margarine or butter, softened
1/2 tsp. Italian seasoning
Dash of salt
Choco-Banana Spread
Mix: 1/3 cup mashed ripe banana
1/2 cup semi-sweet chocolate chips, melted
Ham and Swiss Spread
Mix: 1 package (3 oz) cream cheese, softened
2 Tbsp. fi nely chopped, fully cooked, smoked ham
1 Tbsp. shredded Swiss cheese
1/2 tsp. prepared mustard
Herb-Cream Cheese Spread
Mix: 1 container (4 oz) whipped cream cheese
1 tsp. chopped fresh or 1/2 tsp. dried dill weed
1 small clove garlic, fi nely chopped

www.oster.com
38
www.oster.com
39
Honey-Walnut Spread
Mix: 1 package (3 oz) cream cheese, softened
1 Tbsp. chopped walnuts
2 tsp. honey
Ripe Olive Spread
Cover and mix in food processor or blender until slightly coarse:
1–1/2 cups pitted, ripe olives
3 Tbsp. olive oil
3 Tbsp. capers, drained
3 fl at anchovy fi llets, drained
1 tsp. Italian seasoning
2 cloves garlic
Browned Butter Glaze
2 Tbsp. margarine or butter
2/3 cup powdered sugar
1/2 tsp. vanilla
3 to 4 tsp. milk
Heat margarine in a 1-quart saucepan over medium heat until light brown; cool.
Stir in powdered sugar and vanilla. Stir in milk until smooth and thin enough to drizzle.
Cinnamon Glaze
Mix until thin enough to drizzle:
1/2 cup powdered sugar
1/4 tsp. ground cinnamon
1–1/2 to 2 tsp. water
Citrus Glaze
Mix until thin enough to drizzle:
1/2 cup powdered sugar
1 tsp. grated lemon or orange peel
1–1/2 to 2 tsp. lemon or orange juice
Creamy Vanilla Glaze
Mix until thin enough to drizzle:
1/2 cup powdered sugar
1/4 tsp. vanilla
1–1/2 to 2 tsp. milk
1 Year Limited Warranty
Sunbeam Products, Inc. doing business as Jarden Consumer Solutions or if in Canada, Sunbeam
Corporation (Canada) Limited doing business as Jarden Consumer Solutions (collectively “JCS”) warrants
that for a period of one year from the date of purchase, this product will be free from defects in material and
workmanship. JCS, at its option, will repair or replace this product or any component of the product found
to be defective during the warranty period. Replacement will be made with a new or remanufactured
product or component. If the product is no longer available, replacement may be made with a similar
product of equal or greater value. This is your exclusive warranty. Do NOT attempt to repair or adjust any
electrical or mechanical functions on this product. Doing so will void this warranty.
This warranty is valid for the original retail purchaser from the date of initial retail purchase and is not
transferable. Keep the original sales receipt. Proof of purchase is required to obtain warranty performance.
JCS dealers, service centers, or retail stores selling JCS products do not have the right to alter, modify or any
way change the terms and conditions of this warranty.
This warranty does not cover normal wear of parts or damage resulting from any of the following: negligent
use or misuse of the product, use on improper voltage or current, use contrary to the operating instructions,
disassembly, repair or alteration by anyone other than JCS or an authorized JCS service center. Further, the
warranty does not cover: Acts of God, such as fi re, fl ood, hurricanes and tornadoes.
What are the limits on JCS’s Liability?
JCS shall not be liable for any incidental or consequential damages caused by the breach of any express,
implied or statutory warranty or condition.
Except to the extent prohibited by applicable law, any implied warranty or condition of merchantability or
fi tness for a particular purpose is limited in duration to the duration of the above warranty.
JCS disclaims all other warranties, conditions or representations, express, implied, statutory or otherwise.
JCS shall not be liable for any damages of any kind resulting from the purchase, use or misuse of, or inability
to use the product including incidental, special, consequential or similar damages or loss of profi ts, or
for any breach of contract, fundamental or otherwise, or for any claim brought against purchaser by any
other party.
Some provinces, states or jurisdictions do not allow the exclusion or limitation of incidental or consequential
damages or limitations on how long an implied warranty lasts, so the above limitations or exclusion may
not apply to you.
This warranty gives you specifi c legal rights, and you may also have other rights that vary from province to
province, state to state or jurisdiction to jurisdiction.
How to Obtain Warranty Service
In the U.S.A.
If you have any question regarding this warranty or would like to obtain warranty service, please call
1-800-334-0759 and a convenient service center address will be provided to you.
In Canada
If you have any question regarding this warranty or would like to obtain warranty service, please call
1-800-667-8623 and a convenient service center address will be provided to you.
In the U.S.A., this warranty is off ered by Sunbeam Products, Inc. doing business as Jarden Consumer
Solutions located in Boca Raton, Florida 33431. In Canada, this warranty is off ered by Sunbeam Corporation
(Canada) Limited doing business as Jarden Consumer Solutions, located at 20 B Hereford Street, Brampton,
Ontario L6Y 0M1. If you have any other problem or claim in connection with this product, please write our
Consumer Service Department.
PLEASE DO NOT RETURN THIS PRODUCT TO ANY OF THESE ADDRESSES
OR TO THE PLACE OF PURCHASE.

www.oster.com
40
www.oster.com
41
PRECAUCIONES IMPORTANTES
Cuando utilice artefactos eléctricos, siempre se deben seguir precauciones básicas
de seguridad como las que se enumeran a continuación:
1. Lea las instrucciones, etiquetas del producto y advertencias antes de
utilizar la panifi cadora.
2. No toque las superfi cies calientes. Siempre use guantes para horno cuando
manipule material caliente. Deje enfriar las partes metálicas antes de limpiar.
Deje enfriar completamente la panifi cadora antes de quitar o colocar las
partes.
3. Cuando no esté en uso y antes de limpiarla, desenchufe la panifi cadora del
tomacorriente de la pared.
4. No sumerja el artefacto ni el cable o enchufes en agua ni otro tipo de líquido
para no correr el riesgo de una descarga eléctrica.
5. Siempre debe controlarse de cerca cuando a este artefacto o a algún otro lo
utilizan niños.
6. No deje objeto alguno apoyado sobre el cable de energía. No enchufe el cable
en un lugar de tránsito
o paso de personas.
7. No utilice ni enchufe este artefacto u otro si el cable se encuentra dañado o
pelado, luego de un mal funcionamiento, e sufrir una caída o luego de haber
sufrido un daño cualquiera sea su tipo. Lleve el artefacto al servicio autorizado
más cercano para un control, reparación o ajuste eléctrico o mecánico.
8. No permita que el cable cuelgue del borde de la mesa o de la mesada o que
toque superfi cies calientes. No la coloque en una superfi cie inestable ni
cubierta con tela.
9. Evite todo contacto con partes móviles.
10. No utilice accesorios que no estén recomendados por el fabricante. Pueden
provocar un incendio, una descarga eléctrica o una lesión.
11. No la utilice al aire libre ni con fi nes comerciales.
12. No coloque el artefacto cerca de un mechero caliente, eléctrico ni a gas, ni de
un horno caliente.
13. No utilice los artefactos para otros fi nes que no sean los especifi cados.
14. Para desenchufarla: apáguela, sujete fi rmemente el enchufe y retírelo de la
pared. Nunca tire del cable.
ESTA UNIDAD ES SÓLO PARA USO
DOMÉSTICO SOLAMENTE
Este artefacto es para uso DOMÉSTICO ÚNICAMENTE. No posee partes reparables
por el usuario en su interior. No intente reparar este producto. No sumerja la base
en agua o ningún otro líquido.
Este artefacto tiene un enchufe polarizado (una de las patas es más ancha que la
otra). Para reducir el riesgo de una descarga eléctrica, este enchufe entra de una
sola forma en un tomacorriente polarizado. De no ser así, inviértalo, y si aún no
entra, llame a un electricista califi cado.
NO INTENTE IGNORAR ESTA CARACTERÍSTICA DE SEGURIDAD.
USO DE UN CABLE DE EXTENSIÓN
El aparato viene con un cable corto de suministro de potencia para reducir el
riesgo que resulta de enredarse o tropezar con un cable más largo. SE PUEDE
USAR UN CABLE DE EXTENSIÓN CON PRECAUCIÓN. SI SE USA UN CABLE DE
EXTENSIÓN, LA CALIFICACIÓN ELÉCTRICA DEL CABLE DEBE SER AL MENOS
IGUAL QUE LA DEL APARATO. El cable de extensión se debe acomodar de manera
que no quede colgando sobre la superfi cie del mostrador o mesa donde los niños
lo pueden halar o se puedan tropezar accidentalmente.
Energía eléctrica
Si el circuito eléctrico se sobrecarga con otros aparatos, puede que su panifi cadora
no opere apropiadamente. La panifi cadora debe ser operada en un circuito
eléctrico separado de otros aparatos en operación.
GUARDE ESTAS INSTRUCCIONES
Gracias por comprar la Panifi cadora Oster®. Antes de usar este producto
por primera vez, tómese unos minutos para leer estas instrucciones y
guárdelas como referencia. Preste particular atención a las instrucciones de
seguridad que se ofrecen. Revise las declaraciones de servicio del producto
y de garantía. Para obtener más información acerca de los productos Oster®,
visítenos en www.oster.com o llámenos al 1-800-334-0759.

www.oster.com
42
www.oster.com
43
APRENDA SOBRE LA PANIFICADORA
EXPRESS BAKE
INSTRUCCIONES:
a
c
i
j
h
d
e
g
Preparar la pani cadora
1 Coloque la panifi cadora en la mesada desde donde se conectará el enchufe.
NO enchufe todavía el artefacto en el tomacorriente de la pared. Luego se le
indicará cuándo hacerlo.
2 Asegúrese de poder abrir la parte superior de la
panifi cadora sin golpear los armarios de arriba
de la cocina.
3 Abra la tapa y retire el recipiente para pan. Para esto,
simplemente tome la manija del recipiente y tire
hacia arriba. Utilice un jabón suave y no abrasivo.
Lave, enjuague y deje secar el recipiente
profundamente.
4 Agregue la cuchilla para amasar (a) al recipiente
para pan (b), como se muestra. Usted encontrará
la hoja para masa empacada dentro de la taza
medidora que se le incluye.
5 Retire el recipiente Todavía no coloque el recipiente
en la panifi cadora.
a
b
¡Listo para comenzar!
b
f
a
Visor
b
Ventilación
c
Junta tapa superior
d
Cuchara medidora
e
taza medidora
Panifi cadora
f
g
Panel de control / Visor LCD
h
Recipiente desmontable para el pan
i
Cuchilla para amasar
j
Herramienta para desmontar la
cuchilla para amasar

www.oster.com
44
www.oster.com
45
Cómo hornear pan
La forma más simple de aprender a hornear pan es seguir una receta básica. La siguiente
receta es fácil y el pan es delicioso.
Antes de comenzar, asegúrese de tener el siguiente equipo medidor:
- taza para medir líquidos
- tazas para medir ingredientes secos
- cucharas para medir
Necesitará los siguientes ingredientes:
- Agua
- Manteca / margarina
- Sal
- Harina para pan (asegúrese de comprar harina para pan, preferentemente para
panifi cadoras)
- Leche en polvo
- Azúcar
- Levadura activa con leudante rápido
Medición de ingredientes
El secreto más importante para hacer pan es la medición exacta. Esta es la clave para
hornear pan con éxito.
Con ingredientes húmedos, SOLAMENTE utilice las tazas con tazas/onzas marcadas
claramente a un costado. Luego de llenar la taza para medir, colóquela en una superfi cie
plana y mírela al nivel de la vista para asegurarse de que la cantidad de líquido es la exacta.
Luego, vuelva a verifi carlo.
Con los ingredientes secos siempre nivele la medida con la parte trasera de un cuchillo o
una espátula para asegurarse de que la medida es la exacta. Otro truco útil es nunca utilizar
la taza para sacar los ingredientes (por ejemplo, harina) Si lo hiciera, podría agregar hasta
una cuchara soperas de más del ingrediente. Llene la taza medidora con una cuchara antes
de nivelar.
Orden en el agregado de ingredientes
El SEGUNDO secreto más importante para hacer pan es colocar los ingredientes en la
panifi cadora EXACTAMENTE en el orden que indica la receta.
Es decir:
- PRIMERO, ingredientes líquidos
- SEGUNDO, ingredientes secos
- POR ÚLTIMO, la levadura
Asimismo, asegúrese de que todos los ingredientes se encuentren a temperatura ambiente
(entre 77º y 85º F) salvo que la receta indique lo contrario.
Nota: Una temperatura muy fría o muy caliente puede afectar el modo de cocción y el
modo leudante del pan. Una buena idea es contar con que los ingredientes sean todos
frescos (en especial la harina y la levadura).
Ahora, probemos una receta simple (pero muy buena en realidad).
Pan blanco tradicional - Flauta 2 libras
Ingredientes:
1 3/8 tazas de agua
2 cucharadas soperas de margarina o manteca blanda
4 tazas de harina para pan
2 cucharadas soperas de azúcar
2 cucharadas soperas de leche en polvo
1 3/8 cucharadita de sal
2 1/4 cucharaditas de levadura activa seca
Instrucciones:
1 Mida cuidadosamente 1 3/8 tazas de agua. Recuerde utilizar agua a temperatura
ambiente. NO use agua muy fría o muy caliente. Una buena idea es ver la medición
de la taza a nivel de la vista para asegurarse de haber medido exactamente 1 3/8 taza.
2 Vierta el agua en el recipiente para pan.
3 Mida cuidadosamente 2 cucharadas soperas de margarina o manteca a temperatura
ambiente. Agréguela al recipiente para pan. Esto abarca todos los ingredientes líquidos
de la receta. A continuación, siguen los ingredientes secos.
4 Mida 4 tazas de harina para pan Asegúrese de no “aplastar” la harina en la taza.
A fi n de evitar el sobrellenado, un buen truco consiste en llenar la taza medidora hasta
derramarse, luego, de golpecitos ligeros a un costado de la taza con un cuchillo o espátula
para quitar las bolsas de aire. Nivele la taza medidora con un cuchillo o espátula. Vierta la
harina en el recipiente para pan.
5 Mida 2 cucharadas soperas de azúcar. Una vez más, asegúrese de nivelar las cucharas
soperas para una medición exacta. Vierta el azúcar en el recipiente para pan.
6 Mida 2 cucharadas soperas de leche en polvo. Nivele las cucharadas soperas de leche
en polvo como con todos los otros ingredientes secos. Agregue la leche en polvo en
el recipiente para pan.
7 Mida 1 3/4 cucharadita de sal. Es de especial importancia medir la sal de manera precisa
puesto que mucha sal, aún siendo poca cantidad, puede afectar el leudante de la masa.
Agregue sal en el recipiente para pan.
8 Antes de agregar la levadura, utilice el dedo para hacer un agujero (hueco) en la harina
donde colocará la levadura. La levadura NUNCA debe entrar en contacto con el líquido
cuando agrega ingredientes. Mida (nivele nuevamente) 2 1/4 cucharaditas de levadura
y colóquelas cuidadosamente en el hueco que hizo en la harina.
9 Coloque el recipiente para pan cuidadosamente a presión en la panifi cadora.
10 Cierre la tapa de la panifi cadora y enchufe el cable al tomacorriente de la pared. Ocurrirá
lo siguiente. El artefacto emitirá un “pip” y se prenderán las luces del visor. La
temporizador marcará “3:25” horas.
11 Presione repetidas veces el botón “Color de costra” para seleccionar el tipo de costra
que desea. Para esta receta, recomendamos “Medio”. De acuerdo con el color de costra
que selecciona, la fl echa marcará claro, medio u oscuro.
12 Presione el botón Comenzar / Parar y la máquina comenzará a hacer el pan. Escuchará
cómo la panifi cadora comienza a mezclar los ingredientes.

www.oster.com
46
www.oster.com
47
Nota: Es importante que NO presione el botón Comenzar / Detener mientras que la
panifi cadora está haciendo el pan. Si lo hace, la máquina se apagará y deberá comenzar
nuevamente de cero.
Nota: Es importante que no levante la tapa en esta receta. (Para otras recetas que hará más
adelante, deberá levantar la tapa para agregar nueces u otros ingredientes).
Precaución: La panifi cadora se calienta mucho. NO manipule la máquina mientras se
encuentre en funcionamiento. NO levante la tapa mientras la panifi cadora esté horneando
el pan.
Etapas de la panifi cadora (fl autas de 2 lb.)
Es divertido ver cómo se hace el pan a través del visor. Para el ciclo básico, se supone que
sucederá lo que se enumera a continuación a medida que el contador alcanza cero.
Para comenzar: Se amasan los ingredientes por primera vez (5 minutos)
Cuando el temporizador está en 3:20, la masa descansa por 5 minutos
Cuando está en 3:15, la masa se trabaja por segunda vez (20 minutos)
Cuando está en 2:55, la masa comienza a leudar (39 minutos)
Cuando está en 2:16, la masa se “golpea” (10 segundos)
Cuando está en 02:16, la masa continúa leudando (25 minutos y 50 segundos)
Cuando está en 1:50, se le da “forma” a la masa (15 segundos)
Cuando está en 1:50, la masa llega al último leudado (48 minutos y45 segundos)
Cuando está en 0:60, la masa comienza a hornearse (60 minutos)
Cuanto está en 0:00, el pan está listo.
Una vez horneado el pan
Precaución: No coloque la cara cerca de la tapa cuando abra la panifi cadora, puede salir
vapor caliente que podría quemarlo.
Importante: La panifi cadora tiene una confi guración automática para “mantener tibio”
el pan durante una hora. Sin embargo, recomendamos retirar el pan de la panifi cadora
de inmediato a fi n de mantener su frescura.
1 Utilice agarraderas para cacerolas o guantes para horno para levantar con cuidado
el recipiente de la panifi cadora.
2 Coloque el recipiente boca abajo sobre una rejilla para que se enfríe y sacuda
ligeramente hasta que salga el pan. Si se pega, tome una espátula de goma (las de metal
pueden dañar la superfi cie del recipiente) y pásela por los costados de la fl auta hasta que
salga el pan.
3 Si la cuchilla para amasar sale con el pan, utilice la herramienta para remover cuchilla
de amasar incluida a fi n de retirarla de la fl auta. Recuerde ¡estará muy caliente!
Deje enfriar el pan 15 minutos antes de cortarlo y disfrutarlo.
Importante: Si desea hacer otro pan de inmediato, espere a que la panifi cadora se enfríe
durante 10 o 15 minutos con la tapa abierta y el recipiente afuera.
Generalidades de las funciones de la pani cadora
Función pan:
Sírvase consultar la receta correspondiente y siga el procedimiento que se
describe a continuación.
1 Coloque la cuchilla para amasar en el recipiente para pan.
2 Coloque los ingredientes en el recipiente para pan en este orden: Primero, ingredientes
líquidos; segundo, ingredientes secos (salvo la levadura) y por último, la levadura. Nota:
La levadura NUNCA debe entrar en contacto con el líquido cuando esté agregando los
ingredientes.
3 Coloque el recipiente para pan en la panifi cadora y cierre la tapa suavemente .
4 Enchufe la panifi cadora, el visor LCD mostrará “MENÚ 1 - TIEMPO 3:25”.
5 Presione el botón Seleccionar menú para elegir el tipo de pan que desea (BÁSICO,
FRANCÉS, INTEGRAL, DULCE, HORNEADO EXPRÉS 1.5 LBS. HORNEADO EXPRÉS 2.0
LBS., SIN GLUTEN, MASA PARA PASTAS, MERMELADA, HORNEADO, TORTA). Nota: El visor
marcará el número de Menú correspondiente al tipo de pan seleccionado de 1 a 13.
6 Presione el botón Color de costra para seleccionar el color de costra deseado (Claro,
mediano, oscuro o rápido). Nota: El visor marcará el color de costra con una fl echa y
señalará el correspondiente color de costra seleccionado (los programas selectos tienen
posiciones fi jas). Nota: la posición de rápido
está disponible en los programas básico, francés o integral y reduce el tiempo total por
alrededor de una hora para resultados más rápidos.
7 Presione el botón Tamaño de la fl auta para seleccionar el tamaño (1.0lb, 1.5lb o 2.0lb).
Nota: El visor marcará el tamaño de la fl auta con una fl echa y señalará el correspondiente
tamaño seleccionado (los programas selectos tienen posiciones fi jas).
8 Si se precisa programación de encendido automático, ajuste el temporizador moviendo
las fl echas hacia arriba o hacia abajo según corresponda. Es posible programar una
demora de hasta 15 horas para el inicio del programa. Nota: El programación de
encendido automático se calcula teniendo en cuenta el tiempo de funcionamiento
más el tiempo que falta para el encendido (por ejemplo, para un pan básico de 2.0 lbs:
el programa de encendido automático se confi gura en 15 horas = es decir, el encendido
automático será dentro de 11 horas 35 minutos más el tiempo de funcionamiento de 3
horas 25 minutos para un pan básico de 2.0 lbs).
9 Presione el botón Comenzar / Detener para que comience a funcionar la panifi cadora.
10 Si precisa detener la panifi cadora, presione el botón Comenzar / Detener por un
segundo aproximadamente. La panifi cadora se detendrá pero deberá repetir el proceso
desde cero.
11 Una vez que el programa esté completo y el visor marque “0:00” emitirá 15 pips como
advertencia y luego se apagará para mantenerse en modo tibio. En el modo tibio, el “0:00”
titilará. Nota: El modo tibio se mantendrá hasta una hora. Pasada aquella hora, emitirá 15
pips y regresará al estado de inicio.
12 Cuando la máquina emita el pip e indique que el programa ha terminado, retire el
recipiente para pan de la máquina con guantes para horno. Coloque el recipiente boca
abajo y sacuda ligeramente hasta que salga el pan. Retire la cuchilla para amasar de la
base del pan con la herramienta para retirarla que se provee y ya está listo para comer.

www.oster.com
48
www.oster.com
49
Función masa:
La función masa es un programa similar a la función pan, salvo que no incluye horneado.
Cuando el programa haya fi nalizado, emitirá 5 pips como advertencia. Cuando la máquina
emita el pip e indique que el programa ha terminado, retire la masa del recipiente para pan.
Función horneado:
Esta función puede utilizarse para hornear pan u otra masa. Sírvase consultar la receta
correspondiente y siga los siguientes pasos
1 Coloque el recipiente para pan en la panifi cadora.
2 Coloque pequeños trozos de comida juntos dentro del recipiente para pan, luego cierre la tapa.
3 Presione el botón Seleccionar menú de la función Horneado.
4 Presione el botón Comenzar / Detener para que comience a funcionar el programa horneado.
5 Una vez que el programa esté completo y el visor marque “0:00” emitirá 5 pips como
advertencia y luego se apagará y regresará al estado inicial.
6 Es posible detener el programa en cualquier momento del proceso presionando el botón
“Comenzar / Detener”.
Nota: Para un horneado más uniforme, se recomienda cortar la comida en rodajas pequeñas
y distribuirlas de manera uniforme en el recipiente para pan.
Confi guración de la panifi cadora (para fl auta de 2 libras)
La panifi cadora puede hornear casi todo tipo de pan. Se incluyen recetas para mostrarle
claramente la confi guración que debe utilizar. Este modelo tiene 13 posiciones en total – 10
posiciones para pan (BÁSICO, FRANCÉS, INTEGRAL, DULCE,SIN GLUTEN, MASA PARA PASTAS,
MERMELADA, HORNEADO, TORTA) y 3 posiciones de rápido horneado (RÁPIDO, HORNEADO
RÁPIDO “EXPRESS” DE 1.5 LIBRAS Y HORNEADO RÁPIDO “EXPRESS” DE 2.0 LIBRAS).
1 Básico 2 lbs. (tiempo: 3 horas 25 minutos)
2 Francés 2 lbs. (tiempo: 3 horas 35 minutos)
3 Integral 2 lbs. (tiempo: 3 horas 48 minutos)
4 Dulce 2 lbs. (tiempo: 3 horas 27 minutos)
5 Rápido 2 lbs. (tiempo: 1 hora, 20 minutos)
6 Horneado exprés 1.0 lb (tiempo: 58 minutos)
7 Horneado exprés 1.5 lb (tiempo: 58 minutos)
8 Sin gluten (tiempo: 2 horas, 10 minutos)
9 Masa (tiempo: 1 hora 30 minutos)
10 Pasta Dough (tiempo: 14 minutos)
11 Mermelada (tiempo: 1 hora 5 minutos)
12 Horneado (tiempo: 1 hora)
13 Torta (tiempo: 1 hora, 30 minutos)
Nota: Los tiempos son aproximados según el tamaño del pan.
Básico - Esta confi guración se utiliza probablemente más que cualquier otra puesto que
brinda los mejores resultados de todas las recetas.
Francés - Utilice esta confi guración para pan francés. El pan francés lleva más tiempo de
amasado, y para leudar y hornearse, lo que le da una costra más dura.
Integral - La confi guración pan integral brinda la posibilidad de leudar durante un período
más prolongado para panes que tienen más del 50% de harina de integral.
Dulce - La confi guración dulce es para hornear pan con alto contenido de azúcar, grasas y
proteínas; características que tienden a aumentar el dorado.
Rápida - Utilice esta confi guración para hornear pan rápidamente. La cantidad de tiempo
es un poco mayor que en la confi guración Horneado exprés pero la textura será mejor.
Horneado exprés (1.5 lb) - Utilice esta confi guración para hornear fl autas de pan más
pequeñas en menos de una hora.
Horneado exprés (2.0 lb) - Utilice esta confi guración para hornear fl autas de pan más
grandes en menos de una hora.
Sin Gluten - Use esta posición para hornear panes sin gluten. Es necesario asegurarse de
que todos los ingredientes que se vayan a usar tengan la indicación de no contener gluten.
Note que el no contener trigo no siempre signifi ca que no contenga gluten, por ello debe
leer todas las etiquetas cuidadosamente.
Masa - Esta confi guración le permite preparar una masa para pancitos, panes especiales,
pizza, etc. a mano, los deja leudar y luego hornea en el horno convencional.
Masa pastas - Esta confi guración le permite preparar masa pastas para hacer tallarines,
ravioles u otras pastas frescas.
Mermelada - Esta confi guración es para preparar mermeladas y jaleas.
Hornear - Esta confi guración es para hornear masa.
EXPRESS BAKE: Con guración pani cadora
Preparación de pan en menos de una hora
La panifi cadora OSTER® puede hornear fantásticos panes en menos de
una hora. Se la denomina confi guración “Panifi cadora EXPRESS BAKE”.
Las fl autas de esta confi guración son un poco diferentes de las otras.
Asegúrese de probar las diversas confi guraciones para verifi car cuál es
de su preferencia.
Debe estar al tanto de algunas cuestiones de confi guración de la
panifi cadora EXPRESS BAKE que son diferentes de otras confi guraciones.
• El pan de la confi guración EXPRESS BAKE suele tener una costra más oscura y dura que los
otros panes. En ocasiones encontrará una fractura en la parte superior de la costra. Esto se
debe a que el horneado es a temperaturas más altas. Asimismo, suelen ser fl autas más
cortas y más compactas.
• NO puede utilizar el programa de encendido automático en la confi guración EXPRESS BAKE.
Enfriaría los ingredientes líquidos y afectaría el modo en que se leuda el pan.
• NO puede utilizar los botones “Color de costra” en la confi guración EXPRESS BAKE.
• NO abra la tapa mientras hace el pan con la confi guración EXPRESS BAKE.
• Si es difícil sacar la fl auta del recipiente, déjela reposar 5 minutos para que se enfríe. Retire
el pan del recipiente sacudiendo suavemente y espere 15 minutos antes de cortarlo.
• Si desea hornear otra fl auta de pan, deje que la panifi cadora se enfríe durante 20 minutos
con la tapa abierta.
• PUEDE utilizar mezclas de pan estándar para pan EXPRESS BAKE: los resultados tal vez no
sean tan buenos como cuando se utilizan las recetas de este libro
PANIFICADORA EXPRESS BAKE - TRUCOS Y CONSEJOS
Levadura
Siempre utilice una levadura con leudante rápido. NO emplee levadura activa seca para la
panifi cadora EXPRESS BAKE : las fl autas quedarán mucho más cortas una vez horneadas.
Líquidos
Siempre utilice agua con una temperatura de entre 115º y 125º F. Utilice un termómetro de
cocina para medir la temperatura. Agua más caliente puede estropear la levadura y más fría
puede no activarla.

www.oster.com
50
www.oster.com
51
Sal
Como norma, debe usar MENOS sal para los panes con la confi guración EXPRESS BAKE. Una
menor cantidad de sal le dará una fl auta más grande. Siga la receta de la panifi cadora Oster®
para obtener mejores resultados.
Otros ingredientes
Todos los otros ingredientes (como harina, azúcar, leche en polvo, manteca, etc.) deben estar a
temperatura ambiente. Siempre utilice harina para pan para la confi guración de EXPRESS BAKE.
Cosas que deberá comprar
• Sólo debe emplear harina “para máquina de pan” en las recetas de la panifi cadora EXPRESS
BAKE.
• Tal vez precise un termómetro de cocina para medir la temperatura del agua que emplea
en estas recetas. Sólo debe emplear agua caliente (entre 115º y 125º F) para las recetas de
la panifi cadora EXPRESS BAKE .
Si bien el pan de la confi guración de horneado EXPRESS BAKE es un tanto diferente, los
resultados y conveniencia bien lo valen.
La siguiente receta es fantástica para su primera fl auta con la confi guración EXPRESS BAKE.
Pan blanco tradicional - Flauta 1-1/2 libras
Ingredientes:
1 taza + 2 cucharadas soperas
9 onzas en total) de agua
caliente (115º – 125ºF)
2 cucharadas soperas de aceite
(temperatura ambiente)
Instrucciones:
1 Mida cuidadosamente 1 taza y 2 cucharadas soperas (9 onzas en total) de agua caliente.
Recuerde, una buena idea es ver la medición de la taza a nivel de la vista para asegurarse
de haber medido exactamente 1 taza y 2 cucharadas soperas (9 onzas en total).
2 Utilice un termómetro de cocina para medir la temperatura del agua, que debe ser entre
115° – 125° F. A la temperatura correcta, viértala en el recipiente para pan.
3 Mida cuidadosamente y agregue 2 cucharadas soperas de aceite a temperatura ambiente.
4 Mida cuidadosamente y agregue sal y azúcar en el recipiente para pan.
5 Mida y agregue exactamente 3 tazas de harina en el recipiente para pan. Recuerde no
“aplastar” la harina en la taza. A fi n de evitar sobrellenado, un buen truco consiste en
llenar la taza medidora hasta que se desborde. Luego, dar golpecitos suaves a un
costado de la taza con un cuchillo o espátula para quitar las bolsas de aire. Nivele la taza
medidora con un cuchillo o espátula.
6 Antes de agregar la levadura, utilice el dedo para hacer un agujero (hueco) en la harina
donde colocará la levadura. La levadura NUNCA debe entrar en contacto con el líquido
cuando agrega ingredientes. Mida (y nivele nuevamente) 5 cucharaditas de levadura y
colóquelas cuidadosamente en el hueco que hizo en la harina.
7 Coloque el recipiente para pan cuidadosamente a presión en la panifi cadora.
8 Cierre la tapa de la panifi cadora y enchufe el cable al tomacorriente de la pared. Ocurrirá
lo siguiente. El artefacto emitirá un “pip” y se prenderán las luces del visor. La
confi guración de tiempo marcará “3:25” horas.
2 cucharadas soperas de azúcar
1 cucharadita de sal
3 tazas de harina para máquina de pan
5 cucharaditas de levadura con leudante rápido
9 Presione repetidas veces el botón “Seleccionar menú” para seleccionar la confi guración
panifi cadora EXPRESS BAKE (1.5LB).
10 Presione el botón Comenzar / Detener y la máquina comenzará a hacer el pan.
Escuchará cómo la panifi cadora comienza a mezclar los ingredientes.
Nota: Es importante que NO presione el botón Comenzar / Detener mientras que la panifi cadora
está haciendo el pan. Si lo hace, la máquina se apagará y deberá comenzar nuevamente de cero.
Nota: NO levante la tapa cuando esté utilizando la confi guración EXPRESS BAKE. Si la
levanta, puede afectar el leudado de la masa.
Precaución: La panifi cadora se calienta mucho. NO manipule la máquina mientras se
encuentre en funcionamiento.
Después de horneado el pan con la confi guración EXPRESS BAKE
Precaución: No coloque la cara cerca de la tapa cuando abra la panifi cadora, puede
escaparse vapor caliente que podría quemarlo.
Importante: La panifi cadora tiene una confi guración automática para “mantener tibio” el
pan durante una hora. Sin embargo, recomendamos retirar el pan de la panifi cadora de
inmediato a fi n de mantener su frescura.
1 Utilice agarraderas para cacerolas o guantes para horno para levantar con cuidado el
recipiente de la panifi cadora.
2 Coloque el recipiente boca abajo sobre una rejilla fría hasta que el pan se desprenda.
Si se pega, tome una espátula de goma (el metal puede dañar la superfi cie del recipiente)
y pásela por los lados de la fl auta hasta que se desprenda.
3 Si la cuchilla para amasar sale con el pan, utilice la herramienta para remover cuchilla de
amasar incluida a fi n de retirarla de la fl auta. Recuerde ¡estará muy caliente!
Deje enfriar el pan 15 minutos antes de cortarlo y disfrutarlo.
Importante: Si desea hacer otro pan de inmediato, espere a que la
panifi cadora se enfríe durante 10 o 15 minutos con la tapa abierta y el
recipiente afuera.
Cómo usar el programa de encendido automático
Puede demorar el momento de inicio de la panifi cadora para tener pan fresco cuando se
levante a la mañana o cuando vuelve del trabajo.
Recomendamos que antes de utilizar el programa de encendido automático pruebe algunas
recetas. Utilice las recetas que ya le hayan dado buenos resultados.
Importante: NO puede utilizar el programa de encendido automático en la confi guración
EXPRESS BAKE. Antes de usar el programa de encendido automático:
Antes de utilizar el temporizador de retardo:
1 Agregue todos los ingredientes de la receta.
2 Seleccione la confi guración correcta para el tipo de pan que vaya a hacer
(francés, dulce, etc.).
3 Seleccione el color de costra.
Precaución: No utilice recetas con ingredientes que puedan provocar un deterioro como
leche o huevos.

www.oster.com
52
www.oster.com
53
Para usar el programa de encendido automático:
1 Calcule las horas y minutos hasta la hora en que desea que su pan esté horneado. Por
ejemplo, si son las 8 a.m. y desea pan para la cena a las 6 de la tarde, tendrá 10 horas.
2 Utilice el botón de demora para adelantar en intervalos de 10 minutos. En nuestro
ejemplo, avanzará hasta que el visor se lea “10:00”. De ser necesario, utilice el botón de
programación de encendido automático para reducir la cantidad de tiempo. (Para
avanzar rápidamente, simplemente mantenga presionado los botones para aumentar /
disminuir del programa de encendido automático).
Importante: Si comete un error o desea comenzar nuevamente, mantenga presionado
el botón “Comenzar / Detener” hasta que escuche un pip y luego presione una vez más
el botón “Comenzar / Detener”. El visor mostrará la confi guración original y el tiempo del
ciclo. Se cancela el programa de encendido automático y puede comenzar nuevamente.
3 Cuando haya confi gurado el programa de encendido automático deseado, asegúrese
de presionar el botón “Comenzar / Detener”.
Importante: Cuando utilice el programa de encendido automático en un clima caluroso,
puede utilizar una o dos cucharas soperas menos de líquido en la receta. Es para evitar
que la masa leude demasiado. También puede reducir la cantidad de sal en 1/8 o 1/4 y la
cantidad de azúcar en 1/4 de cucharadita al mismo tiempo.
Trucos y consejos
Los cocineros experimentados consideran que hacer pan es una ciencia más que un arte.
Tenga en cuenta que deberá experimentar con algunas recetas antes de que le salgan
exactamente como usted quiere. No desista. Más aún, existen trucos especiales para
asegurar siempre un pan de calidad.
Utilice las medidas exactas
Ya hemos mencionado lo importante que es usar las medidas exactas al momento de
hornear pan. Sin embargo, lo repetimos nuevamente. Nivele todos los ingredientes secos
y asegúrese de que todos los ingredientes líquidos se midan en una taza de vidrio con
medidas claramente marcadas a un costado.
Utilice ingredientes frescos
Siempre debe utilizar ingredientes frescos. Aquí enumeramos los motivos:
• Harina - Si hace tiempo que tiene harina en la alacena, es posible que se haya
humedecido por la absorción de humedad o que se haya secado; depende de la zona
del país en la que viva. Recomendamos que utilice harina para pan fresca.
• Levadura -Probablemente la levadura fresca sea el ingrediente más importante para
hornear pan. Si la levadura no está fresca, el pan no leudará. Es mejor comprar levadura
nueva que arriesgarse a utilizar una guardada por mucho tiempo.
Puede verifi car si la levadura está fresca. Simplemente llene una taza con agua tibia y
agregue 2 cucharaditas de azúcar y revuelva. Espolvoree unas cucharaditas de levadura en
la superfi cie de agua y espere. Luego de 15 minutos, la levadura debería hacer espuma y
tener un aroma característico. Si no sucede ninguna de las dos cosas, la levadura está vieja
y debe descartarse.
Agregue los ingredientes en el orden correcto
Lea todas las recetas de arriba a abajo y recuerde:
- PRIMERO, ingredientes líquidos
- SEGUNDO, ingredientes secos
- POR ÚLTIMO, la levadura
Cómo hornear a gran altura
Si se encuentra por encima de los 3000 pies, probablemente ya sepa cómo ajustar otras
recetas como tortas o magdalenas.
La gran altura tiende a afectar así:
• Hace que la masa leude más rápidamente
• Hace que la masa se seque más
A fi n de contrarrestar los efectos de la altura sobre el horneado en la altura, recomendamos
lo siguiente:
Si la masa está demasiado seca
• Aumente la cantidad de agua para la receta, en ocasiones hasta 2-4 cucharadas soperas
por taza.
Si el pan leuda demasiado
• Reduzca la cantidad de levadura. Por cada cucharadita de levadura, intente disminuir la
levadura de 1/8 a 1/4 de cucharadita
• Reduzca la cantidad de azúcar. Por cada cucharada sopera de azúcar, reduzca la cantidad
en 1 o 2 cucharaditas.
Cuadro de medidas equivalentes
El siguiente cuadro lo ayudará a convertir las medidas utilizadas en las recetas.
Por ejemplo: 1/2 cuchara soperas = 1–1/2 cucharaditas
Fluido onza/s taza/s Cuchara/s sopera Cucharadita/s
8 = 1 = 16 = 48
7 = 7/8 = 14 = 42
6 = 3/4 = 12 = 36
5 = 5/8 = 10 = 30
4 = 1/2 = 8 = 24
3 = 3/8 = 6 = 18
2 = 1/4 = 4 = 12
1 = 1/8 = 2 = 6
= = 1 = 3
1/2 = 1 1/2

CUIDADO Y LIMPIEZA
PREGUNTAS FRECUENTES
Cómo cuidar la pani cadora
Precaución: No coloque la panifi cadora en agua ni en la lavadora de platos. No utilice
benzina, cepillo de fregar ni limpiadores químicos puesto que dañarán la máquina. No
sumerja en líquidos. Presione el botón Detener y retire el cable del tomacorriente de la
pared. Deje enfriar.
Utilice solamente limpiador suave no abrasivo para limpiar la panifi cadora.
Limpieza general
1 Retire todas las migas de pan con un trapo apenas humedecido.
2 NO doble el calentador eléctrico que se encuentra dentro de la panifi cadora.
Limpieza del recipiente para pan y cuchilla para amasar
1 Pase un trapo húmedo al recipiente para pan y a la cuchilla para amasar y
seque en su totalidad.
2 NO lave el recipiente ni sus partes en la lavadora de platos. Dañará la terminación del
recipiente o de las otras partes.
Cuidado de la panifi cadora
1 Mantenga limpia la panifi cadora en todo momento.
Precaución: No emplee utensilios de metal en la panifi cadora. Dañará el recipiente
antiadherente y otras partes.
2 No se alarme si el color del recipiente de pan cambia con el correr del tiempo. El cambio
de color se debe al vapor y humedad y no afecta el desempeño de la máquina
3 Si tiene difi cultades para retirar la cuchilla para amasar, coloque agua tibia en el recipiente
para pan durante 10-15 minutos y de este modo se ablandará la cuchilla.
Cómo guardar la panifi cadora
1 Asegúrese de que la máquina esté limpia y seca antes de guardarla.
2 Guarde la panifi cadora con la tapa cerrada.
3 No coloque objetos pesados sobre la tapa.
4 Retire la cuchilla de amasar y colóquela dentro del recipiente.
Detección y resolución de problemas
Si tiene difi cultades con el funcionamiento de la panifi cadora, revise la información de esta
sección a fi n de encontrar la solución. Si no encuentra la solución, comuníquese con el
Departamento de Atención al Consumidor l 1(800)334–0759.
Interrupción de energía
El artefacto cuenta con una función de memoria si interrumpe la energía cuando está
utilizando la panifi cadora.
1 Si se produce una interrupción de energía mientras está funcionando y la interrupción
es menor a 6 minutos, cuando regrese la energía el artefacto retomará el programa
donde lo dejó.
2 Si produce una interrupción de energía mientras está funcionando y la interrupción es
mayor a 6 minutos, cuando regrese la energía el artefacto no retomará el programa.
Si se produce una interrupción de energía por más de 6 minutos, cuando regrese, deberá
hacer lo siguiente:
1 Mantener presionado el botón “Comenzar / Detener” por al menos 3 segundos. Si el
visor no vuelve a la confi guración de tiempo anterior al corte, desenchufe la
panifi cadora y vuelva a enchufarla.
2 Si aún así el artefacto no arranca, mantenga presionado el botón “Comenzar / Detener”
una segunda vez por 3 segundos. Continúe desenchufando y volviendo a enchufar el
artefacto y manteniendo presionado el botón “Comenzar / Detener” hasta que el visor
vuelva al tiempo de ciclo anterior al corte.
Cómo comprender la información del visor
¿Qué hacer si el visor no enciende?
Verifi que que la panifi cadora se encuentre enchufada.
¿Qué hacer si el visor muestra 0:00 y los dos puntos “:” titilan?
No hay problema. Simplemente signifi ca que el ciclo de horneado ha terminado y que la
panifi cadora está manteniendo el pan tibio. Presione el botón “Comenzar / Detener” para
apagar el modo para mantener tibio.
¿Qué hacer si el visor muestra “E00” o “E01” y emite pips continuos?
Esto sucede cuando la temperatura interna de la cámara es demasiado alta (>136º F) o
demasiado baja (<-4º F).
1 Deje que el artefacto se asiente y tome la temperatura ambiente. Luego, verifi que si
puede funcionar nuevamente.
2 Si aún no funciona, llame al centro de servicio para efectuar una reparación.
¿Qué hacer si el visor muestra “EEE” y emite pips continuos?
El circuito del sensor de temperatura está roto. Comuníquese con el centro de servicios
para efectuar una reparación.
54
www.oster.com
www.oster.com
55

www.oster.com
56
www.oster.com
57
¿Qué hacer si el visor muestra “HHH” y emite pips continuos?
Se ha sobrepasado el circuito del sensor de temperatura. Comuníquese con el centro de
servicios para efectuar una reparación.
Detección y resolución de problemas con la panifi cadora
¿Qué hacer si sale humo o si hay olor a quemado proveniente de la parte trasera
de la máquina?
Se han derramado los ingredientes fuera del recipiente para pan y han caído en la misma
máquina. Detenga la panifi cadora y deje enfriar. Limpie la panifi cadora antes de volver a
utilizar. Sírvase consultar la sección “Cuidado y limpieza” de este manual.
¿Qué hacer si la masa no se mezcla?
Asegúrese de que el recipiente para pan y la cuchilla de amasar se encuentran colocadas
en el artefacto como corresponde.
Detección y resolución de problemas de horneado
¿Qué hacer si los costados del pan se rompen y la base del pan está húmeda?
Existen diversas soluciones posibles. El pan puede haber permanecido demasiado
tiempo en el recipiente luego del horneado. Retire el pan del recipiente lo antes posible
y déjelo enfriar. Pruebe esto: use más harina (una cucharadita por vez) o menos levadura
(1/4 de cucharadita por vez) o menos agua o líquido (una cucharadita por vez). También
puede ocurrir por no agregar sal a la receta.
¿Qué hacer si el pan tiene una textura pesada y gruesa?
Pruebe con menos harina (una cucharadita por vez) o más levadura (1/4 de cucharadita
por vez). La harina podría vieja o ser de un tipo inadecuado para la receta.
¿Qué hacer si el pan no está cocido en el centro?
Pruebe con más harina (una cucharadita más por vez) o menos agua (una cucharadita
menos por vez). No levante la tapa tantas veces durante el horneado.
¿Qué hacer si el pan tiene una textura áspera y con agujeros?
También puede ocurrir por no agregar sal a la receta.
¿Qué hacer si el pan leudó demasiado?
Pruebe con menos levadura (1/4 de cucharadita menos por vez). También podría ocurrir por
olvidar agregar sal a la receta o por no colocar la cuchilla de amasar en el recipiente para pan.
¿Qué hacer si el pan no ha leudado lo su ciente?
Existen diversas soluciones posibles. Pruebe con menos harina (una cucharadita menos
por vez) o más levadura (1/4 de cucharadita más por vez). También puede ocurrir por:
• olvidar agregar sal a la receta,
• usar harina vieja o del tipo inapropiado,
• usar levadura vieja,
• no usar agua caliente (salvo para los ciclos EXPRESS BAKE).
¿Qué hago si el pan tiene harina en la parte superior?
Por lo general sucede cuando se usa demasiada harina o poca agua. Pruebe con menos
harina (una cucharadita o menos por vez) o más levadura (1/4 de cucharadita menos por vez).
¿Qué hacer si el pan está demasiado dorado?
Por lo general esto ocurre cuando se agrega demasiada azúcar a la receta. Pruebe con menos
azúcar (1 cucharadita por vez). También puede seleccionar un color de costra más suave.
¿Qué hacer si el pan no está lo su cientemente dorado?
Por lo general sucede cuando se levanta la tapa del artefacto repetidas veces o cuando
se deja la tapa abierta mientras se está horneando el pan. Asegúrese de que la tapa se
encuentre cerrada cuando la panifi cadora esté en funcionamiento.
RECETAS
Recetas con la con guración básica (Menú 1)
Etapas de la máquina para pan básico (para fl autas de 1.5 lb.)
Para el ciclo básico, se supone que sucederá lo que se enumera a continuación a medida
que el contador llega a 0. alcanza cero.
Para comenzar: Los ingredientes se amasan por primera vez ( 5 minutos)
Cuando el temporizador está en 03:13, la masa descansa por 5 minutos
Cuando el temporizador está en 3:08, la masa se trabaja por segunda vez (20 minutos)
Cuando el temporizador está en 2:48, la masa comienza a leudar (39 minutos)
Cuando el temporizador está en 2:09, la masa se “golpea” (10 segundos)
Cuando el temporizador está en 2:09, la masa continúa leudando
(25 minutos y 50 segundos)
Cuando el temporizador está en 1:43, se le da “forma” a la masa (15 segundos)
Cuando el temporizador está en 1:43, la masa llega al último leudado
(48 minutos y 45 segundos)
Cuando el temporizador está en 0:53, la masa comienza a hornearse (53 minutos)
Cuando el temporizador está en 0:00, el pan está listo.
Nota: La posición rápida reducirá el tiempo total en aproximadamente una hora.
Pan blanco tradicional
Flauta de 1.5 libras
1 taza de agua
2 cucharadas soperas de margarina o manteca
1 1/2 cucharadita de sal
3 tazas de harina para pan
2 cucharadas soperas de leche en polvo
1 cucharada sopera de azúcar
2 cucharaditas de levadura activa seca
1 Mida y agregue los ingredientes líquidos en el recipiente para pan
2 Mida y agregue los ingredientes secos en el recipiente para pan (menos la levadura).
3 Utilice el dedo para hacer un agujero (hueco) en la harina donde colocará la levadura. La levadura
NUNCA debe entrar en contacto con líquido cuando agrega ingredientes. Mida la levadura
cuidadosamente colóquela en el hueco.
4 Coloque el recipiente para pan en la panifi cadora y cierre la tapa.
5 Presione el botón “Seleccionar menú” para elegir la confi guración Básica.
6 Presione el botón “tamaño de la fl auta” para elegir 1 lb., 1.5 lb. o 2 lb.
7 Presione el botón “Color de costra” para elegir costra suave, media, oscura o rápida.
8 Presione el botón “Comenzar / Detener”.
Flauta de 2 libras
1 3/8 taza de agua
2 cucharadas soperas de margarina o manteca
1 3/4 cucharadita de sal
4 tazas de harina para pan
2 cucharadas soperas de leche en polvo
2 cucharadas soperas de azúcar
2 1/4 cucharaditas de levadura activa seca
Básico

www.oster.com
58
www.oster.com
59
Pan de campo blanco
(sin programación de encendido automático) - fl auta de 2 libras
1 taza de leche tibia (110 – 115º F)
1 1/2 cucharada sopera de manteca o margarina
1 huevo grande
1 1/2 cucharadita de sal
1 Mida y agregue los ingredientes líquidos en el recipiente para pan
2 Mida y agregue los ingredientes secos en el recipiente para pan (menos la levadura).
3 Utilice el dedo para hacer un agujero (hueco) en la harina donde colocará la levadura.
La levadura NUNCA debe entrar en contacto con líquido cuando agrega ingredientes.
Mida la levadura cuidadosamente colóquela en el hueco.
4 Coloque el recipiente para pan en la panifi cadora y cierre la tapa.
5 Presione el botón “Seleccionar menú” para elegir la confi guración Básica.
6 Presione el botón “tamaño de la fl auta” para elegir 1 lb., 1.5 lb. o 2 lb.
7 Presione el botón “Color de costra” para elegir costra suave, media, oscura o rápida.
8 Presione el botón “Comenzar / Detener”.
4 tazas de harina para pan
1 1/2 cucharada sopera de azúcar
2 cucharaditas de levadura activa seca
Pan de papa - fl auta de 2 libras
1 3/8 taza de agua
2 cucharadas soperas de margarina o manteca
1 3/4 cucharadita de sal
4 tazas de harina para pan
1 Mida y agregue los ingredientes líquidos en el recipiente para pan
2 Mida y agregue los ingredientes secos en el recipiente para pan (menos la levadura).
3 Utilice el dedo para hacer un agujero (hueco) en la harina donde colocará la levadura.
La levadura NUNCA debe entrar en contacto con líquido cuando agrega ingredientes.
Mida la levadura cuidadosamente colóquela en el hueco.
4 Coloque el recipiente para pan en la panifi cadora y cierre la tapa.
5 Presione el botón “Seleccionar menú” para elegir la confi guración Básica.
6 Presione el botón “tamaño de la fl auta” para elegir 1 lb., 1.5 lb. o 2 lb.
7 Presione el botón “Color de costra” para elegir costra suave, media, oscura o rápida.
8 Presione el botón “Comenzar / Detener”.
2 cucharadas soperas de azúcar
1/4 tasa de copos de papa instantánea
2 cucharadas soperas de leche en polvo
1 3/4 cucharaditas de levadura activa seca
Pan con harina de avena - fl auta de 2 libras
1 1/4 tazas de agua
3 cucharadas soperas de miel
2 cucharadas soperas de margarina o manteca
3/4 taza de avena de rápida cocción
1 3/4 cucharadita de sal
1 Mida y agregue los ingredientes líquidos en el recipiente para pan
2 Mida y agregue los ingredientes secos en el recipiente para pan (menos la levadura).
3 Utilice el dedo para hacer un agujero (hueco) en la harina donde colocará la levadura.
La levadura NUNCA debe entrar en contacto con líquido cuando agrega ingredientes.
Mida la levadura cuidadosamente colóquela en el hueco.
4 Coloque el recipiente para pan en la panifi cadora y cierre la tapa.
5 Presione el botón “Seleccionar menú” para elegir la confi guración Básica.
6 Presione el botón “tamaño de la fl auta” para elegir 1 lb., 1.5 lb. o 2 lb.
7 Presione el botón “Color de costra” para elegir costra suave, media, oscura o rápida.
8 Presione el botón “Comenzar / Detener”.
3 3/4 tazas de harina para pan
2 cucharadas soperas de salvado de avena
2 cucharadas soperas de leche en polvo
2 cucharaditas de levadura activa seca
Básico
Básico
Básico
Pan con pasas de uva (sin programación de encendido automático)
Flauta de 1.5 libras
7/8 taza de agua
1 1/2 cucharadas soperas de manteca o margarina
1 cucharadita de sal
3 tazas de harina para pan
2 cucharadas soperas de azúcar
1 1/2 cucharada sopera de leche en polvo
1 cucharadita de canela
1 3/4 cucharaditas de levadura activa seca
3/4 taza de pasas de uva (ver nota anterior)
1 Mida y agregue los ingredientes líquidos en el recipiente para pan
2 Mida y agregue los ingredientes secos en el recipiente para pan (menos la levadura).
3 Utilice el dedo para hacer un agujero (hueco) en la harina donde colocará la levadura. La levadura
NUNCA debe entrar en contacto con líquido cuando agrega ingredientes. Mida la levadura
cuidadosamente colóquela en el hueco.
4 Coloque el recipiente para pan en la panifi cadora y cierre la tapa.
5 Presione el botón “Seleccionar menú” para elegir la confi guración Básica.
6 Presione el botón “tamaño de la fl auta” para elegir 1 lb., 1.5 lb. o 2 lb.
7 Presione el botón “Color de costra” para elegir costra suave, media, oscura o rápida.
8 Presione el botón “Comenzar / Detener”.
Nota: Cuando agregue frutas, por ejemplo, pasas de uva, la panifi cadora emitirá unos pips durante el
ciclo de amasado. Cuando la panifi cadora emita el pip durante el ciclo de amasado. Levante la tapa y
agregue las pasas de uva, pocas por vez, hasta que se mezclen con la masa.
Flauta de 2 libras
1 1/4 tazas de agua
2 cucharadas soperas de margarina o manteca
1 1/2 cucharadita de sal
4 tazas de harina para pan
3 cucharadas soperas de azúcar
2 cucharadas soperas de leche en polvo
1 1/2 cucharaditas de canela
2 1/4 cucharaditas de levadura activa seca
1 taza de pasas de uva (ver nota anterior)
Pan de centeno liviano - fl auta de 1.5 libras
1 3/8 taza de agua
1 1/2 cucharadas soperas de manteca o margarina
1 1/2 cucharadita de sal
3 tazas de harina para pan
1 Mida y agregue los ingredientes líquidos en el recipiente para pan
2 Mida y agregue los ingredientes secos en el recipiente para pan (menos la levadura).
3 Utilice el dedo para hacer un agujero (hueco) en la harina donde colocará la levadura. La levadura
NUNCA debe entrar en contacto con líquido cuando agrega ingredientes. Mida la levadura
cuidadosamente colóquela en el hueco.
4 Coloque el recipiente para pan en la panifi cadora y cierre la tapa.
5 Presione el botón “Seleccionar menú” para elegir la confi guración Básica.
6 Presione el botón “tamaño de la fl auta” para elegir 1 lb., 1.5 lb. o 2 lb.
7 Presione el botón “Color de costra” para elegir costra suave, media, oscura o rápida.
8 Presione el botón “Comenzar / Detener”.
1 taza de harina de centeno
2 cucharadas soperas colmadas
de azúcar negra
2 cucharaditas de levadura activa seca
Básico
Básico

www.oster.com
60
www.oster.com
61
Recetas con la con guración francesa (Menú 2)
Etapas de la máquina para pan francés (para fl autas de 1.5 libras )
Para el ciclo francés, se supone que sucederá lo que se enumera a continuación a medida que el contador
va bajando hasta alcanzar el cero.
Para comenzar: Los ingredientes se amasan por primera vez ( 5 minutos)
Cuando el temporizador está en 03:30, la masa descansa por 5 minutos
Cuando está en 03:25, la masa se trabaja por segunda vez (20 minutos)
Cuando está en 03:05, la masa comienza a leudar (39 minutos)
Cuando está en 02:26, la masa se “golpea” (10 segundos)
Cuando está en 02:26, la masa continúa leudando (30 minutos y 50 segundos)
Cuando está en 01:55, se le da “forma” a la masa (10 segundos)
Cuando está en 01:55, la masa llega al último leudado (59 minutos y50 segundos)
Cuando está en 00:55, la masa comienza a hornearse (55 minutos)
Cuando está en 0:00, el pan está listo.
Nota: La posición rápida reducirá el tiempo total en aproximadamente una hora.
Pan de campo francés - fl auta de 2 libras
1 3/8 taza de agua
1 1/2 cucharada sopera de aceite
vegetal o de oliva
1 1/2 cucharadita de sal
1 Mida y agregue los ingredientes líquidos en el recipiente para pan.
2 Mida y agregue los ingredientes secos (salvo la levadura) en el recipiente para pan.
3 Utilice el dedo para hacer un agujero (hueco) en la harina donde colocará la levadura. La levadura
NUNCA debe entrar en contacto con el líquido cuando agrega ingredientes. Mida la levadura y
viértala cuidadosamente en el hueco.
4 Coloque el recipiente para pan en la panifi cadora y cierre la tapa.
5 Presione el botón “Seleccionar menú” para elegir la confi guración francesa.
6 Presione el botón “tamaño de la fl auta” para elegir 1 lb., 1.5 lb. o 2 lb.
7 Presione el botón “Color de costra” para elegir costra suave, media, oscura o rápida.
8 Presione el botón “Comenzar / Detener”.
4 tazas de harina para pan
1 cucharada sopera de azúcar
2 cucharaditas de levadura activa seca
Pan italiano con hierbas - fl auta de 2 libras
1 1/4 taza de agua
1 1/2 cucharas soperas de aceite
vegetal o de oliva
1 cucharadita de sal
3 1/2 tazas de harina para pan
1 cucharaditas de azúcar
1 Mida y agregue los ingredientes líquidos en el recipiente para pan.
2 Mida y agregue los ingredientes secos (salvo la levadura) en el recipiente para pan.
3 Utilice el dedo para hacer un agujero (hueco) en la harina donde colocará la levadura. La levadura
NUNCA debe entrar en contacto con el líquido cuando agrega ingredientes. Mida la levadura y
viértala cuidadosamente en el hueco.
4 Coloque el recipiente para pan en la panifi cadora y cierre la tapa.
5 Presione el botón “Seleccionar menú” para elegir la confi guración francesa.
6 Presione el botón “tamaño de la fl auta” para elegir 1 lb., 1.5 lb. o 2 lb.
7 Presione el botón “Color de costra” para elegir costra suave, media, oscura o rápida.
8 Presione el botón “Comenzar / Detener”.
1 cucharada sopera de perejil seco
1/4 taza de queso parmesano rallado
2 cucharaditas de copos de cebolla en polvo
1/2 cucharadita de albahaca en polvo
1/2 cuchara soperas de ajo en polvo
2 cucharaditas de levadura activa seca
Francés
Francés
Recetas de la con guración Pan integral (Menú 3)
Etapas de la máquina (para fl autas de 1.5 libras )
Para el ciclo Pan integral se supone que sucederá lo que se enumera a continuación a medida que el
contador alcanza cero..
Para comenzar: Los ingredientes se amasan por primera vez (5 minutos)
Cuando está en 3:15, la masa descansa por 5 minutos
Cuando está en 3:10, la masa se amasa por segunda vez (15 minutos)
Cuando está en 2:55, la masa comienza a leudar (49 minutos)
Cuando está en 2:05, la masa se “golpea” (10 segundos)
Cuando está en 2:05, la masa continúa leudando (25 minutos y 50 segundos)
Cuando está en 1:40, se da “forma” a la masa (10 segundos)
Cuando está en 1:40, la masa llega al último leudaudo (49 minutos and 50 segundos)
Cuando está en 0:50, la masa comienza a hornearse (50 minutos)
Cuando está en 0:00, el pan está listo.
Nota: La posición rápida reducirá el tiempo total en aproximadamente una hora.
100% Pan Integral - fl auta de 2 libras
1 5/8 de tazas de agua
1/3 taza de azúcar morena comprimida
2 cucharaditas de sal
4 2/3 tazas de harina integral
3 cucharaditas de levadura activa seca
1 Mida y agregue los ingredientes líquidos en el recipiente para pan.
2 Mida y agregue los ingredientes secos (salvo la levadura) en el recipiente para pan.
3 Utilice el dedo para hacer un agujero (hueco) en la harina donde colocará la levadura. La levadura
NUNCA debe entrar en contacto con el líquido cuando agrega ingredientes. Mida la levadura y
viértala cuidadosamente en el hueco.
4 Coloque el recipiente para pan en la panifi cadora y cierre la tapa.
5 Presione el botón “Seleccionar/Menú” para elegir la confi guración Pan Integral
6 Presione el botón “tamaño de la fl auta” para elegir 1 lb., 1.5 lb. o 2 lb.
7 Presione el botón “Color de costra” para elegir costra suave, media, oscura o rápida.
8 Presione el botón “Comenzar / Detener”.
Integral

www.oster.com
62
www.oster.com
63
Pan de trigo de miel
Flauta de 1.5 libras
1 taza de agua
2 cucharadas de mantequilla o margarina
1 1/2 cucharadas de miel
1 cucharadita de sal
2 1/4 tazas de harina para pan
1 taza de harina integral
1/2 taza de avena instantánea
2 cucharaditas de levadura activa seca
1 Mida y agregue los ingredientes líquidos en el recipiente para pan.
2 Mida y agregue los ingredientes secos (salvo la levadura) en el recipiente para pan.
3 Utilice el dedo para hacer un agujero (hueco) en la harina donde colocará la levadura. La levadura
NUNCA debe entrar en contacto con el líquido cuando agrega ingredientes. Mida la levadura y
viértala cuidadosamente en el hueco.
4 Coloque el recipiente para pan en la panifi cadora y cierre la tapa.
Flauta de 2 libras
1 y 3/8 tazas de agua
2 1/2 cucharadas mantequilla o margarina
2 cucharadas de miel
1 y 3/4 cucharaditas de sal
2 1/2 tazas harina para pan
1 1/4 tazas de harina integral
2/3 taza de avena instantánea
2 1/4 cucharaditas de levadura activa seca
Integral
5 Presione el botón “Seleccionar/Menú” para elegir la confi guración Pan Integral
6 Presione el botón “tamaño de la fl auta” para elegir 1 lb., 1.5 lb. o 2 lb.
7 Presione el botón “Color de costra” para elegir costra suave, media, oscura o rápida.
8 Presione el botón “Comenzar / Detener”.
Pan Integral de Miel - fl auta de 1.5 libras
1 1/8 tazas de agua
2 cucharadas de mantequilla o margarina
4 cucharadas de miel
1 cucharadita de sal
1 Mida y agregue los ingredientes líquidos en el recipiente para pan.
2 Mida y agregue los ingredientes secos (salvo la levadura) en el recipiente para pan.
3 Utilice el dedo para hacer un agujero (hueco) en la harina donde colocará la levadura. La levadura
NUNCA debe entrar en contacto con el líquido cuando agrega ingredientes. Mida la levadura y
viértala cuidadosamente en el hueco.
4 Coloque el recipiente para pan en la panifi cadora y cierre la tapa.
3 1/2 tazas harina para pan
1 taza de hojuelas de trigo
2 cucharadas cereal de salvado de trigo
2 cucharaditas de levadura activa seca
Integral
5 Presione el botón “Seleccionar/Menú” para elegir la confi guración Pan Integral
6 Presione el botón “tamaño de la fl auta” para elegir 1 lb., 1.5 lb. o 2 lb.
7 Presione el botón “Color de costra” para elegir costra suave, media, oscura o rápida.
8 Presione el botón “Comenzar / Detener”.
Pan de trigo de verano - fl auta de 1.5 libras
1 3/8 tazas de agua
1 1/2 cucharadas de aceite vegetable
2 cucharadas de piloncillo
1 1/2 cucharaditas de sal
1 Mida y agregue los ingredientes líquidos en el recipiente para pan.
2 Mida y agregue los ingredientes secos (salvo la levadura) en el recipiente para pan.
3 Utilice el dedo para hacer un agujero (hueco) en la harina donde colocará la levadura. La levadura
NUNCA debe entrar en contacto con el líquido cuando agrega ingredientes. Mida la levadura y
viértala cuidadosamente en el hueco.
4 Coloque el recipiente para pan en la panifi cadora y cierre la tapa.
2 tazas de harina para pan
2 tazas harina integral
2 cucharaditas levadura activa seca
Integral
5 Presione el botón “Seleccionar/Menú” para elegir la confi guración Pan Integral
6 Presione el botón “tamaño de la fl auta” para elegir 1 lb., 1.5 lb. o 2 lb.
7 Presione el botón “Color de costra” para elegir costra suave, media, oscura o rápida.
8 Presione el botón “Comenzar / Detener”.
Pan de suero de leche - fl auta de 1.5 libras
1 1/4 tazas de agua
1 1/2 cucharada de mantequilla o margarina
1 cucharadita de vinagre blanco
2 cucharadas de azúcar morena comprimida
2 tazas de harina para pan
1 taza de harina integral
1 Mida y agregue los ingredientes líquidos en el recipiente para pan.
2 Mida y agregue los ingredientes secos (salvo la levadura) en el recipiente para pan.
3 Utilice el dedo para hacer un agujero (hueco) en la harina donde colocará la levadura. La levadura
NUNCA debe entrar en contacto con el líquido cuando agrega ingredientes. Mida la levadura y
viértala cuidadosamente en el hueco.
4 Coloque el recipiente para pan en la panifi cadora y cierre la tapa.
1 taza de harina de centeno
2 cucharadas de suero de leche en polvo
1 cucharada de vital gluten
1 1/2 cucharaditas de semillas de alcaravea
2 cucharaditas levadura activa seca
Integral
5 Presione el botón “Seleccionar/Menú” para elegir la confi guración Pan Integral
6 Presione el botón “tamaño de la fl auta” para elegir 1 lb., 1.5 lb. o 2 lb.
7 Presione el botón “Color de costra” para elegir costra suave, media, oscura o rápida.
8 Presione el botón “Comenzar / Detener”.

www.oster.com
64
www.oster.com
65
Recetas con la con guración dulce (Menú 4)
Etapas de la máquina para pan dulce (para fl autas de 1.5 libras )
En el ciclo de pan dulce, se supone que sucederá lo que se enumera a continuación a medida que
el contador desciende hasta alcanzar el cero.
Para comenzar: Los ingredientes se amasan por primera vez ( 5 minutos)
Cuando está en 3:17, la masa descansa por 5 minutos
Cuando está en 3:12, la masa se amasa por segunda vez (20 minutos)
Cuando está en 2:52, la masa empieza a elevar (39 minutos)
Cuando está en 02:13, la masa se “golpea” (10 segundos)
Cuando está en 02:13, la masa continúa leudando (25 minutos y 50 segundos)
Cuando está en 01:47, se le da “forma” a la masa (5 segundos)
Cuando está en 1:47, la masa llega al último leudado (51 minutos y55 segundos)
Cuando está en 00:55, la masa comienza a hornearse (55 minutos)
Cuando está en 0:00, el pan está listo.
Nota: Con el programa de pan dulce, el color de la costra no se puede cambiar.
Primavera favorito pan
(sin programación de encendido automático) - fl auta de 1.5 libras
1 taza de agua
1/4 taza de manteca o margarina
1 huevo grande
1 1/2 cucharadita de extracto de vainilla
1 1/4 cucharadita de extracto de almendras
1 cucharadita de sal
1 Mida y agregue los ingredientes líquidos en el recipiente para pan.
2 Mida y agregue los ingredientes secos (salvo la levadura) en el recipiente para pan.
3 Utilice el dedo para hacer un agujero (hueco) en la harina donde colocará la levadura. La levadura
NUNCA debe entrar en contacto con el líquido cuando agrega ingredientes. Mida la levadura y
viértala cuidadosamente en el hueco.
4 Coloque el recipiente para pan en la panifi cadora y cierre la tapa.
5 Presione el botón “Seleccionar menú” para elegir la confi guración Dulce.
6 Presione el botón “tamaño de la fl auta” para elegir 1 lb., 1.5 lb. o 2 lb.
7 Presione el botón “Comenzar / Detener”.
Nota: Cuando agregue frutas, por ejemplo, pasas de uva, la panifi cadora emitirá unos pips durante el
ciclo de amasado. Levante la tapa y agregue las pasas de uva, pocas por vez, hasta que se mezclen
con la masa.
3 3/4 tazas de harina para pan
1/2 taza de azúcar
3 cucharadas soperas de leche en polvo
2 cucharaditas de levadura activa seca
3/4 taza de pasas de uva
1 1/2 cucharaditas de cáscara de naranja rallada
Dulce
Queso cottage y pan con cebollino
Dulce
(sin programación de encendido automático) - fl auta de 1.5 libras
3/8 taza de agua
1 taza de queso cottage
1 huevo
2 cucharadas soperas de margarina o manteca
1 1/2 cucharadita de sal
1 Mida y agregue los ingredientes líquidos en el recipiente para pan.
2 Mida y agregue los ingredientes secos (salvo la levadura) en el recipiente para pan.
3 Utilice el dedo para hacer un agujero (hueco) en la harina donde colocará la levadura. La levadura
NUNCA debe entrar en contacto con el líquido cuando agrega ingredientes. Mida la levadura y
viértala cuidadosamente en el hueco.
4 Coloque el recipiente para pan en la panifi cadora y cierre la tapa.
5 Presione el botón “Seleccionar menú” para elegir la confi guración Dulce.
6 Presione el botón “tamaño de la fl auta” para elegir 1 lb., 1.5 lb. o 2 lb.
7 Presione el botón “Comenzar / Detener”.
Pan especial de invierno
3 3/4 tazas de harina para pan
3 cucharadas soperas de cebollinos en polvo
2 1/2 cucharadas soperas de azúcar
2 1/4 cucharaditas de levadura activa seca
Dulce
(sin programación de encendido automático) - fl auta de 1.5 libras
7/8 taza de agua
2 cucharadas soperas de margarina o manteca
Un huevo grande
1/4 taza de melaza
1 Mida y agregue los ingredientes líquidos en el recipiente para pan.
2 Mida y agregue los ingredientes secos (salvo la levadura) en el recipiente para pan.
3 Utilice el dedo para hacer un agujero (hueco) en la harina donde colocará la levadura. La levadura
NUNCA debe entrar en contacto con el líquido cuando agrega ingredientes. Mida la levadura y
viértala cuidadosamente en el hueco.
4 Coloque el recipiente para pan en la panifi cadora y cierre la tapa.
5 Presione el botón “Seleccionar menú” para elegir la confi guración Dulce.
6 Presione el botón “tamaño de la fl auta” para elegir 1 lb., 1.5 lb. o 2 lb.
7 Presione el botón “Comenzar / Detener”.
Pan con manzana y nueces - fl auta de 1.5 libras
3/4 taza de salsa de manzana sin azúcar
3/8 tazas de jugo de manzana
3 cucharadas soperas de margarina o manteca
1 huevo grande
1 cucharadita de sal
4 tazas de harina para pan
1 Mida y agregue los ingredientes líquidos en el recipiente para pan.
2 Mida y agregue los ingredientes secos (salvo la levadura) en el recipiente para pan.
3 Utilice el dedo para hacer un agujero (hueco) en la harina donde colocará la levadura. La levadura
NUNCA debe entrar en contacto con el líquido cuando agrega ingredientes. Mida la levadura y
viértala cuidadosamente en el hueco.
4 Coloque el recipiente para pan en la panifi cadora y cierre la tapa.
5 Presione el botón “Seleccionar menú” para elegir la confi guración Dulce.
6 Presione el botón “tamaño de la fl auta” para elegir 1 lb., 1.5 lb. o 2 lb.
7 Presione el botón “Comenzar / Detener”.
Nota: Cuando agregue frutas, por ejemplo, pasas de uva, la panifi cadora emitirá unos pips durante el
ciclo de amasado. Levante la tapa y agregue las pasas de uva, pocas por vez, hasta que se mezclen
con la masa.
1/4 taza harina de maíz
2 3/4 tazas de harina para pan
2/3 taza de harina integral
2 1/4 cucharaditas de levadura activa seca
Dulce
1/4 taza colmada de azúcar negra
1 1/4 cucharadita de canela
1/2 cucharadita de bicarbonato de sodio
2 cucharaditas de levadura activa seca
1/2 taza de nueces partidas

www.oster.com
66
www.oster.com
67
EXPRESS BAKE: Con guración
Recetas de con guración (Menús 6 y 7)
EXPRESS BAKE Etapas de la máquina
Para el ciclo de la panifi cadora EXPRESS BAKE Breadmaker puede
esperar que suceda lo siguiente mientras el contador alcanza cero.
Para comenzar: Los ingredientes se amasan por primera vez
(15 minutos)
Cuando está en 0:43,la masa empieza a leudar (8 minutos)
Cuando está en 0:35, la masa empieza a hornearse (35minutos)
Cuando está en 0:00, está listo el pan.
Important: NO PUEDE usar el programa de encendido automático con la panifi cadora en EXPRESS
BAKE. NO PUEDE cambiar el color de la costra.
Pan Blanco
Flauta de 1 libras
1 taza y 2 cucharadas de agua caliente (115°–125°F)
2 cucharadas de aceite
2 cucharadas de azúcar
1 cucharadita de sal
3 tazas de harina para pan
5 cucharaditas de levadura activa seca
Importante: Mida con exactitud el agua caliente y asegúrese de que está entre 115°–125°F
con un termómetro de cocina.
1 Mida y agregue los ingredientes líquidos en el recipiente para pan.
2 Mida y agregue los ingredientes secos (salvo la levadura) en el recipiente para pan.
3 Utilice el dedo para hacer un agujero (hueco) en la harina donde colocará la levadura. La levadura
NUNCA debe entrar en contacto con el líquido cuando agrega ingredientes. Mida la levadura y
viértala cuidadosamente en el hueco.
4 Coloque el recipiente para pan en la panifi cadora y cierre la tapa.
5 Presione el botón “Seleccionar Menú” y elija la confi guración de Express Bake
a. Express Bake (1 LB) para fl autas de 1 libras
b. Express Bake (1.5 LB) para fl autas de 1.5 libras
6 Presione el botón “Comenzar / Detener”.
Flauta de 1.5 libras
1 1/2 taza de agua caliente (115°–125°F)
3 cucharadita de aceite
3 cucharadas de azúcar
1 1/2 cucharadita de sal
4 tazas de harina para pan
2 cucharadas de levadura activa seca
EXPRESS BAKE
Pan de queso y centeno
Flauta de 1 libras
1 taza y 2 cucharadas de agua caliente (115°–125°F)
1 cucharada de aceite
1 cucharada de azúcar
1 cucharadita de sal
2 1/2 tazas de harina para pan
1/2 taza de harina de centeno
1 cucharada de queso Parmesano rallado
1 taza de queso cheddar desmenuzado
5 cucharaditas de levadura activa seca
Importante: Mida con exactitud el agua caliente y asegúrese de que está entre 115°–125°F
con un termómetro de cocina.
1 Mida y agregue los ingredientes líquidos en el recipiente para pan.
2 Mida y agregue los ingredientes secos (salvo la levadura) en el recipiente para pan.
3 Utilice el dedo para hacer un agujero (hueco) en la harina donde colocará la levadura. La levadura
NUNCA debe entrar en contacto con el líquido cuando agrega ingredientes. Mida la levadura y
viértala cuidadosamente en el hueco.
4 Coloque el recipiente para pan en la panifi cadora y cierre la tapa.
Flauta de 1.5 libras
1 1/2 taza de agua caliente (115°–125°F)
4 cucharadita de aceite
2 cucharadas de azúcar
1 1/2 cucharadita de sal
3 1/4 tazas de harina para pan
2/3 taza de harina de centeno
2 cucharadas de queso Parmesano rallado
1 1/4 tazas de queso cheddar desmenuzado
2 cucharadas de levadura activa seca
EXPRESS BAKE
5 Presione el botón “Seleccionar Menú” y elija la confi guración de Express Bake
a. Express Bake (1 LB) para fl autas de 1 libras
b. Express Bake (1.5 LB) para fl autas de 1.5 libras
6 Presione el botón “Comenzar / Detener”.
Pan de Sopa de Cebolla
Flauta de 1 libras
1 taza y 2 cucharadas de
agua caliente (115°–125°F)
2 cucharadas de aceite
2 cucharadas de azúcar
3 tazas de harina para pan
2 cucharadas de mezcla de sopa cesa de cebolla
4 1/2 de cucharaditas de levadura activa seca
Importante: Mida con exactitud el agua caliente y asegúrese de que está entre 115°–125°F
con un termómetro de cocina.
1 Mida y agregue los ingredientes líquidos en el recipiente para pan.
2 Mida y agregue los ingredientes secos (salvo la levadura) en el recipiente para pan.
3 Utilice el dedo para hacer un agujero (hueco) en la harina donde colocará la levadura. La levadura
NUNCA debe entrar en contacto con el líquido cuando agrega ingredientes. Mida la levadura y
viértala cuidadosamente en el hueco.
4 Coloque el recipiente para pan en la panifi cadora y cierre la tapa.
Flauta de 1.5 libras
1 1/2 y 1 cucharada de
agua caliente (115°–125°F)
3 cucharadas de aceite
3 cucharadas de azúcar
4 tazas de harina para pan
3 cucharadas de mezcla de sopa cesa de cebolla
2 cucharadas de levadura activa seca
EXPRESS BAKE
5 Presione el botón “Seleccionar Menú” y elija la confi guración de Express Bake
a. Express Bake (1 LB) para fl autas de 1 libras
b. Express Bake (1.5 LB) para fl autas de 1.5 libras
6 Presione el botón “Comenzar / Detener”.

www.oster.com
68
www.oster.com
69
Receta para la posición de Sin Gluten (menú 8)
Etapas de la máquina para el Pan Sin Gluten
Para el ciclo de Sin Gluten, usted puede esperar que lo siguiente suceda a medida que el marcador
de tiempo llega a cero.
Para empezar: Los ingredientes se mezclan por primera vez (5 minutos)
A las 2:05, la masa se mezcla por segunda vez (10 minutos)
A la 1:55, la masa se eleva (60 minutos)
A las 0:55, la masa empieza a hornear (60 minutos)
A las 0:00, el pan está listo.
Pan Sin Gluten Tradicional
IMPORTANTE: Revise cuidadosamente las etiquetas para asegurarse de que todos los ingredientes
sean Sin Gluten.
1 1/4 taza de agua
3 cucharadas de aceite
1 cucharadita de vinagre
3 huevos
1/2 taza de tapioca
1 1/2 cucharadita de sal
2 tazas de Harina Sin Gluten
1 Mida y añada los ingredientes líquidos en el recipiente para pan
2 Mida y añada los ingredientes secos (con excepción de la levadura) en el recipiente para pan
3 Use sus dedos para formar un agujero (hueco) en la harina donde colocará la levadura. La levadura
NUNCA debe entrar en contacto con un líquido cuando agregue los ingredientes. Mida la levadura y
añádala cuidadosamente en el agujero.
4 Coloque el recipiente para pan en la panifi cadora y cierre la tapa.
5 Presione el botón “Seleccionar Menú” para elegir la posición de Sin Gluten.
6 Presione le botón de “Comenzar/Detener”
1 taza de harina de arroz
2/3 taza de papa en polvo
1/3 de taza de polvo de soya
1/2 taza de leche en polvo
3 cucharadas de azúcar
1 cucharada de Xanthan
2 cucharaditas de levadura activa seca
Gluten Free
Ingredientes para la masa (2 libras):
2 cucharaditas de aceite
2 cucharaditas de sal
2 cucharaditas de leche seca
1 cucharadita de azúcar
4 1/2 tazas harina
1 3/4 tazas de agua
1 cucharadita de levadura activa seca
Ingredientes para la receta de la masa para Bagels:
1 3/4 tazas de agua
1 1/2 cucharaditas de miel
1 1/2 cucharaditas de sal
3 tazas de harina
1 1/2 cucharaditas de levadura activa seca
Instrucciones para la masa
1 Coloque los ingredientes en un molde de pan y coloque el molde en la panifi cadora.
2 Presione el botón “Seleccionar Menú” para elegir la confi guración de la masa de la masa para bagels
(si está preparando masa para bagels).
3 Presione el botón “Comenzar / Detener”. La pantalla comenzará a contar de manera regresiva el tiempo en
la confi guración de la masa. Cuando la masa esté lista, se escuchará una señal y la pantalla mostrará “0:00.”
4 Presione el botón “Comenzar / Detener” hasta que oiga un pip y se ponga en blanco la pantalla.
5 Para remover el molde de pan, agarre la manga fi rmemente y remueve el molde.
Nota: No se calienta el molde al usar la confi guración para la masa.
La Preparación de la Masa para Hornear
1 Espolvoree ligeramente la harina sobre un petate o una tabla para postres. Al utilizar una espátula
de hule o una cuchara de madera, remueva la masa del molde y colóquela sobre una superfi cie
ligeramente espolvoreada con harina. Amase la masa 2 ó 3 veces para eliminar el aire. Si se maneja
la masa fácilmente sin harina, dele forma sobre una superfi cie limpia ligeramente engrasada.
2 Moldee la masa a su gusto en rollos, roscas, etc. (las sugerencias vienen a continuación). Colóquelo
sobre un molde engrasado. Tape la masa con un trapo limpio y déjela leudarse hasta que casi se
duplique en tamaño (casi 1 hora).
3 Hornee según la receta. Retírelo del molde y deje que se enfríe sobre una rejilla o sírvalo tibio.
Recetas Con guración de Masa/Pasta (Menús 9 y 10)
Las Etapas de la Panadería de Masa/Pasta
Para el ciclo de masa/pasta, se supone que sucederá lo que se enumera a
continuación a medida que el contador alcanza cero.
Masa/Pasta:
Para comenzar: Los ingredientes se amasan por primera vez (5 minutos)
Cuando está en 1:25, la masa descansa por 5 minutos
Cuando está en 1:20, la masa se amasa por segunda vez (20 minutos)
Cuando está en 1:00, la masa comienza a leudar (60 minutos)
Cuando está en 0:00, la masa está lista.
Masa para Bagels:
Para comenzar: Los ingredientes se amasan por primera vez (5 minutos)
Cuando está en 1:40, la masa se amasa por segunda vez (10 minutos)
Cuando está en 1:30, la masa comienza a leudar (90 minutos)
Cuando está
en 0:00, la masa está lista.
Variaciones para darle forma a la masa
Panecillos
Divida la masa en 12 piezas iguales, forme bolitas y colóquelas en un molde para panquecitos. Cúbralo,
deje que se leuden y hornee según las instrucciones. Rinde 12 piezas.
Roles
Engrase ligeramente una bandeja para hornear. Divida la masa en 10 piezas iguales. Sobre una
superfi cie ligeramente engrasada enrollar a mano cada pieza de aproximadamente 10 pulgadas
de largo alrededor de un lápiz . Empiece a enrollar cada pieza alrededor
del centro para formar un rollo. Coloque los rollos sobre una bandeja
para hornear previamente engrasada. Cúbralo, deje que se leude, y
hornee según las instrucciones. Rinde 10 unidades.
Cuernos de mantequilla
Engrase una bandeja para hornear y colóquela a un lado. Sobre una superfi cie
ligeramente espolvoreada con harina, enrolle la masa en un círculo de 12 pulgadas.
Barnice la masa con mantequilla derretida. Coloque los rollos volteados, con un
espacio de 2 a 3 pulgadas entre cada uno, sobre la lámina previamente engrasada.
Cúbralo, deje que se leude, y hornee según las instrucciones. Rinde 12 unidades.

www.oster.com
70
www.oster.com
71
Leudado
Para reducir el tiempo en que la masa leude
Precaliente un horno convencional a 200°F por 5 minutos, después apague el horno. Moldee la masa,
colóquela sobre una bandeja para hornear según las instrucciones y cúbrala con un trapo limpio de la
cocina. Coloque la masa en el horno hasta que se duplique en tamaño. Esto reducirá el tiempo necesario
para leudar a aproximadamente la mitad.
Las recetas en las que se usa harina integral o harina no refi nada contienen menos gluten y posiblemente
no se leuden tanto como aquellas en las que se utiliza harina blanca para pan. Debido a esto, los panes
más pesados pueden tener un parte más chata o inclusive un hueco pequeño en el centro. Asimismo se
puede agregar el gluten de trigo para mejorar la forma y el volumen del pan hecho con harinas que
contienen menos gluten.
Almacenamiento
Mantener Su Pan Fresco
El pan hecho en casa no contiene conservadores, entonces guarde la fl auta enfriada en una bolsa de
plástico ligeramente cerrada. Si así lo desea, coloque un tallo de apio en la bolsa para mantener el pan
más fresco por más tiempo. No lo guarde en el refrigerador debido a que esto causa que el pan se
reseque más rápido.
Pan para Pretzels
Todos los ingredientes al tiempo del ambiente (70– 80°F)
2 tazas de harina para pan
1 1/2 cucharadita de levadura activa seca
1/4 cucharadita de sal
1/2 cucharadita de azúcar
1 Mida y agregue los ingredientes salvo el huevo y la sal no refi nada en el recipiente para pan.
2 Presione el botón “Comenzar / Detener” para borrar la pantalla.
3 Presione el botón “Seleccionar/Menú” para elegir la confi guración de la masa.
4 Presione el botón “Comenzar / Detener”. La pantalla comenzará a contar de manera regresiva el
tiempo en la confi guración de la masa. Cuando la masa esté lista, se escuchará una señal y la
pantalla mostrará “0:00.”
5 Presione el botón “Comenzar / Detener” hasta que oiga un pip y se ponga en blanco la pantalla.
6 Para remover el molde de pan, agarre la manga fi rmemente y remueve el molde.
7 Precaliente el horno a 450°F.
8 Divida la masa en 12 piezas. Enrolle cada una en la forma de un lazo de 8 pulgadas. Moldéelo en la
forma de un pretzel o deje como un palito. Coloque sobre una charola para hornear engrasada,
barnice cada uno con el huevo cuando está enido. Espolvoree con la sal no refi nada.
9 Hornee en el horno precalentado por 12 a 15 minutos.
7/8 taza de agua
1 a 2 cucharadas de sal no refi nada (Kosher)
1 huevo, ligeramente cuando está enido
Masa
Rollos de Mantequilla (sin programa de encendido automático)
Todos los ingredientes al tiempo del ambiente (70–80°F), salvo la leche
2 cucharadas de azúcar
1 cucharadita de sal
2 3/4 tazas de harina para pan
2 cucharadita de levadura activa seca
1 Mida y agregue los ingredientes en el recipiente para pan
2 Presione el botón “Comenzar / Detener” para borrar la pantalla.
3 Presione el botón “Seleccionar/Menú” para elegir la confi guración de la masa.
4 Presione el botón “Comenzar / Detener”. La pantalla comenzará a contar de manera regresiva el
tiempo en la confi guración de la masa. Cuando la masa esté lista, se escuchará una señal y la
pantalla mostrará “0:00.”
5 Presione el botón “Comenzar / Detener” hasta que oiga un pip y se ponga en blanco la pantalla.
6 Para remover el molde de pan, agarre la manga fi rmemente y remueve el molde.
7 Moldee a su gusto (véase “Variaciones para Moldear la Masa”, página 72).
8 Hornee a 350°F por 25 a 30 minutos. Rinde 12 rollos.
1/4 taza de agua
1 huevo
3/4 a 7/8 tazas de leche
1/4 taza de mantequilla
Roscas (sin programa de encendido automático)
Todos los ingredientes al tiempo del ambiente (70–80°F), salvo la leche
1/4 taza de azúcar
1 cucharadita de sal
2 1/4 tazas de harina para pan
2 cucharaditas de levadura activa seca
1 Mida y agregue los ingredientes en el recipiente para pan
2 Presione el botón “Comenzar / Detener” para borrar la pantalla.
3 Presione el botón “Seleccionar/Menú” para elegir la confi guración de la masa.
4 Presione el botón “Comenzar / Detener”. La pantalla comenzará a contar en forma regresiva el tiempo
que requiera la confi guración elegida. Cuando la masa esté lista, se escuchará una señal y la pantalla
mostrará “0:00.”
5 Presione el botón “Comenzar / Detener” hasta que oiga un pip y se ponga en blanco la pantalla.
6 Para remover el molde de pan, agarre la manga fi rmemente y remueve el molde.
7 Coloque la masa en un molde redondo engrasado de 9 pulgadas o en un molde rectangular
engrasado de 5 x 7 pulgadas.
8 Agregue la cubierta. Rinde una rosca. (Véase la receta de “Cubiertas”, a la derecha.)
1 yema de huevo
3/4 a 7/8 tazas de leche
1 cucharada de mantequilla o margarina
Cubiertas
2 cucharadas de mantequilla derretida
1 cucharadita de canela molida
1/2 taza de azúcar
1/2 taza de nueces cortadas
Masa
Masa
Masa
Glaseado de azúcar glas, opcional (ver la receta abajo)
1 Salpica la mantequilla sobre la masa.
2 En un tazón pequeño, mezcle el azúcar, la canela y las nueces; espolvoree sobre la mantequilla.
Cubrir y dejar que se leude en un lugar templado por aproximadamente 30 minutos.
3 Hornee en un horno precalentado (375°F) por 20 a 25 minutos, hasta que se dore.
4 Enfríe por 10 minutos en el molde sobre la rejilla.
5 Salpique con la cubierta de azúcar glas, si así lo desea. Rinde sufi ciente como para cubrir una rosca

www.oster.com
72
www.oster.com
73
Glaseado de azúcar glas
(para roscas y roles dulces)
1 taza de azúcar de glas cernida
1 ó 2 cucharadas de agua o leche
1 En un tazón pequeño, combine todos los ingredientes y mezclar hasta que tenga una textura suave.
1 cucharadita de mantequilla o margarina, blanda
1/2 cucharadita de vainilla
Masa
2 Untar o salpicar el glaseado sobre la rosca o los rollos dulces tibios. Rinde lo sufi ciente como para
cubrir una rosca.
Pan para pizza
Todos los ingredientes a temperatura ambiente (70–80°F)
1.5 libra
1/2 cucharadita de sal
3 tazas de harina multiuso
1 1/2 cucharadita de levadura activa seca
1 taza de agua
2 cucharadas de aceite de olivo o vegetal
1 Mida y agregue los ingredientes en el recipiente para pan.
2 Presione el botón “Comenzar / Detener” hasta que se ponga en blanco la pantalla.
3 Presione el botón “Seleccionar/Menú” para elegir la confi guración de la masa.
4 Presione el botón “Comenzar / Detener”. La pantalla comenzará a contar en forma regresiva el
tiempo en la confi guración de la masa. Cuando la masa esté lista, se escuchará una señal y la
pantalla mostrará “0:00.”
5 Presione el botón “Comenzar / Detener” hasta que oiga un pip y se ponga en blanco la pantalla.
6 Para retirar el molde de pan, agarre la manija fi rmemente y saque el recipiente.
7 Coloque la masa en una molde para rollos de jalea que mide 12 x 15 pulgadas o un molde redondo
engrasado de 12 pulgadas (la receta de 1/2 libra) o en una bandeja para pizzas de 14 pulgadas (la
receta de 2 libras)
8 Precaliente el horno a 400°F.
9 Unte la salsa para pizzas sobre la masa. Salpica las cubiertas sobre la salsa.
2 libras
3/4 cucharadita de sal
4 tazas de harina multiusos
2 cucharadita de levadura activa seca
1 y 3/8 tazas de agua
3 cucharadas de aceite de olivo o vegetal
Masa
10 Hornee de 15 a 20 minutos o hasta que el pan esté dorado.
Cubiertas para pizzas (opcional)
1 taza (8 oz) de salsa preparada para pizzas
1/2 libra de chorizo, dorado y sin grasa
1/3 taza de cebollas picadas
1 paquete. (de 3 a 4 onzas) de peperoni en rebanadas
1 Cuando está ena (4 onzas) de tallos y piezas de champiñones, sin líquido
1 taza de pimientos verdes picados
Recetas para Pastas
Masa
Pasta Sencilla (sin programa de encendido automático)
Todos los ingredientes a temperatura ambiente (70–80°F)
2 tazas de harina multiuso
1 taza harina de sémola
1 cucharadita de sal
1 Mida y agregue los ingredientes en el recipiente para pan.
2 Presione el botón “Comenzar / Detener” hasta que se ponga en blanco la pantalla.
3 Presione el botón “Seleccionar/Menú” para elegir la confi guración de la masa.
4 Presione el botón “Comenzar / Detener” y permita que se mezcle entre 8 y 10 minutos. Luego, vuelva
a presionar el botón “Comenzar / Detener” para cancelar la operación.
5 Saque la masa y enróllela sobre una superfi cie con harina. Enrolle a un grosor de 1/8 pulgadas.
Espolvoree la masa está pegajosa.
6 Córtelo en trozos de 1/8 de una pulgada para los tallarines delgadas y de 1/4 de una pulgada para los
tallarines medianos. Cocine un una olla grande con agua hirviendo y sal por 10 a 15 minutos.
Escúrralos en un colador
1 cucharada de aceite de oliva o vegetal
7/8 taza de agua
Recetas para la con guración Jaleas (Jaleas y Mermeladas) (Menú 11)
Etapas de la máquina
Para el ciclo Jaleas se supone que sucederá lo que se enumera a continuación a medida que el contador
va descendiendo hasta alcanzar cero.
To begin: Los ingredientes se amasan por primera vez (15 minutos)
Cuando esté en 0:50, la masa comienza a hornearse (50 minutos)
Cuando esté en 0:00, la Jalea está lista.
Jalea de Mermelada (sin programa de encendido automático)
1 taza de azúcar
1 cucharada de pectina de fruta en
polvo baja en azúcar
1 Mida y agregue los ingredientes en el recipiente para pan
2 Presione el botón “Comenzar / Detener” hasta que se ponga en blanco la pantalla.
3 Presione el botón “Seleccionar/Menú” para elegir la confi guración de la jalea.
4 Presione el botón “Comenzar / Detener”. La pantalla comenzará a contar en forma regresiva el tiempo en
la confi guración de la jalea. Cuando la jalea esté lista, se escuchará una señal y la pantalla mostrará “0:00.”
5 Utilizando agarraderas, saque el recipiente para pan. Vierte la jalea en contenedores; cubra y refrigere
para que se cuaje. Rinde aproximadamente 3 tazas.
1 1/2 de fresas frescas, en rebanadas
2 cucharaditas de jugo de limón
Mermelada

www.oster.com
74
www.oster.com
75
Mermelada de Naranja (sin programa de encendido automático)
1 1/4 tazas de azúcar
2 cucharadas de pectina de fruta en polvo baja
en azúcar
1 Use un pelador de verduras para rasurar el nivel brilloso de la cáscara de una naranja y de un limón;
picar fi namente.
2 Remueva y tire la capa blanca de la naranja y del limón.
3 Pelee las demás naranjas y tire la cáscara. Rebanee la fruta en piezas de 1/2 pulgada.
4 Combine las cáscaras, la fruta, el azúcar y la pectina en el recipiente para pan.
5 Presione el botón “Comenzar / Detener” hasta que se ponga en blanco la pantalla.
6 Presione el botón “Seleccionar/Menú” para elegir la confi guración de la jalea.
7 Presione el botón “Comenzar / Detener”. La pantalla comenzará a contar de manera regresiva el
tiempo en la confi guración de la jalea. Cuando la jalea esté lista, se escuchará una señal y la pantalla
mostrará “0:00.”
8 Utilizando agarraderas, saque el recipiente para pan. Vierta la jalea en contenedores; cubra y refrigere
para que se cuaje. Rinde aproximadamente 3 tazas.
3 naranjas grandes
1 limón
Jalea de bayas congeladas
Mermelada
Mermelada
(sin programa de encendido automático)
1 3/4 tazas de azúcar
1 paquete (de 10 a 12 onzas) de bayas
congeladas (fresas y zarzamoras son ideales)
1 Mida y agregue los ingredientes en el recipiente para pan.
2 Presione el botón “Comenzar / Detener” hasta que se ponga en blanco la pantalla.
3 Presione el botón “Seleccionar/Menú” para elegir la confi guración jalea.
4 Presione el botón “Comenzar / Detener”. La pantalla comenzará a contar en forma regresiva el tiempo
en la confi guración jalea. Cuando la jalea esté lista, se escuchará una señal y la pantalla mostrará “0:00.”
5 Utilizando agarraderas, saque el recipiente para pan. Vierte la jalea en contenedores; cubra y
refrigere. Rinde aproximadamente 3 tazas.
1 bolsa (3 onzas) de pectina de fruta en líquido
1 cucharada de jugo de limón
Glaseados
Después de que los rollos se leudan, aplique el glaseado deseado con una brocha de pastelería.
Cocine según las instrucciones en la receta.
• Para un pan brilloso y dorado, use un glaseado de huevo o de yema de huevo.
• Para un pan brilloso y consistente, use un glaseado de clara l blanco del huevo
(el color del pan será más claro).
Glaseado de huevo
Mezcle un huevo ligeramente batido con un 1 cda.de agua o leche
Glaseado de yema de huevo
Mezcle un huevo ligeramente batido con un 1 cda.de agua o leche
Glaseado de la clara de huevo
Mezcle un huevo ligeramente batido con un 1 cda.de agua.
Nota: Para mantener la yema del huevo fresca por varios días, cubra con agua fría y guarde en el
refrigerador en un recipiente cubierto.
Mantequilla con ajo
Mezcle: 1/4 taza de margarina o mantequilla, suavizada
1/8 cda. de ajo en polvo
Herb-Cheese Butter
Mezcle: 1/4 de una taza margarina o mantequilla, suavizada
1 cda. de queso Parmesano rayado
1 cda. de perejil fresco picado
1/4 cda. de hojas secas de orégano
Una pizca de sal de ajo
Mantequilla de Yerbas Italianas
Mezcle: 1/4 de una taza margarina o mantequilla, suavizada
1/2 cda. de sazonamiento italiano
Una pizca de sal
Crema choco-plátano
Mezcle: 1/3 taza de plátano maduro aplastado
1/2 taza de chispas de chocolate semi-dulce, derretidas
Crema de jamón y queso suizo
Mezcle: 1 paquete (3 onzas) de queso crema, suavizado
2 cda. de jamón ahumado, picado fi namente, completamente cocido
1 cda. de queso suizo desmenuzado
1/2 cda. de mostaza preparada

www.oster.com
76
www.oster.com
77
Crema de yerbas y queso crema
Mezcle: 1 paquete (4 onzas) de queso crema batido
1 cda. de eneldo fresco o 1/2 cda. eneldo seco
1 pequeño diente de ajo, fi namente picado
Crema de miel-nuez
Mezcle: 1 paquete (3 onzas) de queso crema, suavizado
1 cda. de nueces picadas
2 cda. de miel
Crema de aceituna maduro
Cubra y mezcle en un procesador de comida o en una licuadora hasta que esté ligeramente gruesos:
1 1/2 aceitunas maduras, deshuesadas
3 cda. aceite de oliva
3 cda. alcaparras, sin agua
3 fi letes planos de anchoa, sin agua
1 cda. de sazonamiento italiano
2 dientes de ajo
Glaseado de mantequilla dorada
2 cda. de margarina o mantequilla
2/3 taza de azúcar glas
1/2 cda. de vainilla
3 a 4 cda. de leche
Caliente la margarina en una olla de 1 litro a fuego mediano hasta que se dore ligeramente; enfríe.
Mezcle el azúcar glas y la vainilla. Vierta la leche hasta que tenga una consistencia suave y delgada
como para salpicar.
Glaseado de canela
Mezcle hasta que tenga una consistencia como para salpicar:
1/2 taza de azúcar glas
1/4 cda. de canela molida
1 1/2 cda. de agua
Glaseado cítrico
Mezcle hasta que tenga una consistencia como para salpicar:
1/2 taza de azúcar glas
1 cda. de cáscaras de limón o naranja
1 1/2 a 2 cda. de jugo de limón o naranja
Glaseado cremoso de vainilla
Mezcle hasta que tenga una consistencia para salpicar:
1/2 taza de azúcar glas
1/4 cda. de vainilla
1 1/2 a 2 cda. de leche
Garantía Limitada de 1 Año
Sunbeam Products, Inc. operando bajo el nombre de Jarden Consumer Solutions, o en Canadá, Sunbeam
Corporation (Canada) Limited operando bajo el nombre de Jarden Consumer Solutions, (en forma conjunta,
“JCS”), garantiza que por un período de un año a partir de la fecha de compra, este producto estará libre de
defectos de materiales y mano de obra. JCS, a su elección, reparará o reemplazará este producto o cualquier
componente del mismo que presente defectos durante el período de garantía. El reemplazo se realizará por
un producto o componente nuevo o reparado. Si el producto ya no estuviera disponible, se lo reemplazará
por un producto similar de valor igual o superior. Ésta es su garantía exclusiva. No intente reparar o ajustar
ninguna función eléctrica o mecánica de este producto. Al hacerlo elimínará ésta garantía.
La garantía es válida para el comprador minorista original a partir de la fecha de compra inicial y la misma
no es transferible. Conserve el recibo de compra original. Para solicitar servicio en garantía se requiere
presentar un recibo de compra. Los agentes y centros de servicio de JCS o las tiendas minoristas que venden
productos de JCS no tienen derecho a alterar, modifi car ni cambiar de ningún otro modo los términos y las
condiciones de esta garantía.
Esta garantía no cubre el desgaste normal de las piezas ni los daños que se produzcan como resultado de
uso negligente o mal uso del producto, uso de voltaje incorrecto o corriente inapropiada, uso contrario a
las instrucciones operativas, y desarme, reparación o alteración por parte de un tercero ajeno a JCS o a un
Centro de Servicio autorizado por JCS. Asimismo, la garantía no cubre actos fortuitos tales como incendios,
inundaciones, huracanes y tornados.
¿Cuál es el límite de responsabilidad de JCS?
JCS no será responsable de daños incidentales o emergentes causados por el incumplimiento de alguna
garantía o condición expresa, implícita o legal.
Excepto en la medida en que lo prohíba la ley aplicable, cualquier garantía o condición implícita de
comerciabilidad o aptitud para un fi n determinado se limita, en cuanto a su duración, al plazo de la garantía
antes mencionada.
JCS queda exenta de toda otra garantías, condiciones o manifestaciones, expresa, implícita, legal o de
cualquier otra naturaleza.
JCS no será responsable de ningún tipo de daño que resulte de la compra, uso o mal uso del producto, o por
la imposibilidad de usar el producto, incluidos los daños incidentales, especiales, emergentes o similares, o
la pérdida de ganancias, ni de ningún incumplimiento contractual, sea de una obligación esencial o de otra
naturaleza, ni de ningún reclamo iniciado contra el comprador por un tercero.
Algunas provincias, estados o jurisdicciones no permiten la exclusión o limitación de los daños incidentales
o emergentes ni las limitaciones a la duración de las garantías implícitas, de modo que es posible que la
exclusión o las limitaciones antes mencionadas no se apliquen en su caso.
Esta garantía le otorga derechos legales específi cos y es posible que usted tenga otros derechos que varían
de un estado, provincia o jurisdicción a otro.
Cómo solicitar el servicio en garantía
En los Estados Unidos
Si tiene alguna pregunta sobre esta garantía o desea recibir servicio de garantía, llame al 1-800-334-0759
y podrá obtener la dirección del centro de servicio que le resulte más conveniente
En Canadá
Si tiene alguna pregunta sobre esta garantía o desea recibir servicio de garantía, llame al 1-800-667-8623
y podrá obtener la dirección del centro de servicio que le resulte más conveniente.
En los Estados Unidos, esta garantía es ofrecida por Sunbeam Products, Inc. operando bajo el nombre de
Jarden Consumer Solutions, Boca Ratón, Florida 33431. En Canadá, esta garantía es ofrecida por Sunbeam
Corporation (Canada) Limited operando bajo el nombre de Jarden Consumer Solutions, 20 B Hereford
Street, Brampton, Ontario L6Y 0M1. Si usted tiene otro problema o reclamo en conexión con este producto,
por favor escriba al Departamento de Servicio al Consumidor
POR FAVOR NO DEVUELVA ESTE PRODUCTO A NINGUNA DE ESTAS DIRECCIONES
NI AL LUGAR DE COMPRA.

www.oster.com
78
www.oster.com
79
NOTES
NOTAS
 Loading...