


LEGENDARY PERFORMANCE. DESIGNED TO LAST.
For product questions contact:
Sunbeam Consumer Service
USA : 1.800.334.0759
Canada : 1.800.667.8623
Mexico : 1.800.506.1700
www.oster.com
© 2016 Sunbeam Products, Inc. doing business as Jarden Consumer Solutions.
All rights reserved. Distributed by Sunbeam Products, Inc. doing business as
Jarden Consumer Solutions, Boca Raton, Florida 33431.
Para preguntas sobre los productos llama:
Sunbeam Consumer Service
EE.UU. : 1.800.334.0759
Canadá : 1.800.667.8623
México : 1.800.506.1700
www.oster.com
© 2016 Sunbeam Products, Inc. operando bajo el nombre de Jarden Consumer Solutions.
Todos los derechos reservados. Distribuido por Sunbeam Products, Inc. operando bajo
el nombre de Jarden Consumer Solutions, Boca Raton, Florida 33431.
Pour les questions de produit:
Sunbeam Consumer Service
États-Unis : 1.800.334.0759
Canada : 1.800.667.8623
Mexique : 1.800.506.1700
www.oster.com
© 2016 Sunbeam Products, Inc. faisant affaires sous le nom de Jarden Consumer Solutions.
Tous droits reservés. Distribué Sunbeam Corporation(Canada) Limited faisant affaires sous le nom de
Jarden Consumer Solutions, 20B Hereford Street, Brampton (Ontario) L6Y 0M1.
User Manual
Manual de Instrucciones
Manuel d’Instructions
MODELS/
Push Button Blenders
MODELOS
MODÈLES
Mélangeurs à poussoirs
Classic Series
Serie Clásica
Série Classic
Printed in U.S.A. Impreso en EE.UU Imprimé aux États-Unis
BLSTSG Classic Series_16ESFM1 GCDS-OST47842-JC
BLSTSG Classic Series_16ESFM1.indd 2-3 10/14/16 08:53
*Above images do not reflect the entire Oster® blending assortment.
For more information go to www.oster.com
P.N. 133093-019-000

Welcome
Features oF Your Blender
IMPORTANT SAFEGUARDS
Read all instRuctions befoRe use
this PRoduct is foR household use only
PoWer cord InstructIons
When using electrical appliances, basic safety precautions should be followed,
including the following:
Congratulations on your purchase of an Oster® Classic Series Blender!
To learn more about OSTER® products, please visit us at www.oster.com.
• To protect against risk of electrical shock, do not immerse the cord, plug or motor base in
• Do not let cord hang over edge of table or counter or touch hot surfaces, including the stove.
• Never leave appliance unattended when in use.
• Close supervision is necessary when used by or near children.
• Avoid contact with moving parts. Keep hands and utensils out of jar while blending to prevent
• The blade is sharp. Handle with care.
• To reduce the risk of injury, never place cutter-assembly blades on base without jar properly
• Always put the lid on the jar before operating the blender.
• Do not blend boiling liquids in the blender.
• When blending hot liquids beware of steam. Remove the filler cap from the lid to allow steam
• Do not operate any appliance with a damaged cord or plug or after the appliance malfunctions
• Do not use outdoors or for commercial purposes; this appliance is for household use only.
• Always operate on a flat surface.
• Unplug the blender when not in use, before taking off or putting on parts and before cleaning.
• Use this appliance for its intended use as described in this manual. The use of attachments not
water or any other liquids.
personal injury or damage to the blender. A rubber spatula may be used only when the blender
is not running.
attached.
to escape.
or is dropped or damaged in any manner. Return the appliance to the nearest Authorized
Sunbeam Appliance Service Center for examination, repair or electrical mechanical adjustment.
made by the manufacturer, including canning or ordinary jar and processing assembly parts, is
not recommended by Sunbeam Products, Inc. and may cause injury.
SAVE THESE INSTRUCTIONS
A. Feeder cap for adding ingredients while blending
B. Spill-proof lid
C. Your
6-cup (1.4 L) Dishwasher-Safe Glass Jar
6-cup (1.4 L) Break-Resistant Plastic Jar
5-cup (1.1 L) Dishwasher -Safe Glass Jar
BPA Free Smoothie Cup
D. Sealing ring for tight seal
E. Ice Crusher Blade pulverizes ice for smooth frozen drinks
F. Threaded Jar Nut (Select Models Feature a Threaded Jar Skirt)
G. Powerful motor with DuralastTM ALL-METAL-DRIVE for lasting durability
H. Control panel
I. Pulse for precise blending control (Location varies per model)
J.
B
Oster® Blender may include one of the following:
A
D
E
F
The maximum rating marked on the product is based on the attachment that draws
the greatest load. Other attachments may draw less power.
Please follow the instructions below to ensure the safe use of the power cord.
• This appliance is equipped with a polarized plug. This type of plug has one blade that
is wider than the other. This plug will fit in a polarized outlet only one way. This is
a safety feature intended to help reduce the risk of electrical shock. If you are unable
to insert the plug into the outlet, contact a qualified electrician to replace the obsolete
outlet. Do not attempt to defeat the safety purpose of the polarized plug by modifying
the plug in any way.
• You may use an extension cord, if necessary, but be certain to follow these guidelines:
– The marked electrical rating of the extension cord must be at least as great as the
appliance itself. The electrical ratings are marked directly on the appliance.
–
The extension must be arranged so that it will not drape over the countertop
tabletop, will not be within the reach of children, and will not be tripped over.
– Do not pull, twist or otherwise abuse the power cord.
BLSTSG Classic Series_16ESFM1.indd 2-3 10/14/16 08:53
or
2 3
C
G
H
I
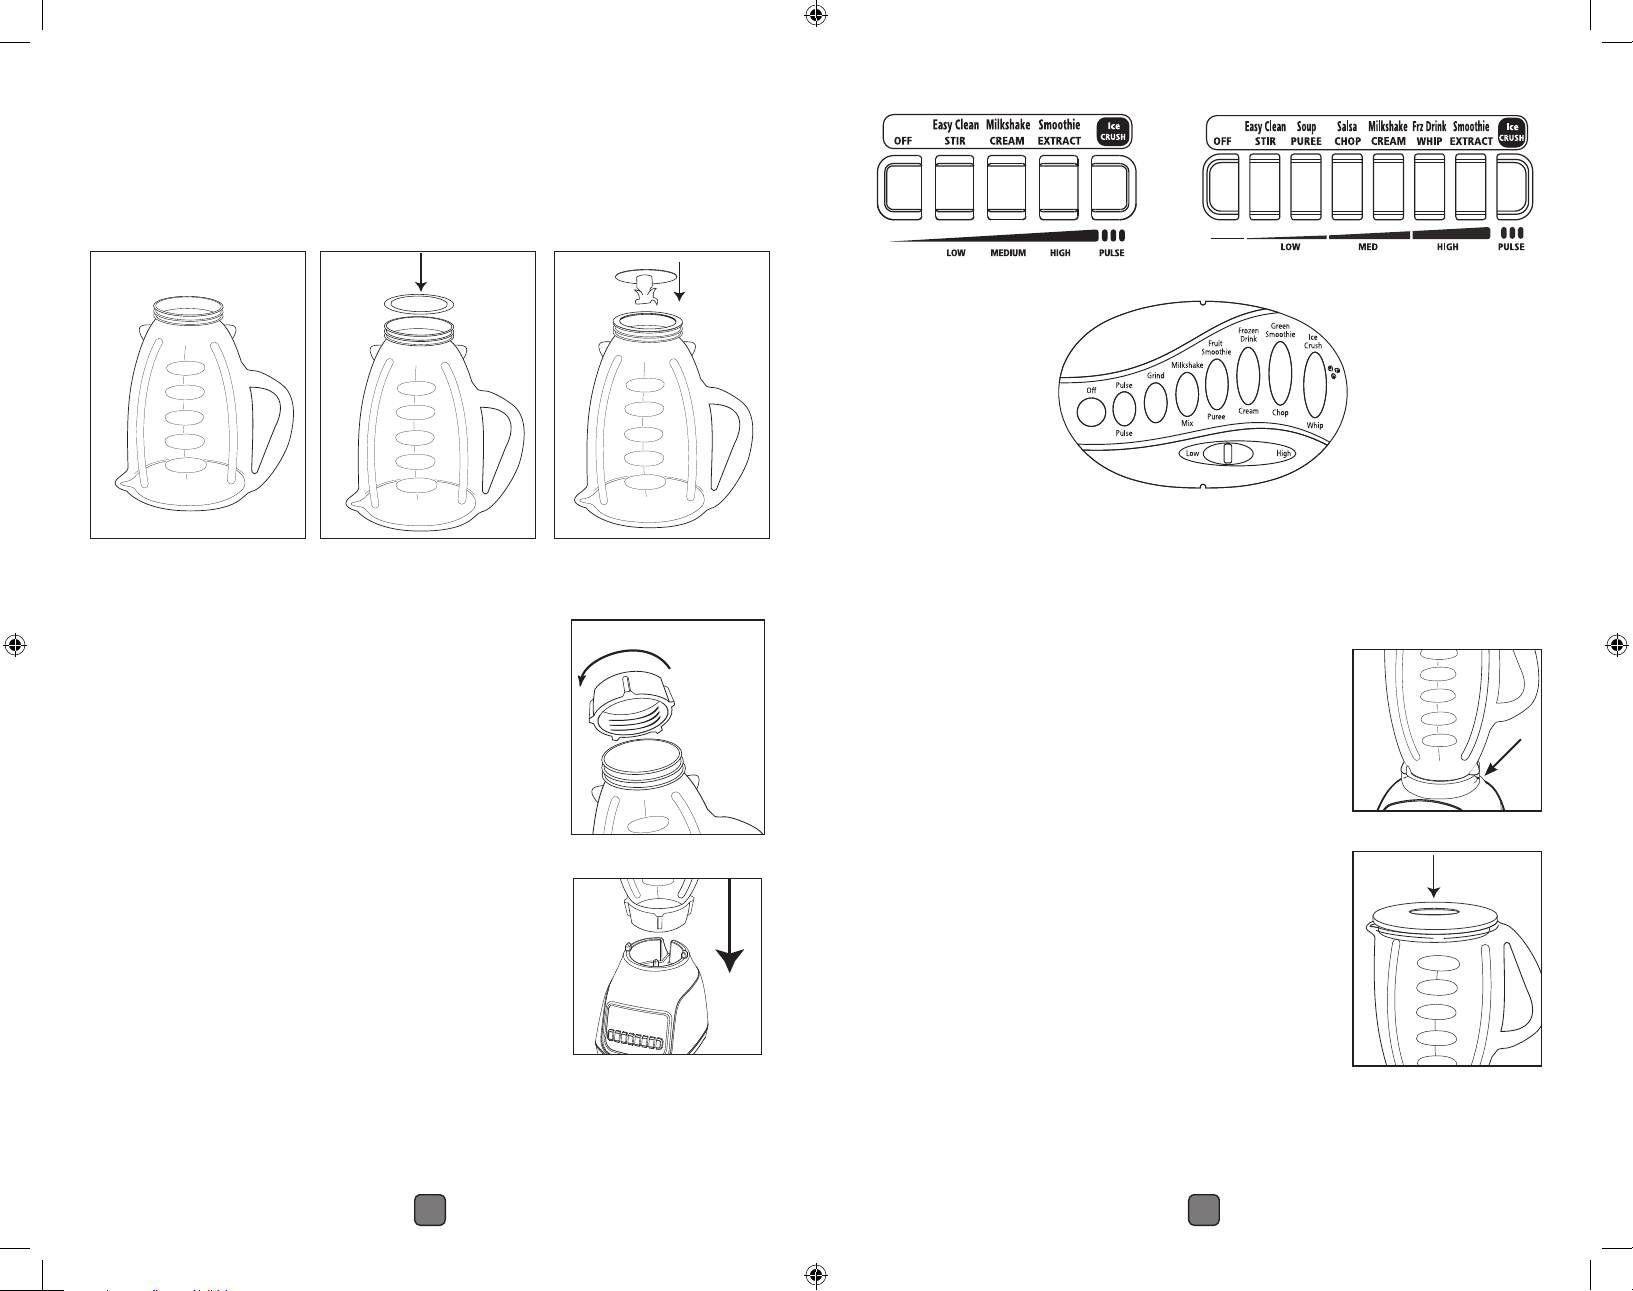
Using Your Blender
1. Clean blender according to the instructions in the “Cleaning and Storing
Your Blender” section.
2. Turn jar upside down so the small opening is at the top. (Figure 1)
3. Place sealing ring over jar opening. (Figure 2)
4. Place blade into jar. (Figure 3)
Figure 1 Figure 2 Figure 3
5. Place threaded jar nut or threaded jar skirt over
blade and jar (Note: If there are slots on top of
collar, line them up with notches on jar.) Place the
threaded jar nut or threaded jar skirt on jar and turn
it clockwise to tighten. (Figure 4)
6. Place jar assembly onto base. (Figure 5)
7.
Line up tabs of jar with tabs on blender base.
Make sure the tab of the jar on the
left
side is in the
back of the tab of the blender base and the tab of
the jar on the right side is in front of the tab of the
blender base. Make sure jar is seated into position.
(Figure 6)
Figure 4
8. Place ingredients into jar.
9. Place lid with feeder cap on jar.
10. Plug the power cord into a 120 Volt AC
electrical outlet.
11. Push desired speed and blend ingredients
to desired consistency. Slide switch to HIGH or LOW.
(If your model does not have a slide switch, push
HIGH or LOW button on select models).
12. Press OFF to stop the blender. (Figure 5a)
Figure 5
13. To use PULSE, select HIGH or LOW (on select models). Push PULSE and
hold down for desired length of time. Release PULSE and allow blade to
stop. Repeat cycle as desired.
(Figure 5a)
Figure 5a
Easy Clean
*Above images do not reflect the entire Oster® blending assortment. For more
information go to www.oster.com
Blending Tips
• Put liquids in the jar first, unless a recipe says otherwise.
• Crushing ice: Crush 6 ice cubes or approximately 2 cups
of ice at a time.
• Do not remove the lid while in use. Remove filler cap to
add smaller ingredients. (Figure 7)
• Cut all firm fruits and vegetables, cooked meats, fish and
seafood into pieces no larger than ¾ inch (1.8 cm) to
1 inch (2.5 cm). Cut all kinds of cheeses into pieces no
larger than 3/4 inch (1.8 cm).
• This blender will not mash potatoes, whip egg whites
or substitute dairy toppings, mix stiff dough or grind
raw meat.
ALWAYS PLACE HAND ON CONTAINER COVER
WHILE OPERATING BLENDER.
Hot Foods
• Open the Filler Cap to vent steam. Tilt Filler Cap away
from you. Keep hands away from the cover opening to
prevent possible burns.
• When working with hot liquids, remove Filler Cap and
start blending at a low speed. Then move to a faster speed. DO NOT add liquid
over the 4 cup (1 liter) level.
Figure 6
Figure 7
54
BLSTSG Classic Series_16ESFM1.indd 4-5 10/14/16 08:53

Processing Foods in Blender*
PRocessed unPRocessed sPecial
food Quantity Quantity instRuctions
Breadcrumbs ½-cup (125 ml) 1 slice, torn in 8 pieces Pulse on low
Celery ¾-cup (200 ml) 1-cup (250 ml) of 1-inch (2.5 cm) pieces Pulse on low
Cheese, Cheddar 1-cup (250 ml) 1-cup (250 ml) of 1-inch (2.5 cm) pieces Pulse on low
Cheese, Swiss 1-cup (250 ml) 1-cup (250 ml) of 1-inch (2.5 cm) pieces Pulse on low
Cheese, Hard
or Semi-Hard 1-cup (250 ml) 1-cup (250 ml) of 1-inch (2.5 cm) pieces Chop continuously
Coffee Beans 1-cup (250 ml) 1-cup (250 ml) Grind 45 seconds or to
Cookies, Wafer ½-cup (125 ml) 10 wafers Pulse on low
Crackers, Graham ½-cup (125 ml) 8 crackers Pulse on low
Peppers ²⁄³-cup (150 ml) 1-cup (250 ml) Pulse on high
Meat, Boneless,
Cooked 1-cup (250 ml) 1-cup (250 ml) of 1-inch (2.5 cm) pieces Chop continuously
Nuts, almonds,
peanuts, pecans, 1-cup (250 ml) 1-cup (250 ml) Pulse on high
walnuts
*Suggested processing and blending guidelines.
desired consistency
Cleaning and Storing Your Blender
CAUTION: UNPLUG BEFORE CLEANING. DO NOT IMMERSE THE
BLENDER BASE IN WATER OR ANY OTHER LIQUID.
Use a damp, soft
sponge with mild detergent to clean the outside of the blender base. All parts except
for the blender base are dishwasher-safe. Place sealing ring in bottom basket of
dishwasher. You can also wash the parts in warm, soapy water. Rinse well and dry.
Easy Clean
Note: Easy Clean is not a substitute for regular cleaning described above.
It is especially important to disassemble and thoroughly clean your blender when
processing milk, dairy products, meats, seafood and eggs.
Pour 3 cups of warm water in the blender jar. Add 1 – 2 drops of liquid dishwashing
detergent. Select Easy Clean or blend on lowest speed. Blend detergent for 10 – 15
seconds. Empty jar of soapy water into sink. Rinse jar thoroughly with clean water.
Storing Your Blender
After cleaning, reassemble blade to jar with sealing ring and jar bottom. Store blender
with cover ajar to prevent container odor.
Recipes
For fun and creative recipes for your new Oster® blender please visit www.oster.com.
Here you will find everything from the perfect Breakfast Smoothie to creamy Soups,
Sauces and a host of Oster signature Frozen Drinks. For the perfect recipe for any
occasion—turn on your creativity with Oster® Blenders!
3 Year Satisfaction Guarantee
Sunbeam Products, Inc. doing business as Jarden Consumer Solutions or if in Canada, Sunbeam Corporation
(Canada) Limited doing business as Jarden Consumer Solutions (collectively “JCS”) warrants that for a
period of three (3) years from the date of purchase, this product will be free from defects in material and
workmanship. JCS, at the Consumer’s sole option, will repair, or replace this product or any component of
the product found to be defective during the guarantee period. This guarantee is valid for the original retail
purchaser from the date of initial retail purchase and is not transferable. Keep the original sales receipt. Proof
of purchase is required to obtain satisfaction guarantee performance. JCS dealers, service centers, or retail
stores selling JCS products do not have the right to alter, modify or any way change the terms and conditions
of this guarantee.
All Metal Drive Ten (10) Year Limited Warranty
JCS also warrants that for a period of ten (10) years from the date of purchase, the All Metal Drive base unit
metal coupling will be free from defects in material and workmanship. JCS, at its option, will repair or replace
the metal drive stud component of the All Metal Drive coupling if found to be defective during the warranty
period. Replacement will be made with a new or remanufactured product or component. If the product is
no longer available, replacement may be made with a similar product of equal or greater value. This is your
exclusive warranty. Do NOT attempt to repair or adjust any electrical or mechanical functions on this product.
Doing so will void this warranty.
This warranty does not cover damage resulting from any of the following: negligent use or misuse of the
product, use on improper voltage or current, use contrary to the operating instructions, disassembly, repair or
alteration by anyone other than JCS or an authorized JCS service center. Further, the warranty does not cover:
Acts of God, such as fire, flood, hurricanes and tornadoes.
This warranty is valid for the original retail purchaser from the date of initial retail purchase and is not
transferable. Keep the original sales receipt. Proof of purchase is required to obtain warranty performance.
JCS dealers, service centers, or retail stores selling JCS products do not have the right to alter, modify or
any way change the terms and conditions of this limited warranty.
What are the limits on JCS’ Liability?
JCS shall not be liable for any incidental or consequential damages caused by the breach of any express,
implied or statutory warranty or condition. Except to the extent prohibited by applicable law, any implied
warranty or condition of merchantability or fitness for a particular purpose is limited in duration to the
duration of the above limited warranty. JCS disclaims all other warranties, conditions or representations,
express, implied, statutory or otherwise. JCS shall not be liable for any damages of any kind resulting from the
purchase, use or misuse of, or inability to use the product including incidental, special, consequential or similar
damages or loss of profits, or for any breach of contract, fundamental or otherwise, or for any claim brought
against purchaser by any other party. Some provinces, states or jurisdictions do not allow the exclusion or
limitation of incidental or consequential damages or limitations on how long an implied warranty lasts, so the
above limitations or exclusion may not apply to you. This limited warranty gives you specific legal rights, and
you may also have other rights that vary from province to province, state to state or jurisdiction to jurisdiction.
How to Obtain Satisfaction Guarantee and/or Limited Warranty Service
In the U.S.A.
If you have any question regarding this guarantee or limited warranty or would like to obtain guarantee or limited
warranty service, please call 1-800-334-0759 and a convenient service center address will be provided to you.
In Canada
If you have any question regarding this guarantee or limited warranty or would like to obtain guarantee or limited
warranty service, please call 1-800-667-8623 and a convenient service center address will be provided to you.
In the U.S.A., this guarantee and limited warranty is offered by Sunbeam Products, Inc. doing business as
Jarden Consumer Solutions located in Boca Raton, Florida 33431. In Canada, this guarantee and limited
warranty is offered by Sunbeam Corporation (Canada) Limited, located at 20 B Hereford Street, Brampton,
Ontario L6Y 0M1. If you have any other problem or claim in connection with this product, please write to the
Consumer Service Department.
PLEASE DO NOT RETURN THIS PRODUCT TO ANY OF
THESE ADDRESSES OR TO THE PLACE OF PURCHASE.
For inquiries regarding recycling and proper disposal of this product,
please contact your local waste management facility.
76
BLSTSG Classic Series_16ESFM1.indd 6-7 10/14/16 08:53

PRECAUCIONES IMPORTANTES
este PRoducto es sólo PaRa uso doméstico
InstruccIones soBre el caBle alImentacIón
Bienvenido
CaraCterístiCas de su LiCuadora
Al usar electrodomésticos, deben seguirse precauciones básicas de seguridad,
incluidas las siguientes:
LEA TODAS LAS INSTRUCCIONES ANTES DE USAR
• Para proteger contra el riesgo de choques eléctricos, no sumerja el cable, el enchufe ni la base con
motor en agua ni en ningún otro líquido.
• No permita que el cable cuelgue del borde de la mesa o del mostrador ni que toque las superficies
calientes, incluyendo la estufa.
• Nunca deje el electrodoméstico sin supervisión cuando lo esté usando.
• Es necesaria una supervisión atenta cuando el electrodoméstico es usado por niños o cerca de ellos.
• Evite el contacto con las piezas en movimiento. Mantenga las manos y utensilios fuera de la jarra
cuando licúe para evitar lesiones personales o causar daño a la licuadora. Puede usar una espátula de
goma sólo cuando la licuadora no esté en funcionamiento.
• La cuchilla es filosa. Manipule con cuidado.
• Para reducir el riesgo de herida, nunca asamblea de hoja de lugar en la base sin frasco conectó
apropiadamente.
• Siempre coloque la tapa en la jarra antes de poner la licuadora en funcionamiento.
• No licúe líquidos hirviendo en la licuadora.
• Cuando licúe líquidos calientes tenga cuidado con el vapor. Quite la tapa de llenado de la tapa para
permitir que salga el vapor.
• No ponga en funcionamiento ningún electrodoméstico que tenga un cable o enchufe dañado o
después de que el electrodoméstico funcione mal o se haya caído o se haya dañado de algún modo.
Devuelva el electrodoméstico al Centro de servicio autorizado de electrodomésticos Sunbeam más
cercano para que sea revisado, reparado o para ajustes electromecánicos.
• No use en exteriores ni con fines comerciales; este electrodoméstico es sólo para uso doméstico.
• Siempre use en una superficie horizontal.
• Desenchufe la licuadora cuando no esté en uso, antes de quitar o colocar piezas y antes de limpiarla.
• Use este electrodoméstico para el fin que está diseñado según se describe en este manual. El uso de
accesorios no fabricados por el fabricante, incluyendo latas o jarras comunes y piezas del ensamble
del procesador no está recomendado por Sunbeam Products, Inc. y puede provocar lesiones.
¡Felicitaciones por su compra de una Licuadora de la Serie Clásica Oster®! Para
averiguar más sobre los productos
www.oster.com.
A. Copa de acceso para agregar ingredientes mientras licua
B. La tapa a prueba de derrames
C. Su Licuadora
Vaso de vidrio con capcidad para 8 tazas
Vaso de Vidrio de 5 tazas (1,1 L) Lavable en Lavadora de Platos
Vaso para batidos libre de BPA
D. Anillo sellador para un cierre hermético
E. Cuchilla Trituradora de Hielo pulveriza el hielo para las bebidas congeladas suaves
F. Disco de Fondo Roscado (solamente algunos modelos incluyen el Ars)
G. Motor poderoso con el sistema Durlast
H. Panel de control
I. Pulso para un exacto control de licuado (Localización depende del modelo)
J.
OSTER®, por favor visítenos en
OSTER® puede incluir uno de los siguientes:
Vaso de Vidrio de 6 tazas (1,4 L) Lavable en Lavadora de Platos
TM
ALL-METAL-DRIVE para una mayor durabilidad
A
D
E
GUARDE ESTAS INSTRUCCIONES
La potencia máxima marcada en el producto se basa en el accesorio que soporta la carga más grande.
Otros accesorios pueden requerir menos potencia.
Siga las instrucciones que aparecen a continuación para asegurar el uso seguro del cable de corriente.
• Este electrodoméstico está equipado con un enchufe polarizado. Este tipo de enchufe
tiene una clavija que es más ancha que la otra. Este enchufe encajará en un tomacorriente
polarizado en un solo sentido. Esta es una característica de seguridad con el fin de
ayudar a reducir el riesgo de choques eléctricos. Si no puede introducir el enchufe en
el tomacorriente, póngase en contacto con un electricista calificado para que cambie el
tomacorriente obsoleto. No intente modificar el enchufe de ningún modo para eliminar el
propósito de seguridad del enchufe polarizado.
• Puede usar un cable de extensión, si fuera necesario, pero asegúrese de seguir estas pautas:
– La clasificación eléctrica marcada del cable de extensión debe ser por lo menos la
misma que la del electrodoméstico. Las clasificaciones eléctricas están marcadas
directamente en el electrodoméstico.
– La extensión debe colocarse de modo que no quede colgando del mostrador o la mesa,
que no esté al alcance de los niños, y en donde no pueda tropezarse con ella.
– No tire, gire ni maltrate de ningún otro modo el cable de corriente.
B
F
C
G
H
I
98
BLSTSG Classic Series_16ESFM1.indd 8-9 10/14/16 08:53

Uso de Su Licuadora
1. Limpie la licuadora según las instrucciones en la sección “Limpieza y
Almacenaje de su Licuadora”.
2. Gire el vaso al revés de modo que la abertura pequeña esté en la parte alta.
(Figura 1)
3. Ponga el anillo sellador sobre la abertura del vaso. (Figura 2)
4. Coloque la cuchilla en el vaso. (Figura 3)
Figura 1 Figura 2 Figura 3
5. Junte hasta traber el disco de fondo roscado con el aro.
Coloque el aro sobre la cuchilla y el vaso. (Nota: Si hay
ranuras en la parte superior del aro, alinéelas con las
muescas del vaso.) Coloque el aro sobre el vaso y gire el
disco con fondo roscado en sentido horario para apretar.
(Figura 4)
6. Ponga el conjunto del vaso sobre la base. (Figura 5)
7. Alinee las lengüetas del vaso con las lengüetas de la base
de la licuadora. Asegúrese de que la lengüeta del vaso en
el lado izquierdo esté en el dorso de la lengüeta de la base
de la licuadora y la lengüeta del vaso en el lado derecho
esté adelante de la lengüeta de la base de la licuadora.
Asegúrese que el vaso se asiente en posición. (Figura 6)
8. Coloque los ingredientes en el vaso.
9. Coloque la tapa con la copa de acceso en el vaso.
10. Enchufe el cordón de alimentación en un tomacorriente
de 120 volts CA.
11. Presione la velocidad deseada y licúe los ingredientes hasta
alcanzar la consistencia deseada. Deslice el interruptor
a la posición ALTA o BAJA. (Si su modelo no tiene un
interruptor deslizante, presione los botones de velocidad
ALTA o BAJA en modelos selectos).
12. Presione APAGAR para parar la licuadora. (Figura 5a)
13. Para usar la función de pulso (PULSE), seleccione la posición ALTA o BAJA (en
modelos selectos). Presione PULSO y reténgalo abajo por la longitud deseada de
tiempo. Libere PULSO y permita que la cuchilla se detenga. Repita el ciclo según lo
deseado. (Figura 5a)
Figura 4
Figura 5
Figura 5a
*Las imagenes anteriores no reflejan la selección completa de licuado de Oster®.
Para más información, visite www.oster.com
Easy Clean
Sugerencias para Licuar
• Ponga los líquidos en el vaso primero, a menos que la
receta diga otra cosa.
• Para picar hielo: Machaque 6 cubos de hielo
o aproximadamente 2 tazas de hielo a la vez.
• No quite la tapa mientras esté en uso. Quite la copa de
acceso para agregar los ingredientes más pequeños. (Figura 7)
• Corte todas las frutas y vegetales firmes, las carnes cocinadas,
los pescados y los mariscos en piezas no más grandes que
¾ pulgada (1,8 centímetros) a 1 pulgada (2,5 centímetros).
Corte toda clase de quesos en piezas no más grandes que 3/4
pulgada (1,8 centímetros).
• Esta licuadora no tritura patatas, no bate claras de huevo
ni cremas de substitutos de la leche, no mezcla la masa
tiesa ni muele carne cruda.
SIEMPRE PONGA LA MANO SOBRE LA TAPA DEL
RECIPIENTE AL OPERAR LA LICUADORA.
Alimentos Calientes
• Abra la tapa de llenado para dejar salir el vapor.
Incline la tapa de llenado en dirección opuesta a usted.
Mantenga las manos alejadas de la abertura de la tapa
para evitar posibles quemaduras.
• Cuando trabaje con líquidos calientes, quite la tapa de
llenado y comience a licuar a baja velocidad. Luego
pase a una velocidad mayor. NO agregue líquidos por encima del nivel de 4
tazas (1 litro).
Figura 6
Figura 7
1110
BLSTSG Classic Series_16ESFM1.indd 10-11 10/14/16 08:53

cómo PRocesaR alimentos en la licuadoRa*
cantidad instRucciones
alimentos PRocesada cantidad no PRocesada esPeciales
nota:
Pan Rallado ½ taza (125 ml)
Apio ¾ taza (200 ml) 1 taza (250 ml) de trozos de 1 pulg. (2,5 cm) Pulso de los bajos
Queso, Amarillo 1 taza (250 ml) 1 taza (250 ml) de trozos de 1 pulg. (2,5 cm) Pulso de los bajos
Queso, Suizo 1 taza (250 ml) 1 taza (250 ml) de trozos de 1 pulg. (2,5 cm) Pulso de los bajos
Queso,
Duro o Semiduro 1 taza (250 ml) 1 taza (250 ml) de trozos de 1 pulg. (2,5 cm) Picar continuamente
Granos de Café 1 taza (250 ml) 1 taza (250 ml)
Bizcochitos, Oblea ½ taza (125 ml) 10 obleas Pulso de los bajos
Galletitas, Graham ½ taza (125 ml) 8 galletitas Pulso de los bajos
Pimienta ²⁄³ taza (150 ml) 1 taza (250 ml) Pulso en alto
Carne, Sin Hueso,
Cocida 1 taza (250 ml) 1 taza (250 ml) de trozos de 1 pulg. (2,5 cm) Picar continuamente
Nueces, almendras,
maní, nueces lisas 1 taza (250 ml) 1 taza (250 ml) Pulso en alto
nueces de nogal
*Sugerencias para el procesamiento y mezcla.
Limpieza y Guardado de Su Licuadora
ADVERTENCIA: DESENCHUFE ANTES DE LIMPIAR LA BASE
y NO
SUMERJA LA BASE DE LA LICUADORA EN AGUA NI EN
NINGÚN
OTRO LÍQUIDO. Utilice una esponja suave húmeda con detergente
suave para limpiar el exterior de la base de la licuadora. Todas las piezas a
excepción de la base de la licuadora son lavable a máquina. Ponga el anillo de sello
en el fondo de la canasta del lavaplatos. Usted puede también lavar las piezas en
agua tibia, jabonosa. Enjuague bien y seque.
Función para una fácil limpieza
Es especialmente importante desmontar y limpiar a fondo su licuadora al procesar
la leche, los productos lácteos, las carnes, los mariscos y los huevos.
Vierta 3 tazas de agua tibia en el vaso de la licuadora. Agregue 1 – 2 gotas de detergente
líquido para lavar platos. Seleccione Limpieza Fácil o licue en la velocidad más baja.
Licue el detergente por 10 – 15 segundos. Vacíe el vaso de agua jabonosa en el fregadero.
Enjuague el vaso a conciencia con agua limpia.
La Limpieza Fácil no es un substituto para la limpieza regular descrita arriba.
Almacenar Su Licuadora
Después de limpiar, vuelva a montar la cuchilla en el vaso con el anillo de sellar y el collar
del vaso. Almacene la licuadora con la cubierta entornada para evitar olor del envase.
Para divertidas y creativas recetas para su nueva licuadora Oster
Aquí encontrará todo desde el licuado perfecto para el desayuno hasta cremosas sopas,
salsas y una gran cantidad de bebidas congeladas de Oster. ¡Para la receta perfecta para
toda ocasión—encienda su creatividad con Oster
1 rodaja, cortada en 8 partes
Pulso de los bajos
Recetas
®
!
Moler los granes de café
hasta la consistencia deseada
®
visite www.oster.com.
Garantía de Satisfacción de 3 Años
Sunbeam Products, Inc. haciendo negocios como Jarden Consumer Solutions, o en Canadá, Sunbeam Corporation
(Canada) Limited haciendo negocios como Jarden Consumer Solutions (colectivamente “JCS”) garantiza por
un período de tres (3) años desde la fecha de compra, que este producto estará libre de defectos de material y
manufactura. JCS, a la discreción del consumidor, reparará, o reemplazará este producto o cualquiera de sus
componentes que se encuentren defectuosos durante el período de la garantía. Esta garantía es válida para el
comprador original desde la fecha de compra inicial, y no es transferible. Guarde el recibo original de venta. La
prueba de compra es requerida para obtener la garantía de satisfacción. Los establecimientos autorizados de JCS,
Centro de servicios o tiendas de venta al por menor que vendan los productos de JCS no tienen el derecho de alterar,
modificar o cambiar de cualquier manera los términos y condiciones de esta garantía.
Garantía Limitada de Diez (10) Años de la Tracción de Metal
JCS también garantiza que por un período de diez (10) años desde la fecha de compra, la tracción de metal de la
base de la unidad y el acoplamiento de metal estarán libres de defecto en cuanto su material y manufactura. JCS,
a su propia discreción, reparará o reemplazará el componente corchete de la tracción de metal que se encuentra
en el acoplamiento de tracción de metal, si se encuentra que está defectuoso, durante el período de la garantía.
El reemplazo será con un producto o componente nuevo o re-manufacturado. Si el producto ya no se encuentra
disponible, el reemplazo se hará con un producto similar de igual o mayor valor. Esta es su garantía exclusiva. No
intente reparar, ajustar cualquier función eléctrica o mecánica en este producto. De hacerlo se anulará esta garantía.
Esta garantía no cubre el daño que resulte de cualquiera de los siguientes: uso negligente o mal uso del producto, uso
en el voltaje o corriente no adecuados, uso contrario a lo que se indica en las instrucciones de operación, desmontaje,
reparación o alteración por cualquier otro que no sea un establecimiento autorizado de JCS o un centro de servicio
de JCS. Más aún, la garantía no cubre: fenómenos naturales tales como fuego, inundaciones, huracanes o tornados.
Esta garantía es válida para el comprador original desde la fecha de la compra inicial y no es transferible. Guarde el
recibo original. La prueba de la compra se requiere para obtener la garantía.
Los establecimientos autorizados de JCS, centros de servicio, o tiendas de venta al por menor de productos JCS no tienen
el derecho de alterar, modificar o cambiar de ninguna manera los términos y condiciones de esta garantía limitada.
¿Cuáles son los Límites de Responsabilidad de JCS?
JCS no será responsable por cualquier daño adicional o resultante causado por el rompimiento de cualquier garantía
o condición estatutarias expresa o implícita. Con excepción de lo que fuese prohibido por la ley, cualquier garantía
o condición de comercio implícita o diseñada para un propósito particular es limitada de acuerdo a la duración de
la garantía limitada aquí arriba. JCS niega cualquier otra garantía, condición o representación, expresa implícita
estatutaria o cualquiera que fuese. JCS no se encontrará responsable por ningún daño de ninguna manera que resulte
de la compra, uso o mal uso, o inhabilidad de usar el producto incluyendo daños adicionales, especiales, resultantes
o daños similares, o pérdida de utilidades, o por cualquier rompimiento de contrato, fundamental o de otra forma,
o por ningún reclamo en contra del comprador por un tercero. Algunas provincias, estados o jurisdicciones no
permiten la exclusión o limitación de daños adicionales o resultantes o limitaciones en cuanto al tiempo de duración
de la garantía limitada, de modo que las limitaciones aquí arriba o exclusiones, puede que no sean aplicables a usted.
Esta garantía limitada le da derechos específicos legales, y también puede tener otros derechos los cuales varían de
provincia a provincia, estado a estado, o jurisdicción a jurisdicción.
Cómo Obtener Servicio de Satisfacción Garantizada y/o Garantía Limitada
En los Estados Unidos.
Si tiene cualquier pregunta acerca de esta garantía o garantía limitada o si desease obtener garantía limitada o servicio de
garantía, Por favor llame al 1-800-334-0759 y se le proporcionará la dirección de un centro de servicio.
En Canadá
Si tiene cualquier pregunta acerca de esta garantía o garantía limitada o quisiera obtener garantía o servicio limitado,
por favor llame al 1-800-667-8623 y se le proporcionará la dirección de un centro de servicio.
En los Estados Unidos, esta garantía y garantía limitada es ofrecida por by Sunbeam Products, Inc también haciendo
negocio como Jarden Consumer Solutions ubicada en Boca Raton, Florida 33431. En Canadá, esta garantía
y garantía limitada es ofrecida por Sunbeam Corporation (Canada) Limited, ubicada en20 B Hereford Street,
Brampton, Ontario L6Y 0M1. Si tiene cualquier otro problema o reclamo en conexión con este producto, por favor
escribanos al departamento de servicio al consumidor.
POR FAVOR NO DEVUELVA ESTE PRODUCTO A NINGUNA DE ESTAS
DIRECCIONES O AL LUGAR DE COMPRA.
Para preguntas acerca del reciclaje y el desecho apropiado de este producto,
por favor contacte a su oficina local de la administración de desperdicios.
1312
BLSTSG Classic Series_16ESFM1.indd 12-13 10/14/16 08:53

CONSIGNES IMPORTANTES
est uniQuement destiné à l’usaGe domestiQue
Instru c t I o n s relatIves au c o r d o n
Bienvenue
CaraCtéristiques de votre méLangeur
L’utilisation de tout appareil électroménager exige l’observation de certaines précautions
fondamentales, y compris des suivantes :
LISEZ LES INSTRUCTIONS AVANT L’EMPLOI
• Pour éviter les chocs électriques, n’immergez le cordon, la fiche ou le socle-moteur ni dans l’eau
ni dans un autre liquide, quel qu’il soit.
• Ne laissez pas le cordon pendre sur le bord d’une table ou d’un comptoir, ni en contact avec
des surfaces chaudes, y compris un poêle.
• Ne laissez pas l’appareil sans surveillance quand il fonctionne.
• Soyez très vigilant lorsque le mélangeur est employé par des enfants ou à proximité d’eux.
• Évitez tout contact avec les pièces en mouvement. Gardez mains et tous ustensiles hors du
récipient lors du fonctionnement, pour éviter blessures corporelles ou endommagement de
l’appareil. N’utilisez une spatule de caoutchouc que lorsque le moteur est au repos.
• Le couteau est acéré, ne le manipulez que très prudemment.
• Pour réduire le risque de blessure, jamais l’assemblée de lame de lieu sur la base sans le pot a
attaché convenablement.
• Placez toujours le couvercle sur le récipient avant la mise en marche.
• Ne traitez pas de liquides bouillants dans le mélangeur.
• Méfiez-vous de la vapeur lorsque vous mélangez des liquides chauds. Retirez le bouchonmesure du couvercle afin que la vapeur puisse s’échapper.
• N’utilisez pas l’appareil si son cordon ou sa fiche est abîmé, s’il a mal fonctionné, a été échappé
ou endommagé de quelque façon. Retournez-le au centre de service agréé de Sunbeam le plus
proche pour le faire examiner et lui faire subir les réglages électriques ou mécaniques requis.
• N’employez cet appareil conçu pour l’usage domestique ni dehors ni à des fins commerciales.
• Faites toujours fonctionner le mélangeur sur une surface plane et d’aplomb.
• Débranchez-le lorsqu’il ne sert pas, pour monter ou démonter toute pièce et pour le nettoyer.
• N’utilisez l’appareil qu’aux fins décrites dans la notice d’emploi. Sunbeam Products, Inc.
déconseille l’emploi d’accessoires non manufacturés par le fabricant – bocaux de conserve ou
ordinaires et pièces mobiles, par exemple – car ils pourraient provoquer des blessures.
GaRdeZ ces instRuctions
Félicitations pour votre achat d’un mélangeur de série Classic d’OsterMD!
en savoir plus sur les produits OSTERMD, veuillez visiter notre site Internet à
www.oster.com
A. Goulotte pour ajouter des ingrédients lors du fonctionnement du mélangeur
B. Couvercle étanche
C. Votre mélangeur
Récipient en verre lavable au lave-vaisselle de 1,4 l (6 tasses)
Récipient incassable de 1,4 l (6 tasses)
Récipient en verre lavable au lave-vaisselle de 1,1 l (5 tasses)
Tasse pour frappés aux sans BPA
D. Joint d’étanchéité pour une fermeture étanche
E. La lame de broyage de la glace pulvérise la glace pour la préparation de
boissons glacées moelleuses
F. Fond du récipient ó Bague pour assuier (sur certains modèles sealement)
G. Moteur puissant avec le système DurlastMC ALL-METAL-DRIVE pour une
longévité supplémentaire
H. Panneau de commandel
I. Pulse pour un contrôle précis du mélange (L’emplacement pent varier
sclon le modéle)
J.
A
B
.
OSTERMD inclut l’un des articles suivants :
Pour
D
E
F
La puissance nominale maximale indiquée sur le produit est basée sur l’accessoire qui
utilise le plus d’énergie. Certains des accessoires peuvent en consommer moins.
Veuillez observer les instructions suivantes pour assurer une utilisation sans risques.
• Cet appareil est équipé d’une fiche polarisée – une branche est plus large que l’autre. La
fiche n’enfonce dans les prises de courant polarisées que dans un sens. Cette mesure de
sécurité a pour but de réduire les risques de choc électrique. Si vous ne pouvez pas enfoncer
la fiche dans la prise de courant, demandez à un électricien qualifié de remplacer la prise
désuète. N’essayez en aucun cas de neutraliser la mesure de sécurité de la fiche polarisée en la
modifiant de quelque façon que ce soit.
• Vous pouvez utiliser un cordon prolongateur à condition de respecter ces conseils:
–
Le calibre électrique de la rallonge doit être au moins aussi élevé que celui de l’appareil. Les
calibres électriques sont indiqués sur l’appareil.
– Le cordon ne doit pas pendre du plateau de table ou autre, afin que les enfants ne puissent
pas le tirer et qu’il ne risque pas de faire accidentellement trébucher.
– Ne le tirez pas d’un coup sec, ne l’entortillez pas et ne l’utilisez pas abusivement.
BLSTSG Classic Series_16ESFM1.indd 14-15 10/14/16 08:53
C
1514
G
H
I

Utilisation de votre mélangeur
1. Nettoyez le mélangeur selon les instructions de la section « Nettoyage et
rangement de votre mélangeur ».
2. Renversez le récipient afin que sa petite ouverture soit en haut. (Figure 1)
3. Placez le joint d’étanchéité sur l’ouverture du récipient. (Figure 2)
4. Placez la lame dans le récipient. (Figure 3)
Figure 1 Figure 2 Figure 3
5. Enclencher la bague dans l’anneau de fixation. Mettre
la bague par-dessus de la bague, les aligner avec les
crans du récipient. (Remarque :S’il y a des rainures
sur le dessus de la bague, aligner-les avec les crans du
le récipient.) Mettre la bague sur le récipient et visser
l’anneau de fixation dans le sens des aiguilles d’une
montre pour bien la fixer. (Figure 4)
6. Placez le récipient sur l’embase. (Figure 5)
7. Alignez les languettes du récipient avec celles de
l’embase du mélangeur. Assurez-vous que la languette
gauche du récipient est derrière celle de l’embase du
mélangeur et que la languette droite du récipient est
devant celle de l’embase du mélangeur. Assurez-vous
que le récipient repose en position. (Figure 6)
8. Placez des ingrédients dans le récipient.
9. Placez le couvercle avec la goulotte sur le récipient.
10. Branchez le cordon d’alimentation électrique à une
prise électrique de 120 V CA.
11. Appuyez sur la vitesse désirée et mélangez jusqu’à la
consistance voulue. Réglez le commutateur à HIGH
(élevée) ou LOW (basse). (Si votre modèle ne comporte pas
de commutateur à glissière, appuyez sur le bouton HIGH
ou LOW de certains modèles.)
12. Appuyez sur ARRÊT pour arrêter le mélangeur. (Figure 5a)
13. Pour utiliser la fonction PULSE (impulsion), sélectionnez HIGH ou LOW (sur
certains modèles). Appuyez sur le bouton PULSE et maintenez-le enfoncé pendant
la durée souhaitée. Relâchez PULSE laissez la lame s’arrêter. Répétez ce cycle au
besoin. (Figure 5a)
Figure 4
Figure 5
Figure 5a
*Les illustrations ci-dessus n’affichent pas toutes les options de la gamme de
mélangeurs d’OsterMD. Pour obtenir plus de renseignements,
allez à www.oster.com.
Easy Clean
Conseils de mélange
• Mettez d’abord les liquides dans le récipient, sauf si la
recette indique le contraire.
• Broyage de la glace : Broyez 6 glaçons ou environ
2 tasses de glace à la fois.
• Ne retirez pas le couvercle en cours d’utilisation. Retirez
la goulotte pour ajouter de petits ingrédients. (Figure 7)
• Coupez tous les fruits et les légumes fermes, les viandes,
les poissons, les crustacés cuits en morceaux de 1,8 cm
(¾ pouce) à 2,5 cm (1 pouce) au maximum. Coupez
les fromages en morceaux de 1,8 cm (3/4 pouce) au
maximum.
• Ce mélangeur ne hache pas les pommes de terre, ne bat
pas les œufs en neige ou les garnitures de produits de
substitution au lait, ne bat pas la pâte épaisse ou ne
broie pas la viande crue.
TOUJOURS METTRE EN MAIN DE FONCTIONNER
CONTAINER COVER BLENDER.
Aliments Chauds
• Retirez le bouchon-mesure pour laisser échapper la
vapeur loin de vous. Écartez vos mains de l’ouverture
afin de limiter les risques de brûlures.
• Quand vous traitez des aliments chauds, retirez le
bouchon-mesure puis débutez le mélange à vitesse basse avant d’augmenter
l’allure. NE dépassez PAS le niveau 4 tasses (1 litre) indiqué sur le récipient.
Figure 6
Figure 7
1716
BLSTSG Classic Series_16ESFM1.indd 16-17 10/14/16 08:53

RemaRQue :
PRéPaRation d’aliment dans le mélanGeuR
aliments Quantité
PaRticulièRes bRoyée Quantité non bRoyée consiGnes
Chapelure ½ tasse (125 ml) 1 tranche, cassée en 8 morceaux Appuyer sur « Pulse » Bas
Céleri ¾ tasse (200 ml) 1 tasse (250 ml) de morceaux de 1 pouce (2,5 cm) Appuyer sur « Pulse » Bas
Fromage, cheddar 1 tasse (250 ml) 1 tasse (250 ml) de morceaux de 1 pouce (2,5 cm) Appuyer sur « Pulse » Bas
Fromage, suisse 1 tasse (250 ml) 1 tasse (250 ml) de morceaux de 1 pouce (2,5 cm) Appuyer sur « Pulse » Bas
Fromage,
dur ou mi-dur 1 tasse (250 ml) 1 tasse (250 ml) de morceaux de 1 pouce (2,5 cm) Hacher continuellement
Grains de café 1 tasse (250 ml) 1 tasse (250 ml) Moudre 45 s de la consistance désirée
Biscuits, gaufrettes ½ tasse (125 ml) 10 gaufrettes Appuyer sur « Pulse » Bas
Biscuits graham ½ tasse (125 ml) 8 biscuits Appuyer sur « Pulse » Bas
Piments ²⁄³ tasse (175 ml) 1 tasse (250 ml) Appuyer sur « Pulse » Rapid
Viande, désossée, cuite 1 tasse (250 ml) 1 tasse (250 ml) de morceaux de 1 pouce (2,5 cm) Hacher continuellement
Noix, amandes, 1 tasse (250 ml) 1 tasse (250 ml) Appuyer sur « Pulse » Rapid
arachides, pacanes
*Suggestions pour le traitement et le mélange.
Nettoyage et rangement de votre mélangeur
ATTENTION: DÉBRANCHEZ AVANT TOUT NETTOYAGE DE
L’EMBASE et N’IMMERGEZ PAS L’EMBASE DU MÉLANGEUR DANS
L’EAU OU
détergent doux pour
à l’exception de l’embase
d’étanchéité dans le panier
à l’eau chaude savonneuse.
particulièrement important de démonter et de nettoyer complètement votre mélangeur
lors du traitement du lait, de produits laitiers, de viandes, de poisson et d’œufs.
Verser 3 tasses d’eau chaude dans le récipient du mélangeur. Ajouter 1 ou 2 gouttes de
détergent liquide pour lave-vaisselle. Sélectionnez Easy Clean ou mélangez à la vitesse
la plus lente. Mélangez le détergent pendant 10 à 15 secondes. Videz l’eau savonneuse
du récipient dans l’évier. Rincez complètement le récipient à l’eau claire.
Après le nettoyage, remontez la lame sur le récipient avec le joint d’étanchéité et le
fond du récipient. Rangez le mélangeur avec le récipient fermé pour éviter la formation
la contamination par les odeurs de l’espace de rangement.
Pour le plaisir pur et simple ainsi que pour découvrir de nouvelles recettes créées pour
votre nouveau mélangeur Oster®, veuillez visiter au www.oster.com. Vous y trouverez une
profusion de délices, depuis le smoothie par excellence pour le déjeuner jusqu’aux potages
crémeux délectables, en passant par les sauces onctueuses, ainsi qu’une variété de boissons
frappées propres à Oster. Quelle que soit l’occasion, donnez libre cours à votre créativité
et imagination avec Oster
TOUT AUTRE LIQUIDE. Utilisez une éponge humide et douce avec un
nettoyer l’extérieur de l’embase du mélangeur. Tous les éléments,
du mélangeur, sont lavables au lave-vaisselle. Placez le joint
inférieur du lave-vaisselle. Les éléments peuvent aussi être lavés
Bien rincez et séchez.
Caractéristique Easy Clean
Easy Clean ne remplace pas le lavage régulier décrit ci-dessus. Il est
Rangement de votre mélangeur
Recettes
®
mékabgeur
!
Garantie de satisfaction de 3 ans
Sunbeam Products, Inc. faisant affaire sous le nom de Jarden Consumer Solutions, ou au Canada, Sunbeam
Corporation (Canada) Limited, faisant affaire sous le nom de Jarden Consumer Solutions (collectivement «
JCS ») garantit que pendant une période de trois (3) ans à compter de la date d’achat ce produit sera exempt
de vices de matériaux et de fabrication. À la seule discrétion du consommateur, JCS réparera ou remplacera cet
article ou toute pièce de celui-ci dont la défectuosité a été constatée au cours de la période de garantie. Cette
garantie n’est valable que pour l’acheteur au détail initial, à compter de la date d’achat au détail initial et elle
n’est pas transférable. Veuillez conserver votre preuve d’achat originale, elle est exigée pour tout service que
couvre la garantie. Les concessionnaires JCS, les centres de services ou les détaillants qui vendent des produits
JCS n’ont pas le droit d’altérer, de modifier ou de changer d’une manière quelconque les modalités de la
présente garantie.
Garantie limitée de dix (10) ans de l’entraînement tout métal
JCS garantit, en outre, que pendant une période de dix (10) ans à compter de la date d’achat, le raccord
d’accouplement de l’entraînement tout métal sera exempt de vices de matériaux et de fabrication. JCS se réserve
le droit de choisir entre réparer ou remplacer l’ergot de l’arbre d’entraînement en métal de l’accouplement de
commande tout métal, si sa défectuosité est constatée au cours de la période de garantie. Le remplacement
se fera au moyen d’un produit neuf ou réusiné ou bien d’une pièce neuve ou réusinée. Si l’article n’est plus
disponible, il sera remplacé par un article semblable, de valeur égale ou supérieure. La présente constitue
votre garantie exclusive. N’essayez PAS de réparer ou d’ajuster toute fonction électrique ou mécanique du
produit, sous peine d’annulation de la garantie. Cette garantie ne couvre pas l’endommagement attribuable
à la négligence ou à l’utilisation abusive de l’article, au branchement sur un courant ou une tension autre
que ceux spécifiés, au non-respect du mode d’emploi, au démontage, à la réparation ou à la modification par
quiconque autre que JCS ou un Centre de services agréé JCS. De plus, la garantie ne couvre pas les cas de
force majeure, comme les incendies, les inondations, les ouragans et les tornades. Cette garantie n’est valable
que pour l’acheteur au détail initial, à compter de la date d’achat au détail initial et elle n’est pas transférable.
Veuillez conserver votre preuve d’achat originale, elle est exigée pour tout service que couvre la garantie. Les
concessionnaires JCS, les centres de services ou les détaillants qui vendent des produits JCS n’ont pas le droit
d’altérer, de modifier ou de changer d’une manière quelconque les modalités de cette garantie limitée.
Quelles sont les limites de responsabilité de JCS ?
JCS décline toute responsabilité en cas de dommages accessoires ou indirects résultant du non-respect de toute
garantie ou condition explicite ou implicite. Sauf dans la mesure interdite par la législation pertinente, toute
garantie ou condition implicite de qualité commerciale ou d’application à un usage particulier est limitée à
la durée de la garantie limitée ci-dessus. JCS rejette toutes autres garanties, conditions ou représentations
expresses, tacites, légales, ou autres. JCS ne sera pas responsable des dégâts, quels qu’ils soient, résultant de
l’achat, de l’utilisation abusive ou non du produit ou de l’inaptitude à l’utiliser, y compris les dégâts directs,
spéciaux, indirects ou identiques, ni des pertes de revenus, ni de toute rupture de contrat, fondamentale
ou autre, ni de toute plainte déposée contre l’acheteur par un tiers. Certaines provinces ou juridictions et
certains États interdisent d’exclure ou de limiter les dommages accessoires ou indirects, ou ne permettent pas
la limitation de la durée d’application de la garantie implicite, de sorte que vous pouvez ne pas être assujetti
aux limites ou exclusions énoncées ci-dessus. Cette garantie limitée vous confère des droits juridiques précis et
vous pouvez avoir d’autres droits, ces droits variant d’une province, d’une juridiction ou d’un État à l’autre.
Obtention du service prévu par la garantie de satisfaction et/ou la garantie limitée
Aux États-Unis
Pour toute question concernant cette garantie ou garantie limitée, ou bien pour obtenir un service prévu par la
garantie ou la garantie limitée, appelez au 1 800 334-0759 et l’adresse d’un centre de services commodément
situé vous sera fournie.
Au Canada
Pour toute question concernant cette garantie ou garantie limitée, ou bien pour obtenir un service prévu par la
garantie ou la garantie limitée, appelez au 1 800 667-8623 et l’adresse d’un centre de services commodément
situé vous sera fournie. Aux États-Unis, la garantie ou la garantie limitée est offerte par Sunbeam Products, Inc.
faisant affaire sous le nom de Jarden Consumer Solutions, situé à Boca Raton, en Floride 33431. Au Canada, la
garantie ou la garantie limitée est offerte par Sunbeam Corporation (Canada) Limited, du 20B Hereford Street
à Brampton (Ontario) L6Y 0M1. Pour toute autre question ou réclamation concernant ce produit, veuillez
écrire à notre service à la clientèle.
NE RETOURNEZ CE PRODUIT NI À L’UNE DE
CES ADRESSES NI AU LIEU D’ACHAT.
Pour toute demande de renseignements en ce qui concerne le recyclage et l’élimination
appropriée de ce produit, veuillez communiquer avec l’installation de gestion des
déchets locale.
1918
BLSTSG Classic Series_16ESFM1.indd 18-19 10/14/16 08:53

Notes
Notes
2120
BLSTSG Classic Series_16ESFM1.indd 20-21 10/14/16 08:53

Notes
Notes
2322
BLSTSG Classic Series_16ESFM1.indd 22-23 10/14/16 08:53
 Loading...