

For product questions contact:
Sunbeam Consumer Service
USA : 1.800.334.0759
Canada : 1.800.667.8623
www.oster.com
©2016 Sunbeam Products, Inc. doing business as
Jarden Consumer Solutions. All rights reserved.
Distributed by Sunbeam Products, Inc. doing business as
Jarden Consumer Solutions, Boca Raton, Florida 33431.
Para preguntas sobre los productos llame:
Sunbeam Consumer Service
EE.UU.: 1.800.334.0759
Canadá : 1.800.667.8623
www.oster.com
©2016 Sunbeam Products, Inc. operando bajo el nombre de
Jarden Consumer Solutions. Todos los derechos reservados.
Distribuido por Sunbeam Products, Inc. operando bajo el
nombre de Jarden Consumer Solutions, Boca Raton, Florida 33431.
GCDS-OST45734-SL P.N. 188609
CKSTWF20-TECO Series
Printed in China
Impreso en China
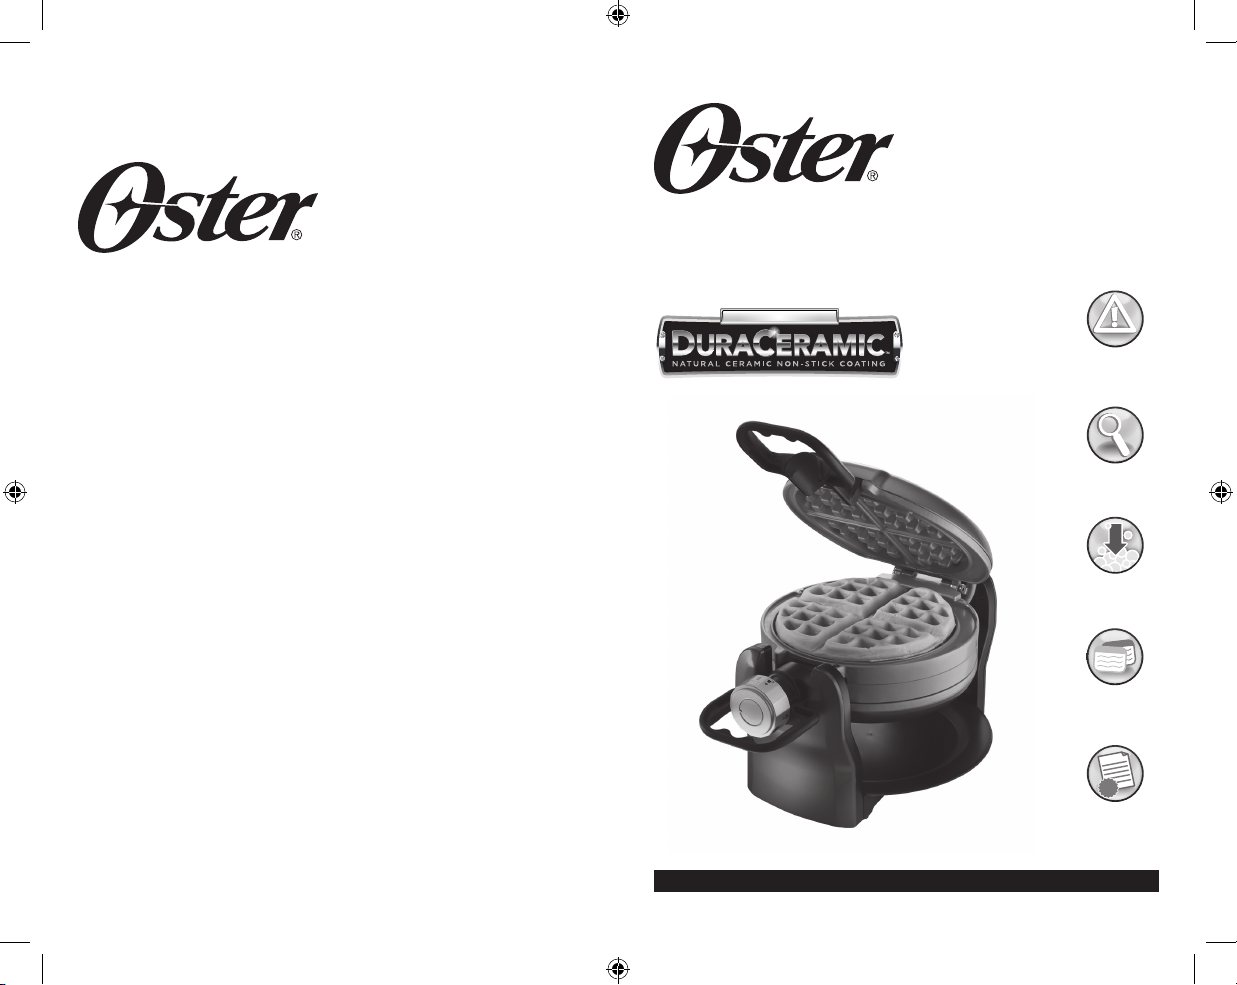
DOUBLE FLIP WAFFLE MAKER
WAFLERA DOBLE GIRATORIA
User Guide/ Guía del Usuario:
TITANIUM INFUSED
Safety
Seguridad
How to use
Cómo usar
Cleaning
Cuidado y Limpieza
Recipes
Recetas
Warranty
Garantía
www.oster.com
www.oster.com
www.oster.com
IMPORTANT SAFEGUARDS
When using electrical appliances, basic safety precautions
should always be followed, including the following:
1. Read all instructions before using.
2. Make sure the voltage in your outlet is the same as the
voltage indicated on the appliance’s rating label.
3. To protect against risk of electric shock, do not immerse
the cord, plug or cooking unit in water or any other liquid.
4. Do not touch hot surfaces. Use handles or knobs.
5. This appliance is not to be used by children or by persons
with reduced physical, sensory or mental capabilities.
6. Close supervision is necessary when any appliance is
used near children. Children should not play with the
appliance.
7. Unplug from wall outlet when not in use and before cleaning.
Allow to cool before putting on or taking o parts, and before
cleaning the appliance.
8. Never yank the cord to disconnect the cooking unit from
the outlet. Instead, grasp the plug and pull to disconnect.
9. Do not operate any appliance with a damaged CORD or
PLUG or after the appliance malfunctions or has been
damaged in any manner. Return appliance to the nearest
authorized Oster service facility for examination, repair
or adjustment. Do not attempt to replace or splice a
damaged cord.
10. The use of accessories or attachments not recommended by
the manufacturer may cause re, electrical shock or injury.
11. Do not use outdoors or for commercial purposes.
12. Do not use appliance for other than intended use.
13. Do not let the electrical cord touch hot surfaces. The
cord should be arranged so that it will not drape over
the counter-top or table top where it can be pulled by
children or tripped over unintentionally.
14. Do not place on or near a hot gas or electric burner or
heated oven.
15. Use on a heat-resistant, at level surface only.
16. Use extreme caution when moving any appliance
containing hot food, water, oil or other liquids.
17. To disconnect, remove plug from outlet.
18. Always unplug after use. The appliance will remain on
unless unplugged.
19. When using this appliance, provide adequate ventilation
above and on all sides for air circulation. Do not allow
this appliance to touch curtains, wall coverings, clothing,
dish towels or other ammable materials during use.
20. The appliance is only to be operated in the closed cover
position.
SAVE THESE INSTRUCTIONS
This appliance is for HOUSEHOLD USE ONLY.
DO NOT ATTEMPT TO DEFEAT THIS SAFETY FEATURE.
POLARIZED PLUG
This appliance has a polarized plug
(one blade is wider than the other). To
reduce the risk of electric shock, this
plug is intended to fit into a polarized
outlet only one way. If the plug does
not fit fully into the outlet, reverse the plug. If it still does not
fit, contact a qualified electrician. Do not attempt to modify
the plug in any way. If the plug fits loosely into the AC outlet
or if the AC outlet feels warm do not use that outlet. DO NOT
ATTEMPT TO DEFEAT THIS SAFETY FEATURE.
2
3
www.oster.com
www.oster.com
EXTENSION CORD USE
A short power-supply cord is provided to reduce the risk
resulting from becoming entangled in or tripping over
a longer cord. An extension cord may be used if care is
exercised in its use. If an extension cord is used, the electrical
rating of the cord must be at least as great as the electrical
rating of the appliance. The extension cord should be
arranged so that it will not drape over the countertop or
tabletop where it can be pulled on by children or tripped
over unintentionally.
Thank you for purchasing the OSTER® Flip Belgian Wae
Maker. Before you use this product for the rst time, please take a
few moments to read these instructions and keep it for reference.
Pay particular attention to the Safety Instructions provided. Please
review the product service and warranty statements. Please do not
return to the place of purchase. To learn more about Oster® products,
please visit us at www.oster.com or call us at 1-800-334-0759.
Congratulations on your purchase of a Titanium Infused
DuraCeramic™ appliance!
This appliance features a Titanium Infused DuraCeramic™
non-stick natural ceramic coating which is 8X more durable
than other non-stick coatings. This means there’s no aking
or peeling o to worry about. Furthermore, the ultra-durable
ceramic coating cooks faster than other non-stick coatings,
saving time and energy. The natural Titanium Infused
DuraCeramic™ non-stick coating also oers greater health
and benets as it’s free of PTFE and PFOA. 8X More Durable –
Titanium Infused DuraCeramic™!
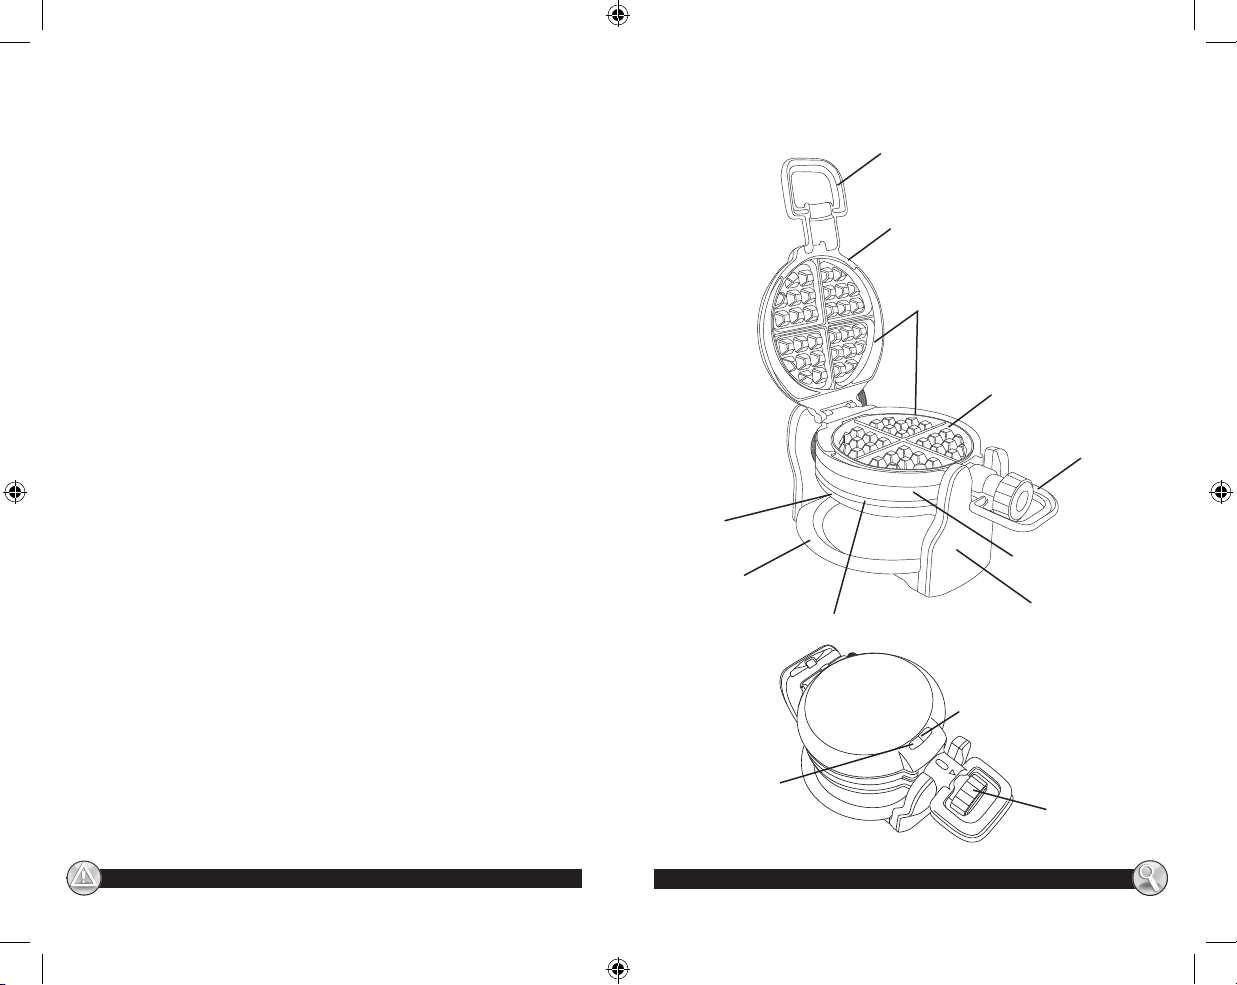
LEARNING ABOUT YOUR
DOUBLE FLIP WAFFLE MAKER
Top lid handle
Top lid
Ceramic coated non-stick
upper and lower wae grids
Top wae
compartment
Bottom lid
Removable drip tray
Bottom wae compartment
Green READY light
Red POWER light
Bottom lid
handle
Wae maker body
Base
Temperature
Control and
Locking Dial
4
5
www.oster.com
www.oster.com
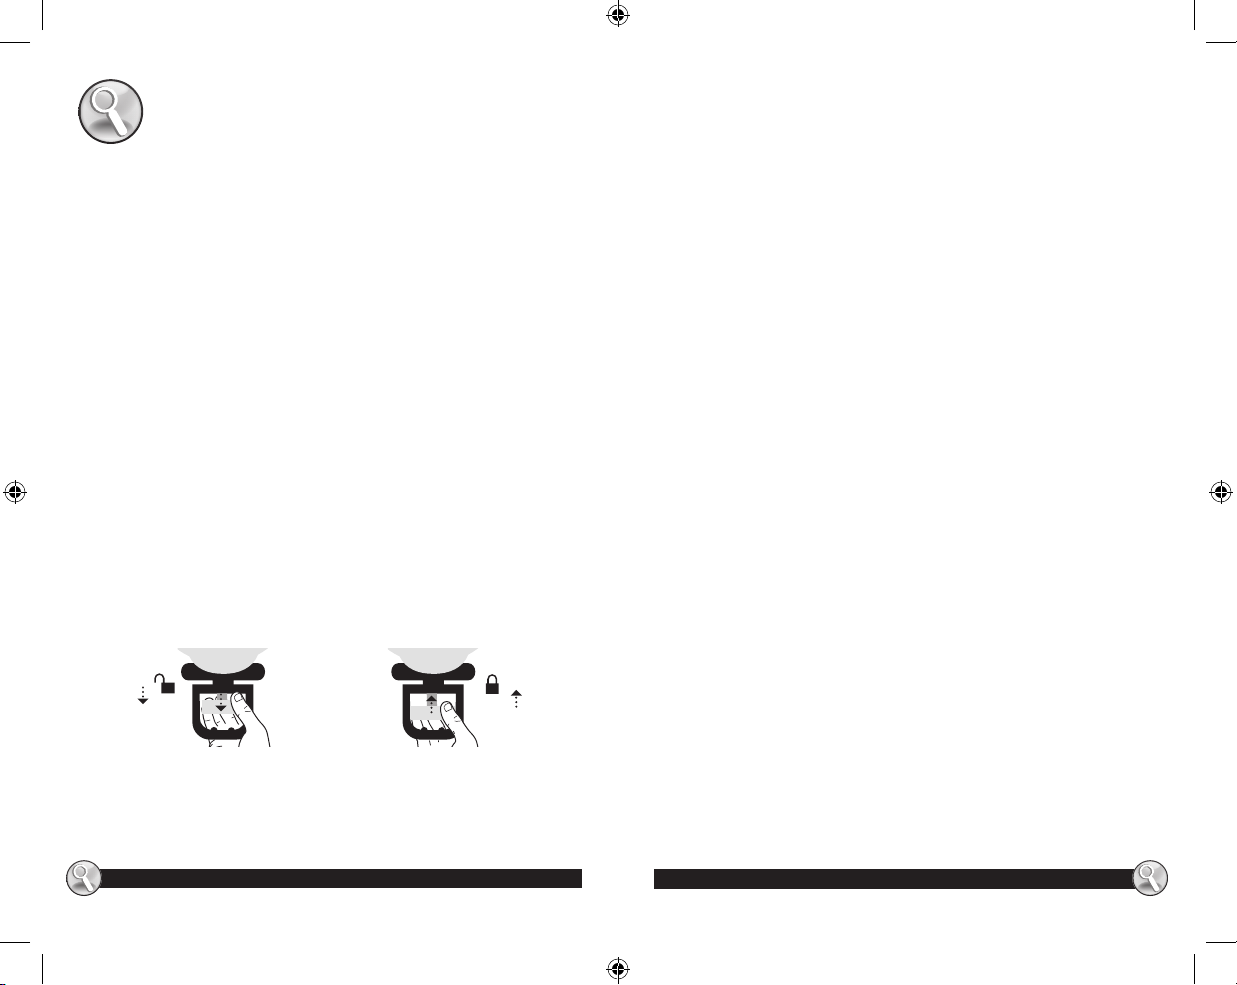
HOW TO:
PUSH
CONTROL KNOB
IN TO LOCK
USING YOUR OSTER® DOUBLE FLIP WAFFLE MAKER
For best results, follow these simple instructions.
When your wae maker is heated for the rst time, it may
emit slight smoke or odor. This is normal with many heating
appliances. This does not aect the safety of your appliance.
However, it may aect the avor of the rst set of waes
prepared in your wae maker, and it is recommended that you
discard these.
Preparing Your Double Flip Waffle Maker
1 Remove all packaging materials before using.
2 Close the wae maker and plug it into the wall outlet, you
will notice that the red POWER light will turn on. Turn the
control dial to “dark” setting. It will take approximately 3
minutes 30 seconds to reach baking temperature. When the
green READY light goes on, the wae maker is ready for use.
3 This wae maker includes a lock and unlock mechanism. To
unlock/open the lids for access of the wae maker grids, see
the below left gure to pull out the control dial knob. To
close/lock the lids for baking, see the below right gure to
push in the control dial knob towards the unit.
PULL
CONTROL KNOB
OUT TO OPEN
Baking
1 When the proper baking temperature is reached, the green
light will go on. Turn the control dial to the desired setting
according to your preference of darkness (light/medium/
dark). Once heated up, cycle times will be faster.
6
PUSH
CONTROL KNOB
IN TO LOCK
2 Use the top lid handle to open the lid of the top wae maker
grids. Pour batter onto bottom grid of wae maker. Ladle
just enough batter to ll lower grid so that the peak area of
the grid is covered. If necessary, use a spatula to spread the
batter into the corners of the grid. At this point the green
light will go o as the baking cycle begins.
3 Close the lid, push the control dial in to lock the lid.
WARNING: To avoid spillage, always make sure the lids are
properly locked into position before rotating.
4 Rotate 180° to access the bottom wae maker grids. Pull out
the control dial to unlock the lid and open the lid. Follow the
previous steps to pour batter onto bottom grid of wae
maker to make another wae at the same time. Then, close
the lid and push the control dial in to lock the lid. Do not open
for at least 1½ minutes. Opening the lid too soon will cause
under-baked waes to split, making them dicult to remove.
5 When the green light goes on again, rotate wae maker 180º
and allow the wae maker to bake for 5 to 7 minutes. Your
waes should be done. If you want them darker, close the lid
and continue baking until the desired color is achieved.
6 Remove waes from the grid using non-metallic utensils.
7 If additional baking is to be done, close wae maker to
retain heat. Always be sure the green light goes on again
before making more waes.
8 If you need to take a short break, close wae maker to
maintain heat. When you return to baking, you will notice
that the rst waes will bake faster because extra heat has
been allowed to build up.
9 When baking is complete, simply unplug the power cord
from wall outlet. Leave wae maker open to cool. Do not
clean until unit has cooled.
Waffle Baking Tips
1 Cooking times may vary. Depending on your taste
preference, leave the wae in longer for darker, crispier
waes or shorter for light and uy waes. Dierent wae
batters will also cook up dierently.
7

www.oster.com
www.oster.com
2 When preparing wae batter, do not over mix or waes will
be tough. Stir batter only until large lumps of dry ingredients
disappear.
3 The optimal amount of batter to produce a full-shaped wae,
without overowing, will vary with dierent wae batters.
Pouring batter from a measuring cup will help you gauge how
much batter to use each time. Fill bottom grid of wae maker
with enough batter to cover peak areas of the grid.
4 For more evenly shaped waes, spread thick batters to outer
edge of grid, using a heat proof rubber spatula or other nonmetallic utensil before closing lid.
5 Cake-based waes, such as the Chocolate Waes are more
tender than regular waes, and may require more care when
removing from wae maker. You may want to break these
waes into halves or quarters before removing. Use a spatula
to support waes when removing from the wae maker.
6 To retain crispness, move baked waes to a wire cooling
rack to prevent steam from accumulating underneath.
7 When serving several waes at one time, keep waes hot
and crisp by placing on a rack in a preheated 200°F oven
until ready to serve.
8 Baked waes freeze well. Cool completely on wire rack.
Store in plastic freezer bag or in covered container,
separating waes with wax paper. Reheat frozen waes in
toaster oven, oven or toaster until hot and crisp.
CARE & CLEANING
Your Titanium Infused DuraCeramic™ Double Flip Wae
Maker should be cleaned after every use.
CAUTION: Unplug the wae maker when not in use and before
cleaning. Never immerse Wae Maker, cord or plug in water or
any other liquids. Allow the WAFFLE MAKER to cool completely
before cleaning.
NOTE: To protect the Titanium Infused DuraCeramic™
coating, do not run cold water over cooking surface
immediately after use.
1 Brush away any loose crumbs from the grooves. Wipe grids
clean with a paper towel, absorbing any oil or butter that
might be down in the grooves of the grid. You can also wipe
grids with a damp cloth. Do not use anything abrasive that
can scratch or damage the ceramic non-stick coating.
2 Wipe the outside of the wae maker with a damp cloth only.
Do not clean the outside with any abrasive scouring pad or
steel wool, as this will damage the nish. Do not immerse in
water or any other liquid. Do not place in the dishwasher.
3 Should any batter become baked onto the grids, pour a little
cooking oil onto the hardened batter. Let sit 5 minutes to
soften batter, then wipe o with a paper towel or soft cloth.
4 Do not use metal utensils to remove your waes, they can
damage the non-stick surface.
For proper care of your Titanium Infused DuraCeramic™
coated wae maker, follow the following steps if stubborn
stains appear:
1 Sprinkle some baking soda on the stained area.
2 Add enough water to moisten the baking soda, making a
paste like texture.
3 Let sit for a few minutes (for tougher stains let sit up to an
hour).
4 Lightly scrub with a plastic scouring pad or damp cloth and
dry thoroughly.
5 Repeat if necessary.
Should any stubborn stains appear, they will not aect the
performance and non-stick quality of the Titanium Infused
DuraCeramic™ coating.
Questions or comments? Please visit us at www.oster.com or call
800-334-0759.
8
9

www.oster.com
www.oster.com
RECIPES
Classic Waffles
1 1⁄2 cups all-purpose our 3 large eggs, separated
1
⁄2 cup cornstarch 2 tbsp. granulated sugar
2 tbsp. cornmeal (optional) 1 3⁄4 cups milk
1 tbsp. baking powder
1 tsp. salt
melted
In large bowl, sift or whisk together our, cornstarch, cornmeal,
baking powder and salt to blend thoroughly; set aside. In mixer
bowl, beat egg whites until soft peaks form. Add sugar; continue
beating just until sti peaks form; set aside. Whisk together egg
yolks, milk and vanilla. Using rubber spatula, stir milk mixture
into our mixture, blending just until dry ingredients are
moistened. (There should still be small lumps; do not over mix).
Stir in melted butter. Fold in beaten egg whites until combined.
Pour batter onto hot, greased wae maker and bake.
Makes about 5
1
⁄2 cups batter
Waffle Tip: Cornstarch makes the waes crisper. If you don’t
have cornstarch, you could still make great waes by omitting
cornstarch and increasing our to 2 cups. Bake as directed.
Toasted Pecan & Cranberry Waffles
Sprinkle chopped pecans onto bottom grid of hot, greased
wae maker. Pour batter over pecans. Sprinkle dried cranberries
over batter. Close wae maker and bake as directed.
1
⁄2 tsp. pure vanilla extract
1
⁄2 cup (1 stick) unsalted butter,
Classic Buttermilk Waffles
1 1⁄2 cups all-purpose our 3 large eggs, separated
1
⁄2 cup cornstarch 3 tbsp. granulated sugar
2 tbsp. cornmeal (optional) 1 3⁄4 cups buttermilk
1 tbsp. baking powder
3
⁄4 tsp. baking soda
1 tsp. salt melted
In large bowl, sift or whisk together our, cornstarch, cornmeal,
baking powder, baking soda and salt to blend thoroughly; set
aside. In mixer bowl, beat egg whites until soft peaks form. Add
sugar; continue beating just until sti peaks form. Set aside.
Whisk together egg yolks, buttermilk and vanilla to blend.
Using rubber spatula, stir buttermilk mixture into our mixture,
blending until dry ingredients are moistened. (There should
still be small lumps; do not over mix.) Stir in melted butter. Fold
in beaten egg whites until combined. Pour batter onto hot,
greased wae maker and bake.
Makes about 5
1
⁄2 cups batter
Waffle Tip: Cornstarch makes the waes crisper. If you don’t
have cornstarch, you could still make great waes by omitting
cornstarch and increasing our to 2 cups. Bake as directed
Buttermilk Blueberry Waffles
Pour batter onto bottom grid of wae maker; sprinkle batter
with fresh (or defrosted frozen) blueberries. Close wae maker
and bake as directed.
1
⁄2 tsp. pure vanilla extract
1
⁄2 cup (1 stick) unsalted butter,
10
11

www.oster.com
www.oster.com
Old World Belgian Waffles (yeast-leavened)
2 1⁄2 cups all-purpose our 3 large eggs
3 tbsp. granulated sugar
1 1⁄2 tsp. active dry yeast 1 tsp. pure vanilla extract
1 1⁄4 tsp. salt 2 cups very warm milk
(120 to130ºF to activate yeast)
In large bowl, whisk together our, sugar, yeast and salt to
blend. In medium bowl, whisk together milk, eggs, butter and
vanilla; add to dry ingredients, mixing until large lumps are
moistened. Cover; let rise in a warm, draft-free place 1 hour or
until light and bubbly (Or, cover and refrigerate overnight.) Stir
down batter; pour onto hot, greased wae maker and bake.
Makes about 4
1
⁄2 cups batter
1
⁄3 cup unsalted butter, melted
Whole Wheat Waffles (carb smart with whole grain goodness)
3
⁄4 cup whole wheat our 1 egg, separated
1
⁄4 cup wheat bran
2 tbsp. wheat germ 1 tbsp. honey (optional)
1 tsp. baking powder 2 tbsp. unsalted butter, melted
1
⁄4 tsp. salt
In medium bowl, whisk together whole wheat our, wheat
bran, wheat germ, baking powder and salt to blend thoroughly;
set aside. In mixer bowl, beat egg white just until sti peaks
form; set aside. Whisk together egg yolk, milk and honey. Using
rubber spatula, stir milk mixture into our mixture, blending just
until dry ingredients are moistened. (There should still be small
lumps; do not over mix.) Stir in melted butter. Fold in beaten
egg white until combined. Pour batter onto hot, greased wae
maker and bake.
Makes about 2 cups batter
3
⁄4 cup skim or nonfat milk
Chocolate Waffles
1 1⁄2 cups all-purpose our 1 cup granulated sugar
1 1⁄2 tsp. baking powder 1 tsp. vanilla extract
1
⁄2 tsp. salt 2 large eggs
1
⁄2 cup (1 stick) unsalted butter
2 ounces unsweetened chocolate,
cut into chunks
Sift together our, baking powder and salt to blend thoroughly;
set aside. In large microwave-safe bowl, microwave butter and
chocolate on HIGH 1 to 1
1
Stir chocolate until completely melted. Whisk in sugar and
vanilla (Be sure mixture is not hot enough to cook eggs when
added; cool slightly, if necessary). Beat in eggs, 1 at a time. Add
our mixture, in 3 parts, alternately with milk, in 2 parts (Batter
will thicken as chocolate cools.) Pour or spoon batter onto hot,
greased wae maker and bake.
Serve with sweetened, quartered strawberries and whipped
cream. For a special treat, top waes with ice cream, caramel
or fudge sauce, whipped cream and toasted nuts.
Makes about 3 cups batter
Double Chocolate Waffles
1
Stir
⁄3 cup mini chocolate morsels into prepared batter; bake
as directed.
3
⁄4 cup milk
⁄4 minutes or until butter is melted.
12
13

www.oster.com
www.oster.com
1 Year Limited Warranty
Sunbeam Products, Inc. doing business as Jarden Consumer Solutions or if
in Canada, Sunbeam Corporation (Canada) Limited doing business as Jarden
Consumer Solutions (collectively “JCS”) warrants that for a period of one year
from the date of purchase, this product will be free from defects in material
and workmanship. JCS, at its option, will repair or replace this product or
any component of the product found to be defective during the warranty
period. Replacement will be made with a new or remanufactured product or
component. If the product is no longer available, replacement may be made
with a similar product of equal or greater value. This is your exclusive warranty.
Do NOT attempt to repair or adjust any electrical or mechanical functions on
this product. Doing so will void this warranty.
This warranty is valid for the original retail purchaser from the date of initial
retail purchase and is not transferable. Keep the original sales receipt. Proof
of purchase is required to obtain warranty performance. JCS dealers, service
centers, or retail stores selling JCS products do not have the right to alter,
modify or any way change the terms and conditions of this warranty.
This warranty does not cover normal wear of parts or damage resulting from
any of the following: negligent use or misuse of the product, use on improper
voltage or current, use contrary to the operating instructions, disassembly,
repair or alteration by anyone other than JCS or an authorized JCS service
center. Further, the warranty does not cover: Acts of God, such as re, ood,
hurricanes and tornadoes.
What are the limits on JCS’s Liability?
JCS shall not be liable for any incidental or consequential damages caused by
the breach of any express, implied or statutory warranty or condition.
Except to the extent prohibited by applicable law, any implied warranty or
condition of merchantability or tness for a particular purpose is limited in
duration to the duration of the above warranty.
JCS disclaims all other warranties, conditions or representations, express,
implied, statutory or otherwise.
JCS shall not be liable for any damages of any kind resulting from the purchase,
use or misuse of, or inability to use the product including incidental, special,
consequential or similar damages or loss of prots, or for any breach of contract,
fundamental or otherwise, or for any claim brought against purchaser by any
other party.
Some provinces, states or jurisdictions do not allow the exclusion or limitation
of incidental or consequential damages or limitations on how long an implied
warranty lasts, so the above limitations or exclusion may not apply to you.
This warranty gives you specic legal rights, and you may also have other
rights that vary from province to province, state to state or jurisdiction to
jurisdiction.
How to Obtain Warranty Service
In the U.S.A.
If you have any question regarding this warranty or would like to obtain
warranty service, please call 1-800-334-0759 and a convenient service center
address will be provided to you.
In Canada
If you have any question regarding this warranty or would like to obtain
warranty service, please call 1-800-667-8623 and a convenient service center
address will be provided to you.
In the U.S.A., this warranty is oered by Sunbeam Products, Inc. doing business as
Jarden Consumer Solutions located in Boca Raton, Florida 33431. In Canada, this
warranty is oered by Sunbeam Corporation (Canada) Limited doing business as
Jarden Consumer Solutions, located at 20 B Hereford Street, Brampton, Ontario
L6Y 0M1. If you have any other problem or claim in connection with this product,
please write our Consumer Service Department.
PLEASE DO NOT RETURN THIS PRODUCT TO ANY OF
THESE ADDRESSES OR TO THE PLACE OF PURCHASE.
14
15

www.oster.com
www.oster.com
PRECAUCIONES IMPORTANTES
When using electrical appliances, basic safety precautions
should always be followed, including the following:
1. Lea todas las instrucciones antes de usar.
2. Asegúrese que el voltaje del tomacorriente sea el mismo
que el voltaje indicado en la placa del aparato.
3. Para protegerse contra descargas eléctricas, no sumerja el
aparato, el cable o el enchufe en agua o en cualquier otro
líquido.
4. No toque las supercies calientes. Use guantes o
agarraderas.
5. Este artefacto no debe ser utilizado por niños o por
personas con capacidades físicas, sensoriales o mentales
reducidas.
6. Se requiere supervisión cuando el artefacto sea utilizado
cerca de niños. Los niños no deben jugar con el artefacto.
7. Desenchufe del tomacorriente cuando el aparato no está
en uso y antes de limpiar. Permita enfriar antes de poner o
remover las partes y antes de lavar el artefacto.
8. Nunca hale el cable para desenchufar la unidad del
tomacorriente. Más bien, sujete el enchufe y hale para
desenchufar.
9. No opere ningún artefacto con un CABLE o ENCHUFE
dañado o después de un mal funcionamiento o que haya
sido dañado de alguna manera. Devuelva el artefacto
al centro de servicio autorizado Oster más cercano para
revisión, reparación o ajuste. No intente reemplazar o
empalmar un cable dañado.
10. El uso de accesorios o aditamentos no recomendados por
el fabricante pueden causar incendios, choques eléctricos o
lesiones.
11. No lo utilice a la interperie ni para propósitos comerciales.
12. No use este artefacto para un propósito diferente al cual
fue diseñado.
13. No permita que el cable cuelgue sobre el borde de la mesa
o tablón, o toque supercies calientes.
14. No permita que el cable toque supercies calientes. El
cable se debe colocar de manera que no cuelgue por el
16
mostrador o mesa donde un niño lo pueda halar o alguien
se pueda tropezar inadvertidamente.
15. Utilice sobre supercies planas y resistentes al calor.
16. Tenga extrema precaución cuando mueva cualquier
artefacto que contenga alimento caliente, agua, aceite o
cualquier otro líquido.
17. Para desconectar, hale el enchufe del tomacorriente.
18. Siempre desenchufe después de usar. El artefacto se
mantendrá prendido hasta que sea desenchufado.
19. Al utilizar este artefacto, debe haber una adecuada
ventilación tanto encima como alrededor de la unidad para
la circulación de aire. No permita que este artefacto esté
cerca de cortinas, papel tapiz, ropa, papel toalla o cualquier
otro material que se pueda incendiar durante su uso.
20. El artefacto debe funcionar únicamente para las
operaciones que se adjuntan.
CONSERVE ESTAS INSTRUCCIONES
USO DE UN CABLE DE EXTENSIÓN
Este artefacto `es de USO DOMÉSTICO SOLAMENTE.
NO INTENTE IGNORAR ESTA CARACTERÍSTICA DE
SEGURIDAD.
ENCHUFE POLARIZADO
Este aparato tiene un enchufe
polarizado (un extremo es más ancho
que el otro). Para reducir el riesgo de
descarga eléctrica, este enchufe está
diseñado para encajar en un
tomacorriente polarizado de una sola manera. Si el enchufe
no entra completamente en el tomacorriente, invierta el
enchufe. Si aún así no encaja llame a un electricista
calificado. No intente modificar el enchufe de ninguna
manera. Si el enchufe queda flojo en el tomacorriente o el
tomacorriente se recalienta no utilice dicho punto de
electricidad. NO INTENTE DESACATAR ESTA MEDIDA DE
SEGURIDAD.
17

www.oster.com
www.oster.com
El aparato viene con un cable corto de suministro de
potencia para reducir el riesgo que resulta de enredarse o
tropezar con un cable más largo. Se puede usar un cable de
extensión con precaución. Si se usa un cable de extensión,
la calicación eléctrica del cable debe ser al menos igual
que la del aparato. El cable de extensión se debe acomodar
de manera que no quede colgando sobre la supercie del
mostrador o mesa donde los niños lo pueden halar o se
puedan tropezar accidentalmente.
Gracias por comprar la Waflera Doble Giratoria OSTER®
usar este producto por primera vez, tómese un momento para leer
estas instrucciones y consérvelas para referencia. Preste particular
atención a las instrucciones de seguridad que se ofrecen. Revise la
declaración de servicio y garantía del producto. Por favor no devuelva
al lugar de compra. Para conocer más acerca de los productos de
Oster®, visítenos en www.oster.com o llámenos
al 1-800-334-0759.
. Antes de
APRENDIENDO ACERCA DE SU
WAFLERA DOBLE GIRATORIA
Poignée du couvercle supérieur
Couvercle supérieur
Placa inferior y superior de
la waera con recubrimiento
antiadherente de cerámica
Moule à gaufre
supérieur
Poignée du
couvercle
inférieur
Felicitaciones por la compra de un artefacto con Titanio
Infundido DuraCeramic ™!
Este artefacto cuenta con un recubrimiento antiadherente
natural de cerámica con Titanio Infundido DuraCeramic
™ que es 8 veces más durable que otros recubrimientos
antiadherentes. Esto signica que no hay desconchamientos
o desprendimientos de qué preocuparse. Además, con
el recubrimiento de cerámica ultra-resistente se cocina
más rápido que con otros recubrimientos antiadherentes,
ahorrando tiempo y energía. El recubrimiento natural
antiadherente con Titanio Infundido DuraCeramic ™ también
brinda una mayor salud y grandes benecios, ya que está
libre de PFOA y PTFE. 8 veces Más Durable - con Titanio
Infundido DuraCeramic ™!
18
Couvercle inférieur
Plateau d’égouttage
amovible
Luz roja de
ENCENDIDO
Moule à gaufre inférieur
Boîtier du gaufrier
Socle
Voyant lumineux vert
(READY)
Control de
Temperatura
y Dispositivo
para Cerrar
19

www.oster.com
www.oster.com
COMO:
PRESIONE
HACIA DENTRO DISPOSITIVO
PARA CERRAR
UTILIZANDO SU WAFLERA DOBLE GIRATORIA OSTER®
Para mejores resultados, siga estas simples indicaciones.
Cuando su waera es calentada por primera vez, pudiera emitir
un leve humo u olor. Esto es normal con muchos artefactos con
elementos de calentamiento. Esto no afecta la seguridad de
su unidad. Pero como pudiera afectar el sabor de sus primeros
waes, se recomienda desecharlos.
Preparando su Waflera Doble Giratoria
1 Retire todo el material de embalaje antes de usar.
2 Cierre la waera y conecte en el tomacorriente, verá que la
luz roja indicadora se encenderá. Gire la perilla de control a la
función “dark” (“oscuro”). Tomará aproximadamente entre 3
minutos 30 segundos para alcanzar la temperatura de
hornear. Cuando la luz verde indicadora se encienda, la
máquina estará lista para usar.
3 Esta waera incluye un mecanismo de cerrar y liberar. Para
liberar/abrir las tapas y accesar a las planchas, vea la gura
inferior derecha para halar el dispositivo. Para cerrar/bloquear
las tapas y permitir la cocción, vea la gura inferior derecha
para empujar el dispositivo hacia la unidad.
HALE
HACIA AFUERA DISPOSITIVO
PARA ABRIR
Cocción
1 Cuando se alcanza la temperatura adecuada de cocción, la luz
verde se prende. Gire el selector de control hacia las funciones
deseadas de acuerdo a su preferencia de tostado (claro/mediano/
oscuro). Una vez que la unidad ya está caliente, los ciclos de
tiempo son más rápidos.
20
PRESIONE
HACIA DENTRO DISPOSITIVO
PARA CERRAR
2 Use la agarradera de la tapa superior para abrir la tapa superior de
la waera. Vierta la mezcla sobre la plancha inferior de la waera.
Sirva solo suciente mezcla para rellenar la plancha inferior de
forma que alcance hasta los extremos . Si es necesario utilice una
espátula para esparcir la mezcla hacia las esquinas de la plancha. En
este momento la luz verde se apagará y comenzará el ciclo de
cocción.
3 Cierre la tapa, empuje el dispositivo a la posición de cerrar la
tapa. ADVERTENCIA: Para evitar derrames, asegúrese siempre
que las tapas estén cerradas adecuadamente en posición antes de
comenzar a girar.
4 Gire en 180° para accesar a la plancha inferior de la waera. Hale
el dispositivo para liberar la tapa y abrirla. Siga los pasos
anteriores para verter la mezcla sobre la plancha inferior y hacer
otro wae al mismo tiempo. Después, cierre la tapa y empuje el
dispositivo para cerrar la tapa. No abra por lo menos hasta que
pase 1 ½ minutos. Abriendo la tapa muy pronto causará que los
waes no tengan la adecuada cocción y se partan, dicultándose
removerlos.
5 Cuando se prende la luz verde nuevamente, gire la waera en 180° y
permita que la waera haga la cocción durante 5 a 7 minutos. Sus
waes estarán listos. Sus waes deben estar listas de acuerdo con el
control de la temperatura para dorar que usted seleccionó.
6 Retire los waes de la plancha usando utensilios no metálicos.
7 Si necesita cocción adicional, cierre la waera para retener el calor.
Siempre debe asegurarse que la luz verde se prenda nuevamente
para hacer más waes.
8 Si usted necesita tomar una pausa, cierre su waera para mantener
el calor. Cuando regrese para continuar, usted notará que sus
primeros waes se cocinarán más rápido por el calor acumulado.
9 Cuando termine de hacer los waes, simplemente desenchufe el
cable del tomacorriente. Deje la waera abierta para que se enfríe.
No la limpie hasta que la unidad no se enfríe.
Recomendaciones Para Cocción Waffles
1 El tiempo de cocción puede variar. Dependiendo de sus preferencias
de gusto, deje el wae más tiempo para waes más oscuros y
crujientes, o menos tiempo para waes ligeros y esponjosos.
Diferentes mezclas de wae también se cocinan de manera diferente.
21

www.oster.com
www.oster.com
2
Cuando prepare la mezcla para waes, no la mezcle excesivamente
para evitar que los waes salgan duros. Bata la mezcla solamente
hasta que desaparezcan los grumos o ingredientes secos.
3 La cantidad óptima de mezcla para obtener un wae perfecto, sin
derramar, variará con las diferentes mezclas de wae. Vertiendo la
mezcla de una taza de medir ayudará a precisar cuanta mezcla
requiere cada vez. Para rellenar la plancha inferior de la waera con
suciente mezcla para cubrirla hasta los extremos es alrededor.
4 Para tener unos waes uniformes, esparza la mezcla en forma
gruesa hacia los bordes de afuera de la plancha, usando una
espátula de goma resistente al calor o cualquier otro utensilio no
metálico antes de cerrar la tapa.
5 Los waes para pasteles, tales como los waes de chocolate son más
suaves que los waes regulares, y pueden requerir más cuidado al
sacarlas de la waera. También partirlas en mitades o cuartos de
wae antes de sacarlas. Siempre use una espátula para sujetar los
waes cuando las esté sacando de la waera.
6 Para mantener los waes crocantes, coloque los waes listos
enfriándose sobre una rejilla de metal para evitar que el vapor se
acumule debajo de ellos.
7 Para tener unos waes con una forma perfecta, puede recortar los bordes
con una tijera de cocina antes de servirlos. Cuando quiera servir varios
waes al mismo tiempo, mantenga los waes calientes y crocantes en una
parrilla dentro del horno a 200 ºF hasta que se sirvan para comer.
8 Los waes ya listos se congelan perfectamente. Enfríelos
comp
letamente en una rejilla de metal. Guárdelos en una bolsa de
plástico de congelador o en un recipiente cubierto, separando cada
wae con papel encerado. Recaliente los waes congelados en un
horno tostadora, en el horno o en una tostadora hasta que estén
calientes y crocantes.
CUIDADO Y LIMPIEZA
Su Waera Doble Giratoria con Titanio Infundido
DuraCeramic™ debe limpiarse después de cada uso.
PRECAUCIÓN: Desconecte la waera cuando no esté en uso y
antes de limpiarlo. Nunca sumerja la Waera, el cable o el
enchufe en agua o cualquier otro líquido. Deje que la WAFLERA
se enfríe por completo antes de limpiar.
22
NOTA: Para proteger el recubrimiento con Titanio Infundido
DuraCeramic ™ no deje correr agua fría sobre la supercie de
cocción inmediatamente después del uso.
1 Quite las migas de las ranuras. Limpie las planchas con papel
toalla, para absorber cualquier resto de aceite o mantequilla
de las ranuras. También puede limpiar la plancha con un
paño húmedo. No use ningún material abrasivo, ya que
pudieran rallar o dañar el recubrimiento antiadherente de
ceramic.
2 Limpie el exterior de la waera con un paño húmedo
solamente. No utilice ningún tipo de esponjas abrasivas o de
metal para limpiarlo ya que podría dañar su acabado. Nunca
sumerja la waera dentro de agua ni la coloque dentro del
lavaplatos.
3 Si quedara algo de mezcla endurecida sobre la plancha,
viértale encima un poco de aceite de cocinar y déjelo 5
minutos hasta que ablande, luego pásele un poco de papel
toalla o un paño suave.
4 No use utensilios de metal para sacar sus waes, pueden
dañar la supercie antiadherente.
Para el cuidado apropiado de su Waera con
recubrimiento natural antiadherente con Titanio
Infundido DuraCeramic™, siga los siguientes pasos en caso
que aparezcan manchas difíciles:
1 Espolvoree un poco de bicarbonato de sodio sobre la zona
manchada.
2 Agregue suciente agua para humedecer el bicarbonato de
sodio, haciendo como una pasta
3 Deje reposar durante unos minutos (para manchas más
difíciles deje reposar hasta una hora).
4 Frote ligeramente con una esponja o paño húmedo y seque
a fondo.
5 Repita si es necesario.
Should any stubborn stains appear, they will not aect the
performance and non-stick quality of the Titanium Infused
DuraCeramic™ coating.
Questions or comments? Please visit us at www.oster.com or call
800-334-0759.
23

www.oster.com
www.oster.com
RECETAS
Wafles Clásicos
1 1⁄2 tazas de harina 3 huevos grandes, separados
1 1⁄2 taza de fécula de maíz 2 cucharadas de azucar granulada
2 cucharadas de harina de maíz 1 3⁄4 tazas de leche
(opcional)
1 cucharada de polvo de hornear vainilla
1 cucharadita de sal
sin sal derretida
En un tazón grande, mezcle la harina, la fécula de maíz, la
harina de maíz, el polvo de hornear y la sal; ponga aparte. En
un tazón de batir bata las claras de huevo hasta que se formen
picos suaves. Agregue azúcar; continúe batiendo hasta que
se formen picos más rmes; ponga aparte. Mezcle bien las
amarillas de huevo, la leche y la vainilla. Usando una espátula
de goma, revuelva la mezcla de leche dentro de la mezcla
de harinas solamente hasta que los ingredientes secos se
humedezcan. (Pueda que queden algunos pequeños grumos;
no lo bata en exceso). Agréguele la mantequilla derretida.
Agréguele las claras de huevo batidas con movimientos
envolventes hasta mezclarlo completamente. Vierta la mezcla
sobre la waera caliente y engrasada; cocine.
Rinde 5
1
⁄2 tazas de mezcla
Consejo práctico para Wafles: La fécula de maíz hace que
los waes sean más crocantes. Si no se tiene fécula de maíz,
puede omitirlo e incrementar hasta 2 tazas la harina y sus waes
igualmente le quedarán exquisitos.
Wafles de Nueces Macadamia & Arándano (Cranberry)
Espolvoree nueces de macadamias picadas namente sobre
la plancha inferior de la waera previamente precalentada y
engrasada. Vierta la mezcla sobre las nueces. Espolvoree los
arándanos secos sobre la mezcla. Cierre la waera y ajuste la
cocción deseada.
1
⁄2 cucharadita de esencia de
1
⁄2 taza (1 barra) de mantequilla
Wafles Clásicos de Crema de Leche
1 1⁄2 tazas de harina 3 huevos grandes, separados
1 1⁄2 taza de fécula de maíz 2 cucharadas de azucar granulada
2 cucharadas de harina de maíz 1 3⁄4 tazas de leche
(opcional)
1 cucharada de polvo de hornear vainilla
3
⁄4 cucharadita de bicarbonato
de soda sin sal derretida
1 cucharadita de sal
En un tazón grande, mezcle la harina, la fécula de maíz, la harina
de maíz, el polvo de hornear y la sal; ponga aparte. En un tazón
de batir bata las claras de huevo hasta que se formen picos
suaves. Agregue azúcar; continúe batiendo hasta que se formen
picos más rmes; ponga aparte. Mezcle bien las amarillas de
huevo, la crema de leche y la vainilla. Usando una espátula de
goma, revuelva la mezcla de crema de leche dentro de la mezcla
de harinas solamente hasta que los ingredientes secos se
humedezcan. (Pueda que queden algunos pequeños grumos;
no lo bata en exceso). Agréguele la mantequilla derretida.
Agréguele las claras de huevo batidas con movimientos
envolventes hasta mezclarlo completamente. Vierta la mezcla
sobre la waera caliente y engrasada; cocine.
Rinde 5
1
⁄2 tazas de mezcla
Consejo práctico para Wafles: La fécula de maíz hace que
los waes sean más crocantes. Si no se tiene fécula de maíz,
puede omitirlo e incrementar hasta 2 tazas la harina y sus waes
igualmente le quedarán exquisitos
Wafles de Crema de Leche y Moras
Vierta la mezcla sobre la plancha inferior de la waera,
espolvoree la mezcla con moras frescas (o también pueden ser
descongeladas). Cierre la waera y ajuste la cocción deseada.
1
⁄2 cucharadita de esencia de
1
⁄2 taza (1 barra) de mantequilla
24
25

www.oster.com
www.oster.com
Wafles Belgas al estilo Antiguo (con levadura)
2 1⁄2 tazas de harina 3 huevos grandes
3 cucharadas de azúcar
1 1⁄2 cucharadita de levadura seca derretida
1 1⁄4 cucharadita de sal 1 cucharadita de esencia de
2 tazas de leche muy caliente vainilla
2 tazas de leche muy caliente
(120 a 130º F para activar la levadura)
En un tazón grande, mezcle bien la harina, el azúcar, la levadura
y la sal. En un tazón mediano, mezcle la leche, los huevos, la
mantequilla y la vainilla; agrégueselo a los ingredientes secos,
mezcle hasta que los grumos grandes estén humedecidos. Tape;
déjelo crecer en un lugar caliente y sin corriente de aire por 1
hora o hasta que esté liviano y esponjoso (o también podría
taparlo y refrigerarlo toda la noche). Revuelva la mezcla; viértala
sobre la waera previamente precalentada y engrasada; cocine.
Rinde 4
1
⁄2 tazas de mezcla
1
⁄3 taza de mantequilla sin sal,
Wafles de Trigo Integral
(a base de granos enteros y bajo en calorías)
3
⁄4 tazas de harina integral 1 huevo, separado
1
⁄4 taza de salvado de trigo
2 cucharadas de germen de trigo 1 cucharada de miel (opcional)
1 cucharadita de polvo de hornear 2 cucharadas de mantequilla
1
⁄4 cucharadita de sal sin sal, derretida
En un tazón mediano, mezcle la harina de trigo, el salvado,
el germen de trigo, el polvo de hornear y la sal. En un tazón
de batir, bata la clara a punto de nieve; ponga aparte. Mezcle
la yema del huevo, la leche y la miel. Utilizando una espátula
de goma, revuelva la mezcla de leche dentro de la mezcla
de harina, solamente hasta que los ingredientes secos se
humedezcan. (Pueda que queden algunos pequeños grumos;
no lo bata en exceso). Agréguele la mantequilla derretida.
Agréguele las clara de huevo batida con movimientos
envolventes hasta mezclarlo completamente. Vierta la mezcla
sobre la waera caliente y engrasada; cocine.
Rinde 2 tazas de mezcla
3
⁄4 taza leche descremada
26
27

www.oster.com
www.oster.com
Wafles de Chocolate
1 1⁄2 tazas de harina 1 taza de azúcar granulado
1 1⁄2 cucharada de polvo 1 cucharadita de esencia de
de hornear vainilla
1
⁄2 cucharadita de sal 2 huevos grandes
1
⁄2 taza (1 barra) de mantequilla
sin sal
2 onzas de chocolate sin azúcar cortado en trozos
Pase por un tamiz la harina, el polvo de hornear y la sal para que
se mezclen bien; ponga aparte. En un tazón grande seguro para
microondas, añada el chocolate y la mantequilla y métalo en
el microonda de 1 a 1 1⁄4 de minutos hasta que la mantequilla
se derrita. Revuelva el chocolate hasta que se derrita
completamente también. Agréguele revolviendo el azúcar y
la vainilla (asegúrese que la mezcla no esté muy caliente para
que los huevos no se cocinen, enfríelo un poco si es necesario).
Agregue los huevos revolviendo uno por uno.
Añádale la mezcla de harina, en 3 partes alternando con la leche
en 2 partes (la mezcla se va espesar a medida que el chocolate
se enfríe). Viértalo sobre la waera caliente y engrasada; cocine.
Sirva con fresas endulzadas y con crema batida. Para una
ocasión especial póngale encima helado, salsa de caramelo o de
chocolate, crema batida o nueces tostadas
Rinde 3 tazas de mezcla
Wafles de Chocolate Doble
Revuelva dentro de la mezcla preparada 1⁄ 3 taza de pedacitos
pequeños de chocolate y cocine como se indica.
3
⁄4 taza de leche
Garantía Limitada de 1 Año
Sunbeam Products, Inc. operando bajo el nombre de Jarden Consumer
Solutions, o en Canadá, Sunbeam Corporation (Canada) Limited operando
bajo el nombre de Jarden Consumer Solutions, (en forma conjunta, “JCS”),
garantiza que por un período de un año a partir de la fecha de compra, este
producto estará libre de defectos de materiales y mano de obra. JCS, a su
elección, reparará o reemplazará este producto o cualquier componente del
mismo que presente defectos durante el período de garantía. El reemplazo
se realizará por un producto o componente nuevo o reparado. Si el producto
ya no estuviera disponible, se lo reemplazará por un producto similar de valor
igual o superior. Ésta es su garantía exclusiva. No intente reparar o ajustar
ninguna función eléctrica o mecánica de este producto. Al hacerlo elimínará
ésta garantía.
La garantía es válida para el comprador minorista original a partir de la fecha
de compra inicial y la misma no es transferible. Conserve el recibo de compra
original. Para solicitar servicio en garantía se requiere presentar un recibo de
compra. Los agentes y centros de servicio de JCS o las tiendas minoristas que
venden productos de JCS no tienen derecho a alterar, modicar ni cambiar de
ningún otro modo los términos y las condiciones de esta garantía.
Esta garantía no cubre el desgaste normal de las piezas ni los daños que se
produzcan como resultado de uso negligente o mal uso del producto, uso de
voltaje incorrecto o corriente inapropiada, uso contrario a las instrucciones
operativas, y desarme, reparación o alteración por parte de un tercero ajeno
a JCS o a un Centro de Servicio autorizado por JCS. Asimismo, la garantía
no cubre actos fortuitos tales como incendios, inundaciones, huracanes y
tornados.
¿Cuál es el límite de responsabilidad de JCS?
JCS no será responsable de daños incidentales o emergentes causados por el
incumplimiento de alguna garantía o condición expresa, implícita o legal.
Excepto en la medida en que lo prohíba la ley aplicable, cualquier garantía o
condición implícita de comerciabilidad o aptitud para un n determinado se
limita, en cuanto a su duración, al plazo de la garantía antes mencionada.
JCS queda exenta de toda otra garantías, condiciones o manifestaciones,
expresa, implícita, legal o de cualquier otra naturaleza.
28
29

www.oster.com
www.oster.com
JCS no será responsable de ningún tipo de daño que resulte de la compra,
uso o mal uso del producto, o por la imposibilidad de usar el producto,
incluidos los daños incidentales, especiales, emergentes o similares, o la
pérdida de ganancias, ni de ningún incumplimiento contractual, sea de una
obligación esencial o de otra naturaleza, ni de ningún reclamo iniciado contra
el comprador por un tercero.
Algunas provincias, estados o jurisdicciones no permiten la exclusión o
limitación de los daños incidentales o emergentes ni las limitaciones a la
duración de las garantías implícitas, de modo que es posible que la exclusión o
las limitaciones antes mencionadas no se apliquen en su caso.
Esta garantía le otorga derechos legales especícos y es posible que usted
tenga otros derechos que varían de un estado, provincia o jurisdicción a otro
Cómo solicitar el servicio en garantía
En los Estados Unidos
Si tiene alguna pregunta sobre esta garantía o desea recibir servicio de
garantía, llame al 1-800-334-0759 y podrá obtener la dirección del centro de
servicio que le resulte más conveniente.
En Canadá
Si tiene alguna pregunta sobre esta garantía o desea recibir servicio de
garantía, llame al 1-800-667-8623 y podrá obtener la dirección del centro de
servicio que le resulte más conveniente.
En los Estados Unidos, esta garantía es ofrecida por Sunbeam Products,
Inc. operando bajo el nombre de Jarden Consumer Solutions, Boca Ratón,
Florida 33431. En Canadá, esta garantía es ofrecida por Sunbeam Corporation
(Canada) Limited operando bajo el nombre de Jarden Consumer Solutions, 20
B Hereford Street, Brampton, Ontario L6Y 0M1. Si usted tiene otro problema o
reclamo en conexión con este producto, por favor escriba al Departamento de
Servicio al Consumidor.
POR FAVOR NO DEVUELVA ESTE PRODUCTO A NINGUNA DE ESTAS
DIRECCIONES NI AL LUGAR DE COMPRA.
NOTAS
30
31
 Loading...