

Instruction Manual & Recipes
ICE CREAM AND FROZEN YOGURT MAKER
Manuel d’Instructions et Recettes
SORBETIÈRE GLACE ET YOGOURT GLACÉ
MODEL/MODÈLE
4746
MODEL/MODÈLE
4746

2
Thank you for purchasing the Oster®Ice Cream and Frozen Yogurt Maker.
Before you use this product for the first time, please take a few moments
to read these instructions and keep it for reference and enjoyment of the recipes.
Pay particular attention to the Safety Instructions provided. Please review the
product service and warranty statements. For your future reference, please note:
Date Product Received:_________________________________________
Service Number: _____________________________________________
(located on the bottom of the machine)

3
When using electrical appliances, basic safety precautions should
always be followed, including the following:
• READ AND SAVE ALL INSTRUCTIONS.
• To protect against risk of electrical shock do not put motor base
in water or other liquid.
• Close supervision is necessary when any appliance is used
by or near children or incapacitated persons.
• Unplug from outlet when not in use, before putting on or taking
off parts, and before cleaning.
• Avoid contacting moving parts.
• Do not operate any appliance with a damaged cord or plug or
after the appliance malfunctions, or is dropped or damaged
in any manner. Return appliance to the nearest authorized
Sunbeam Appliance Service Center for examination,
repair or electrical or mechanical adjustment.
• The use of attachments not recommended or sold by the
appliance manufacturer may cause fire, electric shock or injury.
• Do not use outdoors or for commercial purposes.
• Do not let cord hang over edge of table or counter or touch
hot surfaces.
T
HISUNITISFORHOUSEHOLD
USEO
NLY
FOR PRODUCTS PURCHASED IN THE U.S. AND CANADA ONLY
To reduce the risk of electrical shock, this appliance has a polarized plug
(one blade is wider than the other). This plug fits a polarized outlet only one way;
if the plug does not fit fully into the outlet, reverse the plug. If it still does not fit,
contact a qualified electrician. Do not attempt to defeat this safety feature.
SAVE THESE INSTRUCTIONS
IMPORTANT SAFEGUARDS

4
INTRODUCTION
Congratulations on owning an Oster®“Quick Freeze™” Ice Cream/Frozen YogurtMaker!
This easy-to-use appliance makes all your favorite frozen creations in a snap!
From sinful ice creams to rich custards . . . creamy ice sorbets to refreshing ices . . . you’ll
be the most famous “cook” on the block.
Try each one of the taste-tempting recipes in this cookbook . . . then let your imagination
run wild! Chop up a candy bar or purée your favorite fruit in your Osterizer
®
Blender
and mix it into a basic recipe. There’s no end to the combinations you can create.
Best of all, some of “your specialties” can be ready in just 10 minutes!
The Oster
®
“Quick Freeze™” Ice Cream/Frozen Yogurt Maker . . . it makes your kitchen
even more versatile.
This unit uses ordinary table salt and ice cubes. It is not necessary to use rock salt
or crushed ice in this unit.
BEFORE USING FOR THE FIRST TIME
After unpacking, disassemble unit before using for the first time. Wash all parts
(except ice bucket and motor base) in warm, soapy water. Rinse and dry immediately.
DO NOT IMMERSE ICE BUCKET OR MOTOR BASE.
MAINTENANCE
1. If the canister stalls or fails to rotate while processing:
A) Turn off unit and allow to cool.
B) After cooling, turn unit on. If canister still fails to rotate, return unit
to an Authorized Service Center.
2. Any other servicing needed should be performed only by an Authorized
Service Center.
3. Always specify the Product Model Number located on the bottom of the
Ice Bucket when service is required.

5
INSTRUCTIONS
HOW TO ASSEMBLE ICE BUCKET COVER
1. Position Ice Bucket on motor base.
2. Pour ice cream mixture into Cream Canister.
3. Place Freezing Cover on Cream Canister.
4. Position Cream Canister in Ice Bucket.
5. Add ice and salt as directed.
6. Remove Freezing Cover.
7. Insert Paddle.
8. Place Mixing Cover on Cream Canister.
9. Place Ice Bucket Cover on Bucket engaging Paddle with Center Feed on both covers.
10. Swing Latches up and interlock with Notches on Cover.
Center Feed
Ice Feed
Corner
Paddle
Cream
Canister
Pivot Pin
Kitchen Center
Appliance
Motor Base
Ice Bucket
Cover
Mixing Cover
Notch
Slot
Ice Bucket
Latch
Freezing
Cover
6
TO PROCESS YOUR FAVORITE RECIPE
You will need approximately: 2 cups (500 ml) table salt and 6 trays of ice cubes.
It is NOT NECESSARY to use rock salt or crushed ice in this unit.
1. Prepare recipe as directed.
2. Pour into Cream Canister. (To prevent overload and damage
to the product do not prepare more than one batch of ice cream
at a time.)
3. Put Freezing Cover in place.
4. Position Cream Canister in Ice Bucket.
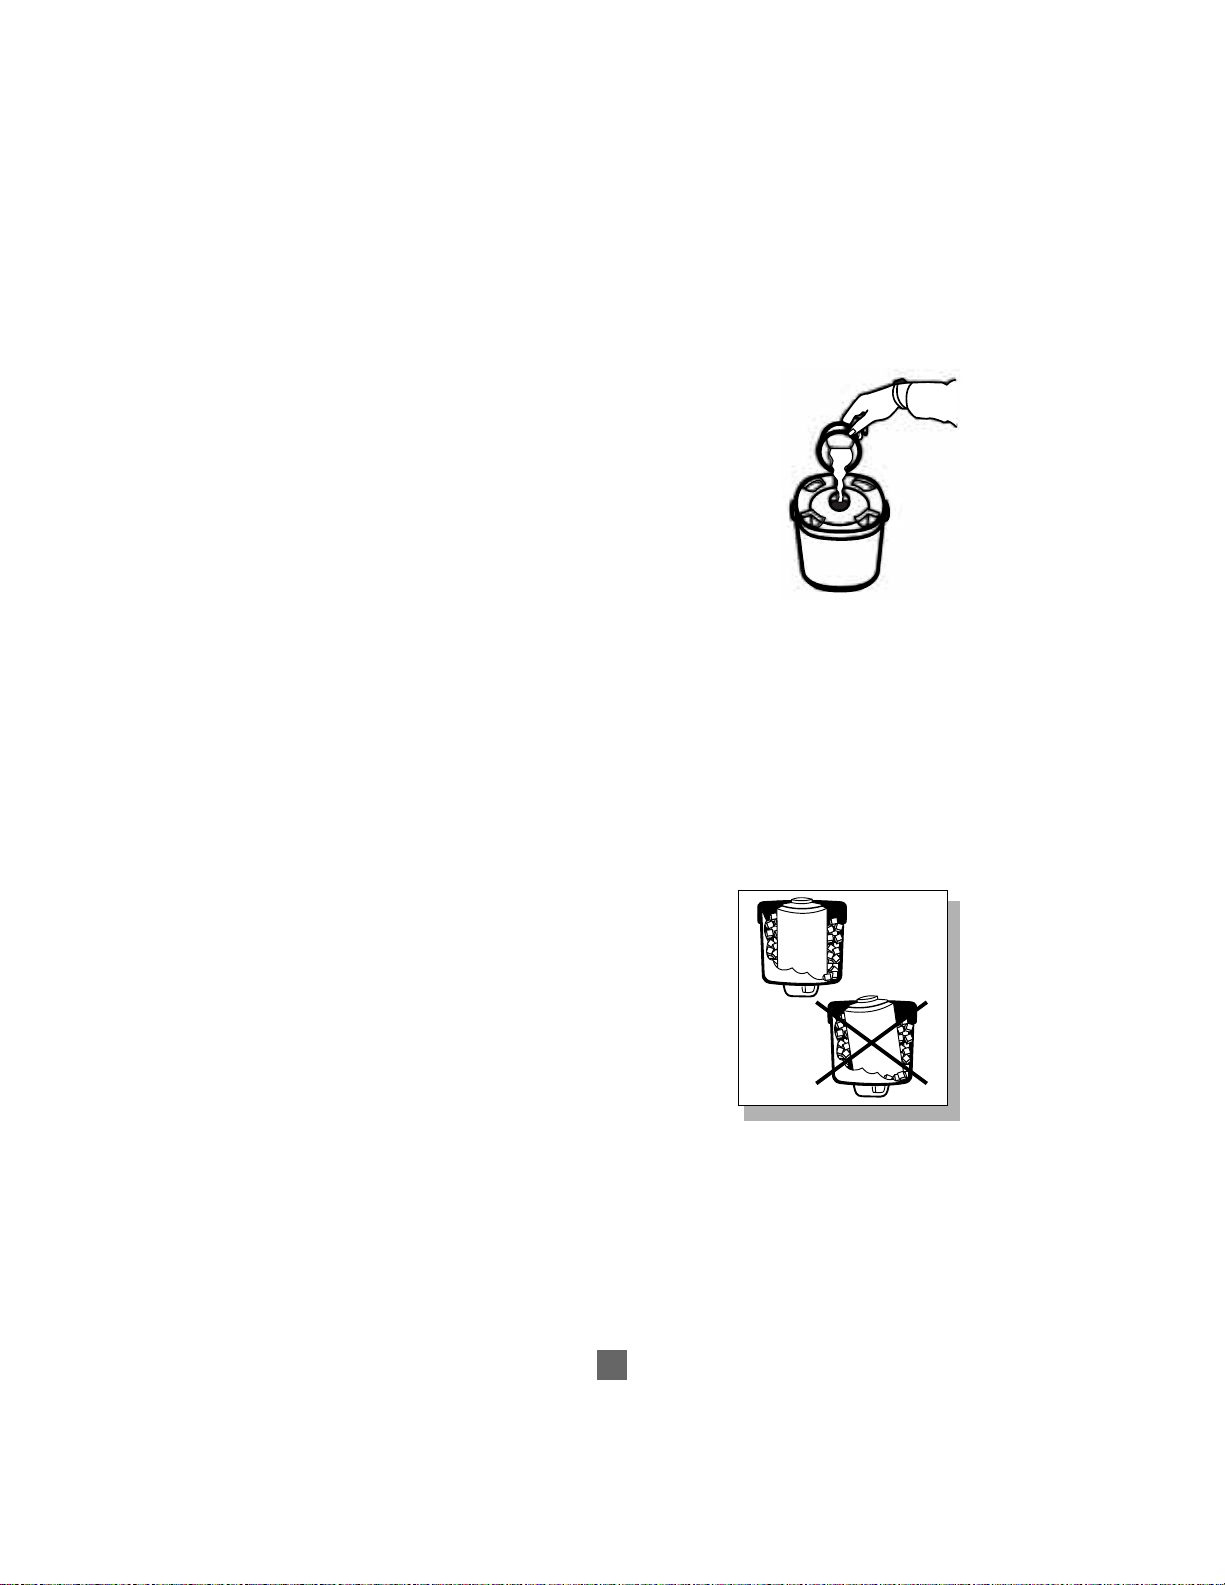
5. Layer ice and salt solution as follows:
A. Pour 1 cup (250 ml) cold water into Ice Bucket.
B. Place a 1 inch (2.5 cm) layer of ice cubes around Cream Canister in Ice Bucket.
(Hint: Cream Canister should stand straight while layering.)
C. Sprinkle 1/3 cup (75 ml) table salt or 1/4 cup (50 ml) Kosher (coarse)
salt on ice.
D. Continue layering ice and salt to the top of the Ice Bucket.
E. Pour 1 cup (250 ml) cold water over top ice layer.
6. Remove Freezing Cover.
7. Insert Paddle and put Mixing Cover in place.
8. Place Ice Bucket Cover on Ice Bucket. Latch.
9. Turn unit on.
10. As ice melts, add more ice cubes through Ice Feed
Corners. For each 1 cup (250 ml) of ice cubes added,
add 1/4 cup (50 ml) salt.
11. Process until frozen mixture reaches Mixing Cover or until desired consistency
is reached. REMINDER: DO NOT OVER-PROCESS ICE CREAM.
DAMAGE TO UNIT COULD OCCUR.

7
APPROXIMATE TIMES
Ice Cream – 18-25 minutes Ices and Sorbets – 12-20 minutes
Sherbet – 20-25 minutes Frozen Yogurt – 18-25 minutes
Frozen Custard – 18-25 minutes Ice Milk – 12-20 minutes
12. To use Center Feed:
(Use the Center Feed to add nuts and chocolate bits or to make swirled ice creams . . .
there’s no end to the uses of this feature.)
A. Place ingredients to be added in measuring cup with pouring spout.
B. When frozen mixture comes within 1/2 in. (1.25 cm) of Mixing Cover
(or desired consistency is reached), pour dry ingredients through Center Feed.
Churn until mixture reaches desired consistency. Do not add these ingredients
too early. They will settle to the bottom of the mixture and slow freezing.
C. For swirled ice creams, when frozen mixture comes within 1/2 in. (1.25 cm)
of Mixing
Cover (or desired consistency is reached*), add room temperature liquid ingredients
through Center Feed. DO NOT ADD HOT SYRUPS TO FROZEN MIXTURE.
After liquid ingredients are added, allow Paddle to swirl ONCE so Canister
turns one revolution only.
D. Hint: Instead of chopping chocolate bits, melt them and allow to cool slightly.
When ice cream is almost finished, pour melted mixture in a thin stream
through Center Feed. Chocolate will harden immediately and form a
“shaved chocolate” appearance.
13. Turn unit off.
*Note: Some recipes will not reach top of canister due to their density
or to the size of the recipe.
TO DISASSEMBLE UNIT
1. Unplug “Quick Freeze™” ice cream maker.
2. Remove Ice Cream Bucket from motor base.
3. Unlatch Ice Bucket Cover. Remove.
4. Remove Cream Canister from Ice Bucket.
5. Wipe Mixing Cover to remove salt residue and remove. Set aside.
6. Lift out Paddle. Scrape clean with rubber spatula. Set aside.
7. Serve ice cream with your favorite toppings or harden as directed below.

8
TO HARDEN ICE CREAM
In Your Freezer:
1. Pack ice cream down in Cream Canister. Seal with flexible plastic Freezing Cover.
Wipe dry. (If you wish to make additional batches, you may transfer ice cream
to a separate plastic container. Seal with a tight cover.)
2. Freeze several hours or until desired hardness is reached.
In Your “Quick-Freeze™” Ice Cream Maker:
1. When ice cream has reached desired consistency, turn unit off. Donot open Ice Bucket.
2. Remove Ice Bucket from motor base. Add additional ice if necessary.
(Ice cream will still be of a soft serve consistency.)
3. Cover top of Ice Bucket with newspapers or heavy cloth for insulation.
4. Allow mixture to harden for 2-3 hours or until desired consistency is reached.
CARE AND CLEANING
1. Wash Cream Canister, Paddle and both Mixing and Freezing Covers in hot,
soapy water. Rinse well and dry.
2. Clean Ice Bucket and Cover thoroughly with a clean damp cloth to remove salt residue.
Wipe clean and dry. DO NOT IMMERSE ICE BUCKET.
3. Wipe Motor Base with clean damp cloth to remove salt residue. Dry.
DO NOT IMMERSE MOTOR BASE. This will cause electric shock and/or
damage to the unit.
4. Do not reassemble unit for further processing or storage until all parts
are completely dry.
5. Do not wash any parts in dishwasher.
HINTS & TIPS
HELPFUL HINTS FOR FREEZING
Times needed for freezing as well as consistency of ice cream will vary according to
ingredients in mixture, temperature of ingredients, size of ice, coarseness of salt and room
temperature. Try these hints to make ice cream to your personal preference:
1. To freeze your favorite mixture more quickly, always use chilled ingredients.
2. After mixing ingredients together in Cream Canister, cover and place in refrigerator to
keep chilled until you are ready to freeze the mixture.

9
3. If your ice cream was lumpy or hardened too quickly, next time reduce the table salt
layers from 1/3 cup (75 ml) to 1/4 cup (50 ml).
4. If your ice cream was too soft or did not freeze quickly, next time increase the table salt
layers from 1/3 cup (75 ml) to 1/2 cup (125 ml).
5. If you use your own mixture, be sure to adjust ingredients to no more than
1-1/4 quarts (1.25 L).
6. For stiff ice cream, fill the canister no more than half full (1 quart or 1.0 L).
Process normally.
7. DO NOT OVER-PROCESS ICE CREAM. If the Canister movement slows down or stops,
the mixture is stiff. TURN OFF UNIT.
8. When using cooked mixtures, allow to chill before processing.
9. Do not add last-minute ingredients (chocolate bits, nuts, syrups) too early.
They will settle to the bottom of the mixture and slow freezing.
TIPS FOR TASTY DESSERTS
1. Always use pure vanilla and other extracts. Imitations will lose flavor when frozen.
2. When cooking eggs for a mixture, cook on low heat, stirring constantly.
Do not allow mixture to overheat and curdle. Freezing a curdled mixture
will make ice cream very lumpy.
3. Instead of chopping chocolate chips, melt them and allow to cool slightly.
When ice cream is almost finished, pour melted mixture in a thin stream
through Center Feed. Chocolate will harden immediately and form
a“shaved chocolate” appearance in ice cream.
4. Chopped fruit and nuts mix in more easily than whole pieces.
5. Food coloring should be added sparingly. Always add prior to freezing.
Mix thoroughly.
6. Alcohol inhibits freezing. Do not use! Use flavorings or extracts.

10
ICE CREAM
EASY VANILLA ICE CREAM
2 cups (500 ml) whipping cream 1 cup (250 ml) sugar
2 cups (500 ml) half and half 1 Tbsp. (15 ml) vanilla extract
Combine all ingredients in Cream Canister. Stir until sugar is dissolved. Freeze as directed.
YIELD: 1-1/2 QUART S (1.5 L)
Variations:
Chocolate Chip – Add 2/3 cup (150 ml) miniature or chopped chocolate chips
immediately after freezing.*
Cookies with Cream – Add 10 crushed chocolate sandwich cookies to ice cream
immediately after freezing.*
Tin Roof Delight – Combine 1/2 cup (125 ml) Chocolate Fudge Sauce and 3/4 cup
(200ml) chopped Spanish peanuts. Swirl into ice cream immediately after freezing.*
Fudge Revel – Swirl 1/2 cup (125 ml) Chocolate Fudge Sauce in ice cream immediately
after freezing.*
Caramel Revel – Swirl 1/2 cup (125 ml) Caramel Sauce in ice cream immediately
after freezing.*
Cherry Chip – Add 1 cup (250 ml) chopped maraschino cherries to ice cream
immediately after freezing.*
Peppermint Stick – Add 2/3 cup (150 ml) crushed peppermint candies to ice cream
immediately after freezing.*
*See Instructions HOW TO USE CENTER FEED on Page 7.
CINNAMON ICE CREAM
2 cups (500 ml) whipping cream 1 Tbsp. (15 ml) ground cinnamon
2 cups (500 ml) half and half 1-1/2 tsp. (7 ml) vanilla extract
1 cup (250 ml) sugar
Combine all ingredients in Cream Canister. Stir until sugar dissolves. Freeze as directed.
YIELD: 1-1/2 QUART S (1.5 L)
EASY CHOCOLATE ICE CREAM
2 cups (500 ml) half and half 1 tsp. (5 ml) vanilla extract
1-1/2 cups (375 ml ) sugar 2 cups (500 ml) whipping cream
1/2 cup (125 ml) cocoa powder
Combine half and half, sugar, cocoa powder and vanilla in Osterizer®Blender container. Cover and
process at a LOW speed until smooth. Pour mixture into Cream Canister. Stir in whipping cream.
Freeze as directed.
YIELD: 1-1/2 QUART S (1.5 L)

11
Variations:
Toasted Almond Fudge – Add 3/4 cup (200 ml) toasted slivered almonds to ice cream
immediately after freezing.*
Marshmallow Revel – Swirl 1 cup (250 ml) marshmallow creme in ice cream
immediately after freezing.*
Mandarin Orange Surprise – Reduce half and half to 1 cup (250 ml). Add 3/4 cup
(200 ml) orange juice to recipe before freezing. Freeze as directed.
Rocky Road Delight – Swirl 1/2 cup (125 ml) each of miniature marshmallows
and peanuts into ice cream immediately after freezing.
Chocolate Chocolate Chip – Swirl 1/2 cup (125 ml) miniature or chopped chocolate chips
into ice cream immediately after freezing.*
Mocha – Add 1-1/2 tsps. (7 ml) instant coffee powder to recipe before freezing.
Freeze as directed.
Mocha Chip – Swirl 1/2 cup (125 ml) miniature or chopped chocolate chips
to Mocha Ice Cream (above) immediately after freezing.
*See Instructions HOW TO USE CENTER FEED on Page 7.
STRAWBERRY ICE CREAM
2 cups (500 ml) fresh or frozen strawberries 1 cup (250 ml) sugar
2 cups (500 ml ) whipping cream 2 tsp. (10 ml) vanilla extract
1 cup (250 ml) half and half 1 drop red food coloring
Place strawberries in Osterizer®Blender container. Cover and process at a LOW speed until
chopped. Pour into Cream Canister. Add remaining ingredients. Stir until sugar is dissolved.
Freeze as directed.
YIELD: 1-1/2 QUART S (1.5 L)
COFFEE ICE CREAM
2 cups (500 ml) whipping cream 1-1/2 Tbsp. (22 ml)
2 cups (500 ml) half and half instant coffee powder
1 cup (250 ml) sugar 1-1/2 tsp. (7 ml) vanilla extract
Combine all ingredients in Cream Canister. Stir until sugar and instant coffee powder are dissolved.
Freeze as directed.
YIELD: 1-1/2 QUART S (1.5 L)
Variation:
Coffee Chip Ice Cream – Add 1/2 cup (125 ml) miniature or chopped chocolate chips to
ice cream when frozen.*

12
BUTTER PECAN ICE CREAM
2 cups (500 ml) half and half 2 cups (500 ml) whipping cream
1 cup (250 ml) brown sugar 1 tsp. (5 ml) vanilla extract
2 Tbsp. (30 ml) butter 1/2 cup (125 ml) toasted pecans, chopped
Combine half and half, sugar and butter in medium saucepan. Cook, stirring constantly, over low
heat until bubbles form around the edges of the pan. Chill. Place mixture in Cream Canister.
Stir in whipping cream and vanilla. Freeze as directed. Add pecans immediately after freezing.*
YIELD: 1-1/2 QUART S (1.5 L)
PEANUT BUTTER CHOCOLATE CHIP ICE CREAM
2 cups (500 ml) half and half 1 tsp. (5 ml) vanilla extract
1-1/2 cups (375 ml) sugar 2 cups (500 ml) whipping cream
1/2 cup (125 ml) chunk style peanut butter 1/2 cup (125 ml) miniature or
chopped chocolate chips
Combine half and half, sugar, peanut butter and vanilla in Osterizer®Blender container.
Cover and process at a MEDIUM speed until blended. Pour mixture into Cream Canister.
Stir in whipping cream. Freeze as directed. Add chocolate chips immediately after freezing.*
YIELD: 1-1/2 QUART S (1.5 L)
*See Instructions HOW TO USE CENTER FEED on Page 7.
BUTTER BRICKLE ICE CREAM
2 cups (500ml) half and half 2 cups (500 ml) whipping cream
1 cup (250 ml) brown sugar 1 tsp. (5 ml) vanilla extract
2 Tbsp. (30 ml) butter 1/2 cup (125 ml) butter brickle candy pieces
Combine halt and half, sugar and butter in medium saucepan. Cook, stirring constantly,
over low heat until bubbles form around the edges of the pan. Chill. Place mixture in Cream Canister.
Stir in whipping cream and vanilla. Freeze as directed. Add butter brickle candy pieces immediately
after freezing.*
YIELD: 1-1/2 QUART S (1.5 L)
MINT CHOCOLATE CHIP ICE CREAM
2 cups (500 ml) whipping cream 1-1/2 tsp. (7 ml) vanilla extract
2 cups (500 ml) half and half 1 drop green food coloring
1 cup (250 ml) sugar 2/3 cup (150 ml) miniature or chopped
1-1/2 tsp. (7 ml) mint extract chocolate chips
Combine all ingredients except chocolate chips in Cream Canister. Stir until sugar is dissolved.
Freeze as directed. Add chocolate chips immediately after freezing.*
YIELD: 1-1/2 QUART S (1.5 L)

13
LEMON CHIP ICE CREAM
2 cups (500 ml) whipping cream 1-1/2 tsp. (7 ml) vanilla extract
2 cups (500 ml) half and half 1/2 tsp. (2 ml) grated lemon peel
1-1/2 cups (375 ml) sugar 3/4 cup (200 ml) lemon drop candy, crushed
1/3 cup (75 ml) lemon juice
Combine all ingredients except lemon candy in Cream Canister. Stir until sugar is dissolved.
Freeze as directed. Add lemon candy immediately after freezing.*
YIELD: 1-1/2 QUART S (1.5 L)
*See Instructions HOW TO USE CENTER FEED on Page 4.
FROZEN CUSTARD
FROZEN CHOCOLATE CUSTARD
1 cup (250 ml) half and half 4 egg yolks
1 cup (250 ml) sugar 2 cups (500 ml) whipping cream
1/2 cup (125 ml) cocoa powder 1 tsp. (5 ml) vanilla extract
Place first four ingredients in Osterizer®Blender container. Cover and process at a LOW speed
until smooth. Pour into a medium saucepan. Cook over low heat, stirring constantly, until bubbles
form around edge of mixture. Chill. Pour into Cream Canister. Stir in whipping cream and vanilla.
Freeze as directed.
YIELD: 1-1/2 QUART S (1.5 L)
BITTERSWEET CHOCOLATE CUSTARD
1 cup (250 ml) half and half 4 egg yolks
3/4 cup (200ml) sugar 2 cups (500 ml) whipping cream
1/2 cup (125 ml) cocoa powder 1 tsp. (5 ml) vanilla extract
Place first four ingredients in Osterizer®Blender container. Cover and process at a LOW speed
until smooth. Pour into a medium saucepan. Cook over low heat, stirring constantly, until bubbles
form around edge of mixture. Chill. Pour into Cream Canister. Add whipping cream and vanilla.
Freeze as directed.
YIELD: 1-1/2 QUART S (1.5 L)
FROZEN VANILLA CUSTARD
1 cup (250 ml) half and half 2 cups (500 ml) whipping cream
3/4 cup (200ml) sugar 4 egg yolks, beaten
1 Tbsp. (15 ml) vanilla extract
Combine half and half, sugar and egg yolks in medium saucepan. Cook, stirring constantly,
over a heat until bubbles form around edge of mixture. Chill. Pour into Cream Canister.
Stir in whipping cream and vanilla. Freeze as directed.
YIELD: 1-1/2 QUART S (1.5 L)

14
SHERBET & FROZEN YOGURT
LIME SHERBET
3 cups (750 ml) milk 1 cup (250 ml) sugar
1 cup (250 ml) lime juice 1 drop green food coloring
Combine ingredients in Cream Canister. Stir until sugar is dissolved. Freeze as directed.
YIELD: 1-1/2 QUART S (1.5 L)
TANGY ORANGE SHERBET
3 cups (750 ml) milk 1 cup (250 ml) sugar
2 cups (500 ml) orange juice
Combine ingredients in Cream Canister. Stir until sugar has dissolved. Freeze as directed.
YIELD: 1-1/2 QUART S (1.5 L)
PEACH FROZEN YOGURT
1 cup (250 ml) sliced peaches, 1 cup (250 ml) sugar
fresh, frozen or canned 1 quart (1 L) unflavored yogurt
Place peaches and sugar in Osterizer®Blender container. Cover and process at a HIGH speed
until smooth. Pour into Cream Canister. Add yogurt. Stir until mixed. Freeze as directed.
YIELD: 1-1/2 QUART S (1.5 L)
RASPBERRY FROZEN YOGURT
1 cup (250 ml) raspberries, 1 cup (250 ml) sugar
fresh or frozen 1 quart (1 L) unflavored yogurt
Place raspberries and sugar in Osterizer®Blender container. Cover and process at a HIGH speed
until smooth. Pour into Cream Canister. Stir in yogurt. Freeze as directed.
YIELD: 1-1/2 QUART S (1.5 L)
BLUEBERRY FROZEN YOGURT
1 cup (250 ml) blueberries, fresh or frozen 1 quart (1 L) plain yogurt
1 cup (250 ml) sugar
Place blueberries and sugar in Osterizer®Blender container. Cover and process at a MEDIUM speed
until smooth. Pour into Cream Canister. Stir in yogurt. Freeze as directed.
YIELD: 1-1/2 QUART S (1.5 L)

15
SORBET & ICES
RASPBERRY SORBET
2/3 cup (150 ml) water 1 quart (1 L) raspberries, fresh or frozen
1/2 cup (125 ml) sugar 2 Tbsp. (30 ml) orange juice
2 tsp. (10 ml) grated lemon peel 2 Tbsp. (30 ml) lemon juice
Combine water, sugar and lemon peel in small saucepan. Bring to a boil on medium heat, stirring
constantly. Remove from heat and allow to cool. Place raspberries, orange juice and lemon juice
into Osterizer®Blender container. Cover and process at a MEDIUM speed until smooth. If desired,
pour both mixtures into Cream Canister through a fine strainer or cheesecloth to remove lemon peel
and berry seeds. Stir well. Freeze as directed.
YIELD: 1 QUART (1 L)
BLACKBERRY SORBET
2/3 cup (150 ml) water 1 quart (1 L) blackberries, fresh or frozen
1/2 cup (125 ml) sugar 2 Tbsp. (30 ml) orange juice
2 tsp. (10 ml) grated lemon peel 2 Tbsp. (30 ml) lemon juice
Combine sugar, water and lemon peel in small saucepan. Bring to a boil on medium heat,
stirring constantly. Remove from heat and allow to cool. Place blackberries, orange juice and
lemon juice into Osterizer®Blender container. Cover and process at a MEDIUM speed until smooth.
If desired, pour both mixtures into Cream Canister through a fine strainer or cheesecloth to remove
lemon peel and berry seeds. Stir well. Freeze as directed.
CRANBERRY SORBET
3 cups (750 ml) low calorie cranberry juice cocktail
3/4 -1 cup (200-250 ml) sugar (Optional)
Combine cranberry juice cocktail and sugar in cream canister. Stir until sugar is dissolved.
Freeze as directed.
YIELD: 1-1/4 QUARTS (1.25 L)
STRAWBERRY ICE
2 cups (500 ml) cold water 1 Tbsp. (15 ml) lemon juice
2 cups (500 ml) strawberries, fresh or frozen 1 cup (250 ml) cold water
1 cup (250 ml) sugar
Combine 2 cups (500 ml) water, strawberries, sugar and lemon juice in
Osterizer®Blender container.
Cover and process at a HIGH speed until smooth. Pour into Cream Canister.
Stir in remaining 1 cup(250 ml) water. Freeze as directed.
YIELD: 1-1/2 QUART S (1.5 L)

16
ICE MILK
CHOCOLATE ICE MILK
1/2 cup (125 ml) cold milk 1/2 cup (125 ml) cocoa powder
1 envelope (1/4 oz. or 7G) unflavored gelatin 1 Tbsp. (15 ml) vanilla extract
1/2 cup (125 ml) milk, heated to boiling 3 cups (750 ml) cold milk
1 cup (250 ml) sugar
Place 1/2 cup (125 ml) cold milk and gelatin into Osterizer®Blender container. Cover and process at
a LOW speed to soften gelatin. Remove feeder cap and add hot milk. Process until gelatin is dissolved.
If gelatin granules cling to container, STOP BLENDER, use a rubber spatula to push them into the
mixture. When gelatin is dissolved, add sugar, cocoa powder and vanilla. Cover and process at a
LOW speed until mixed. Pour mixture into Cream Canister. Add 3 cups (750 ml) cold milk and stir.
Freeze as directed.
YIELD: 1-1/2 QUART S (1.5 L)
VANILLA ICE MILK
1/2 cup (125 ml) cold milk 3/4 cup (200 ml) sugar
1 envelope (1/4 oz. or 7 g) unflavored gelatin 1-1/2 Tbsp. (22 ml) vanilla extract
1/2 cup (125 ml) milk, heated to boiling 3 cups (750 ml) cold milk
Place 1/2 cup (125 ml) cold milk and gelatin into Osterizer®Blender container. Cover and process at
a LOW speed to soften gelatin. Remove feeder cap and add hot milk. Process until gelatin is dissolved.
Il gelatin granules cling to container, STOP BLENDER, use a rubber spatula to push them into
the mixture. When gelatin is dissolved, add sugar and vanilla. Cover and process at a LOW speed
until mixed. Pour mixture into Cream Canister. Add 3 cups (750 ml) cold milk and stir.
Freeze as directed.
YIELD: 1-1/2 QUART S (1.5 L)
STRAWBERRY ICE MILK
1 cup (250 ml) milk 2 Tbsp. (30 ml) lemon juice
3 cups (750 ml) strawberries, fresh or frozen 2 cups (500 ml) milk
1 cup (250 ml) sugar
Place 1 cup (250 ml) milk, strawberries, sugar and lemon juice in Osterizer®Blender container.
Cover and process at a HIGH speed until smooth. Pour into Cream Canister. Stir in remaining milk.
Freeze as directed.
YIELD: 1-1/2 QUART S (1.5 L)

17
1-YEAR LIMITED WARRANTY
Sunbeam Products Inc. warrants to the original purchaser, subject to the limitations and exclusions
set forth below, that this product shall be free, in all material respects, of mechanical and electrical
defects in material and workmanship from the date of purchase for one year. This warranty does not
cover normal wear of parts or damage resulting from any of the following: negligent use or misuse
of the product, use on improper voltage or current, use contrary to operating instructions or
disassembly, repair or alteration by any person other than an authorized service center.
Our obligation hereunder is limited to repair or replacement with a new or refurbished unit of the
same or a similar model of as good or better quality, at manufacturer’s option, of the product during
the warranty period, provided that the product, along with the model number and original dated
proof of purchase, is sent postage prepaid, directly to the following address:
For products purchased in the United States:
SUNBEAM APPLIANCE SERVICE STATION
Attention: Service Department
117 Central Industrial Row
Purvis, MS 39475
For products purchased in Canada:
SUNBEAM APPLIANCE SERVICE STATION (KND)
Attention: Service Department
Please call 1-800-667-8623
consumeraffairs@consumer.sunbeam.com
Do not return this product to the place of purchase or to the manufacturer; doing so may delay the
processing of your warranty claim.
Answers to questions regarding this warranty or for your nearest authorized service location may be
obtained by calling toll-free 1-800-597-5978 or by writing to Sunbeam – Consumer Affairs, at P.O.
Box 948389, Maitland, FL 32794-8389. Answers to questions regarding this warranty or for your
nearest Canadian authorized service location may be obtained by calling toll-free in Canada
1-800-667-8623. For warranty information or for an authorized service location outside of the
United States and Canada, please see the warranty service card inserted in the product packaging.
DISCLAIMER
Product repair or replacement as provided under this warranty is your exclusive remedy.
SUNBEAM PRODUCTS, INC. SHALL NOT BE LIABLE FOR ANY INCIDENTAL OR
CONSEQUENTIAL DAMAGES FOR BREACH OF ANY EXPRESS OR IMPLIED
WARRANTY ON THIS PRODUCT OR ANY PART THEREOF. EXCEPT TO THE EXTENT
PROHIBITED BY APPLICABLE LAW, SUNBEAM PRODUCTS, INC. DISCLAIMS ANY
IMPLIED WARRANTY OF MERCHANTABILITY OR FITNESS FOR A PARTICULAR
PURPOSE OF THIS PRODUCT OR ANY PART THEREOF. Some states and provinces
do not allow the exclusion or limitation of incidental or consequential damages, or allow
limitations on how long an implied warranty lasts, so the above limitations or exclusions
may not apply to you. This warranty gives you specific legal rights, and you may also have
other rights, which vary from State to State or Province to Province.

18
Nous vous remercions d’avoir acheté la Sorbetière Oster®. Avant d’utiliser ce produit
pour la première fois, veuillez prendre quelques instants pour lire ces instructions
puis conservez-les pour toute référence ultérieure et pour les recettes qu’il contient.
Nous vous conseillons d’accorder une attention particulière aux mesures de sécurité.
Veuillez prendre connaissance des termes du service après-vente et de la garantie.
Veuillezégalement noter les renseignements suivants:
Date de Réception du Produit: ____________________________________
Numéro de Service: ___________________________________________
(situé sur le fond de l’appareil)

19
Lors de l’utilisation d’appareils électriques, toujours prendre les précautions
nécessaires, et en particulier:
• LIRE ET CONSERVER TOUTES LES INSTRUCTIONS.
• Pour écarter tout risque d’électrocution, ne pas placer le Bloc-moteur dans l’eau,
ni dans aucun autre liquide.
• Faites particulièrement attention lorsque l’appareil est utilisé par,
ou en présence d’enfants ou d’invalides.
• Débrancher après l’usage, à l’installation et à la dépose des pièces
et avant le nettoyage.
• Éviter tout contact avec les parties mobiles.
• Ne pas faire fonctionner l’appareil si le fil ou la fiche est endommagé ou après
que l’appareil ait mal fonctionné, qu’il ait été échappé ou endommagé d’une
façon quelconque. Retourner l’appareil au Centre de Service Autorisé le plus
près aux fins d’inspection, de réparation, de réglage électrique ou mécanique.
• L’utilisation d’accessoires non conseillés ou vendus par le fabricant présente
des risques d’incendie, d’électrocution ou de blessure.
• Ne pas utiliser à l’extérieur ou à des fins commerciales.
• Ne pas laisser le cordon pendre du rebord de la table ou du plan de travail ni
entrer au contact de surfaces chaudes.
CET APPAREIL EST PRÉVU UNIQUEMENT POUR USAGE MÉNAGER
PRODUITS ACHETÉS AUX ÉTATS-UNIS ET AU CANADA UNIQUEMENT
Pour réduire le risque de choc électrique, cet appareil est doté d’une fiche polarisée
(une broche est plus large que l’autre). Cette fiche ne va que dans un sens seulement
sur une prise de courant polarisée. Si la fiche ne s’enfonce pas complètement dans
la prise, la retourne et essayer de nouveau. Si elle ne s’adapte toujours pas à fond,
consulter un électricien qualifié. Veillez à respecter les mesures de securité de la
prise polarisée.
CONSERVER CES INSTRUCTIONS
PRÉCAUTIONS IMPORTANTES

20
INTRODUCTION
Toutes nos félicitations au propriétaire de cette Sorbetière Oster®«Quick Freeze™».
Cet appareil facile à utiliser préparera vos recettes glacées préférées en un clin d’œil!
Crèmes glacées décadentes et riches parfaits . . . sorbets onctueux et rafraîchissants
glaçons . . . vous serez le «chef» le plus populaire de votre quartier.
Essayez chacune des alléchantes recettes de ce livre . . . puis donnez libre cours à votre
imagination! Concassez des confiseries ou passez vos fruits préférés en purée à l’aide
de votre Mélangeur Osterizer
®
puis ajoutez-les à l’une des préparations de base.
Les combinaisons possibles sont illimitées. Et le plus extraordinaire,
c’est que vos «spécialités» peuvent être prêtes en tout juste 10 minutes!
La Sorbetière Oster
®
«Quick Freeze™» . . . une dimension nouvelle dans votre cuisine.
Cet appareil utilise du sel de table et des glaçons ordinaires. Il n’est pas nécessaire
d’utiliser de sel de mines (gemme) ni de glacé pilée.
AVANT LA PREMIÈRE UTILISATION
Après déballage, démonter l’appareil avant de l’utiliser pour la première fois.
Laver tous les éléments (à l’exception du Bloc-moteur et du Seau Isotherme)
à l’eau chaude savonneuse. Rincer et sécher immédiatement. NE PAS
IMMERGER LE SEAU ISOTHERME OU LE BLOC-MOTEUR DANS L’EAU.
ENTRETIEN
1. Si le Récipient à Crème se bloque ou ne tourne pas durant la marche:
A) Éteindre la machine et la laisser refroidir.
B) Une fois que la machine a refroidi, la remettre en marche. Si le récipient
ne tourne toujours pas, renvoyer l’appareil à un Centre de Réparation Agréé.
2. Toute autre opération d’entretien ou de réparation devra être effectuée
par un Centre de Réparation Agréé.
3. Lors de toute de demande de réparation, veiller à toujours indiquer
le Numéro de Modèle du Produit figurant sur la base de l’appareil.

21
INSTRUCTIONS
ASSEMBLAGE DU COUVERCLE DU SEAU ISOTHERME
1. Placer le Seau Isotherme sur le Bloc-moteur.
2. Verser la préparation dans le Récipient à Crème.
3. Placer le Couvercle à Glacer sur le Récipient à Crème.
4. Placer le Récipient à Crème dans le seau isotherme.
5. Ajouter la glace et le sel comme indiqué.
6. Enlever le Couvercle à Glacer.
7. Introduire la Palette.
8. Placer le Couvercle à Mélanger sur le Récipient à Crème.
9. Poser le Couvercle du Seau Isotherme sur le seau en faisant passer l’axe
de la Palette à travers l’orifice central des deux couvercles.
10. Relever les Loquets et les engager dans les Encoches du Couvercle.
Orifice Central
Alimentation
en Glace
Palette
Récipient
à Crème
Axe de Rotation
Bloc-Moteur
Électroménager
Couvercle du
Seau Isotherme
Couvercle
à Mélanger
Encoche
Slot
Seau Isotherme
Rainure
Couvercle
à Glacer

22
EXÉCUTION DES RECETTES
Sont nécessaires (approximativement): 500 g (2 tasses) de sel de table
et le contenu de 6 bacs à glaçons.
Il n’est PAS NÉCESSAIRE d’utiliser de sel de mines(gemme) ni de glace pilée
dans cet appareil.
1. Suivre les instructions de la recette.
2. Verser la préparation dans le Récipient à Crème
(pour éviter tout débordement ou dommage de l’appareil,
ne pas préparer plus d’une quantité de glace à la fois).
3. Mettre le Couvercle à Glacer en place.
4. Placer le Récipient à Crème dans le Seau Isotherme.
5. Disposer la glace et le sel en couches de la manière suivante:
A. Verser 250 ml (1 tasse) d’eau froide dans le Seau Isotherme.
B. Placer une couche de 2,5 cm (1 inch) de glaçons autour du Récipient à Crème
dans le Seau Isotherme.
(S
UGGESTION: La boîte de crème doit rester debout durant l'étagement.)
C. Saupoudrer 75 g (1/3 tasse) de sel de table ou 50 g (1/4 tasse) de gros sel (Kasher)
sur les glaçons.
D. Continuer à alterner les couches de glaçons et de sel jusqu’au sommet
du Seau Isotherme.
E. Verser 250 ml (1 tasse) d’eau froide surla dernière couche de glaçons.
6. Enlever le Couvercle à Glacer
7. Introduire la Palette et mettre le Couvercle à Mélanger
en place.
8. Placer le Couvercle du Seau Isotherme sur le seau.
Fermer le loquet.
9. Mettre la sorbetière en marche.
10. À mesure que la glace fond, ajouter des glaçons par
les orifices d’alimentation en glace. Verser 50 g (1/4
tasse) de sel à chaque fois que 250 ml (1 tasse) de
glaçons auront été ajoutés.
11. Faire tourner la machine jusqu’à ce que la préparation atteigne le niveau
du Couvercle à Mélanger ou qu’elle présente la consistance désirée.
RAPPEL: POUR ÉCARTER LES RISQUES DE DOMMAGE DE LA MACHINE,
NE PAS PROLONGER LE PROCESSUS INUTILEMENT.

23
DURÉES APPROXIMATIVES
Crème Glacée – 18 à 25 minutes Glaçons et Sorbets– 12 à 20 minutes
Glace au Lait – 20 à 25 minutes Yogourt Glace – 18 à 25 minutes
Glace aux Oeufs – 18 à 25 minutes Lait Glace – 12 à 20 minutes
12. Utilisation de l’Orifice Central:
(Utiliser l’orifice central pour ajouter des noix et morceaux de chocolat ou pour
produire des volutes dans la glace . . . ses usages sont sans limites.)
A. Placer les ingrédients à ajouter dans un pot-verseur gradué.
B. Lorsque la préparation glacee se trouve à 1,2 cm (1/2 inch) du Couvercle
à Mélanger (ou que la consistance désirée a été atteinte), verser les ingrédients
secs à travers l’orifice central. Faire tourner la machine jusqu’à ce que la
préparation présente la consistance désirée. Ne pas incorporer ces ingrédients
trop tôt. Ils se déposeraient au fond du récipient et ralentiraient le processus
de congélation.
C. Pour produire des volutes dans la glace, lorsque la préparation glacee se trouve
à 1,2 cm (1/2 inch) du Couvercle à Mélanger (ou que la consistance désirée
a été atteinte), verser par l’orifice central des ingrédients liquides qui sont à
la température de l’air ambiant. NE PAS VERSER DE SIROPS CHAUDS DANS
LA PRÉPARATION glacée. Une fois que ces ingrédients liquides ont été ajoutés,
laisser la Palette tourner UNE FOIS de manière à ce que le récipient n’effectue
qu’un seul tour.
D. Conseil pratique: Plutôt que de concasser les morceaux de chocolat, les faire
fondre et les laisser légèrement refroidir. Lorsque la glace est presque terminée,
verser ce mélange fondant en fin filet à travers l’orifice central. Le chocolat durcit
immédiatement et prend la forme de «copeaux» de chocolat.
13. Éteindre la sorbetière.
*Remarque: En raison de leur densité ou de leur quantité, certaines préparations
ne gonflent pas jusqu’au sommet du récipient.
DÉMONTAGE DE L’APPAREIL
1. Débrancher la sorbetière «Quick Freeze
™
».
2. Séparer le Seau Isotherme du Bloc-Moteur.
3. Ouvrir les Loquets du Couvercle du Seau Isotherme. Enlever le Couvercle.
4. Sortir le Récipient à Crème du Seau Isotherme.
5. Essuyer le Couvercle à Mélanger pour éliminer les résidus de sel puis l’enlever.
Le mettre de côté.
6. Extraire la Palette. La racler à l’aide d’une spatule en caoutchouc.
7. Servir la glace avec des garnitures ou la faire durcir suivant les instructions ci-dessous.

24
POUR FAIRE DURCIR LA GLACE
Au Congélateur:
1. Tasser la glace dans le Récipient à Crème. Fermer hermétiquement avec une couvercle
en plastique souple (pour pouvoir réutiliser immédiatement la sorbetière,
transvaser la glace dans un autre récipient en plastique.
Fermer hermétiquement avec un couvercle bien serré).
2. Laisser à congeler durant plusieurs heures ou jusqu’à obtention
de la consistance désirée.
Dans la Sorbetière «Quick Freeze™»
1. Une fois que la glace a atteint la consistance recherchée, éteindre la sorbetière.
Ne pas ouvrir le Seau Isotherme.
2. Ôter le Seau Isotherme du Bloc-moteur. Ajouter des glaçons si nécessaire
(la glace aura encore une consistance molle).
3.
Couvrir le dessus du Seau Isotherme avec du papier journal ou un tissu épais pour isoler.
4. Laisser la préparation durcir pendant 2 à 3 heures ou jusqu’à obtention
de la consistance désirée.
SOINS ET NETTOYAGE
1. Laver le Récipient à Crème, la Palette et les Couvercles à Glacer et à Mélanger à l’eau
chaude savonneuse. Bien rincer et sécher.
2. Nettoyer minutieusement le Seau Isotherme et son Couvercle avec un chiffon propre
et humide pour éliminer les résidus de sel.
NE PAS IMMERGER LE SEAU
ISOTHERME DANS L’EAU.
3. Essuyer le Bloc-moteur avec un chiffon propre et humide pour éliminer les résidus
de sel. Sécher.
NE PAS IMMERGER LE BLOC-MOTEUR DANS L’EAU.
Ceci présente des risques d’électrocution et de dommages de l’appareil.
4. Ne pas réassembler la sorbetière pour une nouvelle utilisation ou pour l’entreposer
avant que tous les éléments soient totalement secs.
5. Ne laver aucun élément au lave-vaisselle.
CONSEILS ET TIPS
CONSEILS UTILES POUR LA CONGÉLATION
La durée nécessaire à la congélation et la consistance de la crème glacee varient
en fonction de la nature des ingrédients, de leur température, de la taille des glaçons,
de la grosseur du sel et de la température ambiante. Les conseils suivants permettent
de préparer une glace selon ses propres préférences:

25
1. Pour accélérer le processus de congélation de la préparation, toujours utiliser
des ingrédients refroidis.
2. Après le mélange des ingrédients dans le Récipient à Crème, couvrir et placer au
réfrigérateur pour garder au frais jusqu’à ce que la sorbetière soit prête à l’utilisation.
3. Si la glace présente des grumeaux ou si elle a congelé trop vite, essayer de réduire
les couches de sel de table de 75 g (1/3 tasse) à 50 g (1/4 tasse).
4. Si la glace est trop molle ou si elle n’a pas congelé assez vite, augmenter les couches
de sel de table de 75 g (1/3 tasse) à 125 g (1/2 tasse).
5. Lors de l’utilisation de ses propres recettes, veiller à ce que l’ensemble des ingrédients
ne dépasse pas 1,25 litres.
6. Pour obtenir une glace bien ferme. Ne pas remplir le récipient à plus de la moitié
(1 litre). Procéder normalement.
7. NE PAS PROLONGER LE PROCESSUS INUTILEMENT. Si le mouvement du récipient
ralentit ou s’arrête, alors la préparation est trop ferme. ÉTEINDRE LA SORBETIÈRE.
8. Lors de l’utilisation de préparations cuites, laisser refroidir avant de congeler.
9. Ne pas ajouter les ingrédients supplémentaires (morceaux de chocolat, noix, sirops)
trop tôt. Ils se déposeraient au fond du récipient et ralentiraient le processus
de congélation.
POUR PLUS DE GOÛT
1. Toujours utiliser de véritables extraits de vanille ou autres. Les imitations perdent
leur parfum à la congélation.
2. Lors de la cuisson d’œufs dans une préparation, cuire à feu doux en remuant
constamment. Ne pas laisser la préparation surchauffer et cailler. La congélation
d’un mélange caillé produira une glace avec beaucoup de grumeaux.
3. Plutôt que de concasser les morceaux de chocolat, les faire fondre et les laisser
légèrement refroidir. Lorsque la glace est presque terminée, verser ce mélange
fondant en fin filet à travers l’orifice central. Le chocolat durcit immédiatement
et prend la forme de «copeaux» de chocolat dans la glace.
4. Les fruits et noix se mélangent mieux s’ils sont hachés plutôt qu’entiers.
5. Les colorants alimentaires sont à utiliser avec modération. Toujours les ajouter avant
la congélation. Bien mélanger.
6. L’alcool empêche la congélation, ne pas en utiliser. Utiliser des parfums ou extraits.

26
GLACE
GLACE À LA VANILLE FACILE
2 tasses (500 ml) de crème à fouetter 1 tasse (250 ml) de sucre
2 tasses (500 ml) de demi-crème 1 c. à soupe (15 ml) d’extrait de vanille
Combiner tous ces ingrédients dans le Récipient à Crème. Remuer jusqu’à dissolution complète
du sucre. Suivre les instructions pour la congélation.
QUANTITÉ: 1,5 LITRES
VARIANTES:
Grains de Chocolat – Ajouter 2/3 tasse (150 ml) de chocolat en mini-grains ou haché
immédiatement après la congélation*.
Biscuits Fourrés – Écraser 10 biscuits au chocolat fourrés et les mélanger à la glace
immédiatement après la congélation*.
Délice aux Arachides – Combiner 1/2 tasse (125 ml) de sauce au chocolat (fudge)
et 3/4 tasse (200 ml) darachides espagnoles. Les incorporer en volute dans la glace
immédiatement après la congélation*.
Tourbillon au Chocolat – Incorporer en volute 1/2 tasse (125 ml) de sauce au chocolat
(fudge) dans la glace immédiatement après la congélation*.
Tourbillon au Caramel – Incorporer en volute 1/2 tasse (125 ml) de sauce au caramel
dans la glace immédiatement après la congélation*.
Cerise – Ajouter 1 tasse (250 ml) de cerises au marasquin hachées à la glace
immédiatement après la congélation*.
Éclats de Menthe – Ajouter 2/3 tasse (150 ml) de bonbons à la menthe écrasés
à la glace immédiatement après la congélation*.
*Voir la section UTILISATION DE L’ORIFICE CENTRAL à la Page 23.
GLACE À LA CANNELLE
2 tasses (500 ml) de crème à fouetter 1 c. à soupe (15 ml) de cannelle moulue
2 tasses (500 ml) de demi-crème 1-1/2 c. à thé (7 ml) d’extrait de vanille
1 tasse (250 ml) de sucre
Combiner tous ces ingrédients dans le Récipient à Crème. Remuer jusqu’à dissolution complète
du sucre. Suivre les instructions pour la congélation.
QUANTITÉ: 1,5 LITRES
GLACE AU CHOCOLAT FACILE
2 tasses (500 ml) de demi-crème 1 c. à thé (5 ml) d’extrait de vanille
1-1/2 tasses (375 ml) de sucre 2 tasses (500 ml) de crème à fouetter
1/2 tasse (125 ml) de cacao en poudre
Combiner la demi-crème, le sucre, le cacao et la vanille dans le récipient du Mélangeur Osterizer.
®
Couvrir et faire tourner le Mélangeur à vitesse LENTE jusqu’à ce que le mélange soit lisse.
Verserdans le Récipient à Crème. Ajouter la crème à fouetter. Suivre les instructions pour
la congélation.
QUANTITÉ: 1,5 LITRES

27
VARIANTES:
Amandes Grillées – Ajouter 3/4 tasse (200 ml) d’amandes effilées grillées à la glace
immédiatement après la congélation*.
Tourbillon à la Guimauve – Incorporer en volute 1 tasse (250 ml) de crème de
guimauve dans la glace immédiatement après la congélation*.
Surprise à l’Orange – Réduire la quantité de demi-crème à 1 tasse (250 ml).
Ajouter 3/4 tasse (200 ml) de jus d’orange avant congélation. Suivre les instructions
pour la congélation.
Délice «Rocky Road» – Incorporer en volute 1/2 tasse (125 ml) de mini-guimauves
et 125 ml d’arachides dans la glace immédiatement après la congélation*.
Chocolat aux Grains de Chocolat – Ajouter 1/2 tasse (125 ml) de chocolat en
mini-grains ou haché à la glace immédiatement après la congélation*.
Moka – Ajouter 1-1/2 c. à thé (7 ml) de café instantané en poudre à la préparation
avant congélation. Suivre les instructions pour la congélation.
Moka-Chocolat – Ajouter 1/2 tasse (125 ml) de chocolat en mini-grains ou haché
à la glace au moka (ci-dessus) immédiatement après la congélation*.
*Voir la section UTILISATION DE L’ORIFICE CENTRAL à la Page 23.
GLACE À LA FRAISE
2 tasses (500 ml) de fraises fraîches 1 tasse (250 ml) de sucre
ou congelées 2 c. à thé (10 ml) d’extrait de vanille
2 tasses (500 ml) de crème à fouetter 1 goutte de colorant alimentaire rouge
1 tasse (250 ml) de demi-crème
Placer les fraises dans le Mélangeur Osterizer.®Couvrir et faire tourner le Mélangeur
à vitesse LENTE jusqu’à ce quelles soient hachées. Verser dans le Récipient à Crème.
Ajouter les autres ingrédients. Remuer jusqu’à dissolution complète du sucre.
Suivre les instructions pour lacongélation.
QUANTITÉ: 1,5 LITRES
GLACE AU CAFÉ
2 tasses (500 ml) de crème à fouetter 1-1/2 c. à soupe (22 ml) de café
2 tasses (500 ml) de demi-crème instantané en poudre
1 tasse (250 g) de sucre 1-1/2 c. à thé (7 ml) d’extrait de vanille
Combiner tous ces ingrédients dans le Récipient à Crème. Remuer jusqu’à dissolution complète
du sucre et du café instantané. Suivre les instructions pour la congélation.
QUANTITÉ: 1,5 LITRES
VARIANTES:
Café et Grains de Chocolat – Ajouter 1/2 tasse (125 ml) de chocolat en mini-grains ou haché
dans la glace à la fin de sa congélation*.

28
GLACE BEURRE ET NOIX DE PÉCAN
2 tasses (500 ml) de demi-crème 2 tasses (500 ml) de crème à fouetter
1 tasse (250 ml) de sucre brun 1 c. à thé (5 ml) d’extrait de vanille
2 c. à soupe (30 ml) de beurre 1/2 tasse (125 ml) de noix de pécan
grillées et hachées
Combiner la demi-crème, le sucre et le beurre dans une casserole moyenne. Cuire à feu doux
sans cesser de remuer jusqu’à ébullition sur le pourtour de la casserole. Faire refroidir. Verser la
préparation dans le Récipient à Crème. Ajouter la crème à fouetter le la vanille. Suivre les
instructions pour la congélation. Ajouter les noix de pécan immédiatement après congélation*.
QUANTITÉ: 1,5 LITRES
GLACE BEURRE D’ARACHIDE ET GRAINS DE CHOCOLAT
2 tasses (500 ml) de demi-crème 1 c. à thé (5 ml) d’extrait de vanille
1-1/2 tasse (375 ml) de sucre 2 tasses (500 ml) de crème à fouetter
1/2 tasse (125 ml) de beurre d’arachide 1/2 tasse (125 ml) de chocolat en mini-grains
grossier ou haché
Combiner la demi-crème, le sucre, le beurre d’arachide et la vanille dans le récipient du Mélangeur
Osterizer.®Couvrir et faire tourner le Mélangeur à vitesse MOYENNE jusqu’à ce que les ingrédients
soient mélangés. Verser dans le Récipient à Crème. Ajouter la crème à fouetter. Suivre les
instructions pour la congélation. Ajouter les grains de chocolat immédiatement après congélation*.
QUANTITÉ: 1,5 LITRES
*Voir la Section UTILISATION DE L’ORIFICE CENTRAL à la Page 23.
GLACE «BUTTER BRICKLE»
2 tasses (500 ml) de demi-crème 2 tasses (500 ml) de crème à fouetter
1 tasse (250 ml) de sucre brun 1 c. à thé (5 ml) d’extrait de vanille
2 c. à soupe (30 ml) de beurre 1/2 tasse (125 ml) de morceaux de
confiserie «butter brickle»
Combiner la demi-crème, le sucre et le beurre dans une casserole moyenne. Cuire à feu doux sans
cesser de remuer jusqu’à ébullition sur le pourtour de la casserole. Faire refroidir. Verserla préparation
dans le Récipient à Crème. Ajouter la crème à fouetter le la vanille. Suivre les instructions pour
la congélation. Ajouter les morceaux de confiserie immédiatement après congélation*.
QUANTITÉ: 1,5 LITRES
GLACE À LA MENTHE ET AUX GRAINS DE CHOCOLAT
2 tasses (500 ml) de crème à fouetter 1-1/2 c. à thé (7 ml) d’extrait de vanille
2 tasses (500 ml) de demi-crème 1 goutte de colorant alimentaire vert
1 tasse (250 ml) de sucre 2/3 tasse (150 ml) de chocolat en
mini-grains ou haché
Combiner tous les ingrédients sauf le chocolat dans le Récipient à Crème.
Remuer jusqu’à dissolution complète du sucre. Suivre les instructions pour la congélation.
Ajouter le chocolat immédiatement après congélation*.
QUANTITÉ: 1,5 LITRES

29
GLACE AU CITRON
2 tasses (500 ml) de crème à fouetter 1-1/2 c. à thé (7 ml) d’extrait de vanille
2 tasses (500 ml) de demi-crème 1/2 c. à thé (2 ml) de zest de citron
1-1/2 tasse (375 ml) de sucre 3/4 tasse (200 ml) de bonbons acidulés
1/3 tasse (75 ml) de jus de citron au citron, écrasés
Combiner tous les ingrédients sauf les bonbons au citron dans le Récipient à Crème.
Remuer jusqu’à dissolution complète du sucre. Suivre les instructions pour la congélation.
Ajouter les bonbons au citron immédiatement après congélation*.
QUANTITÉ: 1,5 LITRES
*Voir la section UTILISATION DE L’ORIFICE CENTRAL à la Page 23.
GLACE AUX OEUFS
GLACE AUX OEUFS AU CHOCOLAT
1 tasse (250 ml) de demi-crème 4 jaunes d’œuf
1 tasse (250 ml) de sucre 2 tasses (500 ml) de crème à fouetter
1/2 tasse (125 ml) de cacao en poudre 1 c. à thé (5 ml) d’extrait de vanille
Combiner les quatre premiers ingrédients dans le récipient du Mélangeur Osterizer.
®
Couvrir et faire tourner le Mélangeur à vitesse LENTE jusqu’à ce que le mélange soit lisse.
Verserdans une casserole moyenne. Cuire à feu doux sans cesser de remuer jusqu’à ébullition
sur le pourtour de la casserole. Faire refroidir. Verser dans le Récipient à Crème. Ajouter la crème
à fouetter et la vanille. Suivre les instructions pour la congélation.
QUANTITÉ: 1 LITRE
GLACE AUX OEUFS AU CHOCOLAT DOUX-AMER
1 tasse (250 ml) de demi-crème 4 jaunes d’œuf
3/4 tasse (200 ml) de sucre 2 tasses (500 ml) de crème à fouetter
1/2 tasse (125 ml) de cacao en poudre 1 c. à thé (5 ml) d’extrait de vanille
Combiner les quatre premiers ingrédients dans le récipient du Mélangeur Osterizer.®Couvrir et
faire tourner le Mélangeur à vitesse LENTE jusqu’à ce que le mélange soit lisse. Verser dans une
casserole moyenne. Cuire à feu doux sans cesser de remuer jusqu’à ébullition sur le pourtour de la
casserole. Faire refroidir. Verser dans le Récipient à Crème. Ajouter la crème à fouetter et la vanille.
Suivre les instructions pour la congélation.
QUANTITÉ: 1 LITRE
GLACE AUX OEUFS À LA VANILLE
1 tasse (250 ml) de demi-crème 2 tasses (500 ml) de crème à fouetter
3/4 tasse (200 ml) de sucre 4 jaunes d’œuf, battus
1 c. à soupe (15 ml) d’extrait de vanille
Combiner la demi-crème, le sucre et les jaunes d’œuf dans une casserole moyenne. Cuire à feu
doux sans cesser de remuer jusqu’à ébullition sur le pourtour de la casserole. Faire refroidir.
Verserdans le Récipient à Crème. Ajouter la crème à fouetter et la vanille.
Suivre les instructions pour la congélation.
QUANTITÉ: 1,5 LITRES

30
GLACE AU LAIT ET YOGOURT GLACÉ
GLACE AU LAITÀLALIME
3 tasses (750 ml) de lait 1 tasse (250 ml) de sucre
1 tasse (250 ml) de jus de lime 1 goutte de colorant alimentaire vert
Combiner tous les ingrédients dans le Récipient à Crème. Remuer jusqu’à dissolution complète
du sucre. Suivre les instructions pour la congélation.
QUANTITÉ: 1,5 LITRES
GLACE AU LAITÀL’ORANGE
3 tasses (750 ml) de lait 1 tasse (250 ml) de sucre
2 tasses (500 ml) de jus d’orange
Combiner tous les ingrédients dans le Récipient à Crème. Remuer jusqu’à dissolution complète
du sucre. Suivre les instructions pour la congélation.
QUANTITÉ: 1,5 LITRES
YOGOURT GLACÉ À LA PÊCHE
1 tasse (250 ml) de pêches coupées 1 tasse (250 ml) de sucre
fraîches, surgelées ou en boîte 1 litre de yogourt nature
Placer les pêches et le sucre dans le Mélangeur Osterizer.®Couvrir et faire tourner le Mélangeur
à vitesse RAPIDE jusqu’à ce que le mélange soit lisse. Verser dans le Récipient à Crème.
Ajouter le yogourt. Bien mélanger. Suivre les instructions pour la congélation.
QUANTITÉ: 1,5 LITRES
YOGOURT GLACÉ À LA FRAMBOISE
1 tasse (250 ml) de framboises 1 tasse (250 ml) de sucre
fraîches ou surgelées 1 litre de yogourt nature
Placer les framboises et le sucre dans le Mélangeur Osterizer.®Couvrir et faire tourner le Mélangeur
à vitesse RAPIDE jusqu’à ce que le mélange soit lisse. Verser dans le Récipient à Crème.
Ajouter le yogourt. Bien mélanger. Suivre les instructions pour la congélation.
QUANTITÉ: 1,5 LITRES
YOGOURT GLACÉ AUX BLEUETS
1 tasse (250 ml) de bleuets frais ou surgelés 1 litre de yogourt nature
1 tasse (250 ml) de sucre
Placer les bleuets et le sucre dans le Mélangeur Osterizer.®Couvrir et faire tourner le Mélangeur
à vitesse MOYENNE jusqu’à ce que le mélange soit lisse. Verser dans le Récipient à Crème.
Ajouter le yogourt. Bien mélanger. Suivre les instructions pour la congélation.
QUANTITÉ: 1,5 LITRES

31
SORBET ET GLAÇONS
SORBET À LA FRAMBOISE
2/3 tasse (150 ml) d’eau 4 tasses (1 L) de framboises fraîches ou surgelées
1/2 tasse (125 ml) de sucre 2 c. à soupe (30 ml) de jus d’orange
2 c. à thé (10 ml) de zest de citron 2 c. à soupe (30 ml) de jus de citron
Combiner l’eau, le sucre et le zest de citron dans une petite casserole. Amener à ébullition à feu
moyen sans cesser de remuer. Ôter du feu et laisser refroidir. Placer les framboises, le jus d’orange
et le jus de citron dans le Mélangeur Osterizer.®Couvrir et faire tourner le Mélangeur à vitesse
MOYENNE jusqu’à ce que le mélange soit lisse. Il est possible de passer les deux mélanges à la
passoire ou à l’étamine pour éliminer le zest de citron et les pépins de framboises en les versant
dans le Récipient à Crème. Bien mélanger. Suivre les instructions pour la congélation.
QUANTITÉ: 1 LITRE
SORBET À LA MÛRE
2/3 tasse (150 ml) d’eau 4 tasses (1 L) de mûres fraîches ou surgelées
1/2 tasse (125 ml) de sucre 2 c. à soupe (30 ml) de jus d’orange
2 c. à thé (10 ml) de zest de citron 2 c. à soupe (30 ml) de jus de citron
Combiner l’eau, le sucre et le zest de citron dans une petite casserole. Amener à ébullition à feu
moyen sans cesser de remuer. Ôter du feu et laisser refroidir. Placer les mûres, le jus d’orange
et le jus de citron dans le Mélangeur Osterizer.®Couvrir et faire tourner le Mélangeur à vitesse
MOYENNE jusqu’à ce que le mélange soit lisse. Il est possible de passer les deux mélanges
à la passoire ou à l’étamine pour éliminer le zest de citron et les pépins de framboises en
les versant dans le Récipient à Crème. Bien mélanger. Suivre les instructions pour la congélation.
SORBET À LA CANNEBERGE
3 tasses (750 ml) de cocktail de jus 3/4 à 1 tasse (200 à 250 ml) de sucre
de canneberge hypocalorique (facultatif)
Combiner le cocktail de jus de canneberge et le sucre dans le Récipient à Crème.
Remuer jusqu’à dissolution complète du sucre. Suivre les instructions pour la congélation.
QUANTITÉ: 1,25 LITRES
GLAÇON À LA FRAISE
2 tasses (500 ml) d’eau froide 1 tasse (250 ml) de sucre
2 tasses (500 ml) de fraises, 1 c. à soupe (15 ml) de jus de citron
fraîches ou surgelées 1 tasse (250 ml) d’eau froide
Combiner 2 tasses (500 ml) d’eau, les fraises, le sucre et le jus de citron dans le Mélangeur
Osterizer.®Couvrir et faire tourner le Mélangeur à vitesse RAPIDE jusqu’à ce que le mélange soit
lisse. Verser dans le Récipient à Crème. Ajouter le reste de l’eau (250 ml). Suivre les instructions
pour la congélation.
QUANTITÉ: 1,5 LITRES

32
LAIT GLACÉ
LAIT GLACÉ AU CHOCOLAT
1/2 tasse (125 ml) de lait froid 3 tasses (750 ml) de lait froid
1 sachet (7 g ou 1/4 oz.) de gélatine 1/2 tasse (125 ml) de cacao en poudre
non parfumée 1 c. à soupe (15 ml) d’extrait de vanille
1/2 tasse (125 ml) de lait porté à ébullition 1 tasse (250 ml) de sucre
Verser 1/2 tasse (125 ml) de lait froid et la gélatine dans le Mélangeur Osterizer.®Couvrir et faire
tourner le Mélangeur à vitesse LENTE pour ramollir la gélatine. Ôter le bouchon d’alimentation et
ajouter le lait chaud. Faire tourner le Mélangeur jusqu’à ce que la gélatine soit dissoute. Si des
grumeaux de gélatine restent collés aux parois, ARRÊTER LE MÉLANGEUR et les pousser dans
la préparation à l’aide d’une spatule en caoutchouc. Une fois la gélatine dissoute, ajouter le sucre,
le cacao et la vanille. Couvrir et bien mélanger à vitesse LENTE. Verser dans le Récipient à Crème.
Ajouter 3 tasses (750 ml) de lait froid et mélanger. Suivre les instructions pour la congélation.
QUANTITÉ: 1,5 LITRES
LAIT GLACÉ À LA VANILLE
1/2 tasse (125 ml) de lait froid 1-1/2 c. à soupe (22 ml) d’extrait de vanille
1 sachet (7 g ou 1/4 oz.) de gélatine 1/2 tasse (125 ml) de lait porté
parfumée à non ébullition
3/4 tasse (200 ml) de sucre 3 tasses (750 ml) de lait froid
Verser 1/2 tasse (125 ml) de lait froid et la gélatine dans le Mélangeur Osterizer.®Couvrir et faire
tourner le Mélangeur à vitesse LENTE pour ramollir la gélatine. Ôter le bouchon dalimentation et
ajouter le lait chaud. Faire tourner le Mélangeur jusqu’à ce que la gélatine soit dissoute. Si des
grumeaux de gélatine restent collés aux parois, ARRÊTER LE MÉLANGEUR et les pousser dans
la préparation à laide dune spatule en caoutchouc. Une fois la gélatine dissoute, ajouter le sucre
et la vanille. Couvrir et bien mélanger à vitesse LENTE. Verser dans le Récipient à crème.
Ajouter 3 tasses (750 ml) de lait froid et mélanger. Suivre les instructions pour la congélation.
QUANTITÉ: 1,5 LITRES
LAIT GLACÉ À LA FRAISE
1 tasse (250 ml) de lait 2 c. à soupe (30 ml) de jus de citron
3 tasses (750 ml) de fraises fraîches ou surgelées 2 tasses (500 ml) de lait
1 tasse (250 ml) de sucre
Verser 1 tasse (250 ml) de lait, les fraises, le sucre et le jus de citron dans le Mélangeur Osterizer.
®
Couvrir et faire tourner le Mélangeur à vitesse RAPIDE jusqu’à ce que le mélange soit lisse. Verser
dans le Récipient à crème. Ajouter le reste du lait froid. Suivre les instructions pour la congélation.
QUANTITÉ: 1,5 LITRES

33
GARANTIE LIMITÉE 1 AN
Sunbeam Products Inc. garantit à l’acheteur initial, sous couvert des limitations et exclusions stipulées
ci-après, que ce produit est exempt, sous tous les aspects matériels, de tout défaut mécanique et électrique
de matériel ou de fabrication pendant un an à compter de la date d’achat. Cette garantit ne couvre pas l’usure
normale des pièces ni les dommages résultant des situations suivantes: usage négligent ou abusif du produit,
courant ou tension d’alimentation inadaptés, utilisation en contradiction avec le mode d’emploi ou démontage,
réparation ou modification par toute personne autre que le personnel d’un centre de réparation agréé.
Notre responsabilité est limitée à la réparation ou au remplacement de l'appareil par un modèle similaire de
bonne
ou de meilleure qualité, selon le choix du constructeur et cela durant la période de guarantie, si le
produit, accompagné du numéro de modèle et de la preuve d'achat datée est envoyé par courrier affranchi à
l'adresse suivante:
Produits achetés aux États-Unis:
SUNBEAM APPLIANCE SERVICE STATION
Attention: Service Department
117 Central Industrial Row
Purvis, MS 39475
Produits achetés au Canada:
SUNBEAM APPLIANCE SERVICE STATION (KND)
Attention: Service Department
Please call 1-800-667-8623
consumeraffairs@consumer.sunbeam.com
Ne pas renvoyer l’appareil au revendeur ou au fabricant; ceci aurait pour effet de retarder le traitement de la
demande de garantie.
Pour toute question relative à cette garantie ou pour obtenir l’adresse du centre de réparation agréé le plus
proche, appeler sans frais le 1-800-597-5978 ou écrire à Sunbeam – Consumer Affairs, P.O. Box 948389,
Maitland, FL 32794-8389.
Au Canada, pour toute question relative à cette garantie ou pour obtenir l’adresse du centre de réparation agréé
canadien le plus proche, appeler sans frais le 1-800-667-8623. Pour toutes questions relatives à cette garantie
ou
pour obtenir l’adresse du centre de réparation agréé le plus proche en-dehors des États-Unis
et du Canada,
consulter la carte de service de la garantie jointe à l’emballage du produit.
AVERTISSEMENT
La réparation ou le remplacement du produit suivant les termes de cette garantie constituent votre unique
recours.
SUNBEAM PRODUCTS, INC. NE POURRA ÊTRE TENUE RESPONSABLE DE DOMMAGES
ACCESSOIRES OU INDIRECTS POUR RUPTURE D’UNE QUELCONQUE GARANTIE EXPRESSE OU
IMPLICITE CONCERNANT CE PRODUIT OU UNE PARTIE DE CE PRODUIT. DANS LES LIMITES DE
LA RÉGLEMENTATION EN VIGUEUR, SUNBEAM PRODUCTS, INC. N’OFFRE AUCUNE GARANTIE
I
MPLICITE QUANT À L’ADÉQUATION DE CE PRODUIT OU D’UNE PARTIE DE CE PRODUIT À UN
USAGE PARTICULIER OU À LA COMMERCIALISATION. Certains états ou provinces n’autorisant pas
l’exclusion ou la limitation des dommages accessoires ou indirects ou autorisant uniquement des limitations
sur la durée de validité d’une garantie implicite, les limitations et exclusions ci-dessus peuvent ne pas
s’appliquer à votre situation. Cette garantie vous accorde des droits juridiques particuliers et il est possible que
vous ayez d’autres droits, différents d’un état ou d’une province à l’autre.

34
NOTES

35
NOTES

©1999 Sunbeam Corporation or its affiliated companies. All rights reserved.
Oster®and Osterizer®are registered trademarks of Sunbeam Corporation or its affiliated companies.
Quick Freeze
™
is a trademark of Sunbeam Corporation or its affiliated companies.
Distributed by Sunbeam Products Inc., Delray Beach, Florida 33445, or an affiliated company.
©1999 Sunbeam Corporation ou ses sociétés affiliées. Tous droits réservés.
Oster
®
et Osterizer®sont marques déposées de Sunbeam Corporation ou de ses sociétés affiliées.
Quick Freeze™est une marque de Sunbeam Corporation ou de ses sociétés affiliées.
Distribué par Sunbeam Products Inc., Delray Beach, Florida 33445, ou une société affiliée.
P.N.27989-
 Loading...