

™
9000 SERIES
JUICE EXTRACTOR
EXTRACTOR DE JUGOS
Safety
www.oster.com
USER GUIDE
How to use
Cleaning
Recipes
Guarantee

IMPORTANT SAFEGUARDS
When using electrical appliances, basic safety
precautions should always be followed including
the following:
1. Read all instructions before use, and keep for
future reference.
2. To protect against risk of electrical shock, do not
put unit base or electrical cord in water or any
other liquid. This may cause personal injury or
damage to the product.
3. Close supervision is necessary when using this
appliance near children.
4. Turn unit off and unplug from outlet to discon-
nect appliance, before putting on or taking off
parts, before cleaning and when not in use.
5. Avoid contact with moving parts. Do not touch
the small cutting blades located at the base of
the stainless steel filter of the juicer accessory.
6. Do not operate any appliance with a damaged
cord or plug or after the appliance malfunctions,
or is dropped or damaged in any manner. Take
appliance to the nearest authorized service
center for examination, repair or mechanical
adjustment.
7. The use of attachments not recommended or
sold by the manufacturer may cause fire,
electrical shock or injury.
8. Do not let cord touch hot surfaces or hang over
table edges or counters.
9. Do not use your juice extractor if any part
is broken.
10. Do not use outdoors or for commercial
purposes.
11. Always make sure juicer lid is clamped securely
in place before motor is turned on. Do not
unfasten the locking arm while juicer is in
operation.
12. Do not operate this appliance continuously for
more than 5 minutes to avoid overheating the
motor.
13. Be sure to turn switch to off position “OFF” after
each use of your unit. Make sure the motor
stops completely before disassembling.
14. While using the juice extractor accessory, do
not put your fingers or other objects into the
unit opening while it is in operation. If food
becomes lodged in the opening, use food
pusher or another piece of fruit or vegetable to
push it down. When this method is not possible
turn the motor off, unplug from outlet and disassemble juicer to remove the remaining food.
15. Do not use the appliance if the rotating sieve/
filter is damaged.
16. Do not push produce into the feed chute
with your finger. Always use the food pusher
provided.
17. This appliance is intended for household use
only, not for commercial or industrial use. Use
for anything other than intended will void the
guarantee.
18. Do not attempt to defeat the clamps interlock
mechanism.
19. Always make sure the juice extractor is properly
and completely assembled before operating.
The unit will not turn on unless properly
assembled.
20. Always use unit on a dry, level surface.
21. Always turn unit off first before unplugging it
from outlet.
22. To reduce the risk of fire or electric shock, do
not attempt to remove the bottom cover of
the unit. There are no serviceable parts inside.
Repair should only be done by authorized
service personnel.
23. Do not place this appliance on or near a hot
gas or electric burner or where it could touch a
heated oven.
24. This appliance is not intended for use by
persons (including children) with reduced
physical, sensory or mental capabilities, or
lack of experience and knowledge, unless they
have been given supervision or instruction
concerning use of the appliance by a person
responsible for their safety.
SAVE THESE INSTRUCTIONS
www.oster.com1

(For 120 & 127 Volts Only)
To reduce the risk of electrical shock, this appliance has a polarized plug (one blade
is wider than the other). This plug ts a polarized outlet only one way. This is a safety
feature intended to help reduce the risk of electrical shock. If the plug does not t fully
into the outlet, reverse the plug. If it still does not t, contact a qualied electrician. Do
not attempt to defeat this safety feature.
Thank you for purchasing the Oster® Juice Extractor.
Before you use this product for the rst time, please take a few moments
to read these instructions and keep it for reference. Pay particular attention
to the Safety Instructions provided. Please review the product service and
warranty statements. To learn more about Oster® products, please visit us at
www.oster.com or call us at 1-800-334-0759.
www.oster.com 2

CONGRATULATIONS!
You are the proud owner of an Oster® centrifugal Juice Extractor. Your juicing journey to a
more t YOU has just gotten even simpler. At Oster®, we understand that life is busy and
time to prepare the foods best for your body is limited, so that’s why we’ve purpose-built
this product with special features to get you juicing.
This multi-functional product allows you to extract nutrients from soft and hard fruits and
veggies, to quickly and easily prepare nutrition-packed and tasty juices to enjoy and keep
your body feeling its best.
The Benefits of Juicing:
Juicing is a quicker way to extract many of the key nutrients you need from fresh fruits and
veggies, including antioxidants and vitamins that help your body keep energized. Juicing
eliminates the digestion process for a faster absorption. Please note that “whole fruits and
vegetables” also have healthy ber that is needed for your body.
We have included Helpful Tips and Recipes created by the Oster® Juicing team, to please
the most demanding palates (including your kids’) and guide you through the juicing
journey. Whether you like proven and tested recipes or feel like experimenting, you can
take your rst delicious step to a healthier you TODAY!
www.oster.com3
LEARNING ABOUT YOUR
JUICE EXTRACTOR
A
B
C
E
F
G
I
M
J
H
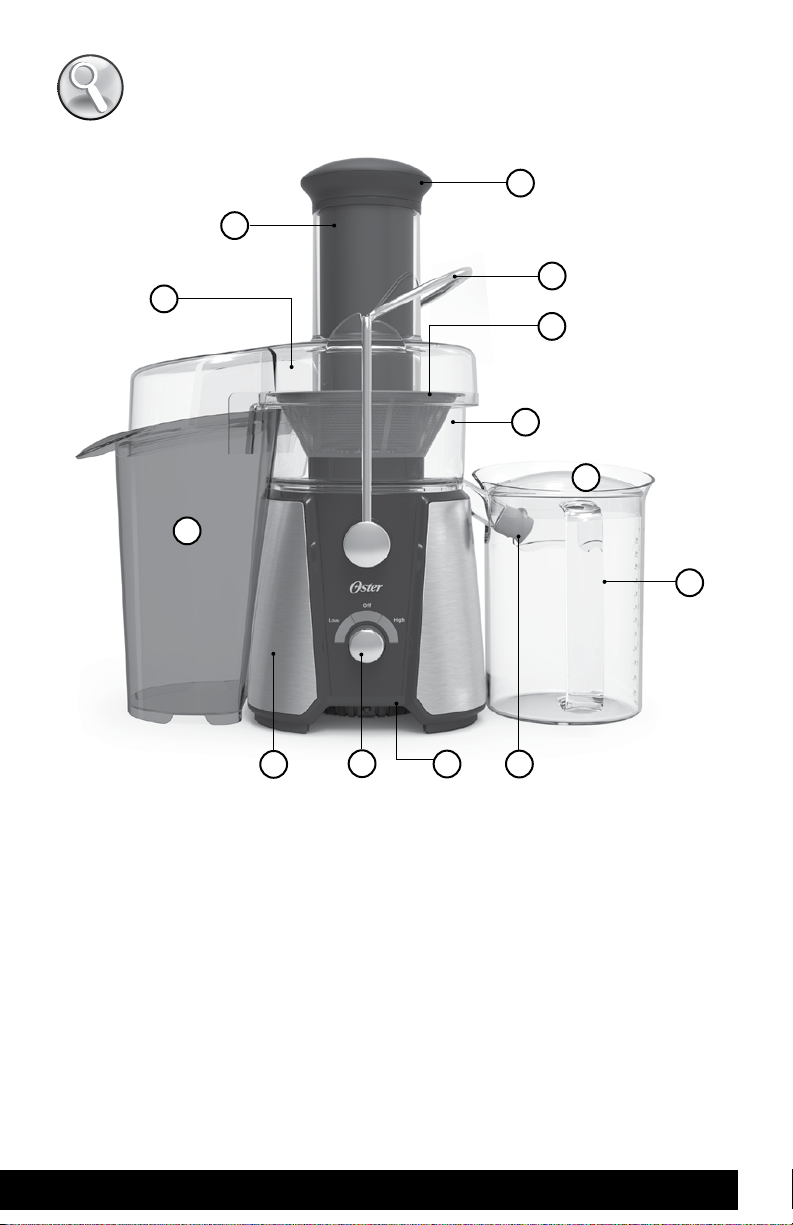
A. Food Chute
Fits whole fruits & veggies. Even a whole apple!
B. Juicer Cover
Dishwasher safe.
C. Large Pulp Collector Container
Dishwasher safe.
D. Speed Control Dial
E. Food Pusher
To push whole fruit & veggies down
the feed chute.
F. Safety Locking Arm
Ensures cover is locked in place during juicing.
G. Rinse n’ Ready™ Filter
Separates the pulp from the juice.
www.oster.com 4
LKD
H. Motor Base Housing
I. Filter Basket
Dishwasher safe.
J. Juice Jug
Dishwasher safe.
K. Heavy Duty Motor
With one year motor warranty.
L. Juice Nozzle/Drip Stopper
Perfect for mess free/splash free juicing
M. Juice Jug Lid/with Froth Separator
Covers jug while juicing to avoid any
splatter and collects froth when pouring.
ASSEMBLING YOUR JUICER
Before First Use
Before your begin, remove any packaging material and extra stickers/ labels from your juicer.
Check that the unit is turned o and unplugged.
Wash all of the components with warm/soapy water before assembling: the lter basket,
cutting disc, food pusher, pulp collector and juice jug and lid. Rinse and dry thoroughly.
Motor can be wiped down with a damp cloth. Your juicer is now ready for use.
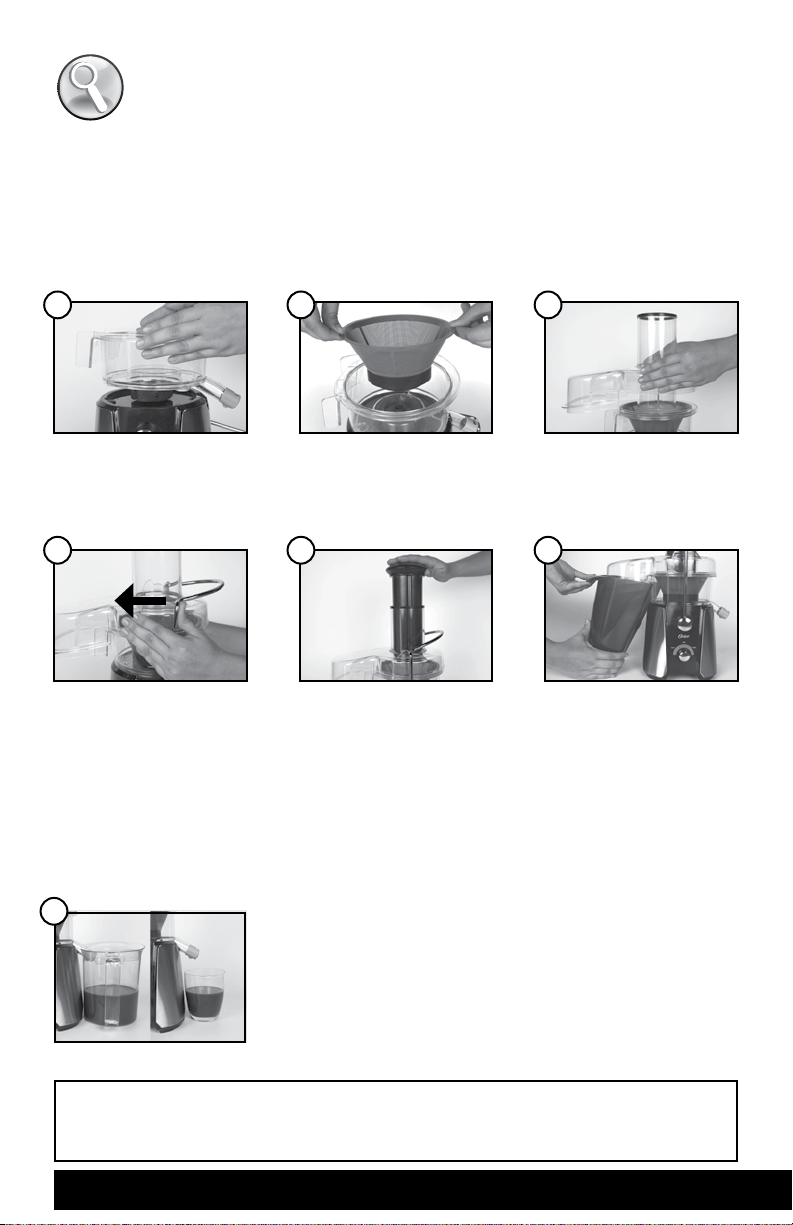
1
• Place lter basket on top
of the motor housing.
4
• Raise the safety locking
arm up and then lower it
down to securely t into
the grooves (from right
to left) on the lid. The
arm should rest vertically
on top of the juicer lid –
keeping in in place.
2
• Place the Rinse n’ Ready™
lter on top of the lter
basket, push down and
click into place.
5
• Slide the food pusher
down the food chute. Be
sure to align the grooves
in the pusher with the
small protrusion on the
inside top of the feed
chute. Push all the way
down until it’s entirely
within the chute.
3
• Place juicer cover/lid on
top of the lter basket.
6
• Place the Pulp Collector
into position by tilting
it slightly at an angle to
t underneath the juicer
cover. Important: Check
that the Pulp Collector
edge is underneath the
lip of the basket.
7
IMPORTANT: Remember to place the juice nozzle/drip stopper open and facing
down before juicing.
• Place the juice jug with lid under the spout located on the
right hand side of the juicer. Use the juice jug lid to avoid
any splatter. Alternatively, you can t the juice nozzle over
the juice spout and place a glass underneath. This will
direct the ow of juice directly into the glass to ensure
mess-free juicing! You can ip the juice nozzle/drip stopper
up to avoid dripping on the countertop.
www.oster.com5
TO BEGIN JUICING
1. Wash your fruits and vegetables thoroughly before juicing.
Root veggies should be double-checked to ensure all of the soil is removed
to avoid getting grit in your yummy juice.
2. At this point, your juicer should be assembled properly and ready for use. Refer back to the
assembly instructions if this is not the case. Always place the juice jug (or a glass) underneath
the spout and check that the pulp collector is in position before you begin. If you forget,
there’s a good chance your juice will end up on your countertop!
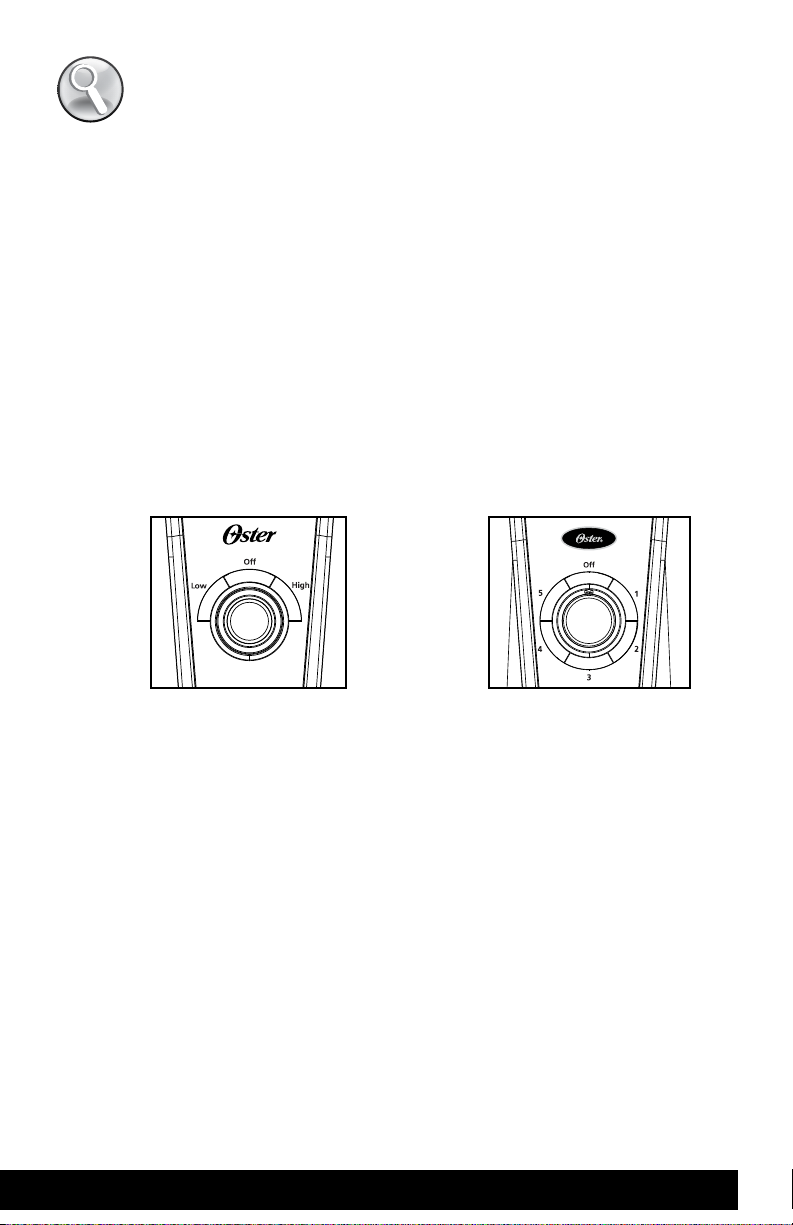
3. Plug unit in. Make sure the knob is on the OFF position. Raise the safety locking arm up to the
lid. Note: the lights only turn on when you select a speed.
4. Turn the control knob to the RIGHT to your desired speed (from 1 to 5 for model 9020 or Low
or High for model 9010). The juicer will immediately start to operate at the selected speed
indicated on the speed dial. Speed can be changed at any time during the juicing process by
adjusting the control knob.
Models
with
2 speeds
5. As the motor is running, begin placing food into the feed chute and use the food pusher to
guide food down into the machine. For maximum extraction, slow controlled pushing of the
food pusher down the chute is ideal.
6. As fruit and veggies are processed, you’ll start to see juice will owing into the juice jug.
Simultaneously, the separated pulp will accumulate in the pulp collector. The pulp collector
can be emptied during the juicing process by turning the juicer control knob to the OFF
position and then carefully removing the pulp collector to clean. Replace the empty pulp
collector back into position and get right back to juicing.
WARNING
Never use fingers, hands or utensils to push food down the chute.
It is important to ONLY use the food pusher to avoid injury.
Models
with 5
speeds
www.oster.com 6

CHOOSING THE RIGHT SPEED
FOR YOUR FRUITS & VEGGIES
Models with 5 speeds
Fruit / Vegetables Suggested Speed
Apples, Beetroots (trimmed), Brussel
Sprouts (trimmed), Carrots (cleaned),
Fennel, Hard Pears, Pineapple
5
Broccoli, Cabbage, Cauliflower,
Celery, Cucumber
Oranges (Peeled),
Peeled Citrus Fruit
Apricots (no seed),
Cucumber (peeled), Kiwi (peeled),
Mangos (peeled, no seed),
Nectarines (no seed),
Peaches (no seed), Soft Pears,
Plums (no seed)
Blueberries, Raspberries,
Tomatoes, Watermelon,
Seedless Grapes, Melons (peeled)
Models with 2 speeds
Fruit / Vegetables Suggested Speed
4
3
2
1
Apples , Beets, Carrots, Fennel,
Ginger, Pineapple
Tomatoes, Grapes, Spinach, Kale,
Oranges, Lemons
www.oster.com7
HIGH
for hard fruits and vegetables
LOW
for soft fruits and vegetables,
citrus and green leaves
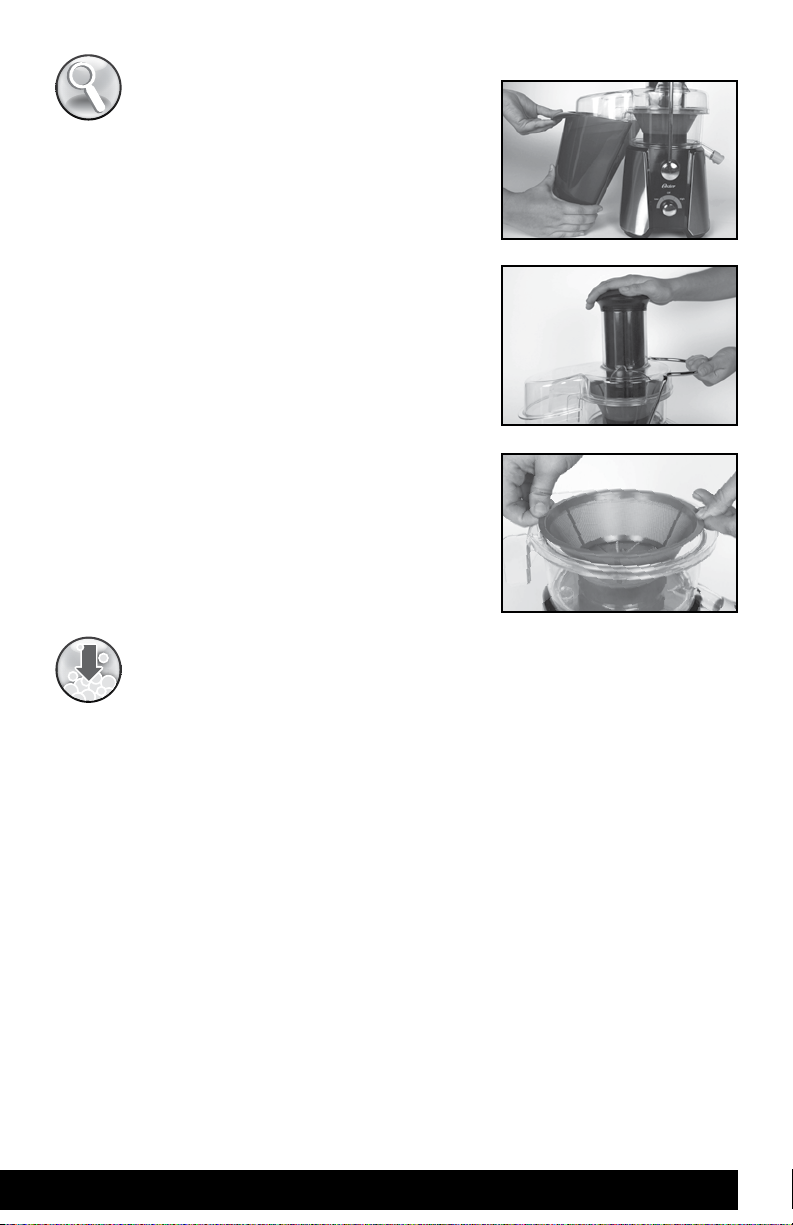
AFTER USE
1. Turn the juicer o by turning the control knob to the
OFF position. Unplug the juicer.
2. Remove the pulp collector the same way you placed it
in position.
HINT: you’ll have to tilt it away from the juicer. (Figure 8)
3. Remove the safety locking arm from the juicer cover
and lower it downward out of position so it rests on the
side of the unit. (Figure 9)
4. Remove the lter basket, while the cutting disc is still
in place.
5. To remove the cutting disc, use your ngers to wedge
underneath the side grooves and lift up. (Figure 10)
WARNING
The cutting disc has sharp blades.
Avoid touching the blades to avoid injury.
Figure 8
Figure 9
Figure 10
CARE AND CLEANING
• All parts are removable and dishwasher safe, with the exception of the motor base.
• After disassembling all removable parts of the juice extractor, wash them by hand
with warm soapy water or in the dishwasher (top shelf only). If the pulp dries out in
the pulp collector container, the lter or the lter basket, let it soak in water for
approximately 10 minutes before washing it.
• Wipe the motor base with a damp cloth.
• Cleaning the Rinse ‘n Ready lter: As soon as you nish juicing, rinse the lter with
running water to avoid the pulp drying and clinging to the lter. If needed, you might
use a soft sponge to remove any remaining residue.
WARNING: DO NOT IMMERSE THE MOTOR BASE IN WATER OR ANY OTHER LIQUID.
MAINTENANCE
• Some plastic parts might stain when in contact with some fruits and vegetables for too long.
In order to avoid this from happening, all parts should be washed immediately after each use.
www.oster.com 8

Healthful Content
Incorporate key nutrients contained in fruits and vegetables in to your diet!
Below you will nd s a list of the benets of some of the most commonly used fruits
and vegetables, and four key ingredients you could use to boost your drink.
vitamin C
iron, calcium, vitamin C
Tomato: beta carotene and
Spinach: antioxidants, potassium,
pectin
elements
Apple: boron, cellulose and
Cranberry: antibiotic and anti-viral
Berries: antioxidants,
Orange: natural aspirin and boron
phytochemicals that
help protect cell from
potassium
Papaya: vitamin A and
damage, boost mental
and heart health, fight
urinary infections
vitamin c
Pineapple: bromelain, manganese,
Calcium, manganese,
phosphorus, protein
Chia Seeds: rich in fiber, Omega 3,
Flax Seeds: Omega 3-Fatty acids,
potassium
calcium, iron, folic acid,
Beet: folic acid, iron, calcium,
Broccoli: beta catorene, vitamin c,
vitamin B, magnesium,
manganese, fiber,
antioxidants
chromium
Carrot: beta carotene, vitamin A,
calcium, vitamin D,
Greek Yogurt: high protein content,
C, pectin, fluorine,
potassium
calcium, build muscles,
burn fat
B3, cooper, iron, calcium,
Peanut Butter: fiber, protein, Vitamin E,
iron, vitamin A, C
iron, vitamin A, C
Kale: antioxidants, calcium,
Parsley: antioxidants, folic acid,
potassium, antimicrobial,
lower LDL- bad
cholesterol-, provides
feeling of fullness
harder one i.e. juice tomatoes rst and then celery
General Guidelines for Juicing
• Juice softer items rst and then follow with a
• Always serve juices immediately. After seconds,
it starts to loose nutrients
blender to prepare healthiest and tastiest smoothies.
and a sweet taste to your dough.
Soups, Stews and more: Veggie pulp adds thickness and
avor to your favorite recipes.
• Skins: juicing with them is a personal preference
Just grape stems are benecial.
• Stems: remove them as they don’t have nutritional value.
always roll into a ball before feeding through the chute.
• Use apples and carrots to sweeten veggie mixes
• When juicing leafy greens (spinach, cabbage, herbs, etc.)
• Seeds: removing them is discretionary
and seeds from citrus fruits due their tart avor, but it is a
personal preference
• Citrus Fruits-We recommend you to remove the skins
produce juice. Blend them with your juice for a thicker drink
or smoothie.
• Do not juice Bananas, Avocados and Coconuts as they don’t
• Use the Pulp! – Save the pulp from the lid and pulp collector
to use it in an innumerable healthy ways…
• Smoothies: add juice, ice, low-fat milk or yogurt in your
• Muns, Breads and Pies: fruit and veggies provide ber
• Favorite Dishes: Meat Loaf, Quiches, Casseroles, Lasagna,

RECIPES
SUPER VEGGIE GALORE
JUICE…
1 medium beet
2 medium carrots
1 medium tomato
1 cup rmly packed spinach leaves
½ cup parsley
2 small red apples
Cut the beet, carrots, tomato and apples into pieces that will t into
the food chute of the juice extractor if needed.
Process with spinach and parsley through the juice extractor.
Makes about 20 ounces.
TANGY VEGETABLE
JUICE…
1 medium Granny Smith apple,
cut into pieces
1 cup broccoli orets
1 medium grapefruit, skin and white pith
removed
1 cup kale leaves
1 cup rmly packed watercress
ADD if desired…
½ cup ice cubes
1 tbsp lemon juice
ADD if desired…
½ cup ice cubes
BOOST your juice...
Pour the juice into an Oster® blender and
add ½ cup plain Greek yogurt, 2 tbsp
honey and 1-2 tsp Chia or Flax seeds.
Blend the mix until smooth.
Cut the apple into pieces that will t into the food chute of the juice extractor if
needed. Process with broccoli, grapefruit, kale and watercress through the juice
extractor.
Makes about 20 ounces.
www.oster.com 10

ENERGY EXPLOSION
JUICE…
2 medium celery stalks
1 medium Granny Smith apple
1 ½ cups cubed pineapple
Cut the celery, apple and pineapple into pieces that will t into the
food chute of the juice extractor if needed.
Process through the juice extractor.
If desired, garnish with a wedge of pineapple
Makes about 16 ounces.
ADD if desired…
Juice of 1 lemon (about 2 tbsp)
BOOST your juice…
Pour the juice into an Oster® blender and
add 1 medium banana, 1 tbsp peanut
butter, 1-2 tsp Chia or Flax seeds. Blend
the mix until smooth.
HEALTH BOOSTER - GREEN APPLE REFRESHER
JUICE…
1 Granny Smith apple, cut into pieces
1 medium carrot
1 kiwi
1 pear
1 cup rmly packed spinach leaves
Cut the fruit into pieces that will t into the food chute of the juice extractor if
needed. Process through the juice extractor.
Makes about 20 ounces.
ADD if desired…
½ cup ice cubes
Boost your juice…
Pour the juice into an Oster® blender and
add 1 cup plain Greek yogurt,juice of 1
lime (about 2 tbsp), Chia or Flax seeds.
Blend the mix until smooth.
HEALTH BOOSTER - MELON SURPRISE
JUICE…
1 cup broccoli orets
1 cup cubed cantaloupe
1 cup cubed honeydew
1 lemon, peel and white pith removed
Cut the fruit into pieces that will t into the food chute of the juice extractor if
needed. Process through the juice extractor.
If desired, garnish with a wedge of lemon.
Makes about 20 ounces.
www.oster.com11
ADD if desired…
½ cup ice cubes
Boost your juice…
Pour the juice into an Oster® blender and
add 1/2 cup plain Greek yogurt,
1 tbsp agave syrup*
Note: *You can replace with 1 tbsp brown
sugar or sweetener of your preference

ENERGY BOOSTER - BREAKFAST BONANZA
JUICE…
2 medium carrots
1 cup blueberries
2 cups cubed pineapple
1 cup kale leaves
2 medium oranges (to make ½ cup
of squeezed orange juice)
Cut the carrots and pineapples into pieces that will t into the food chute of the juice
extractor if needed. Process with the blueberries, pineapple and kale through the
juice extractor.
If desired, garnish with a pineapple or lemon wedge.
Makes about 20 ounces.
ADD if desired…
½ cup ice cubes
BOOST your juice…
Pour the juice into an Oster® blender and
add 1 medium banana, 1 tbsp protein
powder and 1-2 tsp Chia or
Flax seeds. Blend the mix until smooth.
ENERGY BOOSTER - FRESH FROM THE GARDEN
JUICE…
2 medium carrots
1 medium celery stalk
4-inch piece of cucumber
1 medium apple
1 medium tomato
1 lemon, peel and white pith removed
1-inch piece fresh ginger
1 cup rmly packed spinach leaves
Cut the carrots, celery, cucumber, apple, tomato, lemon and ginger into pieces that
will t into the food chute of the juice extractor if needed. Process them with the
spinach through the juice extractor.
If desired, garnish with a lemon wedge.
Makes about 18 ounces.
ADD if desired…
½ cup cold brewed green tea
½ cup ice cubes
BOOST your juice…
Add 2 tsp Chia or Flax seeds.
www.oster.com 12

DETOX RECIPE - GINGERED SUPER GREENS
JUICE…
2 cups rmly packed spinach leaves
1 cup rmly packed arugula leaves
1 medium red delicious apple, cut into
wedges
½ rmly packed watercress leaves
1 lemon, peel and pith removed and
cut in half
1-inch piece fresh ginger
Process the spinach, arugula, apple, watercress, lemon and ginger through the juice
extractor.
If desired, garnish with a lemon wedge.
Makes about 18 ounces.
ADD if desired…
½ cup ice cubes
Boost if desired…
Pour the juice into an Oster® blender and
add 1 cup cranberry juice and 1-2 tsp
Chia or Flax seeds. Blend the mix until
smooth.
DETOX RECIPE - THE BERRY BEST
JUICE…
1 cup fresh blueberries
1 cup fresh strawberries, halved *
1 cup fresh raspberries
½ cubed pineapples
2 celery stalks
Note: * Replace by 1 cup cranberries
when they are in season, if desired
ADD if desired…
½ cup cold brewed organic green tea
with pomegranate and açai
Boost if desired…
Pour the juice into an Oster® blender and
add ½ cup plain Greek yogurt,
2 tbsp honey and 1-2 tsp Chia or Flax
seeds. Blend the mix until smooth.
Process the blueberries, cranberries and raspberries through the juice extractor.
If desired, garnish with blueberries and raspberries.
Makes about 18 ounces.
www.oster.com13

1 Year Limited Warranty
Sunbeam Products, Inc. doing business as Jarden Consumer Solutions or if in Canada, Sunbeam Corporation
(Canada) Limited doing business as Jarden Consumer Solutions (collectively “JCS”) warrants that for a period
of one year from the date of purchase, this product will be free from defects in material and workmanship.
JCS, at its option, will repair or replace this product or any component of the product found to be defective
during the warranty period. Replacement will be made with a new or remanufactured product or component. If the product is no longer available, replacement may be made with a similar product of equal or
greater value. This is your exclusive warranty. Do NOT attempt to repair or adjust any electrical or mechanical
functions on this product.
Doing so will void this warranty.
This warranty is valid for the original retail purchaser from the date of initial retail purchase and is not trans-
ferable. Keep the original sales receipt. Proof of purchase is required to obtain warranty performance. JCS
dealers, service centers, or retail stores selling JCS products do not have the right to alter, modify or any way
change the terms and conditions of this warranty.
This warranty does not cover normal wear of parts or damage resulting from any of the following: negligent
use or misuse of the product, use on improper voltage or current, use contrary to the operating instructions,
disassembly, repair or alteration by anyone other than JCS or an authorized JCS service center. Further, the
warranty does not cover: Acts of God, such as re, ood, hurricanes and tornadoes.
What are the limits on JCS’s Liability?
JCS shall not be liable for any incidental or consequential damages caused by the breach of any express,
implied or statutory warranty or condition.
Except to the extent prohibited by applicable law, any implied warranty or condition of merchantability or
tness for a particular purpose is limited in duration to the duration of the above warranty.
JCS disclaims all other warranties, conditions or representations, express, implied, statutory or otherwise.
JCS shall not be liable for any damages of any kind resulting from the purchase, use or misuse of, or inability
to use the product including incidental, special, consequential or similar damages or loss of prots, or for any
breach of contract, fundamental or otherwise, or for any claim brought against purchaser by any other party.
Some provinces, states or jurisdictions do not allow the exclusion or limitation of incidental or consequential
damages or limitations on how long an implied warranty lasts, so the above limitations or exclusion may not
apply to you.
This warranty gives you specic legal rights, and you may also have other rights that vary from province to
province, state to state or jurisdiction to jurisdiction.
How to Obtain Satisfaction Guarantee Service
In the U.S.A.
If you have any question regarding this warranty or would like to obtain warranty service,
please call 1-800-334-0759 and a convenient service center address will be provided to you.
In Canada
If you have any question regarding this guarantee or would like to obtain guarantee service, please call
1-800-667-8623 and a convenient service center address will be provided to you.
In the U.S.A., this guarantee is oered by Sunbeam Products, Inc. doing business as Jarden Consumer Solutions located in Boca Raton, Florida 33431. In Canada, this guarantee is oered by Sunbeam Corporation
(Canada) Limited doing business as Jarden Consumer Solutions, located at 20 B Hereford Street, Brampton,
Ontario L6Y 0M1. If you have any other problem or claim in connection with this product, please write our
Consumer Service Department
PLEASE DO NOT RETURN THIS PRODUCT TO ANY OF THESE ADDRESSES
OR TO THE PLACE OF PURCHASE
www.oster.com 14

PRECAUCIONES IMPORTANTES
Al utilizar artefactos eléctricos deben seguirse
siempre las precauciones básicas de seguridad,
inclusive las siguientes:
1. Lea todas las instrucciones antes de usar el
electrodoméstico y consérvelas para referencia
en el futuro.
2. Para protegerse contra descargas eléctricas, no
sumerja la base ni el cable de alimentación de la
unidad en agua u otros líquidos.
3. Se requiere estricta supervisión cuando se utilice el
artefacto cerca de los niños.
4. Apague la unidad y desenchúfela del
tomacorriente para apagar el electrodoméstico
antes de limpiarlo y cuando no esté en uso.
5. Evite el contacto con piezas en movimiento.
No toque las cuchillas que se encuentran en la
base del filtro de acero inoxidable del accesorio
extractor de jugo.
6. No utilice ningún artefacto que tenga un cable
o un enchufe dañado, ni después de que el
electrodoméstico haya presentado fallas, se haya
caído o haya sufrido cualquier otro desperfecto.
Lleve el electrodoméstico al centro de servicio
autorizado más cercano para su inspección,
reparación o ajuste mecánico.
7. El uso de accesorios no recomendados o vendidos
por el fabricante puede causar incendios,
descargas eléctricas o lesiones.
8. No permita que el cable toque superficies
calientes ni que cuelgue del borde de la mesa o
del mostrador.
9. No utilice el extractor de jugo si tiene alguna
pieza rota.
10. No utilice al aire libre ni para fines comerciales.
11. Compruebe que la tapa del extractor de jugo esté
firmemente fijada en su lugar antes de poner
en marcha el motor. No destrabe el brazo de
bloqueo mientras el extractor de jugo esté en
funcionamiento.
12. Para evitar que el motor se sobrecaliente no
utilice este artefacto continuamente durante más
de 5 minutos.
13. Gire el interruptor a la posición de apagado
“OFF” cada vez que termine de usar la unidad.
Compruebe que el motor se haya detenido
completamente antes de desarmar el
electrodoméstico.
14. Cuando use el accesorio extractor de jugo,
no coloque los dedos ni otros objetos en la
abertura de la unidad mientras esta esté en
funcionamiento. Si los alimentos quedan atorados
en la abertura, use el empujador de alimentos u
otra fruta o verdura para empujarlos hacia abajo.
Cuando no sea posible utilizar este método,
apague el motor, desenchufe del tomacorriente y
desarme el extractor de jugo para sacar los restos
de alimentos.
15. No use el artefacto si el tamiz o filtro giratorio
está dañado.
16. No empuje los alimentos dentro del conducto
para alimentos con los dedos.
17. Este electrodoméstico está destinado únicamente
para uso doméstico, no para uso comercial o
industrial.
18. No intente alterar el mecanismo de seguridad de
las abrazaderas.
19. Cerciórese de que el extractor de jugo esté bien
ensamblado antes de ponerlo en marcha.
20. Utilice siempre sobre una superficie seca y
nivelada.
21. Apague primero la unidad antes de
desenchufarla del tomacorriente.
22. Para disminuir el riesgo de incendios o descargas
eléctricas, no intente retirar la cubierta inferior
de la unidad. No contiene piezas que se puedan
reparar. Las reparaciones solo deben ser
efectuadas por personal de servicio autorizado.
23. No coloque este artefacto cerca o sobre un quemador
caliente, ya sea de gas o eléctrico, ni donde pueda
entrar en contacto con un horno caliente.
24. Este artefacto eléctrico no está destinado para
ser usado por personas (niños incluidos) cuyas
capacidades físicas, sensoriales o mentales
estén disminuidas, o carezcan de experiencia
y conocimientos, a menos que una persona
responsable de su seguridad los supervise o les dé
instrucciones para usar este aparato.
CONSERVE ESTAS INSTRUCCIONES
www.oster.com15

(Para modelos de 120 y 127 voltios únicamente)
Para disminuir el riesgo de descargas eléctricas este electrodoméstico cuenta con un enchufe
polarizado (una clavija es más ancha que la otra). El enchufe entra de una sola manera en
un tomacorriente polarizado. Esta es una característica de seguridad destinada a contribuir
a disminuir el riesgo de descargas eléctricas. Si el enchufe no encaja por completo en el
tomacorriente, inviértalo. Si aún no encaja, comuníquese con un electricista calicado. No
intente alterar esta característica de seguridad.
Gracias por la compra de su Extractor de Jugo Oster®.
Antes de utilizar este producto por primera vez, dedique unos momentos
para leer estas instrucciones y consérvelas para futura referencia. Preste
atención especialmente a las instrucciones de seguridad que se suministran.
Revise las declaraciones sobre la garantía y el servicio del producto.
Para conocer más sobre los productos Oster®, visite nuestra página
www.oster.com o llámenos al 1-800-334-0759.
www.oster.com
16

¡FELICITACIONES!
Usted es el afortunado propietario de un Extractor de Jugo centrífugo
Oster®. Su camino hacia un estilo de vida más saludable se ha vuelto aún
más placentero. En Oster®, comprendemos que el ajetreo de la vida limita el
tiempo disponible para preparar las comidas ideales para su salud. Por eso,
hemos creado este producto con funciones especiales para sacarle el jugo a
cada momento. Este producto multifuncional le permite extraer nutrientes
de verduras y frutas duras y blandas para preparar rápida y fácilmente jugos
deliciosos y repletos de nutrientes que disfrutará y lo llenarán de energía.
Beneficios de la extracción de jugo:
Preparar jugos es una forma más rápida para extraer los nutrientes clave de
las frutas y verduras, incluso antioxidantes y vitaminas, que su cuerpo necesita para mantenerse en condiciones óptimas. La extracción de jugo elimina
el proceso de digestión y proporciona una absorción más rápida. Recuerde
que las “frutas y verduras enteras” también son ricas en bra saludable que su
organismo necesita.
Hemos incluido consejos prácticos y recetas creados por el equipo especializado en jugos de Oster®, diseñados para satisfacer hasta los paladares
más exigentes (¡incluso los de sus hijos!) y guiarlo en la aventura de crear sus
propios jugos. Ya sea que preera las recetas conocidas y comprobadas o que
le guste experimentar, hoy mismo puede dar el primer paso hacia una vida
más sana.
17
www.oster.com

FAMILIARÍCESE CON SU
EXTRACTOR DE JUGO
A
B
C
E
F
G
I
M
J
H
A. Conducto de alimentación
Con capacidad para frutas y verduras
enteras. ¡Inclusive una manzana entera!
B. Cubierta del extractor de jugo
Apta para el lavaplatos automático.
C. Envase grande para pulpa
Apto para el lavaplatos automático.
D. Control de velocidades
E. Empujador de alimentos
Para empujar frutas y verduras por el
conducto de alimentación.
F. Brazo de bloqueo de seguridad
Garantiza que la cubierta esté ja en su lugar
durante el proceso de extracción de jugo.
G. Filtro Rinse n’ Ready™
Separa la pulpa del jugo.
www.oster.com
LKD
H. Cubierta de la base del motor
I. Canasta del filtro
Apta para el lavaplatos automático.
J. Jarra para jugo
Apta para el lavaplatos automático.
K. Motor altamente resistente
Con un año de garantía.
L. Boquilla dispensadora y tapón
Ideales para extraer jugo sin que se
produzcan salpicaduras ni goteos.
M. Tapa de la jarra para jugo con
separador de espuma
Tapa la jarra mientras se está extrayendo
el jugo para evitar salpicaduras y recoge la
espuma que se forma durante el vertido.
18

CÓMO ARMAR EL EXTRACTOR DE JUGO
Antes De Usar Por Primera Vez
Antes de comenzar, retire todos los materiales de embalaje y las etiquetas o calcomanías del
extractor de jugo. Verique que la unidad esté apagada y desenchufada.
Lave todos los componentes con agua tibia jabonosa antes de armarlos: la canasta del ltro,
el disco de corte, el empujador de alimentos, el envase para pulpa, la jarra para jugo y su tapa.
Enjuáguelos y séquelos completamente. Puede limpiar el motor con un paño húmedo. Su
extractor de jugo ya está listo para usar.
1
• Coloque la canasta del ltro
sobre la cubierta
del motor.
4
• Levante el brazo de
bloqueo de seguridad y a
continuación, bájelo para
que encaje rmemente
en las ranuras (de derecha
a izquierda) de la tapa.
El brazo debe descansar
verticalmente sobre la
cubierta del extractor de
jugo para mantenerla en
su lugar.
2
• Coloque el ltro Rinse n’ Ready™
sobre la canasta del ltro; empújelo para que calce en su lugar.
5
• Deslice el empujador
de alimentos dentro del
conducto de alimentación.
Cerciórese de alinear las
ranuras del empujador con la
pequeña protuberancia de la
parte superior e interna del
conducto de alimentación.
Empújelo hasta el fondo para
que quede completamente
dentro del conducto.
3
• Coloque la cubierta
sobre la canasta del ltro.
6
• Coloque el envase para
la pulpa en su lugar. Para
ello, inclínelo levemente
para deslizarlo debajo de
la cubierta del extractor
de jugo. IMPORTANTE:
Compruebe que el borde
del envase para la pulpa
quede por debajo del
reborde de la canasta.
7
•
Coloque la jarra para jugo con su tapa debajo del dispensador que
se encuentra a la derecha del extractor de jugo. Utilice la tapa de la
jarra para jugo para evitar salpicaduras. Si lo desea, puede colocar la
boquilla sobre el dispensador de jugo y colocar un vaso debajo. Esto
encauzará el jugo directamente hacia el vaso para garantizar una
extracción de jugo sin salpicaduras. Puede girar la boquilla y el tapón
hacia arriba para evitar goteos sobre el mostrador.
IMPORTANTE: Recuerde colocar la boquilla dispensadora y el tapón abierto
apuntando hacia abajo antes de comenzar la extracción de jugo.
www.oster.com19

PARA COMENZAR A EXTRAER JUGO
1. Lave bien las frutas y verduras antes de extraerles el jugo. Debe revisar a conciencia
los tubérculos para cerciorarse de haber eliminado cualquier vestigio de tierra y
evitar que esta caiga en su delicioso jugo.
2. Su extractor de jugo debe estar debidamente ensamblado y listo para usar. En caso contrario,
consulte las instrucciones para ensamblarlo. Siempre se debe colocar la jarra para jugo (o el
vaso) debajo del dispensador y comprobar que el envase para pulpa esté en su lugar, antes
de comenzar. Si se olvida, ¡lo más seguro es que el jugo termine regado sobre el mostrador!
3. Enchufe la unidad. Cerciórese de que la perilla esté en la posición de apagado.
Levante el brazo de bloqueo de seguridad para que quede sobre la cubierta.
NOTA: las luces solamente se encienden al seleccionar una velocidad.
4. Gire la perilla de control hacia la derecha hasta la velocidad deseada (del 1 al 5 para el
modelo 9020; Baja o Alta para el modelo 9010). El extractor de jugo comenzará a funcionar inmediatamente a la velocidad que indique el control de velocidad. Puede cambiar la
velocidad en cualquier momento durante el proceso de extracción de jugo con solo ajustar
la perilla de control.
Modelos con
2 velocidades
5. Con el motor en marcha, comience a colocar los ingredientes dentro del conducto de
alimentación y utilice el empujador de alimentos para guiarlos hacia el interior del extractor.
Para lograr la máxima extracción de jugo, se recomienda introducir los alimentos lenta y
controladamente con el empujador.
6. A medida que se procesan las frutas y las verduras, comenzará a ver que el jugo uye hacia la
jarra. Al mismo tiempo, la pulpa separada se acumulará en el envase correspondiente.Puede
vaciar el envase para pulpa durante el proceso de extracción de jugo. Para ello, gire la perilla
de control a la posición de apagado y retire cuidadosamente el envase para pulpa para vaciarlo. Vuelva a colocar el envase en su lugar y reanude el proceso de extracción de jugo.
ADVERTENCIA Jamás use los dedos, las manos ni ningún otro utensilio para
empujar los alimentos por el conducto. Para evitar lesiones, es importante utilizar
ÚNICAMENTE el empujador de alimentos.
Modelos con
5 velocidades
www.oster.com 20

CÓMO ELEGIR LA VELOCIDAD ADECUADA
PARA SUS FRUTAS Y VERDURAS
Modelos con 5 velocidades
Fruta o verdura Velocidad recomendada
Manzana, remolacha (betabel; sin
hojas), coles de Bruselas (sin hojas),
zanahoria (limpia), hinojo, peras duras,
piña
5
Brócoli, repollo (col),
coliflor, apio, pepino
Naranja (pelada), cítricos pelados 3
Melocotón (albaricoque; sin carozo),
pepino (pelado), kiwi (pelado),
mango (pelado, sin hueso),
nectarina (sin carozo),
durazno (sin carozo),
peras blandas,
ciruela (sin carozo)
Arándano azul, frambuesa, tomate,
sandía, uvas sin semillas, melones
(pelados)
Modelos con 2 velocidades
Fruta o verdura Velocidad recomendada
4
2
1
Manzana, remolacha (betabel),
zanahoria, hinojo, jengibre, piña
Tomate, uva, espinaca,
col rizada (berzas), naranja, limón
www.oster.com21
ALTA
para frutas y verduras duras
BAJA
para frutas y verduras blandas,
cítricos y verduras de hoja verde

DESPUÉS DE UTILIZAR
EL EXTRACTOR
1. Apague el extractor de jugo girando la perilla de
control hacia la posición de apagado. Desenchufe el
extractor de jugo.
2. Saque el envase para la pulpa de la misma forma que
lo colocó. CONSEJO PRÁCTICO: tiene que inclinarlo en
dirección opuesta al extractor. (Figura 8)
3. Destrabe el brazo de bloqueo de seguridad; para ello,
bájelo hasta que quede en posición horizontal
(Figura 9)
4. Con el disco de corte todavía en su lugar, saque la
canasta del ltro.
5. Para sacar el disco de corte, use los dedos para
levantarlo por debajo de las ranuras laterales y sáquelo.
(Figura 10)
ADVERTENCIA
El disco de corte tiene cuchillas afiladas.
Para evitar lesiones, no toque las cuchillas.
Figure 8
Figure 9
Figure 10
• Todas las piezas son removibles y aptas para el lavaplatos, excepto la base del motor.
• Después de desensamblar todas las partes removibles del extractor de jugo, lávelas a mano
con agua tibia jabonosa o en el lavaplatos automático (únicamente en la rejilla superior). Si la
pulpa se seca en el envase para pulpa, el ltro o la cesta del ltro, remójelos en agua durante
aproximadamente 10 minutos antes de lavarlos.
• Limpie la base del motor con un paño húmedo.
• Para lavar el ltro Rinse ‘n Ready: Tan pronto termine de usar el extractor, enjuague el ltro bajo
el chorro para evitar que la pulpa se seque y se adhiera al ltro. Si fuera necesario, puede usar
una esponja suave para eliminar los residuos restantes.
ADVERTENCIA:
NO SUMERJA LA BASE DEL MOTOR EN AGUA NI EN NINGÚN OTRO LÍQUIDO.
MANTENIMIENTO Y LIMPIEZA
MANTENIMIENTO
• Algunas piezas plásticas podrían mancharse por el contacto prolongado con algunas frutas y
verduras. Para evitar esto, todas las partes deben lavarse de inmediato después de cada uso.
www.oster.com 22

vitamina C
Tomate: betacaroteno y vitamina C
Espinaca: antioxidantes, potasio, hierro, calcio,
Bayas: antioxidantes, sustancias toquími-
cas que ayudan a proteger las
células contra daños, refuerzan la
salud mental y cardíaca y ayudan a
combatir infecciones urinarias
manganeso, fósforo, proteína
Semillas
de Chía:: ricas en bra, omega 3, calcio,
B, magnesio, manganeso, bra,
antioxidantes
Linaza: ácidos grasos omega 3, vitamina
Yogur
Griego: alto contenido proteínico, calcio,
vitamina D, ayuda a desarrollar
músculos y a quemar grasa
cobre, hierro, calcio, potasio,
propiedades antimicrobianas,
ayuda a disminuir el colesterol LDL
(el colesterol “malo”), proporciona
sensación de saciedad
Mantequilla
de Maní: bra, proteína, vitaminas E y B3,
Contenido Nutritivo
¡Incorpore a su dieta los valiosísimos nutrientes que contienen las frutas y las verduras! A continuación
encontrará una lista de los benecios de algunas de las frutas y las verduras utilizadas más comúnmente, y
Pautas Generales Para
La Extracción De Jugo:
antivirales
Manzana: boro, celulosa y pectina
Arándano
Rojo: compuestos antibióticos y
cuatro ingredientes clave que puede emplear para reforzar sus bebidas.
duros; por ej.: extraiga primero el jugo de los tomates y luego de los apios.
• Extraiga el jugo de los alimentos más blandos y luego prosiga con los más
comienza a perder nutrientes.
• Sirva los jugos inmediatamente. Tras unos pocos segundos, el jugo
• Use manzanas y zanahorias para endulzar las mezclas de verduras.
Naranja: aspirina natural y boro
enróllelas y forme una bola antes de introducirlas por el conducto
para alimentos.
• Para extraer el jugo de hojas verdes (espinaca, repollo o col, hierbas, etc.)
vitamina C
Papaya: vitamina A y potasio
Piña: bromelaína, manganeso,
Remolacha
(betabel): ácido fólico, hierro, calcio,
preferencia personal.
Solamente los tallos de las uvas aportan benecios.
• Tallos: córtelos ya que no agregan ningún valor nutricional.
• Semillas: quitarlas es cuestión de gusto personal
• Piel: extraer el jugo de los alimentos sin pelar es cuestión de
potasio
hierro, ácido fólico, cromo
Brócoli: betacaroteno, vitamina C, calcio,
debido a su sabor amargo, pero esto depende de la preferencia personal
• Cítricos: recomendamos quitar la cáscara y las semillas de las frutas cítricas
• No extraiga el jugo de bananos, aguacates (paltas) ni cocos ya que no
pectina, úor, potasio
Zanahoria: betacaroteno, vitaminas A y C,
producen jugo Mézclelos con su jugo para crear una bebida o un licuado
más espeso.
recipiente para pulpa y úsela de muchísimas y saludables maneras...
• ¡Aproveche la pulpa! Reserve la pulpa que se acumule en la tapa y el
Col Rizada
(Berza): antioxidantes, calcio, hierro, vitam-
• Licuados: añada a la licuadora jugo, hielo, leche o yogur bajos en
inas A y C
Perejil: antioxidantes, ácido fólico, hierro,
grasa para preparar licuados más saludables y deliciosos.
bra y endulzan la mezcla o la masa.
• Panecillos dulces, panes y pasteles: las frutas y las verduras aportan
vitaminas A y C
sopas, guisos y más: La pulpa de verduras espesa y añade sabor a
sus recetas preferidas.
• Platillos favoritos: Arrollado de carne, quiches, cacer las, lasaña,

RECETAS
CORNUCOPIA DE 10 SÚPER VEGETALES
Extraiga el jugo de...
1 remolacha (betabel) mediana
2 zanahorias medianas
1 tomate mediano
1 taza de hojas de espinaca compactadas
Corte la remolacha (betabel), el tomate y las manzanas en trozos que quepan en el
conducto para alimentos del extractor de jugo, si fuera necesario.
Procese en el extractor de jugo junto con las espinacas y el perejil.
Rinde aproximadamente 20 onzas.
AGRIDULCE DE VERDURAS
Extraiga el jugo de...
1 manzana verde (Granny Smith)
mediana, cortada en trozos
1 taza de cogollos de brócoli
1 toronja mediana, pelada y sin hollejo
1 taza de hojas de col rizada (berzas)
1 taza de berro bien compactado
½ taza de perejil
2 manzanas rojas pequeñas
Si lo desea, añada...
½ taza de cubos de hielo
1 cucharada de jugo de limón
Si lo desea, añada...
½ taza de cubos de hielo
REFUERCE el jugo...
Vierta el jugo en una licuadora Oster® y
añada ½ taza de yogur griego natural, 2
cucharadas de miel y 1-2 cucharaditas
de semillas de chía o de linaza. Licue la
mezcla hasta homogeneizarla.
Corte la manzana en trozos que quepan en el conducto para alimentos del extractor
de jugo, si fuera necesario. Procese en el extractor de jugo junto con el brócoli, la
toronja, la col rizada y el berro.
Rinde aproximadamente 20 onzas.
www.oster.com 24

EXPLOSIÓN DE ENERGÍA
Extraiga el jugo de...
2 tallos de apio medianos
1 manzana verde (Granny Smith) mediana
1 ½ tazas de piña cortada en cubos
Si lo desea, añada...
El jugo de 1 limón (aproximadamente
2 cucharadas)
Corte el apio, la manzana y la piña en trozos que quepan en el conducto para
alimentos del extractor de jugo, si fuera necesario. Procese en el extractor de jugo.
Si lo desea, adorne con un gajo de piña.
Rinde aproximadamente 16 onzas.
REFUERCE el jugo...
Vierta el jugo en una licuadora Oster® y
añada 1 banano mediano, 1 cucharada de
mantequilla de maní y 1-2 cucharaditas
de semillas de chía o de linaza. Licue la
mezcla hasta homogeneizarla.
REFUERZO PARA LA SALUD -
REFRESCO DE MANZANA VERDE
Extraiga el jugo de...
1 manzana verde (Granny Smith),
cortada en trozos
1 zanahoria mediana
1 kiwi
1 pera
1 taza de hojas de espinaca
bien compactadas
Si lo desea, añada...
½ taza de cubos de hielo
REFUERCE el jugo...
Vierta el jugo en una licuadora Oster®
y añada 1 taza de yogur griego natural,
el jugo de 1 lima (aproximadamente 2
cucharadas) y semillas de chía o de linaza.
Licue la mezcla hasta homogeneizarla.
Corte las frutas en trozos que quepan en el conducto para alimentos del extractor de
jugo, si fuera necesario. Procese en el extractor de jugo.
Rinde aproximadamente 20 onzas.
REFUERZO PARA LA SALUD - SORPRESA DE MELÓN
Extraiga el jugo de...
1 taza de cogollos de brócoli
1 taza de melón cortado en cubos
1 taza de melón verde cortado en cubos
1 limón, pelado y sin hollejo
Si lo desea, añada...
½ taza de cubos de hielo
Corte las frutas en trozos que quepan en el conducto para alimentos del extractor de
jugo, si fuera necesario.
Procese en el extractor de jugo. Si lo desea, adorne con un gajo de limón.
Rinde aproximadamente 20 onzas.
www.oster.com25
REFUERCE el jugo...
Vierta el jugo en una licuadora Oster® y
añada ½ taza de yogur griego natural, 1
cucharada de jarabe de agave*.
Nota: * Puede sustituir por 1 cucharada de
azúcar moreno o el endulzante de
su preferencia.

REFUERZO DE ENERGÍA - DESAYUNO OPULENTO
Extraiga el jugo de...
2 zanahorias medianas
1 taza de arándanos azules
2 tazas de piña cortada en cubos
1 taza de hojas de col rizada (berzas)
2 naranjas medianas (para elaborar ½ taza
de jugo de naranja recién exprimido)
Corte las zanahorias y la piña en trozos que quepan en el conducto para alimentos
del extractor de jugo, si fuera necesario. Procese en el extractor de jugo junto con los
arándanos azules, la piña y la col rizada.
Si lo desea, adorne con un gajo de piña o de limón.
Rinde aproximadamente 20 onzas.
Si lo desea, añada...
½ taza de cubos de hielo
REFUERCE el jugo...
Vierta el jugo en una licuadora Oster® y
añada 1 banano mediano, 1 cucharada de
proteína en polvo y 1-2 cucharaditas de
semillas de chía o de linaza.
Licue la mezcla hasta homogeneizarla.
REFUERZO DE ENERGÍA - DE LA COSECHA DEL HUERTO
Extraiga el jugo de...
2 zanahorias medianas
1 tallo de apio mediano
1 trozo de pepino de 4 pulgadas (10 cm)
1 manzana mediana
1 tomate mediano
1 limón, pelado y sin hollejo
1 trozo de jengibre de 1 pulgada (2,5 cm)
1 taza de hojas de espinaca
bien compactadas
Si lo desea, añada...
½ taza de té verde frío
½ taza de cubos de hielo
REFUERCE el jugo...
Añada 2 cucharaditas de semillas de chía
o de linaza.
Corte las zanahorias, el apio, el pepino, la manzana, el tomate, el limón y el jengibre
en trozos que quepan en el conducto para alimentos del extractor de jugo, si fuera
necesario. Procese en el extractor de jugo junto con las espinacas.
Si lo desea, adorne con un gajo de limón.
Rinde aproximadamente 18 onzas.
www.oster.com 26

RECETA DESINTOXICANTE - SÚPER VERDURAS AL JENGIBRE
Extraiga el jugo de...
2 tazas de hojas de espinaca bien
compactadas
1 taza de hojas de arúgula bien
compactadas
1 manzana roja mediana
cortada en cuñas
½ taza de hojas de berro bien
compactadas
1 limón, sin piel ni hollejo y
cortado a la mitad
Procese en el extractor de jugo junto las espinacas, la arúgula, la manzana, el berro, el
limón y el jengibre. Si lo desea, adorne con un gajo de limón.
Rinde aproximadamente 18 onzas.
1 trozo de jengibre de
1 pulgada (2,5 cm)
Si lo desea, añada...
½ taza de cubos de hielo
Si lo desea, REFUÉRCELO...
Vierta el jugo en una licuadora Oster®
y añada 1 taza de jugo de arándanos
rojos y 1-2 cucharaditas de semillas de
chía o de linaza. Licue la mezcla hasta
homogeneizarla.
RECETA DESINTOXICANTE - BEBA BAYAS
Extraiga el jugo de...
1 taza de arándanos azules naturales
1 taza de fresas naturales, cortadas
a la mitad*
1 taza de frambuesas naturales
½ taza de piña cortada en cubos
2 tallos de apio
Nota: * Si lo desea, sustituya por 1 taza
de arándanos rojos, si están en
temporada.
Si lo desea, añada...
1/2 taza de té verde orgánico frío con
granada y açaí
Si lo desea, REFUÉRCELO...
Vierta el jugo en una licuadora Oster® y
añada ½ taza de yogur griego natural, 2
cucharadas de miel y 1-2 cucharaditas
de semillas de chía o de linaza. Licue la
mezcla hasta homogeneizarla.
Procese en el extractor de jugo junto con los arándanos azules, los arándanos rojos y
las frambuesas. Si lo desea, adorne con arándanos azules y rojos.
Rinde aproximadamente 18 onzas.
www.oster.com27

Garantía Limitada de 1 año
Sunbeam Products, Inc., que opera bajo el nombre Jarden Consumer Solutions, y en Canadá, Sunbeam
Corporation (Canada) Limited, que opera bajo el nombre Jarden Consumer Solutions (en conjunto denominadas “JCS”), garantiza que este producto no presentará defectos ni en el material ni en la mano de obra durante el período de un año a partir de la fecha de compra. JCS, a su discreción, reparará o reemplazará este
producto o cualquier componente de este que se considere defectuoso durante el período de garantía.
El reemplazo se efectuará por un producto o un componente nuevo o reacondicionado. Si el producto ya
no estuviera disponible, se reemplazará por un producto similar de igual o mayor valor. Esta es su garantía
exclusiva. NO intente reparar ni ajustar ninguna de las funciones eléctricas o mecánicas de este producto. Si
lo hace, anulará la garantía.
Esta garantía tiene validez para el comprador minorista original a partir de la fecha de la compra inicial y
dicha garantía no es transferible. Conserve la factura original. Para hacer valer la garantía se necesita el comprobante de compra. Ni los distribuidores de JCS, ni los centros de servicio ni las tiendas minoristas que
vendan productos de JCS tienen potestad para alterar, modicar ni cambiar de forma alguna los términos y
condiciones de esta garantía.
Esta garantía no cubre el desgaste normal de las piezas ni los daños a consecuencia de cualquiera de las
siguientes acciones: uso negligente o inadecuado del producto, uso con un voltaje o corriente inapropiados, uso contrario a las instrucciones de funcionamiento, desarmado, reparación o alteración por parte de
terceros distintos a JCS o un centro de servicio autorizado de JCS. Asimismo, la garantía no ampara: actos
de fuerza mayor tales como incendios, inundaciones, huracanes y tornados.
¿Cuáles son los límites de la responsabilidad de JCS?
JCS no será responsable de daños accidentales o resultantes ocasionados por el incumplimiento de una
garantía o condición expresa, implícita o estatutaria. Salvo en la medida en que lo prohíban las leyes
pertinentes, toda garantía o condición de comerciabilidad o idoneidad para un n determinado tendrá
una duración limitada al plazo de la garantía antes mencionada. Sunbeam desconoce cualesquiera otras
garantías, condiciones o declaraciones, expresas, implícitas, estatutarias o de cualquier otra naturaleza.
Sunbeam no se hará responsable de daños de ningún tipo que resulten de la compra, utilización o uso
inadecuado del producto, o la imposibilidad de uso del mismo, lo que comprende daños accidentales, especiales, resultantes o similares, o la pérdida de ganancias, ni por ningún incumplimiento contractual, fundamental o de otra naturaleza, ni por ninguna acción emprendida por terceros en contra del comprador.
Algunas provincias, estados o jurisdicciones no permiten la exclusión o limitación de los daños accidentales
o resultantes ni las limitaciones en cuanto a la duración de una garantía implícita, por lo tanto, es posible
que las limitaciones o exclusiones anteriores no sean pertinentes en su caso.
Esta garantía le otorga ciertos derechos legales pero quizás usted goce además de otros derechos que
varían de un estado, una provincia o una jurisdicción a otra.
Cómo obtener servicio garantizado
En EE. UU.
Si tiene preguntas relativas a esta garantía o desea obtener servicio en garantía, sírvase llamar al 1-800-3340759 y le proporcionaremos la dirección del centro de servicio que le resulte más conveniente.
En Canadá
Si tiene preguntas relativas a esta garantía o desea obtener servicio en garantía, sírvase llamar al 1-800-6678623 y le proporcionaremos la dirección del centro de servicio que le resulte más conveniente.
En EE. UU., esta garantía la ofrece Sunbeam Products, Inc., que opera bajo el nombre Jarden Consumer
Solutions, ubicada en Boca Raton, Florida 33431.
En Canadá, esta garantía la ofrece Sunbeam Corporation (Canada) Limited, que opera bajo el nombre
Jarden Consumer Solutions, ubicada en 20 B Hereford Street, Brampton, Ontario L6Y 0M1.
Si tiene algún problema o reclamo en relación con este producto, sírvase escribir a nuestro departamento
de atención al cliente.
LE ROGAMOS QUE NO DEVUELVA ESTE PRODUCTO A NINGUNA DE LAS DIRECCIONES ANTERIORES
NI AL LUGAR DONDE LO ADQUIRIÓ.

NOTES

NOTES

For Product Questions Contact:
Jarden Customer Service
USA : 1.800.334.0759
Canada : 1.800.667.8623
www.oster.com
©2014 Sunbeam Products, Inc. doing business as Jarden Consumer Solutions.
All rights reserved. Distributed by Sunbeam Products, Inc. doing business as
Jarden Consumer Solutions, Boca Raton, Florida 33431.
Sunbeam Products, Inc. is a subsidiary of Jarden Corporation (NYSE:JAH).
Para preguntas sobre los productos llame:
Jarden Customer Service
EE.UU.: 1.800.334.0759
Canadá : 1.800.667.8623
www.oster.com
©2014 Sunbeam Products, Inc. operando bajo el nombre de Jarden Consumer Solutions.
Todos los derechos reservados. Distribuido por Sunbeam Products, Inc. operando bajo el nombre de
Jarden Consumer Solutions, Boca Raton, Florida 33431.
Sunbeam Products, Inc. es una subsidiaria de Jarden Corporation (NYSE:JAH).
Printed in China/
SPR102114-629P
Impreso en China
P.N. 176260
 Loading...