

OSKARTM 2IN1
SALAD PREP AND FOOD PROCESSOR
OSKAR
TM
2EN1
MÁQUINA PARA PREPARAR ENSALADAS
Y PROCESADOR DE ALIMENTOS
Safety
Seguridad
FOR PRODUCT QUESTIONS CONTACT:
Jarden Customer Service
USA: 1.800.334.0759
Canada: 1.800.667.8623
www.oster.com
©2015 Sunbeam Products, Inc. doing business as Jarden Consumer Solutions.
All rights reserved. Distributed by Sunbeam Products, Inc. doing business as
Jarden Consumer Solutions, Boca Raton, Florida 33431. Sunbeam Products, Inc.
is a subsidiary of Jarden Corporation (NYSE:JAH).
User Guide / Guía del Usuario:
Printed in China
FPSTFP4xxx_15ESM1 GCDS-OST43472-JC
FPSTFP4xxx_15ESM1.indd 32-1 12/16/15 09:06
P.N.185151 Rev. A
FPSTFP4xxx
WWW.OSTER.COM
How to Use
Cómo Usar
Cleaning
Cuidado y Limpieza
Warranty
Garantía

www.oster.com
IMPORTANT SAFEGUARDS
When using electrical appliances, basic safety precautions should always be
followed including the following:
1. Read all instructions before use, and keep for future reference.
2. To protect against risk of electrical shock, do not put food processor base or
electrical cord in water or any other liquid. This may cause personal injury or
damage to the product.
3. Close supervision is necessary when using this appliance near children.
4. Turn unit o and unplug from outlet when not in use, before putting on or taking
o parts, and before cleaning.
5. Do not contact moving parts. Keep ngers out of discharge opening.
6. Do not operate food processor with a damaged cord or plug or after the
appliance malfunctions, or is dropped or damaged in any manner. Return
appliance to the nearest authorized service center for examination, repair or
mechanical adjustment. This appliance has important markings on the plug
blade. The attachment plug or entire cordset (if plug is molded onto cord) is not
suitable for replacement. If damaged, the appliance shall be replaced.
7. The use of attachments not recommended or sold by the manufacturer may
cause re, electrical shock or injury.
8. Do not let cord contact hot surfaces, including the stove.
9. Do not let cord hang over edge of table or counter.
10. Do not use outdoors.
11. Keep hands and utensils away from moving blades or discs while processing food
to reduce the risk of severe injury to persons or damage to the food processor.
A scraper may be used but must be used only when the food processor is not
running.
12. Blade and processing disc are sharp. Handle carefully.
13. To reduce the risk of injury to persons, never place cutting blade on motor base
without rst locking bowl properly in place.
14. Be certain container cover is securely locked in place before operating appliance.
Make sure motor, Disc, and/or chopping blades have completely stopped before
removing cover.
15. Never feed food into food chute by hand, always use the food pusher.
16. Do not attempt to defeat the cover interlock mechanism.
17. To reduce the risk of re or electric shock, do not attempt to remove the bottom
cover of the unit. There are no serviceable parts inside.
Repair should only be done by authorized service personnel.
THIS UNIT IS INTENDED FOR HOUSEHOLD USE ONLY.
This appliance has a polarized alternating current plug (one blade is wider
than the other). To reduce the risk of electric shock, as a safety feature, this
plug will t in a polarized outlet only one way. If the plug does not insert
fully in the outlet, reverse the plug. If it still fails to t, contact a qualied
electrician. Do not modify the plug in any way.
DO NOT ATTEMPT TO DEFEAT THIS SAFETY FEATURE.
EXTENSION CORD USE
A short power-supply cord is provided to reduce the risk resulting from
becoming entangled in or tripping over a longer cord. An extension cord
may be used if care is exercised in its use. If an extension cord is used, the
electrical rating of the cord must be at least as great as the electrical rating of
the appliance. The extension cord should be arranged so that it will not drape
over the countertop or tabletop where it can be pulled on by children or
tripped over unintentionally.
Thank you for purchasing the OSTER® 2in1 Salad Prep and Food Processor.
Before you use this product for the rst time, please take a few moments
to read these instructions and keep it for reference. Pay particular attention
to the Safety Instructions provided. Please review the product service and
guarantee statements. To learn more about Oster® products, please visit us at
www.oster.com or call us at 1-800-334-0759.
SAVE THESE INSTRUCTIONS
2
FPSTFP4xxx_15ESM1.indd 2-3 12/16/15 09:06
www.oster.com
3
www.oster.com
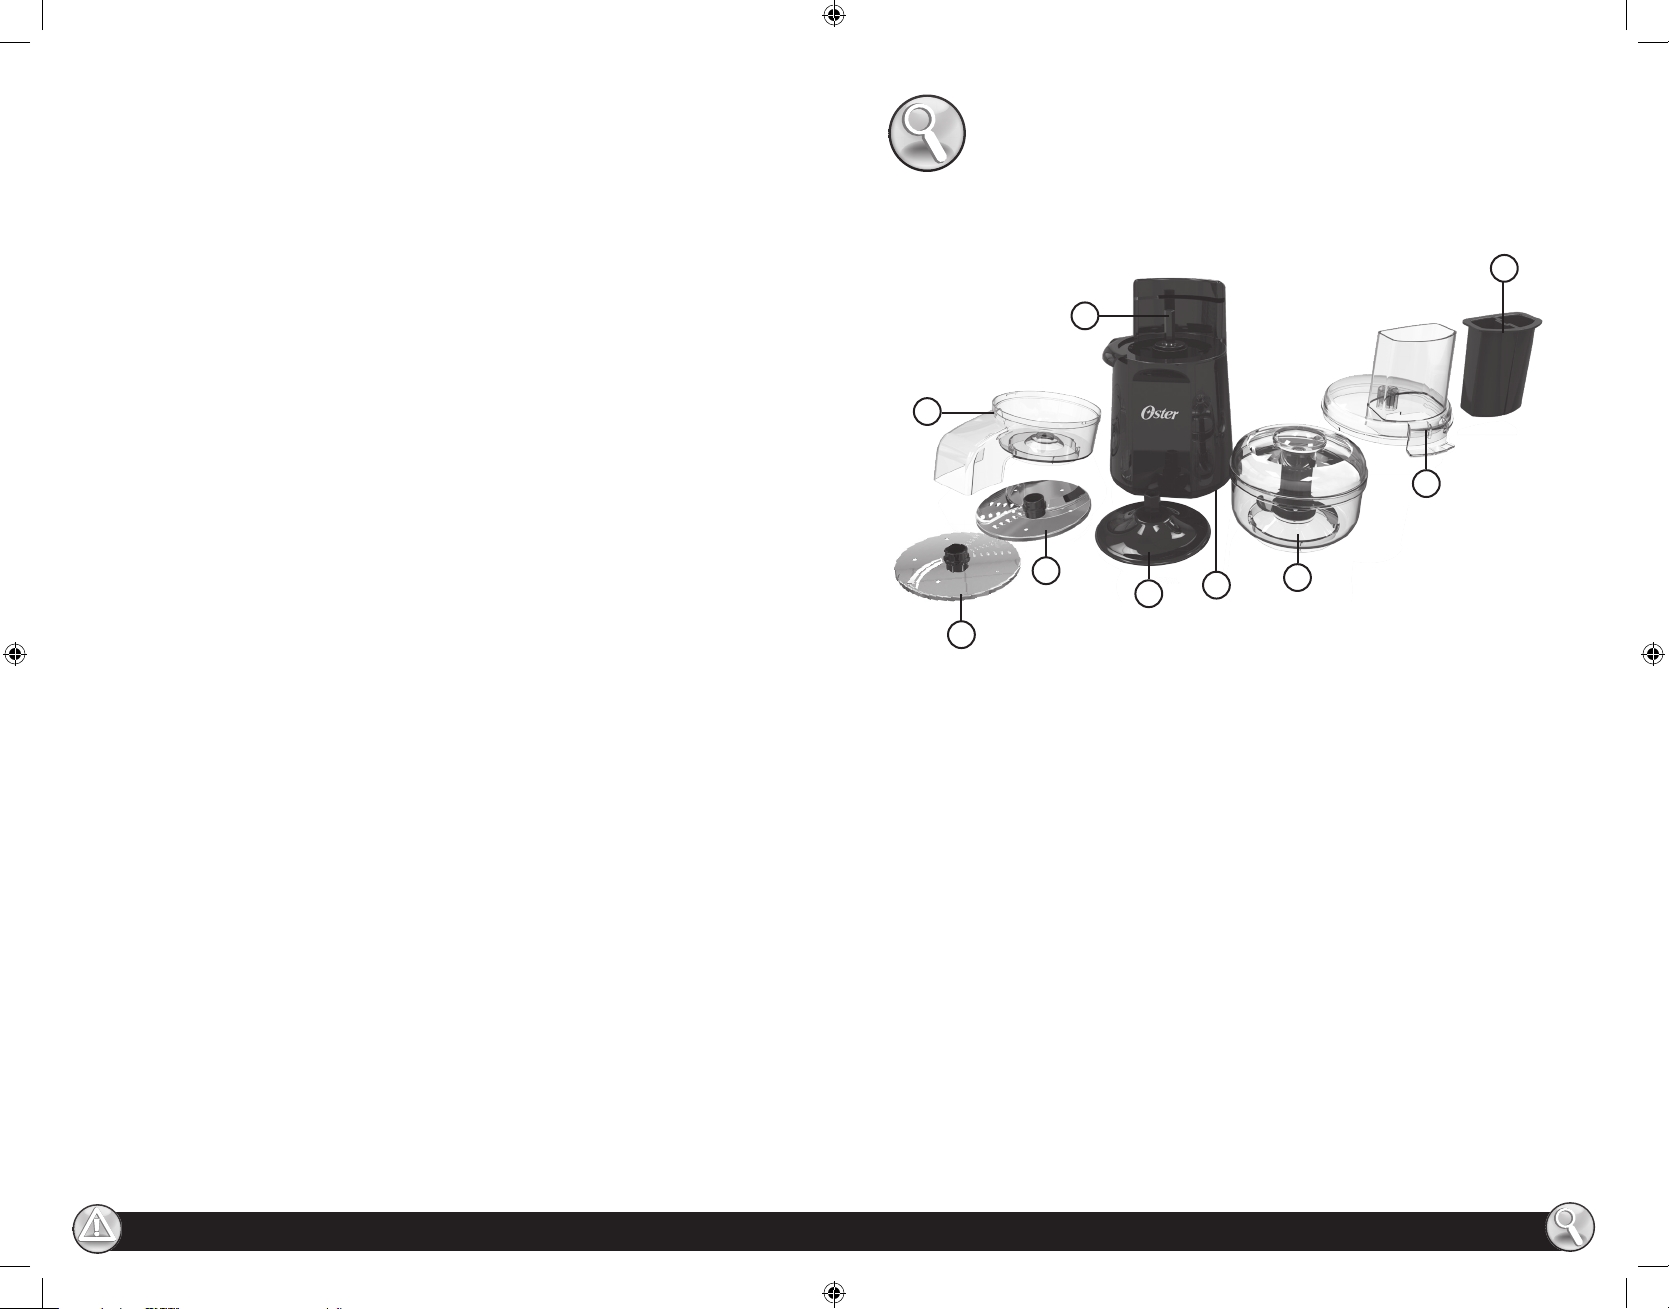
LEARNING ABOUT YOUR OSTER® 2IN1
SALAD PREP AND FOOD PROCESSOR
D
C
A
B
CONGRATULATIONS for the purchase of the new
Oster® 2in1 Salad Prep and Food Processor.
A powerful motor along with 2 dierent sizes of reversible slice/shred discs to
customize your slicing/shredding from ultra-thin to thick, a half food pusher plus
an easy-to-use processing bowl with continuous ow attachment will make this
multitasker your best allied in the kitchen to help you slice, shred, chop and purée
your food with ease and ensure consistent results every time.
F
E
G
A. Full-to-Half food pusher
B. Cover with food chute
C. Slice/shred bowl with continuous ow attachment
D. Center post
E. Food Flow tool
F. Reversible thick slice/shred disc
G. Reversible thin slice/shred disc
H. 4-cup chopper bowl with stainless steel chopping blade
(sold separately or available with Models FPSTFP4050,
FPSTFP4100)*
I. Non-slip feet
*For more information about the product and its accessories,
please visit www.oster.com
I
H
4
FPSTFP4xxx_15ESM1.indd 4-5 12/16/15 09:06
www.oster.com
5
www.oster.com
ABOUT YOUR OSTER® 2IN1 SALAD PREP
AND FOOD PROCESSOR FEATURES
HOW TO:
Full-to-Half – This full-to-half food pusher is designed to give you great exibility and control.
You can either use both pieces together to guide food items through the food chute or just use
one half of the pusher to control and get consistent results while slicing and shredding stick
veggies.
Cover with food chute – This see-through cover is the lid for the bowl with continuous ow
attachment. The food chute ts a variety of foods for slicing or shredding.
Slice/Shred bowl with Continuous Flow Attachment - This attachment locks onto the base
and activates the automatic On/O interlock switch system. The continuous ow attachment
allows you to slice or shred food right into a serving bowl.
4-Cup Chopper Bowl Cover – This see-through cover activates the automatic On/O
interlock switch system. The cover also has a pouring opening so that ingredients, such as oil or
sauce, can be added slowly during processing.
4-Cup Chopper Bowl - The chopper bowl locks into place on the base. The shape, in
combination with the design of the blade, ensures even, ecient processing. The transparency
of the processing bowl allows you to monitor the food during processing.
Center Post – Holds the discs and chopping blade in place.
Stainless Steel Chopping Blade – Use to coarsely or nely chop, mince, mix and purée foods
to desired consistency.
Food Flow tool – Collects excess food left over after processing for easy disposal and cleaning.
Reversible Thin Slice/Shred Disc - Use for ultra-thin slicing or shredding of a variety of foods.
Reversible Thick Slice/Shred Disc - Use for coarse slicing or shredding of a variety of foods.
Non-slip feet – Keeps processor rmly in place on surfaces while in use.
BEFORE FIRST USE
• Remove and peel o any stickers and packaging materials.
NOTE: do not remove the electrical ratings label on the appliance.
• Clean the food processor as instructed in the Care and Cleaning section.
CAUTION: blade and processing disc are sharp. Handle carefully.
• Select a leveled dry countertop where the appliance is to be used allowing air space on all
sides to provide proper ventilation for the motor.
• When using your food processor for the rst time, you may notice some smoke and a slight
odor. This is normal due to some residue left on the motor from the manufacturing process
and should be no reason for concern.
IMPORTANT INFORMATION
NOTE: Do not attempt to chop ice in this food processor; it will damage the bowl and dull the
chopping blade. This unit will not whip cream, beat egg whites, grind coee beans, spices or
other items with high oil content, or slice or shred hard-cooked eggs, marshmallows, or soft
cheeses.
CAUTION: For your protection, this unit has an interlock system. The processor will not operate
unless the bowl is properly locked onto the base and cover is properly locked onto the bowl.
Do not attempt to defeat the cover interlock mechanism.
Do not attempt to operate the unit without the bowl cover, bowl and food chute lid correctly
in place. Be sure base is on a at, dry and clean surface before you begin processing.
The stainless steel chopping blade is only for use in the 4-cup chopper bowl for in-bowl
chopping, mixing or pureeing. NEVER use the blade in the bowl with continuous ow
attachment.
CAUTION: Before you begin, please be sure that the electric cord is unplugged.
ASSEMBLING AND USING SLICE/SHRED BOWL WITH
CONTINUOUS FLOW ATTACHMENT
Use this attachment to slice or shred ingredients into your own bowl.
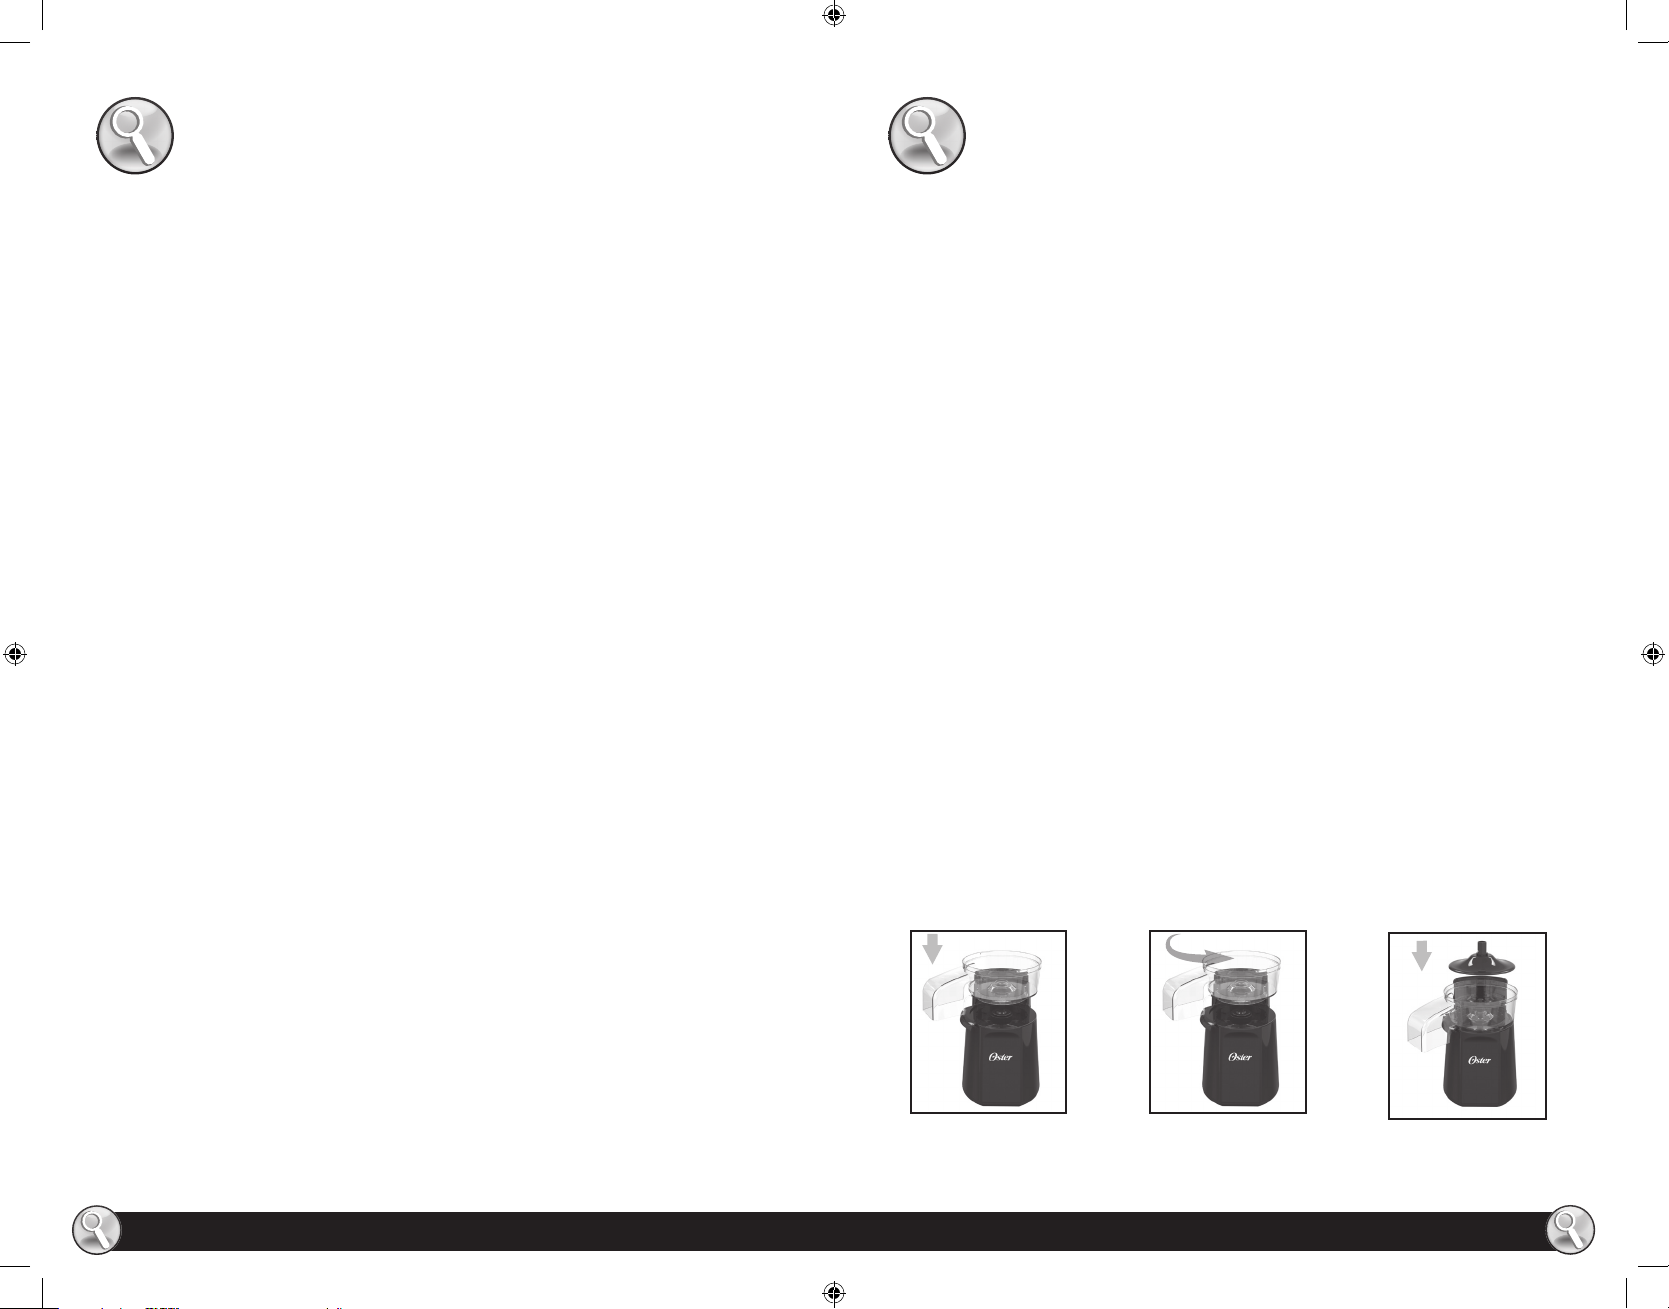
1. Place unit on a at, leveled surface with the Oster® logo facing you (Figure 1).
2. Place the slice/shred bowl with the continuous ow attachment over the center post of the base and
turn until it drops evenly onto the base. Turn bowl to counterclockwise until it locks securely into place
(Figure 2).
3. Hold the stem at the top of the food ow tool, place over center post and gently push all the way
down into the bowl (Figure 3).
FIGURE 1 FIGURE 2
FIGURE 3
6
FPSTFP4xxx_15ESM1.indd 6-7 12/16/15 09:06
www.oster.com
7
www.oster.com
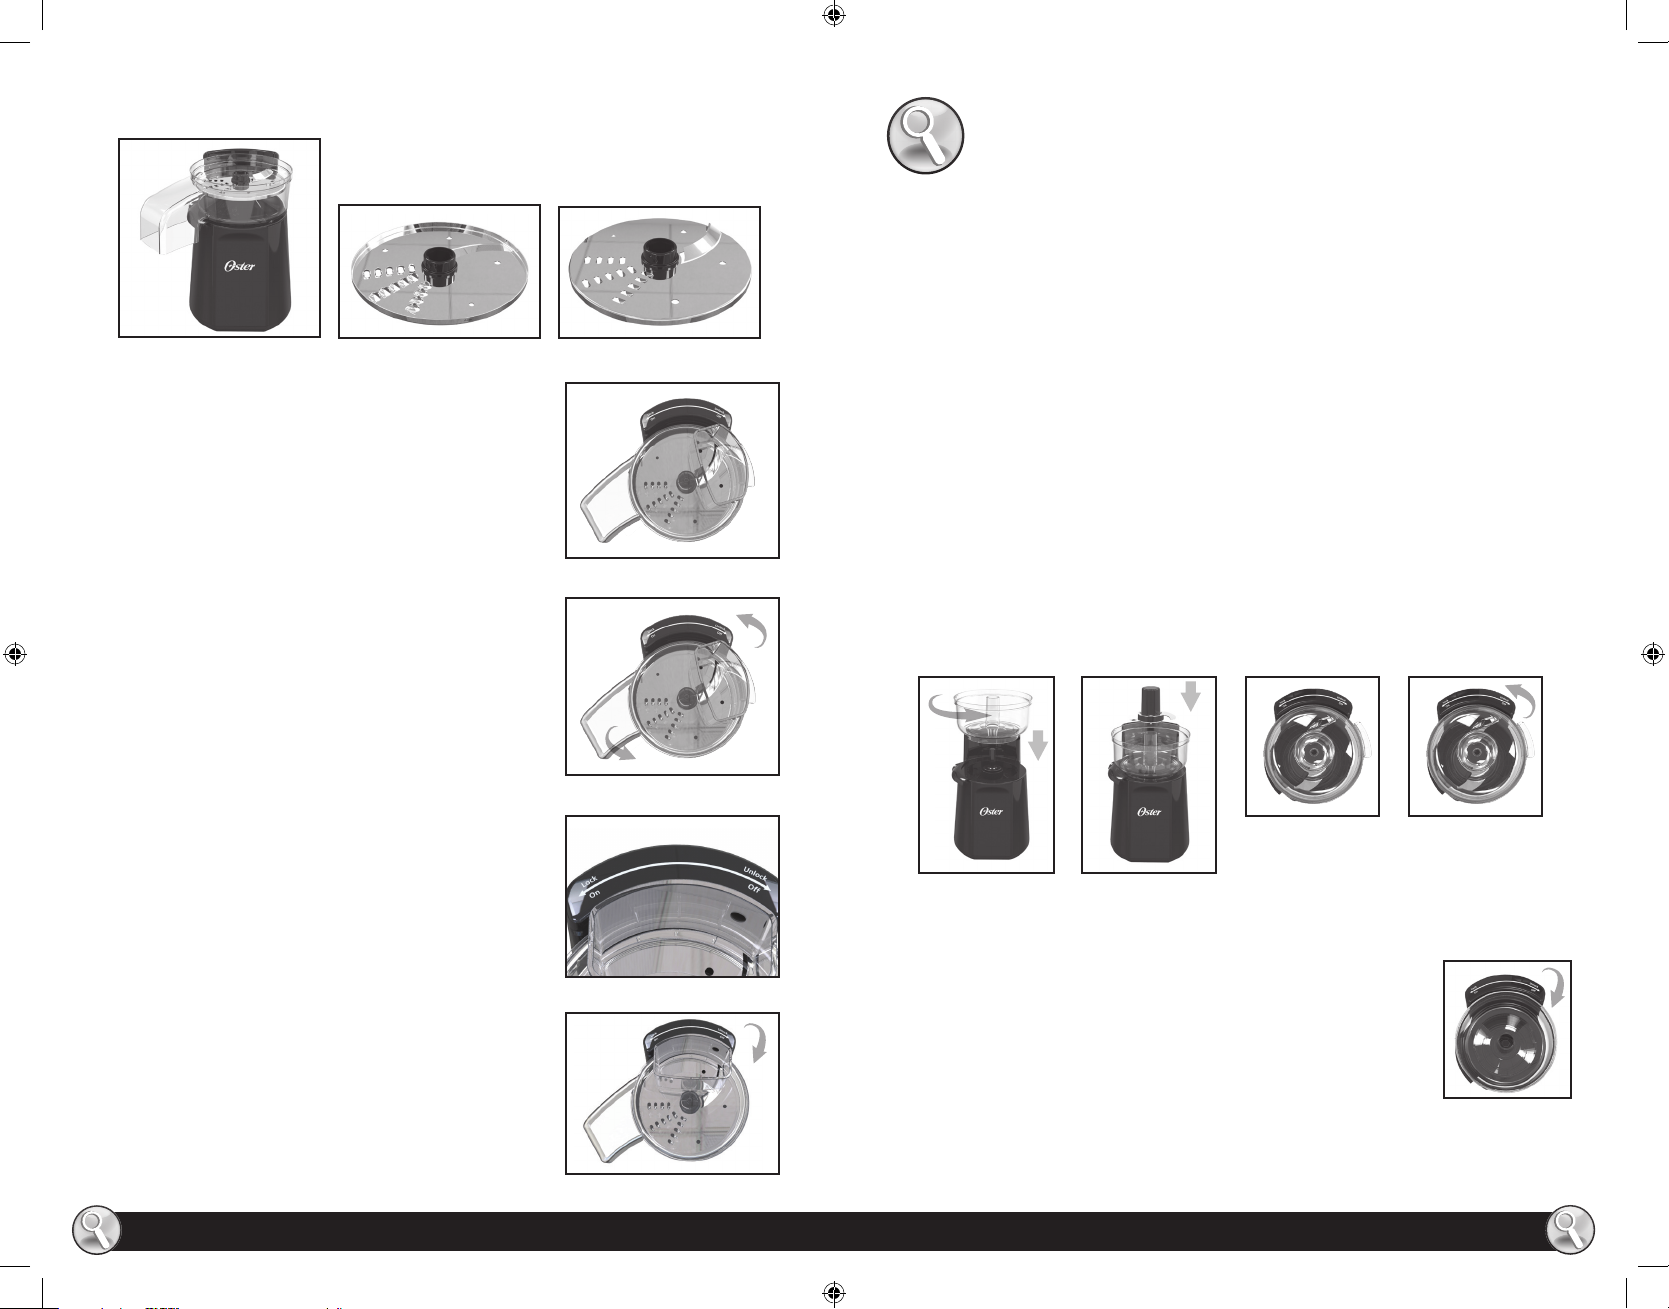
4. Place slice/shred disc onto the food ow tool stem. Place disc with appropriate side up for slicing or for
shredding (Figures 4a and 4b).
FIGURE 4A
5. Place the cover with food chute on the bowl with the large
locking tab to the right side of the bowl, near the horizontal slot at
the back of the unit (Figure 5).
6. Place a bowl under continuous ow chute to collect food.
7. Plug unit into a standard electrical outlet
8. Load the feed chute with the food to be processed and position
food pusher over food.
CAUTION: Never use ngers to push food down the feed chute or
to direct food through the continuous ow chute. Always use the
food pusher.
TIP: Use half of the food pusher to easily control and guide
vegetable sticks. Insert half of the food pusher in the unit and use
the extra piece to push down the feed chute.
9. Holding food pusher with one hand and food chute with the
other, turn the cover counterclockwise toward ON/LOCK until
the large locking tab slides into horizontal slot. This engages the
automatic interlock switch and turns the food processor on
(Figure 6).
CAUTION: The unit will not turn on until the locking tab on the
bowl cover is locked in the slot.
10. When nished, turn the attachment clockwise toward OFF/
UNLOCK to stop the processor (Figure 7a and 7b).
11. Wait for the disc to stop spinning before removing the cover.
Remove cover and carefully remove the slice/shred disc holding it
by the short stem and pulling o the bowl.
12. Remove the food ow tool holding it by the stem and lifting o the
bowl.
13. To remove the slice/shred bowl, simply turn it to the right until it
unlocks and lift o the base.
14. Unplug the appliance when not in use.
FIGURE 4B - SHREDDING
FIGURE 4B - SLICING
FIGURE 5
FIGURE 6
FIGURE 7a
ASSEMBLING AND USING 4CUP FOOD
PROCESSOR
NOTE: Food Processor Bowl only sold with models FPSTFP4050, FPSTFP4100 or sold separately.
Use this bowl with the chopping blade to chop, mince, mix and puree a variety of ingredients.
1. Place unit on a at, leveled surface with the Oster® logo facing you.
2. Place the chopper bowl over the center post of the base. Align the two horizontal tabs at
the bottom of the bowl with the indentations on the base and insert bowl onto the base.
Turn chopper bowl counterclockwise until it locks securely into place (Figure 8).
3. Carefully hold the blade stem at the top, place blade over center post and gently push all
the way down (Figure 9).
CAUTION: blade and processing disc are sharp. Handle carefully.
4. Add your ingredients.
5. Place the cover on the chopper bowl with the large locking tab to the right side of the
bowl, near the horizontal slot at the back of the unit (Figure 10).
6. Plug unit into a standard electrical outlet. Turn cover counterclockwise toward ON/LOCK to
engage the automatic interlock switch and turn the food processor on (Figure 11).
IMPORTANT: The unit will not turn on until the locking tab on the bowl cover is locked in
the slot.
FIGURE 10
FIGURE 9FIGURE 8
7. When processing is complete, turn chopper bowl clockwise toward
OFF/UNLOCK to stop the food processor (Figure 12).
8. Remove the cover and the chopping blade from the bowl before
removing the processed food.
CAUTION: Be sure chopping blade has completely stopped spinning
before removing cover from the bowl.
9. Unplug the appliance when not in use.
FIGURE 11
FIGURE 12
FIGURE 7b
8
FPSTFP4xxx_15ESM1.indd 8-9 12/16/15 09:06
www.oster.com
9

www.oster.com
PROCESSING TIPS
PROCESSING LONG AND THIN FOODS
SLICING AND SHREDDING
• Cut all ingredients to a size that ts comfortably into the food chute.
• Always remove seeds, core and pits before processing.
• Select foods that are rm and not over ripe.
• Remove the core from hard vegetables, such as cabbage.
• When preparing longer slices, pack food items horizontally in the food chute; for shorter
slices, pack them vertically.
• Shred hard cheeses, such as Parmesan or Romano, at room temperature.
• Soft and semi hard cheeses, such as Cheddar, Mozzarella or Swiss should be well chilled
before shredding.
• When using the slice /shred disc do not let the food accumulate too high; stop and empty
the bowl.
• Apply light pressure to the food pusher when processing soft foods, such as tomatoes and
slightly more pressure for hard foods like onions.
• Take advantage of the exibility and control the food pusher design provides. Use the full size pusher for thick slices of fruit (like apples) or just use one half when shredding or slicing
long, thin veggies (like carrot sticks).
CHOPPING AND BLENDING
• For best results, process foods that are about the same size.
• Do not overload the bowl.
• Never leave the processor unattended while it is on.
• Do not use food processor to chop ice.
• Add liquid ingredients by slowly pouring desired amount through the pouring opening on
the cover of the 4-cup bowl.
• When blending liquids, apply pressure to the cover to prevent leakage. If contents are very
hot, place a cloth over the cover, before applying pressure.
• Use hot but never boiling liquids.
• Monitor food closely to avoid over-processing.
• The quantities that can be processed within the processing bowl will vary with the density
of the mixture.
• When using the chopping blade to process meats, cut meat into approximately 1” cubes.
Process for 15-20 seconds or until evenly processed.
1. Insert HALF of the FOOD PUSHER into the chute (Figure 13), plug the cord into an electric
outlet.
2. Load the feed chute with thin or long food, then turn the food processor ON and use the
other half of the pusher to continue guiding the food down the chute (Figure 14).
FIGURE 13 FIGURE 14
10
FPSTFP4xxx_15ESM1.indd 10-11 12/16/15 09:06
www.oster.com
11

www.oster.com
CARE & CLEANING
TROUBLESHOOTING
NOTE: Do not attempt to sharpen the cutting edges of the chopping blade or the reversible
disc. They are permanently sharpened at the factory and will be ruined by attempted
sharpening.
CLEANING
NOTE: Whenever possible, rinse parts immediately after processing for easy cleanup.
CAUTION: Turn unit o and unplug from outlet before putting on or taking o parts, and
before cleaning.
• Wipe base and feet with a damp cloth and dry thoroughly. Never use a harsh detergent or
abrasive cleaner.
CAUTION: to protect against risk of electrical shock, do not put food processor base or
electrical cord in water or any other liquid.
• All removable parts can be washed by hand or in a dishwasher.
- If washing by hand, wash in hot sudsy water, rinse, and dry thoroughly. If necessary, use
a small nylon bristle brush to thoroughly clean the bowl and food chute/cover, this type
of brush will also help prevent cutting yourself on the sharp chopping blade and slice/
shred disc.
- If washing in a dishwasher, place removable parts on the top rack only.
CAUTION: Blade and processing disc are sharp. Handle carefully.
• Some foods, such as carrots, may temporarily stain the bowl. To remove stains, make a paste
of 2 tablespoons baking soda and 1 tablespoon warm water. Apply the paste to the stains
and rub with a cloth. Rinse with sudsy water and dry.
• Do not use rough scouring pads or cleansers on any plastic or metal parts.
• Do not ll the bowl with boiling water or place any of the parts in boiling water.
Problem Possible Cause Solution
Food is being processed
unevenly or the food processor
is moving across the work
surface.
The food processor vibrates
or there are signs that the
chopping blade or slice/shred
disc is hitting the chopper bowl
while the processor is operating.
Liquid leaks from the bottom of
the chopper bowl.
Cover does not move freely
when attached to the chopper
bowl.
Food falls over in the food chute
during slicing.
Unit stops and will not come
back on.
Unit does not work. The unit is not plugged in. Verify that unit is plugged in.
You are overloading the
chopper bowl.
The chopping blade or slice/
shred disc has not been
assembled properly.
Too much liquid in the bowl. Process smaller amounts.
The edges might need
lubricating.
The food chute has not been
well packed or uneven pressure
has been applied to the food
pusher during processing.
The unit is plugged into an
outlet that is not working.
Next time, process this amount
in two or more batches.
Stop the food processor
immediately and assemble the
chopping blade or slice/shred
disc properly.
Use a small amount of
vegetable oil to lubricate the
edges of the chopper bowl and
cover.
Cut pieces in even lengths just a
little shorter than the length of
the food chute. Pack the chute
carefully and maintain an even
pressure on the food pusher as
the food is being processed.
Verify outlet is not working by
plugging another appliance
then plug into a working outlet.
STORAGE
CAUTION: Blade and processing disc are sharp. Handle carefully.
Store appliance in a clean, dry place with the chopper bowl and cover in the unlocked position.
12
FPSTFP4xxx_15ESM1.indd 12-13 12/16/15 09:06
www.oster.com
13

www.oster.com
RECIPES
7 Layer Salad for a Crowd
1 medium iceberg or romaine lettuce
6 medium carrots
6 mini cucumbers
8 celery stalks
1 medium purple onion
8 plum tomatoes
6 oz Monterey Jack cheese
½ cup Lime Cilantro dressing
Process lettuce, carrots, cucumbers, celery, purple onion and tomatoes through the processor
using the slicing disc and forming layers of each vegetable.
Change disc to the shredding side and process cheese through the processor topping the
salad with the cheese.
Prepare dressing and toss the dressing into the salad just before serving.
Makes 10 to 12 servings
Lime Cilantro Dressing: In bowl of processor, combine ¼ cup olive oil, 3 tbsp fresh lime juice, 3
sprigs of cilantro, 2 sprigs parsley, 1 medium clove garlic, ½ tsp salt and 1/8 tsp coarsely ground
pepper. Process to blend.
Coleslaw with Creamy Dill Dressing
½ medium head cabbage
¼ medium head purple cabbage
3 medium carrots
1 bunch green onions
6 radishes
2 celery stalks
Creamy Dill Dressing
Process vegetables through the processor into large salad bowl using the slicing disc.
Prepare dressing and toss the dressing into the salad; blend well. Refrigerate at least 30 minutes
or until ready to serve.
Makes 8 to 10 servings
Creamy Dill Dressing: In bowl of processor, combine 2/3 cup mayonnaise, ¼ cup rice wine
vinegar, 6 sprigs of chives, 4 sprigs dill, 1 medium clove garlic, ½ tsp salt and 1/8 tsp coarsely
ground pepper. Process to blend.
14
FPSTFP4xxx_15ESM1.indd 14-15 12/16/15 09:06
www.oster.com
15

www.oster.com
Spinach and Mushroom Pizza
Green Onion Lemon Hummus
½ lb mushrooms
1 small onion
3 tbsp olive oil
2 ½ cups spinach leaves
8 large basil leaves
1 large clove garlic
Pizza dough for 15-inch pizza
1 tbsp olive oil
1 ½ cups marinara or basil marinara sauce
8 oz part skim milk Mozzarella cheese
4 oz Provolone cheese
2 oz Parmesan cheese
Process mushrooms and onion through the processor into large bowl using the slicing disc.
Reverse disc to shredding side. Process spinach, basil leaves and garlic into another bowl.
Heat 10-inch, non-stick skillet over medium heat. Add 2 tbsp oil and cook mushrooms and
onion until lightly browned; stir often. Add spinach mixture and cook just until spinach is
slightly wilted. Remove from heat.
Lightly brush a 15-inch pizza pan with olive oil and dust with corn meal. On very lightly oured
board, roll out dough to t prepared pizza pan. Bake in preheated 400 F. oven for 10 minutes .
Meanwhile, shred cheeses into medium bowl.
Top partially baked pizza crust with marinara sauce spreading evenly to within ¾ inch of edges
of crust. Top with cheese mixture and spinach mixture. Return to oven and bake for 12 minutes
or until edges are golden and cheese is bubbling.
Let stand 5 minutes before serving.
Makes 1 – 15 inch pizza
1 can (16 oz) garbanzo beans (chick peas)
3 tbsp tahini
2 large cloves garlic
2 green onions
2 stalks at leaf parsley
1 tsp grated lemon peel
¼ tsp salt
¼ tsp ground cumin
4 tbsp fresh lemon juice
2 tbsp extra virgin olive oil
4 pita pockets, cut into wedges
Drain garbanzo beans, reserving liquid. In bowl of processor, combine beans and ¼ cup liquid.
Add remaining ingredients, except pita wedges. Process until almost smooth. (Mixture should
be slightly chunky.)
Refrigerate for 30 minutes to allow avors to blend or until ready to serve. Serve in bowl with
pita chips for dipping.
Makes about 1 ¾ cup
NOTE: Lemon and garlic give a tang and cumin adds a little heat.
16
FPSTFP4xxx_15ESM1.indd 16-17 12/16/15 09:06
www.oster.com
17

www.oster.com
1 Year Satisfaction Guarantee
NOTES
Sunbeam Products, Inc. doing business as Jarden Consumer Solutions or if in Canada, Sunbeam Corporation
(Canada) Limited doing business as Jarden Consumer Solutions (collectively “JCS”) warrants that for a period
of one year from the date of purchase, this product will be free from defects in material and workmanship. JCS,
at its option, will repair or replace this product or any component of the product found to be defective during
the guarantee period. Replacement will be made with a new or remanufactured product or component. If
the product is no longer available, replacement may be made with a similar product of equal or greater value.
This is your exclusive guarantee. Do NOT attempt to repair or adjust any electrical or mechanical functions
on this product.
Doing so will void this guarantee.
This guarantee is valid for the original retail purchaser from the date of initial retail purchase and is not
transferable. Keep the original sales receipt. Proof of purchase is required to obtain satisfaction guarantee
performance. JCS dealers, service centers, or retail stores selling JCS products do not have the right to alter,
modify or any way change the terms and conditions of this guarantee.
This guarantee does not cover normal wear of parts or damage resulting from any of the following: negligent
use or misuse of the product, use on improper voltage or current, use contrary to the operating instructions,
disassembly, repair or alteration by anyone other than JCS or an authorized JCS service center. Further, the
guarantee does not cover: Acts of God, such as re, ood, hurricanes and tornadoes.
What are the limits on JCS’s Liability?
JCS shall not be liable for any incidental or consequential damages caused by the breach of any express,
implied or statutory guarantee or condition.
Except to the extent prohibited by applicable law, any implied guarantee or condition of merchantability or
tness for a particular purpose is limited in duration to the duration of the above guarantee.
JCS disclaims all other guarantees, conditions or representations, express, implied, statutory or otherwise.
JCS shall not be liable for any damages of any kind resulting from the purchase, use or misuse of, or inability
to use the product including incidental, special, consequential or similar damages or loss of prots, or for any
breach of contract, fundamental or otherwise, or for any claim brought against purchaser by any other party.
Some provinces, states or jurisdictions do not allow the exclusion or limitation of incidental or consequential
damages or limitations on how long an implied guarantee lasts, so the above limitations or exclusion may
not apply to you.
This guarantee gives you specic legal rights, and you may also have other rights that vary from province to
province, state to state or jurisdiction to jurisdiction.
How to Obtain Satisfaction Guarantee Service
In the U.S.A.
If you have any question regarding this guarantee or would like to obtain guarantee service,
please call 1-800-334-0759 and a convenient service center address will be provided to you.
In Canada
If you have any question regarding this guarantee or would like to obtain guarantee service, please call
1-800-667-8623 and a convenient service center address will be provided to you.
In the U.S.A., this guarantee is oered by Sunbeam Products, Inc. doing business as Jarden Consumer
Solutions located in Boca Raton, Florida 33431. In Canada, this guarantee is oered by Sunbeam
Corporation (Canada) Limited doing business as Jarden Consumer Solutions, located at 20 B Hereford
Street, Brampton, Ontario L6Y 0M1. If you have any other problem or claim in connection with this product,
please write our Consumer Service Department
PLEASE DO NOT RETURN THIS PRODUCT TO ANY OF THESE ADDRESSES
OR TO THE PLACE OF PURCHASE
18
FPSTFP4xxx_15ESM1.indd 18-19 12/16/15 09:06
www.oster.com
19

www.oster.com
MEDIDAS IMPORTANTES DE SEGURIDAD
Cuando se utilizan aparatos eléctricos, siempre se deben respetar medidas
de seguridad básicas, incluyendo las siguientes:
1. Lea estas instrucciones antes de usar el producto y conserve para referencia
futura.
2. Para prevenir el riesgo de descargas eléctricas, no sumerja el procesador de alimentos en
agua u otros líquidos. Ello podría ocasionar lesiones personales o daños al producto.
3. Se requiere supervisión adecuada cuando el electrodoméstico se utiliza cerca de niños.
4. Desenchufe el electrodoméstico del tomacorriente cuando no esté siendo utilizado, antes
de colocar o retirar piezas o antes de limpiarlo.
5. No toque las piezas móviles. Mantenga los dedos alejados del conducto de ujo continuo.
6. No utilice el procesador de alimentos si el cable de alimentación o el enchufe está dañado,
si el electrodoméstico no funciona correctamente, se ha caído o presenta algún tipo de
daño. Para la inspección, reparación o ajuste mecánico, recurra al centro de mantenimiento
autorizado más cercano. Ni el enchufe del accessorio ni el cable completo (si el enchufe
está moldeado en el cable) debe ser reemplazado. Si se daña, el aparato debe ser
reemplazado.
7. El uso de accesorios no recomendados o no vendidos por el fabricante puede ocasionar
incendios, descargas eléctricas o lesiones.
8. No deje que el cable toque supercies calientes, incluyendo la estufa.
9. No deje que el cable cuelgue del borde de la mesa ni que esté en contacto con supercies
calientes.
10. No utilice el electrodoméstico a la intemperie.
11. Cuando procese alimentos, mantenga las manos y los utensilios alejados de los discos o las
cuchillas móviles para reducir el riesgo de lesiones graves a personas o daños al procesador
de alimentos. Puede utilizarse un raspador pero solo cuando la procesador de alimentos no
esté en funcionamiento.
12. El disco y las cuchillas son losos. Manipule con cuidado.
13. Para reducir el riesgo de lesiones a personas, nunca coloque la cuchilla o la base del motor
sin haber colocado previamente el recipiente correctamente en su lugar.
14. Asegúrese de que la tapa del recipiente esté asegurada en su lugar cuando utilice el
electrodoméstico. Asegúrese de que el motor, el disco y/o las cuchillas hayan parado
completamente antes de retirar la tapa.
15. Nunca coloque alimentos en el conducto de alimentos con la mano; siempre utilice el
empujador de alimentos.
16. No trate de anular el mecanismo de entrecierre de la tapa.
17. Para reducir el riesgo de incendio o descarga eléctrica, no trate de retirar la tapa inferior de
la unidad. Este aparato no tiene piezas que deban ser reparadas por el usuario. Cualquier
reparación debe ser desempeñada por personal calicado autorizado.
ESTA UNIDAD HA SIDO DISEÑADA SOLO PARA USO DOMÉSTICO.
Este electrodoméstico tiene un enchufe de corriente alternativa polarizado (un
contacto es más ancho que el otro). Para reducir el riesgo de descargas eléctricas,
como una función de seguridad, este enchufe entra en un tomocarriente
polarizado solo de una forma. Si el enchufe no entra completamente en el
tomacorriente, invierta el enchufe. Si aún no entra, consulte a un electricista
calicado. No modique el enchufe de ninguna manera.
NO INTENTE IGNORAR ESTA MEDIDA DE SEGURIDAD
CABLE DE EXTENSIÓN
Se proporciona un cable de alimentación corto para reducir el riesgo de
enredarse o tropezar con un cable más extenso. Si se utiliza con cuidado,
puede emplearse un cable de extensión. En caso de utilizar un cable de
extensión, la capacidad eléctrica del cable debe ser al menos igual que la
capacidad eléctrica nominal del electrodoméstico. El cable de extensión debe
instalarse de modo que no cuelgue del mostrador o la mesa donde pueda ser
halado por niños o pueda ocasionar tropiezos.
Gracias por su compra de la Maquina para Preparar Ensaladas y Procesador
de Alimentos 2en1 OSTER®. Antes de utilizar este producto por primera
vez, por favor lea estas instrucciones y consérvelas para referencia futura.
Preste especial atención a las Instrucciones de Seguridad. Por favor lea las
declaraciones de garantía y mantenimiento del producto. Para obtener más
información sobre los productos OSTER®, por favor visite www.oster.com o
llámenos al 1-800-334-0759.
CONSERVE ESTAS INSTRUCCIONES
20
FPSTFP4xxx_15ESM1.indd 20-21 12/16/15 09:06
www.oster.com
21

www.oster.com
CONOZCA SU MÁQUINA PARA PREPARAR
ENSALADAS Y PROCESADOR DE
ALIMENTOS 2EN1 DE OSTER®
D
C
B
A
FELICITACIONES por la compra de la nueva Máquina para
Preparar Ensaladas y Procesador de Alimentos 2en1 Oster®.
Un potente motor junto con 2 tamaños diferentes de discos reversibles para
personalizar su rebanado y rallado de ultra no a grueso, un empujador de alimentos
especial, más un recipiente fácil de utilizar con accesorio de ujo continuo hara que
esta máquina multifunción se convierta en su mejor aliada en la cocina para rebanar,
picar, cortar y rallar sus alimentos con facilidad y asegurar resultados consistentes
cada vez.
F
E
G
A. Empujador de alimentos (entero/mitad)
B. Tapa con conducto de alimentos
C. Recipiente para rebanar/rallar con conducto de ujo continuo
D. Poste central
E. Disco colector de alimentos
F. Disco reversible para rebanar/rallar no
G. Disco reversible para rebanar/rallar grueso
H. Recipiente de 4 tazas con cuchilla de acero inoxidable
I. Pies antideslizantes
*Para más información acerca del producto y sus accesorios, por favor visite www.oster.com
I
H
22
FPSTFP4xxx_15ESM1.indd 22-23 12/16/15 09:06
www.oster.com
23

www.oster.com
ACERCA DE LAS CARACTERÍSTICAS DE SU
por favor asegúrese de que el cable eléctrico esté desenchufado.
MÁQUINA PARA PREPARAR ENSALADAS Y
PROCESADOR DE ALIMENTOS 2EN1
DE OSTER®
Empujador de alimentos (entero/mitad) – Este empujador—desde entero hasta la mitad-
-está diseñado para brindarle gran exibilidad y control. Utilice ambas piezas del empujador
para guiar los alimentos a través del conducto de alimentos o simplemente utilice una mitad
para controlar el rebanado y rallado de vegetales nitos y obtener resultados consistentes.
Tapa con conducto de alimentos – Esta es la tapa para el accesorio de ujo continuo. El
conducto de alimentos acomoda una variedad de alimentos para rebanar o rallar.
Recipiente para rebanar/rallar con accesorio de ujo continuo – Este accesorio se
asegura sobre la base y activa el interruptor de encendido/apagado del sistema de entrecierre
automático. Este accesorio le permite rebanar o rallar los alimentos directo en un recipiente de
servir.
Tapa del recipiente de 4 tazas – Esta tapa activa el interruptor de encendido/apagado
del sistema de entrecierre automático. La tapa también cuenta con un oricio para que los
ingredientes líquidos, como el aceite y las salsas, se puedan añadir lentamente durante el
procesamiento.
Recipiente de 4 tazas – La forma del recipiente en combinación con el diseño de la cuchilla
aseguran un procesamiento uniforme y eciente. El recipiente transparente le permite vigilar
los alimentos mientras se procesan.
Poste central – Sujeta los discos y la cuchilla en posición.
Cuchilla de acero inoxidable – Utilice para picar grueso o no, cortar, mezclar y hacer puré
con la consistencia deseada.
Disco colector de alimentos – Colecta el exceso de alimentos que haya quedado después
del procesamiento para facilitar el desecho y la limpieza.
Disco reversible para rebanar/rallar no – Utilice para rebanar o rallar bien nito una
variedad de alimentos.
Disco reversible para rebanar/rallar grueso – Utilice para rebanar o rallar grueso una
variedad de alimentos.
Pies antideslizantes – Mantiene el procesador de alimentos seguro en su lugar mientras está
en uso.
CÓMO:
INFORMACIÓN IMPORTANTE
NOTA: No trate de picar hielo en el procesador de alimentos; esto dañará el recipiente y hará
que la cuchilla pierda el lo. Esta unidad no batirá crema, clara de huevos, molerá granos de
café, especias ni otros tipos de ingredientes con alto contenido de aceite, no rebanará o rallará
huevos duros cocinados, “marshmallows” ni quesos suaves.
PRECAUCIÓN: Para su protección, esta unidad tiene un sistema de entrecierre. El procesador
no funcionará hasta que el recipiente esté asegurado correctamente sobre la base y la tapa este
asegurada sobre el recipiente. No trate de ignorar el mecanismo de entrecierre de la tapa.
No trate de operar la unidad sin que la tapa del recipiente, el recipiente y la tapa del conducto
de alimentos esten colocados correctamente en posicion. Asegurese de que la base se
encuentre sobre una supercie plana, seca y limpia antes de comenzar a procesar.
La cuchilla de acero inoxidable solo se debe utilizar en el recipiente de 4 tazas para picar,
mezclar o hacer pure. NUNCA utilice la cuchilla en el recipiente con accesorio de ujo continuo.
PRECAUCIÓN: Antes de comenzar,
ENSAMBLAJE Y USO DEL RECIPIENTE PARA REBANAR/RALLAR
CON ACCESORIO DE FLUJO CONTINUO
1. Coloque la unidad sobre una supercie plana nivelada con el logo Oster® mirando hacia usted
(Figura 1).
2. Coloque el recipiente sobre el poste central de la base y gire hasta que caiga plano sobre la base. Gire
el recipiente hacia la izquierda hasta que se asegure en posición (Figura 2).
3. Sujete el vástago en la parte superior del disco colector de alimentos, coloque sobre el poste central de
la base y empuje ligeramente hacia el fondo del recipiente (Figura 3).
ANTES DEL PRIMER USO
• Limpie el procesador de alimentos siguiendo las instrucciones en la sección de Cuidado y
Limpieza.
PRECAUCIÓN: La cuchilla y los discos procesadores están alados. Maneje con cuidado.
• Escoja un mostrador nivelado y seco donde utilizar el electrodoméstico, dejando suciente
espacio a su alrededor para que el motor tenga la ventilacion adecuada.
• Cuando utilice su procesador de alimentos por primera vez, podría notar un poco de humo y
un ligero olor. Esto es normal debido a los residuos que puedan haber quedado en el motor
durante el proceso de fabricación y no debe ser motivo de preocupación.
4. Coloque el disco para rebanar/rallar sobre el vástago del disco colector de alimentos. Coloque el disco
24
FPSTFP4xxx_15ESM1.indd 24-25 12/16/15 09:06
FIGURA 1 FIGURA 2
www.oster.com
FIGURA3
25

www.oster.com
con el lado adecuado mirando hacia arriba para rebanar o rallar
(Figuras 4a y 4b).
FIGURA 4
5. Coloque la tapa con el conducto de alimentos sobre el recipiente
con la lengüeta grande de cierre posicionada hacia la derecha,
cerca de la ranura horizontal en la parte posterior de la unidad
(Figura 5).
6. Coloque un recipiente debajo del conducto de ujo continuo para
colectar los alimentos.
7. Enchufe la unidad a un tomacorriente estándar.
8. Llene el conducto de alimentos con los ingredientes a procesar y
posicione el empujador de alimentos sobre los alimentos.
IMPORTANTE: Nunca utilice los dedos para empujar los
alimentos ni para guiar los alimentos a través del conducto de
ujo continuo. Siempre utilice el empujador de alimentos.
CONSEJO: Utilice una mitad del empujador de alimentos para
controlar y guiar los vegetales nitos con facilidad. Inserte la mitad
del empujador de alimentos en la unidad y utilice la pieza extra
para empujar en el conducto de alimentos.
9. Sosteniendo el empujador de alimentos con una mano y el
conducto de alimentos con la otra, gire la tapa hacia la izquierda,
hacia ON/LOCK (encendido/asegurado) hasta que la lengüeta
grande de cierre se deslice dentro de la ranura horizontal. Esto
activa el interruptor de entrecierre automático y a la vez activa el
procesador de alimentos (Figura 6).
PRECAUCIÓN: La unidad no funcionara hasta que la lengueta del
recipiente este asegurada en la ranura.
10. Cuando termine de procesar, gire el accesorio hacia la derecha
hacia OFF/UNLOCK (apagado/liberado) para detener el procesador
de alimentos (Figura 7a y 7b).
11. Espere a que el disco haya parado de girar por completo antes
de retirar la tapa. Retire la tapa y el disco cuidadosamente,
sosteniéndolo por el vástago y halándalo hacia arriba para sacarlo
del recipiente.
12. Retire el disco colector de alimentos sujetándolo por el vástago y
alzándolo fuera del recipiente.
13. Para retirar el recipiente, simplemente gírelo hacia la derecha hasta
que se libere y álcelo fuera de la base.
14. Desenchufe la unidad cuando no esté en uso.
FIGURA 4A - SHREDDING
FIGURA 4B - SLICING
FIGURA 5
FIGURA 6
FIGURA 7a
ENSAMBLAJE Y USO DEL RECIPIENTE DE 4 TAZAS
NOTA: El recipient de 4 tazas está disponible solo con los modelos FPSTFP4050 y FPSTFP4100, y también se
vende por separado.
Utilice este recipiente con la cuchilla para picar, cortar no, mezclar y hacer puré de una variedad de
ingredientes.
1. Coloque la unidad sobre una supercie plana y nivelada con el logo Oster® mirando hacia usted.
2. Coloque el recipiente sobre el poste central de la base. Alinee las dos lengüetas horizontales en la
parte inferior del recipiente con las indentaciones de la base y coloque el recipiente en la base. Gire el
recipiente hacia la izquierda hasta que se asegure en su lugar (Figura 8).
3. Sujete con cuidado el vástago superior de la cuchilla, coloque la cuchilla sobre el poste central y
empuje ligeramente hacia el fondo del recipiente (Figura 9).
PRECAUCIÓN: La cuchilla y el disco precesador están alados. Maneje con cuidado.
4. Añada los ingredientes.
5. Coloque la tapa sobre el recipiente con la lengüeta grande de cierre hacia la derecha, cerca de la ranura
horizontal en la parte posterior de la unidad
(Figura 10).
6. Enchufe la unidad a un tomacorriente estándar y gire la tapa hacia la izquierda hacia ON/LOCK
(encendido/asegurado) para activar el interruptor de entrecierre automático y también activar el
procesador de alimentos (Figura 11).
IMPORTANTE: La unidad no funcionará hasta que la lengüeta de cierre en la tapa del recipiente esté
asegurada en la ranura.
FIGURE 10
FIGURE 9FIGURE 8
7. Cuando termine de procesar, gire el recipiente hacia la derecha hacia
OFF/UNLOCK (apagado/liberado) para detener el procesador de
alimentos (Figura 12).
8. Retire la tapa y la cuchilla del recipiente antes de retirar los alimentos
procesados.
IMPORTANTE: Asegúrese de que la cuchilla haya parado de girar por
completo antes de reitirar la tapa del recipiente.
9. Desenchufe la unidad cuando no esté en uso.
FIGURE 11
FIGURE 12
FIGURA 7b
26
FPSTFP4xxx_15ESM1.indd 26-27 12/16/15 09:06
www.oster.com
27

www.oster.com
CONSEJOS PARA PROCESAR ALIMENTOS
PROCESAMIENTO DE ALIMENTOS LARGOS Y FINOS
1. Inserte la mitad del empujador de alimentos en el conducto (Figura 13), enchufe el cable a
un tomacorriente.
REBANAR Y RALLAR
• Corte todos los ingredientes a un tamaño que acomode el conducto de alimentos.
• Siempre quite las semillas antes de procesar.
• Seleccione alimentos que sean rmes y no pasados de maduros.
• Remueva el centro de las verduras duras, tales como la col.
• Cuando prepare rebanadas más largas, acomode los ingredientes horizontalmente en el
conducto de alimentos; para rebanadas más cortas, acomode verticalmente.
• Ralle los quesos duros, como el parmesano o romano a temperatura ambiental.
• Los quesos suaves o medio duros, como cheddar, mozzarella o suizo, deben ser enfriados
bien antes de rallarlos.
• Al usar el disco para rebanar/rallar, no permita que los alimentos se acumulen demasiado
alto; detenga el procesamiento y vacie el recipiente.
• Ejerza una presión leve sobre el empujador de alimentos cuando procese alimentos
blandos, como los tomates y un poco más intensa si se trata de alimentos duros como las
cebollas.
• Saque provecho del control y la exibidad que le brinda el empujador de alimentos. Utilice
el empujador entero para rebanadas de frutas gruesas (como la manzana) o utilice una
mitad del empujador para los vegetales largos y nitos (como los palitos de zanahoria).
PICAR Y MEZCLAR
• Para mejores resultados, se recomienda procesar alimentos semejantes en tamaño.
• No llene demasiado el recipiente.
• Nunca desatienda el procesador mientras está en funcionamiento.
• No utilice el procesador para picar hielo.
• Añada ingredientes líquidos vertiendo lentamente la cantidad deseada a través del oricio
en la tapa del recipiente de 4 tazas.
• Cuando mezcle líquidos, aplique presión a la tapa para prevenir goteos. Si el líquido está
muy caliente, coloque un paño sobre la tapa antes de aplicar presión.
• Puede procesar líquidos calientes pero no hirviendo.
• Vigile el progreso de los alimentos para no procesarlos demasiado.
• Las cantidades a procesar en el recipiente dependerá de la densidad de la mezcla.
• Cuando procese vegetales tales como las cebollas, pele y corte en cuartos.
• Cuando utilice la cuchilla para procesar carnes, corte la carne en cubos de 1 pulgada.
Procese por 15 a 20 minutos o hasta que quede procesada de forma uniforme.
2. Llene el conducto de alimentos con alimentos nos y largos, luego encienda el procesador
de alimentos y utilice la otra mitad del empujador para guiar los alimentos a través del
conducto (Figura 14).
FIGURE 13 FIGURE 14
28
FPSTFP4xxx_15ESM1.indd 28-29 12/16/15 09:06
www.oster.com
29

www.oster.com
CUIDADO Y LIMPIEZA
NOTA: No trate de alar los bordes cortadores de las cuchillas ni los discos. Estos vienen
alados de fábrica y se dañarán si trata de alarlos.
LIMPIEZA
NOTA: Para facilitar la limpieza, cuando sea posible, enjuague las piezas inmediatamente
después de procesar los alimentos.
PRECAUCIÓN: Apague la unida y desenchufe del tomacorriente antes de instalar o remover
las piezas y antes de limpiar.
• Limpie la base y los pies con un paño humedecido y séquelos bien. Nunca utilice detergentes
fuertes ni limpiadores abrasivos.
PRECAUCIÓN: Para protegerse del riesgo de descarga eléctrica, no sumerja el procesador de
alimentos ni cable eléctrico en agua ni en ningún otro líquido.
• Todas las piezas removibles pueden ser lavadas a mano o en la máquina lavaplatos.
- Si lava a mano, hágalo en agua jabonosa caliente, enjuague y seque por completo. Si es
necesario, use un cepillo pequeño con cerdas de nylon para limpiar completamente el
recipiente, la tapa y el conducto de alimentos., este tipo de cepillo también ayudará a evitar
que usted se corte con el lo de la cuchilla y el disco para rebanar/rallar.
- Si usa la máquina lavaplatos, coloque las piezas removibles solo en la rejilla superior.
PRECAUCIÓN: La cuchilla y el disco procesador están alados. Maneje con cuidado.
• Algunos alimentos, como las zanahorias, pueden manchar temporalmente el recipiente.
Para quitar las manchas, haga una pasta con 2 cucharadas de bicarbonato de soda y una
cucharada de agua tibia. Aplique la pasta a las manchas y frote con un paño. Enjuague con
agua jabonosa y seque.
• No use almohadillas de bras abrasivas ni agentes de limpieza en las partes plásticas o
metálicas del producto.
• No llene el recipiente con agua hirviendo ni sumerja ninguna de las piezas en agua hirviendo.
ALMACENAMIENTO
PRECAUCIÓN: La cuchilla y el disco procesador están alados. Maneje con cuidado.
Almacene el aparato en un lugar limpio y seco con el recipiente y la tapa en posición abierta.
RESOLUCIÓN DE PROBLEMAS
Problema Causa Posible Solución
Los alimentos no se están
procesando bien o el
procesador de alimentos
camina a través de la supercie
del mostrador.
El procesador de alimentos vibra
o hay señales de que la cuchilla
o el disco para rebanar/rallar
está golpeando el recipiente
mientras el procesador está en
funcionamiento.
El recipiente gotea por debajo. El recipiente tiene demasiado
La tapa no se mueve libremente
cuando se conecta al recipiente.
Los alimentos caen por encima
del conducto de alimentos
mientras se rebanan.
El procesador para de funcionar
y no vuelve a activarse.
El procesador no funciona. La unidad no está enchufada a
El recipiente está demasiado
lleno.
La cuchilla o el disco para
rebanar/rallar no está
ensamblado correctamente.
líquido.
Pudiera ser que los bordes
necesiten lubricación.
Los alimentos en el conducto
de alimentos no han sido bien
comprimidos o no se le ha
aplicado suciente presión
al empujador al procesar los
alimentos.
La unidad está enchufada a un
tomacorriente que no funciona.
un tomacorriente.
La próxima vez, procese esta
cantidad en dos tandas o más.
Pare el procesador
inmediatamente y ensamble la
cuchilla o el disco para rebanar/
rallar correctamente.
Procese cantidades más
pequeñas.
Utilice una cantidad pequeña
de aceite vegetal para lubricar
los bordes del recipiente y de
la tapa.
Corte los pedazos en tamaños
iguales, un poco más pequeños
que el largo del conducto de
alimentos. Llene el conducto
de alimentos con cuidado y
mantenga presión constante
sobre el empujador a medida
que procesa los alimentos.
Compruebe que el
tomacorriente no está
funcionando, enchufando
otro electrodoméstico y luego
enchufe a un tomacorriente que
funcione.
Verique que la unidad esté
enchufada.
30
FPSTFP4xxx_15ESM1.indd 30-31 12/16/15 09:06
www.oster.com
31

www.oster.com
RECETAS
Ensalada de Col con Aderezo Cremoso de Eneldo
Ensalada de 7 Capas para Multitud
1 lechuga iceberg o romana, mediana
6 zanahorias medianas
6 pepinos mini
8 tallos de apio
1 cebolla morada mediana
8 tomates ovalados
6 onzas de queso Monterrey Jack
1/2 taza de aderezo de lima y cilantro
Procese la lechuga, las zanahorias, los pepinos, el apio, la cebolla morada y los tomates en el
procesador de alimentos utilizando el disco para rebanar y formando capas de cada vegetal.
Voltee el disco al lado para rallar y procese el queso en el procesador de alimentos, cubriendo la
ensalada con el queso.
Prepare el aderezo y mézclelo en la ensalada antes de servir.
Rinde de 10 a 12 porciones
Aderezo de Lima y Cilantro: En el recipiente del procesador, combine 1/4 de taza de aceite de
oliva, 3 cucharadas de jugo de lima fresco, 3 ramitos de cilantro, 2 ramitos de perejil, 1 diente de
ajo mediano, 1/2 cucharadita de sal, 1/8 cucharadita de pimienta molida gruesa. Procese para
mezclar los ingredientes.
½ cabeza de col, mediana
¼ cabeza de col morada, mediana
3 zanahorias medianas
1 manojo de cebolletas
6 rábanos
2 tallos de apio
Aderezo cremoso de eneldo
Procese los vegetales en el procesador, directo en un recipiente grande de ensalada, utilizando
el disco para rebanar. Prepare el aderezo e incorpórelo en la ensalada; revuelva bien. Refrigere
por lo menos 30 minutos o hasta que esté listo para servir.
Rinde 8 a 10 porciones.
Aderezo cremoso de eneldo: En el recipiente del procesador combine 2/3 taza de mayonesa,
¼ taza de vinagre de vino de arroz, 6 ramitos de cebollinos, 4 ramitos de eneldo, 1 diente de
ajo mediano, ½ cuharadita de sal y 1/8 cucharadita de piemienta molida gruesa. Procese para
mezclar.
32
FPSTFP4xxx_15ESM1.indd 32-33 12/16/15 09:06
www.oster.com
33

www.oster.com
Pizza de Espinaca y Champiñones
Hummus con Cebolleta y Limón
½ libra de champiñones
1 cebolla pequeña
3 cucharadas de aceite de oliva
2 ½ tazas de hojas de espinaca
8 hojas grandes de albahaca
1 diente de ajo grande
Masa de pizza para pizza de 15 pulgadas
1 cucharada de aceite de oliva
1 ½ tazas de salsa marinara o salsa marinara con albahaca
8 onzas de queso mozzarella de leche descremada
4 onzas de queso provolone
2 onzas de queso parmesano
Procese los champiñones y la cebolla en el procesador de alimentos en un recipiente grande,
utilizando el disco para rebanar. Voltee el disco al lado para rallar. Procese la espinaca, las hojas
de albahaca y el ajo en otro recipiente.
Caliente una sartén antiadherente de 10 pulgadas a temperatura mediana. Añada 2 cucharadas
de aceite y cocine los champiñones y la cebolla hasta que estén ligeramente dorados, revuelva
con frecuencia. Añada la mezcla de espinaca y cocine hasta que la espinaca comience a
marchitarse ligeramente. Retire del calor.
Utilizando un cepillo, unte una capa ligera de aceite de oliva en una bandeja para pizza de 15
pulgadas y empolvoree con harina de maiz. Sobre una tabla de cocina cubierta con una capa
ligera de harina, extienda la masa con un rodillo para acomodar la bandeja de pizza preparada.
Hornee en un horno precalentado a 400 F. por 10 minutos.
Mientras tanto, ralle los quesos en un recipiente mediano.
Cubra parcialmente la masa de la pizza con la salsa marinara, esparciendola uniformemente
hasta que quede a una distancia de ¾ de pulgada de los bordes de la masa. Cubra con la
mezcla de queso y la mezcla de espinaca. Coloque de nuevo en el horno y hornee por 12
minutos o hasta que los bordes estén dorados y el queso esté burbujeante.
Deje reposar 5 minutos antes de servir.
Hace una pizza de 15 pulgadas.
1 lata de 16 onzas de garbanzos
2 cucharadas de tahini
2 dientes de ajo grandes
2 cebolletas
2 tallos de perejil de hoja plana
1 cucharadita de cáscara de limón rallada
1/4 cucharadita de sal
1/4 cucharadita de comino molido
4 cucharadas de jugo de limón fresco
2 cucharadas de aceite de oliva extra virgen
4 panes de pita para rellenar, cortados en forma de cuñas
Escurra los frijoles garbanzos, conservando el líquido. En el recipiente del procesador, combine
los frijoles y 1/4 de taza del líquido. Añada el resto de los ingredientes, excepto las cuñas de pan
pita. Procese hasta que la consistencia esté casi suave. (La mezcla debe quedar con unos pocos
trozos).
Refrigere por 30 minutos para permitir que se mezclen los sabores o hasta que esté listo para
servir. Sirva en recipiente con las cuñas de pan pita para mojar.
Rinde aproximadamente 1 ¾ tazas
NOTA: El limón y el ajo dan un poco de sabor fuerte y el comino añade picante.
34
FPSTFP4xxx_15ESM1.indd 34-35 12/16/15 09:06
www.oster.com
35

www.oster.com
Garantía de Satisfacción de 1 Año
OROR
Sunbeam Products, Inc. operando bajo el nombre de Jarden Consumer Solutions o en Canadá, Sunbeam
Corporation (Canada) Limited, operando bajo el nombre de Jarden Consumer Solutions, (en forma
conjunta, “JCS”), garantiza que por un período de un año a partir de la fecha de compra, este producto
estará libre de defectos de materiales y mano de obra. JCS, a su elección, reparará o reemplazará este
producto o cualquier componente del mismo que presente defectos durante el período de garantía. El
reemplazo se realizará por un producto o componente nuevo o reparado. Si el producto ya no estuviera
disponible, se lo reemplazará por un producto similar de valor igual o superior. Ésta es su garantía exclusiva.
No intente reparar o ajustar ninguna función eléctrica o mecánica de este producto.
Al hacerlo anulará ésta garantía.
La garantía es válida para el comprador minorista original a partir de la fecha de compra inicial y la misma
no es transferible. Conserve el recibo de compra original. Para solicitar servicio en garantía se requiere
presentar un recibo de compra. Los agentes y centros de servicio de JCS o las tiendas minoristas que
venden productos de JCS no tienen derecho a alterar, modicar ni cambiar de ninguna manera los
términos y las condiciones de esta garantía.
Esta garantía no cubre el desgaste normal de las piezas ni los daños que se produzcan como resultado de
lo siguiente: uso negligente o mal uso del producto, uso de voltaje incorrecto o corriente inapropiada, uso
contrario a las instrucciones de operación, desensamble, reparación o alteración por parte de un tercero
ajeno a JCS o a un Centro de Servicio autorizado por JCS. Asimismo, la garantía no cubre: actos fortuitos
tales como incendios, inundaciones, huracanes y tornados.
¿Cuáles son los límites de responsabilidad de JCS?
JCS no será responsable de daños incidentales o emergentes causados por el incumplimiento de alguna
garantía o condición expresa, implícita o legal.
Excepto en la medida en que lo prohíba la ley aplicable, cualquier garantía o condición implícita de
comerciabilidad o aptitud para un n determinado se limita, en cuanto a su duración, al plazo de la garantía
antes mencionada.
JCS queda exenta de toda otra garantías, condiciones o manifestaciones, expresa, implícita, legal o de
cualquier otra naturaleza.
JCS no será responsable de ningún tipo de daño que resulte de la compra, uso o mal uso del producto, o por
la imposibilidad de usar el producto, incluyendo los daños incidentales, especiales, emergentes o similares, o
la pérdida de ganancias, ni de ningún incumplimiento contractual, sea de una obligación esencial o de otra
naturaleza, ni de ningún reclamo iniciado contra el comprador por un tercero.
Algunas provincias, estados o jurisdicciones no permiten la exclusión o limitación de los daños incidentales
o emergentes ni las limitaciones a la duración de las garantías implícitas, de modo que es posible que la
exclusión o las limitaciones antes mencionadas no se apliquen en su caso.
Esta garantía le otorga derechos legales especícos y es posible que usted tenga otros derechos que varían
de un estado, provincia o jurisdicción a otro.
Cómo solicitar el servicio de garantía de satisfacción
En los Estados Unidos
Si tiene alguna pregunta sobre esta garantía o desea recibir servicio de garantía, por favor llame al 1-800334-0759 y podrá obtener la dirección del centro de servicio que le resulte más conveniente.
En Canadá
Si tiene alguna pregunta sobre esta garantía o desea recibir servicio de garantía, por favor llame al 1-800667-8623 y podrá obtener la dirección del centro de servicio que le resulte más conveniente.
En los Estados Unidos, esta garantía es ofrecida por Sunbeam Products, Inc. operando bajo el nombre de
Jarden Consumer Solutions, localizada en Boca Ratón, Florida 33431. En Canadá, esta garantía es ofrecida
por Sunbeam Corporation (Canada) Limited operando bajo el nombre de Jarden Consumer Solutions,
localizada en 20 B Hereford Street, Brampton, Ontario L6Y 0M1. Si usted tiene otro problema o reclamo en
conexión con este producto, por favor escriba al Departamento de Servicio al Consumidor.
GO ONLINE! WWW.OSTER.COM/REGISTER
Register Your Oster® Brand Product Today!
IMPORTANT!
Please complete and
return within the next
10 days or re gister
www.oster.com/registe r
or call toll-free
1. Mr. Mrs. Ms. Miss
First Name
Street Apt. No.
City State ZIP Code
E-mail Address
(Pleas e check the box below to receive e -mail messages containing special of fers and promotions.)
YES! I w ant to receive spe cial offers and promotions from Jarden Consumer Solutions.
2. Your Date of Birth
Month
Year
3. Marital Status
Married Single
4. Date of Purchase
Month Day
* 5 Year Satisfaction Guarantee, see instructional manual for details
Year
Last NameInitial
5. Model Number
6. Name of Store Where Purchased
online at
800 -334-0759
POR FAVOR NO DEVUELVA ESTE PRODUCTO A NINGUNA DE ESTAS
36
FPSTFP4xxx_15ESM1.indd 36-37 12/16/15 09:06
DIRECCIONES NI AL LUGAR DE COMPRA.
www.oster.com
37

www.oster.com
NOTES
NOTES
38
FPSTFP4xxx_15ESM1.indd 38-39 12/16/15 09:06
www.oster.com
39
 Loading...