


 Loading...
Nokia 6210 Navigator
User Guide
Manual del Usuario

Nokia 6210 Navigator User Guide
Nota: La traducción en español de este manual inicia en la página 79.
9210190
Issue 2
1

DECLARATION OF CONFORMITY
0434 Hereby, NOKIA CORPORATION declares that this RM-367/RM-419 product is in compliance with the essential requirements and other relevant provisions of Directive 1999/5/EC. A copy of the Declaration of Conformity can be found at http://www.nokia.com/phones/declaration_of_conformity/.
© 2009 Nokia. All rights reserved.
Nokia, Nokia Connecting People, Navi, Visual Radio and Nokia Care are trademarks or registered trademarks of Nokia Corporation. Nokia tune is a sound mark of Nokia Corporation. Other product and company names mentioned herein may be trademarks or tradenames of their respective owners.
Reproduction, transfer, distribution, or storage of part or all of the contents in this document in any form without the prior written permission of Nokia is prohibited.
This product includes software licensed from Symbian Software Ltd © 1998-2009. Symbian and Symbian OS are trademarks of Symbian Ltd.
US Patent No 5818437 and other pending patents. T9 text input software Copyright (C) 1997-2009. Tegic Communications, Inc. All rights reserved.
Java™ and all Java-based marks are trademarks or registered trademarks of
Sun Microsystems, Inc.
Portions of the Nokia Maps software are © 1996-2009 The FreeType Project. All rights reserved.
This product is licensed under the MPEG-4 Visual Patent Portfolio License (i) for personal and noncommercial use in connection with information which has been encoded in compliance with the MPEG-4 Visual Standard by a consumer engaged in a personal and noncommercial activity and (ii) for use in connection with MPEG-4 video provided by a licensed video provider. No license is granted or shall be implied for any other use. Additional information, including that related to promotional, internal, and commercial uses, may be obtained from MPEG LA, LLC. See http://www.mpegla.com.
Nokia operates a policy of ongoing development. Nokia reserves the right to make changes and improvements to any of the products described in this document without prior notice.
TO THE MAXIMUM EXTENT PERMITTED BY APPLICABLE LAW, UNDER NO CIRCUMSTANCES SHALL NOKIA OR ANY OF ITS LICENSORS BE RESPONSIBLE FOR ANY LOSS OF DATA OR INCOME OR ANY SPECIAL, INCIDENTAL, CONSEQUENTIAL OR INDIRECT DAMAGES HOWSOEVER CAUSED.
THE CONTENTS OF THIS DOCUMENT ARE PROVIDED "AS IS". EXCEPT AS REQUIRED BY APPLICABLE LAW, NO WARRANTIES OF ANY KIND, EITHER EXPRESS OR IMPLIED, INCLUDING, BUT NOT LIMITED TO, THE IMPLIED WARRANTIES OF MERCHANTABILITY AND FITNESS FOR A PARTICULAR PURPOSE, ARE MADE IN RELATION TO THE ACCURACY, RELIABILITY OR CONTENTS OF THIS DOCUMENT. NOKIA RESERVES THE RIGHT TO REVISE THIS DOCUMENT OR WITHDRAW IT AT ANY TIME WITHOUT PRIOR NOTICE.
The availability of particular products and applications and services for these products may vary by region. Please check with your Nokia dealer for details, and availability of language options.
2
Export controls
This device may contain commodities, technology or software subject to export laws and regulations from the US and other countries. Diversion contrary to law is prohibited.
FCC NOTICE
Your device may cause TV or radio interference (for example, when using a telephone in close proximity to receiving equipment). The FCC can require you to stop using your telephone if such interference cannot be eliminated. If you require assistance, contact your local service facility. This device complies with part 15 of the FCC rules. Operation is subject to the following two conditions: (1) This device may not cause harmful interference, and (2) this device must accept any interference received, including interference that may cause undesired operation. Any changes or modifications not expressly approved by Nokia could void the user's authority to operate this equipment.
The third-party applications provided with your device may have been created and may be owned by persons or entities not affiliated with or related to Nokia. Nokia does not own the copyrights or intellectual property rights to the third-party applications. As such, Nokia does not take any responsibility for end-user support, functionality of the applications, or the information in the applications or these materials. Nokia does not provide any warranty for the third-party applications.
BY USING THE APPLICATIONS YOU ACKNOWLEDGE THAT THE APPLICATIONS ARE PROVIDED AS IS WITHOUT WARRANTY OF ANY KIND, EXPRESS OR IMPLIED, TO THE MAXIMUM EXTENT PERMITTED BY APPLICABLE LAW. YOU FURTHER ACKNOWLEDGE THAT NEITHER NOKIA NOR ITS AFFILIATES MAKE ANY REPRESENTATIONS OR WARRANTIES, EXPRESS OR IMPLIED, INCLUDING BUT NOT LIMITED TO WARRANTIES OF TITLE, MERCHANTABILITY OR FITNESS FOR A PARTICULAR PURPOSE, OR THAT THE APPLICATIONS WILL NOT INFRINGE ANY THIRD-PARTY PATENTS, COPYRIGHTS, TRADEMARKS, OR OTHER RIGHTS.
9210190/ Issue 2
3

Contents |
|
SAFETY.............................................. |
6 |
Support ............................................. |
8 |
Help ...................................................................... |
8 |
Nokia support and contact information .... |
8 |
1. Get started.................................... |
9 |
Insert a (U)SIM card and battery ................. |
9 |
Memory card...................................................... |
9 |
Charge the battery ........................................ |
10 |
Switch the device on and off ..................... |
11 |
Antenna locations ......................................... |
11 |
Configuration settings ................................. |
12 |
Welcome application.................................... |
12 |
Settings wizard............................................... |
12 |
2. Your device ................................. |
13 |
Keys and parts ................................................ |
13 |
Standby mode................................................. |
14 |
Indicators ......................................................... |
15 |
Screen saver .................................................... |
16 |
Menu ................................................................. |
16 |
Mark items in an application ..................... |
16 |
Switch between applications ..................... |
16 |
Close an application ..................................... |
17 |
Volume control............................................... |
17 |
Display rotation.............................................. |
17 |
Turning control............................................... |
17 |
Keypad lock (keyguard) ................................ |
17 |
Remote lock..................................................... |
18 |
Access codes ................................................... |
18 |
Download!........................................................ |
19 |
My own............................................................. |
19 |
Connect a compatible headset .................. |
19 |
Connect a USB data cable .......................... |
20 |
3. Call functions ............................. |
20 |
Make a voice call........................................... |
20 |
Answer or reject a call ................................. |
22 |
Video calls........................................................ |
22 |
Call settings..................................................... |
23 |
Video sharing .................................................. |
24 |
Log...................................................................... |
26 |
4. Write text................................... |
26 |
Traditional and predictive text input........ |
26 |
Copy and delete text..................................... |
27 |
5. Messaging .................................. |
27 |
Write and send messages ............................ |
27 |
Inbox.................................................................. |
28 |
Service messages............................................ |
28 |
E-mail ................................................................ |
29 |
Mail for exchange.......................................... |
29 |
Outbox............................................................... |
31 |
Message reader............................................... |
31 |
View messages on the SIM card ................ |
31 |
Cell broadcast ................................................. |
31 |
Service commands ......................................... |
31 |
Messaging settings........................................ |
32 |
6. Contacts ..................................... |
32 |
Save and manage contact information ... |
32 |
Contact groups ............................................... |
33 |
Add a ringing tone......................................... |
33 |
7. Positioning ................................. |
33 |
About GPS ........................................................ |
33 |
Assisted GPS .................................................... |
34 |
Set up GPS connection................................. |
34 |
Position requests ............................................ |
35 |
Maps .................................................................. |
35 |
Landmarks ........................................................ |
40 |
GPS data ........................................................... |
40 |
8. Gallery ........................................ |
41 |
Main view......................................................... |
41 |
Download files ................................................ |
42 |
View images..................................................... |
42 |
Edit images ...................................................... |
42 |
Edit video clips................................................ |
42 |
Print images..................................................... |
42 |
Share online..................................................... |
43 |
9. Camera........................................ |
44 |
4
Capture images .............................................. |
44 |
Record video clips.......................................... |
45 |
Capture panoramic images......................... |
45 |
10.Media......................................... |
45 |
Music player.................................................... |
45 |
Nokia Podcasting........................................... |
47 |
Radio ................................................................. |
49 |
RealPlayer ........................................................ |
50 |
Recorder ........................................................... |
50 |
11.Internet...................................... |
51 |
Browse the web.............................................. |
51 |
Search ............................................................... |
53 |
12.Personalization.......................... |
53 |
Themes.............................................................. |
53 |
Profiles.............................................................. |
54 |
13.Time management .................... |
54 |
Clock.................................................................. |
54 |
Calendar ........................................................... |
55 |
14.Office applications ................... |
55 |
Active notes..................................................... |
55 |
Notes ................................................................. |
55 |
Calculator......................................................... |
55 |
Converter.......................................................... |
55 |
Mobile dictionary........................................... |
56 |
Adobe Reader.................................................. |
56 |
Quickoffice ...................................................... |
57 |
15.Settings ..................................... |
57 |
Voice commands............................................ |
57 |
Phone settings ................................................ |
57 |
Speech............................................................... |
59 |
16.Data management .................... |
59 |
Install or remove applications ................... |
59 |
File manager.................................................... |
61 |
Licenses ............................................................ |
61 |
Device manager.............................................. |
62 |
17.Connectivity .............................. |
63 |
Transfer or synchronize data...................... |
63 |
PC Suite ............................................................ |
64 |
Bluetooth connectivity................................. |
64 |
USB connection .............................................. |
65 |
Remote synchronization .............................. |
66 |
Push to talk...................................................... |
66 |
Connection manager..................................... |
67 |
18.Enhancements .......................... |
68 |
19.Battery and charger information 68
Nokia battery authentication guidelines. 69
Care and maintenance................... |
70 |
Additional safety information ...... |
71 |
Index............................................... |
75 |
5

SAFETY
Read these simple guidelines. Not following them may be dangerous or illegal. Read the complete user guide for further information.
SWITCH ON SAFELY
Do not switch the device on when wireless phone use is prohibited or when it may cause interference or danger.
ROAD SAFETY COMES FIRST
Obey all local laws. Always keep your hands free to operate the vehicle while driving. Your first consideration while driving should be road safety.
INTERFERENCE
All wireless devices may be susceptible to interference, which could affect performance.
SWITCH OFF IN RESTRICTED AREAS
Follow any restrictions. Switch the device off in aircraft, near medical equipment, fuel, chemicals, or blasting areas.
QUALIFIED SERVICE
Only qualified personnel may install or repair this product.
ENHANCEMENTS AND BATTERIES
Use only approved enhancements and batteries. Do not connect incompatible products.
WATER-RESISTANCE
Your device is not water-resistant. Keep it dry.
■ About your device
The wireless devices described in this guide are approved for use on the following networks:
•GSM/EGSM 850, 900, 1800 and 1900 and WCDMA/HSDPA 2100/900 networks (RM-367)
•GSM/EGSM 850, 900, 1800 and 1900 and WCDMA/HSDPA 1900/850 networks (RM-419)
Contact your service provider for more information about networks.
When using the features in this device, obey all laws and respect local customs, privacy and legitimate rights of others, including copyrights.
Copyright protection may prevent some images, music, and other content from being copied, modified, or transferred.
6

Your device supports several methods of connectivity. Like computers, your device may be exposed to viruses and other harmful content. Exercise caution with messages, connectivity requests, browsing, and downloads. Only install and use services and other software from trustworthy sources that offer adequate security and protection against harmful software, such as applications that are Symbian Signed or have passed the Java Verified™testing. Consider installing antivirus and other security software on your device and any connected computer.
Your device may have preinstalled bookmarks and links for third-party internet sites. You may also access other third-party sites through your device. Third-party sites are not affiliated with Nokia, and Nokia does not endorse or assume liability for them. If you choose to access such sites, you should take precautions for security or content.
Warning: To use any features in this device, other than the alarm clock, the device must be switched on. Do not switch the device on when wireless device use may cause interference or danger.
The office applications support common features of Microsoft Word, PowerPoint, and Excel (Microsoft Office 2000, XP, and 2003). Not all file formats can be viewed or modified.
Remember to make back-up copies or keep a written record of all important information stored in your device.
When connecting to any other device, read its user guide for detailed safety instructions. Do not connect incompatible products.
■ Network services
To use the phone you must have service from a wireless service provider. Many of the features require special network features. These features are not available on all networks; other networks may require that you make specific arrangements with your service provider before you can use the network services. Your service provider can give you instructions and explain what charges will apply. Some networks may have limitations that affect how you can use network services. For instance, some networks may not support all language-dependent characters and services.
Your service provider may have requested that certain features be disabled or not activated in your device. If so, these features will not appear on your device menu. Your device may also have a special configuration such as changes in menu names, menu order, and icons. Contact your service provider for more information.
This device supports WAP 2.0 protocols (HTTP and SSL) that run on TCP/IP protocols. Some features of this device, such as multimedia messaging, web browsing, and e-mail require network support for these technologies.
■ Battery removing
Always switch the device off and disconnect the charger before removing the battery.
7

Support
■ Help
Your device has context-sensitive help. To access help when an application is open, select Options > Help. To switch between help and the application that is open in the background, select and hold  , and select from the list of open applications.
To open help from the main menu, select  > Help > Help. Select an application to view a list of help topics, and select the related help text. To open a keyword list, select Options > Search.
■ Nokia support and contact information
Check www.nokia.com/support or your local Nokia website for the latest guides, additional information, downloads, and services related to your Nokia product.
On the website, you can get information on the use of Nokia products and services. If you need to contact Nokia Care services, check the list of local Nokia Care contact centres at www.nokia.com/customerservice.
For maintenance services, check your nearest Nokia Care point at www.nokia.com/repair.
Software updates
Nokia may produce software updates that may offer new features, enhanced functions, or improved performance. You may be able to request these updates through the Nokia Software Updater PC application. To update the device software, you need the Nokia Software Updater application and a compatible PC with Microsoft Windows 2000, XP, or Vista operating system, broadband internet access, and a compatible data cable to connect your device to the PC.
To get more information and to download the Nokia Software Updater application, visit www.nokia.com/softwareupdate or your local Nokia web site.
If software updates over the air are supported by your network, you may also be able to request updates through the device. See ”Update software,” p. 62.
Downloading software updates may involve the transmission of large amounts of data through your service provider's network. Contact your service provider for information about data transmission charges.
Make sure that the device battery has enough power, or connect the charger before starting the update.
8
1. Get started
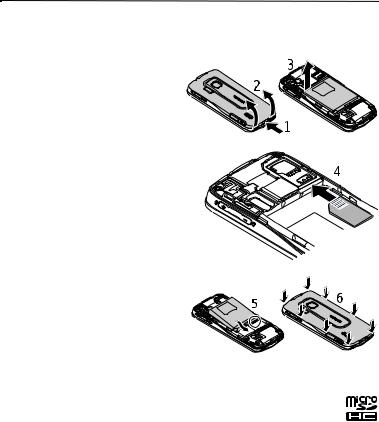
■ Insert a (U)SIM card and battery
This device uses BL-5F batteries.
1. To open the back cover of the device, press the back cover release button.
2. Lift the back cover to remove it.
3. To remove the battery, lift it from the end.
4. Slide the (U)SIM card into the SIM card holder. Ensure that the gold-colored contact area on the card is facing downward on the device, and the beveled corner faces toward the card holder slot.
5. Replace the battery.
6. Replace the back cover.
■ Memory card
Use only compatible microSD and microSDHC cards approved by Nokia for use with this device. Nokia uses approved industry standards for memory cards, but some brands may not be fully compatible with this device. Incompatible cards may damage the card and the device and corrupt data stored on the card.
Insert a memory card
Note that the memory card may be supplied with the device, and may already be inserted.
9
1. Open the memory card slot door.
2. Place the memory card in the slot with the gold-colored area facing down. Push the card gently to lock it into place.
3. Close the slot door.
Remove a memory card
Important: Do not remove the memory card in the middle of an operation when the card is being accessed. Removing the card in the middle of an operation may damage the memory card as well as the device, and data stored on the card may be corrupted.
1.In the standby mode, briefly press the power key.
2.Scroll to Remove memory card, and select OK > Yes.
3.Open the memory card slot door.
4.Push the card gently to release it.
5.Pull the card out, and select OK.
6.Close the slot door.
■ Charge the battery
Your battery has been precharged but the charging levels may vary.
1.Connect the charger to the wall outlet.
2.Connect the charger to the device. You can use your device while it is charging.
3.When the battery is fully charged,
disconnect the charger from the device, then from the wall outlet.
If the battery is completely discharged, it may take a few minutes before the charging indicator appears on the display or before any calls can be made.
The charging time depends on the charger and the battery used.
10
■ Switch the device on and off
Press and hold the end key.
If the device asks for a PIN code, enter the PIN code, and select OK.
If the device asks for the lock code, enter the lock code, and select OK. The factory setting for the lock code is 12345.
Set time and date
To set the correct time zone, time, and date, select the country you are presently in, then enter the local time and date.
My Nokia
My Nokia is a free service that sends you tips, tricks, and support for your Nokia device regularly as text messages. If My Nokia is available in your country and supported by your service provider, your device invites you to join the My Nokia service after you have set the time and date.
Select the language for the service. If you change the language, the device restarts. To sign-up to My Nokia, select Accept and follow the instructions on the display.
To sign-up to My Nokia later, select  > Help > My Nokia.
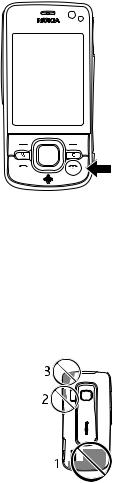
■ Antenna locations
Cellular antenna (1)
Bluetooth antenna (2)
GPS antenna (3)
Your device may have internal and external antennas. As with any radio transmitting device, avoid touching the antenna area unnecessarily while the antenna is transmitting or receiving. Contact with such an antenna affects the communication quality and may cause the device to operate at a higher power level than otherwise needed and may reduce the battery life.
11
■ Configuration settings
Before you can use multimedia messaging, push to talk, e-mail, synchronization, streaming, and the browser, you must have the proper configuration settings on your device. Your device may automatically configure browser, multimedia messaging, access point, and streaming settings based on the SIM card used. Otherwise, you can use the Sett. wizard application to configure the settings, or you may receive the settings directly as a configuration message, which you save to your device. For more information on availability, contact your service provider or nearest authorized Nokia dealer.
When you receive a configuration message, and the settings are not automatically saved and activated, 1 new message is displayed. To save the settings, select Show > Options > Save. You may need to enter a PIN code provided by the service provider.
■ Welcome application
The Welcome application starts when you switch on your device for the first time. With the Welcome application, you can access the following applications:
Sett. wizard — Configure connection settings. See ”Settings wizard,” p. 12.
E-mail settings — Configure e-mail settings. See ”E-mail settings,” p. 32.
Switch — Copy or synchronize data from other compatible devices.
Tutorial — Learn about the features of your device and how to use them. To start the tutorial later, select  > Help > Tutorial and a tutorial item.
To open Welcome later, select  > Help > Welcome.
■ Settings wizard
The setting wizard application configures your device for operator and e-mail settings based on your service provider. Configuring other settings may also be possible.
To use these services, you may have to contact your service provider to activate a data connection or other services.
Select  > Settings > Sett. wizard.
12
2. Your device
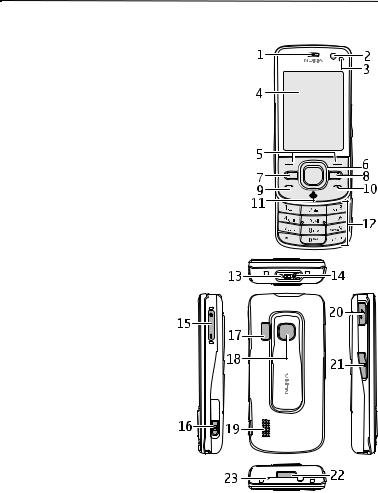
■ Keys and parts
1 - Earpiece
2 - Secondary camera lens
3 - Light sensor
4 - Display
5 - Left and right selection keys
6 - NaviTM scroll key, hereafter referred to as scroll key, and Navi key light around it
7 - Menu key 
8 - Clear key
9 - Call key
10 - Power key / end key
11 - Navigator key with GPS light
12 - Number keys
13 - Charger connector
14 - Headset connector
15 - Volume keys
16 - Camera key
17 - Camera flash
18 - Main camera lens
19 - Loudspeaker
20 - Micro USB connector
21 - Memory card slot
22 - Back cover release button
23 - Microphone
During extended operation, the device may feel warm. In most cases, this condition is normal. If you suspect the device is not working properly, take it to the nearest authorized service facility.
13

■ Standby mode
When you have switched on the device, and it is registered to a network, the device is in the standby mode and ready for use.
To select the view for the standby mode, select  > Settings > Phone sett. > General >
Personalization > Standby mode > Standby theme.
Keep your device away from magnets or magnetic fields as they may cause some applications to activate unexpectedly.
Shortcuts in the standby mode
To open a list of most recently dialed numbers, press the call key.
To call your voice mailbox, press and hold the 1 key.
To use the voice commands or voice dialling, press and hold the right selection key.
To listen to new received messages, press and hold the left selection key until Msg. reader starts.
To change the profile, briefly press the power key, and select a profile.
To quickly change to silent profile from any other profile, press and hold #.
To start a connection to the web, press and hold 0.
Depending on the selected standby theme, you can select applications or events to add to a shortcut list in the standby mode or the scroll keys. To select the applications or events, select  > Settings > Phone sett. > General > Personalization > Standby mode > Shortcuts.
Offline profile
To quickly activate the Offline profile, in the standby mode, briefly press the power key, and select Offline. To leave the Offline profile, briefly press the power key, and select another profile.
When the Offline profile is active, all the connections to a cellular network are turned off. However, you can use your device without a SIM card, and listen to the radio or music using the Music Player. Remember to switch off your device when wireless phone use is prohibited.
Important: In the offline profile you cannot make or receive any calls, or use other features that require cellular network coverage. Calls may still be possible to the official emergency number programmed into your device. To make calls, you must first activate the phone function by changing profiles. If the device has been locked, enter the lock code.
14

■ Indicators
Icons
 or
or  The device is connected to a WCDMA or GSM network.
HSDPA (network service) in the WCDMA network is activated.
|
The device is in the Offline profile and not connected to a cellular network. |
|
|
A memory card is inserted in the device. |
|
|
You have unread messages in the inbox in Messaging. |
|
|
You have new e-mail in your remote mailbox. |
|
|
You have messages waiting to be sent in outbox. |
|
|
You have missed calls. |
|
|
Ringing type is set to Silent and Message alert tone and E-mail alert tone are set |
|
|
to Off. |
|
|
The device keypad is locked. |
|
|
The loudspeaker is activated. |
|
|
An alarm is active. |
|
|
|
All calls to the device are diverted to another number. |
or |
|
A headset or a loopset is connected to the device. |
or |
or |
A GPRS packet data connection is active, or the connection is on hold, or a |
|
|
connection is available. |
or |
or |
A packet data connection is active in a part of the network that supports |
|
|
EGPRS, or the connection is on hold, or a connection is available. Your device |
|
|
may not use EGPRS in the data transfer. |
or |
or |
A WCDMA packet data connection is active, or the connection is on hold, or a |
|
|
connection is available. |
or |
|
Bluetooth connectivity is switched on, or data is being transmitted using |
|
|
Bluetooth technology. |
A USB connection is active.
The GPS receiver is active
Other indicators may also be shown.
15
Light indication
GPS light
The GPS light blinks when your device is trying to establish a GPS connection, and remains on when the GPS connection is established. When you close an application using GPS connection, the light blinks quickly a few times.
Navi key light
You can set the Navi key light to blink slowly to indicate when the device is switched on. The light turns on for a few second at intervals of approximately 20 seconds. To activate the status light, select  > Settings > Phone sett. > General > Personalization > Standby mode > Status light > On. The status light is not active in bright ambient light.
Missed events
The Navi key light blinks slowly for a few minutes after a missed event, such as a missed call.
■ Screen saver
To set the screen saver settings, select  > Settings > Phone sett. > General > Personalization >
Display > Screen saver. To set the timeout period after which the screen saver is activated, select Screen saver time-out. To set for how long the screen saver is active, select Screen saver duration.
■ Menu
In the menu, you can access the functions in your device. To access the main menu, select  . To open an application or a folder, scroll to it, and press the scroll key.
If you change the order of the functions in the menu, the order may differ from the default order described in this user guide.
To change the menu view, select Options > Change Menu view and a view type.
■ Mark items in an application
To mark or unmark an item in applications, such as an image or a video clip in Gallery, press
#. To mark or unmark several consecutive items, press and hold #, and scroll.
■ Switch between applications
To switch between open applications, do one of the following:
•Select Options > Show open applicats. and the application.
•Press and hold  . Scroll to an application, and select it.
16

■ Close an application
To close an application or a folder, select Back and Exit as many times as needed to return to the standby mode, or select Options > Exit.
Leaving applications running in the background increases the demand on battery power and reduces the battery life.
■ Volume control
To adjust the earpiece or loudspeaker volume during a call or when listening to an audio file, press the volume keys. To activate or deactivate the loudspeaker during a call, select Loudsp. or Handset.
Warning: Do not hold the device near your ear when the loudspeaker is in use, because the volume may be extremely loud.
■ Display rotation
Your device has an accelerometer that senses the movement of the device.
To rotate the display content automatically when you turn the device on its left side or back to a vertical position, select  > Settings > Phone sett. > General > Sensor settings >
Sensors On. Some applications and features may not support rotating the display content.
■ Turning control
To be able to silence calls and snooze alarms by turning the device so that the display faces down, select  > Settings > Phone sett. > General > Sensor settings > Sensors > On. Select Turning control, and mark Silencing calls and Snoozing alarms.
■ Keypad lock (keyguard)
To lock the keypad when you close the slide, select  > Settings > Phone sett. > General >
Slide handling > Keyguard activation > Change > On when closing slide.
To set the device to automatically lock the keypad after a certain time, select  > Settings >
Phone sett. > General > Security > Phone and SIM card > Keypad autolock period > User defined and the desired time.
Opening the slide unlocks the keypad. To unlock the keypad when the slide is closed, press the left selection key and select OK within 1.5 seconds.
When the device or keypad is locked, calls may be possible to the official emergency number programmed into your device.
17
■ Remote lock
To prevent unauthorized use of your device, you can lock your device and memory card remotely by using a text message. To lock your device, you must define the message text and then send that text message to your device. To unlock your device, you need the lock code.
To enable remote locking and to define the text message content to be used, select  >
>
Settings > Phone sett. > General > Security > Phone and SIM card > Remote phone locking >
Enabled. Enter the text message content (5 to 20 characters), verify it, and enter the lock code.
■ Access codes
To set how your device uses the access codes, select  > Settings > Phone sett. > General >
Security > Phone and SIM card.
Lock code
The lock code (5 digits) helps to lock your device. The preset code is 12345. You can change the code. Keep the new code secret and in a safe place separate from your device.
To change the lock code, select  > Settings > Phone sett. > General > Security > Phone and SIM card > Lock code. To activate the automatic locking of your device, select Phone autolock period > User defined.
If you forget the code and your device is locked, your device will require service and additional charges may apply. For more information, contact a Nokia Care point or your device dealer.
When the device or keypad is locked, calls may be possible to the official emergency number programmed into your device.
PIN codes
The personal identification number (PIN) code or the universal personal identification number (UPIN) code (4 to 8 digits) help to protect your SIM card. The (U)PIN code is usually supplied with the SIM card. Set the device to request the code each time the device is switched on, select  > Settings > Phone sett. > General > Security > Phone and SIM card > PIN code request > On.
The PIN2 code may be supplied with the SIM card and is required for some functions.
The module PIN is required to access the information in the security module. The signing PIN is required for the digital signature. The module PIN and the signing PIN are supplied with the SIM card if the SIM card has a security module in it.
18
PUK codes
The personal unblocking key (PUK) code or the universal personal unblocking key (UPUK) code (8 digits) are required to change a blocked PIN code and UPIN code, respectively. The PUK2 code is required to change a blocked PIN2 code.
If needed, contact your local service provider for the codes.
Restriction password
The restriction password (4 digits) is required when using call restriction. You can obtain the password from your service provider. If the password is blocked, contact your service provider.
■ Download!
Download! (network service) is a mobile content shop available on your device.
With Download! you can discover, preview, buy, download, and upgrade content, services, and applications. The items are categorized under catalogs and folders provided by different service providers. The available content depends on your service provider.
Select  > Download! or > Internet > Download!, depending upon your device.
Download! uses your network services to access the most up-to-date content. For information on additional items available through Download!, contact your service provider, or the supplier or manufacturer of the item.
■ My own
You can install applications to your device. To access the applications, select  >
>
Applications > My own.
Important: Only install and use applications and other software from trusted sources, such as applications that are Symbian Signed or have passed the Java VerifiedTM testing.
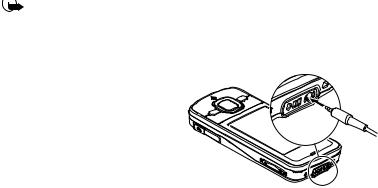
■ Connect a compatible headset
Do not connect products that create an output signal as this may cause damage to the device. Do not connect any voltage source to the Nokia AV Connector.
When connecting any external device or any headset, other than those approved by Nokia for use with this device, to the Nokia AV Connector, pay special attention to volume levels.
19
■ Connect a USB data cable
Connect a compatible USB data cable to the USB connector.
To select the default USB connection mode or change the active mode, select  >
>
Settings > Connectivity > USB > USB connection mode and the desired mode. To set whether the default mode is activated automatically, select Ask on connection > No.
3. Call functions
To adjust the volume during a call, press the volume keys.
■ Make a voice call
1.In the standby mode, enter the phone number, including the area code. Press the clear key to remove a number.
For international calls, press * twice for the international prefix (the + character replaces the international access code), and enter the country code, area code (omit the leading zero if necessary), and phone number.
The character + as replacement for the international access code may not work in all regions. In this case, enter the international access code directly.
2.To call the number, press the call key.
3.To end the call, or to cancel the call attempt, press the end key.
To select whether active calls are ended when closing the slide, select  > Settings >
Phone sett. > General > Slide handling > Closing the slide > Options > Change > End active call or Continue active call.
To make a call from Contacts, select  > Contacts. Scroll to the desired name; or enter the first letters of the name, and scroll to the desired name. To call the number, press the call key.
To call a recently dialed number from the standby mode, press the call key.
20

1-touch dialing
The 1-touch dialing feature is a quick way to call frequently used numbers from the standby mode. You need to assign a phone number to the 1-touch dialing keys 2 to 9 (the 1 is reserved for the voice call mailbox), and set 1-touch dialing to On.
To assign a phone number to a 1-touch dialing key, select  > Settings > 1-touch. Scroll to a key icon, and select Assign and the contact to whom you want to assign the 1-touch dialing key. For information on adding a contact, see ”Save and manage contact information,” p. 32. To change the number, select Options > Change.
To activate 1-touch dialing, select  > Settings > Phone sett. > Phone > Call > 1-touch dialing > On.
To call a 1-touch dialing number, press and hold the 1-touch dialing key until the call begins.
Call mailbox
To call your voice mailbox (network service), from the standby mode, press and hold 1. You can have call mailboxes for voice calls and multiple phone lines.
To define the call mailbox number if no number is set, select  > Settings > Call mailbox. Scroll to Voice mailbox, and enter the corresponding mailbox number. To change the call mailbox number, select Options > Change number. For the call mailbox number, contact your service provider.
Voice dialing
A voice tag is added automatically to all entries in Contacts. Use long names, and avoid similar names for different numbers.
Make a voice dialing call
Voice tags are sensitive to background noise. Use voice tags in a quiet environment.
Note: Using voice tags may be difficult in a noisy environment or during an emergency, so you should not rely solely upon voice dialling in all circumstances.
1.In the standby mode, press and hold the right selection key.
If you are using a compatible headset with the headset key, press and hold the headset key.
2.When Speak now is displayed, speak the voice command clearly. The device plays the voice command of the best match. After 1.5 seconds, the device dials the number; if the result is not the correct one, before dialling select another entry.
Make a conference call
Your device supports conference calls (network service) between a maximum of six participants, including yourself.
21

1.Make a call to the first participant.
2.To make a call to another participant, select Options > New call.
3.To create the conference call when the new call is answered, select Options > Conference.
To add another person to the conference call, repeat step 2, and select Options >
Conference > Add to conference.
4.To end the conference call, press the end key.
■ Answer or reject a call
To answer a call, press the call key.
To mute the ringing tone, select Silence.
To reject the call, press the end key, or select Options > Decline. If you have activated Call forwarding > If busy, rejecting the call forwards the call.
To send a text message as a reply to the caller instead of answering the call, select Options > Send message. To activate the text message reply and edit the message, select  > Settings >
Phone sett. > Phone > Call > Decline call with msg. and Message text.
To determine whether calls are answered automatically when opening the slide, select  >
>
Settings > Phone sett. > General > Slide handling > Opening the slide > Change > Answer incoming call or Call not answered > OK.
Call waiting
During a call, to answer the waiting call, press the call key. The first call is put on hold. To switch between the two calls, select Swap. To end the active call, press the end key.
To activate the call waiting function (network service), select  > Settings > Phone sett. >
Phone > Call > Call waiting > Activate.
■ Video calls
Make a video call
To make a video call, you may need to have a USIM card and be within the coverage of a WDCMA network. For availability of and subscription to video call services, contact your service provider. A video call can only be made between two parties and when no other voice, video, or data calls are active. The video call can be made to a compatible mobile phone or an ISDN client.
You have captured a still image to be sent instead of video sending.
 You have denied video sending from your device.
1.Enter the phone number in the standby mode and select Video call. Or, select  > Contacts, scroll to the desired contact, and select Options > Video call.
22
2.To change between showing video or only hearing sound during a video call, select from the toolbar Enable video sending or Disable video sending.
If you have denied video sending during a video call, the call is still charged as a video call. Check the pricing with your network operator or service provider.
3.To end the video call, press the end key.
Answer a video call
When a video call arrives,  is displayed.
To answer the video call, press the call key. Allow video image to be sent to caller? is shown. If you select Yes, the image captured by the camera in your device is shown to the caller. Otherwise, video sending is not activated.
If you have denied video sending during a video call, the call is still charged as a video call. Check the pricing with your service provider.
To end the video call, press the end key.
■ Call settings
Call
Select  > Settings > Phone sett. > Phone > Call and from the following:
Send my caller ID (network service) — to display or hide your phone number from the person to whom you are calling
Call waiting (network service) — See ”Call waiting,” p. 22.
Decline call with msg. and Message text — See ”Answer or reject a call,” p. 22.
Own video in recvd. call— to set whether you allow to send your own video image when you receive a video call
Image in video call — to select a still image to be shown when you deny a video call
Automatic redial — to set your device to make a maximum of 10 attempts to connect the call after an unsuccessful call attempt
Show call duration and Summary after call — to set the device to display the call duration during a call and the approximate duration of the last call
1-touch dialing — See ”1-touch dialing,” p. 21.
Anykey answer — to answer an incoming call by briefly pressing any key, except the left and right selection keys, volume keys, and end key
Line in use (network service) — to select the phone lines for making calls and sending short messages. This is shown only if the SIM card supports two phone lines.
Line change (network service) — to enable or disable the line selection
23
Call forwarding
1.Select  > Settings > Phone sett. > Phone > Call forwarding (network service).
2.Select which calls you want to forward, for example, Voice calls.
3.Select the desired option. For example, to forward voice calls when your number is busy or when you reject an incoming call, select If busy.
4.Select Options > Activate and the phone number to which you want to forward the calls. Several forwarding options can be active at the same time.
Call restriction and call forwarding cannot be active at the same time.
Call restriction
1.Select  > Settings > Phone sett. > Phone > Call restriction (network service) to restrict the calls that you make and receive with your device.
2.Scroll to the desired restriction option, and select Options > Activate. To change the settings, you need the restriction password given by your service provider.
Call restriction and call forwarding cannot be active at the same time.
When calls are restricted, calls may be possible to certain official emergency numbers.
Network
Select  > Settings > Phone sett. > Phone > Network and from the following:
Network mode — to select which network to use (this is shown only if it is supported by the service provider). If you select Dual mode, the device uses the GSM or WDCMA network automatically.
Operator selection — to set the device to search for and automatically select one of the available networks, select Automatic. To select the desired network manually from a list of networks, select Manual. The selected network must have a roaming agreement with your home network.
Cell info display (network service) — to set the device to indicate when it is used in a cellular network based on microcellular network (MCN) technology, and to activate cell info reception
■ Video sharing
Use video sharing to send live video from your mobile device to another compatible mobile device during a voice call.
Video sharing requirements
Video sharing requires a 3G universal mobile telecommunications system (UMTS) connection. For information about network availability and the fees associated with this application, contact your service provider.
24
To use video sharing, you must do the following:
•Ensure that your device is set up for person-to-person connections.
•Ensure that both the sender and recipient are registered to the WDCMA network.
•Ensure you have an active UMTS connection and you are within WDCMA network coverage. If you move away from a WDCMA network during the sharing session, the sharing session is discontinued, but your voice call continues.
Video sharing settings
A person-to-person connection is also known as a session initiation protocol (SIP) connection. Before you can use video sharing, ask your service provider for the configured SIP profile to be used in your device.
Select  > Settings > Phone sett. > Connection > Video sharing and from the following:
Video sharing — to select whether the video sharing is enabled
SIP profile — to select a SIP profile
Video saving — to set whether the live videos are automatically saved
Preferred saving memory — to select whether to save the videos to the device memory or to a memory card
Capability alert tone — to set an alert tone to sound when video sharing is available during a call
If you know a recipient’s SIP address, you can save it to Contacts. Select  > Contacts, the contact, and Options > Edit > Options > Add detail > SIP or Share video. Enter the SIP address (username@domainname). You can use an IP address instead of a domain name.
Share live video or video clip
1.To share live video you are recording with the device camera, select Options > Share video > Live video during a voice call. To share a saved video clip, select Video clip and the clip you want to share.
2.The device sends the invitation to the SIP address you saved to Contacts.
If necessary, to send the invitation, select the SIP address of the recipient; or enter a SIP address, and select OK.
3.Sharing begins automatically when the recipient accepts the invitation, and the loudspeaker is active. Use the toolbar buttons to control the video sharing.
4.To end the sharing session, select Stop. To end the voice call, press the end key.
Accept an invitation
Your device rings when you receive an invitation. The invitation shows the sender’s name or SIP address. Select Yes to begin the sharing session. To decline the invitation and to return to the voice call, select No.
25

■ Log
To view missed, received, or dialled calls; text messages; packet data connections; and fax and data calls registered by the device, select  > Log.
In the standby mode, you can use the call key as a shortcut to Dialed numbers in the Recent calls log (network service).
Note: The actual invoice for calls and services from your service provider may vary, depending on network features, rounding off for billing, taxes, and so forth.
Note: Some timers, including the life timer, may be reset during service or software upgrades.
4. Write text
■ Traditional and predictive text input
When you write text,  on the display indicates predictive text input and
  traditional text input. To set the predictive text input on or off, press # repeatedly, or press *, and select
Activate predictive text or Predictive text > Off.
 ,
,  ,
,  or
or  next to the text input indicator indicates the character case or number mode. To change the character case, or to change between letter and number mode, press # repeatedly.
To change the writing language of your device, select  > Settings > Phone sett. > General > Personalization > Language > Writing language. The writing language affects the characters available when writing text and the predictive text dictionary used. Not all characters available under a number key are printed on the key.
Write with traditional text input
Press a number key, 2 to 9, repeatedly until the desired character appears. Press the 1 key for the most common punctuation marks and special characters.
If the next letter you want is on the same key as the present one, wait until the cursor appears (or scroll forward to end the time-out period), and enter the letter.
Write with predictive text input
1.Press a number key, 2–9, only once for one letter. The word changes after every keypress. For the most common punctuation marks, press 1.
2.When you have finished the word and it is correct, to confirm it, scroll forward or insert a space.
If the word is not correct, to view the matching words the dictionary has found one by one, press * repeatedly.
26

If the ? character is shown after the word, the word you intended to write is not in the dictionary. To add a word to the dictionary, select Spell. Enter the word (up to 32 letters), and select OK. The word is added to the dictionary. When the dictionary becomes full, a new word replaces the oldest added word.
Common functions in traditional and predictive text input
To insert a number, press and hold the number key.
To enter punctuation marks and special characters, press and hold *.
To erase a character, press the clear key. To erase more characters, press and hold the clear key.
To insert a space, press 0. To move the cursor to the next line, press 0 three times.
■ Copy and delete text
1.To select letters and words, press and hold #, and at the same time scroll left or right. To select lines of text, press and hold #, and at the same time scroll up or down.
2.To copy the text, press and hold #, and at the same time select Copy. To delete the selected text, press the clear key.
3.To insert the text, scroll to the insertion point, press and hold #, and at the same time select Paste.
5. Messaging
Before you can receive or send messages or e-mail, you must have the necessary settings and access points defined. Contact your service provider for the settings.
■ Write and send messages
Your device supports the sending of text messages beyond the character limit for a single message. Longer messages are sent as a series of two or more messages. Your service provider may charge accordingly. Characters that use accents or other marks, and characters from some language options, take up more space, limiting the number of characters that can be sent in a single message.
The wireless network may limit the size of MMS messages. If the inserted picture exceeds this limit, the device may make it smaller so that it can be sent by MMS.
Only devices that have compatible features can receive and display multimedia messages. The appearance of a message may vary depending on the receiving device.
27
1.Select  > Messaging > New message and the message type. To create a text message or multimedia message, select Message. The message type changes automatically based
on the content.
2.In the To field, enter the phone numbers or e-mail addresses of the recipients, or, to select recipients from Contacts, press the scroll key. Separate recipients with a semicolon (;).
3.To enter the subject for a multimedia, or e-mail message, scroll down to the Subject field. If the subject field is not visible for a multimedia message, select Options >
Message header fields, mark Subject, and select OK.
4.Scroll down to the message field and enter the message content.
When you write a text message, the message length indicator shows how many characters you can enter in the message. For example, 10 (2) means that you can still add 10 characters for the text to be sent as a series of two text messages.
To insert an object, such as an image, video clip, note, or a business card, to a multimedia, or e-mail message, press the scroll key, and select Insert content.
To record a new sound clip for an audio message, select Record. To use a previously recorded sound clip, select Options > Insert sound clip > From Gallery.
5.To send the message, select Options > Send.
■ Inbox
Inbox contains received messages except e-mail and cell broadcast messages. To read received messages, select  > Messaging > Inbox and the message.
To view the list of media objects that are included in the multimedia message, open the message, and select Options > Objects.
Your device can receive many kinds of messages, such as operator logos, business cards, calendar entries, and ringing tones. You can save the special message content to your device. For example, to save a received calendar entry to the calendar, select Options >
Save to Calendar.
The appearance of a message may vary depending on the receiving device.
■ Service messages
Service messages (network service) are notifications that may contain a text message or the address of a browser service.
To define whether service messages are enabled and whether the messages are downloaded automatically, select  > Messaging > Options > Settings > Service message.
28
Before you can use e-mail, you must have an e-mail account and the correct settings. To check the availability and the settings of your e-mail account, contact your e-mail service provider.
You must also set up a mailbox in your device. When you create a new mailbox, the name you give to the mailbox replaces New mailbox. You can have up to six mailboxes.
IMAP4 and POP3 mailboxes
Select  > Messaging and the mailbox. Connect to mailbox? is displayed. To connect to your mailbox (network service), select Yes, or to view previously retrieved e-mail messages offline, select No.
To connect to the mailbox afterwards, select Options > Connect. When you are online, to end the data connection to the remote mailbox, select Options > Disconnect.
Retrieve and read e-mail messages
1.Select Options > Retrieve e-mail and whether you want to retrieve new, selected, or all messages.
2.To open an e-mail message, select it.
To view e-mail attachments, indicated with  , select Options > Attachments. You can open, save or send attachments in supported formats.
Delete e-mail messages
To delete an e-mail message from the device and retain it in the remote mailbox, select Options > Delete > Phone only. To delete an e-mail from both the device and the remote mailbox, select Options > Delete > Phone and server.
To cancel deletion of an e-mail from both the device and server, scroll to an e-mail that has been marked to be deleted during the next connection, and select Options > Restore.
Sync mailboxes
Select  > Messaging and the sync mailbox.
To synchronize your device with the remote mailbox, select Options > Synchronization > Start.
To view received messages, select Inbox and the message.
■ Mail for exchange
With Mail for Exchange, you can access the e-mail, calendar, contacts (address book), and tasks of your Microsoft® Exchange account on your mobile device. Keeping the entries on your mobile device updated with the entries on your Exchange account is possible through the process of synchronization.
29
Loading...