


(En)
INSTRUCTION MANUAL |
En |
Introduction 


•Thank you for purchasing the Nikon F65/F65D—a camera that is sure to make photography a bigger part of your life.
Get to know your F65/F65D camera, and be sure to read this manual thoroughly before using it. We recommend that you keep this manual handy.
Main features of the F65/F65D:
•Exposure mode dial makes operation simple and intuitive, so great pictures are a snap in every shooting situation.
•The big, high-visibility LCD lets you check camera settings at a glance.
•With a AUTO and Vari-Program modes, you don’t have to be a pro to take better pictures—just press the shutter release button.
•3D Matrix Metering can read atmosphere as well as brightness and contrast, for recording the scene in all its nuanced detail.
•Wide-coverage Five-Area Dynamic AF system keeps subjects in clear focus and eliminates unintended blurring.
•The auto pop-up Speedlight, featuring Matrix Balanced Fill-Flash, throws just the right light on a scene to make the shot look beautiful and natural.
•Crisp, precise film advance and shutter release assure superb 2.5- frame-per-second continuous shooting.
•The Nikon F65/F65D is so compact and lightweight, anyone can handle it.
2
•Take trial shots
Take trial shots before shooting at important occasions like weddings or graduations.
•Have Nikon spot-check your camera regularly
Nikon recommends that you have your camera serviced by an authorised dealer or service centre at least once every two years.
•Using your camera correctly
The Nikon F65/F65D’s performance has been optimised for use with Nikon brand accessories. Accessories made by other manufacturers may not meet Nikon’s criteria for specifications, and nonconforming accessories could damage the F65/F65D’s components. Nikon cannot guarantee the F65/F65D’s performance when it is used with other than Nikon brand accessories.
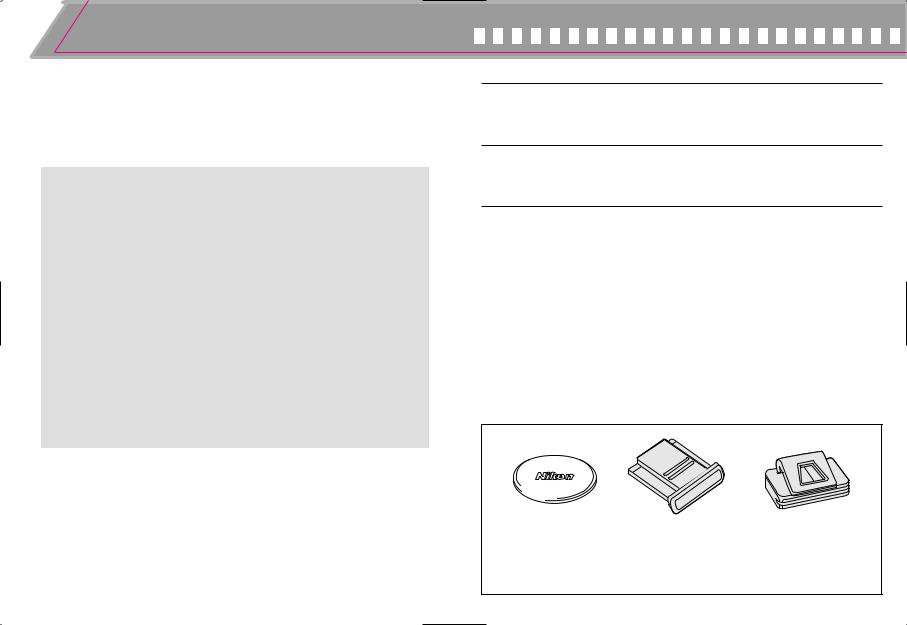
Supplied accessories
Body cap (P. 19) |
Accessory shoe cover Eyepiece cap DK-5 (P. 67) |
*Remove this cover when attaching an optional Speedlight to the accessory shoe.
3

Contents 


......................................................................................................Introduction |
2-3 |
Nomenclature ................................................................................................... |
6-7 |
LCD Panel/Viewfinder Display.......................................................................... |
8-9 |
Available Exposure Modes........................................................................... |
10-11 |
Start Shooting Immediately....................................................................... |
12-13 |
|
|
|
|
|
|
|
|
|
..............................................................................PREPARATION |
15-24 |
|
||
|
|
|
|
|
|
|
1. Install Batteries and Check Battery Power .............................................. |
16-17 |
|
||
|
2. Mount Lens............................................................................................... |
18-19 |
|
||
|
3. Load Film.................................................................................................. |
20-21 |
|
||
|
4. Set Date and Time (F65D only) ................................................................ |
22-23 |
|
||
|
About Shutter Release Button........................................................................... |
24 |
|
||
|
|
|
|
|
|
|
......................................................................BASIC OPERATION |
25-41 |
|
|
1. Set Focus Mode to AF ............................................................................. |
26-27 |
|
|
2. Set Exposure Mode to a........................................................................ |
28-29 |
|
|
3. Hold Camera and Focus .......................................................................... |
30-31 |
|
|
4. Release Shutter ........................................................................................ |
32-33 |
|
|
Using Built-In Speedlight ............................................................................. |
34-35 |
|
|
Shooting with Vari-Program ......................................................................... |
36-38 |
|
|
Imprinting Date/Time (F65D only)...................................................................... |
39 |
|
|
Self-Timer Operation .................................................................................... |
40-41 |
|
|
|
|
|
|
|
|
|
|
About Metering Systems and Exposure............................................................ |
42 |
|
|
|
|
|
4
DETAILED OPERATION ............................................................... |
43-73 |
Focus Mode ................................................................................................. |
44-45 |
Focus Area ................................................................................................... |
46-47 |
AF-Assist Illuminator .................................................................................... |
48-49 |
Focus Lock ........................................................................................................ |
50 |
Shooting in Each Exposure Mode................................................................ |
51-60 |
AUTO mode ................................................................................................... |
51 |
Auto-Multi Program/Flexible Program...................................................... |
52-53 |
Shutter-Priority Auto ................................................................................. |
54-55 |
Aperture-Priority Auto............................................................................... |
56-57 |
Manual ...................................................................................................... |
58-60 |
Exposure Compensation ................................................................................... |
61 |
Auto Exposure Bracketing ........................................................................... |
62-63 |
Multiple Exposure......................................................................................... |
64-65 |
Film Rewind ....................................................................................................... |
66 |
Dioptre Adjustment/Viewfinder Accessories ..................................................... |
67 |
Depth-of-Field Preview...................................................................................... |
68 |
Remote Control Operation (optional) ........................................................... |
69-72 |
Available Mode Combinations........................................................................... |
73 |
About Depth of Field ......................................................................................... |
74 |
FLASH PHOTOGRAPHY ............................................................. |
75-86 |
Built-In Speedlight and TTL Flash Modes......................................................... |
76 |
Ready-Light/Accessory Shoe ............................................................................ |
77 |
Flash Sync Mode Features .......................................................................... |
78-79 |
Using Built-In Speedlight ............................................................................. |
80-83 |
Flash Shooting Distance Range ........................................................................ |
84 |
Usable Lenses with Built-In Speedlight............................................................. |
85 |
Available Flash Sync Mode Combinations ........................................................ |
86 |
MISCELLANEOUS ...................................................................... |
87-113 |
Lens Compatibility........................................................................................ |
88-90 |
Usable Optional Speedlights........................................................................ |
91-93 |
Optional Accessories ................................................................................... |
94-95 |
Camera Care ................................................................................................ |
96-97 |
Notes on Batteries ............................................................................................. |
98 |
Troubleshooting.......................................................................................... |
99-101 |
Glossary.................................................................................................... |
102-105 |
Specifications ........................................................................................... |
106-110 |
Index......................................................................................................... |
112-113 |
5
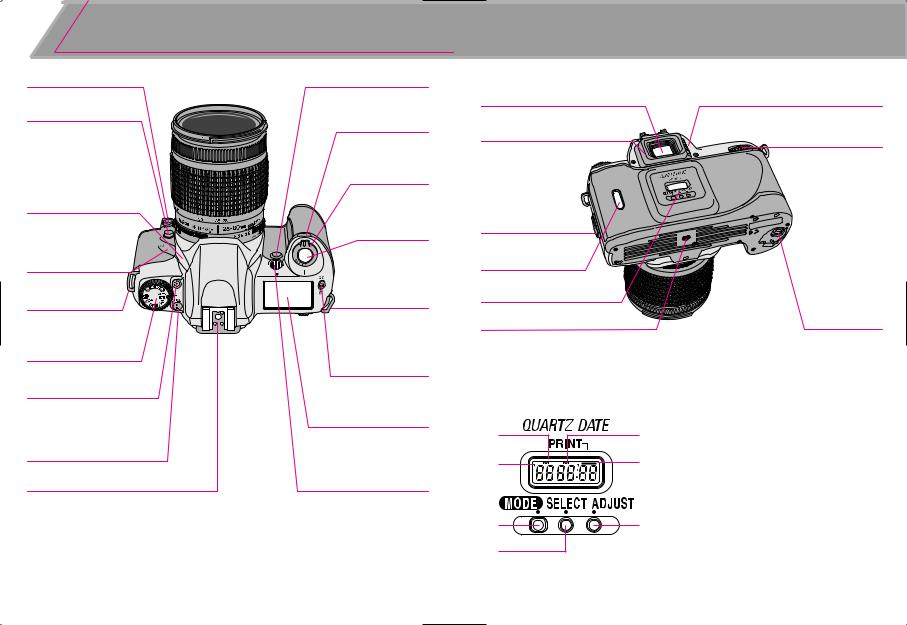
Nomenclature 


Focus mode selector (PP. 44-45) |
Depth-of-field preview button (P. 68) |
Lens release button |
Remote control sensor |
(P. 19) |
|
|
(P. 69) |
Flash lock-release (P. 80)/ Flash sync mode button (P. 78)
Focus area (P. 46)/ 
 AF-Assist Illuminator
 cancel button (P. 49)

Camera strap eyelet
Exposure mode dial (P. 10)
Self-timer/Remote control button (P. 40/69)
Auto Exposure Bracketing (P. 62)/
Multiple Exposure (P. 64)/
Film rewind button (P. 66)
Accessory shoe (P. 77)
Power switch (P. 16)
Shutter release button (P. 17/24)
Camera strap eyelet
Aperture (P. 59)/ Exposure Compensation button (P. 61)/Film rewind button (P. 66)
LCD panel (P. 8)
Self-timer (P. 40)/
AF-Assist Illuminator (P. 48)/
Red-Eye Reduction lamp
(P. 79)
6
Viewfinder eyepiece
Rubber eyecup (P. 67)
Camera back lock release lever (P. 20)
Film confirmation window (P. 21)
Data Back (F65D only) (P. 22/39)
Tripod socket
Dioptre adjustment lever (P. 67)
Command Dial
Battery chamber cover lock lever (P. 16)
* Illustration shown is the F65D. The camera back of the F65 differs from the F65D.
•F65D only: Data imprint LCD/buttons
|
|
1. |
Date/time display LCD |
1 |
5 |
2. |
’: Year indicator |
|
|
3. |
MODE button: Push to select one of five |
2 |
6 |
|
available displays. |
4. |
SELECT button: Push to select date/time |
||
|
|
|
to be adjusted. |
|
|
5. |
M: Month indicator |
|
|
6. |
: Data imprint indicator: Blinks |
3 |
7 |
7. |
–approx. 2 sec. when data is imprinted. |
|
|
ADJUST button: Push to adjust |
|
4 |
|
|
date/time. |
|
|
|
|
|
|
|
7 |
LCD Panel/Viewfinder Display
•LCD panel
Remote control (P. 69) |
Self-timer (P. 40) |
Shutter speed |
Aperture |
Exposure |
Multiple |
Compensation |
|
(P. 61) |
Exposure (P. 64) |
|
Battery power |
AUTO |
(P. 17) |
|
|
SLOW |
|
REAR |
|
|
Frame counter (P. 21)/ |
Flash sync mode (P. 78/80) |
Exposure Compensation |
value (P. 61) |
|
Focus area (P. 46) |
Auto Exposure Bracketing (P. 62) |
NOTE: About LCD
The LCD panel and viewfinder displays tend to turn darker at high temperatures and have slower response time at low temperatures. In either case, when the temperature returns to normal, the displays also return to normal.
•Viewfinder display
Focus area (focus brackets) (P. 30/46) |
12mm-dia. reference circle for Centre- |
||||||||||||
|
|
|
|
|
|
|
|
Weighted Metering area (P. 58) |
|||||
|
|
|
|
|
|
|
|
|
|
|
|
|
|
|
|
|
|
|
|
|
|
|
|
|
|
|
|
|
|
|
|
|
|
|
|
|
|
|
|
|
|
|
|
|
|
|
|
|
|
|
|
|
|
|
|
|
|
|
|
|
|
|
|
|
|
|
|
|
|
|
|
|
|
|
|
|
|
|
|
|
|
|
|
Focus indicator (P. 31)
Focus area (P. 46)
Flash ready-light (P. 77)/ Flash recommended indication (P. 76/80)
Exposure Compensation
(P. 61)
Electronic analog exposure (P. 59)/Exposure Compensation value display (P. 61)
Shutter speed |
Aperture |
8 |
9 |
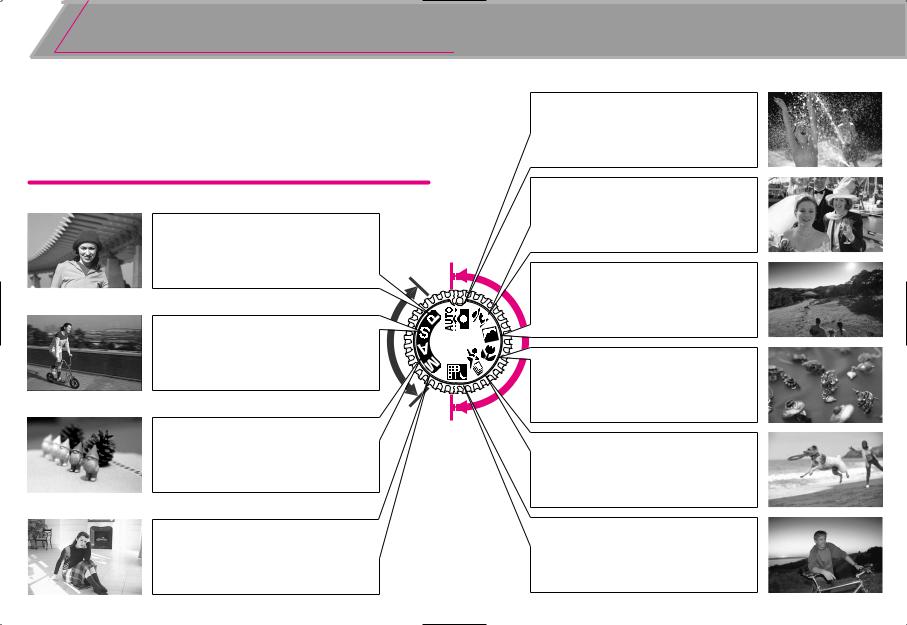
Available Exposure Modes 


The exposure mode dial of the Nikon F65/F65D can be divided into two sections. One is the user
Program, Shutter-Priority modes, where the
The other section is point automatically controls
• User-controlled
P: Auto-Multi Program (P. 52)
Camera controls shutter speed and aperture automatically. Other settings, such as Flexible Program (page 53) or Exposure Compensation (page 61) are possible.
S: Shutter-Priority Auto (P. 54)
You set desired shutter speed, and the camera selects the correct aperture. Freeze the motion of a moving subject or blur the subject.
A: Aperture-Priority Auto (P. 56)
You set the desired aperture, and the camera selects the correct shutter speed. Lets you determine depth of the in-focus area.
• Point-and-shoot exposure mode
a: AUTO mode (P. 28, 51)
Camera automatically controls all the exposure settings. Suitable for taking pictures right away.
s: Portrait mode (P. 37)
Use this mode to take portraits. The background is blurred to accentuate your main subject.
d: Landscape mode (P. 37)
Use this mode to take pictures of distant scenes. The overall landscape will be sharply focused.
f: Close-Up mode (P. 37)
Use this mode to take up-close pictures of
M: Manual (P. 58)
Shutter speed and aperture are set manually. Suitable for taking photographs with unique effects.
h: Night Scene mode (P. 38)
Use this mode for subjects with an evening or night background.
10 |
11 |

Start Shooting Immediately 


1 Open the battery chamber and install batteries while the camera’s power is off (page 16).
2 Attach the lens and turn the power switch on (page 18).
•With CPU Nikkor lens other than G-type, set the lens aperture to its minimum and lock.
3 Open the camera back and install the film (page 20).
4 Set the focus mode selector to AF (autofocus) (page 26).
5 Set the exposure mode dial to a (AUTO mode) (page 28).
6 Hold the camera properly, compose frame and focus by lightly pressing the shutter release button (page 30).
7 Confirm focus indicator / appears without blinking and slowly depress the shutter release button (page 32).
8 Film starts to rewind automatically when it reaches the end of the roll (page 33).
12 |
13 |

PREPARATION
This section introduces the various operations necessary before you start shooting.
• Install batteries and check battery power
• Mount lens
• Load film
•Set date and time (F65D only)
•About shutter release button
14 |
15 |
1 Install Batteries and Check Battery Power 
Use two CR2-type 3V lithium batteries. (For other power sources, see
1 Turn the power switch off and open the battery chamber cover by sliding the battery chamber cover lock lever toward indicated direction.
• When replacing batteries, be sure to turn the power switch off and replace both batteries at the same time. Always use fresh batteries of the same brand
NOTE: Storing batteries
Keep the batteries out of children’s reach. If swallowed, contact a doctor immediately. (For “Notes on Batteries”, see page 98.)
Check points
•We recommend that you take spare batteries with you, especially when travelling.
•For the number of film rolls that can be shot with fresh batteries, see page 110.
Turn the power switch on and confirm |
|
|
3 battery power with the N indication. |
|
|
N appears: Sufficient battery power. |
|
|
M appears: Batteries are nearing exhaustion. |
|
|
Have a fresh set ready. (Viewfinder |
|
|
indications turn off when you release |
PREPARATION |
|
your finger from shutter release |
||
|
||
button after taking the picture.) |
|
|
M blinks: Batteries are exhausted. Replace |
|
|
batteries. (Shutter locks.) |
|
|
• Shutter speed and aperture indications in the LCD |
|
|
panel automatically turn off 5 sec. after the power |
|
|
switch is turned on and the camera remains |
|
|
unused. (All indications in the viewfinder turn off.) |
|
|
Lightly press the shutter release button |
|
|
4 to activate the exposure meter. |
|
|
• Lightly pressing the shutter release button |
|
|
reactivates the exposure meter and indications in |
|
|
the LCD panel and viewfinder for approx. 5 sec. |
|
|
See page 24 about the shutter release button. |
|
power switch is off
16 |
17 |
2 Mount Lens 


Turn the power switch off and mount the lens to the camera body.
CPU contacts of CPU |
Å CPU Nikkor lens Í G-type Nikkor lens |
Nikkor lens |
other than G-type |
1 Check the lens type.
ÅCPU Nikkor lenses other than G-type (Illustration is D-type Nikkor lens), with aperture ring
ÍG-type Nikkor lens, without aperture ring
G-type Nikkor lens
The G-type Nikkor lens has no aperture ring; aperture should be selected from camera body. Unlike other CPU Nikkor lenses, aperture does not need to be set to minimum.
2 Turn the power switch off and mount the lens to the camera body.
With CPU Nikkor lens with aperture ring (other than G-type)
Position lens in the camera’s bayonet mount so that the mounting indexes on lens and camera body are aligned, then twist lens counterclockwise until it locks into place. (Be sure not to touch the lens release button.) And then, set the lens aperture to its minimum and lock.
• When the lens is not set to its minimum aperture setting and the power switch is turned on, ƒEE blinks in the LCD panel and viewfinder and the shutter cannot be released.

 With G-type Nikkor lens
Position lens in the camera’s bayonet mount so that the mounting indexes on lens and camera body are aligned,
|
it locks into place. |
|
|
button.) |
PREPARATION |
3 |
• Push and hold the lens release button, then turn the |
|
|
Detaching the lens. |
|
lens clockwise to detach the lens.
When camera is left unattended without lens
When you leave the camera lens attached, be sure to attach body cap (page 3), or optional (BF-1 body cap cannot be used.
NOTE: Non-CPU Nikkor lens
When a non-CPU Nikkor lens is attached and the power switch is turned on, ƒ-- blinks in the LCD panel and viewfinder, and the shutter cannot be released (except in Manual exposure mode). See page 90 for a non-CPU lens.
Check points
•Use a D- or G-type AF Nikkor lens to utilise all of this camera’s functions. (See page 88 for Lens Compatibility.)
•Make sure to turn the power switch off when attaching/detaching the lens.
•Avoid direct sunlight when attaching/detaching the lens.
18 |
19 |
3 Load Film 


Turn the power switch on and load DX-coded film. With DX-coded film, |
Gently close the camera back until the |
film speed will be set automatically (ISO 25-5000). Closing the camera |
3 camera back snaps closed. Film |
automatically advances the film to the first frame. |
automatically advances to the first frame. |
|
• When 1 appears on the LCD panel, the film has |
|
advanced to the first frame. |
|
• When E appears in the LCD panel or Err and E in |
|
the LCD panel and Err in viewfinder blink, film is |
|
not properly installed. Open the camera back again |
|
and reload film by aligning the film leader to the red |
|
index mark. |
|
• Frame number display remains when the power |
|
switch is off. |
PREPARATION
NOTE: Loading/removing film
the shutter
DX-coded film
With DX-coded film, film speed will be set automatically between ISO 25 to ISO 5000. Film speed is set to ISO 100 with non-DX- coded film.
DX-coded film
ISO
(film speed)
DX mark
Check points
• Avoid direct sunlight when changing film |
|
• You can check the number of available |
film roll and film |
speed through the film confirmation window |
|
• Infrared films cannot be used with this |
sensor is used |
for the detection of the film frame position. |
|
20 |
21 |
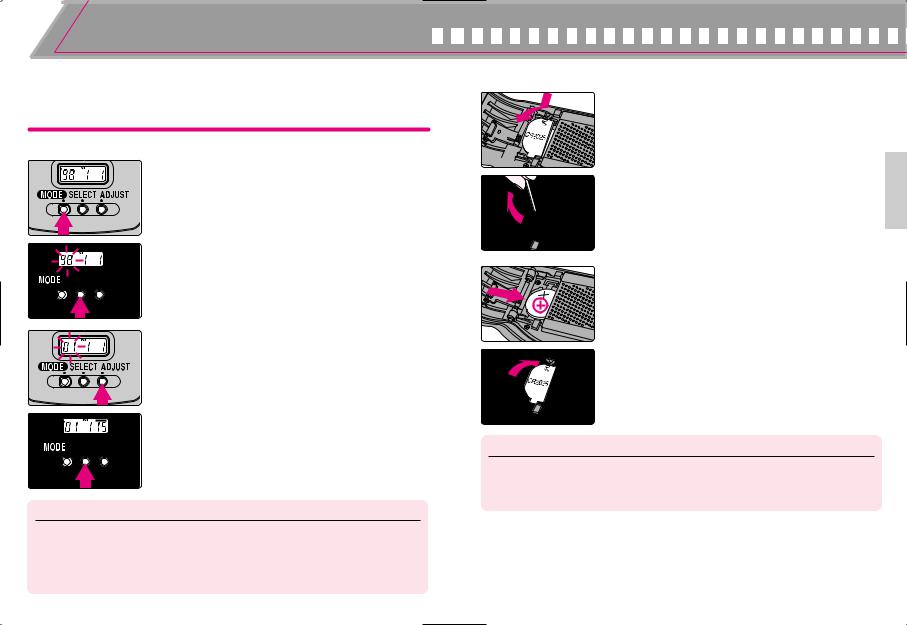
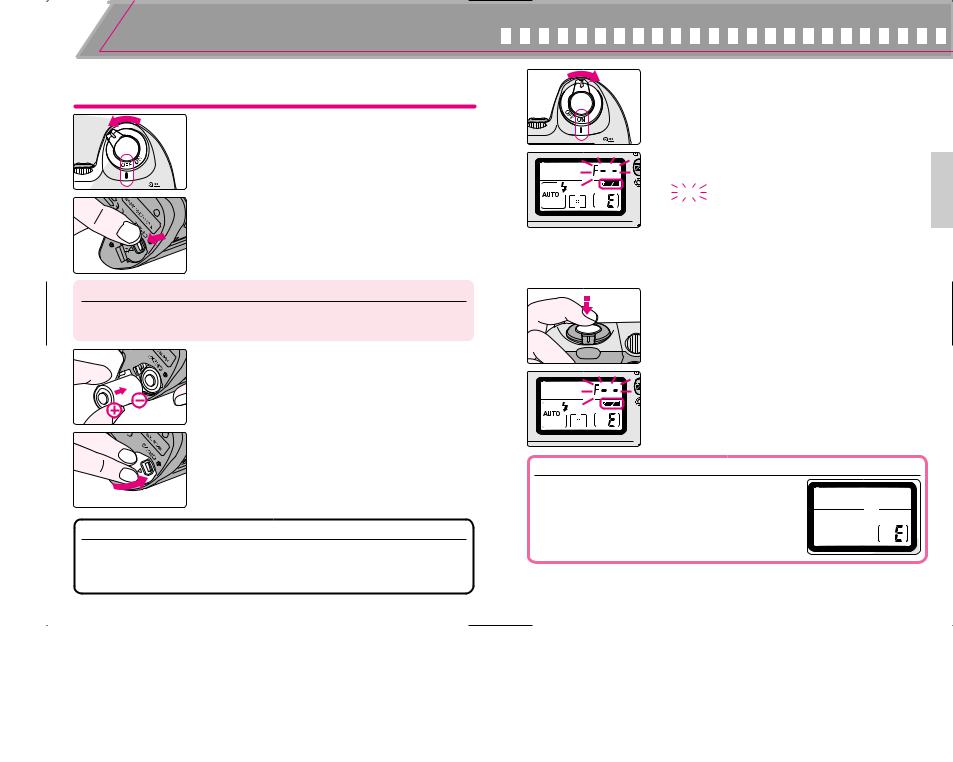
4 Set Date and Time (F65D only)
This camera allows you to imprint Year/Month/Day, Day/Hour/Minute (24hour clock), Month/Day/Year or Day/Month/Year on your picture in any exposure mode. (For imprinting date/time, see page 39.)
• Adjusting date and time (Example: year 2001, January 15)
of the
starts
display. To set date, select Year/Month/Day, Month/Day/Year or Day/Month/Year.
• Set the time in Day/Hour/Minute display.
button to change the numbers and after correction,
button until the numbers
.
push the ADJUST button, year section from 98 to 49 (back to 98 after 49).
• To change the numerical indication rapidly, hold the ADJUST button down for more than 1 sec.
• Push SELECT button until the date/time display stops blinking. When the imprint indicator — appears in the data imprint LCD panel, the setting is complete.
NOTE: Battery requirements for imprinting
Imprinting of date/time requires one CR2025 3V lithium battery separate from the batteries required for the camera body. Battery life is approx. 3 years. When the imprinting on the photo appears faded and/or the display of the data imprint on the LCD becomes faint or disappears, this indicates low battery power. Replace the battery (making sure to set correct date/time after changing battery).
22
• Changing battery for imprinting
camera back, remove the battery cover for imprinting and then
the used battery.
 pointed object to remove the battery.
a new CR2025 3V lithium battery side facing up. Attach the battery
cover.
NOTE: Storing batteries
Keep the batteries out of children’s reach. If swallowed, contact a doctor immediately. (For “Notes on Batteries”, see page 98.)
23
PREPARATION

About Shutter Release Button
Lightly pressing the shutter release button and holding it halfway down activates the camera’s exposure meter and pressing it all the way down releases the shutter.
|
|
|
|
|
|
|
|
1 Lightly press the shutter release button. |
|
|
|
|
|
|
|
|
|
|
|
|
|
|
|
|
|
|
|
|
|
|
|
|
|
|
|
|
|
• When the focus mode selector is set to AF |
|
|
|
|
|
|
|
|
|
(autofocus), camera starts to focus on the subject |
|
|
|
|
|
|
|
|
|
when the shutter release button is lightly pressed |
|
|
|
|
|
|
|
|
|
|
|
|
|
|
|
|
|
|
|
(page 30). |
|
|
|
|
|
• Lightly pressing the shutter release button |
|
||||
Before |
Lightly |
|
|||||||
pressing |
|
pressing |
|
activates the indications in the LCD panel and |
|
||||
|
|
||||||||
|
|
|
|
|
|
|
|
|
|
|
|
|
|
|
|
|
|
viewfinder (for approx. 5 sec. from removal of |
|
|
|
|
|
|
|
|
|
finger). (See page 17 for the exposure meter.) |
|
|
|
|
|
|
|
|
|
|
|
|
|
|
|
|
|
|
|
2 Fully depress the shutter release button. |
|
|
|
|
|
|
|
|
|
|
|
|
|
|
|
|
|
|
|
|
|
|
|
|
|
|
|
|
|
• Fully depressing the shutter release button |
|
|
|
|
|
|
|
|
|
releases shutter and film automatically advances to |
|
Lightly |
Fully |
the next frame. |
|
||||||
|
|
||||||||
pressing |
depressing |
|
|
||||||
NOTE: Camera shake
Pressing the shutter release button abruptly can result in picture blur. Make sure to press the shutter release button slowly.
24
BASIC OPERATION
This section features the settings for most common picture-taking situations using AUTO mode (a) to enable easy operation even for the inexperienced beginner.
Shooting modes/functions explained in this section are as follows:
Lens attached |
D- |
type AF Nikkor |
||
|
|
|
|
|
Focus mode |
AF |
|
(autofocus) |
|
|
|
|
|
|
Focus area |
Dynamic AF Mode with |
|||
Closest-Subject Priority* |
||||
|
||||
|
|
|
|
|
Exposure metering |
Six |
- |
segment 3D Matrix |
|
system |
Metering* |
|||
|
|
|
|
|
Exposure mode |
AUTO |
mode (a) |
||
|
|
|
||
Flash sync mode |
Front |
-Curtain Sync (fi)* |
||
|
|
|
|
|
* Automatically set when AUTO mode is selected.
25
1 Set Focus Mode to AF 


Set focus mode to AF (autofocus). (See page 44 for details.)
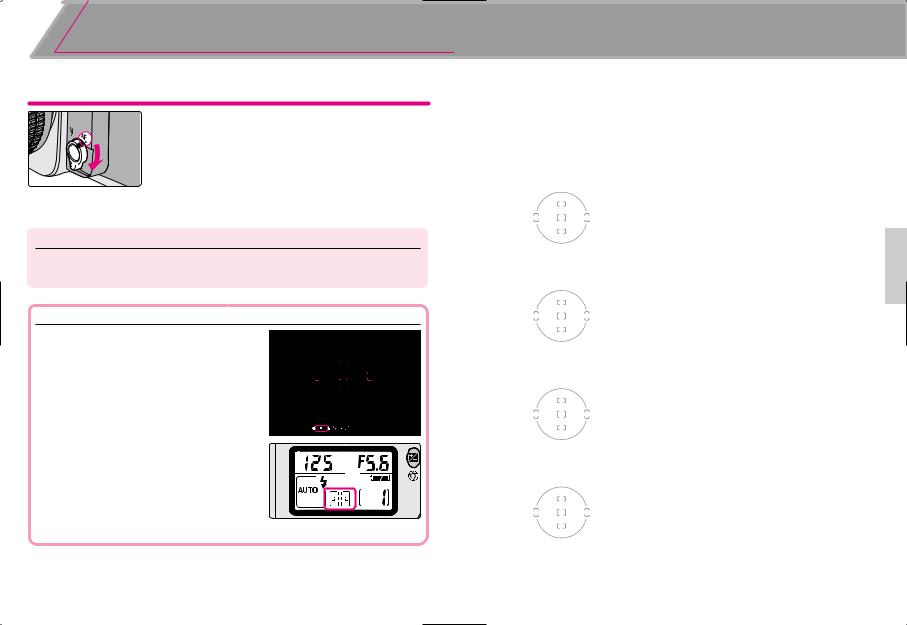
Turn the power switch on and set the focus mode selector to AF (autofocus).
• Make sure to turn the focus mode selector until it clicks into position.
•To focus, lightly press the shutter release button (page 24).
NOTE: AF focus mode
Do not rotate the lens focusing ring manually when the focus mode selector is set to AF.
Dynamic AF Mode with Closest-Subject Priority
Dynamic AF Mode with Closest-Subject Priority automatically focuses on the subject located closest to any of five focus areas (page 46). If the subject moves from the selected focus area before focus is achieved, camera automatically focuses on the subject determining the data from the other focus areas. When the exposure mode is set to a (AUTO mode, page 51) or to any Vari-Program (page 36) (except f Close-Up mode), the F65/F65D automatically selects Dynamic AF Mode with Closest-Subject Priority for easy operation, making it unnecessary to switch the focus area.
•Situations where autofocus may not work as expected
Autofocus may not work as expected in the following situations. In such situations, focus manually using the clear matte field (page 45) or focus on a different subject located at the same distance, use focus lock (page 50) then recompose.
Low-contrast scenes
For example, where the subject is wearing clothing the same colour as a wall or other background.
Scenes with subjects within the focus |
OPERATION |
|
BASIC |
||
brackets located at different distances from |
||
|
the camera
For example, when photographing an animal in a cage or a person in a forest.
Patterned subject or scene
For example, building windows.
Scenes with pronounced differences in

 brightness within the focus brackets
For example, when the sun is in the background |
and the main subject is in shadow. |
26 |
27 |
2 Set Exposure Mode to a


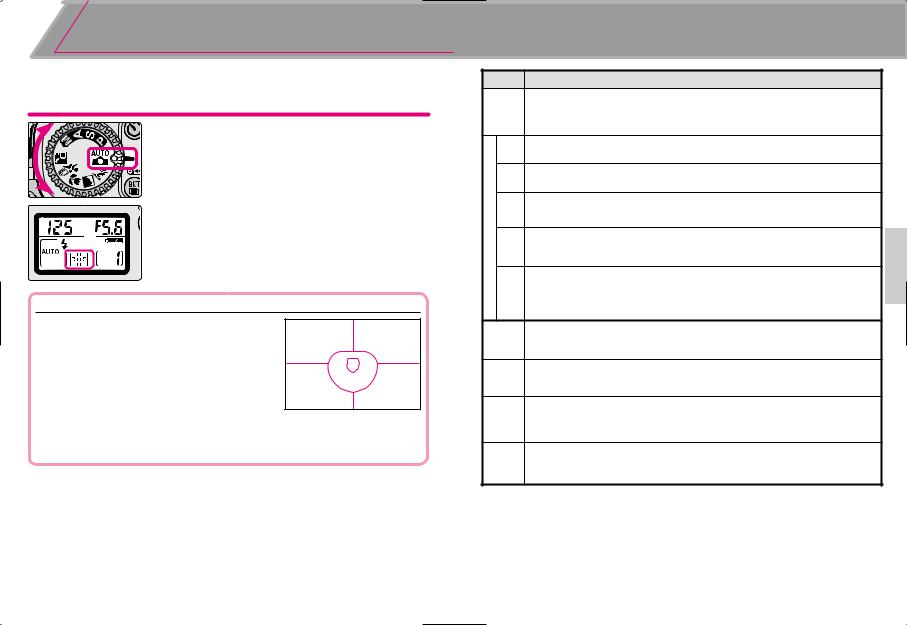
When the exposure mode is set to a, the camera automatically controls all the exposure settings.
Set exposure mode to a (AUTO mode).
When the shutter release button is lightly pressed, shutter speed and aperture are indicated in the LCD panel and viewfinder.
When the exposure mode is set to a (AUTO mode), Matrix Metering is automatically selected. Check if the AF Area mode is set to Dynamic AF Mode with Closest-Subject Priority. See page 46 for details.
Matrix Metering (page 42)
The Matrix Meter employed in the F65/F65D uses a six-segment sensor to achieve superior metering results even in extremely complex lighting conditions. The microcomputer analyses data including scene brightness and contrast— and subject distance when you use a D- or G- type Nikkor lens (the 3D Matrix Meter is performed)—and makes the calculations
necessary to assure correct exposure. This camera automatically selects Matrix Metering in all exposure modes except Manual exposure mode (page 58).
•About exposure mode
Four exposure modes besides a (AUTO mode) and five Vari-Program modes are available with this camera. Utilising the characteristics of each exposure mode, effective results can be achieved with various types of subjects or shooting situations. And the five Vari-Program modes enable you to easily choose proper exposure controls by simply selecting the desired mode for various shooting situations.
See each reference page for operating instructions and details.
Symbol
a
|
s |
|
Program-Vari |
d |
|
f |
||
|
||
|
g |
|
|
h |
|
|
P |
|
|
S |
|
|
A |
|
|
M |
Exposure mode |
Characteristics/Shooting situations |
|
|
The easiest exposure mode for general shooting. Camera controls |
|
AUTO mode P. 51 |
shutter speed and aperture automatically depending on the subject’s |
|
brightness—allowing you to freely take pictures, concentrating only |
||
|
||
|
on the shutter release opportunity. |
|
Portrait mode P. 37 |
Use this mode to take portraits. The background is blurred to |
|
accentuate your main subject. |
||
|
||
Landscape mode |
Use this mode to take pictures of distant scenes. The overall |
|
P. 37 |
landscape will be sharply focused. |
|
Close-Up mode |
Use this mode to take up-close pictures of subjects such as flowers |
|
or insects. Your close-ups will be taken with an artistically blurred |
||
P. 37 |
||
background. |
||
|
||
Sports Continuous |
Use this mode to take sports pictures. Using a fast shutter speed, it |
|
mode |
freezes the motion of fast-moving subjects to create exciting action |
|
P. 38 |
photos. Continuous shooting is possible with this mode. |
|
|
Use this mode for subjects with an evening or night background. This |
|
Night Scene mode |
mode captures all lighting in the scene, including the foreground |
|
subject which is illuminated by the flash, and the background. When |
||
P. 38 |
||
flash is cancelled, a natural-looking night scene or twilight scene can |
||
|
||
|
be captured. |
|
Auto-Multi Program |
Camera controls shutter speed and aperture automatically, while |
|
allowing you to make other settings, such as Flexible Program (page |
||
P. 52 |
||
53) or Exposure Compensation (page 61). |
||
|
||
Shutter-Priority Auto |
You set desired shutter speed, and the camera selects the correct |
|
aperture. Freeze the motion of a moving subject using a fast shutter |
||
P. 54 |
||
speed or blur the subject using a slower speed. |
||
|
||
|
You set the desired aperture, and the camera selects the correct |
|
Aperture-Priority Auto |
shutter speed. Lets you determine depth of the in-focus area, so you |
|
P. 56 |
can choose whether near or far subjects are in sharp focus, or |
|
|
whether foreground or background is to be blurred. |
|
|
Shutter speed and aperture are set manually. Suitable for situations |
|
Manual P. 58 |
where it is difficult to attain the desired effect using other exposure |
|
|
modes. Long Time exposure is possible with this exposure mode. |
|
|
|
BASIC OPERATION
28 |
29 |
3 Hold Camera and Focus 


Lightly pressing the shutter release button automatically focuses the camera on the subject and when the subject is in focus, causes / to appear in the viewfinder.
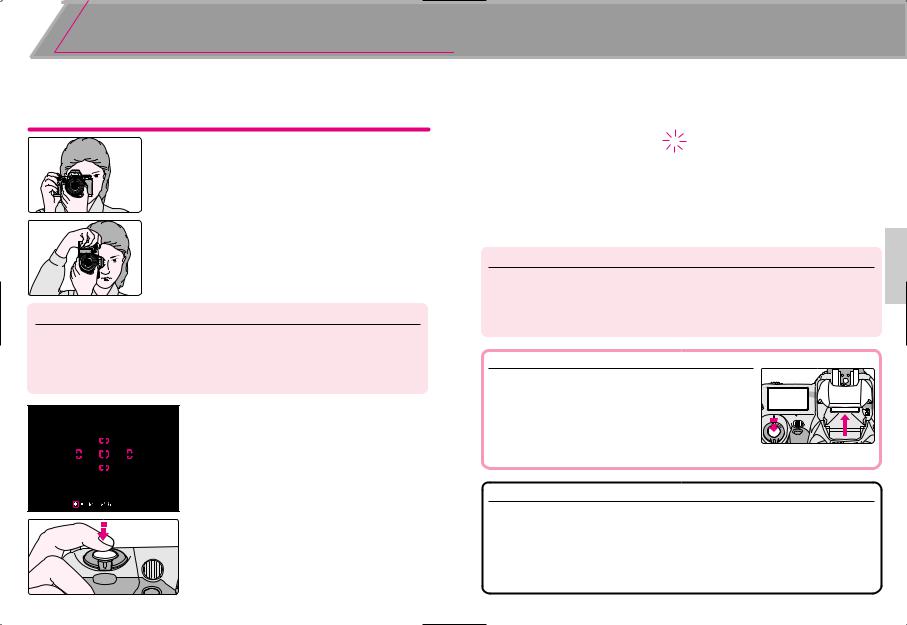
1 Hold the camera properly.
• Keep your elbow propped against your body for support.
• Stand with one foot forward a half step and keep your upper body still.
• Grasp the camera handgrip with your right hand and use your left hand to cradle the camera (or lens).
NOTE: Camera shake
Camera shake is likely to occur when the camera is not held steady or with slow shutter speed. The Speedlight automatically fires in dark conditions (where slow shutter speed is required) in a or Vari-Program with this camera but always remember to hold the camera correctly.
2 Compose frame, centre focus brackets on your subject, and focus by lightly pressing the shutter release button.
• Compose frame so that the subject to be focused is located closest at any of five focus areas and lightly press the shutter
AF (page
located
•When shutter release button is lightly pressed, the camera focuses automatically and focus indicator appears or blinks as follows.
/appears: Subject is in focus.
/blinks: Unable to focus using
autofocus.
•With dark subjects, the camera’s AF-Assist Illuminator (page 48) is automatically activated to guide autofocus. See page 44 for details on focusing.
NOTE: Composing frame
This camera’s viewfinder frame shows approximately 89% of the image actually exposed on the film frame. Therefore, the actual exposed frame is somewhat larger than the image you see through the viewfinder. Note that the edges of a negative film are partially cropped by most labs.
Built-in Speedlight
When the subject g) and the shutter the built-in Speedlight (AUTO mode) or page 76 for details
Check points
•Dioptre adjustment (page 67) enables you to see more clearly through the viewfinder.
•To take a picture of a subject outside the focus area, shift the focus area (page 46) or use focus lock (page 50).
•In situations where autofocus may not work as expected, see page 27.
BASIC OPERATION
30 |
31 |
4 Release Shutter 


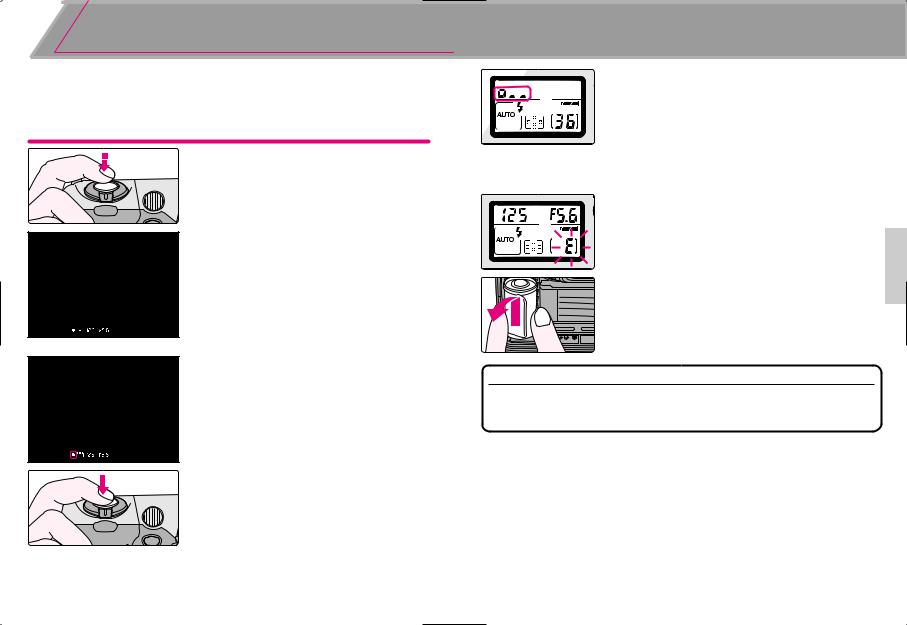
Confirm that / (in-focus indicator) appears in the viewfinder, then slowly, fully depress the shutter release button. With a moving subject, Continuous Servo AF (page 44) activates and camera continuously focuses on the subject.
1 Confirm indications in the viewfinder while lightly pressing the shutter release button.
• When the subject is dark or backlit and shutter release button is lightly pressed, the built-in Speedlight automatically pops up and starts charging (pages 34, 76).
2 Confirm that focus indicator / appears and slowly depress the shutter release button.
• After the shutter is released, the film automatically advances to the next frame and the next shot can be taken.
Film starts to rewind automatically when film reaches the end of the roll.
• The frame counter counts down until rewind is complete.
• Pictures taken on frames beyond the indicated number of the exposures for the film roll may be discarded in the process of developing.
Confirm that film is completely rewound, then remove film cartridge.
• Film is completely rewound when the frame counter |
OPERATION |
|
|
shows blinking E in the LCD panel. (E appears |
|
without blinking when the exposure meter is off.) |
|
Make sure the film is completely rewound (E is |
BASIC |
|
blinking in the LCD panel), open the camera back away from sunlight and remove the film cartridge by tilting it to one side.
Check points
•If any other warning indications appear, see page 99.
•For mid-roll rewind, see page 66.
32 |
33 |
Using Built-In Speedlight 


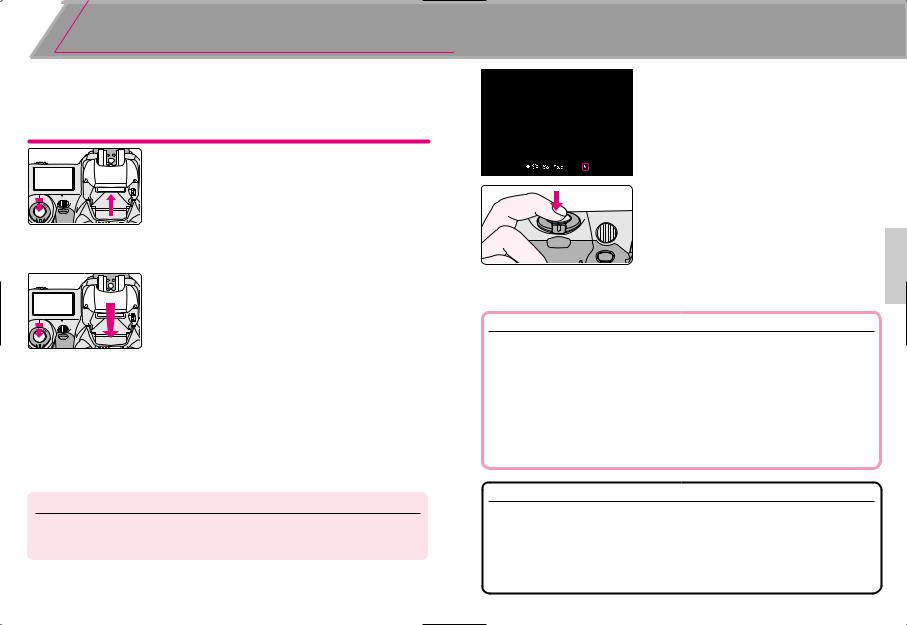
When the subject is dark or backlit (except in d or g) and the shutter release button is lightly pressed, the built-in Speedlight automatically pops up in a (AUTO mode) or Vari-Program (s, d, f, g, h). Fully depress the shutter release button to take pictures with the Speedlight.
When the subject is dark or backlit and |
1 the shutter release button is lightly |
pressed, the built-in Speedlight |
automatically pops up and starts |
charging. |
•When the Speedlight is ready to fire, fi appears without blinking in the viewfinder (when the camera’s meter is on).
flash, lightly flash
shutter
remove your finger from the shutter release button and shutter release button is lightly pressed again, the built-in Speedlight pops up again and flash starts charging.)
•To cancel the flash for subsequent shots, select the Flash Cancel mode (page 79).
•When the subject is backlit in d or g mode, built-in Speedlight does not fire automatically.
NOTE: Continuous use of built-in Speedlight
After continuous use of the built-in Speedlight, it may stop firing to protect the firing tube. Wait for a while before using the Speedlight again.
2 Confirm fi in viewfinder, then compose, focus and take the picture with flash by fully depressing the shutter release button.
•The shutter cannot be released unless fi appears without blinking in the viewfinder.
•fi blinks in the viewfinder approx. 3 sec.
after full flash output. If this happens, |
|
|
underexposure may have occurred. Check |
|
|
the flash shooting distance range (page 84) |
OPERATION |
|
and shoot again. |
||
|
||
• With dark subjects, the camera’s AF-Assist |
|
|
Illuminator is automatically activated to |
|
|
guide autofocus. See page 48 for details. |
BASIC |
|
|
||
lens with a guide |
|
|
than 28mm focal |
|
|
the flash may |
|
|
. |
|
|
enables use of |
|
|
contrast level |
|
|
ensures proper |
|
|
adequate flash |
|
|
76 for details. |
|
Check points
•Be sure to remove (or store) the lens hood before flash shooting.
•Some lenses have limitations using the built-in Speedlight and may cause vignetting (a shadow may appear within the frame) (page 85).
•Normal Front-Curtain Sync flash mode is introduced in this section. Various flash sync modes are also available. For details, see page 78.
34 |
35 |
 Loading...