

Page 1
MANUAL
Page 2

The information in this document is subject to change without notice and does not represent a
commitment on the part of Native Instruments GmbH. The software described by this document is subject to a License Agreement and may not be copied to other media. No part of this
publication may be copied, reproduced or otherwise transmitted or recorded, for any purpose,
without prior written permission by Native Instruments GmbH, hereinafter referred to as Native
Instruments.
“Native Instruments”, “NI” and associated logos are (registered) trademarks of Native Instruments GmbH.
All product and company names are trademarks™ or registered® trademarks of their respective holders. Use of them does not imply any affiliation with or endorsement by them.
All specifications are subject to change without notice.
Document authored by: Adam Hanley
Software version: 1.0 (05/2018)
Special thanks to the Beta Test Team, who were invaluable not just in tracking down bugs, but
in making this a better product.
Disclaimer
Page 3

Contact
NATIVE INSTRUMENTS GmbH
Schlesische Str. 29-30
D-10997 Berlin
Germany
www.native-instruments.de
NATIVE INSTRUMENTS K.K.
YO Building 3F
Jingumae 6-7-15, Shibuya-ku,
Tokyo 150-0001
Japan
www.native-instruments.co.jp
NATIVE INSTRUMENTS FRANCE SARL
113 Rue Saint-Maur
75011 Paris
France
www.native-instruments.com
NATIVE INSTRUMENTS North America, Inc.
6725 Sunset Boulevard
5th Floor
Los Angeles, CA 90028
USA
www.native-instruments.com
NATIVE INSTRUMENTS UK Limited
18 Phipp Street
London EC2A 4NU
UK
www.native-instruments.co.uk
SHENZHEN NATIVE INSTRUMENTS COMPANY Limited
203B & 201B, Nanshan E-Commerce Base Of
Innovative Services
Shi Yun Road, Shekou, Nanshan, Shenzhen
China
www.native-instruments.com
© NATIVE INSTRUMENTS GmbH, 2018. All rights reserved.
Page 4

Table of Contents
Table of Contents
1 Welcome to SESSION STRINGS PRO 2 ........................................................................
2 SESSION STRINGS PRO 2 Key Features .......................................................................
2.1 About KONTAKT / KONTAKT PLAYER ............................................................................................. 7
3 The Ten KONTAKT Instruments (.nki Files) ..................................................................
4 Using SESSION STRINGS PRO 2 ..................................................................................
4.1 Main Controls ............................................................................................................................. 11
4.2 Main Window View ...................................................................................................................... 15
4.3 Mixer Window View ..................................................................................................................... 31
4.4 Effects Window View ................................................................................................................... 35
4.5 Settings Window View ................................................................................................................. 42
4.1.1 Smart Voice Split ....................................................................................................... 12
4.1.2 Smart Chord .............................................................................................................. 13
4.2.1 Section Setup ............................................................................................................ 17
4.2.2 Velocity Switch Mode ................................................................................................. 18
4.2.3 Key Switch Mode ........................................................................................................ 19
4.2.4 Rhythm Animator ....................................................................................................... 20
4.2.5 Phrase Animator ........................................................................................................ 25
4.3.1 Channel Strip Controls .............................................................................................. 33
4.3.2 Channel Effects ......................................................................................................... 34
4.4.1 Shape Controls .......................................................................................................... 36
4.4.2 Humanize Controls .................................................................................................... 37
4.4.3 Insert Effects ............................................................................................................. 37
4.4.4 Send Effects .............................................................................................................. 40
4.5.1 Chord Detection ......................................................................................................... 43
4.5.2 Dynamic Control ........................................................................................................ 44
6
7
8
11
SESSION STRINGS PRO 2 - Manual - 4
Page 5

Table of Contents
4.5.3 Pitchbend Setup ........................................................................................................ 45
4.5.4 Memory Management ................................................................................................ 46
4.5.5 Tuning ....................................................................................................................... 47
5 Credits ......................................................................................................................
48
SESSION STRINGS PRO 2 - Manual - 5
Page 6

Welcome to SESSION STRINGS PRO 2
1 Welcome to SESSION STRINGS PRO 2
Thank you for choosing SESSION STRINGS PRO 2.
SESSION STRINGS PRO 2 is a huge advancement on the original SESSION STRIGS PRO, updated with a more versatile sound, new features, and an improved interface.
With SESSION STRINGS PRO 2 you have command of a top-notch string ensemble that offers
a diverse number of playing styles, sound varieties, and outstanding sound quality.
We hope you enjoy using SESSION STRINGS PRO 2 and we would be delighted to hear your
feedback and ideas! You can find e-instruments on the web under http://www.e-instru-
ments.com.
SESSION STRINGS PRO 2 - Manual - 6
Page 7

SESSION STRINGS PRO 2 Key Features
About KONTAKT / KONTAKT PLAYER
2 SESSION STRINGS PRO 2 Key Features
▪ The SESSION STRINGS PRO 2 sounds were recorded with utmost precision and are de-
signed for maximum flexibility.
▪ All sections were sampled in both a modern seating arrangement and a traditional seating
arrangement, so you can chose the arrangement that suits your work.
▪ SESSION STRINGS PRO 2 features authentic phrases and sound settings for a variety of
different genres. Its intuitive approach lets you quickly produce excellent phrases and arrangements, even if you don’t have prior detailed knowledge of strings arrangement.
▪ SESSION STRINGS PRO 2’s unique Smart Voice Split allocates each note of a chord to
the corresponding string instrument.
▪ The Animators turns chords into authentic phrases while maintaining real-time perform-
ance capabilities. The Animators always follow the played chord and adjusts the phrase to
proper voicing.
▪ A Smart Chord mode lets you play authentic string chords and voicings with just one or two
fingers.
▪ A variety of creative mix and mastering presets provides a scope of inspiring sound images.
2.1 About KONTAKT / KONTAKT PLAYER
SESSION STRINGS PRO 2 is an Instrument powered by KONTAKT; you will, therefore, need
KONTAKT or the free KONTAKT PLAYER installed on your computer in order to use SESSION
STRINGS PRO 2. Refer to the KONTAKT/KONTAKT PLAYER documentation to learn how to
load and configure KONTAKT Instruments.
SESSION STRINGS PRO 2 - Manual - 7
Page 8

The Ten KONTAKT Instruments (.nki Files)
3 The Ten KONTAKT Instruments (.nki Files)
SESSION STRINGS PRO 2 provides you with ten separate KONTAKT *.nki files, but these can
be broken down into simple categories.
There are two main instrument types:
▪ Individual Instrument Groups – these nkis contain the samples of the two sections of a single
string instrument:
◦ Violins
◦ Violas
◦ Celli
◦ Basses
▪ Ensemble – the ensemble nkis contain a full string orchestra, combining all of the string
sections into one nki.
SESSION STRINGS PRO 2 - Manual - 8
Page 9
The Ten KONTAKT Instruments (.nki Files)
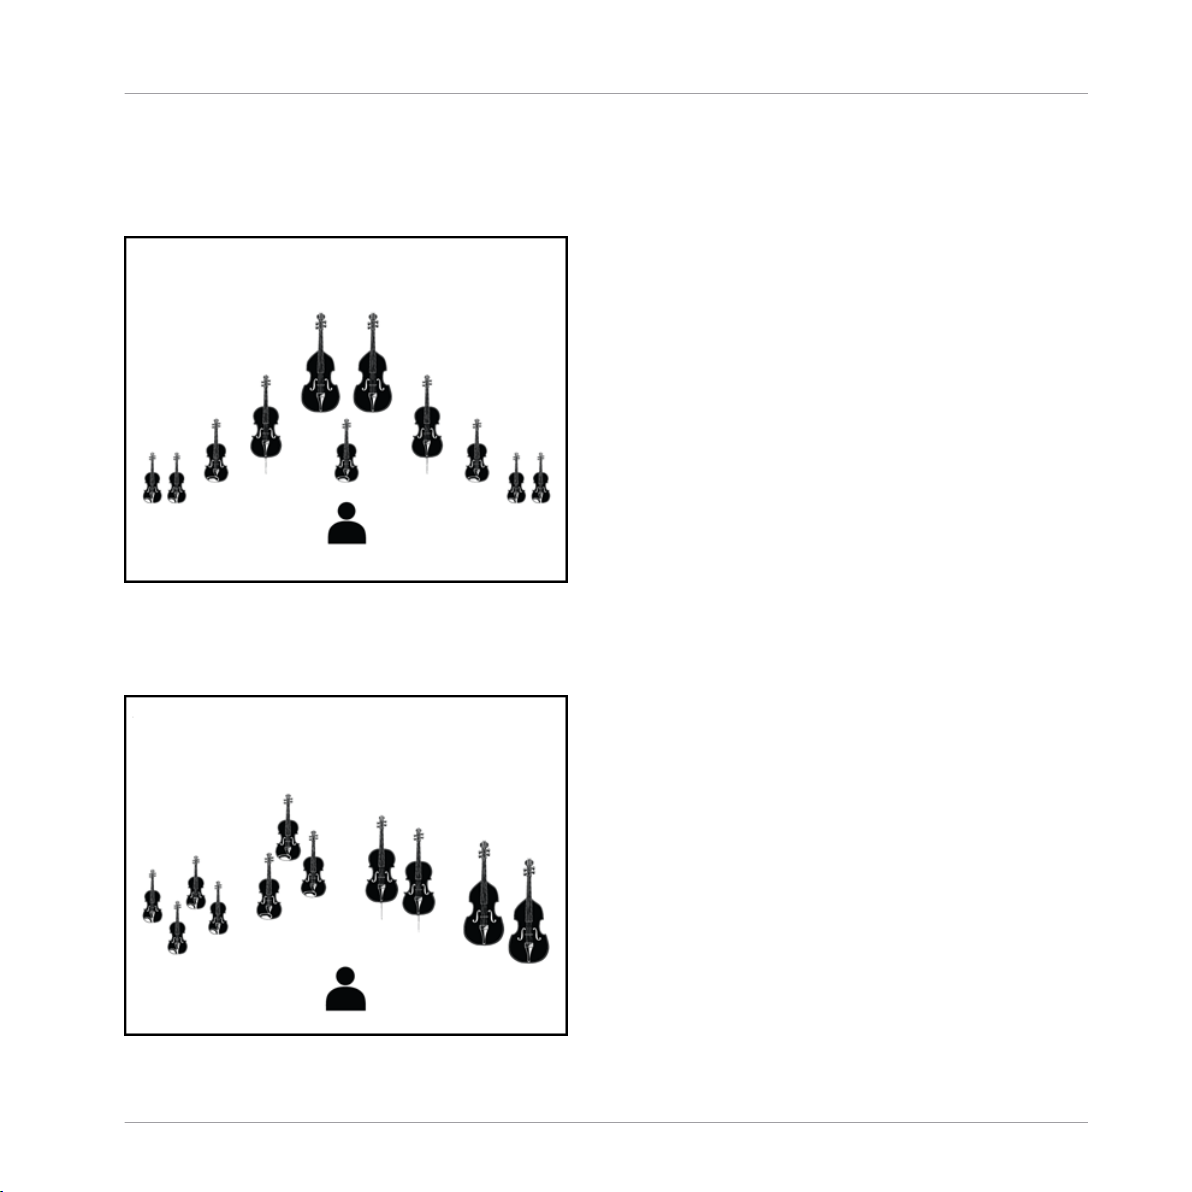
For each nki there are two variations, which define how the sections are seated on the recording stage:
▪ Modern – the sections are spread out wide, but evenly.
The Modern Seating Arrangement
▪ Traditional – the sections are seated more closely, with violins on the left and celli on the
right.
The Traditional Seating Arrangement
SESSION STRINGS PRO 2 - Manual - 9
Page 10

The Ten KONTAKT Instruments (.nki Files)
From a functionality perspective, there are only differences between the Instrument Group nkis
and Ensemble nkis.
Generally speaking the Ensemble nkis have more features, but even then the feature sets are
similar. In this manual features will be described for both and differences will be highlighted
where appropriate.
SESSION STRINGS PRO 2 - Manual - 10
Page 11
Using SESSION STRINGS PRO 2
4 Using SESSION STRINGS PRO 2
This section gives you an overview of the SESSION STRINGS PRO 2 interface and explains
how to use it.
4.1 Main Controls
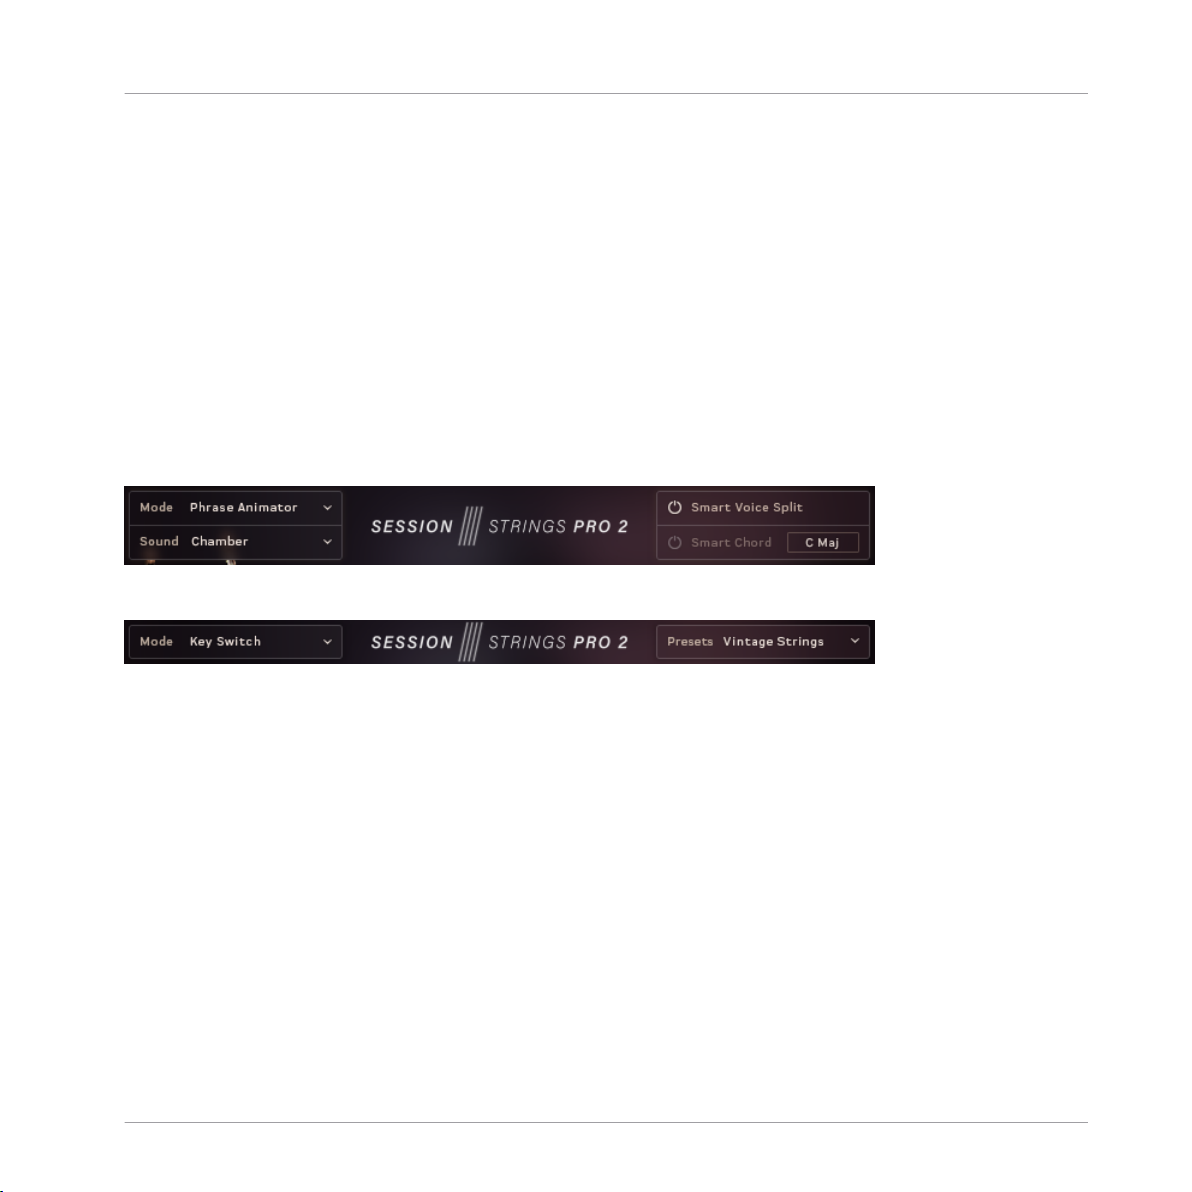
At the top of the instrument interface you will find the main controls, these are always visible
and control both how the instrument is played and how it sounds.
The exact configuration of controls available depends on the instrument type.
The Main Controls of the Ensemble Interface
Main Controls
The Main Controls of the Instrument Group Interface
All instrument types have the Mode menu, which can be used to set how the instrument plays:
▪ All instruments have the Key Switch and Velocity Switch modes, which allow you to play
and switch between articulations manually.
▪ The Ensemble instruments also have the Rhythm Animator and Phrase Animator modes,
which give you the ability to play back realistic and complex phrases by only holding a note
or chord.
Details on how to use the different modes, and their controls, can be found here: ↑4.2, Main
Window View
The Sound menu in the Ensemble interface and the Presets menu from the Instrument Groups
each allow you to select a preset configuration of the sections, mixer, and effects. In essence
these allow you to quickly change how the overall instrument sounds.
SESSION STRINGS PRO 2 - Manual - 11
Page 12
Using SESSION STRINGS PRO 2
The Ensemble interface has two additional sections that control the ensemble voicing:
▪ Smart Voice Split – a system that divides the notes you play between the different sections
of the ensemble.
▪ Smart Chord – a system that creates chords from single notes.
Both of these will be described in more detail in the following sections.
4.1.1 Smart Voice Split
The Smart Voice Split system splits the notes you play across the sections in a realistic manner. For example, if you play a C major 7th chord, it might assign C to the basses, E to the celli,
G to the violas, and B to the violins (depending on the range in which you play the chord).
The Smart Voice Split system will also work out the root note of the chord you are playing and
assign that to the Bass section.
This system avoids a problem often found in string sample libraries where the size of the ensemble changes depending on the number of notes you are playing. For example, playing one
note triggers 4 violins, but an additional note also triggers 4 violins, so suddenly you go from 4
violins to 8 violins, then 12, then 16, and so on.
Main Controls
If you do not wish to use the Smart Voice Split system, you can turn it off and the ensemble
will play like a more traditional sampled string instrument.
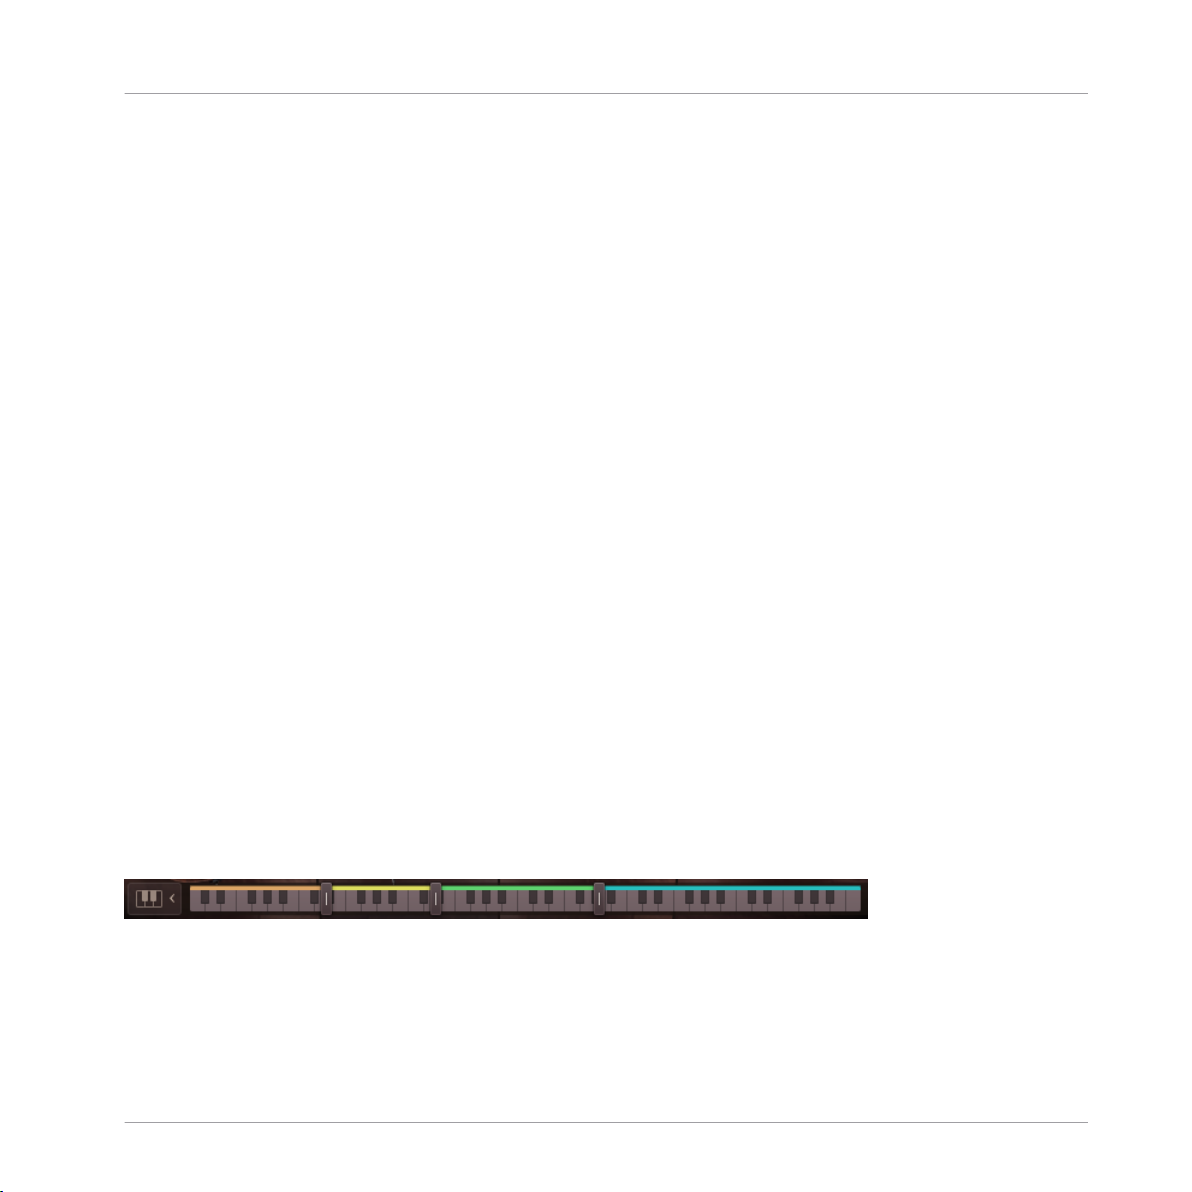
Editing Key Ranges
When Smart Voice Split is turned off, new controls are revealed on the Main Window view that
allow you to assign the ranges of the different sections.
► To view the Key Range editor, click on the Keyboard icon to the lower left side of the en-
semble view.
The Key Range Editor
In this view you can set the key-split points. The instrument groups are then blended from one
to the other at these points. In the above example, the violas will blend into the violins around
C3.
SESSION STRINGS PRO 2 - Manual - 12
Page 13
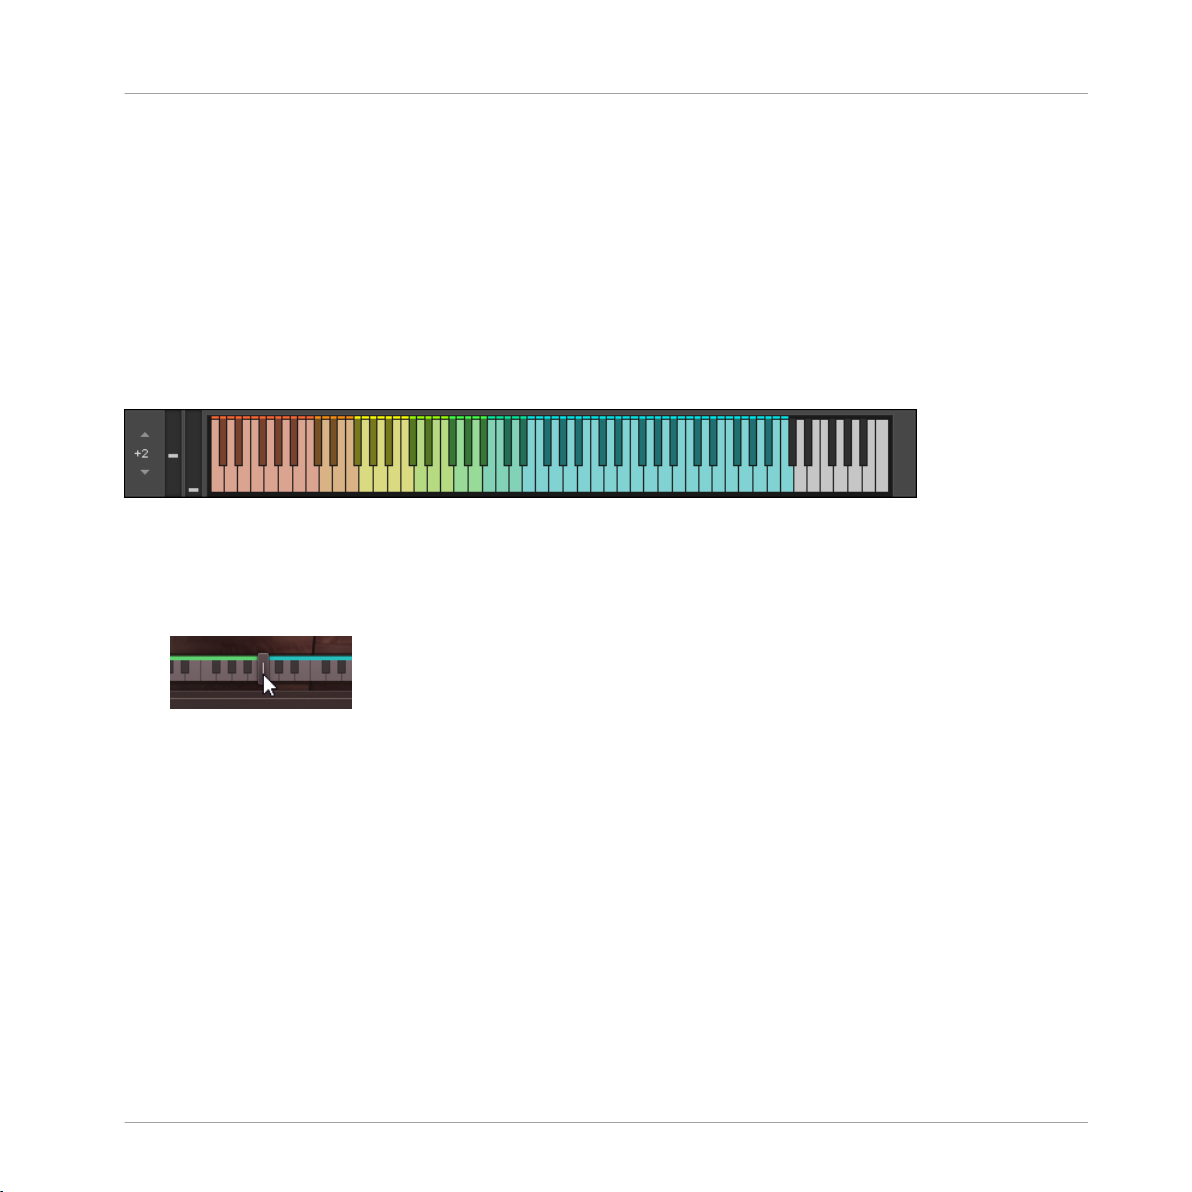
Using SESSION STRINGS PRO 2
Each group’s key range has a color:
▪ Basses – orange.
▪ Celli – Yellow.
▪ Violas – Green.
▪ Violins – Blue.
These colors are also displayed on KONTAKT’s virtual keyboard, as well as the KOMPLETE
KONTROL keyboards (if you have loaded the instrument in the KOMPLETE KONTROL software).
The Virtual Keyboard
You can also see here where the different sections blend. For example, the blend between
Basses (orange) and Celli (yellow) is a lighter shade of orange.
► To set your own key-split points, click and drag on the sliders.
Main Controls
4.1.2 Smart Chord
The Smart Chord function lets you play chords by pressing one or two keys on your external
MIDI controller keyboard.
► To activate the Smart Chord function, click the power button next to the text Smart
Chord.
Now you can set up the Smart Chord function:
SESSION STRINGS PRO 2 - Manual - 13
Page 14
Using SESSION STRINGS PRO 2
► Open the Smart Chord setup window by clicking the chord button beside the Smart Chord
text.
Main Controls
Smart Chord Setup Window
The chords defined by root note and chord map will automatically be assigned to the (“white”)
keys on your controller keyboard, starting with the C key.
If you select “F” as root note and “major” as gender, pressing the C key on your keyboard will
therefore create an F major chord.
► Use the ROOT menu and CHORD SETS buttons to select the key for the smart chords.
SESSION STRINGS PRO 2 - Manual - 14
Page 15
Using SESSION STRINGS PRO 2
Main Window View
Now you can play the resulting chords by pressing the respective key on your external keyboard
controller. If you don't additionally press a modifier key, the degrees of the selected scale are
used. These already include chord inversions.
The exact voicing of the chords is set using the VOICING options:
▪ Wide – the notes of the chord will be spread out.
▪ Close – the notes of the chord will be clustered near each other.
By additionally pressing a modifier key—the “black” keys—you can further modify the resulting chords.
If you use Smart Chord in conjunction with the Animator, it may sometimes happen that pressing a
modifier key yields no or only a slight change. This depends on the harmonic structure of the Animator phrase that you want to modify.
Memory Key-Switches
If your project shifts between different keys, you can use the memory slots to switch between
chord sets using key-switches.
You have access to four memory slots, which can be selected either by clicking on the buttons
on the interface, or by pressing the corresponding key-switch.
Changes made to the chord sets are automatically saved in the selected memory slot.
You will need to save the nki or Snapshot to recall these changes after closing KONTAKT.
4.2 Main Window View
► Click the MAIN button at the bottom of the interface to bring up the Main Window View.
SESSION STRINGS PRO 2 - Manual - 15
Page 16

Using SESSION STRINGS PRO 2
Main Window View
The Main Window View of an Ensemble
Using the functions in the Main window view you can:
▪ Activate and deactivate the included string sections, setting the size of the instrument
group or ensemble.
▪ Define how you want to switch between the available articulations.
In the Ensemble nkis you can also:
▪ Define how the instruments are spread across the keyboard range when Smart Voice Split
is turned off (see ↑4.1.1, Smart Voice Split for more information on this).
▪ Set up and control the two Animators.
SESSION STRINGS PRO 2 - Manual - 16
Page 17

Using SESSION STRINGS PRO 2
Main Window View
4.2.1 Section Setup
Each instrument group is comprised of two sections. For example, in the violins you have the
first violins and the second violins.
SESSION STRINGS PRO 2 lets you define the size of each section by allowing you to turn
these sections on or off.
1. Click on an instrument’s image to display the setup controls for that instrument group.
2. Click on the section buttons to toggle them on or off.
SESSION STRINGS PRO 2 - Manual - 17
Page 18

Using SESSION STRINGS PRO 2
Main Window View
Depending on your Memory Management setup, turning sections on or off can cause samples to be
purged or reloaded. So when a section is activated, it might take time to load and become fully
playable.
4.2.2 Velocity Switch Mode
Velocity Switch Controls
When the instrument is in Velocity Switch mode, the velocity of the played key is used to select between two articulations: one for the low velocities and one for the high velocities.
▪ The articulation to be used at lower velocities is selected using the MAIN menu.
▪ The articulation to be used with the higher velocities is selected using the VEL SWITCH
menu.
▪ The velocity split point is set using the slider between the menus.
The split point slider also displays the velocities of the notes you are playing, so you can more
easily find a split point that suits your playing.
Depending on your Memory Management setup, selecting articulations can cause samples to be
purged or reloaded. So when an articulation is activated, it might take time to load and become
fully playable.
SESSION STRINGS PRO 2 - Manual - 18
Page 19

Using SESSION STRINGS PRO 2
Main Window View
4.2.3 Key Switch Mode
Key Switch Controls
When the instrument is in Key Switch mode, articulations can be selected with MIDI notes or
MIDI controller messages.
There are nine slots into which you can load any of the available articulations. Each slot is
then assigned to a MIDI note or MIDI CC and can be selected by using the corresponding keys
or controls on your MIDI controller.
1. Click on the Key or CC buttons to switch between key-switches and controller switches.
2. To select an articulation for a slot, use the drop-down menu for that slot.
3. Set the key/CC for a slot using the display beside the menu.
You can also set the key/CC of a slot by using the Learn button:
1. Activate the Learn button by clicking on it.
2. Press the Key or move the CC you want to use.
3. The Key/CC will be assigned to the selected articulation slot.
Depending on your Memory Management setup, selecting articulations can cause samples to be
purged or reloaded. So when an articulation is activated, it might take time to load and become
fully playable.
SESSION STRINGS PRO 2 - Manual - 19
Page 20

Using SESSION STRINGS PRO 2
Main Window View
4.2.4 Rhythm Animator
The Rhythm Animator is a tool for creating rhythmic phrases that you can then play back easily
by simply holding a note or chord.
The Rhythm Animator Controls
The Rhythm Animator controls are roughly split into three areas:
1. The playback controls are at the bottom of the interface.
2. The pattern selectors are located on the left.
3. And the main area is the pattern editor / browser.
SESSION STRINGS PRO 2 - Manual - 20
Page 21

Using SESSION STRINGS PRO 2
Main Window View
Playback Controls
In the middle you have a selection of buttons for setting the playback rate, including a Triplets
option.
The other controls are as follows:
▪ Retrigger – when active, the rhythmic pattern will restart from the beginning with each new
note.
▪ Order – defines the order that the held notes will be played back.
▪ Swing – sets the intensity of swing applied to the rhythm.
▪ Hold – when active, pattern playback will not stop when you release the MIDI keys.
▪ Loop/One Shot – selects the loop mode:
◦ Loop – the pattern will loop continuously.
◦ One Shot – the pattern will play from start to end and then stop until retriggered.
▪ Dynamic – defines how the animator should process its dynamics. When turned all the way
to the left the animator will have full control of the dynamics; when turned to the right the
played velocity will control the dynamics.
SESSION STRINGS PRO 2 - Manual - 21
Page 22

Using SESSION STRINGS PRO 2
Main Window View
Selecting Patterns
Pattern Selection Controls
Patterns can be selected either by key-switches on the white keys in the range of C-2 to A-2, or
by clicking on the corresponding buttons on the interface.
The chain icon button to the top left is the link button. When active, selecting a pattern will
also load a matching Sound preset.
Be aware of the link setting. Loading a pattern with link mode active will overwrite changes you may
have made to the sound of the instrument.
SESSION STRINGS PRO 2 - Manual - 22
Page 23

Editing Patterns
The Pattern Editing Controls
There are three main areas in the pattern editor:
Using SESSION STRINGS PRO 2
Main Window View
▪ At the top you have the option to switch between 16 Steps or 32 Steps (this can then be
defined further later)
▪ There are then three rows of controls that define how each step will be played:
◦ The top selects the articulation for the step. You can select between 6 articulations,
which are illustrated on the interface.
◦ The middle row is used to define the dynamic level of each step.
◦ The bottom row sets whether a step plays all held notes, or only a single note as de-
fined by the Order menu.
◦ Each of these rows can be randomized by using the corresponding RND button.
▪ At the bottom is a control for setting the start and end points of the pattern. Changing
these will also change the length of the pattern.
SESSION STRINGS PRO 2 - Manual - 23
Page 24

Using SESSION STRINGS PRO 2
Main Window View
Browsing and Loading Patterns
► Click on either of the BROWSE buttons to the top right of the pattern editor to open the
pattern browser.
The Patterns Browser
You can browse for either individual Patterns, or full pattern Sets.
Pattern Sets will load a pattern in each key-switch, whereas individual patterns will only be
loaded into the selected key-switch.
SESSION STRINGS PRO 2 - Manual - 24
Page 25

The displayed patterns or sets can be filtered by tags:
1. Click on the tags above the browser to filter the browser contents.
The Browser Filtered by the Sixteeth and Simple Tags
2. To load a pattern or set, double-click on its entry in the browser.
Using SESSION STRINGS PRO 2
Main Window View
4.2.5 Phrase Animator
The Phrase Animator is a tool for playing back realistic string phrases by simply holding a note
or chord. The Phrase animator does not have the programmability of the Rhythmic Animator,
but it contains more complex phrases tailored to strings.
The Phrase Animator will detect the basic chord you are playing and adjust the harmonic and
melodic content of the phrase to match as closely as possible. The Phrase Animator can also
be used in combination with the Smart Chord feature.
SESSION STRINGS PRO 2 - Manual - 25
Page 26

Using SESSION STRINGS PRO 2
Main Window View
The Phrase Animator Window
The Phrase Animator controls are roughly split into three areas:
1. The playback controls are at the bottom of the interface.
2. The pattern selectors are located on the left.
3. And the main area is the phrase/song browser.
The Phrase Playback Controls
SESSION STRINGS PRO 2 - Manual - 26
Page 27

Using SESSION STRINGS PRO 2
Main Window View
Below the browser are controls for setting the start and end points of the phrase. These are
displayed as two arrows on a grid.
The other controls are as follows:
▪ Retrigger – when active, the phrase will restart from the beginning with each new note.
▪ Timing Options – you can select between three playback speeds:
◦ 1/2 – plays the phrase back at half the speed.
◦ 1:1 – plays the phrase back at its original speed.
◦ x 2 – plays the phrase back at double speed.
▪ Rhythm Only – removes all harmonic content from the phrase and only plays the rhythm.
▪ Unison – creates a version of the phrase in which all sections play the main phrase.
▪ Swing – sets the intensity of swing applied to the rhythm.
▪ Hold – when active, the phrase playback will not stop when you release the MIDI keys.
▪ Loop/One Shot – selects the loop mode:
◦ Loop – the phrase will loop continuously.
◦ One Shot – the phrase will play from start to end and then stop until retriggered.
▪ Dynamic – defines how the animator should process its dynamics. When turned all the way
to the left the animator will have full control of the dynamics; when turned to the right the
played velocity will control the dynamics.
SESSION STRINGS PRO 2 - Manual - 27
Page 28

Using SESSION STRINGS PRO 2
Main Window View
Selecting Phrases
The Phrase Selection Controls
Phrases can be selected either by key-switches on the white keys in the range of C-2 to A-2, or
by clicking on the corresponding buttons on the interface.
The chain icon button to the top left is the link button. When active, selecting a phrase will
also load a matching Sound preset.
Be aware of the link setting. Loading a phrase with link mode active will overwrite changes you may
have made to the sound of the instrument.
SESSION STRINGS PRO 2 - Manual - 28
Page 29

Using SESSION STRINGS PRO 2
Main Window View
Browsing and Loading Phrases
The Phrase Browser
You can browse for either individual Phrases, or sets of phrases called Songs.
Songs will load a phrase in each key-switch, whereas individual phrases will only be loaded into the selected key-switch.
SESSION STRINGS PRO 2 - Manual - 29
Page 30

The displayed phrases or songs can be filtered by tags:
1. Click on the tags above the browser to filter the browser contents.
The Phrase Menu Filtered by the Rhythmic and Complex Tags
2. To load a phrase or song, double-click on its entry in the browser.
Using SESSION STRINGS PRO 2
Main Window View
SESSION STRINGS PRO 2 - Manual - 30
Page 31

4.3 Mixer Window View
► Click on the MIXER tab to open the Mixer Window View.
Using SESSION STRINGS PRO 2
Mixer Window View
The Mixer Window View
This window view displays a mixer where you can blend the different sections in the nki. The
solo instruments will have two channels, and the ensemble will have eight. However, functionality for both mixer types remains the same between nkis.
Each section has a channel strip for controlling things like volume and pan. The effects section
below the channels is used to set up individual compressor and equalizer settings for each section. You can also set up the individual section’s send levels to the reverb and delay.
SESSION STRINGS PRO 2 - Manual - 31
Page 32

Using SESSION STRINGS PRO 2
Mixer Window View
Send Effect Routing
To the right of the channel strips is the Color Pre/Post Send switch. Clicking this will toggle between two routing options for the sends:
▪ Pre – The sends are taken from the individual channel outputs, before they are processed
by the master insert effects. In this mode you can set individual send levels for each channel.
▪ Post – The sends are taken after the master insert effects. In this mode the reverb and de-
lay will have more of the final character of the instrument; however you will be unable to
set individual delay and reverb levels per channel.
SESSION STRINGS PRO 2 - Manual - 32
Page 33

Using SESSION STRINGS PRO 2
Mixer Window View
4.3.1 Channel Strip Controls
Each section in the instrument has its own channel strip that you can use to control the balance of the different sections.
A Mixer Channel Strip
The controls for each channel are the same:
▪ Reverb – sets the reverb send level. When the routing is set to Pre, the send level can be
set per channel; when set to Post, the send levels are set to the same level for all channels.
▪ Delay – sets the delay send level.
▪ Pan – this control has two modes depending on the instrument type:
◦ In the Modern nkis this controls the position of the channel in the stereo field.
◦ In the Traditional nkis a Swap button allows you to switch the seating position of the
section.
▪ Solo – clicking on the S button solos the channel so that only it (and any other soloed
channel) can be heard.
▪ Mute – clicking on the M button mutes the channel, silencing the output of the channel.
▪ Level – sets the output volume level of the channel.
SESSION STRINGS PRO 2 - Manual - 33
Page 34

Using SESSION STRINGS PRO 2
Mixer Window View
▪ Detune – controls the fine-tuning of the section.
▪ Transpose – transposes the section in semi-tonal increments.
4.3.2 Channel Effects
Each channel has its own compressor and EQ effects, which are displayed below the channel
strips.
► To view the compressor and EQ effects for a channel, click on any control in the channel
strip (including the channel name).
Channel Compressor
A compressor automatically adjusts the output gain of a signal based on its input level. This
can be used either as a utility to control variations in volume, or as a creative effect to alter the
envelope of a sound.
The Channel Compressor Controls
The Channel Compressor has four controls:
▪ Power Switch – located to the left of the effect name, this toggles the effect on or off.
▪ Amount – sets the intensity of the compression.
▪ Mix – controls the blend between the dry signal and the compressed signal.
▪ Gain – sets the output gain level for the effect.
Channel EQ
An equalizer (or EQ) allows you to control the level of select bands of frequencies, as such it
allows you to alter the timbre of an instrument.
SESSION STRINGS PRO 2 - Manual - 34
Page 35

Using SESSION STRINGS PRO 2
Effects Window View
EQs can be used as correctional effects (as they allow you to reduce the level of problem frequencies like hum), but they can also help you place a sound in the mix, and can even be
used creatively to alter a sound in unnatural ways.
The Channel EQ Controls
The Channel EQ has four controls:
▪ Power Switch – located to the left of the effect name, this toggles the effect on or off.
▪ Low – controls the gain of the lower frequencies (bass).
▪ Mid – controls the gain of the mid-range frequencies.
▪ High– controls the gain of the high frequencies (treble).
4.4 Effects Window View
The Effects Window View is where you control the overall sound of the nki.
SESSION STRINGS PRO 2 - Manual - 35
Page 36

Using SESSION STRINGS PRO 2
Effects Window View
The Effects Window View
A combination of global sound settings and master effects give you the ability to fine-tune your
sound.
The controls of the Effects Window are the same for all nkis.
4.4.1 Shape Controls
The SHAPE Controls are five controls that alter the sound of the instruments in a way that is
deeper than audio effects. By adjusting the volume envelope settings and the levels of additional sample layers, you can change the fine details of how the instruments sound.
SESSION STRINGS PRO 2 - Manual - 36
Page 37

Using SESSION STRINGS PRO 2
Effects Window View
The Shape Controls
▪ Attack – adjusts the volume envelope attack (fade-in) time.
▪ Release – adjusts the volume envelope release (fade-out) time.
▪ Rel Vol – controls the volume of the release samples.
▪ Bow Noise – controls the volume of the bowing noise samples.
▪ Stereo Width – controls the width of the stereo image. With this knob turned all the way
down, the resulting audio output will be mono. Leave this knob in the middle setting for
the natural width of the recorded samples.
4.4.2 Humanize Controls
The HUMANIZE Controls add levels of subtle randomization and variation to certain sound parameters to create imperfections that can make performances sound more natural.
The Humanize Controls
There are two knobs for controlling the humanization amount of two parameters:
▪ Pitch – adds variation in tuning
▪ Timing – adds variation in note start and end timing
4.4.3 Insert Effects
There are three insert effects that can be used to shape the final sound of the nki.
Each effect can be switched on or off using the power button beside its name.
SESSION STRINGS PRO 2 - Manual - 37
Page 38

Using SESSION STRINGS PRO 2
Effects Window View
The effects and their controls are as follows…
COMPRESSOR
A compressor automatically adjusts the output gain of a signal based on its input level. This
can be used either as a utility to control variations in volume, or as a creative effect to alter the
envelope of a sound.
The Compressor Controls
▪ Character – the three preset buttons control the character of the compressor in an easy-to-
use manner. Simply click on the button to select the character you want to use:
◦ Gentle – uses medium attack and release times for gentle compression.
◦ Punchy – uses a slow attack and a fast release for a more intense compressed sound.
◦ Transparent – uses slow attack and release settings to react to the signal level as sub-
tly as possible.
▪ Amount – controls the intensity of the compressor.
▪ Mix – controls the mix between the uncompressed signal and the compressed signal.
EQ
An equalizer (or EQ) allows you to control the level of select bands of frequencies, as such it
allows you to alter the timbre of an instrument.
EQs can be used as correctional effects (as they allow you to reduce the level of problem frequencies like hum), but they can also help you place a sound in the mix, and can even be
used creatively to alter a sound in unnatural ways.
SESSION STRINGS PRO 2 - Manual - 38
Page 39

Using SESSION STRINGS PRO 2
Effects Window View
The EQ Controls
▪ Character – the three preset buttons control the frequency ranges of the three EQ bands.
Click on a button to select the focus of the EQ:
◦ Warmth – focuses on the lower mid-range.
◦ Wood – focuses on a little higher in the mid-range .
◦ Bow – focuses on the higher mid-range, where the bowing noise is most prominent.
▪ Low – controls the gain of the lower frequencies (bass).
▪ Mid – controls the gain of the mid-range frequencies.
▪ High – controls the gain of the high frequencies (treble).
COLOR
While the EQ and Compressor are effects for aiding in mixing your sound, the Color effect is
more of a creative tool.
The Color Controls
SESSION STRINGS PRO 2 - Manual - 39
Page 40

Using SESSION STRINGS PRO 2
Effects Window View
The Color effect has a number of different modes, but all are controlled with a single Intensity
knob.
The mode of the Color effect is set via two menus:
▪ The menu above the effect thumbnail selects the category of effect:
◦ Studio – effects that emulate studio equipment, from tape saturators to channel strip
emulations and tube pre-amps.
◦ Distortion – heavier distortion effects that really degrade your sound.
◦ Modulation – effects that add movement and animation to the sound.
◦ Accent – these effects are creative, but not too out there, and really benefit from real-
time control of the Intensity knob.
◦ Abstract – the weird and the strange.
▪ The menu below the thumbnail can be used to select an effect. The contents of this menu
depends on the category selection.
4.4.4 Send Effects
The Send Effects are applied to a separate sub-mix of the output signal. The exact routing of
this is set in the MIXER page (See ↑4.3, Mixer Window View for more information).
Regardless of the input routing, the Send Effects are both processed in parallel (in other
words: one does not feed directly into the other).
Reverb
The Reverb effect simulates an acoustic space. It can be used subtly to give distance to the
sound, or it can be used to completely change the space the instruments are in.
The Reverb Controls
SESSION STRINGS PRO 2 - Manual - 40
Page 41

Using SESSION STRINGS PRO 2
Effects Window View
The character of the reverb is selected using two menus above and below the effect thumbnail:
▪ The top menu selects the reverb category.
▪ The lower menu selects the reverb character.
Two knobs control the reverb parameters:
▪ Predelay – sets the delay time between the input signal and the reverb signal.
▪ Rtn Level – controls the return level (i.e. output volume) of the effect.
Delay
In its simplest form, a delay effect delays the sound. However, when you mix this delayed signal with the input signal you get an echo effect.
The Delay Controls
▪ Sync – toggles tempo sync on or off. When active, the delay times will sync to the host
tempo.
▪ Time – sets the delay time (i.e. the time between the input signal and the delayed signal).
▪ Feedback – controls how much of the output signal is fed back into the effect input. Es-
sentially this controls the number of repeating echoes.
▪ Rtn Level – controls the return level (i.e. output volume) of the effect.
SESSION STRINGS PRO 2 - Manual - 41
Page 42

Using SESSION STRINGS PRO 2
Settings Window View
4.5 Settings Window View
► To access the Settings Window View, click on the cog icon in the bottom left corner of the
interface.
The Settings of the Ensemble nkis
The Settings Window View is where you can select and set up a number of parameters that you
can control using external MIDI controllers or by the way you play. In addition, you can activate
or deactivate a few important sample management functions.
SESSION STRINGS PRO 2 - Manual - 42
Page 43

Using SESSION STRINGS PRO 2
Settings Window View
The Settings controls are mostly the same between nkis, although the CHORD DETECTION section is only available in the Ensemble nkis.
4.5.1 Chord Detection
The Chord Detection section is only available in the Ensemble nkis as it sets the sensitivity of
the chord detection for the Animator modes and the Smart Voice Split system.
The Chord Detection Settings
There are three Sensitivity settings:
▪ Loose – a longer chord detection time. This catches more notes, but has a slower response.
▪ Tight – a shorter chord detection time. This has a faster response, but can occasionally
miss notes if your playing is a little loose.
▪ Off – turns chord detection off completely.
SESSION STRINGS PRO 2 - Manual - 43
Page 44

Using SESSION STRINGS PRO 2
Settings Window View
4.5.2 Dynamic Control
The Dynamic Control section is where you set how you want your MIDI setup to control the dynamics of the instruments.
The Dynamic Control Settings
The top three knobs set the ranges and sensitivity of the dynamics:
▪ Min – sets the limit for minimum possible dynamic level.
▪ Curve – sets the dynamic response curve.
▪ Max – sets the limit for maximum possible dynamic level.
The lower buttons set which MIDI messages will control the dynamics:
▪ Midi CC# – a MIDI controller of your choice will control the dynamics. You can set the
MIDI controller number either via the number display, or by clicking on the Learn button
and then moving the control you wish to use.
▪ Modwheel – the Modwheel will control the dynamics.
▪ Velocity – the key velocity (i.e. how hard you hit the MIDI keys) will control the dyanmics.
SESSION STRINGS PRO 2 - Manual - 44
Page 45

Using SESSION STRINGS PRO 2
Settings Window View
4.5.3 Pitchbend Setup
Here you can select one of three available options and thereby define what happens when you
use the Pitch Wheel on your controller keyboard.
The Pitchbend Settings
There are two options:
▪ Scoops and Falls – with this option selected, the Pitch Wheel will act as an articulation se-
lector. When the wheel is up, the “scoops” articulation will be selected; when the wheel is
down, the “falls” articulation will be selected. Both articulations are available in two different speeds. Moving the pitch wheel slightly will select slow falls/scoops, moving it all the
way up or down will select fast scoops/falls.
▪ Range – with this option selected, the Pitch Wheel will perform in the traditional manner,
altering the pitch of the played notes. The numeric display can be used to select the maximum pitch change in semi-tones.
SESSION STRINGS PRO 2 - Manual - 45
Page 46

Using SESSION STRINGS PRO 2
Settings Window View
4.5.4 Memory Management
The three functions available in this section help you create an even more realistic strings section sound. As this may also increase your computer's workload, these functions are optional.
The Memory Management Settings
Release Samples
If you activate this function, special release samples, which reflect natural instrument release
behavior, are applied at the end of played notes.
Round Robin
If you activate this function, various slightly different samples (instead of one) become available for each note of each instrument you play. These samples are used randomly which creates
a much more lively and realistic acoustic picture.
Purge Mode
The Purge Mode sets how many samples will be loaded into memory, ranging from the bare
essentials to everything.
There are three settings:
SESSION STRINGS PRO 2 - Manual - 46
Page 47

Using SESSION STRINGS PRO 2
Settings Window View
▪ Eco – only the necessary samples for the current settings are loaded. Changing settings in
the instrument will result in samples being purged and loaded.
▪ Standard – purges all unused articulations, but keeps instruments in memory.
▪ Ultimate – keeps everything in memory; changing settings will never cause KONTAKT to
purge or load anything, but the overall memory footprint will be high.
4.5.5 Tuning
The Tuning section has a single control for fine-tuning the instrument or ensemble. 440Hz is
the general modern standard, and thus the default setting, but you may wish to change this for
your project.
SESSION STRINGS PRO 2 - Manual - 47
Page 48

5 Credits
Concept and Design: Thomas Koritke, Frank Elting
KSP Scripting: Alexander Paprotny, Till Weinrich
Sound Design: Sascha Haske, Andreas Rogge, Thomas Koritke, Lars Dahlke
Animator: Lars Dahlke
User Interface Design: Max Mondon
3D Rendering: pixelsonic
Product Manager: Christian Wachsmuth
Finalisation and Encoding: Carlos Ruiz
Quality Assurance: Konstantin Fichtner
Documentation: Adam Hanley
Marketing Manager: Pia Detjen
Credits
Artwork: Claudia Eden
Special Thanks: Paul Lawley, Thomas Berlin, Martin von Frantzius
SESSION STRINGS PRO 2 - Manual - 48
 Loading...