


 Loading...
ABSYNTH 5
|
|
|
|
Germany |
USA |
||
Native Instruments GmbH |
Native Instruments North America, Inc. |
||
Schlesische Str. 28 |
5631 Hollywood Boulevard |
||
D-10997 Berlin |
Los Angeles, CA 90028 |
||
Germany |
USA |
||
info@native-instruments.de |
sales@native-instruments.com |
||
www.native-instruments.de |
www.native-instruments.com |
||

Table Of Contents
1 Welcome to ABSYNTH 5!......................................................................................... |
5 |
|||
|
1.1 |
What’s New in ABSYNTH 5? .................................................................. |
5 |
|
|
1.2 |
The ABSYNTH 5 Documentation . ........................................................... |
6 |
|
|
|
1.2.1 |
In this Manual............................................................................. |
6 |
|
|
1.2.2 |
Other Documentation................................................................... |
6 |
|
|
1.2.3 |
Formatting Conventions............................................................... |
6 |
|
1.3 |
System Requirements ............................................................................ |
7 |
|
2 |
Setup |
...................................................................................................................... |
|
8 |
|
2.1 ........................................... |
Setting up ABSYNTH 5 in Stand - Alone Mode |
8 |
|
|
.............................................................. |
2.1.1 |
Audio and MIDI Settings |
8 |
|
.......................................................................... |
2.1.2 |
About Latencies |
9 |
|
................................................................... |
2.1.3 |
The MIDI Hardware |
10 |
|
2.2 ..................................................................... |
ABSYNTH 5 as a Plug - in |
11 |
|
3 |
ABSYNTH ............................................................................................5 Overview |
12 |
||
|
3.1 ............................................................... |
The Idea behind ABSYNTH 5 |
12 |
|
|
................................................................ |
3.1.1 |
Semi-Modular Design |
12 |
|
............................................................................... |
3.1.2 |
Modulation |
13 |
|
.......................................................................... |
3.1.3 |
Macro Controls |
13 |
|
................................................................................ |
3.1.4 |
Waveforms |
14 |
|
.............................................................................. |
3.1.5 |
The Mutator |
15 |
|
3.2 .............................................................................. |
The User Interface |
15 |
|
|
.......................................................................... |
3.2.1 |
Navigation Bar |
16 |
|
........................................................................ |
3.2.2 |
Browser Window |
17 |
|
..................................................................... |
3.2.3 |
Attributes Window |
18 |
|
........................................................................ |
3.2.4 |
Perform Window |
19 |
|
........................................................................... |
3.2.5 |
Patch Window |
20 |
|
.......................................................................... |
3.2.6 |
Effect Window |
21 |
|
............................................................................ |
3.2.7 |
Wave Window |
22 |
|
...................................................................... |
3.2.8 |
Envelope Window |
23 |
|
............................................................................. |
3.2.9 |
LFO Window |
24 |
4 |
Quick ..........................................................................................................Starts |
|
25 |
|
|
4.1 ................................................................Finding and Loading Sounds |
25 |
||
|
.................................................................................. |
4.1.1 |
The Plan |
26 |
|
............................................................................. |
4.1.2 |
The Browser |
26 |
|
............................................................ |
4.1.3 |
Finding the Right Sound |
27 |
|
............................................................... |
4.1.4 |
Using the Search Field |
28 |
|
........................................................................ |
4.1.5 |
Always available |
28 |
ENGLISH
ABSYNTH 5 – Getting Started – III
4.2 |
Mutate Your Sounds!........................................................................... |
29 |
|
|
4.2.1 |
Choosing the Right Direction...................................................... |
29 |
|
4.2.2 |
Two Sliders, Two Buttons........................................................... |
30 |
|
4.2.3 |
Refining Your Mutation............................................................... |
31 |
|
4.2.4 |
Using the History...................................................................... |
33 |
|
4.2.5 |
Tips......................................................................................... |
33 |
4.3 Creating Sounds: the Good Old Way...................................................... |
34 |
||
|
4.3.1 |
Preparations............................................................................. |
34 |
|
4.3.2 |
Configuring the First Module...................................................... |
36 |
|
4.3.3 |
Adding other Modules................................................................ |
37 |
|
4.3.4 |
Interlude: Saving Your Sound...................................................... |
40 |
|
4.3.5 |
Modulating the Filter................................................................. |
40 |
|
4.3.6 |
Add Attributes to Your Sound!.................................................... |
43 |
|
4.3.7 |
Useful Tips............................................................................... |
44 |
|
4.3.8 |
What Is Next?........................................................................... |
45 |
4.4 Creating and Morphing Waveforms........................................................ |
45 |
||
|
4.4.1 |
Creating a Morph Wave.............................................................. |
45 |
|
4.4.2 |
Editing the Initial Waveforms...................................................... |
47 |
|
4.4.3 |
Playing with the Morphing.......................................................... |
49 |
|
4.4.4 |
What Is Next?........................................................................... |
50 |
4.5 |
Introducing the Aetherizer.................................................................... |
50 |
|
|
4.5.1 |
Get ready................................................................................. |
51 |
|
4.5.2 |
Setting up the Aetherizer........................................................... |
52 |
|
4.5.3 |
Playing with the Aetherizer......................................................... |
53 |
|
4.5.4 |
What Is Next?........................................................................... |
57 |
Index |
.................................................................................................................... |
|
59 |
IV – ABSYNTH 5 – Getting Started

1 Welcome to ABSYNTH 5!
We are delighted that you have chosen ABSYNTH 5! ABSYNTH’s semi-modular design allows you to combine oscillators, modulation sources, and filters in any way you want. You can create unusual and dynamic sounds by combining the numerous effects and modulation possibilities in various ways. The new Aetherizer effect and filter feedback bring ABSYNTH 5 to a new level in sound design. You can explore the huge ABSYNTH 5 Factory Library of more than 1700 presets. Moreover, the new Mutator feature allows you to create whole new sounds based on a favorite and the attributes you choose! Dedicated Macro Controls allow you to operate several parameters at the touch of a button or just by pressing one key on your MIDI keyboard, and everything is fully automatable in your audio MIDI sequencer.
All this allows you to focus on what this is all about: realizing your musical ideas! We hope you enjoy ABSYNTH 5 as much as we do.
The ABSYNTH 5 Team at Native Instruments.
1.1What’s New in ABSYNTH 5?
Here is a short overview of the new features in ABSYNTH 5 compared to ABSYNTH 4:
•• The Mutator introduces a totally new approach to sound design with ABSYNTH. With the Mutator, you can let ABSYNTH automatically generate new Sounds somewhere between the current Sound and other Sounds from the Library.
•• The Aetherizer Effect combines a granular-based feedback with a post-delay section. Moreover, all of its parameters can be both randomized and modulated.
•• The Cloud filter is the little brother of the new Aetherizer Effect, for use in the
Filter modules within the Patch window.
•• The Supercomb filter extends the capacities of the Comb filter (still available), using some of the characteristics of the Resonators and Pipe Effects.
•• New feedback loop for many filter types: LPF 2 Pole, LPF 4 Pole, LPF 8 Pole, Supercomb, Allpass 2, Allpass 4, Allpass 8. Filter feedback allows you to insert a sound modulator like a Waveshaper, Frequency Shifter or Ring Modulator in the resonance path, giving your filters custom distortions, even ones never heard before.
•• Reorganized Filter, Modulator and Waveshaper modules present a unified interface and propose a new organization for their menus.
•• Support for Windows XP/Vista 64-bit operating systems.
ENGLISH
ABSYNTH 5 – Getting Started – 5

1.2The ABSYNTH 5 Documentation
1.2.1In this Manual
What you are holding in your hands right now is the Getting Started Manual which will give you an overview of ABSYNTH 5’s main features and functions.
This Getting Started Manual is divided into four parts:
•• The first part is the introduction you are reading now.
•• Chapter 2 “Setup” will help you to set up ABSYNTH 5 on your computer.
•• Chapter 3 “ABSYNTH 5 Overview” will introduce you to the main concepts of ABSYNTH 5, giving you the basic understanding of the ABSYNTH 5 “way-of- thinking”. This chapter also provides you with a description of ABSYNTH 5’s user interface and its main areas and control elements.
•• Chapter 4 “Quick Starts” is a selection of tutorials that will let you discover how to use the various tools provided by ABSYNTH 5. These practical examples will simplify the learning process, to get you quickly started with designing your own Sounds!
1.2.2Other Documentation
For more in-depth information on all topics not covered here, please refer to the ABSYNTH 5 Reference Manual which is available as a PDF file in the subfolder
“Documentation” of ABSYNTH 5’s installation folder. Alternatively, you can download the Reference Manual from the Update Manager on the Native Instruments Website: www.native-instruments.com
1.2.3Formatting Conventions
The icons introducing these notes let you see what kind of information is to be expected:
Whenever this exclamation mark icon appears, you should read the corresponding note carefully and follow the instructions and hints given there if applicable.
6 – ABSYNTH 5 – Getting Started

ENGLISH
This lightbulb icon indicates that a note contains useful extra information. This information may often help you to solve a task more efficiently, but does not necessarily apply to the setup or operating system you are using. However, it should be worth reading for most users.
1.3System Requirements
For current information about system requirements and compatibility with current and legacy operating systems, please see our website at: www.native-instruments.com/absynth
ABSYNTH 5 – Getting Started – 7
2 Setup
This chapter leads you through the necessary steps for setting up your ABSYNTH
5 installation. The first part deals with the stand-alone version of ABSYNTH 5. The second section provides an overview of the available ABSYNTH 5 plug-ins.
2.1Setting up ABSYNTH 5 in Stand-Alone Mode
ABSYNTH 5 can run as a stand-alone software with its own interface to your audio and MIDI hardware. Use this mode if you only want to play ABSYNTH 5 via a MIDI keyboard/controller attached to your computer or if you want ABSYNTH 5 to receive MIDI data from a piece of software that cannot host any of the available ABSYNTH 5 plug-ins.
2.1.1Audio and MIDI Settings
Before you start your work with ABSYNTH 5 it is a good idea to configure its audio settings to fit your needs. This only applies to the stand-alone version of ABSYNTH 5 as with the ABSYNTH 5 plug-ins all things audio and MIDI are handled by the host software.
The Audio Hardware
Do the following to set up your audio hardware in ABSYNTH 5:
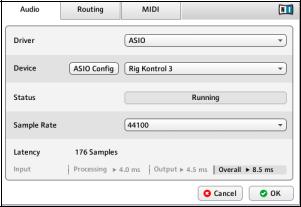
1.Choose the entry Audio and MIDI Settings… from the File menu in the Application Menu Bar, at the very top of the application’s window. The Audio and MIDI Settings dialog opens:
The Audio page of the Audio and MIDI Settings showing a RIG KONTROL 3 as the active audio hardware
(Windows version shown).
8 – ABSYNTH 5 – Getting Started

2.From the Driver menu of the Audio page, select ASIO on Windows for best results
(on a Mac this will be set to CoreAudio, your only choice in Mac OS X).
3.Use the Device menu to select the desired audio interface.
4.We recommend setting the sample rate to 44100 and setting the output latency to about 10 ms. Depending on your hardware this may be done via the Latency Slider on the bottom of the Audio Tab or via the button ASIO Config that opens the control panel of your audio interface.
These are recommended settings that should work well on most computer systems; for information on what these settings mean, please refer to section 2.1.2, “About Latencies.”
ENGLISH
2.1.2About Latencies
The data produced by audio software like ABSYNTH 5 has to be handed over to the driver of the currently used audio hardware, which in turn passes it to the digital to analog converters that produce an analog signal to be heard via your speakers. This procedure takes time. The resulting delay is called latency.
The high performance level of current computer hardware combined with advances in driver technologies has reduced the required time to a few milliseconds. Still, there is a trade-off to be made, as an extremely low latency taxes the computer resources more than a relaxed setting with a longer delay between sound production in the software and sound reproduction via the speakers.
The nature of the driver used is also an important factor in this game.
Use low-latency drivers
Whenever possible you should use low-latency drivers while working with ABSYNTH 5. ABSYNTH 5 works with two types of low-latency drivers:
•• ASIO drivers
•• Core Audio (only on computer running Mac OS X)
These two technologies ensure an efficient data transfer between Software and audio hardware and should provide a latency that is suitable for live play, if not unnoticeable.
ABSYNTH 5 – Getting Started – 9
2.1.3The MIDI Hardware
For using ABSYNTH 5 with a MIDI keyboard or controller you have to choose the right MIDI interface so that the MIDI data reaches ABSYNTH 5.
To do this:
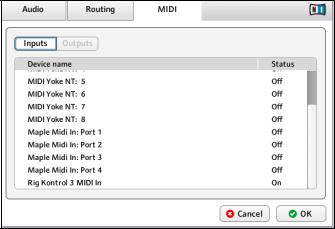
1.Open the Audio and MIDI Settings dialog from the File menu.
2.Switch to the MIDI page.
The MIDI page of the Audio and MIDI Settings showing an active RIG KONTROL 3 MIDI interface
(Windows version shown).
3.On the MIDI page, check that the MIDI interface or device you are using is turned on. If you see your interface listed but it is off, click on the Off label to turn it on.
Now you should be able to play ABSYNTH 5 via your MIDI keyboard or controller.
If you do not have a MIDI controller available, you can still play MIDI notes by using the computer’s keyboard. We have assigned the four rows of alphanumeric keys in a similar pattern to that of a piano keyboard. For example, the bottom row of keys on your computer keyboard (from [Z] on the left to [/] on the right) is assigned to the white keys of the piano keyboard, with the [Z] key being assigned to C. The row of keys above that (from [S] to [;]) covers the corresponding black keys, with [S] assigned to C#. The two rows of keys above are assigned in a similar pattern, but one octave higher.
10 – ABSYNTH 5 – Getting Started
2.2ABSYNTH 5 as a Plug-in
ABSYNTH 5 does not only come as a stand-alone application but also in a variety of plug-in formats for use in hosts like Native Instruments KORE, Steinberg Cubase/
Nuendo, Ableton Live, MOTU Digital Performer, Apple Logic or Digidesign Pro Tools®. The synthesis functionality of the ABSYNTH 5 plug-ins is identical to the stand-alone version. However, the plug-ins lack the options for settings up audio and MIDI hardware as this is handled by the host the plug-in is working in.
Plug-in Formats and Hosts
Depending on the operating system running on your computer you have the choice between the following plug-in formats:
•• VSTi® (Mac OS X and Windows)
•• Audio Unit (Mac OS X only)
•• RTAS® (Mac OS X and Windows for use in Digidesign Pro Tools®)
Please refer to the documentation of your host software for details about the required plug-in format and how to open and use the ABSYNTH 5 plug-in.
ENGLISH
ABSYNTH 5 – Getting Started – 11
3 ABSYNTH 5 Overview
3.1The Idea behind ABSYNTH 5
This section will introduce you to the fundamental concepts behind ABSYNTH 5. This will familiarize you with the way ABSYNTH 5 works and let you catch sight of the power of its design. You will continuously encounter these concepts in your work with ABSYNTH 5. You will find practical examples of how these concepts are implemented in the chapter 4, “Quick Starts.” For an in-depth explanation of all functionality to be found in ABSYNTH 5, please refer to the Reference Manual.
3.1.1Semi-Modular Design
ABSYNTH 5’s Patch window displays a bunch of so-called Module Slots. You can activate/deactivate any Module Slot by simply clicking on its left border (the thicker one).
The audio signal path is depicted by wires that connect the activated modules. This allows you to see at a glance which modules are used in the current Sound.
The Oscillator Channels
Basically, ABSYNTH 5 offers three so-called Oscillator Channels (labeled A, B and C), presented vertically in the top part of the Patch window. Each Channel can hold up to three modules.
The signal is flowing from the top to the bottom of each Channel.
An Oscillator module always sits at the top of a Channel. The Oscillator modules are the only sound sources in ABSYNTH 5. They provide the foundation for every Sound. At least one of the three Oscillator modules must be activated in order to hear a sound! The two following Module Slots in each Channel can hold any of the 19 sound processing modules, these being of three different types: Filters, Modulators or Waveshapers.
The Master Channel
The signals coming from the three Channels A to C then run together through the Master Channel, laid out horizontally at the bottom of the Patch window–the signal going from left to right.
Here also, you can activate up to three modules: The first two Module Slots can hold additional sound processing modules (Filter, Modulator or Waveshaper modules).
In the last Module Slot at the far right, you can activate the Effect module, which allows you to make use of the amazing ABSYNTH effects. This module is driven by the separate Effect window.
12 – ABSYNTH 5 – Getting Started

As you can see, the semi-modular design of ABSYNTH 5 allows you to adapt the structure of your synthesizer to meet your needs. Unlike most hardware synthesizers, ABSYNTH allows you complete flexibility setting up the number and order of the oscillators, filters and other features you wish to use.
3.1.2Modulation
ABSYNTH is known for its lively, organic sounds that grow and evolve over the time. The backgrounds of these capabilities are the flexible possibilities of modulation in
ABSYNTH 5.
A modulation uses a control signal (the modulation source) to let a particular parameter (the modulation target) change its value over time.
To modulate a parameter for the duration of a sound, simply connect this parameter with a modulation source: the modulation source then takes control of the relevant parameter.
There are different modulation sources available within ABSYNTH 5:
•• Use LFOs to produce cyclical value sequences, for example to let the amplitude of an oscillator go up and down or to change the cutoff frequency of a filter periodically. ABSYNTH 5 allows you to create LFOs from virtually any kind of waveform (see section “Waveforms” below).
•• Use Envelopes to precisely modify the value of a parameter at some particular points (called “break points”) in the sound. ABSYNTH’s Envelopes are indeed very powerful tools for shaping your control signals. You will find a practical example of the use of Envelopes at section 4.3.5, “Modulating the Filter.”
LFOs and Envelopes are very flexible modulation sources and hold many parameters.
Hence, they both have their own windows.
3.1.3Macro Controls
The Macro Controls are the interface between ABSYNTH 5 and the MIDI world. They allow you to control most of the ABSYNTH parameters via MIDI, either from a MIDI hardware device or by using sequencer automation. For example, you can raise the filter resonance or move the breakpoints of your envelopes in real time. This can be seen as a sort of “external modulation”: Instead of controlling your parameters via internal LFOs or Envelopes, you control them via external MIDI control signals.
%You can even control your internal modulation sources via external MIDI signals, thus combining both external and internal modulations!
ENGLISH
ABSYNTH 5 – Getting Started – 13
The Macro Controls let you define groups of parameters to be controlled from the same MIDI Control Change (CC). This way, you can build powerful MIDI controlling schemes by assigning various pertinent parameters to the same Macro Control. You can then control all the parameters in this group using a single rotary knob on your MIDI hardware controller or an automation track in your sequencer software.
Macro Controls, along with all other ABSYNTH’s MIDI features, are managed in the dedicated Perform window.
All details about ABSYNTH’s MIDI functionalities can be found in the Reference Manual.
3.1.4Waveforms
Waveforms play an important role in many areas of ABSYNTH 5: for example, they can serve as sound sources in the Oscillator modules or as building blocks for your LFOs. Basically, a Waveform is a small chunk of signal designed to be looped, thus generating a periodic signal, may it be an audio signal or a control signal. Usual examples are the sine, square, sawtooth and ohters.
Although a large number of readymade Waveforms are available out of the box for immediate use, ABSYNTH 5 does not limit you to these factory Waveforms. Instead, you may start from scratch and design your own Waveforms. This happens in the Wave window.
The Wave window provides you with a selection of drawing tools and functions in order to create custom Waveforms according to your needs. By default, you see the Waveform page. To create a new Waveform, simply select one of the graphic tools in this view and draw the curves with the mouse. You can then apply various transform functions to the Waveform such as turning the curve on its head, changing its phase etc. You can also produce many weird and wonderful sounds using the Fractalize command.
As well as changing the temporal progression of the Waveform, you can also edit its harmonic content using the tools in the Spectrum page. Just draw the amplitude and phase of the harmonics and you can produce subtle to drastic changes in the resulting Waveform.
When you are happy with a Waveform you created, you can store it in your own Waveform library. These Waveforms are then readily available in ABSYNTH 5 for any use. Another powerful feature is the possibility to morph different Waveforms: the resulting
Morph Wave will be “somewhere” between two fixed Waveforms. This way, you can produce interesting curve progressions, which allow greater variety in the creation of Sounds and control signals.
The Quick Start at section 4.4, “Creating and Morphing Waveforms”, will give you a practical illustration of how to use Waveforms.
14 – ABSYNTH 5 – Getting Started

3.1.5The Mutator
The Mutator proposes a totally different approach to the generation of new Sounds.
Let’s say, you found a nice Sound in the ABSYNTH 5 Library, but you would like to have some of its characteristics tend towards those of another nice Sound from the Library, or even of a selection of Sounds. The Mutator allows you to select some parts of the Sound currently loaded and to “mutate” them towards the equivalent parts of other Sounds. These other Sounds are selected via the Browser (the big organizer for both factory and user-defined Sounds). The mutation is made based on “feeling”:
•• You can set the extent of the mutation (how far from the original Sound).
•• You can add some randomization to the mutation of all affected parameters.
The result is a new full-featured Sound – and you got it in one click!
Furthermore, you can iterate the process as many times as you want, recursively mutating your Sound, going back to some previous Sound Mutation and trying another direction, thereby traveling through endless sIn addition, the Mutator provides you with eight intuitive Finetuning controls allowing you to custom shape some global characteristics of the newly generated Sounds, or any loadable Sound as well!
To use the Mutator you hardly even need to know the internal structure of your Sound. Instead, think of subjective descriptions of the Sounds – in NI terminology, we call them
“Attributes”, the Mutator will learn from the patches with those characteristics. In order to use the Mutator, the only thing you need to do is choose some other Sounds from the Library. Therefore, the Mutator and its creations are directly integrated with the Browser window, but can be triggered from anywhere in ABSYNTH 5.
You will find a practical example of mutating Sounds at section 4.2, “Mutate Your
Sounds!.”
3.2The User Interface
In this section, we will introduce you to the individual windows, areas and control elements of ABSYNTH 5 so that you get to know its user interface.
For an in-depth explanation of each window and all its functionality, please refer to the Reference Manual.
ENGLISH
ABSYNTH 5 – Getting Started – 15
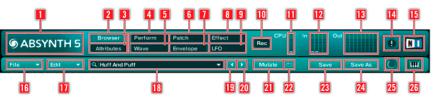
3.2.1Navigation Bar
The Navigation Bar is a central feature in ABSYNTH 5. Located at the top of ABSYNTH 5’s user interface, it is the only area that is always visible.
1ABSYNTH logo
2Browser tab
3Attributes tab
4Perform tab
5Wave tab
6Patch tab
7Envelope tab
8Effect tab
9LFO tab
10Record button
11CPU meter
12Input Level meter
13Output Level meter
14Panic button
15NI logo
16File menu
17Edit menu
18Sound Name display
19Previous Sound button
20Next Sound button
21Mutate button
22Retry button
23Save button
24Save As button
25Database Activity indicator
26Keyboard button
16 – ABSYNTH 5 – Getting Started
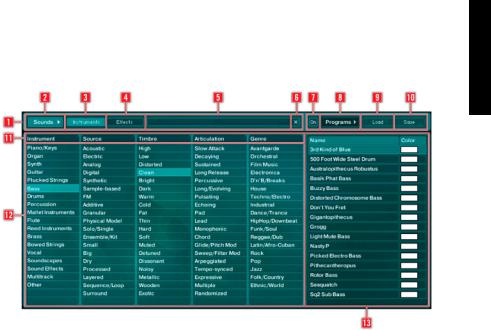
3.2.2 Browser Window
1Browser Control Bar
2Sounds button
3Instruments button
4Effects button
5Search Field
6Reset button
7On button
8Programs button
9Load button
10Save button
11Categories
12Attributes
13Search Result List
ENGLISH
ABSYNTH 5 – Getting Started – 17

14Mini-Patch view
15Mutation Amount slider
16Randomization Amount slider
17Mutation button
18Retry button
19Previous Mutation button
20Mutation History
21Next Mutation button
22Finetuning controls
3.2.3 Attributes Window
1Instruments button
2Effects button
3Reset button
4Categories
5Attributes
6Meta Information
18 – ABSYNTH 5 – Getting Started
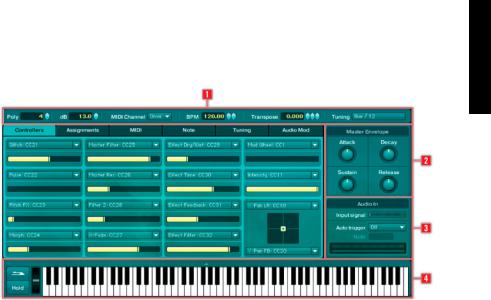
3.2.4 Perform Window
1Global Settings Bar
2Master Envelope area
3Audio In area
4Virtual Keyboard
ENGLISH
ABSYNTH 5 – Getting Started – 19
Loading...