

Page 1
Service Manual
0070-01-0604-02_revB_Duo srv color.indd 1 3/10/10 5:17:19 PM
Page 2

Service Manual
Page 3

Duo™ is a U.S. trademark of Mindray DS USA, Inc.
f
Navigator
™
Masimo SET
is a U.S. trademark of Mindray DS USA, Inc.
®
, LNOP® and CleanShield® are U.S. registered trademarks of Masimo Corp.
Copyright
©
Mindray DS USA, Inc., 2008. All rights reserved. Contents of this publication may not be reproduced in any
orm without permission of Mindray DS USA, Inc.
0070-10-0604-01 Duo Service Manual
Page 4

Table of Contents
Foreword....................................................................................................................................................... iii
Warnings, Precautions And Notes ....................................................................................................................iii
Theory of Operation ......................................................................................................... 1 - 1
Introduction.................................................................................................................................................... 1 - 1
Hardware Overview ....................................................................................................................................... 1 - 2
Power Supply Board ................................................................................................................................ 1 - 2
Fan Driver Board Overview ...................................................................................................................... 1 - 4
CPU/Display Board Overview .................................................................................................................. 1 - 4
NIBP Module Overview............................................................................................................................ 1 - 5
Overview....................................................................................................................................... 1 - 6
SpO
2
Calibration and Performance Verification .......................................................................... 2 - 1
Introduction.................................................................................................................................................... 2 - 1
Warnings and Guidelines................................................................................................................................ 2 - 2
Test Equipment and Special Tools Required........................................................................................................ 2 - 2
Calibration and System Checks ........................................................................................................................ 2 - 3
Device Appearance and Installation Checks................................................................................................ 2 - 3
Maintenance Functions/Non-Monitoring Modes .......................................................................................... 2 - 3
Unit of Measure Mode ............................................................................................................................. 2 - 3
Software Version Mode............................................................................................................................ 2 - 4
Safety Test ..................................................................................................................................................... 2 - 5
Test Equipment ........................................................................................................................................ 2 - 5
Case Leakage ......................................................................................................................................... 2 - 5
NIBP Calibration............................................................................................................................................. 2 - 6
Test Equipment ........................................................................................................................................ 2 - 6
Test Procedure......................................................................................................................................... 2 - 6
Verification ........................................................................................................................................... 2 - 8
SpO
2
Test Equipment ........................................................................................................................................ 2 - 8
Test Procedure......................................................................................................................................... 2 - 8
Parts ................................................................................................................................ 3 - 1
Introduction.................................................................................................................................................... 3 - 1
Parts Listing .................................................................................................................................................... 3 - 10
Repair Information ........................................................................................................... 4 - 1
Introduction.................................................................................................................................................... 4 - 1
Troubleshooting Guide .................................................................................................................................... 4 - 2
Disassembly Instructions................................................................................................................................... 4 - 6
Tools Needed ......................................................................................................................................... 4 - 6
Front Housing Removal............................................................................................................................. 4 - 6
Interface Board Removal ................................................................................................................. 4 - 6
SpO
2
Board Removal............................................................................................................................... 4 - 6
SpO
2
CPU/Display Board Removal .................................................................................................................... 4 - 6
NIBP Module Removal ............................................................................................................................. 4 - 6
Power Supply Removal............................................................................................................................. 4 - 7
Duo™ Service Manual 0070-10-0604-01 i
Page 5

Table of Contents
This page intentionally left blank.
ii 0070-10-0604-01 Duo™ Service Manual
Page 6

Foreword Introduction
Foreword
This service manual gives a detailed description of the Duo Portable Patient Monitor,
including circuit descriptions, test and calibration procedures, and spare parts listings. This
manual is intended as a guide for technically qualified personnel during repair, testing, or
calibration procedures.
Warnings, Precautions And Notes
Please read and adhere to all warnings, precautions, and notes listed here and in the
appropriate areas throughout this manual.
A WARNING is provided to alert the user to potential serious outcomes (death, injury, or
serious adverse events) to the patient or the user.
A CAUTION is provided to alert the user to use special care necessary for the safe and
effective use of the device. They may include actions to be taken to avoid effects on patients
or users that may not be potentially life threatening or result in serious injury, but about which
the user should be aware. Cautions are also provided to alert the user to adverse effects on
this device of use or misuse and the care necessary to avoid such effects.
A NOTE is provided when additional general information is applicable.
Duo™ Service Manual 0070-10-0604-01 iii
Page 7

Introduction Warnings, Precautions And Notes
This page intentionally left blank.
iv 0070-10-0604-01 Duo™ Service Manual
Page 8

1.0
Theory of Operation
1.1 Introduction
The Duo is a compact, lightweight, portable patient monitor intended for monitoring the
following vital signs: blood pressure, SpO
patients. The Duo monitor can be powered by either the internal rechargeable Lithium-Ion
battery or external 100~240 volt 50/60 Hz AC.
(optional), and pulse rate on adult and pediatric
2
Duo™ Service Manual 0070-10-0604-01 1 - 1
Page 9
Hardware Overview Theory of Operation
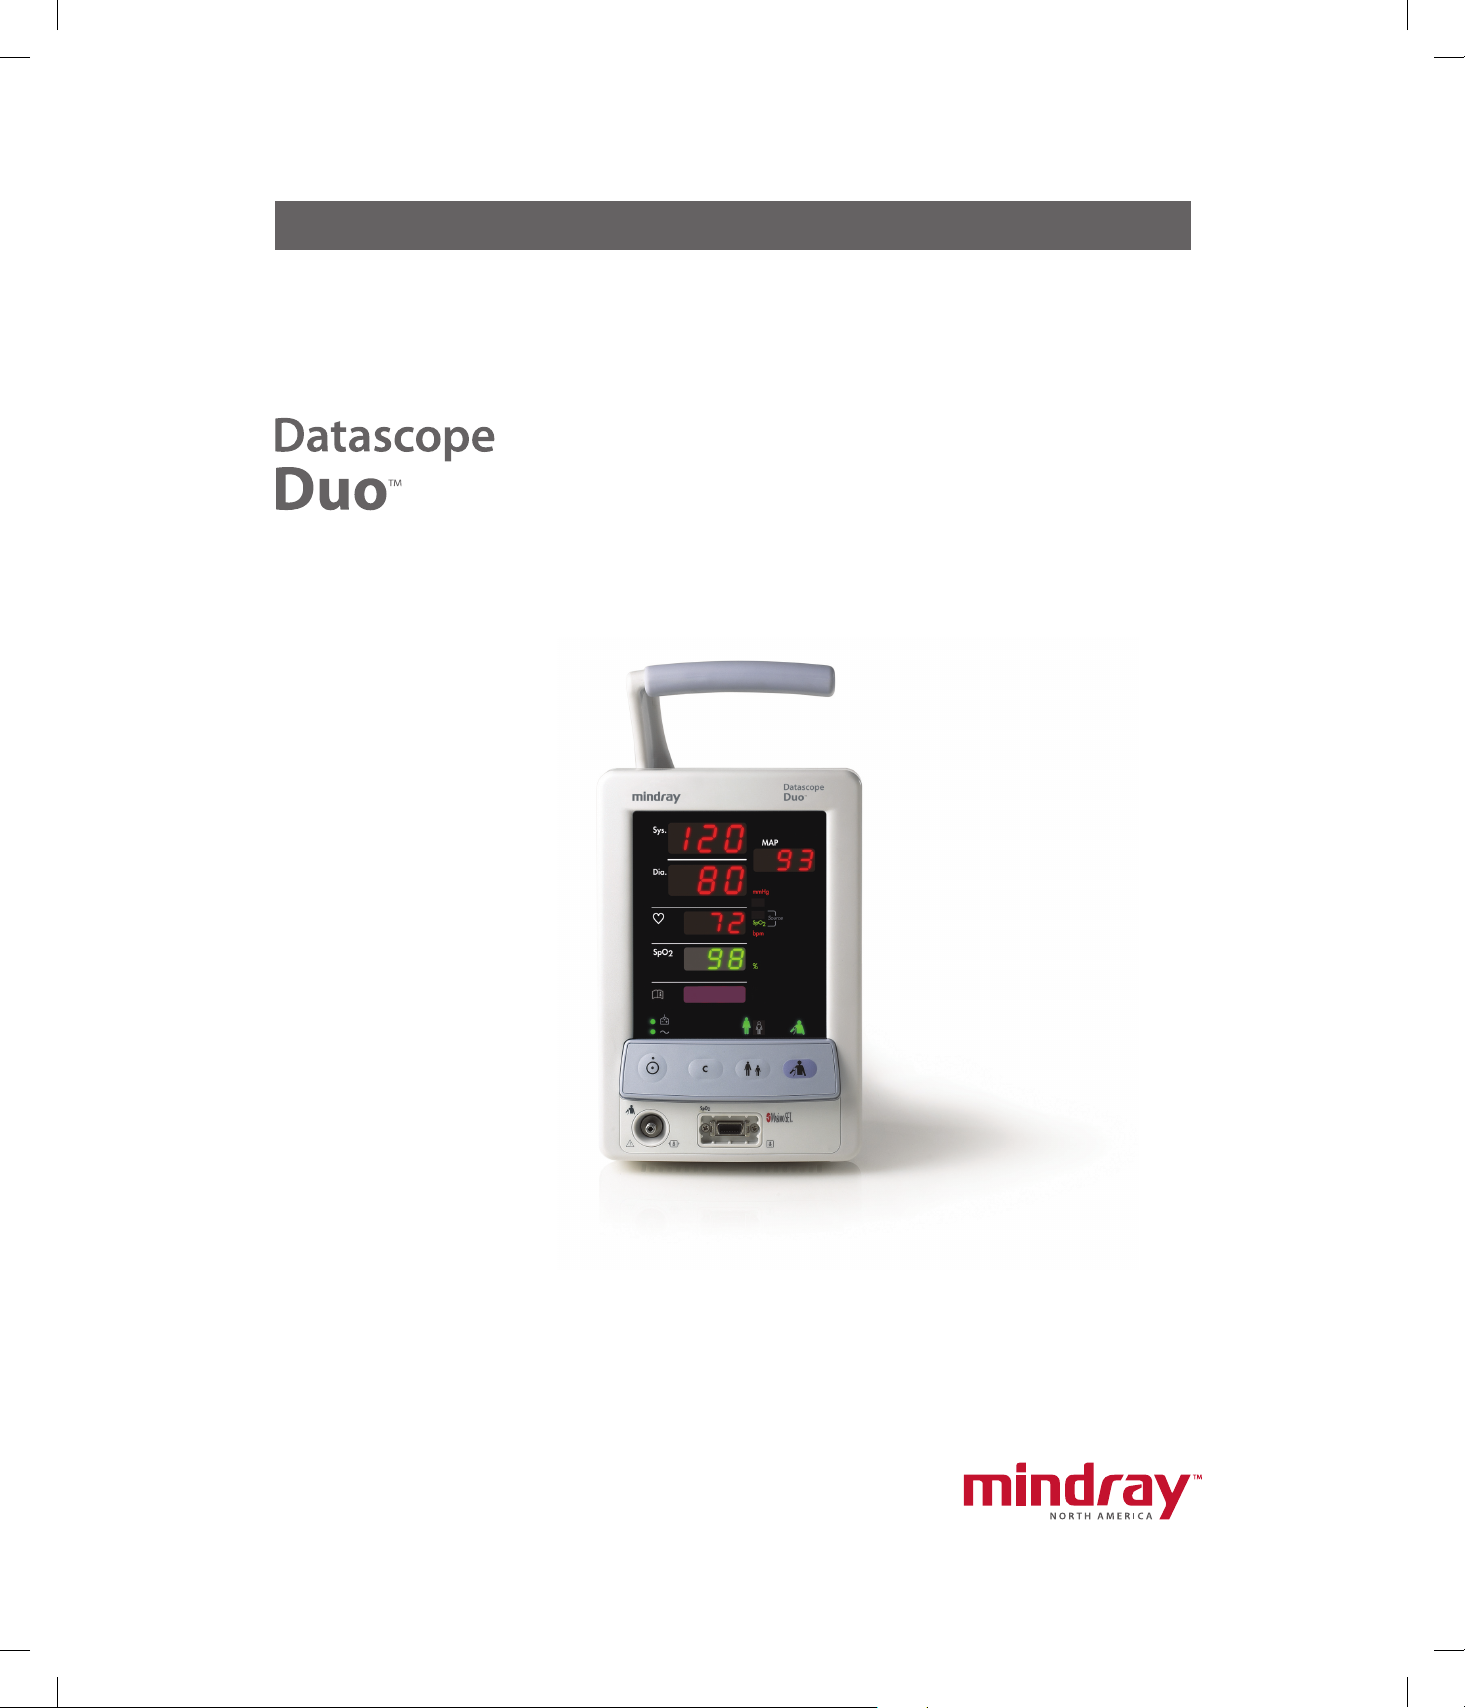
1.2 Hardware Overview
Patient Connectors
Fan
Driver
AC Input
Power Supply
Lithium-Ion
Battery
FIGURE 1-1 Interconnection Block diagram
*The Isolated SpO2 Power Supply is present with optional Masimo and Nellcor SpO2 ONLY.
** The RS232 - TTL Inverter and Serial Interface Connector is used for software updates by Service
1.2.1 Power Supply Board
Overview
The AC/DC converter transforms the AC input voltage (90 - 264 vac 50/60 Hz) to a DC
voltage used to charge the internal Lithium-Ion battery and supply power to the +12 vdc and
+3.3 vdc DC/DC converters. The battery charging circuit will actively charge the battery
while the Duo is connected to an AC source. Battery charging takes place whether the
monitor is on, off, or in use. The power supply will automatically switch to the internal battery
if an AC source is not present.
External
Interface
NIBP Module
Keypad Switches
CPU / Display pcb
RS232 - TTL
Inverter**
Module
SpO
2
Isolated SpO
Power Supply*
2
Serial
Interface**
NOTE: The power supply board MUST be connected to a resistive
load to operate properly and to avoid damage due to an
over current condition.
Power ON / OFF
Control Circuit
AC Input
AC / DC
Converter
Battery and Charging
Management Circuit
1 - 2 0070-10-0604-01 Duo™ Service Manual
3.3v DC/DC
Converter
12v DC/DC
Converter
Page 10

Theory of Operation Hardware Overview
FIGURE 1-2 Power Supply Block Diagram
Power Supply Voltage Test Points:
Location Function
Measure across C5 Primary Rectified Voltage (DC). Range: 105 - 374 volts.
C5 Negative Lead Primary Ground.
Measure across Q1 pin1 and
C5 Negative Lead
Measure across C12 +10.5 vdc input for Fan Driver board.
C12 Negative Lead Secondary Ground.
C47 Positive Lead +5 vdc supply for Power On/Off Control.
C50 Positive Lead +3.3 vdc output.
C68 Positive Lead +12 vdc output.
110k Hz Drive frequency.
Duo™ Service Manual 0070-10-0604-01 1 - 3
Page 11
Hardware Overview Theory of Operation
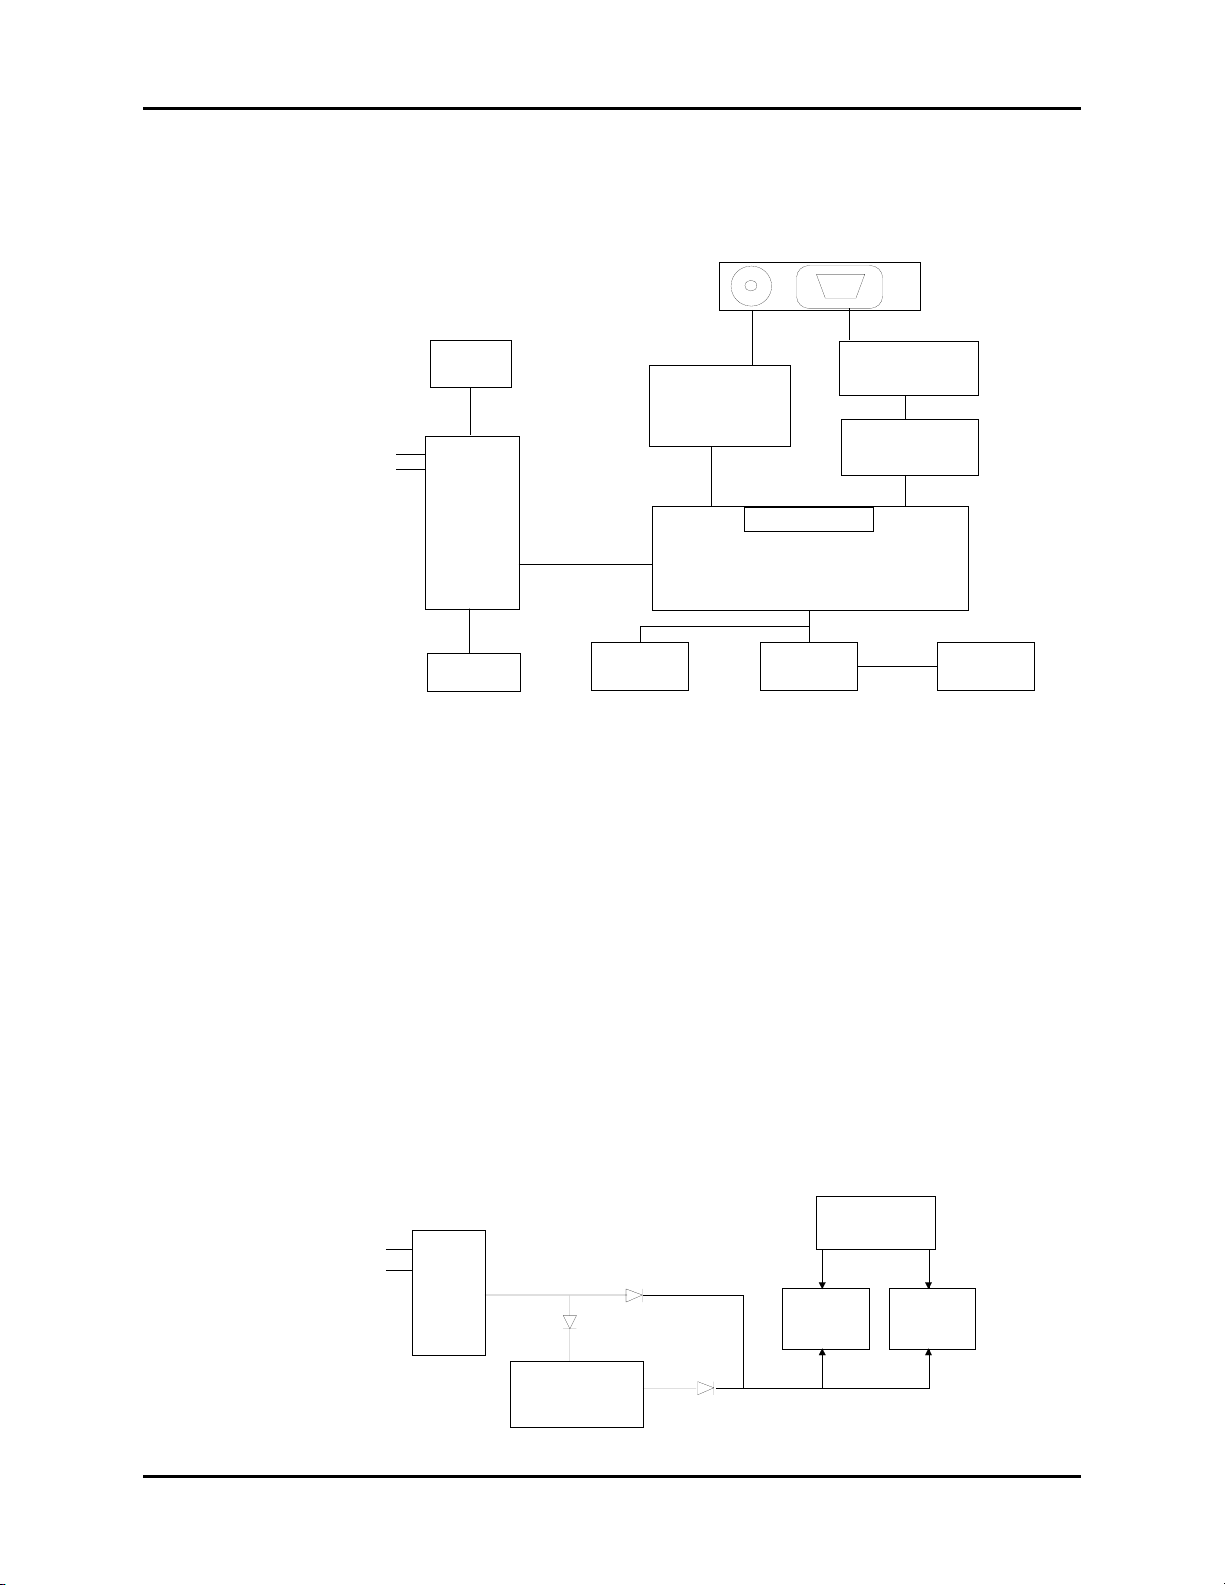
1.2.2 Fan Driver Board Overview
The Fan Drive Board is active during the battery charging cycle. The Temperature Detector
senses the temperature of the heat sink of the Secondary Rectifier diode and turns on the fan
when the heat sink reaches a certain temperature.
Temperature
Detector
DC
Input
FIGURE 1-3 Fan Driver Block Diagram
Fan Driver
Circuit
Fan Driver Board Test Points
Location Function
Measure across C202 +5 vdc Fan power.
C202 Negative Lead Ground.
Measure between Q202 pin1 and Ground Drive frequency when the Fan is activated.
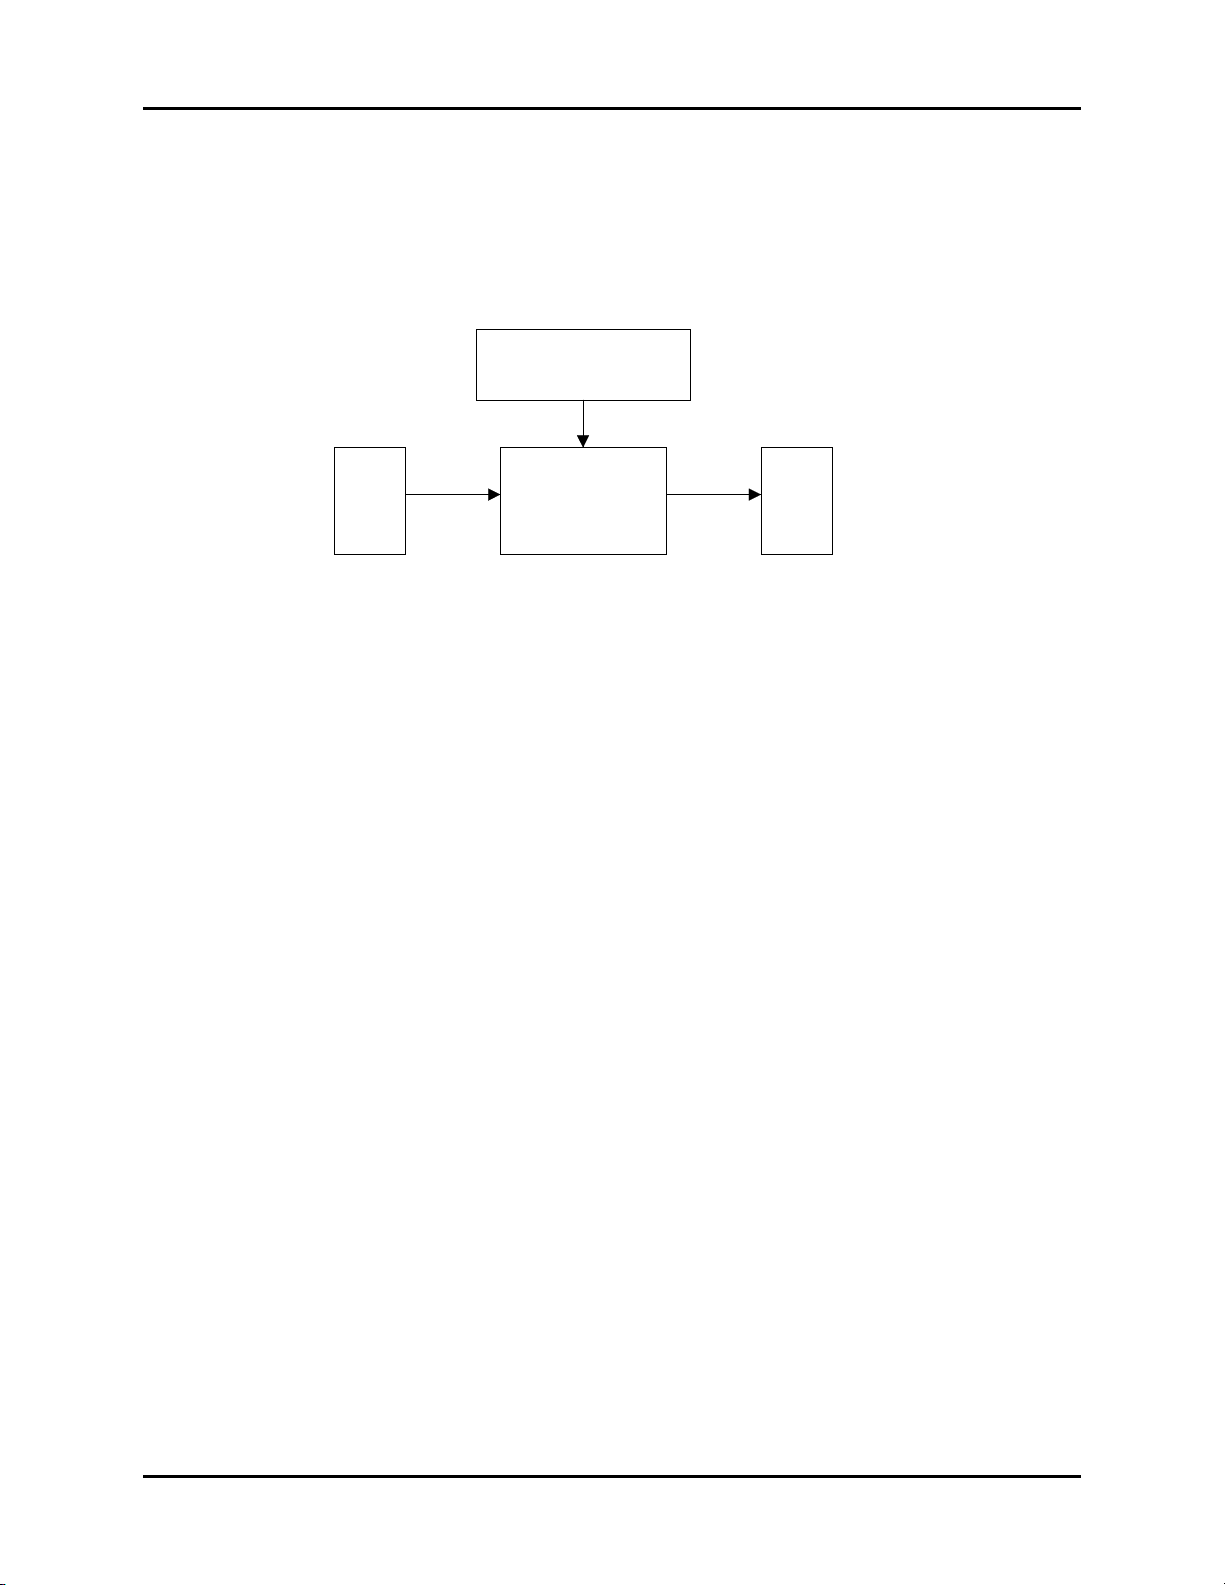
1.2.3 CPU/Display Board Overview
The CPU/Display board controls the SpO2 Module and NIBP Module through
communications via UART devices. The CPU Board receives user commands from the
Keypad. The power supply board provides +3.3 vdc and +12 vdc to the CPU board. These
voltages are monitored by an A/D converter located on the CPU board. The CPU also
controls an integral LED display array and indicator LEDs. The main processor has a built-in
serial port that is used to load software. The processor also uses a FPGA to communicate
with the NIBP Module, the optional SpO
on JP1) and to drive the LED arrays and indicators.
Fan
module (SpO2 presence is detected via a jumper
2
1 - 4 0070-10-0604-01 Duo™ Service Manual
Page 12
Theory of Operation Hardware Overview
A/D Converter
CPU
To
External
Interface
To
SpO2
Module
Serial Interface
To
NIBP
Module
FPGA
FIGURE 1-4 CPU/Display Board Block Diagram
CPU Board Test Points
Location Function
VPP in +12 vdc power supply
VDD in +3.3 vdc power supply
BV Battery voltage
5B in +5 vdc power supply
RTC/ E
2
PROM
User Interface
LED Array
Display
Keypad
Indicator
LEDs
ADV +10.5 vdc ADV out
RST CPU reset line
XT2 11.0592 MHz clock
1.2.4 NIBP Module Overview
The Duo monitor determines non-invasive blood pressure using the oscillometric method. The
blood pressure cuff is inflated until the pressure in the cuff is sufficient to block blood flow in
the brachial artery. As the cuff begins to deflate, blood beginning to flow through the artery
will cause the artery to pulsate. These pulsations are transmitted through the blood pressure
cuff and connecting hose to the pressure transducer in the NIBP module. The output of the
pressure transducer is an analog pulsating signal. This signal is filtered by a high-pass filter
and then amplified. The amplified analog signal is then converted to a digital signal. The
digital signal is then processed to determine the systolic, diastolic, and mean pressures as
well as heart rate.
Duo™ Service Manual 0070-10-0604-01 1 - 5
Page 13

Hardware Overview Theory of Operation
1.2.5 SpO2 Overview
Pulse oximetry (SpO2) measurement is used to determine the oxygen saturation level of the
patient's blood. The SpO2 numeric display indicates the amount of hemoglobin that has
bonded with oxygen molecules to form oxyhemoglobin. By analyzing the pulse in the
fingertip using specified algorithm and consulting the clinical data table, we can obtain the
SpO
value. The SpO2 sensor consists of two LEDs (one red and one infrared) and a
2
photodetector. The two LEDs are alternately lighted at a precise frequency. When the
capillary vessels of the fingertip are filled, a certain amount of light from the LEDs is
absorbed by blood in the capillaries. The remaining red and infrared light is then picked up
by the photodetector. The photodetector detects the varying light intensity due to pulsations
and transmits the changing light intensity in the form of changing electronic signals. The
amount of light absorption is then compared to the known fixed LED output by the SpO
board. The pulse rate is counted and the SpO
value is determined by using an algorithm
2
contained in the software on the SpO2 board.
2
1 - 6 0070-10-0604-01 Duo™ Service Manual
Page 14

2.0
Calibration and Performance
Verification
2.1 Introduction
The following procedures are provided to verify the proper operation of the Duo monitor. A
menu driven interface is used to execute all verification tests. Performance tests should be
performed at least once per year and after any preventive maintenance or repair has been
performed.
Duo™ Service Manual 0070-10-0604-01 2 - 1
Page 15

Warnings and Guidelines Calibration and Performance Verification
2.2 Warnings and Guidelines
In the event that the instrument cover is removed, observe the following warnings and
guidelines:
1. Do not short component leads together.
2. Perform all steps in the exact order they are given.
3. Use extreme care when reaching inside the opened instrument. Do not contact exposed
metal parts that may become ‘‘live’’.
4. Read through each step in the procedure so it is understood prior to performing the step.
2.3 Test Equipment and Special Tools Required
• 0-300 mmHg Digital or Mercury manometer with bulb and valve
• 500 cc Test Chamber/Dummy Cuff. P/N 0138-00-0001-03
•DVM
•SpO
• NIBP simulator
• Safety Analyzer (Dempsey model 431 or equivalent)
• Oscilloscope
• Laptop or PC (software upgrade)
simulator
2
2 - 2 0070-10-0604-01 Duo™ Service Manual
Page 16

Calibration and Performance Verification Calibration and System Checks
2.4 Calibration and System Checks
2.4.1 Device Appearance and Installation Checks
Inspect the Duo monitor to ensure that:
• The outer housing is clean and has no scratches or cracks
• When the device is gently shaken, there are no loose components
• All keys are smooth and free for operation
• Labels are complete, clean, and accurate
• All connectors/accessory modules are installed securely
Ensure monitor is securely fastened to its rolling stand (if used)
2.4.2 Maintenance Functions/Non-Monitoring Modes
• When entering the maintenance functions/non-monitoring mode, the monitor will perform
a self-test, however the verification of functional LEDs will not be displayed
• In the maintenance mode, the standby mode will not be active
• In the maintenance mode, the auto-shutoff will activate if no key is pressed for a period of
15 minutes.
2.4.3 Unit of Measure Mode
The unit of measure mode is used to change between mmHg and kPa. To access the Unit of
Measure mode:
1. Turn the monitor off.
2. Simultaneously press and hold the POWER and CLEAR buttons.
3. Press the CLEAR button to cycle through the unit of measure choices.
4. Once the desired unit of measure is displayed, turn the Duo off to save that setting.
Duo™ Service Manual 0070-10-0604-01 2 - 3
Page 17

Calibration and System Checks Calibration and Performance Verification
2.4.4 Software Version Mode
Use the following procedure to view the software version.
1. Ensure that the Duo is powered OFF.
2. Press and hold the Patient Size key.
3. While continuing to hold the Patient Size key, press and hold the
Power ON/OFF key for two (2) seconds until the Duo beeps.
4. Release both keys.
5. After an additional 2-second delay, Duo will display “100” in the Pulse Rate tile and a
number in the Information Codes tile.
6. Pressing the Clear key will cause the number displayed in the Pulse Rate tile to cycle
through a sequence of four numbers indicating which software version is being
displayed in the Information Codes tile as shown in the following table.
PULSE RATE TILE INFORMATION CODES TILE SHOWS
100 Host Software Revision Level
200 NIBP Software Revision Level
300 SpO2 Software Revision Level
7. To return to normal operation, press the Power ON/OFF key for two (2) seconds to
turn the Duo off.
8. You may then turn the Duo back on to resume normal operation.
NOTE: The Duo cannot be placed directly back into normal
monitoring mode from Software Version Mode. It must first
be powered OFF.
2 - 4 0070-10-0604-01 Duo™ Service Manual
Page 18

Calibration and Performance Verification Safety Test
2.5 Safety Test
2.5.1 Test Equipment
• Safety Analyzer (Dempsey model 431 or equivalent)
2.5.2 Case Leakage
1. Plug the line cord of the unit into the safety analyzer.
2. Connect the case ground lead of the analyzer to the equipotential lug of the Duo
monitor.
3. Perform the leakage tests under the following conditions:
a. Case grounded:
Normal polarity
Normal polarity with open neutral
Reverse polarity
b. Case ungrounded:
Normal polarity
Normal polarity with open neutral
Reverse polarity
4. Verify the current reading is <100 uA under normal operating conditions; <300 uA
under single fault conditions for 120 VAC and <500 uA under single fault conditions for
230 VAC.
Duo™ Service Manual 0070-10-0604-01 2 - 5
Page 19

NIBP Calibration Calibration and Performance Verification
2.6 NIBP Calibration
2.6.1 Test Equipment
• NIBP simulator
• NIBP test chamber/dummy cuff
• Manometer with bulb
2.6.2 Test Procedure
2.6.2.1 Transducer Accuracy
1. Connect the 500 cc Test Chamber and calibrated manometer via a ‘‘T’’ fitting to the
NIBP fitting on the Duo monitor under test.
2. Ensure the Duo is not turned on. Simultaneously, press and hold the POWER and NIBP
START/STOP buttons.
When the monitor enters the NIBP Calibration Mode, message code 525 will be
displayed in the Information Codes window. Release the buttons simultaneously.
3. Momentarily press the NIBP START/STOP button to start the NIBP calibration. Vent the
Test Chamber and verify the Duo and the manometer read zero. Using the bulb,
pressurize the test chamber to 50 mmHg and verify the Duo reading agrees with the
manometer +/- 3 mmHg. Using the bulb, increase the pressure to 200 mmHg and verify
the Duo reading agrees with the manometer +/- 3 mmHg.
2.6.2.2 Pneumatic Leak Test
1. Connect the 500 cc test chamber to the NIBP fitting on the Duo monitor under test.
2. From the NIBP Calibration Mode (code 525) momentarily press the CLEAR button on
the Duo keypad. The Duo will then switch to the Pneumatic Test Mode and will display
message code 550 in the Information Codes window.
3. Momentarily press the NIBP START/STOP button to start the leak test. The Duo under
test will automatically pressurize the test chamber to approximately 180 mmHg.
4. After approximately 20 seconds, the Duo under test will vent the pressure in the test
chamber and display a message code E06 (Pass) or E07 (Fail) in the systolic window.
2.6.2.3 Dynamic Repeatability Test
1. Restart unit and allow it to enter normal operating mode.
2. Use polyurethane tubing to connect the Duo monitor to a calibrated NIBP simulator and
the 500 cc test chamber/dummy cuff via a ‘‘T’’ fitting.
3. Select Adult patient size for both the Duo under test and the NIBP simulator.
4. Select a target simulated blood pressure within the ‘‘normal’’ range on the simulator.
5. Take 10 successive NIBP readings and compare the systolic, diastolic, mean and heart
rate readings for consistency. Readings should not deviate more than +/- 5 mmHg for
the NIBP readings and +/- 2 bpm or 2%, whichever is greater for heart rate.
2 - 6 0070-10-0604-01 Duo™ Service Manual
Page 20

Calibration and Performance Verification NIBP Calibration
NOTE: The actual measured values displayed on the Duo monitor
may not compare with the selected target pressure on the
simulator. This test is intended to confirm the REPEATABILITY,
not accuracy, of dynamic NIBP readings. Accuracy can only
be confirmed by performing the NIBP Calibration outlined in
section 2.6 of this manual.
Duo™ Service Manual 0070-10-0604-01 2 - 7
Page 21

SpO2 Ver i f i c a t i o n Calibration and Performance Verification
2.7 SpO2 Verification
2.7.1 Test Equipment
•SpO2 simulator
2.7.2 Test Procedure
1. Connect the appropriate SpO2 probe connector to the Duo monitor.
2. Connect the SpO
3. Set the simulator target values to:
= 98%
SpO
2
Pulse Rate = 70
4. Verify that the displayed SpO2 and pulse rate values on the Duo monitor are +/- 2% of
the simulator target values.
5. Change the simulator values.
6.
Verify the displayed values on the
probe to the SpO2 simulator.
2
Duo
monitor are equal to the simulator values +/- 2%.
2 - 8 0070-10-0604-01 Duo™ Service Manual
Page 22

3.0
Parts
3.1 Introduction
This section contains exploded views of the Duo monitor, internal modules, and parts list.
Duo Service Manual 0070-10-0604-01 3 - 1
Page 23

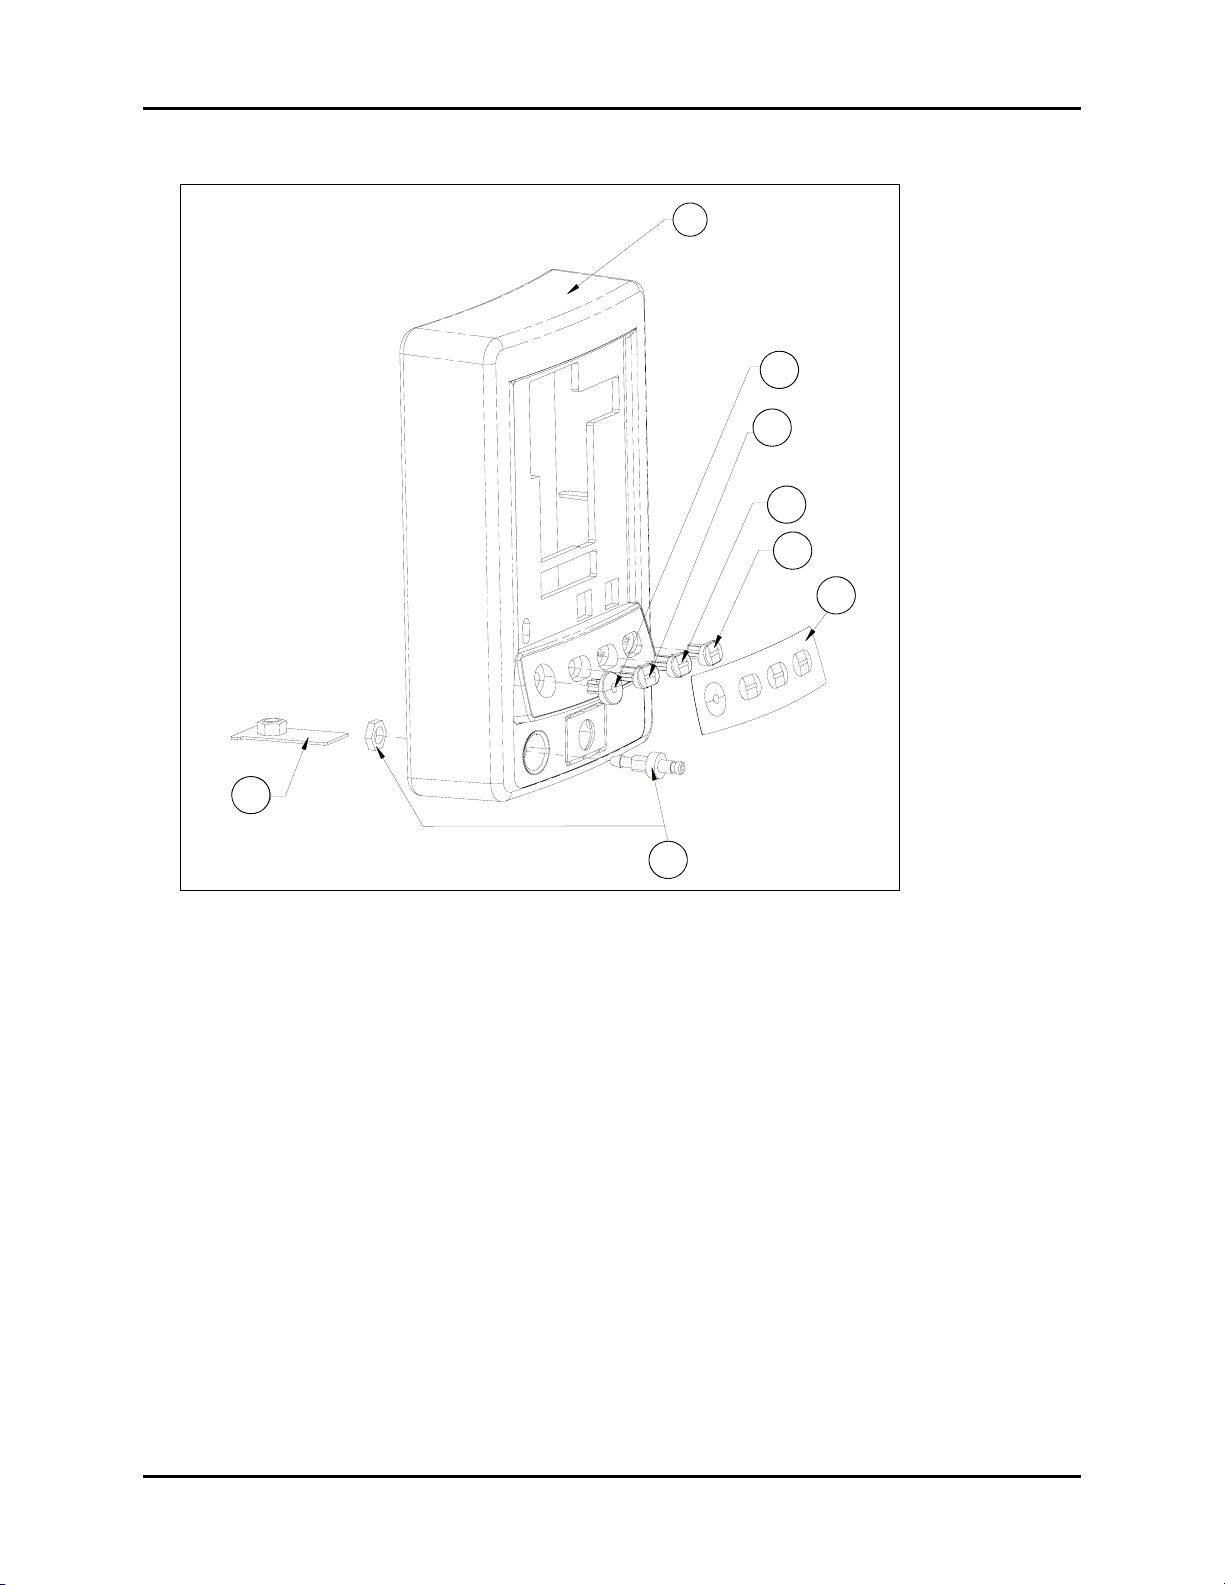
Introduction Parts
9
SpO2 Module
See SpO
4
Detail
2
6
5
8A
8
7
5
1
2
FIGURE 3-1 Duo Exploded View
3
3 - 2 0070-10-0604-01 Duo Service Manual
Page 24

Parts Introduction
18
19
10
10
11
11
12
12
13
13
12
12
FIGURE 3-2 Masimo SpO2 Detail
14
14
Duo Service Manual 0070-10-0604-01 3 - 3
Page 25

Introduction Parts
18
16a
12
16
15
10
FIGURE 3-3 Nellcor SpO2 Detail
17
17a
3 - 4 0070-10-0604-01 Duo Service Manual
Page 26

Parts Introduction
19
5
21
20
3
4
5
11
5
22
Battery Latch Detail
FIGURE 3-4 Main Frame
Duo Service Manual 0070-10-0604-01 3 - 5
Page 27

Introduction Parts
30
27
28
33
30
31
31
32
29
1
1
34
41
45
35
35
25
28
26
29
24
27
23
26
FIGURE 3-5 Rear Case Assembly
33
36
3 - 6 0070-10-0604-01 Duo Service Manual
Page 28
Parts Introduction
9
9
34
37
35
38
39
36
40
37
38
41
40
43
FIGURE 3-6 Front Case Assembly
39
42
Duo Service Manual 0070-10-0604-01 3 - 7
Page 29

Introduction Parts
FIGURE 3-7 Battery Connector Assembly Detail
3 - 8 0070-10-0604-01 Duo Service Manual
Page 30

Parts Introduction
g
Screws,
mounting plate*
Washers, locking*
Utility basket
Mounting screw
for basket*
Casters, Non locking
Duo monitor
mounting plate*
Mounting screw
for basket*
Casters, lockin
FIGURE 3-8 Duo Rolling Stand
Replacement Parts, Duo Rolling Stand
DESCRIPTION PART NUMBER
Duo rolling stand, value DUOROLLSTD
Duo monitor mounting kit 0406-00-0857-01
Casters, Non locking 0401-00-0045
Casters, Locking 0401-00-0046
Utility basket 0202-00-0166
* Included in Duo monitor mounting kit
Washers, locking*
Mounting bolts, pole*
Duo Service Manual 0070-10-0604-01 3 - 9
Page 31

Parts Listing Parts
3.2 Parts Listing
REF. NUMBER PART NUMBER DESCRIPTION
1 0211-00-0146 Housing Screw (metric panhead)
2 0380-00-0475 Rear Housing
3 0441-00-0107 Chassis
4 0671-00-0045 Power Supply Board
5 0211-00-0145 Metric Panhead Screw
6 0671-00-0044 CPU/Display Board
7 0213-00-0032 Self Tapping Screw
8 0380-00-0472 Nellcor Connector Shroud
8A 0380-00-0473 Masimo Connector Shroud
9 0380-00-0476 Front Housing
10 0012-00-1595 SpO
11 0671-00-0246 Masimo Isolated Power Board
12 0211-00-0143 Screw
13 0671-00-0243 Masimo SpO
14 0012-00-1474 Masimo Flex Cable
15 0671-00-0247 Nellcor Isolated Power Board
16 0671-00-0242 Nellcor SpO
16a 0671-00-0066 Nell-3 SpO
17 0012-00-1457 Nellcor Flex Cable
17a 0012-00-1661 Nellcor Flex Cable
18 0386-00-0308 SpO
19 0104-00-0037 NIBP Module
20 0671-00-0063 Fan Driver Board
21 0671-00-0043 Battery Connector Board
22 0380-00-0481 Battery Latch
23 0380-00-0474 Battery Door
24 0346-00-0052 Battery Door Tether
25 0012-00-1592 Fan with cable
26 0348-00-0216 Fan Gasket
27 0213-00-4014 Screw
28 0386-00-0310 Fan Mounting Plate
29 0380-00-0471 Filler Panel
30 0367-00-0084 Handle
31 0211-00-0147 Handle Screw (metric panhead)
32 0334-00-1603-03 Rear Label, Lower, S/N
33 0348-00-0202 Foot
34 0380-00-0480-01 Power Switch Plunger
35 0380-00-0480-02 Clear Switch Plunger
36 0380-00-0480-03 Patient Size Switch Plunger
37 0380-00-0480-04 Start NIBP Switch Plunger
N/S - Not Shown
Power Cable
2
Board
2
Board
2
Board
2
Mounting Plate
2
3 - 10 0070-10-0604-01 Duo Service Manual
Page 32

Parts Parts Listing
REF. NUMBER PART NUMBER DESCRIPTION
38 0330-00-0052 Keypad Overlay
39 0103-00-0411 Pneumatic Fitting
40 0386-00-0309 Mounting Plate
41 See table below Rear Label, Upper
N/S See table below Display Overlay
N/S See table below Connector Label
N/S - Not Shown
Display Overlay
LANGUAGE OPTION PART NUMBER
English NIBP Only 0330-00-0053-01
English NIBP/SpO
2
0330-00-0053-11
Upper Rear Label
LANGUAGE PART NUMBER
English 0334-00-1641-01
Connector Label
DESCRIPTION PART NUMBER
No SpO
Masimo SpO
Nellcor SpO
2
2
2
0334-00-1602-01
0334-00-1602-02
0334-00-1602-04
Duo Service Manual 0070-10-0604-01 3 - 11
Page 33

Parts Listing Parts
This page intentionally left blank.
3 - 12 0070-10-0604-01 Duo Service Manual
Page 34

4.0
Repair Information
4.1 Introduction
This chapter of the Duo Service Manual provides the necessary technical information
needed to perform repairs on the instrument. The most important prerequisites for effective
troubleshooting are a thorough understanding of the instrument functions as well as an
understanding of the theory of operation.
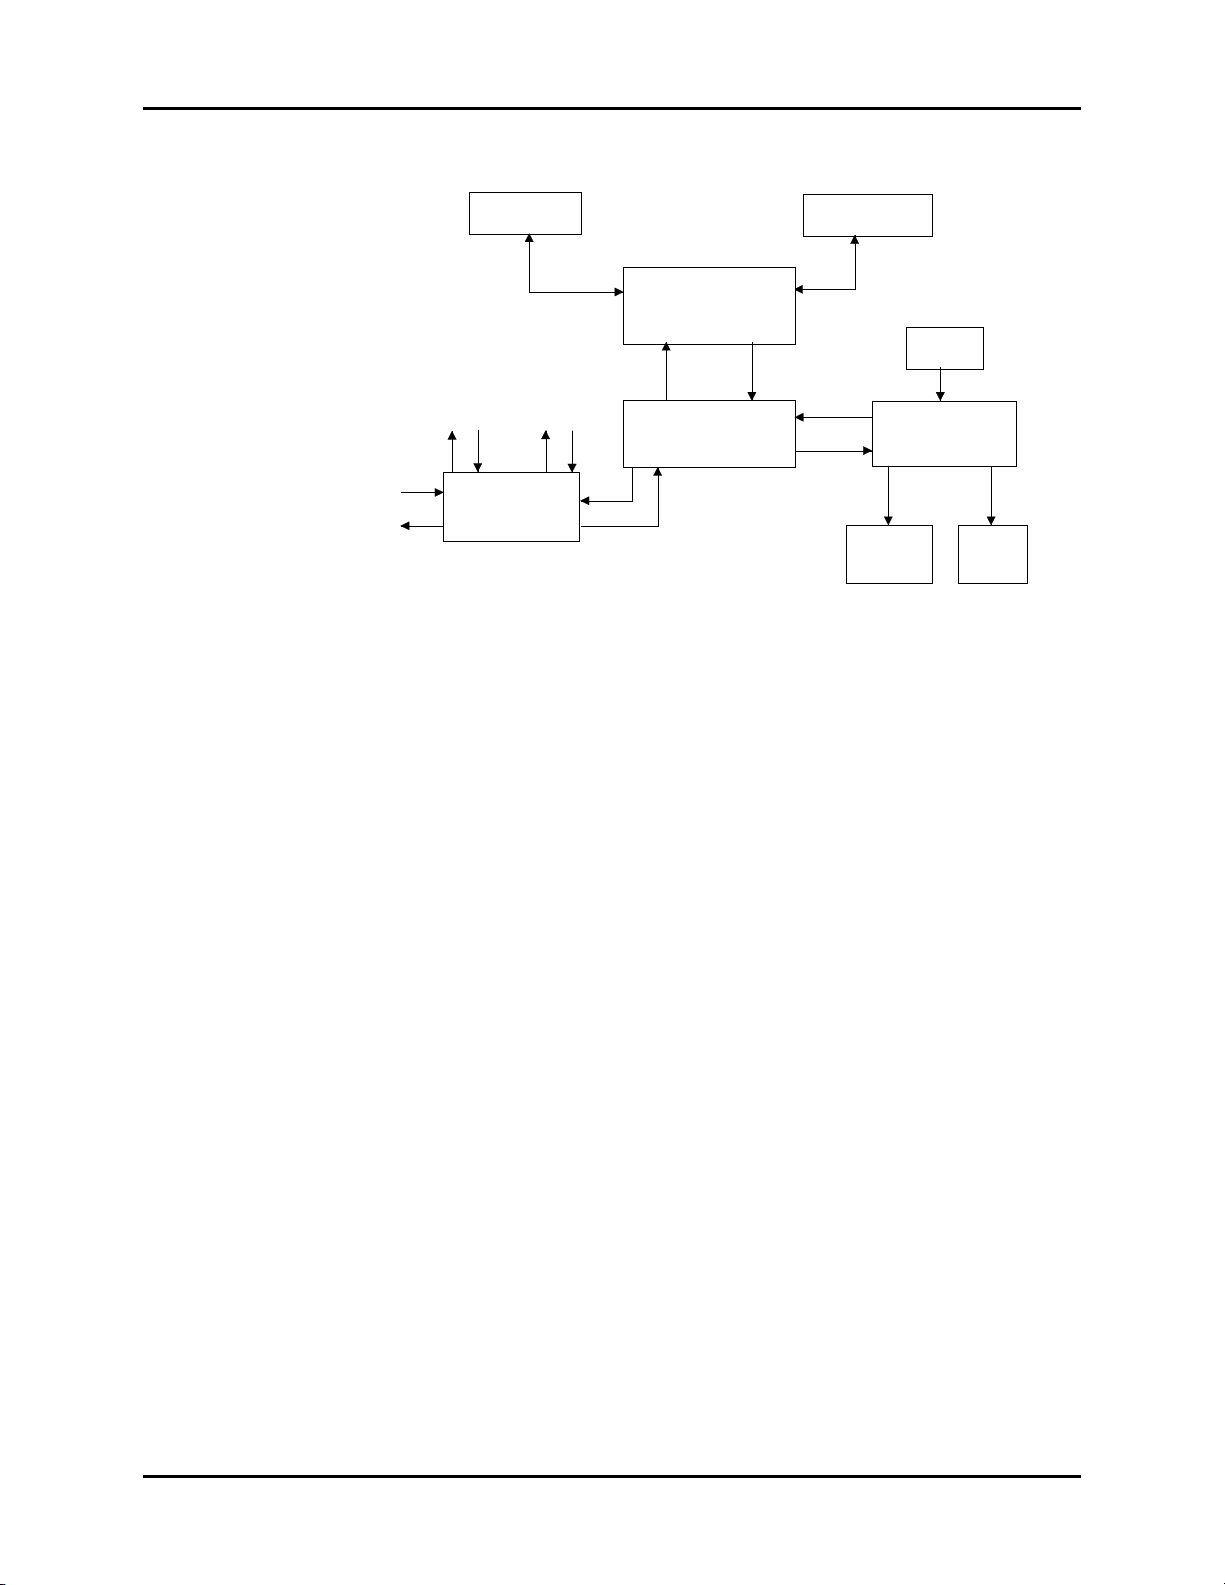
To P1 on Main
Control Board
To P1 on Main
Control Board
External
Interface
Serial
Interface
Battery P1
Fan
RS232<>TTL
Inverter
Power
Supply
Board
Fan
P2 P1
Drive
Board
P2
P3
FIGURE 4-1 Module Interconnection
Isolated
Power
P1 P2
Board
Isolated
Power
P1 P2
Board
P5
Main
P3
Control
Board
P4
P1
P2
Masimo
SpO2
J3 J1
Module
Nellcor
SpO2
J2 J1
Module
P1
NIBP
Module
SpO2
Sensor
SpO2
Sensor
Cuff
Duo™ Service Manual 0070-10-0604-01 4 - 1
Page 35

Troubleshooting Guide Repair Information
4.2 Troubleshooting Guide
Error Codes and Solutions
MESSAGE/
PROBLEM REASON SOLUTION
E01 NIBP Self Test Error NIBP Module hardware failure
E02 NIBP Communications
Error
E03 Loose Cuff Cuff is not properly wrapped or no cuff is present
E04 Air Leak Cuff, hose or connector is damaged, internal leak
E05 Air Pressure Failure Stable pressure value is not available (e.g. hoses
E06 Successful Pneumatic
Test
E07 Pneumatic Test Failed/
Pneumatic Leak
E08 Weak Signal Cuff is too loose or patient pulse is too weak
E09 Range Exceeded NIBP value exceeds the upper measurement limit
E10 Excessive Motion
Signal Saturated
E11 Over Pressure Pressure has exceeded the specified upper safety
E12 NIBP System Failure Operation of blood pressure pump system has
E13 NIBP Time Out Measuring time has exceeded 120 seconds
E14 NIBP Illegally Reset Unexpected NIBP reset
E15 NIBP Reset Failed NIBP reset failed
E16 NIBP Communications
CRC Error
E17 NIBP Patient Size
Change Error
E20 Masimo SpO
Interference
E21 Masimo SpO
Perfusion
E22 Masimo SpO
Much Light
E23 Masimo SpO
Unrecognized Sensor
E24 Masimo SpO
Communication Error
E25 Masimo SpO
Fault
E26 Masimo SpO
Fault
E28 Masimo SpO
E29 Masimo SpO
Signal IQ
2
Low
2
Too
2
2
2
Board
2
Sensor
2
Timeout SpO2 data has been determined continuously for
2
Low
2
Communications with NIBP Module have failed
are pinched or occluded)
Indicates NIBP pneumatic test was successful
Leak detected during the pneumatic test
Monitor is detecting too much motion and/or
noise to obtain a reading
limit
failed
NIBP Serial Communication CRC failure
Attempt to change Patient Size failed
Noise detected on the pulse signal prevents pulse
discrimination
Patient perfusion is low
There is too much ambient room light for the
sensor to function properly
The monitor does not recognize the sensor
The monitor and the SpO2 module are not
communicating
The Masimo SET board has failed to operate
properly
Defective sensor
more than 2 minutes, so SpO
from the display
data has timed out
2
The SpO2 signal quality is poor
4 - 2 0070-10-0604-01 Duo™ Service Manual
Page 36

Repair Information Troubleshooting Guide
Error Codes and Solutions (Continued)
MESSAGE/
PROBLEM REASON SOLUTION
E34 Masimo SpO2 Pulse
Rate Exceeded
E34 Nellcor SpO
Exceeded
E40 Nellcor SpO
Interference
E41 Nellcor SpO
PR
2
2
Check
2
Sensor
E42 Nellcor SpO
Communication Error
E43 Nellcor SpO
Pulse
E44 Nellcor SpO
Signal
E45 Nellcor SpO
2
Weak
2
Weak
2
Board
2
Fault
E46 Nellcor SpO
E47 Nellcor SpO
Motion Motion is detected. The message is removed
2
Timeout SpO2 data has been determined continuously for
2
E501 Unit Battery Voltage
Low
E504 Unit Keyboard Error 1 Error with front panel keypad board
E505 Monitor Shut Off
Failure
E506 SpO
Module Not
2
Recognized
Pulse Rate value exceeds the measurement range
Pulse Rate value exceeds the measurement range
Noise is detected on the pulse signal, preventing
pulse discrimination from the noise. The
interference may be due to motion, excess
infrared light or electrical/optical interference.
The message is removed when the noise is
removed
The Nellcor module senses an unstable or illegal
sensor. This may be due to a poor connection or
a bad sensor. The user is required to reconnect
the same sensor or connect a new sensor. The
message will be removed once the Nellcor
module clears the error
The front end module is having problems
communicating (i.e.: framing errors or bad
checksums) with the Nellcor module
A pulse rate can not be determined and all other
measurement conditions are normal. The message
is removed when a pulse is detected
Noise is detected but a pulse rate can not be
discriminated. The message is removed when a
pulse is detected
The SpO2 board has malfunctioned
when No Pulse status is detected or when motion
ceases
more than 2 minutes, so SpO
from the display
data has timed out
2
Battery voltage is low
Monitor cannot be turned off normally
Monitor cannot communicate with SpO2 module
during self-test
Duo™ Service Manual 0070-10-0604-01 4 - 3
Page 37

Troubleshooting Guide Repair Information
Monitor Failures
MESSAGE/
PROBLEM REASON SOLUTION
No display after
power-on, power
indicator does not
light.
NIBP or SpO
not function.
2
will
Bad line fuse Replace fuse
Bad power supply Replace power supply
Bad CPU/Display
board
CPU/Display board or
module failure.
Replace CPU/Display board
Isolate and replace defective board/module
4 - 4 0070-10-0604-01 Duo™ Service Manual
Page 38

Repair Information Troubleshooting Guide
Module Failures
MESSAGE/
PROBLEM REASON SOLUTION
NIBP cuff cannot
be inflated.
Intermittently won't
take an NIBP
reading.
NIBP readings
inappropriately
high or low for
patient condition.
No SpO
SpO
inaccurate
reading SpO2 sensor or cable
2
value is
2
Pinched or leaking hose
or cuff
Loose cuff or patient
movement
Incorrect cuff size.
Incorrectly applied cuff
NIBP module is out of
calibration
damaged or
disconnected
Sensor not on patient
SpO2 sensor or cable
damaged or
disconnected
Sensor not on patient
Coloring agent (dye)
has been injected into
patient
Patient movement Keep patient quiet
Patient is cold Warm patient and retry
Patient is wearing nail
polish
Check hose and cuff. Replace as needed
Keep the patient quiet. Reapply cuff
Use appropriate size cuff. Ensure correct cuff
application
Calibrate/replace NIBP module
Check sensor placement and connection. Replace
if damaged
Check sensor placement and connection. Replace
if damaged
Retry after the coloring agent has dissipated
Remove nail polish
Duo™ Service Manual 0070-10-0604-01 4 - 5
Page 39

Disassembly Instructions Repair Information
4.3 Disassembly Instructions
Before disassembling the unit, perform the following:
• Turn off the unit and remove the line cord
• Remove all cables and hoses
• Remove the battery
• Perform all maintenance on a properly grounded work station.
4.3.1 Tools Needed
• Phillips Screwdriver
• 5 mm nutdriver
4.3.2 Front Housing Removal
1. Remove four (4) 3 x 30 mm Phillips panhead machine screws from the corners of the
Rear Housing.
2. Carefully separate the front and rear housings and disconnect the cables from the CPU/
Display PCB connectors P02, P03 and P07. Disconnect the NIBP tubing from the front
housing pressure fitting.
4.3.3 SpO2 Interface Board Removal
1. Disconnect the cable from P01 on the CPU/Display pcb.
2. Remove three (3) 5mm hexnuts from their stand-offs on the SpO2 pcb.
3. Lift the SpO
Interface pcb from the stand-offs.
2
4.3.4 SpO2 Board Removal
1. Remove three (3) 5mm hex stand-offs from the SpO2 Board.
2. Remove one (1) 3 x 6 mm Phillips panhead machine screw from the SpO2 Board.
3. Lift the SpO
Board from the mounting bracket.
2
4.3.5 CPU/Display Board Removal
1. Remove four (4) 3 x 6 mm Phillips panhead machine screws from the corners of the
CPU/Display Board.
2. Lift the CPU/Display Board from the Front Housing.
4.3.6 NIBP Module Removal
1. Remove four (4) 3 x 6 mm Phillips panhead machine screws from the corners of the NIBP
module frame.
2. Lift the NIBP module from the battery housing frame.
4 - 6 0070-10-0604-01 Duo™ Service Manual
Page 40

Repair Information Disassembly Instructions
4.3.7 Power Supply Removal
1. Remove the battery cable from P1 on the power supply PCB.
2. Remove four (4) 3 x 6 mm Phillips panhead machine screws from the corners of the
power supply PCB.
3. Remove one (1) 3 x 6 mm Phillips panhead machine screw from the line power entry
connector.
4. Slide the Power Supply pcb towards the bottom (open end) of the battery housing frame
until it can go no farther.
5. Lift the power supply PCB from the battery housing frame. Use care to avoid breaking
the positioning tab from the line power entry connector.
Duo™ Service Manual 0070-10-0604-01 4 - 7
Page 41

0070-10-0604-01 Revision F July 12, 2010
Page 42

Mindray DS USA, Inc. • 800 MacArthur Boulevard • Mahwah, NJ 07430 • USA •
Dom. Customer Service: 1.800.288.2121 • Intl. Customer Service: +1.201.995.8000 •
Dom. Fax: 1.800.926.4275 • Intl. Fax: +1.201.995.8680 • www.mindray.com
Mindray Medical Netherlands B.V.• P.O. Box 26 • 3870 CA Hoevelaken • The Netherlands •
Tel: +31 33 25 44 911 • Fax: +31 33 25 37 621
Mindray (UK) Limited • 3 Percy Road • St. John’s Park • Huntingdon • Cambridgeshire PE29 6SZ •
United Kingdom • Tel: 01480 416840 • Fax: 01480 436588
Mindray Medical France SARL • Europarc Créteil •123, Chemin des Bassins •
94035 Créteil Cedex • France • Tel: (0)1.45.13.91.50 • Fax: (0)1.45.13.91.51
Mindray Medical German GmbH • Zwischen den Bächen 4 • 64625 Bensheim • Germany •
Tel: +49.6251.17524-0 • Fax: +49.6251.17524-20
Mindray Medical International Ltd. • 2813 Office Tower, Convention Plaza • No 1 Harbour Road •
Wanchai • Hong Kong • Tel: +852 2793 5596 • Fax: +852 2344 8824
0002-08-8918
 Loading...