

Solution for Liquid Level Detect error of BS200
Solution for Liquid Level Detect error of BS200
I. General
When aspirating samples/reagents and dispensing sample in reaction disc, the
BS-200 chemistry analyzer requires the probe to dip into the liquid for a specific depth
(3mm below the liquid level), so as to avoid carryover that has impacts on test results, and
to avoid air aspiration when the reagent/sample is insufficient. Also when washing the
probe in washing pool, probe also need to stay at a special depth to wash the inner part
and outer part.
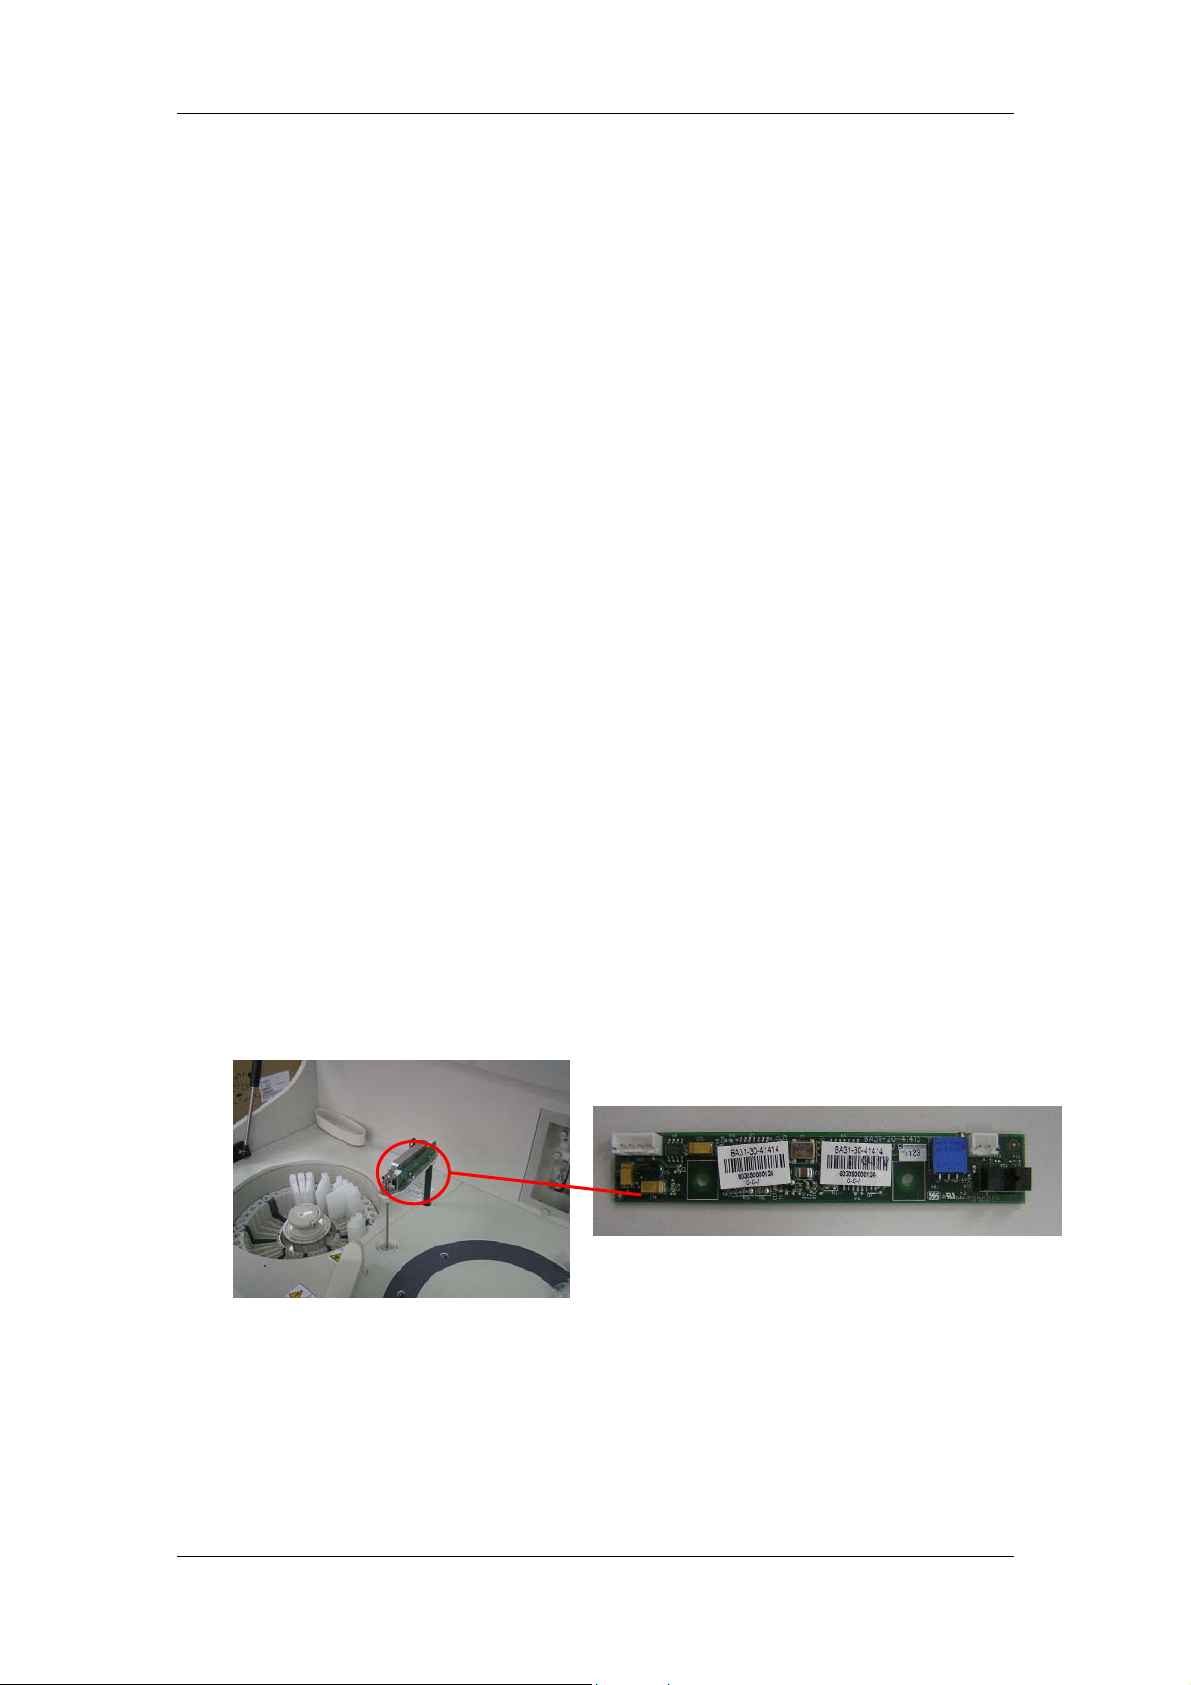
II. Composition of Level Detection System
The Level Detection System consists of:
1) Sample/reagent probe,
2) Liquid level detection board,
3) Electric wire from liquid level detection board to probe connection board,
4) Electric wire from liquid level detection board to main board,
5) Main board.
Liquid Level Detect board
The level detection board requires the 5V and 9V voltages. The 9V voltage is the
working voltage of the phase-locked loop, and 5V is the working voltage of other
components on this board. The main control board supplies this board with a 12V voltage,
which is converted into the 5V and 9V voltages as required.
:
Main board

Solution for Liquid Level Detect error of BS200
r
Sample/reagent Probe (Dual-tube)
Inner probe tube
内针管
Inner insulation layer
内绝缘层
Outer probe tube
外针管
Outer insulation laye
外绝缘层
III. Level Detection process
When the sample/reagent probe touches the sample/reagent level, there will be a
change in the capacitance between the two tubes inside the probe. As the capacitance

Solution for Liquid Level Detect error of BS200
changes, the phase changes. The phase discriminator then outputs a voltage variation,
which will be filtered by a low-pass filter. After that, a band-pass filter takes the variation
and reshapes it to pulse signals, which are finally transmitted to the MCU of the main
control board.
Solution for Liquid Level Detect error of BS200
A
r
t
IV. Check procedure (please enlarger the font to see clearly)
LLD error
1) Can’t detect
liquid level in
reaction disc
When aspirate reagent, probe detect reagent level by mistake, so probe aspirates air which leads
to no reagent in reaction disc, when add sample, probe can’t detect liquid level at special height.
Cause: see 3) Detect liquid level by mistake
When aspirate reagent, probe aspirates insufficient reagent and add to reaction disc, when add
sample, probe can’t detect liquid level at special height in reaction disc.
Cause: syringe not fixed, bubble in reagent disc, reagent leakage
s 2) LLD function paralysis
No reagent in reaction disc
Insufficient reagent in reaction disc
LLD function paralysis
When probe touches liquid level, the LLD voltage changes normally, and LED1 is on for about 2
seconds, but still there is an error message said: can’t detect liquid level
Cause: wire disconnect or bro ken, c onnec tor f aulty. In this cas e, u sually w e can’ t detec t th e v olt ag e
change in main board.
Solution: reconnect wire on LLD board and on main board,
LLD signal transmit failure
When probe touches liquid level, the conversion of LLD voltage changes normally, and LED1 is on fo
about 2 seconds, also we can measure the v olt age change i n J35, but still ther e is a LLD e rror message
Shown in the screen.
LLD signal tackle error (by main board)
2) LLD function
paralysis
3) Detect liquid
level by mistake
Probe is ok, but LED on LLD board is always on, or even
probe touches the liquid level, LED still off, that may be
Produce LLD
signal
Failure
In this condition, there is no error message at all, but we can know from reaction curve that no
sample/reagent be added
Possible problem: Probe broken, connection wire not good, signal influence (main board or LLD
board not work normally).
Solution: reference check procedure and change relation parts
This condition only occurs when add sample, (when add reagent, the probe doesn’t detec
liquid level) although there is no error message at all, but we can get some information from
reaction curve, also, there will be some leakage from the needlepoint when probe moves from
reaction disc to washing pool.
Possible problem: probe isn’t in the center of cuvette, bubble in reaction cuvette
something wrong with LLD board, also we can check the
voltage on LLD board to confirm.
Solution: change the LLD board, adjust LLD voltage
Inner part and outer part depart, distort, and so on
Solution: change probe
Detect liquid level by mistake in sample/reagent disc
Detect liquid level by mistake in reaction disc
LLD board problem
Probe problem
Solution for Liquid Level Detect error of BS200
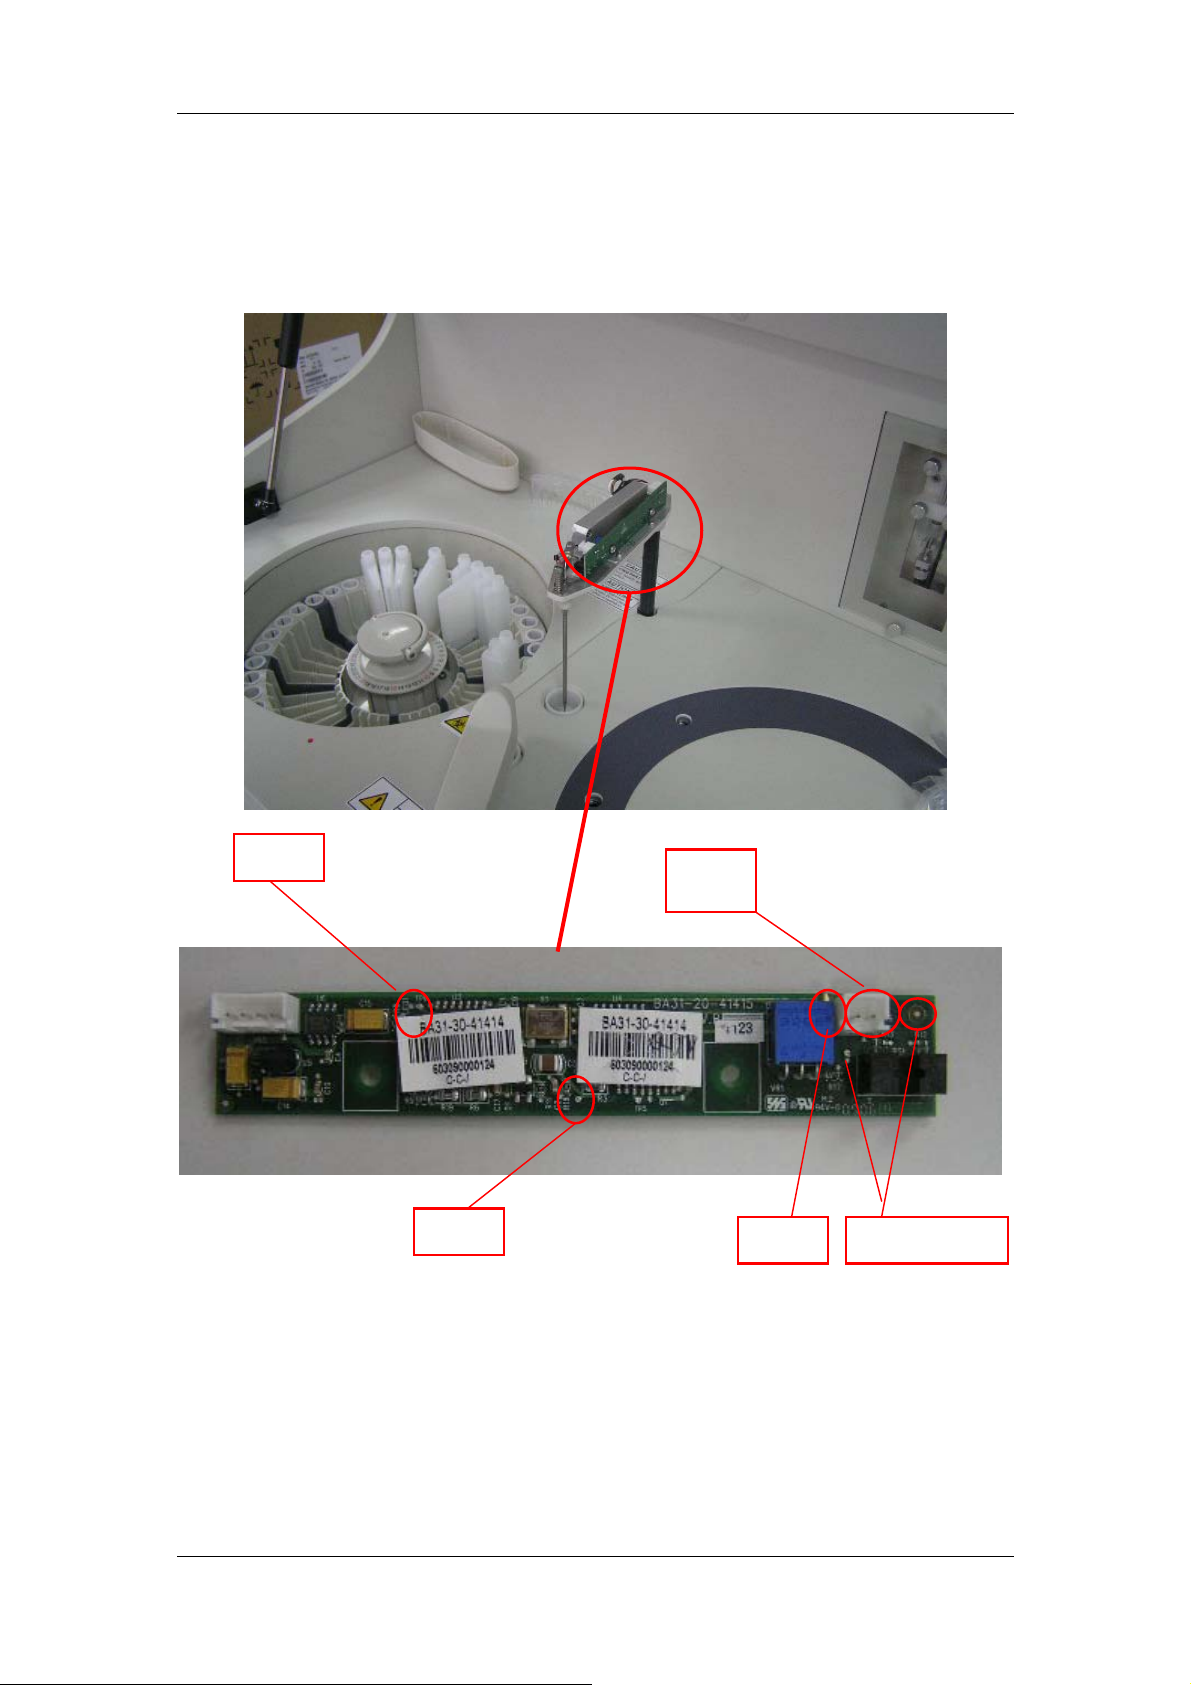
V. Convert defective parts
(a) LLD voltage adjustment
Location of the liquid level detect board:
LED1
Liquid Level Detect board:
FRONT VIEW 1
TP2
What we need to do is like below:
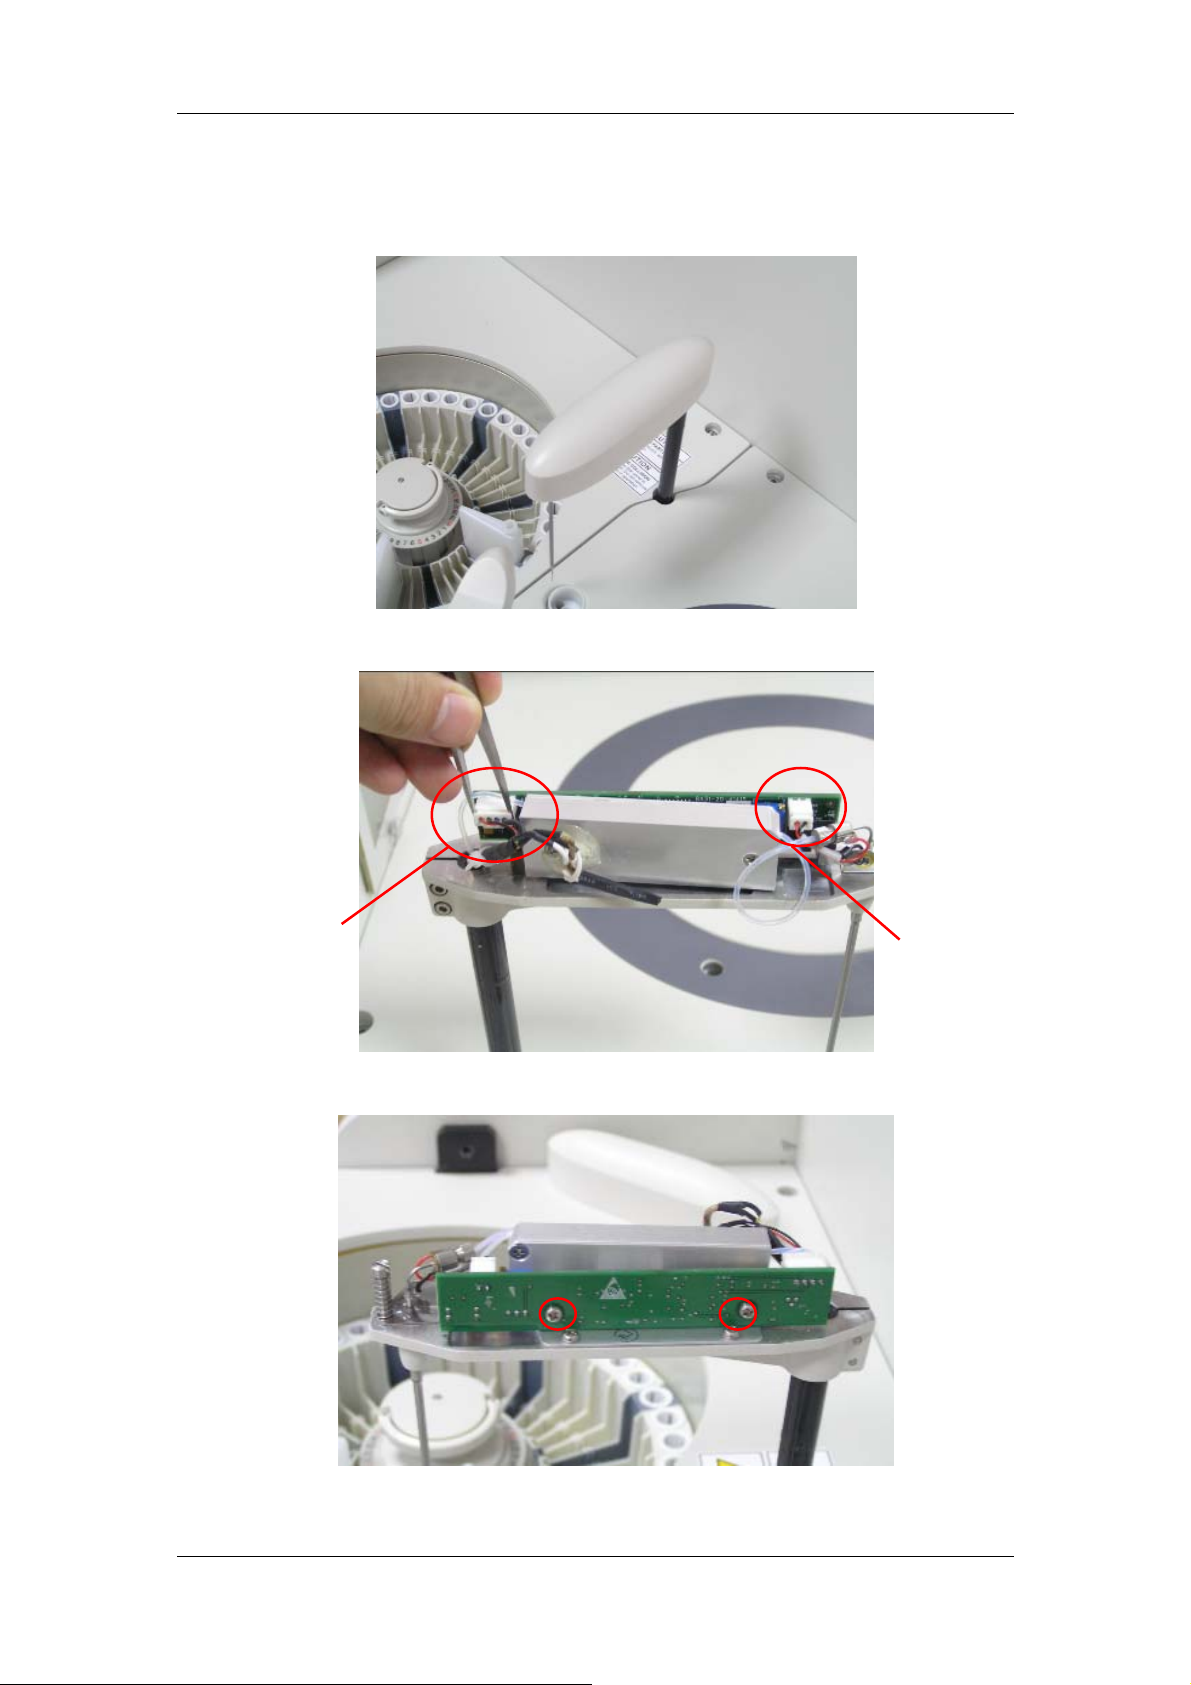
1) Detach the cover of probe arm.
J66
VR1
TP4(ground)

Solution for Liquid Level Detect error of BS200
2) Find TP2, TP4, and the VR1 (marked above)
BACK VIEW 1
TP4(ground)
TP2
3) Adjust VR1, to make voltage between TP2 and TP4 are 4.5 volt.
Remember: every time after we convert a new probe or LLD board, we need to
adjust LLD voltage to 4.5V.Also,this adjustment is the foundation of solution for
LLD error.
(b) Replace probe
(i) Removing the old Probe
Before replacing or unclogging the probe, remove it first in the following procedures:
1. Place the Power of the analyzing unit to OFF.
2. Pull the probe arm to the highest point by hand. Rotate the probe arm to a
position above the sample/reagent disk for convenient operation.
3. Grab the lower part of the arm covers with two hands and pull them slightly
outwards and remove the cover upward from the arm base.
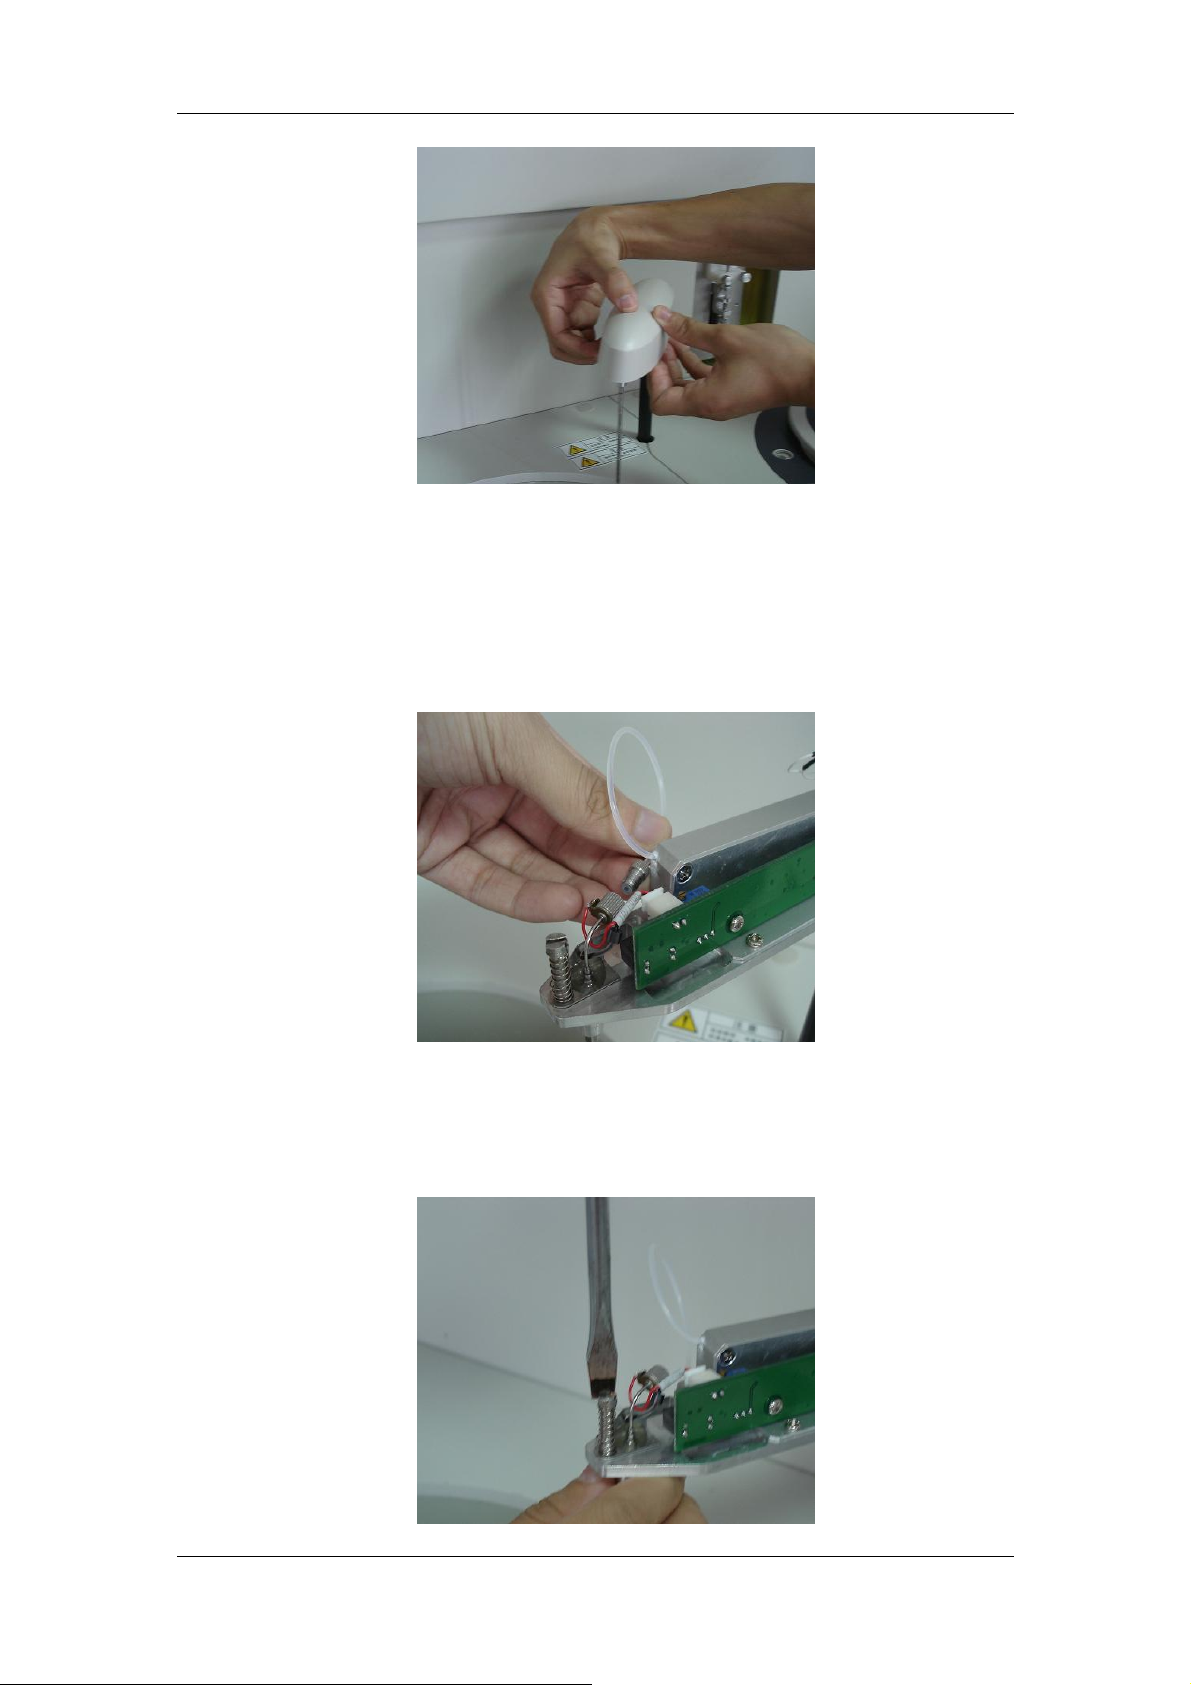
Solution for Liquid Level Detect error of BS200
Removing the arm cover
4. Disconnecting the probe from the tubing.
Hold the probe’s fluid connector with one hand and the tubing connector with the other.
Rotate the tubing connector counter-clockwise until it is loosened. Unplug the tube from
the probe.
Disconnecting the probe from the tubing
5. Removing the retaining screw of the probe
Remove the retaining screw with a screwdriver and take away the spring.

Solution for Liquid Level Detect error of BS200
1 Removing the retaining screw
6. Unplugging the lead of the level detector
The probe arm is delicate. Exercise caution when disconnecting the connector. Excessive
force may damage the connector and/or the level detection board.
图 2 Unplugging the connector
7. Removing the probe
Slowly pull the probe away from the probe arm.
(ii) Install new probe
1. Add the small washer in to the probe.
2. Insert the probe into the probe arm.
Put the washer in the root
hole of probe (prevent
leakage)

Solution for Liquid Level Detect error of BS200
3. Sleeve the spring over the pole in the probe arm, and screw the retaining screw
back onto the pole.
4. Insert the connector of the probe lead into corresponding jack on the level
detection board. The probe arm is delicate. Exercise caution when inserting the
connector. Excessive force may damage the connector and/or the level detection
board.
5. Screw the probe’s fluid connector back to the tubing connector. Note that
excessive force may bend the probe.
6. Then push the probe upward and then release the probe to check if it can move

Solution for Liquid Level Detect error of BS200
freely. If not, find the reason and solve the problem.
7. Adjust the liquid level detect voltage to 4.5V as (a).
8. Installing the arm cover.
9. Pinch the probe by the part near the probe arm. Gently push the probe upward
and then release the probe to see if it can move freely. If not, remove the arm
cover and re-install it.
10. Do some tests to check whether every thing is ok.
Solution for Liquid Level Detect error of BS200
(c) Replace LLD board
1. Detach the arm cover.
2. Unplug J65 and J66
J65
3. Disconnect the 2 screws and we can detach the LLD board.
4. Change the board.
J66

Solution for Liquid Level Detect error of BS200
5. Set everything back and remember to adjust LLD voltage to 4.5V as procedure
(a), and pinch the probe by the part near the probe arm. Gently push the probe
upward and then release the probe to see if it can move freely.
We should make sure the
block board of probe in
the sensor
(d) Replace Main board
1. Detach the screws, and we can detach the protective cover.
There are totally 3
screws each side
2. After that, detach the 10 screws and we can remove the desk cover.

Solution for Liquid Level Detect error of BS200
3. Remove the 8 screws below, and detach the cover of board and syringe.
4. We can see the main board
5. Just disconnect the four screws and all of the connectors; we can change the
main board.
Probe connection
Board
Main board

Solution for Liquid Level Detect error of BS200
6. Set everything back.
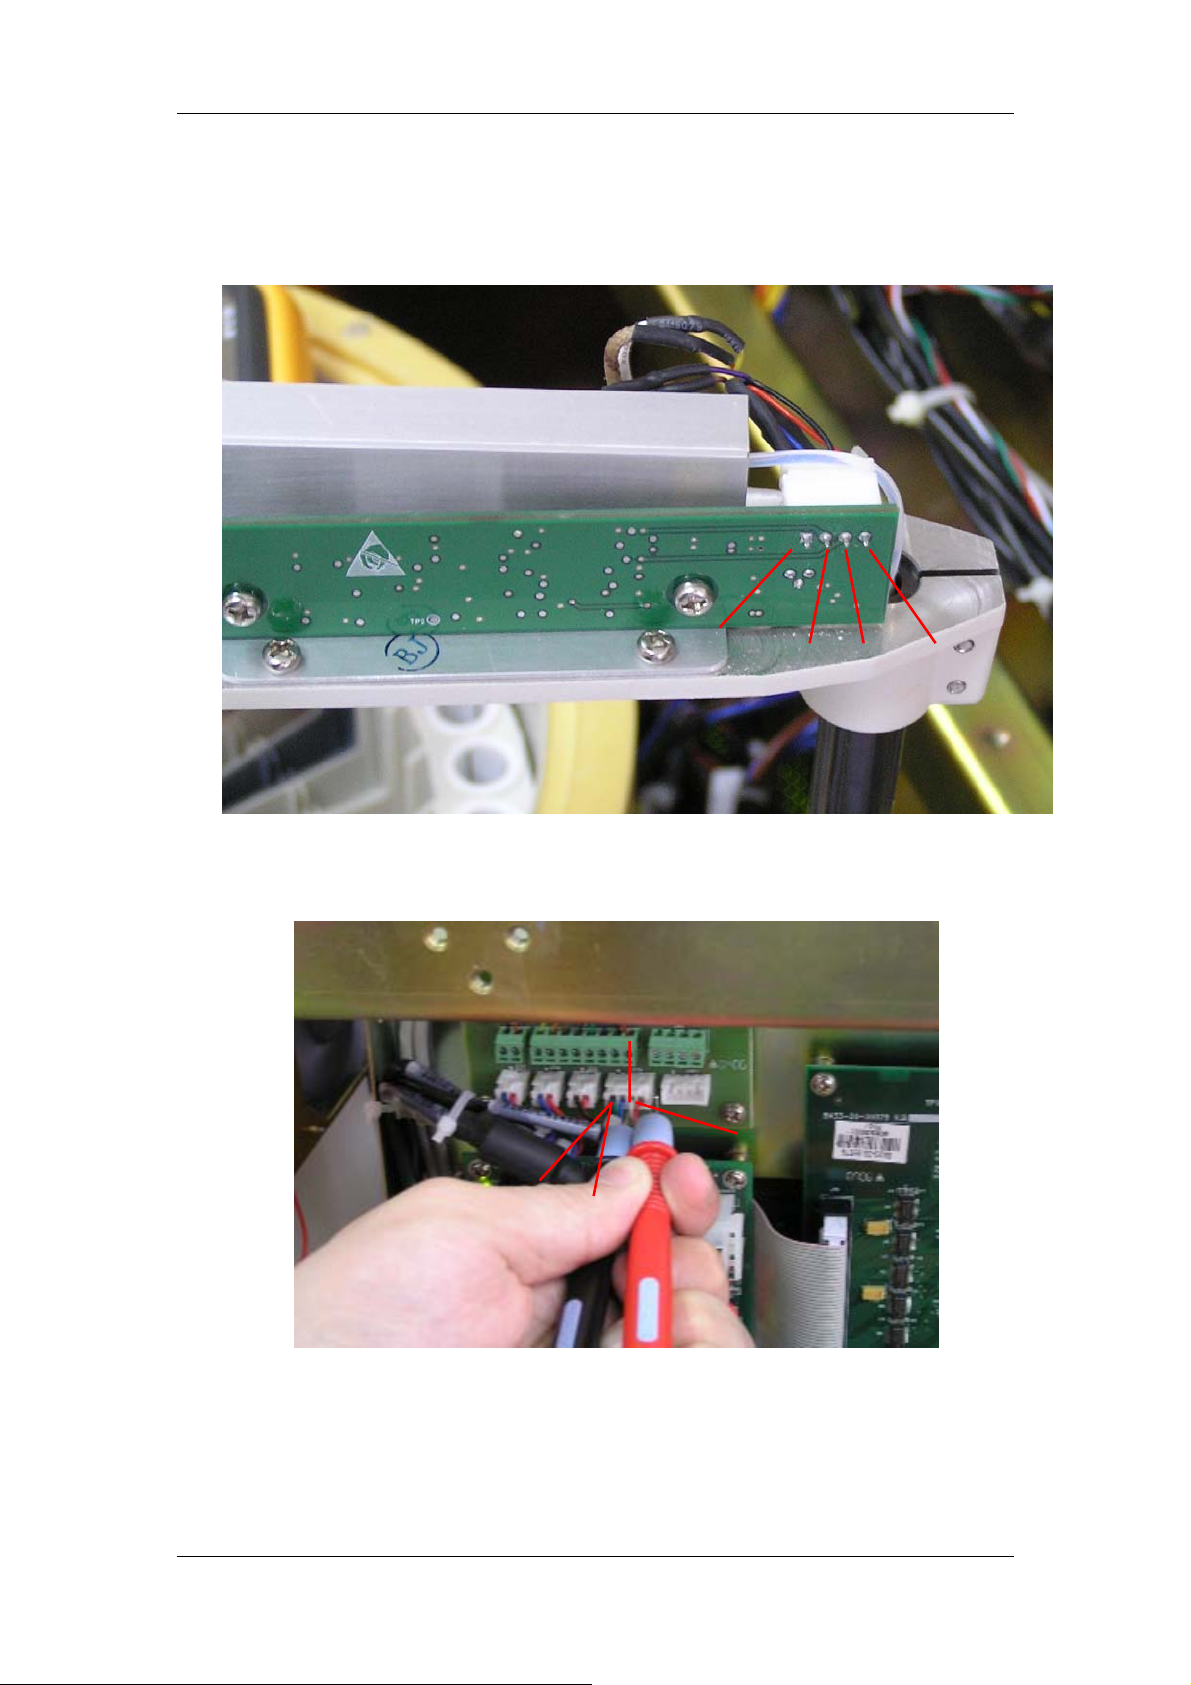
VI. Check procedure of LLD signal
1. First, we need to know how to simulate LLD and collision function. Two picture
below indicates the method.
Simulate collision function
Lift
Simulate LLD function
Det ach relation p arts until we can see the main board and LLD board. (See procedure
d)
Not touch liquid level Touch liquid level
2. Turn on the main power and analysis power.
3. Adjust LLD voltage on LLD board to 4.5V(TP2 and TP4). When detect liquid level,
voltage between TP2 and TP4 should rise more than 4.5v(4.8v, 5v,and so on), if
we can’t do this, or we can do this but there is LLD error, please turn to step 5.
Solution for Liquid Level Detect error of BS200
4. Check the LLD signal in LLD board (in this condition, you’d better ask a people to
help you simulate LLD and collision function):
Signal in LLD board:
AD BC
Signal in probe connection board:
Signal in probe connection board
A
Signal in LLD board
C
D
B
Signal in main board:

Solution for Liquid Level Detect error of BS200
Signal in main board
DACB
Pin Function Description
A Ground
Collision
B
signal
C LLD signal
D Power supply
LLD: normally point A and C is 0V,when the probe touches
the liquid, voltage will suddenly change to 5v,and after
about 1 second, back to 0V again.
Collision: normally point A and B is 5V,when collision
occurs, voltage will suddenly change to 0v.
Power supply is always 12V without change.
VII. Summary (not finished)
Because BS200 only have one probe, one LLD board, and one syringe, so we can
image that sometimes when LLD error occurs, always this error will happen in both
sample disc and reagent disc. If only occurs in one disc, we should pay more attention to
ample and reagent itself.
 Loading...