


Operating and installation instructions
Fridge freezer
with Dynamic cooling and ice maker
KF 889 iDNE-1
To avoid the risk of accidents or damage to the appliance, it is
essential to read these operating instructions before it is installed or used for the
first time.
G
M.-Nr. 06 175 860

Contents
Description of the appliance. . . . . . . . . . . . . . . . . . . . . . . . . . . . . . . . . . . . . . . . . 5
Caring for the environment . . . . . . . . . . . . . . . . . . . . . . . . . . . . . . . . . . . . . . . . . . 7
Warning and Safety instructions . . . . . . . . . . . . . . . . . . . . . . . . . . . . . . . . . . . . . 8
How to save energy . . . . . . . . . . . . . . . . . . . . . . . . . . . . . . . . . . . . . . . . . . . . . . . 12
Switching on and off . . . . . . . . . . . . . . . . . . . . . . . . . . . . . . . . . . . . . . . . . . . . . . 14 To switch the refrigerator section off separately . . . . . . . . . . . . . . . . . . . . . . . . 14 Safety lock . . . . . . . . . . . . . . . . . . . . . . . . . . . . . . . . . . . . . . . . . . . . . . . . . . . . . . . 15 Switching off for longer periods of time . . . . . . . . . . . . . . . . . . . . . . . . . . . . . . . . . 15
The correct temperature . . . . . . . . . . . . . . . . . . . . . . . . . . . . . . . . . . . . . . . . . . . 16
. . . in the refrigerator . . . . . . . . . . . . . . . . . . . . . . . . . . . . . . . . . . . . . . . . . . . . . . . 16
. . . in the freezer . . . . . . . . . . . . . . . . . . . . . . . . . . . . . . . . . . . . . . . . . . . . . . . . . . 16 Temperature selection . . . . . . . . . . . . . . . . . . . . . . . . . . . . . . . . . . . . . . . . . . . . . . 16 Temperature range . . . . . . . . . . . . . . . . . . . . . . . . . . . . . . . . . . . . . . . . . . . . . . 17 Temperature displays. . . . . . . . . . . . . . . . . . . . . . . . . . . . . . . . . . . . . . . . . . . . . . . 17 Temperature display brightness . . . . . . . . . . . . . . . . . . . . . . . . . . . . . . . . . . . . 18
Alarm. . . . . . . . . . . . . . . . . . . . . . . . . . . . . . . . . . . . . . . . . . . . . . . . . . . . . . . . . . . 19 Temperature alarm. . . . . . . . . . . . . . . . . . . . . . . . . . . . . . . . . . . . . . . . . . . . . . . . . 19 Door alarm . . . . . . . . . . . . . . . . . . . . . . . . . . . . . . . . . . . . . . . . . . . . . . . . . . . . . . . 19 Switching on the alarm system . . . . . . . . . . . . . . . . . . . . . . . . . . . . . . . . . . . . . . . 19 Switching the alarm off early . . . . . . . . . . . . . . . . . . . . . . . . . . . . . . . . . . . . . . . . . 19
Super cool, super freeze and dynamic cooling. . . . . . . . . . . . . . . . . . . . . . . . . 20 Super cool . . . . . . . . . . . . . . . . . . . . . . . . . . . . . . . . . . . . . . . . . . . . . . . . . . . . . . . 20 Freezing fresh food . . . . . . . . . . . . . . . . . . . . . . . . . . . . . . . . . . . . . . . . . . . . . . . . 20 Super freeze. . . . . . . . . . . . . . . . . . . . . . . . . . . . . . . . . . . . . . . . . . . . . . . . . . . . . . 21 Dynamic cooling . . . . . . . . . . . . . . . . . . . . . . . . . . . . . . . . . . . . . . . . . . . . . . . . . . 21
Using the refrigerator efficiently. . . . . . . . . . . . . . . . . . . . . . . . . . . . . . . . . . . . . 22 Different storage zones . . . . . . . . . . . . . . . . . . . . . . . . . . . . . . . . . . . . . . . . . . . . . 22 Coldest area . . . . . . . . . . . . . . . . . . . . . . . . . . . . . . . . . . . . . . . . . . . . . . . . . . . 22 Warmest area . . . . . . . . . . . . . . . . . . . . . . . . . . . . . . . . . . . . . . . . . . . . . . . . . . 22 Food which should not be stored in a refrigerator. . . . . . . . . . . . . . . . . . . . . . . . . 22 Storing food correctly. . . . . . . . . . . . . . . . . . . . . . . . . . . . . . . . . . . . . . . . . . . . . . . 23 Fruit and vegetables . . . . . . . . . . . . . . . . . . . . . . . . . . . . . . . . . . . . . . . . . . . . . 23
Adjusting the interior fittings . . . . . . . . . . . . . . . . . . . . . . . . . . . . . . . . . . . . . . . 24 Moving the shelves . . . . . . . . . . . . . . . . . . . . . . . . . . . . . . . . . . . . . . . . . . . . . . . . 24 Split shelf . . . . . . . . . . . . . . . . . . . . . . . . . . . . . . . . . . . . . . . . . . . . . . . . . . . . . . . . 24 Adjusting the door shelves . . . . . . . . . . . . . . . . . . . . . . . . . . . . . . . . . . . . . . . . . . 24 Moving the bottle divider . . . . . . . . . . . . . . . . . . . . . . . . . . . . . . . . . . . . . . . . . . . . 24

Contents
Freezing and storing food . . . . . . . . . . . . . . . . . . . . . . . . . . . . . . . . . . . . . . . . . . 25 Maximum freezing capacity. . . . . . . . . . . . . . . . . . . . . . . . . . . . . . . . . . . . . . . . . . 25 Storing frozen food. . . . . . . . . . . . . . . . . . . . . . . . . . . . . . . . . . . . . . . . . . . . . . . . . 25 Home freezing . . . . . . . . . . . . . . . . . . . . . . . . . . . . . . . . . . . . . . . . . . . . . . . . . . . . 25 Hints on home freezing . . . . . . . . . . . . . . . . . . . . . . . . . . . . . . . . . . . . . . . . . . . 25 Packing . . . . . . . . . . . . . . . . . . . . . . . . . . . . . . . . . . . . . . . . . . . . . . . . . . . . . . . 26 Before placing food in the freezer . . . . . . . . . . . . . . . . . . . . . . . . . . . . . . . . . . 26 Placing food in the freezer . . . . . . . . . . . . . . . . . . . . . . . . . . . . . . . . . . . . . . . . 26 Freezer calendar . . . . . . . . . . . . . . . . . . . . . . . . . . . . . . . . . . . . . . . . . . . . . . . . . . 27 Marker system for frozen food . . . . . . . . . . . . . . . . . . . . . . . . . . . . . . . . . . . . . . . . 27 Defrosting. . . . . . . . . . . . . . . . . . . . . . . . . . . . . . . . . . . . . . . . . . . . . . . . . . . . . . . . 27 Cooling drinks . . . . . . . . . . . . . . . . . . . . . . . . . . . . . . . . . . . . . . . . . . . . . . . . . . . . 28 Freezer tray . . . . . . . . . . . . . . . . . . . . . . . . . . . . . . . . . . . . . . . . . . . . . . . . . . . . . . 28 Cool pack. . . . . . . . . . . . . . . . . . . . . . . . . . . . . . . . . . . . . . . . . . . . . . . . . . . . . . . . 28
Ice cube maker . . . . . . . . . . . . . . . . . . . . . . . . . . . . . . . . . . . . . . . . . . . . . . . . . . . 29
Defrosting . . . . . . . . . . . . . . . . . . . . . . . . . . . . . . . . . . . . . . . . . . . . . . . . . . . . . . . 31 Refrigerator section . . . . . . . . . . . . . . . . . . . . . . . . . . . . . . . . . . . . . . . . . . . . . . . . 31 Freezer section . . . . . . . . . . . . . . . . . . . . . . . . . . . . . . . . . . . . . . . . . . . . . . . . . . . 31
Cleaning and care . . . . . . . . . . . . . . . . . . . . . . . . . . . . . . . . . . . . . . . . . . . . . . . . 32 Cleaning the interior and accessories . . . . . . . . . . . . . . . . . . . . . . . . . . . . . . . . . . 32 Cleaning the ice cube tray. . . . . . . . . . . . . . . . . . . . . . . . . . . . . . . . . . . . . . . . . . . 32 Ventilation gaps . . . . . . . . . . . . . . . . . . . . . . . . . . . . . . . . . . . . . . . . . . . . . . . . . . . 33 Door seals . . . . . . . . . . . . . . . . . . . . . . . . . . . . . . . . . . . . . . . . . . . . . . . . . . . . . . . 33
Problem solving guide. . . . . . . . . . . . . . . . . . . . . . . . . . . . . . . . . . . . . . . . . . . . . 35
Noises . . . . . . . . . . . . . . . . . . . . . . . . . . . . . . . . . . . . . . . . . . . . . . . . . . . . . . . . . 38
Service Department . . . . . . . . . . . . . . . . . . . . . . . . . . . . . . . . . . . . . . . . . . . . . . . 39
Mains water connection . . . . . . . . . . . . . . . . . . . . . . . . . . . . . . . . . . . . . . . . . . . 40 Notes on connecting to the mains water supply . . . . . . . . . . . . . . . . . . . . . . . . . . 40 Connection to the water inlet . . . . . . . . . . . . . . . . . . . . . . . . . . . . . . . . . . . . . . . . . 40
Electrical connection. . . . . . . . . . . . . . . . . . . . . . . . . . . . . . . . . . . . . . . . . . . . . . 42 Electrical connection U.K. . . . . . . . . . . . . . . . . . . . . . . . . . . . . . . . . . . . . . . . . . . . 42
Installation . . . . . . . . . . . . . . . . . . . . . . . . . . . . . . . . . . . . . . . . . . . . . . . . . . . . . . 43 Location . . . . . . . . . . . . . . . . . . . . . . . . . . . . . . . . . . . . . . . . . . . . . . . . . . . . . . . . . 43 Climate range . . . . . . . . . . . . . . . . . . . . . . . . . . . . . . . . . . . . . . . . . . . . . . . . . . 43 Ventilation. . . . . . . . . . . . . . . . . . . . . . . . . . . . . . . . . . . . . . . . . . . . . . . . . . . . . . . . 43 Before installation. . . . . . . . . . . . . . . . . . . . . . . . . . . . . . . . . . . . . . . . . . . . . . . . . . 43 Building into a peninsular run . . . . . . . . . . . . . . . . . . . . . . . . . . . . . . . . . . . . . . . . 43

Contents
Building-in dimensions . . . . . . . . . . . . . . . . . . . . . . . . . . . . . . . . . . . . . . . . . . . . 44
Changing the door hinging . . . . . . . . . . . . . . . . . . . . . . . . . . . . . . . . . . . . . . . . 45
Building in the appliance . . . . . . . . . . . . . . . . . . . . . . . . . . . . . . . . . . . . . . . . . . 47
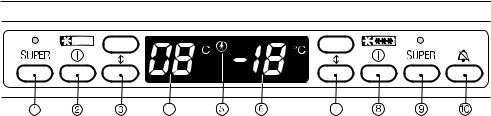
Description of the appliance
aSuper cool button and indicator light
bOn button for switching the whole appliance on and
On/Off button for independently switching
the refrigerator section on and off
cTemperature selector buttons for the refrigerator section Upper button: warmer Lower button: colder
dRefrigerator section temperature display
eSafety lock indicator light
fFreezer section temperature display
gTemperature selector buttons for the freezer section Upper button: warmer Lower button: colder
hMaster switch for switching the whole appliance on and off
iSuper freeze button and indicator light
jAlarm button
5
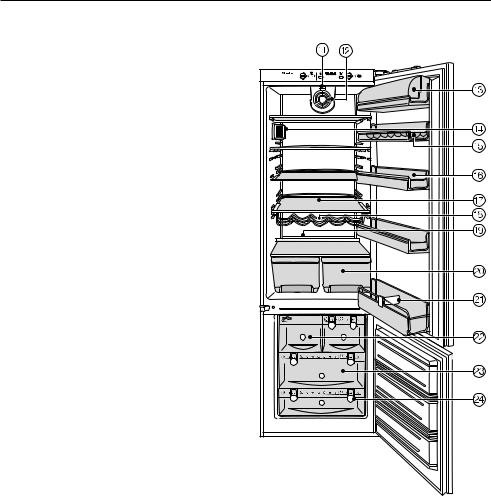
Description of the appliance
kSwitch for Dynamic cooling
lDynamic cooling fan
mButter and cheese compartment
nInterior lighting
oEgg tray
pDoor shelves
qShelves
rBottle rack
sCondensate channel and drain hole
tFruit and vegetable containers
uDivider*
vIce cube drawer with automatic ice cube maker
wFreezer drawers with freezer calendar
xMarker system for frozen food
* depending on model
6
Caring for the environment
Disposal of the packing material
The transport and protective packing has been selected from materials which are environmentally friendly for disposal, and can normally be recycled.
Ensure that any plastic wrappings, bags etc. are disposed of safely and kept out of the reach of babies and young children. Danger of suffocation!
Rather than just throwing these materials away, please ensure that they are recycled.
Disposal of your old appliance
Please ensure that the appliance presents no danger to children while being stored for disposal.
It should be unplugged or disconnected from the mains electricity supply by a competent person. The plug must be rendered useless and the cable cut off directly behind the appliance to prevent misuse. See the "Warning and Safety" section of this booklet for further details.
Electrical and electronic appliances often contain materials which, if handled or disposed of incorrectly, could be potentially hazardous to human health and to the environment. They are, however, essential for the correct functioning of your appliance.
Please dispose of your old appliance at your local community waste collection / recycling centre and not with your household waste.
Take care not to damage the pipework at the back of it before or during transportation to an authorised collection depot.
In this way, refrigerant in the pipework and oil in the compressor will be contained, and will not leak out into the environment.
7

Warning and Safety instructions
This appliance complies with all relevant legal safety requirements. Improper use can, however, present a risk of both personal injury and material damage.
To avoid the risk of accidents and damage to the appliance, read the operating instructions carefully before installation and before using for the first time. They contain important notes on the installation, safety, operation and care of the appliance.
Keep these operating instructions in a safe place and pass them on to any future user.
Correct use
This appliance is intended for domestic use only for the cool storage of food and drinks as well as for storing deep frozen food, freezing
fresh food and for preparing ice. Any other usage is not supported by the manufacturer and could be dangerous. The manufacturer cannot be held liable for damage caused by incorrect or improper use of the appliance.
This appliance is not a toy! To avoid the risk of injury, do not allow children to play on or near it, or to play with the controls. Supervise its use by the elderly or infirm.
Technical safety
This appliance contains the coolant Isobutane (R600a), a natural gas
which is environmentally friendly. Although it is flammable, it does not damage the ozone layer and does not increase the greenhouse effect. The use of this coolant has, however, led to a slight increase in the noise level of the appliance. In addition to the noise of the compressor, you might be able to hear the coolant flowing around the system. This is unavoidable, but does not have any adverse effect on the performance of the appliance.
Care must be taken during transportation and setting up of the appliance that no parts of the cooling system are damaged. Leaking coolant can damage the eyes.
In the event of any damage:
-avoid open fires and anything which creates a spark,
-disconnect from the mains,
-air the room in which the appliance is located for several minutes and
-contact the Service Department for advice.
The more coolant there is in an appliance, the larger the room it should be installed in. In the event of a leakage, if the appliance is in a small
room, there is the danger of combustible gases building up.
For every 8 g of coolant at least 1 m3 of room space is required. The amount of coolant in the appliance is stated on the data plate inside the appliance.
8

Warning and Safety instructions
Before connecting the appliance to the mains supply, make sure that
the rating on the data plate corresponds to the voltage and frequency of the household supply. This data must correspond in order to avoid the risk of damage to the appliance. Consult a qualified electrician if in any doubt.
The electrical safety of this appliance can only be guaranteed
when continuity is complete between the appliance and an effective earthing system which complies with local and national safety regulations. It is most important that this basic safety requirement is present and regularly tested. Where there is any doubt, the household wiring system should be inspected by a qualified electrician. The manufacturer cannot be held liable for the consequences of an inadequate earthing system (e.g. electric shock).
Safe operation of the appliance is only assured if it has been installed
and connected in accordance with these operating and installation instructions.
This equipment is not designed for maritime use or for use in mobile
installations such as caravans, aircraft etc. However it may be suitable for such usage subject to a risk assessment of the installation being carried out by a suitably qualified engineer.
Installation work, maintenance and repairs may only be carried out by
suitably qualified and competent persons to ensure safety.
Repairs and other work by unqualified
persons could be dangerous and the manufacturer will not be held liable. Ensure current is not supplied to the appliance while maintenance or repair work is being carried out.
The manufacturer cannot be held liable for damage caused by a
faulty connection to the mains water supply.
Connection to the mains water supply and any repairs to the ice
cube maker must only be carried out by a suitably qualified and competent person.
The ice cube maker is not suitable for connection to a hot water
supply.
Before making plumbing connections, ensure the appliance
is disconnected from the mains electricity supply.
The appliance is only completely isolated from the electricity supply
when:
–it has been switched off at the wall socket and the plug has been withdrawn.
–the mains fuse is withdrawn, or
–the screw-out fuse is removed (in countries where this is applicable).
Do not connect the appliance to the mains electricity supply by an
extension lead.
Extension leads do not guarantee the required safety of the appliance (e.g. danger of overheating).
9

Warning and Safety instructions
Use
Never handle frozen food with wet hands. Your hands may freeze to
the frozen food. Danger of frost burn.
Do not use any electrical equipment in this appliance, e.g.
ice cream makers. Danger of sparking and explosion!
Do not take ice cubes out with your bare hands and never place ice
cubes or ice lollies in your mouth straight from the freezer.
The very low temperature of the frozen ice or lollies can cause frost burn to the lips and tongue.
Do not refreeze thawed or partially thawed food.
Defrosted food should be used up as quickly as possible as food soon loses it nutritional value and goes off. Defrosted food may only be re-frozen after it has been cooked.
Do not store explosive materials in the appliance or any products
containing propellants (e.g. spray cans). Thermostats switching on may produce sparks which could present a fire hazard. Flammable compounds could explode.
If storing alcohol with a high percentage proof, make sure it is
tightly closed and stored upright. Danger of explosion.
Do not store cans or bottles containing carbonated drinks or
liquids which could freeze in the freezer section. The cans or bottles could explode. Danger of injury and damage to the appliance.
When cooling drinks quickly in the freezer make sure bottles are not
left in for more than one hour, otherwise they could burst. This could result in injury or damage.
Observe the "use by" dates given on food to avoid the risk of food
poisoning.
Storage times will depend on several factors including the freshness and quality of the food as well as the temperature at which it is stored. Follow the instructions given on food manufacturer’s packaging on storage conditions required as well as the "use by" date.
Do not use sharp edged objects to
–remove frost and ice,
–separate frozen foods and remove ice trays. They will damage the evaporator, causing irreversible damage to the appliance.
Never place electric heaters or candles in the appliance to defrost
it. These can damage the plastic parts.
Do not use defrosting sprays or de-icers, as they might contain substances which could damage the plastic parts or which could cause a
build-up of gases and pose a danger to health.
Do not use any oils or grease on the door seals, as these will cause
the seals to deteriorate and become porous with time.
10
Warning and Safety instructions
Do not block the ventilation gap in the plinth or the top of the
appliance housing unit as this would impair the efficiency of the appliance, increase the electricity consumption and could cause damage to the appliance.
The appliance is designed for use within certain climate ranges
(ambient temperatures), and should not be used outside this range. The climate range for your appliance is stated on the data plate inside the appliance. Installing it in a room with too low an ambient temperature, e.g. a garage, will lead to the appliance switching off for longer periods so that it cannot maintain the required temperature.
Never use a steam-cleaning appliance to defrost or clean this
appliance. Pressurised steam could reach the electrical components and cause a short circuit.
In countries where there are areas which may be subject to infestation
by cockroaches or other vermin, pay particular attention to keeping the appliance and its surroundings in a clean condition at all times. Any damage which may be caused by cockroaches or other vermin will not be covered by the guarantee.
Disposal of your old appliance
Before disposing of an old appliance, first make the door latch
or lock unusable. This way you will prevent children from accidentally locking themselves in and endangering their lives.
Disconnect it from the mains. Cut off the cable and render any plug
unusable.
Be careful not to damage any part of the pipework whilst awaiting
disposal, e.g. by
–puncturing the refrigerant channels in the evaporator.
–bending any pipework.
–scratching the surface coating.
Splashes of refrigerant can damage the eyes.
The manufacturer cannot be held liable for damage caused by non-compliance with these Warning and Safety instructions.
11

How to save energy
|
Normal energy consumption |
Increased energy |
|
|
consumption |
|
|
|
Installation site |
In a ventilated room. |
In an enclosed, unventilated room. |
|
|
|
|
Protected from direct sunlight. |
In direct sunlight. |
|
|
|
|
Not situated near to a heat source |
Situated near to a heat source |
|
(radiator, oven). |
(radiator, oven. |
|
|
|
|
Where the ambient room |
Where there is a high ambient |
|
temperature is ideal at approx. |
room temperature. |
|
20°C. |
|
|
|
|
Temperature setting with |
With a medium setting of 2 to 3. |
With a high setting: The lower the |
a thermostat which is |
|
temperature in the freezer, the |
approximate (set in |
|
higher the energy consumption. |
stages). |
|
|
|
|
|
Temperature setting with |
Cellar section 8 to 12°C |
On appliances with winter setting, |
a thermostat which is |
|
please make sure that the winter |
exact to the degree |
|
setting is switched off when the |
(digital display). |
|
ambient temperature is warmer |
|
|
than 16 °C. |
|
Refrigerator section 4 to 5 °C |
|
|
|
|
|
|
|
|
StayFresh zone just above 0 °C |
|
|
|
|
|
Freezer section -18°C |
|
|
|
|
Use |
Only open the door when |
Frequent opening of the door for |
|
necessary and for as short a time |
long periods will cause a loss of |
|
as possible. |
coldness. |
|
|
|
|
Store food in an organised way. |
If food is not stored in an |
|
|
organised way, searching for an |
|
|
item will mean the door is open for |
|
|
longer. |
|
|
|
|
Allow hot food and drinks to cool |
Placing hot food in the appliance |
|
down before placing them in the |
will cause the compressor to run |
|
appliance. |
for a long time, as the appliance |
|
|
will have to work harder to lower |
|
|
the temperature. |
|
|
|
|
Store food covered or packaged. |
The evaporation or condensation |
|
|
of liquids will cause a loss of |
|
|
coldness in the refrigerator. |
|
|
|
|
Place frozen food in the |
|
|
refrigerator to defrost. |
|
|
|
|
|
Do not over-fill the appliance to |
|
|
allow air to circulate. |
|
|
|
|
|
|
|
12
|
|
How to save energy |
|
|
|
|
|
|
Normal energy |
|
Increased energy |
|
|
||
|
consumption |
|
consumption |
|
|
|
|
Defrosting |
Defrost the freezer when a layer of |
|
A layer of ice hinders the cold |
|
ice one centimetre thick has built |
|
from reaching the frozen food, and |
|
up. |
|
causes an increase in energy |
|
|
|
consumption. |
|
|
|
|
13
Switching on and off
Before using for the first time
^Clean the inside of the appliance and the accessories with warm water and a little washing up liquid, and then dry with a soft cloth.
Important:
To ensure the correct functioning of the appliance, let it stand for between 11/2 and 2 hour after transporting it to its final location before connecting it to the mains.
The temperature display goes out and the cooling process is switched off. If this does not happen, then the safety lock is engaged.
To switch the refrigerator section off separately
The refrigerator section can be switched off without having to switch off the freezer section. This is useful e.g. whilst on holiday.
Switching on
The refrigerator and freezer sections are switched on together by pressing the master switch on the right hand side of the control panel.
^ Press the master switch.
Bars will flash in the temperature display and a buzzer will sound. The appliance starts cooling.
You can also switch the whole appliance on by pressing the "On/Off" button for the refrigerator section on the left hand side of the control panel.
Allow the appliance to run for a few hours before placing food in it. This will ensure that the temperature is sufficiently low.
Switching off
^ Press the master switch.
^Press the "On/Off" button for the refrigerator section on the left hand side of the control panel.
The temperature display for the refrigerator section goes out and the refrigerator section switches off.
To switch the refrigerator section on again
^Press the "On/Off" button on the left hand side of the display again.
Bars will appear in the temperature display for the refrigerator section. The refrigerator section starts cooling. The interior light will come on when the door is opened.
14

Switching on and off
Switching off the alarm
^ Press the alarm button.
The alarm will stop. The bars will continue flashing in the temperature display until the temperature which has been set is reached.
Cool pack
Place the cool pack in the top drawer of the freezer section. The cool pack will be at its most effective after it has been in the freezer for approx. 24 hours.
Safety lock
The safety lock can be activated to prevent the appliance being switched off inadvertently.
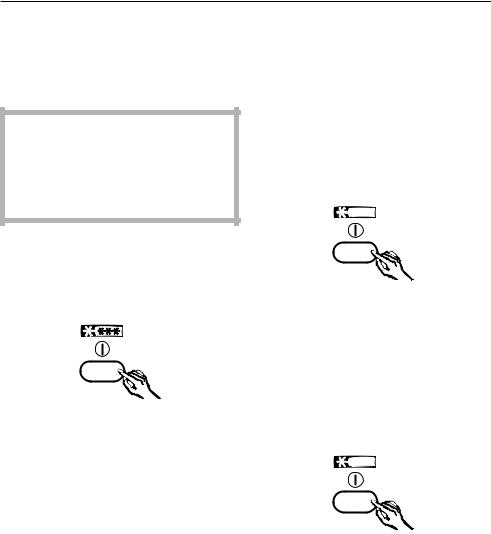
To activate the safety lock
^Press and hold the alarm button.
^Then press the Super freeze button as well and keep both buttons pressed in for approx. 3 seconds until the Safety lock indicator light d in the temperature display lights up and a beep sounds.
Now the appliance cannot be switched off until the lock is de-activated.
De-activating the safety lock
^Repeat the same procedure as for activating the lock given above.
The safety lock indicator light must go out in the temperature display. The appliance can now be switched off at any time.
Switching off for longer periods of time
If the appliance is not going to be used for a longer period of time, e.g. whilst on holiday,
^switch the appliance off,
^switch off at the wall socket and withdraw the plug,
^defrost the freezer section,
^close the stopcock for the water inlet,
^clean the appliance out and
^leave the doors ajar to air the appliance.
If, during a long absence, the appliance is switched off but not cleaned out and the doors are left shut, there is a danger of mould and odours building up inside the appliance.
15

The correct temperature
It is very important to set the correct temperature for storing food in the appliance. Micro organisms will cause food which is not stored at the correct temperature to deteriorate rapidly. Temperature influences the growth rate of these micro organisms. Reducing the temperature reduces their growth rate.
The temperature in the appliance will rise:
–the more often the door is opened and the longer it is kept open,
–if too much food is stored in it at once,
–the warmer the food is which is being put into it,
–the higher the ambient temperature surrounding the appliance.
The appliance is designed for use in specific ambient temperatures (climate ranges). Do not use in ambient temperatures for which it is not designed.
. . . in the freezer
For freezing fresh food and storing frozen food for a long time a temperature of at least -18 °C is needed. At this temperature the growth of micro organisms is generally halted. As soon as the temperature rises to above -10 °C, the micro organisms become active in the food again so that it cannot be kept as long. For this reason, partially defrosted or defrosted food must not be re-frozen. Food may be re-frozen once it has been cooked as the high temperatures achieved when cooking destroy most micro organisms.
Temperature selection
The temperatures for the refrigerator section and for the freezer section are set independently from one another using the buttons to the right and left hand sides of the temperature displays.
Press the
. . . in the refrigerator
We recommend a temperature of 4 °C in middle of the refrigerator section.
Upper button: to raise the temperature (it gets warmer)
Lower button: to reduce the temperature (it gets colder)
The temperature being set will flash in the display.
16
 Loading...