


Operating Instructions
Washer-disinfector
G 7899
To prevent accidents and machine damage read these instructions before
en - US
installation or use. |
M.-Nr. 09 461 360 |
2

Contents
IMPORTANT SAFETY INSTRUCTIONS
Intended use
Guide to the machine
Opening and closing the door
To open the door using the emergency release . . . . . . . . . . . . . . . . . . . . . . . . . . 13
Water softener
Setting the water softener . . . . . . . . . . . . . . . . . . . . . . . . . . . . . . . . . . . . . . . . . . . 14 Filling the salt reservoir . . . . . . . . . . . . . . . . . . . . . . . . . . . . . . . . . . . . . . . . . . . . . 16 Add salt indicator. . . . . . . . . . . . . . . . . . . . . . . . . . . . . . . . . . . . . . . . . . . . . . . . . . 17
Applications
Loading the machine . . . . . . . . . . . . . . . . . . . . . . . . . . . . . . . . . . . . . . . . . . . . . . . 19 Water connector spring adapter . . . . . . . . . . . . . . . . . . . . . . . . . . . . . . . . . . . . . . 20 Height adjustable top basket. . . . . . . . . . . . . . . . . . . . . . . . . . . . . . . . . . . . . . . . . 20 Surgical instruments . . . . . . . . . . . . . . . . . . . . . . . . . . . . . . . . . . . . . . . . . . . . . . . 21 ENT . . . . . . . . . . . . . . . . . . . . . . . . . . . . . . . . . . . . . . . . . . . . . . . . . . . . . . . . . . . . 22 GYN . . . . . . . . . . . . . . . . . . . . . . . . . . . . . . . . . . . . . . . . . . . . . . . . . . . . . . . . . . . . 23 Rigid Endoscopy . . . . . . . . . . . . . . . . . . . . . . . . . . . . . . . . . . . . . . . . . . . . . . . . . . 25 Ophthalmology . . . . . . . . . . . . . . . . . . . . . . . . . . . . . . . . . . . . . . . . . . . . . . . . . . . 26
Possible effects of using non-recommended Cleaning Agents
Dispensing cleaning agents
Add rinse aid indicator . . . . . . . . . . . . . . . . . . . . . . . . . . . . . . . . . . . . . . . . . . . . . 31 Adding rinse aid . . . . . . . . . . . . . . . . . . . . . . . . . . . . . . . . . . . . . . . . . . . . . . . . . . 31 Setting the dosage. . . . . . . . . . . . . . . . . . . . . . . . . . . . . . . . . . . . . . . . . . . . . . . . . 32 Adding neutralizing agent . . . . . . . . . . . . . . . . . . . . . . . . . . . . . . . . . . . . . . . . . . . 33 Add neutralizing agent indicator . . . . . . . . . . . . . . . . . . . . . . . . . . . . . . . . . . . . . 34 Adding cleaning agent . . . . . . . . . . . . . . . . . . . . . . . . . . . . . . . . . . . . . . . . . . . . . 35 Using powder cleaning agents . . . . . . . . . . . . . . . . . . . . . . . . . . . . . . . . . . . . . . . 35
Operation
Turning on . . . . . . . . . . . . . . . . . . . . . . . . . . . . . . . . . . . . . . . . . . . . . . . . . . . . . . . 37 Starting a program . . . . . . . . . . . . . . . . . . . . . . . . . . . . . . . . . . . . . . . . . . . . . . . . . 37 Selecting “Drying” . . . . . . . . . . . . . . . . . . . . . . . . . . . . . . . . . . . . . . . . . . . . 37 Program sequence indicators . . . . . . . . . . . . . . . . . . . . . . . . . . . . . . . . . . . . . . . . 38 At the end of the program . . . . . . . . . . . . . . . . . . . . . . . . . . . . . . . . . . . . . . . . . . . 38 Additional drying. . . . . . . . . . . . . . . . . . . . . . . . . . . . . . . . . . . . . . . . . . . . . . . . 38 Canceling a program . . . . . . . . . . . . . . . . . . . . . . . . . . . . . . . . . . . . . . . . . . . . . . . 39 Turning off . . . . . . . . . . . . . . . . . . . . . . . . . . . . . . . . . . . . . . . . . . . . . . . . . . . . . . . 39
3

Contents
Program chart
Programmable functions
To activate the programming mode . . . . . . . . . . . . . . . . . . . . . . . . . . . . . . . . . 42 Saving values in programming mode. . . . . . . . . . . . . . . . . . . . . . . . . . . . . . . . 42 Exiting the programming mode without saving . . . . . . . . . . . . . . . . . . . . . . . . 42 Resetting the operating hours counter for the filter in the drying unit . . . . . . . . . . 43 DOS 1 (liquid detergent) . . . . . . . . . . . . . . . . . . . . . . . . . . . . . . . . . . . . . . . . . . . . 44 Setting the dosage concentration. . . . . . . . . . . . . . . . . . . . . . . . . . . . . . . . . . . 44 Priming the dispensing system. . . . . . . . . . . . . . . . . . . . . . . . . . . . . . . . . . . . . 45 DOS 3 (neutralizer) . . . . . . . . . . . . . . . . . . . . . . . . . . . . . . . . . . . . . . . . . . . . . . . . 46 Setting the neutralizer dosage . . . . . . . . . . . . . . . . . . . . . . . . . . . . . . . . . . . . . 46 Priming the dispensing system. . . . . . . . . . . . . . . . . . . . . . . . . . . . . . . . . . . . . 47 Buzzer . . . . . . . . . . . . . . . . . . . . . . . . . . . . . . . . . . . . . . . . . . . . . . . . . . . . . . . . . . 48 Changing program parameters . . . . . . . . . . . . . . . . . . . . . . . . . . . . . . . . . . . . . . . 49 Changing wash and rinse parameters . . . . . . . . . . . . . . . . . . . . . . . . . . . . . . . 49 Changing the drying parameters . . . . . . . . . . . . . . . . . . . . . . . . . . . . . . . . . . . 49 Changing the temperature . . . . . . . . . . . . . . . . . . . . . . . . . . . . . . . . . . . . . . . . 50 Changing the temperature holding time. . . . . . . . . . . . . . . . . . . . . . . . . . . . . . 50 Restoring to factory default settings . . . . . . . . . . . . . . . . . . . . . . . . . . . . . . . . . . . 51 Setting the time and date. . . . . . . . . . . . . . . . . . . . . . . . . . . . . . . . . . . . . . . . . . . . 52
Process documentation
Cleaning and care
Cleaning the filters in the wash cabinet . . . . . . . . . . . . . . . . . . . . . . . . . . . . . . . . . 56 Cleaning the spray arms . . . . . . . . . . . . . . . . . . . . . . . . . . . . . . . . . . . . . . . . . . . . 58 Baskets and inserts . . . . . . . . . . . . . . . . . . . . . . . . . . . . . . . . . . . . . . . . . . . . . . . . 60 Drying unit (TA) - Maintenance . . . . . . . . . . . . . . . . . . . . . . . . . . . . . . . . . . . . . . . 61 Cleaning the drain pump and non-return valve . . . . . . . . . . . . . . . . . . . . . . . . . . . 62 Cleaning the water intake filters. . . . . . . . . . . . . . . . . . . . . . . . . . . . . . . . . . . . . . . 63
Frequently asked questions
After sales service
Caring for the environment
Installation
Electrical connection
Plumbing
Technical data
4

IMPORTANT SAFETY INSTRUCTIONS
This washer-disinfector complies with all applicable safety regulations. However, improper use may cause material damage and/or personal injury.
Read the operating instructions carefully before using this appliance. This will help keep you safe and avoid damage to the appliance.
Keep these instructions in a safe, accessible location.
Intended use
This washer-disinfector is not intended for any purpose that is not specified in the operating instructions. Conversions, modifications, and other unintended uses are considered to be dangerous. The cleaning and disinfection processes described herein apply only to those medical products that are specifically designed by the manufacturer to be re-used and thermally disinfected. Always follow the instrument manufacturer’s instructions.
This washer-disinfector is intended for stationary indoor use only.
Please pay attention to the following to maintain safe procedures.
Installation and repair work should only be performed by a Miele authorized service technician. Work by unqualified persons could be dangerous and may void the warranty.
The installation and the work flow of the instruments must be in such a way, that a recontamination of disinfected instruments and a mixed up of clean and dirty instruments is not possible. AMMI ST79 shows an example of proper layout and work-flow.
Do NOT install the appliance in an area where there is a risk of explosion or freezing.
The electrical safety of this appliance is only ensured if it is connected to a properly grounded electrical system. It is very important to verify this fundamental safety feature. If in doubt have the wiring checked by an electrician.
A damaged or leaking
washer-disinfector may be dangerous and pose a safety hazard. If you suspect a leak, shut down the washer-disinfector and immediately contact Miele.
As standard, the washer-disinfectors drain water will reach temperatures greater than 160°F. These temperature can damage the drain system. In order to reduce the drainage temperature Miele offers an optional drain temperature reduction Kit.
5

IMPORTANT SAFETY INSTRUCTIONS
Operators must be trained on a regular basis. Untrained personnel should not be allowed access to the appliance or its controls.
Please do not use the
washer-disinfector, before it has been set up by a Miele Service Technician. The Technician will perform the initial set-up and verification of the machine.
Always exercise caution when handling cleaning agents. Some are corrosive and irritants. Wear safety glasses and gloves! Always follow the manufacturer’s safety recommendations when using cleaning agents.
The washer-disinfector is designed to operate with water and the recommended cleaning agents only! The appliance MUST NOT be used with organic solvents or flammable liquids. These may cause an explosion or damage rubber and plastic components, which in turn could cause leaks.
Avoid inhaling powdered products. Never swallow cleaning agents as this can result in chemical burns to the mouth and throat, or suffocation.
The water in the wash cabinet is NOT safe to drink!
Do not lean or sit on the open door. This could damage the washer-disinfector or cause it to tip over.
Take care when loading items with sharp, pointed ends. Position them in the wash cabinet so that they do not pose a risk of injury.
When operating the washer-disinfector, beware of the high temperatures involved. Bypassing the electronic door lock to open the door carries the risk of burns or scalding.
Allow mobile units, baskets, inserts, and loads to cool before removing them. Empty any water from hollow items into the wash cabinet before removing.
Do not touch the heating elements. They may still be hot enough to cause burns several minutes after the program has ended.
NEVER hose down the
washer-disinfector or the immediate vicinity with a water hose, steam cleaner, or power washer.
Before servicing the washer-disinfector, disconnect it from the power supply.
To assist in maintaining quality standards when processing medical devices (such as surgical instruments), to protect patients, and to avoid damage to property, the following items should be observed!
Only authorized persons should interrupt a program, and only in exceptional cases.
It is the responsibility of the operator to check that the required cleaning and disinfection standards are met. Process results need to be regularly checked and documented through inspection.
6

IMPORTANT SAFETY INSTRUCTIONS
Under certain circumstances, some cleaning agents can cause damage to the appliance. Consult the cleaning agent manufacturer for recommendations. For concerns involving possible damage to the appliance or materials, please contact Miele.
For critical applications where very high processing quality requirements must be met, it is strongly recommended that all process-related factors (cleaning agents, water quality, etc.) be discussed in advance with Miele.
Pre-treating (e.g. with cleaners or disinfectants) as well as some types of soiling and the interaction of cleaning agents can cause foaming. Foam can have an adverse effect on cleaning and disinfection.
Use mobile units, baskets and inserts only as instructed by the manufacturer.
Hollow items must be positioned so they receive full exposure to wash water.
Some disinfectant can denaturate proteins which has an adverse effect on cleaning. Please only use non foaming and non denaturation cleaners or disinfectants for manual prewash.
To prevent damage to the
washer-disinfector and accessories from the effects of cleaning agents only use chemical agents which have been approved by their manufacturer for use in the application you are using. Miele can recommend suitable products.
Even when a cleaning agent is recommended, the appliance manufacturer takes no responsibility for the effect of such chemicals on the items being washed.
Note that formulation changes, storage conditions, etc. that are not disclosed by the manufacturer may adversely affect the cleaning results.
Always follow the manufacturer’s instructions when using cleaning agents. To avoid possible chemical reactions, only use cleaning agents for the applications and purposes intended by their manufacturer.
Empty all containers and hollow items before loading them in the washer.
Ensure that no acid or solvent residues, especially hydrochloric acid or chloride solutions, get inside the wash cabinet. Any items that can rust should also be avoided.
Any solvents used should not be present in more than trace amounts.
To avoid corrosion, ensure that the stainless steel exterior does not come into contact with solvents containing hydrochloric acid / vapors.
Whenever work is conducted on the water supply, the supply lines to the washer must be bled.
Failure to do so can result in damage to the appliance.
Follow the instructions in this manual and in the Installation manual.
7

IMPORTANT SAFETY INSTRUCTIONS
Accessories
Whatever the application, only Miele accessories should be connected to, or used in, this machine. Consult Miele on the type and application of such equipment.
Use only Miele mobile units, baskets and inserts. If Miele accessories are altered in any way, or equipment from another manufacturer is used, cleaning and disinfection results cannot be ensured. Damage caused in these cases may be excluded from the warranty.
Only use Miele approved cleaning agents. Use of other cleaning agents may void the warranty and may result is poor cleaning results.
Please consult Miele Applications (medical@mieleusa.com) for any questions regarding detergents and effects on the items being cleaned.
Symbols on the appliance
Warning:
Observe the operating instructions!
Warning:
Risk of electric shock!
Disposing your old appliance
Please note that the appliance may be contaminated by blood or other bodily fluids and must be decontaminated before disposal.
For safety and environmental protection, be sure to remove all chemical residue, in compliance with safety regulations (wear protective eyewear and gloves!).
Remove or destroy the door latch, to prevent children from locking themselves inside. The appliance can now be sent for disposal through the proper resource recovery facilities.
SAVE THESE INSTRUCTIONS
8

Intended use
This washer-disinfector can be used to clean, rinse, intermediate-level thermally disinfect, and dry a wide range of reusable medical devices in hospitals, surgery centers, and clinics. Always follow the surgical instrument manufacturer’s instructions for machine-based cleaning. This washer-disinfector provides an automated process for the initial steps of cleaning and intermediate-level disinfection of re-useable surgical instruments prior to sterilization. The G 7899 is designed for applications such as:
General Surgical Instruments
Reusable, hard-surfaced surgical instruments such as scissors, forceps, etc.
Stainless steel lumened instruments. These can be processed but must be connected to Miele injection ports according to loading instructions provided with the specific Miele accessory.
Minimally Invasive Surgical (MIS)
Instruments
Rigid endoscopes
Note: The G 7899 is NOT intended for reprocessing of flexible endoscopes of any kind.
Containers and utensils
Such as kidney dishes, sterilization containers, trays, etc.
Microsurgical Instruments
Such as instruments used in eye surgery
When processing instruments in the Miele washer-disinfector you must:
Follow the instrument manufacturer’s instructions for cleaning and disinfection. Instruments must be disassembled according to the manufacturer’s instructions
Follow Miele instructions for proper loading (included with specific accessories and in the “applications” section of this manual). Proper instrument loading and connection of lumened instruments to injection ports is required
This washer-disinfector is intended to provide the initial step in reprocessing of soiled, re-usable medical devices. Any devices that contact blood or compromised tissues must be sterilized prior to re-use following industry best practices such as AAMI ST79.
9

Intended use
Processing instruments by machine achieves reproducible results with less opportunity for human error when compared with to manual cleaning. Thermal disinfection can be carried out using the Vario TD program which meets the parameters to achieve intermediate-level disinfection.
The cleaning program as well as chemical agents must be chosen according to the type of soil and load being processed.
Medical devices are best processed using the Vario TD program. The final result will be instruments that are clean, free of residue, and ready for subsequent sterilization. Only then can the instruments be safely used.
The use of a suitable load carrier (basket, module, insert, etc.) is important to ensure the adequate cleaning of the load. Examples are given in the “Applications” section.
The washer-disinfector can be programmed to perform the final rinse with tap water, or with purified water of a quality to suit the application (de-ionized, de-mineralized, reverse osmosis (RO), distilled). We recommend the use of purified water.
All instruments and accessories cleaned in the washer-disinfector (with the exception of non-critical items) must be sterilized before use.
10
Guide to the machine
“On/Off” button
“Door” button
Display
“Display” indicator
“Drying” indicator
“Start” indicator
“Start” button
“Drying” button
“Display” button to toggle between the:
-actual Temperature in °C
-elapsed time
-active wash blocks
“ Dosing Pump” indicator and optical interface for service technician.
Also used as an
“add liquid cleaning agent” indicator when connected to a K 60 DOS module for liquid cleaning agent
Refill “Rinse Aid” indicator
Refill “Neutralizer” indicator
“Recharge Softener” indicator
“Fill/Drain” indicator
Program sequence display
Program selector
11
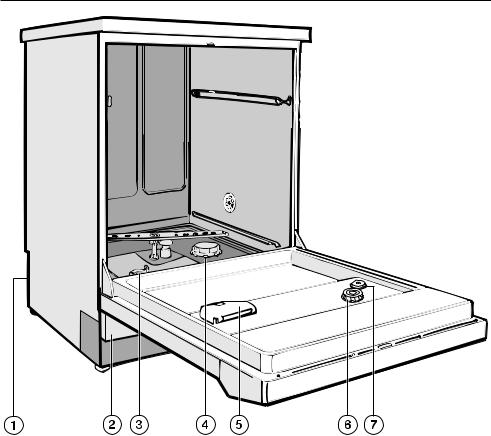
Guide to the machine
Connection for the optional K 60 DOS module for liquid cleaning agents
Service panel
Combination filter
Salt reservoir
Dispenser for powder cleaning agent
Rinse aid reservoir (with dosage selector)
Rinse aid level indicator
At the rear of the machine:
–RS 232 Interface connection (used for optional process documentation via a printer or software)
–Suction tube for external neutralizing agent container
12
Opening and closing the door
Electric door lock
This machine is equipped with an electric door lock.
The door can only be opened when:
the electrical supply to the machine is on and
the “On/Off” button is pressed.
To open the “Door”
Press the door release switch in as far as it will go, and at the same time grip the handle and and pull the door open.
Do not touch the heating elements, you could burn yourself. They remain hot for some time after the end of the program.
The door cannot be opened after a wash program has been started, and it will remain locked until the end of the program. It is possible however to open the door during the “Rinse” and “Drain” programs.
The machine can also be programmed (by a Miele service technician) to open during “Drying”.
To close the door
Lift the door and push it until it clicks shut. Do not press the door release button while shutting the door.
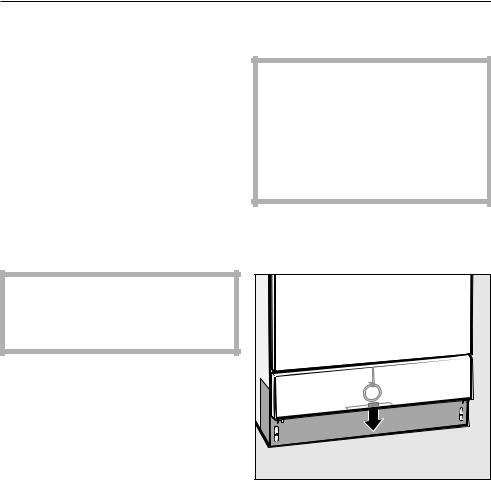
To open the door using the emergency release
The emergency release should only be used when the door cannot be opened normally, such as in the event of a power failure.
If the door is opened using the emergency release cord, there is a danger or burning or scalding!
Turn the program selector to .
Turn the machine off with the “On/Off” button.
The emergency release cord is located at the bottom of the machine behind the service panel. Pull it downwards to open the door.
13

Water softener
Before using the washer-disinfector for the first time, the water softener should be programmed. The water should be softened to avoid calcium deposits on instruments and in the washer chamber.
If the water supply is harder or softer than the default factory setting of
19 gr/gal (340 ppm CaCO3), the setting should be changed. See “Setting the water softener”.
–In order to function properly, the water softener requires a supply of reactivation salt.
–The washer must be programmed to match the hardness of the water supply.
–Your local water authority can provide information about the hardness of the tap water in your area.
If the water hardness is known to fluctuate, always program the softener for the highest value.
The built-in water softener can be programmed between 1 - 60 gr/gal (20 - 1080 ppm).
Please note the water hardness in the space provided here:
gr/gal or ppm CaCO3
This may be needed for any troubleshooting should problems occur in the future.
Setting the water softener
Close the door.
Use the On/Off button to turn off the machine.
Turn the program selector to .
Simultaneously press and hold the “Display” and “Start” buttons, while pressing the On/Off button.
The current program version P....
will appear in the display, and the “Fill/Drain” indicator will light.
Press the “Drying” button once.
E01 will appear in the display.
Turn the program selector switch to the one o’clock position.
The number 19 will appear in the display (this indicates the factory setting in gr/gal).
Please refer to the “Water softener - Settings” table on the following page to determine the setting you will need.
Press and hold the “Display” button until the required value appears in the display.
(Once the 60 setting has been reached, the counter will begin again at 0.)
Press “Start” .
SP will appear in the display.
Press “Start” again.
The setting you selected is now stored in memory. The display light(s) will turn off.
The machine is now ready for use.
14

Water softener
Settings
Settings |
gr/gal |
ppm |
1 - 30 |
1 - 30 |
CaCO3 |
1 |
1 |
20 |
2 |
2 |
40 |
3 |
3 |
50 |
4 |
4 |
70 |
5 |
5 |
90 |
6 |
6 |
110 |
7 |
7 |
130 |
8 |
8 |
140 |
9 |
9 |
160 |
10 |
10 |
180 |
11 |
11 |
200 |
12 |
12 |
220 |
13 |
13 |
230 |
14 |
14 |
250 |
15 |
15 |
270 |
16 |
16 |
290 |
17 |
17 |
310 |
18 |
18 |
320 |
19 |
19 *) |
340 |
20 |
20 |
360 |
21 |
21 |
380 |
22 |
22 |
400 |
23 |
23 |
410 |
24 |
24 |
430 |
25 |
25 |
450 |
26 |
26 |
470 |
27 |
27 |
490 |
28 |
28 |
500 |
29 |
29 |
520 |
30 |
30 |
540 |
|
|
|
*) factory setting
Settings |
gr/gal |
ppm |
31 -60 |
31 -60 |
CaCO3 |
31 |
31 |
560 |
32 |
32 |
580 |
33 |
33 |
590 |
34 |
34 |
610 |
35 |
35 |
630 |
36 |
36 |
650 |
37 |
37 |
670 |
38 |
38 |
680 |
39 |
39 |
700 |
40 |
40 |
720 |
41 |
41 |
740 |
42 |
42 |
760 |
43 |
43 |
770 |
44 |
44 |
790 |
45 |
45 |
810 |
46 |
46 |
830 |
47 |
47 |
850 |
48 |
48 |
860 |
49 |
49 |
880 |
50 |
50 |
900 |
51 |
51 |
920 |
52 |
52 |
940 |
53 |
53 |
950 |
54 |
54 |
970 |
55 |
55 |
990 |
56 |
56 |
1010 |
57 |
57 |
1030 |
58 |
58 |
1040 |
59 |
59 |
1060 |
60 |
60 |
1080 |
|
|
|
15
Water softener
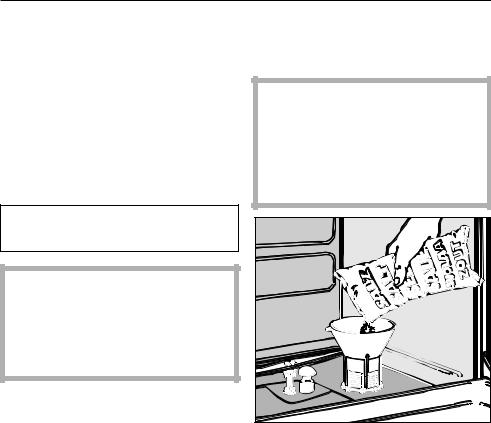
Filling the salt reservoir
Only use reactivation salt with granules of approx. 1 - 4 mm. Do not use other types of salt such as cooking salt, agricultural grade or road salt. These may contain insoluble additives which can impair the functioning of the water softener. If in doubt please contact Miele.
Reactivation salt can be ordered directly from Miele.
Remove the bottom basket from the machine.
Unscrew the salt reservoir cap.
Before filling the salt reservoir with reactivation salt for the first time, you will have to fill the reservoir with approx. 2/3 gal (2.5 liters) of clean water to enable the salt to dissolve. Once the machine has been used, this will no longer be necessary.
The salt reservoir holds approx. 2.5 kg of salt.
Inadvertently filling the salt reservoir with cleaning agent will damage the water softener. Before filling the salt reservoir make sure that there is no fluid covering the salt reservoir cap.
|
Place the provided funnel in position. |
|
Fill carefully with salt. |
As it is poured in, displaced water will run out.
16
Water softener
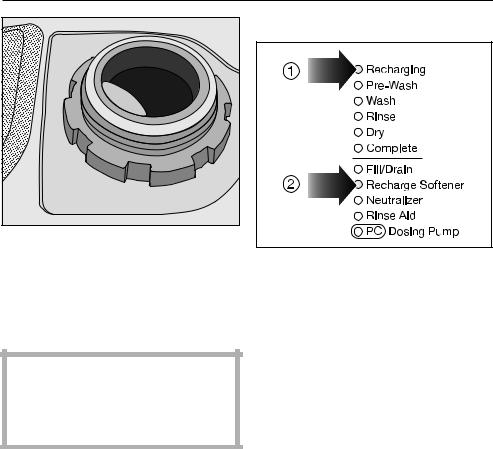
Add salt indicator
Remove the funnel and wipe any residual salt off the seal and the screw threads.
Screw the cap back on firmly.
Run the “Rinse” program to remove any traces of salt from the cabinet.
The program sequence may be delayed for a few minutes after the start of the “Rinse” program. This is normal as the water softener is being reactivated.
Reactivation will take place automatically when needed prior to the start of your selected program. The “Recharging” indicator lamp will be lit during this process.
Add salt when the “Recharge Softener” indicator lights up.
17

Applications
This washer-disinfector normally requires a top and bottom basket. Various inserts and special baskets are available for a wide variety of instruments and utensils.
Select baskets and inserts which are appropriate for the application.
Applications and loading examples are given on the following pages.
Before starting a program, visually check the following:
–Is everything correctly loaded/connected?
–Are the lumen or necks of hollow instruments positioned so that water can access them unhindered?
–Are the spray arms clean and do they freely rotate?
–Are the filters clean? Remove any coarse soils and clean them if necessary.
–Is the adapter connecting the water supply to the spray arms/jets connected correctly?
–Are all chemical containers sufficiently filled?
At the end of each program:
–Visually check the load for cleanliness.
–Check that all hollow shafted instruments are still securely positioned on their jets.
Any hollow instruments that have become disconnected from their adapters during processing must be processed again.
–Check that the lumen of hollow instruments are free of obstruction.
–Check that jets and connectors are securely in position in the baskets or inserts.
Verification testing
For verification of the cleaning process, periodic testing as outlined in current best practices documents such as AAMI ST79 is highly recommended. While Miele washers automatically monitor critical parameters such as time, temperature and dispensing, periodic verification to ensure proper soil removal should be part of your quality and safety program.
Miele also offers process documentation to support your periodic verification.
18

Applications
Loading the machine
–For proper cleaning, arrange the load so that water can access all surfaces.
–Do not place items inside other pieces where they may be concealed.
–Hollow instruments must be throughly cleaned, internally and externally.
–Ensure that instruments with long narrow hollow sections can be flushed through properly before placing them in inserts or connecting them to jets.
–Hollow vessels should be inverted and placed in the correct baskets or inserts to ensure that water can flow into and out of them unrestricted.
–Large or concave items should be placed at an angle to make sure water runs off them freely.
–Tall, narrow, hollow items should be placed in the center of the baskets to ensure better water coverage.
–Lightweight items should be secured with a cover net (e.g. an A 6) and small items placed in a mesh tray to prevent them from bouncing around or blocking the spray arms.
–The spring adapter of the mobile units or baskets must be correctly engaged.
–The spray arms must not be blocked by items which are too tall or which hang down in their path.
–Only process instruments made of surgical steel, as these are less susceptible to corrosion.
–Nickel plated instruments, colored anodized aluminum instruments, or disposable instruments are not suitable for machine reprocessing.
Preparing the load
Empty all containers before loading them into the machine.
Ensure that acids and residual solvents, especially those containing hydrochloric acid or chlorides, do not get into the wash cabinet.
Loading instruments
Contaminated instruments can be placed directly in the machine without pre-treatment (no soaking required). Always refer to the surgical instrument manufacturer’s instructions for cleaning.
Chemically pre-treated instruments must be thoroughly rinsed before placing them in the machine.
19
Applications
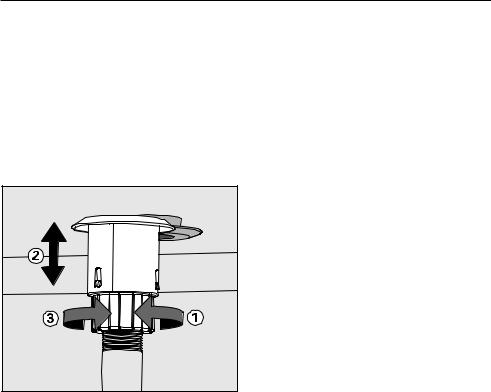
Water connector spring adapter
Make sure that the spring adapter to the water connector engages correctly when a basket or injector unit is inserted in the machine. It must be 4-5 mm higher than the water connection inlet in the machine.
If it is not, adjust the adapter as follows.
Loosen the lock ring .
Push the adaptor up.
Tighten the lock ring .
Height adjustable top basket
The top basket can be adjusted above and below its middle position by 2 cm.
Items of different heights can be cleaned in this machine by changing the position of the upper basket.
To adjust the top basket:
Pull out the basket until a resistance is felt; lift it from the runners and remove.
Loosen the roller bearings on both sides of the basket with a 7 mm wrench and reposition it to the height desired.
Re-tighten the roller bearings.
20
Applications
Surgical instruments
Surgical instruments should be stored for as short a time as possible before cleaning them.
Disinfection of surgical and minimally invasive instruments is performed thermally, after they have been cleaned. Deionized water should be used for the final rinse to help prevent spotting and corrosion.
More information regarding the water quality you can find in the AAMI publication TIR34:2007
Open up any hinged instruments and place them in mesh trays so that they are not touching each other.
Instruments with very narrow lumen must be manually pre-rinsed where necessary. Follow the manufacturer’s instructions on how to process them.
21

Applications
ENT
E 417 Insert
For ear funnels and ear and nasal specula. This insert can be placed in the top or bottom basket.
Open the specula before loading so the water can access all surfaces.
E 373 Insert |
For ENT instruments, such as ear funnels. The insert can be placed in the top basket.
The thin chrome plating on ear funnels can be very sensitive to neutralizing agents. Make sure your neutralizer is compatible with your funnels before washing.
Please note:
The Miele washer-disinfector is intended for cleaning and intermediate-level disinfection only. This cleaning and disinfection process is intended as a preliminary step prior to sterilization. Semi-critical instruments such as those used for this type of application should be sterilized before use.
22
Applications
GYN
E 416 Insert
Insert for gynecology specula.
Load as shown in the illustration.
One part specula:
Place opened one part specula between the holders.
Two part specula:
Place the lower parts in the narrow section of the insert (on the left in the illustration).
Place the upper parts in the wide sections of the insert (on the right in the illustration).
Specula should always be arranged so that they do not come into contact or cover each other.
Please note:
The Miele washer-disinfector is intended for cleaning and intermediate-level disinfection only. This cleaning and disinfection process is intended as a preliminary step. Semi-critical instruments such as those used for this type of application should be sterilized before use.
23
Applications
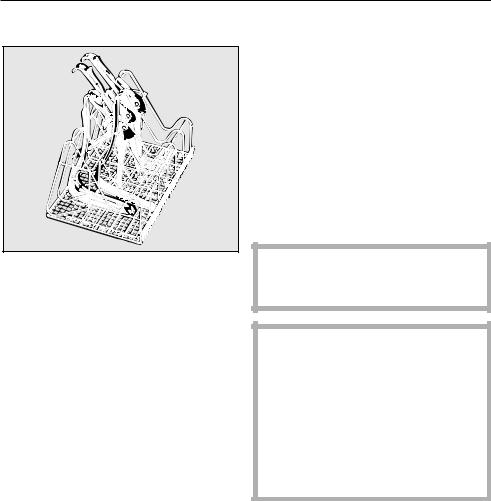
To avoid injury from instruments that are pointed at both ends or standing instruments with upward-facing probes, the washer should be loaded from back to front, and unloaded from front to back.
The O 177/1 Top basket and E 337/1 insert come with their own instructions for use.
O 177/1 Top injector basket
The left side of the O 177/1, has a retaining grid with 28 jets in silicone receptacles for hollow-bodied instruments. The jets spray the wash water directly into the instrument so that the recesses can be thoroughly flushed, cleaned, and disinfected.
Depending on the items to be cleaned, special nozzles, bushings or adapters are required. Further information can be obtained from the Miele Professional Sales Department.
The right side of the O 177/1 is left free to hold various inserts, such as the
E 337/1 (shown) for standing instruments.
24

Applications
Rigid Endoscopy
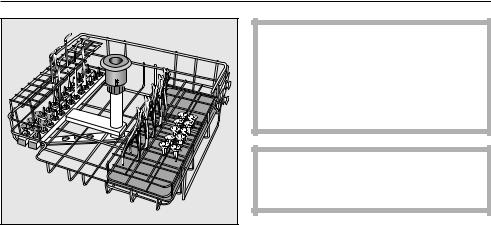
O 176/1 Top Injector Basket
Please note that the washer disinfector is designed for RIGID Endoscope cleaning and disinfection only. The endoscopes must first be disassembled for the best cleaning results. Always consult the manufacturer’s instuctions before processing any instrument in the washer-disinfector.
To ensure that water can flow in and out of the hollow parts of instruments, remove any caps and/or seals. Open valves and arrange according to the manufacturer’s instructions.
The left hand side of the basket is left free for inserts, such as the E 379.
This basket should be loaded only with slightly contaminated items.
To minimize the risk of injury from instruments that have a probe at the end, the washer should be loaded from back to front and unloaded from front to back.
25

Applications
Ophthalmology
The “C - Ophtha” program is especially designed for ophthalmic applications. This program has an additional rinse which uses deionized water.
This program is locked at the factory. To unlock this program please contact Miele Technical Service.
To prevent cross contamination of lumen or hollow items, the treatment of ophthalmic instruments should only be performed in a washer-disinfector designed for this application. Also, do not use plastic fiber cover nets (Miele nets A2 or A3) at any time in a washer disinfector that is also used for ophthalmic instrument processing.
Do not use Rinse Aid or any other rinsing agents when processing ophthalmic items.
The E 429 mobile injector can be used to clean and disinfect surgical, ophthalmic instruments used in the OR.
The top of the injector unit has connections for hollow instruments such as rinsing or suction hand pieces and cannulae, as well as silicone holders that are used to secure the instruments to their hose connections.
The lower level of the E 429 mobile injector can accommodate E 441/1 inserts or E 142 mesh trays that can be used for holding solid bodied instruments.
The E 429 mobile injector unit for surgical ophthalmic instruments comes with its own operating instructions.
Use of the E 429 requires a modification to the water intake path inside the wash chamber. This means that the E 429 cannot be used interchangeably with other mobile units or baskets.
26
 Loading...