


G 7804

Operating and Installation
Instructions
Laboratory Glassware
Washer
G 7804
To prevent accidents
and machine damage
read these instructions
before
installation or use.
en-US
M.-Nr. 09 234 570

2

Contents
IMPORTANT SAFETY INSTRUCTIONS. . . . . . . . . . . . . . . . . . . . . . . . . . . . . . . . . 5
Function of the glassware washer . . . . . . . . . . . . . . . . . . . . . . . . . . . . . . . . . . . . 9
Guide to the glassware washer . . . . . . . . . . . . . . . . . . . . . . . . . . . . . . . . . . . . . 10
Opening and closing the door . . . . . . . . . . . . . . . . . . . . . . . . . . . . . . . . . . . . . . 12
Water softener . . . . . . . . . . . . . . . . . . . . . . . . . . . . . . . . . . . . . . . . . . . . . . . . . . . 13
Setting the water softener ...........................................13
Filling the salt reservoir .............................................15
Salt indicator .....................................................16
Areas of application. . . . . . . . . . . . . . . . . . . . . . . . . . . . . . . . . . . . . . . . . . . . . . . 17
Spring adapter for the water connection ................................19
Adjusting the upper basket ..........................................19
Effects of Processing Chemicals . . . . . . . . . . . . . . . . . . . . . . . . . . . . . . . . . . . . 22
Dispensing chemical agents. . . . . . . . . . . . . . . . . . . . . . . . . . . . . . . . . . . . . . . . 27
Operation . . . . . . . . . . . . . . . . . . . . . . . . . . . . . . . . . . . . . . . . . . . . . . . . . . . . . . . 31
Turning on the lab washer ...........................................31
Starting a program.................................................31
Select the Drying 3 function if desired ................................31
Changing a program ...............................................31
Starting the program ...............................................32
Program sequence display ..........................................32
End of a program..................................................32
Turning off .......................................................32
Canceling a program...............................................33
Program guide . . . . . . . . . . . . . . . . . . . . . . . . . . . . . . . . . . . . . . . . . . . . . . . . . . . 34
Programming functions . . . . . . . . . . . . . . . . . . . . . . . . . . . . . . . . . . . . . . . . . . . 36
The following instructions apply to all programming functions:...............36
To access the programming mode .................................36
Saving to memory and exiting the programming mode ..................36
Exiting the programming mode without saving ........................36
Buzzer ..........................................................37
Changing program parameters .......................................38
Changing the temperature ........................................38
Changing the holding time ........................................38
Activating Rinse 2 .................................................39
Delay start .......................................................40
Restoring the factory settings ........................................41
3

Contents
Maintenance . . . . . . . . . . . . . . . . . . . . . . . . . . . . . . . . . . . . . . . . . . . . . . . . . . . . . 42
Routine checks ...................................................42
Cleaning and Care . . . . . . . . . . . . . . . . . . . . . . . . . . . . . . . . . . . . . . . . . . . . . . . . 43
Frequently asked questions . . . . . . . . . . . . . . . . . . . . . . . . . . . . . . . . . . . . . . . . 50
Thermo switch ....................................................58
After Sales Service . . . . . . . . . . . . . . . . . . . . . . . . . . . . . . . . . . . . . . . . . . . . . . . 59
INSTALLATION INSTRUCTIONS. . . . . . . . . . . . . . . . . . . . . . . . . . . . . . . . . . . . . 61
Installation . . . . . . . . . . . . . . . . . . . . . . . . . . . . . . . . . . . . . . . . . . . . . . . . . . . . . . 62
Plumbing. . . . . . . . . . . . . . . . . . . . . . . . . . . . . . . . . . . . . . . . . . . . . . . . . . . . . . . . 64
Water inlet .......................................................64
Drainage ........................................................66
Electrical connection. . . . . . . . . . . . . . . . . . . . . . . . . . . . . . . . . . . . . . . . . . . . . . 67
Technical data . . . . . . . . . . . . . . . . . . . . . . . . . . . . . . . . . . . . . . . . . . . . . . . . . . . 68
Caring for the environment. . . . . . . . . . . . . . . . . . . . . . . . . . . . . . . . . . . . . . . . . 69
4

IMPORTANT SAFETY INSTRUCTIONS
This machine conforms to current
safety requirements. However,
inappropriate use can lead to
personal injury and property
damage.
To avoid the risk of accidents and
machine damage read the operating
instructions carefully before using
this machine.
Keep these instructions in a safe
place and pass them on to any
future user.
Please pay attention to the following
notes to maintain safe procedures.
Installation and repair work should
~
be performed by a Miele authorized
service technician. Work by unqualified
persons could be dangerous and may
void the warranty.
Do not use the labwasher until
~
properly installed.
Do not install the machine in an area
~
where a danger of explosion or of
freezing temperatures may be present.
WARNING - To reduce the risk of fire,
electric shock or injury:
Use
This lab washer is not intended for
~
any purpose that is not indicated in the
operating instructions. Conversions,
modifications, and other unintended
uses are considered to be dangerous.
The cleaning processes described here
apply only to those medical products
that are specifically designed by the
manufacturer to be re-used. Follow the
product manufacturer's instructions.
This lab washer in intended for
~
indoor stationary use only.
Before installation, make sure that
~
the voltage and frequency listed on the
data plate correspond with the
household electrical supply. This data
must correspond to prevent injury and
machine damage. Consult a qualified
electrician if in doubt.
Be certain this machine is properly
~
installed and grounded by an
authorized technician. To guarantee
the electrical safety of this machine,
continuity must exist between the
machine and an effective grounding
system. It is imperative that this basic
safety requirement be met. If there is
any doubt, have the electrical system
checked by a qualified technician.
Do not install or use a damaged
~
machine. A damaged machine is
dangerous. Unplug the machine and
call your Miele dealer or the Miele
Technical Service Department.
If the power cord is damaged it
~
must only be replaced by a Miele Ser
vice technician with a genuine Miele
power cord.
-
5

IMPORTANT SAFETY INSTRUCTIONS
Do not use an extension cord to
~
connect this machine to electricity.
Extension cords do not guarantee the
required safety of the machine (e.g.
danger of overheating).
Defective components should be
~
replaced by Miele original parts only.
Before installation or service,
~
disconnect the power supply to the
work area by unplugging the unit,
"tripping" the circuit breaker or
removing the fuse.
When work has been performed on
~
the supply plumbing, air must be bled
from the supply line to the labwasher.
Otherwise, the water softening system
may be damaged.
Use
Please follow the advice on
~
installation in this manual and in the
separate Installation Instructions.
Personnel operating the lab washer
~
should be trained regularly. Children
and untrained personnel must not be
allowed access to the machine or its
controls.
Persons who lack physical, sensory
~
or mental abilities, or experience with
the machine should not use it without
supervision or instruction by a
responsible person.
Do not allow children to play in or
~
around the machine, or to operate it.
BURN AND SCALD HAZARD
~
This machine reaches very high
temperatures. Take care when
unloading the unit. Let baskets and
inserts cool before touching them. Any
water which may remain in containers
will be very hot and should be emptied
into the wash cabinet.
BURN HAZARD
~
The heating elements become
extremely hot during use. Do not touch
the heating elements during or directly
after the end of a program.
Take care when handling
~
processing chemicals (detergents,
softeners, neutralizers, etc.). These may
contain irritant or corrosive ingredients.
Wear protective gloves and goggles.
With all chemical agents the
manufacturer’s safety conditions must
be observed.
6

IMPORTANT SAFETY INSTRUCTIONS
The lab washer is only designed to
~
operate with water and the
recommended processing chemicals.
The machine must NOT be operated
with organic solvents or flammable
liquids. This may cause an explosion or
damage to rubber and plastic
components, which in turn allows liquid
substances to leak out.
Avoid inhaling detergent. If
~
swallowed, it can cause burning in the
mouth and throat or inhibit breathing.
Be careful when sorting and loading
~
items to be washed: locate sharp items
so that they are not likely to damage the
door seal; and load sharp knives with
the handles up to reduce the risk of
injuries.
The water in the machine must not
~
be used as drinking water.
Do not sit or lean on the open door.
~
This could cause the machine to tip or
be damaged.
Never clean the machine or near its
~
vicinity with a water or high pressure
hose.
Only use cleaning agents
~
formulated for special processes and
approved by Miele for use with this
labwasher. Use of unsuitable cleaning
agents could adversely affect the
components of the machine.
Pre-treatments with detergents can
~
create suds, as can certain rinsing
agents. For pre-treatment and / or
cleaning only, use low-sudsing
detergents which have been approved
by Miele. Suds can have an adverse
effect on the cleaning process.
When a chemical additive is
~
recommended on technical application
grounds (e.g. with a detergent), this
does not imply that the manufacturer of
the labwasher takes responsibility for
the affect of the chemical on the
material of the items being cleaned.
Please be aware that changes in
formulation, storage conditions, etc.,
which may not be publicized by the
chemical producer, can have a
negative effect on the cleaning result.
Always follow the instructions of the
~
chemical manufacturer when using
detergents and special application
chemicals. Only use such chemicals for
the purpose and in the situation
specified to avoid such dangers as
chemical reactions and material
damage.
The labwasher is designed only for
~
operation with water and additive
cleaning agents. Organic solvents must
not be used in the machine. An
explosion or machine corrosion could
occur with the use of organic solvents.
In critical applications where very
~
stringent requirements must be met, it
is highly recommended that all relevant
factors for the process, such as
cleaning agent, quality of water, etc.,
be discussed with a Miele Application
Specialist.
For applications that demand
~
especially stringent cleaning and
rinsing results, the operator must
ensure that quality control occurs on a
regular basis.
7

IMPORTANT SAFETY INSTRUCTIONS
The mobile units and special inserts
~
should only be used for their specific
application.
Empty any containers or utensils
~
before arranging them in the machine.
Do not allow any remains of acids or
~
solvents, particularly hydrochloric acid
or chloride solutions, to get into the
wash cabinet. The presence of any
solvents should be minimized
(especially those in hazard class A1).
To avoid corrosion damage ensure
~
that solutions or steam containing
hydrochloric acid do not come into
contact with the steel outer casing of
the labwasher.
Please note the following symbols on
the machine:
Caution : See Operating
Instructions!
Caution : Danger of electric
shock!
Accessories
Only genuine, Miele parts and
~
accessories should be used with this
lab washer, including Miele mobile
units, baskets and inserts.
Adequate cleaning results cannot
~
be guaranteed when non-Miele
accessories are used, or when Miele
accessories are altered. Damages
resulting from the use of unsuitable
accessories are not covered by the
warranty.
Disposal of an old appliance
Obsolete appliances should be made
unusable. To do this, first disconnect
the appliance from the power supply,
then cut off the power cord. It is
important to note that the old appliance
may be contaminated from exposure to
pathogens, genetically modified
material, blood, etc., and therefore
must be decontaminated before
disposal.
For safety and environmental
protection, be sure to remove all
chemical residue, in compliance with
safety regulations (wear protective
eyewear and gloves!).
Remove or destroy the door latch, to
prevent children from locking
themselves inside. The appliance can
now be sent for disposal through the
proper resource recovery facilities.
SAVE THESE
INSTRUCTIONS
8

Function of the glassware washer
This Miele dishwasher is designed for
cleaning and rinsing laboratory
glassware which is suitable for machine
reprocessing. Always follow the
labware manufacturer's instructions.
Examples of application areas:
laboratory glassware used in
–
research and development,
laboratory glassware used in areas
–
of analysis and specimen taking,
laboratory glassware used in
–
micro-biology and biotechnology.
The type of laboratory glassware which
can be reprocessed ranges from Petri
dishes to centrifugal test tubes.
Reprocessing glassware by machine
achieves reproducible results and
should be used in preference to
processing them by hand.
The cleaning program as well as the
agents used must be chosen according
to the type of soiling and load being
processed.
The agents used in the machine for
reprocessing should be selected
according to the level of cleaning
required as well as the method the
product will be used.
The use of a suitable carrier (mobile
unit, module, insert etc.) is important to
ensure adequate cleaning. Examples
are given in the section "Areas of
application".
The dishwasher is programmed to carry
out the final rinse with mains water or
with processed water of a quality to suit
the application (e.g. distilled, purified,
de-ionized or demineralized water). The
water quality is important for
applications requiring analytically clean
laboratory glassware.
9
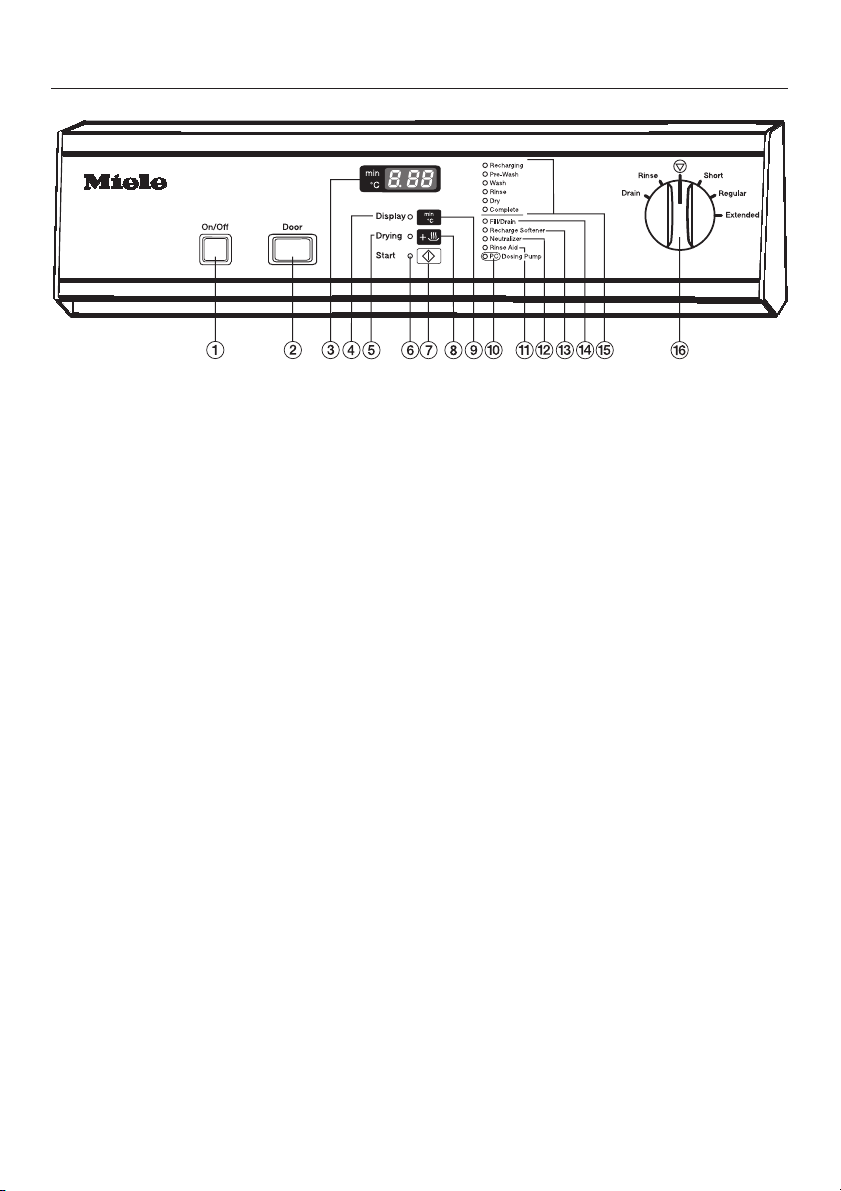
Guide to the glassware washer
a On/Off button
b Door button
c Display
d Display indicator
e Drying indicator
f Start indicator
g Start button 6
h Drying button 3
i Button 4 to switch between the
actual temperature and the elapsed
time.
Check / Refill indicators:
j 8 Optical interface for service
technician
k Rinse Aid
l Neutralizer
m Recharge softener
n Fill/Drain
o Program sequence indicators
p Program selector
10
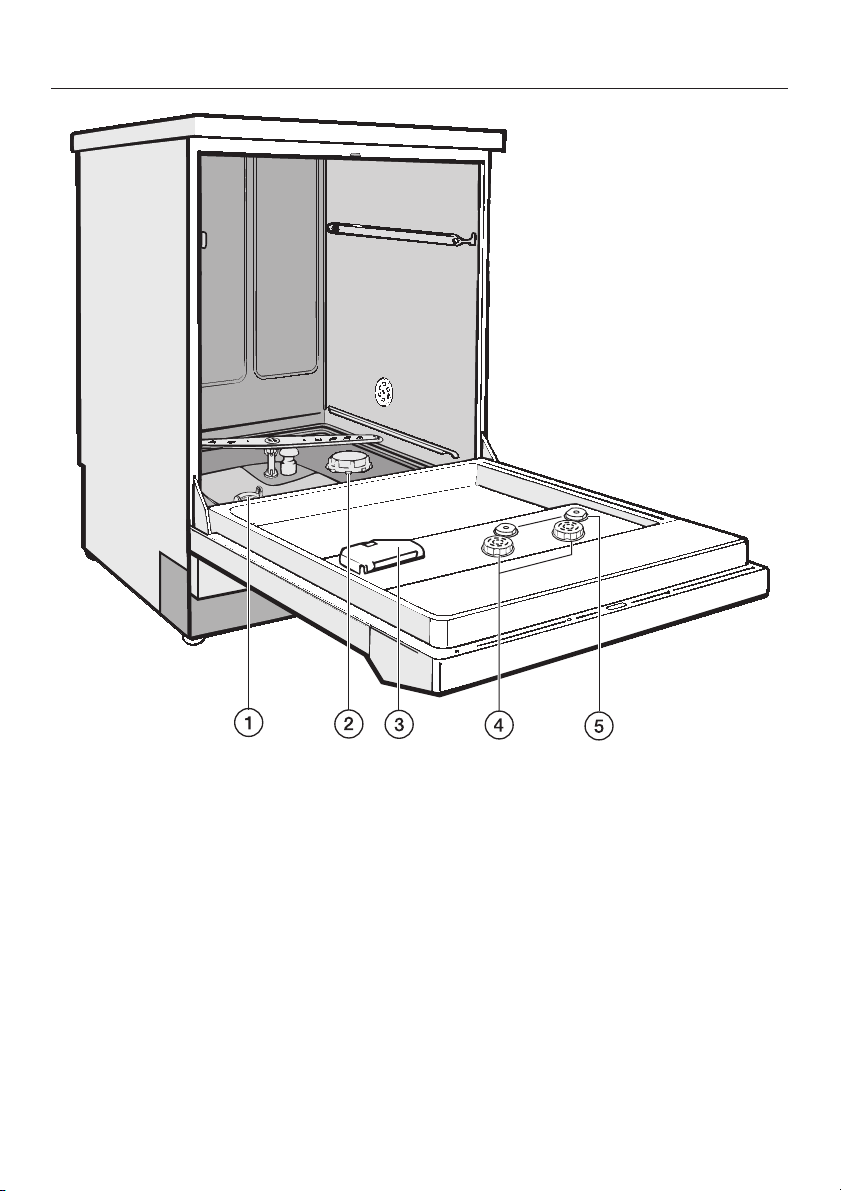
Guide to the glassware washer
a Filter combination
b Salt reservoir (water softener)
c Dispenser for powdered detergent
d Dispenser for rise aid or netralizing
agent (with dosage selector)
e Level indicator for rinse aid or
neutralizing agent
11

Opening and closing the door
Electric door lock
The machine is equipped with an
electric door lock. The door can only be
opened when the electrical supply to
the machine is turned on, and the
"On/Off" button is pressed.
To open the door
Press the "Door" button in as far as it
^
will go. At the same time, grip the
handle and open the door.
After the first intake of water, the door
remains locked and cannot be opened
until the end of the program (except
during the "Rinse" and "Drain"
programs). The machine can be
programmed to open during the
"Drying" program, if desired.
Do not touch the heating elements.
They remain hot for some time after
the end of the program and can
cause burns.
To open the door with the
emergency release
The emergency release should only be
used when the door cannot be opened
normally, e.g. in the event of a power
failure.
Turn the program selector to "Stop"
^
f.
Press the "On/Off" button to turn the
^
machine off.
Take precaution against pressure
wave release (rapid opening of the
door).
To close the door
^
Lift the door upwards and push it
until it clicks shut. Do not press the
release catch while shutting the door.
To cancel a program
If a program has to be canceled in an
emergency, e.g. the program has been
interrupted due to a fault, the door will
have to be opened manually.
^
Turn the program selector to the
"Stop" f position. The program is
canceled after approximately
2 seconds.
12
^
Pull the emergency release cable
(located at the bottom of the machine
behind the service panel) downwards
to open the door.
The door latch will reset after the
emergency cable has been activated.

Water softener
Before using the lab washer for the first
time, the water softener should be
programmed. The water needs to be
softened to avoid calcium deposits on
the items being cleaned and in the
machine itself.
If the water supply is harder or softer
than the factory setting (including
below 4 gr/gal or 70 ppm), the setting
will need to be changed. See "Setting
the water softener".
In order to function properly, the
–
water softener requires a supply of
reactivation salt.
– The cleaner must be correctly
programmed to match the hardness
of the tap water supply.
– Your local water authority can
provide information about the
hardness of the tap water in your
area.
If the water hardness is known to
fluctuate, always program for the
highest value.
The built-in water softener can be
programmed at settings from
1 - 60 gr/gal or 20 - 1080 ppm.
It is useful to make a note of your water
hardness so that you can provide the
service technician with this information
in the event of any service calls.
Please note the water hardness in the
space provided here:
gr/gal or ppm
Setting the water softener
Use the On/Off button to switch off
^
the machine.
Turn the program selector to f.
^
Simultaneously press and hold the
^
"Display" ß and "Start" 6 buttons,
while turning the machine on with the
On/Off button.
The current program status P....
will appear in the display, and the
"Fill/Drain" indicator will come on.
Press the "Drying" 0 button once.
^
E01 will appear in the display.
^ Turn the program selector one switch
position clockwise (to 1 o'clock).
The number 19 will appear in the
display (this indicates the factory
setting in gr/gal).
^ Press and hold the "Display" ß
button until the required value
appears in the display.
Please refer to the "Settings" table for
detailed water hardness tables (water
hardness in gr/gal and ppm).
Once the 60 setting has been reached,
the counter begins again from 0.
^
Press "Start" 6.
SP will appear in the display.
^
Press "Start" 6 again.
The setting you selected will now be
stored in memory. The display light(s)
will turn off.
The machine is now ready for use.
13

Water softener
Settings
Settings
1-30
1
2
3
4
5
6
7
8
9
10
11
12
13
14
15
16
17
18
19
20
21
22
23
24
25
26
27
28
29
30
gr/gal
1-30
1
2
3
4
5
6
7
8
9
10
11
12
13
14
15
16
17
18
19 **)
20
21
22
23
24
25
26
27
28
29
30
ppm
CaCO
0*)
20
40
50
70
90
110
130
140
160
180
200
220
230
250
270
290
310
320
340
360
380
400
410
430
450
470
490
500
520
540
Settings
3
31-60
31
32
33
34
35
36
37
38
39
40
41
42
43
44
45
46
47
48
49
50
51
52
53
54
55
56
57
58
59
60
gr/gal
31-60
31
32
33
34
35
36
37
38
39
40
41
42
43
44
45
46
47
48
49
50
51
52
53
54
55
56
57
58
59
60
ppm
CaCO
560
580
590
610
630
650
670
680
700
720
740
760
770
790
810
830
850
860
880
900
920
940
950
970
990
1010
1030
1040
1060
1080
3
**) The "0" setting is only for machines that do not have a water softener
*) Factory setting
14
Water softener
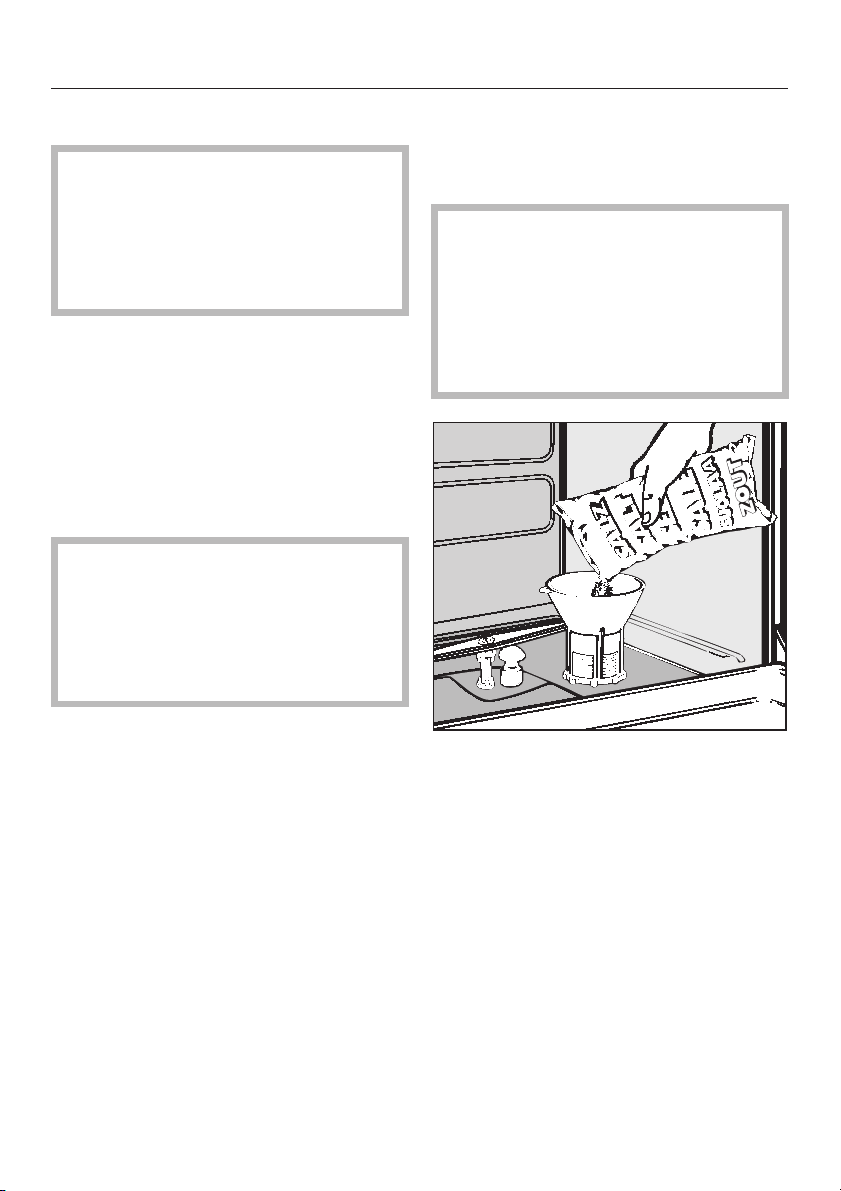
Filling the salt reservoir
Only special, coarse-grained
reactivation salt* should be used in
this lab washer.
*Available from Miele. Please see
back page for more information.
Do not use other types of salt, e.g. table
salt, agricultural or gritting salt. These
could contain components which are
insoluble in water and could damage
the water softener. If in doubt, consult
Miele Technical Service.
The salt reservoir holds approximately
2.5 kg salt.
Inadvertently filling the salt
,
reservoir with detergent will damage
the water softener.
Before filling the reservoir, make
sure that you are using reactivation
salt.
Remove the bottom basket from the
^
machine.
Unscrew the salt reservoir cap.
^
Before filling the salt reservoir for the
first time fill the reservoir with
approximately 2.5 liters of water, so
that the salt can dissolve properly.
Once the lab washer has been
operated, there will always be
enough water in the reservoir.
^
Place the funnel provided in place.
^
Carefully fill the reservoir with the
reactivation salt.
15

Water softener
Wipe any residual salt off the screw
^
threads and seal of the reservoir.
^ Screw the cap on securely.
^ Immediately after this step, start the
"Rinse" program, to remove any
traces of salt from the inside of the
lab washer.
Note: There may be a delay of a few
minutes before the "Rinse" program
starts due to the reactivation of the
water softener.
Salt indicator
When the salt reservoir is empty, the
"Recharge Softener" indicator b lights
to remind you to fill the reservoir.
Reactivation takes place automatically
as needed during a program. The
"Recharging" indicator a lights while
this is occurring.
16

Areas of application
Depending on the type of labware you
wish to clean, the lab washer can be
used with an upper basket, lower
basket, or injector wagon, as well as an
assortment of inserts and special
baskets to suit your needs.
Baskets and inserts should be
properly selected to match the
application desired.
Before every program start, conduct
the following visual inspection:
– Is the labware properly loaded and
secured in the lab washer?
– Are the hollow vessels properly
loaded so that all cavities and
channels will be flushed clean?
– Are the spray arms clean, and can
they rotate freely?
– Is the filter combination free of
coarse debris (clean if necessary)?
After every program completion,
conduct the following visual
inspection:
Inspect the labware for cleanliness.
–
Has any hollowware been dislodged
–
from its proper position on the
nozzles?
Any items that were dislodged
,
from the adapters during a program
cycle must be washed again.
Are the cavities and channels in any
–
hollow vessels cleaned through?
– Are the nozzles and connections
firmly attached to the
baskets/inserts?
–
Is the basket adapter properly
connected to the water supply for the
spray arms and nozzles?
–
Are the chemical dispensers filled?
17

Areas of application
Loading the machine
Disposable items must not be
processed in the machine.
Always load items in a way that all
–
surfaces are exposed. This ensures
that the items will be properly
cleaned.
Do not nest any items inside other
–
items. Keep each item separate.
Hollow vessels must be arranged for
–
complete inside exposure to the
cleaning water.
– Prior to loading the machine or
connecting to the machine ensure
that vessels with long, narrow
cavities they can be completely
flushed.
– Hollow vessels should be inverted
and placed in suitable baskets and
inserts so that water will have
unrestricted access and exit.
–
Deep-based items should be
arranged at an angle, so that water
can run off easily.
–
Tall, narrow pieces should be placed
in the center of the basket for best
water coverage.
–
Secure light loads with netting and
place small items in a mesh
tray/basket so that they do not
obstruct the spray arms.
–
Baskets and inserts with an adapter
must be properly connected.
–
The spray arms must not be blocked
by items that are too tall or hang
through the baskets.
To avoid corrosion, only load
–
stainless steel instruments in good
condition.
Do not use this machine to wash
–
nickel-plated items or discolored
(oxidized) aluminum items.
Do not load plastics unless they are
–
heat-resistant.
Prepare items before loading
Empty all glassware before loading
^
into the machine. Comply with all
applicable infection-control
regulations.
^ Remove all agar residue from petri
dishes.
^ Remove all stoppers, corks, labels,
sealing wax residue, etc.
,
Ensure that no acid or solvent
residues, especially hydrochloric
acid or chlorides, get inside the
machine.
Special preparations before
operating the machine
Items effected by heavy contamination
that resists removal, such as vacuum
grease, paper labels, etc., can affect
the cleaning and rinsing of the whole
load. Pre-treat these items before
loading.
Lab equipment that is contaminated by
microbiological material, pathogens,
propathogens, genetically altered
material, etc., should be sterilized
before being washed in the lab washer
18
Areas of application
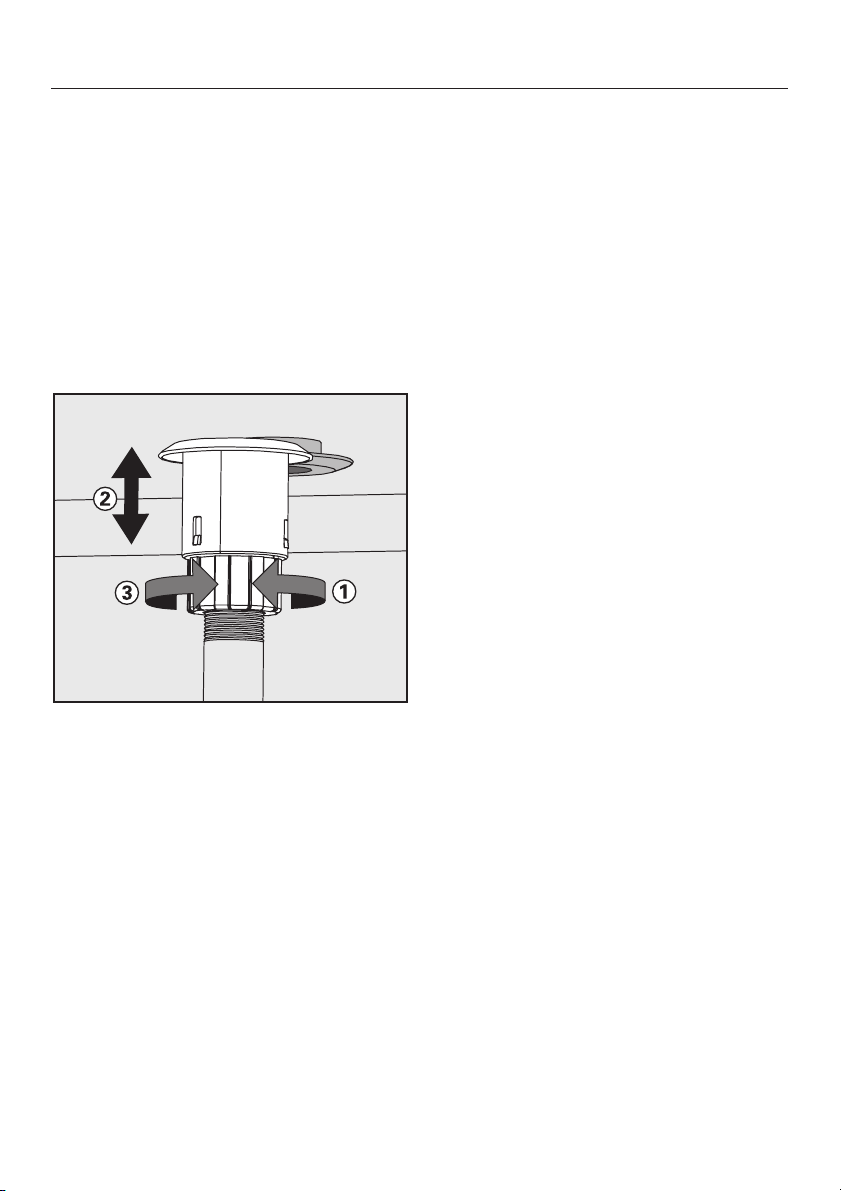
Spring adapter for the water
connection
The spring adapter for the water
connection must be properly engaged
when a basket or the injector wagon is
inserted into the machine. It must be
4-5mmhigher than the water inlet in
the machine.
If this is not the case, the adapter
needs to be adjusted as follows:
Adjusting the upper basket
The upper basket can be adjusted
above and below the middle position,
by 2 cm.
Depending on the height selected and
which inserts are used, labware of
various heights can be arranged in the
baskets.
To adjust the upper basket:
Pull the upper basket out as far as it
^
will go, lift it up off the runners and
remove.
Use a wrench to unscrew the roller
bearings on either side of the basket,
then reposition as required.
^
Loosen the locking ring a.
^
Move the adapter up to the proper
height b.
^
Tighten the locking ring c.
19

Areas of application
Laboratory equipment
Wide-necked labware, e.g., beakers,
wide-necked Erlenmeyer flasks and
Petri dishes, or cylindrical items,
e.g., test tubes, can be cleaned inside
and out by the rotating spray arms.
For proper cleaning, load these items in
whole, half or quarter inserts, and place
them in an empty lower basket or upper
basket with spray arm.
Narrow-necked items, e.g., narrow
necked Erlenmeyer flasks, round flasks,
volumetric flasks and pipettes, require
the use of injector wagons or injector
baskets.
Separate instructions are included
for the use of injector baskets and
inserts for narrow-necked labware.
This section only covers basic
information on how to prepare and load
labware.
Petri dishes and similar items should
–
be loaded in a suitable insert with the
soiled side facing center.
Pipettes should be placed with the
–
narrow end facing down.
Protective netting can be used to
–
avoid glass breakage.
Quarter baskets should be loaded at
–
least 3 cm away from the edge of the
wagon.
20
Areas of application
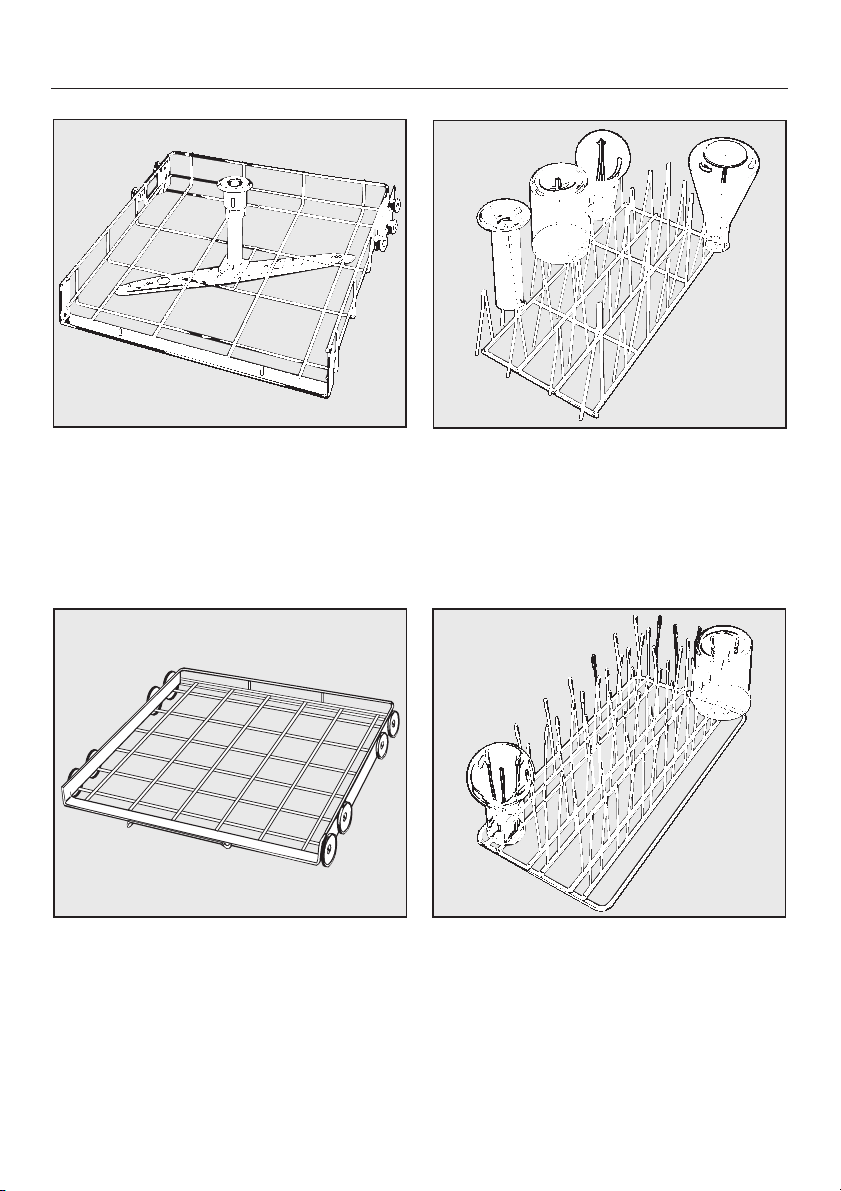
Upper basket O 188/1
For various inserts.
Lower basket U 874/1
For various inserts.
E 106/2
Stainless steel half insert with 26 spring
hooks in 2 different heights for various
glassware, e.g. narrow necked flasks,
graduated cylinders, medicine bottles,
etc.
E 109
Stainless steel half insert to
accommodate 21 beakers up to 250 ml,
Erlenmeyer flasks, round flasks, etc.
21

Effects of Processing Chemicals
General information
Effects Action
Damage to elastomer (seals and hoses)
or plastic components of the lab
washer may cause the materials to
swell, shrink, harden or become brittle,
possibly causing cracks to form in the
materials. This will impair their function,
which will generally lead to leaks.
Strong foaming during the program
prevents proper cleaning and rinsing of
the load. Foam escaping from the wash
compartment can result in damage to
the lab washer.
If foaming occurs, the cleaning process
is not standardized and not validated.
Stainless steel corrosion in the wash
compartment and/or accessories may
appear in various ways:
– rust formation (red spots / stains),
–
black spots / stains,
–
white spots / stains (smooth surface
is slightly corroded).
Corrosion that forms holes can result in
leaks in the lab washer. Depending on
the application, the corrosion may
impair the cleaning and rinsing results
(laboratory analysis) or cause corrosion
of the load (stainless steel).
Find and correct the causes of the
–
damage.
See "Connected processing
chemicals", "Soiling" and "Reactions
between processing chemicals and
soils" for more information.
Find and correct the cause of the
–
foaming.
The process must be checked
–
regularly in order to detect any
foaming.
See "Connected processing
chemicals", "Soiling" and "Reactions
between processing chemicals and
soils" for more information.
– Find and correct the cause of the
corrosion.
See "Connected processing
chemicals", "Soiling" and "Reactions
between processing chemicals and
soils" for more information.
22
 Loading...