


G 7783 CD

Operating Instructions for
Compact Disinfector
G 7783 CD MIELABOR
Laboratory Glasswasher
It is essential to read these
Operating Instructions before
installing or using the machine,
to avoid the risk of accident,
or damage to the machine. M.-Nr. 04 195 811
Q

Contents
Contents
Guide to the machine. . . . . . . . . . . . . . . . . . . . . . . . . . . . . . . . . . . . . . . . . . . . . . . 3
Warning and safety instructions. . . . . . . . . . . . . . . . . . . . . . . . . . . . . . . . . . . . . . 5
Warning and safety instructions (detachable) . . . . . . . . . . . . . . . . . Centre pages
Description of the machine . . . . . . . . . . . . . . . . . . . . . . . . . . . . . . . . . . . . . . . . . . 9
Setting the water softener. . . . . . . . . . . . . . . . . . . . . . . . . . . . . . . . . . . . . . . . . . 10
Opening and closing the door . . . . . . . . . . . . . . . . . . . . . . . . . . . . . . . . . . . . . . 12
Applications and loading. . . . . . . . . . . . . . . . . . . . . . . . . . . . . . . . . . . . . . . . . . . 13
Rinsing agent . . . . . . . . . . . . . . . . . . . . . . . . . . . . . . . . . . . . . . . . . . . . . . . . . . . . 17
Setting the dosage . . . . . . . . . . . . . . . . . . . . . . . . . . . . . . . . . . . . . . . . . . . . . . 17
Adding neutralising agent and (liquid) detergent. . . . . . . . . . . . . . . . . . . . . . . 18
Venting the liquid dispensing system / Maintenance. . . . . . . . . . . . . . . . . . . . 19
Adding powder detergent . . . . . . . . . . . . . . . . . . . . . . . . . . . . . . . . . . . . . . . . . . 20
Programme selection. . . . . . . . . . . . . . . . . . . . . . . . . . . . . . . . . . . . . . . . . . . . . . 21
Programme chart . . . . . . . . . . . . . . . . . . . . . . . . . . . . . . . . . . . . . . . . . . . . . . . . . 22
Switching the machine on and off . . . . . . . . . . . . . . . . . . . . . . . . . . . . . . . . . . . 24
Selecting a programme . . . . . . . . . . . . . . . . . . . . . . . . . . . . . . . . . . . . . . . . . . 24
Selecting an additional programme . . . . . . . . . . . . . . . . . . . . . . . . . . . . . . . . . 24
Programme sequence indicator . . . . . . . . . . . . . . . . . . . . . . . . . . . . . . . . . . . . 26
Interrupting a programme. . . . . . . . . . . . . . . . . . . . . . . . . . . . . . . . . . . . . . . . . 26
Programming special functions . . . . . . . . . . . . . . . . . . . . . . . . . . . . . . . . . . . . . 28
Reactivating the water softener . . . . . . . . . . . . . . . . . . . . . . . . . . . . . . . . . . . . . 29
Cleaning and care . . . . . . . . . . . . . . . . . . . . . . . . . . . . . . . . . . . . . . . . . . . . . . . . 31
Drying unit (TA) cleaning and care. . . . . . . . . . . . . . . . . . . . . . . . . . . . . . . . . . . 33
Changing the Coarse Filter. . . . . . . . . . . . . . . . . . . . . . . . . . . . . . . . . . . . . . . . 33
Exchanging the S-class particle filter . . . . . . . . . . . . . . . . . . . . . . . . . . . . . . . . 33
Correcting minor faults . . . . . . . . . . . . . . . . . . . . . . . . . . . . . . . . . . . . . . . . . . . . 34
Installation . . . . . . . . . . . . . . . . . . . . . . . . . . . . . . . . . . . . . . . . . . . . . . . . . . . . . . 35
Electrical connection. . . . . . . . . . . . . . . . . . . . . . . . . . . . . . . . . . . . . . . . . . . . . . 37
Plumbing. . . . . . . . . . . . . . . . . . . . . . . . . . . . . . . . . . . . . . . . . . . . . . . . . . . . . . . . 39
Caring for the environment. . . . . . . . . . . . . . . . . . . . . . . . . . . . . . . . . . . . . . . . . 42
T e c h nical Data . . . . . . . . . . . . . . . . . . . . . . . . . . . . . . . . . . . . . . . . . . . . . . . . . . . 43
2

Guide to the machine
Guide to the machine
°C
min
DOS
•
•
•
•
DESIN
•
•
•
•
•
•
1234 5 6 7 8 9
1 "Check water inlet/outlet"
check light
2 "Reactivate softener" indicator light
3 Add
(liquid) detergent
indicator light
4 "Add neutralising agent"
indicator light
10’- 80’
T
1
T
2
•
I-O
•
A
•
B
•
C
•
D
•
E
•
F
•
5 Programme sequence indicator
6 Display
7 Door release
8 ON-OFF Button (I-0)
9 Programme touch controls
•
•
•
•
3
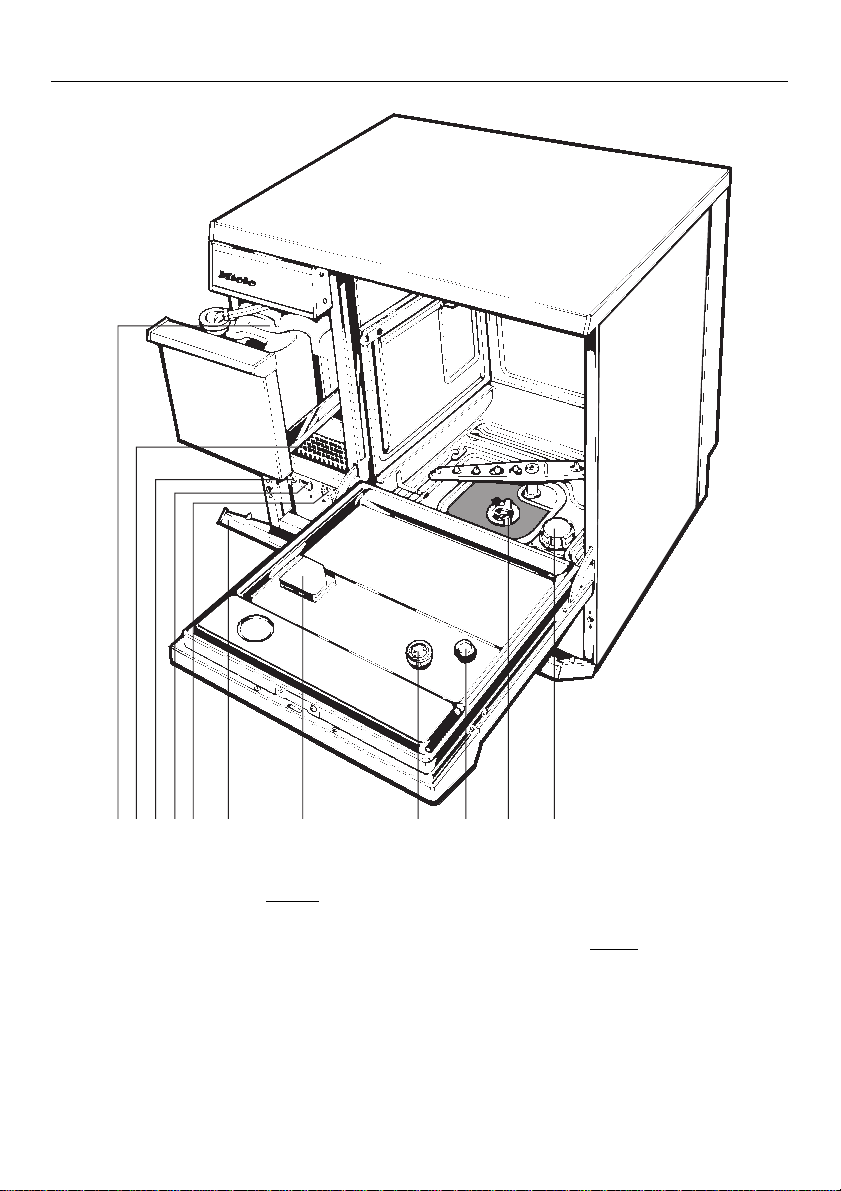
Guide to the machine
Guide to the machine
10 11
12 13 14
15 16 17 18 19 20
10 Dispenser for neutralising agent
(DOS 10 - red) and
liquid detergent
(DOS 60 - blue)
11 Drying unit (TA)
12 Safety fuse for TA Drying Unit
13 Time counter for TA Drying Unit
14 Temperature selector for TA Drying
Unit
4
15 Service panel
16 Dispenser for powder detergent
17 Dispenser for
liquid rinsing agent
with dosage selector
18 Level indicator
19 Filter combination
20 Connection socket for salt
container (water softener)

Warning and safety instructions
Warning and safety instructions
This machine conforms to current
safety requirements. Inappropriate
use can however lead to personal
injury and damage to property.
Read the operating instructions
carefully before starting to use this
machine. This way you will avoid
the risk of accidents, and damage
to the machine.
Keep these instructions in a safe
place, and make them available to
future users.
Correct usage
This machine is designed for com-
mercial use and for specialised applications only, as described in these
Operating Instructions. Using it for purposes other than those for which it was
designed would be unauthorised and
could cause harm.
The manufacturer cannot be held responsible for damage caused by improper use.
Please pay attention to the following
notes, to maintain safe procedures.
The machine should be commis-
sioned and then maintained only
by the Miele Service Department, an
authorised Miele Service Dealer or
other approved competent person.
The electrical safety of this ma-
chine can only be guaranteed if
connected to a correctly installed earthing system on site. It is most important that this basic safety requirement is
met and complies with local and national regulations. It should be checked
by an expert if necessary.
The manufacturer cannot be held responsible for damage caused by missing or defective earthing, such as
electric shock.
A damaged machine is dan-
gerous. Switch off at the mains immediately and call an authorised Miele
service dealer, or suitably competent
engineer.
Repair work may only be carried
out by an authorised, suitably competent person. Repairs by unqualified
persons could be dangerous.
Personnel operating the machine
should be trained regularly. Children and untrained personnel should not
be allowed access to the machine or
its controls.
Do not install the machine in an
area where a danger of explosion
may be present.
5

Wa rning and safety instructions
Warning and Safety instructions
Take care when handling liquids
such as detergents, wetting
agents, or neutralising agents. These
may contain irritant or corrosive ingredients, acids or alkalis. On no account
use any organic solvent, as there may
be the danger of an explosion occurring.
Follow the instructions and relevant
safety procedures carefully. Wear protective gloves and goggles.
Avoid inhalation of powder
cleaners. They can cause burning
in the mouth and throat if swallowed, or
inhibit breathing.
The water in the machine must not
be used as drinking water.
Do not sit or lean on the open door,
or rest objects on it. This could
cause the machine to tip and be damaged.
Be careful when sorting items with
sharp pointed ends and positioning them in the machine that you do not
hurt yourself or create danger for other
operators.
When using this machine in the
temperature ranges from 70 to
95°C be especially careful not to scald
or burn yourself. Baskets and inserts
must first cool down. Any water which
may remain in containers will be very
hot and must be emptied into the wash
cabinet.
After drying with the TA drying unit then
open the door to allow the items and inserts to cool down.
programme, you could burn yourself.
of the machine.
must be disconnected from the mains
supply, by switching off at the mains
isolator, or withdrawing the mains fuse.
The following points should be observed to avoid damage to the machine and the loads being cleaned.
confirmed by the user as a routine matter. The process should be regularly
checked using chemical indicators,
and bacteriologically at intervals using
bio-indicators, with full documentation.
Proceed according to local health authority regulations.
limiting effect on the disinfection result.
However, should an interruption be
necessary. the complete programme
must be repeated.
proved by Miele for use with this machine. Use of unsuitable cleaning
agents could adversely affect the load
or the machine.
Do not touch the heating elements
during or directly after the end of a
Never use an ordinary or a high
pressure hose on or in the vicinity
Before any maintenance or repair
work is undertaken, the machine
The standard of disinfection in the
Disinfection programmes must be
Disinfection programmes must not
be interrupted, as this can have a
Only use cleaning agents formulated for special processes and ap-
6

Warning and safety instructions
Warning and Safety instructions
For pre-treatment and / or cleaning
only use low-foaming detergents
and disinfecting agents which have
been approved by Miele. Foam can
have an adverse effect on the disinfection and cleaning process.
Where a chemical additive is re-
commended on technical application grounds (for example with a cleaning agent), this does not imply that the
manufacturer of the machine takes responsibility for the effect of the chemical on the material of the items being
cleaned. Please be aware that changes
in formulation, storage conditions etc,
which may not be publicised by the
chemical producer, can have a negative effect on the cleaning result.
When using cleaning agents and
specialised products it is essential
that the manufacturer’s instructions are
followed. Only use the product for the
application described by the manufacturer, to avoid any material damage or
the occurrence of strong chemical reactions such as oxyhydrogen.
The machine is designed only for
operation with water and additive
cleaning agents. Organic solvents
must not be used in the machine, as
there is the danger under certain circumstances of explosion. Although this
is not the case with all organic solvents, other problems could arise with
their use, for example damage to rubber and synthetic materials.
In critical applications where very
stringent requirements have to be
met, it is strongly recommended that all
the relevant factors for the process,
such as cleaning agent, quality of
water are discussed with the Miele Application Technology specialists.
If the cleaning result is subject to these
particularly stringent requirements (e.g.
chemical analysis, specialised processes), a regular quality control test
should be carried out by the user to ensure that required standards of cleanliness are being achieved.
Please follow the advice on installa-
tion in these instructions and the
separate Installation Instructions.
Empty any containers or utensils
before arranging them in the machine.
Do not allow any remains of acids
or solvents, or chloride solutions to
get into the wash cabinet. Similarly
avoid any materials with a corrosive effect.
The presence in compounds of any solvents should be minimal, (especially
those in hazard class A1).
Ensure that solutions or steam con-
taining acid salts do not come into
contact with the steel outer casing of
the machine, to avoid any corrosion
damage.
7

Wa rning and safety instructions
Warning and Safety instructions
Accessories
Use special inserts in accordance
with the instructions provided.
The only accessories to be used
with the special commercial machine must be those supplied or approved by MIELE for the specific application. Consult your dealer or the Miele
Professional department for advice.
Disposal of an old machine
When disposing of an old machine
first make it unusable. Disconnect,
cut off the cable and any plug from the
cable. For environmental and safety
reasons ensure the machine is completely drained of any residue water
and cleaning agent. (Observe safety
regulations and wear safety goggles
and gloves). Make the door lock inoperative, so that children cannot accidentally shut themselves in. The simplest
way to do this is to remove the locking
pin (2 philips screws above the door).
Make appropriate arrangements for the
safe disposal of the machine. For tank
system machines ensure that any water
is emptied out of the tank.
The manufacturer cannot be held responsible for any damage caused
through non-observance of these
Warning and Safety instructions.
In countries where there are areas
which may be subject to infestation by cockroaches or other vermin,
pay particular attention to keeping the
machine and its surroundings in a
clean condition at all times. Any damage which may be caused by cockroaches or other vermin will not be
covered by the machine guarantee.
8

Description of the machine
Description of the machine
The G 7783 CD is a front-loading automatic machine for the efficient washing
- neutralising - rinsing - final rinsing of
laboratory glassware. It can be operated on normal water supply. There are
"AD" (aqua destillata) programmes with
final rinses using purified water (distilled, R.O., or de-ionised).
On completion of the automatic programme sequence, laboratory glassware is cleaned to the standard required for analysis.
The electronic control unit offers a
choice of temperatures for the cleaning
and final rinsing phases. A combination
often preferred is cleaning - T
and final rinse T
70 °C.
2
85° C
1
With the SPECIAL "B" programme the
machine can thermally disinfect at
90°C with relevant holding times.
"Instrument disinfection in automatic
machines" is to be found under subsection 3.2.4. of paragraph 10c of
BSeuchG, according to the German
Federal Health Authority, Berlin (BGA).
The disinfection parameters of between
90°C and 93°C held for 10 minutes
apply to the effective areas A + B. Reduction factor 7 (by reduction factor
7
).
~10
The effective areas are defined as follows:
A = Suitable for destruction of vegetative bacteria, including myco-bacteria
and fungus and fungal spores.
B = Suitable for inactivation of viruses
Including HBV and HIV).
The SPECIAL "B" programme operates
at 90°C with 10 minutes holding time.
This machine is fitted with a TA drying
unit and water softener as standard.
Available at extra cost:
– Machine lid
9

Setting the water softener
Setting the water softener
To avoid the build-up of calcium deposits on glassware and in the machine
the water needs to be softened, where
the supply hardness exceeds 107
ppm, (6°d).
To ensure a steady supply of soft water
the water softener unit must always be:
1. correctly set
2. reactivated with "dishwasher" salt as
soon as the k indicator light comes on.
The water softener must be set to correspond with the water hardness the
time the machine is used.
Your local water authority will advise
you on the water hardness in your area.
first
Time
unit
18
17
16
15
14
13
12
11
10
9
8
7
6
5
4
3
2
1
0
°d mmol/l° f °e ppm
6
10
11
12
13
15
17
19
22
24
28
32
38
48
71
1.07
7
1.25
8
1.42
9
1.60
1.78
1.96
2.14
2.31
2.67
3.03
3.38
3.92
4.27
4.98
5.70
6.76
8.54
12.64
10.7
12.5
14.3
16.0
17.9
19.6
21.4
23.2
26.8
30.4
33.9
39.3
42.8
50.0
57.1
67.8
85.7
126.7
7.5
8.8
10,0
11.3
12.5
13.8
15.0
16.3
18.8
21.3
23.8
27.5
30.0
35.0
40.0
47.6
60.1
88.9
CaCO
107
125
143
160
179
196
214
232
268
304
339
393
428
500
571
678
857
1267
3
Setting the WaterSoftener
The hardness range is divided into 18
"time" units ad a zero position. The machine is set at the factory, corresponding to 339 ppm, (19°d).
If your water supply is harder or softer
than this, then:
Use the touch pads on the control
panel to change the time setting (see
Ta bl e ).
Press T1 and c touch pads simul-
taneously and, whilst depressed,
switch the machine on, using the
main switch "I-0".
"P..." will appear in the display field (to
indicate current programming status).
Press touch pad k. The "P" will disappear and setting "0" will appear in
the display field. This setting "0" can
now be changed if necessary. To do
this:
Press touch pad cas many times
as is necessary for the desired value
to appear in the display field.
Press touch padh. "SP" appears.
Press h once more. The setting will
now be stored. The display field
clears.
The machine is now ready for operation.
10

Setting the water softener
If the water hardness in your area is
permanently below 107 ppm (6°d):
Select setting "0". The control light
k will not come on and the water
softener does not need to be regenerated.
Reactivating the water softener, see
page 29.
Setting the water softener
11

Opening and closing the door
Opening and closing the door
To open the door a
Press the release catch as far as it
will go and, at the same time, grasp
the door grip and open the door.
The door should only be opened during operation for emergencies: e.g. if
articles are knocking together (see interrupting a programme).
To close the door
Lift the door upwards and push until
it clicks into position. Do not press
the release catch.
12

Applications and loading
Applications and loading
This laboratory glasswasher normally
requires a top and a bottom basket.
Depending on the type and shape of
the glassware, inserts can be supplied
and there is a range of other baskets
for special applications. The diversity of
the inserts is so great that it is not
possible to illustrate them all or give detailed instructions on their use here. As
an example there are inserts for direct
injection spraying of volumetric flasks,
butyrometers, pipettes etc.
General glassware used in laboratories, e.g. beakers, conical flasks, test
tubes, etc., can be arranged in fullsize, half or quarter inserts in top or bottom baskets. Your Miele laboratory
dealer will advise on specific requirements.
The following instructions relate only to
basic preparation and loading of glassware.
Remove all agar residues from petri
dishes.
Remove blood clots and residues
from test tubes, etc.
Remove all stoppers, corks, labels,
sealing wax residues, etc.
Notes
Load the glassware so that water will
come into contact with all surfaces.
This ensures that they will be
properly cleaned.
Do not place items to be cleaned inside other pieces where they may be
concealed.
Hollow vessels such as beakers,
measuring cylinders, flasks, etc.
should be inverted and placed in the
correct inserts. A cover net can be
used to reduce the risk of movement
during the wash process.
Loading the machine
Removing excess soils
Empty all glassware before loading
into the machine. Take any hygiene
measures necessary against infection.
Ensure that no acid or solvent
residues, especially hydrochloric
acid or chlorides get into the wash
cabinet.
Petri dishes and similar should be
placed in the correct insert with the
soiled side facing the centre.
Pipettes should be placed with the
mouthpiece facing upwards.
Deep based items should be placed
at enough of an angle for water to
run off them freely.
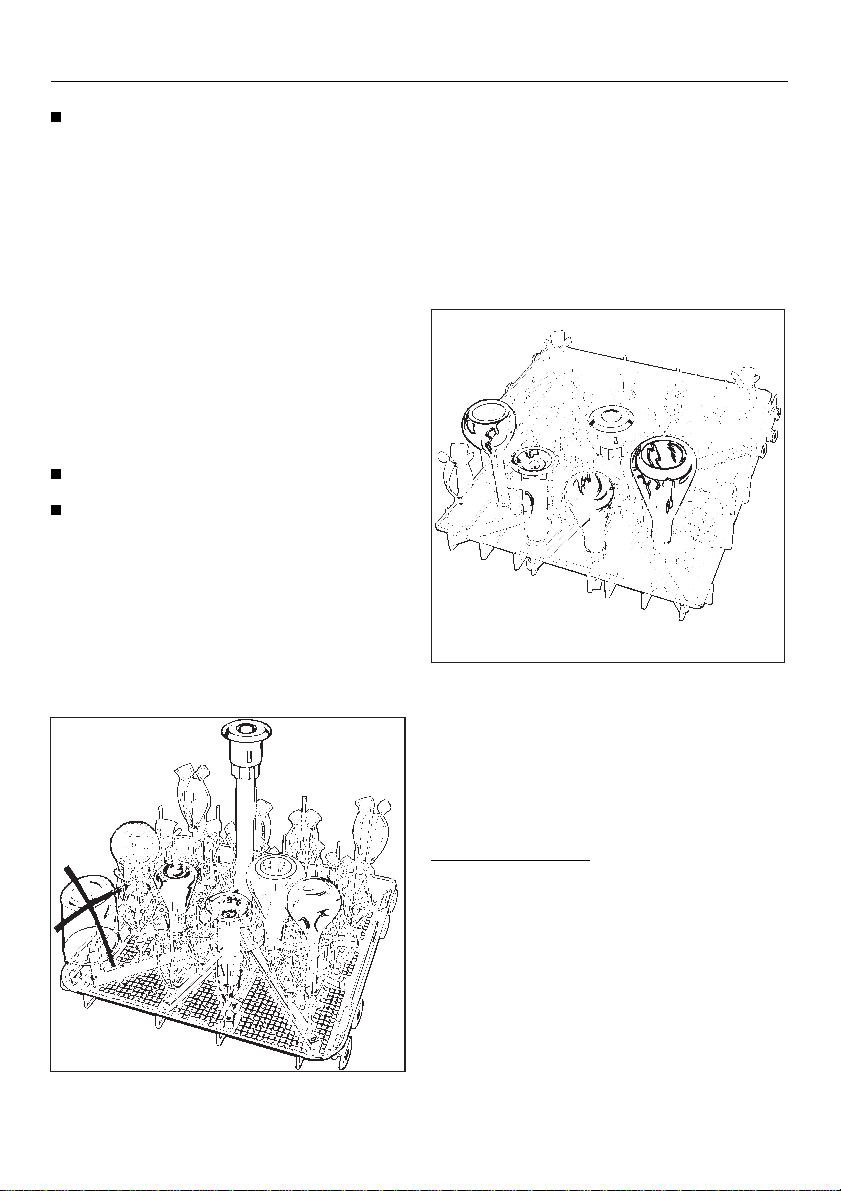
Tall, narrow, hollow pieces should be
placed in the centre of the basket to
ensure good coverage of water.
Do not cover the funnel in the middle
of the top basket. Mobile injector
units or baskets with an adapter
must engage correctly, (see below).
13
Applications and loading
Applications and loading
The spray arms must not be blocked
by items which are too tall for the
basket or which hang down. Rotate
the arms manually to test.
Important
Make sure that the spring adapter for
water connection engages correctly
when a basket, injector or mobile unit is
inserted into the machine. It must be 4 5 mm higher than the water connection
inlet in the roof of the cabinet.
If it is not, adjust the adapter accordingly.
Loosen the lock ring.
Push up the adapter (4-5 mm higher
than the water connection inlet) and
tighten the lock ring.
Select baskets and inserts which are
appropriate for the application.
E 380 "Intermiel"
Injector mobile unit (with TA connection)
For narrow necked glassware, complete with 15 nozzles 4x1 mm/160 mm
high, 18 nozzles 6x1 mm/220 mm high
with 33 "Mielava" clips.
Loading example:
14
O 175 Injector mobile unit
(with (TA) Drying unit connection)
(top basket) for direct injection of narrow necked glassware, 34 nozzles 4x1
mm/ 160 mm high with "Mielava" clips.
Please note:
powder detergent can only be placed
in the inner side of the door when using
the O 175 unit .
Applications and loading the machine
Applications and loading
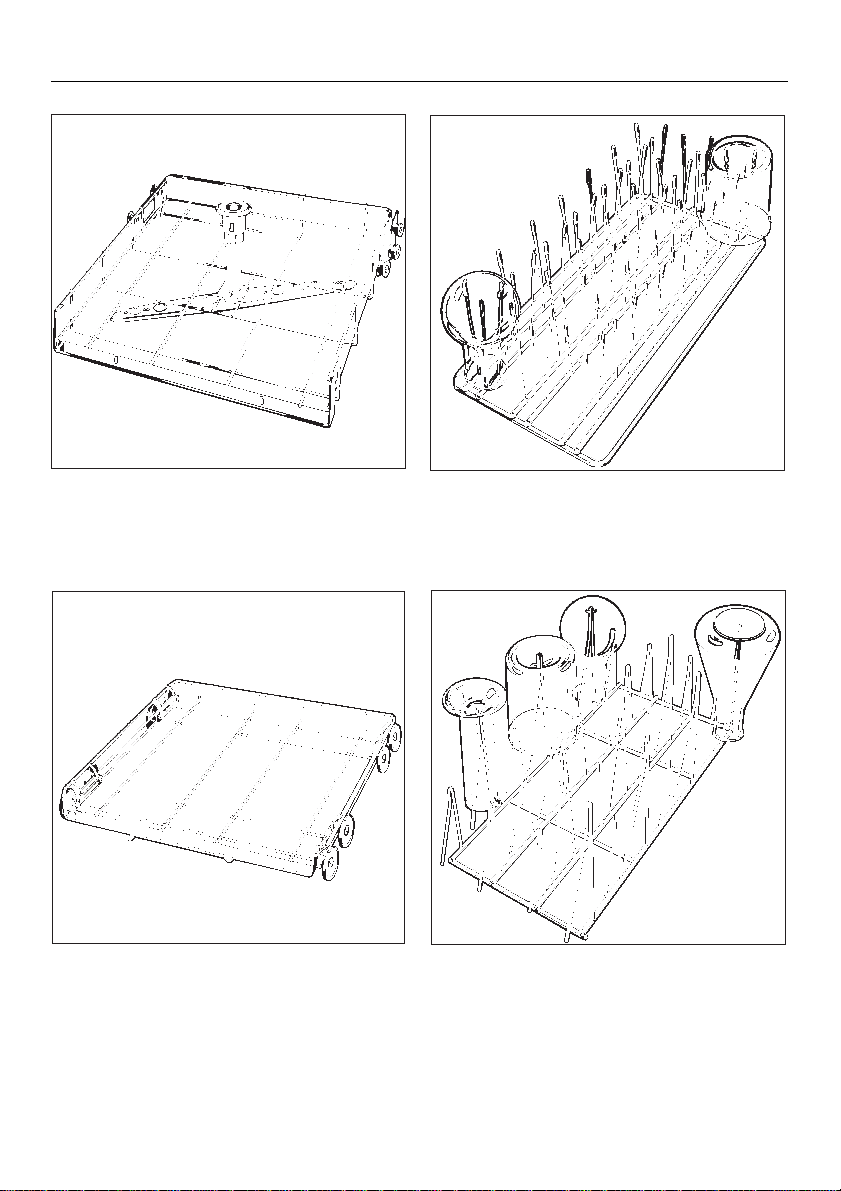
O 188 top basket frame
can take various inserts.
U 174 bottom basket frame
can take various inserts.
E 109
Half insert, stainless steel, with 21 glass
beakers up to 250 cm3, round and
conical flasks etc.
E 106
Half insert, stainless steel, with 28
spring hooks at two heights for glassware, such as narrow necked bottles,
measuring cylinders, medicine bottles
etc.
15
 Loading...