


Operating instructions
Washer-disinfector
G 7862
To avoid the risk of accidents or damage to the machine it is essential to read these instructions before it is installed, commissioned and used for the first time.
G
M.-Nr. 05 880 901

Contents
Description of the machine . . . . . . . . . . . . . . . . . . . . . . . . . . . . . . . . . . . . . . . . . . 4
Guide to the machine. . . . . . . . . . . . . . . . . . . . . . . . . . . . . . . . . . . . . . . . . . . . . . . 5
Warning and Safety instructions . . . . . . . . . . . . . . . . . . . . . . . . . . . . . . . . . . . . . 7
Caring for the environment . . . . . . . . . . . . . . . . . . . . . . . . . . . . . . . . . . . . . . . . . 11 Disposal of your old appliance . . . . . . . . . . . . . . . . . . . . . . . . . . . . . . . . . . . . . . . 11
Opening and closing the door . . . . . . . . . . . . . . . . . . . . . . . . . . . . . . . . . . . . . . 12 Electro-thermal door lock. . . . . . . . . . . . . . . . . . . . . . . . . . . . . . . . . . . . . . . . . . . . 12 To open the door a . . . . . . . . . . . . . . . . . . . . . . . . . . . . . . . . . . . . . . . . . . . . . . . 12 To close the door . . . . . . . . . . . . . . . . . . . . . . . . . . . . . . . . . . . . . . . . . . . . . . . . . . 12 To open the door with the emergency release. . . . . . . . . . . . . . . . . . . . . . . . . . . . 13
Water softener . . . . . . . . . . . . . . . . . . . . . . . . . . . . . . . . . . . . . . . . . . . . . . . . . . . 14 Setting the water softener . . . . . . . . . . . . . . . . . . . . . . . . . . . . . . . . . . . . . . . . . . . 14 Filling the salt reservoir . . . . . . . . . . . . . . . . . . . . . . . . . . . . . . . . . . . . . . . . . . . . . 16 Salt indicator . . . . . . . . . . . . . . . . . . . . . . . . . . . . . . . . . . . . . . . . . . . . . . . . . . . . . 17
Adding neutralising or rinsing agent . . . . . . . . . . . . . . . . . . . . . . . . . . . . . . . . . 18 Neutralising agent (factory setting) . . . . . . . . . . . . . . . . . . . . . . . . . . . . . . . . . . . . 18 Adding neutralising agent . . . . . . . . . . . . . . . . . . . . . . . . . . . . . . . . . . . . . . . . 18 Rinsing agent. . . . . . . . . . . . . . . . . . . . . . . . . . . . . . . . . . . . . . . . . . . . . . . . . . . . . 19 Adding Rinsing agent . . . . . . . . . . . . . . . . . . . . . . . . . . . . . . . . . . . . . . . . . . . . 19 Setting the dosage. . . . . . . . . . . . . . . . . . . . . . . . . . . . . . . . . . . . . . . . . . . . . . . . . 20
Adding cleaning agent. . . . . . . . . . . . . . . . . . . . . . . . . . . . . . . . . . . . . . . . . . . . . 21 Maintenance of the dispensing system . . . . . . . . . . . . . . . . . . . . . . . . . . . . . . . . . 22
Loading the machine . . . . . . . . . . . . . . . . . . . . . . . . . . . . . . . . . . . . . . . . . . . . . . 23 Loading the machine . . . . . . . . . . . . . . . . . . . . . . . . . . . . . . . . . . . . . . . . . . . . . . . 23 Adjusting the top basket . . . . . . . . . . . . . . . . . . . . . . . . . . . . . . . . . . . . . . . . . . . . 27
Operation . . . . . . . . . . . . . . . . . . . . . . . . . . . . . . . . . . . . . . . . . . . . . . . . . . . . . . . 28 Switching on . . . . . . . . . . . . . . . . . . . . . . . . . . . . . . . . . . . . . . . . . . . . . . . . . . . . . 28 Starting a programme. . . . . . . . . . . . . . . . . . . . . . . . . . . . . . . . . . . . . . . . . . . . 28 Changing a programme . . . . . . . . . . . . . . . . . . . . . . . . . . . . . . . . . . . . . . . . . . 29 Selecting an additional function . . . . . . . . . . . . . . . . . . . . . . . . . . . . . . . . . . . . 29 Programme sequence display . . . . . . . . . . . . . . . . . . . . . . . . . . . . . . . . . . . . . 29 Programme end . . . . . . . . . . . . . . . . . . . . . . . . . . . . . . . . . . . . . . . . . . . . . . . . 29 Switching off. . . . . . . . . . . . . . . . . . . . . . . . . . . . . . . . . . . . . . . . . . . . . . . . . . . . . . 29 To cancel a programme . . . . . . . . . . . . . . . . . . . . . . . . . . . . . . . . . . . . . . . . . . . . . 30
2

Contents
Programming special functions . . . . . . . . . . . . . . . . . . . . . . . . . . . . . . . . . . . . . 31 1. Setting the dosage concentration and venting the dispensing system . . . . . . 31 2. Altering the wash/rinse temperature and/or the temperature holding time
in the "Main wash" and "Final rinse" programme stages . . . . . . . . . . . . . . . . . . 33 3. Audible tone (Buzzer) . . . . . . . . . . . . . . . . . . . . . . . . . . . . . . . . . . . . . . . . . . . . 35 4. Re-setting all parameter changes back to the factory settings. . . . . . . . . . . . . 36
Cleaning and care . . . . . . . . . . . . . . . . . . . . . . . . . . . . . . . . . . . . . . . . . . . . . . . . 37 Cleaning the filters in the wash cabinet. . . . . . . . . . . . . . . . . . . . . . . . . . . . . . . . . 37 Cleaning the spray arms . . . . . . . . . . . . . . . . . . . . . . . . . . . . . . . . . . . . . . . . . . . . 39 Cleaning the drain pump and non-return valve. . . . . . . . . . . . . . . . . . . . . . . . . . . 40 Cleaning the filters in the water inlet . . . . . . . . . . . . . . . . . . . . . . . . . . . . . . . . . . . 41 Cleaning the control panel. . . . . . . . . . . . . . . . . . . . . . . . . . . . . . . . . . . . . . . . . . . 41 Cleaning the front of the machine . . . . . . . . . . . . . . . . . . . . . . . . . . . . . . . . . . . . . 41
Correcting minor faults . . . . . . . . . . . . . . . . . . . . . . . . . . . . . . . . . . . . . . . . . . . . 42 Faults / possible causes . . . . . . . . . . . . . . . . . . . . . . . . . . . . . . . . . . . . . . . . . . . . . 42 After sales service . . . . . . . . . . . . . . . . . . . . . . . . . . . . . . . . . . . . . . . . . . . . . . . . . 43 Technical safety . . . . . . . . . . . . . . . . . . . . . . . . . . . . . . . . . . . . . . . . . . . . . . . . . . . 43
Installation . . . . . . . . . . . . . . . . . . . . . . . . . . . . . . . . . . . . . . . . . . . . . . . . . . . . . . 44
Electrical connection. . . . . . . . . . . . . . . . . . . . . . . . . . . . . . . . . . . . . . . . . . . . . . 46
Plumbing. . . . . . . . . . . . . . . . . . . . . . . . . . . . . . . . . . . . . . . . . . . . . . . . . . . . . . . . 48 Connection to the water inlet . . . . . . . . . . . . . . . . . . . . . . . . . . . . . . . . . . . . . . . . . 48 Drainage . . . . . . . . . . . . . . . . . . . . . . . . . . . . . . . . . . . . . . . . . . . . . . . . . . . . . . . . 50
Technical data . . . . . . . . . . . . . . . . . . . . . . . . . . . . . . . . . . . . . . . . . . . . . . . . . . . 51
Programme chart . . . . . . . . . . . . . . . . . . . . . . . . . . . . . . . . . . . . . . . . . . . . . . . . . 52
3

Description of the machine
This washer disinfector is suitable for cleaning and disinfecting instruments and accessories including anaesthetic instruments in medical surgeries and clinics, as well as in gynaecology, urology, ENT theatres etc.
It is capable of cleaning and thermally disinfecting instruments to general hygiene requirements using the "vario TD" (AN) programme.
The disinfection programme chosen will depend on the area of effectiveness required (bactericidal and/or virucidal) and the thermal stability of the instruments.
The parameters for thermal disinfection in accordance with EN ISO 15883-1 are 80 °C (+ 5 °C, - 0 °C) with a 10 min. holding time or 90 °C (+ 5 °C, - 0 °C) with a 5 min. holding time for the inactivation of HBV.
Contaminated instruments can be placed directly in the machine without pre-treatment (no soaking required).
This machine is equipped with a water softener as standard.
4

Guide to the machine
a On/Off button (I-0)
b Door release
c Display
d Delay start indicator light
e Drying indicator light
f Programme start indicator light
g Start button
h Drying button
iButton to toggle between the actual temperature, elapsed time and active washing block displays
jAdd (liquid) cleaning agent indicator light *
Optical interface for service technician
k Add rinsing agent indicator light
l Add neutralising agent indicator light
m Add salt indicator light
n Water inlet / Drain indicator light
o Programme sequence display
p Programme selector
*only applies to machine fitted with optional external DOS-Module
5

Guide to the machine
aConnections for DOS module Optional dispenser pump for liquid cleaning agent
- at the back of the machine -
b Filter combination
cSalt container
(for the water softener)
d Dispenser for powder cleaning agent
eDuo dispenser for neutralising agent or rinsing agent (with dosage selector)
f Level indicators
6

Warning and Safety instructions
This machine complies with all relevant local and national safety requirements. Incorrect use can, however, lead to personal injury and damage to property.
Read the operating instructions carefully before starting to use this machine. This way you will avoid the risk of accidents and damage to the machine.
Keep these instructions in a safe place for reference, and pass them on to any future user.
Correct use
This machine is designed for commercial use and for
specialised applications only, as described in these Operating Instructions. Alterations to the machine, or using it for purposes other than those for which it was designed, are unauthorised and could cause harm. The manufacturer cannot be held liable for damage caused by improper or incorrect use of the machine.
This equipment is not designed for maritime use or for use in mobile
installations such as caravans, aircraft etc. However it may be suitable for such usage subject to a risk assessment of the installation being carried out by a suitably qualified engineer.
Please pay attention to the following notes to avoid injury and damage.
This machine should be commissioned and then
maintained by a Miele authorised and trained service technician or other suitably qualified and competent approved person. Repairs and other work by unqualified persons could be dangerous.
Do not install the machine in an area where there is any danger of
explosion or of freezing conditions.
The electrical safety of this machine can only be guaranteed if
connected to a correctly installed earthing system on site. It is imperative that this basic safety requirement is tested regularly and, where there is any doubt, the electrical wiring system on site should be inspected by a qualified electrician.
The manufacturer cannot be held liable for damage or injury caused by the lack of or inadequacy of an effective earthing system (e.g. electric shock).
A damaged machine is dangerous. Switch off at the mains immediately
and call the Miele Service Department or an authorised and trained Miele Service Dealer or other suitably qualified and competent approved person.
7

Warning and Safety instructions
Personnel operating the machine should be trained regularly.
Untrained personnel must not be allowed access to the machine or its controls.
This machine is not a toy! Do not allow children to play in or around it, or to operate it. There is a danger they could injure themselves, or get into the machine and lock themselves in.
Take great care when handling liquid agents and additives. These
may contain irritant or corrosive ingredients. Do not use organic solvents as these could cause an explosion.
Follow all relevant safety procedures carefully. Wear protective gloves and goggles. With all chemical agents, the manufacturer’s safety conditions must be observed.
Avoid inhalation of powder cleaners. They can cause burning
in the mouth and throat if swallowed, and can inhibit breathing.
The water in the machine must not be used as drinking water.
Do not sit or lean on an open door. The machine could tip up and be
damaged or cause an injury.
Be careful when sorting items with sharp pointed ends and
positioning them in the machine that you do not hurt yourself or create a danger for others. Sharp knives etc. should be placed in baskets with the pointed end facing downwards.
When using this machine in the higher temperature ranges, be
especially careful not to scald or burn yourself when opening the door. Baskets and inserts must be allowed to cool down before they are unloaded. Any water remaining in containers could still be very hot. Empty them into the wash cabinet before taking them out.
Do not touch the heating elements if you open the door during or
directly after the end of a programme: you could burn yourself. They remain hot for some time after the end of the programme.
Never clean the machine or near vicinity with a water hose or a high
pressure hose.
Before any maintenance or repair work is carried out, the machine
must be disconnected from the mains supply by switching off at the mains isolator or withdrawing the mains fuse.
The following points should be observed to assist in maintaining quality standards, to protect users, and to avoid damage to the machine and items being cleaned.
If the machine is being used for disinfection in accordance with
official regualtions on the control of epidemics, the steam condenser and its connections to and from the wash cabinet must be cleaned and disinfected whenever any repairs are carried out or parts replaced.
8

Warning and Safety instructions
When running a disinfecting programme in accordance with
official regulations on the control of epidemics, the programme must not be interrupted once it has been started (see Cancelling a programme in an emergency).
The standard of disinfection in the disinfection programmes must be
routinely confirmed by the user. The process should be regularly monitored using thermo-electrical, chemical or bio-indicators, and this should be fully documented.
Disinfection programmes must not be interrupted as this can have a
limiting effect on the disinfection result. If interruption is unavoidable, however, the complete programme must be repeated.
For thermal disinfection, use temperatures and temperature
holding times to achieve the required infection prophylaxis in accordance with current health and safety regulations.
Only use Miele approved cleaning agents in this machine. Using
unsuitable cleaning agents could adversely affect the components of the machine, as well as items being cleaned.
For pre-treatment and/or cleaning, only use low-foaming cleaning and
disinfecting agents which have been approved by Miele. Foam can have an adverse effect on the disinfection and cleaning process.
Where a chemical additive is recommended on technical application grounds (e.g. a cleaning agent), this does not imply that the manufacturer of the machine accepts liability for the effect of the chemical on
the items being cleaned.
Please be aware that changes in formulation, storage conditions etc. which may not be publicised by the chemical manufacturer, can have a negative effect on the cleaning result.
When using cleaning agents and special application chemicals, it is
essential that the manufacturer’s instructions are followed. Only use such chemicals for the purpose and in the situation specified, to the exclusion of other chemicals, to avoid such dangers as chemical reactions and material damage.
The machine is designed for operation with water and additive
cleaning agents only. Organic solvents must not be used in this machine, as there is the danger under certain circumstances of fire or explosion. (Although this is not the case with all organic solvents, other problems could arise with their use, for example damage to rubber and synthetic materials).
In critical applications where very stringent requirements have to be
met, it is strongly recommended that all the relevant factors for the process, such as cleaning agent, water quality etc. are discussed with the Miele Application Technology specialists.
9

Warning and Safety instructions
If cleaning and rinsing results are subject to particularly stringent
requirements (e.g. chemical analysis, specialised industrial processes etc.), a regular quality control test must be carried out by the user to ensure that required standards of cleanliness are being achieved.
The special inserts should only be used for their specific application.
Hollow instruments must be thoroughly cleaned, internally and externally.
Empty any containers or utensils before arranging them in the
machine.
Do not allow any remains of acids or solvents, and in particular
hydrochloric acid or chloride solutions, to get into the wash cabinet. Similarly avoid any materials with a corrosive effect.
The presence in compounds of any solvents should be minimal (especially those in hazard class A1).
To avoid any corrosion damage, ensure that solutions or steam
containing hydrochloric acid do not come into contact with the steel outer casing of the machine.
Please follow the advice on installation in these instructions
and the separate Installation Instructions.
Using accessories
Only use genuine Miele accessories with this machine.
Consult Miele on the type and application of such equipment.
Only use Miele mobile units, baskets and inserts in this
machine. Using accessories made by other manufacturers, or making modifications to Miele accessories can result in unsatisfactory cleaning and disinfecting results, for which Miele cannot be held liable. Any resultant damage would also invalidate the machine guarantee.
Disposal of your old machine
Before disposing of your old machine first make it unusable.
Disconnect from the mains, cut off the cable near the machine and any plug from the cable.
For environmental and safety reasons ensure the machine is completely drained of any residual water and cleaning agent. (Observe safety regulations and wear safety goggles and gloves).
Make the door lock inoperative, so that children cannot accidentally shut themselves in. Then make appropriate arrangements for the safe disposal of the machine.
The manufacturer cannot be held liable for damage caused by non-compliance with these Warning and Safety instructions.
10
Caring for the environment
Disposal of the packing material
The transport and protective packing has been selected from materials which are environmentally friendly for disposal and can normally be recycled.
Ensure that any plastic wrappings, bags etc. are disposed of safely and kept out of the reach of babies and young children. Danger of suffocation.
Rather than just throwing these materials away, please ensure that they are recycled.
Disposal of your old appliance
Electrical and electronic appliances often contain materials which, if handled or disposed of incorrectly, could be potentially hazardous to human health and to the environment. They are, however, essential for the correct functioning of your appliance. Please do not therefore dispose of it with your household waste.
Please dispose of it at your local community waste collection / recycling centre and ensure that it presents no danger to children while being stored for disposal.
It should be unplugged or disconnected from the mains electricity supply by a competent person. Any plug must be rendered useless and the cable cut off directly behind it to prevent misuse. See the "Warning and Safety" section of this booklet for further details.
11

Opening and closing the door
Electro-thermal door lock
The machine is equipped with an electro-thermal door lock.
The door can only be opened when:
^the electricity supply to the machine is switched on and:
^the On/Off button I-0 is pressed in.
To open the door a
^Press the door button in as far as it will go, and at the same time, grip the handle and open the door.
,Do not touch the heating elements if you open the door during or directly after the end of a programme, you could burn yourself. The elements remain hot for some time after the end of the programme.
To close the door
^Lift the door upwards and push until it clicks shut. Do not press the release catch whilst shutting the door!
After the first intake of water, it is no longer possible to open the door, except in the D (PRE-RINSE) and 6 (DRAIN) programmes. The machine can be opened during drying if this option has been selected.
The door remains locked until the end of the programme. It can then be opened.
To cancel a programme
If a programme has to be cancelled in an emergency, e.g. when articles in the machine jostle against each other or the programme has been interrupted because of a fault, the door will have to be opened manually:
^Turn the programme selector to the f position (the programme is cancelled after approx. 2 secs.).
Important!
See "To cancel a programme" in the "Operation" section of this booklet for details of how to continue from here.
12
Opening and closing the door
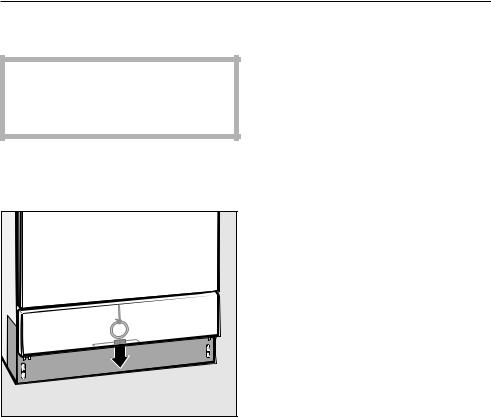
To open the door with the emergency release
The emergency release should only be used when the door cannot be opened normally, e.g. in the event of a power failure.
^Turn the programme selector to f.
^Press the On/Off button I-0 to switch the machine off.
^The emergency release cable is located at the bottom of the machine behind the service panel. Pull it downwards to open the door.
13

Water softener
The water needs to be softened to avoid calcium deposits building up on instruments and utensils and in the machine itself.
To ensure a steady supply of soft water the water softener unit must always be:
1.correctly set (programmed) and
2.the salt reservoir must be filled.
(If the water hardness level is below 0.7 mmol/l (4 °d - German scale) the reservoir does not need to be filled with reactivation salt.)
The machine is set at the factory for a water hardness level of 3.4 mmol/l (19 °d).
If the water supply is harder or softer than this (including below 0.7 mmol/l or 4 °d) the factory setting will need to be changed following the instructions in "Setting the water softener". See chart on the next page for settings.
Your local water authority will advise you on the water hardness in your area.
For fluctuating levels (e.g. 1.4 - 3.1 mmol/l or 8 - 17 °d) set the water softener to the highest setting (in this example to 3.1 mmol/l or 17 °d).
Important
The built-in water softener has settings from 0.2 - 10.8 mmol/l or 1 °d - 60 °d.
Setting the water softener
^Switch off the machine.
^Turn the programme selector to the STOP position f.
^Press ß and 6 at the same time, hold them in and, whilst doing so, switch the machine on with the I-0 button.
The current programme status "P..." will show in the display.
The indicator light p / 6 will come on.
^Press 0 once, E01 for programming level 1 will appear in the display.
^Turn the programme selector one switch position clockwise (1 o’clock position).
The number 19 appears in the display (the factory water hardness setting in °d), (equivalent to
3.4 mmol/l).
^Press ß as many times as is necessary, or hold it in until the required value (hardness level in °d) appears in the display.
Once the number 60 has been reached, the counter will begin again at 0.
^Press the 6 button. SP will appear in the display.
^Press 6 again. The setting will now be stored in memory. The display will go out.
^The machine is now ready for use.
14

Water softener
Settings
°d |
mmol/l |
°f |
Setting |
(German scale) |
|
|
|
1 |
0.2 |
2 |
1 |
2 |
0.4 |
4 |
2 |
3 |
0.5 |
5 |
3 |
4 |
0.7 |
7 |
4 |
5 |
0.9 |
9 |
5 |
6 |
1.1 |
11 |
6 |
7 |
1.3 |
13 |
7 |
8 |
1.4 |
14 |
8 |
9 |
1.6 |
16 |
9 |
10 |
1.8 |
18 |
10 |
11 |
2.0 |
20 |
11 |
12 |
2.2 |
22 |
12 |
13 |
2.3 |
23 |
13 |
14 |
2.5 |
25 |
14 |
15 |
2.7 |
27 |
15 |
16 |
2.9 |
29 |
16 |
17 |
3.1 |
31 |
17 |
18 |
3.2 |
32 |
18 |
19 *) |
3.4 |
34 |
19 |
20 |
3.6 |
36 |
20 |
21 |
3.8 |
38 |
21 |
22 |
4.0 |
40 |
22 |
23 |
4.1 |
41 |
23 |
24 |
4.3 |
43 |
24 |
25 |
4.5 |
45 |
25 |
26 |
4.7 |
47 |
26 |
27 |
4.9 |
49 |
27 |
28 |
5.0 |
50 |
28 |
29 |
5.2 |
52 |
29 |
30 |
5.4 |
54 |
30 |
31 |
5.6 |
56 |
31 |
32 |
5.8 |
58 |
32 |
33 |
5.9 |
59 |
33 |
34 |
6.1 |
61 |
34 |
35 |
6.3 |
63 |
35 |
36 |
6.5 |
65 |
36 |
37 |
6.7 |
67 |
37 |
38 |
6.8 |
68 |
38 |
39 |
7.0 |
70 |
39 |
40 |
7.2 |
72 |
40 |
41 |
7.4 |
74 |
41 |
42 |
7.6 |
76 |
42 |
43 |
7.7 |
77 |
43 |
44 |
7.9 |
79 |
44 |
45 |
8.1 |
81 |
45 |
°d |
mmol/l |
°f |
Setting |
(German scale) |
|
|
|
46 |
8.3 |
83 |
46 |
47 |
8.5 |
85 |
47 |
48 |
8.6 |
86 |
48 |
49 |
8.8 |
88 |
49 |
50 |
9.0 |
90 |
50 |
51 |
9.2 |
92 |
51 |
52 |
9.4 |
94 |
52 |
53 |
9.5 |
95 |
53 |
54 |
9.7 |
97 |
54 |
55 |
9.9 |
99 |
55 |
56 |
10.1 |
101 |
56 |
57 |
10.3 |
103 |
57 |
58 |
10.4 |
104 |
58 |
59 |
10.6 |
106 |
59 |
60 |
10.8 |
108 |
60 |
*) factory setting
For future servicing it is useful to make a note of your water hardness level.
Enter your water hardness level here:
°d (German scale)
or
mmol/l
15
Water softener
Filling the salt reservoir
Please only use special coarse grained reactivation salt with granules of approx. 1-4 mm. Do not use other types of salt, e.g. table salt, agricultural or gritting salt. These could contain components which are insoluble in water which could result in damage to the water softener. If in doubt consult your Miele Professional Department.
The salt reservoir holds approx. 2.5 kg of salt.
,Inadvertently filling the salt reservoir with cleaning agent will damage the water softener.
Before filling the salt reservoir make sure that you have picked up the right packet of reactivation salt.
^Remove the bottom basket from the machine.
^Unscrew the salt reservoir cap.
Before filling the salt reservoir with reactivation salt for the first time, fill it with approx. 2.5 litres of water.
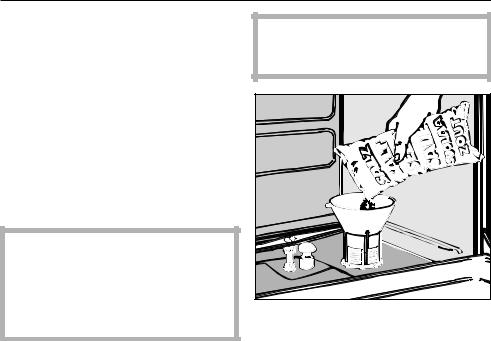
^Place the funnel provided in place.
^Fill carefully with salt. As it is filled, displaced water will run out).
^Wipe any residual salt off the screw threads on the socket.
^Screw the cap on firmly.
^Immediately after this: Run the PRE-RINSE programme D to remove any traces of salt from the cabinet.
Important: If after starting the PRE-RINSE programme D the machine does not start for a few minutes this is not a fault. The water softener is being reactivated.
16

Water softener
Salt indicator
When the salt reservoir is empty the k indicator light b comes on to remind you to fill the reservoir.
Reactivation takes place automatically during a programme.
The programme sequence indicator light k a lights up whilst this is happening.
17
 Loading...