

Page 1

CH-9101 Herisau/Switzerland
E-Mail info@metrohm.com
Internet www.metrohm.com
794 Basic Titrino
Program version 5.794.0010
Instructions for Use
8.794.1003 02.2002 / pkl
Page 2

Page 3

Table of contens
Table of contents
1 Introduction...........................................................................................................1
1.1 Instrument description........................................................................................... 1
1.2 Controls and parts................................................................................................. 2
2
Manual operation..................................................................................................6
2.1 Keypad ..................................................................................................................6
2.2 Principle of data input............................................................................................ 7
2.3 Text input ...............................................................................................................8
2.4 Tutorial ................................................................................................................... 9
2.4.1 Entering data, setting the dialog language....................................................9
2.4.2 Development of a method, titration of an acid.............................................11
2.4.3 Storage and loading of methods ................................................................. 16
2.4.4 pH calibration.............................................................................................. 17
2.4.5 Statistics, acid capacity of drinking water.................................................... 18
2.5 Configuration, key <CONFIG>...........................................................................22
2.6 Selection of the mode, key <MODE> ................................................................ 24
2.7 Parameters, key <PARAM> ............................................................................... 26
2.7.1 Parameters for DET and MET ...................................................................... 26
2.7.2 Parameters for SET ......................................................................................36
2.7.3 Parameters for MEAS................................................................................... 45
2.7.4 Parameters for CAL......................................................................................47
2.7.5 Parameters for TIP .......................................................................................50
2.8 Result calculations............................................................................................... 52
2.9 Statistics calculation ............................................................................................55
2.10 Common variables ..............................................................................................57
2.11 Data output.......................................................................................................... 58
2.12 TIP, Titration procedure ....................................................................................... 62
2.13 Method memory, keys <USER METH> ............................................................. 66
2.14 Calibration data, key <CAL.DATA> ...................................................................68
2.15 Current sample data, key <SMPL DATA> .........................................................69
2.16 Silo memory for sample data ..............................................................................70
2.17 Storing determination results and silo calculations............................................. 73
2.17.1 Storing determination results .......................................................................73
2.17.2 Silo calculations ........................................................................................... 74
3
Operation via RS232 Interface...........................................................................77
3.1 General rules .......................................................................................................77
3.1.1 Call up of objects .........................................................................................78
3.1.2 Triggers ........................................................................................................79
3.1.3 Status messages .........................................................................................80
3.1.4 Error messages............................................................................................82
3.2 Remote control commands................................................................................. 85
3.2.1 Overview.......................................................................................................85
3.2.2 Description of the remote control commands ........................................... 102
3.3 Properties of the RS 232 Interface.....................................................................125
3.3.1 Handshake................................................................................................. 125
3.3.2 Pin Assignment .......................................................................................... 129
3.3.3 What can you do if the data transfer does not work? ................................ 131
794 Basic Titrino
Page 4

Table of contents
4
Error messages, Troubleshooting...................................................................133
4.1 Error and special messages ............................................................................. 133
4.2 Diagnosis .......................................................................................................... 137
4.2.1 General ...................................................................................................... 137
4.2.2 Procedure .................................................................................................. 137
4.2.3 Equipment required: .................................................................................. 138
4.2.4 Diagnosis steps ......................................................................................... 138
4.3 Initialise and test RAM....................................................................................... 147
4.4 Releasing a locked spindle ............................................................................... 148
5
Preparations .....................................................................................................149
5.1 Setting up and connecting the instruments ...................................................... 149
5.1.1 Titrino with Stirrer or Titration Stand........................................................... 149
5.1.2 Connection of a printer .............................................................................. 150
5.1.3 Connection of a balance............................................................................ 151
5.1.4 Connection of a Sample Changer ............................................................. 152
5.1.5 Connection of a recorder........................................................................... 153
5.1.6 Connection of a computer......................................................................... 154
5.2 Connection of electrodes, preparing titration vessel ........................................ 155
6
Appendix ...........................................................................................................158
6.1 Technical specifications.................................................................................... 158
6.2 Pin assignment of the "Remote" socket ............................................................ 161
6.2.1 Lines of the "Remote" socket during the titration....................................... 163
6.2.2 Possible configurations of the activate pulse in SET and CAL.................. 164
6.3 User methods.................................................................................................... 165
6.3.1 General ...................................................................................................... 165
6.3.2 "Titer_pH" ................................................................................................... 166
6.3.3 "Blank"........................................................................................................ 167
6.3.4 "Chloride" ................................................................................................... 168
6.3.5 "TAN-TBN".................................................................................................. 169
6.3.6 "Diazo"........................................................................................................ 170
6.3.7 "Br-Index" ................................................................................................... 171
6.3.8 "Sapon.No"................................................................................................. 172
6.3.9 "Ca-Mg"...................................................................................................... 173
6.3.10 "EDTA-NTA"................................................................................................ 174
6.3.11 "Metals" ...................................................................................................... 175
6.3.12 "Perox.No" .................................................................................................. 176
6.3.13 "FormolNo""................................................................................................ 177
6.3.14 "P2O5Fert""................................................................................................. 180
6.4 Validation / GLP................................................................................................. 183
6.5 Warranty and conformity ................................................................................... 184
6.5.1 Warranty..................................................................................................... 184
6.5.2 EU Declaration of conformity..................................................................... 185
6.5.3 Certificate of Conformity and System Validation ....................................... 186
6.6 Scope of delivery and ordering designations ................................................... 187
Index.........................................................................................................................190
794 Basic Titrino
Page 5

1.1 Instrument description
1 Introduction
1.1 Instrument description
The 794 Basic Titrino is an all-purpose titrator. Titration modes of the 794 Basic Titrino are
constant or – depending on the titration curve – variable dosing of the titration reagent
and Endpoint-Titration.
All operating modes of the Titrino can be combined to perform extensive analytical sequences. Ready-to-start methods for the most common applications are stored in the
internal method memory. The operator is free to modify and overwrite this methods or to
create and store his own titration sequences.
Data exchange with a PC is possible with the Metrodata VESUV Software and with Metrodata TiNet Software complete remote control, data acquisition and evaluation via PC is
enabled.
794 Basic Titrino
1
Page 6
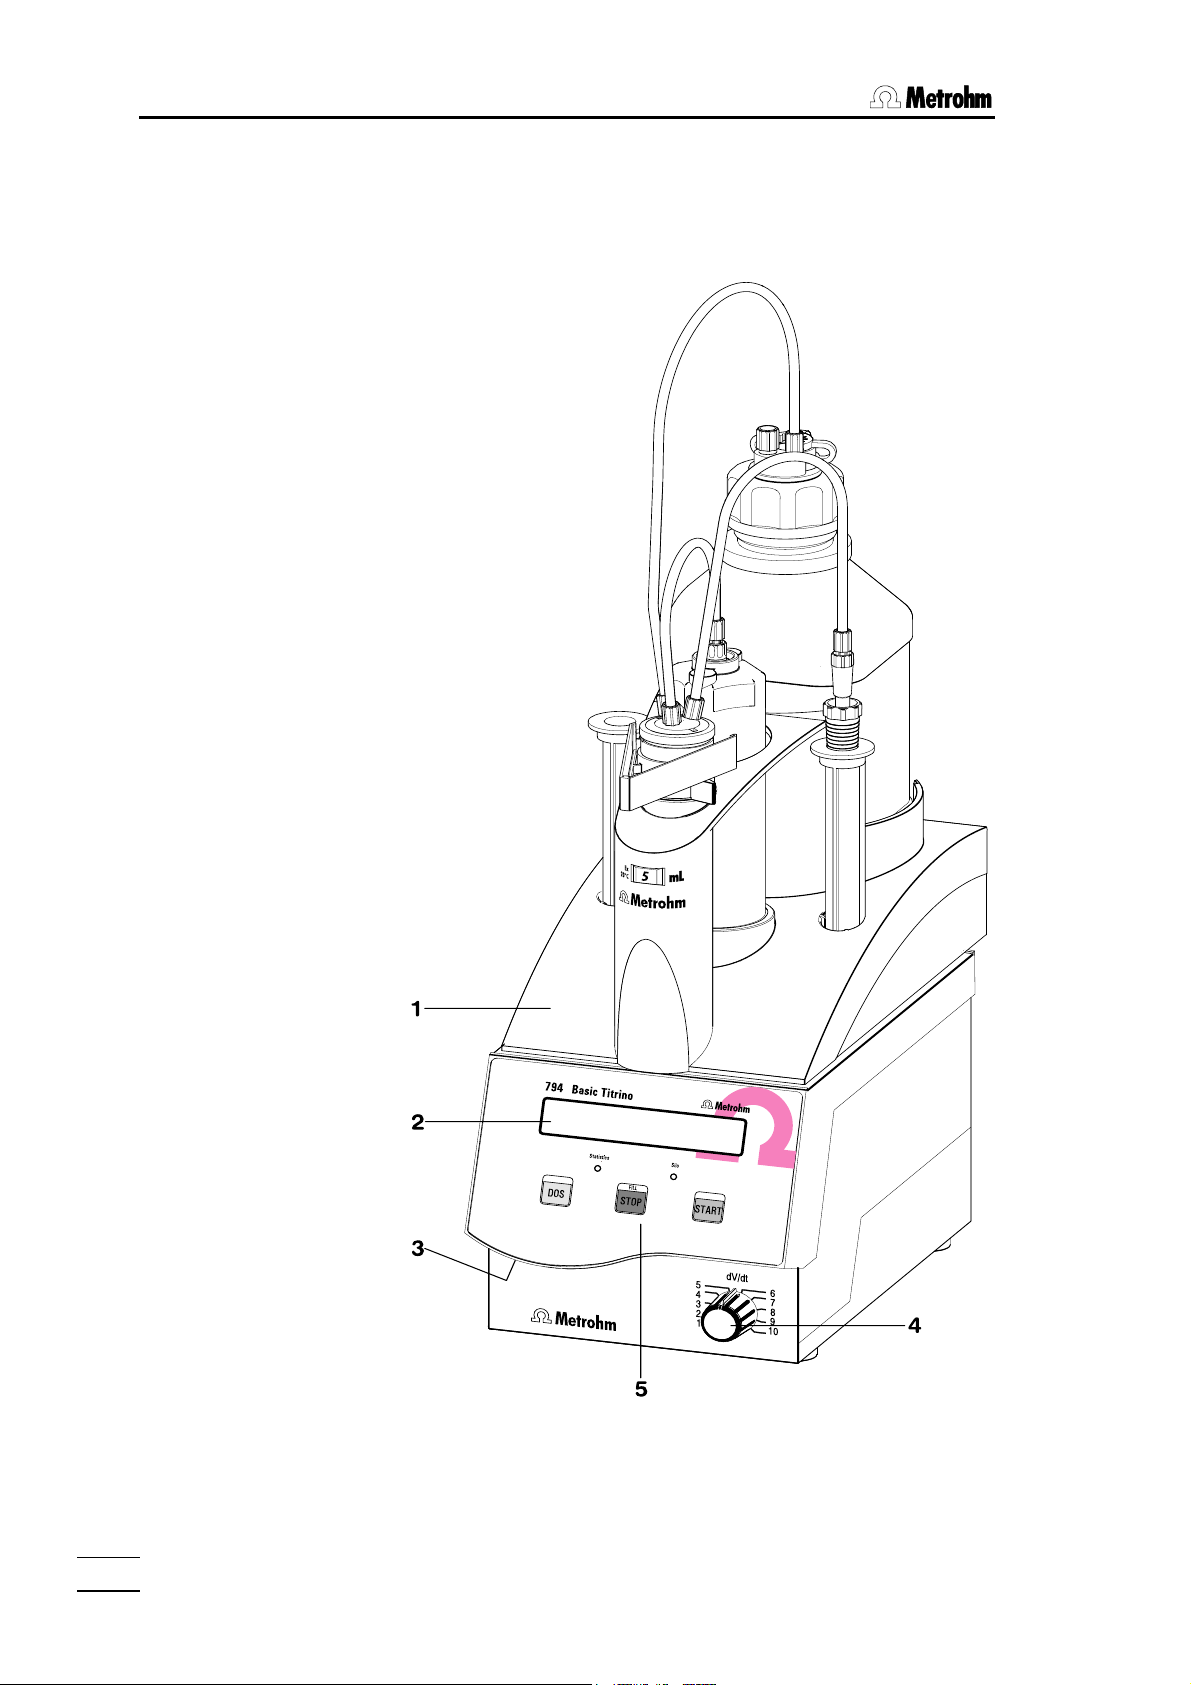
1.2 Controls and parts
1.2 Controls and parts
Front view of instrument:
794 Basic Titrino
2
Page 7

1.2 Controls and parts
1 Exchange Unit
2 Display
3 Setting of display contrast
4 Controls the dosing rate during manual dosing with <DOS> and subse-
quent filling
5 Control keys and indicator lamps on the Titrino
Key <DOS> Dosing key. Dispensing is performed as long as <DOS> is being
pressed. Used e.g. to prepare the Exchange Unit. The dispensing
rate can be set with potentiometer (4).
Key <STOP/FILL> - Stops procedures, e.g. titrations, conditioning.
- Filling after manual dosing with <DOS>.
Key <START> Starts procedures, e.g. titrations, conditioning.
Identical with key <START> of the separate keypad.
Indicator lamps:
"Statistics" Lamp is on when the "statistics" function (calculation of mean and
standard deviation) is on.
"Silo" Lamp is on when silo memory (for sample data) is on.
794 Basic Titrino
3
Page 8
1.2 Controls and parts
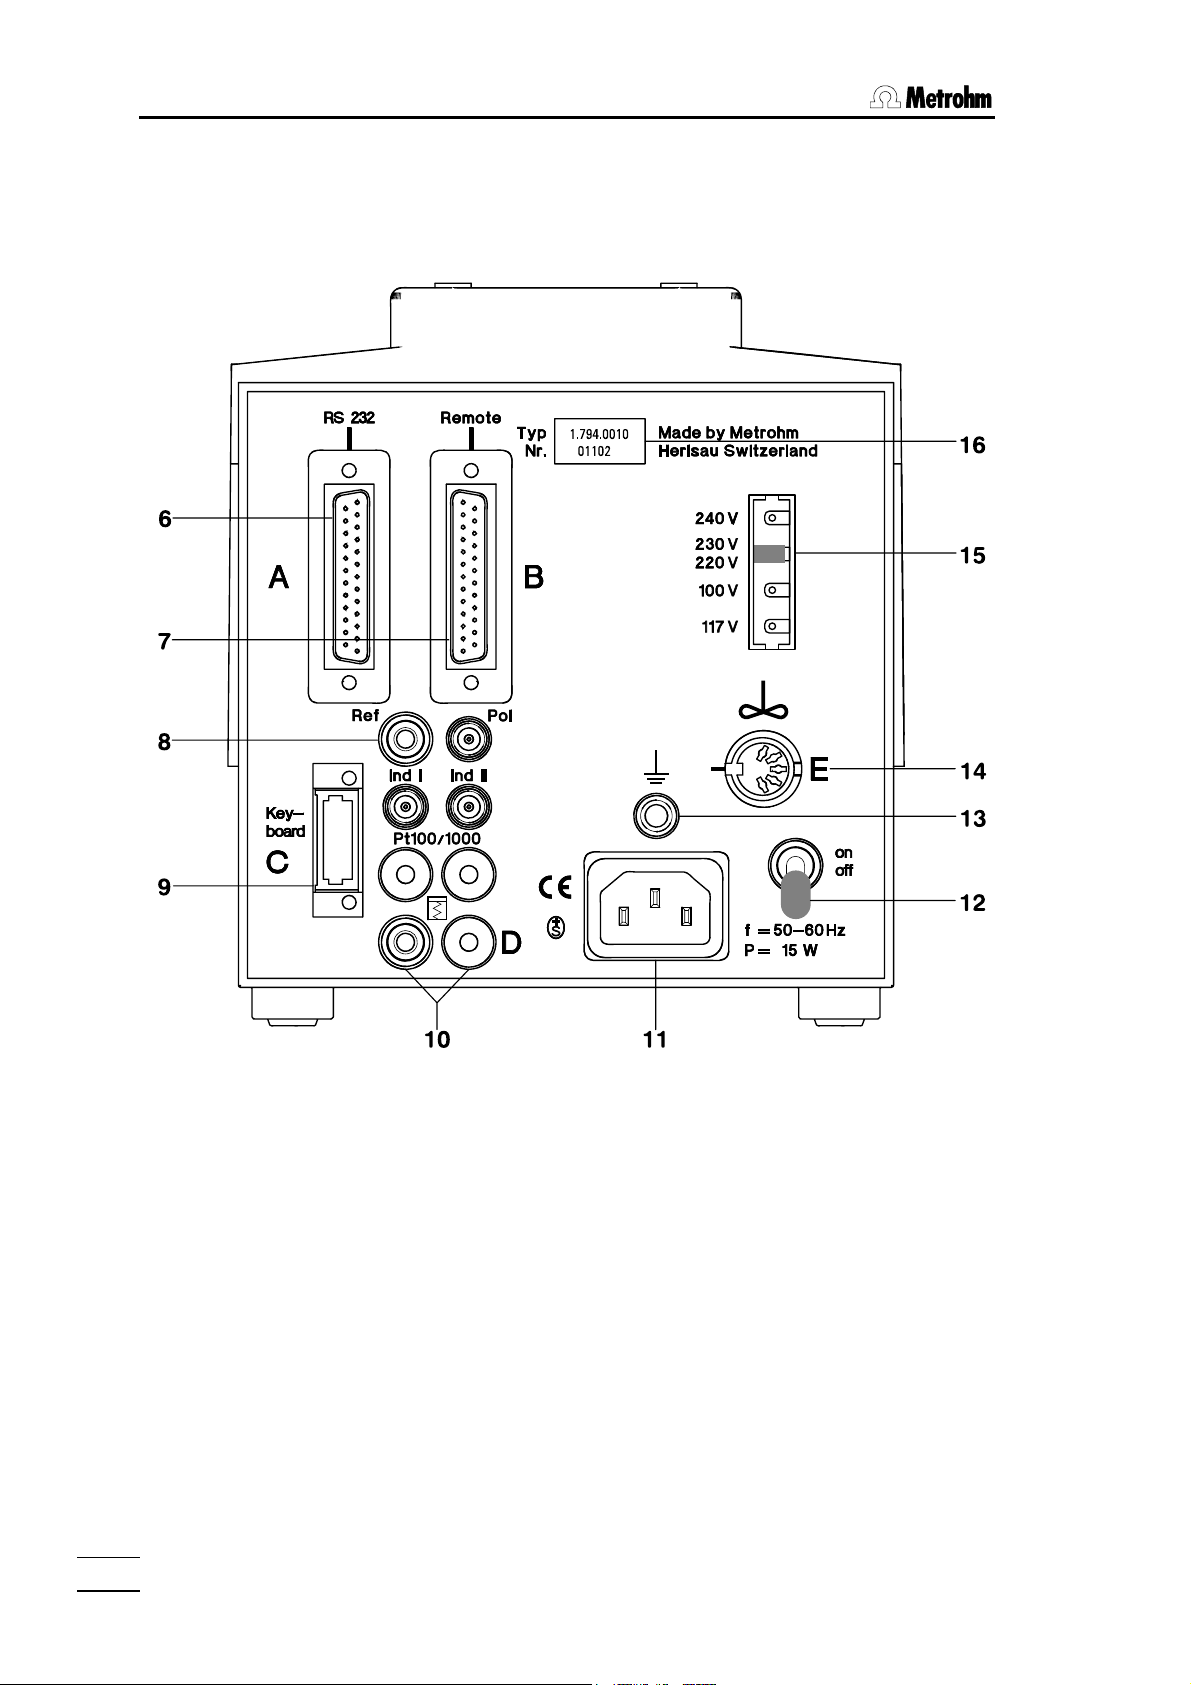
Rear view of instrument:
794 Basic Titrino
4
Page 9

1.2 Controls and parts
6 RS232 interface
for the connection of printer, balance or a computer
7 Remote lines
(input/output)
for the connection of the Remote Box, Sample Changers, robots etc.
8 Connection of electrodes and temperature sensor
• 2 high-impedance measuring inputs for pH and U measurements (Ind I/ Ind II).
They can either be used separately or for differential potentiometry, see page
155.
Important: If you work with both measuring inputs in the same vessel, the same
reference electrode must be used.
• 1 measuring input for polarized electrodes (Pol).
• 1 measuring input for PT100 or Pt1000 temperature sensor.
9 Connection for separate keypad
10 Analog output for the connection of a recorder
11 Connection for power cable
With power supplies where the voltage is subject to severe HF disturbances, the Titrino should be operated via an additional power filter, e.g. Metrohm 615 model.
12 Mains switch
13 Earthing socket
14 Connection for stirrer
728 Magnetic Stirrer, 802 Rod Stirrer, 703 or 727 Ti Stand
Supply voltage: 9 VDC (I ≤ 200 mA)
15 Display of the set mains voltage
Before switching on for the first time, check that the set mains voltage matches the
voltage of your power supply. If this is not the case, disconnect mains cable and
change voltage.
16 Rating plate
with fabrication, series and instrument number
794 Basic Titrino
5
Page 10
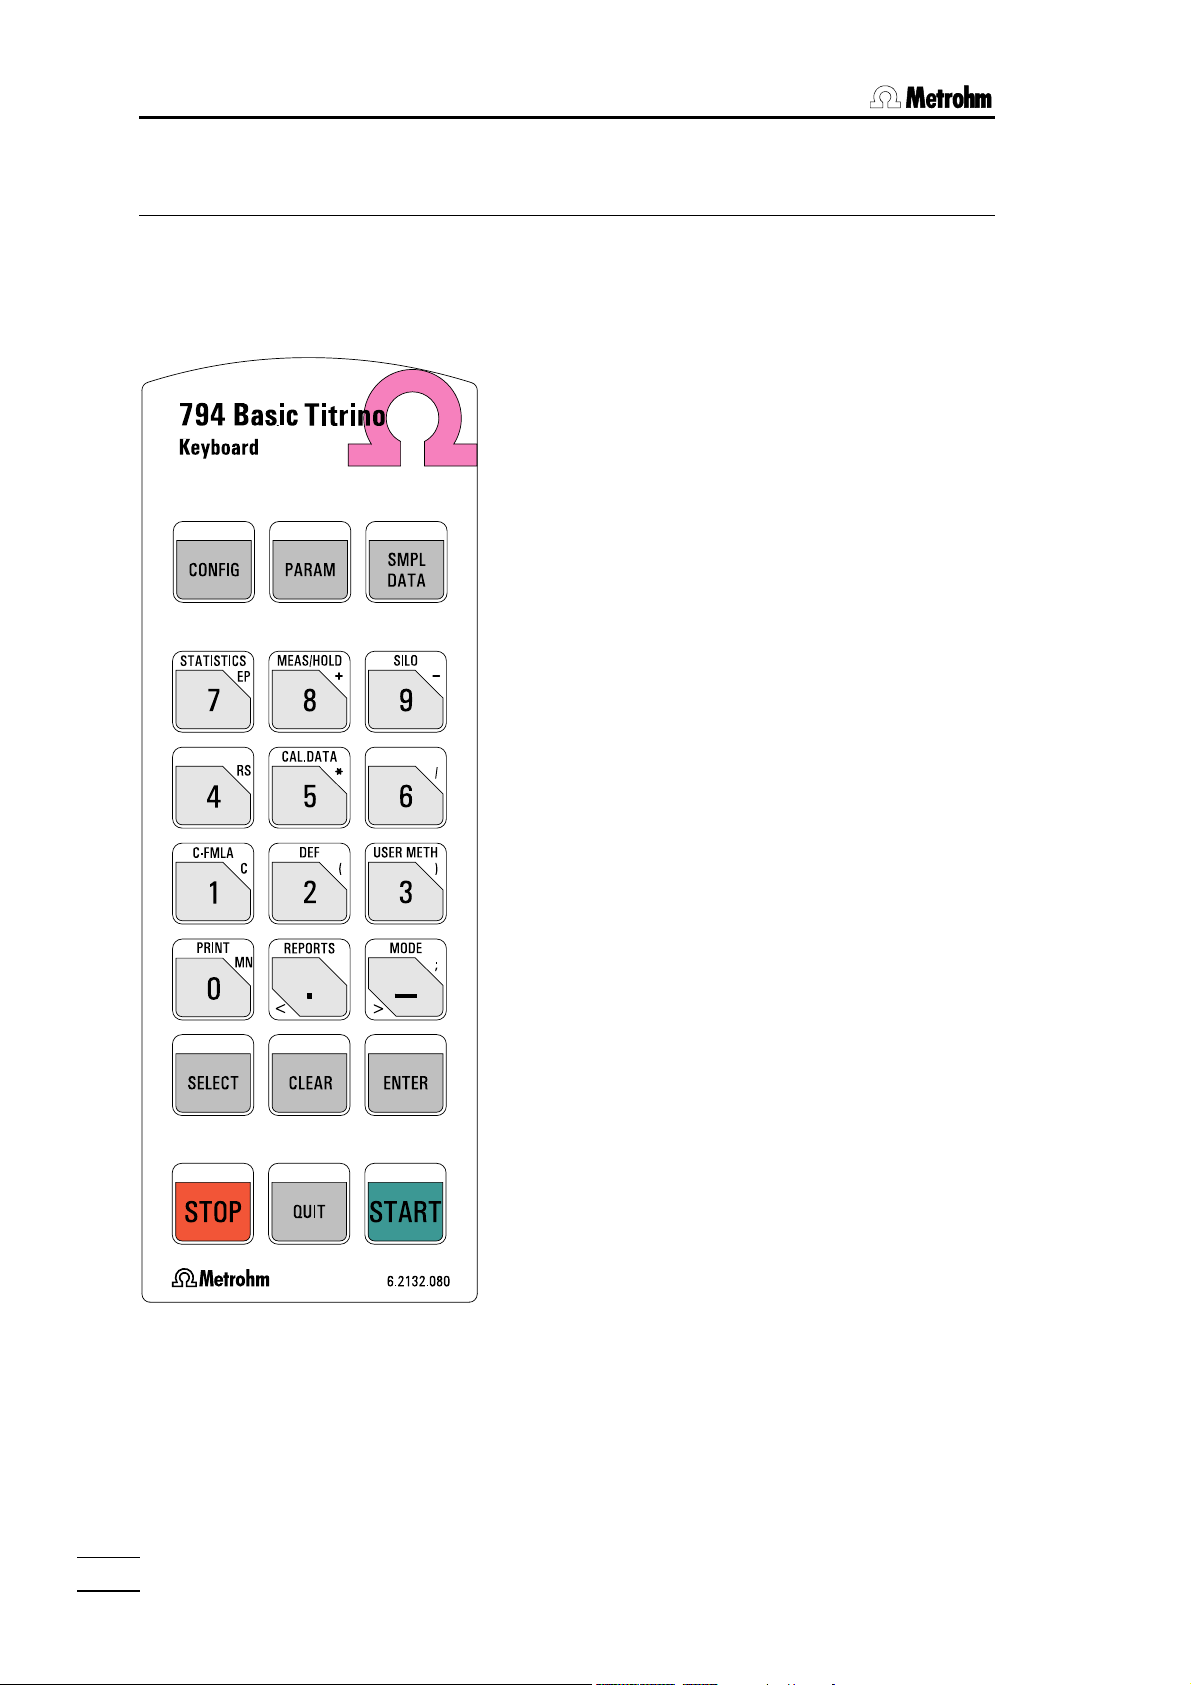
2.1. Keypad
2 Manual operation
2.1 Keypad
CONFIG Configuration.
PARAM Parameters.
SMPL DATA Sample data.
STATISTICS ON/OFF switching of statistics calcu-
lations of consecutive determination,
see page 55.
MEAS/HOLD ON/OFF switching of measurements
between titrations and hold during
titrations.
SILO ON/OFF switching of silo memory for
sample data, see page 69.
CAL.DATA Calibration data, see page 68.
C-FMLA Calculation values, see page 54.
DEF Formulas, data output, sequence for
TIP, see page 52ff.
USER METH Management of internal method
memory, see page 66.
PRINT Printing of reports, see page 60.
REPORTS Result output.
MODE Mode selection, see page 24.
<,> Keys for text input.
SELECT Selection of special values (dialog
marked with ":")
CLEAR Clears values, set special values.
ENTER Stores values.
STOP Stops methods.
QUIT Quits inquiries, waiting times, printing.
START Starts methods.
The third functions (inscriptions in the triangle) on the keys of the keypad are used for
formula entry, see page 52.
794 Basic Titrino
6
Page 11
2.2 Principle of data input
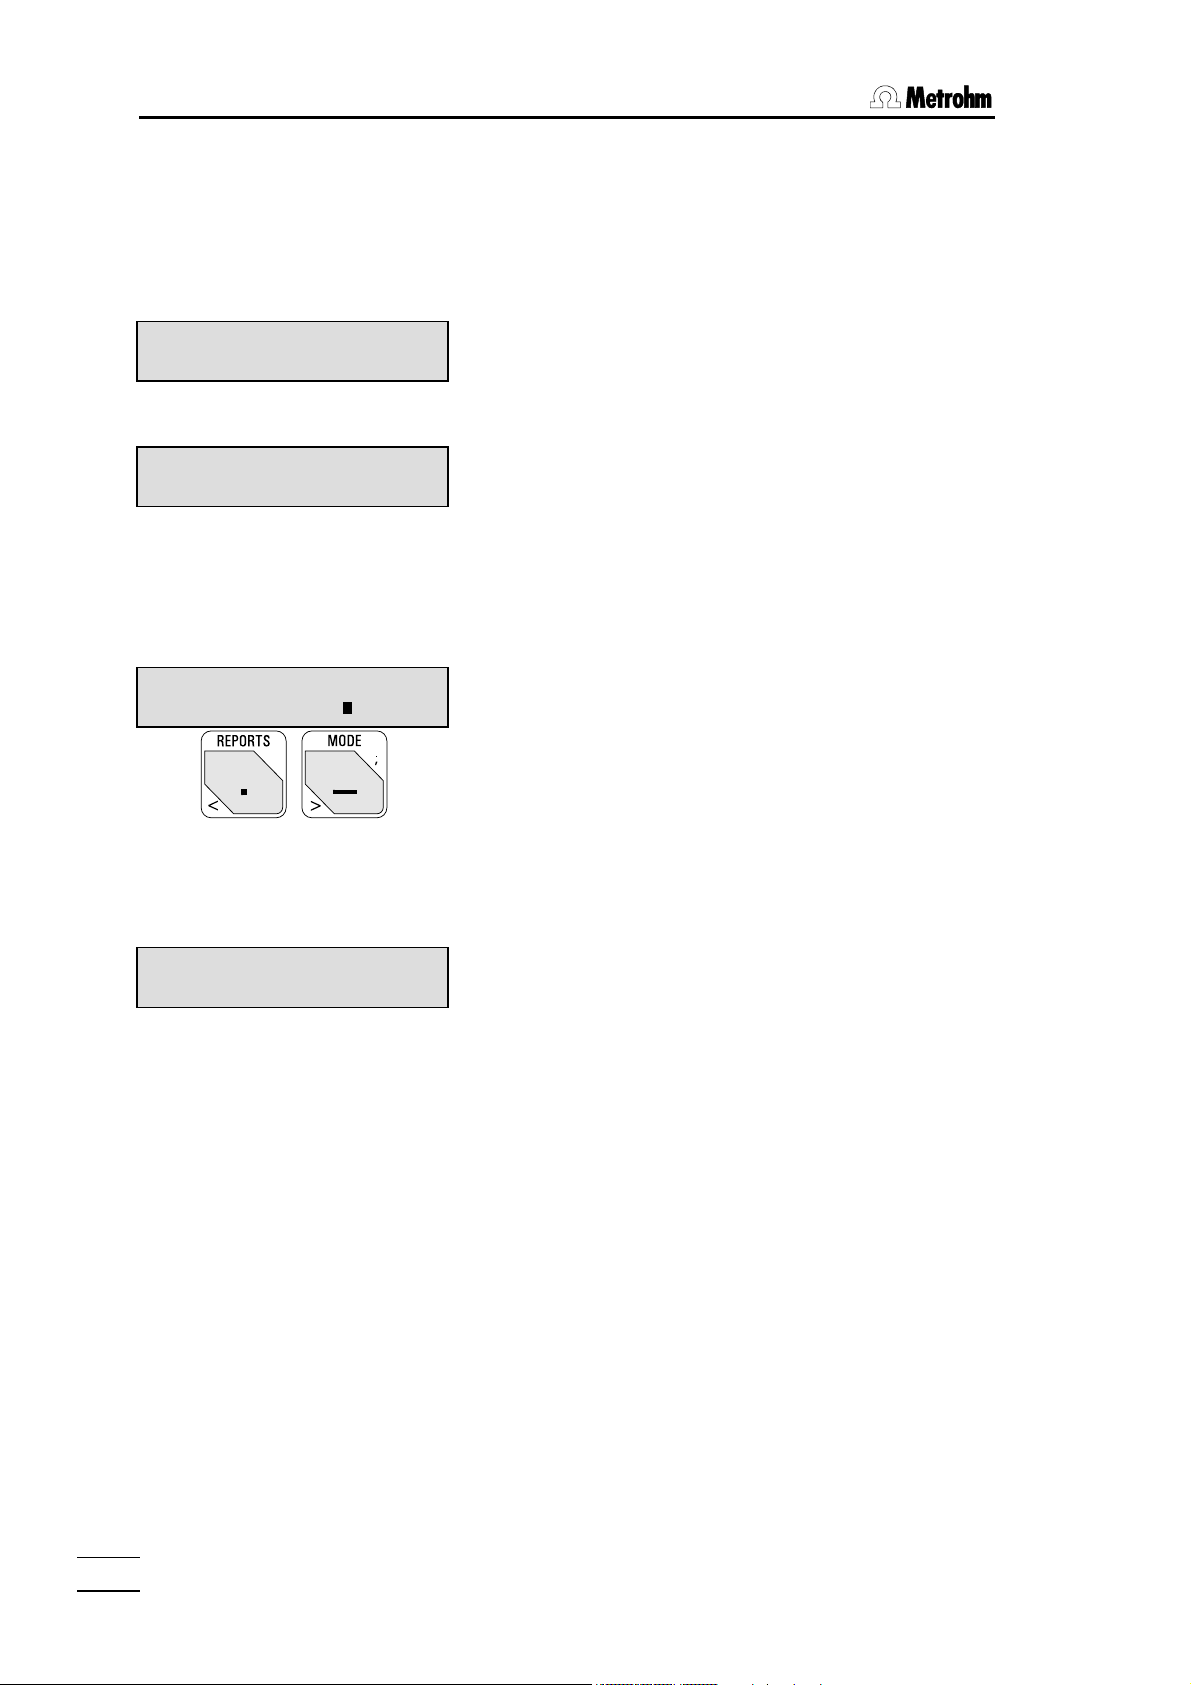
2.2 Principle of data input
• If you press a key you will find the corresponding
menu in the display.
Example key <CONFIG>:
configuration
>peripheral units
>peripheral units
send to: IBM
configuration
>auxiliaries
DET pH ********
In the first line you see where you are: You pressed
key <CONFIG> and you are now in the menu "configuration".
• In our example you are in the menu "configuration"
on the title ">peripheral units". By pressing
<CONFIG> you can move to the other titles of this
menu.
• If a dialog text is marked with ">", it contains a
group of inquiries. You branch into this group by
pressing <ENTER>.
Example inquiries of "peripheral units":
The first line indicates again where you are.
If a dialog text of an inquiry is marked with ":", you
can select a value with the key <SELECT>.
• A value is stored with <ENTER> and the cursor
moves to the next inquiry.
• Repeated pressing of <ENTER> moves you
through the inquiries of the group ">peripheral
units“, after the last inquiry of this group you leave
this group and return to the level above.
The next group of the menu "configuration“ appears:
">auxiliaries“
• With key <QUIT> you leave an inquiry or a group of
inquiries, it always
• In this example you leave the menu "configuration"
by pressing <QUIT> and return to the display of titration mode and the chosen method.
moves you one level up.
794 Basic Titrino
7
Page 12
2.3. Text input
2.3 Text input
<USER METH>
user methods
>recall method
<USER METH>
<ENTER>
>store method
method name:
<CLEAR>
<<>
>store method
method name: ABCDEFG
<QUIT>
<ENTER>
>store method
method name: text
Example storing a method:
• Press key <USER METH>, the group ">recall
method" appears.
• Choose ">store method" by pressing <USER
METH> and press <ENTER>.
The name of the method which is currently in the
working memory is displayed.
• Delete this name with <CLEAR>.
• Open the "text writing mode" with key <<>.
• Select the character marked by the blinking cursor
with the Keys <<> and <>>, confirm it with
<ENTER>. Select the next character...
When you confirmed the last character, i.e. your
name is complete, you quit the text writing mode
with <QUIT>.
Confirm now the name with <ENTER>.
If your text fills the whole text field, just press
<ENTER> to store the text.
• During text input you can correct typing errors with
<CLEAR>:
<CLEAR> deletes the characters one by one.
• If you wish to modify an existing name (e.g. if you
have names like Text 1, Text 2, Text 3), do not delete
the existing name before you start the text input
mode. Proceed then as follows:
1. Press <USER METH>, place the cursor to
">store method" and press <ENTER>.
2. Open the text writing mode directly: Press key
<<>.
3. <CLEAR> now deletes the characters one by
one or you can add additional characters.
794 Basic Titrino
8
Page 13
2.4 Tutorial
2.4 Tutorial
This short operating course teaches you to work quick and efficient with the 794 Basic
Titrino, by means of the most important applications.
Set up your Titrino and connect the peripheral devices needed, see chapter 5.
2.4.1 Entering data, setting the dialog language
We can thus make a start and first take a look at the fundamentals of the entry of data.
We change the dialog language.
DET pH ********
<CONFIG>
configuration
>peripheral units
<CONFIG>
configuration
>auxilliaries
<ENTER>
>auxilliaries
dialog: english
<SELECT>
>auxilliaries
dialog: español
<ENTER>
>ajustes varios
fecha 2002-01-02
• Switch on the Titrino. It is now in the standby state, it
shows you the active mode and method name.
• Press the key <CONFIG>, the display shows:
This is the title of the group "peripheral units". This
group contains various inquiries about peripheral
units.
• Press again <CONFIG>. You see the title of a new
group of inquiries.
This "auxiliaries" group contains the inquiry for the
dialog language.
• Pressing the <ENTER> key takes you to the inquir-
ies of the group "auxiliaries". Note the ">" sign. All titles of inquiry groups are prefixed by this sign.
This is the first inquiry of the "auxiliaries" group: the
selection of the dialog language.
• You select the various dialog languages with the
<SELECT> key. Press <SELECT> repeatedly until
"español" appears in the display.
Note the sign ":". It appears if the values can be selected with the key <SELECT>.
• Accept the new "value" with <ENTER>.
The next inquiry "fecha" (date) of the group "ajustes
varios" (auxiliaries) is shown.
You can open this inquiry by pressing <ENTER>
too and go through all the inquiries of this group this
way.
794 Basic Titrino
9
Page 14

2.4. Tutorial
<QUIT>
configuration
>ajustes varios
<QUIT>
DET pH ********
Because this inquiry follows no colon ":" the value
can't be selected by <SELECT>, the date "fecha"
has to be entered with the numeric keys.
• Exit the inquiries with <QUIT>. You are one level
higher in the "configuration" menu showing the title
"ajustes varios" (auxiliaries).
• Press <QUIT> once again to exit the "configuration"
menu and return to the standby state.
All the dialog texts will now be displayed in Spanish.
If you prefer English as the displayed dialog language, proceed as before and select "English".
794 Basic Titrino
10
Page 15
2.4 Tutorial
2.4.2 Development of a method, titration of an acid
Selection of the mode
<MODE>
mode
mode DET
<ENTER>
DET pH ********
DET: pH
4 × <SELECT>
DET pH ********
For the titration put a Exchange Unit with c(NaOH) = 0.1 mol/L on the Titrino and rinse
the tubing and the buret Tipp with <DOS>. Fill the buret again with <STOP/FILL>.
Plug a combined pH glass electrode into measuring input 1 (Ind I).
Pipette 2 mL c(HCl) = 0.1 mol/L into your titration vessel, dilute with ca. 20 mL dist. water.
Put a magnetic stirrer in the titration vessel and place buret tip and electrode in the probe,
see page 157 for their arrangement.
Start the stirrer and press <START>
During the titration the first line of the display shows the current measured value and the
volume already dispensed:
• Press <MODE> repeatedly until "DET" appears in
the display. For a description of the DET mode see
page 25.
• Confirm "DET" with <ENTER>
• Now select the measured quantity: Press
<SELECT> repeatedly until "pH" appears again in
the display.
Confirm the measured quantity "pH" with
<ENTER>.
You are now ready to titrate.
pH 3.02 0.351 ml
As soon as the instrument has found an equivalence point, this is shown on the second
line:
pH 7.64 2.083 ml
EP1
Let the titration continue for a short while, e.g. until ca. pH 11.50. Now stop it with
<STOP>.
DET pH ********
EP1 2.083 ml pH 7.64
The first line now shows the mode "DET pH" and the name of the chosen method (here
"********" because this method has not been saved under a own name until now). Of
interest is the second line, which shows the equivalence point found.
794 Basic Titrino
11
Page 16
2.4. Tutorial
If more than one equivalence point has been found, the others can be viewed with
<ENTER>.
Calculation of the result: formula entry
<DEF>
def
>formula
<ENTER>
RS?
<1>
RS1=
RS1=EP1*C01*C02/C00
<ENTER>
>formula
RS1 text RS1
>formula
RS1 decimal places 2
>formula
RS1 unit %
<SELECT>
<ENTER>
RS?
2 x <QUIT>
With this equivalence point a result can be calculated.
• Press the <DEF> key.
• Press <ENTER> to move on to the formula entry.
The display now shows "RS?".
• Press "1", i.e. the first formula.
You now can enter a formula. Note here the top inscription on the keys of the keypad and the numbers. The
following symbols can be used:
EP# EP's with 1-digit number, e.g. EP1.
RS# Previously calculated results, e.g. RS1 in the sec-
ond formula.
C## Calculation constant with 2-digit number, e.g. C01.
C00 is reserved for the sample size. For the meaning of the calculation constants see page 53.
Calculate the content of your hydrochloric acid in g/L:
RS1=EP1*C01*C02/C00
End point*conc.(titrant)*molecular weight/sample size
To correct a formula, delete it with <CLEAR>.
• Confirm the formula with <ENTER>.
• You may enter a text for the result output, see page
8.
• Enter the desired number of decimal places for the
result.
• Select the desired unit g/L with <SELECT>, or type
a text as unit, see page 8.
The Titrino prompts for the calculation of the next result.
Quit the formula entry by pressing <QUIT> twice.
In order to be able to calculate the result, enter the calculation constants used in the formula.
794 Basic Titrino
12
Page 17
2.4 Tutorial
Entry of the calculation constants
<C-FMLA>
C-fmla
>C01 0.0
• Press <C-FMLA>.
The constants which have been used in the formula
are requested: input with digit keys, confirm with
<ENTER>.
C01: Concentration of your titrant= 0.1 mol/L. Enter
0.1.
C02: Molar mass of HCl = 36.47 g/mol
Entry of the sample size
4 x <SMPL DATA>
smpl data
smpl size 1.0 g
<2>
<ENTER>
smpl data
smpl unit: g
<SELECT>
<ENTER>
• Press <SMPL DATA> repeatedly until "sample size"
appears in the display.
• Enter 2.
• Use <SELECT> to select the unit "mL" and confirm
the new value with <ENTER>.
The result is now calculated and can be displayed in place of the equivalence point. If
your method already includes a formula at the end of the titration, the calculated result is
displayed directly after the titration. As we have entered the formula later, we now have to
select the result display:
Display of the result
<SELECT>
DET pH ********
>display results
<ENTER>
DET pH ********
RS1 3.80 g/l
• Press <SELECT> repeatedly until ">display results"
appears in the display.
• Press <ENTER> to move to the result display.
794 Basic Titrino
13
Page 18
2.4. Tutorial
If you have a printer connected, you probably wish to have the curve and a result report
printed out automatically at the end of a titration.
To install a printer, see page 150.
Print reports
4 x <DEF>
def
>report
<ENTER>
report:
6 x <SELECT>
<;>
9 x <SELECT>
report:curve;full
<ENTER>
<QUIT>
• Press <DEF> repeatedly until the display shows:
• Press <ENTER> to move to the definition of reports.
• With <SELECT> you select the individual repot
blocks. Use a ";" as delimiter between the report
blocks to print more than one block. If you wish to
print out a curve and a full result report, enter
"curve;full".
• Confirm the entry with <ENTER> and quit the inquir-
ies with <QUIT>.
Now print your reports by pressing <PRINT><REPORTS><ENTER>. Your printout will
look like the following:
'cu
794 Titrino 01102 794.0010
date 2002-01-03 time 17:34 1
start V 0.000 ml DET pH ********
1.0 ml/div dpH=2.0/div
−−−−−−−−−−−−−−−−
'fr
794 Titrino 01102 794.0010
date 2002-01-03 time 17:34 1
pH(init) 2.88 DET pH ********
smpl size 2 ml
EP1 2.083 ml 7.64
RS1 3.80 g/l
manual stop
−−−−−−−−−−−−−−−−
Identification of the report type (cu=curve)
Start volume, mode and method name
Scaling of curve axis
Identification of the report type (fr=full report)
Device type with identification and program version
Initial pH, mode and method name
Volume and pH value of EP1
Calculated result
794 Basic Titrino
14
Page 19

2.4 Tutorial
So that you do not have to stop your titration manually each time, let us add a stop criterion for the titration.
Stop criterion
2 x <PARAM>
parameters
>stop conditions
<ENTER>
>stop conditions
stop V: abs.
<ENTER>
>stop conditions
stop V: 99.99 ml
<ENTER>
>stop conditions
stop pH OFF
<ENTER>
2 x <QUIT>
• Press <PARAM> twice to display the title ">stop
conditions".
• Open this group of inquiries with <ENTER>.
Absolute stop volume. This can be used as a safety
measure to prevent overflow of the titration vessel.
The magnitude of the absolute stop volume. Set a value
that appears suitable for your titration vessel.
Set the pH value, e.g. pH=11.5 as the expected stop
criterion.
If several stop criteria have been set, the one that is
reached first applies.
Confirm your entries with <ENTER> and quit the inquiry
with <QUIT>.
The development of your method is now complete. Before we store it in the method memory, you should check it again. Prepare a fresh sample and restart the titration with
<START>.
If everything appears to be all right, you can now store the method in the method memory.
794 Basic Titrino
15
Page 20

2.4. Tutorial
Y
2.4.3 Storage and loading of methods
Now store the method you have just developed in the method memory.
Storage of a method
2 × <USER METH>
user methods
>store method
<ENTER>
>store method
method name: ********
<ENTER>
DET pH Acid
If you have a printer connected, you can print out the contents of your method memory.
Key sequence: <PRINT><USER METH><ENTER>
Stored methods can be loaded at any time.
Loading a method from the method memory
<USER METH>
user methods
>recall method
<ENTER>
>recall method
method name: ********
<SELECT>
or
direct entry
<ENTER>
DET pH Acid
• Press <USER METH> repeatedly until the title
">store method" appears in the display.
• Open the inquiry with <ENTER>.
• Enter an identifier, e.g. 1 or Acid.
For text input see page 8.
The method now runs under the name "Acid". It is ready
to titrate.
• Press <USER METH>. The display shows the title
">recall method".
• Open the inquiry <ENTER>
•
ou can select the desired method with <SELECT>
(it shows all methods of the method memory one after the other) or by directly enter the method name.
• Load the method with <ENTER>
The method is ready to titrate.
794 Basic Titrino
16
Page 21
2.4 Tutorial
2.4.4 pH calibration
pH calibrations are not a requirement for pH titrations, when the equivalence point is determined from a curve. For end-point titrations, however, where titration is performed to a
fixed, specified pH value, a calibration should be performed.
Selection of the calibration mode, CAL
<MODE>
mode
mode CAL
<ENTER>
CAL ********
pH(as) 7.00 slope 1.000
Calibration procedure
<START>
CAL
cal.temp. 25.0°C
<ENTER>
25.0°C
buffer 1 pH 7.00
<ENTER>
25.0°C
buffer 2 pH 4.00
<ENTER>
oder
<STOP>
CAL ********
pH(as) 6.89 slope 0.985
The calibration data can be viewed at any time under the <CAL.DATA> key. Our calibration data are stored under ">input 1".
The calibration report can be printed out at any time with the key sequence:
<PRINT><CAL.DATA><ENTER>
• Press <MODE> repeatedly until "CAL" appears in
the display and confirm the mode with <ENTER>.
The instrument is ready for a 2-point calibration. The
second display line shows the current calibration data
for measuring input 1.
• Immerse your electrode in the first buffer and start
the calibration procedure.
Inquiry of calibration temperature.
• Enter the current temperature. If you have a tem-
perature sensor connected, this inquiry is skipped.
pH value of the first buffer.
• Enter the pH value of the buffer at your calibration
temperature.
The voltage of the first buffer is measured. When the
measured value has met the set drift criterion, the
measurement is stopped and the pH value of the second buffer is requested.
• Now enter the pH value of the second buffer. If you
require a 1-point calibration, you can also terminate
the calibration with <STOP>.
At the end of the calibration, the calibration data obtained are displayed: asymmetry pH and slope.
794 Basic Titrino
17
Page 22
2.4. Tutorial
2.4.5 Statistics, acid capacity of drinking water
Let us now determine the acid capacity of drinking water. For this, the SET (set endpoint
titration) mode is used to titrate to pH = 4.3.
First select the mode SET pH (keys <MODE> and <SELECT>).
Now set the end point.
Entry of the end point and the control parameters
<PARAM>
parameters
>SET1
<ENTER>
>SET1
EP at pH OFF
>SET1
EP at pH 4.3
<ENTER>
>SET1
dynamics OFF
>SET1
dynamics 3
<ENTER>
>SET1
max.rate 10.0 ml/min
<ENTER>
>SET1
min.rate 25.0µl/min
2 × <QUIT>
Mount an Exchange Unit with c(HCl) = 0.1 mol/L as titrant. Add 25 mL drinking water as
sample and start the titration with <START>. During the titration the first line of the display shows the measured value and dispensed volume. The "c" in pHc shows that the
electrode assembly has been calibrated. The second line shows a "control bar", which
indicates the control deviation of the current measured value from the set end point.
• Press <PARAM>. The display shows:
Control parameters for EP1
• Set the end point to pH = 4.3.
• Dynamics means the control range in which the
adding of the titrant is controlled in dependence on
the measured value (OFF: largest control range, i.e.
slow titration).
With buffered systems such as drinking water, this
value can be set lower, e.g. to 3. I.e. 3 pH units before the set EP controlled dosing starts.
Maximum possible titration rate inside the control
range.
Minimum titration rate inside the control range.
• Quit the inquiry with <QUIT>.
pHc 6.34 0.426 ml
#======
794 Basic Titrino
18
Page 23

2.4 Tutorial
If the titration runs too slow or too fast, you can change the control parameters during the
titration. If you wish to titrate faster, change the following parameters:
• dynamics: lower value, the control range becomes smaller (Attention: possibility of
titrating over the set EP)
• max.rate: bigger value
• min.rate: bigger value
You will find further details of the control parameters on page 42.
After the titration, end point volume and pH value at the end point are displayed.
For the evaluation enter:
the formula to calculate the m value
(key <DEF>) RS1=EP1*C01*C02
with an accuracy of RS1 decimal places 2
the unit RS1 unit: mmol/L
and the calculation constants C01 1 (concentration of titrant ×10)
(key <C-FMLA>) C02 4 (factor for the sample size 100 mL/25 mL)
If you have a printer connected, select the automatic titration report (key <DEF>): "report:full". You can print out the results of the previous titration with keys
<PRINT><REPORTS><ENTER>.
If the previous titration has run to your satisfaction, you can start thinking about performing statistics calculations. Have you already added a new sample to the titration vessel? If
you are no longer certain, you can find out immediately with <MEAS/HOLD>.
Rapid measurement between titrations
Press <MEAS/HOLD>. The pH value of your sample is displayed. You can stop the
measurement with a second <MEAS/HOLD>.
Statistics calculations
Now switch on the statistics calculations. Press <STATISTICS>. The "Statistics" LED is
on. Duplicate determinations are now performed.
• Perform 2 titrations.
794 Basic Titrino
19
Page 24
2.4. Tutorial
After the second titration you receive a printout with statistics calculations:
'fr
794 Titrino 01102 794.0010
date 2002-01-03 time 17:34 3
pHc(init) 6.29 SET pH ********
EP1 0.0628 ml 4.26
m value 5.02 mmol/l
mean(2) +/s s/%
m value 5.04 0.028 mmol/l 0.56
==============
If you have no printer connected, you can view the mean value and standard deviation:
• Press <SELECT> until "display mean" appears in the display.
• With <ENTER> you obtain the mean value.
• A second <ENTER> displays the number of single values which have been used for
the mean calculation.
• If you press <SELECT> again, the display "display std.deviation" appears. Once
again, you can view this value, by pressing <ENTER>.
Perhaps you have noticed that the two values differ too greatly? In any case, we shall perform a third determination with the same sample. The result of this determination will be
another value which is incorporated in the statistics calculations.
Addition of more determinations for the statistics calculations
5 × <PARAM>
parameters
>statistics
<ENTER>
>statistics
status: ON
<ENTER>
>statistics
mean: n= 2
<3>
<ENTER>
2 × <QUIT>
• Press <PARAM> until the display shows:
• Statistics calculations can be switched on either with
the <STATISTICS> key or in the inquiry "status:".
We shall leave them switched on and proceed to the
next inquiry.
Mean value of 2 single determinations.
• Enter "3" to include an additional determination.
• Quit the inquiry.
Perform another titration.
794 Basic Titrino
20
Page 25
2.4 Tutorial
You can now decide which of the results is an "outlier". You can delete it from the statistics
calculation.
Deleting a result from the statistics calculation
5 × <PARAM>
parameters
>statistics
3 × <ENTER>
>statistics
res.tab: original
2 × <SELECT>
>statistics
res.tab: delete n
<ENTER>
>statistics
delete n= 1
<2>
<ENTER>
2 × <QUIT>
• Press <PARAM> until the display shows:
• Select with <ENTER> the inquiry of the result table
"res.tab:"
• To delete a single result with index n from the result
table, press <SELECT> so that "delete n" appears.
• Enter index n of the result you wish to delete; in our
example the second:
• Quit the inquiry by pressing <QUIT>.
Mean value and standard deviation are recalculated
and can be viewed in the display.
With <PRINT><REPORTS><ENTER> you can print
a fresh report.
With <PRINT> <STATISTICS><ENTER> you can
print a statistics overview, in this report the deleted
result is marked with a "∗" in the report.
794 Basic Titrino
21
Page 26

2.5. Configuration, key <CONFIG>
2.5 Configuration, key <CONFIG>
CONFIG
configuration
>peripheral units
>peripheral units
send to: IBM
balance: Sartorius
record: U
Key <CONFIG> serves to enter device specific data.
The set values apply to all modes.
peripheral units:
Selection of printer, balance and the curve at the analog output.
auxiliaries:
e.g. setting of dialog language, date, time, etc.
RS232 settings:
RS parameters for the COM interface.
common variables:
Values of common variables.
The display texts of the Titrino are shown to the left.
The values are the default values.
Settings for peripheral units
Selection of printer (Epson, Seiko, Citizen, HP, IBM) at
the Titrino Rs232 interface.
"Epson", for Epson
"Seiko", e.g. for DPU-414
"Citizen", e.g. for iDP 562 RS, Custom DP40-S4N
"HP" e.g. for Desk Jet types. Place curves always at the
beginning of a page as you cannot have them over 2
pages.
"IBM" for all printers with IBM character set Table 437
and IBM graphics, as well as for the data transmission
to a computer with Metrodata software TiNET or
VESUV.
Selection of balance (Sartorius, Mettler, Mettler AT,
AND, Precisa)
Sartorius: Models MP8, MC1
Mettler: Models AM, PM, AX, MX, UMX and
balances with 011, 012, or 016 interface
Mettler AT: Model AT
AND: Models ER-60, 120, 180, 182, FR-200, 300
and FX-200, 300, 320
Precisa: Models with RS232C interface
Selection of the curve for the output at the analog
output (U, dU/dt, V, dV/dt, U(rel), T
U:. Voltage
dU/dt: Measured value drift
V: Volume
dV/dt Volume drift
U(rel): Control deviation with SET
T: Temperature with MEAS T
794 Basic Titrino
22
Page 27

2.5 Configuration, key <CONFIG>
>auxiliaries
dialog: english
date 2001-01-03
time 08:13
run number 0
auto start OFF
start delay 0 s
dev.label.
program 794.0010
>RS232 settings
baud rate: 9600
data bit: 8
stop bit: 1
parity: none
handshake: HWs
RS control: ON
General settings
Selection of dialog language (english, deutsch,
francais, español, italiano, portugese, svenska)
Current date (YYYY-MM-DD)
Format: Year-month-day, entry with leading zeros.
Current time (HH-MM)
Format: Hours-minutes, entry with leading zeros.
Current run number for result output (0...9999)
The sample number is set to 0 when the instrument is
switched on and incremented on every determination.
Automatic starts of titrations. (1...9999, OFF)
Number of automatic starts ("number of samples").
Used for instrument interconnections in which the
external instrument does not initiate a start. Not
advisable in connections with Sample Changers.
Start delay (0...999999 s)
Delay time after start of methods. Abort start delay time
with <QUIT>.
Individual identification of devices (up to 8 ASCII
characters)
Will be printed in the result report, see page 59.
Display of program version
Settings of RS232 interface
see also page 125ff.
Baud rate (300, 600, 1200, 2400, 4800, 9600)
Data bit (7, 8)
Stop bit (1, 2)
Parity (even, odd, none)
Handshake (HWs, HWf, SWline, SWchar, none)
see page 125ff.
Control via RS232 interface (ON, OFF)
"OFF" means that the receipt of commands via the
RS232 interface is blocked. Data output
is possible.
794 Basic Titrino
23
Page 28

2.6. Selection of the mode, key <MODE>
>common variables
C30 0.0
etc.
Values of the common variables
Common variables C30...C39 (0..
The values of all common variables are displayed. For
creating of common variables see page 57.
2.6 Selection of the mode, key <MODE>
MODE
>
;
–
Press key <MODE> until the desired mode is
displayed and confirm with <ENTER>.
Select the measured quantity pH, U, Ipol, Upol, (T) with
<SELECT> and confirm it also with <ENTER>.
The following modes can be selected:
• DET: Dynamic Equivalence-point Titration
• MET: Monotonic Equivalence-point Titration
• SET: Set Endpoint Titration.
• CAL: pH Calibration.
• MEAS: Measuring.
• TIP: Titration Procedure. Linking of various
commands and methods to a titration procedure.
These standard modes are equipped with a set of
standard parameters. They only need few settings in
order to be ready to work.
TIP is an empty "shell". The TIP sequence has to be
defined with <DEF>, see page 62.
±
999 999)
794 Basic Titrino
24
Page 29
2.6 Selection of the mode, key <MODE>
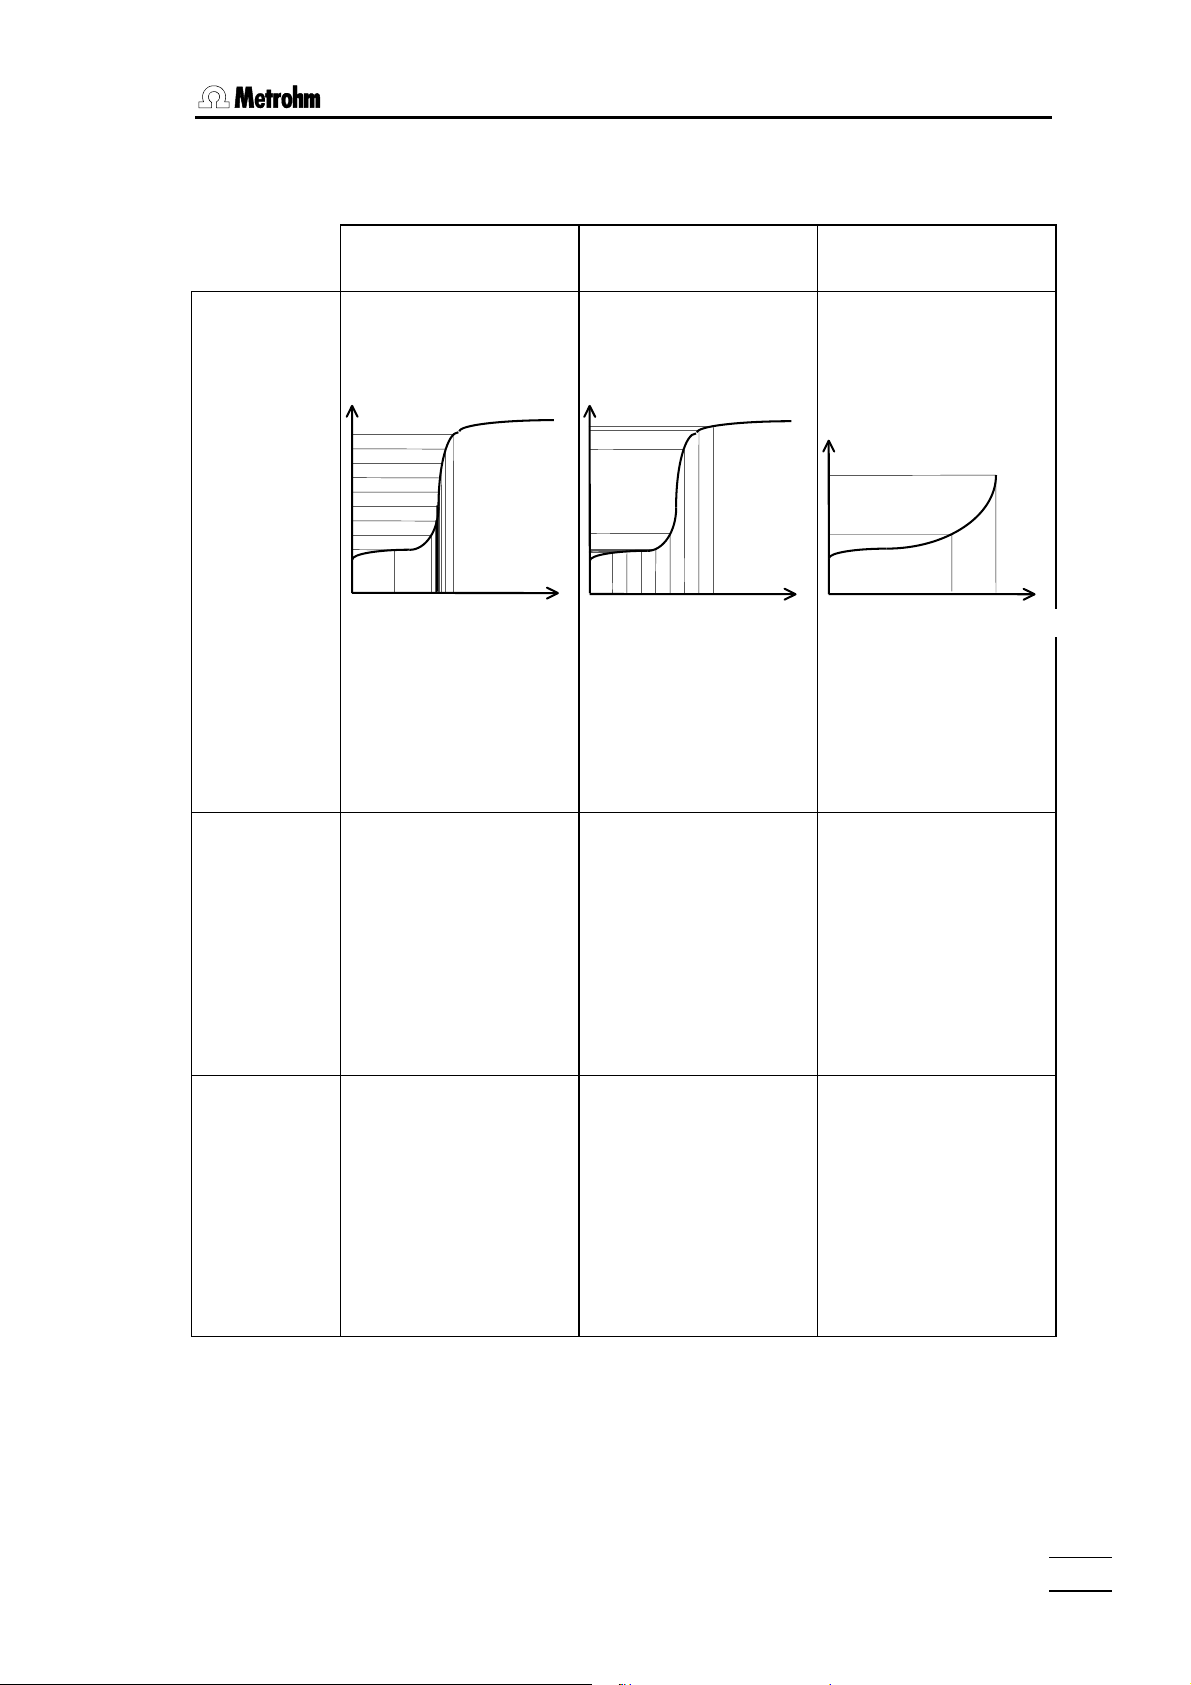
Overview of the titration modes
DET
Dynamic Equivalence
point Titration
Titration
Evaluation
Applications
Reagent feeding:
Variable volume increments,
depending on the slope of
the curve.
U/mV
Acquisition of measured
values:
Drift controlled ("equilibrium
titration")
and/or
after a fixed equilibration
time.
The evaluation of EP' s is
based on the zero crossing
of the second derivative with
a Metrohm correction for the
distortion of the curve from
superimposed jumps. Can
be combined with selectable
recognition criteria.
Recognition criteria:
as for MET
Suitable titration mode for
most problems. Specially
recommended if jumps lie
very close together and for
very flat jumps.
Note: The reagent feeding
algorithm is based on measured data. The curve should
therefore not deviate
markedly from S-shape.
V/mL
MET
Monotonic Equivalence
point Titration
Reagent feeding:
Constant volume increments, independent of the
slope of the curve.
U/mV
Acquisition of measured
values:
Drift controlled ("equilibrium
titration")
and/or
after a fixed equilibration
time.
The evaluation of EP's is
based on the Fortuin interpolation.
Recognition criteria:
all EP's
only the last EP
only the greatest EP
EP windows
For
• slow titration reactions
(diazotations, coupling
reactions)
• sluggish electrode
response.
V/mL
SET, KFT
Endpoint Titration
Titration to preset end-point.
U/mV
Control
range
Acquisition of measured
values:
Continuously
Volume that has been dispensed up to the endpoint
(EPX in mL).
• For rapid, quantitative
determinations in analytical chemistry. Requirement: EP of the titration reaction is
known and does not
change during a determination series.
• If an excess of titrant
must be avoided.
EP
V/mL
794 Basic Titrino
25
Page 30

2.7. Parameters, key <PARAM>
2.7 Parameters, key <PARAM>
The key <PARAM> is used for the entry of values that
PARAM
determine the modes. Values marked with "cond." are
accessible during the conditioning in the SET mode.
"**titr." means that these values can be changed during the titration. They influence the ongoing determination. Other values can only be changed in the inactive
state.
The display texts of the Titrino are shown to the left.
The values are the default values.
2.7.1 Parameters for DET and MET
parameters
>titration parameters
>titration parameters
meas.pt.density 4
DET
min.incr. 10.0 µl
DET
V step 0.10 ml
MET
titration parameters
determine the course of the titration and measured
value acquisition.
stop conditions:
Parameters for the automatic termination of the titration.
statistics:
Calculation of mean values and standard deviation,
see also page 55.
evaluation:
Parameters for the evaluation of EP's, fix EP's, and
pK/HNP.
preselections:
ON/OFF of various auxiliary functions such as automatic requests after the start and activate pulse.
General titration parameters
Measuring point density (0...9)
0 means highest density, 9 lowest. Selection of the
meas.pt.density, see page 32.
Minimum increment (0...999.9 µL)
The increment is dispensed at the beginning of the
titration and in the region of the equivalence point.
Size of volume increment (0...9.999 mL)
Dosing step. Small volume increments are needed to
determine blank values or to assure accuracy with
highly unsymmetrical curves. Selection of size of the
increment, see page 33.
794 Basic Titrino
26
Page 31

2.7 Parameters, key <PARAM>
titr.rate max. ml/min
**titr.
signal drift 50 mV/min
**titr.
equilibr.time 26 s
**titr.
start V: OFF
start V 0.0 ml
factor 0
dos.rate max. ml/min
**titr.
Dosing rate for volume increments (0.01...150 mL/min,
max.)
<CLEAR> sets "max.".
The maximum rate depends on the Exchange Unit:
Exchange Unit max.
5 mL 15 mL/min
10 mL 30 mL/min
20 mL 60 mL/min
50 mL 150 mL/min
Drift criterion for measured value acquisition. (input
range depends on the measured quantity:
pH, U, Ipol: 0.5...999 mV/min, OFF
Upol: 0.05...99.9 µA/min, OFF)
<CLEAR> sets "OFF".
This type of measured value acquisition is often called
an equilibrium titration.
"OFF" means that the measured value is acquired after
an equilibration time. This may be useful for slow
titration reactions or when the response of the
electrode assembly is slow.
Waiting time for measured value acquisition. (0...9999 s,
OFF)
<CLEAR> sets "OFF".
If no new equilibration time has been entered, the
Titrino calculates an equilibration time appropriate to
the drift, see page 31. The measured value is acquired
as soon as the first criterion (drift or time) has been
met.
Type of start volume (OFF, abs., rel.)
"OFF": start volume switched off
"abs": absolute start volume in mL
"rel.": relative start volume to sample size.
If "abs." is set:
Absolute start volume (0...999.99 mL)
If "rel." is set:
±
Factor for relative start volume (0...
Calculated as: start V (in mL) = factor
999 999).
∗sample size
Dosing rate for start volume (0.01...150 mL/min, max.)
<CLEAR> sets "max.".
Maximum rate depends on the Exchange Unit:
Exchange Unit max.
5 mL 15 mL/min
10 mL 30 mL/min
20 mL 60 mL/min
50 mL 150 mL/min
794 Basic Titrino
27
Page 32

2.7. Parameters, key <PARAM>
pause 0 s
**titr.
meas.input: 1
I(pol) 1 µA
U(pol) 400 mV
electrode test: OFF
temperature 25.0 °C
>stop conditions
stop V: abs.
**titr.
stop V 99.99 ml
**titr.
factor 999999
**titr.
stop pH OFF
**titr.
Waiting time (0...999999 s)
Waiting time, e.g. for equilibration of the electrode after
the start or reaction time after dosing of start volume.
The pause can be aborted with <QUIT>.
Measuring input for pH and U (1, 2, diff.)
Request for measuring input for pH and U.
Measuring input 1 or 2 or differential amplifier;
connection of electrodes, see page 155.
With polarized electrodes, instead of the measuring
input the
polarization current (-127...127 µA)
or the
polarization voltage (-1270...1270 mV, in steps of 10
mV)
is inquired.
Electrode test (OFF, ON)
Test for polarized electrodes. Performed on
changeover from the inactive standby state to a
measurement. "OFF" means that the test is not
performed.
Titration temperature (-170.0...500.0 °C)
The temperature is continuously measured if a T
sensor is connected. This parameter is used for
temperature compensation in pH titrations.
Stop conditions for the titration
If several stop conditions have been set, the criterion
which is met first applies.
Type of stop volume (abs., rel., OFF)
"abs.": absolute stop volume in mL.
"rel.": relative stop volume to sample size.
"OFF": stop volume switched off. Stop volume is not
monitored.
If "abs." is set:
Absolute stop volume (0...9999.99 mL)
If "rel." is set:
±
Factor for relative stop volume (0...
Calculated as: Stop V (in mL) = factor
999999)
∗sample size
Stop at measured value (input range dependent on
measured variable:
±
pH: 0...
U, Ipol: 0...
Upol: 0...
20.00, OFF
±
2000 mV, OFF
±
200.0 µA, OFF)
<CLEAR> sets "OFF".
"OFF" means that the criterion is not monitored.
794 Basic Titrino
28
Page 33

2.7 Parameters, key <PARAM>
stop EP 9
**titr.
filling rate max. ml/min
**titr.
>statistics
status: OFF
mean n= 2
res.tab: original
delete n= 1
>evaluation
EPC 5
EP recognition: all
Stop after a number of EP's have been found (1...9,
OFF)
<CLEAR> sets "OFF".
"OFF" means that the criterion is not monitored.
Filling rate (0.01...150 mL/min, max.)
<CLEAR> sets "max.".
The maximum rate depends on the Exchange Unit:
Exchange Unit max.
5 mL 15 mL/min
10 mL 30 mL/min
20 mL 60 mL/min
50 mL 150 mL/min
Statistics calculation
Status of statistics calculation (OFF, ON)
If the statistics calculation is switched off, the following
inquiries regarding the statistics do not appear.
Mean value calculation from n single results (2...20)
Result table (original, delete n, delete all)
"original": The original table is used. Deleted
individual results are again incorporated in
the evaluation.
"delete n": Deletion of single results with the index n.
"delete all": The entire table is deleted.
Delete data from sample number n (1...20)
The deleted result is removed from the statistics
calculation.
EP evaluation/recognition
See page 32ff.
Equivalence point criterion (input range depends on
mode.
For DET:
0...200
For MET:
pH: 0.10...9.99
U, Ipol: 1...999 mV
Upol: 0.1...99.9 µA)
Threshold for the size of the jump, see page 34.
Recognition of EP's which fulfill the EP criterion. (all,
greatest, last, window, OFF)
Selection of equivalence point recognition:
"all": All equivalence points are recognized.
"greatest": Only the greatest (steepest) equivalence
point is recognized.
"last": Only the last equivalence point is
recognized.
794 Basic Titrino
29
Page 34

2.7. Parameters, key <PARAM>
low lim.1 pH -20.00
up lim.1 pH 20.00
fix EP1 at pH OFF
pK/HNP: OFF
>preselections
req.ident: OFF
req.smpl size: OFF
activate pulse: OFF
"window": Only EP's in specified windows are
recognized.
"OFF": Evaluation switched off.
If "window" is selected, lower and upper limits of
windows are inquired.
Lower limit of window 1
and
upper limit of window 1
(Input ranges for both inquiries depend on the
measured quantity):
pH: 0...±20.00, OFF
U, Ipol: 0...±2000 mV, OFF
Upol: 0...±200.0 µA, OFF)
<CLEAR> sets "OFF".
Only equivalence points are recognized which lie within
the set lower and upper limits. The equivalence point
numbering is defined with the windows, see page 34.
Window inquiries continue until the lower limit is set to
"OFF". Up to 9 possible windows.
Always set both limits to
≠ OFF for a valid window.
Interpolation of volumes at fixed times (input range
depends on the measured quantity:
pH: 0...±20.00, OFF
U, Ipol: 0...±2000 mV, OFF
Upol: 0...±200.0 µA, OFF)
<CLEAR> sets "OFF".
If a fix end point has been set, the volume value for the
input measured value is interpolated from the curve,
see also page 35. The volume values are available as
C5X.
Fix EP's are inquired until "OFF" is set. Up to 9 fix EP's.
Evaluation of pK or HNP (ON, OFF)
pK evaluation in case of pH titrations and half
neutralization potential for U, see page 35.
Preselections for the sequence
Request of identifications after start of titration. (id1,
id1&2, all, OFF)
After start, sample identifications can be inquired
automatically: Only id1, id1 & id2, all three id's or no
inquiries.
Request of sample size after start of titration (value, unit,
all, OFF)
"all" requests the value, then the unit.
Pulse output on I/O line "activate" (L6, pin 1) of the
remote socket (ON, OFF)
see page 163.
794 Basic Titrino
30
Page 35

2.7 Parameters, key <PARAM>
Titration sequence of DET and MET
<START>
(Activate pulse)
(Start delay)
(Request ident.)
(Request smpl size)
After the start, the activate pulse is outputted.
The start delay time is waited off.
The sample identifications and the sample size are requested.
(Start conditions)
The start volume is dispensed (no meas.value acquisition)
and the pause is waited off.
Titration:
Dispense increments
Acquire meas.values
During the titration the volume increments are dispensed
and after each increment a measured value is acquired.
Meas.values are either acquired drift controlled ("equilibrium titration") or a after a fixed waiting time. If you have
not intentionally changed the equilibration time, it is calculated according to the formula:
equilibr.time (in s)
The criterion (drift or equilibration time) which is first met
applies. This avoids "infinite" titrations. If the parameter
"signal drift" is set "OFF", the measured values are acquired after a fixed equilibration time.
Stop conditions
The titration is terminated according to the first criterion
which is met.
Calculations
Evaluations and calculations are carried out.
Data output
Data are outputted.
150
=
+
+
5
0.01Drift
794 Basic Titrino
31
Page 36

2.7. Parameters, key <PARAM>
Reagent feeding and EP evaluation of DET
The reagent feeding of DET is similar to the controlling, a human being would apply in
manually controlled titrations: Great volume increments are dosed far away from the EP,
small increments in the region of the equivalence point.
The size of the volume increments dosed by the Titrino is determined by the following
parameters:
meas.pt.density
The measuring point density is entered as a relative
value from 0...9. Input of a low number means small
volume increments, i.e. a large measuring point density
on the curve. A curve results which reproduces all fine
details. "Fine details", however, also include signal noise,
which can easily lead to unwanted equivalence points. A
high number, i.e. low measuring density, on the other
hand, allows a more rapid titration. The standard value of
4 is suitable for most cases.
If you work with small cylinder volumes (1 or 2 mL), a
small measuring point density may be advisable. In
these cases you should also lower the drift for
meas.value acquisition and set a higher EPC.
min.incr.
Defines the minimum possible increment. This minimum
increment is dosed at the beginning of the titration and
in the region of the equivalence point (for steep curves).
Use low minimum increments only, if small volumes of
titrant consumption are expected, e.g. in micro titrations;
otherwise unwanted equivalence points may arise. The
standard value of 10.0 µL is suitable for most cases.
EPC
The EP's are evaluated according to a special
METROHM procedure which is so sensitive that even
weak equivalence points are determined correctly.
Equivalence Point Criteria.
The
preset EPC is compared to the found ERC
(Equivalence point Recognition Criteria) for each
evaluated equivalence point. The ERC is given in the
following reports: deriv (1
st
derivative), comp (combined
titration and derivative curves) as well as in the mplist
(measuring point list). The ERC is the first derivative of
the titration curve overlaid with a mathematical function
so that small maxima become higher and great maxima
smaller. EP's whose ERC is below the preset EPC will
not be recognized. For most cases the standard value of
5 is suitable. The evaluation can be repeated at any time
after the titration in a "dry run" with changed evaluation
criteria. The old titration data are not deleted until a new
titration is started.
794 Basic Titrino
32
Page 37

2.7 Parameters, key <PARAM>
Reagent feeding and EP evaluation of MET
In monotonic titrations, the volume increment is constant over the whole titration curve.
V step
Volume increment.
A prerequisite for good accuracy is the correct size of
the volume increments. A good value is given by V step
= 1/20 V
increment size should always be between 1/10 V
1/100 V
(VEP = volume of the EP). In any case, the
EP
EP
; with steep jumps preferably in the region of
EP
and
1/100 and with flat jumps preferably in the region of 1/10.
The accuracy of the evaluation can not be increased by
dispensing small increments as the changes in the
measured value can then be of the same order of
magnitude as the noise. This can produce "ghost EP's"!
EPC
The EP's are localized with an algorithm which is based
on Fortuin and has been adapted by METROHM for
numeric procedures. Here, the greatest change in the
measured value is sought (∆
). The exact equivalence
n
point is determined with an interpolation factor, which
depends on the delta values before and after ∆
V
= V0 + ρ ∆V
EP
V
: EP volume
EP
V
: Total dispensed volume before ∆n
0
:
n
∆V: Volume increment
ρ : Interpolation factor (Fortuin)
Equivalence Point Criteria.
The
preset EPC is compared to the found ERC
(Equivalence point Recognition Criteria) for each
evaluated equivalence point. The ERC is given in the
following reports: deriv (1
st
derivative), comp (combined
titration and derivative curves) as well as in the mplist
(measuring point list). ERC is the sum of the measured
value changes before and after the break:
∆
+∆
n-2
+∆n+∆
n-1
n+1
+∆
n+2
(In certain cases there are only 3 or 1 summand).
EP's whose ERC is below the preset EPC will not be
recognized. For most titrations the standard value is
suitable.
The evaluation can be repeated at any time after the
titration in a "dry run" with changed evaluation criteria.
The old titration data are not deleted until a new titration
is started.
794 Basic Titrino
33
Page 38

2.7. Parameters, key <PARAM>
EP recognition criteria for DET and MET
The parameter "EP recognition" offers you a range of possibilities to ensure selection of
the EP you are interested in: If the desired jump is very large, you can select the "greatest"
jump (with DET the steepest jump will be evaluated). Thus you always obtain just one EP
per titration (EP1).
If you wish to determine the sum of different components (e.g. acid or base numbers), the
"last" jump can be the correct one.
And finally you can set a "window" for each expected EP.
EP windows
EP windows are used
• to suppress disturbing influences and EP's which are not needed.
• to increase the liability for the calculation of the results. The EP windows make an
unequivocal assignment of the EP's possible: per window one EP is recognized; the
numbering of EP's is defined by the windows so that even if EP's are missing, the
calculations are still performed with the correctly assigned EP volumes.
An EP window defines the range in which an EP is expected. EP's outside these ranges
are not recognized. Windows are defined on the measured value axis.
U/mV
2 EP's are recognized. Their
numbering is defined by the windows:
EP window 2
EP window 1
EP 1
EP 2
Window 1
Window 2
If more than 1 EP is expected, a
⇒ EP1
⇒ EP2
window must be set for each EP.
Windows must not overlap. They may
only touch each another.
V/mL
U/mV
Rule: If there are more than 1 EP in a
upper lim. 1
window, the first jump is recognized as
EP1, the second is not recognized.
+ EP window 1
EP1 is marked as EP1 + to indicate
that more than one EP has been found
in the window
EP 1
lower lim. 1
V/mL
794 Basic Titrino
34
Page 39

2.7 Parameters, key <PARAM>
Fix EP's
Fix EP's allow determination of the associated volume value for every inputted measured
value on the titration curve. This function is useful for performing standard methods such
as TAN/TBN determinations. For the evaluation of fix EP's, the pH calibration is advisable.
The volume values of the fix EP's are available for the calculation as C5X:
Fix EP1
⇒ C51
:
Fix EP9
⇒ C59 Maximum 9 fix EP's are possible.
pK and HNP evaluation
The following relation (Henderson-Hasselbach), derived from the law of mass action,
exists between the activities of a conjugate acid-base pair in aqueous solutions:
When the activities a
pH = pK + log (a
= aA, then pH = pK is valid. This value corresponds to the pH at
B
B/aA
)
the half neutralization point and can be taken from the titration curve. For pK determinations, a careful pH calibration is necessary.
The pK value determined is an approximate value owing to the fact that the ionic strength
of the solution has not been taken into account. For more exact values, titrations must be
performed with decreasing ionic strength and the results extrapolated to zero ionic
strength.
The evaluation of pK's in aqueous solutions is limited to
pK>3.5 due to the leveling effect of strong acids in aqueous solutions
pK<10.5 because for weaker acids no inflection points can be found aqueous
solutions.
pK evaluation for polybasic acids and for acid mixtures is also possible.
In non-aqueous solutions, the half neutralization potential (HNP) is often used instead of
pK. The HNP is evaluated accordingly.
A start volume must be smaller than half of the equivalence point volume of the first EP.
The pK/HNP values are available for calculation as C6X.
794 Basic Titrino
35
Page 40

2.7. Parameters, key <PARAM>
2.7.2 Parameters for SET
parameters
>SET1
>SET1
EP at pH OFF
**titr.
dynamics OFF
**titr.
max.rate 10.0 ml/min
**titr.
SET1, SET2:
Control parameters for EP1 and EP2.
titration parameters
are valid for the global titration sequence.
stop conditions:
Parameters for the termination of the titration.
statistics:
Calculation of mean values and standard deviation,
see also page 55.
preselections:
ON/OFF of various auxiliary functions such as automatic requests after the start and activate pulse.
Control parameters for EP1 or EP2, resp.
Preset EP1 (input range depends on the measured
quantity:
pH: 0...±20.00, OFF
U, Ipol: 0...±2000 mV, OFF
Upol: 0...±200.0 µA, OFF)
<CLEAR> sets "OFF".
If EP1 is "OFF", no further inquiries under SET1 appear.
Distance from EP where constant dosing should stop
and controlling begins. (control range, input range
depends on the measured quantity:
pH: 0.01...20.00, OFF
U, Ipol: 1...2000 mV, OFF
Upol: 0.1...200.0 µA, OFF)
<CLEAR> sets "OFF".
"OFF" means largest control range, i.e. low titration.
Outside the control range, dispensing is performed
continuously, see also page 42.
Maximum dosing rate (0.01...150 mL/min, max.)
<CLEAR> sets "max.".
This parameter determines primarily the addition rate
outside the control range, see also page 42.
The maximum rate depends on the Exchange Unit:
Exchange Unit max.
5 mL 15 mL/min
10 mL 30 mL/min
20 mL 60 mL/min
50 mL 150 mL/min
794 Basic Titrino
36
Page 41

2.7 Parameters, key <PARAM>
min.rate 25.0 µl/min
**titr.
stop crit: drift
**titr.
stop drift 20 µl/min
**titr.
t(delay) 10 s
**titr.
stop time OFF s
**titr.
>titration parameters
titr.direction: auto
start V: OFF
cond.
start V 0.0 ml
cond.
factor 0
cond.
dos.rate max. ml/min
**titr.
Minimum dosing rate (0.01...999.9 µL/min)
This parameter determines the addition rate right at the
start and the end of the titration, see also page 42.
This parameter influences the titration speed and
therefore its accuracy very strongly: A smaller min.rate
results in a slower titration.
Type of stop criteria (drift, time)
Titration stops if EP is and stop drift is reached. (1...999
µL/min)
Titration stops if there is no dosing during t(delay).
(0...999 s, INF)
<CLEAR> sets "INF"
Switch off when the end point is reached and the set
time after the last dispensing has elapsed.
If "INF" is set, an inquiry regarding the stop time
appears.
If t(delay) is "INF"
Stop after a time (0...999999 s, OFF)
<CLEAR> sets "OFF".
Stop after the set time after the start of the titration.
"OFF" means no stop, i.e. titration for an "infinitely" long
time.
General titration parameters
Direction is set automatically (+, -, auto)
auto: The direction is set automatically by the Titrino
(sign [U
- EP]).
first
+: Direction of higher pH, higher voltage (more
"positive"), larger currents.
- : Direction of lower pH, lower voltage, smaller
currents.
The titration direction is fixed if two EP's are set. In this
case, an input for titration direction has no meaning.
Type of start volume (OFF, abs., rel.)
"OFF": start volume switched off
"abs.": absolute start volume in mL
"rel.": relative start volume to sample size.
If "abs." is set:
Absolute start volume (0...999.99 mL)
If "rel." is set:
Factor for relative start volume (0...±999999).
Calculated as: start V (in mL) = factor∗ sample size
Dosing rate for start volume
(0.01...150 mL/min, max.)
<CLEAR> sets "max.".
The maximum rate depends on the Exchange Unit:
794 Basic Titrino
37
Page 42

2.7. Parameters, key <PARAM>
pause 0 s
**titr.
meas.input: 1
I(pol) 1 µA
U(pol) 400 mV
electrode test: OFF
temperature 25.0 °C
cond.
Exchange Unit max.
5 mL 15 mL/min
10 mL 30 mL/min
20 mL 60 mL/min
50 mL 150 mL/min
Pause (0...999999 s)
Waiting time after start volume, e.g. reaction time after
dosing of a start volume. The waiting time can be
aborted with <QUIT>.
Measuring input (1, 2, diff.)
Inquiry only with measured quantities pH and U.
Measuring input 1 or 2 or differential amplifier;
connection of electrodes, see page 155.
With polarized electrodes, instead of the measuring
input the
polarization current (-127...127 µA)
or the
polarization potential (-1270...1270 mV, in steps of 10
mV)
is inquired.
Electrode test (OFF, ON)
Test for polarized electrodes. Performed on
changeover from the inactive state to a measurement.
"OFF" means that the test is not performed.
Titration temperature (-170.0...500.0°C).
Temperature is measured at the start of the titration if a
T sensor is connected. The value is used for
temperature compensation in pH titrations.
794 Basic Titrino
38
Page 43

2.7 Parameters, key <PARAM>
>stop conditions
stop V: abs.
**titr.
stop V 99.99 ml
**titr.
factor 999999
**titr.
filling rate max. ml/min
>statistics
status: OFF
mean n= 2
res.tab: original
delete n= 1
Stop conditions for titration
If this is not "normal", i.e. after reaching the EP.
Type of stop volume (abs., rel., OFF)
"abs.": absolute stop volume in mL.
"rel.": relative stop volume to sample size.
"OFF": stop volume switched off. Stop volume
is not monitored.
If "abs." is set:
Absolute stop volume (0...9999.99 mL)
If "rel." is set:
Factor for relative stop volume (0...±999999)
Calculated as:
Stop V (in mL) = factor∗ sample size
Filling rate after the titration
(0.01...150 mL/min, max.)
<CLEAR> sets "max.".
The maximum rate depends on the Exchange Unit:
Exchange Unit max.
5 mL 15 mL/min
10 mL 30 mL/min
20 mL 60 mL/min
50 mL 150 mL/min
Statistics calculation
Status of statistics calculation (OFF, ON)
If the statistics calculation is switched off, the following
inquiries regarding the statistics do not appear.
Mean value calculation from n single results (2...20)
Result table (original, delete n, delete all)
"original": The original table is used. Deleted
individual results are again incorporated in
the evaluation.
"delete n": Deletion of single results with the index n.
"delete all": The entire table is deleted.
Delete data from sample number n (1...20)
The deleted result is removed from the statistics
calculation.
794 Basic Titrino
39
Page 44

2.7. Parameters, key <PARAM>
>preselections
conditioning: OFF
display drift: ON
cond.
req.ident: OFF
cond.
req.smpl size: OFF
cond.
activate pulse: OFF
cond.
Preselections for the sequence
Automatic conditioning of titration vessel. (ON, OFF)
If conditioning is "on", between the titrations the titration
solution is constantly maintained at the (1st) end point.
When conditioning is performed, the volume drift can
be displayed during the conditioning:
Display of drift during conditioning (ON, OFF).
Volume drift.
Request of identifications after start of titration (id1,
id1&2, all, OFF)
After start, sample identifications can be requested
automatically: Only id1, id1 & id2, all three id's or no
inquiries.
Request of sample size after start of titration (value, unit,
all, OFF)
"all" the value and the unit will be requested.
Pulse output on I/O line 6 (L6, pin 1) of the remote
socket (first, all, cond., OFF)
see page 163.
794 Basic Titrino
40
Page 45

2.7 Parameters, key <PARAM>
Titration sequence of SET
<START>
(Activate pulse)
(Start delay)
(Preconditioning)
(<START>
(Activate pulse)
(Start delay)
(Request ident.)
(Request smpl size)
(Start conditions)
Titration:
st
end point
1
nd
end point
2
Calculations
Data output
(Reconditioning)
After the start, the activate pulse is outputted.
The start delay time is waited off.
If conditioning is on, the sample solution is titrated until
the (first) EP is reached. The display shows then
drift OK 2.3 µl/min
or
SET pH conditioning
The vessel is now conditioned. The titration can be started
with <START>.
The sample identifications and the sample size are requested.
The temperature is measured if a T sensor is connected.
start volume is dispensed and pause 2 waited off.
The
Then the titration is performed to the first, then to the second end point.
Calculations are carried out.
Data are outputted.
Conditioning is carried out.
794 Basic Titrino
41
Page 46

2.7. Parameters, key <PARAM>
V
Control parameters
The control parameters can be set separately for each end point. Optimize your control
parameters for routine analyses for samples with a rather low content.
During the titration, reagent dosing occurs in 3 phases:
U/mV
EP
1. Initial dosing:
Here the dosing rate
increases constantly. The rate
starts with "min.rate" and
goes up to "max.rate".
2. Continuous dosing:
V/mL
Dosing is performed at the
maximum rate "max.rate" until
t/s
the control range (dynamics)
is reached.
3. Control range (dynamics):
In this range, dosing is
performed in single steps.
The last dosing steps are
controlled by the parameter
"min.rate".
Initial
dosing
Continuous
dosing
V/mL
Control
range
Trial settings for the size of the control range
Set a large control range for steep curves. Relatively flat curves, on the other hand, need
a smaller control range. You can get an initial, good approximation for the start of the
control range from the intersection point of the tangents:
"steep curves" "flat curves"
U/mV
Control
range
EP
/mL
Control
range
U/mV
EP
V/mL
794 Basic Titrino
42
Page 47

2.7 Parameters, key <PARAM>
Relation between the stop criteria "time" and "drift"
The stop criterion "time", t(delay), means that the end point must be exceeded for a
certain period of time. In other words, after the last dosed increment, time t is allowed to
elapse before the titration is stopped. The size of this last increment depends on the
volume of the Exchange Unit used. With a 20 mL Exchange Unit, the smallest possible
increment is 2 µL. With a t(delay) = 5 s, the last 2 µL reagent must thus suffice for 5 s or
longer. This results in a drift of ≤ 2 µL/5 s = 24 µL/min (the drift can be less than 24
µL/min as it is not known whether the last increment would also suffice for 10 s). If you
have been working up to this point with a 20 mL Exchange Unit and a t(delay) = 5 s, you
can set a value of ≤ 24 µL/min as stop drift. The following table shows several values for
the maximum stop drift.
t(delay)
5 s 10 s 20 s
min.incr. (Exchange Unit)
0.5 µL (5 mL) 6 µL/min 3 µL/min 1.5 µL/min
1 µL (10 mL) 12 µL/min 6 µL/min 3 µL/min
2 µL (20 mL) 24 µL/min 12 µL/min 6 µL/min
5 µL (50 mL) 60 µL/min 30 µL/min 15 µL/min
Same t(delay) with a range of extremely small volume increments means different switchoff points. In case the stop criterion "drift" is used, the stopping point remains the same.
794 Basic Titrino
43
Page 48

2.7. Parameters, key <PARAM>
If you have entered the endpoint and the control range (dynamics), the default values for
the other control parameters should suffice for the first titration. If you encounter
difficulties in optimizing your titration, the following table will be of use.
How to proceed if ...
Problem Possible causes and corrective measures
Dosing at the end too long and
with too small increments.
"Never ends!"
"Overshoots". Titration is not
controlled, i.e. at the end single
pulses are not dosed.
Titration time is too long. • Set higher "min.rate".
• Increase "min.rate". Perform an experiment with a
much higher min.rate.
• Change switch-off criterion. Attempt, e.g. to increase
the stop drift or use a shorter t(delay) as stop
criterion.
• Possibly pass an inert gas through the titration
vessel.
• Lower "max.rate".
• Set larger control range.
• Set "min.rate" much lower.
• Optimize arrangement of electrode and buret tip and
improve stirring, see page 157. This is particularly
important with very fast titration reactions and with
steep curves.
• Set higher "max.rate".
• Lower "dynamics".
Scatter in titration results is too
great.
• Set "min.rate" lower.
794 Basic Titrino
44
Page 49

2.7 Parameters, key <PARAM>
2.7.3 Parameters for MEAS
parameters
>measuring parameters
>measuring parameters
signal drift OFF mV/min
equilibr.time OFF s
meas.input: 1
I(pol) 1 µA
U(pol) 400 mV
electrode test: OFF
measuring parameters
determine the measurement.
statistics:
Calculation of mean values and standard deviation,
see also page 55.
preselections:
ON/OFF of various auxiliary functions such as automatic requests after the start and activate pulse.
Measuring parameters
Drift criterion for measured value acquisition (input
range depends on the measured quantity:
pH, U, Ipol: 0.5...999 mV/min, OFF
Upol: 0.05...99.9 µA/min, OFF
T: 0.5...999 °C/min, OFF)
<CLEAR> sets "OFF".
"OFF" means that the measured value is acquired after
a fixed equilibration time.
Waiting time for measured value acquisition (0...9999 s,
OFF)
<CLEAR> sets "OFF".
If no new equilibration time has been entered, the
Titrino calculates an equilibration time appropriate to
the drift with the formula
equilibr.time (in s)
The measured value is acquired when the first criterion
(drift or time) is met. With drift and time "OFF", you will
have an "infinite" measurement.
Measuring input for pH and U. (1, 2, diff.)
Inquiry only with measured quantities pH and U.
Measuring input 1 or 2 or differential amplifier;
connection of electrodes, see page 155.
With polarized electrodes, instead of the measuring
input the
polarization current (-127...127 µA)
or the
polarization potential (-1270...1270 mV, in steps of 10
mV)
is inquired.
Electrode test (OFF, ON)
Test for polarized electrodes. Performed on
changeover from the inactive standby mode to a
measurement. "OFF" means that the test is not
150
=
+
+
5
0.01Drift
794 Basic Titrino
45
Page 50

2.7. Parameters, key <PARAM>
temperature 25.0 °C
>statistics
status: OFF
mean n= 2
res.tab: original
delete n= 1
>preselections
req.ident: OFF
req.smpl size: OFF
activate pulse: OFF
performed.
Temperature (-170.0...500.0 °C)
Temperature is measured at the start if a T sensor is
connected.
This parameter is used for temperature compensation
in pH measurements.
Statistics calculation
Status of statistics calculation (OFF, ON)
If the statistics calculation is switched off, the following
inquiries regarding the statistics do not appear.
Mean value calculation from n single results (2...20)
Result table (original, delete n, delete all)
"original": The original table is used. Deleted
individual results are again incorporated in
the evaluation.
"delete n": Deletion of single results with the index n.
"delete all": The entire table is deleted.
Delete data from sample number n (1...20)
The deleted result is removed from the statistics
calculation.
Preselections for the sequence
Request of sample identifications after start of titration
(id1, id1&2, all, OFF)
After start, sample identifications can be inquired
automatically: Only id1, id1 & id2, all three id's or no
inquiries.
Request of sample size after start of titration (value, unit,
all, OFF)
Pulse output on line "activate" (L6, pin 1) of the remote
socket (ON, OFF)
see page 163.
794 Basic Titrino
46
Page 51

2.7 Parameters, key <PARAM>
p
2.7.4 Parameters for CAL
parameters
>calibration parameters
>calibration parameters
meas.input: 1
cal.temp. 25.0 °C
buffer #1 pH 7.00
buffer #2 pH 4.00
buffer #3 pH OFF
signal drift 2 mV/min
equilibr.time 110 s
electr.id
sample changer cal: OFF
calibration parameters
determine the calibration procedure.
statistics:
Calculation of mean values and standard deviation,
see also page 55.
Calibration parameters
Measuring input (1, 2, diff.)
Measuring input 1 or 2 or differential amplifier;
Connection of electrodes, see page 155.
Calibration temperature (-20.0 ... 120.0 °C)
If a T sensor is connected, the temperature will be
measured.
The calibration temperature can also be input during
the calibration sequence.
pH value of first buffer (0...±20.00)
The pH value of the buffers can be put in during the
calibration sequence.
pH value of second and the following buffers
(0...±20.00, OFF)
<CLEAR> sets "OFF".
Buffers are requested until "OFF" is set. This gives an
n-point calibration. Up to 9 buffers.
A regression line will be calculated in calibrations with
more than 2 buffers.
Drift for measured value acquisition (0.5...999 mV/min,
OFF)
<CLEAR> sets "OFF".
"OFF" means that the measured value is acquired after
an equilibration time.
Equilibration time (0...9999 s, OFF)
<CLEAR> sets "OFF".
If a new equilibration time has not been entered, the
Titrino calculates an equilibration time appropriate to
the drift, see page 43. The measured value is acquired
as soon as the first criterion (drift or time) has been
met.
If drift and time are both set to "OFF", the measured
value acquisition is immediate.
Electrode identification (up to 8 characters).
Calibration with sample changer (ON, OFF)
In calibrations with a sample changer, there are no
hold points in the calibration sequence for inputs.
Calibration tem
erature and pH values of the buffers
794 Basic Titrino
47
Page 52

2.7. Parameters, key <PARAM>
activate pulse: OFF
>statistics
status: OFF
mean n= 2
res.tab: original
delete n= 1
Calibration temperature and pH values of the buffers
(which are temperature dependent) must therefore be
entered in advance. The inputs in key <PARAM> are
valid.
Pulse output on the line "activate" (L6, pin 1) of the
remote socket (all, first, OFF)
See page 163.
Statistics calculation
Status of statistics calculation (OFF, ON)
If the statistics calculation is switched off, the following
inquiries regarding the statistics do not appear.
Mean value calculation from n single results (2...20)
Result table (original, delete n, delete all)
"original": The original table is used. Deleted
individual results are again incorporated in
the evaluation.
"delete n": Deletion of single results with the index n.
"delete all": The entire table is deleted.
Delete data from sample number n (1...20)
The deleted result is removed from the statistics
calculation.
794 Basic Titrino
48
Page 53

2.7 Parameters, key <PARAM>
Calibration sequence
<START>
(Activate pulse)
(Start delay)
Measuring cal.temp.
or
entry
Buffer 1 pH
Measuring buffer 1
Buffer 2 pH
Measuring buffer 2
etc.
Data output
After the start, the activate pulse is output.
The start delay time is waited off.
Then, the calibration temperature is measured.
It no T sensor is connected, you enter the temperature
manually. Store the value with <ENTER> or continue with
<START> (T is not stored).
Enter the nominal value of the first buffer.
Store the value with <ENTER> or continue with
<START> (the value is not stored).
The first buffer is measured.
Enter the nominal value of the second buffer.
Store the value with <ENTER> or continue with
<START> (the value is not stored).
Leave the calibration with <STOP>
⇒ 1 point calibration.
The second buffer is measured.
As many buffers appear as have been specified in the
<PARAM> key (up to 9).
You may leave the calibration any time with <STOP>.
Data are output.
The calibration data are available for calculation:
C46: pHas
C47: Electrode slope
Calibration data can be viewed at any time with the
<CAL.DATA> key and the calibration report printed out
using the key sequence
<PRINT><CAL.DATA><ENTER>.
794 Basic Titrino
49
Page 54

2.7. Parameters, key <PARAM>
2.7.5 Parameters for TIP
In TIP, several commands and methods can be linked to make a titration procedure. The
TIP sequence can be defined with <DEF>, see page 62.
parameters
>sequence
>statistics
status: OFF
mean n= 2
res.tab: original
delete n= 1
>preselections
req.ident.: OFF
req.smpl size: OFF
meas.mode: OFF
meas.input: 1
sequence
Parameters for the TIP sequence see page 63.
statistics:
Calculation of mean values and standard deviation,
see also page 55.
preselections:
ON/OFF of various auxiliary functions such as automatic requests after the start and activate pulse.
Statistics calculation
Status of statistics calculation (OFF, ON)
If the statistics calculation is switched off, the following
inquiries regarding the statistics do not appear.
Mean value calculation from n single results (2...20)
Result table (original, delete n, delete all)
"original": The original table is used. Deleted
individual results are again incorporated in
the evaluation.
"delete n": Deletion of single results with the index n.
"delete all": The entire table is deleted.
Delete data from sample number n (1...20)
The deleted result is removed from the statistics
calculation.
Preselections for the sequence
Request of sample identifications after start (id1, id1&2,
all, OFF)
After start, sample identifications can be inquired
automatically: Only id1, id1 & id2, all three id's or no
inquiries.
Request of sample size after the start (value, unit, all,
OFF)
Measured quantity (pH, U, Ipol, Upol, T, OFF)
Quantity for measurements with key <MEAS/HOLD>.
Measuring input (1, 2, diff.)
Inquiry only with measured quantities pH and U.
Measuring input 1 or 2 or differential amplifier;
connection of electrodes, see page 155.
794 Basic Titrino
50
Page 55

2.7 Parameters, key <PARAM>
I(pol) 1 µA
U(pol) 400 mV
electrode test: OFF
temperature 25.0 °C
With polarized electrodes, inquiry of
polarization current (-127...127 µA) or
polarization potential (-1270...1270 mV, steps of 10 mV)
Electrode test (OFF, ON)
Test for polarized electrodes. Performed on
changeover from the inactive standby state to a
measurement. "OFF" means that the test is not
performed.
Temperature (-170.0...500.0 °C)
Temperature for pH compensation. Its value has to be
entered manually even if a T sensor is connected.
794 Basic Titrino
51
Page 56

2.8. Result calculations
2.8 Result calculations
Formula entry, key <DEF>
DEF
(
2
def
>formula
>formula
RS?
RS1=
RS1=EP1*C01/C00
Key <DEF> contains various inquiries for result
calculations and data output. The data of this key are
method specific and they are stored in the method
memory together with the method.
formula:
Formulas for result calculations.
The display texts of the Titrino are shown to the left.
The values are the default values.
Input of formulas
Enter formula number (1...9)
You can calculate up to 9 results per method.
Enter a number 1...9.
Input of formula
Example:
RS1=EP1
∗C01/C00
Enter formula by means of 3rd functions of keyboard.
Here you will find operands, mathematical operations
and parentheses. Operands require a number as an
identification. You can use the following operands:
EPX: EP's. X = 1...9
RSX: Results which have already been calculated with
previous formulas. X = 1...9.
CXX: Calculation constants. XX = 00...79.
Rules:
• Calculation operations are performed in the
algebraic hierarchy: ∗ and / before + and -.
• Store formula with <ENTER>.
• Calculation quantities and operands can be deleted
with <CLEAR> one by one.
• To delete a complete formula press <CLEAR>
repeatedly until only RSX remains in the display.
Confirm with <ENTER>.
If a formula is stored with <ENTER>, result text,
number of decimals and result unit will be requested:
794 Basic Titrino
52
Page 57

2.8 Result calculations
RS1 text RS1
RS1 decimal places 2
RS1 unit: %
Text for result output (up to 8 characters)
Text input see page 8.
Number of decimal places for result (0...5)
Selection of result unit (%, ppm, g/L, mg/mL, mol/L,
mmol/L, g, mg, mL, mg/pc, s, mL/min, no unit or up to
6 characters).
Enter next formula, e.g. for RS2.
Meaning of the calculation variables CXX:
C00 Sample size, see page 69.
C01...C19 Method specific operands, see page 54. They are stored with the
method in the method memory.
C21...C23 Sample specific operands, see page 69ff.
C26, 27 Mean values from silo calculations.
C30...C39 Common variables.
C40 Initial measured value of the sample, last measured value in MEAS.
C41 End volume.
C42 Determination time.
C43 Volume drift for SET with conditioning.
C44 Temperature.
C45 Dispensed start volume.
C46 Asymmetry-pH (calibration).
C47 Electrode slope (calibration).
C51...C59 Fix EP for DET and MET.
C61...C69 pK/HNP values for DET and MET.
C70...C79 Temporary variables for calculations in TIP.
794 Basic Titrino
53
Page 58

2.8. Result calculations
Input method specific operands C01...C19, key <C-FMLA>
C-FMLA
C
1
With <C-FMLA> the operands C01...C19 can be put
in. For the calculation, the operands are used, which
were introduced in the formula.
The inputs method specific and are store in method
memory.
The calculation report can be printed with the key sequence:
<PRINT><SELECT>(press key repeatedly until "calc" appears in the display)<ENTER>
794 Basic Titrino
54
Page 59

2.9 Statistics calculation
2.9 Statistics calculation
Mean values, absolute and relative standard deviations are calculated.
DEF
(
2
def
>mean
>mean
MN1=RS1
MN2=
:
MN9=
>statistics
mean n= 2
res.tab: original
delete n= 1
PARAM
status: OFF
The <DEF> key is used to allocate results for statistics
calculation.
The entries are specific to the method and are stored in
the method memory.
mean:
Assigns values for statistics calculations.
The display texts of the Titrino are shown to the left.
The values are the default values.
Allocations for statistics calculations
Number n of single values for statistics calculation.
(1...9)
You can perform statistics calculation using up to 9
results (RSX), endpoints (EPX) or variables (CXX). For
MN1, the default value RS1 is entered.
Delete allocation with <CLEAR> + <ENTER>
Each mode has an inquiry group ">statistics" in key
<PARAM>
Statistics calculation
Status of statistics calculation (OFF, ON)
If the statistics calculation is switched off, the following
inquiries regarding the statistics do not appear.
Mean value calculation from n single results (2...20)
Result table (original, delete n, delete all)
"original": The original table is used. Deleted
individual results are again incorporated in
the evaluation.
"delete n": Deletion of single results with the index n.
"delete all": The entire table is deleted.
Delete data from sample number n (1...20)
The deleted result is removed from the statistics
calculation. )
794 Basic Titrino
55
Page 60

2.9. Statistics calculation
How do you obtain statistics calculations?
1) Enter the allocations for the statistics calculation, see page 55.
2) Switch on the statistics calculations: Either with <STATISTICS> or set the status under
<PARAM>, "> statistics" to "ON". The "Statistics" LED is on. Storing a method in the
method memory, the status of the statistics calculation is retained.
3) Change the number of the individual values n under "mean n", if necessary.
4) Perform at least 2 titrations. The statistics calculation are constantly updated and
printed. The values are printed in the short and full result report.
5) The statistics report can be printed with <PRINT><STATISTICS><ENTER>.
Rules:
• Recalculated results are incorporated in the statistics calculation.
• If a result of a particular titration can not be calculated, no results for this determination
are incorporated in the statistics calculation. However, the sample counter is still
operative, i.e. the statistics calculation start afresh when the number of required
individual determinations has been performed.
• If the statistics are switched off ("Statistics" LED no longer on), results are no longer
entered in the statistics table. But the table remains unchanged. When the statistics
are switched on again, you can immediately continue working.
• If you delete results, all results of the determination with index n are removed from the
statistics evaluation.
• On method change, the old statistics table is cleared and the statistics instructions of
the new method followed.
• Old results in the statistics table can be deleted with "delete all" (<PARAM>,
">statistics", "res.tab:").
794 Basic Titrino
56
Page 61

2.10 Common variables
2.10 Common variables
Common variables are used for:
• Determination of a titer with a method. This titer is stored permanently as C3X. The
operand C3X can be used in various other methods like any other operand.
• Determination of a blank values with a method . Using this blank value in various other
methods.
• Determination of a result with method. Reconciliation of this result in various other
methods.
You may view the values of the common variables with <CONFIG>.
DEF
2
def
>common variables
>common variables
C30=
C31
:
C39=
(
With <DEF>, results (RSX), endpoints (EPX), variables
(CXX) or mean values (MNX) can be allocated as
common variables.
The entries are specific to the method and are stored in
the method memory.
common variables:
Assigns values as common variables.
The display texts of the Titrino are shown to the left.
The values are the default values.
Allocation for common variables
Common variable C30...C39 (RSX, EPX, CXX, MNX)
Results (RSX), endpoints (EPX), variables (CXX), and
means (MNX) can be assigned.
The values of the common variables remain in force for
all methods until they are overwritten or deleted. They
can be viewed under the <CONFIG> key.
Delete allocation with <CLEAR>+<ENTER>.
794 Basic Titrino
57
Page 62

2.11. Data output
2.11 Data output
Reports for the output at the end of a determination
DEF
(
2
def
>report
>report
report:
report:full;curve
Meaning of the report blocks:
full Full result report with raw results, calculations and statistics.
short Short result report with calculations and statistics.
mplist Measuring point list.
curve Titration curve (with DET and MET) or volume vs. time (with SET) or
measured value vs. time (with MEAS)
derive 1st derivative of the titration curve (with DET)
comb Combined titration curve and 1st derivative (with DET)
scalc full Full report of silo calculations.
scalc srt Short report of silo calculations.
param Parameter report.
calc Report with formulas and operands.
calib Calibration data.
ff Form feed on printer.
With <DEF>, the report sequence at the end of the
determination is defined.
The entries are specific to the method and are stored in
the method memory.
report:
Definition of report blocks to be printed automatically at
the end of the determination.
The display texts of the Titrino are shown to the left.
The values are the default values.
Report sequence (input range depends on the mode:
DET: full, short, mplist, curve, derive, comb, scalc full,
scalc srt, param, calc, calib, ff
MET: full, short, mplist, curve, scalc full, scalc srt,
param, calc, calib, ff
SET, MEAS, CAL:
full, short, scalc full, scalc srt, param, calc, calib,
ff
TIP: full, short, scalc full, scalc srt, param, calc, ff
Select a block with <SELECT>. If you require more
than one report block, set a ";" as a delimiter between
the blocks.
794 Basic Titrino
58
Page 63

2.11 Data output
Original reports which are put out automatically at the end of the titration can be printed
with recalculated values at any time. Key sequence:
<PRINT><REPORTS><ENTER>.
Original reports have double dashes ==== at the end, whereas recalculations are
marked by single dashes ----.
Report outputs can be stopped with <QUIT>.
Example of reports:
Full result report
'fr
794 Titrino 01102 794.0010
date 2002-01-03 time 08:54 14
pH(init) 2.88 DET pH ********
smpl size 0.372 g
EP1 2.083 ml 7.64
RS1 3.80 g/L
device label Titr 1 sign:
============
Device label (if there is a designation, see
page 23) and manual signature
'cu
794 Titrino 01102 794.0010
date 2002-01-03 time 08:54 14
start V 0.000 ml DET pH ********
1.0 ml/div dpH=1.0/div
============
Titration curve
Scaling of volume and pH axis
794 Basic Titrino
59
Page 64

2.11. Data output
Additional possibilities for report outputs
In addition to the reports which are printed at the end of the titration, various other reports
can be put out. There are 2 possibilities to select the reports:
1) <PRINT><SELECT><ENTER> Cursor is pressed repeatedly until the desired report
appears in the display.
2) <PRINT><keyX><ENTER> key X is the key under which the appropriate data
are entered.
List of the "keys X":
Report Display with
<PRINT><SELECT>
Configuration report configuration CONFIG
Parameter report parameters PARAM
Current sample data smpl data SMPL DATA
Statistics report with the individual results statistics STATISTICS
All sample data from the silo memory silo SILO
Calibration data cal.data CAL.DATA
<Key X>
Operands C01...C19 C-fmla C-FMLA
Contents of the <DEF> key def DEF
Contents of the method memory with details of
the memory requirements of the individual
methods and the remaining bytes
Calculation report with formulas and operands calc
Full result report full
Short result report short
Measuring point list (DET and MET) mplist
Titration curve (DET and MET) curve
1st derivative of titration curve deriv
Combined 1st derivative and titration curve (DET) comb
Full report of silo calculations scalc full
Short report of silo calculations scalc srt
All reports all
Complete report sequence of the last
determination, as defined under the <DEF> key
in the method
user methods USER
METH
REPORTS
794 Basic Titrino
60
Page 65

2.11 Data output
Result display without printer
Results can also be viewed in the display. With <SELECT> key, the appropriate section
(EP's, results, etc.) can be selected and <ENTER> can be used to view the individual
EP's, results etc.
<SELECT>: display <ENTER>: display Remarks
>display results RS1...RS9 calculated results
>display EP's EP1...EP9 EP's
>display fix EP's C51...C59 fix EP's (DET and MET)
>dispaly mean m(RS1)...m(RS9),n mean values and number of
individual values
>display std.deviation s(RS1)...d(RS2) absolute standard deviation
>display messages various (error) messages
>display meas.val C40 with MEAS
>display calibration pH(as) and slope with CAL
>display temp. variables C70...C79 with TIP
794 Basic Titrino
61
Page 66

2.12. TIP, Titration procedure
2.12 TIP, Titration procedure
TIP (Titration Procedure) is used to link several commands in a sequence.
TIP is selected with <MODE> and <ENTER>. TIP is an "empty shell" in which the
sequence of the determination must be defined.
Definition of the sequence
DEF
(
2
def
>sequence
>sequence
1.step: OFF
1.method: Chloride
2 x <QUIT>
<ENTER>
<ENTER>
etc.
With key <DEF> the TIP can be defined.
sequence:
Sequence of TIP.
The display texts of the Titrino are shown to the left.
The values are the default values.
Sequence
Select a step with keys <SELECT>:
method: Method from the user memory.
pause: Waiting time
L4, L6 output: Set an output.
info: Hold sequence and write a message
into the display.
stirrer ON/OFF
Confirm the step with <ENTER> and enter the
parameter for the selected step, see below.
The request for the second step follows etc. Up to 30
steps can be selected.
On completion of the sequence definition, exit the
inquiry with <QUIT>.
794 Basic Titrino
62
Page 67

2.12 TIP, Titration procedure
Information for the commands (steps):
Command Meaning Input range
method Method from the user memory. This method runs as a
Name
submethod.
pause Waiting time. The waiting time can be aborted with
<QUIT>.
0...999999 s,
inf.
<CLEAR> sets "inf" (= infinitely long pause time).
L4, L6 output Set L4 output (pin 3) resp. L6 output (pin 1) of the
remote socket.
active = 0 V, inactive = 5 V, pulse > 100 ms, off =
active,
inactive,
pulse, off
output is not used.
Cable Titrino (L6) - Dosimat: 6.2139.000.
Important: A pulse (e.g. a pulse from monitoring or an
activate pulse in a submethod) can set an active output
to inactive! At the end of the TIP method, the outputs are
set to "inactive".
info Message in the display .
The TIP sequence is held and the message displayed.
up to 16
characters
Continue the sequence with <START>, <QUIT> or
<ENTER>.
The parameters of the sequence can be viewed and changed at any time under the
<PARAM> key.
794 Basic Titrino
63
Page 68

2.12. TIP, Titration procedure
Sequence of TIP
As there is no preset sequence of TIP, in what follows the procedure is illustrated by a
sequence that contains all available commands.
<START>
(Start delay)
(Request ident.)
(Request smpl size)
Submethod
Calculations
Data output
C7X
Pause
Set output
Info
TIP calculations
TIP data output
The start delay time is waited off.
The sample identifications and the sample size
are requested.
Submethods are processed according to their
parameters. They run to completion, including
calculations and data output (e.g. curves). The
determination data of submethods are
overwritten in the next sequence step of TIP.
Those values which are needed for higher-level
calculations must therefore be assigned to
temporary variables C7X.
The pause is waited off.
Outputs on the socket "Remote" can be set.
A message can be written in the display. The
sequence is held until it is continued manually
(with <START>, <QUIT> or <ENTER>).
TIP higher-level calculations are carried out.
Data output in TIP.
Attention: TIP contains no more determination
data, i.e. curves must be put out within the
submethods.
794 Basic Titrino
64
Page 69

2.12 TIP, Titration procedure
Preparation of submethods for use in TIP
All titration data, i.e. curves and lists of measured points must be put out in the
submethod as they are overwritten on return to TIP.
Individual values from the submethod, e.g. endpoints or calculated results must be stored
as temporary variables C7X. This allows them to be used in TIP for further calculations.
Reevaluations of data of a submethod are not possible in TIP. The submethods should
thus be thoroughly wet tested before they are used in TIP.
Assignment of temporary variables in the submethod:
DEF
(
2
def
>temporary variables
With key <DEF> temporary variables can be
assigned.
The entries are specific to the method and are stored in
the method memory.
temporary variables
for higher-level calculations.
The display texts of the Titrino are shown to the left.
The values are the default values.
>temporary variables
C70=
C71=
:
C79=
Temporary variables
Assignment of result, endpoints or variables (RSX, EPX,
CXX)
Values of the submethod to be used in TIP
calculations.
Calculations in TIP
In TIP calculations variables C7X from different submethods can be used, formula entry
see page 52.
Note:
We recommend to execute the calculations in TIP, as they can only be recalculated in TIP
itself, e.g. with a different sample size.
794 Basic Titrino
65
Page 70

2.13. Method memory, keys <USER METH>
2.13 Method memory, keys <USER METH>
USER METH
3
user methods
>recall method
>recall method
method name:
>store method
method name:
>delete method
method name:
)
Management of the internal method memory with key
<USER METH>.
Method identifications can be entered directly or
selected with the <SELECT> key.
recall method:
Loads a method from the internal method memory into
the working memory.
store method:
Stores the method which is in the working memory in
the internal method memory.
delete method:
Deletes a method from the internal method memory.
The display texts of the Titrino are shown to the left.
The values are the default values.
Recall method
Recall method from the internal method memory to the
working memory (input of method name, which is
included in the memory).
If a method identification is entered which is not found
in the method memory, the selected value blinks.
Store method
Store method from the working memory to the internal
method memory (up to 8 ASCII characters).
If a method with an identical name is already stored,
you are requested if you wish to overwrite the old
method. With <ENTER> it is overwritten, with <QUIT>
you return to the entry.
Delete method
Delete method from the internal method memory (input
of method name, which is included in the memory).
For safety, you are again asked if you really wish to
delete the method. With <ENTER> it is deleted, with
<QUIT> you return to the working memory.
If a method name is entered which is not found in the
method memory, the selected value blinks.
794 Basic Titrino
66
Page 71

2.13 Method memory, keys <USER METH>
The contents of the method memory can be printed with the key sequence
<PRINT><USER METH><ENTER>
Document your methods (e.g. parameter report, def. report and C-fmla report)!
With a PC and the 6.6008.XXX Vesuv program, you should carry out a complete method
backup from time to time.
794 Basic Titrino
67
Page 72

2.14. Calibration data, key <CAL.DATA>
2.14 Calibration data, key <CAL.DATA>
cal. data
>input 1
CAL.DATA
5
*
With <CAL.DATA>, the current pH calibration data of
all measuring inputs can be seen. Calibration data are
entered here automatically on completion of a
calibration.
input 1:
Calibration data for measuring input 1.
Identical for input 2 and diff.
The display texts of the Titrino are shown to the left.
The values are the default values.
>input 1
pH(as) 7.00
slope 1.000
temp 25.0 °C
cal.date
electr.id
pH calibration data for measuring input 1
Asymmetry pH (0...±20.00)
Entered automatically after a calibration with measuring
input 1.
Slope (0...±9.999)
Entered automatically after a calibration with measuring
input 1.
Calibration temperature (-20.0...120.0 °C)
Will be printed automatically after calibration with
measuring input 1.
Date of last calibration (no entry possible)
If the calibration data "pH(as)" and/or "slope" are
changed by a manual entry, the date entry is deleted.
Electrode identification of calibrated electrodes (no
entry possible)
If an electrode identification has been entered in the
CAL mode, it is automatically entered after the
calibration.
The calibration report with the current measuring input data can be printed at any time
with the key sequence
<PRINT><CAL.DATA><ENTER>.
794 Basic Titrino
68
Page 73

2.15 Current sample data, key <SMPL DATA>
2.15 Current sample data, key <SMPL DATA>
SMPL
DATA
smpl data
>id#1 oer C21
smpl data
id#1 or C21
id#2 or C22
id#3 or C23
smpl size 1.0 g
smpl unit: g
The key <SMPL DATA> can be used to enter the
current sample data. The contents of this key change
when the silo memory is switched on, see page 71.
Instead of entering the current sample data with
<SMPL DATA>, you can request these data
automatically after start of determinations.
Configuration: <PARAM>, ">preselections".
Current sample data can be entered live. For working
with the silo memory see page 70.
id#1...3 or C21...C23, sample identifications:
The sample identifications can also be used as sample
specific calculation variables C21...C23.
smpl size:
Sample size.
Entry using keypad or via balance, see page 151f.
smpl unit:
Unit of the sample size.
The display texts of the Titrino are shown to the left.
The values are the default values.
Sample data
Sample identification 1...3 or sample specific operand
C21...C23 (up to 8 characters).
Sample identifications or sample specific operands
can be entered using the keypad, via a balance with a
special input device or via barcode reader.
Sample size (6-digit number: ±X.XXXXX)
Entry using keypad, via balance or via barcode reader.
Unit of sample size (g, mg, mL, µL, pc, no unit or up to
5 characters)
Select unit with <SELECT>.
794 Basic Titrino
69
Page 74

2.16. Silo memory for sample data
2.16 Silo memory for sample data
In the silo memory or pushup storage, sample data (method, identifications and smpl
size) can be stored. This is useful, e.g. when you work with Sample Changers and other
automatic sample addition systems or if you wish an overview of your determination
results, see page 74.
SILO
-
9
If the silo memory is switched on, sample data are routed to the last free line of the silo
memory. If no new value is put in, the value from the last line is automatically copied. In
this manner, data can be simply taken over when they remain unchanged.
When the instrument is started, the sample data are fetched from the next silo line.
Organisation of the silo memory
Silo memory contains 35 lines.
Next free line is 36
1 silo line needs between 18 and 120 bytes memory capacity.
99
1
2
Press the key <SILO> for working with the silo
memory. The status LED "silo" is on when the silo
memory is switched on. The silo memory works by the
FIFO principle (First In, First Out).
1
99
35
2
35
6 of the 35 lines have been
processed. Free lines from 36 to 99
and from 1 to 6.
6
Filling the silo memory with a connected balance
If the silo memory is filled from the balance, you must ensure that there is sufficient space
in the silo memory for the required number of silo lines! The number of free bytes is given
in the user memory report.
When the sample data are entered from a balance, the transfer of the sample size is
taken as the end of the silo line. You should not send data from the balance and edit the
silo memory at the same time.
For mixed operation, manual input of identifications and sample sizes from a balance, the
values from the balance are sent into the line in which editing just takes place. Confirmed
the data with <ENTER> at the Titrino.
794 Basic Titrino
70
Page 75

2.16 Silo memory for sample data
Key <SMPL DATA> with the silo memory switched on
Sample data can be entered into the silo memory with
SMPL
DATA
smpl data
>edit silo lines
key <SMPL DATA>.
edit silo lines:
Entering sample data into the silo memory.
delete silo lines:
Deletes single silo lines.
delete all silo lines:
Deletes the whole silo memory.
The display texts of the Titrino are shown to the left.
The values are the default values.
>edit silo lines
silo line 1
method:
id#1 or C21
id#2 or C22
id#3 or C23
smpl size 1.0 g
smpl unit: g
Input for silo memory
Silo line (1...99)
The next free line is displayed automatically. Lines
already occupied can be corrected.
Method with which the sample is processed (method
name from the method memory)
If no method name has been entered, the sample is
processed with the method in the working memory.
Selection of the method with <SELECT>.
Sample identification 1..3 or sample specific calculation
variables C21...C23 (up to 8 characters)
Sample size (6-digit number: ±X.XXXXX)
The method specific limits are tested on result
calculation.
Unit of sample size (g, mg, mL, µL, pc, no unit or up to
5 characters)
Select unit with <SELECT>.
>delete silo lines
delete line n OFF
Delete individual silo lines
Line number of the line to be deleted(1...99, OFF)
<CLEAR> sets "OFF".
Deleted lines remain in the silo memory. Access is
blocked during the processing. To show that a line has
been deleted, they are marked with "∗ ". The symbol ∗
indicates that the line has been deleted.
Deleted lines can be reactivated if the appropriate line
is re-edited.
794 Basic Titrino
71
Page 76

2.16. Silo memory for sample data
>delete all silo lines
delete all: no
Delete all silo lines
Confirmation (yes, no)
When all silo lines are deleted, the silo is completely
empty: The line numbering starts again with 1.
cycle lines: OFF
save lines: OFF
With "ON", worked off silo lines will be copied to the
highest line of the silo memory (ON, OFF)
Data cycling "on" is useful if you constantly have to
process the same sample data. In such a case, the
processed silo line is not deleted, but copied to the
next free line, see below. If you work in this mode, you
should not enter any new
silo lines during the
determinations.
Store results in the silo memory (ON, OFF)
Determination results will be stored as C24 or C25 in
the silo memory according to the allocations in the
methods, see page 73.
"save lines" can only be set to "OFF" if the silo is
completely empty.
Silo memory with data cycling "on"
99
2
1
35
Silo memory contains 35 lines.
Next free line is 36.
99
2
1
6
35
41
6 of 35 lines have been processed.
The processed lines have been
copied to the end of the silo
memory: your silo is filled up to line
41.
794 Basic Titrino
72
Page 77

2.17 Storing determination results and silo calculations
2.17 Storing determination results and silo
calculations
2.17.1 Storing determination results
If the sample-specific data of the silo memory should be kept after the determination and
supplemented by results, the following entries are necessary:
1. In the method under <DEF>
Assignment of the determination results to C24 and/or C25:
2. In the silo memory, <SMPL DATA> (when the silo memory is switched on):
"save lines: on"
Assignment of determination results
DEF
(
2
def
>silo calculations
>silo calculations
C24=
C25=
Important:
Ensure that there is still sufficient space for storing the results C24 and C25. (In the report
<PRINT><USER METH><ENTER> the number of free bytes is shown.) Result name,
value and unit are stored. The memory requirements can be estimated as follows:
Result with text (8 characters) and unit (5 characters): 32 bytes
Measured value C40, value without unit: 22 bytes
The determination results are assigned in key <DEF>.
The display texts of the Titrino are shown to the left.
The values are the default values.
Silo calculations
Assignment to C24 (RSX, EPX, CXX)
Calculated results (RSX), endpoints (EPX) or variables
CXX can be stored as C24.
Same procedure for C25.
794 Basic Titrino
73
Page 78

2.17. Storing determination results and silo calculations
After several samples have been processed, the silo memory report can have the
following appearance (printout with <PRINT><SILO><ENTER>):
'si
794 Titrino 01102 794.0010
date 2002-01-03 time 08:54 14
>silo
cycle lines: OFF
save lines: ON
sl method id 1/C21 id 2/C22 id 3/C23 C00 C24 C25
+ 1 11-2 A/12 94-09-12 0.233g 0.142ml/min 98.53%
+ 2 11-2 A/13 94-09-12 0.286g 0.138ml/min 95.75%
/ 3 11-2 A/14 94-09-12 0.197g 0.145ml/min 100.61%
4 11-2 A/15 94-09-12 0.288g NV NV
5 11-2 A/16 94-09-12 0.263g NV NV
processed silo
lines with
saved results
The silo lines can be marked as follows (at very left of report):
+ Silo line has been processed. It cannot be edited anymore.
* A silo line not yet processed has been deleted.
- A processed silo line has been deleted and hence removed from the silo
calculations.
/ The last processed silo line. Recalculation will be considered e.g., if the sample data
of this line are changed.
No marking: The silo line is awaiting processing.
2.17.2 Silo calculations
Mean value and standard deviation of the results available in the silo memory can
subsequently be calculated over the entire series.
The following details can be entered in the method under <DEF>:
>silo calculations
C24=
C25=
match id: OFF
Silo calculations
Assignment to C24 and C25
Calculated results (RSX), endpoints (EPX) and
variables (CXX) can be stored as C24.
Identical for C25.
Which sample identifications must match in order to
combine of the results (id1, id1&2, all, OFF)
"OFF" means no matching ids, all samples which have
been processed with the same method are combined,
see examples below.
794 Basic Titrino
74
Page 79

2.17 Storing determination results and silo calculations
A
A
Starting from the following silo report:
'si
794 Titrino 01102 794.0010
date 2002-01-03 time 08:54 14
>silo
cycle lines: OFF
save lines: ON
sl method id 1/C21 id 2/C22 id 3/C23 C00 C24 C25
+ 1 11-2 A/12 94-09-12 0.233g 0.142ml/min 98.53%
+ 2 0-15 A/13 94-09-12 0.286g 0.9976 NV
+ 3 0-15 A/13 94-09-12 0.197g 0.9947 NV
+ 4 11-2 A/12 94-09-12 0.288g 0.138ml/min 95.75%
/ 5 11-2 A/15 94-09-12 0.263g 0.145ml/min 100.61%
*
ssignment
for C24 only
*
*
with "match id: off" the following silo calculation report (scalc full) is obtained:
:
method id 1/C21 id 2/C22 id 3/C23 mean +/-s n
11-2 * * * Rate 0.142ml/min 0.0035 3
Content 98.30% 2.438 3
0-15 * * * Titer 0.9962 0.00105 2
ll samples
which have been
processed with
the same
method are
combined
With "match id: id1" the following silo calculation report (scalc full) is obtained:
:
method id 1/C21 id 2/C22 id 3/C23 mean +/-s n
11-2 A/12 * * Rate 0.140ml/min 0.0028 2
Content 97.14% 1.966 2
0-15 A/13 * * Titer 0.9962 0.00105 2
11-2 A/15 * * Rate 0.145ml/min 0.000 1
Content 100.61% 0.000 1
Sample
processed with
the same
method and
having the same
id1 are
combined
The short silo calculation report contains only calculations for the current sample.
:
method id 1/C21 id 2/C22 id 3/C23 mean +/-s n
11-2 A/15 * * Rate 0.145ml/min 0.000 1
Content 100.61% 0.000 1
The mean values of the silo calculations are available for further result calculations as C26
and C27 and can be used in the Titrino in formulas.
Mean value of C24 ⇒ C26
Mean value of C25 ⇒ C27
Important:
• If work is performed with silo calculations, the method name must be entered in the
silo memory.
• Results will be overwritten in the silo recalculation, as long as the silo line is marked
with "/". If you do not wish such an input, e.g. because you work off an urgent sample
between a series, disconnect the silo.
794 Basic Titrino
75
Page 80

2.17. Storing determination results and silo calculations
• Calculations and assignments are carried out in the following order:
1. Calculation of the results RSX
2. Assignment of temporary variables C7X for TIP
3. Calculation of means MNX
4. Assignment of silo results C24 and C25
5. Silo calculations
6. Assignment of means C26 and C27 from silo calculations
7. Assignment of common variables C3X
794 Basic Titrino
76
Page 81

3.1 General rules
3 Operation via RS232 Interface
3.1 General rules
The Titrino has an extensive remote control facility that allows full control of
the Titrino via the RS 232 interface, i.e. the Titrino can receive data from an
external controller or send data to an external controller. CR and LF are used
as terminators for the data transfer. The Titrino sends 2xCR and LF as termination of a data block,
LF as terminators. The controller terminates its commands with CR and LF. If
more than one command per line is sent by the controller, “;” is used as a
separator between the individual commands.
The data are grouped logically and easy to understand. Thus e.g., for the selection of the dialog language, the following must be sent
whereby it is sufficient to only transmit the boldface characters, thus:
The quantities of the commands above are:
Config configuration data
Aux auxiliaries, various data
Language setting the dialog language
The data are hierarchically structured (tree form). The quantities that occur in
this tree are called objects in the following. The dialog language is an object
which can be called up with the
command.
If one is in the desired location in the tree, the value of the object can be queried.
The query command $Q initiates the issuing of the value on the instrument
and the value emission is triggered. Entries which start with $, trigger something. They are thus called triggers.
Values of objects can not only be queried, they can also be modified. Values
are always entered in quotes, for example:
&Config.Aux.Language "english"
to differentiate between a data line which has CR and
&Config.Aux.Language "english"
&C.A.L "english"
&Config.Aux.Language
&Config.Aux.Language $Q Q means Query
794 Basic Titrino
77
Page 82

3.1. General rules
A
3.1.1 Call up of objects
An excerpt from the object tree is represented below:
3rd node
2nd node
1st node
0st node
Language Prog
ux
Config
RSSet
&
Root
Rules Example
The root of the tree is designated by &.
The branches (levels) of a tree are marked with
a dot (.) when calling up an object.
When calling up an object, it is sufficient to give
only as many letters as necessary to uniquely
assign the object. If the call is not unequivocal,
Calling up the dialog language
&Config.Aux.Language or &C.A.L
the first object in the series will be recognized.
Mode
Upper- or lowercase letters may be used. &C.A.L or &c.a.l
An object can be assigned a value. Values are
signified at the beginning and end by quotes (").
They may contain up to 24 ASCII characters.
Numerical values can contain up to 6 digits, a
negative sign, and a decimal point. Numbers
with more than 6 characters are not accepted;
more than 4 decimal places are rounded off. For
numbers <1, it is necessary to enter leading
Entering the dialog language:
&C.A.L"english"
correct entry of numbers:
"0.1"
incorrect entry of numbers
"1,5" or "+3" or ".1"
zeros.
The current object remains until a new object is
called.
New objects can be addressed relative to the
old object:
entry of another dialog language:
"deutsch"
From the root to node 'Aux': &C.A
Forward from node 'Aux' to 'Prog': .P
A preceding dot leads forwards to the next level
in the tree.
More than one preceding dot leads one level
backwards in the tree. n node backwards re-
quire n+1 preceding dots.
If you must jump back to the root, enter a preceding &.
Jump from node 'Prog' to node 'Aux' and select
a new object 'Language' at this level: ..L
Change from node 'Language' via the root to
node 'Mode': &M
794 Basic Titrino
78
Page 83

3.1 General rules
3.1.2 Triggers
Triggers initiate an action on the Titrino, for example, starting a process or
sending data. Triggers are marked by the introductory symbol $.
The following triggers are possible:
$G Go Starts processes, for ex. starting the mode run or setting the RS 232 interface
parameters
$S Stop Stops processes
$H Hold Holds processes
$C Continue Continues processes after Hold
$Q Query Queries all information from the current node in the tree forward up to and
including the values
$Q.P Path Queries the path from the root of the tree up to the current node
$Q.H Highest Queries the number of son nodes of the current node
Index
$Q.N"i" Name Queries the name of the son node with index i, i = 1 - n
$D Detail-Info Queries the detailed status information
$U qUit Aborts the data flow of the instrument, for example, after $Q
The triggers $G and $S are linked to particular objects, see the summary table
page 85ff.
All other triggers can be used at any time and at all locations on the object
tree.
Examples
Querying the value of the baud rate: &Config.RSSet.Baud $Q
Querying all values of the node "RSSet": &Config.RSSet $Q
Querying the path of the node "RSSet": &Config.RSSet $Q.P
Start mode: &Mode $G
Querying the detailed status: $D
:
794 Basic Titrino
79
Page 84

3.1. General rules
3.1.3 Status messages
In order to have an efficient control by an external control device, it must also
be possible to query status conditions; they provide information on the status
of the Titrino. The trigger $D initiates output of the status. Status messages
consist of the global status, the detailed status and eventual error messages,
e.g. $S.Mode.SET;E26. The global status informs on the activity of the process, while the detailed status conditions show the exact activity within the
process.
The following global status conditions are possible:
$G Go: The Titrino is executing the last command.
$H Hold: The Titrino has been held ($H, key <meas/hold> or by an error which effects
the hold status)
$C Continue: The Titrino has been restarted actively after hold
$R Ready: The Titrino has executed the last command and is ready
$S Stop: A process has been aborted in an "unnatural manner". e.g. stopped or aborted
because there was an error.
Detailed status conditions
Status conditions of the global $G:
$G .Mode.DET .Inac: Instrument at the beginning or at the end of a titration.
.Req .Id1: Instrument in the DET mode, requesting Id1 after titration start.
.Id2: Instrument in the DET mode, requesting Id2 after titration start.
.Id3: Instrument in the DET mode, requesting Id3 after titration start.
.Smpl: Instrument in the DET mode, requesting sample size after titration start.
.Unit: Instrument in the DET mode, requesting unit of sample size after titration
start.
.Start: Instrument in the DET mode, processing the start conditions.
.Titr: Instrument in the DET mode, titrating.
$G .Mode.MET... As DET.
$G .Mode.SET .Inac: Instrument at the beginning or at the end of a titration.
.Req .Id1: Instrument in the SET mode, requesting Id1 after start.
.Id2: Instrument in the SET mode, requesting Id2 after start.
.Id3: Instrument in the SET mode, requesting Id3 after start.
.Smpl: Instrument in the SET mode, requesting sample size after start.
.Unit: Instrument in the SET mode, requesting unit of sample size after start.
.Start: Instrument in the SET mode, processing the start conditions.
.SET1: Instrument in the SET mode, titrating to the first endpoint.
.SET2: Instrument in the SET mode, titrating to the second endpoint.
.Cond.Ok: Instrument in the SET, conditioning, endpoint reached (after the first
startup from the standby mode).
.Cond.Prog: Instrument in the SET mode, conditioning, endpoint not reached
(Conditioning progressing).
$G .Mode.MEAS .Inac: Instrument at the beginning or at the end of a titration.
.Req .Id1: Instrument in the MEAS mode, requesting Id1 after start.
.Id2: Instrument in the MEAS mode, requesting Id2 after start.
.Id3: Instrument in the MEAS mode, requesting Id3 after start.
.Smpl: Instrument in the MEAS mode, requesting sample size after start.
.Unit: Instrument in the MEAS mode, requesting unit of sample size after start.
.Meas: Instrument in the MEAS mode, measuring.
$G .Mode.CAL .Inac: Instrument at the beginning or at the end of a calibration
.Req.Temp: Instrument in the CAL mode, requesting calibration temperature.
.Meas.Temp: Instrument in the CAL mode, measuring calibration temperature.
.Req.Buf1: Instrument in the CAL mode, requesting pH of buffer 1.
.Meas.Buf1: Instrument in the CAL mode, measures buffer 1.
794 Basic Titrino
80
Page 85

3.1 General rules
.Req.Buf2: Instrument in the CAL mode, requesting pH of buffer 2.
.Meas.Buf2: Instrument in the CAL mode, measures buffer 2.
etc.
$G .Assembly.Bur .Fill: Buret in filling process
.ModeDis: Buret in DIS mode
In TIP, its global status as well as the step number (X) is available.
$G .TIP.X .Inac: Instrument at the beginning or at the end of a TIP.
.Req .Id1: Instrument in the TIP mode, requesting Id1 after start.
.Id2: Instrument in the TIP mode, requesting Id2 after start.
.Id3: Instrument in the TIP mode, requesting Id3 after start.
.Smpl: Instrument in the TIP mode, requesting sample size after start.
.Unit: Instrument in the TIP mode, requesting unit of sample size after start.
.Pause: Instrument in the TIP mode, in pause.
.Info: Instrument in the TIP mode, in info.
.Mode...: Instrument in the TIP mode, working off a submethod. The detailed
status messages of the submethod appear, see above.
Status conditions of the global $H:
The status message of the action which has been held appears.
If the process is held because a monitored limit has been violated, its status
message is $H.Mode.XXX.Titr.
Status conditions of the global $C:
The status conditions of the global $C are identical with the ones of the global
status $G. They appear when the process has been restarted actively from the
status "Hold" ($C, key <meas/hold> or automatically after elimination of an
error).
Status conditions of the global $R:
$R .Mode.XXXX.QuickMeas: Quick manual measurement from the initial status in mode XXXX.
$R .Mode.DET .Inac: Instrument in the DET mode, inactive.
$R .Mode.MET .Inac: Instrument in the MET mode, inactive.
$R .Mode.SET .Inac: Instrument in the SET mode, inactive.
.Cond.Ok: Instrument in the SET mode, conditioning, endpoint reached.
.Cond.Prog: Instrument in the SET mode, conditioning, endpoint not reached.
$R .Mode.MEAS .Inac: Instrument in the MEAS mode, inactive.
$R .Mode.CAL .Inac: Instrument in the CAL mode, inactive.
$R .Assembly.Bur.ModeDis: Buret in the DIS mode, inactive.
$R .TIP.Inac: Instrument in TIP, inactive.
Status conditions of the global $S:
$S .Mode.XXXX.QuickMeas: Quick manual measurement from the initial status in mode XXXX.
The instrument gives the status from which it has been stopped. The detailed
status information is therefore identical to for the global status $G.
Violation of monitored limits with action "end" give the status message
$S.Mode.XXX.Inac;EYYY.
794 Basic Titrino
81
Page 86

3.1. General rules
3.1.4 Error messages
Error messages are added to the status messages and separated from them
by the sign ";".
E20 Check exchange unit.
Exit: Mount Exchange Unit (properly) or &m $S.
E21 Check electrode, short circuit.
Exit: Rectify fault or &m $S.
E22 Check electrode, break.
Exit: Rectify fault or &m $S.
E23 Division by zero.
Exit: The error message disappears on next startup or on recalculation.
E26 Manual stop.
Exit: The error message disappears on next startup.
E27 Stop V reached in SET.
Exit: The error message disappears on next startup.
E28 Wrong object call up
Exit: Send correct path for object. Start path at root.
E29 Wrong value or no value allowed.
Exit: Send correct value or call up new object.
E30 Wrong trigger, this trigger is not allowed or carrying-out of action not
possible.
Exit: Send correct trigger (exception: $D) or call up new object.
E31 Command is not possible in active status. Repeat command in inactive
status.
Exit: Send new command.
E32 Command is not possible during titration. Repeat command during the
conditioning phase or in inactive status.
Exit: Send new command.
E33 Value has been corrected automatically.
Exit: Send new command.
E34 Instrument at the end of the titration and sample data is edited; the instrument
at rest or editing during filling.
Exit: &m $S.
RS receive errors:
E36 Parity
Exit: <QUIT> and ensure settings of appropriate parameters at
both devices are the same.
E37 Stop Bit
Exit: <QUIT> and ensure settings of appropriate parameters at
both devices are the same.
E38 Overrun error. At least 1 character could not be read.
Exit: <QUIT>
E39 The internal working-off buffer of the Titrino is full (>82
characters).
Exit: <QUIT>
794 Basic Titrino
82
Page 87

3.1 General rules
RS send errors:
E40 DSR=OFF No proper handshake for more than 1 s.
Exit: <QUIT> Is the receiver switched on and ready to receive?
E41 DCD=ON No proper handshake for more than 1 s.
Exit: <QUIT> Is the receiver switched on and ready to receive?
E42 CTS=OFF No proper handshake for more than 1 s.
Exit: <QUIT> Is the receiver switched on and ready to receive?
E43 The transmission of the Titrino has been interrupted with XOFF for
at least 6 s.
Exit: Send XON or <QUIT>
E44 The RS interface parameters are no longer the same for both
devices. Reset.
E45 The receive buffer of the Titrino contains an incomplete command
(L
missing). Sending from the Titrino is therefore blocked.
F
Exit: Send L
or <QUIT>.
F
E120 Overrange of the primary measured value (pH, U, Ipol, Upol or T
with MEAS T). The secondary measured value (temperature) may
be instable as well.
Exit: Correct error or &m $S.
E121 Measuring point list overflow (more than 500 measuring points).
Exit: The error message disappears on next startup.
E122 EP overflow.
Exit: The error message disappears on next startup or on
recalculation.
E123 Missing EP for calculation.
Exit: The error message disappears on next startup or on
recalculation.
E124 Number of EP does not correspond with the set windows.
Exit: The error message disappears on next startup or on
recalculation.
E125 Missing fix EP for calculation, has not been defined.
Exit: The error message disappears on next startup or on
recalculation.
E126 Fix-EP outside of measuring point list.
Exit: The error message disappears on next startup or on
recalculation.
E128 No new mean.
Exit: The error message disappears on next startup or on
recalculation.
E129 No new common variable, old value remains.
Exit: The error message disappears on next startup or on
recalculation.
E130 Wrong sample. For SET with preset titration direction the first
measured value lies behind the endpoint.
Exit: The error message disappears on next startup.
E131 No EP set for SET.
Exit: The error message disappears on next startup.
E132 Silo empty and it has been started with open silo or empty silo has
been opened.
Exit: Send a silo entry.
794 Basic Titrino
83
Page 88

3.1. General rules
E133 Silo full.
Exit: Send new command.
E134 No method. A method, which is required from the silo memory or in TIP, does
not exist.
Exit: The error message disappears on next startup.
E135 Check temp.sensor in MEAS T.
Exit: Correct error or &m $S.
E136 Same buffer in CAL. Measured value of the second buffer differs less than 6
mV from the measured value of the first buffer.
Exit: Correct error or &m $S.
E137 XXX Bytes are missing so that the method, the silo line could not be stored or
not enough RAM for running TIP.
Exit: Send new command.
E155 No new silo result (C24 or C25).
Exit: The error message disappears on next start or on recalculation.
E157 No sequence defined in TIP.
Exit. The error message disappears on next start.
E158 A second TIP has been called up in TIP.
Exit: The error message disappears on next start.
E160 No new temporary variable.
Exit: The error message disappears on next start.
E161 Measurement range of the secondary measured value (temperature)
exceeded. The primary measured value (pH, U, Ipol, Upol) can also be
unstable.
Exit: Rectify error or &m $S.
E166 Save lines is "OFF" although a submethod of TIP includes an assignment to
C24 or C25.
Exit: The error message disappears on next start. Attention: The data of this
sample will not be stored.
E172 In TIP, a QuickMeas was started, without defining a measuring quantity.
Exit: The error message disappears on next start or &Mode.QuickMeas $S.
794 Basic Titrino
84
Page 89

3.2 Remote control commands
3.2 Remote control commands
3.2.1 Overview
The internal object tree can be divided into the following branches:
& Root
├ Mode Method parameters
├ UserMeth Administration of the internal user-memory for methods
├ Config Instrument configuration
├ SmplData Sample specific data
├ Info Current Data
├ Assembly Component data
├ Setup Setting the operating mode
└ Diagnose Diagnostics program
794 Basic Titrino
85
Page 90

3.2. Remote control commands
&Mode
Object Description Input range Reference
& Root
├ Mode Mode $G, $S, $H, $C 3.2.2.1.
: ├ .QuickMeas Rapid meas. in basic mode $G, $S 3.2.2.2.
├ .Select Mode selection DET,MET,SET,
│ MEAS,CAL,TIP 3.2.2.3.
├ .DETQuantity Measured quantity for DET pH, U, Ipol, Upol ditto
├ .METQuantity Measured quantity for MET pH, U, Ipol, Upol ditto
├ .SETQuantity Measured quantity for SET pH, U, Ipol, Upol ditto
├ .MEASQuantity Measured quantity for MEAS pH, U, Ipol, Upol, T ditto
├ .Name Name of current method read only/read+write 3.2.2.4.
├ .Parameter* Parameter of current mode, page 87ff
│
├ .Def Definitions for data output
│ ├ .Formulas Calculation formulas
│ │ ├ .1 for result 1
│ │ │ ├ .Formula Calculation formula special 3.2.2.5.
│ │ │ ├ .TextRS Text for result output up to 8 ASCII char ditto
│ │ │ ├ .Decimal Number of decimal places 0...2...5 ditto
│ │ │ ├ .Unit Unit for result output up to 6 ASCII char ditto
│ │ │ : up to 9 results
│ ├ .SiloCalc Silo calculations
│ │ ├ .Assign Assignment
│ │ │ ├ .C24 Store as variable C24 RSX,EPX,CXX 3.2.2.6.
│ │ │ ├ .C25 Store as variable C25 RSX,EPX,CXX ditto
│ │ ├ .MatchId Matching of Id's id1, id1&2, all, OFF ditto
│ ├ .ComVar Assignment of common variables
│ │ ├ .C30 for C30 RSX,EPX,CXX,MNX 3.2.2.7.
│ │ ├ up to C39
│ ├ .Report Reports at the end of determination
│ │ ├ .Assign Assignment depends on mode 3.2.2.8.
│ ├ .Mean Assignment for mean calculation
│ │ ├ .1 MN1
│ │ │ ├ .Assign Input of variable RSX, EPX, CXX 3.2.2.9.
│ │ │ up to 9
│ ├ .TempVar Assignment of temporary variables
│ │ ├ .C70 for C70 RSX,EPX,CXX 3.2.2.10.
│ │ ├ up to C79
├ .CFmla Calculation constants
│ ├ .1 Calculation constant C01
│ │ ├ .Value Input of value 0...±999 999 3.2.2.11.
│ ├ up to C19
794 Basic Titrino
86
Page 91

3.2 Remote control commands
*Parameter Tree part "Parameters for DET"
├ .TitrPara Titration parameters
│ ├ .MptDensity Measuring point density 0...4...9 3.2.2.12.
│ ├ .MinIncr Minimum increment 0...10.0...999.9 ditto
│ ├ .DosRate Dispensing rate for increments 0.01...150.0, max. 3.2.2.13.
│ ├ .SignalDrift Drift for meas. value acquisition depends on meas.quant. 3.2.2.14.
│ ├ .UnitSigDrift Unit of measured value drift read only ditto
│ ├ .EquTime Equilibrium time 0...26...9999, OFF ditto
│ ├ .StartV Start volume
│ │ ├ .Type Type of start volume abs., rel., OFF 3.2.2.15.
│ │ ├ .V Volume for absolute start volume 0...999.99 ditto
│ │ ├ .Factor Factor for relative start volume 0...±999 999 ditto
│ │ ├ .Rate Dispensing rate for start volume 0.01...150.0, max. ditto
│ ├ .Pause Waiting time 0...999 999 3.2.2.16.
│ ├ .MeasInput Measuring input 1, 2, diff. 3.2.2.17.
│ ├ .Ipol Polarization current 0...1...±127 ditto
│ ├ .Upol Polarization voltage 0...400...±1270 ditto
│ ├ .PolElectrTest Test for polarized electrodes ON, OFF ditto
│ ├ .Temp Titration temperature -170.0...25.0...500.0 3.2.2.18.
│
├
.StopCond Stop conditions
│ ├ .VStop Stop volume
│ │ ├ .Type Type of stop volume abs., rel., OFF 3.2.2.19.
│ │ ├ .V Volume for absolute stop volume 0...99.99...9999.99 ditto
│ │ ├ .Factor Factor for relative stop volume 0...±999 999 ditto
│ ├ .MeasStop Stop measured value pH, U, I depends on meas.quant. 3.2.2.20.
│ ├ .UnitMStop Unit of stop measured value read only ditto
│ ├ .EPStop Stop after a number of EP's 1...9, OFF 3.2.2.21.
│ ├ .FillRate Filling rate 0.01...150.0, max. 3.2.2.22.
│
├
.Statistics Statistics
│ ├ .Status Status of statistics calculation ON, OFF 3.2.2.23.
│ ├ .MeanN No. of individual determinations 2...20 ditto
│ ├ .ResTab Result table
│ │ ├ .Select original,delete n,delete all ditto
│ │ ├ .DelN Deletion of individual results 1...20 ditto
│
├
.Evaluation Evaluation
│ ├ .EPC EP criterion 0...5...200 3.2.2.24.
│ ├ .Recognition EP recognition
│ │ ├ .Select Type of EP recognition all,greatest,last,window,OFF ditto
│ │ ├ .Window Window
│ │ │ ├ .1 up to 9 windows
│ │ │ │ ├.LowLim Lower limit window 1 depends on meas.quant. ditto
│ │ │ │ ├.UpLim Upper limit window 1 depends on meas.quant. ditto
│ ├ .FixEP Fix endpoints
│ │ ├ .1 up to 9 fix EP's
│ │ │ ├.Value Measured value for fix EP1 depends on meas.quant. ditto
│ ├ .pK pK or HNP evaluation ON, OFF ditto
│
├
.Presel Preselections
│ ├ .IReq Request of Id's after start id1, id1&2, all, OFF 3.2.2.25.
│ ├ .Sreq Request of smpl size after start value, unit, all, OFF ditto
│ ├ .ActPulse Output of a pulse ON, OFF 3.2.2.26.
794 Basic Titrino
87
Page 92

3.2. Remote control commands
*Parameter Tree part "Parameters for MET"
├ .TitrPara Titration parameters
│ ├ .VStep Volume increment 0...0.10...999.9 3.2.2.12.
│ ├ .DosRate Dispensing rate for increments 0.01...150.0, max. 3.2.2.13.
│ ├ .SignalDrift Drift for meas. value acquisition depends on meas.quant. 3.2.2.14.
│ ├ .UnitSigDrift Unit of measured value drift read only ditto
│ ├ .EquTime Equilibrium time 0...26...9999, OFF ditto
│ ├ .StartV Start volume
│ │ ├ .Type Type of start volume abs., rel., OFF 3.2.2.15.
│ │ ├ .V Volume for absolute start volume 0...999.99 ditto
│ │ ├ .Factor Factor for relative start volume 0...±999 999 ditto
│ │ ├ .Rate Dispensing rate for start volume 0.01...150.0, max. ditto
│ ├ .Pause Waiting time 0...999 999 3.2.2.16.
│ ├ .MeasInput Measuring input 1, 2, diff. 3.2.2.17.
│ ├ .Ipol Polarization current 0...1...±127 ditto
│ ├ .Upol Polarization voltage 0...400...±1270 ditto
│ ├ .PolElectrTest Test for polarized electrodes ON, OFF ditto
│ ├ .Temp Titration temperature -170.0...25.0...500.0 3.2.2.18.
│
├
.StopCond Stop conditions
│ ├ .VStop Stop volume
│ │ ├ .Type Type of stop volume abs., rel., OFF 3.2.2.19.
│ │ ├ .V Volume for absolute stop volume 0...99.99...9999.99 ditto
│ │ ├ .Factor Factor for relative stop volume 0...±999 999 ditto
│ ├ .MeasStop Stop measured value pH, U, I depends on meas.quant. 3.2.2.20.
│ ├ .UnitMStop Unit of stop measured value read only ditto
│ ├ .EPStop Stop after a number of EP's 1...9, OFF 3.2.2.21.
│ ├ .FillRate Filling rate 0.01...150.0, max. 3.2.2.22.
│
├
.Statistics Statistics
│ ├ .Status Status of statistics calculation ON, OFF 3.2.2.23.
│ ├ .MeanN No. of individual determinations 2...20 ditto
│ ├ .ResTab Result table
│ │ ├ .Select original,delete n,delete all ditto
│ │ ├ .DelN Deletion of individual results 1...20 ditto
│
├
.Evaluation Evaluation
│ ├ .EPC EP criterion depends on meas.quant. 3.2.2.24.
│ ├ .Recognition EP recognition
│ │ ├ .Select Type of EP recognition all,greatest,last,window,OFF ditto
│ │ ├ .Window Window
│ │ │ ├ .1 up to 9 windows
│ │ │ │ ├.LowLim Lower limit window 1 depends on meas.quant. ditto
│ │ │ │ ├.UpLim Upper limit window 1 depends on meas.quant. ditto
│ ├ .FixEP Fix endpoints
│ │ ├ .1 up to 9 fix EP's
│ │ │ ├.Value Measured value for fix EP1 depends on meas.quant. ditto
│ ├ .pK pK or HNP evaluation ON, OFF ditto
│
├
.Presel Preselections
│ ├ .IReq Request of Id's after start id1, id1&2, all, OFF 3.2.2.25.
│ ├ .SReq Request of sample size after start value, unit, all, OFF ditto
│ ├ .ActPulse Output of a pulse ON, OFF 3.2.2.26.
794 Basic Titrino
88
Page 93

3.2 Remote control commands
*Parameter Tree part "Parameters for SET"
├ .SET1 Control parameters for EP1
│ ├ .EP Endpoint 1 depends on meas.quant. 3.2.2.27.
│ ├ .UnitEp Unit of endpoint read only ditto
│ ├ .Dyn Dynamics depends on meas.quant. 3.2.2.28.
│ ├ .UnitDyn Unit of dynamics read only ditto
│ ├ .MaxRate Maximum dosing rate 0.01...10...150, max. ditto
│ ├ .MinRate Minimum dosing rate 0.01...25.0...9999 ditto
│ ├ .Stop Titration stop
│ │ ├ .Type Type of stop criterion drift, time 3.2.2.29.
│ │ ├ .Drift Stop drift 1...20...999 ditto
│ │ ├ .Time Switch-off delay time 0...10...999, inf ditto
│ │ ├ .StopT Stop time 0...999 999, OFF ditto
├ .SET2 Control parameters for EP2, as for EP1
├ .TitrPara Titration parameters
│ ├ .Direction Titration direction +, -, auto 3.2.2.30.
│ ├ .Start V Start volume
│ │ ├ .Type Type of start volume abs., rel., OFF 3.2.2.15.
│ │ ├ .V Volume for absolute start volume 0...999.99 ditto
│ │ ├ .Factor Factor for relative start volume 0...±999 999 ditto
│ │ ├ .Rate Dispensing rate for start volume 0.01...150.0, max. ditto
│ ├ .Pause Waiting time after start volume 0...999 999 3.2.2.16.
│ ├ .MeasInput Measuring input 1, 2, diff. 3.2.2.17.
│ ├ .Ipol Polarization current 0...1...±127 ditto
│ ├ .Upol Polarization voltage 0...400...±1270 ditto
│ ├ .PolElectrTest Test for polarized electrodes ON, OFF ditto
│ ├ .Temp Titration temperature -170.0...25.0...500.0 3.2.2.18.
│
.StopCond Stop conditions
├
│ ├ .VStop Stop volume
│ │ ├ .Type Type of stop volume abs., rel., OFF 3.2.2.19.
│ │ ├ .V Volume for absolute stop volume 0...99.99...9999.99 ditto
│ │ ├ .Factor Factor for relative stop volume 0...±999 999 ditto
│ ├ .FillRate Filling rate 0.01...150.0, max. 3.2.2.22.
│
.Statistics Statistics
├
│ ├ .Status Status of statistics calculation ON, OFF 3.2.2.23.
│ ├ .MeanN No. of individual determinations 2...20 ditto
│ ├ .ResTab Result table
│ │ ├ .Select original,delete n,delete all ditto
│ │ ├ .DelN Deletion of individual results 1...20 ditto
│
.Presel Preselections
├
│ ├ .Cond Conditioning ON, OFF 3.2.2.31.
│ ├ .DriftDisp Display of drift during cond. ON, OFF ditto
│ ├ .IReq Request of Id's after start id1, id1&2, all, OFF 3.2.2.25.
│ ├ .SReq Request of smpl size after start value, unit, all, OFF ditto
│ ├ .ActPulse Output of a pulse first, all, cond., OFF 3.2.2.26.
794 Basic Titrino
89
Page 94

3.2. Remote control commands
*Parameter Tree part "Parameters for MEAS"
├ .Measuring Measuring parameters
│ ├ .SignalDrift Drift for meas.value acquisition depends on meas.quant. 3.2.2.32.
│ ├ .UnitSigDrift Unit of measured value drift read only ditto
│ ├ .EquTime Equilibrium time 0...9999, OFF ditto
│ ├ .MeasInput Measuring input 1, 2, diff. 3.2.2.33.
│ ├ .Ipol Polarization current 0...1...±127 ditto
│ ├ .Upol Polarization voltage 0...400...±1270 ditto
│ ├ .PolElectrTest Test for polarized electrodes ON, OFF ditto
│ ├ .Temp Titration temperature -170.0...25.0...500.0 3.2.2.34.
│ │
.Statistics Statistics
├
│ ├ .Status Status of statistics calculation ON, OFF 3.2.2.23.
│ ├ .MeanN No. of individual determinations 2...20 ditto
│ ├ .ResTab Result table
│ │ ├ .Select original,delete n,delete all ditto
│ │ ├ .DelN Deletion of individual results 1...20 ditto
│ │
.Presel Preselections
├
│ ├ .IReq Request of Id's after start id1, id1&2, all, OFF 3.2.2.25.
│ ├ .SReq Request of sample size after start value, unit, all, OFF ditto
│ ├ .ActPulse Output of a pulse ON, OFF 3.2.2.26.
*Parameter Tree part "Parameters for CAL"
├ .Calibration Calibration parameters
│ ├ .MeasInput Measuring input 1, 2, diff. 3.2.2.35.
│ ├ .CalTemp Calibration temperature -20.0...25.0...120.0 3.2.2.36.
│ ├ .Buffer
│ │ ├ .1
│ │ │ ├ .Value pH value of buffer 1 0...7.00...±20.00 3.2.2.37.
│ │ ├ .2
│ │ │ ├ .Value pH value of buffer 2 0...4.00...±20.00, OFF ditto
│ │ ├ : up to 9 buffers
│ ├ .SignalDrift Drift for meas.value acquisition depends on meas.quant. 3.2.2.38.
│ ├ .EquTime Equilibrium time 0...110...9999, OFF ditto
│ ├ .ElectrodeId Electrode identification 8 ASCII char. 3.2.2.39.
│ ├ .SmplChanger Calibration on a Titrino ON, OFF 3.2.2.40.
│ ├ .ActPulse Output of a pulse first, all, OFF 3.2.2.41.
│ │
.Statistics Statistics
├
│ ├ .Status Status of statistics calculation ON, OFF 3.2.2.23.
│ ├ .MeanN No.of individual determinations 2...20 ditto
│ ├ .ResTab Result table
│ │ ├ .Select original,delete n,delete all ditto
│ │ ├ .DelN Deletion of individual results 1...20 ditto
794 Basic Titrino
90
Page 95

3.2 Remote control commands
*Parameter Tree part "Parameters for TIP"
├ .Sequence Sequence
│ ├ .1 Step 1
│ │ ├ .Select Step selection method,pause,L4 output,L6 output,
│ │ info, OFF 3.2.2.42.
│ │ ├ .Method Method from memory special 3.2.2.43.
│ │ ├ .Pause Waiting time 0...999 999, INF ditto
│ │ ├ .L4Output Line L4 active,inactive,pulse,OFF ditto
│ │ ├ .L6Output Line L6 active,inactive,pulse,OFF ditto
│ │ ├ .Info Display information up to 16 ASCII char. ditto
│ │
.Statistics Statistics
├
│ ├ .Status Status of statistics calculation ON, OFF 3.2.2.23.
│ ├ .MeanN No. of individual determinations 2...20 ditto
│ ├ .ResTab Result table
│ │ ├ .Select original,delete n,delete all ditto
│ │ ├ .DelN Deletion of individual results 1...20 ditto
│ │
.Presel Preselections
├
│ ├ .IReq Request of Id's after start id1, id1&2, all, OFF 3.2.2.25.
│ ├ .SReq Request of sample size after start value, unit, all, OFF ditto
│ ├ .MeasMode Measuring mode for man.meas. pH,U,Ipol,Upol,T,OFF 3.2.2.44.
│ ├ .MeasInput Measuring input 1, 2, diff. ditto
│ ├ .Ipol Polarization current 0...1...±127 ditto
│ ├ .Upol Polarization voltage 0...400...±1270 ditto
│ ├ .PolElectrTest Test for polarized electrodes ON, OFF ditto
│ ├ .Temp Titration temperature -170.0...25.0...500.0 ditto
794 Basic Titrino
91
Page 96

3.2. Remote control commands
&UserMeth
Object Description Input range Reference
& Root
:
├ UserMeth Method memory
: ├ .FreeMemory Memory available read only 3.2.2.45.
├ .Recall Load method $G 3.2.2.46.
│ ├ .Name Method name 8 ASCII characters ditto
├ .Store Save method $G ditto
│ ├ .Name Method name 8 ASCII characters ditto
├ .Delete Delete method $G ditto
│ ├ .Name Method name 8 ASCII characters ditto
├ .DelAll Delete all methods $G ditto
├ .List List of methods
│ ├ .1 Method 1
│ │ ├ .Name Method name read only 3.2.2.47.
│ │ ├ .Mode Mode read only ditto
│ │ ├ .Quantity Measured quantity read only ditto
│ │ ├ .Bytes Method size in bytes read only ditto
│ │ ├ .Checksum Checksum of method read only ditto
├ .2 for each method
794 Basic Titrino
92
Page 97

3.2 Remote control commands
&Config
Object Description Input range Reference
& Root
:
├ Config Instrument configuration
├ .PeriphUnit Selection of peripheral units
│ ├ .CharSet1 External printer Epson,Seiko,Citizen
│ │ IBM,HP 3.2.2.48.
│ ├ .Balance Selection of balance Sartorius,Mettler,Mettler AT
│ │ AND,Precisa 3.2.2.49.
│ ├ .Plot Selection of plot at analog output U, dU/dt, V, dV/dt
│ │ U(rel), T ditto
│
├ .Aux Miscellaneous
│ ├ .Language Dialog language english, deutsch,
│ │ francais, espanol, italiano,
│ │ portugese, svenska 3.2.2.50.
│ ├ .Set Setting of date and time $G 3.2.2.51.
│ │ ├ .Date Date XXXX-XX-XX
│ │ ├ .Time Time XX:XX
│ ├ .RunNo Run number 0...9999 3.2.2.52.
│ ├ .AutoStart Automatic start 1...9999, OFF 3.2.2.53.
│ ├ .StartDelay Start delay time 0...999 999 3.2.2.54.
│ ├ .DevName Device label 8 ASCII char. 3.2.2.55.
│ ├ .Prog Program version read only 3.2.2.56.
│
├ .RSSet Settings RS232 $G 3.2.2.57.
│ ├ .Baud Baud rate 300,600,1200,2400,4800,
│ │ 9600
│ ├ .DataBit Number of data bits 7, 8 ditto
│ ├ .StopBit Number of stop bits 1, 2 ditto
│ ├ .Parity Parity even, odd, none ditto
│ ├ .Handsh Handshake HWs, HWf, SWchar,
│ │ SWline, none ditto
│
├ .ComVar Values of common variables
│ ├ .C30 C30 0... ±999 999 3.2.2.58.
│ ├ up to C39 0... ±999 999
│
794 Basic Titrino
93
Page 98

3.2. Remote control commands
&SmplData
Object Description Input range Reference
& Root
:
├ SmplData Sample data
: ├ .Status Status of silo memory ON, OFF 3.2.2.59.
├ .OFFSilo Current sample data
│ ├ .Id1 Sample identification 1 up to 8 ASCII char 3.2.2.60.
│ ├ .Id2 Sample identification 2 up to 8 ASCII char ditto
│ ├ .Id3 Sample identification 3 up to 8 ASCII char ditto
│ ├ .ValSmpl Sample size ±X.XXXXX ditto
│ ├ .UnitSmpl Unit of sample size up to 5 ASCII char ditto
├ .ONSilo Current sample data
│ ├ .Counter Counter of silo memory
│ │ ├ .MaxLines Maximum lines read only 3.2.2.61.
│ │ ├ .FirstLine First line read only ditto
│ │ ├ .LastLine Last line read only ditto
│ ├ .EditLine Editing silo lines
│ │ ├ .1 1
│ │ │ ├ .Method Method name up to 8 ASCII char 3.2.2.62.
│ │ │ ├ .Id1 Sample identification 1 up to 8 ASCII char ditto
│ │ │ ├ .Id2 Sample identification 2 up to 8 ASCII char ditto
│ │ │ ├ .Id3 Sample identification 3 up to 8 ASCII char ditto
│ │ │ ├ .ValSmpl Sample size ±X.XXXXX ditto
│ │ │ ├ .UnitSmpl Unit of sample size up to 5 ASCII char ditto
│ │ │ ├ .C24 Value of variable C24 read only ditto
│ │ │ ├ .C25 Value of variable C25 read only ditto
│ │ │ ├ .Mark Mark of silo line read only ditto
│ │ ├ up to 99 lines
│ ├ .DelLine Delete silo line $G 3.2.2.63.
│ │ ├ .LineNum Line number 1...99, OFF ditto
│ ├ .DelAll Delete silo line $G 3.2.2.64.
│ ├ .CycleLines Cycle lines ON, OFF 3.2.2.65.
│ ├ .SaveLines Save results ON, OFF 3.2.2.66.
st
silo line
794 Basic Titrino
94
Page 99

3.2 Remote control commands
&Info
Object Description Input range Reference
& Root
:
├ Info Current data
: ├ .Report Transmission of formatted reports $G 3.2.2.67.
│ ├ .Select Report type configuration, parameters,
│ smpl data, statistics, silo, calib
│ C-fmla, def, user method, full,
│ short, mplist, curve, derive, comb,
│ scalc full, scalc srt, calc,
│ all, ff ditto
│
├ .CalibrationData pH calibration data $G 3.2.2.68.
│ ├ .Inp1 For measuring input 1
│ │ ├ .pHas Asymmetry pH 0...7.00...±20.00 ditto
│ │ ├ .Slope Slope of electrode 0...1.000...±9.999 ditto
│ │ ├ .Temp Calibration temperature -170.0...25.0...500.0 ditto
│ │ ├ .Date Date of calibration read only ditto
│ │ ├ .ElectrodeId Id of the calibrated electrode read only ditto
│ ├ .Inp2 For measuring input 2, as for input 1
│ ├ .Diff For differential input, as for input 1
│
├ .Checksums Checksums $G 3.2.2.69.
│ ├ .MPList Checksum of meas.point list read only ditto
│ ├ .ActualMethod Checksum of current method read only ditto
│
├ .DetermData Determination data $G 3.2.2.70.
│ ├ .Write Read/write for several nods ON, OFF
│ ├ .ExV Volume of Exchange/Dosing unit read only/read+write ditto
│ ├ .MPList Measuring point list
│ │ ├ .1 Measuring point 1
│ │ │ ├ .Attribute Attribute read only/read+write ditto
│ │ │ ├ .X X coordinate read only/read+write ditto
│ │ │ ├ .Y Y coordinate read only/read+write ditto
│ │ │ for each measuring point
│
├ .TitrResults Titration results
│ ├ .RS Calculated results
│ │ ├ .1 1
│ │ │ ├ .Value Value read only 3.2.2.71.
│ │ ├ up to 9 results
"Info", continuation
│ ├ .EP Endpoint
│ │ ├ .1 1
│ │ │ ├ .V Value read only ditto
│ │ │ ├ .Meas Measured value read only
│ │ │ ├ .Mark Mark if more than 1 EP per window read only
│ │ ├ up to 9 EP's
│ ├ .Var Variables C4X
│ │ ├ .C40 Start measured value read only/read+write ditto
│ │ ├ .C41 Titration end volume read only/read+write
│ │ ├ .C42 Titration time read only/read+write
│ │ ├ .C43 Volume drift in SET read only/read+write
│ │ ├ .C44 Titration temperature read only/read+write
794 Basic Titrino
st
result
st
result
95
Page 100

3.2. Remote control commands
│ │ ├ .C45 Start volume read only/read+write
│ │ ├ .C46 Asymmetry pH read only
│ │ ├ .C47 Slope of electrode read only
│ ├ .FixEP Fix EP
│ │ ├ .51 C51
│ │ │ ├ .Value Value read only 3.2.2.72.
│ │ │ up to 59
│ ├ .pK pK/HNP
│ │ ├ .61 C61
│ │ │ ├ .Value Value read only ditto
│ │ │ up to 69
│ ├ .TempVar Temporary variables C7X
│ │ ├ .C70 up to C79 read only/read+write ditto
│
├ .StatisticsVal Statistics values
│ ├ .ActN Number of results in chart read only 3.2.2.73.
│ ├ .1 1
│ │ ├ .Mean Mean read only ditto
│ │ ├ .Std Absolute standard deviation read only ditto
│ │ ├ .RelStd Relative standard deviation read only ditto
│ ├ up to 9 mean values
│
├ .SiloCalc Values of silo calculations
│ ├ .C24 Values of variable C24
│ │ ├ .Name Name read only 3.2.2.74.
│ │ ├ .Value Value read only ditto
│ │ ├ .Unit Unit read only ditto
│ ├ .C25 as for C24
│ ├ .C26 Values of variable C26
│ │ ├ .ActN Number of single values read only ditto
│ │ ├ .Mean Mean value read only ditto
│ │ ├ .Std Absolute standard deviation read only ditto
│ │ ├ .RelStd Relative standard deviation read only ditto
│ ├ .C27 as for C26
│ "Info", continuation
├ .ActualInfo Current data
│ ├ .Inputs I/O Inputs
│ │ ├ .Status Line status read only 3.2.2.75.
│ │ ├ .Change Change of line status read only ditto
│ │ ├ .Clear Clear change $G ditto
│ ├ .Outputs as for I/O Inputs ditto
│ ├ .Assembly From Assembly
│ │ ├ .CyclNo Cycle number read only 3.2.2.76.
│ │ ├ .Counter Assembly counter read only 3.2.2.77.
│ │ │ ├ .V Volume counter read only ditto
│ │ │ ├ .Clear Clears counter $G ditto
│ │ ├ .Meas Measured value read only 3.2.2.78.
│ ├ .Titrator From Titrator
│ │ ├ .CyclNo Cycle number read only 3.2.2.79.
│ │ ├ .V Volume read only ditto
│ │ ├ .Meas Measured indicator voltage read only ditto
│ │ ├ .dVdt Volume drift dV/dt read only ditto
│ │ ├ .dMeasdt Measured value drift read only ditto
│ │ ├ .dMeasdV 1st deviation of titration curve read only ditto
│ │ ├ .ERC ERC from DET read only ditto
│ ├ .MeasPt Entry in measuring point list
│ │ ├ .Index Index of entry read only 3.2.2.80.
│ │ ├ .X X coordinate read only ditto
st
mean
794 Basic Titrino
96
 Loading...