


 Loading...
USER GUIDE
WRT3200ACM
Dual-Band
Gigabit Wi-Fi Router
1
Contents |
|
Product Overview................................................................................................... |
3 |
Front view................................................................................................................................................... |
3 |
Back view.................................................................................................................................................... |
5 |
Avoid Overheating................................................................................................................................... |
7 |
Wall-Mounting Placement..................................................................................................................... |
7 |
Setting Up: Basics ............................................................................................... |
10 |
Where to find more help..................................................................................................................... |
10 |
How to install your router.................................................................................................................. |
10 |
How to Use Linksys Smart Wi-Fi .................................................................... |
13 |
How to connect to Linksys Smart Wi-Fi........................................................................................ |
13 |
Network Map.......................................................................................................................................... |
14 |
Guest Access......................................................................................................................................... |
14 |
Parental Controls.................................................................................................................................. |
15 |
Media Prioritization.............................................................................................................................. |
15 |
Speed Test.............................................................................................................................................. |
16 |
External Storage................................................................................................................................... |
16 |
Connectivity........................................................................................................................................... |
17 |
Troubleshooting.................................................................................................................................... |
17 |
Wireless.................................................................................................................................................... |
18 |
Security.................................................................................................................................................... |
18 |
Troubleshooting ................................................................................................... |
19 |
Your router was not successfully set up...................................................................................... |
19 |
Your Internet cable is not plugged in message.......................................................................... |
19 |
Cannot access your router message............................................................................................. |
20 |
After setup.............................................................................................................................................. |
22 |
Specifications ....................................................................................................... |
24 |
Linksys WRT3200ACM...................................................................................................................... |
24 |
Environmental........................................................................................................................................ |
24 |
2

Product Overview
Front view
3
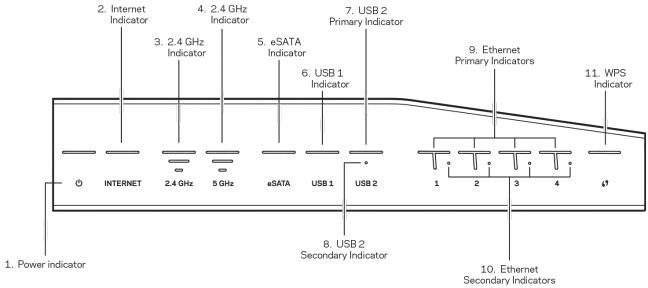
Front panel
(1)Power indicator—(White) The icon LED is solid white while the router is powered on. It will blink when the router goes through its self-diagnostic mode during every boot-up.
(2)Internet Indicator—(White/Amber) The Internet LED is solid white when connected to the Internet. It blinks white while the router works to establish a connection. A solid amber LED indicates the connection is down due to configuration issues. Amber blinking indicates that the connection is down due to hardware issues.
(3)2.4 GHz Indicator—(White) The Wireless LED is solid white when one or more clients are connected to the 2.4 GHz network. If the LED is blinking white, the router is sending or receiving data over the 2.4 GHz network.
(4)5 GHz Indicator—(White) The Wireless LED is solid white when one or more clients are connected to the 5GHz network. If the LED is blinking white, the router is sending or receiving data over the 5 GHz network.
(5)eSATA Indicator—(White) When off, the USB/eSATA port is off or a USB device is connected. The LED is solid white when an eSATA device is connected. A blinking white LED indicates activity through the eSATA port.
(6)USB1 Indicator—(White) When off, the USB /eSATA port is off or an eSATA device is connected. The LED is solid white when a USB device is connected. A blinking white LED indicates activity on the port.
(7)USB2 Primary Indicator—(White) When off, the USB 3.0 port is off. The LED is solid white when a USB device is connected. A blinking white indicates activity on the port.
(8)USB2 Secondary Indicator—(White) When off, a USB 1.0 or USB 2.0 device is connected. A solid white LED indicates a USB 3.0 device is connected.
4
(9)ETHERNET 1 through 4 (Primary)—(White) These numbered LEDs correspond with the numbered ports on the router’s back panel. If the white LED is solid, the router is connected to a device through that port. A flashing white LED indicates network activity over that port.
(10)ETHERNET 1 through 4 (Secondary)—(White) If the white LED is off, the router is successfully connected to a device through that port at 10/100 Mbps. A solid white LED indicates that the router is successfully connected to a device at 1000 Mbps.
(11)WPS Indicator—(White/Amber) The LED blinks slowly for up to two minutes during Wi-Fi Protected Setup. It will be solid white for five seconds to indicate a successful connection. The LED blinks amber if the Wi-Fi Protected Setup process fails. Make sure the client device supports Wi-Fi Protected Setup. Wait until the LED is off, and then try again. The router supports one session at a time.
Back view
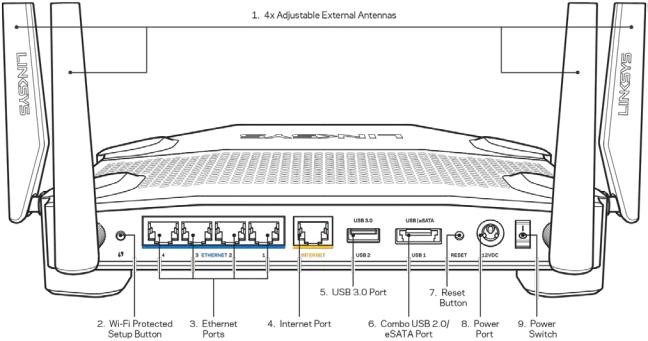
(1) Adjustable antennas—This router ships with four adjustable external antennas that should be connected to the router before powering it on. To connect the antennas, twist the antenna connector clockwise onto the antenna port on the router.
Note—For bestperformance, positionthe sideantennas vertically asshown inthe picture
on the left.
(2) Wi-Fi Protected Setup™ button—Press to configure wireless security on Wi-Fi Protected Setup-enabled network devices.
5
(3) Ethernet ports—Connect Ethernet cables to these blue gigabit (10/100/1000) ports, and to wired devices on your network.
Note—For best performance, use CAT5e or higher rated cables on the Ethernet ports.
(4) Internet port—Connect an Ethernet cable to this yellow gigabit (10/100/1000) port, and to a broadband Internet cable/DSL or fiber modem.
Note—For best performance, use CAT5e or higher rated cables on the Internet port.
(5)USB 3.0 port—Connect and share a USB or eSATA drive on your network or on the Internet.
(6)USB 2.0/eSATA combo port—Connect and share a USB or eSATA drive on your network or on the Internet. You can also connect a USB printer and share it across your network.
(7)Reset button—Press and hold for 10 seconds (until the power LED starts flashing) to reset the router to factory settings. You can also restore the factory settings using Linksys Smart Wi-Fi on the Internet or mobile app.
(8)Power port—Connect the included AC power adapter.
(9)Power button (EUmodels only)—Press to turn on the router.
6

Avoid Overheating
Wall-Mounting Placement
The router has wall-mount slots on the bottom of each foot for flexibility in mounting the router on the wall. The distance between the slots on the short side is 104 mm. The distance between the slots on the longer side is 210 mm. Two screws are needed to mount the router.
Note—Linksys is not responsible for damages incurred by unsecured wall-mounting hardware.
Mounting Instructions
1.Determine where you want to mount the router and which side you should use to mount it. Make sure that the wall you use is smooth, flat, dry, and sturdy. Make sure the location is within reach of an electrical outlet.
7
2.Before drilling holes, choose the template (short side or long side) that fits your installation. Drill the holes using the correct template.
3.Insert a screw into each hole and leave 4 mm of its head exposed.
4.Position the router so the wall-mount slots line up with the two screws.
5.Place the wall-mount slots over the screws and slide the router down until the screws fit snugly into the wall-mount slots.
8
Loading...