


N2A2
1

2
Safety warning
!
Note
Do not place any objects within 15cm of the unit.
The unit reaches high temperatures creating the risk of burn injuries.
When dealing with system components, strictly abide by the instruction manual. Physical contact with the
soldering on the backside of components may cause severe injury.
Only use compatible devices with the system ports, or the system and devices risk being damaged.
Related to damage to the HDD and data:
- during installation or disconnection of the system, ensure that the system does not experience any
external physical shocks.
- During the operation of the HDD, short surges and stoppages of power may cause the system to turn off
and on quickly.
- there may be a sudden stoppage of electricity during operation
- avoid moving the system during operation of the HDD, which may cause external physical shock
- during the configuration of new volumes.
i) if during use, existing volumes are deleted and new volumes are created, data will be lost.
ii) Before configuration of new volumes, each user must back up data, as well as when creating new
volumes, to ensure the possibility of restoration.
– e.g. virus infections.
Always back up hard disk data to avoid accidental data loss.
In the event of the administrator forgetting the password, restoration is impossible. Hence safeguard the
password.
Do not use damaged disks. Product can be damaged.
Do not dismantle or change the structure of the system in any way. This may cause electric shock.
In the event of the cover being removed during operation, the user risks electric shock, injury, and damage
to the system.
When transporting the system, first turn off the system and disconnect the unit from the power source.
Sudden tension in cables can cause severe damage to the system. Loose cables can cause injury.
Take caution when handling the system so as not to corrupt the hard disk data.
- Take caution not to bump or expose the system to extreme temperatures, as it may damage the sensitive
hard disk.
- Take caution when turning on the electricity, as during this time any external bumps to the system may
corrupt the hard disk data.
- The manufacturer disclaims all responsibility for loss of hard disk data.
1
5
2
8
9
3
4
10
6
7
※
※
To create a new password, the system must be re-initialized. In this case, all data will be lost, and data
recovery will be impossible, for security reasons. The manufacturer disclaims all responsibility in the event
of this occurrence.

3
Safety warning
!
Warning
Do not use damaged electrical cords. This may cause electric shock, and is a fire hazard.
Always check and use correct voltage to avoid electric shock, severe damage to the system, and fire.
Use a grounded cord and grounded socket to avoid electric shock and damage to components.
Ensure that electrical cords are correctly plugged into the sockets to avoid fire.
Ensure that electrical cords are not damaged or do not have heavy objects placed on them. Keep electrical
cords away from children and pets. Damaged cords may cause electrical shock or fire.
Do not handle the electrical cord with wet hands, as this may cause shock and injury.
When removing the plug from the socket, ensure that the plug is handled and not the cord. Otherwise this
may cause damage to the plug and even fire.
Always use grounded cords and grounded sockets with correct capacity (voltage / current) to avoid the
danger of damage, electric shock, and injury.
In the event of noise emanating from the electrical cords or sockets, to avoid fire and injury immediately
disconnect, and contact the service centre.
1
5
2
8
9
Keep the power cords and sockets clean at all times to avoid fire and electrical shock.
In the event of moisture entering the system, immediately disconnect the power and contact the service
centre, to avoid the danger of system damage, electrical shock, and fire.
Do not block vents, as this will cause system damage.
Prior to cleaning the system, always disconnect the power, to avoid damage and electric shock.
In the event of lighting and thunderstorms, immediately physically disconnect the system from any power
source, to avoid damage to the system.
In the event of dropping the system, contact the service centre for advice and possible service. Not doing
this creates the risk of damage, fire and electric shock.
Keep the system away from direct sunlight to avoid overheating, and melting of the case, which may
eventuate in fire and injury.
Do not place flammable objects, candles or cigarettes on the system, as this may cause fire
In the event of a burning smell or smoke emanating from the system, immediately disconnect the power,
and contact the service centre.
Keep heating devices and other electrical components at a distance from the system to avoid case melt-
ing, and hence the danger of damage, fire, and electric shock.
Before disassembling the system, always ensure physical disconnection of the electrical cable from the
socket.
10
11
12
13
14
15
16
17
18
19
20
3
4
6
7

4
Safety warning
!
Warning
Do not disassemble the power supply, to avoid the danger of electric shock.
Keep children away from the system, as consuming any parts will cause serious injury. In the event of swal-
lowing any parts, such as screws, immediately seek medical treatment.
Ensure that there are no loose or exposed metallic objects inside the case, to avoid the danger of damage,
fire and electric shock.
Ensure that multipoint power sockets are not overloaded, to avoid the danger of fire and electric shock.
Ensure that cords are always neatly arranged and are not trapped under the system or other heavy objects.
When connecting and disconnecting the electrical cord, take care in handling the socket to avoid the
danger of electric shock.
Ensure that hands are never used, to avoid damaging the system and electric shock. Always use screw
drivers for work inside the system.
21
22
23
24
25

5
Table of contents
1. Product Introduction
09
08
08
10
-
11
-
1 Product features
-
2 Product components and support OS
-
3 Name of the product parts
2. LED panel and using button
13
12
12
14
-
1 LED panel
-
2 USB back-up
-
3 ODD back-up (Supported by N2T2 model)
6. Using a network
27
-
28
27
29
-
30
31
-
32
-
1 Connecting on Windows OS
-
2 Connecting on MAC OS
-
3 Connecting on Linux OS
5. Using a network storage
23
20
-
22
20
24
25
-
26
-
1 Using a NAS Detector
-
2 Using a web menu
-
3 Using a network folder
- 4 Using a NAS Monitor
-
1 Features and support OS environment
-
2 Installing a NAS Detector
3. Product Installation
-
Installing a network storage
15
-
17
4. Installing a program
18
18
19

6
7. System set-up
36
-
37
33
-
35
33
39
-
42
43
38
44
-
45
46
-
47
49
48
50
54
-
1 Network set-up
-
2 Remote access
-
3 Setting up date and time
-
4 Hard drive set-up
-
5 Bad sector recovery (Active BSR)
-
6 Selective Mirror (Selective data protection for folders)
-
7 Power supply management
-
8 Language set-up
-
9 Firmware
-
10 Initialization and configuration value back-up
-
11 Email alerting service set-up
-
12 Confirming states and information set-up
-
13 Checking a log
9. File back-up service
65
-
78
60
-
64
58
-
59
58
79
-
1 DVD (Supported by N2T2 model)
-
2 USB back-up set-up
-
3 Schedule Backup & Restoration (Supported by N2T2 model)
-
4 Time machine
10. File share service
83
82
80
80
-
81
87
-
91
84
-
86
-
1 File server
-
2 Web server
-
3 Torrent
-
4 Network printer
-
5 RSYNC (Remote Data Backup Service)
8. LG Network Storage share set-up
57
55
-
56
52
-
53
51
55
-
1 User set-up
-
2 Folder creation/deletion/editing/authority set-up

7
14.
Network storage management and self-diagnosis function
13. Mobile UI
-
To Use on iPhone
15. Setting up method of a network sharing device
100
-
101
102
-
103
104
-
105
12. The top menu
16. Supplement
100
98
-
99
106
-
107
108
-
110
98
106
-
1 File viewer
-
2 My information
-
1 Volume Construction & RAID Configuration
-
2 Open source software information
11. Multimedia service
96
97
92
-
1 DLNA
-
2 iTunes
-
3 Home Monitoring
92
-
95

8
1
-
1.
Product Introduction Product features
※
N2A2 model does not support ODD function.
9
Thank you for purchasing a LG NETWORK STORAGE.
Please verify that if there are the components are present as follows.
1
-
2.
Product introduction
Product components and support OS
Network Storage
Pictures or photographs used in the user manual are subject to change in accordance with
the components of the model.
Support OS
LG Network Storage
- Windows XP, Server 2003, Vista, Windows 7
- Mac OS 10.x or higher
- Linux (Fedora, Suse, Ubuntu)
Quick Installation Guide
Power supply cord and
adaptor
LAN cable
Multimedia User Guide
PC S/W Installer
Product Warranty
PC S/W
NAS Detector
NAS Monitor
Nero BackItUp & Burn
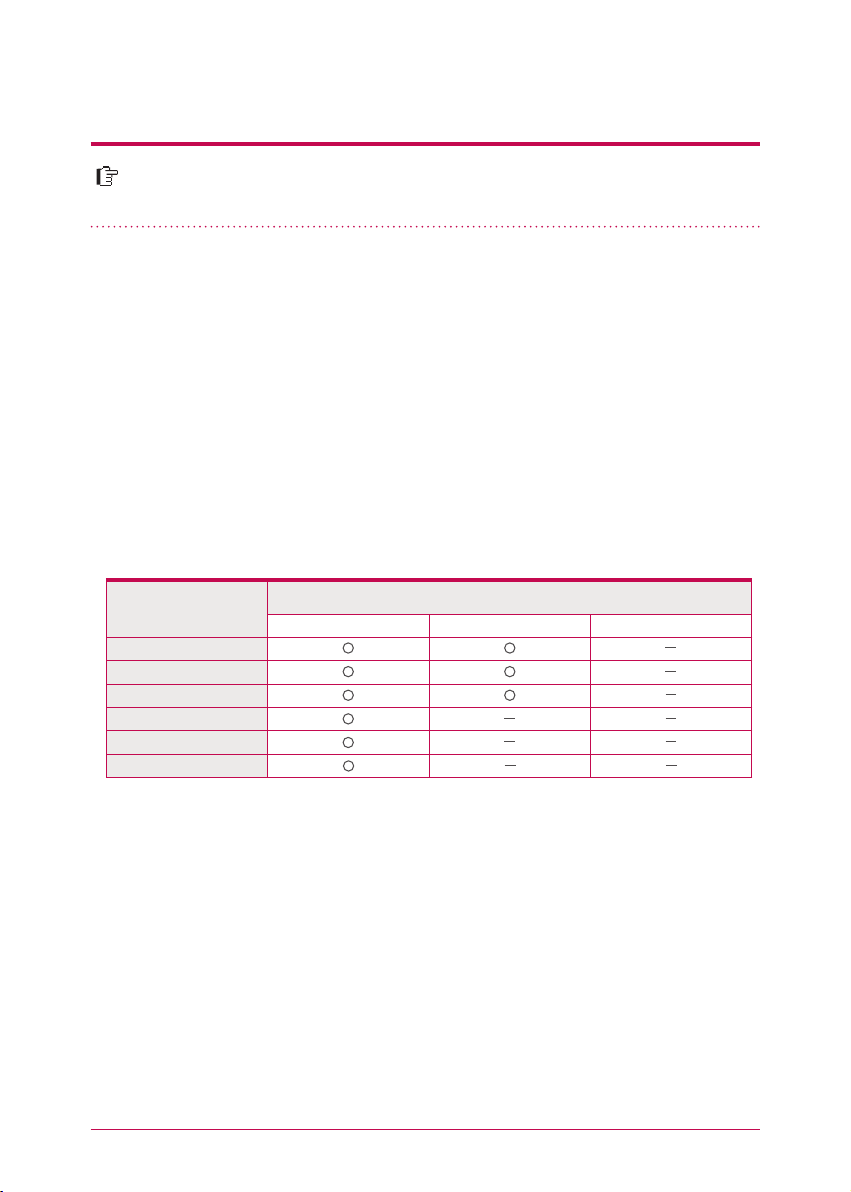
Support OS
Windows XP, Ser ver 2003, Vista, Mac OS 10.x or higher, Windows 7
Windows XP, Ser ver 2003, Vista, Windows 7
Acrobat Reader
Flash Player
Installation wizard
Windows, Mac
Windows, Mac
Windows XP(SP3 or higher), Server 2003, Vista, Windows 7
Windows XP(SP2 or higher), Vista, Windows 7
PC S/W

10
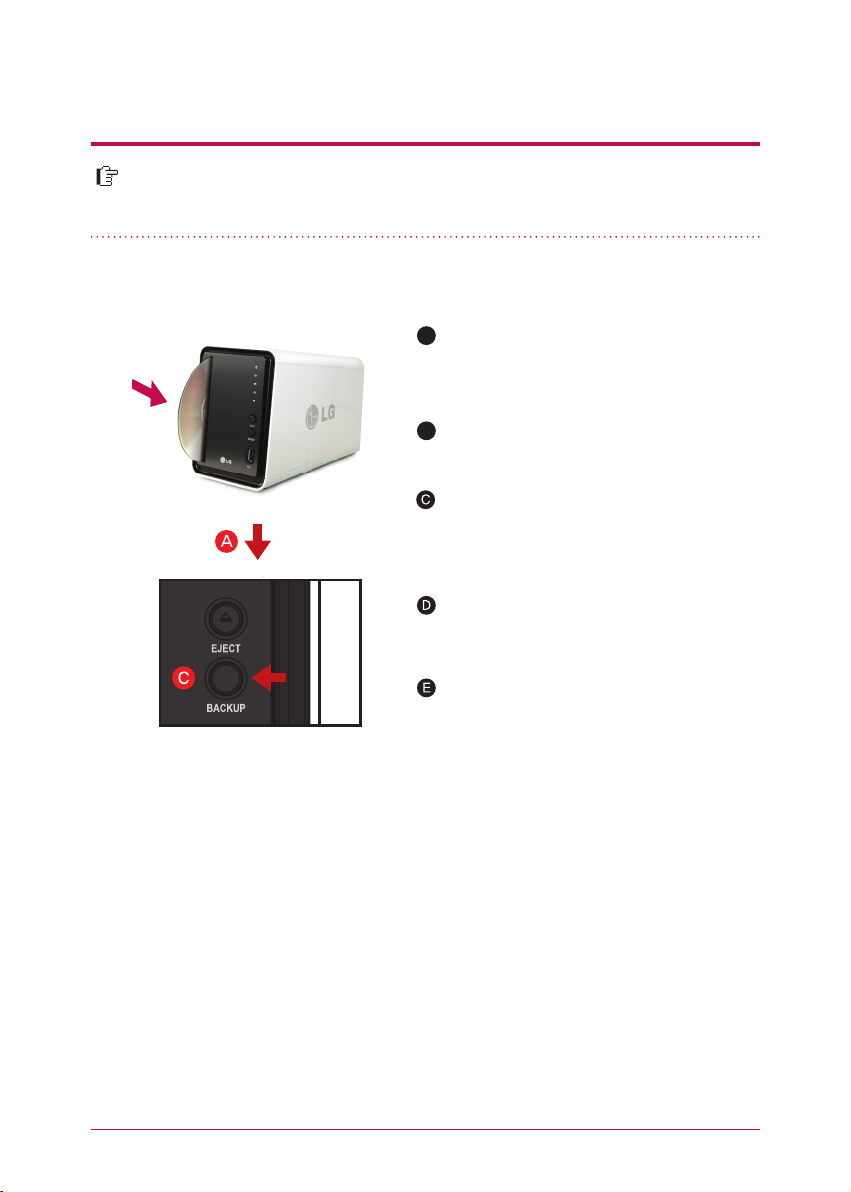
Please be familiar with names of the parts of the product.
1
-
3.
Product introduction
Name of the product parts
(Front)
ODD Slot hole : This is where you insert the disc.
You should insert the disc having the writing side as a data side.
LED panel (Refer to page 12)
Back-up button : A button to back-up data of a disc or USB onto NAS.
ODD eject button : A button to eject a disc
※
Supporting media are subject to change in accordance with the product.
※
N2T2 model contains a slot-type DVD drive and does not support Blu-ray media / 8cm disc.
USB port : USB 2.0 interface
※
N2A2 model does not support ODD function.
N2T2 N2A2
11
1
-
3.
Product introduction
Name of the product parts
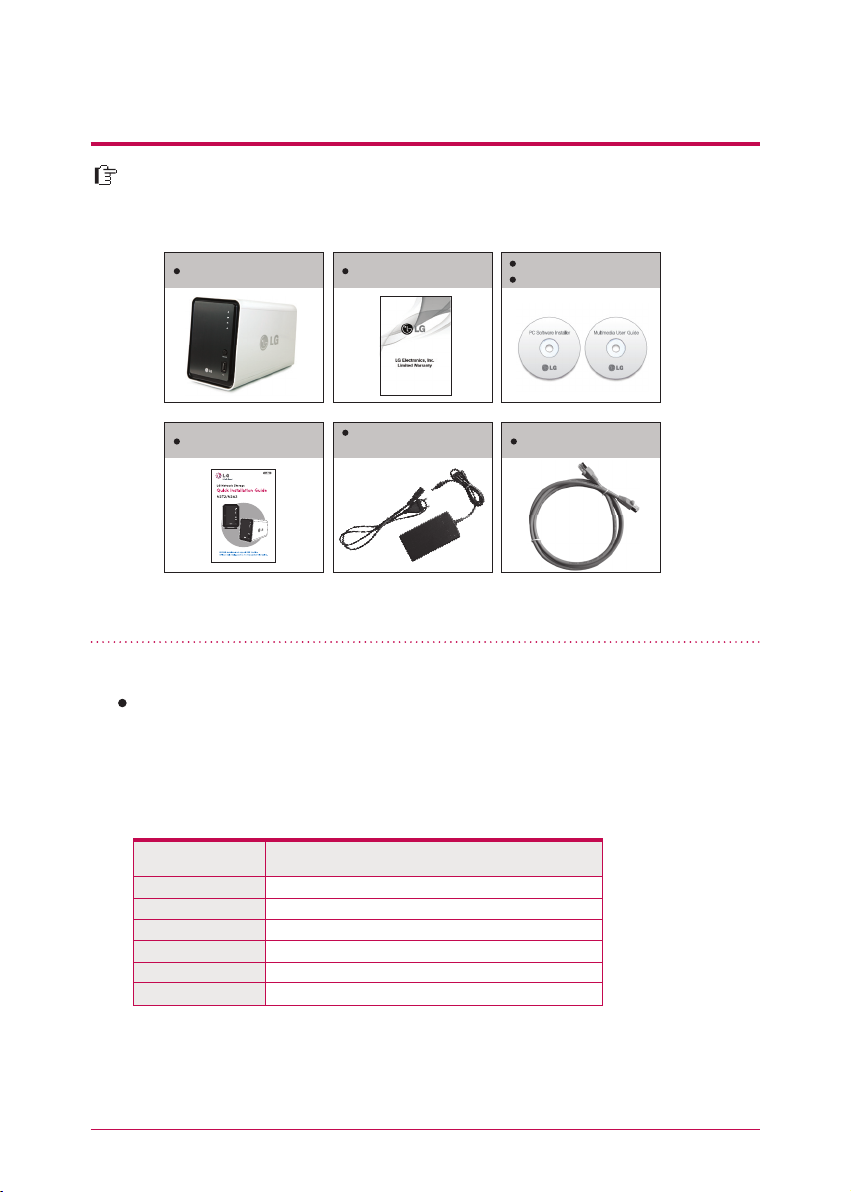
FAN
Power button : A button to switch on and off the power supply
USB port : USB 2.0 interface
LAN port : This is where you connect a LAN cable.
DC port : This is a port where you connect a power supply adaptor.
Adaptor cable holder : This helps to fix an adaptor cable and prevents it from falling out.
Kensington Lock : This is an antitheft lock ring.
(Back)
※
N2A2 model does not support ODD function.
N2T2 / N2A2

12
Please check LED panel.
Switching on the power supply
When you press POWER button, which is located on
the back side, LG Network Storage starts and an alarm
sound rings when it becomes available to use.
Switching off the power supply
Switching off progress starts when you press the power
supply button on the back side until you hear beep
sound.
HDD1/2 : This displays states of action when hard disk reads/writes.
It blinks upon the action of reading/writing.
POWER : This displays states of the power supply.
LAN : This displays a connection state of a network. It is switched on when it becomes active
with network connection and switched off when it becomes inactive.
ODD : This displays action states of reading/writing of an optical disc drive, disc recognition
and back-up. It is switched on disc recognition and displays states of disc reading/writing
including back-up through blinking.
(Back)
2
-
1.
LED panel and using button LED panel
Switching on/off the power supply
(POWER button on the back side)
(Front)
N2T2
N2A2
13
You can back-up USB data onto the Network Storage hard disk with operation
of a back-up button.
2
-
2.
LED panel and using button USB back-up
In case of a simple back-up when the same storage device is backed up more than
several times, all of the data that is backed up at the latest are saved in Last Backup
folder. When you back-up more than twice on the same date, serial number is at-
tached at the back of the date. In a folder that is created for the first time, all of the
data of an external storage device are saved. In folders created afterwards, added
folders and files when compared to the data backed up at the latest are saved.
service/backup/usb
Name of the manufacturer of the storage device, serial
number/type of file back-up/dates on which the folder
is created
Folder name is automatically created as in the following.
Storage location Name of the created folder
※
※
Please refer to 9-2. File back-up service USB back-up set-up for more details.
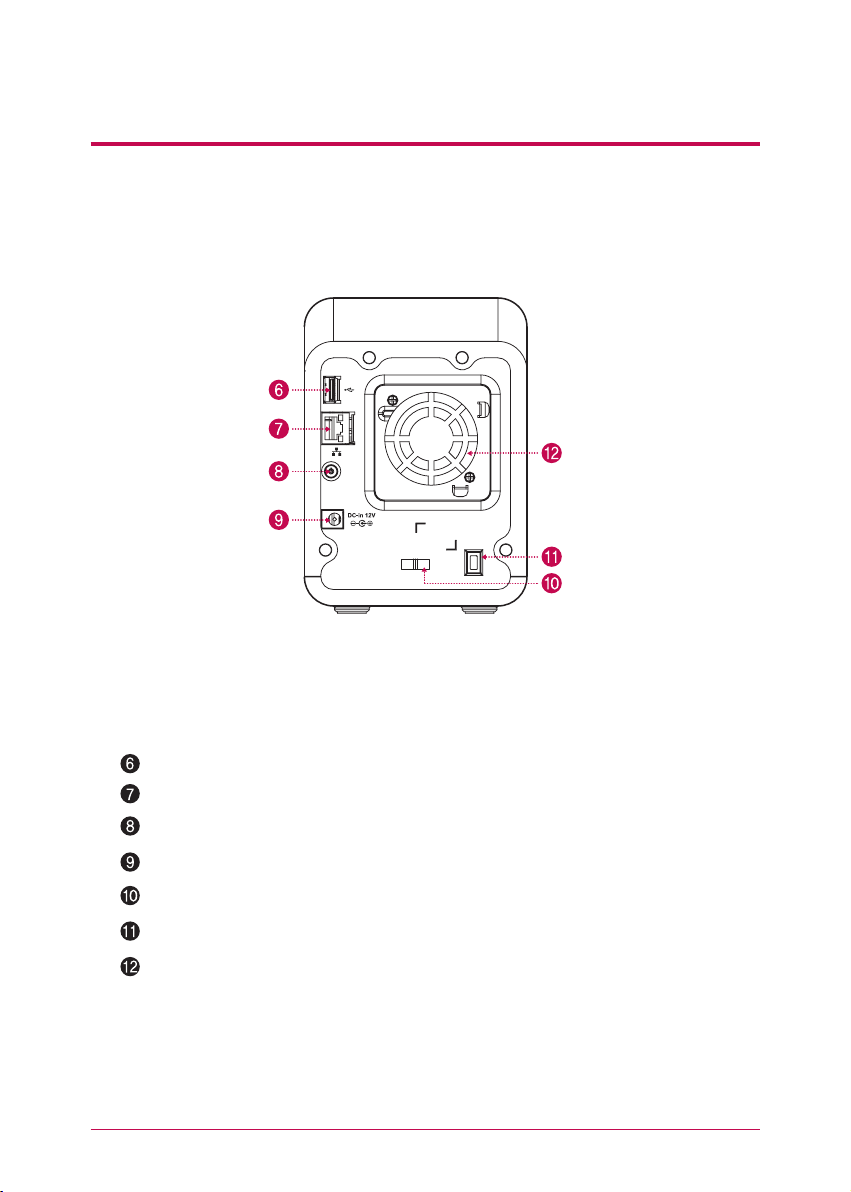
1. Back-up the data of a mobile storage device (USB) to LG Network Storage.
Insert USB onto the Network Storage.
A
When ODD media (CD/DVD) and USB are si-
multaneously connected, back-up is progressed
for the device, that is recognized at the latest.
(Supported by N2T2 model)
B
Press the back-up button.
Once backup completes, a folder named the
name of the storage manufacturer will be
created in the service/backup/usb folder, along
with a beeping sound. This makes it be distinct
from other devices in the future. In addition,
a lower folder according to the back-up date
is created and the whole content of the USB
device is saved in LG Network Storage.
14
It provides a function to back-up the data stored within an optical disc such as
CD/DVD onto LG Network Storage.
2
-
3.
LED panel and using button ODD back-up
Data back-up
It is a function to back up the content of the disc as original onto LG Network Storage. When you
choose the data back-up function, folders are created according to the back-up date and data of
the user is backed up below /service/backup/disc-data folder. If you proceed the back-up process
more than twice on the same date, a serial number is attached at the back of the date.
Image back-up (iso file)
It is a function to back-up the content of a disc as iso image file form. When back-up is completed,
file name is sequentially assigned in accordance with back-up date below /service/backup/disc-
image folder and the data of the user are backed-up. When you back-up more than several times
on the same date, the number is added at the back of the date according to the back-up order.
2. Back-up the data of an optical disc to LG Network Storage.
Insert an optical disc that you want to back-up
to DVD drive of LG Network Storage.
※
Push it in having the arrow direction as the
data writing side as seen in the picture.
Once an optical disc is recognized, alarm sound
rings and ODD part of LED panel is switched
on.
A
B
When back-up proceeds, ODD part of LED
panel blinks so that you can check the
progression.
When the back up in progress is completed,
alarm sound rings and simultaneously an opti-
cal disc is ejected. And ODD part of LED panel
is switched off at this time.
When you press back-up button, data or image
back-up proceeds in accordance with ODD
Backup Mode, which is set up on a web.
※
Default is data back-up.
※
N2A2 model does not support ODD function.
15
3.
Product installation Installing Network Storage
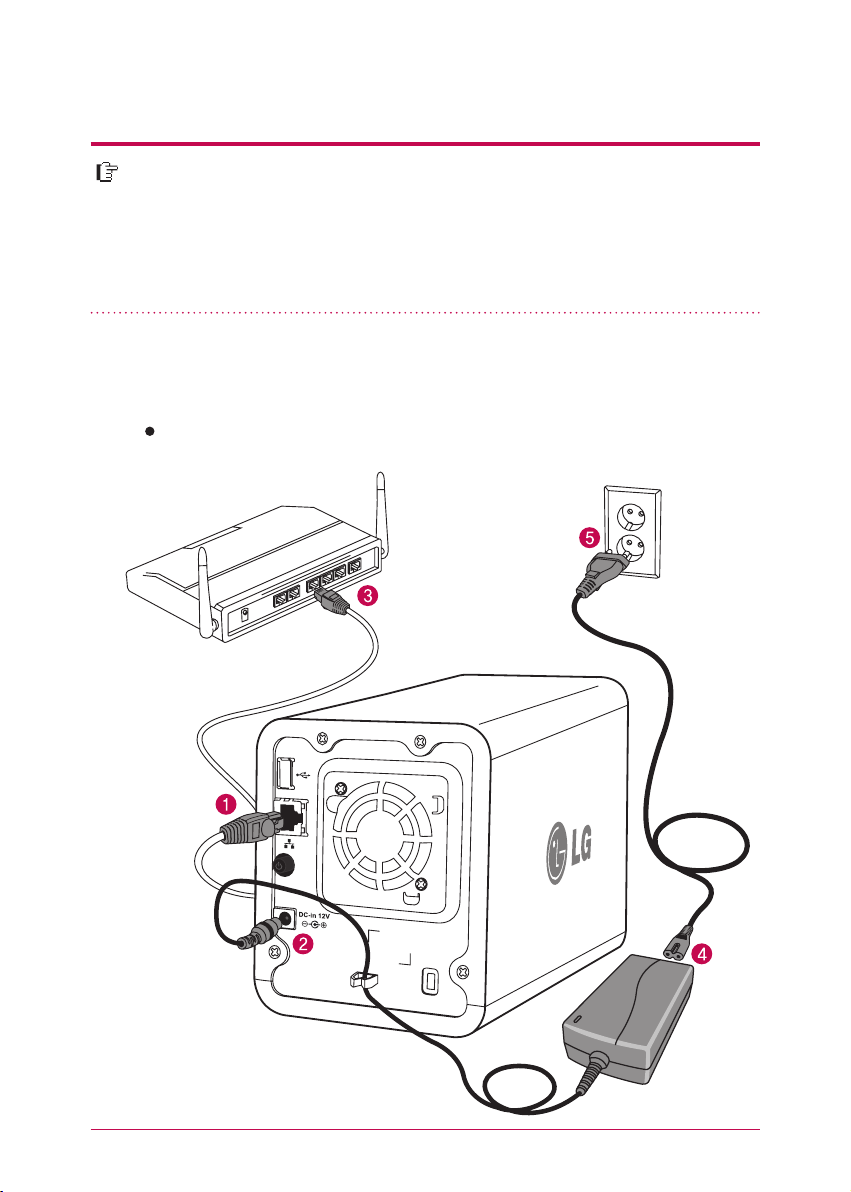
1. Connect LAN port of Network Storage with LAN port of a network equip-
ment (IP network sharing device / router / hub / switch) using a LAN cable
enclosed, or directly connect the LAN port of the PC.
When using the network equipment (IP network sharing device/switch/hub) :
Connect LG Network Storage to user’s PC using hub/switch/router as in the following.
In an environment where there is DHCP server, after connecting Network Storage
to IPnetwork sharing device/switch/hub, choose receiving IP automatically, then
the network information will be retrieved from DHCP server. In case you use a
specific IP address assigned from network IP administrator, you can easily install
if you prepare by receiving assignment of IP address, sub-net mask, standard
gateway, DNS information.
network sharing device
(Shapes may vary depending
on the network sharing device.)
Network Storage
*
*
16
2. After checking the connection of the power supply cable of LG Network
Storage, press the power button at the back and start LG Network Storage.
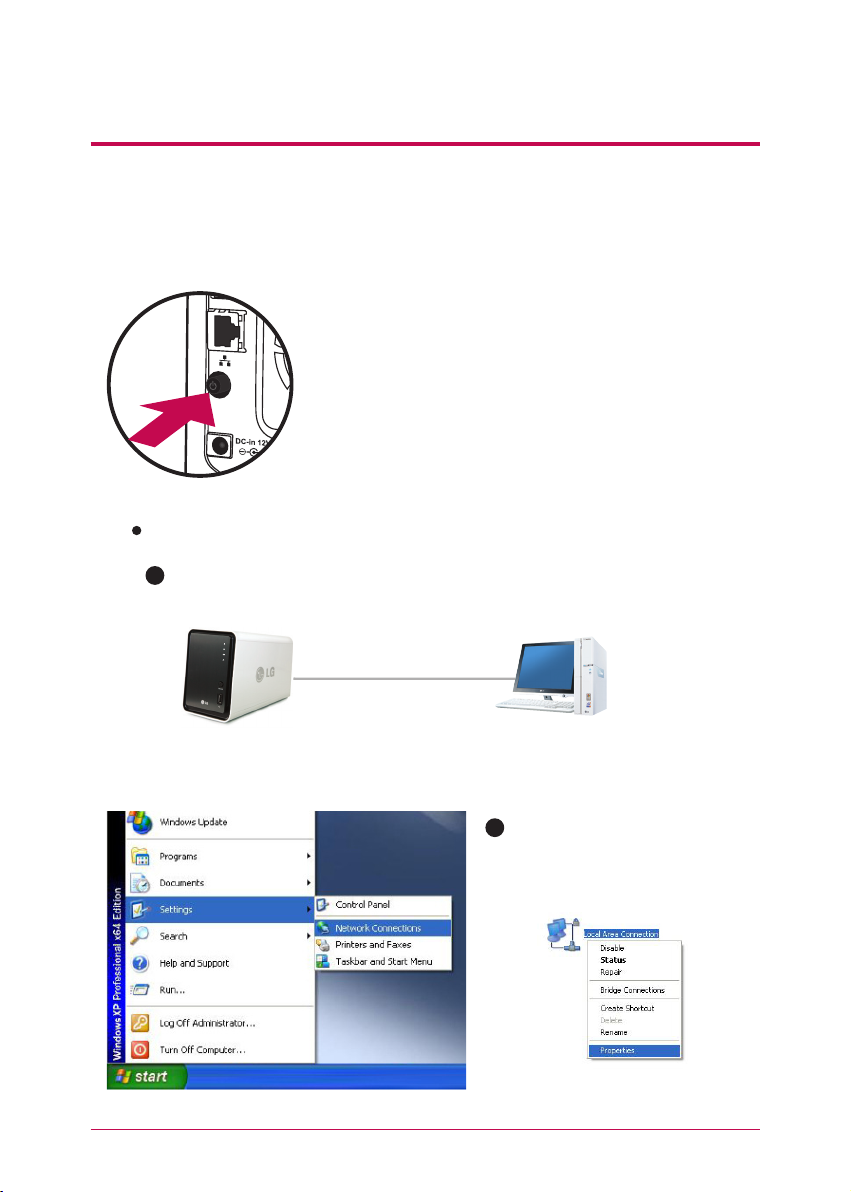
3.
Product installation Installing Network Storage
When you turn on the power at the back of Network
Storage, booting is completed with a cheerful alarm
sound after approximately 40 seconds~1minute.
(On normal connection state, a shape of network LED is
turned on.)
LAN cable
Desktop PCNetwork Storage
When connecting with PC directly without network equipment :
A
Please connect LG Network Storage directly to PC using a LAN cable.
B
Start -> Settings -> Network con-
nection -> click on the right button
of the on Local Area Connection
-> Properties
17
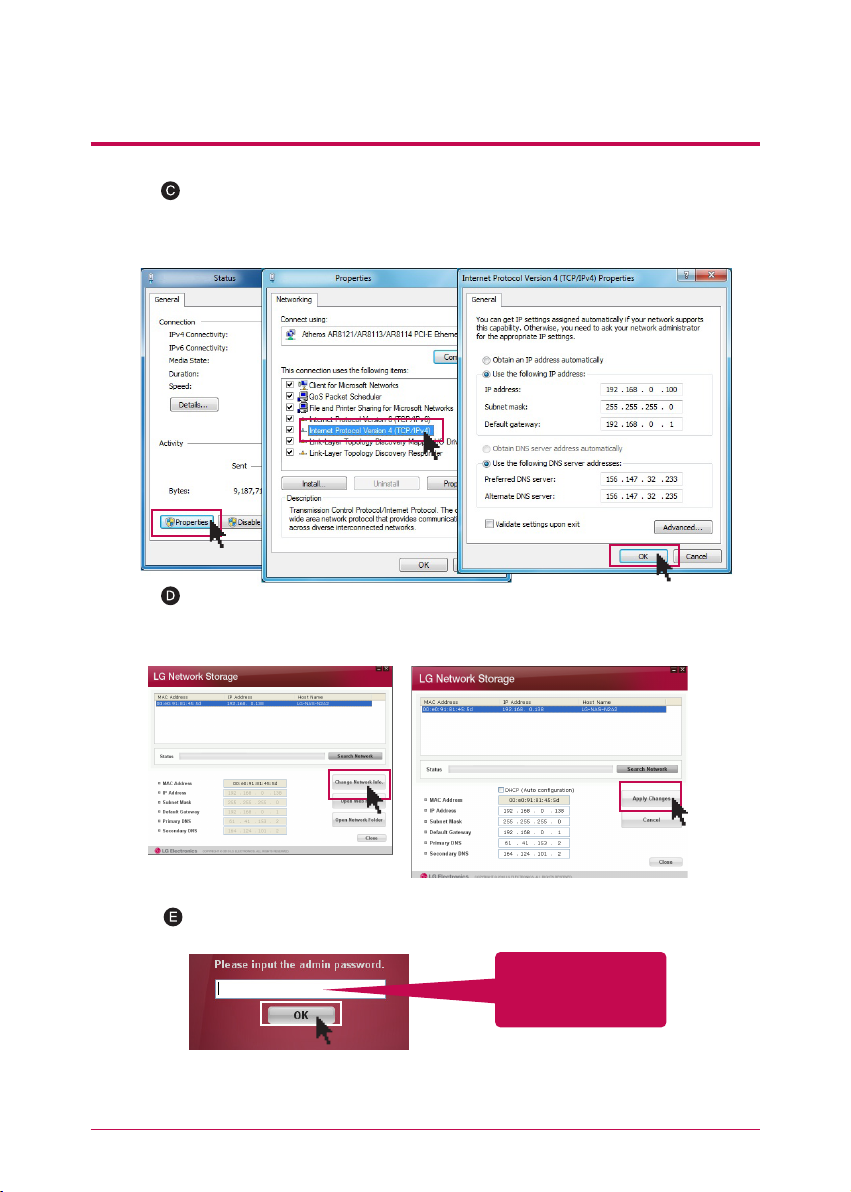
3.
Product installation Installing Network Storage
Please change the IP of the PC as follows if the window of local area connection state
popsup. (Example)
properties -> When you double-click internet protocol Version4 (TCP/IPv4), a window
that is able to change the IP of the PC, and then it makes the change.
Please change the IP of NAS using a NAS Detector.
NAS Detector -> Change Network Info -> Click on ‘apply change’ after changing
(5-1. Refer to Using Network Storage Using NAS Detector)
Click OK after entering password.
※
When you connect Network Storage directly with PC using a LAN cable, wire
internet of the PC is not connected
Enter the password,
‘admin’
18
“LG Network Storage PC Software Installer” CD that is provided on purchasing
LG Network Storage provides programs as in the following.
4
-
1.
Program installation
Features and support OS environment
1. NAS Detector
2. NAS Monitor
3. Nero backitup&burn
“NAS Detector” provides a function of easily and quickly finding LG Network Stor-
age present on the user’s network.
“NAS Monitor” provides a function of checking the state of LG Network Storage in
real time as well as a simple control.
Program you can install varies in accordance with the user’s OS environment.
※
4. LG NAS Installation Wizzard
Program
Windows Mac Linux
Flash Player
Acrobat Reader
NAS Detector
NAS Monitor
Nero backitup&burn
LG NAS Installation Wizard
Supporting operating system
19
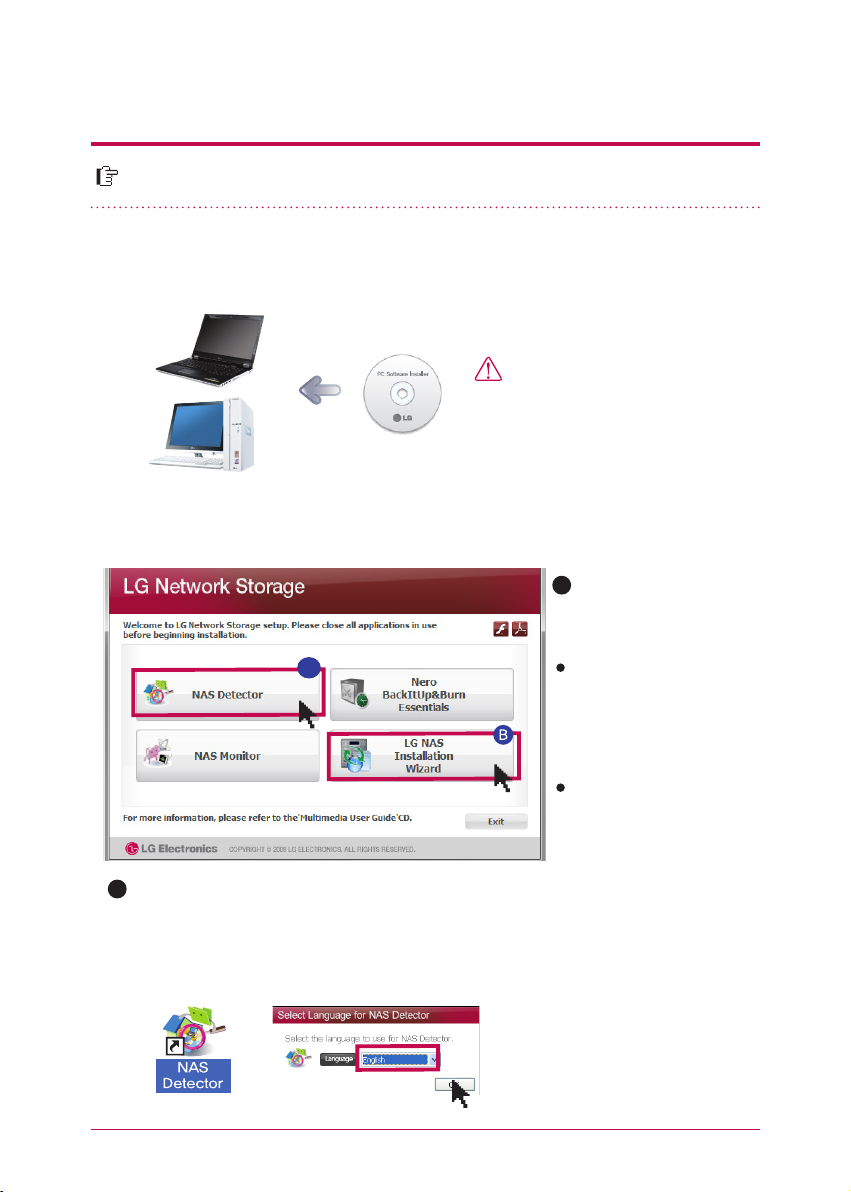
The name of Network Storage is ‘LG Network Storage’ on web UI.
4
-
2.
Program installation NAS Detector installation
Install ‘NAS Detector’ on the
user’s PC by clicking ‘NAS
Detector’.
A
1. Insert “LG Network Storage PC Software Installer”
CD that is provided with the system into an optical drive (CD/DVD drive) of the user’s PC.
2. A pop-up as below appears due to automatic operation.
3. Upon installation completion, choose a language you will use along with a creatioin of
short-cut icon.
Cautions
You should not put in‘Network
Storage’.
※
A
Click on the icon if a flash
player is not installed on
the PC
If you want to install NAS
Monitor, Nero BackItUp
& Burn program, click
on NAS Monitor, Nero
BackItUp & Burn.
LG NAS Install Wizard is a program that helps you to install NAS and set a complicated
network easily.(DDNS)
B
20
This explains about how to use NAS Detector and NAS Monitor.
About detailed explanation in regard to using bundle program, please refer to
manual within the program itself after program installation. (Nero backitup&burn)
5
-
1.
Using Network Storage
Using NAS Detectorlation
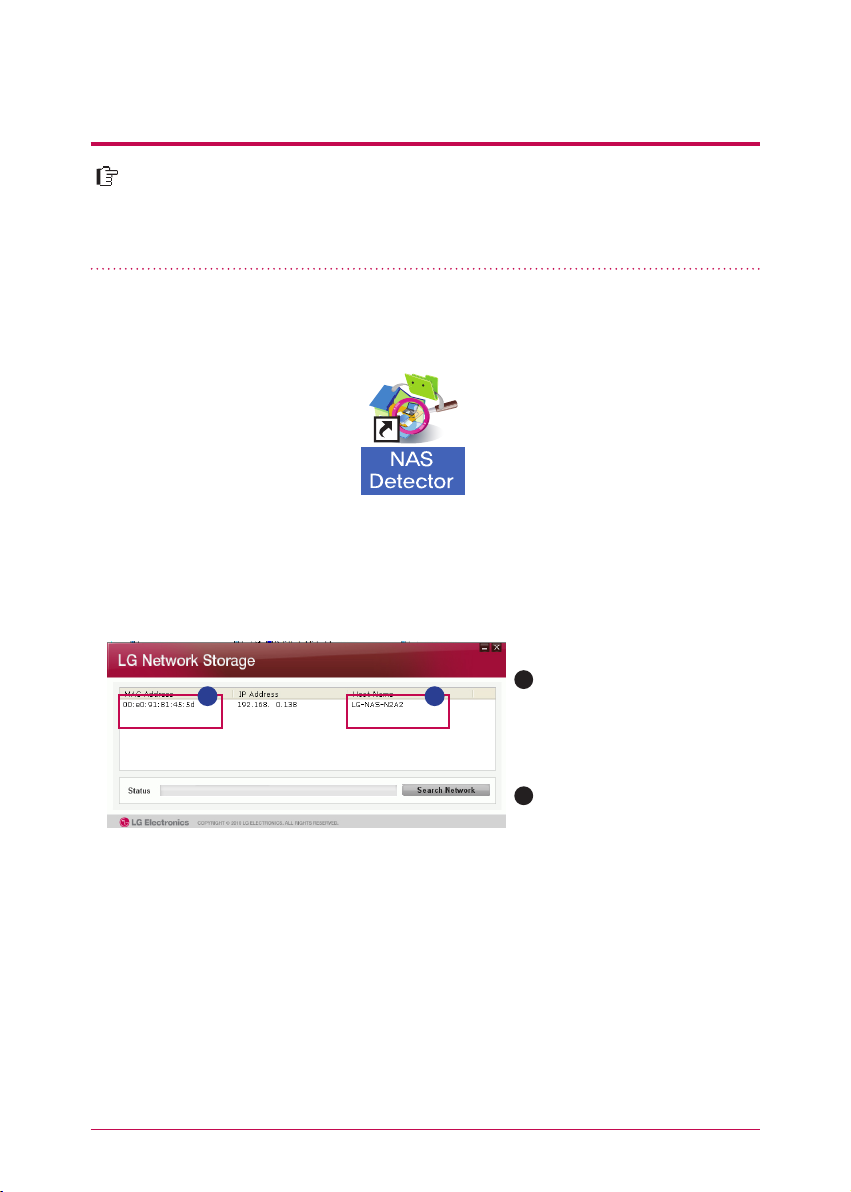
1. After checking there has been a correct network connection of the PC, operate the
program by double-clicking on a ‘NAS Detector’ icon created on a desktop.
2. ’NAS Detector’ automatically finds LG Network Storage, which is connected to the
user’s network currently. Once the search is completed, it shows resulted ‘MAC address’, ‘IP
address’, ‘Host name’ of LG Network Storage in order.
A
MAC address : It is a unique
number of each product of LG
Network Storage, and displayed
on the label at the back of a
mainframe.
Host name : LG-NAS-N2A2
B
A
B
In case you cannot find LG Network Storage you want to connect, search once more by
clicking on ‘Search network’ button. If you cannot search with ’NAS Detector’, please check
the state of network connection. As for a method to set-up an IP address manually, please
refer to 7-1. System set-up [Network set-up].
※
21
5
-
1.
Using Network Storage
Using NAS Detectorlation
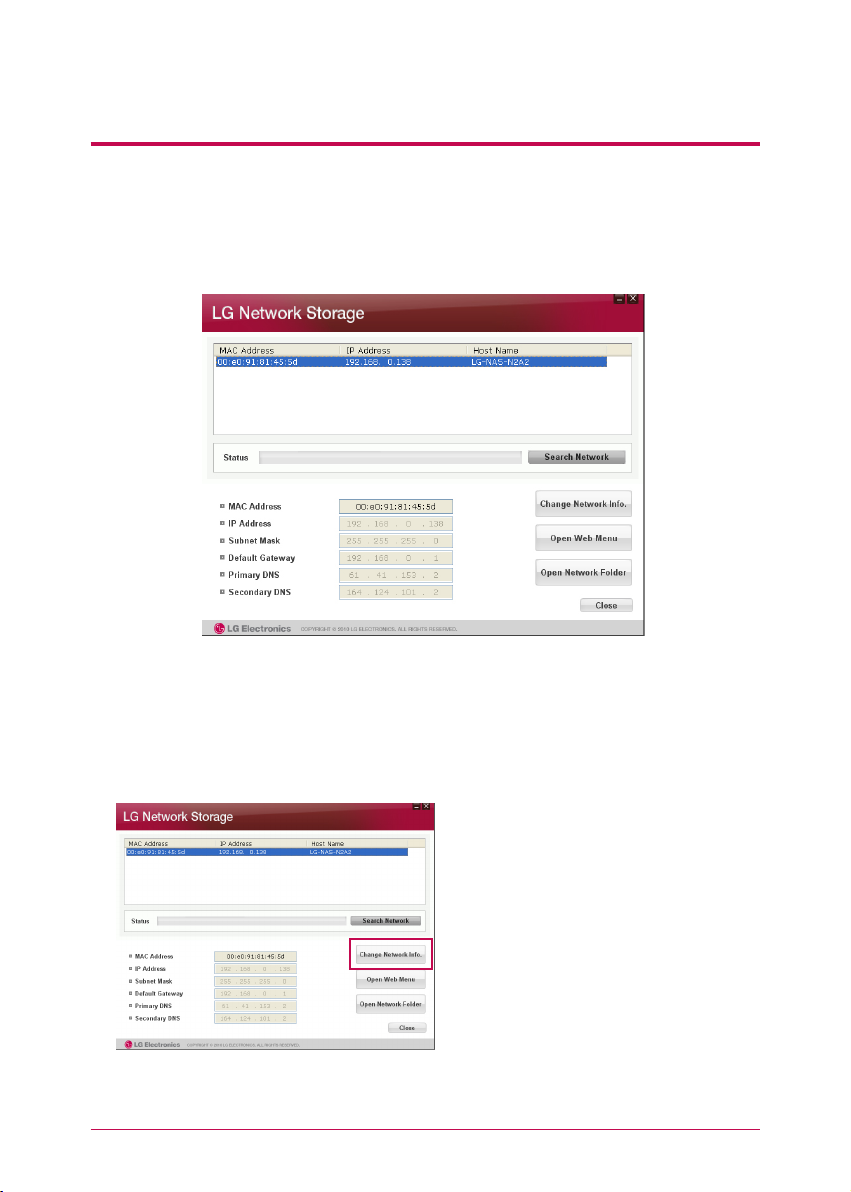
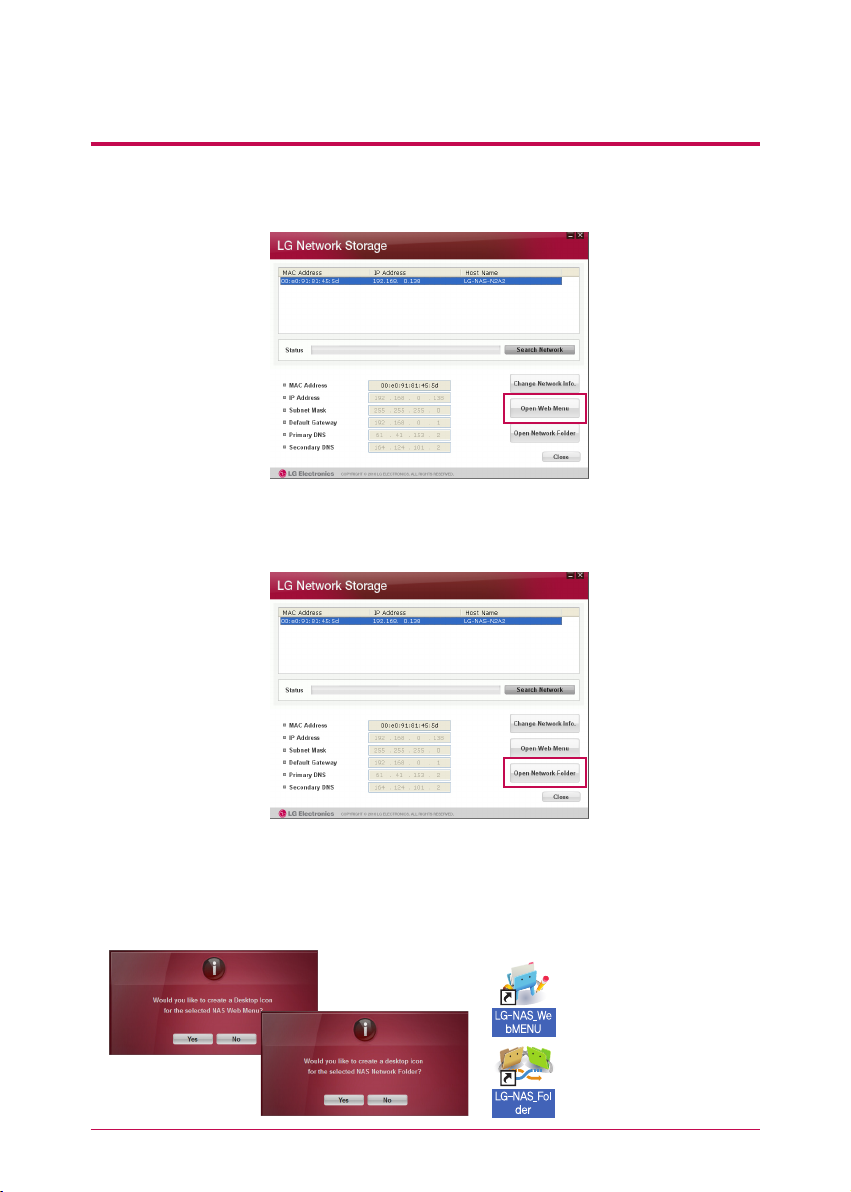
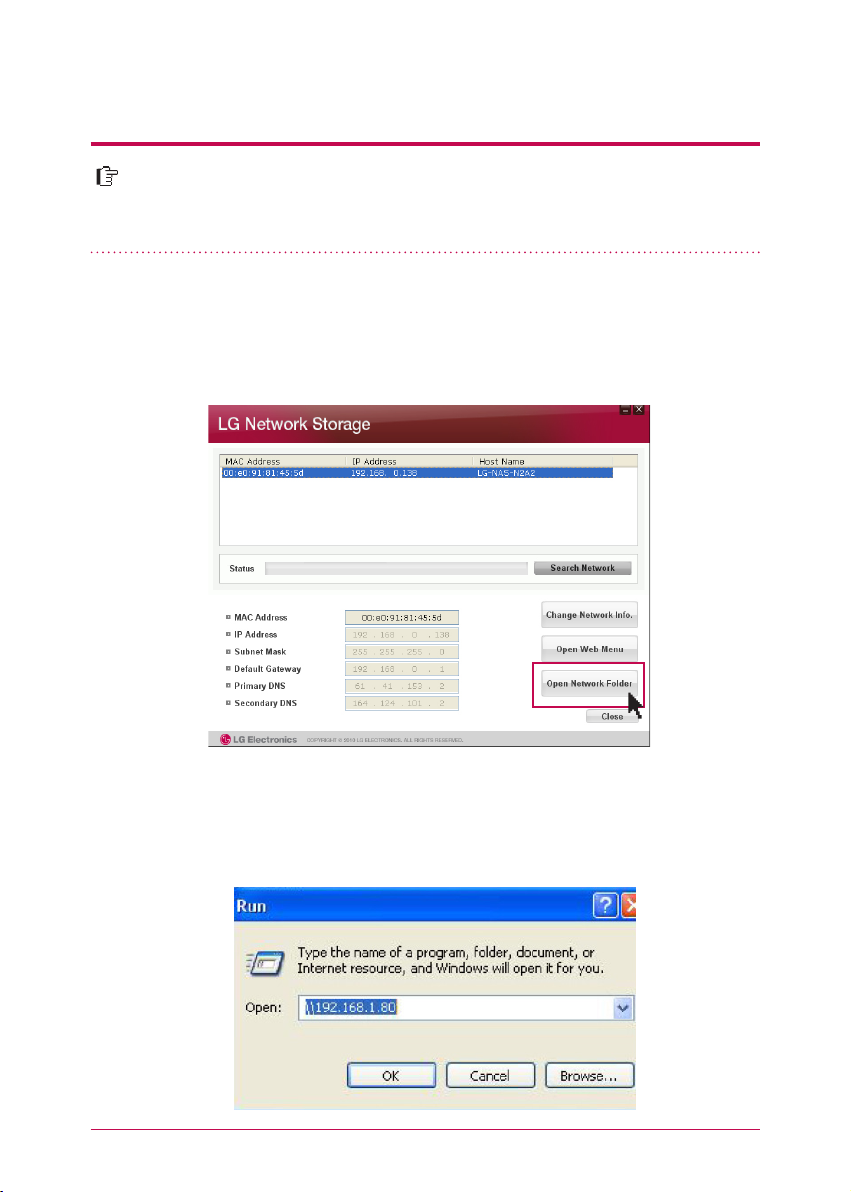
3. When you choose LG Network Storage information that is searched, basic network
information of Network Storage such as sub-net mask, standard gateway, DNS etc. and
‘Network information change’, ‘Open Web menu’, ‘Open Network folder’ buttons are
displayed.
4. You can change relevant information such as IP address etc. with a click on ‘Change
Network Info’ button.
※
For“NAS Detector” program to be normally operated, the user’s PC should be connected
to the same IP network sharing device / switch / hub as LG Network Storage.
※
In case of an environment of IP network
sharing device or a presence of DHCP
server on the network, option for the
choice of DHCP appears. If you do not
have specially assigned IP address, you
can either use the IP address “NAS Detec-
tor” found or choose DHCP option and
receive an automatic assignment of the IP
address.
22
5
-
1.
Using Network Storage
Using NAS Detectorlation
5. You can access a web menu of LG Network Storage when you click on ‘Open Web
Menu’.
NAS web menu short-cut
NAS network folder short-cut
6. You can access LG Network Storage network folder when you click on ‘Open Network
Folder ’.
7. When you click on ‘Open Web Menu’ or ‘Open Network Folder’, you can choose ‘yes’
on a message window that pops up and add a short-cut icon on the desktop. After-
wards, you can have an easier access to Network Storage web menu or network folder
using the short-cut icon.
23
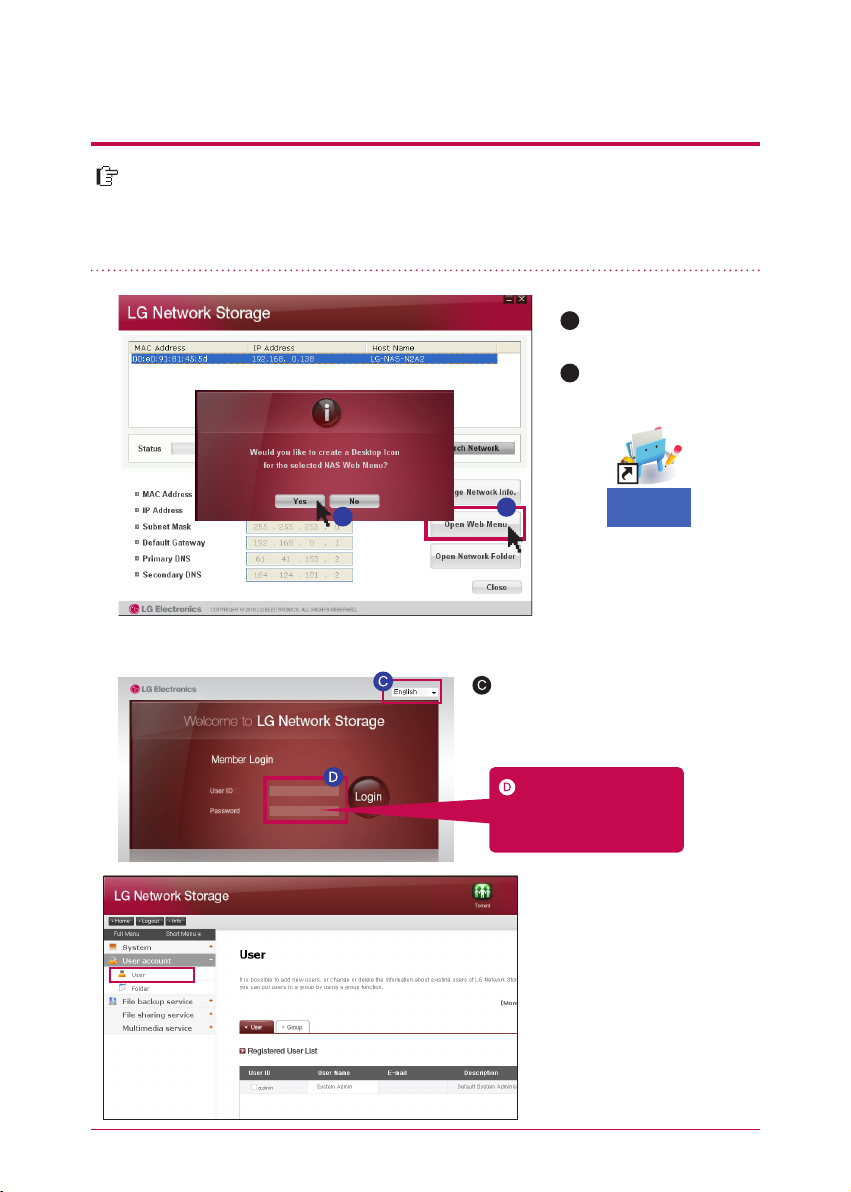
On web menu, you can manage LG Network Storage use including setting up a
network information of LG Network Storage, share management, service man-
agement. You can also set up data storage using DVD drive, back-up of mobile
device on this.
5
-
2.
Using Network Storage Using web menu
Due to security reason, it is logged out au-
tomatically in case you do not perform any
action for 20 minutes after logging in.
※
※
You can change a set-up of
Network Storage.
LG
-
NAS
_
We
bMENU
A
Click on ‘open web
menu’
Choose on a pop-up
window of ‘web menu
short-cut’.
B
A
Logging in by entering
an user ID, ‘admin’, and a
password, ‘admin’.
Select the language you want
Please change the password
for security.
(web menu -> administrator
account -> user -> change
password after clicking on
‘admin’
※
B
24
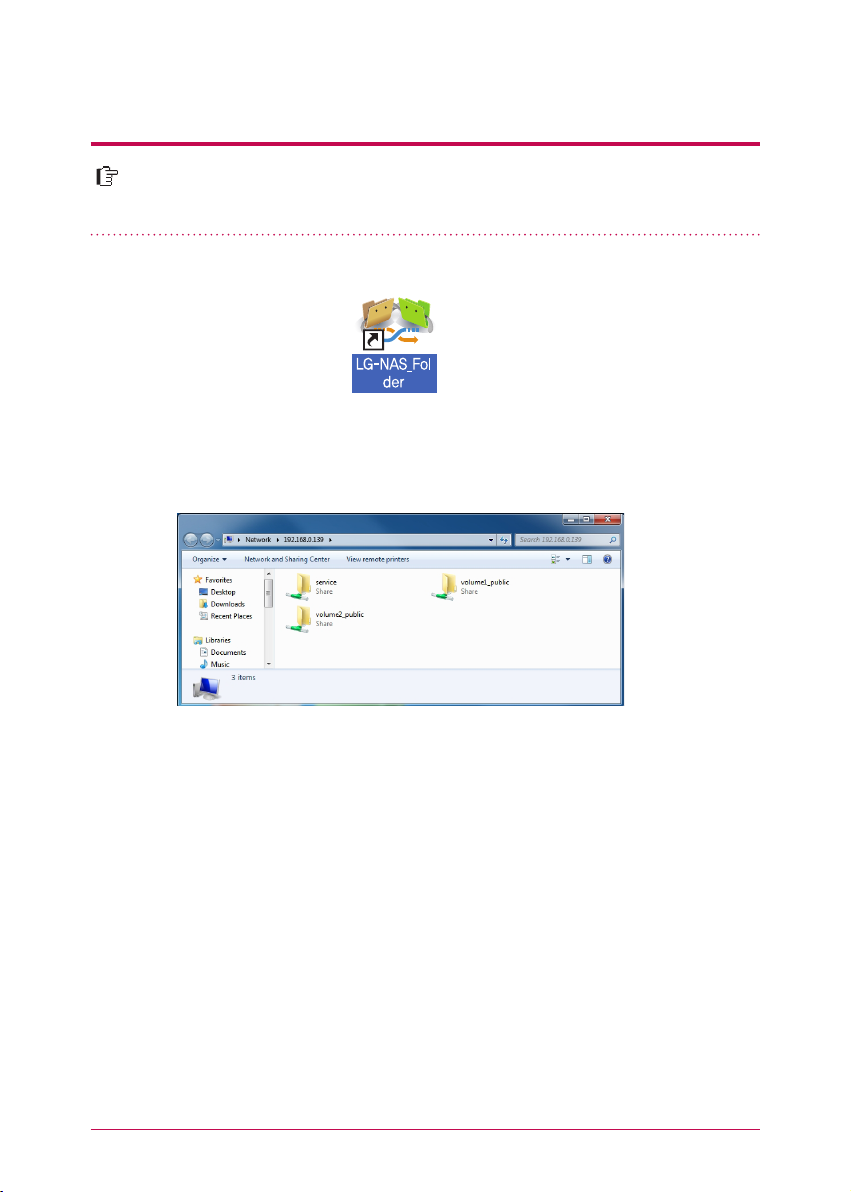
It is possible to share and store files through Network Storage as other hard disk
connected to PC.
5
-
3.
Using Network Storage Using network folder
1. Double-click on a short-cut icon of LG Network Storage network folder.
2. DVD drive of LG Network Storage, ‘service’ / ‘volume1_public’ / ‘volume2_public’ are
displayed.
3. access hard disk of LG Network Storage, double-click on ‘ volume1_public’ or ‘ ‘vol-
ume2_public’ folder.
※
※
※
If the content of the service of LG Network Storage is not properly displayed, please
refresh.
Initial ID of LG Network Storage is admin and a password is admin.
volume1_public, volume2_public, service folder shows provided that the volume is
adequately organized.
25
NAS Monitor provides several functions for users to easily use LG Network Stor-
age.
For example, when opening a network folder or trying to access web page, one
can perform the action easily by clicking on a menu of NAS monitor.
5
-
4.
Using Network Storage
Using NAS Monitor
A
Basically NAS monitor brings
in IP address information while
automatically communicating
with LG Network Storage. There-
fore even when the IP address is
changed, the user is able to ac-
cess open network folder or web
without a specific set-up.
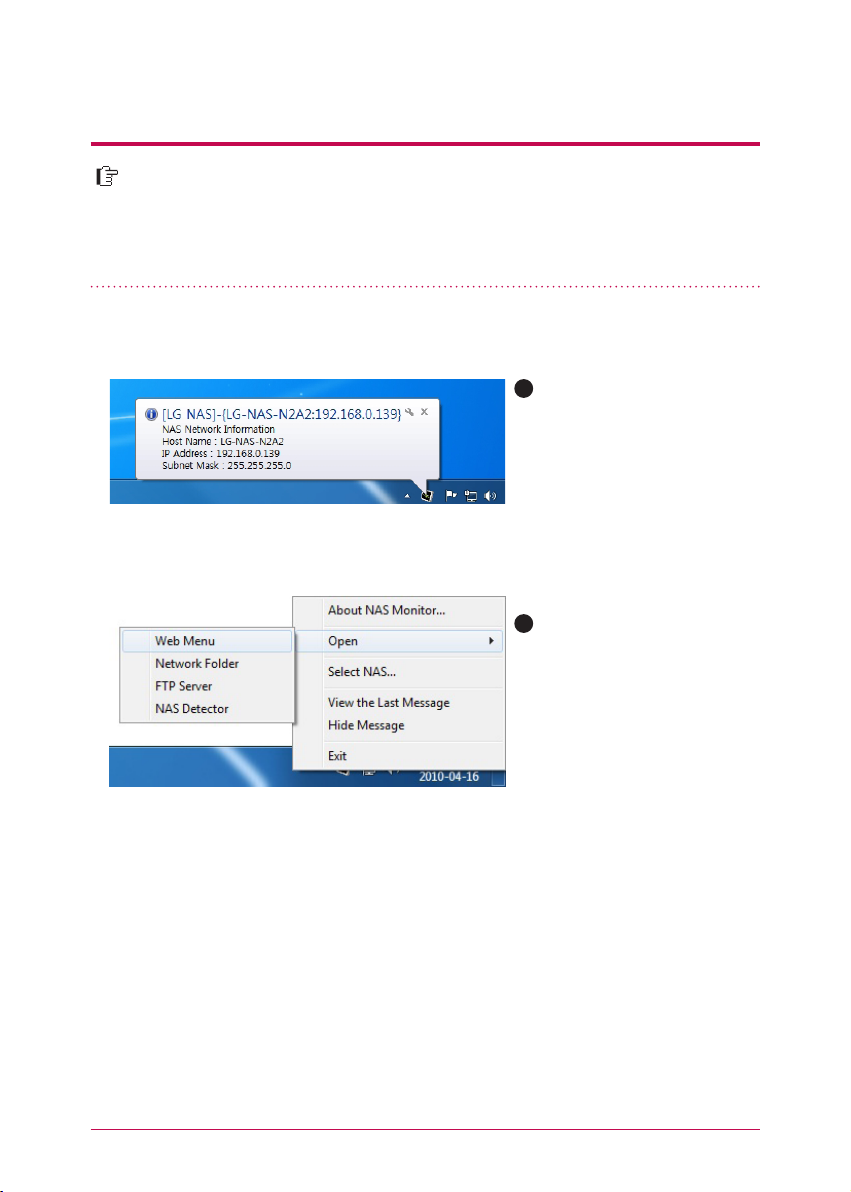
When NAS monitor is activated,
it is operated as a form of tray
icon of the window, and you
can check this on the bottom
of the right side of the screen.
The screen below is the menu
screen, which appears when you
click on the right button of the
mouse.
B
26
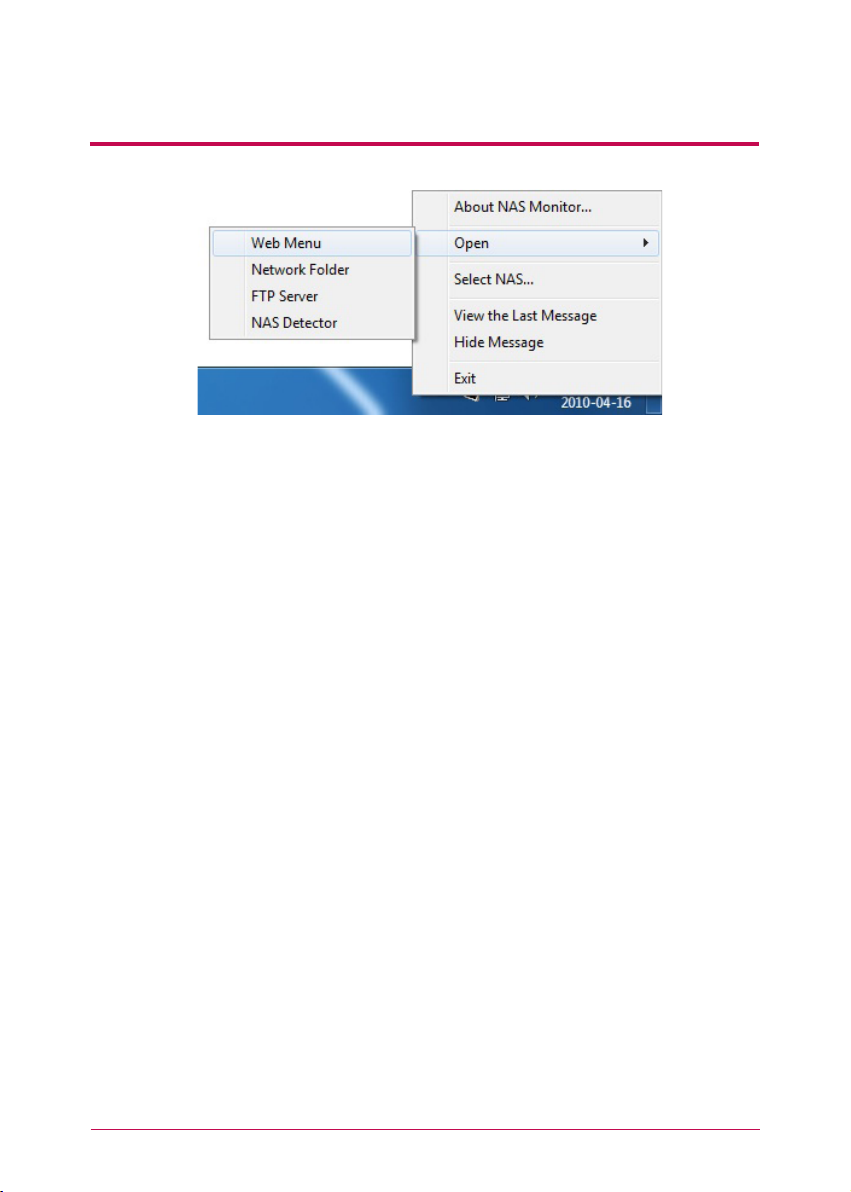
5
-
4.
Using Network Storage
Using NAS Monitor
-
Web menu
It is a menu used to access a web page.
-
Network Folder
It is used when opening network folder. When you double-click on an icon with a left button
of the mouse, open network folder operates basically.
-
FTP server
It is used to connect to FTP server.
-
NAS Detector
It is a menu used to operate NAS detector program, which is used to change IP address
of LG Network Storage. In order to use this menu, NAS detector needs to be installed in
advance.
-
Select NAS
When one LG Network Storage is being used, IP address information of NAS monitor is
automatically set up. However when several LG Network Storage are being used, many
messages may be transferred to NAS monitor, and it cannot be known which LG Network
Storage order is sent on menu selection. Consequently it helps to assign one LG Network
Storage and makes you take care of the information of LG Network Storage you want.
-
view the Las Message
It shows message sent at the latest.
-
Hide Message
it does not show message being sent from LG Network Storage.
27
File share service is the most important function of LG Network Storage. In this
chapter, a method to use LG Network Storage as a network drive for different OS
such as Windows, Mac, Linux is explained.
6
-
1.
Using network
Connecting in Windows OS
1. PC applied program use
2. Use a ‘run’ function of Windows OS
After installing the NAS detector program of LG Network Storage PC Software
Installer disc, run the program and click on “Open Network Folder” button. Then you
can connect to the share folder of LG Network Storage.
When you click on “run” on the start menu of Windows OS and enter ‘\\IPaddress’,
then you can connect to LG Network Storage. Please refer to 5-1. Using Network
Storage [Using NAS Detector] if you do not know IP address.
28
6
-
1.
Using network
Connecting in Windows OS
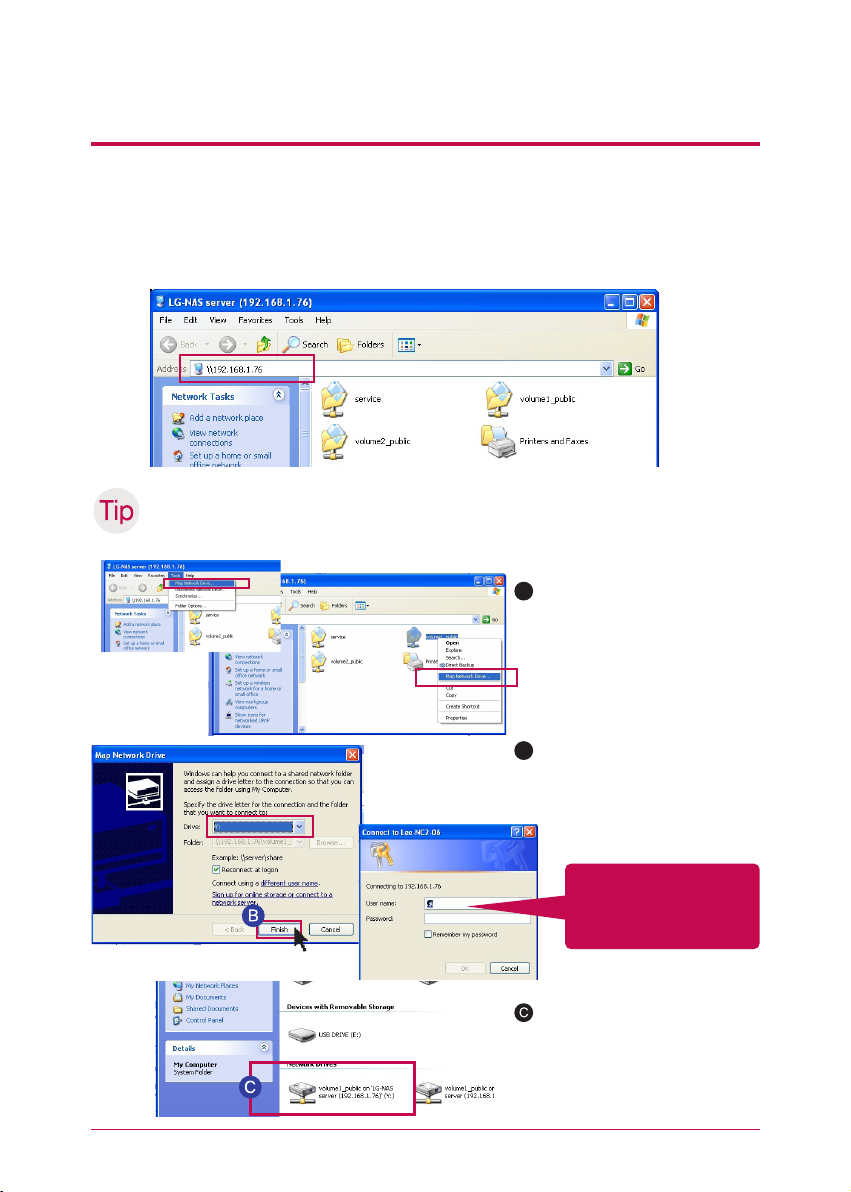
3. Using a function of Windows file share
Open the search engine of Windows, and enter ‘\\IPaddress’ in the address window.
You can access to the server after logging in. Please refer to 5-1. Using Network Storage
[Using NAS Detector] if you do not know IP address.
Set-up as a network drive after Tip server connection.
※
If you set up as a network drive, you can connect to LG Network Storage more conveniently
next time.
A
“tool” -> network drive connec-
tion” or click on network drive
using the right button of the
mouse.
After assigning drive letter and
connection folder on the ‘net-
work drive connection’ window,
click on ‘finish’.
After creating the drive in my
computer, it can be simultane-
ously used with the hard disk.
B
Logging in by entering
an user ID, ‘admin’, and a
password, ‘admin’.
29
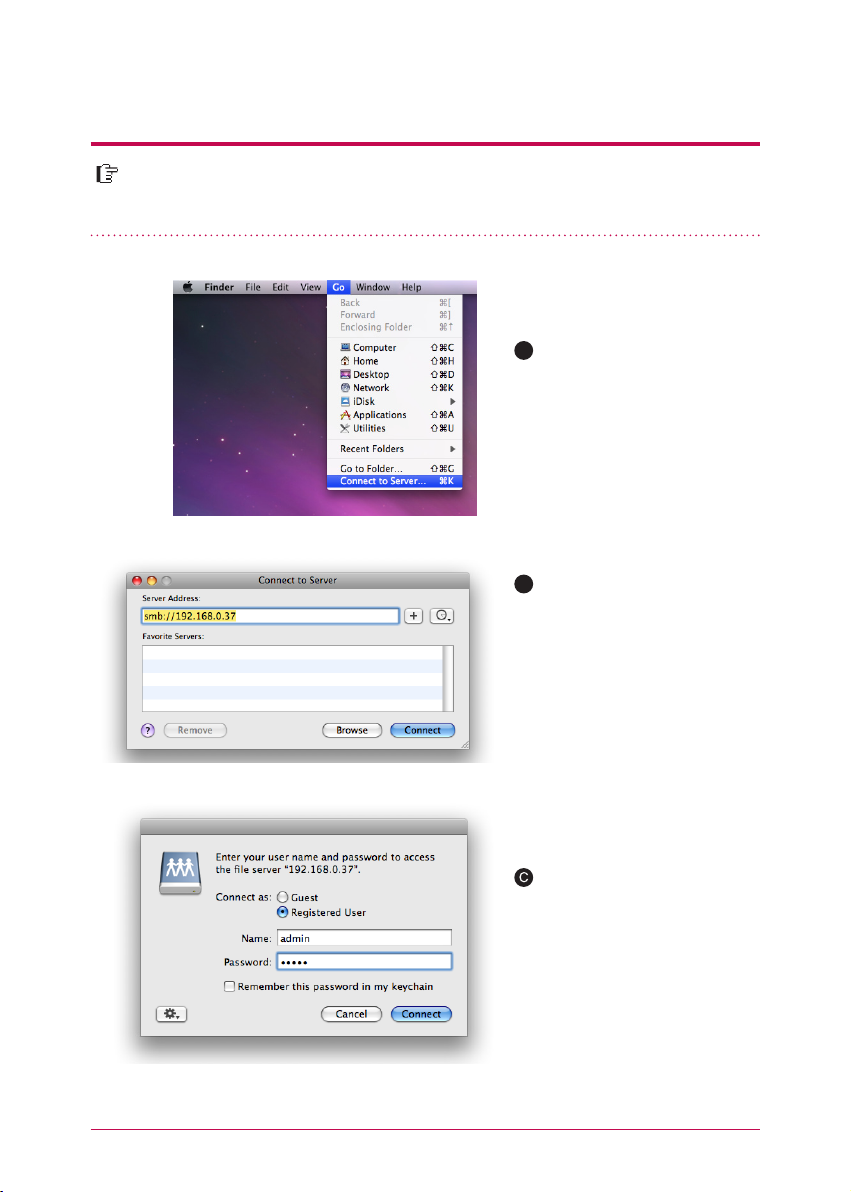
6
-
2.
Using network
Connecting in MAC OS
A
After clicking on “Go” on the
menu bar, select “connect to
server”.
Enter the IP address of LG
Network Storage as a format
of {smb://LG Network Storage
IPaddress}in a ‘server address’
field, and then click on a ‘con-
nect’ button. Please refer to
5-1. Using Network Storage
[Using NAS Detector] if you do
not know the IP address of LG
Network Storage.
Enter the log in ID and password,
and then click on ‘allow’ button.
On initial release, it is setup as
ID: admin, password: admin. It
is recommended to change the
password by connecting to a
web administrator page later on
for the security reason.
B
You can add LG Network Storage share folder to Mac server list, and manually
add the pertinent folder to search engine.

30
6
-
2.
Using network
Connecting in MAC OS
Select the volume (example: /
device / service / volume1_pub-
lic) you will use in the folder list
of LG Network Storage, and click
on “OK” button.
The pertinent share folder opens
and you can see the content of
the folder.
 Loading...