


JTNQ18GPLE6
ROOM AIR
CONDITIONER
OWNER’S MANUAL
4-WAY CEILING CASSETTE
MFL67850901

2
TABLE OF CONTENTS
ENGLISH
TABLE OF CONTENTS
3 TIPS FOR SAVING
ENERGY
4 IMPORTANT SAFETY
INSTRUCTIONS
7 BEFORE USE
7 Preparing for operation
7 Usage
7 Cleaning and maintenance
7 Service
8 PRODUCT
INTRODUCTION
8 Name and function of parts
9 Operation Indication Lamps
10 Wireless Remote Controller
12 OPERATING
INSTRUCTION
12 How to insert the Batteries
12 Wireless Remote Controller
Maintenance
13 INSTALLATION
INSTRUCTIONS
13 Installer Setting -
How to enter installer setting mode
14 Installer Setting -
Installer Setting Code Table
15 Installer Setting -
Setting Address of Central Control
15 Installer Setting -
Checking Address of Central Control
16 OWNER'S
INSTRUCTION
16 Cooling Mode - Standard Operation
16 Cooling Mode - Power Cooling
17 Auto Operation Mode
18 Dehumidification Mod
19 Fan Mode
20 Temperature Setting/
Room Temperature checking
21 Airflow Setting
22 Plasma PurificationOptional)
22 Celsius/Fahrenheit Switching
23 Individual vane angle control
24 Timer
25 MAINTENANCE AND
SERVICE
25 Indoor Unit
26 Purifying filer(Optional)
27 Operation Tips!
27 When the air conditioner is not
going....
28 Troubleshooting Tips! Save time and
money!
28 Call the service immediately in the
following situations

3
TIPS FOR SAVING ENERGY
TIPS FOR SAVING ENERGY
Here are some tips that will help you minimize the power consumption when you use the air
conditioner. You can use your air conditioner more efficiently by referring to the instructions
below:
• Do not cool excessively indoors. This may be harmful for your health and may consume more
electricity.
• Block sunlight with blinds or curtains while you are operating the air conditioner.
• Keep doors or windows closed tightly while you are operating the air conditioner.
• Adjust the direction of the air flow vertically or horizontally to circulate indoor air.
• Speed up the fan to cool or warm indoor air quickly, in a short period of time.
• Open windows regularly for ventilation as the indoor air quality may deteriorate if the air con-
ditioner is used for many hours.
• Clean the air filter once every 2 weeks. Dust and impurities collected in the air filter may block
the air flow or weaken the cooling / dehumidifying functions.
For your records
Staple your receipt to this page in case you need it to prove the date of purchase or for warranty
purposes. Write the model number and the serial number here:
Model number :
Serial number :
You can find them on a label on the side of each unit.
Dealer’s name :
Date of purchase :
ENGLISH

IMPORTANT SAFETY INSTRUCTIONS
IMPORTANT SAFETY INSTRUCTIONS
READ ALL INSTRUCTIONS BEFORE USING THE APPLIANCE.
Always comply with the following precautions to avoid dangerous situations and ensure peak
performance of your product
WARNING
It can result in serious injury or death when the directions are ignored
CAUTION
It can result in minor injury or product damage when the directions are ignored
WARNING
• Installation or repairs made by unqualified persons can result in hazards to you and others.
• The product shall be installed according to the Wiring regulations of the corresponding coun-
try.
• The information contained in the manual is intended for use by a qualified service technician
familiar with safety procedures and equipped with the proper tools and test instruments.
• Failure to carefully read and follow all instructions in this manual can result in equipment mal-
function, property damage, personal injury and/or death.
Installation
• Do not use a defective or underrated circuit breaker. Use this appliance on a dedicated circuit.
There is risk of fire or electric shock.
• For electrical work, contact the dealer, seller, a qualified electrician, or an Authorized Service
Center. Do not disassemble or repair the product. There is risk of fire or electric shock.
• Always ground the product. There is risk of fire or electric shock.
• Install the panel and the cover of control box securely. There is risk of fire or electric shock.
• Always install a dedicated circuit and breaker. Improper wiring or installation may cause fire or
electric shock
• Use the correctly rated breaker or fuse. There is risk of fire or electric shock.
• Do not modify or extend the power cable. There is risk of fire or electric shock.
• Do not install, remove, or re-install the unit by yourself (customer). There is risk of fire, electric
shock, explosion, or injury.
• Be cautious when unpacking and installing the product. Sharp edges could cause injury. Be
especially careful of the case edges and the fins on the condenser and evaporator.
• For installation, always contact the dealer or an Authorized Service Center. There is risk of
fire, electric shock, explosion, or injury.
• Do not install the product on a defective installation stand. It may cause injury, accident, or
damage to the product.
• Be sure the installation area does not deteriorate with age. If the base collapses, the air condi-
tioner could fall with it, causing property damage, product failure, and personal injury.
• Do not let the air conditioner run for a long time when the humidity is very high and a door or
a window is left open. Moisture may condense and wet or damage furniture.
!
!
!
4
ENGLISH

5
IMPORTANT SAFETY INSTRUCTIONS
Operation
• Take care to ensure that power cable could not be pulled out or damaged during operation.
There is risk of fire or electric shock.
• Do not place anything on the power cable. There is risk of fire or electric shock.
• Do not plug or unplug the power supply plug during operation. There is risk of fire or electric
shock.
• Do not touch(operate) the product with wet hands. There is risk of fire or electrical shock.
• Do not place a heater or other appliances near the power cable. There is risk of fire and elec-
tric shock.
• Do not allow water to run into electric parts. It may cause There is risk of fire, failure of the
product, or electric shock.
• Do not store or use flammable gas or combustibles near the product. There is risk of fire or
failure of product.
• Do not use the product in a tightly closed space for a long time. Oxygen deficiency could
occur.
• When flammable gas leaks, turn off the gas and open a window for ventilation before turn the
product on. Do not use the telephone or turn switches on or off. There is risk of explosion or
fire
• If strange sounds, or small or smoke comes from product. Turn the breaker off or disconnect
the power supply cable. There is risk of electric shock or fire.
• Stop operation and close the window in storm or hurricane. If possible, remove the product
from the window before the hurricane arrives. There is risk of property damage, failure of
product, or electric shock.
• Do not open the inlet grill of the product during operation.(Do not touch the electrostatic filter,
if the unit is so equipped.) There is risk of physical injury, electric shock, or product failure.
• When the product is soaked (flooded or submerged), contact an Authorized Service Center.
There is risk of fire or electric shock.
• Be cautious that water could not enter the product. There is risk of fire, electric shock, or
product damage.
• Ventilate the product from time to time when operating it together with a stove, etc. There is
risk of fire or electric shock.
• Turn the main power off when cleaning or maintaining the product. There is risk of electric
shock.
• When the product is not be used for a long time, disconnect the power supply plug or turn off
the breaker. There is risk of product damage or failure, or unintended operation.
• Take care to ensure that nobody could step on or fall onto the outdoor unit. This could result
in personal injury and product damage.
ENGLISH

IMPORTANT SAFETY INSTRUCTIONS
CAUTION
Installation
• Always check for gas (refrigerant) leakage after installation or repair of product. Low refrigerant lev-
els may cause failure of product.
•
Install the drain hose to ensure that water is drained away properly. A bad connection may cause
water leakage.
•
Keep level even when installing the product. To avoid vibration or water leakage.
•
Do not install the product where the noise or hot air from the outdoor unit could damage the neigh-
borhoods. It may cause a problem for your neighbors.
•
Use two or more people to lift and transport the product. Avoid personal injury.
•
Do not install the product where it will be exposed to sea wind (salt spray) directly. It may cause cor-
rosion on the product. Corrosion, particularly on the condenser and evaporator fins, could cause
product malfunction or inefficient operation.
Operation
• Do not expose the skin directly to cool air for long periods of time. (Don't sit in the draft.) This could
harm to your health.
•
Do not use the product for special purposes, such as preserving foods, works of art, etc. It is a con-
sumer air conditioner, not a precision refrigeration system. There is risk of damage or loss of prop-
erty.
•
Do not block the inlet or outlet of air flow. It may cause product failure.
•
Use a soft cloth to clean. Do not use harsh detergents, solvents, etc. There is risk of fire, electric
shock, or damage to the plastic parts of the product.
•
Do not touch the metal parts of the product when removing the air filter. They are very sharp! There
is risk of personal injury.
•
Do not step on or put anyting on the product. (outdoor units) There is risk of personal injury and fail-
ure of product.
•
Always insert the filter securely. Clean the filter every two weeks or more often if necessary. A dirty
filter reduces the efficiency of the air conditioner and could cause product malfunction or damage.
•
Do not insert hands or other objects through the air inlet or outlet while the product is operated.
There are sharp and moving parts that could cause personal injury.
•
Do not drink the water drained from the product. It is not sanitary and could cause serious health is-
sues.
•
Use a firm stool or ladder when cleaning or maintaining the product. Be careful and avoid personal
injury.
•
Replace the all batteries in the remote control with new ones of the same type. Do not mix old and
new batteries or different types of batteries. There is risk of fire or explosion
•
Do not recharge or disassemble the batteries. Do not dispose of batteries in a fire. They may burn or
explode.
•
If the liquid from the batteries gets onto your skin or clothes, wash it well with clean water. Do not
use the remote if the batteries have leaked. The chemicals in batteries could cause burns or other
health hazards.
• If you eat the liquid from the batteries, brush your teeth and see doctor. Do not use the remote if
the batteries have leaked. The chemicals in batteries could cause burns or other health hazards.
!
6
ENGLISH

BEFORE USE
7
ENGLISH
Preparing for operation
• Contact an installation specialist for installation.
• Use a dedicated circuit.
Usage
• Being exposed to direct airflow for an extended period of time could be hazardous to your
health. Do not expose occupants, pets, or plants to direct airflow for extended periods of time.
• Due to the possibility of oxygen deficiency, ventilate the room when used together with stoves
or other heating devices.
• Do not use this air conditioner for non-specified special purposes (e.g. preserving precision de-
vices, food, pets, plants, and art objects). Such usage could damage the items.
Cleaning and maintenance
• Do not touch the metal parts of the unit when removing the filter. Injuries can occur when han-
dling sharp metal edges.
• Do not use water to clean inside the air conditioner. Exposure to water can destroy the insula-
tion, leading to possible electric shock.
• When cleaning the unit, first make sure that the power and breaker are turned off. The fan ro-
tates at a very high speed during operation. There is a possibility of injury if the unit’s power is
BEFORE USE
accidentally triggered on while cleaning inner parts of the unit.
Service
For repair and maintenance, contact your authorized service dealer.
8
PRODUCT INTRODUCTION
ENGLISH
Name and function of parts
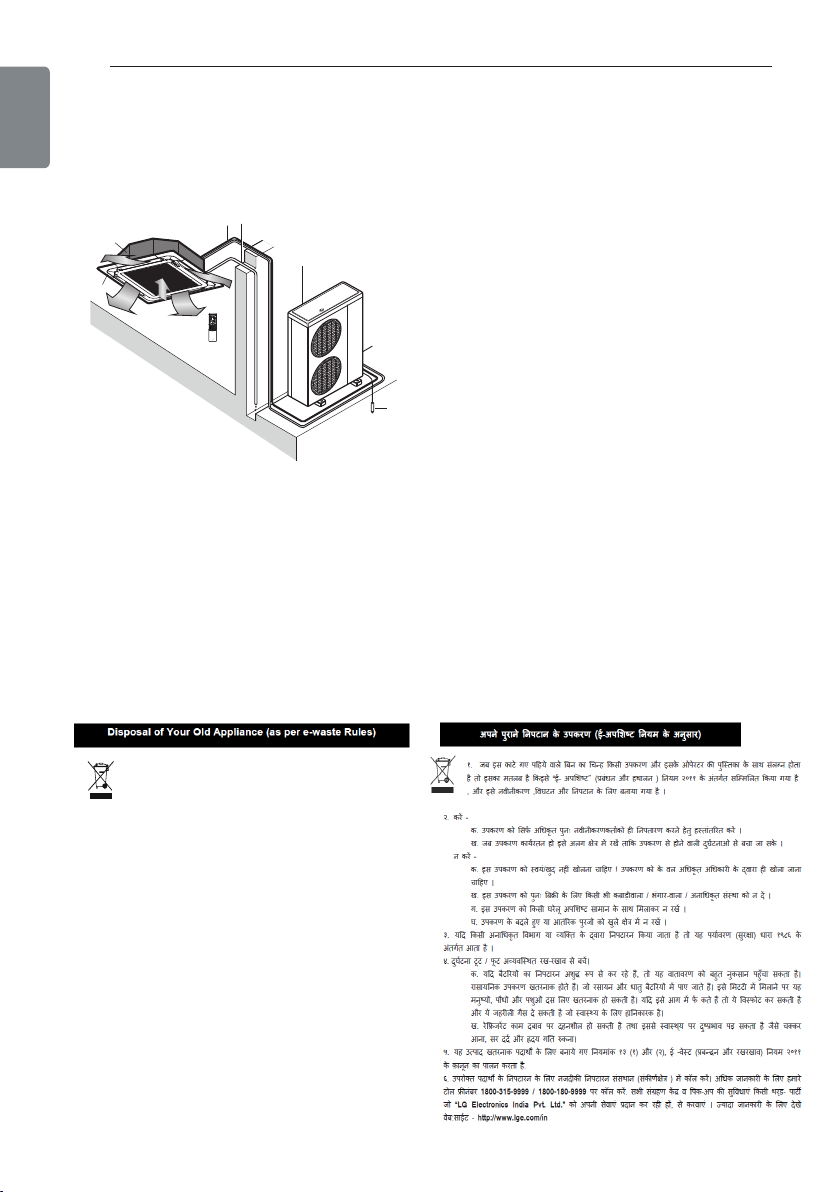
1. Indoor unit
2. Outdoor unit
3. Remote controller
4. Inlet air
5. Discharge air
6. Refrigerant piping, connection electric wire
7. Drain pipe
8. Ground wire
Wire to ground outdoor unit to prevent electrical shocks.
PRODUCT INTRODUCTION
3
7
2
8
6
1
5
4
4
Don’t
a. The product should not be opened by the user himself/herself, but only by
authorized service p e rsonnel.
b. The product is not meant for re-sale to any unauthorized agencies/scrap
dealer/kabariwalah.
c. The product is not meant for mixing into household waste stream.
d. Do not keep any replaced spare part(s) from the product in exposed area.
3. Any disposal through unauthorized agencies/person will attract action under
Environment (Protection) Act 1986.
4. Hazards of improper handling or accidental breakage.
a. If batteries are disposed incorrectly, it can greatly harm the environment. The
chemical by-products are hazardousT. he metals and chemicals found in
batteries can mix into soil which may be hazardous to humans, plants and
animals. If thrown in fire, they can cause blast and release toxic gases which
may be harmful for health.
b. The refrigerant (R410A) used can be combustible at low pressure. The
potential health effects of over exposure isd izziness, headache and heart
irregularities.
5. To locate a nearest collection centre or call for pick-up (limited area only) for
disposal of this appliance, please contact Toll Free No.1800-180-3575 for details.
All collection centre and pick up facilities are done by third parties with LG
Electronics India Pvt. Ltd. merely as a facilitator
.
For more detailed information, please visit : http://www.lge.com/in
1. When this crossed out wheeled bin symbol is depicted on the
product and its operator’s manual, it means the product is
covered by the e-waste Management and Handling Rules ,
2011 and are meant to be recycled, dismantled, refurbished or
disposed off.
2. Dos
a. The product is required to be handed over only to the
authorized recycler for disposal.
b. Keep the p roduct in isolated area, after it becomes
nonfunctional/un-repairable so as top revent its accidental
breakage.
6. This product is complied with the requirement of Hazardous Substances as
specified under Rule 13 (1) & (2) of the E-Waste (Management & Handling) Rules,
2011.
PRODUCT INTRODUCTION
9
ENGLISH
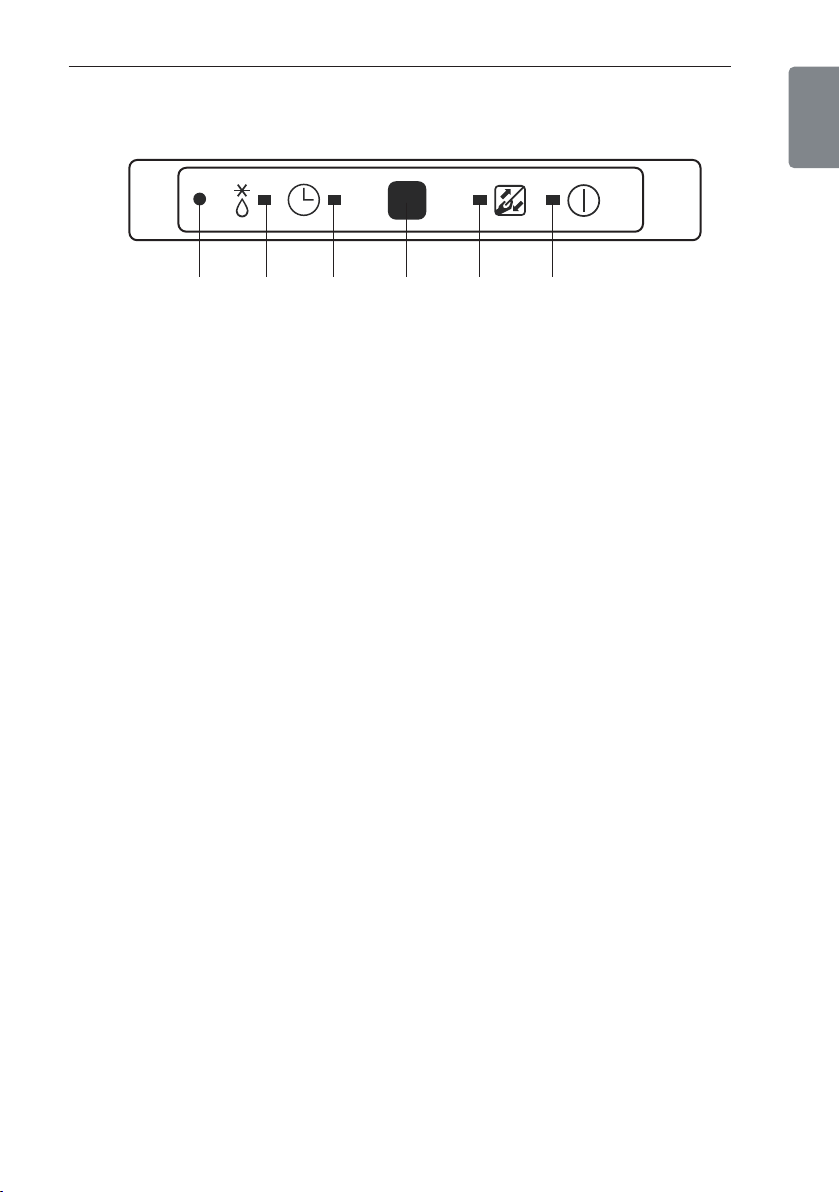
Operation Indication Lamps
1 2 3 4 5 6
1 Forced operation : Operation procedures when remote control can’t be used.
2
Defrost Mode : Lights up during defrost mode or hot start operation.
(heat pump model only)
3
Timer : Lights up during timer operation.
4
Signal Receptor : Receives the signal from remote control (signal receiving sound: two short
beeps and one long beep)
5
Filter sign : Lights up after 2400 hours from the time of first operation.
6
On/Off : Lights up during system operation.
10
PRODUCT INTRODUCTION
ENGLISH
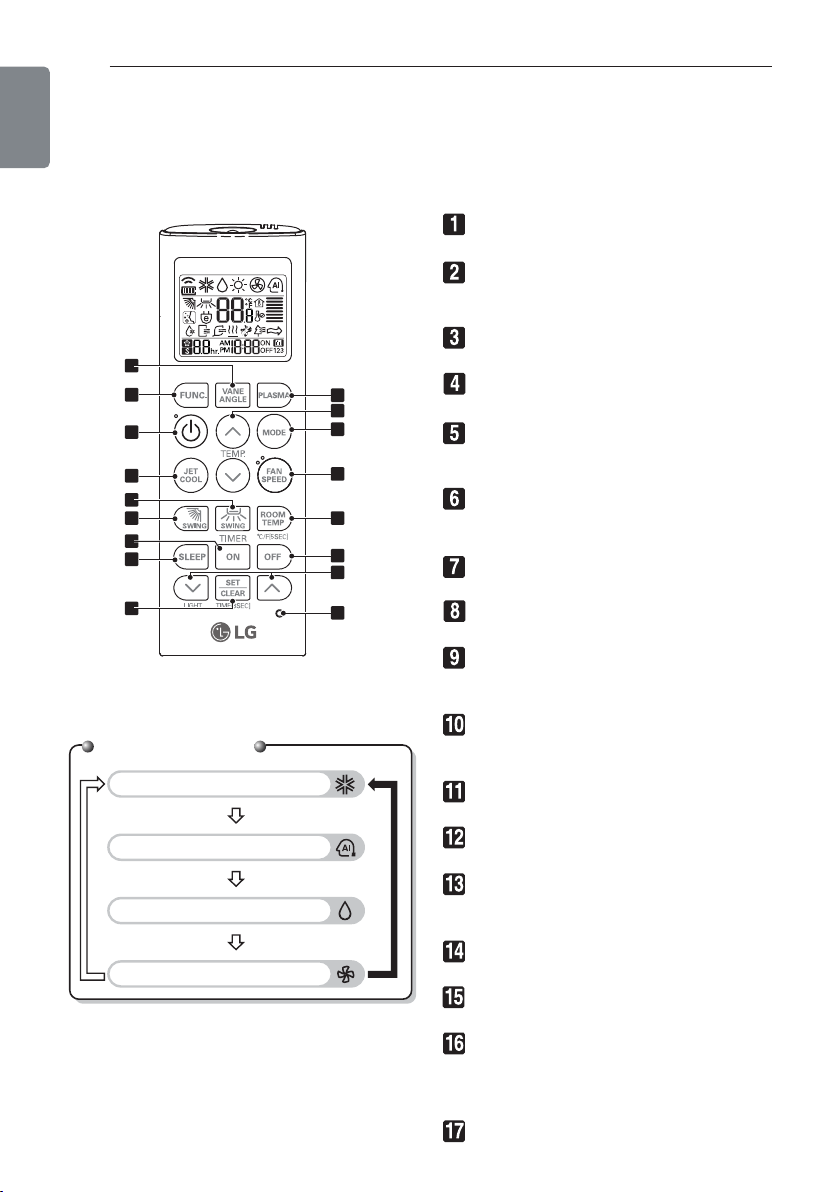
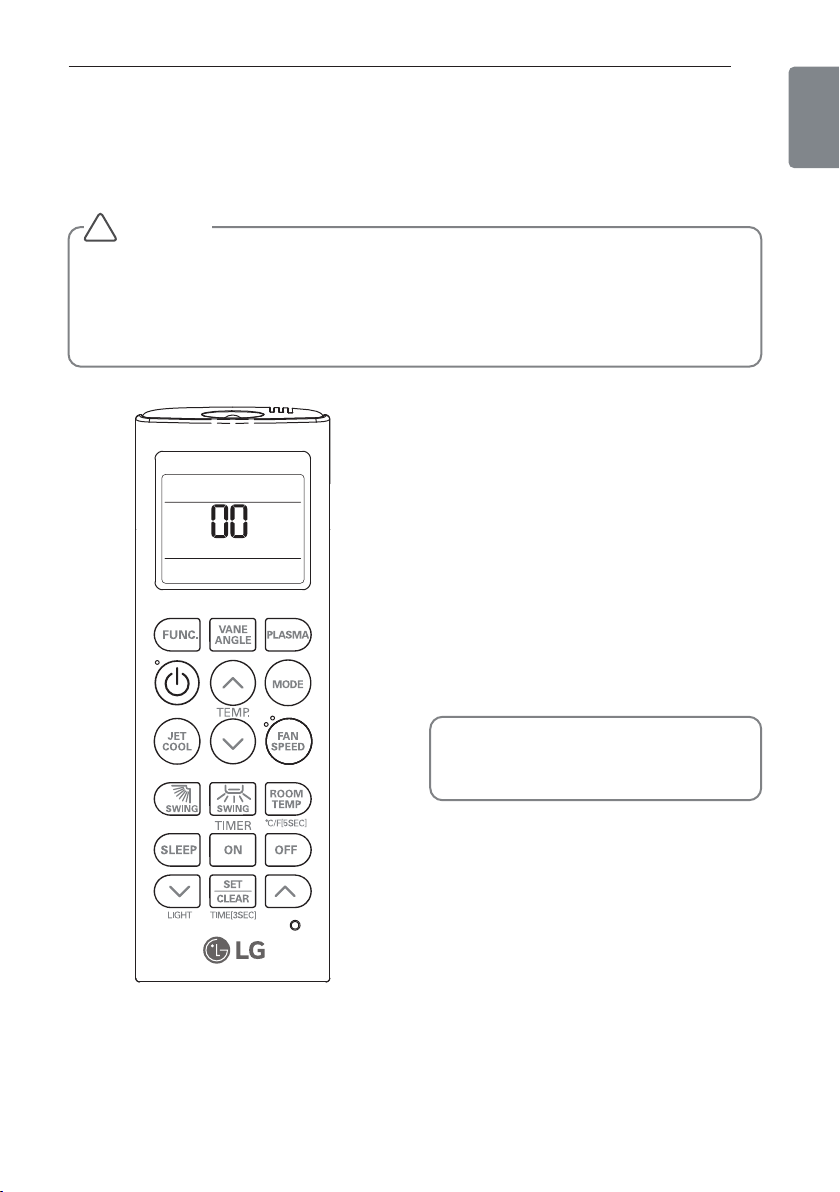
Wireless Remote Controller
This air-conditioner is equipped with wireless remote controller basically. But if you want to be
available with wired remote controller, you pay for it.
Cooling Mode
Dehumidification mode
Operation Mode
Fan Mode
Auto Operation Mode
2
1
5
9
7
10
12
13
14
15
17
16
11
3
4
6
8
VANE ANGLE Button
Used to set each vane angle.
FUNCTION SETTING Button
Used to set or clear Auto Clean, Smart Clean,
Electric heater or Individual vane angle control.
ON/OFF Button
Used to turn on/off the unit.
JET COOL Button
Speed cooling operates super high fan speed.
LEFT/RIGHT AIRFLOW Button (OPTIONAL)
Used to set the desired left/right(horizontal)
airflow direction.
UP/DOWN AIRFLOW Button
Used to stop or start louver movement and set
the desired up/down airflow direction.
ON TIMER Button
Used to set the time of starting operation.
SLEEP TIMER Button
Used to set the time of sleeping operation.
SET / CLEAR Button
Used to set/clear the timer.
Used to set the current time(if it input for 3sec.)
PLASMA Button (OPTIONAL)
Used to start or stop the plasma-purification
function.
ROOM TEMPERATURE SETTING Button
Used to select the room temperature.
OPERATION MODE SELECTION Button
Used to select the operation mode.
INDOOR FAN SPEED SELECTION Button
Used to select fan speed in four steps low,
medium, high and chaos.
ROOM TEMPERATURE CHECKING Button
Used to check the room temperature.
OFF TIMER Button
Used to set the time of stopping operation.
TIMER SETTING(Up/Down)/LIGHT Button
Used to set the timer.
Used to adjust the brightness.(if it is not time
adjust mode)
RESET Button
Used to reset the remote controller.
PRODUCT INTRODUCTION
11
ENGLISH
NOTE
!
•
The wireless remote controller do not
operate the swirl mode.(4Way Type)
•
For more details refer to the Wireless
Remote Control Accessory manual.
•
The actual product can be different
from above contents depending upon
model type.
CAUTION
Caution of handling the Remote Controller
• Aim at the signal receiver on the wired
remote controller so as to operate.
• The remote control signal can be re-
ceived at a distance of up to about 7m.
• Be sure that there are no obstructions be-
tween the remote controller and the sig-
nal receptor.
• Do not drop or throw the remote con-
troller.
• Do not place the remote controller in a lo-
cation exposed to direct sunlight, or near
the heating unit, or any other heat
source.
• Block a strong light over the signal recep-
tor with a curtain or etc. so as to prevent
the abnormal operation. (ex:electronic
quick start, ELBA, inverter type fluores-
cent lamp)
!
12
ENGLISH
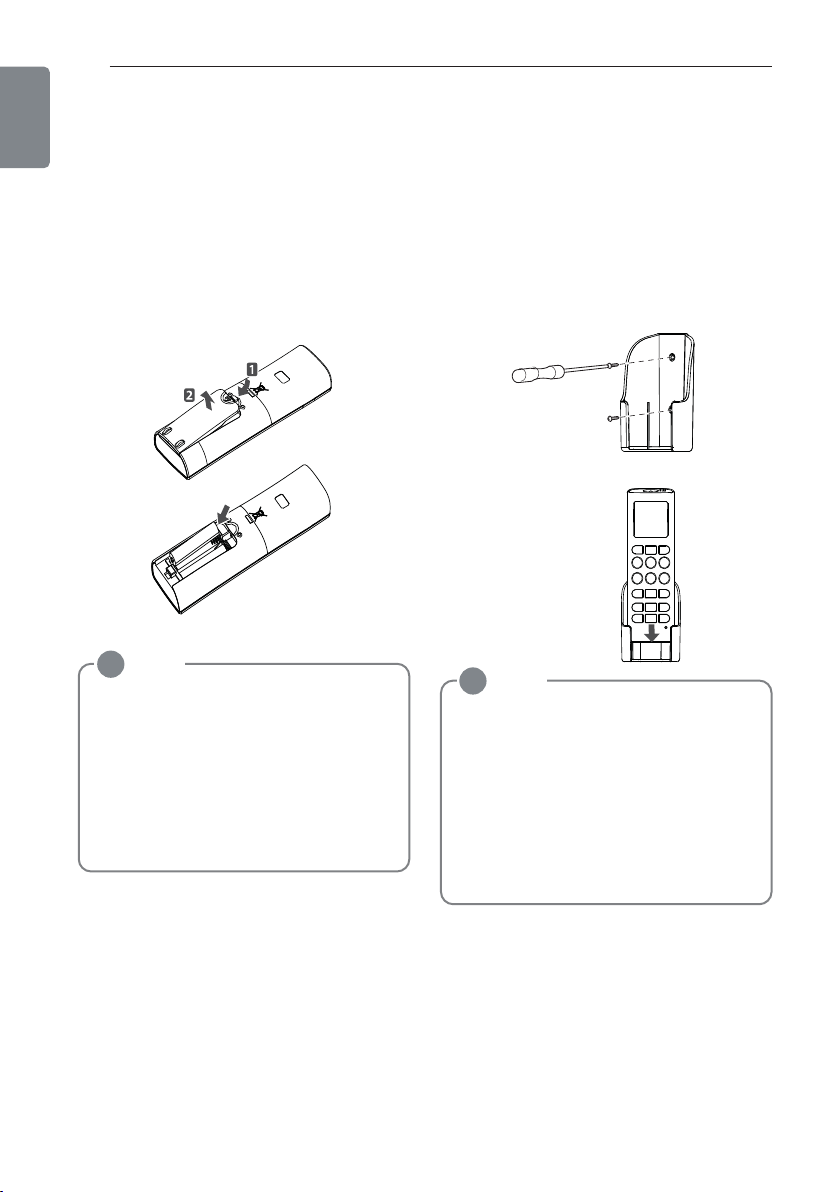
How to insert the Batteries
Remove the battery cover by pulling it accord-
ing to the arrow direction.
Insert new batteries making sure that the (+)
and (-) of battery are installed correctly.
Reattach the cover by sliding it back into posi-
tion.
Wireless Remote Controller
Maintenance
Choose a suitable place where its safe & easy
to reach.
Fix the holder to wall etc with the supplied
screws firmly.
Slide the remote controller inside the holder.
OPERATING INSTRUCTION
NOTE
!
• Always use/replace both batteries of
same type.
• If the system is not to be used for a
long time, remove the batteries to save
their working life.
• If the display screen of remote con-
troller starts, fading replace both of the
batteries.
NOTE
!
• Remote controller should never be ex-
posed to direct sunlight.
• Signal transmitter & receiver should al-
ways be clean for proper communica-
tion. Use a soft cloth to clean them.
• In case some other appliances also get
operated with remote control, change
their position or consult your service-
man.
OPERATING INSTRUCTION
13
ENGLISH
1. With the JET COOL button pressed,
press the RESET button.
2
. By using the TEMPERATURE SETTING but-
ton, set function code and setting value.
(Please refer the Installer Setting Code
Table.)
3
. Press the ON/OFF button toward the in-
door unit 1 time.
4
. Reset the remote controller to use the gen-
eral operation mode.
CAUTION
Installer setting mode is to set the detail function of the remote controller.
If the installer setting mode is not set correctly, it can cause problems to the product, user
injury or property damage. This must be set by an certificated installer, and any installation
or change that is carried out by a non-certificated person should be responsible for the re-
sults. In this case, free service cannot be provided.
!
Refer to the Installer Setting Code Table
on the next page.
INSTALLATION INSTRUCTIONS
Installer Setting - How to enter installer setting mode
INSTALLATION INSTRUCTIONS

ENGLISH
14
INSTALLATION INSTRUCTIONS
Mode Override
This Function is only for Non-Auto Changeover H/P model.
Ceiling Height Selection
Our products provide variety of air volumes and capacities according to the selection of ceil-
ing heights.
Cooling/Heating performance is enhanced with relation to ceiling height.
- The highest/cooling heating performance and efficiency are provide at super high.
(Some noise may be generated according to the level height setting.)
Group Control
This function is only for group control. Please don’t set this function in case of non-group
control.
After setting Group Control of the product, turn off the power then turn it back on after 1
minute.
Auxiliary heater
This function is only applied to models with Auxiliary Heater function being activated.
Installer Setting - Installer Setting Code Table
Installer Setting Code Table
No. Function Function Code Setting Value Remote Controller LCD
0 Mode Override
0
0 : Set to Master
1 : Set to Slave
1
Ceiling Height
Selection
1
1 : Standard
2 : Low
3 : High
4 : Super High
2
Group Control
2
0 : Set to Master
1 : Set to Slave
2 : Check Master/Slave
Auxiliary heater
2
3 : Set to Auxiliary heater
4 : Cancel Auxiliary heater
5 :
Check Auxiliary heater Installation
 Loading...