


LG 32LK451, 32LK455, 32LV2500, 32LV2540, 32LV3400 User Manual
...
|
User’s’s Guidei Specificationifi ti |
|
|
|
||||
|
|
|||||||
|
|
|
|
|
|
|
|
|
|
|
|
|
|
|
GH Bak |
HJ Shin |
JO Kim |
|
|
|
|
|
|
|||
1. Model Description |
|
|
|
|||||
|
|
|
11.01.30 |
11.01.30 |
11.01.30 |
|||
|
|
|
|
|
|
|
|
|
|
MODEL |
32/37/42/47LV3550-ZB |
BRAND |
LG |
Part No. |
MFL67099915 |
||
|
|
|
|
|
|
|||
|
SUFFIX |
|
|
|
|
|||
|
CIS |
Product Name |
32/37/42/47LV3550 |
|
(1103-REV01) |
|||
|
|
|
|
|
|
|
|
|
2. Printing Specification
1.Trim Size (Format) : 182 mm x 257 mm
2.Printing Colors
•Cover : 1 COLOR (BLACK)
•Inside : 1 COLOR (BLACK) 3. Stock (Paper)
•Cover : Uncoated paper , 60 g/
•Inside : Uncoated paper , 60 g/
4. Printing Method : Off-set
5. Bindery : Saddle stitch
6. Language : EN/ RU / KA / UK (4)
7. Number of pages : 76
“This part contain Eco-hazardous substances (Pb, Cd, Hg, Cr6+, PBB, PBDE, etc.) within LG standard level,
NDetails should be followed Eco-SCM management standard[LG(56)-A-2524].
OEspecially, Part should be followed and controlled the following specification.
T(1)Eco-hazardous substances test report should be submitted
Ewhen Part certification test and First Mass Production.
S(2) Especially, Don’t use or contain lead(Pb) and cadmium(Cd) in ink.
3. |
Special Instructions |
|
|
|
|
|
(1) Origin Notification |
|
|
* LGEIN : Printed in Indonesia |
* LGEWA : Printed in U.K. |
|
* LGESP : Printed in Brazil |
* LGEMX : Printed in Mexico |
|
* LGEND : Printed in China |
* LGEIL : Printed in India |
|
* LGEMA : Printed in Poland |
|
|
|
|
4. |
Changes |
|
10 |
|
|
|
|
9 |
|
|
|
|
8 |
|
|
|
|
7 |
|
|
|
|
6 |
|
|
|
|
5 |
|
|
|
|
4 |
|
|
|
|
3 |
|
|
|
|
2 |
|
|
|
Added the content about the quantity of 3D glasses. |
1 |
03/09/11 |
|
S1-24419 |
|
BAK GH |
Deleted the cable holder |
|||
REVNO. |
. MM/DD/YY |
SIGNATURE |
CHANGE NO. |
CHANGE CONTENTS |

Paginationi ti sheett
P/NO. MFL67099915
Total pages : 76 pages
Front |
|
|
|
|
|
|
|
|
|
|
|
|
Cover |
|
|
|
|
|
|
|
|
|
|
|
|
(EN) |
|
|
|
|
|
|
|
|
|
|
|
|
P/NO. |
|
2 |
3 |
|
… |
… |
|
18 |
|
|
|
|
|
|
|
|
|
|
|
|
|
|
|
|
|
Front |
|
|
|
|
|
|
|
|
|
|
|
|
Cover |
|
|
|
|
|
|
|
|
|
|
|
|
(RU) |
|
|
|
|
|
|
|
|
|
|
|
|
|
|
2 |
3 |
|
… |
… |
|
|
18 |
|
|
|
|
|
|
|
|
|
|
|
|
|
|
|
|
Front |
|
|
|
|
|
|
|
|
|
|
|
|
Cover |
|
|
|
|
|
|
|
|
|
|
|
|
(KA) |
|
|
|
|
|
|
|
|
|
|
|
|
|
|
2 |
3 |
|
… |
… |
|
|
18 |
|
|
|
|
|
|
|
|
|
|
|
|
|
|
|
|
Front |
|
|
|
|
|
|
|
|
|
|
|
|
Cover |
|
|
|
|
|
Blank |
|
|
Blank |
Blank |
|
Back |
(UK) |
|
|
|
|
|
page |
|
|
page |
page |
|
Cover |
|
|
2 |
… |
|
18 |
|
|
|
|
|
|
|
|
|
|
|
|
|
|
|
|
|
|
|
|

OWNER’S MANUAL
LCD TV / LED LCD TV
Please read this manual carefully before operating your set and retain it for future reference.
P/NO : MFL67099915 (1103-REV01) |
www.lg.com |
Printed in Korea |

ENGLISH
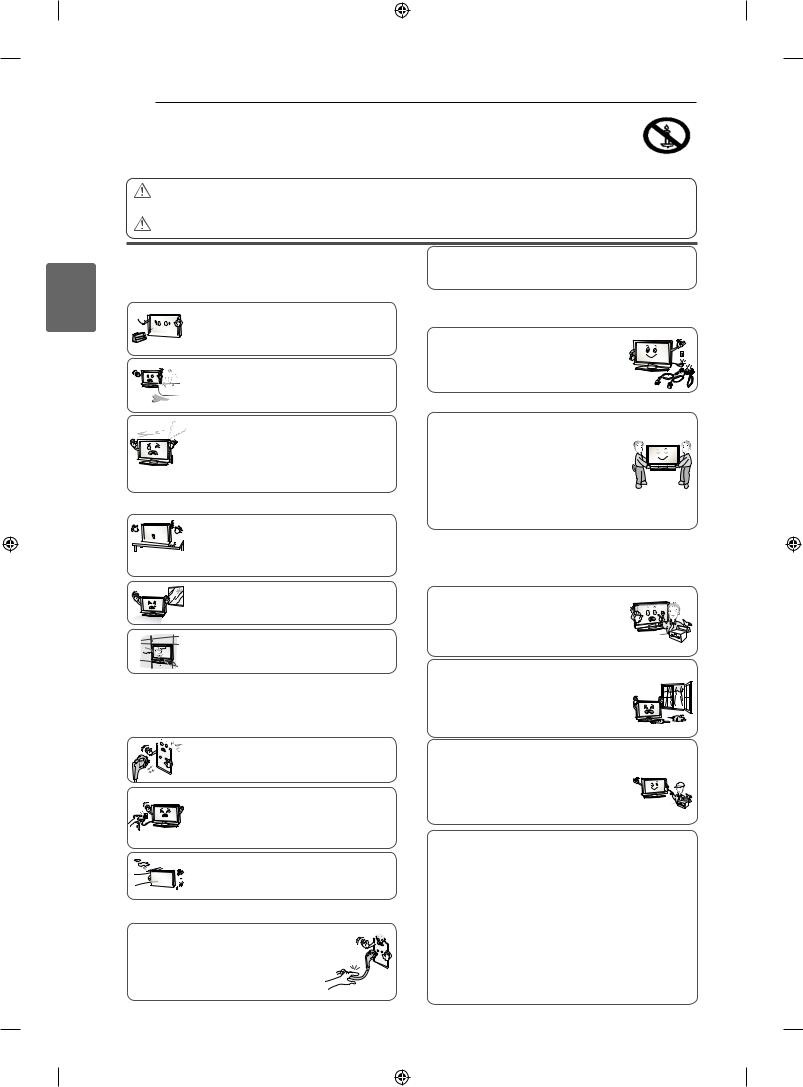
2 SAFETY INSTRUCTIONS
yPlease read these safety precautions carefully before using the product.
yIn this manual, the illustration may be somewhat different from your product because it is just example to help the instruction.
WARNING y If you ignore the warning message, you may be seriously injured or there is a
possibility of accident or death.
CAUTION y If you ignore the caution message, you may be slightly injured or the product may be damaged.
PRECAUTION IN INSTALLING THE PRODUCT
 WARNING
Keep away from heat sources like electrical 


 heaters.
- Electrical shock, fire, malfunction or deformation may occur.
Do not use the product in damp place such as a bathroom or any place where it is likely to get wet.
- This may cause a fire or could give an electric shock.
As long as this unit is connected to the AC wall outlet, it is not disconnected from the AC power source even if you turn off this unit by SWITCH.
PRECAUTIONS WHEN MOVING THE PRODUCT
 WARNING
Make sure to turn off the product. Make sure to remove all cables before moving the product.
- You may be electrocuted or the product can be damaged.
If you can smell smoke or other odours or hear a strange sound unplug the power cord and contact the service center.
- If you continue to use without taking proper measures, electrical shock or fire can occur.
 CAUTION
Install the product on a flat and stable place that has no risk of dropping the product.
 - If the product is dropped, you may be injured
 or the product may be broken.
Keep the product away from direct sunlight. - The product can be damaged.
Do not place the product in a built-in installation such as bookcase or rack. - Ventilation required.
ELECTRICAL POWER RELATED PRECAUTIONS
 WARNING
Make sure to connect the power cable to a
properly earthed outlet.
- You may be electrocuted or injured.
Do not touch the power plug with wet hands. 

 Additionally, it the cord pin is wet or covered
 with dust, dry the power plug completely or wipe
dust off.
- You may be electrocuted due to excess moisture.
During a thunder or lightning storm, unplug the
power cable or signal cable.


 - You may be electrocuted or a fire can break

 out.
out.
 CAUTION
Protect the power cord from physical or mechanical abuse, such as being twisted, kinked, pinched, closed in a door, or walked upon. Pay particular attention to plugs, wall outlets, and the point where the cord exits the appliance.
 CAUTION
Do not impact the product when moving it. - You may be electrocuted or the product
can be damaged.
Make the panel face forward and hold it with both hands to move. - If you drop the product, the damaged
product can cause electric shock or fire. Contact your nearest service center for
repair.
PRECAUTIONS WHEN USING THE PRODUCT
 WARNING
Do not disassemble, repair or modify the product at your own discretion.
- Fire or electric shock accident can occur. - Contact the service center for check, calibration or repair.
To reduce the risk of fire or electric shock, do not expose this apparatus to rain or moisture.
Apparatus shall not be exposed to dripping or splashing and no objects filled with liquids, such as vases, shall be placed on the apparatus.
Refer all servicing to qualified service personnel. Servicing is required when the apparatus has been damaged in any way, such as power supply cord or plug is damaged, liquid has been spilled or objects have fallen into the apparatus, the apparatus has been exposed to rain or moisture, does not operate normally, or has been dropped.
IMPORTANT INFORMATION TO PREVENT “IMAGE BURN / BURN-IN” ON YOUR TELEVISION SCREEN
-When a fixed image (e.g. logos, screen menus, video game, computer display and teletext pages) is displayed on the television for an extended period it can become permanently imprinted on the screen. This phenomenon is known as “image burn” or “burn-in”. Image burn is not covered under the manufacturer’s warranty.
-In order to prevent image burn, avoid displaying a fixed image on your television’s screen for a prolonged period (2 or more hours for LCD, 1 or more hours for Plasma).
-Image burn can also occur on the letterboxed areas of
your television if you use the 4:3 aspect ratio setting for an extended period.
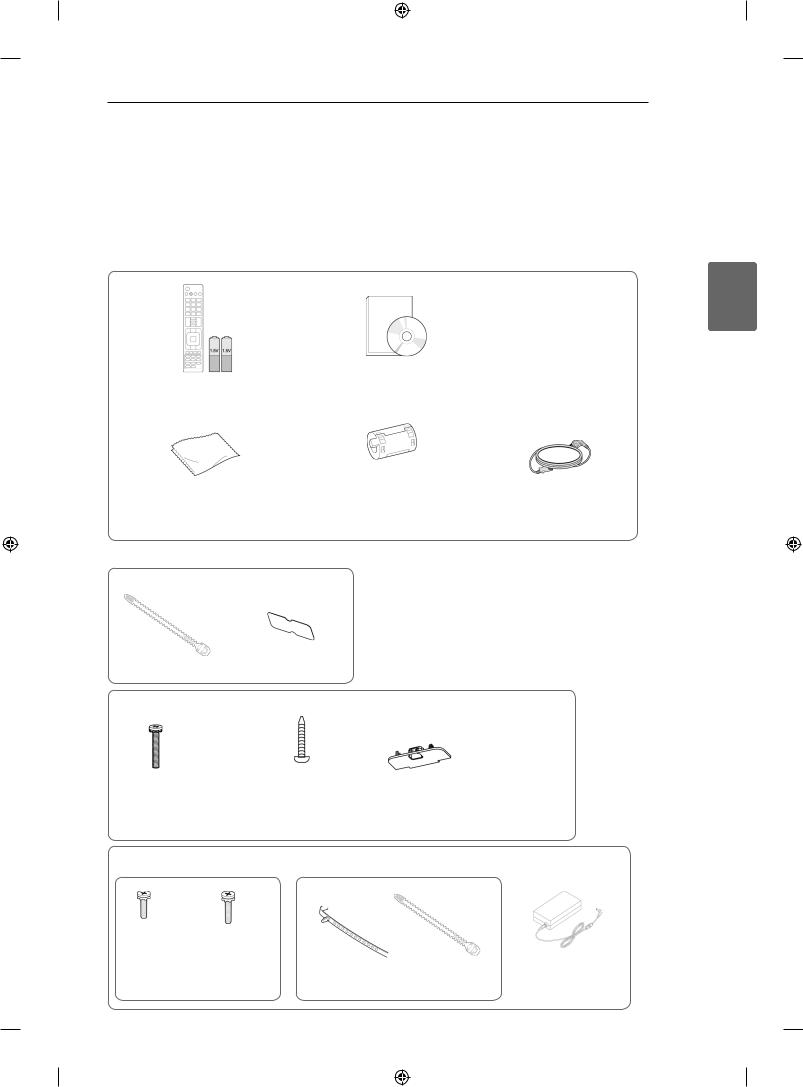
ASSEMBLING AND PREPARING 3
ASSEMBLING AND PREPARING
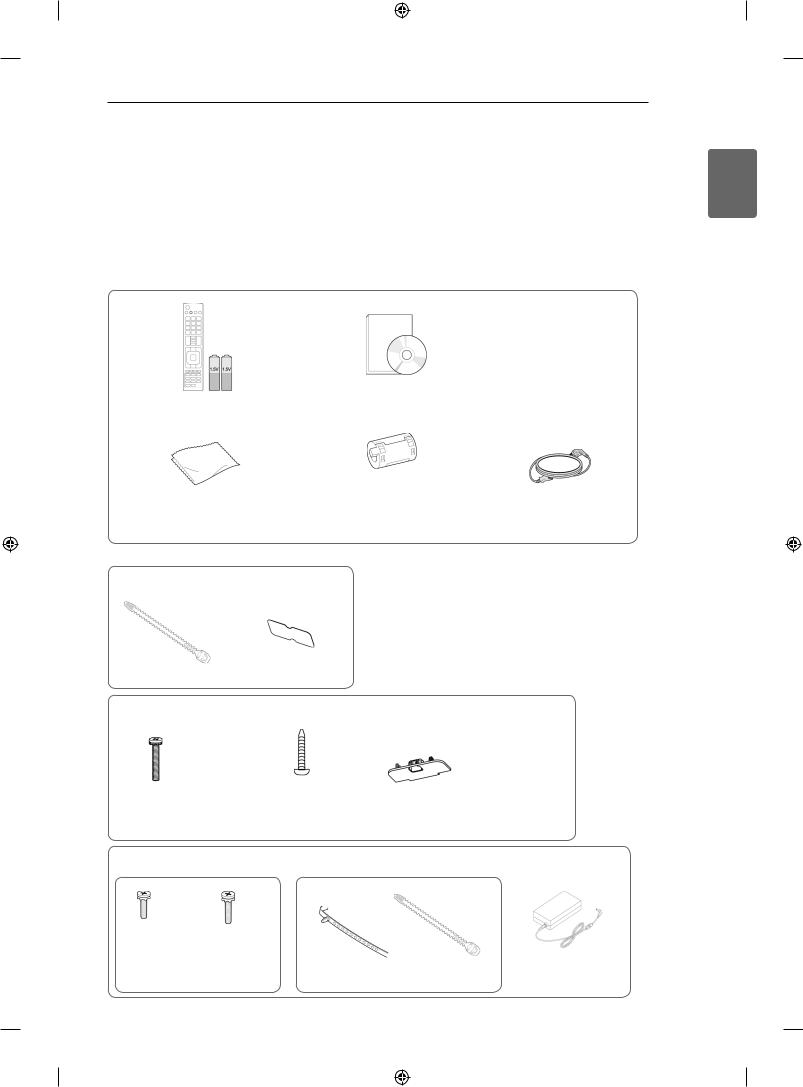
Unpacking
Check your product box for the following items. If there are any missing accessories, contact the local dealer where you purchased your product. The illustrations in this manual may differ from the actual product and item.
ENGLISH
Remote control and batteries(AAA) |
Owner’s Manual |
Polishing cloth1 (This item is not |
Ferrite core |
Power Cord (This item is not |
included for all models.) |
(Depending on model) |
included for all models.) |
1 Gently wipe the spots on the cabinet with the polishing cloth.
Only 22LK33**
Cable Holder |
Protection cover |
|
|
Only 26/32LK33**, 32/37/42LK43**, 32/42/47LK53**, 32/37/42LK45**, 32/42LK55** |
|||
x 8 |
|
|
|
(M4x20) |
(Except for 47LK53**) |
|
|
Screw for assembly |
Screw for fixing |
Protection cover |
|
Only 19/22/26LV25**, 22/26LV55**, 19/22LV23** |
|
||
x 2 |
x 2 |
or |
|
|
|
|
|
(M4x6) |
(M4x16) |
|
|
Screw for assembly |
Cable Holder |
DC Adapter |
|

ENGLISH
4 ASSEMBLING AND PREPARING
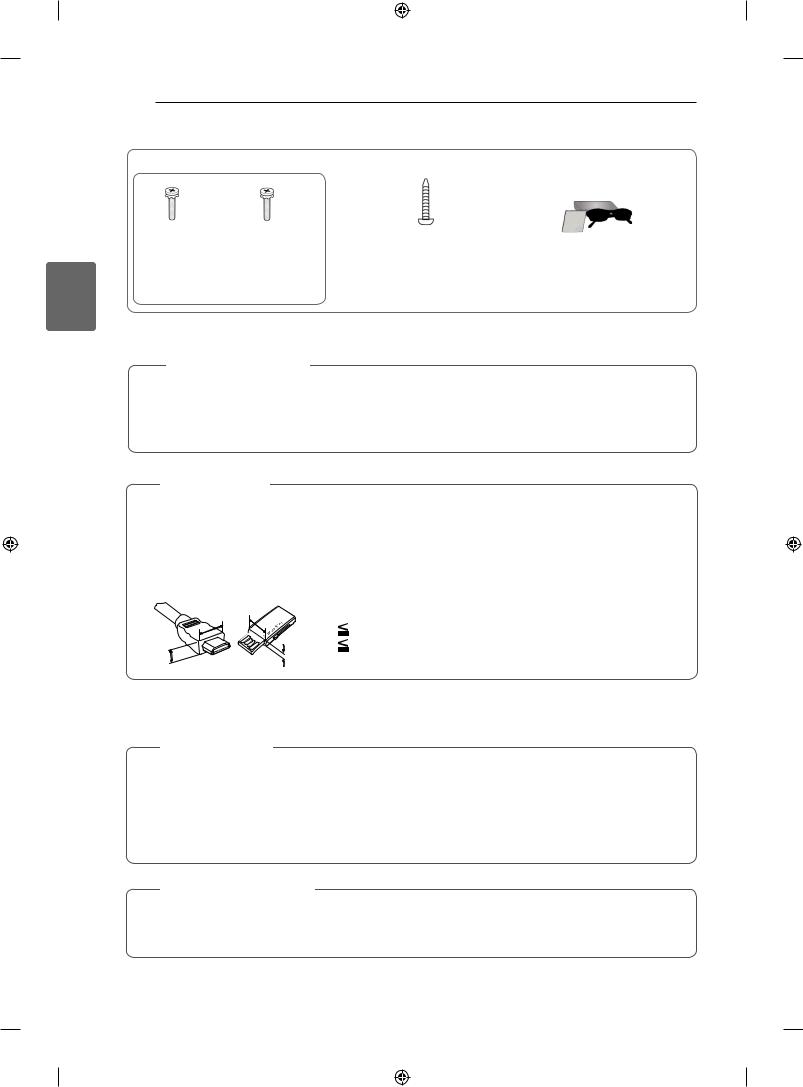
Only 32LV25**, 32/37/40/42/47LV35**, 32/42/47/55LW45**, 32/37/42/47LV45**, 32/42LV34**
x 8 |
x 8 |
|
x 2 |
|
|
|
|
(M4x12) |
(M4x14) |
(Only 32LV25**, |
(Only 32/ |
(Except for 32LV25**) |
(Only 32LV25**) |
32/37LV35**, 32LW45**, |
42/47/55LW45**) |
Screw for assembly |
32/37LV45**, 32LV34**) |
3D Glasses1 |
|
Screw for fixing |
|||
(AG-P110, AG-F110)
1 The number of 3D glasses may differ depending on the country.
Caution
yyDo not use any pirated items to ensure the safety and product life span.
yyAny damages or injuries by using pirated items are not covered by the warranty.
 NOTE
NOTE
yyThe items supplied with your product may vary depending on the model.
yyProduct specifications or contents of this manual may be changed without prior notice due to upgrade of product functions.
yyFor an optimal connection, HDMI cables and USB devices should have bezels less than 10 mm thick and 18 mm width.(Except for 22/26/32LK33**, 32/37/42LK43**, 32/42/47LK53**)
|
*A |
10 mm |
A |
*B |
18 mm |
A |
|
Parts and buttons
 NOTE
NOTE
yyTV can be placed in standby mode in order to reduce the power consumption. And TV should be turned off if it will not be watched for some time, as this will reduce energy consumption.
yyThe energy consumed during use can be significantly reduced if the level of brightness of the picture is reduced, and this will reduce the overall running cost.
 Caution
yyDo not step on the glass stand or subject it to any impact. It may break, causing possible injury from fragments of glass, or the TV may fall.
yyDo not drag the TV. The floor or the product may be damaged.
ASSEMBLING AND PREPARING 5
yyImage shown may differ from your TV.
Only 22/26/32LK33**, 32/37/42LK43**, 32/42/47LK53**(Except for 32/42/47LK530T)
|
|
(Only 22/26/32LK33**) |
|
Screen |
|
|
(Only 22LK33**) |
||||||||||||||||||||
|
|
|
|
|
|||||||||||||||||||||||
|
|
|
|
|
|
|
|
|
|
|
|
|
|||||||||||||||
(Only 32/37/42LK43**, |
|
|
|
|
|
|
|
|
|
|
(Only 26/32LK33**) |
||||||||||||||||
|
|
|
|
|
|
|
|
|
|||||||||||||||||||
|
|
|
|
|
|
|
|||||||||||||||||||||
|
32/42/47LK53**) |
|
|
|
|
|
|
|
|
|
|
|
(Only 32/37/42LK43**) |
||||||||||||||
|
|
|
|
|
|
|
|
|
|
|
|
|
|
|
|
|
|
|
|
|
|
|
|
||||
|
|
|
|
|
|
|
|
|
|
|
|
|
|
|
|
|
|
|
|
|
|
|
|
|
|
||
|
|
|
|
|
|
|
|
|
1 |
|
|
|
|
|
|
|
|
|
|
|
|
|
|
|
(Only 32/42/47LK53**) |
||
|
|
|
|
|
|
|
|
|
|
|
|
|
|
|
|
|
|
|
|
|
|
|
|
||||
|
|
|
|
|
|
|
|
|
|
|
|
|
|
|
|
|
|
|
|
|
|
||||||
|
|
|
|
|
|
|
|
|
|
|
|
|
|
|
|
|
|
|
|
|
|
|
|
|
|||
|
|
|
|
|
|
|
|
|
|
|
|
|
|
|
|
|
|
|
|
||||||||
|
|
|
|
|
|
|
|
|
|
|
2 |
|
|
|
|
|
|
|
|
|
|
|
|
|
|
|
|
|
|
|
|
|
|
|
|
|
|
|
|
|
|
|
|
|
|
|
|
|
|
|
|
|
|||
|
|
|
|
|
|
|
|
|
|
|
|
|
|
|
|
|
|
|
|
||||||||
|
|
|
|
|
|
|
3 |
|
|
|
|
|
|
|
|
|
|
|
|
|
|
|
|
||||
|
|
|
|
|
|
|
|
|
|
|
|
|
|
|
|
|
|
|
|
|
|
||||||
|
|
|
|
|
|
4 |
|
|
|
|
|
|
|
|
Speakers |
|
|
|
|
|
|
|
|||||
|
|
|
|
|
|
|
|
|
|
|
|
|
|
|
|
|
|
|
|
|
|
|
|
|
|
|
|
|
|
|
|
|
|
|
|
|
|
|
|
|
|
|
|
|
|
|
|
|
|
|
|
|
|
|
|
|
|
|
|
|
|
|
|
|
|
|
|
|
|
|
|
|
|
|
|
|
|
|
|
|
|
|
|
|
|
|
|
|
|
|
|
|
|
|
|
|
|
|
|
|
|
|
|
|
|
|
|
|
|
|
|
|
No. |
Description |
|
|
|
|
|
|
Remote control and intelligent1 |
||||||||||||||||||
|
|
|
|
|
|
|
|
|
|
|
|
|
|
|
|
|
|
|
|
|
|
|
|
||||
|
1 |
USB input |
|
|
|
|
|
|
|||||||||||||||||||
|
|
|
|
|
|
|
sensors |
||||||||||||||||||||
|
2 |
PCMCIA Card Slot |
|
|
|
|
|
|
Power Indicator |
||||||||||||||||||
|
3 |
HDMI IN(Except for |
|
|
|
|
|
|
(Can be adjusted using |
||||||||||||||||||
|
|
|
|
|
|
|
the Power Indicator in the |
||||||||||||||||||||
|
22LK33**) |
|
|
|
|
|
|
||||||||||||||||||||
|
|
|
|
|
|
|
|
OPTION menu.) |
|||||||||||||||||||
|
4 |
Headphone Socket |
|
|
|
|
|
|
|||||||||||||||||||
|
|
|
|
|
|
|
|
|
|
|
|||||||||||||||||
|
|
|
|
|
|
|
|
|
|
|
|
|
|
|
|
|
|
|
|
|
|
|
|
|
|
|
|
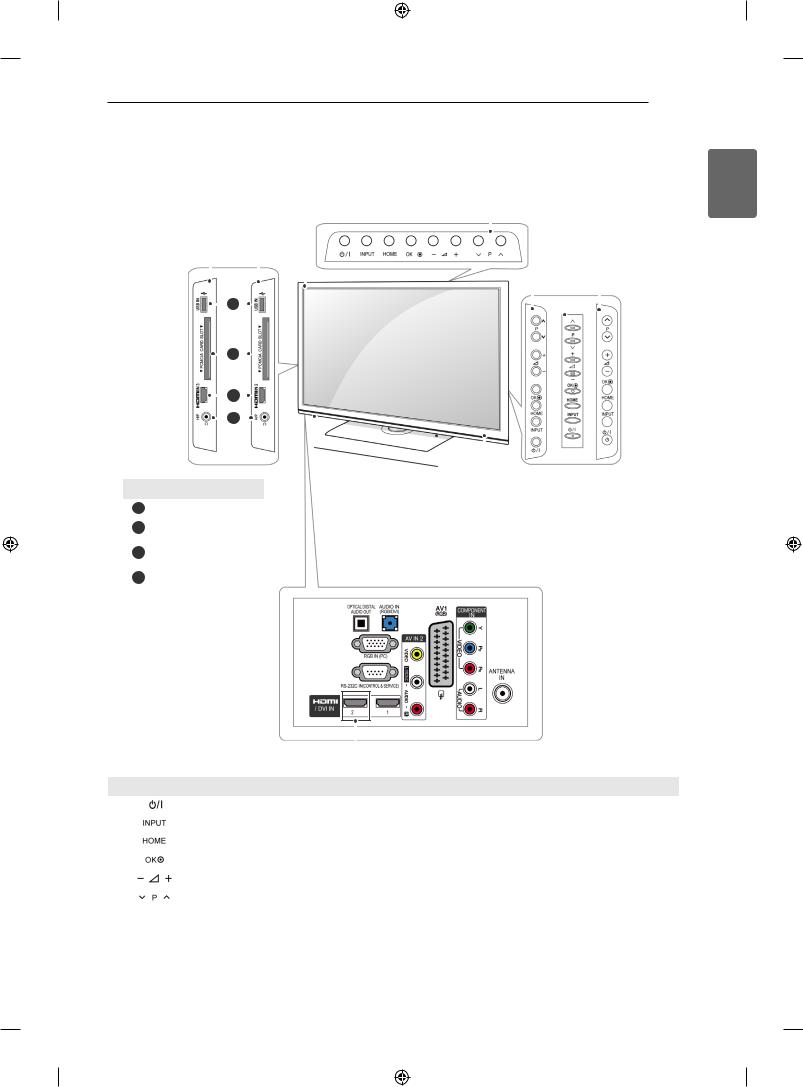
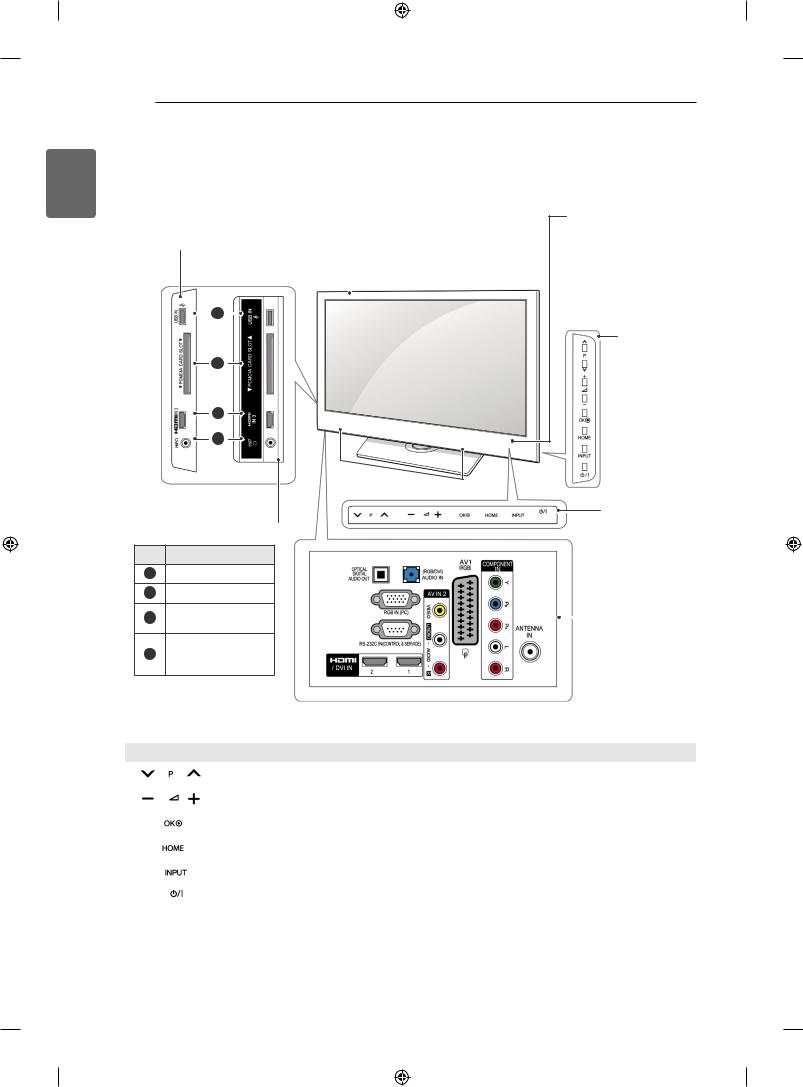
 Connection panel
ENGLISH
|
(Except |
|
for 22/26/32LK33**) |
|
|
||
|
|
|
|
Button |
|
|
Description |
|
Turns the power on or off |
||
|
Changes the input source |
||
|
|
|
|
|
Accesses the main menus, or saves your input and exits the menus |
||
|
|
|
|
|
Selects the highlighted menu option or confirms an input |
||
|
Adjusts the volume level |
||
|
|
|
|
|
Scrolls through the saved programmes |
||
|
|
|
|
1Intelligent sensor - Adjusts the image quality corresponding to the surrounding environment.(Only 32/42/47LK53**)
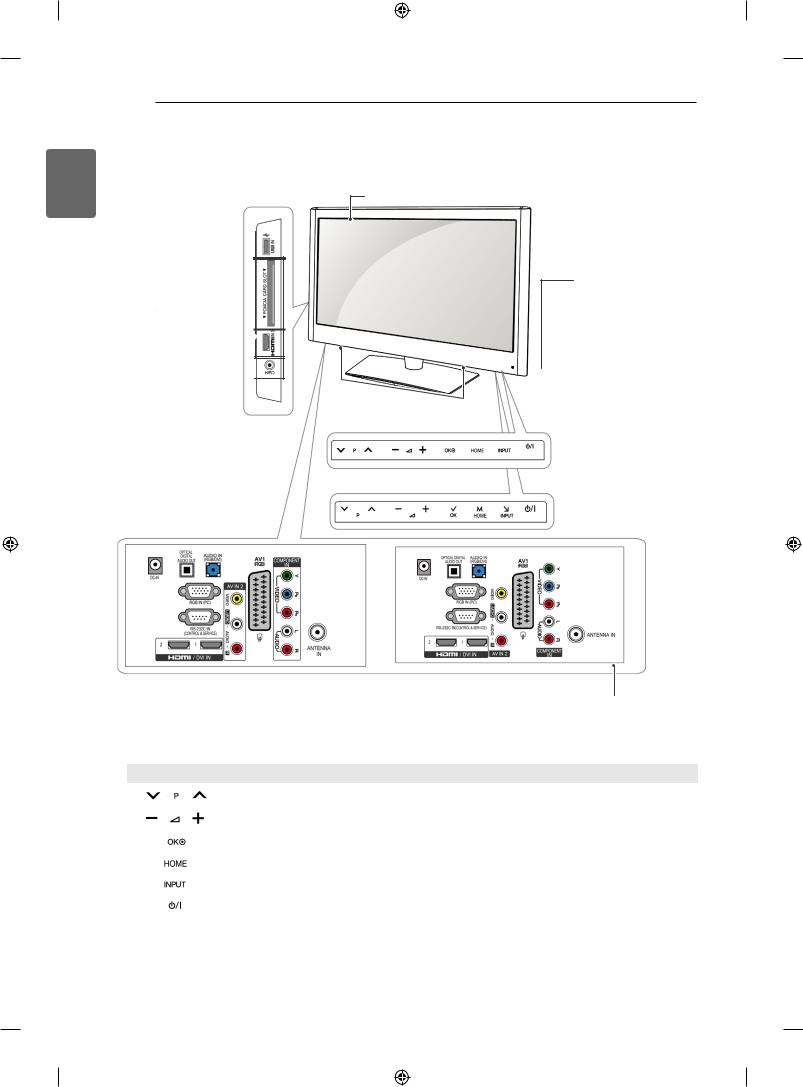
6 ASSEMBLING AND PREPARING
ENGLISH
yyImage shown may differ from your TV.
Only 19/22/26LV25**, 19/22LV23**, 22/26LV55**
Screen
USB input 

PCMCIA Card Slot 
HDMI IN (Only 26LV25**, 26LV55**) 
Headphone Socket 

Speakers
(Only 19/22/26LV25**, 19/22LV23**)
Remote control and intelligent1 sensors
Power Indicator
(Can be adjusted using  the Power Indicator in the
OPTION menu.)
 Touch buttons2
(Only 22/26LV55**)
(Only 19/22/26LV25**, 19/22LV23**) |
(Only 22/26LV55**) |
Connection panel
Button |
Description |
|
Scrolls through the saved programmes |
|
|
|
Adjusts the volume level |
|
|
|
Selects the highlighted menu option or confirms an input |
|
|
|
Accesses the main menus, or saves your input and exits the menus |
|
|
|
Changes the input source |
|
|
|
Turns the power on or off |
|
|
1 Intelligent sensor - Adjusts the image quality corresponding to the surrounding environment. 2. Touch Button - You can use the desired button function by touching.
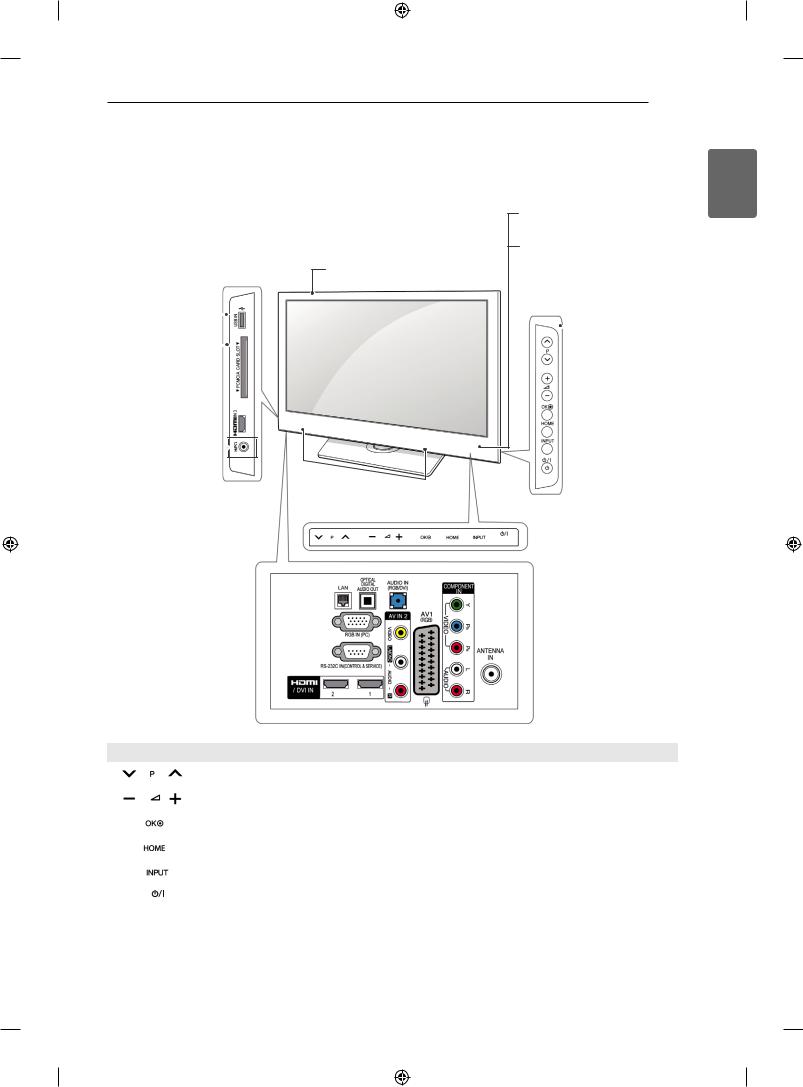
ASSEMBLING AND PREPARING 7
yyImage shown may differ from your TV.
Only 32/42/47LK530T, 32/42LK550T, 32/37/42/47LV355T
Remote control and intelligent1 sensors
Power Indicator
(Can be adjusted using Screen the Power Indicator in the
OPTION menu.)
USB input |
|
|
|
|
|
(Only |
||
|
|
|
|
|||||
|
|
|
|
|
|
|
|
|
|
|
|
|
|
|
|
|
|
PCMCIA Card |
|
|
|
|
|
|
32/42/47LK530T) |
|
|
|
|
|
|
|
|||
|
|
|
||||||
Slot |
|
|
|
|
||||
|
|
|
|
|
|
|
|
|
HDMI IN 


Headphone 

Socket
Speakers
 Touch buttons2
(Except for 32/42/47LK530T)
 Connection panel
ENGLISH
Button |
Description |
|
Scrolls through the saved programmes |
|
|
|
Adjusts the volume level |
|
|
|
Selects the highlighted menu option or confirms an input |
|
|
|
Accesses the main menus, or saves your input and exits the menus |
|
|
|
Changes the input source |
|
|
|
Turns the power on or off |
|
|
1 Intelligent sensor - Adjusts the image quality corresponding to the surrounding environment. 2. Touch Button - You can use the desired button function by touching.
ENGLISH
8 ASSEMBLING AND PREPARING
yyImage shown may differ from your TV.
Only 32/37/42LK45**, 32/42LK55**, 32LV25**, 32/42LV34**, 32/37/40/42/47LV35**, 32/37/42/47LV45**, 32/42/47/55LW45**(Except for 32/42LK550T, 32/37/42/47LV355T)
(Only 32/37/42LK45**, |
|
|
|
Power Indicator |
||||
|
|
|
||||||
|
|
|
(Can be adjusted using |
|||||
32/42LK55**) |
|
Screen |
|
the Power Indicator in the |
||||
|
||||||||
|
|
|
|
|
|
|
|
OPTION menu.) |
|
|
1 |
|
|
|
|
|
|
|
|
|
|
|
|
|
||
2
3
4
Speakers
(Except for 32/37/ 42LK45**, 32/42LK55**)
No. Description
1USB input
2PCMCIA Card Slot
3 |
HDMI IN(Except for |
|
Connection panel |
32/42LV34**) |
|
||
|
|
|
Headphone Socket
4(Except for 32/42LV34**)
Button |
Description |
|
Scrolls through the saved programmes |
|
|
|
Adjusts the volume level |
|
|
|
Selects the highlighted menu option or confirms an input |
|
|
|
Accesses the main menus, or saves your input and exits the menus |
|
|
|
Changes the input source |
|
|
|
Turns the power on or off |
|
|
1 Intelligent sensor - Adjusts the image quality corresponding to the surrounding environment. 2. Touch Button - You can use the desired button function by touching.
ASSEMBLING AND PREPARING 9
Not using the Desk Type Stand
yyImage shown may differ from your TV.
(Only 26/32LK33**, 32/37/42LK43**, 32/42/47LK53**, 32/37/42LK45**, 32/42LK55**)
1Push the supplied protection cover into the opening at the bottom of the TV until clicking sound.
Protection cover
Mounting on a table
yyImage shown may differ from your TV.
1Lift and tilt the TV into its upright position on a table.
-Leave a 10 cm (minimum) space from the wall for proper ventilation.
|
10 cm |
|
cm |
10 cm |
10 |
|
|
|
10 cm |
(Only 22LK33**)
1Lay the TV with the screen side down on a flat surface.
2Remove the 2 screws and pull the stand away from the TV.
3Push the supplied protection cover into the opening at the bottom of the TV until it locks in place.
This will protect the opening from accumulating dust and dirt.
2 Connect the power cord to a wall outlet.
 Caution
yyDo not place the TV near or on sources of heat, as this may result in fire.
 NOTE
NOTE
yySwivel 20 degrees to the left or right and adjust the angle of the TV to suit your view.(Except for 22LK33**, 19/22/26LV25**, 22/26LV55**, 19/22LV23**)
ENGLISH
Protection cover
ENGLISH
10 ASSEMBLING AND PREPARING
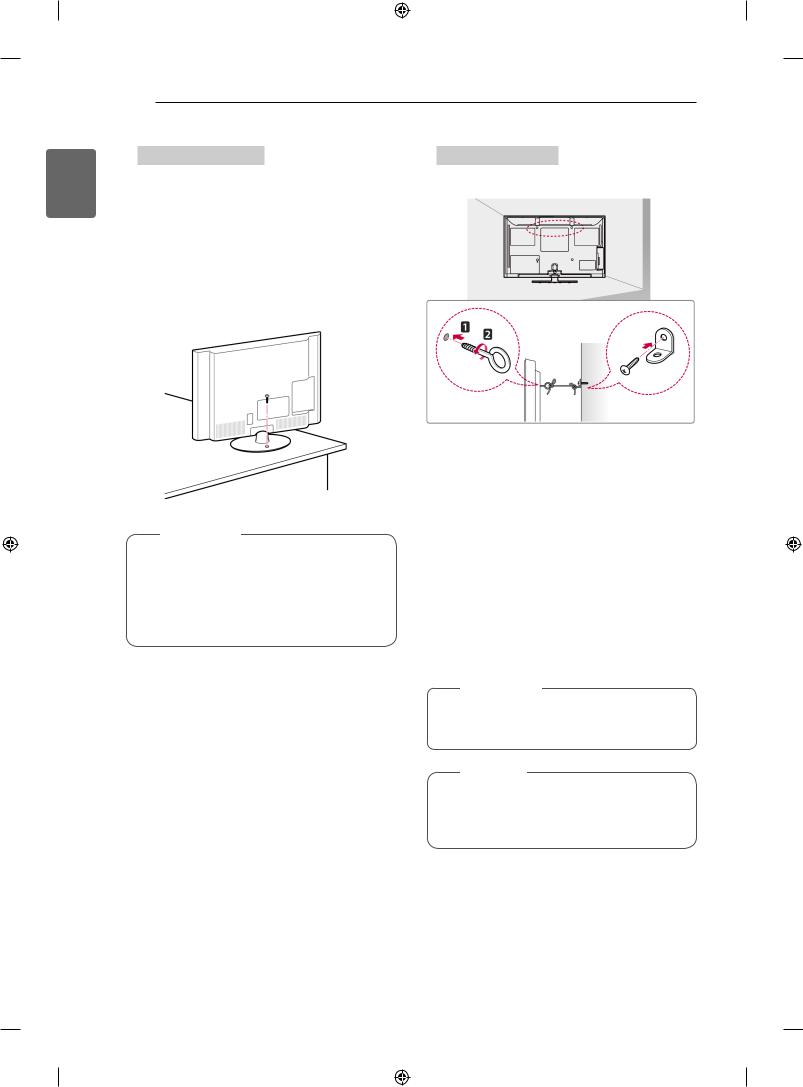
Securing the TV to a table
yyImage shown may differ from your TV. (Only 26/32LK33**, 32/37/42LK43**, 32/37/42LK45**, 32/42LK53**, 32/42LK55**,
32LV25**, 32/37LV35**, 32LW45**, 32/37LV45**, 32LV34**)
Fix the TV to a table to prevent from tilting forward, damage, and potential injury.
Mount the TV on a table, and then insert and tighten the supplied screw on the rear of the stand.
 warning
yyTo prevent TV from falling over, the TV should be securely attached to the floor/ wall per installation instructions. Tipping, shaking, or rocking the TV may cause injury.
Securing the TV to a wall
yyImage shown may differ from your TV.
1Insert and tighten the eye-bolts, or TV brackets and bolts on the back of the TV.
-If there are bolts inserted at the eye-bolts position, remove the bolts first.
2Mount the wall brackets with the bolts to the wall.
Match the location of the wall bracket and the eye-bolts on the rear of the TV.
3Connect the eye-bolts and wall brackets tightly with a sturdy rope.
Make sure to keep the rope horizontal with the flat surface.
 Caution
yyMake sure that children do not climb on or hang on the TV.
 NOTE
NOTE
yyUse a platform or cabinet that is strong and large enough to support the TV securely.
ASSEMBLING AND PREPARING 11
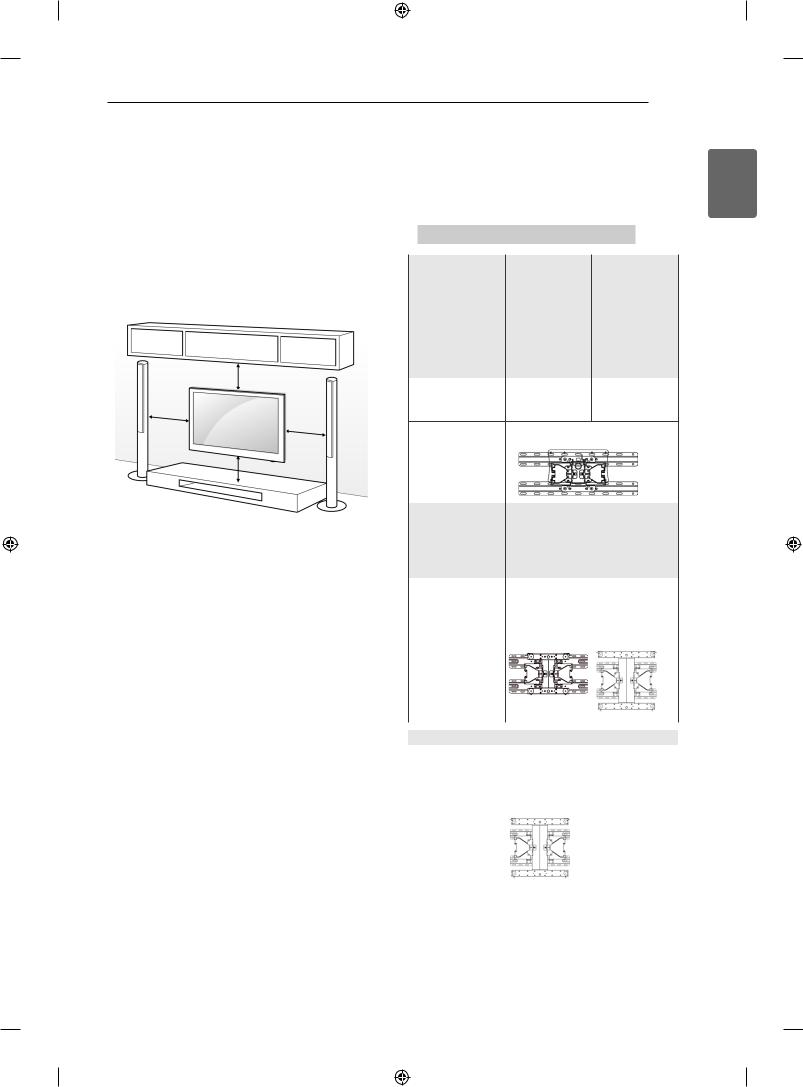
Mounting on a wall
Attach a wall mount bracket at the rear of the TV carefully and install the wall mount bracket on a solid wall perpendicular to the floor. When you attach the TV to other building materials, please contact qualified personnel.
LG recommends that wall mounting be performed by a qualified professional installer.
10 cm
10 cm
10 cm
10 cm
Make sure to use screws and wall mount bracket that meet the VESA standard. Standard
dimensions for the wall mount kits are described in the following table.
Separate purchase(Wall Mounting Bracket)
Model |
22LK33** |
26/32LK33** |
|
19/22/26LV25** |
32LK43** |
|
22/26LV55** |
32LK45** |
|
19/22LV23** |
32LK53** |
|
|
32LK55** |
|
|
32LV25** |
|
|
32LV35** |
|
|
32LV45** |
|
|
32LW45** |
|
|
32LV34** |
VESA (A x B) |
100 x 100 |
200 x 100 |
Standard screw |
M4 |
M4 |
Number of screws 4 |
4 |
|
Wall mount LSW100B, LSW100BG bracket
Model |
37/42LK43** |
40/42/47LV35** |
|
37/42LK45** |
42/47LV45** |
|
42LK55** |
42/47/55LW45** |
|
42/47LK53** |
|
|
37LV35** |
|
|
37LV45** |
|
VESA (A x B) |
200 x 200 |
400 x 400 |
Standard screw |
M6 |
M6 |
Number of screws 4 |
4 |
|
Wall mount |
LSW200B, |
LSW400B, |
bracket |
LSW200BG |
LSW400BG, |
|
|
|
Model |
42LV34** |
VESA (A x B) |
400 x 400 |
Standard screw |
M6 |
Number of screws |
4 |
Wall mount |
LSW400BX, |
bracket |
LSW400BXG |
|
|
ENGLISH
ENGLISH
12 ASSEMBLING AND PREPARING
 Caution
yyDisconnect the power first, and then move or install the TV. Otherwise electric shock may occur.
yyIf you install the TV on a ceiling or slanted wall, it may fall and result in severe injury. Use an authorized LG wall mount bracket and contact the local dealer or qualified personnel.
yyDo not over tighten the screws as this may cause damage to the TV and void your warranty.
yyUse the screws and wall mount bracket that meet the VESA standard. Any damages
or injuries by misuse or using an improper accessory are not covered by the warranty.
 NOTE
NOTE
yyUse the screws that are listed on the VESA standard screw specifications.
yyThe wall mount kit includes an installation manual and necessary parts.
yyThe length of screws may differ depending on the wall mount. Make sure to use the proper length.
yyFor more information, refer to the manual supplied with the wall mount bracket.
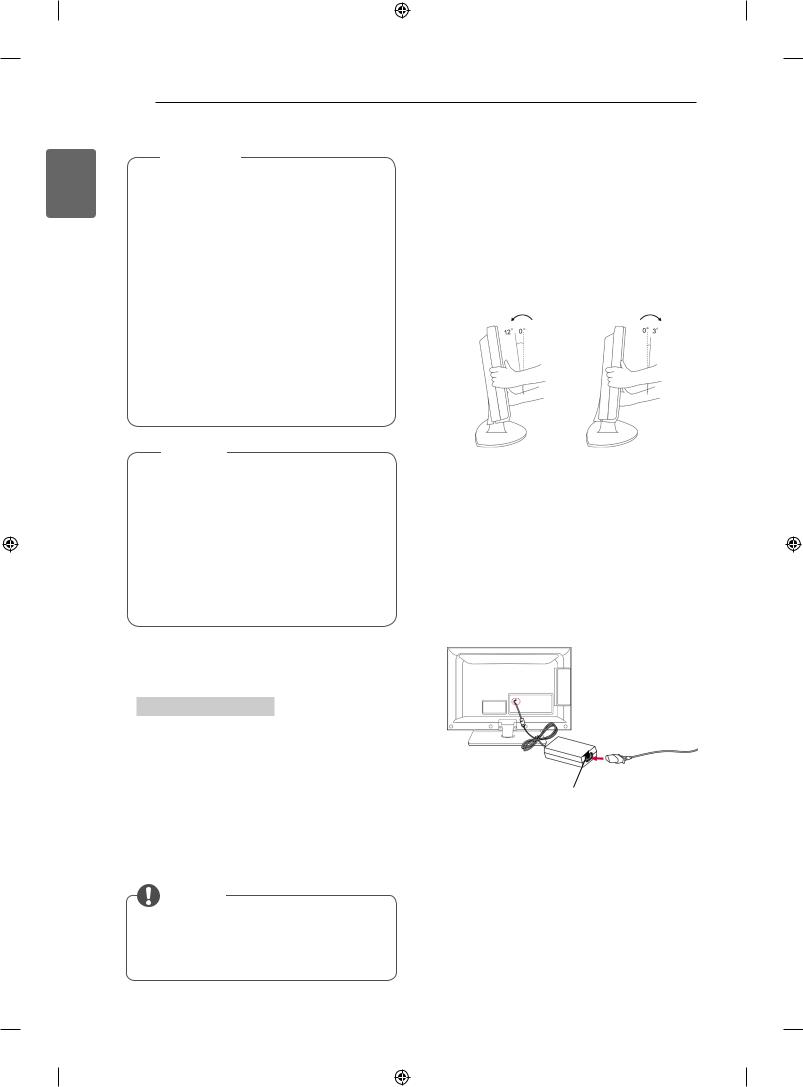
Positioning your display
yyImage shown may differ from your TV.
(Only 22LK33**)
Adjust the position of the panel in various ways for maximum comfort.
• Tilt range
Connection of TV
yyImage shown may differ from your TV.
(Only 19/22/26LV25**, 22/26LV55**, 19/22LV23**)
Additional information of the manual
Viewing the owner’s manual
The owner’s manual in a PDF file format is supplied on a CD. Install the Adobe Acrobat Reader to view the owner’s manual on your PC.
1Insert the supplied CD.
The web page appears automatically.
2Click Owner’s Manual on the web page.
3View the owner’s manual.
 NOTE
NOTE
web page does not appear automatically, access My computer and then click LG and index.htm to view the owner’s manual.
DC Adapter
1Connect the antenna cable to the antenna input port on the TV.
2Connect the DC adapter plug to the power input jack on the TV.
3Connect the power cord to the DC adapter first, then plug the power cord into the wall power outlet.
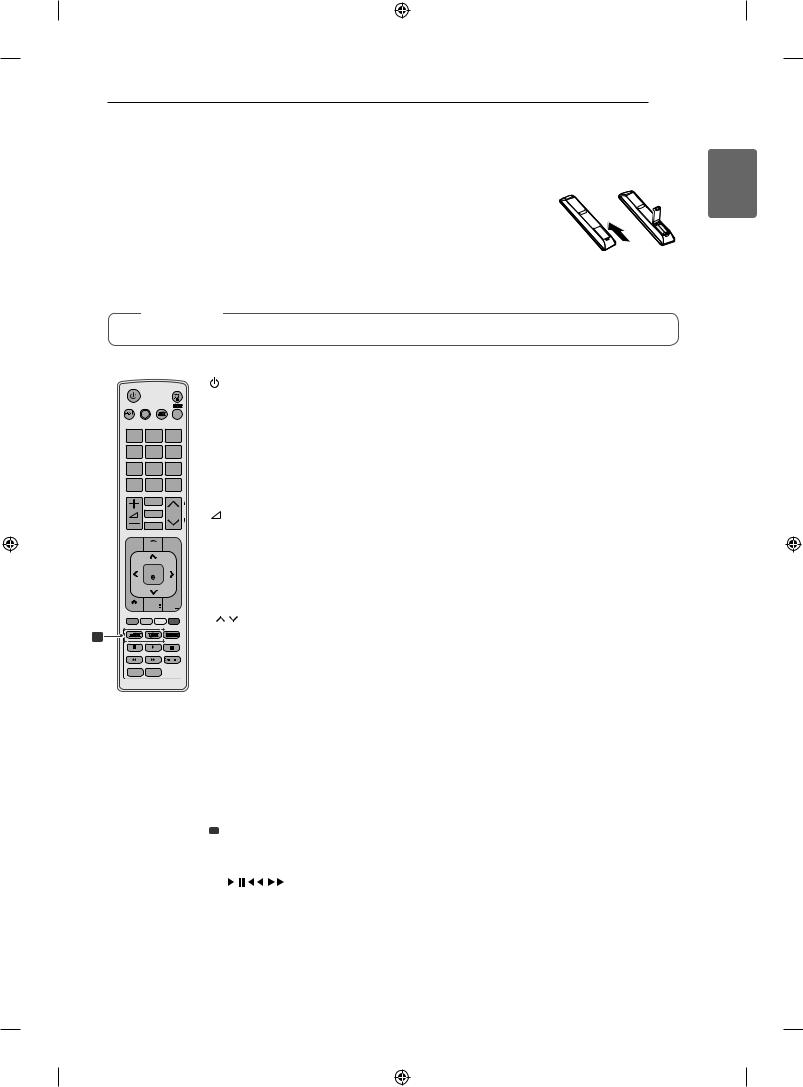
REMOTE CONTROL 13
REMOTE CONTROL
The descriptions in this manual are based on the buttons on the remote control. Please read this manual carefully and use the TV correctly.
To replace batteries, open the battery cover, replace batteries (1.5 V AAA) matching  and
and  ends to the label inside the compartment, and close the battery cover. Be sure to point the remote control to the remote control sensor on the TV.
To remove the batteries, perform the installation actions in reverse.
 Caution
yyDo not mix old and new batteries, as this may damage the remote control.
yyImage shown may differ from your TV.
LIGHT
ENERGY AV MODE |
INPUT |
TV/
RAD
SAVING
1 2 3
4 5 6
7 8 9
LIST 0 Q.VIEW
MARK
FAV
CHAR/NUM |
|
P |
3D |
P |
A |
EG |
||
DELETE |
|
|
MUTE
GUIDE Home Q.MENU
OK
BACK INFO  EXIT
EXIT

3D SETTING
1
RATIO AD
|
(POWER) |
Turns the TV on or off. |
|
LIGHT |
Illuminates the remote control buttons. |
||
ENERGY SAVING |
Adjusts the brightness of the screen to reduce energy consumption . |
||
AV MODE |
Selects an AV mode. |
||
INPUT |
Changes the input source; Turns the TV on . |
||
TV/RAD |
Selects Radio, TV and DTV programme. |
||
Number buttons |
Enters numbers. |
||
LIST |
Accesses the saved programme list. |
||
Q.VIEW |
Returns to the previously viewed programme. |
||
+ - |
Adjusts the volume level. |
||
MARK |
Selects a menu or option. |
||
FAV |
Accesses your favourite programme list. |
||
CHAR/NUM |
Switches between Letter and Number input modes. |
||
3D (Only 3D Models) |
Used for viewing 3D video. |
||
DELETE |
Deletes letters and numbers. |
||
MUTE |
Mutes all sounds. |
||
P |
Scrolls through the saved programmes. |
||
PAGE |
Moves to the previous or next screen. |
||
GUIDE |
Shows programme guide. |
||
Home |
Accesses the main menus. |
||
Q. MENU |
Accesses the quick menus. |
||
Navigation buttons |
Scrolls through menus or options. |
||
(up/down/left/right) |
|
||
OK |
Selects menus or options and confirms your input. |
||
BACK |
Returns to the previous level. |
||
INFO |
Views the information of the current programme and screen. |
||
EXIT |
Clears all on-screen displays and return to TV viewing. |
||
Coloured buttons |
These buttons are used for teletext (on TELETEXT models only), |
||
|
|
|
Programme edit. |
3D SETTING |
Use this to view 3D video. |
||
(Only 3D Models) |
|
||
1 TELETEXT |
These buttons are used for teletext. |
||
BUTTONS |
For further details, see the ‘Teletext’ section. |
||
SUBTITLE |
Recalls your preferred subtitle in digital mode. |
||
Control buttons |
Controls the MY MEDIA menus, or the SIMPLINK compatible devices |
||
( |
|
, , , , ) |
(USB,SIMPLINK). |
|
|||
|
|
|
|
SIMPLINK |
Accesses the AV devices connected to the TV; |
||
|
|
|
Opens the SIMPLINK menu. |
RATIO |
Resizes an image. |
||
AD |
Switches the Audio Description On or Off. |
||
ENGLISH
ENGLISH
14 WATCHING TV
WATCHING TV
Connecting an antenna
Connect an antenna to watch TV while referring to the following.
To prevent damage do not connect to the mains outlet until all connections are made between the devices.
Connect the TV to a wall antenna socket with an RF cable (75 Ω).
 NOTE
NOTE
y yFor optimum picture quality, adjust antenna direction.
y yIn poor signal areas, to achieve better picture quality it may be necessary to install a signal amplifier to the antenna.
y yIf the image quality is poor with an antenna connected, aim the antenna to the correct direction.
y yAn antenna cable and converter are not supplied.
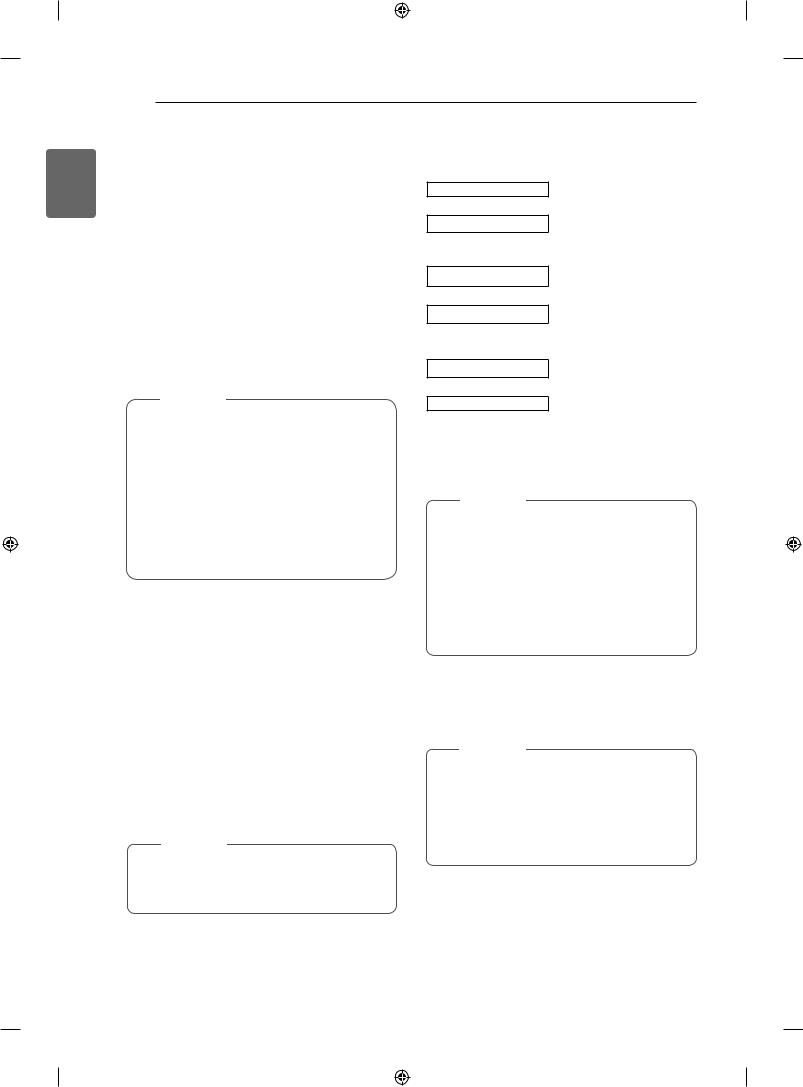
Turning the TV on for the first time
When you turn the TV on for the first time, the Initial setting screen appears. Select a language and customize the basic settings.
1Connect the power cord to a power outlet.
2In Standby mode, press  (POWER) to turn the TV on.
The Initial setting screen appears if you turn the TV on for the first time.
 NOTE
NOTE
y yYou can also access Factory Reset by accessing OPTION in the main menus.
3Follow the on-screen instructions to customize your TV settings according to your preferences.
|
Selects a language to display. |
Language |
Mode Setting
Power Indicator
Selects Home Use for the home environment.
Sets the power indicator. (When you select Home Use from Mode Setting - only LED LCD TV)
Country
Time Zone
Set Password
Auto Tuning
 NOTE
NOTE
Selects a country to display. (Depending on model)
Selects the time zone and daylight saving.
(When Russia is selected for Country)
Set the password.
(When France is selected for Country)
Scans and saves available programmes automatically.
y yFor those countries without confirmed DTV broadcasting standards, some DTV features might not work, depending on the DTV broadcasting environment.
y yWhen France is selected for Country, password is not ‘0’, ‘0’, ‘0’, ‘0’ but ‘1’, ‘2’, ‘3’, ‘4’.
4When the basic settings are complete, press OK.
 NOTE
NOTE
y yIf you do not complete the Initial setting, it will appear whenever the TV turns on.
y yDisconnect the power cord from the power outlet when you do not use the TV for a long period of time.
5 To turn the TV off, press  (POWER).

TROUBLESHOOTING 15
TROUBLESHOOTING
Problem |
|
Resolution |
|
Cannot control the TV with the |
yyCheck the remote control sensor on the product and try again. |
||
remote control. |
yyCheck if there is any obstacle between the product and the remote control. |
||
|
yyCheck if the batteries are still working and properly installed ( |
to , to ). |
|
|
yyCheck if the appropriate input mode such as TV or VCR is set for using the |
||
|
remote control. |
|
|
No image display and no sound is |
yyCheck if the product is turned on. |
|
|
produced. |
yyCheck if the power cord is connected to a wall outlet. |
|
|
|
yyCheck if there is a problem in the wall outlet by connecting other products. |
||
Image appears slowly when the TV |
yyThe image is muted during the product startup process. This is normal. If the |
||
turns on. |
image does not appear in a few minutes, unplug the TV for 30 seconds and try |
||
|
again. If the image still does not appear, contact the authorized service center |
||
|
in your local area. |
|
|
Cannot connect external devices. |
yyRefer to the “Connection overview” and connect an external device. |
||
The TV turns off suddenly. |
yyCheck the power control settings. The power supply may be interrupted. |
||
|
yyCheck if the Auto sleep feature is activated in the Time settings. |
||
|
Refer to the “Sleep Timer”. |
|
|
|
yyIf there is no signal while the TV is on, the TV will turn off automatically after |
||
|
15 minutes of inactivity.(Except for 22/26/32LK335C, 32/37/42LK455C, |
||
|
19/22/26/32LV255C, 32/37/42/47LV355C) |
|
|
|
|
|
|
Problem |
|
Resolution |
|
No sound is produced while images |
yyPress |
+ or - button. |
|
are displaying. |
yyCheck if the sound is muted by pressing MUTE. |
|
|
|
yyScroll to other channels. There may a problem with the broadcast. |
||
|
yyCheck if the audio cables are connected properly. |
|
|
One of the speakers produce noises |
yyA change in ambient humidity or temperature may result in an unusual noise |
||
or does not produce sound. |
when the product turns on or off. |
|
|
|
yyThere is no problem with your product. |
|
|
|
|
|
|
Problem |
|
Resolution |
|
An image displays in black and |
yyAdjust the colour setting in the PICTURE menu. |
|
|
white or the colour quality is poor. |
yyKeep a sufficient distance between this product and other electronic products. |
||
|
yyScroll to other channels. There may a problem with the broadcast. |
||
Horizontal or vertical bars appears |
yyCheck if there are local interferences such as an electrical appliance or power |
||
or images blur |
tool. |
|
|
Lines or streaks appear on images |
yyCheck the antenna or aim the antenna to the proper direction. |
|
|
|
|
||
Afterimages (ghosts) appear when |
yyPixels may have been damaged from a fixed image displayed for a long time |
||
the product turns off |
(image burn). Use a screen saver to prevent the pixel damage on the screen. |
||
The power is on but the screen |
yyAdjust the brightness and contrast in the PICTURE menu. |
|
|
appears extremely dark. |
|
|
|
“No Signal” appears on the screen. |
yyCheck if the signal cable is connected between the TV and products properly. |
||
|
yyCheck the selected input source by pressing INPUT. |
|
|
|
|
||
Black spots appear on the screen. |
yySeveral pixels in red, green, white, or black may appear on the screen that can |
||
|
attribute to the characteristics of the LCD panel. |
|
|
|
yyThis is normal. |
|
|
The display offset is wrong. |
yyAdjust the position setting in the PICTURE menu. |
|
|
|
yyCheck if the video card resolution and frequency are supported by the product. |
||
|
If the frequency is out of range, set to the recommended resolution using the |
||
|
display settings on the external device. |
|
|
Thin lines appear in the background |
yyCheck the video cable connections. |
|
|
of the screen. |
|
|
|
Horizontal noises appear or |
yyAdjust the Phase setting in the PICTURE menu. Refer to the |
“SCREEN”. |
|
characters blur. |
|
|
|
The reception on some channels is |
yyScroll to other channels. There may a problem with the broadcast. |
||
poor |
yyThe station signal may be weak. Aim the antenna to the proper direction. |
||
|
yyCheck if there is local interference such as an electrical appliance or power |
||
|
tool. |
|
|
ENGLISH

ENGLISH
16 SPECIFICATIONS
Weight
|
|
|
22LK33** |
26LK33** |
|
MODELS |
22LK330-ZB / 22LK330A-ZB |
26LK330-ZB / 26LK330A-ZB |
|
|
22LK330N-ZB / 22LK331-ZA |
26LK330N-ZB / 26LK331-ZA |
||
|
|
|
||
|
|
|
22LK330U-ZB / 22LK335C-ZB |
26LK330U-ZB / 26LK335C-ZB |
Weight |
|
With stand |
4.3 kg |
7.6 kg |
|
|
|
|
|
|
|
Without stand |
4.0 kg |
6.5 kg |
|
|
|
|
|
|
|
|
32LK33** |
32LK43** |
|
MODELS |
32LK330-ZB / 32LK330A-ZB |
32LK430-ZA / 32LK430N-ZA |
|
|
2LK330N-ZB / 32LK331-ZA |
|||
|
|
|
32LK430A-ZA / 32LK430U-ZA |
|
|
|
|
32LK330U-ZB / 32LK335C-ZB |
|
|
|
|
|
|
Weight |
|
With stand |
9.6 kg |
9.4 kg |
|
|
Without stand |
8.6 kg |
8.4 kg |
|
MODELS |
37LK43** |
42LK43** |
|
|
37LK430-ZA / 37LK430N-ZA |
42LK430-ZA / 42LK430N-ZA |
||
|
|
|
37LK430A-ZA / 37LK430U-ZA |
42LK430A-ZA / 42LK430U-ZA |
Weight |
|
With stand |
12.5 kg |
15.1 kg |
|
|
Without stand |
10.8 kg |
13.5 kg |
|
|
|
|
|
|
|
|
32LK45** |
37LK45** |
|
MODELS |
32LK450-ZB / 32LK450A-ZB |
37LK450-ZB / 37LK450A-ZB |
|
|
|
|
32LK450N-ZB / 32LK450U-ZB |
37LK450N-ZB / 37LK450U-ZB |
|
|
|
32LK451-ZA / 32LK455C-ZB |
37LK451-ZA / 37LK455C-ZB |
Weight |
|
With stand |
9.6 kg |
12.8 kg |
|
|
|
|
|
|
|
Without stand |
8.5 kg |
11.1 kg |
|
|
|
42LK45** |
32LK53** |
|
MODELS |
42LK450-ZB / 42LK450A-ZB |
32LK530-ZC / 32LK530N-ZC |
|
|
|
|
42LK450N-ZB / 42LK450U-ZB |
32LK530A-ZC / 32LK530U-ZC |
|
|
|
42LK451-ZA / 42LK455C-ZB |
32LK530T-ZC |
Weight |
|
With stand |
15.1 kg |
9.8 kg |
|
|
Without stand |
13.4 kg |
8.7 kg |
|
|
|
42LK53** |
47LK53** |
|
MODELS |
42LK530-ZC / 42LK530N-ZC |
47LK530-ZC / 47LK530N-ZC |
|
|
|
|
42LK530A-ZC/ 42LK530U-ZC |
47LK530A-ZC/ 47LK530U-ZC |
|
|
|
42LK530T-ZC |
47LK530T-ZC |
Weight |
|
With stand |
15.5 kg |
20.3 kg |
|
|
|
|
|
|
|
Without stand |
13.9 kg |
18.3 kg |
|
|
|
|
|
|
|
|
32LK55** |
42LK55** |
|
|
|
|
|
|
MODELS |
32LK550-ZA / 32LK550A-ZA |
42LK550-ZA / 42LK550A-ZA |
|
|
32LK550N-ZA / 32LK550U-ZA |
42LK550N-ZA / 42LK550U-ZA |
||
|
|
|
||
|
|
|
32LK551-ZB / 32LK550T-ZA |
42LK551-ZB / 42LK550T-ZA |
Weight |
|
With stand |
9.2 kg |
15.1 kg |
|
|
|
|
|
|
|
Without stand |
8.1 kg |
13.4 kg |
|
|
|
19LV25** / 19LV23** |
22LV25** / 22LV23** |
|
|
|
|
|
|
|
|
19LV2500-ZA / 19LV250N-ZA |
22LV2500-ZA / 22LV250N-ZA |
|
MODELS |
19LV250A-ZA / 19LV250U-ZA |
22LV250A-ZA / 22LV250U-ZA |
|
|
|
|
19LV2300-ZA / 19LV230N-ZA |
22LV2300-ZA / 22LV230N-ZA |
|
|
|
19LV230A-ZA / 19LV230U-ZA |
22LV230A-ZA / 22LV230U-ZA |
|
|
|
19LV255C-ZA |
22LV255C-ZA |
Weight |
|
With stand |
2.8 kg |
3.4 kg |
|
|
|
|
|
|
|
Without stand |
2.5 kg |
3.2 kg |
|
|
|
|
|
Product specifications shown above may be changed without prior notice due to upgrade of product functions.

SPECIFICATIONS 17
|
|
|
26LV25** |
32LV25** |
|
|
|
26LV2500-ZA / 26LV2540-ZE / |
32LV2500-ZA / 32LV2540-ZE / |
|
MODELS |
26LV250A-ZA / 26LV254A-ZE |
32LV250A-ZA / 32LV254A-ZE |
|
|
|
|
26LV250N-ZA / 26LV254N-ZE / |
32LV250N-ZA / 32LV254N-ZE / |
|
|
|
26LV250U-ZA / 26LV254U-ZE |
32LV250U-ZA / 32LV254U-ZE |
|
|
|
26LV255C-ZA |
32LV255C-ZA |
Weight |
|
With stand |
5.6 kg |
11.9 kg |
|
|
Without stand |
5.0 kg |
10.7 kg |
|
|
|
|
|
|
|
|
32LV35** |
37LV35** |
|
|
|
32LV3500-ZA / 32LV3550-ZB |
37LV3500-ZA / 37LV3550-ZB |
|
MODELS |
32LV350A-ZA / 32LV355A-ZB |
37LV350A-ZA / 37LV355A-ZB |
|
|
32LV350N-ZA / 32LV355N-ZB |
37LV350N-ZA / 37LV355N-ZB |
||
|
|
|
32LV350U-ZA / 32LV355U-ZB |
37LV350U-ZA / 37LV355U-ZB |
|
|
|
32LV355T-ZC / 32LV355C-ZB |
37LV355T-ZC / 37LV355C-ZB |
|
|
|
32LV3551-ZD |
37LV3551-ZD |
Weight |
|
With stand |
11.4 kg |
13.5 kg |
|
|
Without stand |
9.6 kg |
11.7 kg |
|
|
|
|
|
|
|
|
40LV35** |
42LV35** |
|
|
|
|
42LV3500-ZA / 42LV3550-ZB |
|
MODELS |
|
42LV350A-ZA / 42LV355A-ZB |
|
|
40LV3550-ZB / 40LV355N-ZB |
42LV350N-ZA / 42LV355N-ZB |
||
|
|
|
40LV355A-ZB / 40LV355U-ZB |
42LV350U-ZA / 42LV355U-ZB |
|
|
|
|
42LV355T-ZC / 42LV355C-ZB |
|
|
|
|
42LV3551-ZD |
Weight |
|
With stand |
37.3 kg |
15.5 kg |
|
|
|
|
|
|
|
Without stand |
34.3 kg |
13.3 kg |
|
|
|
|
|
|
|
|
47LV35** |
|
|
|
47LV3500-ZA / 47LV3550-ZB |
|
MODELS |
47LV350A-ZA / 47LV355A-ZB |
|
|
47LV350N-ZA / 47LV355N-ZB |
||
|
|
|
47LV350U-ZA / 47LV355U-ZB |
|
|
|
47LV355T-ZC / 47LV355C-ZB |
|
|
|
47LV3551-ZD |
Weight |
|
With stand |
20.9 kg |
|
|
|
|
|
|
Without stand |
18.7 kg |
|
|
|
|
|
MODELS |
32LV34** |
42LV34** |
|
|
|
|
||
|
32LV3400-ZA / 32LV340N-ZA |
42LV3400-ZA / 42LV340N-ZA |
||
|
|
|
32LV340A-ZA / 32LV340U-ZA |
42LV340A-ZA / 42LV340U-ZA |
Weight |
|
With stand |
11.0 kg |
14.8 kg |
|
|
|
|
|
|
|
Without stand |
9.3 kg |
12.4 kg |
|
|
|
|
|
|
MODELS |
32LV45** |
37LV45** |
|
|
|
|
||
|
32LV4500-ZC / 32LV450N-ZC |
37LV4500-ZC / 37LV450N-ZC |
||
|
|
|
32LV450A-ZC / 32LV450U-ZC |
37LV450A-ZC / 37LV450U-ZC |
Weight |
|
With stand |
10.9 kg |
12.4 kg |
|
|
|
|
|
|
|
Without stand |
9.1 kg |
10.6 kg |
|
|
|
|
|
|
MODELS |
42LV45** |
47LV45** |
|
|
42LV4500-ZC / 42LV450N-ZC |
47LV4500-ZC / 47LV450N-ZC |
||
|
|
|
42LV450A-ZC / 42LV450U-ZC |
47LV450A-ZC / 47LV450U-ZC |
Weight |
|
With stand |
15.2 kg |
20.7 kg |
|
|
|
|
|
|
|
Without stand |
13.0 kg |
18.5 kg |
|
|
|
|
|
ENGLISH
Product specifications shown above may be changed without prior notice due to upgrade of product functions.

ENGLISH
18 SPECIFICATIONS
|
MODELS |
32LW45** |
42LW45** |
|
|
32LW4500-ZB / 32LW450N-ZB |
42LW4500-ZB / 42LW450N-ZB |
||
|
|
|
32LW450A-ZB / 32LW450U-ZB |
42LW450A-ZB / 42LW450U-ZB |
Weight |
|
With stand |
11.4 kg |
15.9 kg |
|
|
|
|
|
|
|
Without stand |
9.1 kg |
13.0 kg |
|
|
|
|
|
|
MODELS |
47LW45** |
55LW45** |
|
|
47WL4500-ZB / 47WL450N-ZB |
55LW4500-ZB / 55LW450N-ZB |
||
|
|
|
47WL450A-ZB / 47LW450U-ZB |
55LW450A-ZB / 55LW450U-ZB |
Weight |
|
With stand |
21.4 kg |
27.0 kg |
|
|
Without stand |
18.5 kg |
22.0 kg |
|
|
|
|
|
|
|
|
22LV55** |
26LV55** |
|
MODELS |
22LV5500-ZC / 22LV550N-ZC |
26LV5500-ZC / 26LV550N-ZC |
|
|
22LV550A-ZC / 22LV550U-ZC |
26LV550A-ZC / 26LV550U-ZC |
||
|
|
|
22LV5510-ZD / 22LV551N-ZD |
26LV5510-ZD / 26LV551N-ZD |
|
|
|
22LV551A-ZD / 22LV551U-ZD |
26LV551A-ZD / 26LV551U-ZD |
Weight |
|
With stand |
3.2 kg |
5.05 kg |
|
|
Without stand |
2.8 kg |
4.4 kg |
Product specifications shown above may be changed without prior notice due to upgrade of product functions.
Open source software notice
To obtain the source code under GPL, LGPL, MPL and other open source licenses, that is contained in this product, please visit http://opensource.lge.com.
In addition to the source code, all referred license terms, warranty disclaimers and copyright notices are available for download.
РУКОВОДСТВО ПОЛЬЗОВАТЕЛЯ
LCD / LED LCD
Внимательно прочтите это руководство перед тем, как начать использовать устройство, и сохраните его на будущее.
BZ03 |
www.lg.com |
Русский
2 Инструкции по технике безопасности
•Прежде чем пользоваться устройством, внимательно прочитайте эти инструкции по технике безопасности.
•Иллюстрации в этом руководстве могут немного отличаться от вашего устройства  приведены здесь только для примера.
|
ОПАСНО |
y |
Проигнорировавтакоепредупреждение,можнополучитьсерьезнуютравму. |
|
|||
|
|
|
Возможеннесчастныйслучайилисмертельныйисход. |
|
|
|
|
|
ВНИМАНИЕ |
y |
Проигнорировавтакоесообщение,можнополучитьлегкуютравмуилиповредить |
|
|||
|
|
устройство. |
МЕРЫПРЕДОСТОРОЖНОСТИПРИУСТАНОВКЕ УСТРОЙСТВА
 ОПАСНО
Держите устройство вдали от источников тепла, 


 например электронагревателей.


 - Несоблюдение этого правила может привести к

 поражению электрическим током, пожару, неправильной работе или деформации устройства.
Не используйте устройство в местах |
повышенной влажности, например в ванной |
комнате, или там, где оно может намокнуть. |
- Иначе возможен пожар или поражение |
электрическим током. |
При появлении запаха дыма, других запахов или необычных звуков выньте кабель питания из розетки и обратитесь в
сервисный центр.
- Использование неисправного устройства может привести к поражению электрическим током или пожару.
 ВНИМАНИЕ
Устройство должно стоять на плоской и 

 устойчивой поверхности, откуда оно не
  может упасть.


 - Если устройство упадет, оно может быть повреждено,авыможетеполучитьтравму.
Защищайте устройство от прямого солнечного света.
-Иначевозможноповреждениеустройства.
Не ставьте устройство в отсеки стенок и книжных шкафов.
-Вентиляция обязательна.
МЕРЫЗАЩИТЫОТПОРАЖЕНИЯ ЭЛЕКТРИЧЕСКИМТОКОМ
 ОПАСНО
Убедитесь в том, что розетка, в которую
вставлен кабель питания, заземлена.
- Иначе возможно поражение электрическим током или травма.
Не прикасайтесь к вилке мокрыми руками. Если |
контакты мокрые или пыльные, насухо вытрите |
вилку или сотрите с нее пыль. |
- Избыточнаявлагаможетпривестикпоражению |
электрическим током. |
Во время грозы отсоединяйте кабель питания и сигнальный кабель.


 - Иначе возможно поражение электрическим током

 или пожар.
 ВНИМАНИЕ
Защищайте кабель питания от физического или механического повреждения. Нельзя перекручивать, сгибать, пережимать кабель, наступать на него и зажимать дверью. Обращайте особое внимание на разъемы, стенные розетки и место, где кабель выходит из устройства.
Если устройство подключено к розетке переменного тока, оно не отключается от источника питания переменного тока даже при выключении с помощью переключателя питания.
МЕРЫБЕЗОПАСНОСТИПРИПЕРЕМЕЩЕНИИУСТРОЙСТВА
 ОПАСНО
Убедитесь в том, что устройство выключено.
Прежде чем перемещать устройство, отсоедините от него все кабели. 
- Иначе возможно повреждение устройства или поражение электрическим током.
 ВНИМАНИЕ
Во время перемещения не подвергайте устройство тряске и ударам.
- Иначе возможно повреждение монитора или поражение электрическим током.
При переноске держите устройство двумя руками экраном вперед.
- Если вы уроните устройство, то поврежденное устройство может стать причиной поражения электрическим током или пожара. Обратитесь в сервисный центр для ремонта.
МЕРЫБЕЗОПАСНОСТИПРИЭКСПЛУАТАЦИИ УСТРОЙСТВА
 ОПАСНО
Не следует самостоятельно разбирать, ремонтировать и модифицировать устройство.
- Возможно поражение электрическим током или пожар.
- Для проверки, калибровки или ремонта устройства обращайтесь в сервисный центр.
Чтобы уменьшить риск пожара или |
||
поражения электрическим током, защищайте |
||
устройство от дождя и влаги. На устройство |
||
не должны попадать капли жидкости или |
||
брызги. Нельзя также ставить на него |
||
предметы, |
наполненные |
жидкостью |
(например, вазы). |
|
|
Устройства |
должно обслуживаться только |
|
специалистами. Обслуживание требуется, |
||
когда устройство было повреждено каким- |
||
либо образом (поврежден кабель питания |
||
или разъем, пролита жидкость, внутрь попал |
||
постороннийпредмет,устройствопострадало |
||
от дождя или влаги, устройство не работает |
||
должным образом, или его уронили). |
||
ВАЖНАЯ ИНФОРМАЦИЯ ПО ПРЕДОТВРАЩЕНИЮ «ВЫГОРАНИЯ» ЭKРАНА ТЕЛЕВИЗОРА В РЕЗУЛЬТАТЕ ОТОБРАЖЕНИЯ ИЗОБРАЖЕНИЙ
-Если в течение продолжительного периода времени на экране отображается статическое изображение (логотипы, экранныеменю,видеоигры,экраныкомпьютераистраницы телетекста), на экране может остаться его «отпечаток». Это явление называется «выгоранием» экрана. Гарантия производителя не распространяется на экраны с признаками «выгорания».
-Чтобы предотвратить «выгорание» экрана, не допускайте длительного отображения статического изображения на экране телевизора (2 или более часов для жK-экранов, 1 или более часов для плазменных экранов).
-«Выгорание» экрана может также происходить в боковых областях экрана телевизора, если формат 4:3 используется в течение продолжительного периода времени.
СБОРКА И ПОДГОТОВКА 3
СБОРКА И ПОДГОТОВКА
Распаковка
Комплект должен включать следующие элементы. В случае отсутствия аксессуаров, обратитесь в магазин, в котором был куплен этот товар. Рисунки в инструкции могут отличаться от данного устройства и элементов.
Русский
Пульт дистанционного управления и |
Руководство пользователя |
батареи (AAA) |
|
Салфетка для протирки внутренней |
Ферритовый сердечник |
Шнур питания |
части аппаратуры1 (Этот компонент |
(в зависимости от модели) |
(Этот компонент доступен не |
доступен не для всех моделей.) |
|
для всех моделей.) |
1Осторожно протрите корпус телевизора салфеткой.
Только 22LK33**
Держатель кабелей |
Защитная крышка |
Только 26/32LK33**, 32/37/42LK43**, 32/42/47LK53**, 32/37/42LK45**, 32/42LK55**
x 8
(M4x20) |
(за исключением |
|
|
47LK53**) |
|
Винты для сборки |
Зафиксируйте с |
Зафиксируйте с |
|
помощью винтов |
помощью винтов |
Только 19/22/26LV25**, 22/26LV55**, 19/22LV23** |
|
|
x 2 |
x 2 |
|
|
или |
|
(M4x6) (M4x16)
Винты для сборки |
Держатель кабелей |
Блок питания |
Русский
4СБОРКА И ПОДГОТОВКА
Только 32LV25**, 32/37/40/42/47LV35**, 32/42/47/55LW45**, 32/37/42/47LV45**, 32/42LV34**
x 8 |
x 8 |
|
x 2 |
|
|
|
|
||
(M4x12) |
(M4x14) |
(Толькоy 32LV25**, |
(Толькоy 32/ |
|
32/37LV35**, 32LW45**, |
||||
(за исключением |
|
|||
(Толькоy |
32/37LV45**, 32LV34**) |
42/47/55LW45**) |
||
32LV25**) |
32LV25**) |
|
|
|
Винты для сборки |
Зафиксируйте с |
3D-очки1 |
||
|
|
помощью винтов |
(AG-P110, AG-F110) |
|
1Количество 3D-очков может отличаться в зависимости от страны.
 Предупреждение
yyДля обеспечения безопасности и продолжительного срока службы устройства не используйте детали, выполненные с нарушением авторского права.
yyВ противном случае при повреждении или получении травм гарантия на данное устройство не распространяется.
 ПРИМЕЧАНИЕ
yyКомплектация вашего продукта может отличаться в зависимости от модели. yyСпецификации продуктов или содержание данного руководства может изменяться без предварительного уведомления ввиду модернизации функций продукта.
yyДля оптимального соединения, кабели HDMI и USB-устройства должны иметь кайму толщиной не более 10 мм и шириной не более 18 мм.(за исключением 22/26/32LK33**, 32/37/42LK43**, 32/42/47LK53**)
|
*A |
10 мм |
A |
*B |
18 мм |
A |
|
Составляющие и кнопки
 ПРИМЕЧАНИЕ
yyТелевизор можно переключить в режим ожидания для снижения энергопотребления. Если какое-
то время телевизор не смотрят, следует выключить его, чтобы снизить потребление энергии. yyЭнергопотребление во время использования может быть значительно снижено путем уменьшения
яркости изображения. При этом будут снижены и эксплуатационные расходы.
 Предупреждение
yyНе наступайте на стеклянную подставку и не подвергайте ее воздействию нагрузки. Она может разбиться, осколки стекла могут причинить травму, телевизор может упасть.
yyНе двигайте телевизор. Это может повредить пол или изделие.
 Loading...