Kyocera FS1020 User Manual
FS-1020D
Page Printer
Operation Guide

Caution
NO LIABILITY IS ASSUMED FOR ANY DAMAGE CAUSED BY IMPROPER INSTALLATION.
Notice on Software
SOFTWARE USED WITH THIS PRINTER MUST SUPPORT THE PRINTER’S EMULATION MODE. The printer is factory-set to emulate the PCL. The emulation mode can be changed by following the procedures described in Chapter 1 .
Notice
The information in this manual is subject to change without notification. Additional pages may be inserted in future editions. The user is asked to excuse any technical inaccuracies or typographical errors in the present edition.
No responsibility is assumed if accidents occur while the user is following the instructions in this manual. No responsibility is assumed for defects in the printer’s firmware (contents of its read-only memory).
This manual, any copyrightable subject matter sold or provided with or in connection with the sale of the page printer, are protected by copyright. All rights are reserved. Copying or other reproduction of all or part of this manual, any copyrightable subject matter without the prior written consent of Kyocera Mita Corporation is prohibited. Any copies made of all or part of this manual, any copyrightable subject must contain the same copyright notice as the material from which the copying is done.
Regarding Tradenames
PRESCRIBE is a registered trademark of Kyocera Corporation. KPDL and KIR (Kyocera Image Refinement) are trademarks of Kyocera Corporation.
Diablo 630 is a productof Xerox Corporation.IBM Proprinter X24E isa product of International Business MachinesCorporation. Epson LQ-850 is a product of Seiko Epson Corporation.
Hewlett-Packard, PCL, and PJL are registered trademarks of Hewlett-Packard Company. Centronics is a trade name of Centronics Data Computer Corp. PostScript is a registered trademark of Adobe Systems Incorporated. Macintosh is a registered trademark of Apple computer, Inc. Microsoft, Windows, and Windows NT are registered trademarks of Microsoft Corporation. PowerPC is a trademark of International Business Machines Corporation. ENERGY STAR is a U.S. registered mark. All other brand and product names are registered trademarks or trademarks of their respective companies.
This Kyocera Mita page printer uses PeerlessPrintXL to provide the HP LaserJet compatible PCL6 language emulation. PeerlessPrintXL is a trademark of The Peerless Group, Redondo Beach, CA 90278, U.S.A.
This product was developed using the Tornado™ Real Time Operating System and Tools from Wind River Systems. 

 This product contains UFST™ and MicroType® from Agfa Corporation.
©2003 by KYOCERA MITA CORPORATION All rights reserved. Revision 1.1., August 2003
i

IBM PROGRAM LICENSE AGREEMENT
THE DEVICE YOU HAVE PURCHASED CONTAINS ONE OR MORE SOFTWARE PROGRAMS (“PROGRAMS”) WHICH BELONG TO INTERNATIONAL BUSINESS MACHINES CORPORATION (“IBM”). THIS DOCUMENT DEFINES THE TERMS AND CONDITIONS UNDER WHICH THE SOFTWARE IS BEING LICENSED TO YOU BY IBM. IF YOU DO NOT AGREE WITH THE TERMS AND CONDITIONS OF THIS LICENSE, THEN WITHIN 14 DAYS AFTER YOUR ACQUISITION OF THE DEVICE YOU MAY RETURN THE DEVICE FOR A FULL REFUND. IF YOU DO NOT SO RETURN THE DEVICE WITHIN THE 14 DAYS, THEN YOU WILL BE ASSUMED TO HAVE AGREED TO THESE TERMS AND CONDITIONS.
The Programs are licensed not sold. IBM, or the applicable IBM country organization, grants you a license for the Programs only in the country where you acquired the Programs. You obtain no rights other than those granted you under this license.
The term “Programs” means the original and all whole or partial copies of it, including modified copies or portions merged into other programs. IBM retains title to the Programs. IBM owns, or has licensed from the owner, copyrights in the Programs.
1. License
Under this license, you may use the Programs only with the device on which they are installed and transfer possession of the Programs and the device to another party.
If you transfer the Programs, you must transfer a copy of this license and any other documentation to the other party. Your license is then terminated. The other party agrees to these terms and conditions by its first use of the Program.
You may not:
1)use, copy, modify, merge, or transfer copies of the Program except as provided in this license;
2)reverse assemble or reverse compile the Program; or
3)sublicense, rent, lease, or assign the Program.
2. Limited Warranty
The Programs are provided “AS IS.”
THERE ARE NO OTHER WARRANTIES COVERING THE PROGRAMS (OR CONDITIONS), EXPRESS OR IMPLIED, INCLUDING, BUT NOT LIMITED TO, THE IMPLIED WARRANTIES OF MERCHANTABILITY AND FITNESS FOR A PARTICULAR PURPOSE.
Some jurisdictions do not allow the exclusion of implied warranties, so the above exclusion may not apply to you.
SUPPLEMENT TO AGREEMENT FOR SOFTWARE BUNDLING AND DISTRIBUTION FOR ALDC
3. Limitation of Remedies
IBM’s entire liability under this license is the following;
1) For any claim (including fundamental breach), in any form, related in any way to this license, IBM’s liability will be for actual damages only and will be limited to the greater of:
a)the equivalent of U.S.$25,000 in your local currency; or
b)IBM’s then generally available license fee for the Program
This limitation will not apply to claims for bodily injury or damages to real or tangible personal property for which IBM is legally liable.
IBM will not be liable for any lost profits, lost savings, or any incidental damages or other economic consequential damages, even if IBM, or its authorized supplier, has been advised of the possibility of such damages. IBM will not be liable for any damages claimed by you based on any third party claim. This limitation of remedies also applies to any developer of Programs supplied to IBM. IBM’s and the developer’s limitations of remedies are not cumulative. Such developer is an intended beneficiary of this Section. Some jurisdictions do not allow these limitations or exclusions, so they may not apply to you.
4. General
You may terminate your license at any time. IBM may terminate your license if you fail to comply with the terms and conditions of this license. In either event, you must destroy all your copies of the Program. You are responsible for payment of any taxes, including personal property taxes, resulting from this license. Neither party may bring an action, regardless of form, more than two years after the cause of action arose. If you acquired the Program in the United States, this license is governed by the laws of the State of New York. If you acquired the Program in Canada, this license is governed by the laws of the Province of Ontario. Otherwise, this license is governed by the laws of the country in which you acquired the Program.
ii

Typeface Trademark Acknowledgement
All resident fonts in this printer are licensed from Agfa Corporation.
Helvetica, Palatino and Times are registered trademarks of Linotype-Hell AG.
ITC Avant Garde Gothic, ITC Bookman, ITC ZapfChancery and ITC Zapf Dingbats are registered trademarks of International Typeface Corporation.
Agfa Japan License Agreement Guidelines
1)“Software” shall mean the digitally encoded, machine readable, scalable outline data as encoded in a special format as well as the UFST Software.
2)You agree to accept a non-exclusive license to use the Software to reproduce and display weights, styles and versions of letters, numerals, characters and symbols (“Typefaces”) solely for your own customary business. Agfa Japan retains all rights, title and interest to the Software and Typefaces and no rights are granted to you other than a License to use the Software on the terms expressly set forth in this Agreement.
3)To protect proprietary rights of Agfa Japan, you agree to maintain the Software and other proprietary information concerning the Typefaces in strict confidence and to establish reasonable procedures regulating access to and use of the Software and Typefaces.
4)You agree not to duplicate or copy the Software or Typefaces, except that you may make one backup copy.
5)This License shall continue until the last use of the Software and Typefaces, unless sooner terminated. This License may be terminated by Agfa Japan if you fail to comply with the terms of this License and such failure is not remedied within thirty (30) days after notice from Agfa Japan. When this License expires or is terminated, you shall either return to Agfa Japan or destroy all copies of the Software and Typefaces and documentation as requested.
6)You agree that you will not modify, alter, disassemble, decrypt, reverse engineer or decompile the Software.
7)Agfa Japan warrants that for ninety (90) days after delivery, the Software will perform in accordance with Agfa Japan-published specifications, Agfa Japan does not warrant that the Software is free from all bugs, errors and omissions.
THE PARTIES AGREE THAT ALL OTHER WARRANTIES, EXPRESSED OR IMPLIED, INCLUDING WARRANTIES OF FITNESS FOR A PARTICULAR PURPOSE AND MERCHANTABILITY, ARE EXCLUDED.
8)Your exclusive remedy and the sole liability of Agfa Japan in connection with the Software and Typefaces is repair or replacement of defective parts, upon their return to Agfa Japan.
IN NO EVENT WILL AGFA JAPAN BE LIABLE FOR LOST PROFITS, LOST DATA, OR ANY OTHER INCIDENTAL OR CONSEQUENTIAL DAMAGES, OR ANY DAMAGES CAUSED BY ABUSE OR MISAPPLICATION OF THE SOFTWARE AND TYPEFACES.
9)New York, U.S.A. law governs this Agreement.
10)You shall not sublicense, sell, lease, or otherwise transfer the Software and/or Typefaces without the prior written consent of Agfa Japan.
11)Use, duplication or disclosure by the Government is subject to restrictions as set forth in the Rights in Technical Data and Computer Software clause at FAR 252-227-7013, subdivision (b)(3)(ii) or subparagraph (c)(1)(ii), as appropriate. Further use, duplication or disclosure is subject to restrictions applicable to restricted rights software as set forth in FAR 52.227-19 (c)(2).
12)YOU ACKNOWLEDGE THAT YOU HAVE READ THIS AGREEMENT, UNDERSTAND IT, AND AGREE TO BE BOUND BY ITS TERMS AND CONDITIONS. NEITHER PARTY SHALL BE BOUND BY ANY STATEMENT OR REPRESENTATION NOT CONTAINED IN THIS AGREEMENT. NO CHANGE IN THIS AGREEMENT IS EFFECTIVE UNLESS WRITTEN AND SIGNED BY PROPERLY AUTHORIZED REPRESENTATIVES OF EACH PARTY.
Cautions for Toner Handling
•Do not incinerate the toner and toner containers. Dangerous sparks may cause burn.
•Never open the toner container or waste toner box.
•Make sure not to inhale the toner, and not to rub your eyes or touch your mouth with the hands stained with the toner. And make sure not to stick to your skin.
•For the disposal of old toner container and waste toner box, consult your dealer. Or dispose of the toner or toner containers in accordance with Federal, State and Local rules and regulations.
•Keep away the toner container from children.
iii

Contents
Introduction ................................................................................................ |
vii |
Guide to the Manuals................................................................................................................................... |
viii |
Guide to the Operation Guide........................................................................................................................ |
ix |
Chapter 1 Basic Settings and Operations............................................... |
1-1 |
1.1 Operator Panel....................................................................................................................................... |
1-2 |
1.1.1 Indicators...................................................................................................................................... |
1-3 |
1.1.2 Keys............................................................................................................................................... |
1-3 |
1.2 KM-NET Remote Operation Panel Utility ........................................................................................... |
1-7 |
1.2.1 Requirements ............................................................................................................................... |
1-7 |
1.2.2 Installing the KM-NET Remote Operation Panel...................................................................... |
1-8 |
1.3 Printer Configuration .......................................................................................................................... |
1-12 |
1.3.1 Basic Settings for the KM-NET Remote Operation Panel....................................................... |
1-12 |
1.3.2 Connecting the KM-NET Remote Operation Panel Utility to the Printer.............................. |
1-15 |
1.3.3 Menu Items................................................................................................................................. |
1-16 |
1.4 Paper..................................................................................................................................................... |
1-17 |
1.4.1 Number of Copies to be Printed ................................................................................................ |
1-17 |
1.4.2 Page Orientation ........................................................................................................................ |
1-18 |
1.4.3 Duplex Printing.......................................................................................................................... |
1-19 |
1.4.4 Paper Source............................................................................................................................... |
1-22 |
1.4.5 Paper Size ................................................................................................................................... |
1-23 |
1.4.6 Media Type Settings for Paper Sources .................................................................................... |
1-25 |
1.4.7 Paper Source Properties ............................................................................................................ |
1-27 |
1.4.8 Custom Paper Type Settings ..................................................................................................... |
1-28 |
1.5 Printer Environment ........................................................................................................................... |
1-33 |
1.5.1 KIR.............................................................................................................................................. |
1-33 |
1.5.2 EcoPrint ...................................................................................................................................... |
1-34 |
1.5.3 Resolution................................................................................................................................... |
1-35 |
1.5.4 Form Feed Timeout .................................................................................................................... |
1-36 |
1.5.5 Sleep Mode.................................................................................................................................. |
1-37 |
1.5.6 Sleep Time .................................................................................................................................. |
1-38 |
1.5.7 Emulation ................................................................................................................................... |
1-39 |
1.5.8 Serial Interface Parameters ...................................................................................................... |
1-41 |
1.5.9 Network Interface Card Properties........................................................................................... |
1-43 |
1.5.10 RAM Disk ................................................................................................................................. |
1-44 |
1.5.11 Checking Remaining Toner ..................................................................................................... |
1-46 |
1.5.12 KM-NET Remote Operation Panel Display Language .......................................................... |
1-47 |
iv

Contents
1.6 Other Settings..................................................................................................................................... |
1-49 |
1.6.1 Printer Properties ...................................................................................................................... |
1-49 |
1.6.2 Password for the Printer............................................................................................................ |
1-50 |
1.6.3 Printer Memory Status.............................................................................................................. |
1-52 |
1.6.4 Host Buffer ................................................................................................................................. |
1-53 |
1.6.5 Adding an Asset Number to the Printer................................................................................... |
1-55 |
1.6.6 Displaying the Resource List..................................................................................................... |
1-56 |
1.6.7 Sending PRESCRIBE Commands to the Printer .................................................................... |
1-57 |
Chapter 2 Maintenance ........................................................................... |
2-1 |
|
2.1 |
Toner Container Replacement .............................................................................................................. |
2-2 |
|
2.1.1 Toner Container Replacement Interval ...................................................................................... |
2-2 |
|
2.1.2 Replenishing Toner ...................................................................................................................... |
2-3 |
2.2 |
Cleaning the Printer.............................................................................................................................. |
2-6 |
|
2.2.1 Printer Interior............................................................................................................................. |
2-6 |
Chapter 3 Troubleshooting ...................................................................... |
3-1 |
|
3.1 |
General Guide for Troubleshooting ...................................................................................................... |
3-2 |
3.2 |
Print Quality Problems ......................................................................................................................... |
3-3 |
3.3 |
Indicators ............................................................................................................................................... |
3-6 |
|
3.3.1 Maintenance Messages ................................................................................................................ |
3-7 |
|
3.3.2 Errors Requiring Service Personnel Attention........................................................................... |
3-9 |
|
3.3.3 Error Messages........................................................................................................................... |
3-12 |
|
3.3.4 Normal Indicator Display .......................................................................................................... |
3-14 |
3.4 |
Paper Jam Removal............................................................................................................................. |
3-15 |
|
3.4.1 Jam at the Face-down Tray and the Rear Cover...................................................................... |
3-15 |
|
3.4.2 Jam at the Paper Cassette......................................................................................................... |
3-16 |
|
3.4.3 Jam at the Duplexer .................................................................................................................. |
3-16 |
|
3.4.4 Jam Inside the Printer............................................................................................................... |
3-18 |
|
3.4.5 Jam at the MP Tray ................................................................................................................... |
3-19 |
Chapter 4 Paper Selection....................................................................... |
4-1 |
|
4.1 |
General Guidelines ................................................................................................................................ |
4-2 |
|
4.1.1 Paper Availability......................................................................................................................... |
4-2 |
|
4.1.2 Paper Specifications ..................................................................................................................... |
4-2 |
4.2 |
Selecting the Right Paper...................................................................................................................... |
4-3 |
4.3 |
Special Paper.......................................................................................................................................... |
4-7 |
|
4.3.1 Transparency (overhead projection film).................................................................................... |
4-7 |
|
4.3.2 Adhesive-Backed Labels .............................................................................................................. |
4-8 |
v

Contents
4.4 Paper Type ........................................................................................................................................... |
4-11 |
||
Chapter 5 |
Fonts ....................................................................................... |
5-1 |
|
5.1 Internal Fonts ........................................................................................................................................ |
5-2 |
||
5.2 List of Fonts ........................................................................................................................................... |
5-3 |
||
|
5.2.1 Internal Scalable and Bitmap Fonts and KPDL Fonts .............................................................. |
5-3 |
|
Appendix A |
Options.................................................................................... |
A-1 |
|
A.1 |
Available Options .................................................................................................................................. |
A-2 |
|
A.2 |
Expansion Memory Installation........................................................................................................... |
A-3 |
|
A.3 |
Memory (CompactFlash) Card ............................................................................................................. |
A-8 |
|
A.4 |
Network Interface Card...................................................................................................................... |
A-10 |
|
Appendix B |
Host Computer Interface........................................................ |
B-1 |
|
B.1 |
Parallel Interface.................................................................................................................................. |
B-2 |
|
|
B.1.1 Parallel Interface Communication Modes................................................................................. |
B-2 |
|
|
B.1.2 Interface Signals......................................................................................................................... |
B-2 |
|
B.2 |
USB Interface....................................................................................................................................... |
B-6 |
|
|
B.2.1 Specifications .............................................................................................................................. |
B-6 |
|
|
B.2.2 Interface Signals......................................................................................................................... |
B-6 |
|
B.3 |
Serial Interface (Option)...................................................................................................................... |
B-7 |
|
|
B.3.1 RS-232C Interface ...................................................................................................................... |
B-7 |
|
B.4 |
RS-232C Protocol.................................................................................................................................. |
B-9 |
|
|
B.4.1 PRESCRIBE FRPO D0 Command .......................................................................................... |
B-10 |
|
B.5 |
RS-232C Cable Connection................................................................................................................ |
B-11 |
|
|
B.5.1 Obtain a Suitable RS-232C Cable ........................................................................................... |
B-11 |
|
|
B.5.2 Connecting the Printer to the Computer ................................................................................ |
B-11 |
|
Appendix C |
Printer Specifications............................................................. |
C-1 |
|
C.1 |
Printer Specifications........................................................................................................................... |
C-2 |
|
Glossary........................................................................................ |
|
Glossary-1 |
|
Index .................................................................................................. |
|
Index-1 |
|
vi

Introduction
The Kyocera Mita page printer has many desirable features, such as the duplex printing mode which lets you print onto both sides of the paper and an Auto Media Type Selection function that automatically selects the media before printing.
This section explains the following topics:
•Guide to the Manuals •Guide to the Operation Guide
vii

Guide to the Manuals
Item |
Description |
Installation Guide |
Describes procedures from printer setup to printing a |
(paper manual) |
test page. |
|
|
KX Printer Driver |
Describes the procedure to install the printer |
Installation Guide |
driver software. |
(paper manual) |
|
|
|
Operation Guide |
Guides you through topics concerning the operations |
(this manual) |
and maintenance of the printer. |
|
|
KX Printer Drivers |
Describes how to install and set the printer driver. |
Operation Guide |
|
|
|
PRESCRIBE Command |
PRESCRIBE is the native language of the Kyocera |
Technical Reference |
Mita printers. This Technical Reference contains the |
|
information about how the printing is performed using |
|
the PRESCRIBE commands as well as the font and |
|
emulation description. Also included is a list of |
|
permanent parameters and their explanation needed |
|
when customizing your printer. |
|
|
PRESCRIBE Command |
Gives a detailed explanation of the PRESCRIBE |
Reference |
command syntax and parameters with the aid of print |
|
examples. |
|
|
•For information on how to install the printer driver software, refer to the KX Printer Driver Installation Guide that is included with the printer.
• For information on how to use the printer driver software, refer to the KX Printer Driver Operation Guide that is included on the Kyocera Mita Document Library CD-ROM.
viii

Guide to the Operation Guide
This Operation Guide guides you through the following topics:
Chapter 1 Basic Settings and Operations
This chapter describes the names and functions of the keys and indicators on top of the printer. Further, it explains how to make printer settings using the KM-NET Remote Operation Panel utility contained on the Kyocera Mita Software Library CD-ROM supplied with the printer.
Chapter 2 Maintenance
This chapter explains how to replace the toner container and how to care for your printer.
Chapter 3 Troubleshooting
This chapter explains how to handle printer problems that may occur, such as paper jams.
Chapter 4 Paper Selection
This chapter explains the types of paper that can be used with the printer.
Chapter 5 Fonts
This chapter explains about and lists the printer’s internal fonts.
Appendix A Options
This appendix explains available options, how to expand the printer’s memory, and also how to install the memory card and the network interface card.
Appendix B Host Computer Interface
This appendix describes the pin assignment and specifications for the printer’s parallel interface, USB interface, and optional serial interface.
Appendix C Printer Specifications
This appendix lists the printer’s specifications.
Glossary
This glossary explains the terminology used in this guide.
ix

Chapter 1 Basic Settings and
Operations
This chapter explains the following topics:
•Operator Panel
•KM-NET Remote Operation Panel Utility
•Printer Configuration
•Paper
•Printer Environment
•Other Settings
1-1
Operator Panel
1.1Operator Panel
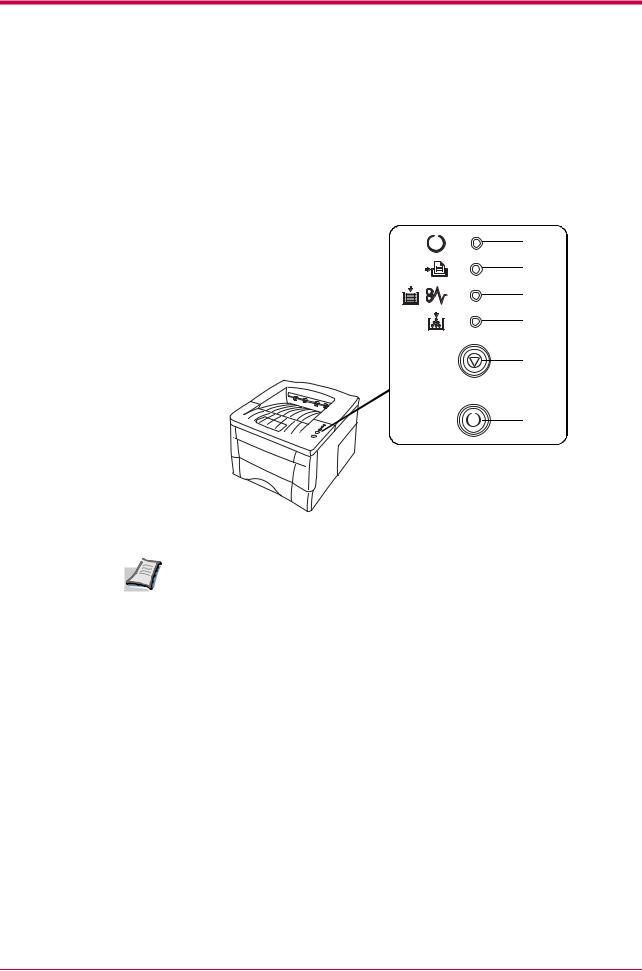
The operator panel on top of the printer consists of four indicators and two keys. The four indicators light, flash, and go off in combination, indicating the printer’s status. The keys perform operations, such as canceling data, switching the printer mode between online and offline status, and printing status pages.
1
2
3
4
5
6
Figure 1-1
The numbers used in the above figure are referred to in the Reference column of the table on the following page.
1-2

Operator Panel
1.1.1Indicators
Refer to the following table for the name and description of each indicator. The same indicator can have a variety of meanings, depending on the speed at which it is flashing. For details, see Chapter 3.
Reference |
Name |
Status |
Meaning |
||
1 |
Ready indicator |
Lit |
Indicates online status (printing is possible). |
||
|
|
|
|
|
|
|
|
|
|
Flashing |
• An error has occurred, but printing resumes when the |
|
|
|
|
|
key is pressed. |
|
|
|
|
|
• Offline status. You cannot print, but the printer can receive |
|
|
(Green) |
|
data. |
|
|
|
|
|
|
• The printer is in sleep mode. |
|
|
|
|
|
|
|
|
|
|
Off |
Printing has stopped because an error has occurred. |
|
|
|
|
|
|
2 |
Data indicator |
Lit |
The printer is processing data. |
||
|
|
|
|
|
|
|
|
|
|
Flashing |
The printer is receiving data. |
|
|
(Green) |
|
|
|
|
|
|
|
|
|
3 |
|
Attention |
Lit |
The printer cover is open. |
|
|
|
indicator |
|
|
|
|
Flashing |
• A paper jam has occurred. |
|||
|
|
|
|
||
|
|
|
|
|
• The paper cassette is not inserted properly or the paper has |
|
|
|
(Red) |
|
run out. |
|
|
|
|
||
|
|
|
|
||
|
|
|
|
|
|
|
|
|
Off |
The printer status is normal. |
|
|
|
|
|
|
|
4 |
Toner indicator |
Lit |
The printer has stopped because the toner is exhausted. |
||
|
|
|
|
|
|
|
|
|
|
Flashing |
The toner is running low. |
|
|
|
(Red) |
|
|
|
|
|
|
|
|
Table 1-1 |
|
|
|
|
|
1.1.2Keys
|
|
Refer to the following table for the name and description of the basic |
|
|
functions of each key. |
|
|
|
Reference |
Name |
Function |
5 |
key |
Cancels printing in progress when pressed for 1 second or more. |
|
(Cancel key) |
|
|
|
|
6 |
key |
• Switches between online and offline when pressed for less than 3 seconds. |
|
|
• Depending on the error message displayed on the KM-NET Remote |
|
|
Operation Panel, there are cases where operation will continue after |
|
(Go key) |
pressing this key. If such a message appears, operation resumes when this key |
|
|
is pressed. |
•Prints a standard status page† when pressed for 3 seconds or more and less than 10 seconds.
•Prints a service status page†† when pressed for 10 seconds or more.
Table 1-2
† For a full description of the standard status page, see the next page.
††The service status page is used for service purposes.
1-3

Operator Panel
Understanding the Status Page
The following is the printout of a typical standard status page. Its contents are explained in detail on the next page.
|
|
FS-1020D Page Printer |
|
|
STATUS PAGE |
|
1 |
|
Firmware Version: |
Released: |
|
|
|
|
|
Hardware Information |
Memory |
|
|
2 |
|
|
5 |
3 |
Page Information |
Installed Options |
|
6 |
|
|
|
|
4 |
Network Status |
Emulation |
|
|
7 |
|
Error Log |
8 |
|
Toner Gauge |
9 |
|
|
|
|
0 |
100 |
|
Interfaces |
|
10 |
|
|
11 |
KIR Test pattern |
Mode ON |
Figure 1-2 |
|
|
Items and values on the status page may vary depending on the printer’s firmware version.
1-4

Operator Panel
1 — Software Version
This information shows the software (firmware) version and date of issue of the printer.
2 — Hardware Information
This information shows the currently selected paper source (indicated by an asterisk), paper size, and various other printer settings.
3 — Page Information
This information shows the currently selected resolution, number of copies printed to date, and the total page count.
4 — Network Status
This shows the IP address, subnet mask address, default gateway address and other settings for the network interface card installed in the printer.
5 — Memory
This information shows the amount of total memory installed in the printer, the amount of currently available memory, and the current status of the RAM disk (see page 1-44).
6 — Installation Options
This shows the option(s) currently installed in the printer.
7 — Emulation
This shows all available emulations and the currently selected emulation (marked with an asterisk). The printer is shipped from the factory with PCL 6 emulation selected.
8 — Error Log
This shows the last three instances of the following six types of errors, listed in order of occurrence: KPDL Error Press GO; Memory overflow
Press GO; Print overrun Press GO; File not found Press GO; MemoryCard err Press GO; RAM disk error Press GO. (These are displayed on the computer screen when using KM-NET Remote Operation Panel.)
The most recent error is displayed on the top line of the Error Log. For error remedies, see Chapter 3. Error information is cleared when the printer’s power is turned off.
1-5

Operator Panel
9 — Toner Gauge
This shows the approximate level of remaining toner. When the value is 100, the toner container is full. The closer to 0, the smaller the amount of remaining toner.
10 — Interface Information
This information shows all interfaces installed in the printer and the currently selected interface (marked with an asterisk).
The Font section shows the font that is automatically selected when the printer starts up (default font). It is possible to set different default fonts for each interface.
11 — KIR Test Pattern
This shows the KIR test pattern. You can confirm whether KIR is on or off.
1-6

KM-NET Remote Operation Panel Utility
1.2KM-NET Remote Operation Panel Utility
The KM-NET Remote Operation Panel utility is provided on the Kyocera Mita Software Library CD-ROM supplied with the printer. You can use it to change basic printer settings, monitor the current printer status, and display error messages (such as paper jam warnings) on the computer screen.
1.2.1Requirements
The KM-NET Remote Operation Panel utility is designed to run under Windows 95/98/Me or Windows NT 4.0/2000/XP operating systems.
Depending upon which Windows operating system you are using, the interface connection that can be used with the KM-NET Remote Operation Panel Utility will differ as follows.
Interface |
Parallel |
Serial |
USB |
Network |
Windows |
|
|
|
(TCP/IP, |
|
|
|
IPX/ |
|
OS |
|
|
|
SPX) |
Windows 95 |
Yes |
Yes |
No |
Yes |
|
|
|
|
|
Windows 98 |
Yes |
Yes |
Yes |
Yes |
|
|
|
|
|
Windows Me |
Yes |
Yes |
Yes |
Yes |
|
|
|
|
|
Windows NT4.0 |
Yes |
Yes |
No |
Yes |
|
|
|
|
|
Windows 2000 |
Yes |
Yes |
Yes |
Yes |
|
|
|
|
|
Windows XP |
Yes |
Yes |
Yes |
Yes |
|
|
|
|
|
|
Yes : Useable |
No : NOT useable |
||
Table 1-3
•The KM-NET Remote Operation Panel utility does not run under any
other operating systems.
• The KM-NET Remote Operation Panel utility provided on the Kyocera Mita Software Library CD-ROM supplied with the printer is for use only with the Kyocera Mita FS-1020D KX printer driver. Printing problems may occur if it is used in combination with any other printer driver.
1-7

KM-NET Remote Operation Panel Utility
1.2.2Installing the KM-NET Remote Operation Panel
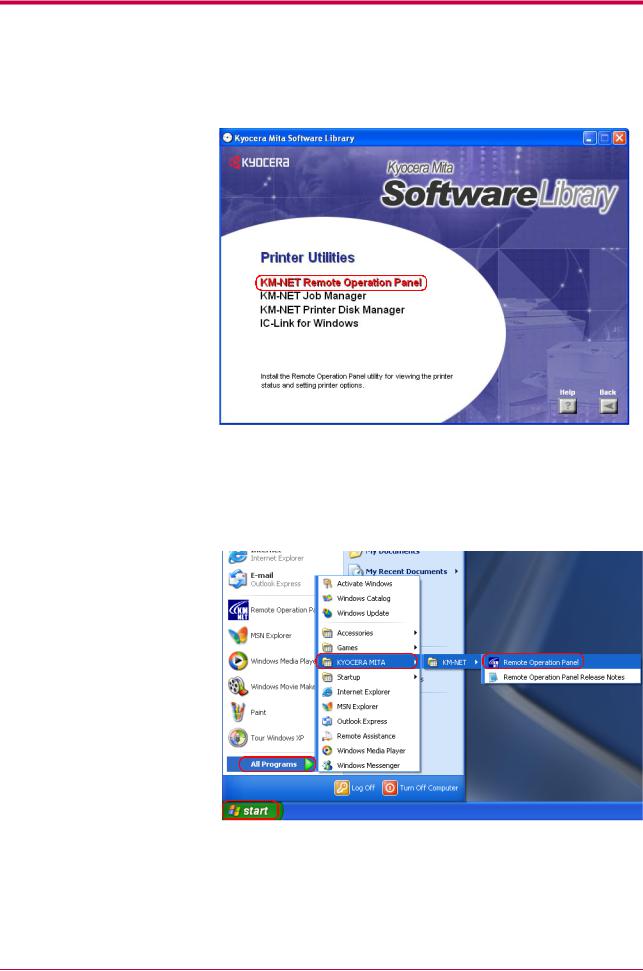
When you insert the Kyocera Mita Software Library CD-ROM supplied with the printer into your computer, the setup screen is automatically displayed. To install the KM-NET Remote Operation Panel, follow the onscreen instructions.
1 |
Set the Kyocera Mita Software Library CD-ROM in your computer’s |
CD-ROM drive. |
After a few moments, the License Agreement window opens.
If this screen does not appear, click the Windows Start button and select
Run. Type the following in the Command Line text box:
[CD drive letter]:\setup
Click the OK button. After a few moments, the License Agreement window appears.
2 |
Click View License Agreement. The License Agreement file opens. |
Read the terms and conditions. |
3 |
Close the License Agreement. On the previous License Agreement |
window, click Accept to accept the agreement. After a few moments, |
the Main Menu appears.
1-8
KM-NET Remote Operation Panel Utility
4 |
Click on Printer Utilities, then click on KM-NET Remote Operation |
Panel to start KM-NET Remote Operation Panel utility installation. |
Starting the KM-NET Remote Operation Panel
Once you have installed the KM-NET Remote Operation Panel, click the Windows Start button, then click Remote Operation Panel from All Programs > KYOCERA MITA > km-net. The KM-NET Remote Operation Panel starts.
1-9

KM-NET Remote Operation Panel Utility
Functions of the KM-NET Remote Operation Panel Utility
6 |
7 |
|
|
||||
1 |
|
|
|
|
|
|
8 |
|
|
|
|
|
|
||
|
|
|
|
|
|
||
2 |
|
|
|
|
|
|
|
|
|
|
|
|
|
||
|
|
|
|
||||
|
|
|
|||||
3 4 5
The following table explains the names and function of the parts of the KMNET Remote Operation Panel utility.
•The numbers appearing in the figure above are referred to in the
Reference column of the table below.
• The explanations of messages appearing in this manual are based on the premise that the printer is used over a network. Accordingly, the explanations include some messages that do not appear when the printer is used locally.
Reference |
Name |
|
|
|
Function |
||||
1 |
Message display |
The printer status is displayed on the upper line (1) and the following |
|||||||
|
(1) |
(3)(4) |
information is displayed on the lower lines. |
||||||
|
(2) |
Active interface |
|||||||
|
|
|
|
|
|
|
|
|
PAR: Standard bi-directional parallel interface |
|
|
|
|
|
|
|
|
|
USB: USB interface |
|
|
|
|
|
|
|
|
|
SER: Optional serial interface (RS-232C) |
|
|
|
|
|
|
|
|
|
|
|
|
|
|
|
|
|
|
|
OPT: Optional network interface |
|
|
|
|
|
|
|
|
(3) |
Paper size of the currently selected paper cassette |
|
(2) |
|
|
|
|
(4) |
Paper type of the currently selected paper cassette |
||
|
|
|
|
|
|
|
|
When an error occurs, details of the error are displayed on the upper |
|
|
|
|
|
|
|
|
|
and lower lines. |
|
|
|
|
|
|
|
|
|
|
|
2 |
|
|
|
|
|
|
|
Displays a suitable icon according to the printer’s status. |
|
 : The printer is ready to print.
:The paper is exhausted or the cassette is not installed properly. Load more paper or close the cassette properly.
:A paper jam has occurred. Refer to section 3.4 Paper Jam Removal on page 3-15 and remove the jammed paper.
:Toner is running low or is exhausted. Replace with a new toner container. See section 2.1 Toner Container Replacement on page 2-2.
:An error has occurred. Refer to the message displayed. See section 3.3 Indicators on page 3-6.
Table 1-4
1-10

KM-NET Remote Operation Panel Utility
Reference |
Name |
Function |
3 |
SET UP button |
This allows you to make the following basic settings for the KM-NET |
|
|
Remote Operation Panel utility: |
|
|
• Status polling |
|
|
• Error notification |
|
|
• Virtual printer animation |
|
|
For details on these settings, see section 1.3.1 Basic Settings for |
|
|
the KM-NET Remote Operation Panel on page 1-12. |
|
|
|
4 |
CONNECT button |
This allows you to select the type of connection between the printer |
|
|
and the computer — either local (via serial, parallel interface, or |
|
|
USB) or network. For details, see section 1.3.2 Connecting the KM- |
|
|
NET Remote Operation Panel Utility to the Printer on page 1- |
|
|
15. |
|
|
|
5 |
HELP button |
Displays help messages. |
6 |
GO button |
This button appears only when the printer is connected to the |
|
|
computer via a network. It has the same function as the printer’s |
|
|
key and does the following: |
•Switches the printer online and offline, prints and feeds out one page, and continues printing when Press GO error messages are displayed on the KM-NET Remote Operation Panel.
7 |
MENU button |
This is used to change various printer settings from the KM-NET |
||
|
|
Remote Operation Panel utility. See page 1-16. |
||
|
|
|
|
|
8 |
Printer image |
This virtual printer animation graphically indicates the printer’s |
||
|
|
status. For example, when you open the printer’s top cover, the top |
||
|
|
cover on the printer image also opens. |
||
|
|
|
|
It may take several minutes for a change in status to be |
|
|
|
|
reflected in the animation. |
|
|
|
|
|
|
|
|
|
|
|
|
|
|
|
Table 1-4 (Continued) |
|
|
|
|
1-11
Printer Configuration
1.3Printer Configuration
This section explains how to set and confirm the printer’s configuration from the KM-NET Remote Operation Panel utility. The value set from the KM-NET Remote Operation Panel utility becomes the printer’s default setting. However, when printing, the printer may automatically switch to another setting, depending on the application software or printer driver settings.
1.3.1Basic Settings for the KM-NET Remote Operation Panel
Before operating the KM-NET Remote Operation Panel, you can change settings for polling, error notification, and whether you want to use the 3D virtual printer to monitor the printer status.
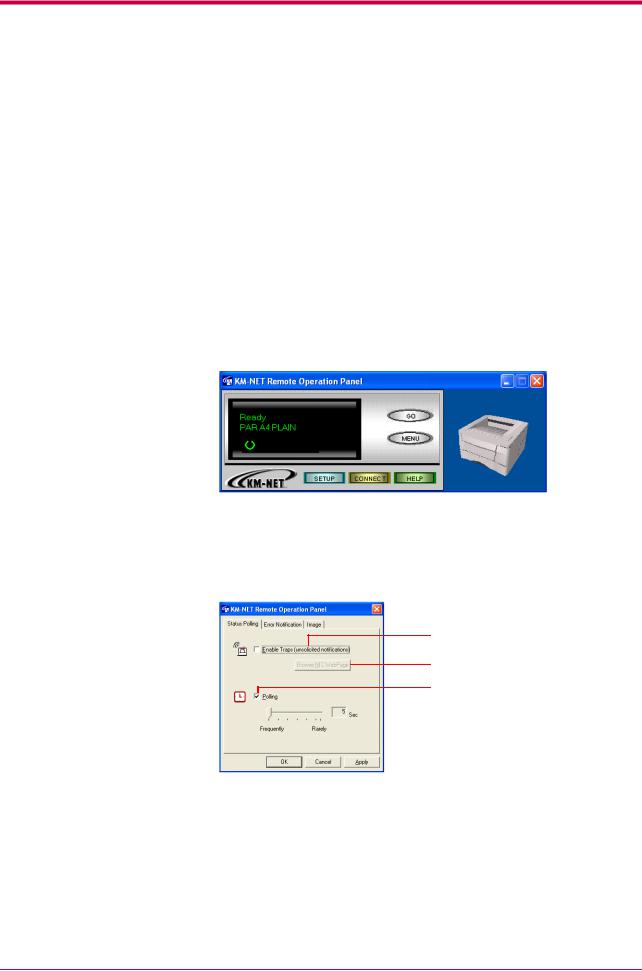
1 Click the SETUP button on the start-up screen.
2 |
The KM-NET Remote Operation Panel dialog appears. Read the |
following explanations, then make the appropriate settings. |
Status Polling
Enable Traps
Browse NIC Web Page button
Polling
1-12

Printer Configuration
Enable Traps (unsolicited notifications)
This allows the KM-NET Remote Operation Panel utility to obtain and display information about the printer, such as the open/closed state of the top cover, that is output automatically by the network interface card in the printer. This requires that the network output of status information by the network interface card be enabled. To do this, click on the Browse NIC Web Page button to call up SNMP trap notification from the network interface card homepage.
Polling
With Polling activated (check box checked), the KM-NET Remote Operation Panel utility logs itself onto the printer and automatically recognizes printer changes at regular intervals. This duration of the interval can be configured by moving the slider with the mouse. The default setting is 5 seconds. Polling must normally be left activated (check box checked).
Error notification
Each of the following functions are activated when the appropriate check box is checked.
Audible Notification
Show on Taskbar
Always on top
These settings allow you to determine the way your computer notifies you of errors:
Audible Notification
A sound is played when an error occurs. Specify the.wav file to be used for the sound by pressing the button on the right and browsing for the folder that contains it.
Show on Taskbar
Error notification is given by displaying an icon on the task bar.
Always on top
Error notification is given by a message that is displayed on top of all other windows that may be currently open on the desktop.
1-13

Printer Configuration
Image
Show 3D image
Show 3D image
This displays the 3D virtual printer for monitoring the printer status. You can select the position of the animation in reference to the KM-NET Remote Operation Panel utility, as well as the motion of the animation from Static, Rotating, and Random.
1-14

Printer Configuration
1.3.2Connecting the KM-NET Remote Operation Panel Utility to the Printer
The KM-NET Remote Operation Panel utility can be used whenever the printer is connected to the computer via the parallel, USB or serial interface, or through a network interface (TCP/IP or IPX/SPX).
To establish the connection to the printer, proceed as follows:
1 Click the CONNECT button on the start-up screen.
2 On the connection wizard:
a.Click Local Printer to connect to a locally attached printer.
b.Click Network Printer to connect to a network printer.
Local Printer
Network Printer
3 |
Depending on the connection type you have chosen above, follow the |
instructions displayed by the wizard. |
1-15

Printer Configuration
1.3.3Menu Items
When you click the MENU button on the KM-NET Remote Operation Panel utility, the printer menu appears. You can display current settings by clicking each item. The contents displayed will vary depending on the optional devices installed and whether the connection is through a network or is local (through a parallel, USB or serial interface).
If you have set a password for the KM-NET Remote Operation Panel utility, a password prompt appears. Enter your password and click the
OK button. The Menu dialog box appears. For details on passwords, see section 1.6.2 Password for the Printer on page 1-50.
1-16
Paper
1.4Paper
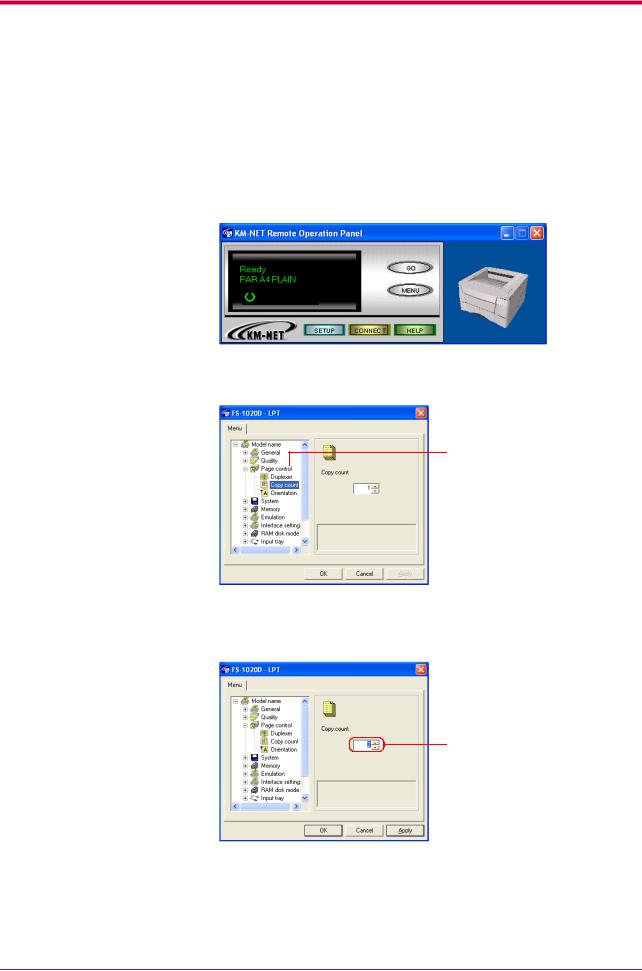
1.4.1Number of Copies to be Printed
This sets the number of copies to be printed. The value set becomes the default for the current interface. The default setting is 1.
1 Click the MENU button on the start-up screen.
2 |
The Menu dialog box is displayed. Select and double click Page |
control, then click Copy count. |
Page control
 Copy count
3 |
Click the S or T button in the combo box on the right, or directly |
input the number of copies you want to set in the combo box. You can |
make settings up to 999.
Copy count
4 |
After you have input the number of copies, click the OK button to |
return to the start-up screen. The number of copies to be printed is |
changed.
1-17
Paper
1.4.2Page Orientation
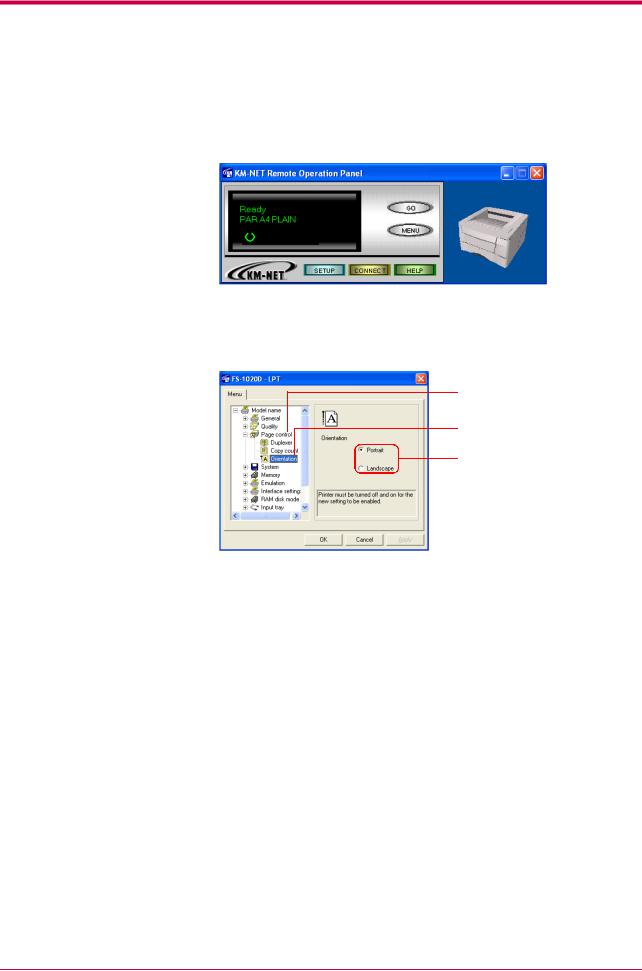
This sets the page orientation. The default setting is Portrait.
1 Click the MENU button on the start-up screen.
2 |
The Menu dialog box appears. Select and double click Page control, |
then click Orientation. Using the radio buttons on the right, select |
either Portrait or Landscape as the page orientation.
3
4
Page control
Orientation
Orientation
After you have selected the orientation, click the OK button to return to the start-up screen.
Turn the printer’s power off and on again to make the new setting effective.
1-18

Paper
1.4.3Duplex Printing
Duplex Printing System
This printer feeds paper for duplex printing as indicated in the following illustration. This printer feeds paper for duplex printing as indicated in the following illustration. As shown, when making 2-sided [duplex] copies, each sheet of paper is temporarily ejected onto the face-down tray (5), from where it is then refed back (6) into the printer for printing on the reverse side and final ejection onto the face-down tray (12).
(6)
(5) (12)
(12)
(7)
(8) |
(4) |
(3) |
(2) |
|
(11) |
||||
|
||||
|
|
(10) |
|
|
|
(9) |
|
(1) |
Figure 1-3
Do not touch the paper as it is being transported through this process, as doing so can be the cause of paper jams as well as malfunction of the
printer itself.
The duplex printing mode which lets you automatically print onto both sides of the paper comes standard with this printer. If you do Not want to print on both sides of the paper, select OFF (duplex printing disabled) as the setting for this mode.
The default setting for the duplex printing mode is OFF.
1-19

Paper
Binding Setups
The term binding refers to the manner in which printed pages of paper are joined together (by gluing, stitching, etc.) in book form. The two possible types of binding are long-edge binding, in which pages are joined together along their long edge; and short-edge binding, in which they are joined together along their short edge. In selecting a binding type, you must also consider the orientation of the printed page. You can use long-edge or short-edge binding with either landscape or portrait printing.
Depending on the binding type and print orientation, the duplexer provides four types of binding setups. These are: (1) portrait, long-edge, (2) portrait, short edge, (3) landscape, long-edge, and (4) landscape, short-edge. The figure below shows these binding setups.
(1) |
(2) |
Portrait, |
|
|
short-edge |
Portrait, |
|
|
long-edge |
|
|
|
|
Landscape, |
(3) |
|
short-edge |
|
|
|
Landscape, |
(4) |
|
long-edge |
|
|
Binding Setups
Figure 1-4
Printing in Duplex Mode
1 Click the MENU button on the start-up screen.
1-20
 Loading...