


FAX System (F)
Operation Guide
ALWAYS read this Operation Guide thoroughly before use. After reading, maintain it in good condition and keep it together with the Operation Guide for your copier.
NOTICE
This Operation Guide contains information that corresponds to using both the inch and metric versions of fax machines using this Fax System. Since the messages and terminology for keys and indicators on those respective operation panels differs between these two versions, for purposes of clarification and easier understanding we have listed the names used in BOTH types of machine in the section herein titled Names of Parts. However, in the main text of this handbook, when the difference in a name or message is only one of upperand lowercase spelling, we have listed the information as it specifically pertains to the inch version of this machine. When there is even a slight difference in the message, key/indicator name or other specifications, we have listed the information for the inch version followed, in brackets, by the corresponding information for the metric version.
Trademark Information
•Microsoft, Windows, Windows NT and Internet Explorer are registered trademarks of Microsoft Corporation of the US and other countries.
•Windows ME and Windows XP are trademarks of Microsoft Corporation.
•Ethernet is a registered trademark of Xerox Corporation.
•IBM and IBM PC-AT are trademarks of International Business Machines Corporation.
•Adobe and Acrobat are registered trademarks Adobe Systems Incorporated.
All other company and product names contained in this Operation Guide are trademarks or registered trademarks of their respective companies. The designations ™ and ® will not be used in this handbook.
Please read the Operation Guide before using the facsimile. Keep it close to the facsimile for easy reference.
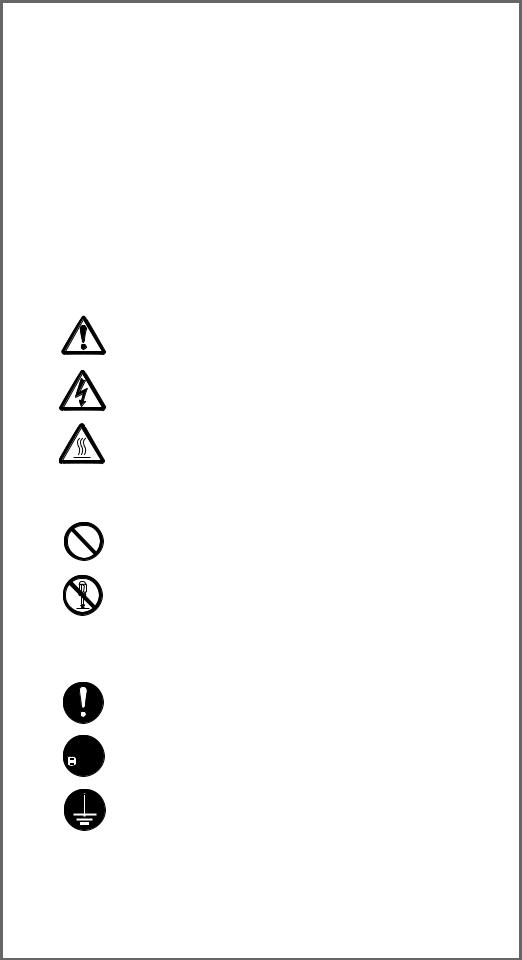
The sections of this handbook and parts of the facsimile marked with symbols are safety warnings meant to protect the user, other individuals and surrounding objects, and ensure correct and safe usage of the facsimile. The symbols and their meanings are indicated below.
 DANGER: Indicates that serious injury or even death will very possibly result from insufficient attention to or incorrect compliance with the related points.
 WARNING: Indicates that serious injury or even death may result from insufficient attention to or incorrect compliance with the related points.
 CAUTION: Indicates that personal injury or mechanical damage may result from insufficient attention to or incorrect compliance with the related points.
Symbols
The symbol indicates that the related section includes safety warnings. Specific points of attention are indicated inside the symbol.
........ [General warning]
........ [Warning of danger of electrical shock]
........ [Warning of high temperature]
The symbol indicates that the related section includes information on prohibited actions. Specifics of the prohibited action are indicated inside the symbol.
........ [Warning of prohibited action]
........ [Disassembly prohibited]
The ● symbol indicates that the related section includes information on actions which must be performed. Specifics of the required action are indicated inside the symbol.
........ [Alert of required action]

 ........ [Remove the power plug from the outlet]
........ [Always connect the facsimile to an outlet with a ground connection]
Please contact your service representative to order a replacement if the safety warnings in the handbook are illegible or if the handbook itself is missing. (fee required)
<Note>
Due to performance updating, information in this Operation Guide is subject to change without notice.

Introduction
The explanations contained in this Operation Guide have been separated into different sections in order to allow those using a fax for the first time, as well as those well familiar with such operation, to use this machine efficiently, properly and with relative ease. A basic introduction to each section can be found below for reference. Refer to the related section when using this fax.
Important! Please read first.
This section contains notes and cautions on installation and operation that should be read prior to using this fax machine for the first time and then strictly obeyed in order to ensure its safe and proper operation. BE SURE to read the notes and cautions contained in the Operation Guide for your copier as well.
Section 1
Basic Use of this Fax
This section contains explanations on the names of parts and their functions, as well as basic instructions on fax operation. Reading this section alone will make it possible for you to perform basic fax transmission and fax reception procedures.
Section 2
Various Functions
of this Fax
This section contains explanations on attempting procedures that will enable more effective use of this fax by those individuals who have already become somewhat familiar with its basic operation. It includes such instructions as setting the time for a transmission to begin, transmitting the same documents automatically to multiple destinations and for transmitting both sides of duplex (2-sided) documents.
Section 3
Troubleshooting
This section contains explanations on handling problems that may occur during operation of this fax. It includes information on responding to error messages that are displayed as well as check points regarding the various settings made.
BE SURE to read this section carefully and follow all procedures and cautions precisely.
Section 4
Other Features of this Fax
This section contains explanations on using the more specialised functions of this fax for those individuals who have become knowledgeable about and quite comfortable with its operation. It includes such special instructions as how to limit who can transmit and receive documents with this machine as well as on the procedures for receiving confidential documents that should not be seen by third parties.
In addition, this fax contains F-Code Based Communication capabilities that enable more functional compatibility with other companies’ fax machines and a Restricted Access function that enables the convenient control of fax communication performed with this machine.
i

|
|
|
Introduction |
|
|
|
|
|
|
|
|
|
|
|
|
|
|
|
|
|
Section 5 |
|
This section contains explanations on checking the message display for information on |
|
|
Managing Information |
|
the conditions surrounding recent fax transmissions and reception. |
|
|
About Your Fax |
|
In addition, it includes explanations on how to print out the management reports and lists |
|
|
|
that contain information about the result of fax communications and other settings made |
|
|
|
Communications |
|
|
|
|
|
in this fax. |
|
|
|
|
|
|
|
|
|
|
|
|
|
|
|
|
|
|
|
|
|
|
|
|
|
|
|
|
|
|
|
|
|
Section 6 |
|
This section contains explanations on certain settings and registration such as adjusting |
|
|
Various Settings and |
|
the volume of the alarm that sounds in the event of some sort of error. |
|
|
|
Use this section to perform the settings and registration most appropriate to how you use |
|
|
|
Registration in this Fax |
|
|
|
|
|
this fax. |
|
|
|
|
|
|
|
|
|
|
|
|
|
|
|
|
|
|
|
|
|
|
|
|
|
|
|
|
|
|
This section contains explanations on the functions available when each of the various |
|
|
|
|
|
|
|
Section 7 |
|
optional equipment is installed in this fax. It includes an explanation on Duplex Reception |
|
|
Optional Equipment |
|
– in which paper is turned over inside the fax machine and printing accomplished on the |
|
|
|
back side – as well as on the Ultra Fine resolution that enables even clearer transmission |
|
|
|
|
|
and reception of documents. |
|
|
|
|
|
|
|
|
|
|
|
|
|
|
|
|
|
|
|
|
|
|
|
|
|
|
|
|
|
This section contains explanations on the setup procedure and settings to be performed |
|
|
Section 8 |
|
|
|
|
|
on the machine in order to use the Network FAX functions available when the optional |
|
|
|
Network FAX Settings |
|
|
|
|
|
Printer/Scanner Kit is installed on this fax machine. Be sure to read the On-Line Manual |
|
|
|
(Option) |
|
on the included CD-ROM as well. |
|
|
|
|
|
|
|
|
|
|
|
|
|
|
|
|
|
|
|
|
|
Section 9
Reference Information
This section contains information on the specifications for this fax machine, a flowchart of the menus that are shown in the message display and tables with explanations related to various error codes. Use this section as reference when using this fax.
ii

Contents
. .............................Important! Please read it first |
v |
|
|
|
|
|
INSTALLATION PRECAUTIONS ........................................... |
v |
|
PRECAUTIONS FOR USE ..................................................... |
v |
|
|
|
Section 1 Fax Operation (Basic Use) .......................... |
1-1 |
|
|
|
|
Names of Parts ....................................................................... |
1-1 |
|
(1) |
Main Body Parts and their Functions .................................. |
1-1 |
(2) |
Operation Panel Parts and their Functions ......................... |
1-2 |
(3) |
Basic fax screen on the touch panel ................................... |
1-3 |
Preparations ........................................................................... |
1-4 |
|
(1) |
Setting the Type of Phone Line .......................................... |
1-4 |
(2) Turning TTI Transmission ON/OFF ..................................... |
1-4 |
|
(3) |
Registering Your Self-Station Information ........................... |
1-5 |
(4) |
Setting the Date and Time .................................................. |
1-6 |
Features and Functions of this Fax ..................................... |
1-7 |
|
(1) |
Switching from the Copy Operation Mode to the Fax |
|
|
Operation Mode .................................................................. |
1-7 |
(2) |
Initial Mode ......................................................................... |
1-7 |
(3) |
When You Press the Reset Key... ....................................... |
1-8 |
(4) Auto Clear Function ............................................................ |
1-8 |
|
(5) |
Document Number ............................................................. |
1-8 |
(6) Auto Shut-Off Function ....................................................... |
1-8 |
|
(7) |
Network FAX Functions (option) ......................................... |
1-9 |
(8) |
Dual Access Function ......................................................... |
1-9 |
(9) |
Batch Transmission Function ........................................... |
1-12 |
(10) Rotate & Transmit Function ............................................ |
1-12 |
|
(11) F-Code Based Communication ....................................... |
1-12 |
|
(12) Memory Reception Function ........................................... |
1-12 |
|
(13) Rotate Received Documents .......................................... |
1-13 |
|
(14) Imaging Memory Back-Up Function ............................... |
1-13 |
|
(15) Fax Priority Printout ........................................................ |
1-13 |
|
(16) Abbreviated numbers ...................................................... |
1-13 |
|
Sending Documents ............................................................ |
1-14 |
|
● Acceptable documents ....................................................... |
1-15 |
|
● Notes on acceptable documents ........................................ |
1-15 |
|
● Resolutions ........................................................................ |
1-16 |
|
● Document contrast ............................................................. |
1-17 |
|
Receiving Documents (Automatic Fax Reception) ........... |
1-19 |
|
● Changing the reception mode ............................................ |
1-19 |
|
● Making copies during a reception ...................................... |
1-20 |
|
● Memory Reception ............................................................. |
1-20 |
|
Canceling a Communication ............................................... |
1-21 |
|
(1) |
Canceling a Memory Transmission (during scanning) ...... |
1-21 |
(2) |
Canceling a Memory Transmission (during transmission) ... |
1-21 |
(3) |
Canceling a Direct Feed Transmission ............................. |
1-21 |
(4) |
Canceling a Reception ..................................................... |
1-22 |
Entering Characters ............................................................. |
1-23 |
|
(1) |
Character Input screen ..................................................... |
1-23 |
(2) |
Procedure ......................................................................... |
1-24 |
One-touch Keys ................................................................... |
1-25 |
|
(1) |
Registering ....................................................................... |
1-25 |
(2) |
Modifying and Deleting ..................................................... |
1-28 |
(3) |
Dialing ............................................................................... |
1-29 |
(4) |
Printing Out a One-Touch Key List ................................... |
1-29 |
Dialing with Abbreviated Numbers ..................................... |
1-30 |
|
Address Book ....................................................................... |
1-31 |
|
(1) |
Search Criteria .................................................................. |
1-31 |
(2) |
Searching with the Address book ..................................... |
1-31 |
(3) |
Printing Out a Telephone Directory List ............................ |
1-32 |
Redialing Functions ............................................................. |
1-33 |
(1) Automatic Redialing .......................................................... |
1-33 |
(2) Manual Redialing .............................................................. |
1-33 |
............Section 2 Fax Operation (Various Functions) |
2-1 |
|
|
|
|
Duplex Transmission ............................................................. |
2-1 |
|
Standby Transmission ........................................................... |
2-3 |
|
Broadcast Transmission ....................................................... |
2-4 |
|
Interrupt Transmission .......................................................... |
2-5 |
|
Communication Using the Timer .......................................... |
2-6 |
|
Chain Dial Keys ...................................................................... |
2-7 |
|
(1) |
Registering ......................................................................... |
2-7 |
(2) |
Modifying and Deleting ....................................................... |
2-8 |
(3) |
Using a Chain Dial Key ....................................................... |
2-9 |
Editing a Communication in Memory ................................. |
2-10 |
|
(1) |
Printing Out a Sample Image of Waiting Documents ....... |
2-10 |
(2) |
Force-Starting the Communication ................................... |
2-10 |
(3) |
Deleting the Communication ............................................. |
2-11 |
(4) |
Modifying the Contents of the Communication ................. |
2-12 |
Manual Fax Transmission ................................................... |
2-14 |
|
Manual Fax Reception ......................................................... |
2-15 |
|
...........................................Section 3 Troubleshooting |
3-1 |
|
|
|
|
When the Fax Data Indicator is Lit... .................................... |
3-1 |
|
(1) |
CAUTIONS before Disconnecting the Power Cord ............ |
3-1 |
(2) |
If a Power Failure Report is Printed Out... .......................... |
3-1 |
If an Error Occurs... ............................................................... |
3-1 |
|
When One of These Message is Displayed... ...................... |
3-2 |
|
Troubleshooting Tables ......................................................... |
3-4 |
|
..........................Section 4 Other Features of this Fax |
4-1 |
|
|
|
|
Auto FAX/TEL Switching ....................................................... |
4-1 |
|
TAD Reception ........................................................................ |
4-2 |
|
D.R.D. Reception (Available in inch versions only) ............ |
4-3 |
|
Remote Switching .................................................................. |
4-4 |
|
(1) |
Changing the Remote Switching Number .......................... |
4-4 |
(2) |
Operation ............................................................................ |
4-5 |
Polling Communication ......................................................... |
4-6 |
|
(1) |
Polling Transmission ........................................................... |
4-6 |
(2) |
Polling Reception ................................................................ |
4-7 |
F-Code Based Communication ............................................. |
4-9 |
|
(1) |
Codes used for F-Code Based Communication ................. |
4-9 |
(2) |
F-Code Boxes ..................................................................... |
4-9 |
F-Code Based Confidential Communication ..................... |
4-10 |
|
(1) |
Registering F-Code Confidential Boxes ........................... |
4-10 |
(2) |
Modifying and Deleting F-Code Confidential Boxes .......... |
4-11 |
(3) |
F-Code Based Confidential Transmission ........................ |
4-12 |
(4) |
Printing Out Documents from an F-Code Confidential Box ..... |
4-13 |
(5) |
Printing Out an F-Code Confidential Box List ................... |
4-14 |
(6) |
Entering Documents into an F-Code Confidential Box ..... |
4-14 |
(7) |
F-Code Based Bulletin Board Reception .......................... |
4-15 |
iii

Contents
F-Code Based Relay Broadcast Communication ............. |
4-17 |
|
(1) |
Registering F-Code Relay Boxes ..................................... |
4-17 |
(2) |
Modifying and Deleting F-Code Relay Boxes ................... |
4-18 |
(3) |
F-Code Based Relay Broadcast Transmission ................. |
4-19 |
(4) |
Printing Out an F-Code Relay Box List ............................. |
4-20 |
Fax Forwarding .................................................................... |
4-21 |
|
(1) |
Registering ....................................................................... |
4-21 |
(2) |
Modifying Registered Information ..................................... |
4-22 |
(3) |
Turning Fax Forwarding ON/OFF ..................................... |
4-22 |
Group Dial Keys ................................................................... |
4-23 |
|
(1) |
Registering ....................................................................... |
4-23 |
(2) |
Modifying and Deleting ..................................................... |
4-24 |
(3) |
Dialing ............................................................................... |
4-25 |
(4) |
Printing Out a Group Dial List ........................................... |
4-25 |
Program Keys ....................................................................... |
4-26 |
|
(1) |
Registering ....................................................................... |
4-26 |
(2) |
Modifying and Deleting ..................................................... |
4-27 |
(3) |
Using a Program Key ....................................................... |
4-28 |
(4) |
Printing Out a Program Dial List ....................................... |
4-28 |
Password Check Communication ...................................... |
4-29 |
|
(1) |
Registering Permit Telephone Numbers ........................... |
4-29 |
(2) |
Modifying and Deleting Permit Telephone Numbers ........ |
4-30 |
(3) |
Registering Permit IDs ...................................................... |
4-30 |
(4) |
Modifying and Deleting Permit IDs ................................... |
4-31 |
(5) Turning Password Check Communication ON/OFF ......... |
4-32 |
|
Encrypted Communication ................................................. |
4-33 |
|
(1) |
Registering Encryption Keys ............................................ |
4-33 |
(2) |
Modifying and Deleting Encryption Keys .......................... |
4-34 |
(3) |
Registering Encryption Boxes .......................................... |
4-35 |
(4) |
Modifying and Deleting Encryption Boxes ........................ |
4-36 |
(5) |
Required Operation (Transmitting party) .......................... |
4-36 |
(6) |
Required Operation (Receiving party) .............................. |
4-37 |
(7) |
Printing Out Documents from an Encryption Box ............. |
4-38 |
(8) |
Printing Out an Encryption Key List .................................. |
4-39 |
(9) |
Printing Out an Encryption Box List .................................. |
4-39 |
Restricted Access ................................................................ |
4-40 |
|
(1) |
Preparations Before Use .................................................. |
4-40 |
(2) |
Changing the Management Password ............................. |
4-40 |
(3) |
Registering Access Codes ................................................ |
4-41 |
(4) |
Modifying and Deleting Access Codes ............................. |
4-42 |
(5) |
Turning Restricted Access ON/OFF ................................. |
4-43 |
(6) |
Printing Out a Restricted Access Report .......................... |
4-43 |
(7) |
Printing Out a Department List ......................................... |
4-45 |
(8) |
Clearing the count for all departments .............................. |
4-45 |
Section 5 Managing Information About Your Fax |
|
|
|
Communications ......................................... |
5-1 |
|
|
|
Communication Result Display ............................................ |
5-1 |
|
(1) Transmission Result Display .............................................. |
5-1 |
|
(2) |
Reception Result Display ................................................... |
5-2 |
Printing the Management Reports/Lists .............................. |
5-3 |
|
(1) Activity Report ..................................................................... |
5-3 |
|
(2) |
Confirmation Report ........................................................... |
5-3 |
(3) |
User Setting List ................................................................. |
5-4 |
.............Section 6 Various Settings and Registration |
6-1 |
|
|
Turning Report Print Out ON/OFF ........................................ |
6-1 |
Turning the Bulletin Board ON/OFF ..................................... |
6-2 |
Setting the Number of Rings (Auto Fax Reception) ........... |
6-3 |
Making Volume Settings ........................................................ |
6-3 |
Setting the Document Size for Scanning from |
|
the Document Processor ...................................................... |
6-4 |
Setting the Default Transmission Mode ............................... |
6-5 |
Selecting the Automatic Reception Mode ........................... |
6-5 |
Turning Reception Date & Time Print Out ON/OFF ............. |
6-6 |
Selecting the Paper Feed Selection Mode ........................... |
6-7 |
Turning Manual Paper Feed ON/OFF .................................... |
6-8 |
Turning 2 in 1 Reception ON/OFF ......................................... |
6-9 |
Turning Remote Diagnosis ON/OFF ..................................... |
6-9 |
Registering the Remote Test ID .......................................... |
6-10 |
....................................Section 7 Optional Equipment |
7-1 |
|
|
Duplex Unit (Duplex Reception ON/OFF) ............................. |
7-1 |
● Turning Duplex Reception ON/OFF ..................................... |
7-1 |
Optional Memory .................................................................... |
7-1 |
...................Section 8 Network FAX Settings (Option) |
8-1 |
|
|
|
|
Setup ....................................................................................... |
8-2 |
|
Connecting the fax machine and the computer .................. |
8-3 |
|
Initial settings on the fax machine ....................................... |
8-3 |
|
(1) |
Network FAX Reception Setting ......................................... |
8-3 |
(2) |
Setting for Saving the Documents for Transmission ........... |
8-4 |
(3) |
File Type Setting ................................................................. |
8-4 |
Network FAX Registration ..................................................... |
8-5 |
|
Printing Out a Network FAX Settings List ........................... |
8-7 |
|
................................Section 9 Reference Information |
9-1 |
|
|
Specifications ......................................................................... |
9-1 |
Special Characters Chart ...................................................... |
9-2 |
Paper Size and Priority Feed Chart (Inch version) ............. |
9-3 |
Paper Size and Priority Feed Chart (Metric version) .......... |
9-4 |
Menu Flow Charts .................................................................. |
9-5 |
Error Code Tables .................................................................. |
9-7 |
iv
Important! Please read it first.
This Operation Guide contains information on using the facsimile functions of this machine. BE SURE to read the Operation Guide for your copier as well and maintain both handbooks in good condition in a location close to the machine.
During use, refer to the Operation Guide for your copier for information regarding the sections listed at right.
Caution Labels
INSTALLATION PRECAUTIONS
PRECAUTIONS FOR USE
How to load paper
Replacing the toner cartridge and waste toner tank When paper misfeeds
Troubleshooting
Cleaning the copier
 INSTALLATION PRECAUTIONS
■ Environment |
|
■ Power supply/Grounding the product |
|
||
• Avoid installing this product in locations where the top or |
|
• DO NOT connect this product to the same outlet as an air |
upper rear portion of the unit will be exposed to direct |
|
conditioner or copier, etc. |
sunlight. Such conditions might adversely effect the unit’s |
|
|
ability to detect the correct size of originals and documents. |
|
|
When such a location cannot be avoided, change the |
|
|
direction the unit is facing in order to eliminate exposure to |
|
|
direct sunlight. |
|
|
|
|
|
 PRECAUTIONS FOR USE
 CAUTION
•DO NOT leave the Document Processor open as there is a danger of personal injury. ………………
Other precautions
•DO NOT open the front cover or left cover, turn off the main switch, or pull out the power plug while transmitting, receiving, or copying.
•This product may only be used within the country of pur chase due to the different safety and communication standards in each country. (International communication standards, however, make the communication between countries possible.)
•This product may be inoperable in areas with poor telephone lines or communication conditions.
•“CALL WAITING” or other telephone company optional services that produce audible tones or clicks on the line can disrupt or cause termination of facsimile communications.
•No matter what the status of the unit, if the sound of the motor within the unit is audible, never open either the front cover or the left cover, nor turn off the main switch.
•Return used battery to point of sales.
v
Section 1 Fax Operation (Basic Use)
Names of Parts
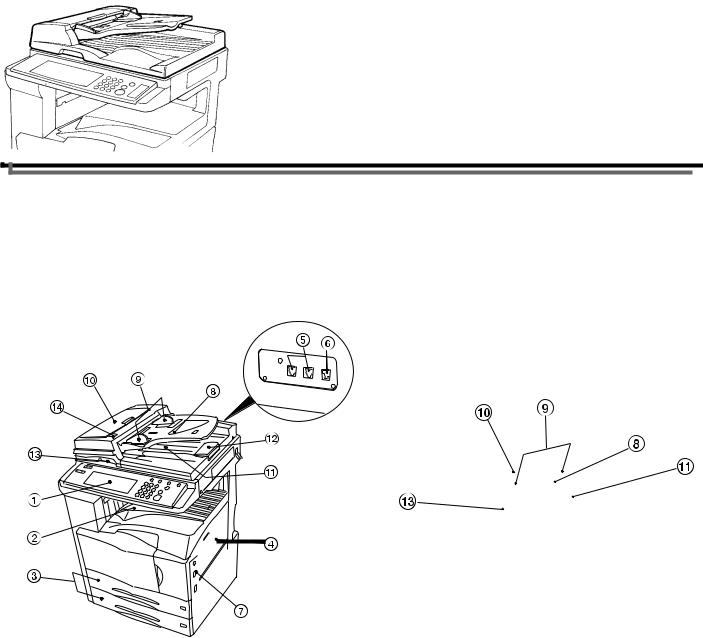
(1) Main Body Parts and their Functions
The following contains information on the names and functions of the parts that are required when this machine is used as a facsimile.
Refer to the Operation Guide for your copier for information on other parts of this machine.
Main Body + Duplex Document Processor attached
1Operation panel...Use the operation panel to perform the procedures required for fax communication.
2Fax storage section...Received documents are ejected and stored face-down in the fax storage section. Up to 250 sheets can be stored in this section at one time.
3Drawers...This fax machine comes standard with two drawers installed. Each drawer can hold up to 500 sheets of plain paper (60 g/m2 - 105 g/m2). Refer to the Operation Guide for your copier
for more detailed information regarding the use of the drawers.
4Multi-Bypass...Paper can be set in the Multi-Bypass as well. In order to use the Multi-Bypass, it is necessary to select “ON” under “Turning Manual Paper Feed ON/OFF” on page 6-8. Refer to the Operation Guide for your copier for more detailed information
regarding the use of the Multi-Bypass.
5Telephone jack (T)...Use this jack to connect a separately purchased telephone to the fax.
6 Line jack (L)...Use this jack to connect the fax to a telephone line using the modular cord.
7Main switch...Turn this switch ON ( | ) in order to perform fax and copy operations. The touch panel will light and operation will be possible.
Document Processor
● Document Processor
There are 2 optional document feeders available for use with this machine: the Document Processor for feeding one-sided documents, and the Duplex Document Processor for using both sides of 2-sided documents.
* Both the Document Processor and Duplex Document Processor can be used with the 25 copies per minute machine. However, only the Duplex Document Processor can be used with both the 35 copies per minute machine and the 40 copies per minute machine.
8Document table...Set the documents you want to transmit on this table. Up to 70 sheets of up to 11" x 8 1/2" [A4] size paper, or up to 50 sheets of 8 1/2" x 14" or 11" x 17" [A3 or Folio] size paper, can be set at one time.
9 Document insert guides...Adjust these guides to match the width of the documents.
0 Document Processor reversing cover...Open this cover if a document jams.
!Document eject cover...Documents are ejected onto this cover after being scanned.
@ Eject guide...Open this guide when transmitting documents of a large size such as 8 1/2" x 14" or 11" x 17" [A3 or Folio].
# Document Processor open/close lever...Operate this lever when opening and closing the Document Processor.
$Document set indicator...This indicator indicates the status of the documents set in the Document Processor. Documents are set properly when the indicator is lit green.
1-1
Section 1 Fax Operation (Basic Use)
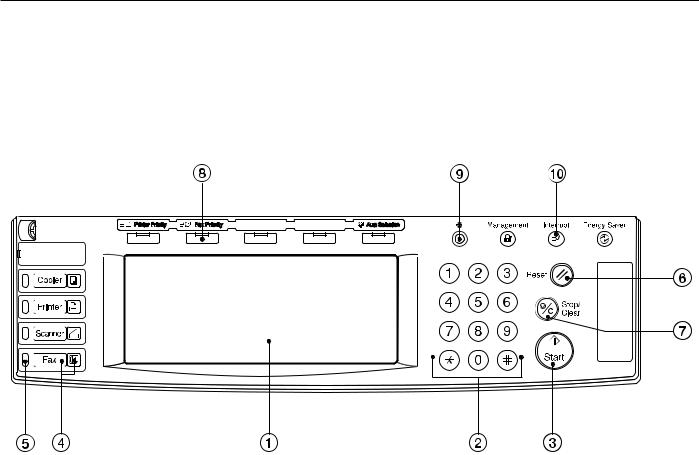
(2) Operation Panel Parts and their Functions
The following contains explanations on the names and functions of the keys and indicators that are utilized when this machine is used as a facsimile. Refer to the Operation Guide for your copier for information on the keys and indicators that are utilized when this machine is used as a copier.
1Touch panel...Indicates operation procedures as well as trouble with the machine. Keys related to operational procedures which appear on the touch panel with their name displayed are indicated in this handbook within double quotation marks. In addition, you will be instructed to “touch” any keys which appear on the touch
panel rather than “press” them. (Ex.: Touch the “xxx” key.)
2Keypad...Use the keypad to enter fax numbers, etc.
*Even if your telephone service is for pulse dialing, press the star (*) key and any key pressed on the keypad
after that will transmit the related tone signal. (Inch version only)
3 Start key...Press this key when you want to initiate a fax communication.
4Fax key / Fax indicator...Press this key when you want to switch between the Copy Operation and Fax Operation modes. The Fax indicator is lit when the machine is in the Fax Operation mode.
5Fax data indicator...This indicator blinks during a fax communication. When this indicator is lit, there are received documents or documents to be transmitted, etc., stored in memory.
6Reset key...Press this key when you want to cancel an operation in progress and have the touch panel return to the initial mode settings.
7Stop/Clear key...Press this key when you want to delete registered fax numbers or names, as well as when you want to stop an operation in progress.
8Fax Priority key...Press this key when you want to give priority to printing out a received fax during a copy operation.
9Default key...Press this key when you want to perform settings related to the various default modes for the fax functions of this machine.
0Interrupt key/indicator lamp...Press this key when you want to interrupt a fax reception in order to make copies. The indicator lamp in the Interrupt key will light when the machine is in the Interrupt mode.
1-2
Section 1 Fax Operation (Basic Use)
(3) Basic fax screen on the touch panel
The initial screen that appears in the touch panel when you press the Fax key in any other mode in order to change to the Fax Operation mode is called the "basic fax screen". The following contains information on the basic keys which are displayed in this screen and their functions.
Inch
Metric
1 Message display...Current status, the next step in a procedure and error messages are shown in the message display.
2 Number of destinations display...The number of destinations that you have chosen to dial to is shown in this area.
3 Speed-dial keys...Keys that you have registered to function as either a one-touch key, a group dial key (G), a program key (P) or a chain dial key
(C) are displayed here.
4 “Address book” key...Touch this key when you want to use the address book. (Refer to page 1-31.)
5“Abbrev.” key...Touch this key when you want to use the abbreviated number that a destination number is registered under in order to dial that number. (Refer to page 1-30.)
6“TX setting” key...Touch this key when you want to perform settings related to transmission conditions such as the size of the documents to be transmitted, the image quality of those documents, the contrast at which you want to send them and the time when they should be sent. Once
you press this key, the TX Setting screen will appear.
7 “▼” and “▲” cursor keys...Use these keys when you want to display speed-dial keys other than those which are currently displayed.
8 “Dest. check” key...Touch this key when you have entered multiple destination fax numbers using speed-dial keys, etc., and you want to check the list of those numbers.
9 “Re-dial” key...Touch this key when you want to have the fax automatically redial the most recently dialed number
0“On-hook” key...When a separately purchased telephone is connected to this fax machine and you touch this key, you can dial a destination number without having to pick up the receiver.
!“Memory TX” / “Dir. Feed Tx” key...When you want to switch between the Memory Transmission mode (“Memory Tx”) and the Direct Feed
Transmission mode (“Dir. Feed Tx”). The mode will change each time you touch this key.
@Reception mode select key...Touch this key when you want to select a different reception mode. The display will change to the reception mode selection screen where you can select the desired reception mode by touching the “Auto RX”, “Manual RX” or “Answering Machine” key, as appropriate.
#Memory bar...Indicates the amount of data stored in memory. As documents are being stored, the bar will move towards “100%” indicating that the data stored in memory is increasing. Once it reaches “100%”, no more documents can be stored in memory.
$ Fax number display...The number that you have entered to dial is displayed here.
% “Basic” key...Touch this key when you want to return to the basic fax screen.
^ “Application” key...Touch this key when you want to use one of the various functions of this fax machine such as polling, etc.
& “Register” [“Registration”] key...Touch this key when you want to perform one of the various registration procedures of this fax machine.
* “Print Report” key...Touch this key when you want to print out one of the various reports or lists of this fax machine.
(“Status” [“Act status”] key...This key is displayed during a transmission, reception or printout. Touch this key when you want to verify the contents of the operation.
1-3

Section 1 Fax Operation (Basic Use)
Preparations
When using the fax functions of this machine for the first time after purchasing your Fax System, perform the procedures as explained in “(1) Setting the Type of Phone Line” through “(4) Setting the Date and Time”.
*If your service representative performs these settings during set-up of your Fax System, there is no further need for you to perform these procedures.
(1) Setting the Type of Phone Line
(Inch version only)
Set the type of phone line here to correspond to the type of telephone service that you are using. BE SURE the type of phone line you select here is correct because, if the setting is incorrect, fax communication will be impossible.
*Prior to operation, check the message display to make sure that the touch panel is in the initial mode for fax operation.
(Refer to “(2) Initial Mode” on page 1-7.)
*If you want to cancel the procedure part way through, press the Reset key. The touch panel will return to the basic copy screen.
1 Press the Default key. The Default Setting screen will appear.
(Inch)
2 Touch the “FAX default” key.
Make sure that “Line Type” is highlighted and touch the 3 “Change #” key.
(Inch)
Touch either the “Tone Line(DTMF)” key or the “Pulse
4 Line(10PPS)” key, as appropriate.
Touch the “Close” key. The message display will return to the 5 same screen as was displayed in step 3.
If you are finished making settings, touch the “Close” key 2
6 more times.
(2) Turning TTI Transmission ON/OFF
The TTI (Transmit Terminal Identifier) refers to information – such as the time of the transmission, the number of pages, your station name and fax number, etc. – that is automatically sent to the receiving party's fax and printed out on the received documents. With this fax, you can select here whether or not that TTI information will be sent to the receiving party's fax, and – if it is – whether it will be printed inside or outside the border of the transmitted page.
*Prior to operation, check the message display to make sure that the touch panel is in the initial mode for fax operation.
(Refer to “(2) Initial Mode” on page 1-7.)
*If you want to cancel the procedure part way through, press the
Reset key. The touch panel will return to the basic copy screen.
1 Press the Default key. The Default Setting screen will appear.
(Inch)
(Metric)
1-4

Section 1 Fax Operation (Basic Use)
2 Touch the “FAX default” key.
Touch the “▼” cursor key until “TTI” is highlighted and then 3 touch the “Change #” key.
(Inch)
(Metric)
If you want your TTI information to be sent to the other party,
4 touch the desired location where you want it to be printed.
If you do NOT want it to be sent, touch the “Not Printed” key.
Touch the “Close” key. The message display will return to the 5 same screen as was displayed in step 3.
If you are finished making settings, touch the “Close” key 2
6 more times.
(3) Registering Your Self-Station
Information
If you register information identifying your station (fax number, station name and station ID) here, it can be sent to the receiving party's fax and printed on the received documents, thereby instantly notifying that party of the source of the fax transmission.
*Use the following procedure as well when you want to change information that is already registered.
*Prior to operation, check the message display to make sure that the touch panel is in the initial mode for fax operation.
(Refer to “(2) Initial Mode” on page 1-7.)
*If you want to cancel the procedure part way through, press the Reset key.
Touch the “Register” [“Registration”] key. The Registration
1 Select screen will appear.
(Inch)
(Metric)
Touch the “Location Info.” key. The currently registered
2 information will be displayed.
*To register your fax number: Touch the “v” key and go to step 3.
To register your station name: Touch the “Own Name” key and go directly to step 5.
To register your station ID: Touch the “Own ID” key and proceed directly to step 7.
(Inch)
(Metric)
1-5
Section 1 Fax Operation (Basic Use)
● Registering your fax number
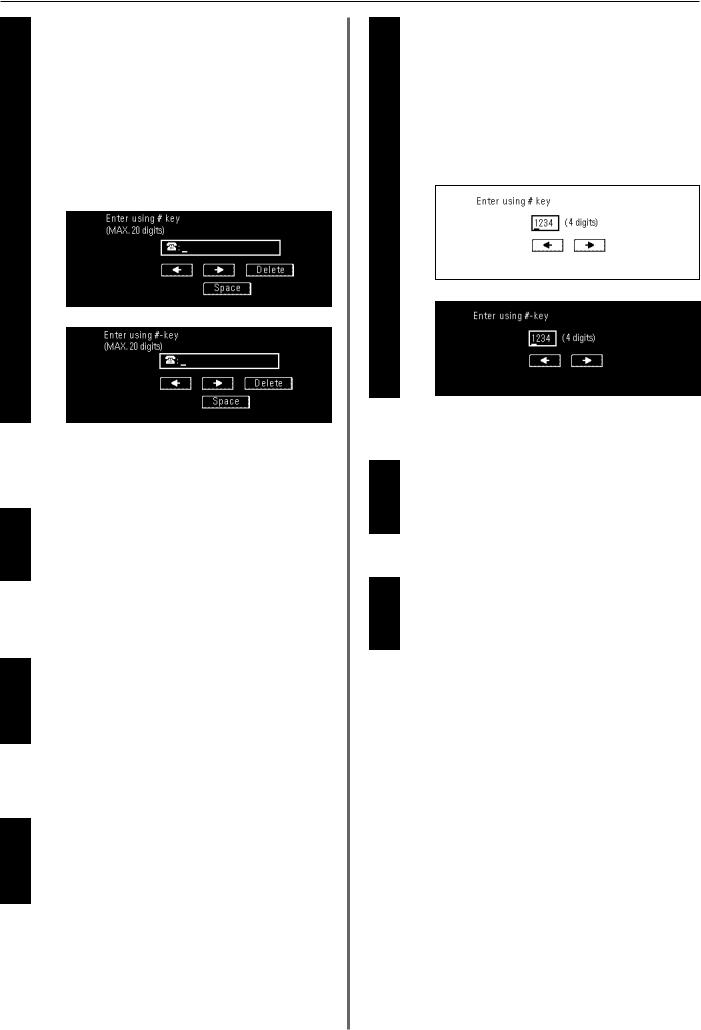
3 Use the keypad to enter your fax number.
*The fax number can be up to 20 digits in length.
*If you want to clear the currently displayed number from the message display, simply press the Stop/Clear key.
*If you want to revise the entered number, touch the “r” or “R” cursor key to move the cursor to the number that you want to change. Then touch the “Delete” key to delete that number and enter the correct number as desired.
(Inch)
(Metric)
4 |
Touch the “OK” key. The message display will return to the |
same screen as was displayed in step 2. |
● Registering your station name
5 Enter the desired name for your station. (Refer to “Entering
Characters” on page 1-23.)
* Your station name can be up to 32 characters in length.
In the Character input screen, touch the “Confirm” key. The
6 message display will return to the same screen as was displayed in step 2.
● Registering your station ID
7 Use the keypad to enter the desired station ID (4 digits).
*If you want to reset the displayed number to “0000”, simply press the Stop/Clear key.
*If you want to revise the entered number, touch the “r” or “R” cursor key to move the cursor to the number that you want to change. Then enter the correct number as desired.
(Inch)
(Metric)
Touch the “Confirm” key. The message display will return to
8 the same screen as was displayed in step 2.
9 If you are finished making settings, press the Reset key.
(4) Setting the Date and Time
Set the date and the time that will appear in the message display here. BE SURE that the date and time that you set here are correct since they will serve as a basis for all communications that use the timer.
*Prior to operation, check the message display to make sure that the operation panel is in the initial mode for fax operation.
(Refer to “(2) Initial Mode” on page 1-7.)
*If you want to cancel the procedure part way through, press the Reset key.
1-6
Section 1 Fax Operation (Basic Use)
Touch the “Register” [“Registration”] key. The Registration 1 Select screen will appear.
(Inch)
(Metric)
2 |
Touch the “Date & Time” key. The currently registered |
information will be displayed. |
(Inch)
(Metric)
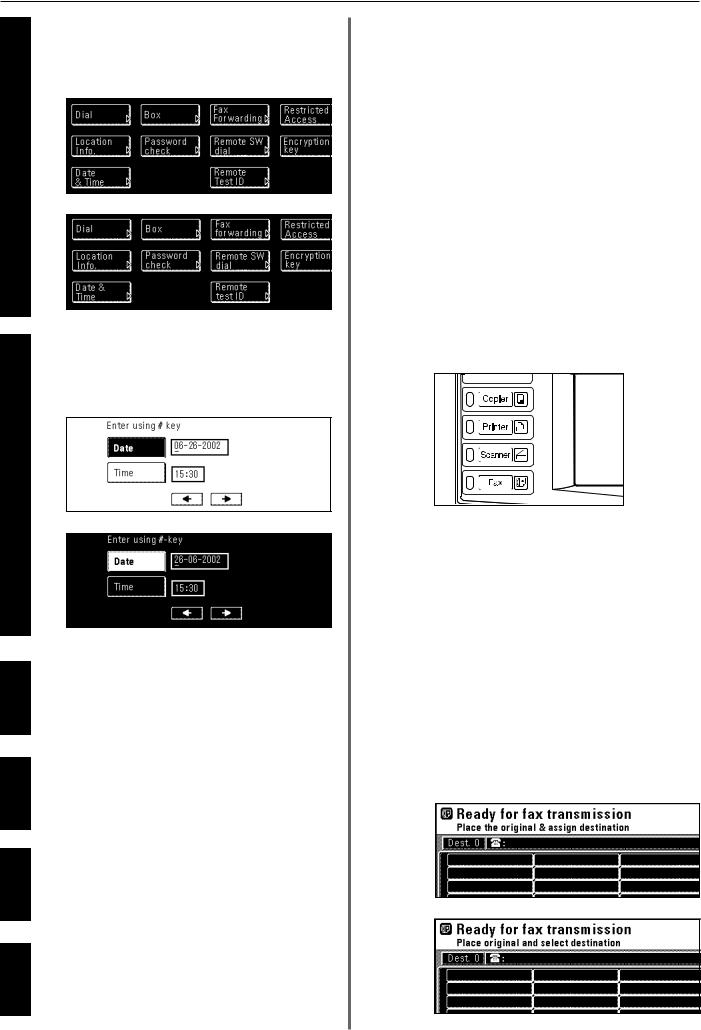
Use the keypad to enter the present date, in order of the
3 month, day and year (day, month and year).
*Use the “r” or “R” cursor keys to move the cursor as required.
Touch the “Time” key and then use the keypad to enter the
4 present time.
*The time should be entered on a 24-hour basis (00:00 - 23:29).
Touch the “Confirm” key. The message display will return to
5 the same screen as was displayed in step 2.
6 If you are finished making settings, press the Reset key.
Features and Functions of this Fax
The following contains explanations about features and functions that should be understood when this machine is used as a facsimile.
(1) Switching from the Copy Operation
Mode to the Fax Operation Mode
This machine was fundamentally designed for use as a copy machine and the default setting is the Copy Operation mode. Therefore, if you want to send a fax to another party it is first necessary to switch to the Fax Operation mode.
However, in terms of receiving a fax. since the Automatic Fax Reception mode is the default setting, fax reception is possible and the documents will be printed out automatically even when the machine is in the Copy Operation mode.
When the machine is in the Copy Operation mode, the COPY indicator will be lit. To switch to the Fax Operation mode, simply press the Fax key. Once the machine is in the Fax Operation mode, the Fax indicator will light and the touch panel will change to the basic fax screen.
(2) Initial Mode
The initial screen that appears in the touch panel when you press the Fax key and change to the Fax Operation mode, or that normally appears in the Fax Operation mode after a successful fax transmission or reception, is called the “basic fax screen”. The accompanying default settings and related operational status is known as the “initial mode”.
When the fax machine is in the initial mode for fax operation, “Ready for fax transmission” will be shown in the message display. Always check the touch panel to make sure that is it is in the initial mode and displaying this basic fax screen PRIOR to performing any facsimile operation.
The fax machine will also return to the initial mode when the Auto
Clear function engages.
(Inch)
(Metric)
1-7
Section 1 Fax Operation (Basic Use)
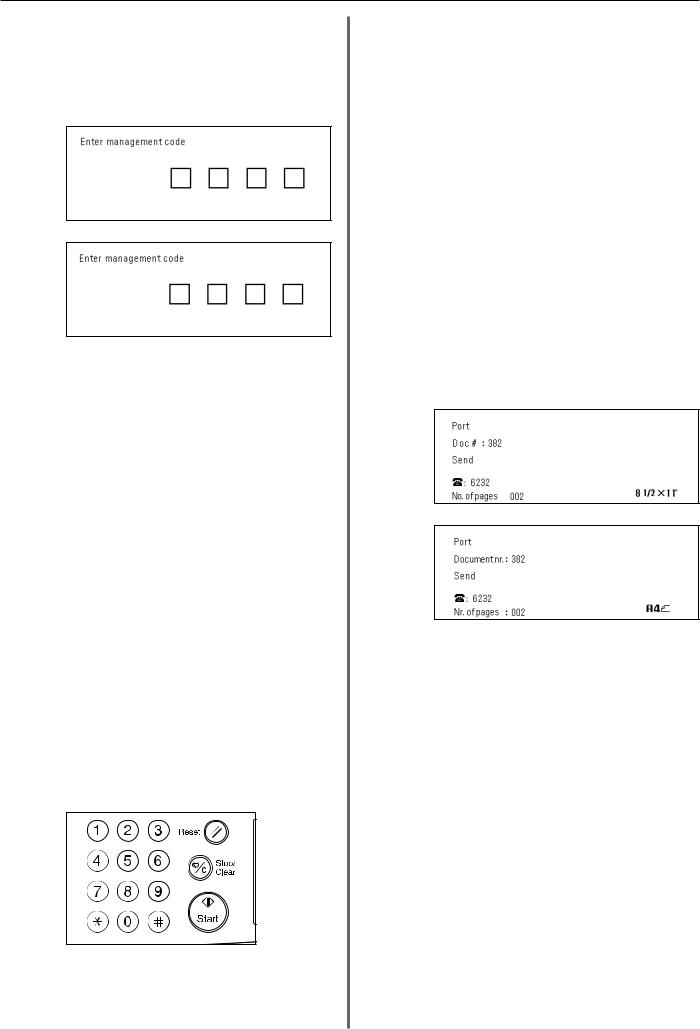
● Message display when Restricted Access is turned ON...
Even if the fax machine is in the initial mode for fax operation, the message display will differ if Restricted Access (page 4-43) is turned ON.
(Inch)
(Metric)
In this case, it is necessary to enter your access code or the registered management password in order to use the fax.
If a viable access code or the registered management password is entered, the touch panel will change to the standard initial mode for fax operation.
CAUTION
When Restricted Access is turned ON, it is necessary to enter the registered management password in the Restricted Access Login
Screen in order to access the various setting and registration procedures of this fax. Even if a viable access code that enables fax operation is entered, the menus that correspond to the various management-related setting and registration procedures of this fax will not be available. (Refer to “Restricted Access” on page 4-40.)
(3) When You Press the Reset Key...
When you want to cancel a procedure part way through, simply press the Reset key. The touch panel will automatically return to the initial mode for fax operation.
*If, however, documents have already been set when you press the
Reset key, the displayed size of those documents will remain in the message display.
*Depending on the status of the operation, there are occasions when pressing the Reset key may have no effect.
(4) Auto Clear Function
The Auto Clear function will clear all entered settings and the touch panel will return to the initial mode settings after any type of transmission or print out, or if you do not press any keys within 90 seconds during any procedure.
*If, however, documents are set when the Auto Clear function engages, the displayed size of those documents will remain in the message display.
(5) Document Number
The fax uses a 3-digit document number in order to manage each fax communication. This document number is assigned during each procedure and in the order that each communication that uses the timer, as well as each transmission or reception, is accomplished. The actual timing of the determination of each document number will differ depending upon the operation being carried out.
In addition to appearing in the message display, this document number can be verified by checking the Transaction Result display, the Delayed Communication Report that is printed out for each communication that uses the timer or by printing out a Confirmation Report. (Refer to “Transaction Result display” on page 5-1,
“(2) Confirmation Report” on page 5-3, and “Turning Report Print Out ON/OFF” on page 6-1.)
(Inch)
(Metric)
(6) Auto Shut-Off Function
Anytime there is no operation of or activity with this fax (no keys are pressed, no documents are set, nothing is printed out, etc.) for a designated period of time, the Auto Shut-Off function will engage for energy saving purposes and the fixing section heater and fan inside the machine will shut down.
The amount of time most copy or fax machines spend waiting for some operation to begin is generally greater than the time actually spent on copying or fax communication. Thus, the energy consumed during that time is a great percentage of the overall energy used by the machine. Shutting down the fixing section heater and fan enables energy and cost reductions by minimizing unnecessary energy consumption while the machine is in this waiting state.
*It is possible to change the amount of time that will elapse before the Auto Shut-Off function is to engage (factory default: 60 minutes). It is recommended that this be set to a longer period of time if the machine is used frequently during the day, and to a shorter time if there are normally long periods between use. (Refer the Operation Guide for your copier.)
1-8
Section 1 Fax Operation (Basic Use)
*Once the Auto Shut-Off function engages, the main switch will turn OFF (O) and all indications on the operation panel will go out. It is therefore necessary to turn the main switch back ON ( | ) in order to send a fax or perform other fax operations on this machine.
*If a fax comes in while the main switch is in the OFF (O) position, that fax reception will still be received and printed out.
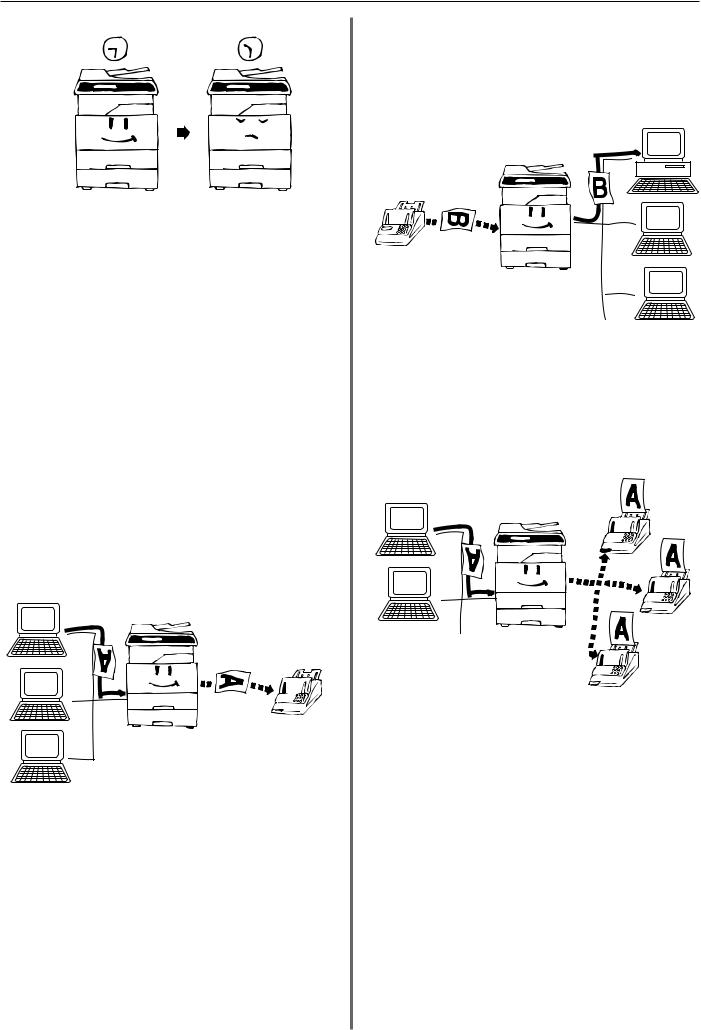
(7) Network FAX Functions (option)
By installing the optional Printer/Scanner Kit, you will be able to use the
Network FAX functions of this machine. Use these functions to send a document made on a network computer to the other fax machine, or to receive a document from the other fax machine onto your network computer. The main functions are as follows.
● Transmission
When this fax machine and a computer are connected over the same network, the image data of a document created on the computer can be sent through the Printer/Scanner Kit that is installed on the fax machine and then transmitted to the other fax, etc.
● Reception
Documents sent by an outside fax machine, etc., will be received by this fax and saved via the Printer/Scanner Kit into a designated folder on the network’s server computer (the computer on which the included Scanner File Utility is installed). In this case, the received document will be saved as a PDF or a TIFF file.
● Address Book
Destination fax numbers can be registered in advance for transmission.
Groups of up to 80 fax numbers can be registered in this machine and can be used conveniently for Broadcast Transmission, etc.
In addition, it is possible to import CSV format address books created with other applications.
(8) Dual Access Function
The Dual Access function allows the machine to simultaneously process 2 operations. For example, you can perform the procedure to transmit documents even during an ongoing fax communication. It is also possible to receive a fax during copying with the received document(s) printed out automatically once the copy operation is completed.
Because the Dual Access function is constantly enabled, no matter what operation is currently in progress, you can perform fax transmission procedures anytime that “Ready for fax transmission” appears in the message display. No special settings are required to use the Dual Access function.
1-9
Section 1 Fax Operation (Basic Use)
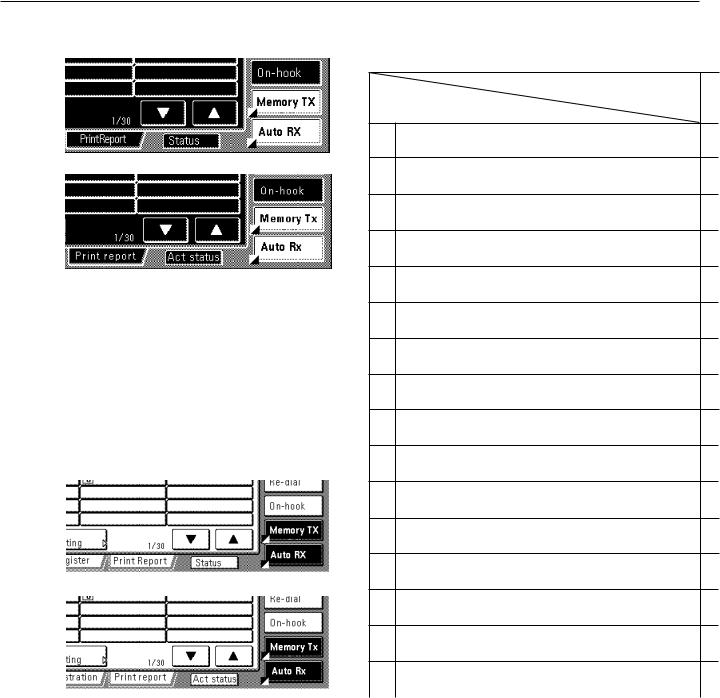
> Checking the status of a fax communication in progress |
● Table of Operations Available/ |
|||||
|
|
|
||||
(Inch) |
|
Unavailable under Dual Access |
||||
|
|
|
|
|
Additional operation |
|
|
|
|
|
Initial operation |
||
|
|
|
1 |
During set-up for sending documents in the Direct Feed |
||
|
|
|
|
|
Transmission mode* |
|
(Metric) |
2 |
During set-up for sending documents in the Memory Trans- |
||||
|
|
|
|
|
mission mode |
|
|
|
|
3 |
During scanning of documents in the Memory Transmission |
||
|
|
|
|
|
mode |
|
|
|
|
4 |
During transmission in the Direct Feed Transmission mode |
||
|
|
|
5 |
During direct reception of documents (w/o using the memory) |
||
|
|
|
||||
Touch the “Status” [“Act status”] key in the bottom right of the touch |
|
|
|
|||
panel. The document number and information related to the other |
6 |
During transmission in the Memory Transmission mode |
||||
party will be displayed. (NOTE: It is possible to cancel that ongoing |
|
|
|
|||
communication by touching the “Stop” key.) |
7 |
During Memory Reception |
||||
* Touch the “Close” key to return to the previous screen. |
||||||
|
|
|
||||
|
|
|
8 |
During direct print out of received documents (w/ the |
||
|
|
|
|
|
transmitting party still connected) |
|
|
|
|
9 |
During print out of received documents from memory (after |
||
> Checking the status of a print out in progress |
|
|
being disconnected from the transmitting party) |
|||
|
|
|
0 |
During print out of a Transmission or Reception Report, or an |
||
|
(Inch) |
|
|
Activity Report, AFTER a communication |
||
|
|
|
|
! During manual print out of a Report or List |
||
|
|
|
|
|||
|
|
|
|
@ During procedures for fax-related settings or registration |
||
|
|
|
|
# During use of both the Scanning and Printing sections when |
||
(Metric) |
|
|
the machine is used as a copier |
|||
|
|
|
||||
|
|
|
|
$ During use of the Printing section when the machine is used |
||
|
|
|
||||
|
|
|
|
|
as a copier |
|
|
|
|
|
% During use of the Printing section when the machine is used |
||
|
|
|
|
|
as a printer |
|
|
|
|
|
^ During use of the Printing section when the machine is used |
||
|
|
|
|
|
as a scanner |
|
Touch the “Status” [“Act status”] key in the bottom right of the touch |
|
|
||||
|
|
|
||||
|
|
|
||||
panel. |
|
|
|
|||
* Touch the “Close” key to return to the previous screen. |
|
|
|
|||
<When the Dual Access function is not available> |
|
|
|
|||
There are cases in which the Dual Access function is not available. |
|
|
|
|||
For example, during a fax communication to one party, you will not be |
|
|
|
|||
able to receive a fax from another party, nor can you perform setting |
|
|
|
|||
or registration procedures during any fax transmission or reception. |
|
|
|
|||
In such cases, perform the desired operation after the current |
|
|
|
|||
communication is completed. |
|
|
|
|||
Refer to “● Table of Operations Available/Unavailable under Dual |
|
|
|
|||
Access”, for more detailed information regarding which operations |
|
|
|
|||
can and cannot be performed simultaneously. |
|
|
|
|||
* Communications that use the timer will not be accomplished, even |
|
|
|
|||
upon reaching the designated time for the communication to begin, |
|
|
|
|||
until the current operation has been completed. |
|
|
|
|||
|
|
|
|
|
|
|
1-10

Section 1 Fax Operation (Basic Use)
1 2 3 4 5 6 7 8 9 0 ! @ # $ % ^
|
X |
X |
X |
O |
O |
O |
O |
O |
O |
X |
5m |
4m |
4m O |
X |
|
X |
|
X |
X |
O |
O |
O |
O |
O |
O |
X |
5m |
4m |
4m |
O |
X |
X |
X |
|
X |
O |
O |
O |
O |
O |
O |
X |
X |
X |
X |
O |
X |
X |
X |
X |
|
X |
X |
X |
X |
X |
X |
X |
X |
X |
X |
O |
X |
O |
O |
O |
X |
|
X |
X |
X |
X |
X |
X |
X |
3m |
3m |
3m X |
|
O |
O |
O |
X |
X |
|
X |
X |
X |
X |
O |
X |
O |
O |
O |
O |
O |
O |
O |
X |
X |
X |
|
X |
X |
X |
O |
X |
O |
O |
O |
O |
O |
O |
O |
X |
X |
X |
X |
|
X |
X |
X |
X |
3m |
3m |
3m X |
|
O |
O |
O |
O |
O |
O |
O |
1m |
|
1m X |
X |
3m |
3m |
3m X |
||
O |
O |
O |
O |
O |
O |
O |
1m |
1m |
|
X |
X |
3m |
3m |
3m X |
|
O |
O |
O |
O |
O |
O |
O |
1m |
1m |
1m |
|
X |
3m |
3m |
3m |
X |
X |
X |
X |
X |
X |
X |
X |
X |
X |
X |
X |
5m |
4m |
4m O |
X |
|
X |
X |
X |
X |
2m O |
O |
2m |
1m |
1m X |
X |
|
– |
– |
X |
||
O |
O |
O |
O |
2m O |
O |
2m |
1m |
1m X |
O |
– |
|
– |
X |
||
O |
O |
O |
O |
2m O |
O |
2m |
1m |
1m |
X |
O |
– |
– |
|
X |
|
X |
X |
X |
X |
2m O |
O |
X |
X |
X |
X |
X |
X |
X |
X |
|
|
<Table codes> |
|
|
|
|
|
|
m: The additional operation will work with the initial operation under |
||||||||
The numbers and symbols shown in the table above refer to the |
|
|
certain conditions. The adjoining numerals refer to the following |
||||||||||||
following: |
|
|
|
|
|
|
|
|
conditions: |
|
|
|
|
|
|
* : During procedures that use the message display but are not |
|
1 : Print out will be accomplished once printing is possible and the |
|||||||||||||
included in the initial procedures listed in the table above, |
|
|
fax is in the Fax Operation mode. |
|
|
|
|||||||||
the procedure will work just like this operation. |
|
|
2 |
: Direct Reception will switch to Memory Reception and print out |
|||||||||||
O : The additional operation will work unconditionally with the |
|
|
will be accomplished once printing is possible and the fax is in the |
||||||||||||
initial operation. |
|
|
|
|
|
|
|
Fax Operation mode. |
|
|
|
|
|||
– : Unrelated to fax operation. |
|
|
|
|
|
3 : Printing can be stopped and copies made. |
|
|
|||||||
X : The additional operation will NOT work with the initial |
|
4 : Settings made in the Fax Operation mode will be deleted once the |
|||||||||||||
operation. |
|
|
|
|
|
|
|
machine is switched to the Copy Operation mode. |
|
||||||
|
|
|
|
|
|
|
|
5 |
: It is possible to add fax default settings, but those communication |
||||||
|
|
|
|
|
|
|
|
|
settings, etc., that have already been made will be canceled. |
||||||
1-11
Section 1 Fax Operation (Basic Use)
(9) Batch Transmission Function
Any time the destination as well as the scheduled time of transmission is the same for separate sets of documents in memory, up to 10 of these multiple sets of documents will be automatically pooled together and transmitted during the same communication. This Batch Transmission function eliminates the need for you to dial the same destination multiple times, thereby lowering communication costs.
*Direct Feed Transmissions will not be included in a Batch Transmission.
*If you register the same destination fax number for two separately scheduled Broadcast Transmissions, those transmissions will not be included in a Batch Transmission even if they are scheduled for the same time.
*When the start time for a scheduled communication arrives and another communication to the same party is currently waiting for automatic redialing, both communications will be grouped together and sent using Batch Transmission.
*When Restricted Access is turned ON, only communications that were scheduled using the same access code will be sent using Batch Transmission. Therefore, if different access codes were used when scheduling two separate communications, those documents will be transmitted separately even if the destination and the scheduled time of transmission are the same.
(10) Rotate & Transmit Function
If 11" x 8 1/2" [A4] (width-wise) size documents are set in the
Document Processor or on the platen, this function will automatically rotate the scanned data 90˚ counter-clockwise and transmitted them as 8 1/2" x 11" [A4] (length-wise) documents.
*To enable the Rotate & Transmit function for documents set in the
Document Processor, you must select “Standard size” when setting the document size for scanning from the Document Processor.
(Refer to “Setting the Document Size for Scanning from the
Document Processor” on page 6-4.)
*The Rotate & Transmit function will only engage for 11" x 8 1/2" [A4] size documents.
(11) F-Code Based Communication
F-Code Based Communication involves fax communication that includes certain codes (in the form of numbers and symbols), the base of a protocol that has been adopted for use by other facsimile manufacturers as well. By using these codes, methods of confidential communication – previously available only between facsimiles that were both from the same manufacturer – are now becoming possible between models from different manufacturers. This fax has such F-Code capabilities.
By using an F-Code Box that has been registered in this machine and designated for F-Code Based Communication to transmit and receive documents, you can perform Confidential and Bulletin Board Communications, as well as Relay Broadcast Communications, between this machine and models from other manufacturers.
In order to perform an F-Code Based Communication, the other party’s fax must have F-Code Based capabilities specific to the communication you are attempting. Therefore, you should thoroughly discuss in advance with the party you plan to communicate with the capabilities of your respective models before attempting to transmit or receive using F-Code Based Communications.
Refer to “F-Code Based Communication” on page 4-9, for a more detailed information regarding the F-Code Based Communication capabilities of this fax.
(12) Memory Reception Function
When you cannot print out because paper has run out or a paper jam occurs, the data for all received documents will be temporarily stored in memory and will then be printed out automatically once printing is enabled.
*If, for any reason, power to the fax is disconnected or lost, data received into memory may be lost. Ask the other party to retransmit any documents for which data was lost. (Refer to page 1-19.)
1-12
Section 1 Fax Operation (Basic Use)
(13) Rotate Received Documents
Even if the orientation of the received documents and of the paper set in the drawers differs, if their size is the same (11" x 8 1/2" [A4]), this function will automatically rotate the received data 90˚ counterclockwise before printing it out. No special settings are required to use this function.
*If paper of the same size is set in different orientations, depending on the type of communication that is involved, there are times when rotation of the received data is not possible. For further information on paper orientation, refer to “Paper Size and Priority Feed Chart” on pages 8-3 and 8-4.
*If the transmitting party’s TTI information is set to be printed outside the border of the transmitted page, received data cannot be rotated and the received image will be reduced slightly to enable the appropriate information to be printed out.
(14) Imaging Memory Back-Up Function
If, for any reason, power to the fax is disconnected or lost, the backup battery in this machine will protect all data related to documents that were already received into Imaging Memory, or that are waiting for transmission, for up to 60 minutes (8 MB of optional memory must be installed [totaling 16 MB in the machine]).
Thus, if power is restored to the fax within that time period, those communications that were scheduled and waiting in memory prior to the failure will be carried out as scheduled.
If power cannot be restored in time and data is lost, a Power Failure Report that indicates what information was lost will be automatically printed out once power is restored to the fax.
*The actual length of time the back-up battery will protect the data in memory may differ depending on the conditions and environment of use of this machine.
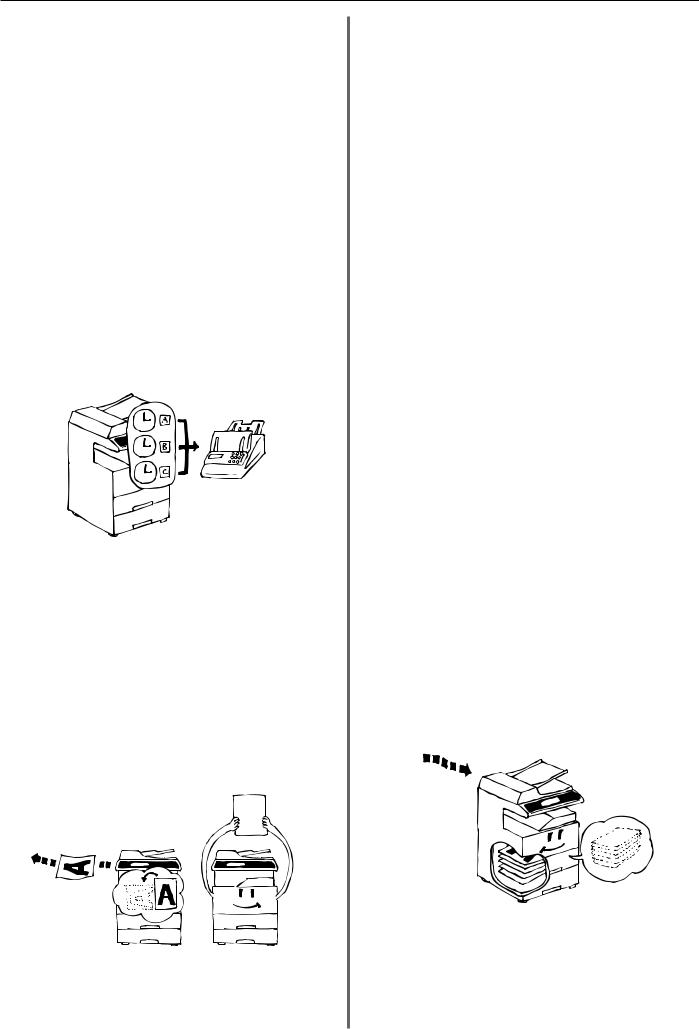
(15) Fax Priority Printout
It is possible to have incoming faxes, which are received during a copy operation, printed out without having to wait for that copy operation to be completed.
> A fax has been received...
The Fax data indicator will light.
> Printing out that fax...
Press the Fax Priority key. The copy operation will continue after the fax documents are printed out.
(16) Abbreviated numbers
600 speed-dial keys are available and each of these keys can be designated to function as either a one-touch key, a group dial key, a program key or a chain dial key. Each of these keys is given a 3-digit
“abbreviated number” between 001 and 600. It is then possible to dial a destination number by simply entering the corresponding abbreviated number. (Refer to page 1-30.) Since only 20 of these speed-dial keys can be display on the touch panel at one time, using the corresponding abbreviated number may be faster than the time required to change screens and find a desired key.
(Inch)
(Metric)
1-13
Section 1 Fax Operation (Basic Use)
Sending Documents
The following contains explanations on the standard method for transmitting documents. Carefully read all the notes regarding acceptable documents, etc., to ensure correct
operation.
(Inch)
Switching to the Fax Operation mode
1 Check the message display to make sure that the touch panel is in the initial mode for fax operation (the basic fax screen is displayed). If the touch panel is not in the initial mode, press the Reset key.
(Metric)
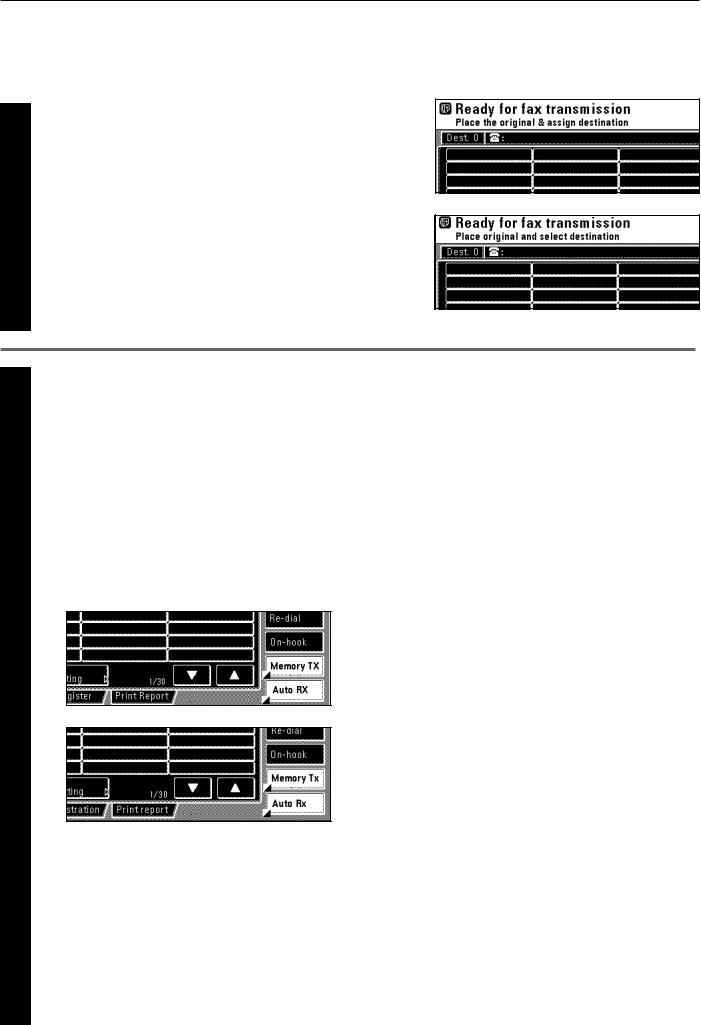
Check the transmission mode
2 Make sure that the fax machine is in the desired transmission mode.
*There are two transmission modes available in this fax: Memory Transmission and Direct Feed Transmission.
Memory Transmission is the default setting in this fax and, in this case, “Memory TX” will be displayed.
*To switch from the Memory Transmission mode to the Direct
Feed Transmission mode, touch the “Memory TX” key until “Dir. Feed Tx” is displayed.
(Inch)
(Metric)
<Transmission Modes>
●Memory Transmission mode (Transmitting from the Document
Processor)
The destination fax number is dialed automatically AFTER the documents are set in the Document Processor, scanned and then entered into memory. This is an extremely convenient mode because your documents are returned to you, ready to use, without making you wait until the actual transmission is complete. This is the most appropriate method to use when transmitting multiple page documents.
●Memory Transmission mode (Transmitting from the platen)
This mode is ideal for transmitting books and the like that cannot be placed in the Document Processor. Documents are set one at a time directly on the platen and, after all the documents are scanned and entered into memory, the destination fax number is then dialed.
In this case, it is necessary – after each page is scanned – to select whether or not you want to transmit more pages. (Refer to <If the Documents Were Set on the Platen...> on page 1-18.)
●Direct Feed Transmission mode (Transmitting from the Document Processor)
The destination fax number is dialed first, and – once the connection with the other fax machine is established – the documents that are set in the Document Processor are scanned and then transmitted. If the transmission involves a multi-page document, the second page is scanned after the data for the first page is transmitted.
*If you want to stop the transmission in progress, press the
Stop/Clear key and remove the remaining documents from the Document Processor.
●Direct Feed Transmission mode (Transmitting from the platen)
This mode is ideal for transmitting books and the like that cannot be placed in the Document Processor. Documents are set one at a time directly on the platen, the destination fax number is then dialed first, and – once the connection with the other fax machine is established – scanning of the document begins and the document is transmitted.
This process is carried out for each page that you want to transmit and it is necessary, after each page is scanned, to select whether or not you want to transmit more pages. (Refer to <If the
Documents Were Set on the Platen...> on page 1-18.)
1-14
Section 1 Fax Operation (Basic Use)
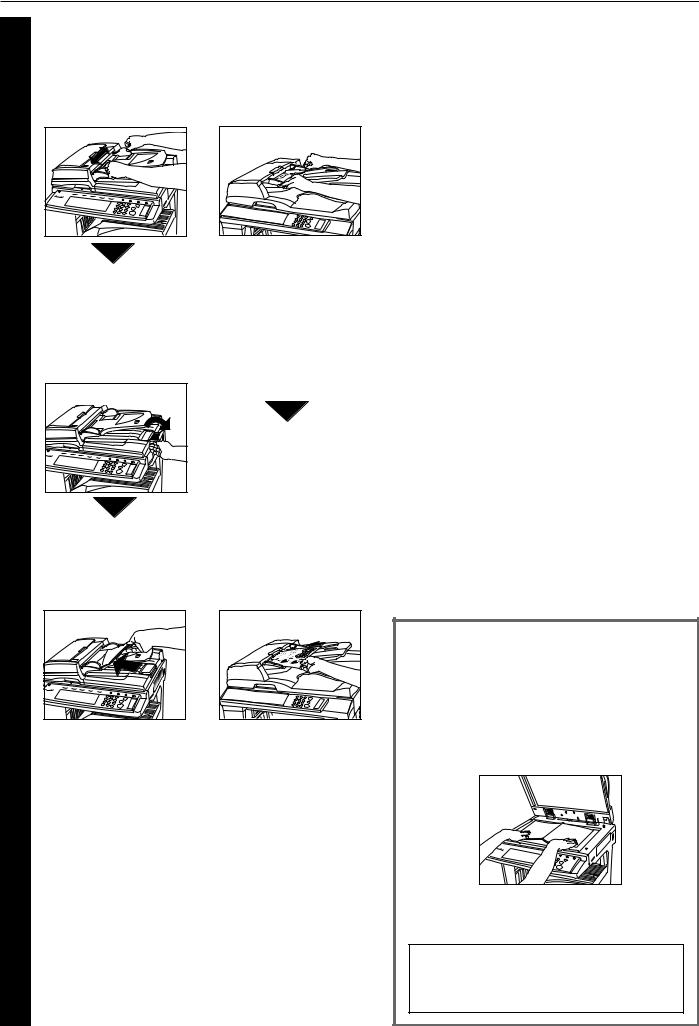
3 Setting the documents
● Duplex Document Processor
1Adjust the document insert guides to match the width of the documents you want to transmit.
2Open the eject guide when transmitting documents of a large size such as 8 1/2" x
14" [B4] or 11" x 17" [A3].
3Set the documents face-up on the document table.
*If the documents are set properly, the document set indicator will be lit green.
*DO NOT set more documents than indicated by the paper volume lines that are located on the inside of the rear document insert guide. Setting more than the acceptable number of documents can be the cause of document jams.
*Refer to the Operation Guide for your Duplex Document
Processor for more detailed information regarding use of the Duplex Document
Processor.
*It is possible to set duplex
(2-sided) documents and have both the front and back sides of those documents transmitted.
(Refer to page 2-1.)
● Document Processor
1Adjust the document insert guides to match the width of the documents you want to transmit.
2Set the documents face-up on the document table.
*DO NOT set more documents than indicated by the paper volume lines that are located on the inside of the rear document insert guide. Setting more than the acceptable number of documents can be the cause of document jams.
*Refer to the Operation Guide for your Document Processor for more detailed information regarding use of the Document Processor.
● Acceptable documents
>When set in the Document Processor...
•Type...Standard sheet documents
•Size...5 1/2" x 8 1/2" - 11" x 17" [A5R - A3]
*If you attempt to transmit a document over 63" [1600 mm] in length, a message indicating that a document jam has occurred in the Document Processor will appear in the message display.
•Paper weight...1-sided documents: 35 g/m2 - 160 g/m2
Duplex (2-sided) documents: 50 g/m2 - 120 g/m2 (Only available with the RADF installed)
• Number (plain paper)...Under 8 1/2" x 11" [A4]: 70 sheets (Document Processor) or 100 sheets (Duplex Document Processor)
8 1/2" x 14" or 11" x 17" [B4, A3 or Folio]: 50 sheets (Document Processor) or 70 sheets (Duplex Document Processor)
>When set on the platen...
• Maximum size: 11" x 17" [A3]
● Notes on acceptable documents
•If documents with very low contrast images or light colored text are transmitted, they may not be received clearly by the other party.
•MAKE SURE that documents written in ink or containing glue, etc., have dried COMPLETELY before setting them for transmission.
•When setting documents in the Document Processor,
ALWAYS set documents AFTER removing any clips and staples as they can cause damage to the machine.
•Documents of sizes outside the prescribed range may not be transmitted successfully.
•If documents with punch holes are set in the Document Processor for transmission, gray streaks may appear on the documents received by the other party. In this case, set the documents in a different direction and try to transmit them again.
<Setting the Documents on the Platen>
Documents can also be transmitted by lifting open the
Document Processor and setting one document at a time directly on the platen. ALWAYS use the platen when transmitting pages from books and the like.
1Set the document face-down and align it properly with the lines on the original size scales.
2When transmitting single-sheet documents directly from the platen, BE SURE to close the
Document Processor.
 CAUTION
DO NOT leave the Document Processor open as there is a danger of personal injury.
1-15

Section 1 Fax Operation (Basic Use)
Dialing a destination fax number
4 Use the keypad to enter the destination fax number.
*The destination fax number can be up to 32 digits in length.
*If a mistake is made at any point in entering the fax number, touch the “r” or “R” cursor key to move the cursor to the desired position and enter the correct number as desired, or press the Stop/Clear key and enter the full number once again from the beginning.
Selecting the resolution
5 It is possible to select a resolution from among the 5 available settings.
* The default setting is for Normal resolution.
1If you want to change the resolution, touch the “Orig image quality” [“Quality Original”] key.
(Inch)
(Metric)
● Resolutions
•Normal: For transmitting documents with standard size characters
•Fine: For transmitting documents with relatively small characters or thin lines
•Super fine: For transmitting documents with detailed lines and characters
•Ultra fine: For transmitting the clearest reproduction of documents with detailed lines and characters
•Half tone [Half-tone]: For transmitting the clearest reproduction of documents containing both photographs as well as text
<Notes>
•The Fine and Super fine resolutions reproduce clearer images in comparison to transmission with the Normal resolution, but transmission time is longer.
•The Half tone [Half-tone] resolution reproduces grays clearly, but transmission time is longer than with the Normal or Fine resolutions.
•To transmit with the Ultra fine resolution, 8 MB of optional memory must be installed. If the additional memory is NOT installed, the Ultra fine resolution will not selectable.
•To transmit with the Super fine or Ultra fine resolutions, the receiving fax must have the corresponding resolution capabilities in order to benefit from their features. If the receiving fax does not have the corresponding capability, transmission will be accomplished with the Fine resolution.
2 Select the desired resolution from among the 5 available.
1-16
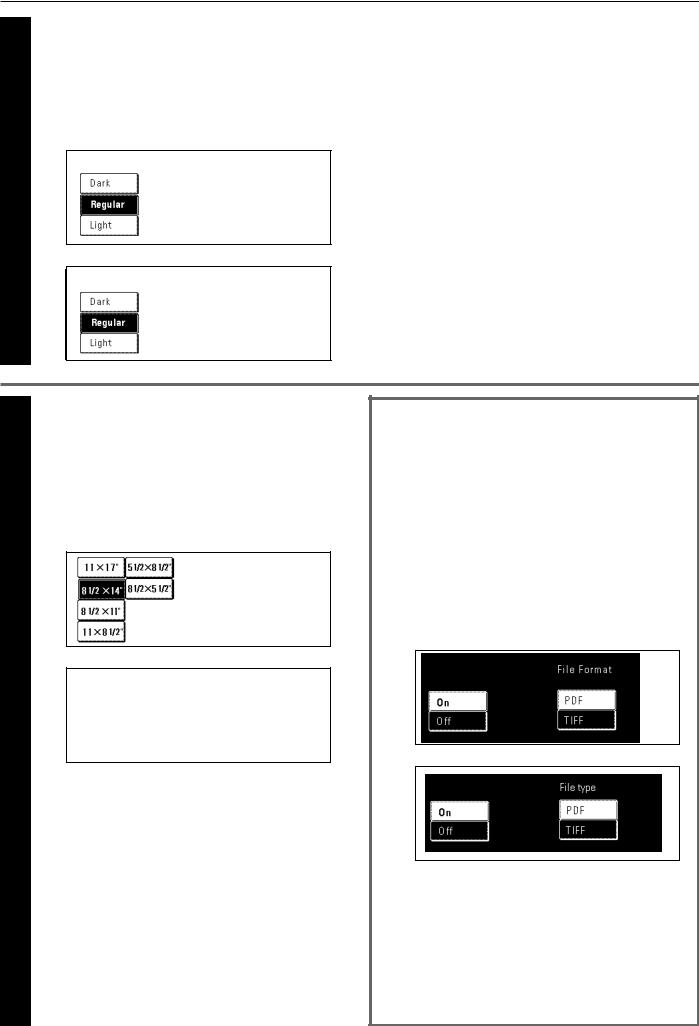
Section 1 Fax Operation (Basic Use)
Selecting the contrast
6 It is possible to select a contrast from among the 3 available settings.
* The default setting is for Regular contrast.
1If you want to change the contrast, touch the “Exposure mode” key.
2 Select the desired contrast from among the 3 available.
(Inch)
(Metric)
● Document contrast
Dark: For transmitting light documents at a darker contrast Regular: For transmitting document with a normal contrast Light: For transmitting dark documents at a lighter contrast
7 |
Indicating the document size |
When you set any documents that you want to transmit on the |
platen, you will need to indicate the size of those documents.
This procedure is not necessary when transmitting documents from the Document Processor.
1 In order to indicate the document size, touch the “Orig. size setting” [“Original setting”] key.
2 Select the appropriate document size.
(Inch)
(Metric)
Saving a document for transmission
When the optional Printer/Scanner Kit is installed...
Perform the following procedure in order to save a document for transmission on the administrator’s network computer.
The document can be saved as a PDF file or a TIFF file.
*In order to save a document for transmission, the IP address or host name must be registered in the administrator’s computer. (See page 8-5)
1 Touch the “Save Tx. original” key.
2 Touch the “On” key.
(Inch)
(Metric)
3Select the desired type of file by touching the “PDF” or “TIFF” key.
1-17

Section 1 Fax Operation (Basic Use)
Initiating the fax transmission
8 Press the Start key. The transmission operation will begin automatically.
*You can select or change the resolution or contrast during scanning or dialing.
(Inch)
(Metric)
> Checking the status of the transmission...
Touch the “Status” [“Act status”] key in the bottom right of the touch panel. The document number and information related to the other party will be displayed.
(Inch)
(Metric)
> Stopping the transmission in progress
It is possible to cancel the ongoing operation by touching the “Stop”key in the confirmation screen that was accessed above.
* Touch the “Close” key to return to the previous screen.
<If the Documents Were Set on the Platen...>
Whenever you set the documents that you want to transmit on the platen, close the Document Processor in order to allow the machine to detect the size of those documents. If you are transmitting information from books or other types of documents that will not allow you to close the Document Processor, it is necessary to indicate the document size manually. (Refer to page 1-17.)
*In addition, any time you set documents on the platen for transmission, a menu like that shown below will appear in the message display once you press the Start key and the documents have been scanned. In this case, perform the following procedure.
(Inch)
(Metric)
> If you have more documents to send...
1 Set the next page to be scanned on the platen.
*The next document(s) may also be set in the Document
Processor.
2 Touch the “Yes” key.
3 Press the Start key.
*If you set the document(s) in the Document Processor, scanning and then transmission of the documents will begin automatically.
*Repeat steps 1 through 3 for all remaining documents.
> Once there are no further pages to be scanned...
1Touch the “No” key. Transmission of the documents will begin automatically.
1-18

Section 1 Fax Operation (Basic Use)
Receiving Documents (Automatic Fax Reception)
Automatic Fax Reception is the default setting for fax reception in this machine and no special settings are required for its use.
*Fax reception is possible even if the main switch is turned OFF (O). If a fax comes in while the main switch is in the OFF (O) position, that fax reception will still be received and printed out.
<Reception modes>
This fax machine offers the following 4 or 5 (depending upon the region of use) ways to receive a fax.
•Automatic Fax Reception
•Manual Fax Reception
•Auto FAX/TEL Switching
•TAD Reception
•D.R.D. Reception
Checking the reception mode
Make sure that “Auto RX” is displayed.
(Inch)
● Changing the reception mode
Touch the reception mode select key when you want to change the reception mode.
(Inch)
(Metric) |
(Metric) |
|
Touch the key that corresponds to the desired reception mode.
1-19

Section 1 Fax Operation (Basic Use)
Receiving a fax
1 When a fax comes in, fax reception will begin automatically after the amount of time equal to a designated number of rings.
*Once fax reception begins, the “Status” [“Act status”] key will appear in the bottom right of the touch panel.
(Inch)
(Metric)
> Stopping the reception in progress
1Touch the “Status” [“Act status”] key in the bottom right of the touch panel.
2 Touch the “Stop” key and the reception will be canceled.
(Inch)
(Metric)
● Making copies during a reception
It is possible to make copies even during a reception in which documents are being directly printed out (whereby Imaging memory is not used to save the documents).
•Press the Interrupt key during a reception. The fax will switch to Memory Reception and copying will be possible.
● Memory Reception
When you cannot print out because paper has run out or a paper jam occurs, the data for all received documents will be temporarily stored in memory and will then be printed out automatically once printing is enabled.
*If, for any reason, power to the fax is disconnected or lost, data received into memory may be lost. Ask the other party to retransmit any documents for which data was lost.
2 |
Printing out the received documents |
* Up to 250 sheets of plain paper can be stored in the copy store |
Received document(s) will be printed out and ejected face- |
section at one time. When the maximum number of sheets has been |
|
|
down in the copy store section. |
reached, remove all of the documents from the copy store section. |
|
|
* Even if you cannot print out because paper has run out or a paper |
|
|
jam occurs, reception is still possible (Memory Reception). |
|
|
* 8 MB of optional memory must be installed in order to use the Ultra |
|
|
fine resolution. |
1-20

Section 1 Fax Operation (Basic Use)
Canceling a Communication
You can cancel a communication even if it is already in progress. The methods for canceling a communication differ depending on whether that communication is a fax transmission or a fax reception, and whether that transmission was initiated using the Memory Transmission mode or the Direct Feed Transmission mode. The following contains explanations on the various methods used for canceling communications.
(1) Canceling a Memory Transmission
(during scanning)
If you want to cancel a Memory Transmission during scanning of the documents, simply press the Stop/Clear key. The document that is currently being scanned will be ejected and the touch panel will return to the initial mode settings. If there are any documents left in the Document Processor, remove them from the document table.
(2) Canceling a Memory Transmission
(during transmission)
If you want to cancel a Memory Transmission in which scanning all of the documents has been completed and the dialing or transmission operation has already begun, perform the following procedure.
(Inch)
(Metric)
Touch the “Status” [“Act status”] key in the bottom right of the 1 touch panel.
The status of the communication currently in progress will appear in the message display.
(Inch)
(Metric)
2 |
Touch the “Stop” key or press the Stop/Clear key. The touch |
panel will return to the initial mode settings. |
*If you attempt to cancel a transmission that is scheduled to multiple destinations (such as a Broadcast Transmission) and there were destinations still remaining to be transmitted to, a message will appear in the message display asking whether or not you want to continue the transmissions to the remaining destinations.
(3)Canceling a Direct Feed Transmission
A message such as that shown below will be displayed after dialing the destination party in the Direct Feed Transmission mode.
If you want to cancel a Direct Feed Transmission, touch the “Stop” key or press the Stop/Clear key. When a display to confirm the cancel appears, touch the “Yes” key. The document that is currently being scanned will be ejected and the touch panel will return to the initial mode settings. If there are any documents left in the Document Processor, remove them from the document table.
(Inch)
(Metric)
1-21

Section 1 Fax Operation (Basic Use)
(4) Canceling a Reception
If you want to cancel a reception, perform the following procedure.
(Inch)
(Metric)
Touch the “Status” [“Act status”] key in the bottom right of the 1 touch panel.
The status of the communication currently in progress will appear in the message display.
(Inch)
(Metric)
Touch the “Stop” key or press the Stop/Clear key. The touch
2 panel will return to the initial mode settings.
*If you attempt to cancel a reception that is scheduled from multiple transmitting faxes (such as a Polling Reception) and there were fax machines still remaining to be received from, a message will appear in the message display asking whether or not you want to continue the receptions from the remaining faxes.
1-22
 Loading...