


bizhub 20
Table of contents
 Loading...
SOFTWARE
USER’S GUIDE
A32R-9563-00A

Trademarks
KONICA MINOLTA and the KONICA MINOLTA logo are trademarks or registered trademarks of KONICA
MINOLTA HOLDINGS, INC.
bizhub and PageScope are trademarks or registered trademarks of KONICA MINOLTA BUSINESS
TECHNOLOGIES, INC.
Windows Vista is either a registered trademark or a trademark of Microsoft Corporation in the United States
and other countries.
Microsoft, Windows, Windows Server and Internet Explorer are registered trademarks of Microsoft
Corporation in the United States and/or other countries.
Apple, Macintosh, Safari and TrueType are trademarks of Apple Inc., registered in the United States and
other countries.
Adobe, Flash, Illustrator, PageMaker, Photoshop, PostScript and PostScript 3 are either registered
trademarks or trademarks of Adobe Systems Incorporated in the United States and/or other countries.
Epson is a registered trademark and FX-80 and FX-850 are trademarks of Seiko Epson Corporation.
IBM is either a registered trademark or a trademark of International Business Machines Corporation in the
United States and/or other countries.
Nuance, the Nuance logo, PaperPort and ScanSoft are trademarks or registered trademarks of Nuance
Communications, Inc. or its affiliates in the United States and/or other countries.
CorelDRAW, Paint Shop Pro and WordPerfect are trademarks or registered trademarks of Corel Corporation
and/or its subsidiaries in Canada, the United States and/or other countries.
Each company whose software title is mentioned in this manual has a Software License Agreement specific
to its proprietary programs.
All other trademarks are property of their respective owners.
i

Table of Contents
Section I Windows
®
1Printing 2
Using the KONICA MINOLTA printer driver...............................................................................................2
Printing a document...................................................................................................................................3
Duplex printing...........................................................................................................................................4
Guidelines for printing on both sides of the paper ...............................................................................4
Automatic duplex printing ....................................................................................................................4
Manual duplex printing ........................................................................................................................4
Simultaneous scanning, printing and faxing ..............................................................................................4
Printer operation keys................................................................................................................................5
Job Cancel...........................................................................................................................................5
Secure Key..........................................................................................................................................5
Printer Emulation Support ...................................................................................................................6
Printing the Internal Font List...............................................................................................................7
Printing the Print Configuration List .....................................................................................................7
Test Print .............................................................................................................................................7
Duplex .................................................................................................................................................8
Restoring default printer settings.........................................................................................................8
Status Monitor............................................................................................................................................9
Monitoring the machine’s status ..........................................................................................................9
Printer driver settings...............................................................................................................................10
Features in the Windows
Basic tab..................................................................................................................................................11
Paper Size .........................................................................................................................................12
Orientation .........................................................................................................................................12
Copies ...............................................................................................................................................12
Media Type........................................................................................................................................12
Resolution..........................................................................................................................................13
Print Settings .....................................................................................................................................13
Multiple Page.....................................................................................................................................13
Duplex / Booklet ................................................................................................................................14
Paper Source.....................................................................................................................................16
Advanced tab...........................................................................................................................................17
Use Watermark..................................................................................................................................19
Watermark Settings ...........................................................................................................................19
Header-Footer Print...........................................................................................................................21
Toner Save Mode ..............................................................................................................................21
Secure Print.......................................................................................................................................21
Administrator .....................................................................................................................................22
User Authentication ...........................................................................................................................22
Other Print Options............................................................................................................................23
Accessories tab .......................................................................................................................................24
Support ....................................................................................................................................................26
®
printer driver..................................................................................................11
ii

Features in the BR-Script3 (PostScript® 3™ language emulation) printer driver ....................................28
Printing Preferences ..........................................................................................................................28
Advanced options ..............................................................................................................................30
Ports tab ...........................................................................................................................................32
2 Scanning 33
Scanning a document using the TWAIN driver........................................................................................33
Scanning a document into the PC .....................................................................................................33
Pre-Scanning to crop a portion you want to scan..............................................................................35
Settings in the Scanner Setup dialog box..........................................................................................36
Scanning a document using the WIA driver (Windows
WIA compliant ...................................................................................................................................40
Scanning a document into the PC .....................................................................................................40
Pre-Scanning to crop a portion you want to scan using the scanner glass .......................................42
Scanning a document using the WIA driver
(Windows Photo Gallery and Windows Fax and Scan) ........................................................................45
Scanning a document into the PC .....................................................................................................45
Pre-Scanning to crop a portion you want to scan using the scanner glass .......................................46
Using the Scan key (For USB or Parallel cable users) ............................................................................48
Scan to USB ......................................................................................................................................49
Scan to E-mail ...................................................................................................................................52
Scan to Image ...................................................................................................................................52
Scan to OCR .....................................................................................................................................53
Scan to File........................................................................................................................................54
Using ScanSoft™ PaperPort™ 11SE with OCR by NUANCE™.............................................................55
Viewing items ....................................................................................................................................56
Organizing your items in folders ........................................................................................................57
Quick links to other applications ........................................................................................................57
ScanSoft™ PaperPort™ 11SE with OCR lets you convert image text into text you can edit............57
Importing items from other applications.............................................................................................58
Exporting items into other formats.....................................................................................................58
®
XP/Windows Vista®/Windows® 7) ...................40
3 ControlCenter3 59
Using ControlCenter3 ..............................................................................................................................59
Switching the user interface ..............................................................................................................61
Turning the Auto Load feature off......................................................................................................61
SCAN.......................................................................................................................................................62
File type.............................................................................................................................................63
Image (example: Microsoft
OCR (Word Processing program) .....................................................................................................65
E-mail ................................................................................................................................................66
File.....................................................................................................................................................67
CUSTOM SCAN ......................................................................................................................................68
File type.............................................................................................................................................69
Customizing a user-defined button....................................................................................................70
COPY ......................................................................................................................................................75
PC-FAX....................................................................................................................................................77
Send ..................................................................................................................................................78
Receive/View Received.....................................................................................................................78
Address Book ....................................................................................................................................79
Setup .................................................................................................................................................79
®
Paint)....................................................................................................63
iii

DEVICE SETTING...................................................................................................................................80
Remote Setup....................................................................................................................................81
Quick-Dial ..........................................................................................................................................82
Status Monitor ..................................................................................................................................82
4 Network Scanning 83
Before using Network Scanning ..............................................................................................................83
Configuring Network Scanning ..........................................................................................................83
Using the Scan key..................................................................................................................................86
Scan to E-mail (PC)...........................................................................................................................86
Scan to E-mail (E-mail Server) ..........................................................................................................87
Scan to Image ...................................................................................................................................89
Scan to OCR .....................................................................................................................................90
Scan to File........................................................................................................................................91
Scan to FTP.......................................................................................................................................92
Scan to Network ................................................................................................................................95
How to set a new default for the file size
(For Scan to E-mail (E-mail server), Scan to FTP and Scan to Network) .....................................98
How to set a new default for the Duplex Scan mode
(For Scan to E-mail (E-mail server) only) ......................................................................................98
5Remote Setup 99
Remote Setup..........................................................................................................................................99
6 PC-FAX Software 101
PC-FAX sending ...................................................................................................................................101
Setting up user information..............................................................................................................101
Sending setup..................................................................................................................................102
Setting up a cover page...................................................................................................................103
Entering cover page information......................................................................................................104
Sending a file as a PC-FAX using the Facsimile style user interface ..............................................104
Sending a file as a PC-FAX using the Simple style user interface ..................................................105
Address Book ........................................................................................................................................107
Address Book ..................................................................................................................................108
Setting up a member in the Address Book ......................................................................................108
Speed Dial setup .............................................................................................................................109
Setting up a group for broadcasting ................................................................................................110
Editing member information.............................................................................................................110
Deleting a member or group............................................................................................................110
Exporting the Address Book ............................................................................................................111
Importing to the Address Book ........................................................................................................112
PC-FAX receiving ..................................................................................................................................114
Enabling PC-FAX Receiving software on your machine .................................................................115
Running the PC-FAX Receiving software on your PC.....................................................................115
Setting up your PC ..........................................................................................................................116
Configuring the Network PC-FAX Receiving Settings .....................................................................117
Viewing new PC-FAX messages.....................................................................................................118
iv

7 Firewall settings (For Network users) 119
Before using the KONICA MINOLTA software ......................................................................................119
Windows
Windows Vista
®
XP SP2 ..........................................................................................................................119
®
/Windows®7 ..........................................................................................................121
Section II Apple Macintosh
8 Printing and Faxing 125
Printer operation keys............................................................................................................................125
Job Cancel.......................................................................................................................................125
Secure Key......................................................................................................................................125
Printer Emulation Support ...............................................................................................................126
Printing the Internal Font List...........................................................................................................127
Printing the Print Configuration List .................................................................................................127
Test Print .........................................................................................................................................127
Duplex .............................................................................................................................................128
Restoring default printer settings.....................................................................................................128
Status Monitor........................................................................................................................................129
Updating the machine’s status ........................................................................................................129
Hiding or showing the window .........................................................................................................129
Quitting the window .........................................................................................................................129
Web Based Management (Network Connection Only)....................................................................130
Features in the printer driver (Macintosh)..............................................................................................131
Choosing page setup options..........................................................................................................131
Choosing printing options ................................................................................................................132
Cover Page (Mac OS X 10.4.x or greater) ......................................................................................133
Paper Feed......................................................................................................................................133
Layout..............................................................................................................................................134
Secure Print.....................................................................................................................................135
Print Settings ...................................................................................................................................136
Removing the Printer driver for Macintosh ............................................................................................140
Using the BR-Script3 Driver
(Post Script
Features in the BR-Script3
(PostScript
Page Setup......................................................................................................................................147
Choosing page setup options..........................................................................................................147
Cover Page (Mac OS X 10.4.x or greater) ......................................................................................149
Layout..............................................................................................................................................149
Secure Print (Mac OS X 10.5.x and 10.6.x only).............................................................................152
Printer Features...............................................................................................................................152
Sending a fax.........................................................................................................................................157
Macintosh ........................................................................................................................................157
Drag a vCard from the Mac OS X Address Book application
(Mac OS X 10.3.9 to 10.4.x)........................................................................................................160
Using Mac OS X 10.5.x and 10.6.x Addresses panel......................................................................161
®
3™ language emulation printer driver)..........................................................................141
®
3™ language emulation) printer driver...........................................................................147
v

9 Scanning 163
Scanning from a Macintosh ...................................................................................................................163
Scanning an image into your Macintosh..........................................................................................163
Scanning a duplex document .........................................................................................................164
Pre-Scanning an image...................................................................................................................165
Settings in the Scanner window ......................................................................................................166
Using the Scan key (For USB cable users) ...........................................................................................169
Scan to USB ....................................................................................................................................170
Scan to E-mail .................................................................................................................................173
Scan to Image .................................................................................................................................173
Scan to OCR ...................................................................................................................................174
Scan to File......................................................................................................................................175
Using Presto! PageManager..................................................................................................................176
Features ..........................................................................................................................................176
System requirements for Presto! PageManager .............................................................................176
NewSoft Technical Support .............................................................................................................176
10 ControlCenter2 179
Using ControlCenter2 ............................................................................................................................179
Turning the AutoLoad feature off.....................................................................................................180
SCAN.....................................................................................................................................................181
File types .........................................................................................................................................182
Image
(example: Apple Preview)............................................................................................................182
OCR
(word processing application)......................................................................................................184
E-mail ..............................................................................................................................................185
File...................................................................................................................................................186
CUSTOM SCAN ....................................................................................................................................187
File types .........................................................................................................................................188
User-defined button .........................................................................................................................188
Scan to Image .................................................................................................................................189
Scan to OCR ...................................................................................................................................191
Scan to E-mail .................................................................................................................................192
Scan to File......................................................................................................................................193
COPY / PC-FAX ....................................................................................................................................195
DEVICE SETTINGS ..............................................................................................................................197
Remote Setup..................................................................................................................................197
Quick-Dial ........................................................................................................................................198
Status Monitor .................................................................................................................................198
vi

11 Network Scanning 199
Before using Network Scanning ............................................................................................................199
Configuring network scanning .........................................................................................................199
Using the Scan key................................................................................................................................201
Scan to E-mail (PC).........................................................................................................................202
Scan to E-mail .................................................................................................................................203
Scan to Image .................................................................................................................................204
Scan to OCR ...................................................................................................................................205
Scan to File......................................................................................................................................206
Scan to FTP.....................................................................................................................................207
Scan to Network ..............................................................................................................................211
How to set a new default for the file size
(For Scan to E-mail (E-mail server), Scan to FTP and Scan to Network) ...................................214
How to set a new default for the Duplex Scan mode
(For Scan to E-mail (E-mail server) only) ....................................................................................215
12 Remote Setup 216
Remote Setup........................................................................................................................................216
A Index 218
vii

Section I
Windows
Printing 2
Scanning 33
ControlCenter3 59
Network Scanning 83
Remote Setup 99
PC-FAX Software 101
Firewall settings (For Network users) 119
®
I

1
Note
• The screens in this section are from Windows
operating system.
• If your PC is protected by a firewall, and is unable to print, you may need to configure the firewall settings
to allow communication through port number 137. (See Firewall settings (For Network users)
on page 119.)
Printing 1
®
XP. Screens on your PC may vary depending on your
Using the KONICA MINOLTA printer driver 1
A printer driver is software that translates data from the format used by a PC into the format needed by a
particular printer, using a printer command language or page description language.
The printer drivers are on the CD/DVD-ROM we have supplied. Install the drivers by following the Quick
Guide. The latest printer driver can also be downloaded at:
http://konicaminolta.com/
Windows® Printing
The dedicated printer drivers for Microsoft
®
Windows Vista
CD/DVD-ROM supplied with your KONICA MINOLTA device. You can install them easily into your Windows
system using our installer program. The drivers support our unique compression mode to enhance printing
speed in Windows
mode and custom paper size.
1
Windows Server® 2003 and Windows Server® 2008 are available for network printing only.
/Windows® 7/Windows Server® 20031 /Windows Server® 20081 are available on the
®
applications, and allows you to set various printer settings, including economy printing
®
Windows® 2000 Professional/XP/XP Professional x64 Edition/
®
1
2

Printing
Printing a document 1
When the machine receives data from your computer, it begins printing by picking up paper from the paper
tray. The paper tray can feed many types of paper and envelopes. (See the User’s Guide for information
about the Paper Tray and Recommended paper.)
a From your application, choose the Print command.
If any other printer drivers are installed on your computer, choose KONICA MINOLTA bizhub 20* as
your printer driver from the Print or Print Settings menu in your software application, and then click OK
to begin printing.
*(If you are using a LAN cable or a parallel cable to connect your machine then LAN or LPT will be in the
printer driver name.)
Note
• Parallel interface is not supported for Windows Vista
• (Macintosh) See Features in the printer driver (Macintosh) on page 131.
b Your computer sends the data to the machine.
®
/Windows® 7.
1
c When the machine finishes printing all the data, the LCD shows the machine status.
Note
You can choose the paper size and orientation in your application software.
If your application software does not support your custom paper size, choose the next largest paper size.
Then adjust the print area by changing the right and left margins in your application software.
3

Printing
Duplex printing 1
The supplied printer driver supports duplex printing.
Guidelines for printing on both sides of the paper 1
If the paper is thin, it may wrinkle.
If paper is curled, turn over the stack, straighten it and then put it back in the paper tray or the Manual Feed
Slot.
If the paper is not feeding properly, it may be curled. Remove the paper, straighten it and turn over the
stack.
When you use the manual duplex function, it is possible that there may be paper jams or poor print quality.
If there is a paper jam, see Paper jams in the User’s Guide. If you have a print quality problem, see
Improving the print quality in the User’s Guide.
Automatic duplex printing 1
1
Use A4, Letter, Legal or Folio size paper when you use the automatic duplex printing function.
Make sure that the back cover is closed.
Make sure that the duplex tray is installed correctly in the printer.
If paper is curled, straighten it and then put it back in the paper tray.
Use regular paper or thin paper. DO NOT use bond paper.
Manual duplex printing 1
The machine prints all the even-numbered pages on one side of the paper first. Then, the Windows® driver
instructs you (with a pop-up message) to reinsert the paper. Before reinserting the paper, straighten it well,
or you may get a paper jam. Very thin or thick paper is not recommended.
Simultaneous scanning, printing and faxing 1
Your machine can print from your computer while sending or receiving a fax in memory, or while scanning a
document into the computer. Fax sending will not be stopped during PC printing. However, when the machine
is copying or receiving a fax on paper, it pauses the PC printing operation, and then continues printing when
copying or fax receiving has finished.
4

Printing
Printer operation keys 1
Job Cancel 1
To cancel the current print job, press Job Cancel. You can clear the data that is left in the printer memory by
pressing Job Cancel. To cancel multiple print jobs, hold down this key until the LCD shows
Job Cancel (All).
Secure Key 1
Secured data is password protected. Only those people who know the password will be able to print the
secured data. The machine will not print secure data until the password is entered. After the document is
printed, the data will be cleared from the memory. To use this function, you need to set your password in the
printer driver dialog box. If you turn the power switch Off, the secured data saved in memory will be cleared.
1
a Press Secure/Direct.
Note
If the LCD displays No Data Stored, there is no secured data in the memory.
b Press a or b to choose the user name. Press OK. The LCD displays the secured jobs list for that name.
c Press a or b to choose the job. Press OK.
d Enter your four-digit password and press OK.
e To print the data, press a or b to choose Print, press OK and then enter the number of copies you want.
Press OK.
The machine prints the data.
To delete the secured data, press a or b to choose Delete. Press OK.
Note
Make sure there are no USB Flash memory drive inserted.
5

Printing
Printer Emulation Support 1
Your machine will receive print commands in a printer job language or emulation. Different operating systems
and applications will send the print commands in different languages. Your machine can receive print
commands in a variety of emulations and has an automatic emulation selection feature. When the machine
receives data from the computer, it automatically chooses the emulation mode. The default setting is Auto.
Your machine has the following emulation modes. You can change the setting by using the control panel or
a web browser.
HP LaserJet Mode
The HP LaserJet mode (or HP mode) is the emulation mode in which this printer supports the PCL6
language of a Hewlett-Packard LaserJet laser printer. Many applications support this type of laser printer.
Using this mode will allow your printer to run at its best with those applications.
BR-Script 3 Mode
BR-Script is an original KONICA MINOLTA page description language and a PostScript
®
emulation interpreter. This printer supports PostScript
3™. The BR-Script interpreter of this printer allows
you to control text and graphics on the page.
®
For technical information about PostScript
• Adobe Systems Incorporated. PostScript
commands, see the following manuals:
®
Language Reference, 3rd edition. Addison-Wesley
Professional, 1999. ISBN: 0-201-37922-8
• Adobe Systems Incorporated. PostScript
®
Language Program Design. Addison-Wesley Professional,
1988. ISBN: 0-201-14396-8
®
• Adobe Systems Incorporated. PostScript
Language Tutorial and Cookbook. Addison-Wesley
Professional, 1985. ISBN: 0-201-10179-3
EPSON FX-850 and IBM
®
Proprinter XL Mode
®
language
1
The EPSON FX-850 and IBM Proprinter XL modes are the emulation modes that this printer supports to
meet the industry-standard for dot matrix printers. Some applications support these dot matrix printer
emulations. Use these emulation modes so your printer will work well when printing from those types of
applications.
Setting the Emulation mode 1
a Press Menu, 4, 1.
b Press a or b to choose Auto(EPSON), Auto(IBM), HP LaserJet, BR-Script 3, Epson FX-850
or IBM Proprinter. Press OK.
c Press Stop/Exit.
Note
We recommend that you set the emulation setting with your application software or network server. If the
setting does not work properly, choose the required emulation mode manually using the control panel
buttons of the machine.
6

Printing
Printing the Internal Font List 1
You can print a list of the machine’s internal (or resident) fonts to see how each font looks before you choose
it.
a Press Menu, 4, 2, 1.
b Press a or b to choose 1.HP LaserJet or 2.BR-Script 3. Press OK.
c Press Start. The machine prints the list.
d Press Stop/Exit.
Printing the Print Configuration List 1
You can print a list of current printer settings.
a Press Menu, 4, 2, 2.
b Press Start. The machine prints the settings.
1
c Press Stop/Exit.
Test Print 1
If you are having problems with print quality, you can do a test print.
a Press Menu, 4, 2, 3.
b Press Start.
c Press Stop/Exit.
Note
If the problem appears on the printout, see Improving the print quality in the User’s Guide.
7

Printing
Duplex 1
You can choose whether you want to automatically print on both sides of the paper. The setting in the printer
driver will take priority over the setting made on the control panel.
a Press Menu, 4, 3.
b Press a or b to choose Off, On(Long Edge) or On(Short Edge). Press OK.
c Press Stop/Exit.
Restoring default printer settings 1
You can return the machine’s printer settings to the factory settings.
a Press Menu, 4, 4.
b To restore the default settings, press a or b to choose 1.Reset. Press OK.
To exit without making a change, press a or b to choose 2.Exit. Press OK.
c Press Stop/Exit.
1
8
Printing
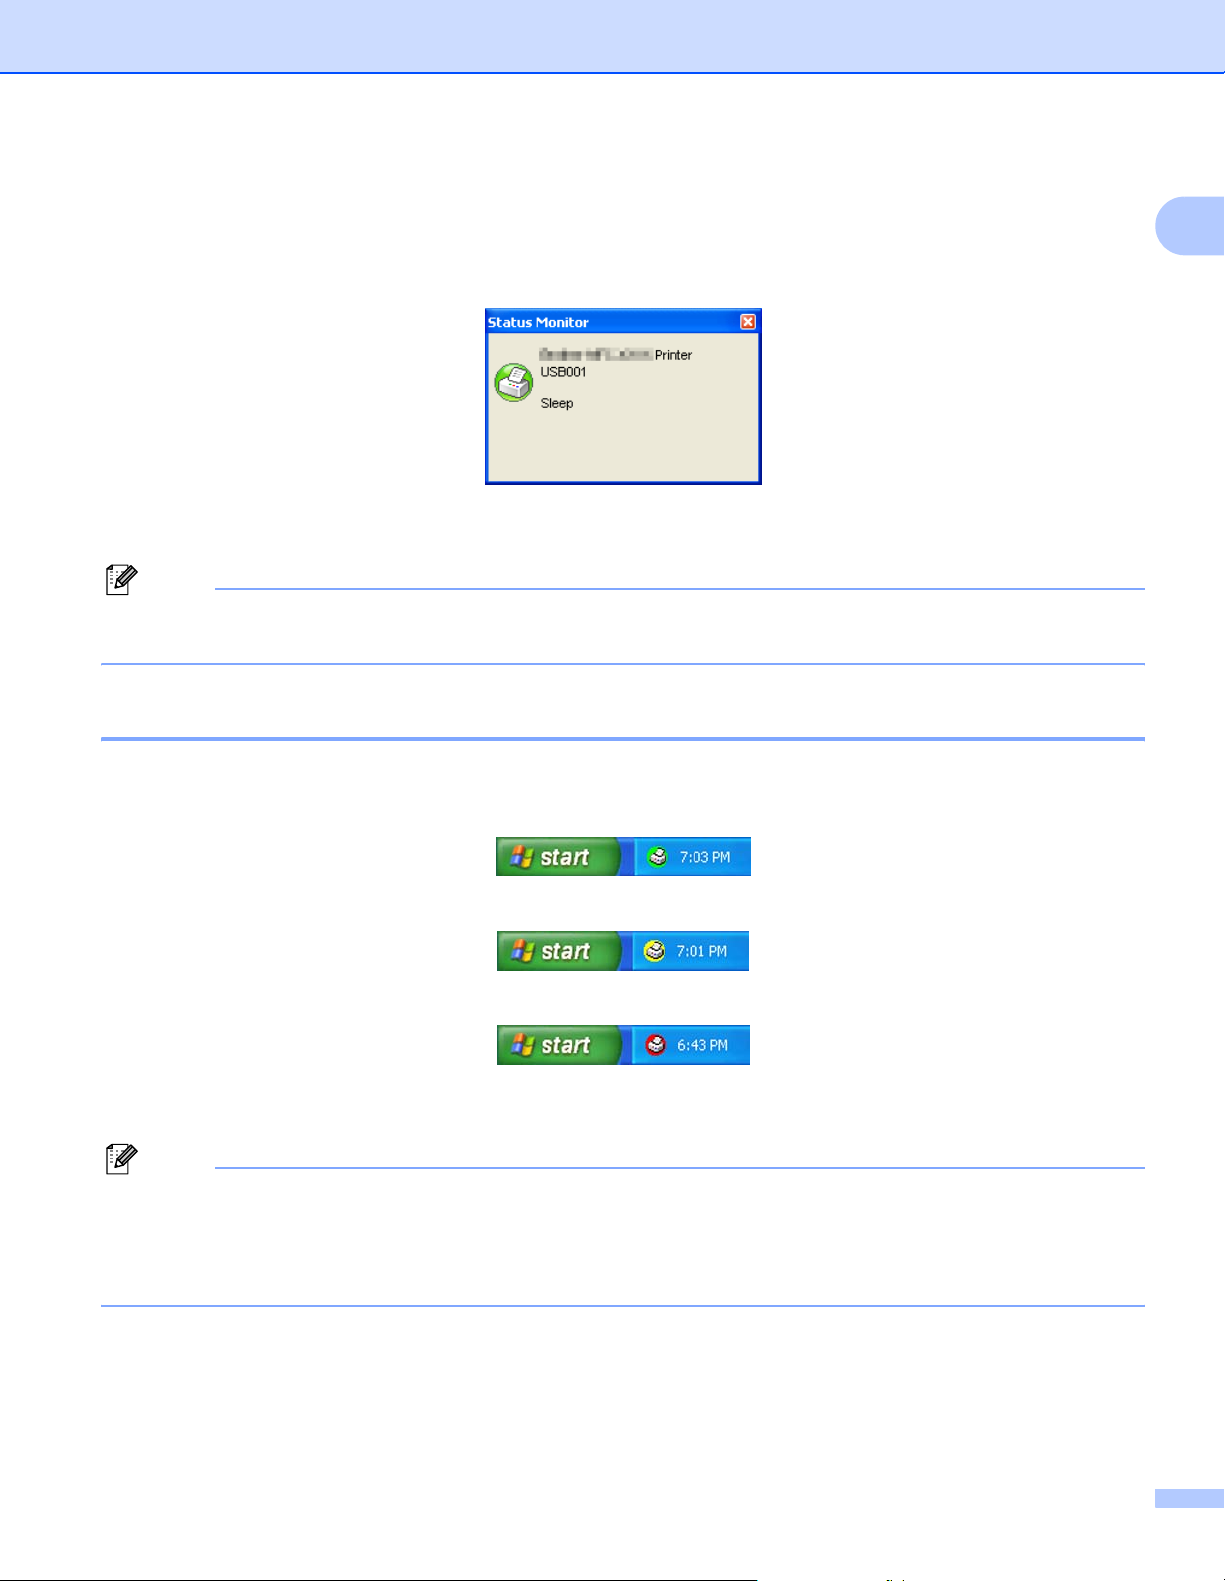
Status Monitor 1
The Status Monitor utility is a configurable software tool for monitoring the status of one or more devices,
allowing you to get immediate notification of error messages such as paper empty or paper jam.
You can check the device status at anytime by double-clicking the icon in the tasktray or by choosing
Status Monitor located in Start/All Programs/KONICA MINOLTA/bizhub 20 on your PC.
Note
For more information about using the Status Monitor software, right-click the Status Monitor icon and
choose Help.
1
Monitoring the machine’s status 1
The Status Monitor icon will change color depending on the machine status.
A green icon indicates the normal stand-by condition.
A yellow icon indicates a warning.
A red icon indicates a printing error has occurred.
There are two locations where you can display the Status Monitor on your PC - in the tasktray or on the
desktop.
Note
• You can check the device status at anytime by double-clicking the icon in the tasktray or selecting the
Status Monitor located in the Start/All Programs/KONICA MINOLTA/bizhub 20 on your computer.
• For more information about using the Status Monitor software, right click the Status Monitor icon and
choose Help.
9

Printing
Printer driver settings 1
Note
(Macintosh) See Printing and Faxing on page 125.
You can change the following printer settings when you print from your computer.
Paper Size
Orientation
Copies
Media Type
Resolution
Print Settings
Multiple Page
Duplex / Booklet
Paper Source
Scaling
1
1
Reverse Print
Use Watermark
Header-Footer Print
1
1
Toner Save Mode
Secure Print
Administrator
User Authentication
Macro
1
1
1
1
Density Adjustment
Improve Print Output
1
These settings are not available with the BR-script printer driver for Windows®.
10
Printing
Features in the Windows® printer driver 1
For more information, see the Help text in the printer driver.
Note
• The screens in this section are from Windows
operating system.
• You can access the Printing Preferences dialog box by clicking Printing Preferences... in the General
tab of the Printer Properties dialog box.
®
XP. The screens on your PC will vary depending on your
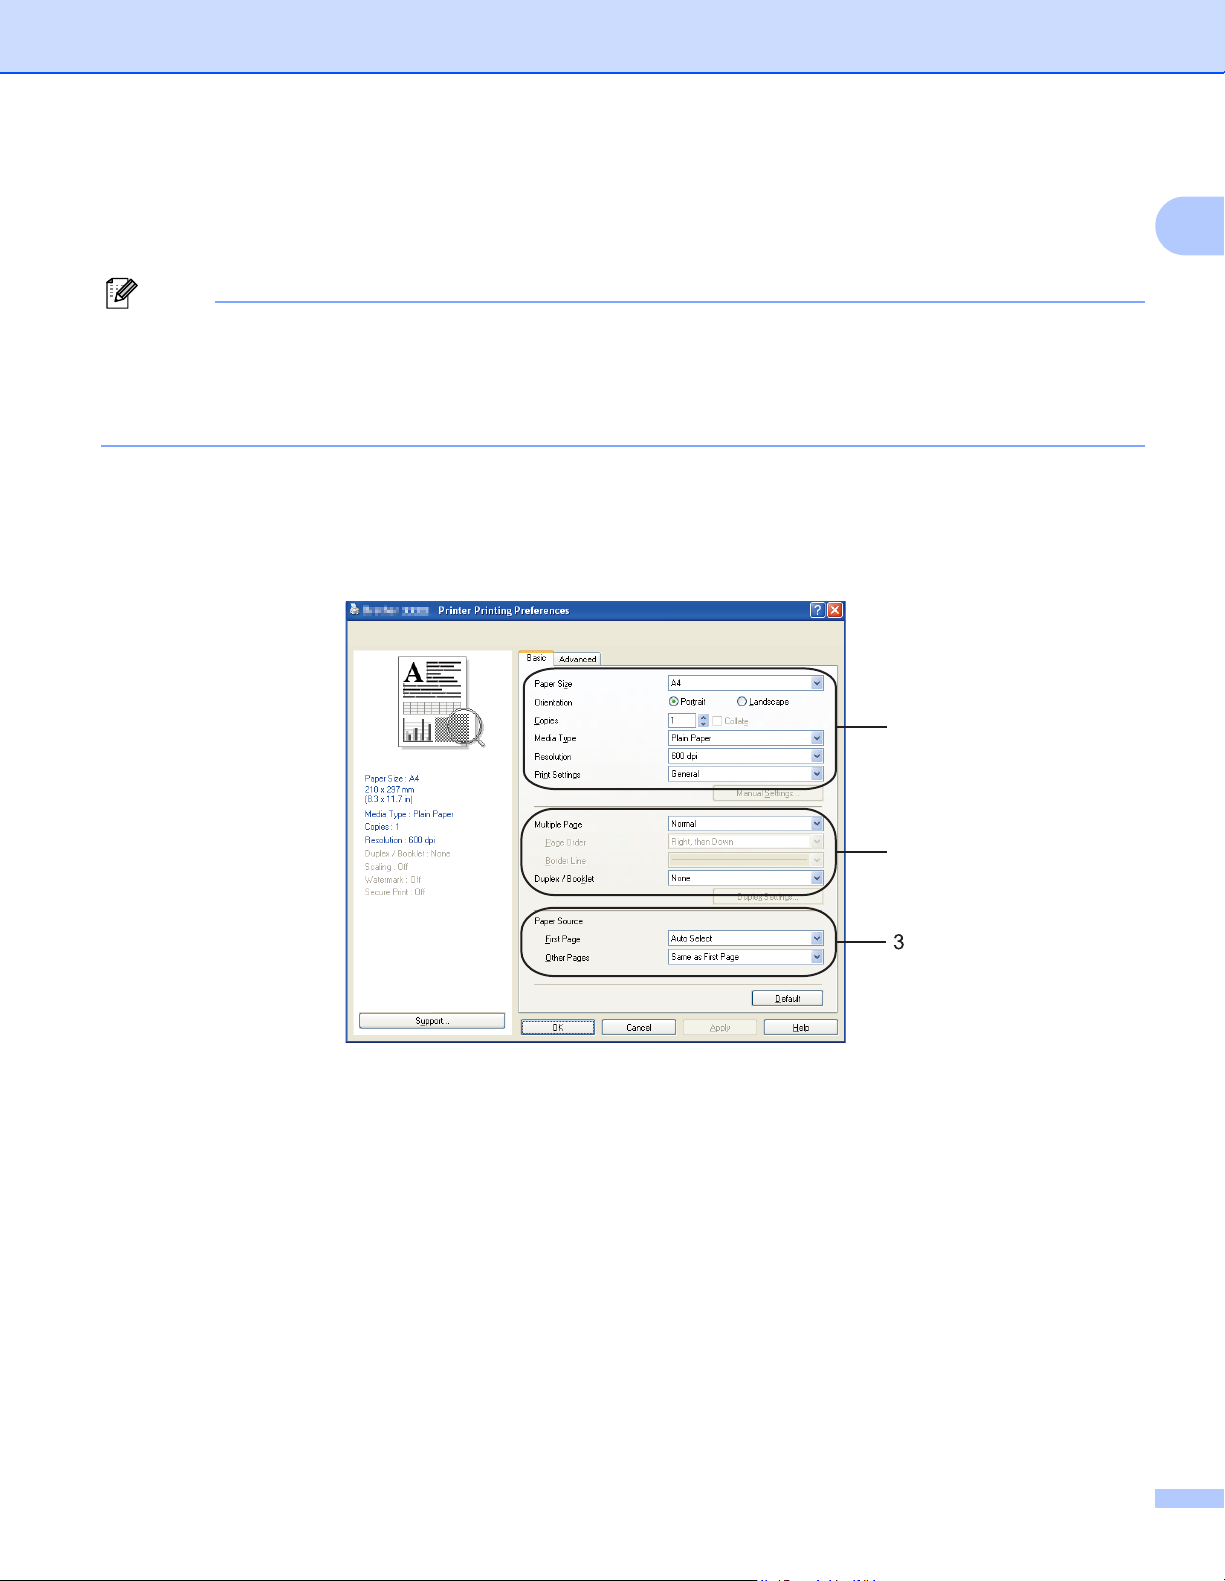
Basic tab 1
You can also change settings by clicking the illustration on the left side of the Basic tab.
1
1
2
a Choose the Paper Size, Orientation, Copies, Media Type, Resolution and Print Settings (1).
b Choose the Multiple Page and Duplex / Booklet setting (2).
c Choose the Paper Source (3).
d Click OK to apply your chosen settings.
To return to the default settings, click Default, then OK.
11
Printing
Paper Size 1
From the drop-down menu choose the Paper Size you are using.
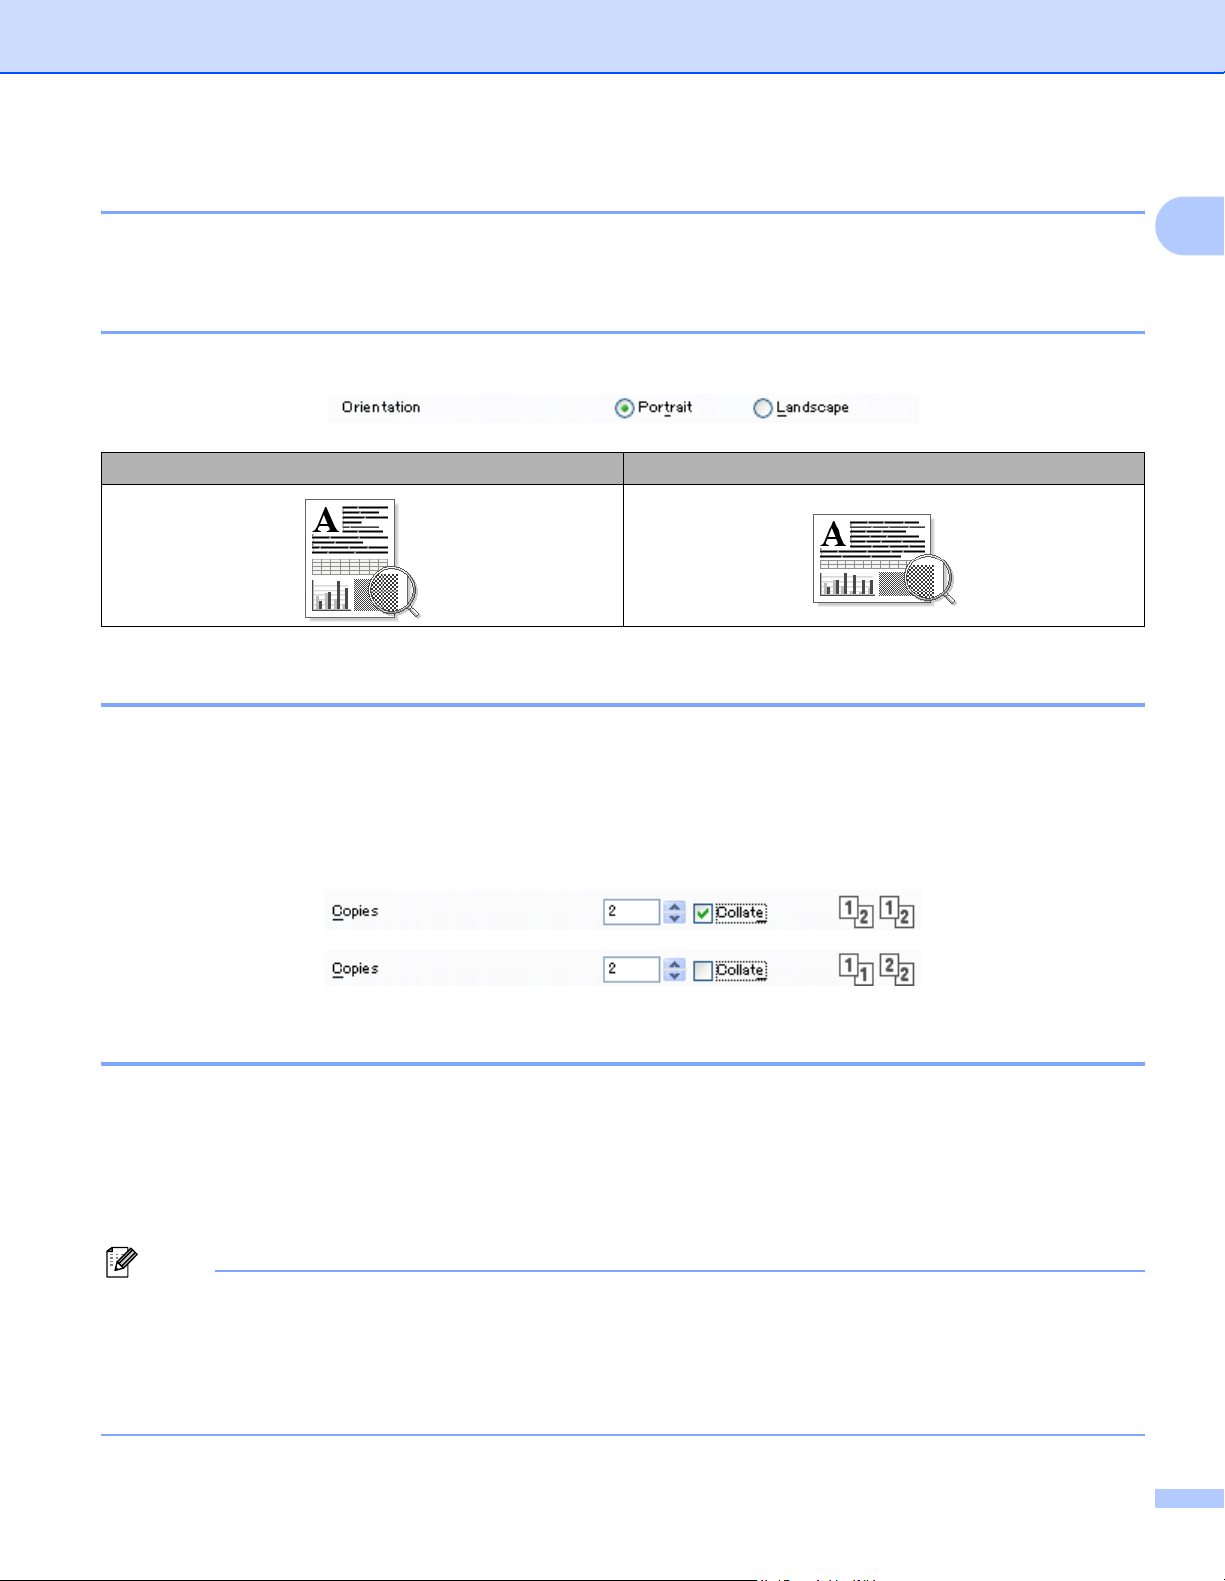
Orientation 1
Orientation selects the position of how your document will be printed (Portrait or Landscape).
Portrait (Vertical) Landscape (Horizontal)
Copies 1
1
The copies selection sets the number of copies that will be printed.
Collate
With Collate checked, one complete copy of your document will be printed and then reprinted according
to the number of copies you choose. If Collate is unchecked, then each page will be printed according to
the number of copies chosen before the next page of the document is printed.
Media Type 1
You can use the following types of media in your machine. For the best print quality, select the type of media
that you wish to use.
Plain Paper Thin Paper Thick Paper Thicker Paper Bond Paper Transparencies
Envelopes Env. Thick Env. Thin Recycled Paper
Note
• When using ordinary plain paper choose Plain Paper. When using heavier weight paper, envelopes or
rough paper choose Thick Paper or Thicker Paper. For bond paper, choose Bond Paper.
• When you use envelopes, choose Envelopes. If the toner is not fixed to the envelope correctly when
Envelopes has been selected, choose Env. Thick. If the envelope is crumpled when Envelopes has
been selected, choose Env.Thin. (See the User’s Guide for information about printing on envelopes.)
12
Printing
Resolution 1
You can change the resolution as follows:
300 dpi
600 dpi
HQ 1200
1200 dpi
Note
If you use the high quality 1200 dpi setting (1200 x 1200 dpi) the print speed will be slower.
Print Settings 1
You can manually change the print setting.
General
This is a printing mode for general printing of documents.
1
Graphics
This is the best mode for printing documents that contain graphics.
Office Document
This is the best mode for printing office documents that include both tables and text.
Text
This is the best mode for printing text documents.
Manual
You can change the settings manually by choosing Manual and clicking the Manual Settings... button.
You can set brightness, contrast and other settings.
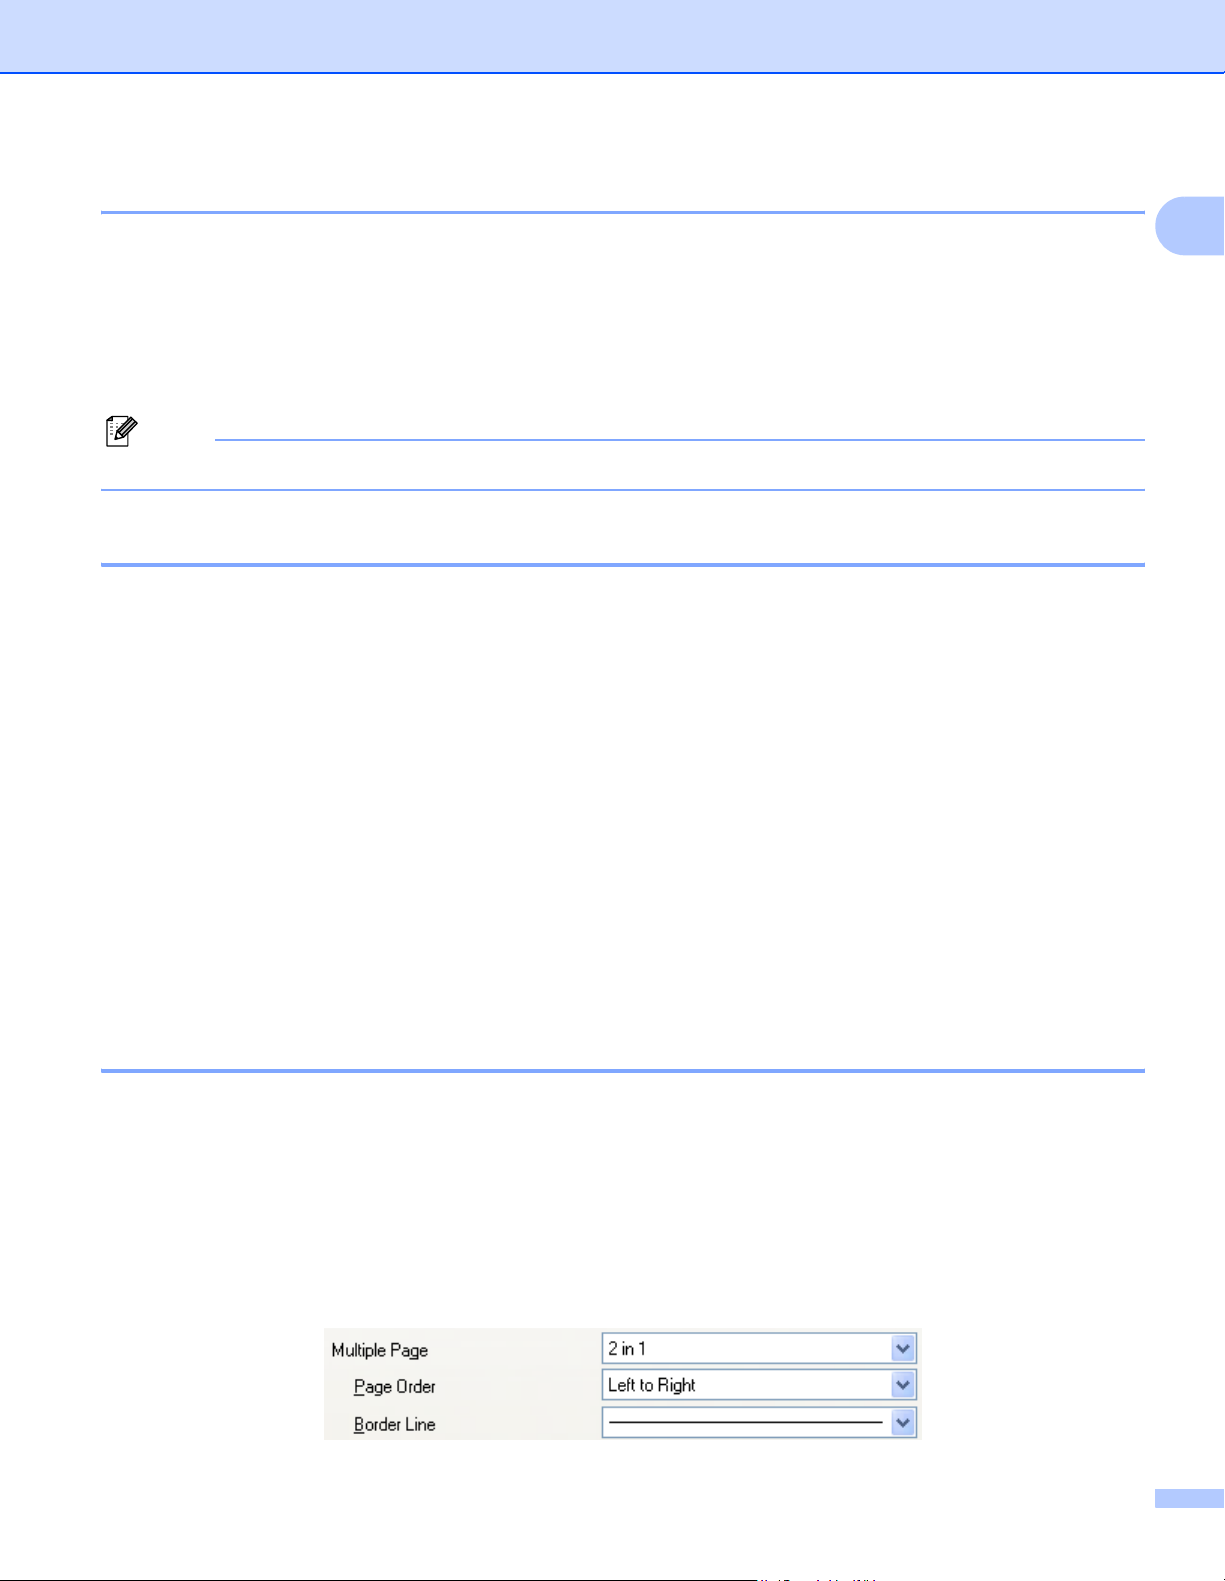
Multiple Page 1
The Multiple Page selection can reduce the image size of a page allowing multiple pages to be printed on
one sheet of paper or enlarge the image size for printing one page on multiple sheets of paper.
Page Order
When N in 1 option is selected, the page order can be selected from the drop-down list.
Border Line
When printing multiple pages on one sheet with the Multiple Page feature you can choose to have a solid
border, dash border or no border around each page on the sheet.
13

Printing
Duplex / Booklet 1
a Put paper in the paper tray or MP tray.
b (Windows printer driver)
1 Open the Properties dialog box in the printer driver.
2 From the General tab, click the Printing Preferences icon.
3 From the Duplex/Booklet dropdown list in the Basic tab, choose Duplex.
4 Click Duplex Settings....
5 Make sure that Use Duplex Unit has been chosen.
6 Click OK. The printer will print on both sides of the paper automatically.
(BR-Script printer driver)
1 Open the Properties dialog box in the printer driver.
1
2 From the General tab, click the Printing Preferences icon.
3 From the Layout tab, choose Orientation, Print on Both Sides and Page Order.
4 Click OK. The printer will print on both sides of the paper automatically.
None
Disable duplex printing.
14
Printing
Duplex
When you want to do duplex printing, use this function.
If you choose Duplex and click Duplex Settings... button, you can set the following settings.
• Duplex Mode
• Use Duplex Unit
In this mode, the printer prints on both sides of the paper automatically.
• Manual Duplex
In this mode, the printer prints all the even numbered pages first. Then the printer driver will stop and
show the instructions required to re-install the paper. When you click OK the odd numbered pages
will be printed.
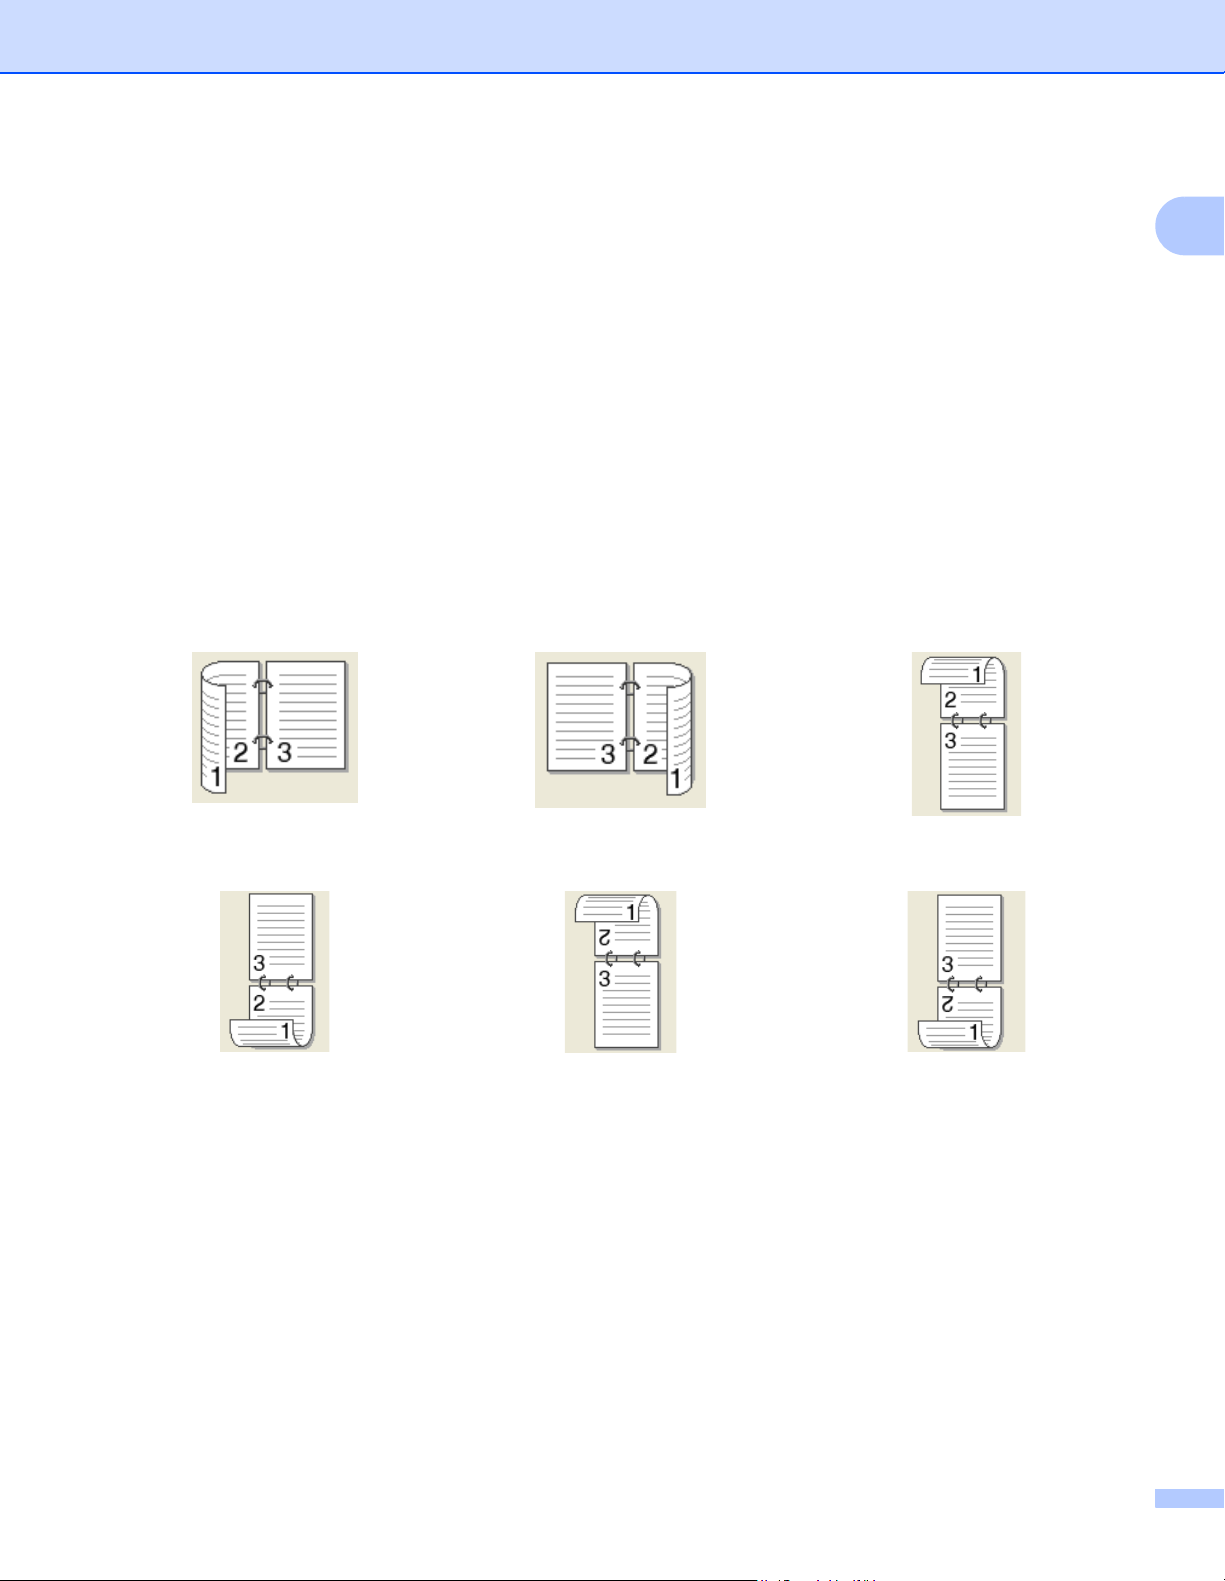
• Duplex Type
There are six types of duplex binding directions available for each orientation.
Flip on Left Edge Flip on Right Edge Flip on Top Edge
1
Flip on Bottom Edge Flip on Top Edge (No Reverse) Flip on Bottom Edge (No Rever
se)
• Binding Offset
If you check the Binding Offset option, you can also specify the offset for binding in inches or
millimeters.
15
Printing
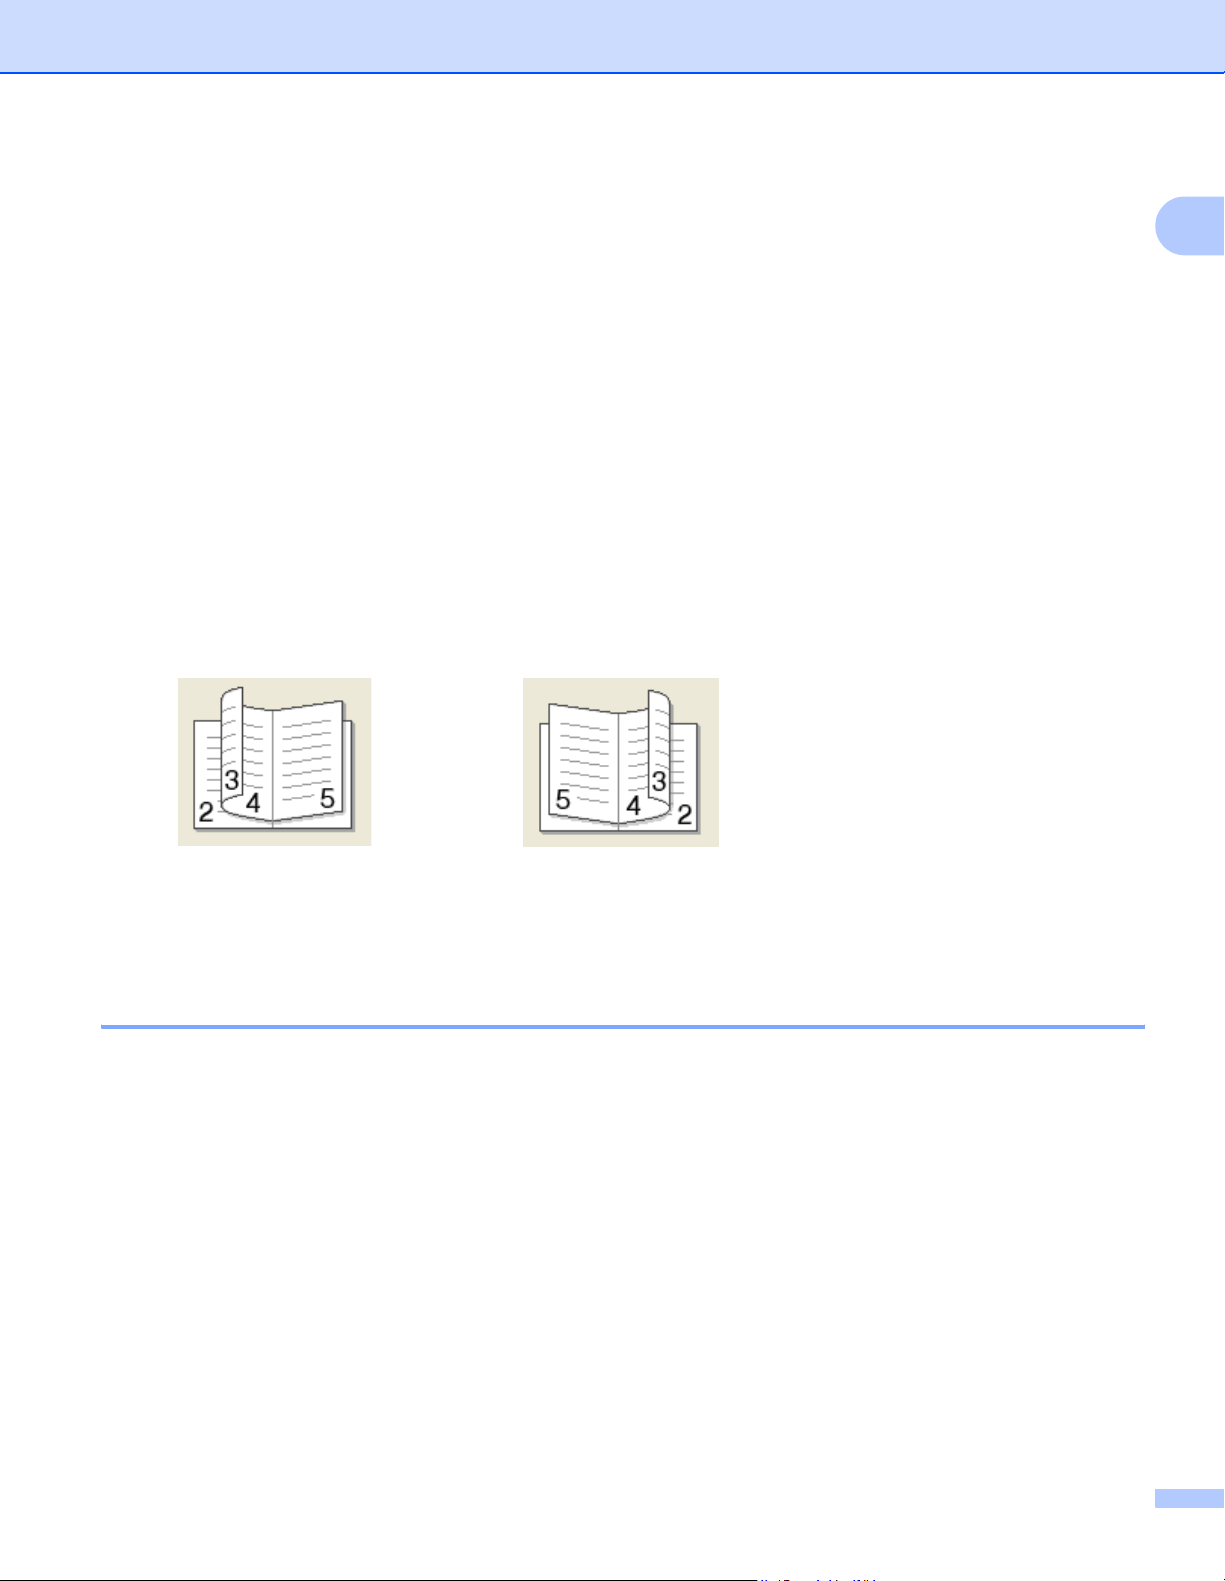
Booklet
When you want to do print a booklet, use this function. To make a booklet, fold the printed pages down in
the middle.
If you choose Booklet and click Duplex Settings... button, you can set the following settings.
• Duplex Mode
• Use Duplex Unit
In this mode, the printer prints on both sides of the paper automatically.
• Manual Duplex
In this mode, the printer prints all the even numbered pages first. Then the printer driver will stop and
show the instructions required to re-install the paper. When you click OK the odd numbered pages
will be printed.
• Duplex Type
There are two types of duplex binding directions available for each orientation.
Flip on Left Edge Flip on Right Edge
1
• Binding Offset
If you check the Binding Offset option, you can also specify the offset for binding in inches or
millimeters.
Paper Source 1
You can choose Auto Select, Tray1, Tray21, MP Tray or Manual and specify separate trays for printing the
first page and for printing from the second page onwards.
1
Available if the optional tray is installed.
16
Printing
Advanced tab 1
!
"
#
$
%
&
'
1
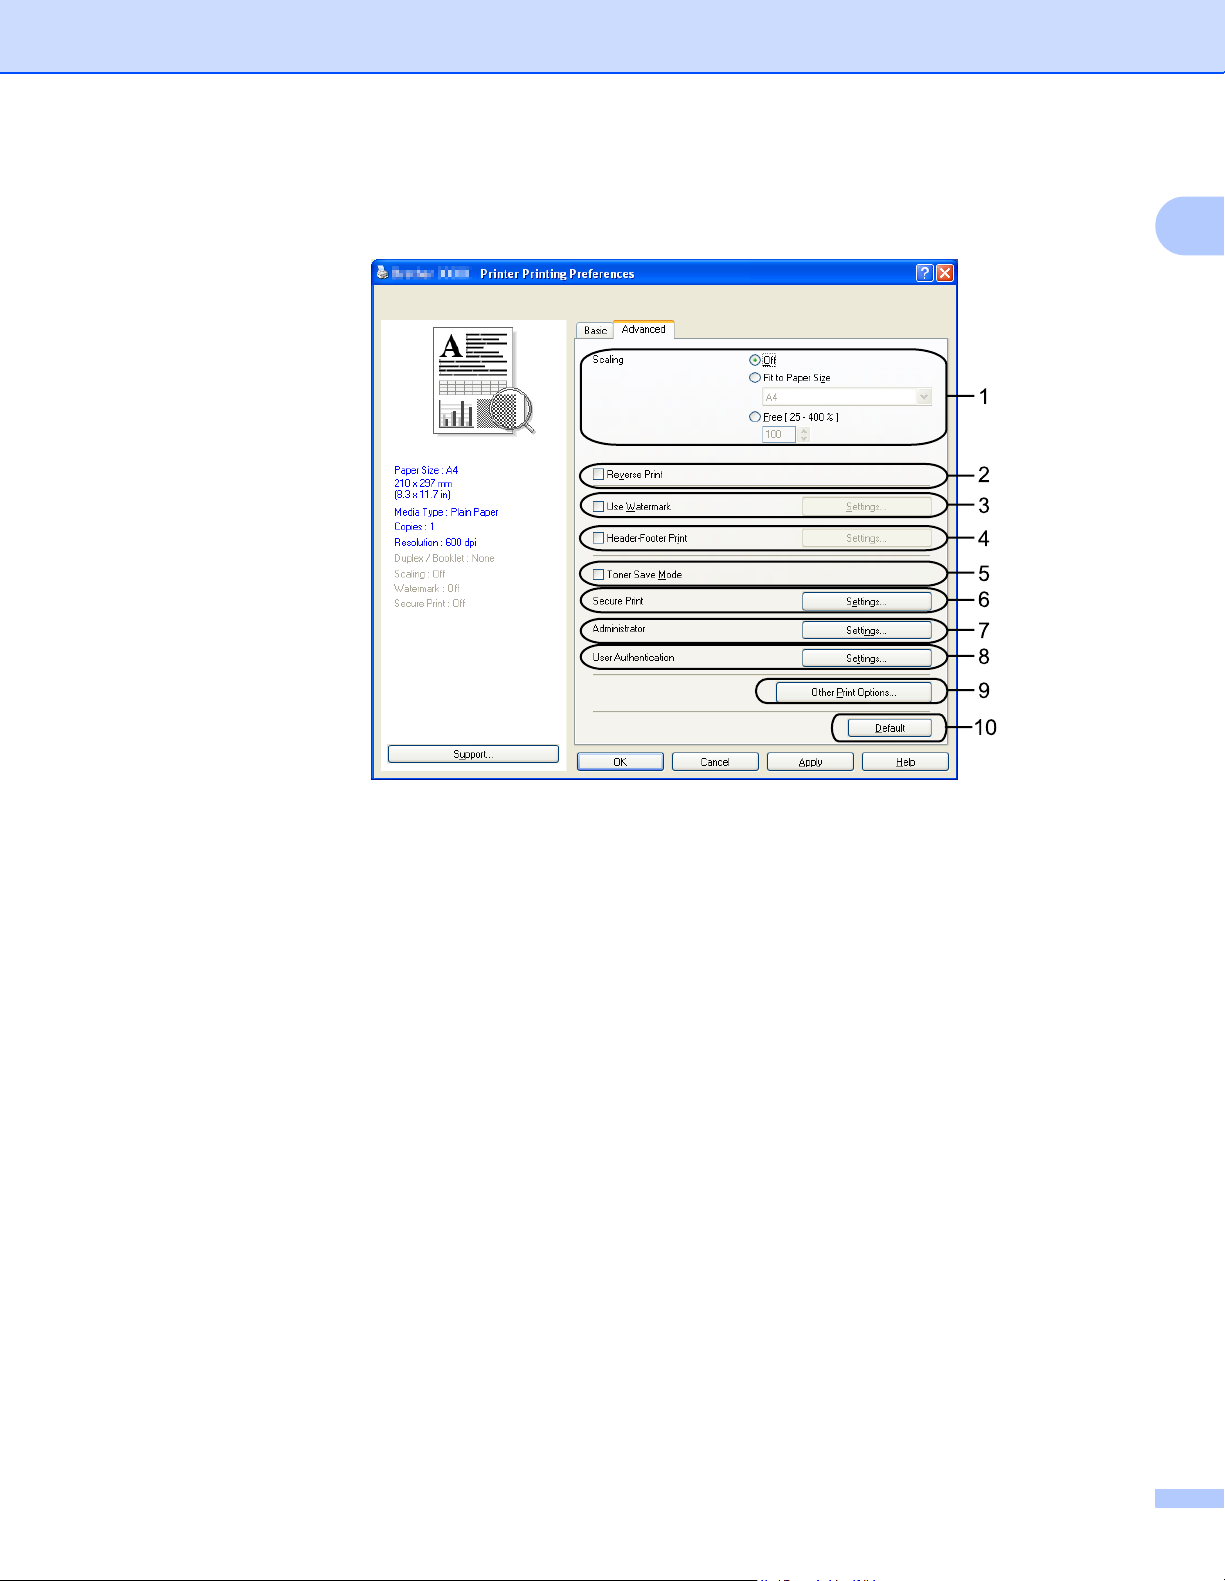
Change the tab settings by clicking one of the appropriate icons:
Scaling (1)
Reverse Print (2)
Use Watermark (3)
Header-Footer Print (4)
Toner Save Mode (5)
Secure Print (6)
Administrator (7)
User Authentication (8)
Other Print Options (9)
Default (10)
a Choose the Scaling setting (1).
Check Off if you want to print the document as it appears on your screen.
Check Fit to Paper Size if you want to enlarge or reduce the document to fit the paper size.
Check Free if you want to change the size.
b Check Reverse Print to reverse the data from up to down (2).
17

Printing
c You can print a logo or text onto your document as a Watermark (3). You can choose one of the preset
Watermarks, or you can use a bitmap or text file that you have created.
d You can print the date and time on your document from your computer's system clock. You can choose
to restrict printing by PC login user name or ID number and name (4) (see Secure Function Lock 2.0 in
the Network Users Guide).
e You can save running costs by reducing the print density (5).
f You can protect your document using a password (6).
g You can limit access to functions such as scaling and watermark (7). To use this function, you need to
have administrator privileges.
h You can enter your ID and PIN number when you are restricted from PC print by the Secure Function
Lock feature (8).
i Click Other Print Options to set more printer functions (9).
j If you want to return the settings to the default, click Default (10).
1
18
Printing
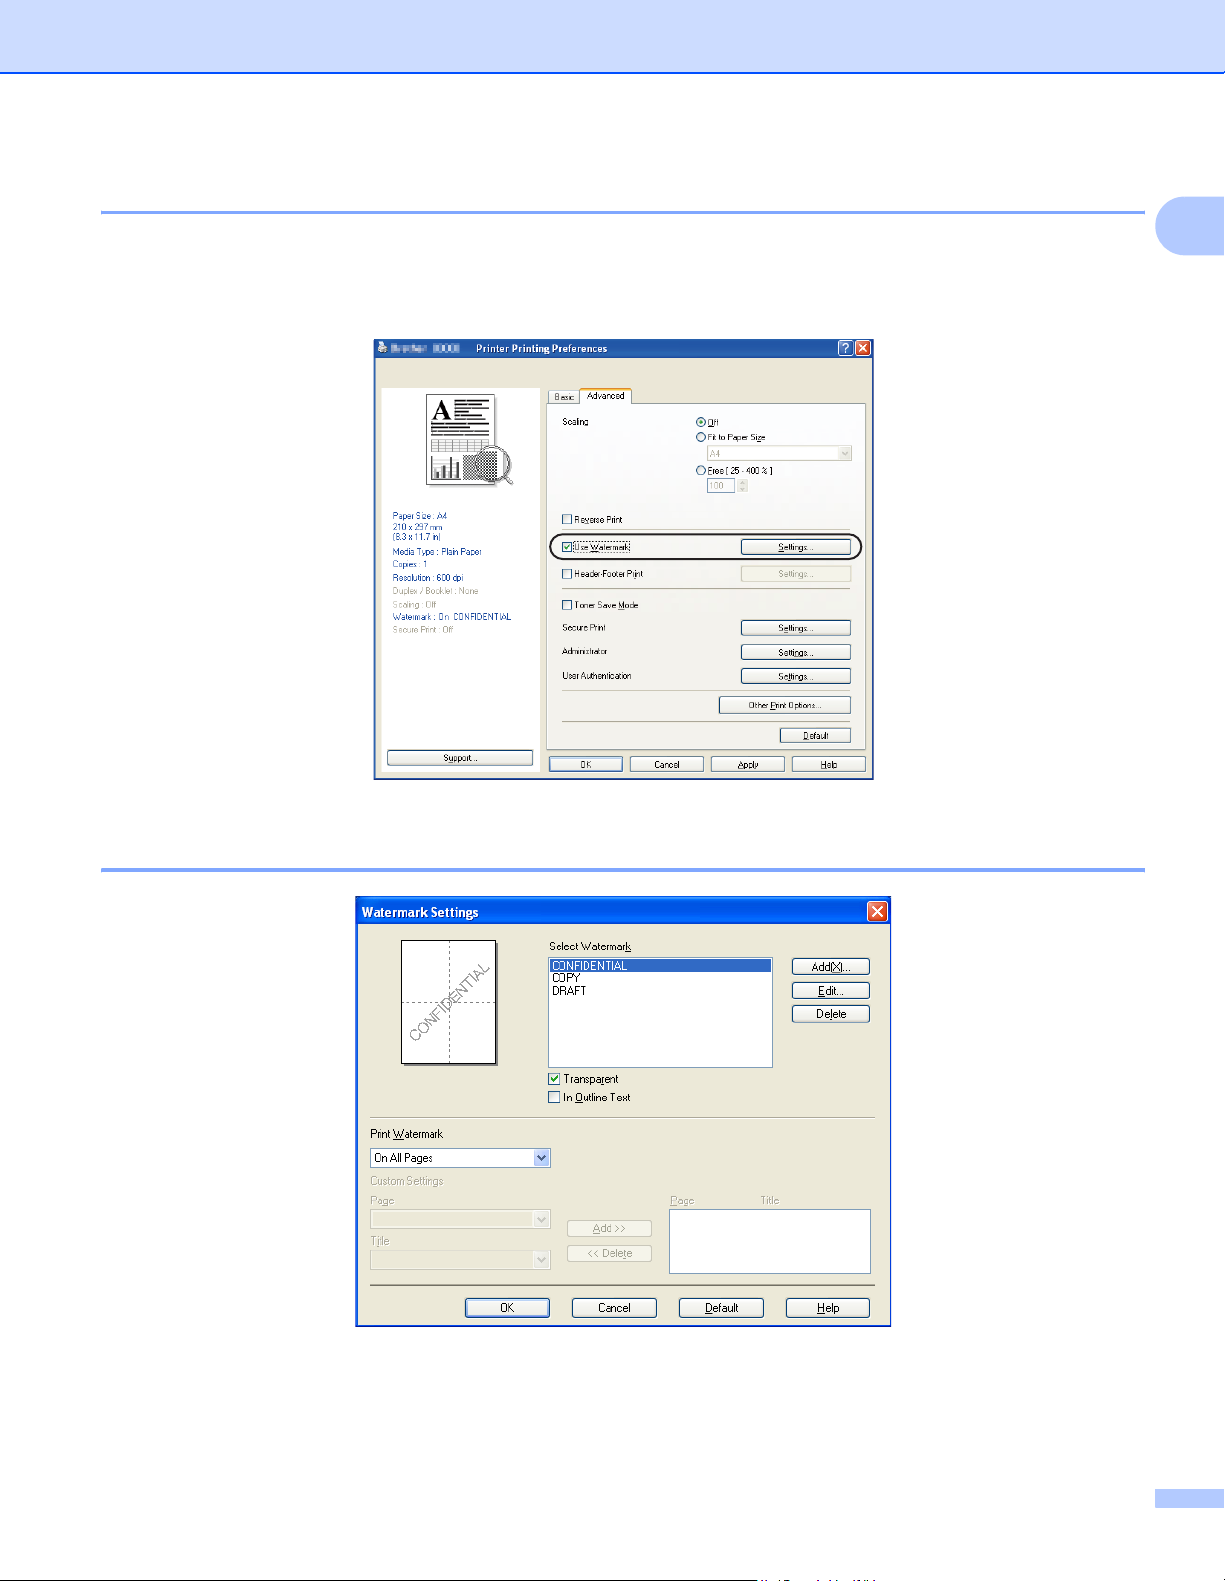
Use Watermark 1
You can put a logo or text into your document as a watermark. You can choose one of the preset Watermarks,
or you can use a bitmap file that you have created. Check Use Watermark and then click the Settings...
button.
1
Watermark Settings 1
Transparent 1
Check Transparent to print the watermarked image in the background of your document. If this feature is not
checked then the watermark will be printed on top of your document.
19
Printing
In Outline Text 1
Check In Outline Text if you only want to print an outline of the watermark. It is available when you choose
a text watermark.
Print Watermark 1
You can print the watermark in any of the following ways.
On All Pages
On first page only
From second page
Custom
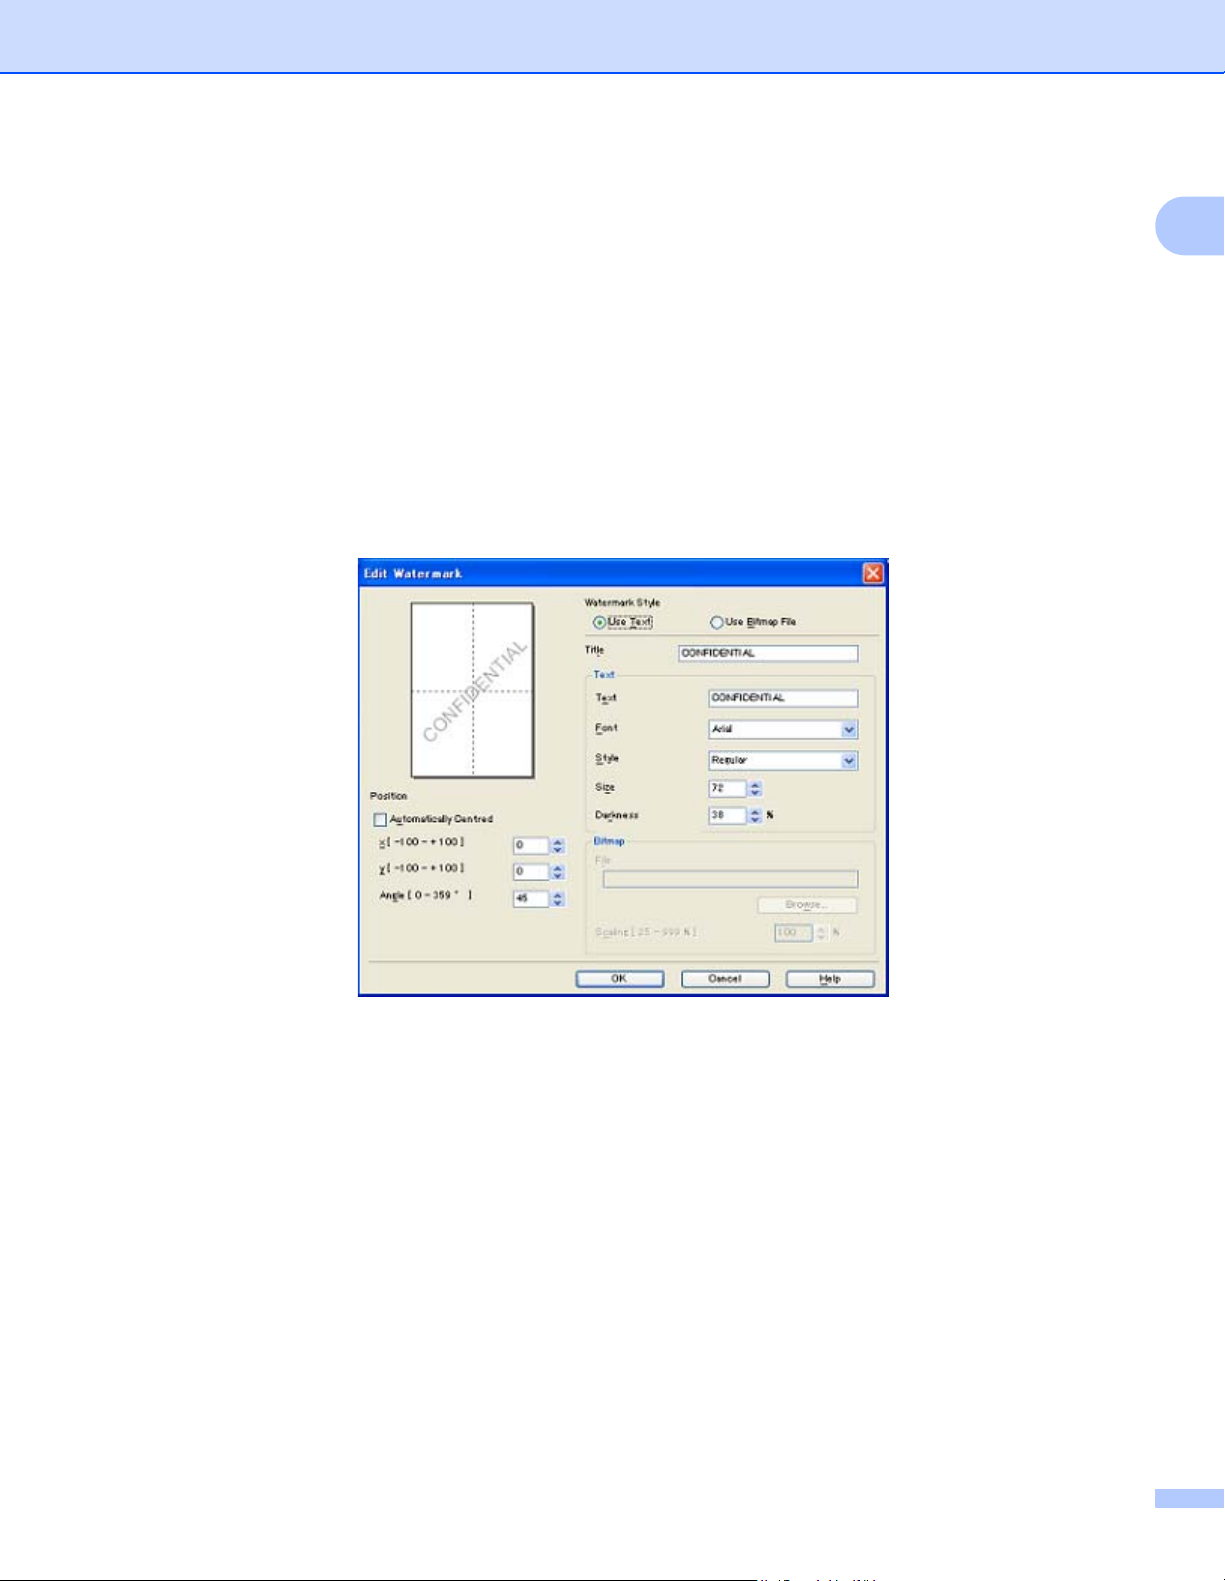
Click the Edit button to change the watermark settings.
1
You can change the watermark’s size and position on the page by selecting the watermark, and clicking the
Edit button. If you want to add a new watermark, click the Add button, and then choose Use Text or
Use Bitmap File in the Watermark Style.
Title
Enter a title you like in the field.
Text
Enter your Watermark Text into the Text box, and then choose the Font, Style, Size and Darkness.
Bitmap
Enter the file name and location of your bitmap image in the File box, or click Browse to search for the
file. You can also set the scaling size of the image.
Position
Use this setting if you want to control the position of the watermark on the page.
20

Printing
Header-Footer Print 1
When this feature is enabled, it will print the date and time on your document from your computer’s system
clock and the PC login user name or the text you entered. By clicking Settings..., you can customize the
information.
ID Print
If you select Login User Name, your PC login user name will be printed. If you select Custom and enter
the text in the Custom edit box, the text you entered will be printed.
Toner Save Mode 1
You can save running costs by turning on the Toner Save Mode, which reduces the print density (your prints
appear lighter).
Note
• We do not recommend Toner Save Mode for printing photo or grayscale images.
• Toner Save Mode is not available for HQ 1200 and 1200 dpi resolution.
1
Secure Print 1
Secure documents are documents that are password protected when they are sent to the machine. Only the
people who know the password will be able to print them. Since the documents are secured at the machine,
you must enter the password using the control panel of the machine to print them.
To send a secured document:
a Click Settings... of the Secure Print and check Secure Print.
b Enter your password and click OK.
c To print the secured documents, you must enter your password from the control panel of the machine.
(See Secure Key on page 5.)
Note
Printing multiple copies is not available when Secure Print is set to on.
To delete a secured document:
You need to use the control panel of the machine to delete a secured document. (See Secure Key on page 5.)
21
Printing
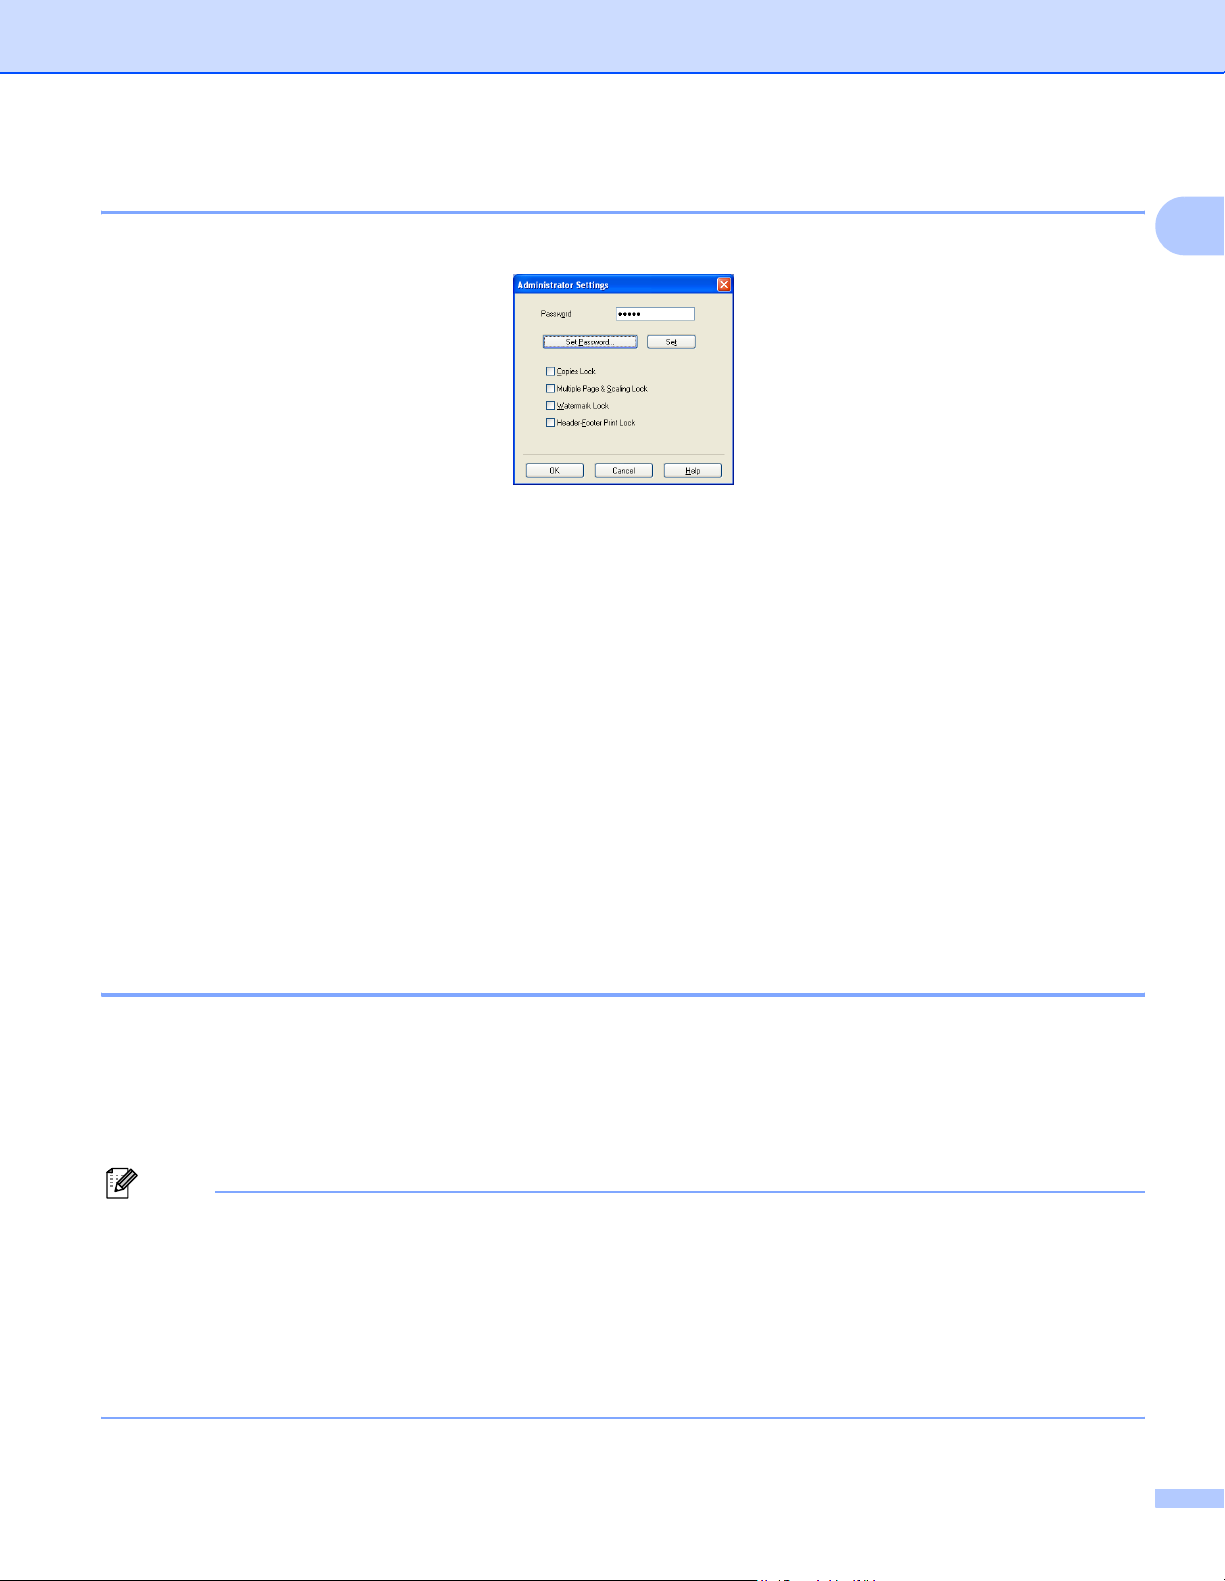
Administrator 1
Administrators have the authority to limit access to functions such as scaling and watermark.
Password
Enter the password into this box.
Set Password
Click here to change the password.
Copies Lock
Set the copy pages selection to one to prevent multiple copy printing.
1
Multiple Page & Scaling Lock
Lock the scaling and multiple page setting to prevent changes being made.
Watermark Lock
Lock the current settings of the Watermark option to prevent changes being made.
Header-Footer Print Lock
Lock the current settings of the Header-Footer Print option to prevent changes being made.
User Authentication 1
If you are restricted from PC Print by the Secure Function Lock feature, you need to set your ID and PIN
number in the User Authentication dialog box.
Click Settings... of the User Authentication and enter your ID and PIN number. If your PC login name is
registered to Secure Function Lock, you can check the Use PC Login Name box instead of entering your ID
and PIN number.
Note
• If you want to see information about your ID such as the status of the restricted features and the number
of remaining pages you are allowed to print, click Verify. The Authentication result dialog box will
appear.
• If you want to make the Verify dialog box appear each time you print,
check Show print status before printing.
• If you want to enter your ID and PIN number each time you print,
check Enter ID Name/PIN for each print job.
22
Loading...