


Instruction Manual
PacTronics, Inc. 800-607-2243 www.pactronics.com
UHF FM TRANSCEIVER
TK-3130
ProTalkXLS
© B62-1486-00 (K)
09 08 07 06 05 04 03 02 01 00

THANK YOU
We are grateful for your purchase of this KENWOOD product and welcome you to the Business Radio Service (BRS). Your KENWOOD 2-way Business Radio is called a “transceiver”, meaning “transmitter & receiver”. We believe this easy-to-use transceiver will provide you with dependable and reliable communications. This KENWOOD transceiver is a precision device. Treat it with care, and you will enjoy years of reliable operation.
FEATURES
•2 channels with 121 tone/code settings for each channel, allowing you to ignore unwanted calls.
•Voice scrambler, giving you complete privacy for your conversations.
•Automatic battery power saver, providing you with longer battery usage.
•Low battery power warning.
•Key lock, preventing you from accidentally changing your transceiver settings.
•Hands free operation when using an optional headset.
OPERATING CONDITIONS
Open locations |
Up to 4 miles |
(no obstructions) |
(approximately 6 1/2 km) |
|
|
Residential areas |
Up to 1 1/2 miles |
(near buildings) |
(approximately 2 1/2 km) |
|
|
In steel/ concrete reinforced |
Up to 200,000 square feet |
buildings |
(approximately 18,580 m2) |
|
|
In high rises |
Up to 15 floors |
|
|
|
|
Note: The listed ranges are based on field testing and may vary with individual transceivers.
i
FCC LICENSE INFORMATION
Your KENWOOD radio operates on communications frequencies which are subject to FCC (Federal Communications Commission) Rules & Regulations. FCC Rules require that all operators using Private Land Mobile radio frequencies obtain a radio license before operating their equipment. Application for license must be made on FCC form 600, and schedules D, E, and G.
FAX: Forms can be obtained by fax from the FCC Fax-On-Demand system. Call 1-202-418-0177 from your fax machine and request document number 000600 for the form, schedules, and instructions.
MAIL: Forms can be ordered by telephone, and will be sent to you by first class mail. Call the FCC Forms Hotline at 1-800-418-FORM (1-800-418-3676).
INTERNET: Form 600 and instructions can be downloaded from the FCC Forms website at: http://www.fcc.gov/formpage.html
Before filling out your Form 600 application Technical Data section, you must decide which frequency (or frequencies) you will operate on. Refer to the frequency chart on page 26.
Questions? Call the FCC for license application questions at 1-888-CALL-FCC (1-888-225-5322).
BANDS
FCC Regulations require that most new licenses must be operating on 12.5 kHz channel spacing capable radios. The ProTalkXLS radio operates on 12.5 kHz channel spacing and may not have optimal sound quality when used with radios operating on 25 kHz channel spacing. If you have any questions, call Kenwood Product Services:
1-800-NNN-NNNN
ii

PRECAUTIONS
•Refer service to qualified technicians only. Do not modify or attempt to adjust the transceiver for any reason.
•Do not expose the transceiver to long periods of direct sunlight, nor place it close to heating appliances.
•Do not place the transceiver in excessively dusty, humid, or wet areas, nor on unstable surfaces.
•Avoid extremes in exposure to weather, heat, and cold. This transceiver can be used in mild weather conditions, but it is not waterproof.
•Turn OFF your transceiver while taking on fuel or while parked in gasoline service stations.
•Do not operate your transceiver or charge your battery pack in an explosive atmosphere (gases, dust, fumes, etc.).
•If an abnormal odor or smoke is detected coming from the transceiver, immediately switch OFF the power and remove the batteries from the transceiver. Contact your KENWOOD dealer.
Government law prohibits the operation of unlicensed radio transmitters within the territories under government control.
Illegal operation is punishable by fine and/or imprisonment
SAFETY: It is important that the operator is aware of and understands hazards common to the operation of any transceiver.
iii

CONTENTS
UNPACKING AND CHECKING EQUIPMENT ......................... |
1 |
SUPPLIED ACCESSORIES .......................................................... |
1 |
ORIENTATION .......................................................................... |
2 |
DISPLAY ................................................................................ |
3 |
PREPARATION ........................................................................ |
4 |
INSTALLING/ REMOVING THE BATTERY PACK ................................ |
4 |
INSTALLING/ REMOVING BATTERIES ............................................ |
5 |
CHARGING THE BATTERY PACK ................................................. |
6 |
INSTALLING/ REMOVING THE BELT HOOK .................................... |
8 |
INSTALLING/ REMOVING OPTIONAL ACCESSORIES ........................ |
8 |
GETTING STARTED ................................................................ |
9 |
QUIET TALK/ DIGITAL QUIET TALK .................................... |
11 |
SCANNING THE CHANNELS ............................................... |
12 |
REVERT CHANNEL ................................................................ |
13 |
MONITORING A CHANNEL .................................................. |
14 |
VOICE ACTIVATED CONTROL (VOX) .................................. |
15 |
VOICE SCRAMBLER ............................................................. |
18 |
OPERATING FEATURES ....................................................... |
19 |
TRANSMISSION POWER .......................................................... |
19 |
KEY LOCK ........................................................................... |
19 |
DISPLAY ILLUMINATION ........................................................... |
20 |
TIME-OUT TIMER ................................................................. |
21 |
BATTERY POWER SAVER ....................................................... |
22 |
BATTERY INDICATOR .............................................................. |
23 |
CALL TONES ........................................................................ |
24 |
CALL ALERT ........................................................................ |
25 |
BUSY CHANNEL LOCKOUT ...................................................... |
26 |
TRANSCEIVER BEEP .............................................................. |
26 |
NOTICES TO THE USER ...................................................... |
27 |
QT TONES/ DQT CODES ..................................................... |
29 |
CHANNEL FREQUENCY CHART ......................................... |
31 |
TROUBLESHOOTING GUIDE ............................................... |
32 |
iv
UNPACKING AND CHECKING EQUIPMENT
Carefully unpack the transceiver. We recommend you identify the items listed in the following table before discarding the packing material. If any items are missing or have been damaged during shipment, file a claim with the carrier immediately.
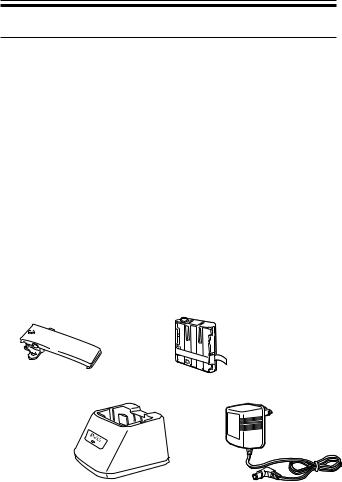
SUPPLIED ACCESSORIES
Item |
Part Number |
Quantity |
Belt hook (with screws) |
J29-0691-XX |
1 |
|
|
|
Battery pack |
W09-0986-XX |
1 |
|
|
|
Rapid charger |
W08-0938-XX |
1 |
|
|
|
AC adapter |
W08-0937-XX |
1 |
|
|
|
Warranty card |
— |
1 |
|
|
|
Instruction manual |
B62-1486-XX |
1 |
|
|
|
Belt hook (with screws) |
Battery pack |
Rapid charger |
AC adapter |
1

ORIENTATION
Antenna |
|
Power switch/ Volume control |
MENU key |
Turn clockwise to switch |
|
Press and hold while |
the power ON and counter- |
|
switching the power ON |
clockwise to switch the power |
|
to enter Menu Mode. |
OFF. Rotate to adjust the |
|
Press to select settings |
volume. |
|
while in Menu Mode. |
|
|
|
MON key |
CAL key |
Press to monitor |
the current channel |
|
Press before |
for activity. |
making a call, |
|
to alert the |
|
other party |
|
members. |
|
|
Microphone |
Speaker
/keys
Press to change the operating |
|
channel, to select a menu in |
|
Menu Mode, and to perform |
|
other functions. |
|
PTT (Push to Talk) switch |
SP/MIC jacks |
Lift the covers |
|
Press and hold, then speak |
and insert the |
into the microphone to |
accessory’s |
transmit. |
plugs here. |
2
DISPLAY
3

PREPARATION
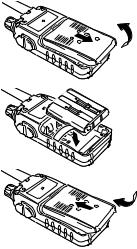
INSTALLING/ REMOVING THE BATTERY PACK
The battery pack is not charged at the factory; charge it before use (pages 6 and 7).
Average battery pack life: 10 hours
•Average times are calculated using 5% transmit time, 5% receive time, and 90% standby time.
Do not short the battery terminals or dispose of the battery by fire.
Never attempt to remove the casing from the battery pack.
1 Match the four grooves of the battery pack with the corresponding guides on the back of the transceiver.
2Slide the battery pack along the back of the transceiver until the
release latch on the base of the transceiver locks.
3 To remove the battery pack, pull back on the release latch and slide the pack away from the transceiver.
4
INSTALLING/ REMOVING BATTERIES
In place of the battery pack, you can use 3 AA batterie. Use high quality alkaline batteries to enjoy longer periods of battery life.
1 Match the four grooves of the battery pack with the corresponding guides on the back of the transceiver.
2 Slide the battery pack along the back of the transceiver until the release latch on the base of the transceiver locks.
3 To remove the battery pack, pull back on the release latch and slide the pack away from the transceiver.
5
CHARGING THE BATTERY PACK
Initially charging the battery pack after purchase or extended storage (greater than 2 months) will not bring the battery pack to its normal operating capacity. After repeating the charge/ discharge cycle two or three times, the operating capacity will increase to normal.
Do not recharge the battery pack if it is already fully charged.
Doing so may cause the life of the battery pack to shorten or the battery pack may be damaged.
After recharging the battery pack, disconnect it from the charger. Charging the battery pack for more than 5 days may reduce the battery pack life due to overcharging.
Note:
The ambient temperature should be between 41°F and 104°F
(5°C and 40°C) while charging is in progress. Charging outside this range may not fully charge the battery.
Always switch OFF the transceiver equipped with a battery pack before charging. Using the transceiver while charging its battery pack will interfere with correct charging.
The battery pack life is over when its operating time decreases even though it is fully and correctly charged. Replace the battery pack.
6
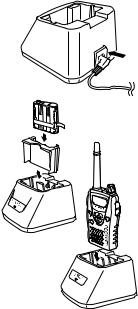
1 Plug the AC adapter cable into the adapter jack located on the rear of the charger.
2 Plug the AC adapter into an AC outlet.
3 Slide a battery pack using the supplied holder or a transceiver equipped with a battery pack into the battery pack slot.
• Make sure the metal contacts of the battery pack mate securely with the charger terminals.
• The indicator lights red and charging starts.
4 When charging is completed, the indicator lights green. Remove the battery pack or the tran-sceiver from the battery pack slot.
•It takes approximately 2.5 hours to charge the battery pack.
•When the charger will not be used for a long time, unplug the AC adapter from the AC outlet.
•When charging a second battery pack, wait for approximately 10 seconds after removing the first battery pack from the charger. If the LED blinks red after installing the second battery pack, remove the battery pack and wait for a few seconds before inserting it again.
7
 Loading...