

Page 1

NEF TIER 2 SERIES
Power generation application
NEF 45
GE NEF 45M
GE NEF 60M
GE NEF 75M
GE NEF 85M
GE NEF 100M
GS NEF 45M
GS NEF 60M
GS NEF 75M
GS NEF 85M
GS NEF 100M
NEF 60
GE NEF 200E
GS NEF 200E
NEF 67
GE NEF 125M
GE NEF 130M
GE NEF 160M
GS NEF 125M
GS NEF 130M
GS NEF 160M
Technical and Repair manual
Page 2

This publication describes the characteristics, data and correct
methods for repair operations on each component of the vehicle.
If the instructions provided are followed and the specified
equipment is used, correct repair operations in the programmed time will be ensured, safeguarding against possible
accidents.
Before starting to perform whatever type of repair, ensure that
all accident prevention equipment is available and efficient.
All protections specified by safety regulations, i.e.: goggles,
helmet, gloves, boot, etc. must be checked and worn.
All machining, lifting and conveying equipment should be i nspected before use.
The data contained in this publication was correct at the time
of going to press but due to possible modifications made by
the Manufacturer for reasons of a technical or commercial nature or for adaptation to the legal requirements of the different countries, some changes may have occurred.
No part of this publication, including the pictures, may be reproduced in any form or by any means.
Publication edited by
Iveco Motors
Iveco SpA
PowerTrain
Mkt. Advertising & Promotion
Viale dell’Industria, 15/17
20010 Pregnana Milanese
Milano (Italy)
nd
Print P4D32N001 E -2
Ed. 04.2007
Produced by:
B.U. TECHNICAL PUBLISHING
Iveco Technical Publications
Lungo Stura Lazio, 15/19
10156 Turin - Italy
Page 3

RYR
NEF POWER GENERATION ENGINES
3
PRELIMINA
Manuals for repairs are split into Parts and Sections, each one of which is marked by a numeral; the contents of these sections are
indicated in the general table of contents.
The sections dealing with things mechanic introduce the specifications, tightening torque values, tool lists, assembly
detaching/reattaching operations, bench overhauling operations, diagnosis procedures and maintenance schedules.
The sections (or parts) of the electric/electronic system include the descriptions of the electric network and the assembly’s
electronic systems, wiring diagrams, electric features of components, component coding and the diagnosis procedures for the
control units peculiar to the electric system.
The manual uses proper symbols in its descriptions; the purpose of these symbols is to classify contained information. In particular,
there have been defined a set of symbols to classify warnings and a set for assistance operations.
EMARKS
SYMBOLS - WARNINGS
Danger for persons
Missing or incomplete observance of these prescriptions can cause serious danger for persons’ safety.
Danger of serious damage for the assembly
Failure to comply, both fully or in part, with such prescriptions will involve serious damage to the assembly and may
sometimes cause the warranty to become null and void.
!
NOTE
General danger
It includes the dangers of above described signals.
Environment protection
Moreover, it describes the correct actions to be taken to ensure that the assembly is used in such a way so as to protect
the environment as much as possible.
It indicates an additional explanation for a piece of information.
Print P4D32N001 E Base - April 2007
Page 4

4
GENERAL WARNINGS
Warnings shown cannot be representativeof all dangersituations possiblyoccurring. Therefore, it issuggested to contact
immediate superiors where a danger situation occurs which is not described.
!
Use both specific and general-purpose toolings according to the prescriptions contained in respective use and
maintenance handbooks. Check use state and suitability of tools not subjected to regular check.
The manual handling of loads must be assessed in advance because it also depends, besides weight, on its size and on
the path.
Handling by mechanical means must be with hoisters proper as for weight as well as for shape and volume. Hoisters,
ropes and hooks used must contain clear indications on maximum carrying capacity acceptable. The use of said means
is compulsorily permitted to authorised personnel only. Stay duly clear of the load, and, anyhow, never under it.
In disassembling operations, always observe provided prescriptions; prevent mechanical parts being taken out from
accidentally striking workshop personnel.
Workshop jobs performed in pairs must always be performed in maximum safety; avoid operations which could be
dangerous for the co-operator because of lack of visibility or of his/her not correct position.
Keep personnel not authorised to operations clear of working area.
You shall get familiar with the operating and safety instructions for the assembly prior to operating on the latter. Strictly
follow all the safety indications found on the assembly.
NEF POWER GENERATION ENGINES
Do not leave the running assembly unattended when making repairs.
When carrying out work on the assembly lifted off the ground, verify that the assembly is firmly placed on its supporting
stands, and that the manual/automatic safety devices have been actuated in the event that the assembly is to be lifted
by means of a hoist.
When you have to operate on assemblies powered by natural gas, follow the instructions contained in the document,
as well as all the specific safety standards provided for.
Only remove radiator cap when the engine is cold by cautiously unscrewing it in order to let system residual pressure
out.
Inflammable fuel and all inflammable fluids and liquids must be handled with care, according to what contained on harmful
materials 12-point cards. Refuelling must be performed outdoors with the engine off, avoiding lit cigarettes, free flames
or sparks in order to prevent sudden fires/bursts. Adequately store inflammable, corrosive and polluting fluids and liquids
according to what provided by regulations in force. Compulsorily avoid to use food containers to store harmful liquids.
Avoid to drill or bore pressurised containers, and throw cloths impregnated with inflammable substances into suitable
containers.
Worn out, damaged or consumable parts must be replaced by IVECO Motors original spares.
During workshopactivity, always keep the work place clean; timely clear or clean floors from accidental liquid or oil spots.
Electric sockets and electric equipment necessary to perform repair interventions must meet safety rules.
Base - April 2007 Print P4D32N001 E
Page 5

NEF POWER GENERATION ENGINES
GENERALWARNINGS
Put on, where required by the intervention, garments and protections provided in accident prevention rules; contact
with moving parts can cause serious injuries. Use suitable, preferably tight-fitted garments, and avoid to use jewels,
scarves, etc.
Do not leave the engine in motion at workshop locations not provided with a pipe to scavenge exhaust gas outside.
Avoid to breathe fumes coming from heating or from paint welding because they can cause damages to health; operate
outdoors or in suitably ventilated areas. Put on proper inspirator if paint powder is present.
Avoid contact with hot water or steam coming from the engine, radiator and pipings because they could cause serious
burns. Avoid direct contact with liquids and fluids present in vehicle systems; where an accidental contact has occurred,
refer to 12-point cards for provisions to make.
Clean the assemblies and carefully verify that they are intact prior to overhauling. Tidy up detached or disassembled
parts with their securing elements (screws, nuts, etc.) into special containers.
Check for the integrity of the parts which prevent screws from being unscrewed: broken washers, dowels, clips, etc.
Self-locking nuts with an insert made of nylon must always be replaced.
5
Avoid contact of rubber parts with diesel oil, petrol or other not compatible substances.
Before washing under pressure mechanical parts, protect electric connectors, and central units, if present.
Tightening screws and nuts must always be according to prescriptions; IVECO Motors commercial and assistance
network is available to give all clarifications necessary to perform repair interventions not provided in this document.
Before welding:
- Disconnect all electronic central units, take power cable off battery positive terminal (connect it to chassis bonding)
and detach connectors.
- Remove paint by using proper solvents or paint removers and clean relevant surfices with soap and water.
- Await about 15 minutes before welding.
- Equip with suitable fire resistant protections to protect hoses or other components where fluids or other materials
flow which may catch fire easily on welding.
Should the vehicle be subjected to temperatures exceeding 80°C (dryer ovens), disassemble drive electronic central
units.
The disposal of all liquids and fluids must be performed with full observance of specific rules in force.
Print P4D32N001 E Base - April 2007
Page 6

6
GENERALWARNINGS ON THE ELECTRIC SYSTEM
If an intervention has to be made on the electric/electronic system, disconnect batteries from the system; in this case,
!
always disconnect, as a first one, the chassis bonding cable from batteries negative terminal.
Before connecting the batteries to the system, make sure that the system is wel l isolated.
Disconnect the external recharging apparatus from the public utility network before taking apparatus pins off battery
terminals.
Do not cause sparks to be generated in checking if the circuit is energised.
Do not use a test lamp in checking circuit continuity, but only use proper control apparatuses.
Make sure that the electronic devices wiring harnesses (length, lead type, location, strapping, connection to screening
braiding, bonding, etc.) comply with IVECO Motors system and are carefully recovered after repair or maintenance
interventions.
Measurements in drive electronic central units, plugged connections and electric connections to components can only
be made on proper testing lines with special plugs and plug bushes. Never use improper means like wires, screwdrivers,
clips and the like in order to avoid the danger of causing a short circuit, as well as of damaging plugged connections, which
would later cause contact problems.
NEF POWER GENERATION ENGINES
To start up the engine, do not use fast chargers. Start up must only be performed with either separate batteries or special
truck.
A wrong polarisation of supply voltage in drive electronic central units (for instance, a wrong polarisation of batteries)
can cause them to be destroyed.
Disconnect the batteries from the system during their recharging with an external apparatus.
On connecting, only screw up connector (temperature sensors, pressure sensors etc.) nuts at prescribed tightening
torque.
Before disconnecting the junction connector from an electronic central unit, isolate the system.
Do not directly supply electronic central units servo components at nominal vehicle voltage.
Cables must be arranged such as to result to be parallel to reference plane, i.e. as close as possible to chassis/body
structure.
Once the intervention on the electric system has been completed, recover connectors and wiring harnesses according
to original arrangement.
NOTE
Connectors presentmust be seen from cable side. Connectors views contained in the manualare representative of cable
side.
Base - April 2007 Print P4D32N001 E
Page 7
NEF POWER GENERATION ENGINES
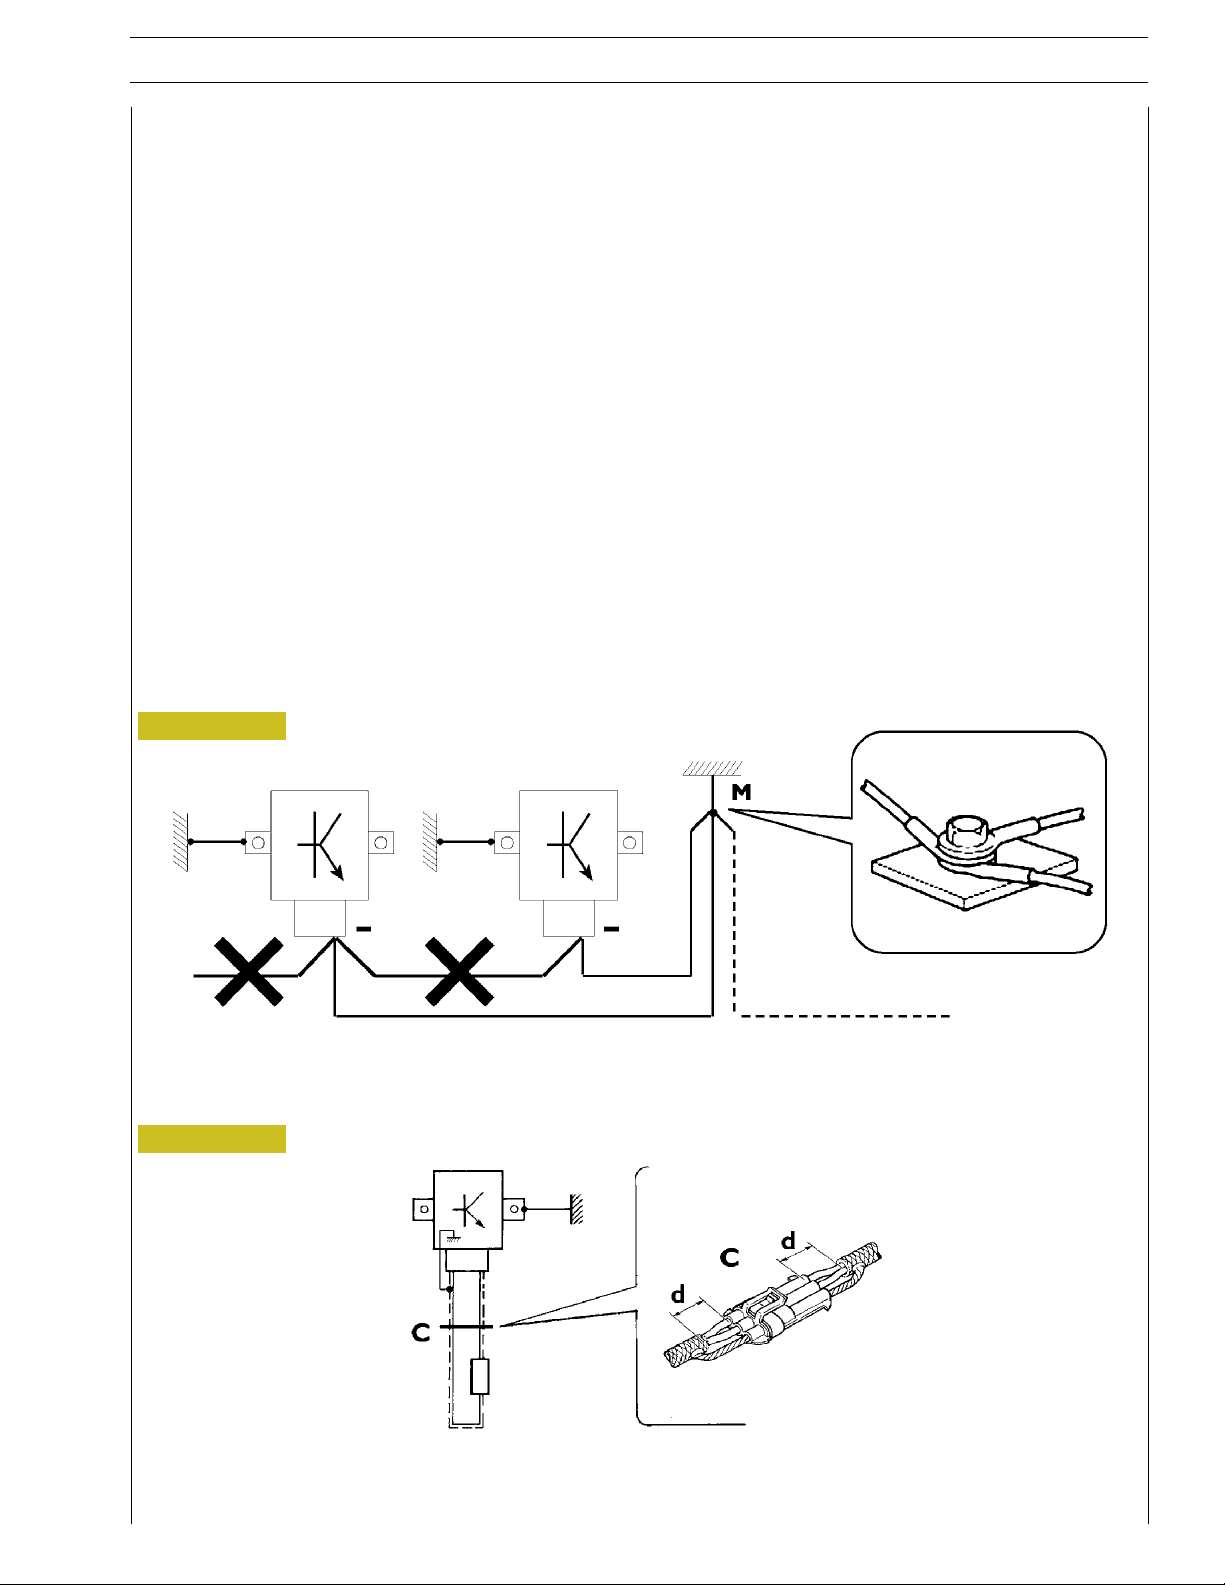
Bonding and screening
Negative leads connected to a system bonded point must be both as short and possible and “star“-connected to each other, trying
then to have their centering tidily and properly made (Figure 1, re. M).
Further, following warnings are to be compulsorily observed for electronic components:
- Electronic central units must be connected to system bonding when they are provided with a metallic shell.
- Electronic central units negative cables must be c onnected both to a system bonding point such as the dashboard opening
bonding (avoiding “serial“ or “chain“ connections), and to battery negative terminal.
- Analog bonding (sensors), although not connected to battery negative system/terminal bonding, must have optimal isolation.
Consequently, particularly considered must be parasitic resistances in lugs: oxidising, clinching defects, etc.
- Screened circuits braiding must only electrically contact the end towards the central unit entered by the signal (Figure 2).
- If junction connectors are present, unscreened section d, near them, must be as short as possible (Figure 2).
- Cables must be arranged such as to result to be parallel to reference plane, i.e. as close as possible to chassis/body structure.
7
Figure 1
1. NEGATIVE CABLES “STAR“ CONNECTION TO SYSTEM BONDING M
Figure 2
88039
2. SCREENING THROUGH METALLIC BRAIDING OF A CABLE TO AN ELECTRONIC COMPONENT — C. CONNECTOR
d. DISTANCE ! 0
Print P4D32N001 E Base - April 2007
Page 8

8
NEF POWER GENERATION ENGINES
OPTIONAL ELECTRICAL AND MECHANICAL PARTS INSTALLATIONS
Assemblies shall be modified and equipped with additions - and their accessories shall be fitted - in accordance with the assembling
directives issued by IVECO Motors.
It is reminded that, especially about the electric system, several electric sockets are provided for as series (or optional) sockets in
order to simplify and normalise the electrical intervention that is care of preparation personnel.
It is absolutely forbidden to make modifications or connections to electric central units wiring harnesses; in particular,
the data interconnection line between central units (CAN line) is to be considered inviolable.
CONVERSIONS BETWEEN THE MAIN UNITS OF MEASUREMENT OF THE INTERNATIONAL SYSTEM AND MOST USED DERIVED QUANTITIES
Power
1 kW = 1.36 metric HP
1 kW = 1.34 HP
1 metric HP = 0.736 kW
1 metric HP = 0.986 HP
1 HP = 0.746 kW
1 HP = 1.014 metric HP
Torque
1 Nm = 0.1019 kgm
1 kgm = 9.81 Nm
Revolutions per time unit
1 rad/s = 1 rpm x 0.1046
1 rpm = 1 rad/s x 9.5602
Pressure
1 bar = 1.02 kg/cm
1 kg/cm
1bar = 10
2
= 0.981 bar
5
2
Pa
Where accuracy is not particularly needed:
- Nm unit is for the sake of simplicity converted into kgm according to ratio 10:1
1 kgm = 10 Nm;
2
- bar unit is for the sake of simplicity converted into kg/cm
2
1 kg/cm
=1bar.
according to ratio 1:1
Temperature
0° C=32° F
1° C = (1 x 1.8 + 32) ° F
Base - April 2007 Print P4D32N001 E
Page 9

NEF POWER GENERATION ENGINES 1
NEF POWER GENERATION ENGINES
F4GE NEF engines Part 1
F4AE NEF engines Part 2
Main electrical power and Troubleshooting Part 3
Print P4D32N001 E Base - April 2007
Page 10

2
NEF POWER GENERATION ENGINES
Base - April 2007 Print P4D32N001 E
Page 11

F4GE NEF ENGINES
1
Part 1
F4GE NEF ENGINES
Section
General specifications
Fuel 2
Power Generation application 3
Overhaul and technical specifications 4
Tools 5
Safety prescriptions Appendix
1
PREFACE TO USER’S GUIDELINE MANUAL
Section 1 describes the NEF engine illustrating its features
and working in general.
Section 2 describes the type of fuel feed.
Section 3 relatesto the specific duty and is divided in four separate parts:
1. Mechanical part, related to the engine overhaul,
limited to those components with different characteristics
based on the relating specific duty.
2. Electrical part, concerning wiring harness, electrical
and electronic equipment with different characteristics
based on the relating specific duty.
3. Maintenance planning and specific overhaul.
4. Troubleshooting part dedicated to the operators who,
being entitled to provide technical assistance, shall have simple
and directinstructions to identify the cause of the major inconveniences.
Sections 4 and 5 illustrate the overhaul operations of the engine overhaul on stand and the necessary equipment to execute
such operations.
Print P4D32N001 E Base - April 2007
Page 12

2
F4GE NEF ENGINES
F4GE NEF ENGINES
Base - April 2007 Print P4D32N001 E
Page 13

F4GE NEF ENGINES
3
SPECIAL REMARKS
Diagrams and symbols have been widely used to give a clearer and more immediate illustration of the subject being dealt with, (see
next page) instead of giving descriptions of some operations or procedures.
Example
∅
Ø 1 = housing for connecting rod small end bush
1
Ø 2 = housing for connecting rod bearings
∅
2
Tighten to torque
Tighten to torque + angular value
α
Print P4D32N001 E Base - April 2007
Page 14

4
F4GE NEF ENGINES
SYMBOLS - ASSISTANCE OPERATIONS
F4GE NEF ENGINES
Removal
Disconnection
Refitting
Connection
Removal
Disassembly
Fitting in place
Assembly
ρ
Tighten to torque
Tighten to torque + angle value Rolling torque
α
Press or caulk Rotation
Regulation
Adjustment
Visual inspection
Fitting position check
Intake
Exhaust
Operation
Compression ratio
Tolerance
Weight difference
Angle
Angular value
Preload
Measurement
Value to find
Number of revolutions
Check
Equipment Temperature
Surface for machining
Machine finish
Interference
Strained assembly
Thickness
Clearance
Lubrication
Damp
Grease
Sealant
Adhesive
bar
Pressure
Oversized
Higher than….
Maximum, peak
Undersized
Less than….
Minimum
Selection
Classes
Oversizing
Temperature < 0 °C
Cold
Winter
Temperature > 0 °C
Air bleeding
Hot
Summer
Replacement
Original spare parts
Base - April 2007 Print P4D32N001 E
Page 15

F4GE NEF ENGINES
UPDATING
Section Description Page Date of revision
5
Print P4D32N001 E Base - April 2007
Page 16

6
F4GE NEF ENGINES
F4GE NEF ENGINES
Base - April 2007 Print P4D32N001 E
Page 17

F4GE NEF ENGINES
SECTION 1 - GENERAL SPECIFICATIONS 1
SECTION 1
General specifications
Page
ELECTRICAL SPECIFICATIONS
OF THE GENERATING SETS 3............
CORRESPONDENCE BETWEEN TECHNICAL
CODE AND COMMERCIAL CODE 4.......
LUBRICATION 5..........................
OIL VAPOUR RECIRCULATING SYSTEM 6.....
COOLING SYSTEM 7......................
AIR INDUCTION BOOST DIAGRAM 8........
- Description 8...........................
Print P4D32N001 E Base - April 2007
Page 18

2
SECTION 1 - GENERAL SPECIFICATIONS
F4GE NEF ENGINES
Base - April 2007 Print P4D32N001 E
Page 19

F4GE NEF ENGINES
ggR
ating
GENEF45MNEF45AM
1
GENEF60MNEF45SM
1
GENEF75MNEF45SM
2
GENEF85MNEF45TM
1
GENEF100MNEF45TM2
GENEF125MNEF67SM1
GENEF130MNEF67TM2
GENEF160MNEF67TM3
GSNEF45MNEF45AM
1
GSNEF60MNEF45SM
1
GSNEF75MNEF45SM
2
GSNEF85MNEF45TM
1
GSNEF100MNEF45TM2
GSNEF125MNEF67SM1
GSNEF130MNEF67TM2
GSNEF160MNEF67TM3
ELECTRICAL SPECIFICATIONS OF THE GENERATING SETS
Electrical specifications
Generating set Assembled Engine
s
Prime 45 36 50 40
Stand By 50 40 55 44
Prime 60 48 66 53
Stand By 66 53 73 58
Prime 75 60 75 60
Stand By 82 66 82 66
Prime 85 68 100 80
Stand By 94 75 110 88
Prime 100 80 110 88
Stand By 110 88 121 97
Prime 125 100 145 116
Stand By 138 110 160 128
Prime 130 104 145 116
Stand By 143 114 160 128
Prime 160 128 170 136
Stand By 176 141 187 150
50 Hz 60 Hz
kVA kW (*) kVA kW (*)
SECTION 1 - GENERAL SPECIFICATIONS 3
(*) Power factor 0.8.
Prime Power
The Prime Power is the maximum power available with varying loads for an unlimited number of hours. The average power output
during a 24 h period of operationmust not exceed 80% of the declared prime power between the prescribed maintenance intervals
and at standard environmental conditions. A 10% overload is permissible for 1 hour every 12 hours of operation.
Stand-by Power
This is the maximumpower available for a period of 500 hours/year with a mean loadfactor of 90% of the declared stand-by power.
No kind of overload is permissible for this use.
Print P4D32N001 E Base - April 2007
Page 20

4
SECTION 1 - GENERAL SPECIFICATIONS
CORRESPONDENCE BETWEEN TECHNICAL CODE AND COMMERCIAL CODE
Technical Code Commercial Code
F4GE0405A*F600 GE NEF 45M
F4GE0405B*F600 GE NEF 45M
F4GE0455A*F600 GE NEF 75M
F4GE0455B*F600 GE NEF 75M
F4GE0455C*F600 GE NEF 60M
F4GE0485C*F600 GE NEF 85M
F4GE0485A*F600 GE NEF 100M
F4GE0655B*B600 GE NEF 125M
F4GE0685D*F601 GE NEF 130M
F4GE0685B*F601 GE NEF 160M
F4GE NEF ENGINES
Technical Code Commercial Code
F4GE0405A*F600 GS NEF 45M
F4GE0405B*F600 GS NEF 45M
F4GE0455A*F600 GS NEF 75M
F4GE0455B*F600 GS NEF 75M
F4GE0455C*F600 GS NEF 60M
F4GE0485C*F600 GS NEF 85M
F4GE0485A*F600 GS NEF 100M
F4GE0655B*B600 GS NEF 125M
F4GE0685D*F601 GS NEF 130M
F4GE0685B*F601 GS NEF 160M
Base - April 2007 Print P4D32N001 E
Page 21

F4GE NEF ENGINES
SECTION 1 - GENERAL SPECIFICATIONS
5
LUBRICATION
Lubrication by forced circulation is achieved through oil
rotary expansion pump, placed in the front part of the
basement, driven by the straight-tooth gear splined to the
shaft’s bar hold.
From the pan, the lubrication oil flows to the driving shaft, to
the camshaft and to the valve drive.
Figure 1
Lubrication involves the heat exchanger (2,3), the
turboblower for turbocompressed versions, and for an y
compressed air system.
All these components may often vary according to the
specific duty.
Lubrication delivery oil
106533
Oil returning to sump
LUBRICATION SYSTEM LAYOUT (6 cyl. engines)
Print P4D32N001 E Base - April 2007
Page 22

6
SECTION 1 - GENERAL SPECIFICATIONS
OIL VAPOUR RECIRCULATING SYSTEM
Figure 2
F4GE NEF ENGINES
1
2
3
3240t
1. Valve - 2. Breather pipe - 3. Tappet Cap.
On the tappet cap (3) there is a valve (1) whose duty is to condense oil vapour inducing these to fall down because of gravity,
to the Tappet cap underneath.
The remaining non-condensed vapours shall be properly conveyed through the breather pipe (2), by suction as an example (connection towards these vapours shall be designed by the Engineer).
Base - April 2007 Print P4D32N001 E
Page 23

r
t
F4GE NEF ENGINES
SECTION 1 - GENERAL SPECIFICATIONS
7
COOLING SYSTEM
The engine cooling system, closed circuit forced circulation
type, generally incorporates the following components:
- expansion tank; placement, shape and dimensions are
subject to change according to the engine’s equipment;
- radiator, which has the duty to dissipate the heat
subtracted to the engine by the cooling liquid. Also th is
component will have specific peculiarities based on the
equipment developed, both for what concerns the
placement and the dimensions;
- visc pusher fan, having the duty to increase the heat
dissipating power of the radiator. This component as
well will be specifically equipped based on the engine’s
development;
Figure 3
- heatexchange
o coolthe lubrication oil: eventhis
component is part of the engine’s specific equipment;
- centrifugal water pump, placed in the front part of the
engine block;
- thermostat regulating the circulation of the cooling
liquid;
- the circuit may eventu ally be extended to the
compressor, if this is included in the equipment.
117585
COOLING SYSTEM LAYOUT (6 cyl. engines)
Print P4D32N001 E Base - April 2007
Page 24

8
SECTION 1 - GENERAL SPECIFICATIONS
AIRINDUCTION BOOST DIAGRAM
Figure 4
F4GE NEF ENGINES
AIR FILTER
AIR FILTER
RADIATOR
4 cylinders version
TURBOCHARGER
EXHAUST
74195
TURBOCHARGER
EXHAUST
RADIATOR
6 cylinders version
Description
The turbocharger is composed by the following main parts:
one turbine, one transforming valve to regulate the boost
feeding pressure , one main body and one compressor.
During engine working process, the exhaust emission flow
through the body of the turbine, provoking the turbine disk
wheel’s rotation.
The compressor rotor, being connected by shaft to the
turbine disk wheel, rotates as long as this last one rotates,
compressing the sucked air through the air filter.
The above mentioned air is then cooled by the radiator and
flown through the piston induction collector.
74195
The turbocharger is equipped with a transforming valve to
regulate the pressure , that is located on the exhaust
collector before the turbine and connected by piping to the
induction c ollec t or.
It’s duty is to choke the exhaust of the emissions , releasing
part of them directly to the exhaust tube when the boost
feeding pressure, over the compressor, reaches the
prescribed bar value.
The cooling process an d the lubrication of the turbocharger
and of the bearings is made by the oil of the engine.
Base - April 2007 Print P4D32N001 E
Page 25

F4GE NEF ENGINES
SECTION 2 - FUEL 1
SECTION 2
Fuel
Page
INJECTION FEED SYSTEM BY MECHANICAL
ROTARY PUMP 3.......................
- General information 3.....................
- Description of working principles 3...........
FEED PUMP 4............................
- STANADYNE DB4 pump 4................
- Description of operation 4.................
PRIMING PUMP 5.........................
FUEL FILTER 6............................
Print P4D32N001 E Base - April 2007
Page 26

2
SECTION 2 - FUEL
F4GE NEF ENGINES
Base - April 2007 Print P4D32N001 E
Page 27

F4GE NEF ENGINES
INJECTION FEED SYSTEM BY MECHANICAL ROTARY PUMP
General information
Fuel feed system is composed by:
- Fuel tank
- Fuel delivery and back-flow to tank
- Fuel pre-filter
- Priming pump, assembled to the engine and driven by the camshaft
- Fuel filter
- Fuel feed rotary pump
- Injector feed pipeline
- Injectors
SECTION 2 - FUEL
3
Figure 1
(6-cylinder version)
106534
Description of working principles
Fuel is sucked from the fuel tank by the priming pump. This
last one is placed on the engine basement and is driven by
the camshaft.
Throughout the filter, the fuel is piped to the union fitting
vacuum chamber of the tran sfer pump.
Transfer pump is placed inside the feed pump, and is bladed
The fuel arrives therefore to the valve gauging the pressure
inside feed pump.
The distribution plunger further increases this pressure and
delivers fuel throughout the delivery pipe fitting to the
injectors.
The fuel drawing from the injectors is recovered and
delivered to the tank again.
type; its duty is to increase fuel pressure in co rrespondence
with the increase of the number of revolutions.
Print P4D32N001 E Base - April 2007
Page 28

4
SECTION 2 - FUEL
FEED PUMP
The rotary type pump is driven by a gear mating the camshaft’s one.
STANADYNE DB4 pump
Figure 2
F4GE NEF ENGINES
1. Camshaft - 2. Distributor rotor - 3. Transfer pump vanes - 4. Pump element pistons (4) -
5. Cam - 6. Hydraulic head - 7. Pressure regulator unit - 8. Regulator - 9. Automatic advance - 10. Casing -
11. Metering valve- 12. Delivery valve - 13. Electrical power cut-off solenoid.
Description of operation
The main rotating components are propeller shaft (1),
distributor rotor (2), transfer pump vanes (3) and regulato r
(8). With reference to the Figure 2, the propeller shaft
engages the distributor rotor inside the hydraulic head.
The four pistons are driven simultaneously, one towards the
other, by a cam by means of rollers and pads positioned on
the peripheral part of the rotor. There is one cam lobe for
each engine cylinder.
The transfer pump, positioned on the rear part of the rotor,
is sealed inside by the end cap. This also contains the filter
mesh and the transfer pump pressure regulator.
106514
The upper part of the regulat or unit is pressed against the
distributor rotor and acts as a seal for the transfer pump.
The distributor rotor incorporates two fuel inputs, an axial
hole and an exhaust that serves all the outputs to the
injection ports.
The hydraulic head contains the head in which the rotor
turns, the metering valve seat, the fuel inputs and the
connectors to the injectors. The high pressure injection
pumps, connected to the injectors, are fastened to the above
connectors.
Base - April 2007 Print P4D32N001 E
Page 29

F4GE NEF ENGINES
SECTION 2 - FUEL
PRIMING PUMP
This pump h as the specific duty to prime the fuel available in the tank and convey it to the feed pump inlet. It is assembled to
the engine basement and driven by the camshaft.
Figure 3
1
5
Figure 4
1. Priming pump - 2. Camshaft.
2
3246t
88209
1. Priming pump - 2. Drive lever - 3. Camshaft.
Print P4D32N001 E Base - April 2007
Page 30

6
SECTION 2 - FUEL
F4GE NEF ENGINES
FUEL FILTER
The filter is assembled close to the feed and priming pump an d has the specific duty to provide barrier to the impurities and
separation of water from fuel.
On the filter cartridge base there is a water dump screw, th roughout which it is possible to provide regular drainage; on the
bearing for th ose equipment applications requiring it (cold climate areas), there can be a heater assembled to and a temperature
sensor. On some versions, a water presence sensor is present at filtering cartridge base.
Figure 5
106515
1. Fuel filter bearing- - 2. Filter cartridge - 3. Water dump screw.
Base - April 2007 Print P4D32N001 E
Page 31

F4GE NEF ENGINES
SECTION 3 - POWER GENERATION APPLICATION
SECTION 3
Power Generation application
Page
GENERAL INFORMATION 3................
- Clearance data - 4 cyl. 4...................
- Clearance data - 6 cyl. 7...................
PART ONE - MECHANICAL COMPONENTS 9
REMOVING AND REFITTING
THE SOUND-PROOFING UNIT 11.........
- Removal 11.............................
- Refitting 12..............................
REMOVING AND REFITTING THE ENGINE/
GENERATOR 13.........................
1
- Removal 13.............................
- Refitting 13..............................
SEPARATING THE GENERATOR FROM
THE ENGINE 14.........................
DETACHING THE TANK FROM THE BASE 15..
OVERHAULING THE 6-CYLINDER ENGINE 16..
- Introduction 16..........................
- Operations of preparing the engine for assembly
on the rotary stand 16.....................
- Installation of rear components 25............
- Flywheel installation 28.....................
- Installation of front components 28...........
- Completing the engine 37..................
- Rotary feed pump disassembly and assembly
procedure 39............................
- Disassembly 40...........................
- Rotary feed pump setting check 41...........
- Assembly 41.............................
Print P4D32N001 E Base - April 2007
Page 32

2
SECTION 3 - POWER GENERATION APPLICATION
Page
ASSEMBLY PROCEDURE OF THE ”ADC100” ELEC-
TRONIC ACTIVATOR ON STANADYNE SERIES ”D”
INJECTION PUMPS 43....................
- Assembly of the actuator 44................
PASSAGE FROM 50 HZ TO 60 HZ FOR NEF MOTORS
WITH STANADYNE PUMP 45..............
- Passage from 50 Hz to 60 Hz 45.............
- Passage from 60 Hz to 50 Hz 47.............
- Stabilization of t h e rotation regime 47.........
- Identification tag 47........................
REPLACEMENT OF THE ELECTRO-VALVE AND THE
SOLENOID VALVE THROTTLE ON STANADYNE
PUMPS 48..............................
- Electro-valve replacement 49................
- Replacement of the soleno id valve throttle 51...
- Checks and controls 52....................
F4GE NEF ENGINES
PART FOUR -
MAINTENANCE PLANNING 53...........
MAINTENANCE PLANNING 55..............
- Recovery 55.............................
- Planning of controls and periodical intervention 55
- Checks not included in maintenance
planning-daily checks 56....................
MAINTENANCE PROCEDURES 56............
- Checks and controls 56....................
- Engine oil level check. 56...............
- Check of fuel system 57................
- Cooling system check 57...............
- Lubricating system check 57.............
- Check for any water in the fuel filter 57....
- Check of drive belt tensioning 58.........
- Check of belt’s tear and wear status 58....
- Check and setting of tappet clearance 58...
- Oil motor and filter replacement 59.......
- Changing the coolant 59................
- Fuel filter replacement 60...............
- Alternator belt replacement 60...........
Base - April 2007 Print P4D32N001 E
Page 33

F4GE NEF ENGINES
GENERAL INFORMATION
Figure 1
SECTION 3 - POWER GENERATION APPLICATION 3
ENGINE WITH 6 CYLINDERS
The NEF engines have been specifically designed by Iveco
Motors for the power generation application.
They are internal combustion engines, with a 4-stroke Diesel
cycle, 4 or 6 cylinders and 2 valves per cylinder.
They are fueled by a rotary mechanical pump.
Data, technical specifications and performances
granted shall be valid only if the Setter will follow and
!
comply with all installation prescriptions provided by
Iveco Motors.
Furthermore, the expanders assembled by the Setter
must always comply with couple, power and number
of revolutions based on which the engine has been
designed.
106522
The section herein described is composed or four directories:
- directory of mechanical overhaul prescribed i n
accordance to the engine’s specific duty, illustrating all
necessary operations to remove and assembly the
external components of the engine, including cylinder
heads, gearbox of the timing system and of the front part
cover;
- electrical directory, describing the connections of the
different components, of the pre-post heating gearbox
(only for some versions) and of the sensors assembled to
the engine;
- troubleshooting directory;
- directory of preventive and regular maintenance
operations, providing instructions for the execution of the
main operations.
Print P4D32N001 E Base - April 2007
Page 34

4
SECTION 3 - POWER GENERATION APPLICATION
Clearance data - 4 cyl.
F4GE NEF ENGINES
bar
ρ
Type
Compression ratio 17.5:1
Working power kW
rpm
Working torque Nm
rpm
Loadless engine
idling rpm
Loadless engine
peak rpm rpm
Borexstroke mm
Displacement cm
LUBRICATION
Oil pressure
(warm engine)
3
F4GE0405A*F600 F4GE0405B*F600
50
1500
318
1500
. -
- 104 x 132
4485
Forced by gear pump, relief valve single action
oil filter
52
1800
-
-
15W40 ACEA E3
- idling bar
- peak rpm bar
COOLING
Water pump control
Thermostat
- start of opening ºC
FILLING
engine sump liters
engine sump
+ filter liters
0.70
3.50
By centrifugal pump, regulating thermostat, heat
exchanger, intercooler
Through belt
81 ± 2
-
-
NOTE
Base - April 2007 Print P4D32N001 E
Data, features and performances are valid only if the setter fully complies with all the installation prescriptions provided
by Iveco Motors.
Furthermore, the users assembled by the setter shall always be in conformance to couple, power and number of turns
based on which the engine has been designed.
Page 35

F4GE NEF ENGINES
Clearance data - 4 cyl.
SECTION 3 - POWER GENERATION APPLICATION 5
ρ
Type
Compression ratio 17.5:1
Working power kW
rpm
Working torque Nm
rpm
Loadless engine
idling rpm
Loadless engine
peak rpm rpm
Borexstroke mm
Displacement cm
SUPERCHARGING
Turbocharger type HOLSET HX25 HOLSET HX25W HOLSET HX25
F4GE0455A*F600 F4GE0455B*F600 F4GE0455C*F600
74
1500
471
1500
. - -
- - -
3
Without intercooler
74
1800
393
1800
104 x 132
4485
direct injection
60
1500
382
1500
bar
15W40 ACEA E3
LUBRICATION
Oil pressure
(warm engine)
- idling bar
- peak rpm bar
COOLING
Water pump control
Thermostat
- start of opening ºC
FILLING
engine sump liters
engine sump
+ filter liters
Forced by gear pump, relief valve single action
oil filter
0.70
3.50
By centrifugal pump, regulating thermostat, heat
exchanger, intercooler
Through belt
81 ± 2
-
-
NOTE
Print P4D32N001 E Base - April 2007
Data, features and performances are valid only if the setter fully complies with all the installation prescriptions provided
by Iveco Motors.
Furthermore, the users assembled by the setter shall always be in conformance to couple, power and number of turns
based on which the engine has been designed.
Page 36

6
SECTION 3 - POWER GENERATION APPLICATION
Clearance data - 4 cyl.
F4GE NEF ENGINES
ρ
Type
Compression ratio 17.5:1
Working power kW
rpm
Working torque Nm
rpm
Loadless engine
idling rpm
Loadless engine
peak rpm rpm
Borexstroke mm
Displacement cm
SUPERCHARGING
Turbocharger type HOLSET HX27W
3
F4GE0485A*F600 F4GE0485C*F600
98
1500
471
1500
. -
- 104 x 132
4485
With intercooler
direct injection
87
1500
554
1500
bar
15W40 ACEA E3
LUBRICATION
Oil pressure
(warm engine)
- idling bar
- peak rpm bar
COOLING
Water pump control
Thermostat
- start of opening ºC
FILLING
engine sump liters
engine sump
+ filter liters
Forced by gear pump, relief valve single action
oil filter
0.70
3.50
By centrifugal pump, regulating thermostat, heat
exchanger, intercooler
Through belt
81 ± 2
-
-
NOTE
Base - April 2007 Print P4D32N001 E
Data, features and performances are valid only if the setter fully complies with all the installation prescriptions provided
by Iveco Motors.
Furthermore, the users assembled by the setter shall always be in conformance to couple, power and number of turns
based on which the engine has been designed.
Page 37

F4GE NEF ENGINES
ype
Typ
e
F4GE065
5
Clearance data - 6 cyl.
SECTION 3 - POWER GENERATION APPLICATION 7
bar
ρ
T
Compression ratio 17.5:1
Working power kW
rpm
Working torque Nm
rpm
Loadless engine
idling rpm
Loadless engine
peak rpm
Borexstroke mm
Displacement cm
SUPERCHARGING
Turbocharger type HOLSET HX35W
LUBRICATION
Oil pressure
(warm engine)
3
F4GE0655
B*B600
125
1500
796
1500
- - -
- - -
Without
intercooler
direct injection
Forced by gear pump, relief valve single action
D*F601 B*F601
104 x 132
oil filter
F4GE0685
130
1500
815
1500
6728
With intercooler
direct injection
156
1500
969
1500
NOTE
- idling bar
- peak rpm bar
COOLING
Water pump control
Thermostat
- start of opening ºC
15W40 ACEA E3
Data, features and performances are valid only if the setter fully complies with all the installation prescriptions provided
by Iveco Motors.
Furthermore, the users assembled by the setter shall always be in conformance to couple, power and number of turns
based on which the engine has been designed.
FILLING
engine sump* liters
engine sump + filter* liters
* First filling operation
0.70
3.50
Liquid
Through belt
81 ± 2
15
16
Print P4D32N001 E Base - April 2007
Page 38

8
SECTION 3 - POWER GENERATION APPLICATION
F4GE NEF ENGINES
Base - April 2007 Print P4D32N001 E
Page 39

F4GE NEF ENGINES
SECTION 3 - POWER GENERATION APPLICATION 9
PART ONE - MECHANICAL COMPONENTS
Print P4D32N001 E Base - April 2007
Page 40

10
SECTION 3 - POWER GENERATION APPLICATION
F4GE NEF ENGINES
Base - April 2007 Print P4D32N001 E
Page 41

F4GE NEF ENGINES
SECTION 3 - POWER GENERATION APPLICATION
11
REMOVING AND REFITTING THE SOUND-PROOFING UNIT
Removal
Figure 2
Figure 3
115047
Operate inside the soundproofing unit and move back the
exhaust pipe cover (1) in order to reach the stop collar (2),
then loosen the fastening screw (3).
114332
Operate from the control board side and disconnect the
electric connection (1) from the stop button.
Figure 4
114334
Operate from the exhaust pipes side and loosen the covering
panel (2) fastening nuts (1) and remove it.
Print P4D32N001 E Base - April 2007
Page 42

12
SECTION 3 - POWER GENERATION APPLICATION
F4GE NEF ENGINES
Figure 5
Remove pipe (1) from its seat.
114335
Figure 7
114337
Secure hooks with c h ain catches (1) into the slots (2)
provided for the purpose and, by means of a proper hoisting
device, lift the soundproofing unit (3) and remove it with the
aid of another operator.
NOTE
Figure 6
When removing pipe (1), pay attention not to
damage the coolin g unit air ducts (2).
NOTE
Make su re that the rods have all the same length
in order to lift the soundproofing unit along the
vertical axis, thus reducing interferences.
Refitting
To refit, reverse the removal in structions.
114336
Operate along the perimeter and loosen the soundproofing
unit (2) fastening screws (1).
Base - April 2007 Print P4D32N001 E
Page 43

F4GE NEF ENGINES
REMOVING AND REFITTING THE ENGINE/GENERATOR
Figure 8
SECTION 3 - POWER GENERATION APPLICATION
13
107479
Removal
Disconnect the electrical system by detaching the cables
from the battery.
Disconnect the positive and negative cables from any clamps,
detach them from their attachments on the starter motor,
then remove them.
Remove the fan safety grilles (4) by undoing the relevant
fasteners.
Place a container under the cock (10) to collect the coolant.
Disconnect and remove the pipes (1) and (16) together with
the sleeves by undoing the clamps. Block the radiator suitably
and remove it from its seat after disconnec ting the brackets
(3) from the engine and the nuts (12) from the support (11).
Disconnect the diesel pipes (6) from the engine and fromthe
Disconnect the air hose (19) from the turbocharger of the
turbine and the oil vapour recovery pipe from the cover of
the cylinder head. Remove the air cleaner (18) by undoing
the fasteners (← ) and remove it from its seat together with
the support (17).
Fit a lifting tool onto the specific h ooks on the engine and
keep it under tension.
Remove the fixing nuts from the four supports (5) of the
engine/generator assembly.
Separate the engine/generator assembly from the crankcase.
Refitting
To refit, reverse the removal instructions; restore the coolant
system as described in the procedure on page 49.
tank, taking care to collect any diesel coming down, then
remove them from their seat.
Disconnect the electrical c onnection (7) of the diesel level
signal (8) and earth (9).
NOTE
Check the integrity of the rubber-type blocks in
the supports (5) of the pipes and electrical
connections.
Print P4D32N001 E Base - April 2007
Page 44

14
SECTION 3 - POWER GENERATION APPLICATION
SEPARATING THE GENERATOR FROM THE ENGINE
Figure 9
F4GE NEF ENGINES
107480
Remove the fan (1), the brackets of the supports (4) and the
support (3).
Separate the generator from the engine as follows:
- disconnect the wiring (10) from the engine at each of its
points of connection with the parts of the engine: starter
- removethe safety grilles (5) by u ndoing the fasteners (7),
unscrew all the nuts (6) connecting the generator (8) to
thehousingoftheengineflywheel;
- block the generator suitably and separate it from the
engine.
motor, alternator, various sensors, etc. Then fasten it
appropriately to the control panel (9) so as not to hinder
operations when separating the two assemblies;
Base - April 2007 Print P4D32N001 E
Page 45

F4GE NEF ENGINES
DETACHING THE TANK FROM THE BASE
Figure 10
SECTION 3 - POWER GENERATION APPLICATION
15
107477
The tank is blocked inside the base (1) with angular brackets
(3).
To remove the tank (2) from its seat, remove the brackets
(3) by undoing the relevant fasteners.
NOTE
At the time of assembly, check that the adhesive
rubber blocks (4) are sound and positioned by the
brackets (3).
At the time of assembly, check that the adhesive rubber
blocks (4) are sound and positioned by the brackets (3).
Print P4D32N001 E Base - April 2007
Page 46

16
SECTION 3 - POWER GENERATION APPLICATION
F4GE NEF ENGINES
OVERHAULING THE 6-CYLINDER ENGINE
Introduction
The following description concerns the operations of overhauling the engine restricted to the components that differentiate
it acco rding to its specific use.
NOTE
Due to requirements dictated by the application, some assemblies may be located on the engine in different positions.
The “General Overhaul” section contains all the operations of overhauling t h e engine block and this sect ion is therefore to be
considered as following this topic.
NOTE
The operations of removing the engine, as those for overhauling, must be performed by skilled personnel with specific
tools.
Operations of preparing the engine for assembly on the rotary stand
Figure 11
108987
- Remove the intake manifold (1) and the sleeve (6).
- Remove the fuel hoses (2).
- Place a container under the diesel filter and unscrew the
condensation bleed cock located under the filter; drain
- Remove the fuel filter mounting (4) from the bracket
secured to the cylinder head.
- Remove the priming pump (5).
- Disconnect the pipes (3) from the injection pump.
off all the diesel it contains.
- Fully unscrew the cock and, using tool 99360076,
remove the diesel filter (4).
Base - April 2007 Print P4D32N001 E
NOTE
Removing the injection pump requires a specific
procedure described in this section.
Page 47

F4GE NEF ENGINES
Figure 12
SECTION 3 - POWER GENERATION APPLICATION
17
- Disconnect the pipe (1) delivering oil to the turbine (3).
- Disconnect the pipe (4) returning oil to the turbine (3).
- Remove the turbine (3).
- Remove the oil filter (6) with tool 99360076.
- Remove the starter motor (5).
- Remove the exhau st manifold (2).
NOTE
Warning: the oil filter contain s inside aprx. 1 kg. of
engine oil.
Provide tank with sufficient capacity to contain the
liquid.
Warning: avoid contact of engine oil with the skin:
in case of skin contamination rinse in running
water.
Engine oil is highly pollutant: provide for disposal
in compliance with the law and regulations in force.
Figure 13
NOTE
108988
70126
To disconnect fuel pipelines (2, Figure 11), in low
pressure from the relating pipe fittings, it is
Necessary to press the locking fastener (1) as
showninpictureB.
After having disconnected the pipeline, reset the
locking fastener (1) in lock position as shown in.
picture A, to avoid any possible deformation of the
fastener itself.
Print P4D32N001 E Base - April 2007
Page 48

18
SECTION 3 - POWER GENERATION APPLICATION
F4GE NEF ENGINES
Figure 14
76147
- Assemble th e bracket bearing 99361037 using the four
screw threaded ports (1).
Figure 16
88143
- Disconnect the supply pipe unit from the injectors (1).
- Remove fuel exhaust pipe (2) from the injectors by
removing screw (4) and seal (3).
Figure 15
106554
- Assemble the second bracket 99361037 throughout the
screw-threaded ports (1).
- Lift the engine usin g the rocker arm 99360595 and put
it on the turning stand 99322205.
- Remove the oil level rod together with guide pipe;
(loosen the guide pipe disassembling from the block);
properly pipe the screw-threaded port to avoid inlet of
foreign matters.
- Drain the oil through the c ap underneath the plug.
Figure 17
(Demonstration)
76150
- Loosen the screws (1) holding the fixing brackets of such
pipelines; pipe the pipeline ends.
Base - April 2007 Print P4D32N001 E
Page 49

F4GE NEF ENGINES
SECTION 3 - POWER GENERATION APPLICATION
19
Figure 18
(Demonstration)
76149
- Remove tappet caps: loosen the fixing sc rews (1) and lift
the caps (2); remove the gaskets.
NOTE
On the tappet cap there is a blow-by valve for t he
lubrication oil vapours.
All the gaskets shall always be replaced durin g
assembly.
Figure 20
(Demonstration)
76151
- Disassemble suction and exhaust manifolds: loosen the
screws (1) fixing the suction manifold plate to the
cylinder head (some of them have already been
screwed-out sinc e fixing the pipe brackets to the
injectors).
From the exhaust manifold side loosen the (2) fixing
screws; remove the gaskets.
Figure 19
84082
- Remove injectors (2) with tool 99340205 (1) and take
out the cylinder head.
Figure 21
2
1
75683
- Disassemble rocker arm bearings; loosen the two fixing
screws (2) and remove the complete rocker arm bearing;
withdraw tappet rods. Repeat the operation for all the
remaining rocker arm bearings.
- Disassemble water temperature transmitter (1).
Print P4D32N001 E Base - April 2007
Page 50

20
SECTION 3 - POWER GENERATION APPLICATION
F4GE NEF ENGINES
Figure 22
88089
- Loosen screw (1) and relevant nut on belt stretcher
bracket (3).
- Loosen screw (2) in order to slide out POLY-V belt (2).
- Remove belt stretcher bracket (3).
- Remove the coolin g fan.
- Disassemble the control pipe pulleys and the guide
rollers.
Figure 24
1
2
75686
- Properly hold the alternator (1) separating it from its
bearing by loosening the screw (2); remove screw nut
and washer.
Figure 23
117588
- Disassemble thermostat unit; loosen the three fixing
screws (1) and disassemble the thermostat unit (2)
together with the bracket (3); remove the gasket (4) and
the thermostat (5).
- In order to facilitate head overhauling operations at the
test bench keep bracket (3) assembled on it by fixing it
with the thermostat unit screws.
Figure 25
106544
- Loosen the screws (1) and withdraw the alternator
bearing (2).
NOTE
The shape and the dimensions of the support of
the alternator vary according to the use of the
engine. The relevant pictures provide a general
trace of the intervention that is to be carried out.
The procedures described are always applicable.
Base - April 2007 Print P4D32N001 E
Page 51

F4GE NEF ENGINES
SECTION 3 - POWER GENERATION APPLICATION
21
Figure 26
106545
- Loosen the screws (4) and disassemble the oil
pressure/temperature sensor (3) (if fitted).
- Disassemble injection pump (see specific procedure).
Figure 28
2
1
3
4
75692
- Apply the suitable tool (2) on the flywheel covering box
(1) in order to lock flywheel (3) rotation. (use the starting
motor fixing nuts and studs).
- Loosen the flywheel fixing screws (4) to engine drive
shaft.
Figure 27
- Disassemble cylinder head;
loosen the screws (1) and (2) fixing the cylinder head (3);
hook the brackets with metal ropes and, throughout a
hoist withdraw cylinder head from the block.
76152
Figure 29
106546
- Unloose the screws (3) and disassemble the damping
flywheel (2) and the pulley (1).
- The engine flywheel lock tool can facilitate the removal
of damper flywheel (2) installed on pulley (1).
Print P4D32N001 E Base - April 2007
Page 52

22
SECTION 3 - POWER GENERATION APPLICATION
F4GE NEF ENGINES
Figure 30
106547
- Remove the screws (1) and disconnect the water pump
(2).
- Remove the screw (3) and the roller (4).
- Remove the screw (5) and disconnect the engine speed
sensor (6).
Figure 32
00904t
- Using the specially provided tie rod (3) for the tool
99363204 and the lever (4), withdraw the external
holding ring (2) from the front cover (1).
Figure 33
Figure 31
00900t
- Remove the engine drive shaft fixing ring from the front
cover. Use the tool 99340055 (4) to operate on the
front tang (2) of the engine drive shaft. Throughout the
tool guide ports, drill the internal holding ring (1) using
Ø 3,5 mm drill for a 5mm depth. Fix the tool to the ring
tightening the 6 screws specially provided.
Proceed withdrawing the ring (1) tightening the screw
(3).
70149
- Loosen the screws (1) and remove the front cover (2).
NOTE
Take note of the screw (1) assembly position, since
the screws have different length.
Figure 34
75811
- Loosen the screws (1) and remove oil pump (2).
Base - April 2007 Print P4D32N001 E
Page 53

F4GE NEF ENGINES
SECTION 3 - POWER GENERATION APPLICATION
23
Figure 35
1
2
4
3
75691
- Screw out the opposite screws (1) from the ports where
the withdrawal pins shall be introduced (see picture
following).
- Loosen remaining flywheel fixing screws (3) to the
engine drive shaft (4).
- Remove the flywheel block tool (2).
Figure 37
00903t
- Remove the flywheel cover box fixing ring using the tool
99340056 (3) to operate on the back tang (5) of the
engine drive shaft. Throughout t he tool guide ports, drill
the internal holding ring using Ø 3,5 mm drill for a 5mm
depth.
- Fix the tool 99340056 (3) to the ring (1) tightening the
6 screws specially provided (4).
- Proceed with drawing the ring (1) tightening the screw
(2).
- Using the specially provided tie rod (3) for the tool
99363204 and the lever (4), withdraw the external
holding ring of the flywheel cover box.
Figure 36
1
4
Figure 38
2
3
75690
- Screw up two medium length screws in the ports (4) to
slingtheflywheelwithahoist.
- Loosen the screws (2) and remove the flywheel cover
box (1).
70153
Throughout two guide pins (2) previously screwed up
into the engine drive shaft ports (3) control the engine
flywheel withdrawal by means of a hoist.
NOTE
Take note of the screw (1) assembly position, since
the screws have different length.
Print P4D32N001 E Base - April 2007
Page 54

24
SECTION 3 - POWER GENERATION APPLICATION
F4GE NEF ENGINES
Figure 39
88076
- Turntheengineupside-down.
- Loosen the screws (2), disassemble th e plate (3) and
remove the oil pan (1).
NOTE
The shape and dimensions of the pan and of the
rose pipe may vary according to the engine
application. The relating illu strations provide
general guidelines of the operation to be
performed. The procedures described are
applicable anyway.
Figure 41
70156
- Loosen the screws (1) and disassemble the gear from the
camshaft (2).
Figure 40
87261
- Loosen the screws (1) and disassemble the oil suction
rose pipe (3).
- Loosen the screws (2) and remove the stiffening plate
(4).
Figure 42
106540
- Loosen the screws (2) and disassemble the timing
gearbox (1).
NOTE
Take note of the screw (2) assembly position, since
the screws have different length.
Base - April 2007 Print P4D32N001 E
Page 55

F4GE NEF ENGINES
SECTION 3 - POWER GENERATION APPLICATION
25
Installation of rear components
Figure 43
1
75712
DIAGRAM SHOWING SEALING LOCTITE 5205
APPLICATION WITHIN GEARBOX AREAS
- Accurately clean the timing gearbox (1) and the engine
block.
NOTE
It is necessary and essential to clean th e surface to
be sealed in order to achieve excellent tight seal.
Apply sealing LOCTITE 5205 on the box in order
to form a kerbstone of a few mm. Diameter.
It must be uniform (no crumbs), with no air blisters,
thinneror irregularzones.
Any eventual imperfection shall be correct as soon
as possible.
Avoid using material in excess to seal the joint. Too
much sealing material would drop out on both
sides of t he joint and obstruct lubricant passages.
Couplings must be assembled within 10 minu t es
after completing the sealing operation.
Figure 44
1
910
6
8
4
3
2
7
1
5
75711
DIAGRAM SHOWING SCREW
TIGHTENING TO FIX REAR GEARBOX
- Reassemble to box (1) to the engine block.
- Tighten the fixing screws in the same position as found
out during disassembly and fix the sc rews to the locking
couples listed here below, following the order as shown
in the picture.
Screws M12 65 ÷ 89 Nm
Screws M8 20 ÷ 28 Nm
Screws M10 42 ÷ 52 Nm
NOTE
Before assembly, always check that the threads of
the ports and of the screws have no evidence of
tear and wear nor dirt.
Figure 45
70211
- With a pen marker, mark the tooth (1) of the driving gear
assembled to the engine drive shaft with (2) (→) timing
notch.
NOTE
Screw up two pins to facilitate operation of engine
drive shaft rotation.
Print P4D32N001 E Base - April 2007
Page 56

26
SECTION 3 - POWER GENERATION APPLICATION
F4GE NEF ENGINES
Figure 46
106541
- Orient enginedrive shaft (3) and camshaft (4) taking care
that in phase o f assembly of the driving gear (2) to the
camshaft, the notches marked on the gears (1 and 2)
shall match.
Figure 48
106543
- Tighten the screws (1) fixing the gear to the camshaft (3)
and lock them to the prescribed couple.
Figure 47
106542
- Position comparator (1) on timing system gear (2) and
check that the clearance between gears (2) and (3) is
within 0.076 ÷ 0.280 mm range.
Figure 49
1
75708
DIAGRAM SHOWING SEALING LOCTITE 5205
APPLICATION.
Base - April 2007 Print P4D32N001 E
Page 57

F4GE NEF ENGINES
SECTION 3 - POWER GENERATION APPLICATION
27
NOTE
It is necessary and essential to clean th e surface to
Figure 51
be sealed in order to achieve excellent tight seal.
Apply sealing LOCTITE 5205 on the box in order
to form a kerbstone of a few mm. Diameter. It must
be uniform (no crumbs), with no air blisters,
thinneror irregularzones.
Any eventual imperfection shall be correct as soon
as possible.
Avoid using material in excess to seal the joint. Too
much sealing material would drop out on both
sides of t he joint and obstruct lubricant passages.
Couplings must be assembled within 10 minu t es
after completing the sealing operation.
0901t
- Apply to engine drive sh aft rear tang (6), the detail (5)
of the tool 99346252, fix it tightening the screws (4) and
key the new holding ring on it (3).
- Place detail (1) on detail (5), tighten the screw nu t (2)
until complete assembly of the fixing ring (3) into th e
flywheel cover box (7).
Figure 50
1
16
15
14
17
8
7
6
18
19
13
5
12
11
20
2
1
21
4
9
10
3
75709
DIAGRAM SHOWING SCREW
TIGHTENING TO FIX FLYWHEEL COVER BOX.
- Reassemble the box (1) to the engine block, tighten the
fixing screws in the same position as found out during
disassembly and fix the screws to the locking couples
listed here below, following the order as sh own in the
picture.
Screws M12 75 ÷ 95 Nm
Screws M10 44 ÷ 53 Nm
Figure 52
12
75696
- Check the conditions of the rim tooth (2). Whether
tooth break or excessive wear is detected, disassemble
the rim from the engine flywheel using a common willow
and replace with a new one, previously heated to
150º C degrees for 15’ ÷ 20’; seconds; bevelling must
be made towards engine flywheel direction.
NOTE
Tightening to angle is performed using tool
99395216.
Print P4D32N001 E Base - April 2007
Page 58

28
SECTION 3 - POWER GENERATION APPLICATION
F4GE NEF ENGINES
Flywheel installation
Figure 53
1
2
3
- Screw up two hooks or trail rings in the flywheel (1)
threaded ports (4) for handling .
- Usinga hoist, handle the flywheel to place it in its housing
inside the flywheel cover box.
- Screw up to pins (2) having appropriate length, in the
shaft ports (3) and using them as guide, assemble the
engine flywheel (1) properly placing it inside the flywheel
cover box.
4
75690
Figure 55
α
1
2
75695
Tighten the engine flywheel (1) fixing screws (2) in two
phases:
- 1stphase; tightening by means of dynamometric wrench
to couple 30 ± 4 Nm;
- 2nd phase, 60º ± 5º angle dwell.
NOTE
Angle dwell shall always be performed using
99395216 tool.
Before assembly, always check that the threads of
the ports and of the screws have no evidence of
tear and wear nor dirt.
Figure 54
2
1
3
4
75692
- Tighte n the screws (4) fixing the engine flywheel (3) to
the engine shaft. Use tool 99360339 (2) to operate on
the flywheel cover box (1) to block engine flywheel
rotation.
Installation of front components
Figure 56
70220
- Assemble oil pump (1).
- Tighten fixing sc rews (2) and lock them to the prescribed
couple.
Base - April 2007 Print P4D32N001 E
Page 59

F4GE NEF ENGINES
SECTION 3 - POWER GENERATION APPLICATION
29
Figure 57
- Apply to the water pump (1) a new fixing ring (2).
Figure 58
Figure 60
70221
75710
76112
- Assemble the water pump (1).
- Tighten the screws (2) and lock them to the prescribed
couple.
Figure 59
- Accurately clean the contact surface of engine block and
apply sealing LOCTITE 5205 on it in order to form a
uniform and continuous kerbstone with no crumbs.
Figure 61
106550
106549
- Remove the fixing ring (2) from the front cover (1),
- Assemble the front cover (2) to the block and tighten
the screws (1) fixing them to the prescribed couple.
accurately clean the plug surface.
Print P4D32N001 E Base - April 2007
Page 60

30
SECTION 3 - POWER GENERATION APPLICATION
F4GE NEF ENGINES
Figure 62
00902t
- Apply on engine drive shaft front tang (6) the detail (4)
of the tool 99346252, fix it with the screws (5) and key
the new holding ring on it (7).
- Place the detail (2) on the detail (4), screw-up the
threaded nut until carrying out the complete assembly
of the holding ring (7) to the front cover.
Figure 64
88075
- Providefor new gasket replacement (1) of the oil pan (2).
NOTE
The pictures illustrating the pan and of the rose
pipe may not correspond to the ones of your
model.
However the procedures described are applicable
anyway.
Figure 63
88074
- Assembleplate (4),suction rose (3) andtighten the fixing
screws (2 and 1) locking them on the prescribed torque.
Figure 65
88076
- Assemble oil pan (1), apply the plate over it (2). Tighten
the screws (2) and lock them to the prescribed couple.
NOTE
Before assembly, always check that the threads of
the ports and of the screws have no evidence of
tear and wear nor dirt.
Base - April 2007 Print P4D32N001 E
Page 61

F4GE NEF ENGINES
SECTION 3 - POWER GENERATION APPLICATION
31
Figure 66
106546
- Assemble the pulley (1) and the dumping flywheel (2) to
the driving shaft.
- Tighten the fixing screws (3) and clamp them to the
couple 68 ± 7 Nm.
Figure 68
106552
- Lubricate the fixing ring (2) using engine oil and place it
on the oil filter (3).
- Manually start the oil filter (3) on the bearing union (1)
until counter-boring, further screw up the oil filter (3) by
3/4 turn.
- Place a new fixing ring on the block housing (4).
Figure 67
106551
- Assemble the following elements to the block: new
gasket (1), heat exchanger (2), new gasket (3), oil filter
bearing (4).
Tighten the screws (5) and lock them to the prescribed
couple.
NOTE
In some applications, the bearing of the exchanger
shall be assembled to a screw t hreaded union
connected to the filter on the opposite side of the
engine, throughout two pipelines.
Figure 69
106553
- Assemble the alternator bearing (1) ensuring that the
pins (3 and 4) are against the engine block.
- Tighten the screws (2) and lock them to the prescribed
couple.
NOTE
Before assembly, always check that the threads of
NOTE
the ports and of the screws have no evidence of
tear and wear nor dirt.
Print P4D32N001 E Base - April 2007
Before assembly, always check that the threads of
the ports and of the screws have no evidence of
tear and wear nor dirt.
Page 62

32
SECTION 3 - POWER GENERATION APPLICATION
F4GE NEF ENGINES
Figure 70
12
- Connect the alternator (1) to the support.
- Tighten without locking th e screw (2).
75686
Figure 72
- Place the gasket (1) over the block.
The choice of the gasket’s thickness shall be made i n
consideration of the cylinder protrusion measured w ith
respect to the block’s upper surface.
NOTE
Verify that the engin e block stand is clean.
Do not grease the gasket. It is recommended to
keep the gasket inside packaging until assembly to
the cylinder head.
1
88092
Figure 71
88090
To refit the POLY-V belt, perform the steps described in
Figure 22 in reverse order.
NOTE
For belt stretching rotate the alternator as
indicated in the figure, lock screw (1) and screw (2,
Figure 70).
NOTE
In case the same belt priory removed is assembled
again, proceed examining it carefully to check
there
Base - April 2007 Print P4D32N001 E
Page 63

F4GE NEF ENGINES
SECTION 3 - POWER GENERATION APPLICATION
33
Figure 74
76152
- Place the head (3) over the block and insert screws (1)
and (2).
NOTE Before using the fixing screws again, measure them
twice as indicated in the picture, c h eckin g D1 and
D2 diameters:
if D1 - D2 < 0,1 mmthe screw can be utilised again;
if D1-D2>0,1mmthescrewmustbereplaced.
D1D2
Figure 73
4 cylinder engine
10
45
1
11
α
13 14
7
9
2
3
8
6
12
76115
6 cylinder engine
76214
- Lubricate c ylinder head bolts and install to head.
- Bolts must be torqued using stitching pattern starting
with the centre bolts and moving out. Bolts to be
torqued in stages: all bolts torqued to snug torque, then
90 degrees rotation for all bolts. Then a further 90
degrees for the M12 x 140 and M12 x 180.
NOTE
75703
If the valves have been removed from the head, it
is necessary to assemble them before assembling
the head itself on the engine block.
M12 x 70 50 Nm + 90 deg’s
M12 x 140 40 Nm + 180 deg’s
M12 x 180 70 Nm + 180 deg’s
Figure 75
4
1
3
2
2
1
3
75705
ROCKER ARM UNIT COMPONENTS:
1. Elastic ring - 2. Spacer- 3. Rocker arms-
4. Support.
- Carry out the assembly of the rocker arms after previous
check of the components.
Print P4D32N001 E Base - April 2007
Page 64

34
SECTION 3 - POWER GENERATION APPLICATION
F4GE NEF ENGINES
Figure 76
18.975
18.963
19.000
19.026
SHAFT AND ROCKER ARM BASIC DATA
Check the coupling surfacesof bearing and shaft: no evidence
of excessive wear shall be detected or damages.
Replace if necessary.
Figure 77
19.000
19.026
75704
Figure 79
D1D2
75703
Insert the tappet driving rods and the Rocker Arm unit.
Before using the fixin g screws again, measure them twice as
indicated in the picture, checking D1 and D2 diameters:
- if D1 - D2 < 0,1 mm the screw can be utilised again;
- if D1-D2>0,1mmthescrewmustbereplaced.
Figure 80
13.00
11.00
116391
ROCKER ARM ADJUSTMENT SCREW
If the adjuster screw has been removed, check the
adjustment distance.
Tighten the screw-threaded nut (1) to the 4 - 6 Nm couple.
Figure 78
2
1
75683
- Tighten the screws (2) to the prescribed couple and
assemble water temperature sensor (1).
32655
Before executing assembly, check the Rocker Arm driving
rods: these shall not be deformed; the spherical ends in
contact with the Rocker Arm adjustment screw and with the
tappet(arrows) shall not present evidenceof seizure or wear:
in case of detection proceed replacing them.
The rods driving the suction and exhaust valves are identical
and therefore interchangeable.
Base - April 2007 Print P4D32N001 E
Page 65

F4GE NEF ENGINES
SECTION 3 - POWER GENERATION APPLICATION
35
Figure 81
2
75806
Adjust the slack between rocker arms and valves using socket
wrench (1), point wrench (3) and feeler gauge (2).
Correct slack is:
- su ction valves 0.25 0.05 mm
- exhaust valves 0.50 0.05 mm.
NOTE
In order carry out a quicker adjustment of the
working slack between rocker arms and valves,
proceed as following:
6 cylinder engine
Rotate the engine drive shaft, balance the valves of
cylinder 1 and adjust the valves identified by star
symbol, as indicated in the following table:
Cylinder n.
Suction
Exhaust
1
234
-
-
-
*
*
-
*
56
*
*
-
*
Rotate the engine drive shaft, balance the valves of
cylinder 6 and adjust the valves identified by star
symbol, as indicated in the following table:
Figure 82
1
3
1
75707
- Assemble injectors after having replaced the sealing
gasket (1).
NOTE
During assembly of injectors, verify that the
injector sphere is correctly positioned on the head
housing.
Figure 83
(Demonstration)
Cylinder n.
Suction
Exhaust
1
234
** -
*- *
*
-
56
-
-
-
*
4 cylinder engine
Rotate the engine drive shaft, balance the valves of
cylinder 1 and adjust the valves identified by star
76149
symbol, as indicated in the following table:
- Assemble cylinder covers (2) with the respective gaskets;
Cylinder n.
Suction
Exhaust
1
-
-*-
234
-
*
*
*
- Fit the seal nods and tighten the screws (1) fixing them
to the prescribed couple.
Rotate the engine drive shaft, balance the valves of
cylinder 4 and adjust the valves identified by star
symbol, as indicated in the following table:
NOTE
Always replace the gaskets using new ones.
Check the threads of the fixing screws: there shall
Cylinder n.
Suction
1
*
Exhaust
Print P4D32N001 E Base - April 2007
234
*
-*
--
-*
be no evidence of wear or dirt deposit.
Seal nods shall have no visible deformation. In such
case provide for replacement with new nods.
Page 66

36
SECTION 3 - POWER GENERATION APPLICATION
F4GE NEF ENGINES
Figure 84
(Demonstration)
117588
- Assemble thermostat unit (2) including thermostat (5)
and gasket (4).
- Tighten the screws to the prescribed couple.
NOTE
The screws (1) have been have been utilised to fix
the bracket (3).
Disassemble the bracket (3) and reassemble
components from 1 to 5 as shown in the picture.
The gasket (4) must be new.
Figure 86
(Demonstration)
2
1
76208
- Assemble the brackets (1) fixing the fuel pipelines to the
injectors: u se the same screws (2) fixing the manifold
plateasshowninthepicture.
Figure 87
Figure 85
106555
- Apply on the surface joining the suction manifold plate
(1) the gasket (3) and provide. Fixing the screws (2) t o
the prescribed couple.
- If you have removed the pipe (7) and the spacer (5) from
the intake manifold plate (1) fit it back on after inserting
two new gaskets (4-6).
- Tighten the screws (8) to the prescribed couple.
107
- Fix the fuel pipes (1) to the injectors (2) and to the
connectors (3) previously fitted.
Base - April 2007 Print P4D32N001 E
Page 67

F4GE NEF ENGINES
Completing the engine
Figure 88
SECTION 3 - POWER GENERATION APPLICATION
37
108988
- Fit the starter motor (5).
- Fit the oil filter (6) with tool 99360076.
- Fit the exhaust manifold (2).
- Fit the turbine (3).
- Fit the pipe (4) returning oil from the turbine (3).
- Fit the pipe (1) delivering oil to the turbine (3).
Print P4D32N001 E Base - April 2007
Page 68

38
SECTION 3 - POWER GENERATION APPLICATION
Figure 89
F4GE NEF ENGINES
Fitting the injection pump requires a specific procedure described in this section.NOTE
- Fit the pipes (3) to the injection pump.
- Fit the priming pump (5).
- Fit the fuel filter mounting (4).
- Fit the diesel filter (4) with tool 99360076.
NOTE
The filter shall be priory filled with fuel to facilitate
feed system bleed operations.
- Fit the fuel pipes (2).
- Fit the intake manifold (1) and the sleeve (6).
Figure 90
NOTE
108987
70126
To connect fuel pipelines (3, Figure 89) in low
pressure from the relating connection unions it is
necessary to press the locking fastener (1) as
showninpictureB.
After having connected the pipeline, reset the
fastener (1) into block position as shown in picture
A.
Base - April 2007 Print P4D32N001 E
Page 69

F4GE NEF ENGINES
SECTION 3 - POWER GENERATION APPLICATION
39
Rotary feed pump disassembly and assembly procedure
This procedure prescribes that:
!
- the fuel pipes (from the pumping elements to
the injectors, recovering blow-by from the
injectors to the pump and the supply from the
priming pump) have all been removed;
- the electrical connections have been
disconnected.
- Accelerator cable shall be disconnected.
Engine versions with tool (99360330)
Figure 91
In case feed pump replacement is necessary, this shall be
supplied pre-set already as spare part.
On the other hand, in case the pump shall be disassembled
and reassembled later on without being repaired it will be
necessary to pr-set it while it is still assembled to th e engine
and disassemble it only afterwards.
The following procedure analyses this second hypothesis
since it is the more complex.
Find the top dead centre with the tool (99395097) - False
injector
Figure 93
1
88140
Disassemblethestarterfromtheflywheelboxandusetool
99360330 to rotate the flyw heel.
Engine versions with tool (99360339)
Figure 92
2
1
1
88141
Remove the rocker covers of the 1stcylinder; remove the 1
injector and place the tool (1) to set the 1stcylinder top dead
centre position (end-of-compression phase). Pre-load the
gauge.
The searched condition is obtained by rotating the engine
shaft properly until you find the maximum value on the
comparator and then checking that the intake and exhaust
valves are both c l osed.
Once PMS has been obtained, lock the flywheel by means of
tool 99360339 (Figure 93).
Searching for the top dead centre with timing gear blocking
pin
Figure 94
st
75714
Disassemble the starter from the flywheel box (1) and use
tool 99360339 (2) to rotate the flywheel.
Print P4D32N001 E Base - April 2007
Turn the flywheel until, when pushing the pin (1), it blocks the
gear (2) obtaining the TDC of the 1° cylinder.
84071
Page 70

40
SECTION 3 - POWER GENERATION APPLICATION
F4GE NEF ENGINES
Disassembly
Figure 95
106659
- Partially unlock pump shaft retaining screw (1) and move
spacer with slot (2) in area with lager size h ole for
complete screw passage.
- Lock applying a torque ranging between 11,9 and 12,4
Nm retaining screw (1) till reaching spacer, thus locking
pump shaft rotation.
Figure 97
106658
- From the pump side, loosen the fixing nuts (1) without
removing them in order to enable moving the pump
backwards using 99340035 extractor.
- Assemble the 99340035 extractor throughout the two
threaded ports (4, Figure 96) and withdraw the gear from
the pump shaft.
- Properly hold the feed pump and loosen completely the
fixing nuts.
- Withdraw the pump from the studs, together with the
gasket.
Figure 96
1
4
23
75693
- From timing side, remove the cover (2) loosening the
screws (1) in order to have access to the union fixing nut
(3) to the pump driving gear.
- Loosen the fixing nut (3) and remove the relating
washer.
NOTE
Hold the pump driving gear to avoid interference
or crawling during timing gear rotation.
Base - April 2007 Print P4D32N001 E
Page 71

F4GE NEF ENGINES
SECTION 3 - POWER GENERATION APPLICATION
41
Rotary feed pump setting check
Figure 98
106660
1. Slot on the hub of the hydraulic rotor -
2. Synchronization pin 99365196 - 3. Plate.
The synchronization pin 99365196 (2) has been designed for
use in the event of the rotor shaft being inadvertently
released.
The correct synchronization of the pump with the engine is
obtained when the synchronization pin 99365196 (2), fitted
in the hole on the plate (3), enters the slot (1) on the exterior
of the hydraulic rotor hub.
Assembly
Figure 99
106658
When installing supplì pump on engine, cylinder no.1 must
be at TDC, end of compression phase.
- Assemble the pump pre-set in its housing on the engine,
fitting the shaft into the gear port (not provided with
wrench).
- Tighten the fixing nuts (1) locking the pump flange in the
slot centre.
NOTE
The gasket removed during pump disassembly shall
not be utilised again.
Always u s e original spare parts.
Therefore:
- Remove the screw cap (3) at the centre of the plate.
- Insert the s ynchroniz a tion pin (1) 99365196 in the hole
on the plate (3). The synchronization position is
obtained when the synchronization pin (2) enters the
slot on the hydraulic rotor hub.
- Lock the control shaft in the correct position by means
of the screw (1, Figure 95).
- Remove the synchronization pin and fit the screw cap of
the plate (3). Tighten the cap using a torque of 2.3 ÷ 3.4
Nm.
NOTE
Support the pump gear to prevent interference or
sticking when the timing system gears turn.
Figure 100
1
4
23
75693
- On the timing side, throughout the specially appointed
port, fit the washer and screw up the fixing nut (3) to the
pump shaft. Lock the nut to the 190-203 Nm couple.
- Assemble the cover (2) including gasket and tighten the
screws (1).
Print P4D32N001 E Base - April 2007
Page 72

42
SECTION 3 - POWER GENERATION APPLICATION
Figure 101
106659
- - Svitare, senza rimuovere, la vite (1) di bloccaggio
rotazione dell’alberino della pompa e spostare il
distanziale con asola nella zona del foro di dimensioni
minori. Avvitare fino a battuta la vite bloccando il
suddetto distanziale: in questo modo l’alberino della
pompa di alimentazione è libero di ruotare.
- Disassemble the flywheel rotation/locking tool
99360339 or 99360330; arrange the starting motor in its
seat.
- Connect all thepipes (fromthe pumpingelements to the
injectors, recovering blow-by from the injectors to the
pump and the supply from the priming pump).
- Connect the electrical connections.
F4GE NEF ENGINES
NOTE
In case pump removal has been carried out while
the engine was assembled, connect acceleration
cable.
Base - April 2007 Print P4D32N001 E
Page 73

F4GE NEF ENGINES
SECTION 3 - POWER GENERATION APPLICATION
43
ASSEMBLY PROCEDURE OF THE ”ADC100” ELECTRONIC ACTIVATOR ON STANADYNE SERIES ”D” INJECTION PUMPS
Figure 102
Before proceeding in the removal of the Injection Pump
cover and then to the replacement with the electronic
actuator, it is important to clean the external part of the
pump, if necessary, using solvents. This prevents
contamination of the internal part of the pump.
- Disconnect the wire of the stop electro-valve from the
clamp (I) positioned on the pump cover, being careful to
isolate it.
- Remove the fuel return pipe from the connection (2).
116978
- Remove the three screws (3) of the pump cover. The
screws will then be replaced assembling the screws
supplied with th e ADC100 actuator.
- Remove the cover of the injection pump very carefully
so that the dirt won’t penetrate inside the pump.
- Remove the connection (2) of the fuel return pipe and
the sealing from the injection pump cover. Keep the
connection (2) and the sealing that will have to be
assembled on t he electronic actuator.
Print P4D32N001 E Base - April 2007
Page 74

44
SECTION 3 - POWER GENERATION APPLICATION
Figure 103
F4GE NEF ENGINES
A. The injection pump open seen from above - B. Front (carter side) - C Rear (injector side)
I. The ”U” shaped hook of the electronic actuator- 2. Injection pump lever- 3. Droop adjustment screws
Assembly of the actuator
- Reassemble the connection forthe fuel return pipe and
the pump cover’s original dealing, on the ADC 100
electronic actuator.
- Position the electronic actuator on the injection pump
with the highest part slightly titled upwards.
- Slide the electronic actuator towards the rear part of the
pump (injectors’ side) until the ”U” shape hook (I) of the
actuator engages the lever of the injection pump
(2).Once engaged, align the holes of the pump and the
electronic actuator.
116979
NOTE
Couplings mistakes between the actuator’s hook
(I) andthe lever (2)of the injection pumpcancause
motoroverspeedconditions.
- Tighten the ADC 100 actuator to the injection pump,
using the screws su pplied with the actuator.
- Reconnect the fuel return pipeto the connection placed
on the actuator.
Base - April 2007 Print P4D32N001 E
Page 75

F4GE NEF ENGINES
SECTION 3 - POWER GENERATION APPLICATION
PASSAGE FROM 50 HZ TO 60 HZ FOR NEF MOTORS WITH STANADYNE PUMP
Figure 104
45
According to the specific needs of the motor employment
it is possible that a request to vary the adjustment of the
Stanadyne pump be made to obtain adifferent u se frequency:
- 1500 rpm / 50 Hz
- 1800 rpm / 60 Hz
The necessary procedures will be described in order to
execute the following adjustments:
- passage from 50 Hz to 60 Hz and vice versa.
- stabilizing of the rotation regime.
NOTE
If only the Stanadyne identification tag (2) is
present, this means that the injection pump
presents a setting of 50 Hz.
In case of modification of the setting from 50 Hz
to 60 Hz done in the factory, an identification tag
(1) is applied by Iveco Motors.
116400
On the Iveco Motors tag (I) reported are:
- the model of the injection pump (4);
- an identification code (3) of the specific application of
the setting ofthe injection pump, forexample: A.S. 7.54
identifies the setting at 1800 rpm of 60 Hz.
Passage from 50 Hz to 60 Hz
To carry out the passage from 50 Hz to 60 Hz you must, first
of all:
- identify the code of t h e injection pump from the
Stanadyne tag (2).
Print P4D32N001 E Base - April 2007
Page 76

46
SECTION 3 - POWER GENERATION APPLICATION
Figure 105
F4GE NEF ENGINES
116975
Type of injection pump
(Stanadyne tag)
Screw rotations at 50 Hz
from the final position
(clockwise)
DB 4629 - 5927 2 6 4
DB 4629 - 5932 2 9 7
DB 4629 - 5944 2.5 8.5 6
DB 4429 - 5945 3 6 3
DB 4429 - 5954 2 8.5 6.5
DB 4427 - 5955 3 9 6
- Act on the droop setting adjustment screw (2), rotating
it clockwise the number of rotations indicated in the
chart figure, starting from the position in which the screw
is.
NOTE
In case of doubt you can always unscrew the
droop setting register screw (2) counter clockwise
till you get to the final position - do n ot force it
further in order to not damage the adjustment
system. At this point, always referring to the chart
figure, rotate the droop setting screw clockwise
(2), the number of rotations indicated for the
regime of 60 Hz from the final position.
Screw rotations at 60 Hz
from the final position
(clockwise)
Difference of rotations
from 50 Hz to 60 Hz
(clockwise)
If, for example, for a motor with an injection pump with code
DB 4429 - 5945, originally set at 50 Hz, you want to pass to
60 Hz, it is sufficient to act on the droop setting adjustment
screw (2) rotating it 3 times cloc kwise from the position in
which it is, start the motor, loosen the adjustment screw of
the maximum regime and accelerate with the accelerator
lever, till yo u obtain the empty rotation regime equal to 62
Hz (l860 rpm),
- Then regulate the screw of the minimum regime (4) so
to block the accelerator lever in the newly obtained
position and finally block both adjustment screws (I and
4) using the appropriate lock nuts (tightening torque 3,5
- 4 Nm).
- After starting the motor you must operate the maximum
NOTE
(I) and minimum (4) register screws in order to block the
accelerator lever (3)in t he position to obtain the desired
regime, considering the frequency fall in the passage from
empty to full of the motor (about 2 Hz).
Base - April 2007 Print P4D32N001 E
The adjustment screw of the minimum regime (4)
does n ot allow the attainment of the minimum
intended in the ”classical” meaning of the term
because the injection pump regulator imposes a
superior rotation regime since it is about an
injection pump for the application of a generator.
Page 77

F4GE NEF ENGINES
SECTION 3 - POWER GENERATION APPLICATION
47
Passage from 60 Hz to 50 Hz
To pass from a 60 Hz regime to the 50 Hz regime, operate
analogously to what seen above, remembering to act on the
droop setting adjustment screw (2, Figure 105), rot ating the
same of 3 counter clockwise rotations from the position in
which it is for the functioning at 60 Hz.
Stabilization of the rotation regime
In case of instability of the rotation regime, act on the droop
setting adjust ment screw (2, Figure 105) rotating lightly the
same clockwise/counter clockwise till the stabilization of the
motor rotation regime.
NOTE
Attention! Some motors cannot undergo the
passage from 50 Hz to 60 Hz and vice versa, as they
need a specific injection pump to work at the
required regimes.
Make reference to the SI 191 1 ”Service
Information” to verify which motors cannot
undergo the passage from 50 Hz to 60 Hz and vice
versa.
Identification tag
Figure 106
116976
In case the Iveco Motors tag is not present because it is a
motor with an injection pump that has a setting of 50 Hz, it
is necessary to proceed in the application of a tag in the
illustrated area as in Figure 4 stamping it as the figure example.
The blank tag can be ordered at the Part Replacement
Service.
Figure 107
116977
If the Iveco Motors tag is already on the injection pump, you
must proceed stamping the new identification suffix of the
newly obtained setting and strikethrough the identification of
the preceding setting, as illustrated in the figure example.
Print P4D32N001 E Base - April 2007
Page 78

48
SECTION 3 - POWER GENERATION APPLICATION
F4GE NEF ENGINES
REPLACEMENT OF THE ELECTRO-VALVE AND THE SOLENOID VALVE THROTTLE ON STANADYNE PUMPS
Figure 108
116980
A. Position of the electro-valve arm - I. E ncapsulated coil - 2. Mobile nucleus of t he electro-valve -3. Electro-valve arm -
4. Isolator - 5. Solenoid valve ends
A. Position of the electro-valve arm - I. E ncapsulated coil - 2. Mobile nucleus of t he electro-valve -3. Electro-valve arm -
4. Isolator - 5. Solenoid valve ends
116981
Two types of electro-valves can be us ed on Stanadyne i njection pumps:
- ETR (Energize To Run)
- ETSO (Energize To Stop).
Please note, in the figure, the different assembling position of the electro-valve according to the ETR - ETSO functions.
Base - April 2007 Print P4D32N001 E
Page 79

F4GE NEF ENGINES
SECTION 3 - POWER GENERATION APPLICATION
49
Electro-valve replacement
Figure 109
116982
To replace the electro-valve remove the cover of the
injection pump loosening and removing the three fixing
screws (I and 2) of the cover and the relative washers.
Check the state of wear of the rubber couplings.NOTE
Figure 111
Figure 110
116983
Remove the entire cover of the electro-valve (I), pulling it
upwards perpendicularly to the injection pump.
Be careful that nothing falls into the injection pump.
116985
Remove the electro-valve (3) from the cover (2).
NOTE
Since the ends of the component are electrically
isolated from the cover, make sure to remember
the assembling order of the nuts, of the washers
and of the components, for the electrical
connection of the electro-valve ends; one end is
earthed through an appropriate element (I). Pay
attention to the position of the isolating element
(4).
Assemble of the new electro-valve on the injection pump’s
cover, using the appropriate kits:
- I2 V-ETR
- 24 V-ETR
- I2 V-ETSO
- 24 V-ETSO
The kits contain the indicated type Check the state of wear
of the rubber couplings. of electro-valve and all that is needed
for its assembling.
The nuts fixing the electro-valve (3) to the cover (2) must be
tightened to a I, I ÷ 1,7 Nm torque.
Print P4D32N001 E Base - April 2007
Page 80

50
SECTION 3 - POWER GENERATION APPLICATION
Figure 112 Figure 113
The repositioning of the cover (2) must be done proceeding
in reverse to what described for its disassembling, making
sure that it corresponds perfectly to the assembling seat
without forcing it (for the ETR version the cover of the pump
116986
will correspond to the assembling seat only after the joint
tool has been removed).
F4GE NEF ENGINES
116987
In the electro-valve ETR kit there is the joint tool (I) which
must be used to position the electro-valve’s arm (2) and to
reassemble the cover on the injection pump.
NOTE
This tool (I) allows to keep in the excitation
position the arm of the electro-valve (2), allowing
the correct assembling of the cover and avoiding
dangerous over rotations at the starting of the
motor.
Once the cover is put on the assembling seat and the relative
screws are pointed on the injection pump, rotate the joint
tool (I) and then pull it carefully from underneath the cover
(3), making sure not to move or damage its sealing.
Then tighten the screws with a 4,0 ÷ 5,1 Nm tightening
torque, making sure not to damage the connection earth ed
element of the electro-valve end.
NOTE
Figure 114
A blue seal is included in the kit and it has to be
positioned on the screw (I), after the cover
reassembling operations (2): when new, the seal is
not blue.
116998
In case the original electro-valve should be replaced and its
characteristics modified (different voltage, ETR instead of
ETSO, eco), it is necessary the application of an identification
tag (I) in the indicated place.
The tag must be stamped (I) as shown in details in the figure.
Base - April 2007 Print P4D32N001 E
Page 81

F4GE NEF ENGINES
SECTION 3 - POWER GENERATION APPLICATION
51
Figure 115
116989
In some cases the tag may already be present. If the tag is
already present, it is necessary to strikethrough the old
identification elements and stamping the new ones, as shown
in the example in the figure.
The electro-valve and the solenoid valve throttle on
the same injection pump, must have t he same
operating voltage, so in case of a change in the
motor’s operating voltage, both must be replaced.
Figure 117
116991
Insert the connection cable socket (I) in the cable group end
and screw the nut (I, Figure 116) tightening it to a 5, 7 ÷ 6,8
Nm torque.
Position the socket clamp (2, Figure 116) and screw the fixing
nut tightening it to a 7, 9 ÷ 9, 0 Nm torque.
Position the magnet in its seat and screw the self-blocking
fixing nut, supplied with the replacement kit, tightening it to
a5,1÷5,7Nmtorque.
Replacement of the solenoid valve throttle
Figure 116
116990
Disconnect the linkage connector from the temperature
sensor on the motor, and then remove the fixing nut of the
socket clamp (2) and the nut (I) of the cable group end, so
to release the electrical lead assembly of the solenoid valve
throttle.
Remove the fixing nut (3) from the magnet and remove the
component from its seat.
NOTE
The operating voltage of the device is easy to find
looking at the c olors of the supply wires of the
solenoid:
- BLACK: forthe I2V device
- RED: for the 24V device
The electro-valve and the solenoid valve throttle on
the same injection pump, must have t he same
operating voltage, so in case of a change in the
motor’s operating voltage, both must be replaced.
Print P4D32N001 E Base - April 2007
Page 82

52
SECTION 3 - POWER GENERATION APPLICATION
Checks and controls
The following tests shall be made after engine
assembly.
!
Preventively check that the liquid levels have been
correctly restored.
Start the engine, let it run at revolution regimen
slightly higher than idling an d wait that the cooling
liquid temperature reaches the value enabling
thermostat opening, then check that:
- no coolant leaks from the coupling sleeves of the cooling
circuit piping, tightening the collars further if necessary.
- Carefully check the fuel connection pipes to th e
respective unions.
- There is no oil leakage from the lubrication circuit of the
various pipelines connecting cover and.
- Cylinder head, oil pan an d bearing, oil filter and heat
exchanger as well as relating housings.
- There is no fuel leakage from fuel pipelines.
- Verify correct working of the lighting leds of the
dashboard containing the tools as well as of the
equipment that was disconnected during engine
disconnection.
- Check and blow by with care the engine cooling system,
carrying out frequent drainage.
F4GE NEF ENGINES
Base - April 2007 Print P4D32N001 E
Page 83

F4GE NEF ENGINES
SECTION 3 - POWER GENERATION APPLICATION 53
PART FOUR - MAINTENANCE PLANNING
Print P4D32N001 E Base - April 2007
Page 84

54
SECTION 3 - POWER GENERATION APPLICATION
F4GE NEF ENGINES
Base - April 2007 Print P4D32N001 E
Page 85

F4GE NEF ENGINES
SECTION 3 - POWER GENERATION APPLICATION 55
MAINTENANCE PLANNING
Recovery
To ensure optimised working conditions, in the following pageswe are providing instructions for the overhaul control interventions,
checks and setting operations that must be performed on the engine at due planned dates.
The frequency of the maintenance operations is just an indication since the use of the engine is the main characteristic to determine
and evaluate replacements and checks.
It is not only allowed but recommended that the staff in charge of the maintenance should also carry out the necessary maintenance
and controlling operations even if not being included in the ones listed here below but that may be suggested by common sense
and by the specific conditions in which the engine is run.
Planning of controls and periodical intervention
Controls and periodical intervention
Visualcheckofengine .............................................
Checkpresenceofwaterinfuelfilterorpre-filter.........................
Checkofbeltwearstatus ...........................................
Checkandsettingoftappetclearance..................................
Replacementofengine’soilandfilter .................................
Replacementoffuelfilter ...........................................
Replacementofbelt ..............................................
NOTE
The maintenance operations are valid only if the setter fully complies with all the installation prescriptions provided by
Iveco Motors.
Frequency (hours)
Daily
Daily
-
4000
500
500
1500
Print P4D32N001 E Base - April 2007
Page 86

56
SECTION 3 - POWER GENERATION APPLICATION
F4GE NEF ENGINES
Checks not included in maintenance planning-daily checks
It is a good habit to execute, before engine start, a series of simple checks that might represent a valid warranty to avoid
inconveniences, even serious, during engine running. Such checks are usually up to the operators and to the vehicle’s drivers.
- Level controls and checks of any eventual leakage from the fuel, cooling and lubricating circuits.
- Notify the maintenance if any inconvenience is detected of if any filling is necessary.
After engine start and while engine is running, proceed with the following checks and controls:
- check presence of any eventual leakage from the fuel, cooling and lubricating circuits.
- Verify absence of noise or unusual rattle during engine working.
- Verify, using the vehicle devices, the prescribed pressure temperature and other parameters.
- Visual check of fumes (colour of exhaust emissions)
- Checking the coolant level.
MAINTENANCE PROCEDURES
Checks and controls
Engine oil level check.
Figure 118
106668
The check must be executed when the engine is disconnected
and possibly cool.
Figure 119
106669
To provide filling, operate through the upper top (1) or
through the lateral top (2). During filling operation, the tops
must be removed as well as the rod in order to make the oil
flow easier”.
Thecheckcanbemadeusingthespeciallyprovidedflexible
rod (1).
Draw off the rod from its slot and check that the level is within
the etched tags of minimum and maximum level.
Whether it should be difficult to make the evaluation, proceed
cleaning the rod using a clean cloth with no rag grinding and
put it back in its slot. Draw it off again and check the level.
In case the l evel results being close to the tag showing
minimum level, provide filling lubrication of the engine’s
components.
The engine oil is highly polluting and harmful.
In caseof contact with the skin, rinse well with water
and detergent.
Adequately protect the skin and the eyes, operate
in full compliance with safety regulations.
Disposal must be carried out properly, and in full
compliance with the law and regulations in force.
Base - April 2007 Print P4D32N001 E
Page 87

F4GE NEF ENGINES
SECTION 3 - POWER GENERATION APPLICATION 57
Check of fuel system
The check must be executed both when the engine
disconnected and when it is running.
The check is made by observing the fuel pipes from the tank
to the fuel pump and to the injectors.
Cooling system check
The check must be executed both when the engine
disconnected and when it is running.
Check the pipes from the engine to the radiator and vice versa;
note any seepage and the state of the pipes especially near the
coupling clamps.
Verify that the r adiator is clean, the correct working of the fan
flywheels, the presence of any leakage from the connectors,
from the mani fold and from the radiating unit.
Due to the high temperatures achieved by the
system, do not operateimmediately after the engine’s
disconnection, but wait for the time deemed
necessary for the cooling.
Protect the eyes and the skin from any eventual high
pressure jet of cooling liquid.
Lubricating system check
The check must be executed both when the engine
disconnected and when it is running.
Verify the presence of any oil leakage or blow-by from the
head, from the engine pan of from the heat exchanger.
The engine oil is highly polluting and harmful.
In case of contact with the skin, rinse well with water
and detergent.
Adequately protect the skin and the eyes, operate in
full compliance with safety regulations.
Disposal must be carried out properly, and in full
compliance with the law and regulations in force.
Check for any water in the fuel filter
NOTE
The components of the system can be damaged
very quickly in presence of water or impurity within
the fuel.
Take prompt action on the filter to drain off the
water in the fuel circuit.
The density of the cooling liquid must be checked any how
every year before winter season and be replaced in any case
every two year.
NOTE
If refilled, bleed the system as described on page 49.
If bleeding of the system is not carried out, serious
inconvenience might be caused to the engine due
to the presence of air pockets in the engine’s head.
Fuel filter is equipped with pump screw-valve to drain the
water eventually mixed with fuel.
Place a container underneath the filter and slightly loosen the
screw. Drain the water eventually contained in the filter’s
bottom.
Lock the screw (max 0.5 Nm locking couple) as soon as fuel
starts bleeding.
Print P4D32N001 E Base - April 2007
Page 88

58
SECTION 3 - POWER GENERATION APPLICATION
Check of drive belt tensioning
Some applications are equipped with an automatic tensioner
that provides correcting belt tensioning.
Check of belt’s tear and wear status
Carefully verify the belt’s surface in order to detect any sign of
incision, crack, excessive wear in correspondence of toothing;
check end and surface grinding.
Danger: if the engine is switched off but is still hot,
unexpected motion of the belt may occur.
Wait for engine temperature cooling as a precaution
in order to avoid serious danger injury.
Check and setting of tappet clearance
NOTE
Cylinder n.
Suction
Exhaust
F4GE NEF ENGINES
In order to more quickly perform the operating
clearance adjustment for rocker arms — valves,
proceed as follows:
rotate the drive shaft, balance cylinder 1 valves and
adjust the valves marked by the asterisk as shown
in the table:
4 cylinder engine
Rotate the drive shaft, balance cylinder 1 valves and
adjust the valves marked by the asterisk as shown
in the table:
1
-
-*-
234
-
*
*
*
Rotate the drive shaft, balance cylinder 4 valves and
adjust the valves marked by the asterisk as shown
in the table:
Figure 120
2
1
3
75806
Adjust clearance between rockers and valves using setscrew
wrench (1), box wrench (3) and feeler gauge (2).
Clearance shall be as follows:
- intake valves 0.25 ± 0.05 mm
- exhaust valves 0.50 ± 0.05 mm.
Cylinder n.
Suction
Exhaust
6 cylinder engine
Rotate the drive shaft, balance cylinder 1 valves and
adjust the valves marked by the asterisk as shown
in the table:
Cylinder n.
Suction
Exhaust
Rotate the drive shaft, balance cylinder 6 valves and
adjust the valves marked by the asterisk as shown
in the table:
Cylinder n.
Suction
Exhaust
1
*
*
1
234
-
-
1
-
*
234
234
*
-*
*
-
** -
*- *
--
56
-
*
*
-
56
*
-
-
*
-
*
*
-
-
Base - April 2007 Print P4D32N001 E
Page 89

F4GE NEF ENGINES
SECTION 3 - POWER GENERATION APPLICATION 59
Oil motor and filter replacement
Warning: We recommend to wear proper protections because of high motor service temperature.
The motor oil reaches very high temperature: you
must always wear protection gloves.
We recommend to carry out the oil drainage when the motor
is hot.
- Place a proper container for the oil collecting under the
pan connected with the drain plug.
- Unscrew the plug and then take out the control dipsick
and the inserting plug to ease the downflow of the lubrication oil.
The oil motor is very pollutant and harmful.
In caseof contact with the skin, wash with much water
and detergent.
Protect properly skin and eyes: operate according to
safety rules.
Dispose of the residual properly following the rules.
Whereas you replace the lubrication oil, it is necessary to replace the filter.
- The filter is composed by a support and a filtering car-
tridge. For the cartridge replacement use the
9936076-tool.
Warning: the oil filter contains inside a quantity of oil
of about 1 kg.
!
Place properly a container for the liquid.
Warning: avoid the contact of skin with the motor oil:
in case of contact wash the skin with running water.
The motor oil is very pollutant: it must be disposed
of according to the rules.
- Replace the filtering cartidge with a new one and screw
manually until when the gasket is in contact with the support.
- Tigthen by means of the 99360076-tool of three fourth
turn.
- Operate the motor for some minutes and check the level
through the dipsick again. If it is necessary, carry out a topping up to compensate the quantity of oil used for the filling of the filtering cartridge.
- After the complete drainage, screw the plug and carry out
the clean oil filling.
Use only the recommended oil or oil having the requested features for the corrrect motor functioning.
!
In case of topping up, don’t mix oils having different
features.
If you don’t comply with theses rules, the service warranty is no more valid.
- Check the level through the dipsick until when the filling
is next to the maximum level notch indicated on the dipsick.
Changing the coolant
- Position a container beneath the radiator tap to r ecover
the coolant.
- Open the tap and allow all the coolant in the radiator to
flow out.
- Charge the coolant for the first time.
- Leave the radiator cap open.
- Start the engine and leave it running for at least a minute
so that all the air in the circuit is completely removed.
- Stop the engine.
- Top up.
NOTE
If the procedure described is not followed, the
radiator fluid level will be incorrect.
Print P4D32N001 E Base - April 2007
Page 90

60
SECTION 3 - POWER GENERATION APPLICATION
F4GE NEF ENGINES
Fuel filter replacement
During this operation don’t smoke and don’t use free
flames.
Avoid to breathe the vapors coming from filter.
NOTE
After filters replacement the supply equipment
deaeration must be carried out.
However the following operationsare valid for allapplications.
- Drain the fuel inside the filter by operating the water re-
lease screw. Collect the fuel in a container without impu rities.
- Unscrew the cartridge by using the 99360076-tool.
- Collect the eventual fuel inside the filtering cartridge.
- Clean the gasket seat on the support and oil slightly the
gasket on the new filtering cartridge.
- Screw manually the new filtering cartdrige until when the
gasket is completely on its seat.
- Tigthen through the 99360076-tool at 10-5 Nm torque.
Alternator belt replacement
Warning: with switched off motor (but still hot) the
belt can operate without advance notice.
Wait for the motor temperature lowering to avoid
very serious accidents.
Figure 121
88089
- Loosen screw (1) and the relevant nut on belt stretching
bracket (3).
- Loosen the bolt that fixes the alternator to the support.
- Remove the worn Poly-V belt (2) from the pulleys and
driving rollers.
- Fit the new Poly-V belt (2) onto the pulleys and driving
rollers.
- Fit the new POLY-V belt (2) on the pulleys and guide
rollers.
- Stretch POLY-V belt (2).
- Lock screw (1) and the bolt that fi xes the alternator to the
support
- Run the engine for a few hours and check proper belt
stretching.
Base - April 2007 Print P4D32N001 E
Page 91

F4GE NEF ENGINES
SECTION 4 - OVERHAUL AND TECHNICAL SPECIFICATIONS
SECTION 4
Overhaul and technical specifications
GENERAL SPECIFICATIONS 3...............
CLEARANCE DATA 4.....................
ENGINE OVERHAUL 10.....................
ENGINE REMOVAL AT THE BENCH 10........
REPAIR OPERATIONS 11....................
CYLINDER UNIT 11........................
- Checks and measurements 11...............
- Checking head supporting surface
on cylin der unit 12........................
1
Page
TIMING SYSTEM 13........................
- Camshaft 13.............................
- Checking cam lift and pin alignment 14........
BUSHES 14...............................
- Bush replacement 16......................
- Tappets 16..............................
- Fitting tappets — camshaft 16................
OUTPUT SHAFT 17........................
- Measuring journ als and crankpins 17..........
- Replacing oil pump control gear 21...........
- Fitting main bearings 21....................
- Finding journal clearance 21.................
- Checking output shaft shoulder clearance 22...
CONNECTING ROD — PISTON ASSEMBLY 22..
- Pistons 23...............................
- Measuring piston diameter 23...............
- Piston pins 24............................
Print P4D32N001 E Base - April 2007
Page 92

2
SECTION 4 - OVERHAUL AND TECHNICAL SPECIFICATIONS
F4GE NEF ENGINES
- Conditions for proper pin-piston coupling 24....
- Split rings 24.............................
- Connecting rods 25.......................
- Bushes 26...............................
- Checking connecting rods 26................
- Checking torsion 26.......................
- Checking bending 27.......................
- Fitting connecting rod-piston assembly 27......
- Connecting rod-piston coupling 27............
Page
Page
- Checking piston protrusion 30...............
CYLINDER HEAD 31........................
- Removing the valves 31....................
- Checking cylinder head wet seal 32...........
- Checking cylinder head supporting surface 32...
VALVES 33................................
- Removing carbon deposits, checking
and grinding valves 33......................
- Checking clearance between valve stem
and valve guide and valve centering 33.........
VALVE GUIDE 34..........................
VALVE SEATS 34...........................
- Regrinding — replacing the valve seats 34.......
- Fitting split rings 28........................
- Fitting connecting rod-piston assembly
into cylinder barrels 28.....................
- Finding crankpin clearance 29................
VALVE SPRINGS 35.........................
FITTING CYLINDER HEAD 35................
- Refitting the cylinder head 36................
TIGHTENING TORQUE 37..................
Base - April 2007 Print P4D32N001 E
Page 93

F4GE NEF ENGINES
GENERAL SPECIFICATIONS
SECTION 4 - OVERHAUL AND TECHNICAL SPECIFICATIONS 3
Type
Cycle Four-stroke diesel engine
Power Supercharged with intercooler
Injection Direct
Number of cylinders 4 in-line 6 in-line
∅
Bore mm 104
Stroke mm 132
+++..=
Total displacement cm
TIMING
start before T.D.C. A
end after B.D.C. B
4 CYLINDERS 6 CYLINDERS
3
4553 6728
15°
35°
start before B.D.C. D
end after T.D.C. C
69°
21°
Checking timing
mm
-
X
mm
-
X
Checking operation
mm
0.25 to 0.05
X
mm
0.50 to 0.05
FUEL FEED
Injection
STANADYNE DB 4
Type: rotary
Nozzle type DSLA 145 P
Injection sequence 1-3-4-2 1-5-3-6-2-4
Print P4D32N001 E Base - April 2007
Page 94

4
SECTION 4 - OVERHAUL AND TECHNICAL SPECIFICATIONS
CLEARANCE DATA
F4GE NEF ENGINES
Type
4 CYLINDERS 6 CYLINDERS
CYLINDER UNIT AND CRANKSHAFT COMPONENTS mm
∅
1
Cylinder barrels ∅1
104.000 to 104.024
X
∅1
∅
1
X
2
∅
Pistons:
Size X
Outside diameter ∅ 1
Pin housing ∅ 2
103.714 ÷ 103.732 / 103.755 ÷ 103.733 (•)
0.4
55.9 / 52.4 (•)
38.010 to 38.016
Piston diameter ∅ 1 0.4
X
Piston protrusion X 0.28 to 0.52
∅
3
Piston pin ∅ 3 37.994 to 38.000
Piston pin — pin housing 0.010 to 0.022
(•) Applicable to F4GE0405 engines only
Base - April 2007 Print P4D32N001 E
Page 95

F4GE NEF ENGINES
SECTION 4 - OVERHAUL AND TECHNICAL SPECIFICATIONS 5
Type
4 CYLINDERS 6 CYLINDERS
CYLINDER UNIT AND CRANKSHAFT COMPONENTS mm
X
X
3
X
Split ring slots X 2
2
*measuredona∅ of
X3
1
X1*
2.705 to 2.735* / 2.600 to 2.620 (•)
2.440 to 2.460 / 2.550 to 2.570 (•)
4.030 to 4.050
99.00 mm
1
S
2
S
3
S
Split rings S 2
S1*
S3
1
Split rings - slots 2
3
3.000 (••) / 2.470 to 2.500 (•)
2.350 to 2.380 / 2.478 to 2.490 (•)
3.970 to 3.990
- / 0.100 to 0.150 (•)
0.060 to 0.110 / 0.060 to 0.092 (•)
0.040 to 0.080
Split rings 0.4
1
X
X
2
X
3
Split ring end opening
in cylinder barrel:
X1
X2
X3
0.30 to 0.45 / 0.25 to 0.55 (•)
0.60 to 0.80 / 0.30 to 0.55 (•)
0.30 to 0.55
1∅
Small end bush
housing ∅ 1
Big end bearing
∅ 2
∅
housing ∅ 2
3
Small end bush diameter
S
Inside ∅ 3
Spare big end half
bearings S
Piston pin — bush 0.019 to 0.039
Big end half bearings 0.250; 0.500
(•) Applicable to F4GE0405 engines only
(••) Nominal dimension
40.987 to 41.013
72.987 to 73.013
38.019 to 38.033
2.205 to 2.218
Print P4D32N001 E Base - April 2007
Page 96

6
SECTION 4 - OVERHAUL AND TECHNICAL SPECIFICATIONS
F4GE NEF ENGINES
Type
CYLINDER UNIT AND CRANKSHAFT COMPONENTS
Journals ∅ 1
Crankpins ∅ 2
12∅∅
Main half bearings S 1
Big end half bearings S 2
1
S
2
S
Main bearings
∅
No. 1—5 / 1-7 ∅ 3
3
No. 2—3—4 / 2-3-4-5-6 ∅ 3
Half bearings — Journals
No. 1—5 / 1-7
No. 2—3—4 / 2-3-4-5-6
Half bearings - Crankpins 0.033 to 0.041
Main half bearings
Big end half bearings
4 CYLINDERS 6 CYLINDERS
mm
82.99 to 83.01
68.987 to 69.013
2.456 to 2.464
1.955 to 1.968
87.982 to 88.008
87.977 to 88.013
0.064 to 0.095
0.059 to 0.100
0.250; 0.500
X
X3
Shoulder journal X 1 37.475 to 37.545
1
Shoulder main bearing X 2 32.180 to 32.280
X 2
Shoulder half-rings X 3 37.28 to 37.38
Output shaft shoulder 0.095 to 0.265
Base - April 2007 Print P4D32N001 E
Page 97

F4GE NEF ENGINES
SECTION 4 - OVERHAUL AND TECHNICAL SPECIFICATIONS 7
Type
4 CYLINDERS 6 CYLINDERS
CYLINDER HEAD — TIMING SYSTEM mm
∅
1
Valve guide seats on
∅α4
cylinder head ∅ 1
Valves:
∅ 4
α
∅ 4
α
8.019 to 8.039
7.960 to 7.980
60º
7.960 to 7.980
45º
Valve stem and guide 0.039 to 0.076
Housing on head for
valve seat:
46.987 to 47.013
43.637 to 43.663
∅ 1
∅1
∅1
∅
Valve seat outside diameter;
2
α
valve seat angle on cylinder
head:
X
Sinking X
Between valve seat
and head
∅ 2
α
∅ 2
α
X
47.063 to 47.089
60º
43.713 to 43.739
45º
0.356 to 1.102
0.104 to 0.840
0.050 to 0.102
0.050 to 0.102
Valve seats -
Print P4D32N001 E Base - April 2007
Page 98

8
SECTION 4 - OVERHAUL AND TECHNICAL SPECIFICATIONS
F4GE NEF ENGINES
Type
CYLINDER HEAD — TIMING SYSTEM
Valve spring height:
free spring H
H
H1
under a load equal to:
H2
329 N H1
641 N H2
Injector protrusion X
X
Camshaft bush
housings No. 1
(flywheel side)
∅
∅
∅
1 23 4 5
∅
2
Camshaft housings
No. 2-3-4-5/2-3-4-5-6-7
Camshaft journals:
1 ⇒ 5 ∅
1 ⇒ 7 ∅
4 CYLINDERS 6 CYLINDERS
mm
63.50
49.02
38.20
59.222 to 59.248
54.089 to 54.139
53.995 to 54.045
∅
1
∅
∅
3
Bush inside
diameter ∅
54.083 to 54.147
Bushes and journals 0.038 to 0.162
Cam lift:
H
H
H
11.02
10.74
Base - April 2007 Print P4D32N001 E
Page 99

F4GE NEF ENGINES
SECTION 4 - OVERHAUL AND TECHNICAL SPECIFICATIONS 9
Type
4 CYLINDERS 6 CYLINDERS
CYLINDER HEAD — TIMING SYSTEM mm
∅
1
Tappet cap housing
on block ∅ 1 16.000 to 16.030
∅ 2
3
∅∅2
Tappet cap outside
diameter: ∅ 2
∅ 3
15.929 to 15.959
15.965 to 15.980
Between tappets and housings -
Tappets -
∅
1
Rocker shaft ∅ 1 18.963 to 18.975
Rockers ∅ 2 19.000 to 19.026
∅ 2
Between rockers and shaft 0.025 to 0.063
Print P4D32N001 E Base - April 2007
Page 100

10
SECTION 4 - OVERHAUL AND TECHNICAL SPECIFICATIONS
F4GE NEF ENGINES
ENGINE OVERHAUL
ENGINE REMOVAL AT THE BENCH
The following instructions are prescribed on the
understanding that the engine has previously been placed on
the rotating bench and that removal of all specific components
of the equipment have been already removed as well. (See
Section 3 of the manual herein).
The section illustrates therefore all the most important engine
overhaul procedures.
The following operations are relating to the 6 cylinders engine
but are analogously applicable for the 4 cylinders.
Figure 1
70158
Figure 3
70160
The second last main bearing cap (1) and the relevant support
are fitted with shoulder half-bearing (2).
NOTE
Take note of lower and upper half-bearing
assembling positions since in case of reuse they shall
be fitted in the same position found at removal.
Figure 4
Remove the screws (1) fastening the connecting rod caps (2)
and remove them.
Withdraw the pistons including the connecting rods from the
top of the engine block.
NOTE
Keep the half-bearings into their housings since in
case of use they shall be fitted in the same position
found at removal.
Figure 2
74774
Use tool 99360500 (1) and hoist to remove the output shaft
(2) from the block.
Figure 5
70159
Remove the screws (1) and the main bearing caps (2).
Remove the main half-bearings (1).
70162
Remove the screws (2) and remove the oil nozzles (3).
Base - April 2007 Print P4D32N001 E
 Loading...