


 Loading...
Intel 633ANH, 622ANH, 633ANH, 622BGH, 622ANH User Manual
...Intel® PROSet/Wireless WiFi Connection Utility
User's Guide
Supported wireless adapters:
●Intel® Centrino® Ultimate-N 6300
●Intel® Centrino® Advanced-N + WiMAX 6250
●Intel® Centrino® Advanced-N 6200
●Intel® WiMAX/WiFi Link 5350
●Intel® WiFi Link 5300
●Intel® WiMAX/WiFi Link 5150
●Intel® WiFi Link 5100
●Intel® WiFi Link 1000
●Intel® Wireless WiFi Link 4965AGN
●Intel® Wireless WiFi Link 4965AG_
●Intel® PRO/Wireless 3945ABG
●Intel® PRO/Wireless 3945_BG
With your WiFi network card, you can access WiFi networks, share files or printers, or even share your Internet connection. All of these features can be explored using a WiFi network in your home or office. This WiFi network solution is designed for both home and business use. Additional users and features can be added as your networking needs grow and change.
Depending on the model of your Intel WiFi adapter, your adapter is compatible with 802.11a, 802.11b, 802.11g, and 802.11n (draft 2.0) wireless standards. Operating at 5 GHz or 2.4 GHz frequency at data rates of up to 450 Mbps, you can now connect your computer to existing high-speed networks that use multiple access points within large or small environments. Your WiFi adapter maintains automatic data rate control according to the access point location and signal strength to achieve the fastest possible connection. All of your wireless network connections are easily managed by the WiFi connection utility. Profiles that are set up through the WiFi connection utility provide enhanced security measures with 802.1X network authentication.
Table of Contents
●Use the Intel® PROSet/Wireless WiFi Connection Utility
Connect to a Network
Use Wi-Fi Protected Setup*
Use Profiles

Set up Security
WiFi Network Overview
Administrator Tool
Create Administrator Packages
Create Profiles
Security Overview
Safety and Regulatory Information
Specifications
Troubleshooting
Glossary
Customer Support
Warranty
Information in this document is subject to change without notice.
© 2004–2009 Intel Corporation. All rights reserved. Intel Corporation, 5200 N.E. Elam Young Parkway, Hillsboro, OR 97124-6497 USA
The copying or reproducing of any material in this document in any manner whatsoever without the written permission of Intel Corporation is strictly forbidden. Intel® is a trademark or registered trademark of Intel Corporation or its subsidiaries in the United States and other countries. Other trademarks and trade names may be used in this document to refer to either the entities claiming the marks and names or their products. Intel disclaims any proprietary interest in trademarks and trade names other than its own. Microsoft and Windows are registered trademarks of Microsoft Corporation. Windows Vista is either a registered trademark or trademark of Microsoft Corporation in the United States and/or other countries.
*Other names and brands may be claimed as the property of others.
Intel Corporation assumes no responsibility for errors or omissions in this document. Nor does Intel make any commitment to update the information contained herein.
"IMPORTANT NOTICE FOR ALL USERS OR DISTRIBUTORS:
Intel wireless LAN adapters are engineered, manufactured, tested, and quality checked to ensure that they meet all necessary local and governmental regulatory agency requirements for the regions that they are designated and/or marked to ship into. Because wireless LANs are generally unlicensed devices that share spectrum with radars, satellites, and other licensed and unlicensed devices, it is sometimes necessary to dynamically detect, avoid, and limit usage to avoid interference with these devices. In many instances Intel is required to provide test data to prove regional and local compliance to regional and governmental regulations before certification or approval to use the product is granted. Intel's wireless

LAN's EEPROM, firmware, and software driver are designed to carefully control parameters that affect radio operation and to ensure electromagnetic compliance (EMC). These parameters include, without limitation, RF power, spectrum usage, channel scanning, and human exposure.
For these reasons Intel cannot permit any manipulation by third parties of the software provided in binary format with the wireless LAN adapters (e.g., the EEPROM and firmware). Furthermore, if you use any patches, utilities, or code with the Intel wireless LAN adapters that have been manipulated by an unauthorized party (i.e., patches, utilities, or code (including open source code modifications) which have not been validated by Intel), (i) you will be solely responsible for ensuring the regulatory compliance of the products, (ii) Intel will bear no liability, under any theory of liability for any issues associated with the modified products, including without limitation, claims under the warranty and/or issues arising from regulatory non-compliance, and (iii) Intel will not provide or be required to assist in providing support to any third parties for such modified products.
Note: Many regulatory agencies consider Wireless LAN adapters to be "modules", and accordingly, condition system-level regulatory approval upon receipt and review of test data documenting that the antennas and system configuration do not cause the EMC and radio operation to be non-compliant."
July 2, 2009

Back to Contents
Use the Intel® PROSet/Wireless WiFi Connection Utility
Use Intel® PROSet/Wireless WiFi Connection Utility as your Wireless Manager Start Intel® PROSet/Wireless WiFi Connection Utility
Start Intel® PROSet/Wireless WiFi Connection Utility from the Taskbar
●Taskbar Icons
●Tool Tips and Desktop Alerts
Intel® PROSet/Wireless WiFi Connection Utility Main Window
●First Time Connection
●WiFi Networks list
●Connection Status Icons
●Network Properties
●Connection Details
Intel® PROSet/Wireless WiFi Software Menus
●Tools Menu
Application Settings
Intel® Wireless Troubleshooter
Manual Diagnostics Tool
Administrator Tool
●Advanced Menu
Adapter Settings
Advanced Statistics
Use Windows to Manage WiFi
●Profiles Menu
Manage Profiles
Manage Exclusions
Use Intel® PROSet/Wireless WiFi Connection Utility Profile Features
Turn Wireless Radio On or Off
Installing Intel® PROSet/Wireless WiFi Connection Utility
Install Additional Software Features
Remove Intel® PROSet/Wireless WiFi Connection Utility

Use Intel® PROSet/Wireless WiFi Connection Utility as Your
Wireless Manager
Intel® PROSet/Wireless WiFi Software is used to set up, edit, and manage WiFi network profiles to connect to WiFi networks. It also includes advanced settings such as power management and channel selection for setting up ad-hoc WiFi networks.
If you use Microsoft* Windows* XP Wireless Zero Configuration as your wireless manager, you can disable it from the Microsoft Windows Wireless Network tab.
To disable Microsoft Windows* XP Wireless Zero Configuration as your wireless manager:
1.Click Start > Control Panel.
2.Double-click Network Connections.
3.Right-click Wireless Network Connection.
4.Click Properties.
5.Click WiFi Networks.
6.Verify that the Use Windows to configure my wireless network settings is not selected. If it is, clear it.
7.Click OK. This confirms that the Intel® PROSet/Wireless WiFi Connection Utility is configured to manage your network profiles.
NOTE: Verify that the Application Settings option Notify when another application
uses the WiFi adapter is selected. This option prompts you when Microsoft Windows* XP Wireless Zero Configuration starts to manage your network profiles.
Start Intel® PROSet/Wireless WiFi Connection Utility
To start the WiFi connection utility, use one of the following methods:
●Click Start > Programs > Intel PROSet Wireless > WiFi Connection Utility.
●Right-click the Taskbar icon  located in the lower right corner of your Windows Desktop to open the Taskbar menu. Click Configure WiFi.
●Double-click the Taskbar icon.
To close the WiFi connection utility from the main window, use one of the following:
●Select File > Exit from the main window.
●Click Close.
●Click the Close button (X) at the top right corner of the window.
Intel® PROSet/Wireless WiFi Connection Utility Main Window
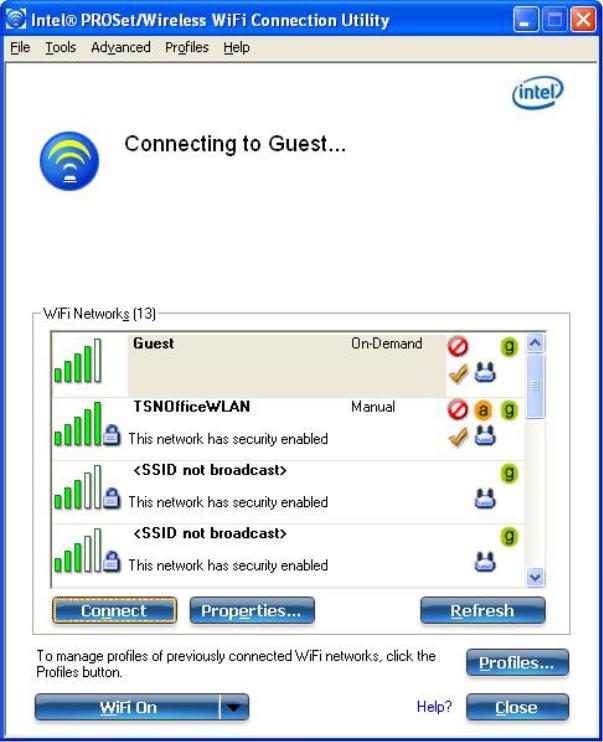
The WiFi Connection Utility Main Window lets you:
●View the current connection details (signal quality, speed and current network name).
●Scan for available WiFi networks.
●Manage profiles.
●Auto-connect profiles to available networks in a specific order defined in the Profile list.
●Connect to Infrastructure and Device to Device (ad hoc) networks.
●Configure adapter settings.
●Troubleshoot wireless connection problems.

Connection Details
On the main window, click Details to view detailed parameters of the access point and network adapter. The Connection Details window displays the current network connection information. See Connection Details for a complete description.
The Taskbar icon also indicates the current connection status. See Taskbar Icons.
Main Window Connection Status Icons
The connection status icons indicate the current connection status of your WiFi adapter. The connection status icon displays in the WiFi connection utility main window See Connection Status
Icons.
Profile Management
On the WiFi connection utility main window, click Connect on a WiFi network. Once connected, a profile is created in the Profiles list. The Profiles List displays the current user profiles in the order that they are to be applied. Use the up and down arrows to arrange profiles in a specific order to automatically connect to a WiFi network.
You can also add, edit, and remove profiles from the Profiles list. Click Profiles on the WiFi connection utility main window.
Different profiles can be configured for each wireless network. Profile settings can include, the network name (SSID), operating mode, and security settings. See Profile Management for more
information.
Menus
Use the File, Tools, Advanced, Profiles and Help menus to configure your network settings.
Name |
Description |
File |
Exit: Closes the WiFi connection utility main window. |

Tools |
Application Settings: Use to set system wide connection preferences. See |
|
Application Settings for information. |
|
Intel® Wireless Troubleshooter: Use to resolve wireless network connection |
|
problems. See Intel® Wireless Troubleshooter for more information. |
|
Manual Diagnostics Tool: The Manual Diagnostics Tool lets you run a set of |
|
diagnostics tests that verify the functionality of your WiFi adapter. See Manual |
|
Diagnostics Tool for more information. |
|
Administrator Tool: Used by administrators or the person who has administrator |
|
privileges on this computer to configure shared profiles (Pre-logon/Common, |
|
Persistent, and Voice over IP [VoIP]). The Administrator Tool can also be used by an |
|
Information Technology department to configure user settings within the WiFi |
|
connection utility and to create custom install packages to export to other systems. |
|
See Administrator Tool for more information. |
|
NOTE: The Administrator Tool is available only if it installed during a custom |
|
installation of the Intel® PROSet/Wireless WiFi Software. See Install Additional |
|
Software Features for more information on custom installation. |
Advanced Adapter Settings: Displays Adapter Settings that are equivalent to the settings in the Microsoft Windows Advanced settings. See Adapter Settings for information.
To access Adapter Settings from Microsoft Windows:
●Double-click Network Connections from the Windows Control Panel.
●Right-click the Wireless Network Connection.
●Select Properties from the menu.
●Click Configure to display the Advanced settings for the adapter.
Advanced Statistics: Select to view detailed information about the WiFi adapter and connection. See Advanced Statistics for more information.
Use Windows to Manage WiFi: Select to enable Microsoft Windows* XP as the wireless manager. See Microsoft Windows* XP Wireless Zero Configuration for more
information.
Profiles Manage Profiles: Select to create or edit profiles.
Manage Exclusions: Select to exclude networks from automatic connection. See Manage Exclusions for more information.

Help |
Help: Starts the online help. |
|
About: Displays version information for the currently installed application |
|
components. |
Administrator Tool (Tools menu)
The Administrator tool is for administrators or the person who has administrator privileges on this computer. This tool allows the administrator to restrict what level of control the users of this computer have over their wireless connections. This tool is used also to configure common (shared) profiles.
Users cannot modify Administrator settings or profiles unless they have the password for this tool. A password should be chosen that is secure and not easily guessed.
You can export these settings and profiles as one package to other computers on your network. For more information, See the Administrator Tool section.
Name |
Description |
Administrator Packages |
The Administrator Packages are used to save administrative profiles |
|
and other settings. For Windows* XP, you can copy or send this self- |
|
extracting executable to clients on your network. When it is run, the |
|
contents are installed and configured on the destination computer. |
|
See Administrator Tool Packages. |
Application Settings |
An administrator can configure the WiFi connection utility Application |
|
Settings to control how the application behaves on the user's |
|
computer, and to select what level of control users have over various |
|
aspects of their wireless connections. See Administrator Tool |
|
Application Settings. |
Administrator Profiles |
Enable or disable Persistent or Pre-logon/Common profiles and |
|
configure Voice over IP (VoIP) settings on the computer. See |
|
Administrator Tool Profiles. |
Adapter Settings |
An administrator can select which level of control that users have over |
|
their wireless network connections. See Administrator Tool Adapter |
|
Settings. |
EAP-FAST A-ID Groups |
An administrator can select which Authority Identifier (A-ID) RADIUS |
|
server to provision Protected Access Credentials (PACs) for profiles |
|
that use EAP-FAST authentication. A-ID groups are shared by all users |
|
of the computer and allow EAP-FAST profiles to support multiple PACs |
|
from multiple A-IDs. See Administrator Tool EAP-FAST A-ID Groups. |
Change Password |
Change the password for the Administrator Tool. See Change |
|
Password for more information. |

Close |
Closes the page. |
Help? |
Provides help information for this page. |
Use Windows to Manage WiFi (Advanced menu)
The Microsoft Windows* XP Wireless Zero Configuration feature provides a built-in wireless configuration utility. This feature can be enabled and disabled within the WiFi connection utility. Click Use Windows to manage WiFi on the Advanced menu. If Windows* XP Wireless Zero Configuration is enabled, the features in the WiFi connection utility are disabled. To let the WiFi connection utility manage your WiFi connections, click Enable WiFi Control on the main window.
Installing Intel® PROSet/Wireless WiFi Connection Utility
Typical Installation
The following components are installed in a Typical installation.
●The WiFi connection utility driver. You can choose to install the driver only if desired. This is the minimal installation.
●The WiFi connection utility. For a Typical installation, this includes the following:
Wi-Fi Protected Setup*
Intel® Wireless Troubleshooter
NOTE: If you plan to use Novell Client* for Windows, it should be installed prior to installation of the WiFi connection utility. If the WiFi connection utility is already installed, you should remove it prior to installation of Novell Client for Windows.
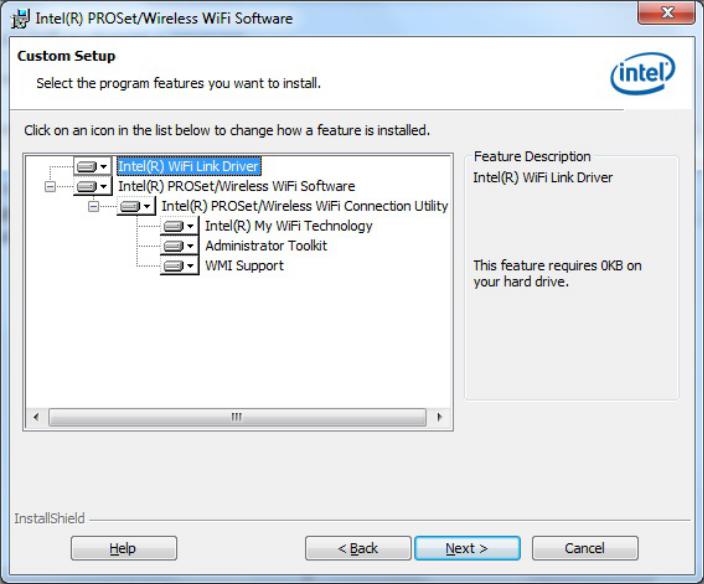
Custom Installation
The following features are available to install during a Custom installation. Of these, Wi-Fi Protected Setup* and Intel® Wireless Troubleshooter are also installed in a typical installation.
●Administrator Tool
●WMI Support
●Single Sign On
Pre-logon Connect
●WiFi Protected Setup
●Intel® Wireless Troubleshooter
Administrator Tool: Installs the Administrator Tool to the Tools menu. This tool is used to configure common (shared) profiles. The Administrator Tool is also used by an Information Technology department to enable or disable features within the WiFi connection utility.
WMI Support: Windows Management Instrumentation functionality allows administrators who do not have the WiFi connection utility installed to manage remotely clients that do have the WiFi connection utility installed.
Single Sign On: Installs the Single Sign On Pre-Login Connect feature. This tool is used to configure common (shared) profiles with the Administrator Tool. Single Sign On is targeted to the enterprise environment where users log on to their computer with a user name, password, and typically a domain. Fast User Switching does not support domain log on. The Fast User Switching and the Windows* XP Welcome Screen are disabled when Single Sign On support is installed.
NOTE: Windows Fast User Switching is enabled by default if you use Windows* XP Home Edition. It is targeted for the home user. Fast User Switching is also available on Windows* XP Professional if you install it on a stand-alone or workgroup-connected computer. If a computer running Windows* XP Professional is added to a domain, then Fast User Switching option is not available.
Pre-logon Connect: A Pre-logon/Common profile is active once a user logs onto the computer. Prelogon Connect establishes a wireless connection prior to user logon to Windows. This feature is installed with Single Sign On.
WiFi Protected Setup: Installed as part of a Typical installation, this feature detects when a compatible wireless router is present and provides easy connection to it.
Intel® Wireless Troubleshooter: Provides valuable assistance in resolving wireless WiFi connection problems.
To install these features, select Custom during installation. Follow the instructions below to install features. If the WiFi connection utility is already installed, see the post-installation instructions.

Install Intel® PROSet/Wireless WiFi Connection Utility
1.Insert the Installation CD in your CD drive.
2.The installer presents the message:
Welcome to the Intel® PROSet Wireless Tools Installation Wizard. Click Next.
3.The next message displays:
Welcome to the InstallShield Wizard for Intel® PROSet/Wireless WiFi Software. Click Next.
4.Read the license agreement.
5.Click I accept the terms in the license agreement. You can click Print if you want a printed copy of the agreement. Then click Next.
6.Click Next to accept the default install destination folder. Otherwise, click Change to specify a different location. Then click OK and Next.
7.Click Typical or Custom. If you click Typical, proceed to step 9.
8.If performing a Custom installation, select from the list of features to install. See Custom Installation for an explanation of the available features. For each feature, you can select:
This feature will be installed on the local hard drive.
This feature, and all subfeatures, will be installed on the local hard drive.
The feature will not be available.
9.Click Next.
10.The installation may take several minutes. When the installation completes, the message
InstallShield Wizard Completed displays. Click Finish.
11.You may be asked to reboot the computer. If so, you should reboot you computer now. Click Yes to do so, or No to reboot later.
Install Additional Software Features
If the WiFi connection utility is already installed, follow the instructions below to add the Administrator Tool and Pre-logon Connect:
1.Click Start > Control Panel > Add or Remove Programs > Intel PROSet/Wireless WiFi Software.
2.Click Change.
3.The next message displays:
Welcome to the InstallShield Wizard for Intel® PROSet/Wireless WiFi Software. Click Next.
4.Click Modify. Then click Next.
5.Click the red X next to any of the features not currently installed that you want to install.
6.For each feature you want to install, click one of the following choices, as appropriate:
This feature will be installed on the local hard drive.
This feature, and all subfeatures, will be installed on the local hard drive.
7.Click Next.
8.The installation may take several minutes. When the installation completes, the message
InstallShield Wizard Completed displays. Click Finish.
9.You may be asked to reboot the computer. If so, you should reboot you computer now. Click

Yes to do so, or No to reboot later.
Remove Intel® PROSet/Wireless WiFi Connection Utility
To uninstall the WiFi connection utility:
1.Click Start > Control Panel > Add or Remove Programs.
2.Click Intel PROSet/Wireless WiFi Software.
3.Click Change.
4.The next message displays:
Welcome to the InstallShield Wizard for Intel® PROSet/Wireless WiFi Software. Click Next.
5.Click Remove.
6.Click Next.
7.The next message appears. Make your selection from the list and click Next.
Save User Defined Settings. Choose what to do with your current application settings:
Save. Save settings and files applicable to the current version of the application.
Convert and Save. Save settings and files in the format compatible with Intel® PROSet/Wireless versions 10 and 11.
Remove. Do not save application settings.
8.The removal may take several minutes. After the software is removed, the message
InstallShield Wizard Completed displays. Click Finish.
9.You may be asked to reboot the computer. If so, you should reboot you computer now. Click Yes to do so, or No to reboot later.
Back to Top
Back to Contents
Trademarks and Disclaimers

Back to Contents
Taskbar Icon
●Taskbar Menu Options
●Taskbar Icons
●Tool Tips and Desktop Alerts
●Start Intel® PROSet/Wireless WiFi Connection Utility from Taskbar
Taskbar Menu Options
The Intel® PROSet/Wireless WiFi Connection Utility status icon displays on the Taskbar located in the lower right corner of your Windows desktop. This icon looks like this: 
Right-click the status icon to display the menu options.
If the WiFi connection utility is managing your WiFi connections, then the following menu options appear.
Name |
Description |
Configure WiFi |
Click to open the Intel® PROSet/Wireless WiFi Connection Utility and configure your |
|
WiFi connections. |
WiFi On |
Click to turn on the Intel WiFi adapter. The adapter will conduct a search for networks |
|
and may connect to a specific network, depending on the application settings. |
WiFi On, 802.11a Off |
This optional menu item may be present, depending on the computer manufacturer |
|
and whether the WiFi adapter supports band 802.11a or not. If present, this lets you |
|
turn on the WiFi radio (band b or g), but turn off the 802.11a band. See Turn Radio |
|
On or Off for more information. |
WiFi Off |
Click to turn off the Intel WiFi adapter. If you are currently connected to a WiFi |
|
network and you click WiFi Off, your WiFi network connection will be closed. |
Connect to Profile |
Displays the current profiles in the Profiles list. Click on a profile to connect to it. |
Add New Device |
This command lets you add a new device (for example, a laptop) using Wi-Fi |
|
Protected Setup*. The availability of this command on your computer means that |
|
your computer is already configured as a Wi-Fi Protected Setup registrar (using the |
|
WiFi connection utility). See Add an New Device. |
If Windows Zero Configuration manager is managing your WiFi connections, then the following menu options appear.
Name |
Description |
Open Wireless Zero |
Click to open Windows Zero Configuration, the wireless connections manager |
Configuration |
provided by Windows*. Only available if you have selected Use Windows to |
|
Manage WiFi at the Intel® PROSet/Wireless WiFi Connection Utility, Advanced menu. |
WiFi On |
Click to turn on the Intel WiFi adapter. The adapter will conduct a search for networks |
|
and may connect to a specific network, depending on the application settings. |
WiFi Off |
Click to turn off the Intel WiFi adapter. If you are currently connected to a WiFi |
|
network and you click WiFi Off, your WiFi network connection will be closed. |
Connect to Profile |
Displays the current profiles in the Profiles list. Click on a profile to connect to it. |
Add New Device |
This command lets you add a new device (for example, a laptop) using Wi-Fi |
|
Protected Setup*. The availability of this command on your computer means that |
|
your computer is already configured as a Wi-Fi Protected Setup registrar (using the |
|
WiFi connection utility). See Add an New Device. |
Enable WiFi Control |
Click to assign management of your WiFi connections to the WiFi connection utility. |
|
Wireless Zero Configuration manager will no longer manage your connections. If you |
|
want to assign management of your WiFi connections back to Wireless Zero |
|
Configuration manager, open the Intel® PROSet/Wireless WiFi software, and under |
|
the Advanced menu, click Use Windows to Manage WiFi. |
Taskbar Icons
The Taskbar icon  provides visual indication of the current WiFi connection state. The connection status icon is located on the lower right corner of your Windows desktop. The Taskbar icon can be set to display or be hidden in the Tools Menu Application Settings.
Name |
Description |
WiFi Off: The WiFi adapter currently is off. The WiFi adapter does not transmit or receive while it is off. Click WiFi On to enable the adapter. The icon is white and static.
Searching for WiFi networks: The WiFi adapter searches for any available WiFi networks. The icon is white with animation.
No WiFi networks found: There are no available WiFi networks found. Intel® PROSet/Wireless WiFi Connection Utility periodically scans for available networks. If you want to force a scan, double-click the icon to launch Intel® PROSet/Wireless WiFi Connection Utility and click Refresh. The icon is red.
WiFi networks found: An available WiFi network is found. Doubleclick the icon to display the WiFi Networks list. Select the network. Click Connect. The icon is yellow.
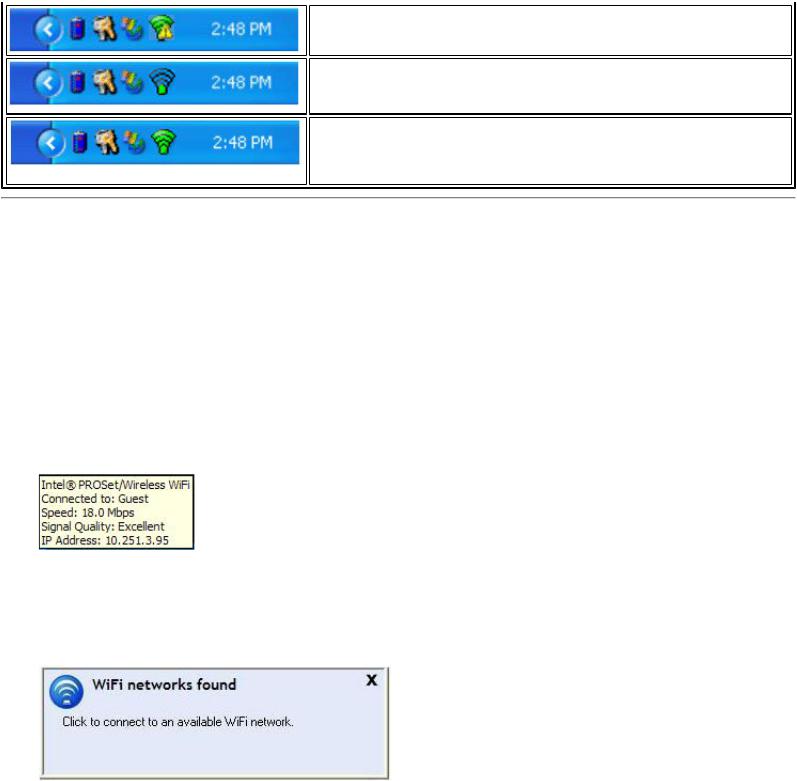
Authentication failed: Unable to authenticate with WiFi network.
The icon is green with a yellow warning triangle.
Connecting to a WiFi network: Flashes while an IP address is being obtained or if an error occurs.
Connected to a WiFi network: Connected to a WiFi network. Tool tip displays network name, speed, signal quality and IP address. The icon is green with waves that reflect signal quality. The more waves, the better the signal quality.
Tool Tips and Desktop Alerts
The Tool Tips and Desktop Alerts provide feedback and interaction. To display Tool Tips, move your mouse pointer over the icon. Desktop alerts are displayed when your WiFi network changes state. For example, if you are out of range of any WiFi networks, a desktop alert is displayed when you come into range.
Select Show Information Notifications in the Application Settings to enable desktop alerts.
Tool Tips
Tool tips display when the mouse pointer rolls over the icon. The tool tips display text for each of the connection states.
Desktop Alerts
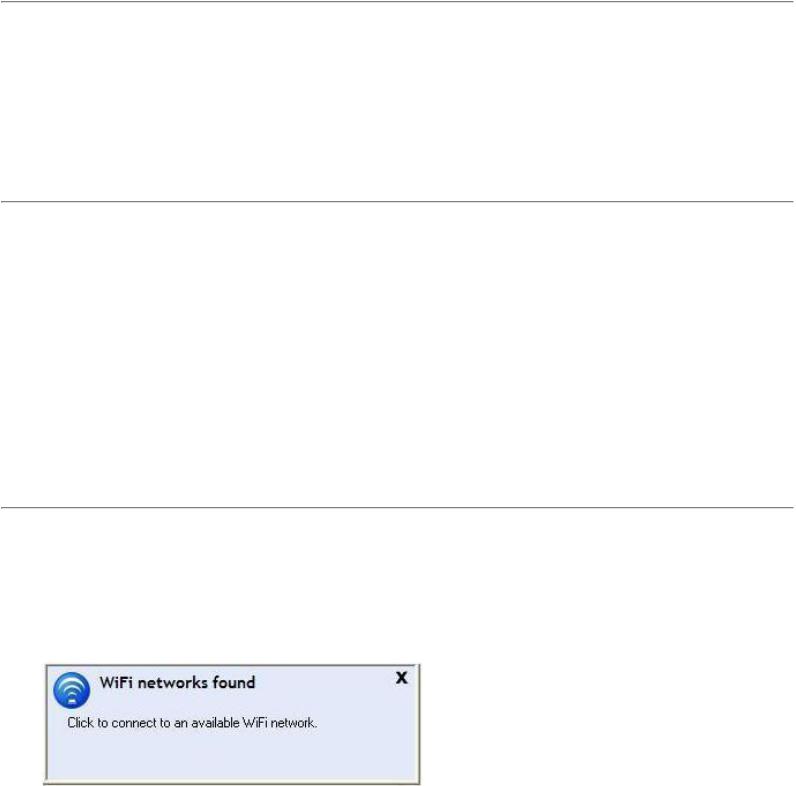
When user action is required, a desktop alert displays. If you click the alert, then an appropriate action is taken. For example when WiFi networks are found, the following alert displays:
Action: Click the desktop alert to connect to a network in the WiFi Networks list.
Once connected, the alert displays the WiFi network that you are connected to, the speed of the connection, signal quality and IP address.
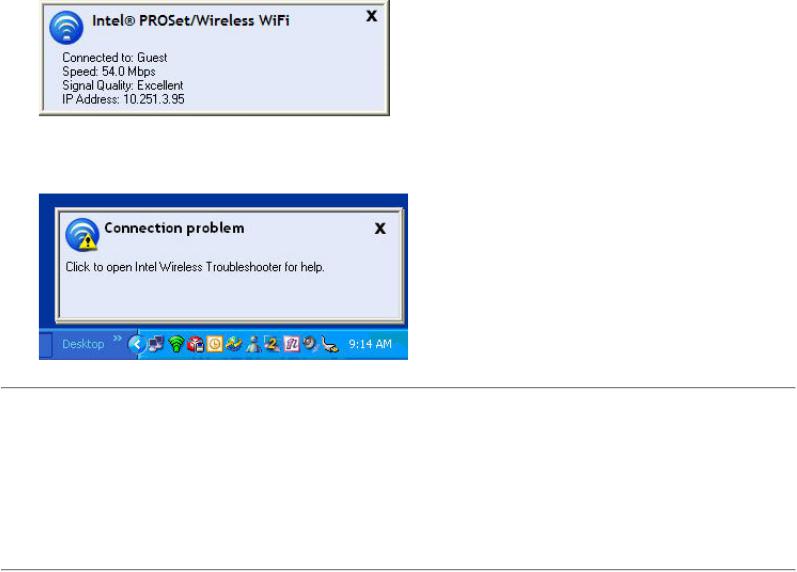
Desktop alerts are also used to indicate if there is a connection problem. Click the alert to open the Intel® Wireless Troubleshooter.
Start Intel® PROSet/Wireless WiFi Software from Taskbar
To start Intel® PROSet/Wireless WiFi Software:
●Double-click the Taskbar icon  located in the lower right corner of your Windows desktop, or
●Right-click the Taskbar icon  , and select Configure WiFi.
Back to Top
Back to Contents
Trademarks and Disclaimers
Back to Contents
Get Connected
Connect to a WiFi Network
First Time Connection
Using Wi-Fi Protected Setup*
Configure an Access Point and set up a WiFi Network
Connect an Enrollee to a WiFi Network or Access Point
Add an Enrollee to a WiFi Network at the Registrar
Other Wireless Managers
Connect to a WiFi Network
You can connect to a WiFi network with one of the following methods.
●Automatic connection: If an existing profile matches an available network, you are automatically connected to that wireless network.
●Configure a new profile: Select a wireless network from the list of WiFi networks in the Intel® PROSet/Wireless WiFi Connection Utility main window. Click Connect. If you successfully connect, a profile is created in the Profiles list for future use.
●Connect to a profile in the Profiles list: You can select a profile from the Profiles list. To activate it, click Connect. This lets you connect to a network that is lower in the list (if it is available).
●Right-click the Taskbar icon located in the lower right corner of your Windows desktop. Click Connect to Profile. A list of previously configured profiles is listed. Select a profile.
First Time Connection
The WiFi connection utility automatically detects WiFi networks that are within range of your WiFi adapter. When a network is found, a desktop alert notification displays: WiFi networks found. See Taskbar Icons
for more information.
1.Double-click the desktop alert to open the WiFi connection utility main window.
2.Select a network from the WiFi Networks list.
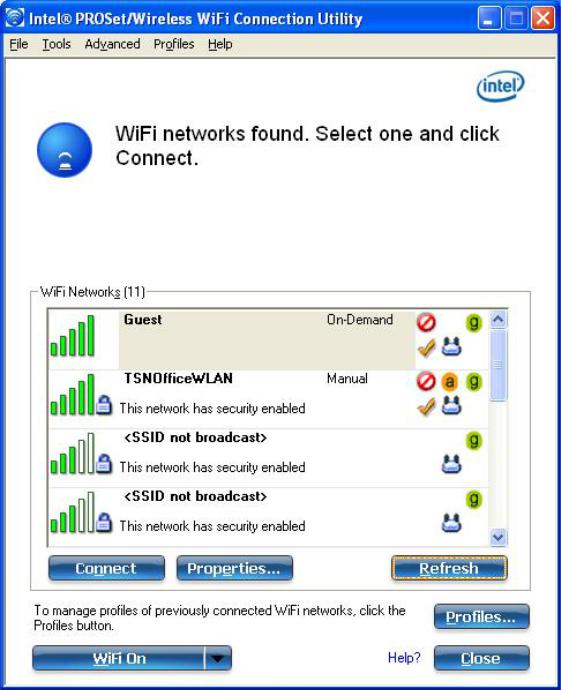
3.Click Connect. If the network does not require security authentication, a desktop alert notifies you that you are connected to the network. See Main Window and Taskbar for more information about the taskbar menu and icons.
4.If the network has security enabled, the Profile Wizard opens the Configure WiFi Settings window. This guides you through the process of creating a WiFi profile for this network. After a profile is created, connecting to this network in the future will be much easier.
5.You are requested to specify a Profile Name. The Profile Name is your name for this network. You can accept the existing profile name if present, or enter one. The profile name can be anything that helps you identify this network. For example, My Home Network, Coffee Shop on A Street.
6.You are requested to specify WiFi Network Name (SSID): This contains the network identifier name. This is a unique identifier that differentiates one WiFi network from another. If one is already entered, you can keep that.
7.Click Next. The Profile Wizard then detects the security settings of this network. The information you enter depends on those security settings. For information about security settings, see Security Settings. For more information about keys and passwords, see Network Keys. For more information about profiles, see Profiles. You may need to contact the network administrator for the information
needed to log into this network.
8. After entering the required information, click OK to connect to the wireless network.
See Main Window for more information.
Using Wi-Fi Protected Setup* to Configure or Join a Network
●Configure an access point and set up a network
●Connect an enrollee (computer) to a network or access point
●Add an enrollee to a network at the registrar
Intel® PROSet/Wireless WiFi Connection Utility implements Wi-Fi Protected Setup* to permit easy and secure set up and management of a WiFi network. You can use this capability to initially set up a wireless network and to introduce new devices to the network. Wi-Fi Protected Setup simplifies the set up process and at same time helps ensure that the network is configured securely. The following terms are used in this discussion.
●Access Point: A device that connects wireless devices to a network. The access point is configured with the necessary network name (SSID) and security credentials.
●Enrollee: A device that seeks to join an access point or wireless network, but does not have the password or key for the access point or network. Once the computer obtains the valid password or key, it becomes a member of the wireless network. The WiFi connection utility can be configured to operate as an enrollee for a supported access point.
●Registrar: A registrar is a logical entity (usually a computer) that allows other devices (usually computers) to join the wireless network. The WiFi connection utility can be configured to operate as a registrar for a supported access point(s). The registrar securely transfers the access point key or password automatically.
A new wireless network is established by configuring the access point, connecting the desired computers equipped with WiFi adapters, and optionally attaching external network connectivity (i.e. the Internet, typically by connecting the access point to a DSL or cable modem, or equivalent).
Configure an Access Point and Set up a WiFi Network
The following steps will configure this computer as a registrar for a secure network or access point.
1.Locate the device ownership password for the access point. This is set by the manufacturer of the access point. The password is often located on a label on the bottom of the device.
2.Turn on the network access point.
3.At the computer that you want to establish as the registrar, turn on the WiFi connection utility.
4.In the WiFi connection utility, click Tools > Application Settings.
5.In the Advanced Settings area under Wi-Fi Protected Setup, turn on Enable device registration.
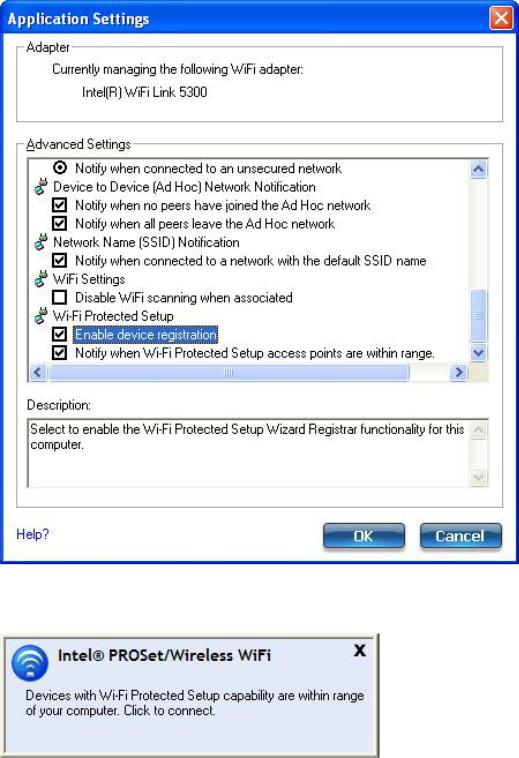
6.The next message tells you that one or more compatible devices are within range of your computer. Click this message. (Or, you can select the network from the WiFi Networks list in the WiFi connection utility main window.)
7.At the next window, on the Available Networks list, select the network that you want to connect to. The listed networks depends on what is detected. Click Next.
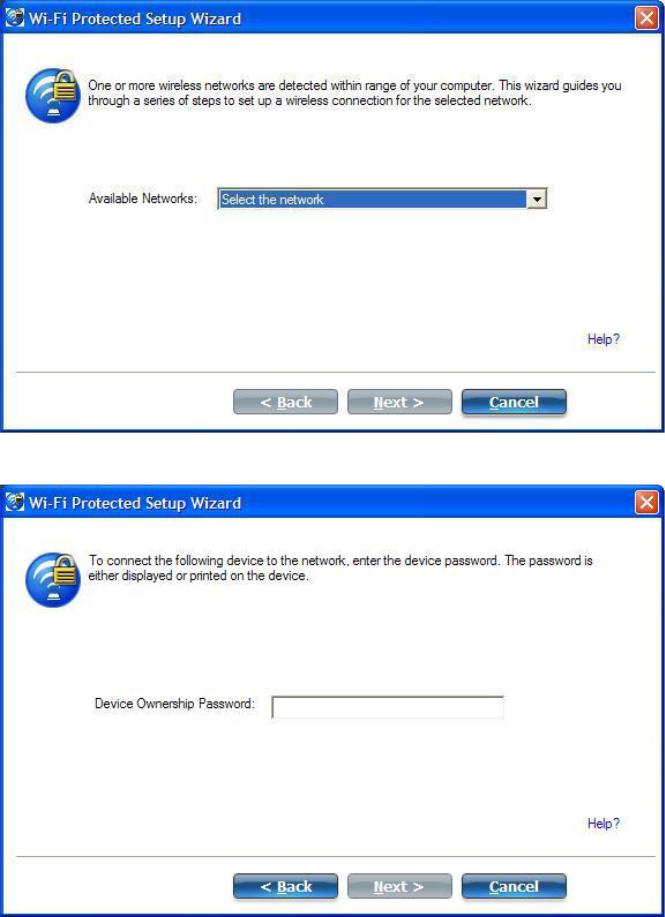
8.At the next window, enter the Device Ownership Password that you retrieved from the access point in step 1. Click Next to continue.
9.The next window shown displays the Network Name, Security Type, and Password. If the access point is already configured, it is grayed out; proceed to step 10. If the access point is not configured (fields are not grayed out), proceed to step 11.

10.After a few seconds the following message is displayed:
The access point is already configured. Do you want to reconfigure it?
If you do not want to reconfigure the access point, select No. The software joins the network, makes the connection, and creates a profile. It then exits and this procedure is completed. If you want to reconfigure the access point, select Yes.
11.The next window is displayed. The first field shows the name of the access point. This is by default the Network Name (SSID). In this example we have reset it to MyWPS. You can name it whatever you want.
12.In the Security Type field, select the security type you want.
WPA* Personal requires manual configuration of a pre-shared key (PSK) on the access point and clients. This PSK authenticates a password or identifying code, on both the client station and the access point. An authentication server is not needed.
WPA2* is the second generation of WPA security that provides enterprise and consumer wireless users with a high level of assurance that only authorized users can access their WiFi networks. Here we have selected WPA2 Personal security. You can use Intel® PROSet/Wireless WiFi Connection Utility profiles to obtain the WiFi network name (SSID) and WPA2-Personal pass phrase to use for a legacy device.
13.The third field is the Password (Key). The password shown is randomly generated or preconfigured, you can change it to whatever password you want. However you should use a robust key for improved security. It must have between 8 and 63 characters. When you have completed this step, click Next.
The following windows show the configuration of the access point and the registrar.
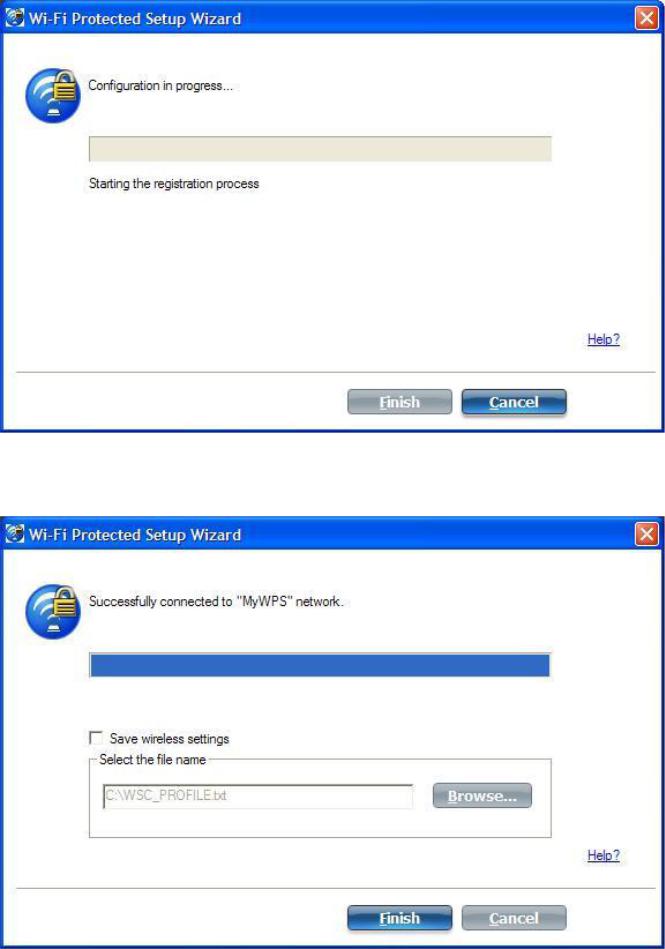
14.After the network receives the Ownership Password, you are notified that you have Successfully connected to <name of wireless network>. Click Finish. This process completes configuration of the access point and the registrar.
15.If you want to save these settings to a profile for future use by a legacy client, click Save wireless settings. The profile settings are saved to a text file (txt) on your local hard drive. The file is saved

to your local C:\ drive by default. Accept the default save location or click Browse to choose another location on your computer.
Next, you can connect an enrollee (computer) to the network using the registrar.
Connect an Enrollee to a WiFi Network or Access Point
Perform these steps to connect an enrollee to the network you just created. This assumes that the registrar computer is running the WiFi connection utility.
NOTE: To achieve transfer rates greater than 54 Mbps on 802.11n connections, WPA2-AES security must be selected. No security (None) can be selected to enable network setup and troubleshooting.
1.At the enrollee you want to connect the network, a message tells you that one or more access points with Wi-Fi Protected Setup capability is within range of your wireless computer. Click on this message. (Or, you can select the network from the WiFi Networks list in the WiFi connection utility main window.)
2.The WiFi Protected Setup Wizard start up page opens. Use the Available Networks list to select the network that you want to connect to (in this example it is MyWPS). Then click Next.
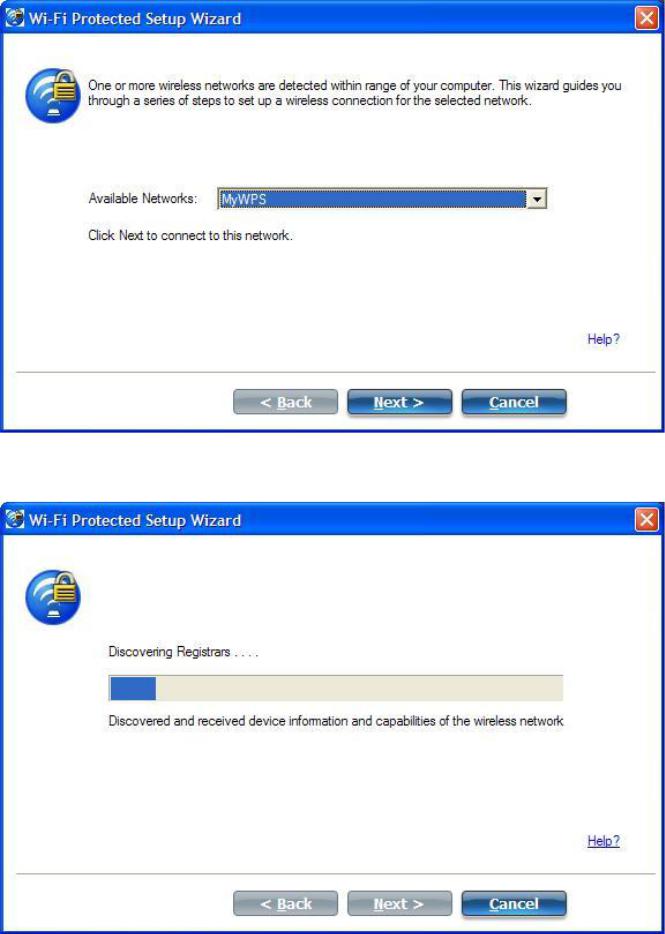
3.The Discovery window opens. The enrollee that you want to connect to the network discovers the registrar for the network. Assuming that the Discovery process succeeds, the name of the registrar or access point is displayed.
4.The next window appears, displaying the Device Password (enrollee password). The password displayed at the enrollee is a unique, randomly generated temporary password for the enrollee. This

password is used to ask permission to connect to the network access point. (The password shown below is an example only.).
5.At the registrar, enter the password provided by the enrollee. Then click Next.
NOTE: This process assumes that the registrar is running the WiFi connection utility; the process and windows displayed at the registrar may be different for software from other vendors. Some access points may have a built in registrar.
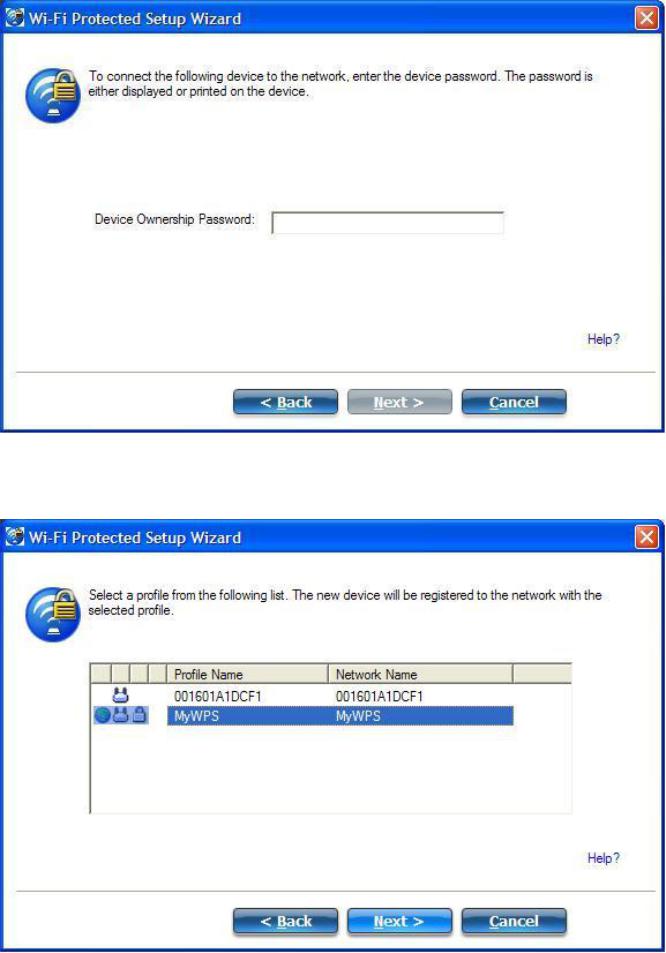
6.The next window lists the profile for this network. The selected profile will be sent to the enrollee, granting it access to the network. Only supported profiles are displayed. Supported profiles are those based on WPA-PSK, WPA2-PSK, and Open (None) security. Select the profile and click Next to finalize the enrollment process.
7. The last window shows that the enrollee registration with the registrar is complete. Click Finish.

8.At the enrollee, click Next. At the enrollee, you are notified when you have Successfully connected to <name of wireless network>. Click Finish.
Add an Enrollee to an Existing WiFi Network at the Registrar
This following procedure lets you add an enrollee to an existing WiFi network, where the access point is already configured and the registrar has already joined the AP.
NOTE: This process assumes that the registrar is running the WiFi connection utility; the process and windows displayed at the registrar may be different for software from other vendors.
1.Get the Device Password for the enrollee computer that you want to add to the network.
2.At the task tray icon for the WiFi connection utility, right-click and select Add New Device.
3.Perform steps 5 through 8 of the procedure Connect an Enrollee to a Network or Access Point.
Other Wireless Managers
If the WiFi connection utility detects another software application trying to communicate with the wireless device, you are notified of this behavior.
Microsoft Windows* XP Wireless Zero Configuration
To switch from the Intel® PROSet/Wireless WiFi Connection Utility to the Microsoft Windows* XP Wireless
Loading...