


DIFP 68B1
EN English
Operating instructions
DISHWASHER - Contents
Operating instructions, 1
Precautions and advice, 2-3
Assistance, 8
Product Data, 9
Installation, 11-12
Description of the appliance, 13
Refined salt and rinse aid, 14
Loading the racks, 15-16
Detergent and dishwasher use, 17
Wash cycles, 18
Special wash cycles and options, 19
Care and maintenance, 20
Troubleshooting, 21
FR Français
Mode d’emploi
LAVE-VAISSELLE - Sommaire
Mode d’emploi, 1 Précautions et conseils, 3-4 Service, 8
Fiche produit, 9 Installation, 22-23
Description de l’appareil, 24
Sel régénérant et Produit de rinçage, 25 Charger les paniers, 26-27
Produit de lavage et utilisation du lave-vaisselle, 28 Programmes, 29
Programmes spéciaux et Options, 30 Entretien et soin, 31
Anomalies et remèdes, 32
DE Deutsch
Gebrauchsanleitung
GESCHIRRSPÜLER – Inhaltsverzeichnis
Gebrauchsanleitung, 1 Vorsichtsmaßnahmen und Hinweise, 4-5 Kundendienst, 8
Produktdatenblatt, 10 Installation, 34-35
Beschreibung Ihres Geschirrspülers, 36 Regeneriersalz und Klarspüler, 37 Beladen der Körbe, 38-39
Spülmittel und Verwendung des Geschirrspülers, 40 Programme, 41
Sonderprogramme und Optionen, 42 Reinigung und Pflege, 43
Störungen und Abhilfe, 44
NL Nederlands
Gebruiksaanwijzing
AFWASAUTOMAAT - Inhoud
Gebruiksaanwijzingen, 1 Voorzorgsmaatregelen en advies, 5-6-7 Service, 8
Productkaart, 10
Installatie, 45-46
Beschrijving van het apparaat, 47 Onthardingszout en glansmiddel, 48 Het laden van de rekken, 49-50
Vaatwasmiddel en gebruik van de afwasautomaat, 51 Programma’s, 52
Speciale programma's en opties, 53 Onderhoud en verzorging, 54 Storingen en oplossingen, 55

EN Precautions and advice
 This appliance was designed and manufacturedincompliancewithinternational safety standards. The following information has been provided for safety reasons and should be read carefully.
Keep this instruction manual in a safe place for future reference. If the appliance is sold, given away or moved, make sure the manual is kept with the machine.
Read the instructions carefully, as they include important information on safe installation, use and maintenance.
This appliance was designed for domestic use or similar applications, for example:
- farmhouses;
- use by guests in hotels, motels and other residential settings;
- bed & breakfasts.
Remove the appliance from all packaging and make sure it was not damaged during transportation. If it was damaged, contact the retailer and do not proceed any further with the installation process.
General safety
• This appliance should not be operated by children younger than 8 years, people with reduced physical, sensory or mental capacities, or inexperienced people who are not familiar with the product, unless they are given close supervision or instructions on how to use it safely and are made aware by a responsible person of the dangers its use might entail.
• Children must not play with the appliance.
• It is the user's responsibility to clean and maintain the appliance. Children should never clean or maintain it unless they are given supervision.
• The appliance was designed for domestic use inside the home and is not intended for commercial or industrial use.
• The appliance must be used to wash domestic crockery in accordance with the instructions in this manual.
• The appliance must not be installed outdoors, even in covered areas. It is extremely dangerous to leave the machine exposed to rain and storms.
• Do not touch the appliance when barefoot.
• When unplugging the appliance always pull the plug from the mains socket. Do not
pull on the cable.
• The water supply tap must be shut off and the plug should be removed from the electrical socket at the end of every cycle and before cleaning the appliance or carrying out any maintenance work.
• The maximum number of place settings is shown in the product sheet.
• If the appliance breaks down, do not under any circumstances touch the internal parts in an attempt to perform the repair work yourself.
• Do not lean or sit on the open door: this may cause the appliance to overturn.
• The door should not be left open as it may create a dangerous obstacle.
• Keep detergent and rinse aid out of reach of children.
• The packaging material should not be used
as a toy.
• Knives and other utensils with sharp edges must be placed either with the points/blades facing downwards in the cutlery basket or horizontally on the tip-up compartments or in the tray/third basket, if available.
• Connect the appliance to the water mains using the new supply hose provided with the appliance. Do not re-use the old hose.
• Install the back side of a free-standing dishwasher against a wall.
Disposal
• To dispose of any packaging materials, follow local legislation so that the packagings may be reused.
• The European Directive 2012/19/EU relating to Waste Electrical and Electronic Equipment (WEEE) states that household appliances should not be disposed of using the normal solid urban waste cycle. Exhausted appliances should be collected separately in order to optimise the cost of reusing and recycling the materials inside the machine, while preventing potential damage to the atmosphere and public health. The crossed-out dustbin symbol shown on all products reminds the owners of their obligations regarding separated waste collection.
For further information relating to the correct disposal of household appliances, owners may contact the relevant public authority or the local appliance dealer.
2

Saving energy and respecting the environment
Saving water and energy
• Only begin a wash cycle when the dishwasher is full. While waiting for the dishwasher to be filled, prevent unpleasant odours with the Soak cycle (if available, see
Wash Cycles).
• Select a wash cycle that is suited to the type
of crockery and to the soil level using the
Table of Wash Cycles:
- For dishes with a normal soil level, use the Eco wash cycle, which guarantees low energy and water consumption levels.
- If the load is smaller than usual activate
the Half Load option (see Special wash cycles
and options, if available).
• If your electricity supply contract gives details of electricity-saving time bands, run the wash cycles when electricity prices are lower. The Delayed Start option can help you organise the wash cycles accordingly
(see Special wash cycles and options, if available).
FR Précautions et conseils
 CET appareil a été conçu et fabriqué conformément aux normes internationales de sécurité. Ces consignes sont fournies pour des raisons de sécurité, il faut les lire attentivement.
Conserver ce mode d’emploi pour pouvoir le consulter à tout moment. En cas de vente, de cession ou de déménagement, s’assurer qu’il accompagne bien l’appareil.
Lire attentivement les instructions: elles fournissent des conseils importants sur l’installation, l’utilisation et la sécurité de l’appareil.
Cet appareil est conçu pour un usage domestique ou autres applications similaires, telles que:
- fermes;
- utilisation par les clients d’hôtels, de motels ou autres locaux de type résidentiel;
- chambres d’hôtes.
Déballer l’appareil et s’assurer qu’il n’a pas été endommagé pendant le transport. S’il est abîmé, ne pas le raccorder et contacter le revendeur.
Sécurité générale
• Cet appareil électroménager peut être utilisé
par des enfants âgés de plus de 8 ans et par des personnes dont les capacités physiques, sensorielles ou mentales sont réduites, ou encore sans l'expérience ou la connaissance nécessaire, mais sous l'étroite surveillance d'un adulte responsable ou après que ces personnes aient reçu des instructions relatives à une utilisation en toute sécurité de l'appareil et compris les dangers qui lui sont inhérents.
• Les enfants ne doivent pas jouer avec l'appareil.
• Le nettoyage et l'entretien de l'appareil doivent être effectués par l'utilisateur. Ils ne doivent pas être effectués par des enfants sans surveillance.
• Cet appareil est conçu pour un usage de type non professionnel à l'intérieur d'une habitation.
• Cet appareil est destiné au lavage de vaisselle à usage domestique et selon les instructions reportées dans cette notice.
• Ne pas installer l’appareil à l’extérieur, même dans un endroit protégé, car il est extrêmement dangereux de l’exposer à la pluie et aux orages.
• Ne pas toucher au lave-vaisselle pieds nus.
• Ne jamais tirer sur le câble pour débrancher
la fiche de la prise de courant.
• Fermer le robinet de l’eau et débrancher la fiche de la prise de courant après chaque utilisation et avant d’effectuer tous travaux de nettoyage et d’entretien.
• Le nombre maximal de couverts est indiqué
dans la fiche produit.
• Encasdepanne,éviteràtoutprixd’accéder aux mécanismes internes pour tenter une réparation.
• Ne pas s’appuyer à la porte ouverte ou s’y asseoir : l’appareil pourrait basculer.
• Ne pas garder la porte ouverte pour éviter de buter contre elle en risquant de se faire mal.
• Garder les produits de lavage et de rinçage
hors de la portée des enfants.
• Les emballages ne sont pas des jouets pour enfants.
• Les couteaux et ustensiles de cuisine à bords tranchants doivent être disposés, pointes et lames tournées vers le bas, dans le panier à couverts ou, à plat, sur les clayettes rabattables du panier supérieur ou bien encore, si le modèle en est équipé, dans le plateau ou troisième panier.
• L’appareil doit être raccordé à l’arrivée d’eau en le reliant avec le nouveau tuyau
3

d’arrivée. L’ancien tuyau d’arrivée ne doit pas être réutilisé.
• Si le lave-vaisselle est en libre pose, le côté arrière de ce dernier doit être placé contre le mur.
Mise au rebut
• Mise au rebut du matériel d’emballage : se conformer aux réglementations locales de manière à ce que les emballages puissent être recyclés.
• La directive européenne 2012/19/EU sur les déchets d’équipements électriques et électroniques (DEEE), prévoit que les électroménagers ne peuvent pas être traités comme des déchets solides urbains normaux. Les appareils usagés doivent être collectés séparément afin d’optimiser le taux de récupération et le recyclage des matériaux qui les composent et réduire l’impact sur la santé humaine et l’environnement Le symbole de la poubelle barrée est appliqué sur tous les produits pour rappeler qu’ils font l’objet d’une collecte sélective.
Pour tout autre renseignement sur la collecte des électroménagers usés, prière de s’adresser au service public préposé ou au vendeur.
Economies et respect de l’environnement
Faire des économies d’eau et d’électricité
• Ne faire fonctionner le lave-vaisselle que quand il est rempli au maximum de sa capacité. Dans l’attente de remplir l’appareil, lancer le cycle de Trempage pour éviter la formation de mauvaises
odeurs (si disponible - voir Programmes).
• Sélectionner un programme adapté au type de vaisselle et à son degré de salissure, consulter pour cela le Tableau des programmes :
- pour de la vaisselle normalement sale, choisir le programme Eco (économique), il limite la quantité d’eau et d’électricité utilisée.
- pour une quantité réduite de vaisselle, choisir l’option Demi-charge (si disponible voir
Programmes Spéciaux et Options).
• Si le contrat de fourniture d’électricité prévoit des tranches horaires à prix réduit, effectuer les lavages pendant ces heures creuses. L’option Départ différé peut aider à organiser les lavages dans ce sens (si
disponible voir Programmes Spéciaux et Options).
DE VorsichtsmaßnahmenHinweise und
 Das Gerät wurde nach den strengsten internationalen Sicherheitsvorschriften konzipiert und hergestellt. Nachstehende
Hinweise werden aus Sicherheitsgründen angegeben und sollten aufmerksam gelesen werden.
Bewahren Sie diese Bedienungsanleitung sorgfältig auf, damit Sie sie jederzeit zu Rate ziehen können. Im Falle eines Verkaufs, einer
Übergabe oder eines Umzugs muss sie dem
Gerät stets beiliegen.
Lesen Sie die folgenden Hinweise aufmerksam durch, denn sie liefern wichtige Informationen hinsichtlich der Installation, des Gebrauchs und der Sicherheit.
Dieses Gerät wurde für den Hausgebrauch oder ähnliche Anwendungen konzipiert, zum Beispiel:
- Bauernhäuser
- Nutzung durch Kunden in Hotels, Motels und anderen Wohnbereichen
- Frühstückspensionen
Nehmen Sie das Verpackungsmaterial ab und prüfen Sie Ihr Gerät auf eventuelle Transportschäden. Schließen Sie das Gerät im Falle einer Beschädigung bitte nicht an, sondern fordern Sie den Kundendienst an.
Allgemeine Sicherheit
• Dieses Haushaltsgerät darf von Kindern ab acht Jahren und von Personen mit eingeschränkten körperlichen, s e n s o r i s c h e n o d e r g e i s t i g e n Fähigkeiten oder ohne Erfahrung und der notwendigen Kenntnis verwendet werden, vorausgesetzt, sie werden streng von einer verantwortungsbewussten Person überwacht oder sie haben eine ausreichende Einweisung in die sichere
Nutzung des Geräts erhalten und die damit verbundenen Gefahren verstanden.
• Kinder dürfen nicht mit dem Gerät spielen.
• Die Reinigung und die Wartung des
Geräts müssen vom Benutzer ausgeführt werden. Diese Arbeiten dürfen nicht von unbeaufsichtigten Kindern ausgeführt werden.
• DiesesGerätistfürdennichtprofessionellen
Einsatz in privaten Haushalten bestimmt.
• Das Gerät darf nur zum Spülen von
Haushaltsgeschirr und gemäß den
4

Anleitungen dieses Handbuchs verwendet werden.
• Das Gerät darf nicht im Freien aufgestellt werden, auch nicht, wenn es sich um einen geschützten Platz handelt. Es ist äußerst gefährlich, das Gerät Regen und Gewittern auszusetzen.
• Berühren Sie den Geschirrspüler nicht, wenn Sie barfuß sind.
• Ziehen Sie den Netzstecker nicht am Netzkabel aus der Steckdose, sondern nur am Netzstecker selbst.
• Vor Reinigungsund Wartungsarbeiten mussamEndejedesZyklusderWasserhahn zugedreht und der Netzstecker aus der
Steckdose gezogen werden.
• Die höchstzulässige Anzahl an Gedecken ist auf dem Produktdatenblatt angegeben.
• Versuchen Sie bei etwaigen Störungen keinesfalls, Innenteile selbst zu reparieren.
• Stützen Sie sich und setzen Sie sich nicht auf die offen stehende Gerätetür; das Gerät könnte umkippen.
• Die Gerätetür sollte nicht offen gelassen werden, da man darüber stolpern könnte.
• Bewahren Sie das Spülmittel und den
Klarspüler außerhalb der Reichweite von Kindern auf.
• Verpackungsmaterial ist kein Spielzeug für
Kinder.
• Messer und anderes Besteck mit scharfen
Kanten müssen mit der Spitze/Klinge nach unten in den Besteckkorb gegeben oder horizontal auf die Klappfächer oder auf das Tablett/den dritten Korb gelegt werden, sofern dies bei Ihrem Modell vorhanden ist.
• Das Gerät wird mit dem neuen
Versorgungsschlauch an das Wassernetz angeschlossen und der alte Schlauch darf nicht mehr verwendet werden.
Handelt es sich bei der Spülmaschine um ein frei stehendes Gerät, muss die Rückseite an eine Wand gestellt werden.
Entsorgung
• Befolgen Sie die lokalen Vorschriften;
Verpackungsmaterialkannwiederverwertet werden.
• DieeuropäischeRichtlinie2012/19/EGüber
Elektround Elektronik-Altgeräte (WEEE) sieht vor, dass Haushaltsgerätenicht mit dem normalen Hausmüll entsorgt werden dürfen. Die Altgeräte müssen getrennt gesammelt werden, um die Rückführung und das Recycling der Materialen zu optimieren, aus denen
die Geräte hergestellt sind, und um mögliche Belastungen der Gesundheit und der Umwelt zu verhindern. Das
Mülleimersymbol ist auf allen Produkten dargestellt, um an die Verpflichtung zur getrennten Abfallsammlung zu erinnern.
Für weitere Informationen hinsichtlich der ordnungsgemäßen Entsorgung von Haushaltsgeräten wenden Sie sich bitte an Ihren Händler oder an die zuständige kommunale Stelle.
Energie sparen und Umwelt schonen
Wasser und Strom sparen
• Setzen Sie den Geschirrspüler nur bei voller Ladung in Betrieb. Um in der Zwischenzeit, d. h. bis das Gerät ganz gefüllt ist, die Bildung unangenehmer Gerüche zu vermeiden, setzen Sie den Einweichzyklus
in Gang (sofern verfügbar – siehe Spülprogramme).
• Wählen Sie ein für das zu spülende
Geschirr und den Verschmutzungsgrad geeignetes Programm. Ziehen Sie hierzu die Programmtabelle zu Rate:
- Verwenden Sie für normal verschmutztes Geschirr das umweltfreundliche Sparprogramm Eco, das einen niedrigen Wasser-undStromverbrauchgewährleistet. - Aktivieren Sie bei geringfügiger Beschickung die Option Halbe Füllung
(sofern verfügbar – siehe Sonderprogramme und
Optionen).
• Sieht Ihr Stromliefervertrag Billigstromzeiten
vor, empfiehlt sich, das Gerät in diesen
Zeiten in Betrieb zu setzen. Die Option
Verzögerter Start kann dabei helfen, die Spülgänge entsprechend zu organisieren
(sofern verfügbar – siehe Sonderprogramme und Optionen).
|
|
Voorzorgsmaatregelen en |
|
NL |
|||
advies |
|||
|
|
||
|
|
||
|
|
HET apparaat is ontworpen en |
|
|
|
||
gebouwd overeenkomstig de internationale |
|||
veiligheidsnormen. Deze aanwijzingen zijn |
|||
geschreven om veiligheidsredenen en |
|||
moeten zorgvuldig worden doorgenomen. |
|||
Bewaar dit boekje zorgvuldig voor eventuele toekomstige raadpleging. Wanneer u het product weggeeft, verkoopt of wanneer u verhuist, dient u dit boekje bij het apparaat te bewaren.
Lees de aanwijzingen zorgvuldig door: er
5

staat belangrijke informatie in over installatie, gebruik en veiligheid.
Dit apparaat is ontworpen voor huishoudelijk gebruik of gelijksoortige toepassingen, bijvoorbeeld:
- boerderijen;
- gebruik door klanten in hotels, motels en andersoortige verblijfsmogelijkheden;
- bed and breakfasts.
Haal het apparaat uit de verpakking en controleer dat het geen schade heeft geleden tijdens het transport. Als het apparaat beschadigd is, moet u het niet aansluiten maar de dealer inschakelen.
Algemene veiligheid
• Dit apparaat mag worden gebruikt door kinderen van 8 jaar en ouder en door personen met een beperkt lichamelijk, sensorisch of mentaal vermogen, ofwel personen die geen ervaring hebben of de nodige kennis, mits zij onder strikt toezicht staan van een persoon die verantwoordelijk is voor hen, ofwel nadat zij de nodige instructies hebben gekregen betreffende het veilig gebruik van het apparaat en zij begrijpen wat de gevaren zijn die ermee verbonden zijn.
• Kinderen mogen niet met het apparaat spelen.
• De reiniging en het onderhoud van het apparaatmoetendoordegebruikerworden uitgevoerd. Deze twee handelingen dienen niet te worden uitgevoerd door kinderen zonder toezicht.
• Dit apparaat is ontwikkeld voor nietprofessioneel gebruik binnenshuis.
• Dit apparaat moet worden gebruikt voor het wassen van huishoudelijke vaat en volgens de aanwijzingen die terug zijn te vinden in dit boekje.
• De afwasautomaat mag niet buitenshuis worden geïnstalleerd, ook niet in overdekte toestand. Het is zeer gevaarlijk hem bloot te stellen aan regen en onweer.
• Raak de afwasautomaat niet blootsvoets aan.
• Haal de stekker niet uit het stopcontact door eraan te trekken, maar door hem beet te pakken.
• Aan het eind van iedere cyclus en voordat u de afwasautomaat reinigt of onderhoud uitvoert, moet u de waterkraan afsluiten en de stekker uit het stopcontact halen.
• Het maximale aantal couverts wordt
aangegeven in de productfiche.
• Bij een storing mag u in geen geval aan de interne mechanismen sleutelen om een reparatie trachten uit te voeren.
• Leun niet tegen de open deur aan en ga er niet op zitten. Het apparaat zou om kunnenvallen.
• De deur dient niet in openstaande stand gelaten te worden omdat men erover zou kunnen struikelen.
• Houd het wasen glansmiddel buiten het bereik van kinderen.
• Het verpakkingsmateriaal is geen speelgoed voor kinderen.
• Messen en gebruiksvoorwerpen met scherpe randen moeten in de bestekkorf worden geplaatst met de punt/het lemmet naar beneden toe gericht of in horizontale stand op de opklaprekjes of in de besteklade/het derde rek bij modellen waar dit voorkomt.
• Het apparaat dient op de waterleiding te worden aangesloten m.b.v. de nieuwe toevoerbuis. De oude toevoerbuis mag niet meer worden gebruikt.
Als de vaatwasser vrijstaand is, moet de achterzijde tegen een muur worden geplaatst.
Afvalverwijdering
• Houd u aan de lokale normen, zodat het verpakkingsmateriaal kan worden hergebruikt.
• De Europese richtlijn 2012/19/EU betreffende afgedankte elektrische en elektronische apparatuur (AEEA) voorziet dat elektrische apparaten niet met het gewone huisvuil mogen worden meegegeven. Afgedankte apparaten moeten gescheiden worden ingezameld om het recyclen en herwinnen van de gebruikte materialen te optimaliseren en potentiële schade voor de gezondheid en het milieu te voorkomen. Het symbool van de afvalemmer met een kruis staat op alle producten om de consument eraan te herinneren dit product gescheiden in te zamelen.
Voor meer informatie betreffende het verwijderen van elektronische apparatuur kan de consument zich wenden tot de gemeentelijke reinigingsdienst of de verkoper.
6

Energiebesparing en respect voor het milieu
Water en energie besparen
• Start de afwasautomaat alleen als hij
volgeladen is. Als u moet wachten totdat de
afwasautomaat gevuld is, kunt u vervelende luchtjes vermijden door het programma Inweken te gebruiken (waar beschikbaar - zie Programma’s).
• Selecteer een geschikt programma voor het type vaat en het soort vuil door de Programmatabel te raadplegen:
- voor een gemiddeld vuile vaat gebruikt u het programma Eco, dat een laag energieen waterverbruik garandeert;
- als u een kleine vaat heeft, activeert u
de optie Halve lading (waar beschikbaar - zie
Speciale programma’s en opties).
• Als uw elektriciteitsbedrijf op bepaalde tijden of dagen goedkopere tarieven heeft, kunt u de afwasautomaat op deze tijden gebruiken. De optie Uitgestelde start kan helpen om het wassen op deze wijze te
organiseren (waar beschikbaar - zie Speciale programma’s en opties).
7
EN Assistance
Before contacting Assistance:
•Check whether the problem can be resolved using the
Troubleshooting guide (see Troubleshooting).
•Restart the programme to check whether the problem has ceased to exist.
•If the problem persists, contact the Authorised Technical
Assistance Service.
 Never use the services of unauthorised technicians. Please have the following information to hand:
•The type of malfunction.
•The appliance model (Mod.).
•The serial number (S/N).
This information can be found on the appliance data plate
(see Description of the appliance).
DE Kundendienst
Bevor Sie den Kundendienst anfordern:
•sollten einige Kontrollen vorab selbst durchgeführt werden
(siehe Störungen und Abhilfe).
•Starten Sie das Programm erneut, um sicherzustellen, dass die Störung behoben wurde.
•Ist dies nicht der Fall, wenden Sie sich bitte an den autorisierten Kundendienst.
 Beauftragen Sie bitte niemals unbefugtes Personal.
Geben Sie bitte Folgendes an:
•die Art der Störung
•das Gerätemodell (Mod.)
•die Seriennummer (S/N).
Diese Informationen können Sie auf dem am Gerät befindlichen Typenschild ablesen (siehe Beschreibung Ihres Geschirrspülers).
FR Service
Avant d’appeler le service d’assistance technique:
•Vérifier s’il est possible de résoudre l’anomalie soi-même
(voir Anomalies et remèdes).
•Faire repartir le programme pour s’assurer que l’inconvénient a été résolu.
•Si ce n’est pas le cas, contacter un Service d’Assistance
Technique agréé.
 Ne jamais faire appel à des techniciens non agréés. Communiquer:
•le type d’anomalie;
•le modèle de l’appareil (Mod.);
•le numéro de série (S/N).
Ces informations figurent sur la plaque signalétique apposée sur l’appareil (voir Description de l’appareil).
NL Service
Voordat u de Servicedienst inschakelt:
•Dient u te controleren of u de storing zelf kunt oplossen
(zie Storingen en Oplossingen).
•Start het programma opnieuw om te controleren of het probleem is opgelost.
•Als dit niet het geval is dient u de erkende Technische
Servicedienst in te schakelen.
Wendt u nooit tot niet erkende technici. U dient door te geven:
•het type storing;
•het model van het apparaat (Mod.);
•het serienummer (S/N).
Deze informatie bevindt zich op het typeplaatje op het apparaat (zie Beschrijving van het apparaat).
8

EN Product Data (product fiche)
Product Fiche
Brand |
INDESIT |
Model |
DIFP 68B1 |
Rated capacity in standard place settings (1) |
13 |
Energy efficiency class on a scale from A+++ (low consumption) to D (high consumption) |
A+ |
Energy consumption per year in kWh (2) |
293.0 |
Energy consumption of the standard cleaning cycle in kWh |
1.03 |
Power consumption of the off-mode in W |
0.5 |
Power consumption of the left-on mode in W |
5.0 |
Water consumption per year in litres (3) |
3080.0 |
Drying efficacy class on a scale from G (low efficacy) to A (high efficacy) |
A |
Programme time for standard cleaning cycle in minutes |
190 |
The duration of the left-on mode in minutes |
12 |
Noise in dB(A) Re 1pW |
46 |
Built-in model |
Yes |
NOTES
1) The information on the label and fiche relates to the standard cleaning cycle, this programme is suitable to clean normally soiled tableware and it is the most efficient programme in terms of combined energy and water consumption. The standard cleaning cycle corresponds to the Eco cycle.
2) Based on 280 standard cleaning cycles using cold water fill and the consumption of the low power modes. Actual energy consumption depends on how the appliance is used.
3) Based on 280 standard cleaning cycles. Actual water consumption depends on how the appliance is used.
FR Fiche de produit
Fiche de produit
Marque |
INDESIT |
Modèle |
DIFP 68B1 |
Capacité nominale dans un environnement standard (1) |
13 |
Classe énergétique sur une échelle de A+++ (faible consommation) à D (consommation élevée) |
A+ |
Consommation d''énergie par année en kWh (2) |
293.0 |
Consommation d''énergie du cycle de lavage standard en kWh |
1.03 |
Consommation d''energie en mode "off" en W |
0.5 |
Consommation d''energie en mode "on" en W |
5.0 |
Consommation d''eau par an en litres (3) |
3080.0 |
Classe d’efficacité du séchage sur une échelle de G (efficacité minimum) à A (efficacité maximum) |
A |
Durée du programme pour un cycle de lavage standard en minutes |
190 |
Durée du mode "on" en minutes |
12 |
Émissions acoustiques dans l’air, exprimées en dB(A) re 1 pW |
46 |
Encastrable |
Oui |
NOTES |
|
1) Les informations sur l’étiquette et sur la fiche se rapportent au cycle de lavage standard. Ce programme convient pour laver une vaisselle normalement sale, et il s’agit des programmes les plus efficaces en termes de consommation combinée d’eau et d’énergie. Le cycle de lavage standard correspond au cycle éco.
2) Sur la base de 280 cycles de lavage standard avec une alimentation en eau froide et une consommation en modes à faible puissance. La consommation réelle d’énergie dépend des conditions d’utilisation de l’appareil
3) Sur la base de 280 cycles de lavage standard. La consommation réelle d’énergie dépend des conditions d’utilisation de l’appareil.
9

DE Datenblatt
Datenblatt
Marke |
INDESIT |
Modell |
DIFP 68B1 |
Nennkapazität in Standardgedecken für den Standardreinigungszyklus (1) |
13 |
Energieeffizienzklasse (A+++ niedriger Verbrauch) bis D (hoher Verbrauch) |
A+ |
Energieverbrauch pro Jahr in kWh (2) |
293.0 |
Energieverbrauch Standardreinigungszyklus in kWh |
1.03 |
Gewichtete Leistungsaufnahme im Aus-Zustand in W |
0.5 |
Gewichtete Leistungsaufnahme im unausgeschalteten Zustand in W |
5.0 |
Wasserverbrauch pro Jahr in Liter (3) |
3080.0 |
Trocknungseffizienzklasse (A höchste Effizienz) bis G (geringste Effizienz) |
A |
Programmdauer des Standardreinigungszyklus in Minuten |
190 |
Dauer des unausgeschalteten Zustands nach Programmende |
12 |
Luftschallemissionen dB(A) re 1pW |
46 |
Einbaugerät |
Ja |
1) Angabe auf Grundlage von 280 Standardreingungszyklen bei Kaltwasserbefüllung und dem Verbrauch der Betriebsarten mit geringer
Leistungsaufnahme. Der tatsächliche Energieverbrauch hängt von der Art der Nutzung des Geräts ab.
2) Die Angaben beziehen sich auf den Standardreinigungszyklus. Dieses Programm eignet sich zur Reingung von normal verschmutztem Geschirr und ist am effizientesten in Bezug auf den kombinierten Energieund Wasserverbrauch. Der Standardreingungszyklus entspricht dem Eco Zyklus.
3) Angabe auf Grundlage von 280 Standardreingungszyklen. Der tatsächliche Energieverbrauch hängt von der Art der Nutzung des Geräts ab.
NL Productkaart
Productkaart
Merk |
INDESIT |
Model |
DIFP 68B1 |
Beladingscapaciteit in standaard couverts (1) |
13 |
Energie-efficiëntieklasse op een schaal van A+++ (laag gebruik) tot D (hoog gebruik) |
A+ |
Jaarlijks energieverbruik in kWh (2) |
293.0 |
Energieverbruik van de standaard wascyclus in kWh |
1.03 |
Energieverbruik in de off-modus in W |
0.5 |
Energieverbruik in de aan-modus in W |
5.0 |
Jaarlijks waterverbruik in liters (3) |
3080.0 |
Droogeffectiviteit op een schaal van G (minimale effectiviteit) tot A (maximale effectiviteit). |
A |
Tijdsduur van het standaardprogramma in minuten |
190 |
Tijdsduur van de aan-modus in minuten |
12 |
Geluidsniveau in dB(A) re 1 pW |
46 |
Inbouwmodel |
Ja |
1) De informatie op het energielabel en de productkaart is gebaseerd op de standaardwascyclus. Dit programma is geschikt om normaal vervuild vaatwerk te wassen en is het meest efficiënte programma wat betreft wateren energieverbruik. De standaardwascyclus correspondeert met de Eco-cyclus.
2) Gebaseerd op 280 standaard wascycli met gebruik van koud water en het energieverbruik in de aanen uit-modus. Het werkelijke energieverbruik is afhankelijk van de manier waarop het apparaat wordt gebruikt.
3) Gebaseerd op 280 standaard wascycli. Het werkelijke waterverbruik is afhankelijk van de manier waarop het apparaat wordt gebruikt.
10
Installation
 If the appliance must be moved at any time, keep it in an upright position; if absolutely necessary, it may be tilted onto its back.
Connecting the water supply
 Adaptation of the water supply for installation should only be performed by a qualified technician.
The water inlet and outlet hoses may be positioned towards the right or the left in order to achieve the best possible installation.
Make sure the dishwasher does not bend or squash the hoses.
Connecting the water inlet hose
•To a 3/4” gas cold or hot water connection point (max.
60°C).
•Run the water until it is perfectly clear.
•Screw the inlet hose tightly into position and turn off the tap.
 If the inlet hose is not long enough, contact a specialist store or an authorised technician (see Assistance).
 The water pressure must be within the values indicated in the Technical Data table - otherwise the dishwasher may be function properly.
 Make sure the hose is not bent or compressed.
Connecting the water outlet hose
Connect the outlet hose to a drain duct with a minimum diameter of 2 cm. (A)
The outlet hose connection must be at a height ranging from 40 to 80 cm from the floor or surface where the dishwasher rests.
MAX 80 cm |
MIN 40 cm |
Before connecting the water outlet hose to the sink drain, remove the plastic plug (B).
Anti-flooding protection
To ensure floods do not occur, the dishwasher:
- is provided with a special system which blocks the water supply in the event of anomalies or leaks from inside the appliance.
Some models are also equipped with the supplementary safety device New Acqua Stop*, which guarantees antiflooding protection even in the event of a supply hose rupture.
WARNING: HAZARDOUS VOLTAGE!
Under no circumstances should the water inlet hose be cut |
EN |
as it contains live electrical parts. |
Electrical connection
Before inserting the plug into the electrical socket, make sure that:
•The socket is earthed and complies with current regulations;
•the socket can withstand the maximum load of the appliance as shown on the data plate located on the inside of the door
(see chapter Description of the appliance);
•The power supply voltage falls within the values indicated on the data plate on the inside of the door.
•The socket is compatible with the plug of the appliance. If this is not the case, ask an authorised technician to replace the plug (see Assistance). Do not use extension cables or multiple sockets.
 Once the appliance has been installed, the power supply cable and the electrical socket should be easily accessible.
 The cable should not be bent or compressed.
 If the power supply cable is damaged, have it replaced by the manufacturer or its authorised Technical Assistance Service in order to prevent all potential hazards. (See Assistance)
 The Company shall not be held responsible for any incidents, if these regulations are not observed.
Positioning and levelling
1.Position the dishwasher on a level sturdy floor. If the floor is uneven, the front feet of the appliance may be adjusted until it reaches a horizontal position. If the appliance is levelled correctly, it will be more stable and much less likely to move or cause vibrations and noise while it is operating.
2.Before recessing the dishwasher, stick the adhesive transparent strip* under the wooden shelf in order to protect it from any condensation which may form.
3.Place the dishwasher so that its sides or back panel are in contact with the adjacent cabinets or the wall. This appliance
can also be recessed under a single worktop* (see the Assembly instruction sheet).
4*. To adjust the height of the rear foot, turn the red hexagonal bushing on the lower central part at the front of the dishwasher using a hexagonal spanner with an opening of 8 mm. Turn the spanner in a clockwise direction to increase the height and in an anticlockwise direction to decrease it. (see Building-in instruction sheet attached to the documentation)
* Only available in selected models.
11
Advice regarding the first wash cycle
EN After the installation, remove the stoppers from the racks and the retaining elastic elements from the upper rack (if any).
Water softener settings
Before starting the first wash cycle, set the hardness level of the water from the mains supply. (see chapter Rinse aid and refined salt).
First load the softener tank with water, then introduce about 1 kg of salt. It is perfectly normal for water to flow out.
As soon as this procedure is complete, run a wash cycle. Only use salt that has been specifically designed for dishwashers.
After the salt has been poured into the machine, the LOW SALT indicator light* switches off.
 If the salt container is not filled, the water softener and the heating element may be damaged as a result.
Technical data
Dimensions |
width 59,5 cm |
||
height 82 cm |
|||
|
|
|
depth 57 cm |
Capacity |
13 standard place-settings |
||
Water supply pressure |
0,05 ÷ 1MPa (0.5 ÷ 10 bar) |
||
7,25 – 145 psi |
|||
Power supply voltage |
See appliance data plate |
||
|
|
||
Total absorbed power |
See appliance data plate |
||
|
|
||
Fuse |
See appliance data plate |
||
|
|
|
This dishwasher conforms to the |
|
|
|
following European Community |
|
|
|
Directives: |
|
|
|
-2006/95/EC (Low Voltage) |
|
|
|
-2004/108/EC (Electromagnetic |
|
|
|
Compatibility) |
|
|
|
-2009/125/EC (Comm. Reg. |
|
|
|
1016/2010) (Ecodesign) |
|
|
|
-97/17/EC (Labelling) |
|
|
|
-2012/19/EU Waste Electrical |
|
|
|
and Electronic Equipment (WEEE) |
|
|
|
|
The machine has a buzzer/set of tones (depending on the dishwasher model) to inform the user that a command has been implemented: power on, cycle end etc.
The symbols/indicator lights/LEDs on the control panel/ display may vary in colour and may have a flashing or fixed light (depending on the dishwasher model).
The display provides useful information concerning the type of wash cycle, drying/wash-cycle phase, remaining time, temperature etc etc.
* Only available in selected models.
12

Description of the appliance
Overall view |
EN |
|
1. Upper rack
2. Upper sprayer arm
3. Tip-up compartments
4. Rack height adjuster
5. Lower rack
6. Lower sprayer arm
7. Washing filter
8. Salt dispenser
9. Detergent dispenser and rinse-aid dispenser
10. Data plate
11. Control panel***
Control panel
Select wash cycle button |
|
|
|
Salt indicator light |
|||||
|
|||||||||
ON-OFF/Reset button |
|
|
|
|
|
|
Wash cycle number and |
||
|
|
|
|||||||
|
|
|
|
|
|
||||
and indicator light |
|
|
|
|
|
|
|||
|
|
|
|
|
|
remaining time indicator light |
|||
|
|
|
|
|
|
|
|
||
|
|
|
|
|
|
|
|
|
|
|
|
|
|
|
|
|
|
|
|
|
|
|
|
|
|
|
|
|
|
|
|
|
|
|
|
|
|
|
|
Rinse aid indicator light |
Delayed start button |
Delayed start indicator light
***Only in completely built-in models. * Only available in selected models.
The number and type of wash cycles and options may vary depending on the dishwasher model.
13
Refined Salt and Rinse Aid
EN |
|
|
Only use products which have been specifically designed |
|
|
||
|
for dishwashers. Do not use table salt or industrial salt. |
||
|
|
||
|
|
Follow the instructions given on the packaging. |
|
 If you are using a multi-function product, we recommend that you add salt in any case, especially if the water is hard or very hard. (Follow the instructions given on the packaging.)
 If you do not add salt or rinse aid, the LOW SALT* and LOW RINSE AID* indicator lights will remain lit.
Measuring out the refined salt
The use of salt prevents the formation of LIMESCALE on the dishes and on the machine's functional components.
•It is important that the salt dispenser be never empty.
•It is important to set the water hardness.
The salt dispenser is located in the lower part of the dishwasher (see Description) and should be filled:
•When the LOW RINSE AID indicator light in the control panel is lit *;
•When the green float* on the cap of the salt dispenser is no longer visible.
•See autonomy in the water hardness table.
1.Remove the lower rack and unscrew the
container cap (anticlockwise).
2. Only the first time you do this: fill the water
dispenser up to the edge.
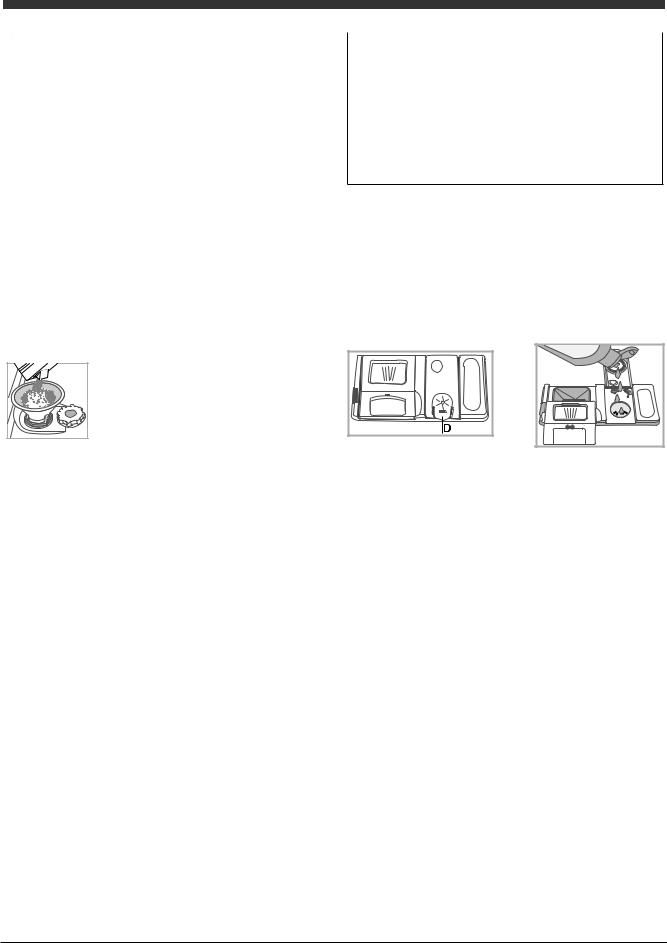
3. Position the funnel (see figure) and fill the salt container right up to its edge (approximately 1 kg); it is not unusual for a
little water to leak out.
4. Remove the funnel and wipe any salt residue away from the opening; rinse the cap under running water and then screw it on. It is advisable to perform this procedure every time you add salt to the container.
Make sure the cap is screwed on tightly, so that no detergent can get into the container during the wash cycle (this could damage the water softener beyond repair).
 Whenever you need to add salt, we recommend carrying out the procedure before the washing cycle is started.
Setting the water hardness
For perfect water softener operation, it is essential that the adjustment be based on the water hardness in your house. Ask your local water supplier for this information. The factory setting is for medium water hardness.
•Switch the dishwasher on using the On/Off button. 
•Switch it off using the On/Off button 
•Hold down button P for 5 seconds until you hear a beep.
•Switch it on using the On/Off button 
•The current selection level number and salt indicator light flash.
•Press button P to select the desired hardness level (see hardness table).
•Switch it off using the On/Off button 
•Setting is complete!
* Only available in selected models.
Water Hardness Table |
Average autonomy |
||||
salt dispenser with 1 |
|||||
|
|
|
|
|
wash cycle per day |
level |
°dH |
°fH |
mmol/l |
months |
|
1 |
0 |
- 6 |
0 - 10 |
0 - 1 |
7 months |
2 |
6 - 11 |
11 - 20 |
1.1 - 2 |
5 months |
|
3 |
12 |
- 17 |
21 - 30 |
2.1 - 3 |
3 months |
4 |
17 |
- 34 |
31 - 60 |
3.1 - 6 |
2 months |
5* |
34 |
- 50 |
61 - 90 |
6.1 - 9 |
2/3 weeks |
For values between 0°f and 10°f, we do not recommend the use of salt. A setting of 5 may increase cycle duration.
(°dH = hardness measured in German degrees - °f = hardness measured in French degrees – mmol/l = millimoles per litre)
Measuring out the rinse aid
Rinse aid makes dish DRYING easier. The rinse aid dispenser should be filled:
•When the LOW RINSE AID indicator light on the panel/display is lit *;
•When the dark optical indicator* on the dispenser door “D” becomes transparent.
A |
X |
M |
1.Open the dispenser “D” by pressing and pulling up the tab on the lid;
2.Carefully introduce the rinse aid as far as the maximum reference notch in the filling space - avoid spilling it. If this happens, clean the spill immediately with a dry cloth.
3.Press the lid down until you hear a click to close it.
NEVER pour the rinse aid directly into the tub.
Adjusting the amount of rinse aid
If you are not completely satisfied with the drying results, you may want to adjust the quantity of rinse aid used.
•Switch the dishwasher on using the On/Off button. 
•Switch it off using the On/Off button 
•Press button P three times - a beep will be heard.
•Switch it on using the On/Off button 
•The current selection level number and rinse aid indicator light flash.
•Press button P to select the level of rinse aid quantity to be supplied.
•Switch it off using the On/Off button 
•Setting is complete!
If the rinse aid level is set to ZERO, the rinse aid will not be supplied and the low rinse aid indicator light will not be lit if you run out of it.
A maximum of 4 levels can be set according to the dishwasher model. The factory setting is for a medium level.
•If you see bluish streaks on the dishes, set a low number (1-2).
•If there are drops of water or limescale marks on the dishes, set a high number (3-4).
14

Loading the racks
Tips
Before loading the racks, remove all food residues from the crockery and empty liquids from glasses and containers. No preventive rinsing is needed under running water.
Arrange the crockery so that it is held in place firmly and does not tip over; and arrange the containers with the openings facing downwards and the concave/convex parts placed obliquely, thus allowing the water to reach every surface and flow freely.
Make sure that the lids, handles, trays and frying pans do not prevent the spray arms from rotating. Place any small items in the cutlery basket.
Since plastic dishes and non-stick frying pans usually retain more water drops, their drying will be not so good as that of ceramic or stainless-steel dishes.
Lightweight items such as plastic containers should be placed in the upper rack and arranged so that they cannot move.
After loading the appliance, make sure that the spray arms can rotate freely.
Lower rack
The lower rack can hold pans, lids, dishes, salad bowls, cutlery etc. Large plates and lids should ideally be placed at the sides.
Very soiled dishes and pans should be placed in the lower rack because in this sector the water sprays are stronger and allow a higher washing performance.
* Only available in selected models.
Several dishwasher models are fitted with tip-up sectors*. |
EN |
|||||||||
They can be used in a vertical position when arranging dishes |
||||||||||
|
||||||||||
or in a horizontal position (lower) to load pans and salad bowls |
|
|||||||||
easily. |
|
|||||||||
|
|
|
|
|
|
|
|
|
|
|
|
|
|
|
|
|
|
|
|
|
|
|
|
|
|
|
|
|
|
|
|
|
|
|
|
|
|
|
|
|
|
|
|
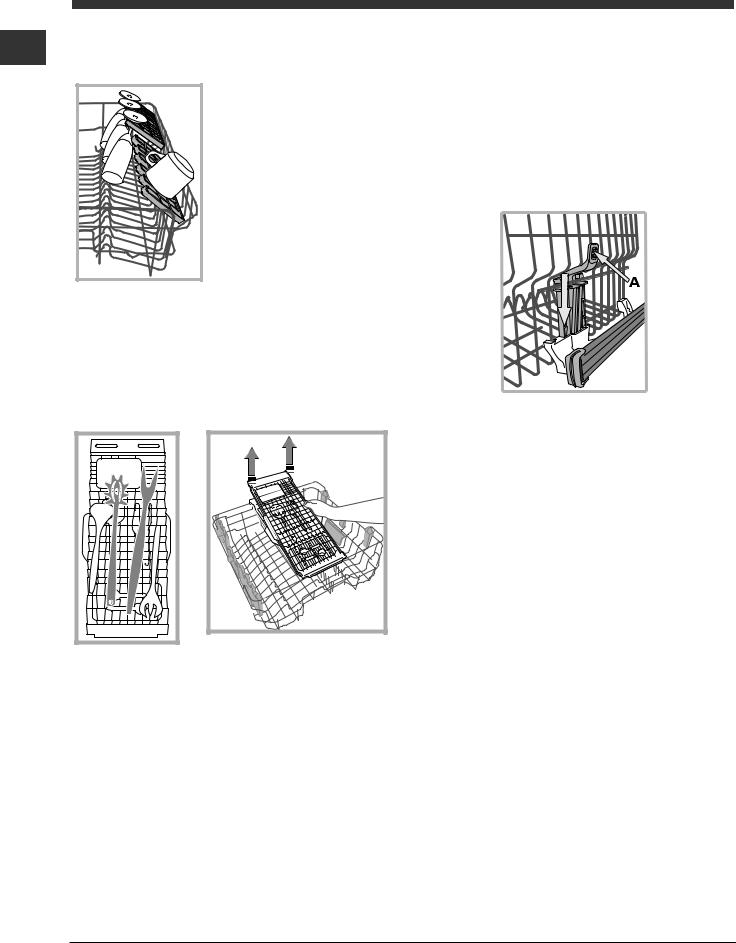
Cutlery basket
The basket is equipped with top grilles for improved cutlery arrangement. The cutlery basket should be positioned only at the front of the lower rack
Upper rack
Load this rack with delicate and lightweight crockery such as glasses, cups, saucers and shallow salad bowls.
Several dishwasher models are fitted with tip-up sectors*. They can be used in a vertical position when arranging tea/ dessert saucers or in a lower position to load bowls and food containers.
15
EN |
Tip-up compartments with adjustable position* |
|
The side tip-up compartments can be positioned at three different |
||
|
||
|
heights to optimize the arrangement of crockery inside the rack. |
|
|
Wine glasses can be placed safely |
|
|
in the tip-up compartments by |
|
|
inserting the stem of each glass |
|
|
into the corresponding slots. For |
|
|
optimum drying results incline the |
|
|
tip-up compartments more. To |
|
|
change the inclination, pull up the |
|
|
tip-up compartment, slide it slightly |
|
|
and position it as you wish. |
Cutlery tray*
Some dishwasher models are fitted with a sliding tray which can be used to hold serving utensils or small cups. For optimum washing performance avoid positioning bulky crockery directly below the tray. The cutlery tray can be removed (see Figure).
*Only available in selected models with different numbers and positions.
The upper rack can be adjusted for height based on requirements: high position to place bulky crockery in the lower rack and low position to make the most of the tip-up compartments/sectors by creating more space upwards.
Adjusting the height of the upper rack
In order to make it easier to arrange the crockery, the upper rack may be moved to a higher or lower position.
The height of the upper rack should be adjusted WHEN THE RACK IS EMPTY.
NEVER raise or lower the rack on one side only.
If the rack is equipped with a Lift-Up device* (see figure), lift it up by holding its sides. To restore the lower position, press the levers (A) at the sides of the rack and follow the rack down.
Unsuitable crockery
•Wooden crockery and cutlery.
•Delicate decorated glasses, artistic handicraft and antique crockery. Their decorations are not resistant.
•Parts in synthetic material which do not withstand high temperatures.
•Copper and tin crockery.
•Crockery soiled with ash, wax, lubricating grease or ink.
The colours of glass decorations and aluminium/silver pieces can change and fade during the washing process. Some types of glass (e.g. crystal objects) can become opaque after a number
of wash cycles too.
Damage to glass and crockery
Caused by:
•Type of glass and glass production process.
•Chemical composition of detergent.
•Water temperature of rinse cycle.
Tips:
•Only use glasses and porcelain guaranteed by the manufacturer as dishwasher safe.
•Use a delicate detergent suitable for crockery.
•Collect glasses and cutlery from the dishwasher as soon as the wash cycle is over.
16
Detergent and dishwasher use
Starting the dishwasher
1.Turn the water tap on.
2.Open the door and press ON-OFF button: the ON/OFF indicator lights, options and the display come on.
3.Measure out the detergent. (see adjacent information).
4.Load the racks (see Loading the racks).
5.Select the wash cycle in accordance with the type of crockery and its soil level (see table of wash cycles) by pressing the P
button.
6.Select the wash options*. (see Special wash cycles and options).
7.Start the wash cycle by shutting the door.
8.The end of the wash cycle is indicated by beeps and by the flashing of the wash cycle number on the display. Open the door, switch off the appliance by pressing the ON/OFF button, shut off the water tap and unplug the appliance from the electricity socket.
9.Wait for a few minutes before removing the crockery, in order to avoid burns. Unload the racks, beginning with the lower level.
 - The machine will switch off automatically during certain extended periods of inactivity, in order to minimise electricity consumption.
 AUTO WASH CYCLES*:some models of dishwashers are equipped with a special sensor which can be used to assess the level of soiling and automatically setting the most efficient and economic wash cycle accordingly.
The duration of the Auto wash cycles may vary due to the operation of the sensor.
 If the crockery is only lightly soiled or if it has been rinsed with water before being placed in the dishwasher, reduce the amount of detergent used accordingly.
Modifying a wash cycle in progress
If a mistake was made during the wash cycle selection process, it is possible to change the cycle, provided that it has only just begun: open the door taking care to avoid the escaping steam, by pressing and holding the ON/OFF button, the machine will switch off. Switch the machine back on using the ON/OFF button and select the new wash cycle and any options desired; start the cycle by closing the door.
Adding extra crockery
Without switching off the machine, open the door, taking care to avoid the escaping steam, and place the crockery inside the dishwasher. Shut the door and the cycle will begin from the point at which it was interrupted.
Accidental interruptions
If the door is opened during the wash cycle, or if there is a power cut, the cycle stops. It starts again from the point at which it was interrupted once the door has been shut or the electricity supply is restored.
* Only available in selected models.
Measuring out the detergent |
|
|
EN |
||
A good wash result also depends on the correct |
||
|
||
amount of detergent being used. Exceeding the stated |
|
|
amount does not result in a more effective wash and |
|
|
increases environmental pollution. |
|
Based on how soiled the items are, the amount can be adjusted to individual cases using powder or liquid detergent.
In the case of normally soiled items, use approximately either 35 gr (powder detergent) or 35 ml (liquid detergent). If tablets are used, one tablet will be enough.
If the crockery is only lightly soiled or if it has been rinsed with water before being placed in the dishwasher, reduce the amount of detergent used accordingly.
For good washing results also follow the instructions shown on the detergent box.
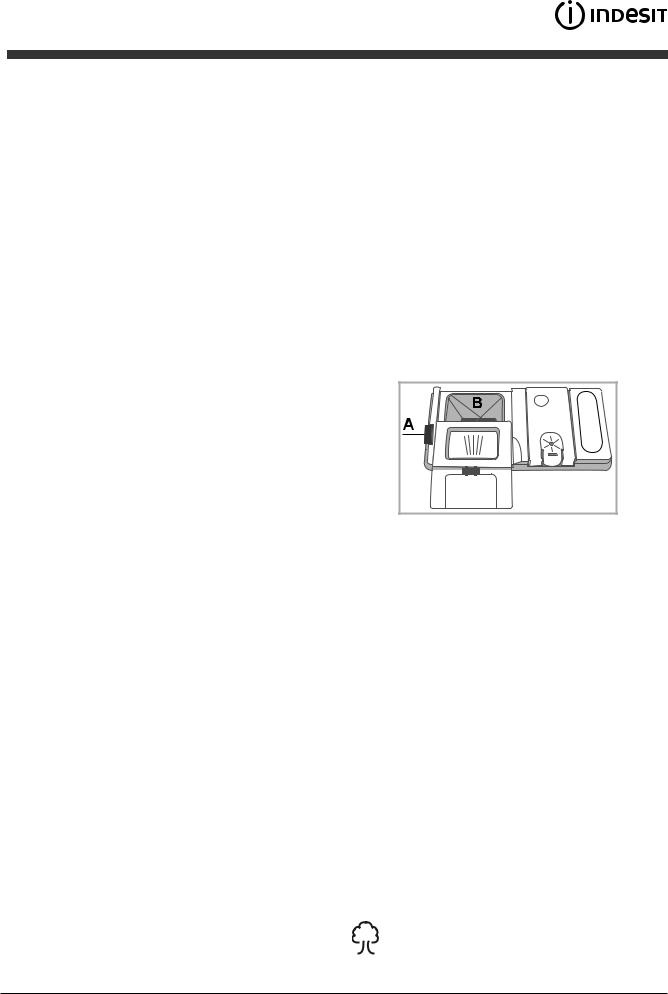
For further questions please ask the detergent producers. To open the detergent dispenser use the opening device “A”.
Introduce the detergent into the dry dispenser “B” only. Place the amount of detergent for pre-washing directly inside the tub.
1.When measuring out the detergent refer to the Table of wash cycles to add the proper quantity. Compartment B comprises a level showing the maximum quantity of liquid or powder detergent that can be added to each cycle.
2.Remove detergent residues from the edges of the dispenser and close the cover until it clicks.
3.Close the lid of the detergent dispenser by pulling it up until the closing device is secured in place.
The detergent dispenser automatically opens up at the right time according to the wash cycle.
If all-in-one detergents are used, we recommend using the TABS option, because it adjusts the cycle so that the best washing and drying results are always achieved.
 Only use detergent which has been specifically designed for dishwashers.
DO NOT USE washing up liquid.
Using excessive detergent may result in foam residues remaining in the machine after the cycle has ended.
To achieve the best washing and drying results, the combined use of detergent, rinse aid liquid and refined salt is required.
We recommend using detergents that do not contain phosphates or chlorine, as these products are harmful to the environment.
17
 Loading...